9 Oracle Cloud Database as a Service Endpoints
Oracle Key Vault deployed on-premises can manage the TDE master keys for Oracle Cloud Database as a Service instances in a hybrid cloud topology.
- About Managing Database as a Service Endpoints
- Preparing a Database as a Service Instance to be an Oracle Key Vault Endpoint
- Set up an SSH Tunnel between Key Vault and Database as a Service Instance
- Manageability of SSH Tunnel
- Register and Enroll Database as a Service Instance as Key Vault Endpoint
- Suspend a Database Cloud Service's Access to Oracle Key Vault
- Resume a Database Cloud Service's Access to Oracle Key Vault
- Resuming a Database Endpoint Configured with a Password-based Keystore
9.1 About Managing Database as a Service Endpoints
An Oracle Key Vault appliance deployed on-premises can now manage TDE master keys for Database as a Service instances in the Oracle Cloud. This provides physical separation of keys from the encrypted data, and gives on-premises administrators control and visibility of how encryption keys are used to access encrypted data in the cloud. This also meets compliance requirements where encryption keys must be managed on-premises or separate from systems containing encrypted data.
Parent topic: Oracle Cloud Database as a Service Endpoints
9.2 Preparing a Database as a Service Instance to be an Oracle Key Vault Endpoint
Oracle Cloud - Database as a Service provides users with fully functional Oracle database instances that use computing and storage resources provided by Oracle Compute Cloud Service. It eliminates the need to purchase, build, and manage silos of server and storage systems. It also makes database resources and capabilities available online so users can consume them whenever and wherever they are needed.
- Setup a Database Cloud Service Instance
- Create Low Privileged Operating System User on Database as a Service
See Also:
-
Using Oracle Database Cloud - Database as a Service - Before You Begin with Database as a Service
Parent topic: Oracle Cloud Database as a Service Endpoints
9.2.1 Setup a Database Cloud Service Instance
Instruction for setting up a Database as a Service instance can be found in the Oracle Database Cloud Service (Database as a Service) documentation. Please refer to the links in See Also to setup a Database as a Service instance.
Once set up, your Oracle Database as a Service instance should have the following default values:
-
A public IP address
-
Two users:
oracleandopc(Oracle Public Cloud) -
SSH access to both users:
oracleandopc
See Also:
-
Using Oracle Database Cloud - Database as a Service: Creating a Database Deployment
-
Using Oracle Database Cloud - Database as a Service: Connect to a Compute Node through SSH
-
Using Oracle Database Cloud - Database as a Service: Viewing Detailed Information for a Database Deployment
9.2.2 Create Low Privileged Operating System User on Database as a Service
By default, Database as a Service instances are provisioned with the users: oracle and opc . These users have more privileges than necessary to create the SSH tunnel, so Oracle recommends that you create another low privileged OS user named okv on the Database as a Service instance. Oracle Key Vault will use user okv to setup a SSH tunnel and communicate with the Database as a Service instances.
To create the low privileged okv user:
See Also:
-
Using Oracle Database Cloud - Database as a Service: Connect to a Compute Node using SSH
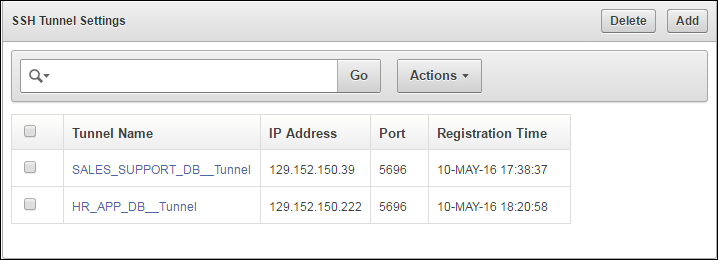
9.3 Set up an SSH Tunnel between Key Vault and Database as a Service Instance
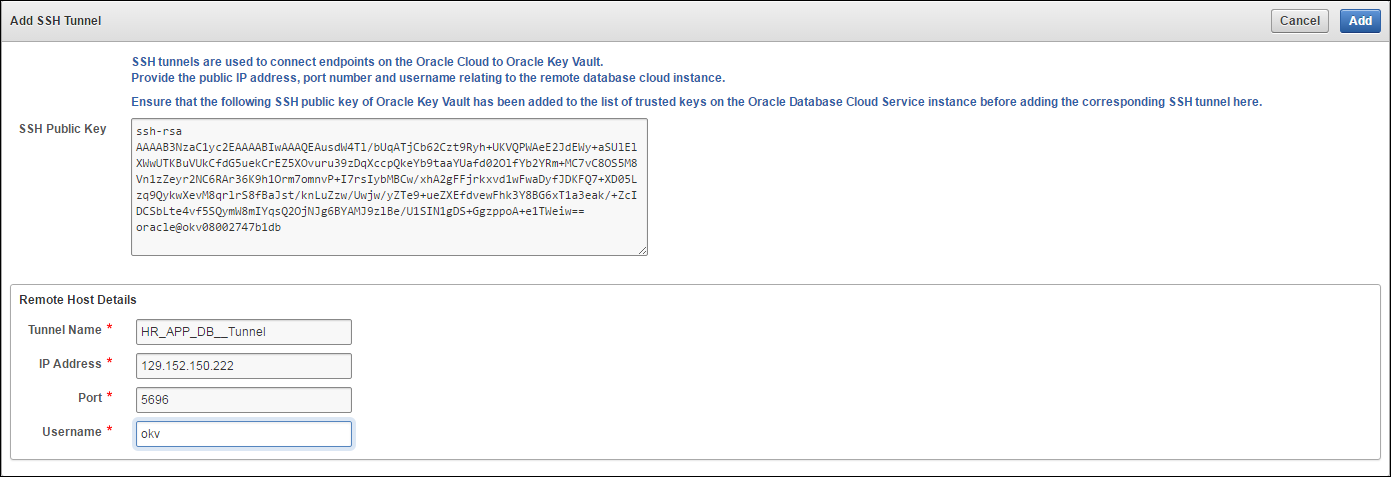
An on-premises Oracle Key Vault communicates with Oracle Cloud Database as a Service instances using a secure SSH tunnel. You can set up the SSH tunnel only after you set up the Database as a Service instance. You will need the Database as a Service instance's public IP address and name of the OS user you wish to use to establish the tunnel.
The following procedure assumes that you followed Oracle's recommendation and created a low privilege user named okv. It creates an SSH tunnel between Key Vault and the Database as a Service instance.
To set up the SSH connection:
Parent topic: Oracle Cloud Database as a Service Endpoints
9.4 Manageability of SSH Tunnel
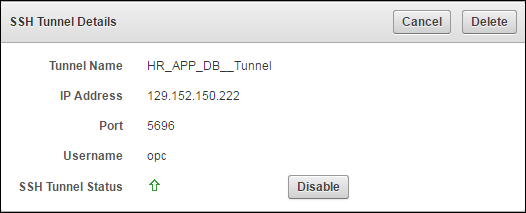
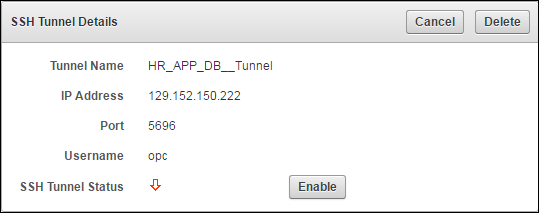
The SSH tunnel is kept alive even if there is no activity between Key Vault and the Database as a Service instance. In case the tunnel drops off, it is automatically restarted.
An alert will be sent out if the tunnel is not available for any reason. An administrative user may elect to receive these alerts by email by configuring SMTP settings on Key Vault.
Parent topic: Oracle Cloud Database as a Service Endpoints
9.5 Register and Enroll Database as a Service Instance as Key Vault Endpoint
The Oracle Database as a Service instance must be enrolled before it can communicate with Oracle Key Vault server. The enrollment of Database as a Service endpoints is similar to the enrollment of on-premises endpoints with the following exceptions:
-
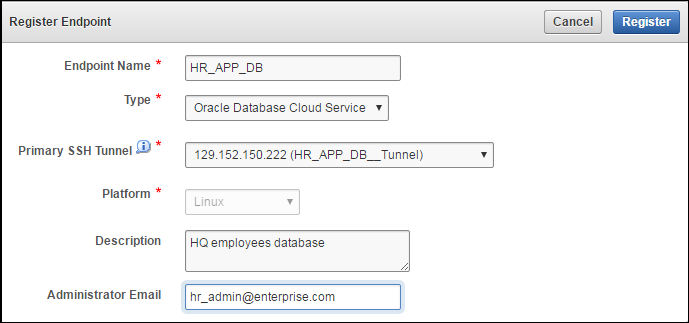
Database as a Service endpoints should be registered with an endpoint type of “Oracle Database Cloud Service".
-
Database as a Service endpoints have a primary tunnel IP associated with them. You must select the SSH tunnel with the same public IP address of the Database as a Service instance.
-
The platform must be Linux. This is automatically selected and cannot be modified.
-
You must download the jar file on-premises and transfer it to the Database as a Service instance using an out-of-band method like SCP or FTP.
To register and enroll a Database as a Service instance as an endpoint:
-
Click the Endpoints tab. The Endpoints page appears.
-
Click Add.
The Register Endpoint page appears.
-
Enter the following endpoint details:
-
Endpoint Name
-
Type - must be Oracle Database Cloud Service
-
Platform - Linux is automatically selected
-
Description - meaningful description to identify endpoint
-
Administrator Email - Optional field to receive endpoint related alerts
-
-
Click Register.
After a short delay the Endpoints page shows the new endpoint in Registered state with an Enrollment Token.
-
Click Endpoint Name. The Endpoint Details page appears.
Associate a default wallet with the registered endpoint now before enrolling the endpoint.
-
Copy the Enrollment Token. You will need it to download the endpoint software and enroll the endpoint (next step).
-
Log out of Oracle Key Vault and open a new session.
The login page appears. Do not log in.
-
Click Endpoint Enrollment and Software Download immediately below Login. The Enroll Endpoint & Download Software page appears.
Figure 9-8 Enroll Database as a Service Endpoint
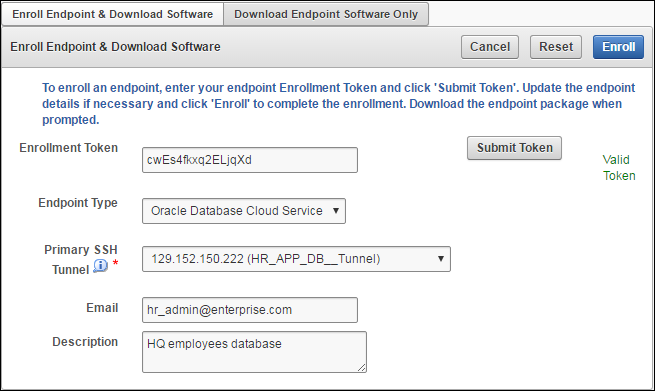
Description of "Figure 9-8 Enroll Database as a Service Endpoint"The fields are populated with the values that were chosen by the Key Vault system administrator while registering the endpoint. You can change these values while completing the enrollment of the endpoint. Note that you must select the Primary SSH Tunnel for Database as a Service endpoints from the drop down list. This is the only difference in the enrollment process from on-premises endpoints.
-
Enter the Enrollment Token and click Submit Token to validate the token.
-
Click Enroll to download the file
okvclient.jar. to your local system. You must then move it to a secure directory on the Cloud Database as a Service instance with appropriate permissions in place so it cannot be read or copied by others.$ scp -i <path-to-private-key-file> <path-to-okvclient.jar-on-local-mc> oracle@node-ip-address:<path-to-okvclient.jar-on-cloud-db-instance>
Where:
path-to-okvclient.jar-on-local-mcrefers to the location ofokvclient.jaron an on-premises local machine.path-to-okvclient.jar-on-cloud-db-instancerefers to the location ofokvclient.jaron the oracle cloud database as a service instance. -
Ensure that you have the necessary administrative privileges to install software on the endpoint.
-
Ensure that you have JDK 1.5 or later installed, and that the
PATHenvironment variable includes thejavaexecutable (in theJAVA_HOME/bindirectory).Oracle Key Vault supports JDK versions 1.5, 1.6, 7, and 8.
-
Run the Shell utility
ORAENVorsource ORAENVcommand to set the correct environment variables on Oracle Database servers. -
Check that the environment variables
ORACLE_BASEandORACLE_HOMEare correctly set.If you used
ORAENVto set these variables, you must verify thatORACLE_BASEpoints to the root directory for Oracle Databases, and thatORACLE_HOMEpoints to a sub-directory underORACLE_BASEwhere an Oracle Database is installed. -
Navigate to the directory in which you saved the
okvclient.jarfile. -
Run the
javacommand to install theokvclient.jarfile.java -jar okvclient.jar -d /home/oracle/okvutil -v
In this command:
-
The
-dargument specifies the directory location for the endpoint software and configuration files, in this case/home/oracle/okvutil.The environment variable
$OKV_HOMErefers to the directory where the endpoint software is installed, in this case/home/oracle/okvutil. -
The
-vargument writes the installation logs to the$OKV_HOME/log/okvutil.deploy.logfile at the server endpoint.
Note:
-ois an optional argument that allows you to overwrite the symlink reference tookvclient.ora, whenokvclient.jaris deployed in a directory other than the original directory. This argument is used only when re-enrolling an endpoint. -
-
The installation process prompts for a password. You can enter a password to create a password-protected wallet or create an auto-login wallet without a password as described below:
-
A password-protected wallet is an Oracle wallet file that store the endpoint's credentials to access Oracle Key Vault. This password will be required whenever the endpoint connects to Oracle Key Vault.
Create a password-protected wallet by entering a password between 8 and 30 characters. Then press Enter.
-
Create an auto-login wallet by simply clicking Enter.
No password will be required when the endpoint connects to Oracle Key Vault. An auto-login wallet enables endpoint provisioning without human intervention.
Enter new Key Vault endpoint password (<enter> for auto-login): Key_Vault_endpoint_password
Confirm new endpoint password: Key_Vault_endpoint_password
The installation proceeds and completes with the following message:
The Oracle Key Vault endpoint software installed successfully.
A successful installation of the endpoint software creates the following directories:
-
bin: contains theokvutilprogram, theroot.shandroot.batscripts, and the binary filesokveps.x64andokveps.x86 -
conf: contains the configuration fileokvclient.ora -
jlib: contains the Java library files -
lib: contains the fileliborapkcs.so -
log: contains the log files -
ssl: contains the TLS-related files and wallet files. The wallet files contain the endpoint credentials to connect to Oracle Key Vault.The
ewallet.p12file refers to a password-protected wallet. Thecwallet.ssofile refers to an auto-login wallet.
-
-
On UNIX platforms, the
liborapkcs.sofile contains the library that the Oracle database uses to communicate with Oracle Key Vault. On Windows platforms, theliborapkcs.dllfile contains the library that the Oracle database uses to communicate with Oracle Key Vault.If you are planning to use a TDE direct connection, then run
root.shon Oracle Linux x86-64, Solaris, AIX, and HP-UX (IA) installations. Theliborapkcs.sofile is copied to the following directory: /opt/oracle/extapi/64/hsm/oracle/1.0.0On Windows installations, run
root.bat. Theliborapkcs.dllfile is copied to C:\oracle\extapi\64\hsm\oracle\1.0.0Log in as the root user and run the
root.shscript. On Windows installations, runroot.bat.$ sudo bin/root.sh
bin\root.bat
Or:
$ su -
# bin/root.sh
On Windows platforms, you are prompted for the version of the RDBMS in use when you execute
root.bat. Switch out of user root after completing this step. -
Run the
okvutil listcommand to verify that the endpoint software installed correctly, and that the endpoint can connect to the Oracle Key Vault server.If the endpoint is able to connect to Key Vault, a No objects found message appears:
$ ./okvutil list
No objects found
If a Server connect failed message appears at any time, you must troubleshoot the installation for possible issues. First check that environment variables are correctly set.
-
You can get help on the endpoint software with the
-hoption:java -jar okvclient.jar -h
The following output appears:
Oracle Key Vault Release 12.2.0.6.0 (2017-12-15 15:36:49.839 PDT)
Production on Fri Dec 15 19:55:31 PDT 2017
Copyright (c) 1996, 2017 Oracle. All Rights Reserved.
Usage: java -jar okvclient.jar [-h | -help] [[-v | -verbose] [-d <destination directory>] [-o]]
-
After installation Oracle recommends that you securely delete the endpoint software file
okvclient.jar. -
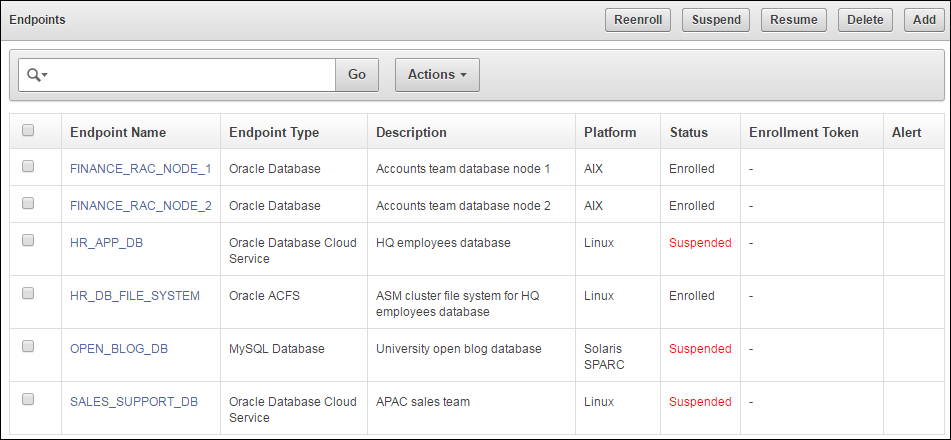
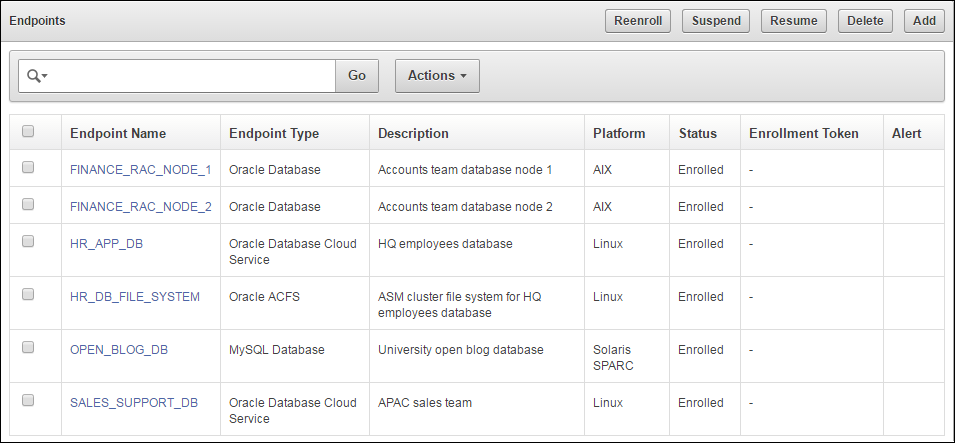
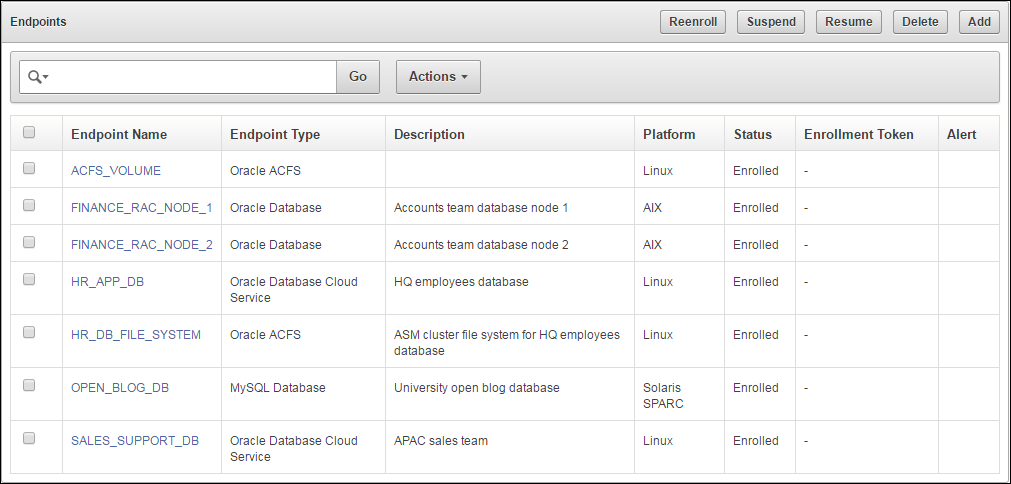
Click Endpoints to see the enrolled endpoint.
Figure 9-9 Database as a Service Endpoints Among other Endpoints
Description of "Figure 9-9 Database as a Service Endpoints Among other Endpoints" -
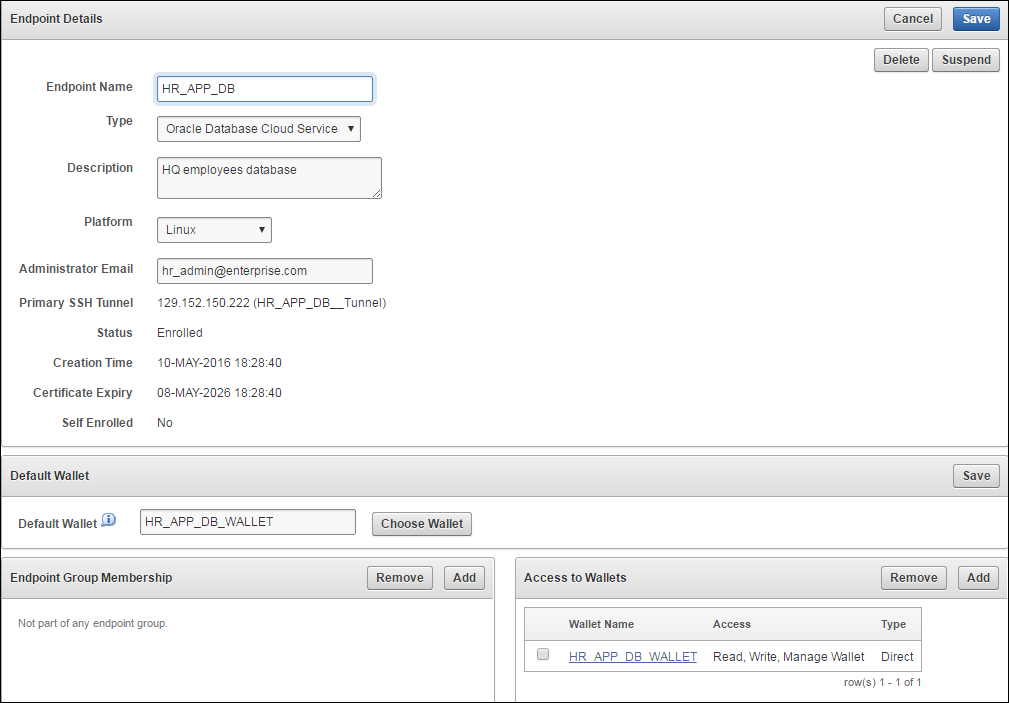
Click the Endpoint Name to see all the details for the endpoint on one page.
Figure 9-10 Database as a Service Endpoint Details
Description of "Figure 9-10 Database as a Service Endpoint Details"
9.6 Suspend a Database Cloud Service's Access to Oracle Key Vault
When using an on-premises Key Vault to manage the TDE master keys for Database as a Service endpoints, the master keys are never stored persistently in Oracle Cloud. This gives the on-premises Key Vault administrator the ability to control access to the encrypted data in the cloud.
The on-premises Oracle Key Vault administrator can suspend Database as a Service endpoints with a single click. This means that the Oracle Key Vault Server rejects all requests from the suspended endpoints. Since the endpoint cannot request keys from the Oracle Key Vault server, its ability to access encrypted data is lost once key cached in memory times out. For Oracle Database Cloud Service endpoints, this time out is 5 minutes by default.
The on-premises Oracle Key Vault administrator can resume a suspended endpoint. This means that the Oracle Key Vault server can start servicing requests from the reinstated endpoint. The reinstated endpoint can now retrieve keys from the Oracle Key Vault server and access sensitive data.
Caution:
The SUSPEND operation is a disruptive operation as it results in operational discontinuity and should be used with care. Usually, this option should be exercised only if there is a strong indication of abnormal activity in the Database as a Service instance.
You can only suspend enrolled endpoints. Endpoints in Registered state may not be suspended. Note that if you try to suspend endpoints that are already suspended, no operation will be performed. The endpoints will continue to be in suspended state.
To suspend endpoints (you can suspend multiple endpoints simultaneously):
Parent topic: Oracle Cloud Database as a Service Endpoints
9.7 Resume a Database Cloud Service's Access to Oracle Key Vault
You can reinstate the connection between suspended Database Cloud Service endpoints and Key Vault. When you resume these endpoints their status will change to Enrolled. Note that resuming enrolled endpoints will not change their enrolled status.
To resume a Database Cloud Service's Access to Key Vault:
Parent topic: Oracle Cloud Database as a Service Endpoints
9.8 Resuming a Database Endpoint Configured with a Password-based Keystore
A Database as a Service endpoint configured with auto-login keystore support will begin operations as soon as the endpoint is resumed. On the other hand, the Database as a Service endpoint configured with password keystore will not resume operations after the endpoint is resumed on the Oracle Key Vault server. The keystore on the Database as a Service instance was closed because Key Vault suspended the endpoint. You should open the password-based keystore on the Database as a Service instance to resume operations.
Parent topic: Oracle Cloud Database as a Service Endpoints
