| Oracle® Agile Engineering Data Management Administration Guide Release e6.2.0.0 E52550-02 |
|

 Previous |
 Next |
| Oracle® Agile Engineering Data Management Administration Guide Release e6.2.0.0 E52550-02 |
|
Previous |
Next |
The Agile e6.2.0.0 Administration client lets you create, configure, and delete Agile e6.2.0.0 applications via the web browser. Agile recommends that you use a supported browser (see Prerequisites Guide for Agile e6.2.0.0) to connect to the Administration client.
|
Note: If you are getting a security message from your browser, you might have to add the Administration client to the trusted websites in your browser settings. |
The Administration client will be installed automatically with the installer if you install a server component. It can be used to create new, or modify existing applications. The Administration client is a web based application and is deployed in an Apache Tomcat servlet container. For detailed information on Apache Tomcat servlet container refer to:
Currently we are using Apache Tomcat v7.0.32
In the Agile e6 package, you can find Apache Tomcat in:
Windows: %ALLUSERSPROFILE%\agile\installer\6.2.0\admin
UNIX: ${HOME}/.agile/installer/6.2.0/admin.
Windows:
Start the service "AgilePLM_AdminClient".
Set the startup type to "Automatically".
UNIX:
Use the standard Apache Tomcat startup.
Stop scripts.
|
Note: A 32-bit Java 7 version has to be used. On most new UNIX servers, the default Java version is a 64-bit Java. |
To set the 32-Bit Java 7 for Tomcat on UNIX:
Create the file "setenv.sh" in the $HOME/.agile/installer/6.2.0/admin/apache-tomcat/bin directory of Tomcat with a line like:
export JAVA_HOME=/usr/local/java/jdk7
Tomcat will automatically use this Java version which must point to a 32-bit Java.
Start Tomcat with "startup.sh".
Stop Tomcat with "shutdown.sh".
Tomcat will show the used Java version at startup with something like:
Using JAVA_HOME: /usr/local/java/jdk7
The Administration client Password has to be defined after the first startup. Login without definition of the password is not possible.
Create new encrypted password.
To create a new password, execute:
Windows:
cd %ALLUSERSPROFILE%\agile\installer\6.2.0
tools\bin\epkeytool.bat -encryptpwd -keyStore file://%ALLUSERSPROFILE%/agile/installer/6.2.0/wallets/adminclient/private/adminclient/cwallet.sso -keyAlias orakey
UNIX:
cd ${HOME}/.agile/installer/6.2.0/tools/bin
./epkeytool.sh -encryptpwd -keyStore file://${HOME}/.agile/installer/6.2.0/wallets/adminclient/private/adminclient/cwallet.sso -keyAlias orakey
The resulting output is your encrypted password.
Find encrypted password.
The encrypted password for the Administration client can be found in:
Windows:
%ALLUSERSPROFILE%\agile\installer\6.2.0\admin\apache-tomcat\webapps\AdminClient\metadata\Adminserver_Props.txt
UNIX:
$HOME/.agile/installer/6.2.0/admin/apache-tomcat/webapps/AdminClient/metadata/Adminserver_Props.txt.
Copy the newly generated password into the "Adminserver_Props.txt" file at the password property, and restart the Apache Tomcat process.
Tomcat is configured with a HTTP connector by default.
|
Note: The Administration client uses port 8030 for the HTTP connector. |
If you want to change this port you have to edit the Apache Tomcat "conf/server.xml" file and restart the Apache Tomcat process.
We recommend enabling HTTPs for the Administration client. Please refer to:
http://tomcat.apache.org/tomcat-7.0-doc/ssl-howto.html
for more information.
Access the Administration client via
http://<servername>:8030/AdminClient
The login screen is opened.
Log in with the following parameters:
User: plm
Password: Your newly generated password
The Welcome screen is opened.
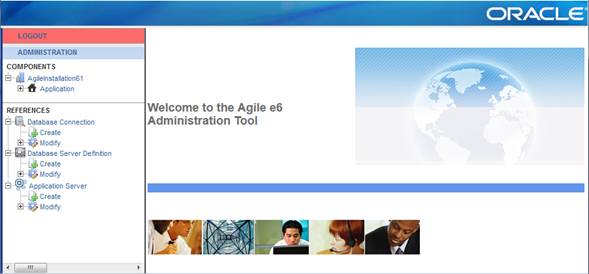
The navigation at the left hand side shows under Components all available installations that can be configured.
Under References, the available Database Connection, Database Server Definition, and Application Servers can be found.
Under <application name> -> Application, click Create.
The Create new application screen is opened.
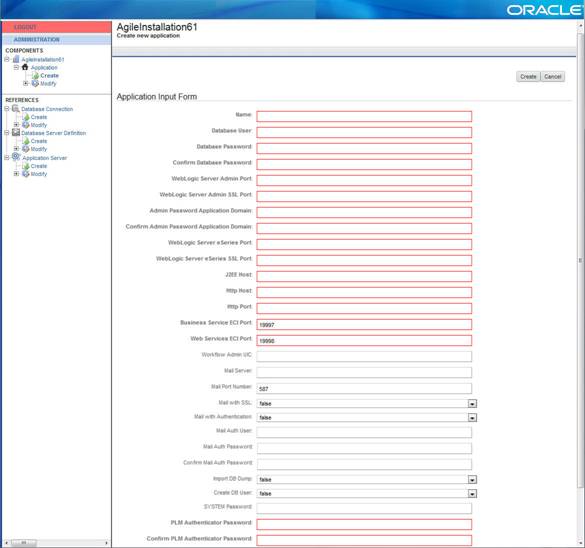

Create a new application with the following parameters:
Application Input Form
| Setting | Description |
|---|---|
| Name | The name of the default application you want to create. |
| Database User | The database user you want to use for the application. |
| Database Password | The password of the database user. |
| Verify Password | The password entered above has to be repeated for the verification. |
| WebLogic Server Admin Port | The listen port for the WebLogic administration server which will contain the WebLogic administration console. |
| WebLogic Server Admin SSL Port | The SSL listen port for the WebLogic administration server which will contain the WebLogic administration console. |
| Admin Password Application Domain | The password of the WebLogic user used for the application domain. |
| Confirm Admin Password Application Domain | The password entered above has to be repeated for verification. |
| WebLogic Server eSeries Port | The listen port for the WebLogic EDM server. The installer will create a separate managed server with the name "eSeries-01" in addition to the administration server. This server will contain the application specific deployments. |
| WebLogic Server eSeries SSL Port | The SSL listen port for the WebLogic EDM server. The installer will create a separate managed server with the name "eSeries-01" in addition to the administration server. This server will contain the application specific deployments. |
| J2EE Host | The host on which Business and/or Web Services are running.
The WebLogic server host name. |
| Http Host | The host where the Web Client can be reached over HTTP.
The WebLogic server host name. |
| Http Port | The port where the Web Client can be reached over HTTP.
The HTTP port of WebLogic server. |
| Business Service ECI Port | The port where the Business Service will be configured to "wait" for requests. |
| Web Services ECI Port | The port where the Web Services will be configured to "wait" for requests. |
| Workflow Admin UIC | The UIC of an Agile e6 user who has administrative rights for the Workflow module. He will receive mails about administrative problems in the Workflow module (1000 - 99999). |
| Mail Server | The name of your SMTP mail server if you want to send emails via the Business Services. Mailing will be disabled if no host name is set. |
| Mail Port Number | The port number of your SMTP mail server if you want to send emails via the Business Services. (587 is the submission port for using encryption. 25 is the old standard SMTP port). |
| Mail with SSL | If enabled, SSL will be used to encrypt the connection to your SMTP mail server if you want to send emails via the Business Services.
Note: We strongly recommend using SSL. |
| Mail with Authentication | If enabled, use the following user/password to authenticate against the mail server if you want to send emails via the Business Services.
Note: We strongly recommend enabling this option. |
| Mail Auth User | User name, if the Mail Authentication for your SMTP mail server is activated. |
| Mail Auth Password | Password, if the Mail Authentication for your SMTP mail server is activated. |
| Confirm Mail Auth Password | The password entered above has to be repeated for verification. |
| Import DB Dump | Select if you want the standard dump to be imported to the above defined database user. |
| Create DB User | Select if you want the database user to be created automatically. |
| SYSTEM Password | Password of the Oracle database user.
Note: You only have to supply a value here if you want to create a new database user and have selected this in the field above. |
| PLM Authenticator Password | Password of the WebLogic user PlmAuthenticatorDSUser, which secures the Data Source PlmAuthenticatorDS used by the PLM Authentication provider. |
| Confirm PLM Authenticator Password | The password entered above has to be repeated for verification. |
References
In the References section you can define which database and application server should be used for this application. Normally, you don't have to change these values.
| Setting | Description |
|---|---|
| Application Server | The name of the reference of the Oracle WebLogic Server where Web Services and Business Service will be deployed. |
| Database | The name of the reference of the database you want to use for the application. |
|
Note: Creating a new application can take up to 20 minutes. If a database user will be created, the database dump for the application has to be imported, the domain created and setup. |
|
Note: In case you receive the error "The connection has timed out", please check if the new application is installed correctly anyway.
|
Click Create.
To update an application click Application -> Modify <application name>.
The following screen is opened with the application details in the right pane:
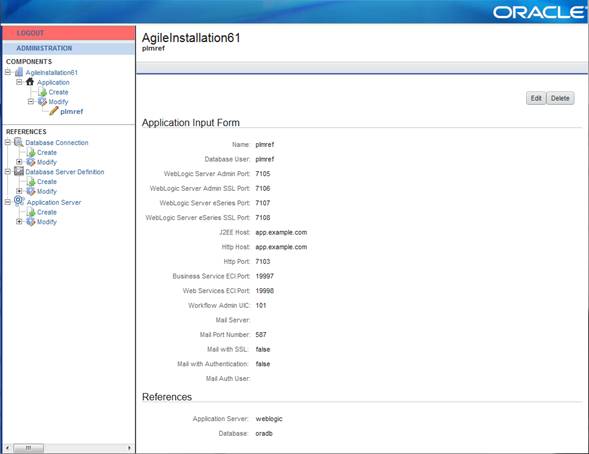
Here you can see the current values of your application.
Click "Edit" in the upper right corner to be able to change the values for the application.
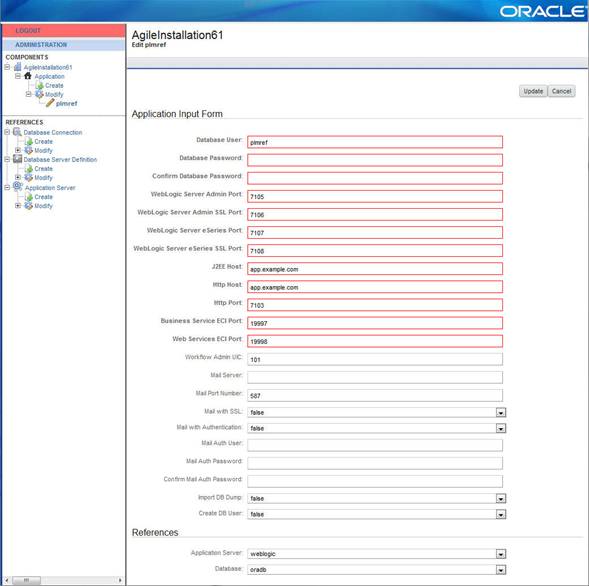
Change the values.
To apply the changes, click "Update" in the upper right corner.
The admin server will redeploy the Web Services and Business Services for this application with the new values.
|
Note: It is NOT recommended updating a production application that is in use and running. |
It is possible to delete the application with the "Delete" button in the upper right corner.
|
Note: Deleting an application will not remove the domain for Web Services/Business Service from the Oracle WebLogic Server. This must be done manually.Refer to the support note "How to Remove/Delete a Weblogic Server (WLS) Domain (Doc ID 1068323.1)" on My Oracle Support. Also, the used database schema remains unchanged. |
|
Note: The enhanced security module is enabled in each newly created application (with a new dump) by default. You can only log in to this application with the user "manager"! |
Perform the following steps:
Start an Agile e6.2.0.0 client and log in to your application with the user "manager" with password "manager".
|
Note: At the first log in, you are asked to set a new password for this user. This will be the password for future logins. |
Set a new password for the user.
All other users are deactivated and have to be activated by setting a new valid password for them.
Set the password for user "EDBCUSTO" and all other standard users:
Start Agile e6.
Open menu Manager > Permissions > User > Basic Data.
To set the password, click Refresh.
Select user "EDBCUSTO".
Open the context menu and select Set Password.
|
Note: At the first log in of user "EDBCUSTO" with the initial password, the user will be asked to set a new password. This will be the password for future logins. |
Repeat these steps for all newly created users and standard users.
|
Note: Further information about the user management can be found in the Online Help > Customizing Agile e6 > Data View > Data View User's Guide > Users, Groups and Privileges. |
