| Oracle Agile Engineering Data Management Web Services Guide for Agile Release e6.2.0.0 E52562-01 |
|

 Previous |
 Next |
| Oracle Agile Engineering Data Management Web Services Guide for Agile Release e6.2.0.0 E52562-01 |
|
Previous |
Next |
The Agile e6 Web Services framework is installed during the basic installation of the Agile e6 application. The WebLogic domains are created with the Agile e6 application installer and/or the Agile e6 Administration Client. By default, the installation has two WebLogic domains - one for installation, and an additional one for every application. Web Services are deployed on the application specific WebLogic domain.
For complete details, please refer to the Administration Guide for Agile e6.2.0.0.
You are required to obtain a WebLogic Agile e6 domain name from the Agile e6 administrator, or create a new domain. This is required as the Web Services are deployed into this WebLogic Agile e6 domain.
During the installation of the WebLogic Server, two domains are created. Each domain consists of an AdminServer and an eSeries-01 server. The AdminServer is only for the administration of the domain, while the eSeries-01 contains the Agile e6 deployments.
For example, the domains directory C:\Oracle\Middleware\user_projects\domains contains the domain names eSeries_domain, and eSeries_domain_plmref.
For complete details on how to install the WebLogic Server and create a domain, please refer to the Server Installation Guide on Windows and UNIX for Agile e6.2.0.0.
The Web Service operations can also be called and tested using the JDeveloper HTTP Analyzer.
You are required to use HTTP/S for the basic authentication with the HTTP analyzer; otherwise you cannot call an operation.
|
Note: For further details please see chapter Configuring the Agile e6 Web Services Security. |
To test the Web Services with the JDeveloper HTTP Analyzer:
Launch the JDeveloper IDE.
Open the HTTP Analyzer screen.
Enter the URL of the WSDL of the Web Service you want to call.
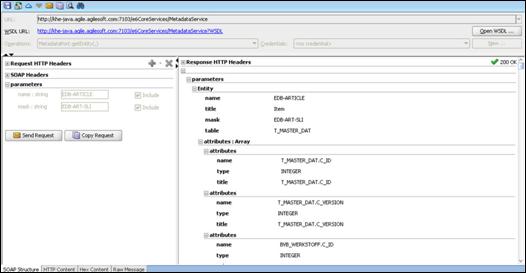
In the Request area on the left, enter the input parameters for name:string and mask:string, such as EDB-ARTICLE and EDB-ART-SLI.
Click on Send Request.
Upon successful call of the Web Service, the result data is displayed in the Response area of the console.
Adjust SoapUI settings as described below:
In SoapUI, go to File > Preferences > HTTP Settings.
Check Authenticate Preemptively.
This adds authentication information to outgoing request.
On your project. double-click to open TestWebServiceSoapBinding.
Switch to Service Endpoints.
Enter a valid Agile username and password to your endpoint.
Click Assign and then select - All Requests with no endpoint.
