The API Gateway Appliance uses the keepalived userspace daemon to provide health checks and failover for cluster nodes in a server pool. This implements the Virtual Router Redundancy Protocol (VRRPv2) to handle failover, and provides a virtual IP address for the server pool. The keepalived daemon ensures that the API Gateway is reachable on a specified IP address, even if one of the servers in a cluster (or API Gateway process on one of the servers) fails.
You can use keepalived to configure multiple servers in a cluster, but only one of the servers is active and listens on the virtual IP address at any given time. There is no load balancing among the servers in a cluster.
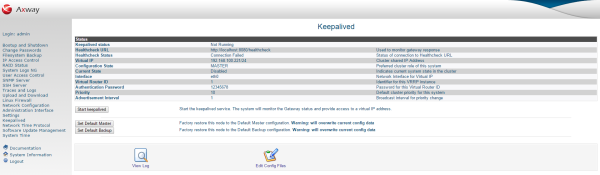
You can use the Keepalived page in the Web Administration Interface (WAI) to configure a cluster and start up keepalived. You can view the status of the keepalived process (whether it is running), and key information about the current keepalived configuration. You can start, stop, and reload the keepalived process, and view any log messages related to the process. You can also edit the configuration file and load a stored master or backup configuration on the server.
This section describes how to configure a two-server cluster using the Keepalived page in the WAI. This example assumes that the server IP addresses are as follows:
| Server | IP Address |
| Server1 eth0 IP Address | 192.168.0.10
|
| Server2 eth0 IP Address | 192.168.0.20
|
| Cluster Virtual IP Address | 192.168.0.100
|
For example, to connect directly to the API Gateway running on Server1,you can access a URL such as http://192.168.0.10:8080/healthcheck. Similarly, for Server2, you can access a URL such as http://192.168.0.20:8080/healthcheck. When the keepalived
service is active, you can access a URL such as http://192.168.0.100:8080/healthcheck
which is served by Server1 or Server2.
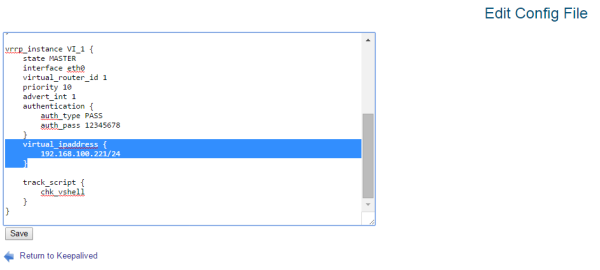
The following steps describe how to configure the master server in the cluster:
virtual_ipaddress
section to 192.168.0.100/24
(or whatever IP address you have chosen). The address is specified in CIDR format, with a subnet mask of /24
. Click the Save
button to apply the configuration.
Connection OK.MASTER, and the Current State
is Active in the keepalived Status
table.The following steps describe how to configure the backup system in the cluster:
virtual_ipaddress
section to 192.168.0.100/24
(or whatever IP address you have chosen). The address is specified in CIDR format, with a subnet mask of /24
. Click the Save
button to apply the configuration.Connection OK.Backup, and the Current State
is Standby in the keepalived Status
table.To have more than one discrete cluster running on the same network, you must modify the default configuration. The settings that you need to change in the keepalived configuration file are as follows:
virtual_router_id
auth_pass
For each cluster, you must specify a unique value for these settings. Each system in that cluster must use the same value in its configuration file.
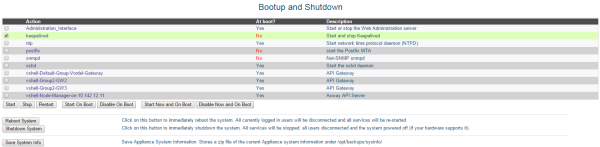
The keepalived service is disabled by default on the appliance. To start the service automatically on system bootup, you must change the default in the WAI Bootup and Shutdown page. Select the check box next to keepalived, and click the Start On Boot button.
Alternatively, you can log in to the appliance as the root user, and run the following command:
# chkconfig keepalived on
By default, keepalived performs a healthcheck on the API Gateway every 120 seconds. To change this to a lower value, edit the interval
value in the chk_vshell
section of the configuration file.
For keepalived to work, you need to allow access through the firewall for packets with a destination of 224.0.0.18
and protocol of 112
(for VRRP). This is configured on the appliance by default.
For more details, see Configure the Linux firewall.
To debug keepalived, check your /var/log/messages
directory for any errors. Common problems arise from incorrect or non-matching entries in the configuration files. Check the values of the following settings in the configuration files:
virtual_router_id
virtual_ipaddress
auth_pass
priority
You should also check that it is possible to reach the Healthcheck URL
configured on the keepalived Status
table. For example, you can log in to the appliance directly, and run the curl
command against this URL.
To check the keepalived traffic reaching the system, run the following tcpdump
command (when logged in as root on the appliance):
# tcpdump -envi ethGb1 host 224.0.0.18
This should show you packets between different hosts in the cluster. If there is no traffic coming through, check the firewall on any systems in the cluster and also check the status of the service.