2 Understanding Network Integrity Security
This chapter describes security fundamentals for Oracle Communications Network Integrity, and also provides procedures to configure user passwords and manage users.
About Network Integrity Security
Network Integrity security includes the following aspects:
-
User Management.
-
Secure centralized storage for users and roles that also enables secure and fast retrieval of that information.
-
Guidelines regarding password policies for Network Integrity, and also for those of the application's integration with external applications, servers, and databases.
-
An audit mechanism to perform audits on security related aspects and provide an audit trail of user activities (such as login attempts).
Network Integrity supports two categories of application security:
-
Authentication is the process of identifying users or computer processes by user name and password to ensure that they are allowed to access the system. See "Authentication" for more information.
-
Authorization controls access to specific parts of Network Integrity, such as pages, actions, and data entities. Users are granted access as the result of being assigned to security roles, which are in turn associated with security policies. For example, when an authenticated user logs in, the content of the main work area depends on their level of access. Users with unrestricted access see links to all pages in the Tasks pane while others see only links to the pages they are authorized to access. See "Authorization" for more information.
Network Integrity uses the following application systems to manage most of its security:
-
Oracle Enterprise Manager enables you to create and manage users, groups, security roles, and security policies. Security roles and security policies define what pages users can access and what actions they can perform.
-
WebLogic Server Administration Console enables you to create and manage users and groups.
You can also use the following application systems for additional application security measures:
-
Oracle Internet Directory is an LDAP-compliant security directory that runs on the Oracle database. It is fully integrated into Oracle Fusion Middleware.
-
Oracle Identity Management is an enterprise-scale tool for managing the end-to-end life cycle of user identities across all resources. Oracle Identity Management is a member of the Oracle Fusion Middleware family of products.
You can choose to use other third-party security applications. See the Oracle WebLogic Server documentation for information about configuring WebLogic with other security applications.
Oracle Platform Security Services
Oracle Platform Security Services (OPSS) provides a security framework for Java Standard Edition (Java SE) and Java Enterprise Edition (Java EE) applications. OPSS is both a security framework exposing security services and APIs, and a platform offering concrete implementation of security services. It includes these five elements:
-
Common Security Services (CSS): The internal security framework on which Oracle WebLogic Server is based
-
Oracle Platform Services: This framework provides security to Oracle applications, for example, Oracle Application Development Framework (ADF), Oracle WebCenter, Oracle SOA Suite, Oracle Web Services Manager (OWSM)
-
User and Role APIs
-
Oracle Fusion Middleware Audit Framework
-
Oracle Security Developer Tools
Security Realms
A security realm comprises mechanisms for protecting WebLogic resources. Each security realm consists of a set of configured security providers, users, groups, security roles, and security policies. A user must be defined in a security realm to access any WebLogic resources belonging to that realm. When a user attempts to access a particular WebLogic resource, WebLogic Server tries to authenticate and authorize the user by checking the security role assigned to the user in the relevant security realm and the security policy of the particular WebLogic resource.
Security Providers
Security providers are modules that ”plug into” a WebLogic Server security realm to provide security services to applications. They call into the WebLogic Security Framework on behalf of applications. You can use the security providers that are provided as part of the WebLogic Server product, purchase custom security providers from third-party security vendors, or develop your own custom security providers.
You have a choice of the following three security providers, during installation, for Network Integrity:
-
The default WebLogic security provider (Embedded LDAP)
-
Any external security provider
-
Any other security provider, if using only the Authentication provider
See Network Integrity Installation Guide for more information on setting up security providers for Network Integrity.
About the Embedded LDAP Server
WebLogic Server uses its embedded LDAP server as the database that stores user, group, security roles, and security policies for the WebLogic security providers. The embedded LDAP server supports the following access and storage functions:
-
Access and modification of entries in the LDAP server
-
Use of an LDAP browser to import and export security data into and from the LDAP server
-
Read and write access by the WebLogic security providers
Note:
WebLogic Server does not support adding attributes to the embedded LDAP server.Table 2-1 provides the usage information for the WebLogic Server's embedded LDAP server.
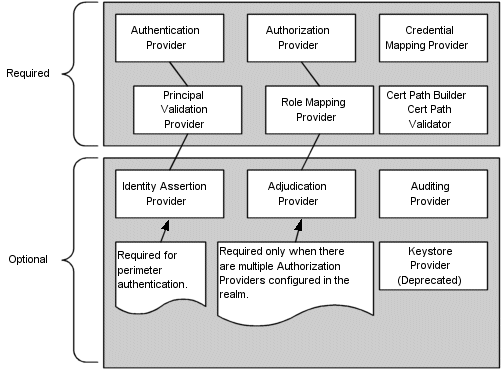
Table 2-1 Usage Information for WebLogic Server's Embedded LDAP Server
| WebLogic Security Provider | Embedded LDAP Server Usage |
|---|---|
|
Authentication |
Stores user and group information |
|
Identity Assertion |
Stores user and group information |
|
Authorization |
Stores security roles and security policies |
|
Adjudication |
None |
|
Role Mapping |
Supports dynamic role associations by obtaining a computed set of roles granted to a requester for a given WebLogic resource |
|
Auditing |
None |
|
Credential Mapping |
Stores user name and password credential mapping information |
|
Certificate Registry |
Stores registered end certificates |
Figure 2-1 provides an illustration of the embedded LDAP server.
About External Security Provider - Oracle Internet Directory
Oracle Internet Directory is a general purpose directory service that combines Lightweight Directory Access Protocol (LDAP) Version 3 with an Oracle Database. It is a component of Oracle Identity Management which is an integrated infrastructure that provides distributed security services for Oracle products and other enterprise applications. Oracle Internet Directory runs as an application on an Oracle Database. It communicates with the database by using Oracle Net Services, Oracle's operating system-independent database connectivity solution. The database may or may not be on the same host.
Oracle Internet Directory includes:
-
Oracle directory server, which responds to client requests for information about people and resources, and to updates of that information, by using a multi-tiered architecture directly over TCP/IP.
-
Oracle directory replication server, which replicates LDAP data between Oracle directory servers.
-
Directory administration tools, which include:
-
Oracle Directory Manager, which has a Java-based graphical user interface.
-
A number of command-line administration and data management tools invoked from LDAP clients.
-
Directory server management tools within Oracle Enterprise Manager. These tools enable you to:
-
Monitor real-time events and statistics from a normal browser
-
Start the process of collecting such data into a new repository
-
-
-
Oracle Internet Directory Software Developer's Kit.
Figure 2-2 provides an illustration of the Oracle Internet Directory.
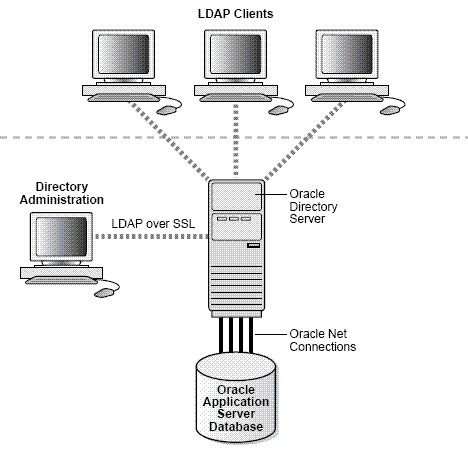
For more information on Oracle Internet Directory, see the Oracle Internet Directory documentation at the following link:
http://www.oracle.com/technology
Note:
For information on any other external security providers, see the respective product documentation.Security Provider Databases
A security provider database contains the users, groups, security roles, security policies, and credentials used by some types of security providers to provide security services. For example, an authentication provider requires information about users and groups; an authorization provider requires information about security policies; a role mapping provider requires information about security roles, and a credential mapping provider requires information about credentials to be used to remote applications. These security providers need this information to be available in a database to function.
The security provider database can be the embedded LDAP server (as used by the WebLogic security providers), a properties file (as used by the sample custom security providers, available on the web), or a production-quality, customer-supplied database that you may already be using.
Note:
The sample custom security providers are available on the Oracle Technology Network web site at the following location:http://www.oracle.com/technology/community/welcome-bea/index.html
Initialize the security provider database the first time you use security providers. That is, before the security realm containing the security providers is set as the default (or, active) security realm. This initialization can be done:
-
When a WebLogic Server instance boots
-
When a call is made to a security provider's MBeans
At minimum, the security provider database is initialized with the default groups, security roles, and security policies provided by WebLogic Server.
See Security Providers and WebLogic Resources for more information.
If you have multiple security providers of the same type configured in the same security realm, these security providers may use the same security provider database. This behavior holds true for all of the WebLogic security providers.
For example, if you configure two WebLogic Authentication providers in the default security realm (called myrealm), both WebLogic Authentication providers use the same location in the embedded LDAP server as their security provider database, and thus, use the same users and groups. Furthermore, if you add a user or group to a WebLogic Authentication provider, the user or group appears in the other WebLogic Authentication provider as well.
Note:
If you have two WebLogic security providers of the same type configured in two different security realms, each uses its own security provider database. Only one security realm can be active at a time.3rd party security providers can be designed so that each instance of the security provider uses its own database or so that all instances of the security provider in a security realm share the same database.
Configuring the Authentication Provider
When you use an external authentication provider, you must configure to use it with Network Integrity.
To configure the authentication provider:
Note:
The use of Oracle Internet Directory and Oracle Identity Manager (OIM) requires a separate license from Network Integrity.Please contact your Oracle representative for information on acquiring a license.
-
Log in to the WebLogic Administration console.
-
In the Home page, select Security Realms.
The Summary of Security Realms screen appears.
-
Select YourRealm.
The Setting for YourRealm screen appears.
-
Select the Providers tab to display it.
The Authentication tab is displayed by default. If not, then select to display it.
-
Click Lock & Edit in the Change Center in the left pane, to activate all buttons in this tab.
-
Click New.
The Create a New Authentication Provider screen appears.
-
In the Name field, enter the name NewAuthProvider of the authentication provider.
-
From the Type list, select OracleInternetDirectoryAuthenticator.
-
Click OK.
The Settings for YourRealm screen appears.
The Authentication tab is displayed by default.
You can see the newly created authentication provider, NewAuthProvider, in the Authentication Providers table.
-
Click NewAuthProvider.
The Settings for NewAuthProvider screen appears.
In the Configuration tab, the Common tab is displayed by default.
If the Common tab is not displayed, select it to display it.
-
In the Control Flag list, select SUFFICIENT.
-
Click Save.
-
Select the Provider Specific tab to display it.
-
In the Connection section, do the following:
-
In the Host field, enter the IP address of the host.
-
In the Port field, enter the relevant port number.
-
In the Principal field, enter the value for the principal.
-
In the Credentials field, enter the relevant credentials.
-
In the Confirm Credentials field, enter the credentials again.
-
-
In the Users section, do the following:
-
In the User Base DN field, provide a value, like the one shown here:
cn=Users,dc=idc,dc=oracle,dc=com
-
In the All User Filter field, provide the relevant value.
-
In the User From Name Filter field, provide the relevant value.
-
In the User Search Scope field, provide the relevant value.
-
In the User Name Attribute field, provide the relevant value.
-
In the User Object Class field, provide the relevant value.
-
-
In the Groups section, do the following:
-
In the Group Base DN field, provide a value, like the one shown here:
cn=Groups,dc=idc,dc=oracle,dc=com
-
In the All Groups Filter field, provide the relevant value.
-
In the Group From Name Filter field, provide the relevant value.
-
In the Group Search Scope field, provide the relevant value.
-
In the Group Membership Searching field, provide the relevant value.
-
In the Max Group Membership Search Level field, provide the relevant value.
-
-
Click Save.
-
Restart the WebLogic server.
To reorder the authentication providers:
-
Log in to the WebLogic Administration console.
-
In the Home page, select Security Realms.
The Summary of Security Realms screen appears.
-
Select YourRealm.
The Setting for YourRealm screen appears.
-
Select the Providers tab to display it.
The Authentication tab is displayed by default. If not, then select to display it.
-
Click Reorder.
The Reorder Authentication Providers screen appears.
-
Use and Up and Down arrows to the right of the Authentication Providers table to reorder them.
-
Click OK.
Authentication
Authentication verifies that you are who you claim to be. Network Integrity requires authentication by user name and password before allowing any user access to the application. User name and password are required for access to the application home page or via direct URL to a specific work area.
Note:
Network Integrity requires a separate sign on from other Oracle Communications applications. Single Sign on (SSO) is not enabled.The login page is configured to not allow auto-completion of user names and passwords. Password text is not echoed to the field as you type. If you enter an invalid user name or password, an error message is displayed.
By default, you manage user names and passwords in the WebLogic Server Administration Console. You can choose to use another application to manage user security. The actual authentication process is performed by the Default Authentication provider or the authentication provider provided by the chosen LDAP. The WebLogic Server Administration Console uses the embedded LDAP by default.
Password requirements are determined by the authentication provider. In the case of the WebLogic Server Embedded LDAP, passwords must be a minimum of eight characters and include at least one numerical and one alphabetic character. Password expiration policies are also determined by the authentication provider.
You can create groups that include similar users. Grouping users makes it easier to set up authorization. You can assign a group to a role, which automatically grants all permissions associated with the role to all members of the group.
See the WebLogic Server Administration Console documentation and Help for information about creating, deleting, and managing users, groups, and passwords.
To grant access to individual pages and actions in Network Integrity, you associate users and groups with security roles, which are in turn associated with security policies. See "Authorization" for more information.
About Network Integrity User Passwords
You manage Network Integrity user passwords using the Oracle WebLogic Administration Console.
Changing the Network Integrity User Password
You can change a Network Integrity user password in Network Integrity if you are using the Embedded LDAP (provided by Oracle WebLogic).
You can also change the user password using the Oracle WebLogic Administration Console. See the Oracle WebLogic online Help for more information.
For information on changing application user passwords when you are using an external security provider, see the respective product documentation.
To change the logged-in user password in Network Integrity:
-
Log in to the Network Integrity application.
The Manage Scans screen appears.
-
In the Links section in the left pane, select Change Password.
The Change Password screen appears.
You can see the user name for the account for which you are changing the password.
-
Do the following:
-
In the Current Password field, enter the current password for this user account.
-
In the New Password field, enter the new password to which to want to change the password.
-
In the Verify New Password field, enter the new password again.
-
Click Save and Close.
The password for this user is changed.
-
Changing the WebLogic Administrator Password
You can change the WebLogic administrator password using the WebLogic Administration Console. See the WebLogic online Help for more information.
Setting User Lockout Attributes
You set the user lockout attributes using the Oracle WebLogic Administration Console.
To set the user lockout attributes:
-
Log in to the Oracle WebLogic Server Administration Console as an administrator.
The WebLogic Administration Console Home appears.
-
In the Change Center on the left, click Lock & Edit.
-
Select Security Realms under Your Application's Security Settings.
The Summary of Security Realms screen appears.
-
In the Realms table, select YourRealm.
The Settings for YourRealm screen appears.
-
In the Configuration tab, select the User Lockout tab to display it.
-
Do the following:
-
Select Lockout Enabled to enable user lockout.
-
In the Lockout Threshold, enter a value for the maximum number of consecutive invalid login attempts that can occur before a user's account is locked out.
-
In the Lockout Duration field, enter the value for the user lockout duration, which is the number of minutes that a user's account is locked out.
-
In the Lockout Reset Duration field, enter the value, in minutes, for the duration within which consecutive invalid login attempts cause a user's account to be locked out. The user is not locked out if the lockout threshold in not reached in this duration.
-
In the Lockout Cache Size field, enter a value for the number of invalid login records (between 0 and 99999) that the server places in a cache.
-
In the Lockout GC Threshold field, enter the value for the maximum number of invalid login records that the server keeps in memory.
-
-
Click Save.
-
In the Change Center of the Administration Console, click Activate Changes.
-
Restart WebLogic Server.
User lockout attributes are set.
Unlocking User Accounts
To unlock a user account:
-
Log in to the Oracle WebLogic Server Administration Console as an administrator.
The WebLogic Administration Console Home appears.
-
In the Change Center on the left, click Lock & Edit.
-
In the left pane, select YourDomain.
The Settings for YourDomain screen appears.
-
Select the Security tab to display it, then select and display the Unlock User tab.
-
In the Unlock User field, enter the name of the user to be unlocked.
-
Click Save.
-
In the Change Center of the Administration Console, click Activate Changes.
The specified user is unlocked.
Authorization
Authorization determines whether an authenticated user has permission to view a work area or to take an action. For example, if an authenticated user does not have permission to view or edit scan information, the link to the Manage Scans work area does not appear in the Tasks panel of the Network Integrity home page.
There are two types of authorization in Network Integrity:
-
Taskflow authorization controls the ability to view work areas, such as the Manage Scans work area. See Table 2-2, "Network Integrity Taskflow Permissions" for a complete list.
-
Resource authorization controls the ability to take actions, such as creating or deleting a scan. These actions are triggered by clicking a button or making selections from the Actions menu. See Table 2-3, "Network Integrity Resource Permissions" for a complete list.
Users are granted permissions by their assignment to security roles and security policies.
-
Security roles define groups of users that require particular kinds of access. For example, you can define a role for users who must be able to view but not edit scan information. You could define another role for users who need to be able make changes to scan information.
-
Security policies are groups of permissions that grant access to pages and actions. You associate security roles to security policies to define the access granted to users who are assigned to those roles. For example, to grant view access for scans, you can create a policy that includes permissions to view the manage scans page.
You use Oracle Enterprise Manager (or another system of your choice) to manage roles and policies for Network Integrity. Changes you make are applied immediately without the need to restart the server. User permission changes require that the user log out and log in again.
Using Security Roles
You create security roles that define the access levels appropriate for users performing particular functions. You can create as many roles as you need and you can assign as many or as few roles to a user as is necessary.
The actual permissions associated with any role are the result of the role being associated with security policies. Each policy defines access to a work area or action. See "Using Security Policies" for more information.
The default role, NetworkIntegrityRole, grants users complete access to all work areas and actions. In some cases, such as in testing or development environments, this may be the only role that is required.
See "Configuring Role-Based Access Control for Network Integrity" for more information.
Configuring Role-Based Access Control for Network Integrity
Network Integrity allows you to manage user access using roles and policies. Roles enable and control access to pages within Network Integrity. You can assign users when you create roles. You can also update existing roles by adding and removing users. Policies enable and control permissions on pages within Network Integrity. You use Oracle Enterprise Manager to create and manage users, groups, security roles, and security policies. You can also use Oracle WebLogic Administration console to create and manage users and groups.
Role-based access control configuration tasks include:
The following procedure provides only the basic steps to create and associate users to groups, roles, and policies. See the Oracle WebLogic Server security documentation for more information.
To create a user:
-
Launch the Oracle Fusion Middleware Control Enterprise Manager by entering the following in a Web browser:
http://ServerName:Port/em
where ServerName is the name of the Administration Server machine and Port is the Administration Server port number.
-
Enter the WebLogic server administration user name and password.
-
Navigate to WebLogic Domain, then Security, and then Users and Groups.
The User and Groups page appears.
-
On the Users tab, click Create.
The Create a New User page appears.
-
Enter the required information in the Name, Description, Password, Confirm Password fields; from the Provider list, select a value, and then click Create.
A confirmation message appears on the Users and Groups page, informing you that the user has been created successfully.
-
Click the newly created user.
The Setting for User page appears.
-
Click the Groups tab.
-
In the Available list, select NetworkIntegrityRole and JDGroup and click the single right arrow button to move both the groups to the Chosen list.
-
Click Save.
A confirmation message appears informing you that the settings have been updated successfully.
To configure a role:
-
Log in to Fusion Middleware Control Enterprise Manager.
-
Navigate to WebLogic Domain, then Security, and then Application Roles.
The Application Roles page appears.
-
From the Application Stripe list, select Network Integrity, and then click Create.
The Create Application Role page appears.
-
In the Role Name field, enter a name for the role.
-
In the Display Name field, enter a display name.
-
Click Add.
The Add Principal page appears.
-
From the Type list, select User, and then click search (blue button with a green arrow).
The Searched Principals section displays the list of users.
-
Select the users to whom you want to assign the role and click OK.
-
On the Create Application Role page, click OK.
To assign policies to a role:
-
Log in to Fusion Middleware Control Enterprise Manager.
-
Navigate to WebLogic Domain, then Security, and then Application Policies.
The Application Policies page appears.
-
From the Application Stripe list, select Network Integrity.
-
From the Principal Type list, select Application Role, and then click the search button.
The list of roles is displayed at the bottom of the page.
-
Select NetworkIntegrityRole and click Create Like.
The Create Application Grant Like Grant To: NetworkIntegrityRole page appears.
-
Click Add.
The Add Principal page appears.
-
From the Type list, select Application Role, and then click the search button.
The Searched Principals section displays the list of roles.
-
Select the roles to which you want to assign the permissions and click OK.
On the Create Application Grant Like Grant To: NetworkIntegrityRole page, under the Permissions section, all the permissions are listed because you are creating a role like the NetworkIntegrityRole.
-
(Optional) Select the permissions that you do not want assigned to the newly created role and click Delete.
Note:
You can delete only one permission at a time. -
Click OK.
The permissions are assigned to the role.
Using Security Policies
You use security policies to associate specific permissions, such as the ability to view the Scan Results work area or make changes to Scans, with roles. Policies are groupings of specific permissions that you grant to users assigned to roles.
It is possible to associate policies directly with users, but using roles reduces duplicative work and is therefore recommended.
Because there are separate permissions for each work area and for the ability to make changes on those work areas, there are a large number of specific permissions that can be assigned. As a result, you can tailor policies to grant exactly the permissions required for a role.
For example, suppose you have two roles associated with Scans. One role (Scan_View) is associated with a policy that includes permissions for viewing Scans information. Another role (Scan_Admin) is associated with a policy that includes those same permissions as well as permission to edit Scan information.
You use Oracle Enterprise Manager to manage policies. To create policies, you combine the permissions that apply to a role and then associate those permissions to a role.
The Oracle Enterprise Manager Application Policies page lists all the policies defined for the application, including the policies for the default NetworkIntegrityRole role.
See the Oracle Enterprise Manager Documentation and online Help for detailed information about working with policies.
Changing Security Policy Providers
By default, Oracle Enterprise Manager uses an XML file as the security policy store. This file, Domain_Home/config/fmwconfig/system-jazn-data.xml, is installed automatically when you install Network Integrity.
You can configure Oracle Enterprise Manager to use a different policy store instead of the default XML file. For example, you may have a pre-existing LDAP server that you want to use for this purpose.
You specify the security policy store in the Enterprise Manager Security Provider Configuration page. See the Oracle Enterprise Manager Help and documentation for detailed instructions.
User Permissions
Table 2-2 lists the Network Integrity taskflow permissions.
Table 2-2 Network Integrity Taskflow Permissions
| Component | Permission String | Access |
|---|---|---|
|
Review discrepancies |
/WEB-INF/oracle/communications/integrity/ui/flow/discrepancies-flow-definition.xml#discrepancies-flow-definition |
Allow access to Review Discrepancies page |
|
Display scan results |
/WEB-INF/oracle/communications/integrity/ui/flow/scanrun-flow.xml#scanrun-flow |
Allow access to Display Scan Results page |
|
Manage scans |
/WEB-INF/oracle/communications/integrity/ui/flow/Local-Region-Task-Flow.xml#Local-Region-Task-Flow |
Allow access to Manage Scans page |
|
Manage tags |
/WEB-INF/oracle/communications/integrity/ui/flow/tags-flow.xml#tags-flow |
Allow access to Manage Tags page |
|
Manage blackout windows |
/WEB-INF/oracle/communications/integrity/ui/flow/blackout-flow-definition.xml#blackout-flow-definition |
Allow access to Manage Blackout Windows page |
|
Manage import system |
/WEB-INF/oracle/communications/integrity/ui/flow/manage-inventory-flow.xml#manage-inventory-flow |
Allow access to Manage Import System page |
Table 2-3 lists the Network Integrity resource permissions.
Table 2-3 Network Integrity Resource Permissions
| Component | Type | Permission Name | Use |
|---|---|---|---|
|
Scans |
Button, menu, right-click |
Scan.CREATE |
Create a scan from Manage Scans work area |
|
Scans |
Button, menu, right-click |
Scan.EDIT |
Edit a scan from Manage Scans work area |
|
Scans |
Button, menu, right-click |
Scan.DELETE |
Delete a scan from Manage Scans work area |
|
Scans |
Button, menu, right-click |
Scan.START |
Start a scan |
|
Scans |
Menu, right-click |
Scan.STOP |
Stop a scan |
|
Scans |
Menu, right-click |
Scan.ENABLE |
Enable a scan |
|
Scans |
Menu, right-click |
Scan.DISABLE |
Disable a scan |
|
Scan Results |
Right-click |
ScanRun.DELETE |
Delete a Scan Run or Scan Result |
|
Import System |
Button |
Import.CREATE |
Create an Import System |
|
Import System |
Button |
Import.EDIT |
Edit an Import System |
|
Import System |
Button |
Import.DELETE |
Delete an Import System |
|
Blackout |
Button, right-click |
Blackout.CREATE |
Create a Blackout Window |
|
Blackout |
Button, right-click |
Blackout.EDIT |
Edit a Blackout Window |
|
Blackout |
Button, right-click |
Blackout.DELETE |
Delete a Blackout Window |
|
Tags |
Button, right-click |
Tags.CREATE |
Create a Tag |
|
Tags |
Button, right-click |
Tags.EDIT |
Edit a Tag |
|
Tags |
Button, right-click |
Tags.DELETE |
Delete a Tag |
|
Discrepancies |
Menu, right-click |
Discrepancies.CORRECT |
Correct Discrepancies |
|
Discrepancies |
Menu, right-click |
Discrepancies.IGNORE |
Ignore Discrepancies |
|
Discrepancies |
Menu, right-click |
Discrepancies.CANCELRESOLUTION |
Cancel Resolution |
|
Discrepancies |
Menu, right-click |
Discrepancies.EDIT |
Edit Discrepancies |
|
Discrepancies |
Button |
Discrepancies.SUBMIT |
Submit Discrepancies |
Working with the Application Role
You manage Application Roles using the Enterprise Manager Console. Oracle recommends backing up the system-jaxn-data.xml file in the Domain_Home/config/fmwconfig/ directory before making any changes to Application Roles.
All the changes made to Application Roles will be in effect immediately, without a restarting the application server.
Oracle recommends not making any changes to the NetworkIntegrityRole role and its policies.
If you want to provide restricted access to a user then create a new Application Role, add policies to be allowed and assign user to that Application Role.
See the Enterprise Manager Console online Help for information about working with Application Roles.
Working with the Application Policy
You manage Application Policies using the Enterprise Manager Console. Oracle recommends backing up the system-jaxn-data.xml file in the Domain_Home/config/fmwconfig/ directory before making any changes to Application Policies.
All the changes made to Application Policies will be in effect immediately, without restarting the application server.
See the Enterprise Manager Console online Help for information about working with Application Policies.
Encrypting Properties
Properties can be encrypted so that they can be configured as Secret properties in a property group on a processor. Properties can be configured to have secret values to pass sensitive information in Network Integrity. See Network Integrity Developer's Guide for more information.
Before running the encryption, create the property. See Network Integrity Developer's Guide for more information.
To encrypt a property:
-
On the system that Network Integrity is installed, go to NI_Home/integrity.
Where NI_Home is the directory where Network Integrity is installed.
-
Run the property encryption tool by running the following command:
./runPropertyEncryptor.sh
-
At the prompt, enter the name of the property.
-
At the prompt, enter the property value.
-
At the prompt, confirm the property value.
The encrypted property value is displayed.
-
Enter the encrypted value as the property value using the MBean interface at deployment time.