3 Working with Processors
This chapter provides information about Oracle Communications Network Integrity processors. This chapter contains the following sections:
This chapter contains the following sections:
About Processors
In Network Integrity, processor entities are the building-blocks for actions, as they implement atomic sub-functions for actions.
For example, an SNMP processor is included in an action to poll network devices; a modeler processor is included in an action to model raw SNMP data from a network device and add it to a database. Combined, these two processors comprise a discovery action that polls SNMP-enabled network devices and persists the modeled SNMP data.
By adding multiple processors to an action, the action performs several complex function by executing the processors according to the sequence in which they were added to the action.
Processors are of different types:
-
Import processor: Part of an import action.
-
Discovery processor: Part of a discovery action that can discover anything.
-
SNMP processor: Part of a discovery action that is prebuilt to discover only SNMP-enabled devices.
-
Assimilation processor: Part of an assimilation action.
-
File transfer processor: Used to retrieve files from local or remote directories. For more information, see Network Integrity File Transfer and Parsing Guide.
-
File parsing processor: Used to parse data retrieved by the File Transfer processor so that the data is available to other processors. For more information, see Network Integrity File Transfer and Parsing Guide.
-
Discrepancy detection processor: Part of a discrepancy detection processor action.
-
Discrepancy resolution processor: Part of a discrepancy resolution action.
Unlike actions, processors are not visible in Network Integrity.
About Context Parameters
Configure input and output parameters for processors.
Input and output parameters are optional for a processor.
After adding input and output parameters for the processor, Oracle Communications Design Studio generates the request and response Java classes based on the input and output parameters.
Specifying Context Parameters before Creating Implementation Class
When creating a processor, it is a good practice to properly configure the context parameters before saving the processor. This way Design Studio properly generates the skeleton implementation Java class for the processor with the correct input and output parameters. If the input and output context parameters are modified later, the generated Interface changes, but Design Studio does not automatically update the implementation class. The user must manually update the implementation class to comply with the changed interface.
About Properties and Property Groups
A property group is a logical container configured on a processor. A property group can be added to multiple processors. Property group names must be unique within a processor.
Properties are added to property groups and are assigned property values to pass to the processor.
Property groups do not inherently pass any values to the processor other than the values belonging to its properties.
Property groups and properties are configured on processors on the Properties tab of the Processor editor.
Property groups can be configured as Managed groups, where the values for the properties it contains can be set at run time using the MBean interface. See Network Integrity System Administrator's Guide for more information. Only managed groups can contain sensitive properties.
Property groups can be configured as Map groups, where the property group produces a simplified API for properties that are used as maps.
Design Studio generates a Java class for the property group so that you can extend a cartridge to access the property values it contains using getter and setter methods.
A property consists of a name-value pair that is passed to the processor through the property group. Property names must be unique within the property group.
The property value can be set in the following ways:
-
At design time, by setting the property with a static value.
-
At deployment time, by setting the property with a cartridge model variable.
-
At run time, using the MBean interface, by configuring its property group as a managed group.
You can configure properties as sensitive. To be configured as sensitive, the properties must be contained in managed property groups and their values must be encrypted. See Network Integrity System Administrator's Guide for information about how to encrypt property values.
You can set the encrypted value of a sensitive property with a model variable at deployment time, or you can set it at run time using the MBean interface.
For more information about setting sensitive properties, see the Design Studio Modeling Network Integrity Help.
For more information on adding property groups to a processor, adding properties to a property group, and setting cartridge model variables, see the Design Studio Help.
About Generated Code
This section describes code generation for processors in Network Integrity:
About the Location for Generated Code
Design Studio code-generates the relevant Java classes for the processor. The generated code is located at:
Studio_Workspace\NI_Project_Root\generated\src\Project_Default_Package\Processor_Type\Processor_Implementation_Prefix
where:
-
Studio_Workspace is the Eclipse Workspace root
-
NI_Project_Root is the Network Integrity project root
-
Project_Default_Package is the default package configured in the Project editor
-
Processor_Type is run time following action types:
-
discoveryprocessors
-
importprocessors
-
assimilationprocessors
-
detectionprocessors
-
resolutionprocessors
-
-
Processor_Implementation_Prefix is the action implementation prefix in lowercase.
About the Processor Interface
Every processor has a generated interface. The generated processor interface class is named Processor_NameProcessorInterface.java.
In general, the generated processor interface has the invoke method defined. The interface has two forms of invoke methods, depending on whether there is an output parameter defined for the processor.
// Signature for processor which does not have output parameters
public void invoke(<Processor_Specific_Context> context,
               ExampleProcessorRequest request) throws ProcessorException {
       // TODO Auto-generated method stub

// Signature for processor which has output parameters
public ExampleProcessorResponse invoke(<Processor_Specific_Context> context,
               ExampleProcessorRequest request) throws ProcessorException {
       // TODO Auto-generated method stub
       return null;
}
The generated processor interface has a slightly different signature, depending on the type of processor: for example, Processor_Specific_Context differs between processor types. See individual chapters on specific processors for more information.
About the PropertyGroup and Properties Classes
A properties class is always code-generated for the processor, whether the processor has property groups and properties configured or not. The properties class is used as an input parameter for the constructor of the generated request class.
The generated properties class is named Processor_NameProcessorProperties.java.
The generated properties class has a public method, String[] getValidProperties(). This method returns a string array that contains a list of valid property group names configured for this processor. If the processor has no property groups configured, this method returns an empty array.
If the processor has property groups and properties configured, for each property group a PropertyGroup class is code-generated.
The generated PropertyGroup class is named PropertyGroup_NamePropertyGroup.java.
The generated PropertyGroup class represents the configured property group and all of its properties. The generated properties class has the getter methods to get each PropertyGroup directly, and has all the setter methods to modify the property values.
The generated PropertyGroup class has a public method, String[] getValidProperties(). This method returns a string array that contains a list of valid properties names configured for this property group. If the property group has no property configured, this method returns an empty array.
If the property group is not configured as a Map group, the generated PropertyGroup class provides getter methods for all the properties configured in this property group.
If the property group is configured as a Map group, the generated PropertyGroup class does not provide getter methods for all the properties configured in this property group. Instead, the API for the property group resembles a Java Map, where the property values are retrieved and set using the property name passed as a value.
Implementing a Processor
Implementing a processor is done in the Processor editor Details tab. See the Design Studio Help for specific configuration details.
You can click the Implementation Class link to open the Java editor for this implementation Java class. Design Studio auto-generates the skeleton Java implementation class, which implements the processor interface with an empty implementation method.
You must decide whether to complete implementing the method. If you modify the processor (for example, by adding output parameters or removing parameters), the implementation class displays a compiling error. This is expected because the skeleton implementation class is regenerated. You must modify the implementation class to match the changed processor interface.
When you delete a processor, you must manually delete the implementation class of the processor. Design Studio does not automatically delete an implementation class when you delete a processor.
For information about how to implement a processor, see the individual processor section.
About the Processor Finalizer
When a processor deals with resources (for example, sockets and files), it is necessary to clean up the resources used or created while the processor executes. Using a finalizer on the processor ensures that the used or created resources get cleaned up, whether the action fails or is successful. When implemented, the finalizer cleans up the resources used or created by the processor. It is not mandatory to implement the finalizer if the processor does not deal with a resource, or if the resource is used only within the processor (in which case the processor implementation should make sure the local resource is closed properly). The processor must implement the finalizer if the processor allocates a resource that is to be output for use by other processors.
Finalizers that are not inside a For Each loop are called by the action controller class (code-generated) before it completes. Finalizers that are inside a For Each loop are called by the action controller class at the end of the For Each loop. In all cases, finalizers are called in the reverse order to which they are registered (finalizers registered first are called last; finalizers registered last are called first).
About the ProcessorFinalizer Interface
The processor implementation class must implement the interface oracle.communications.sce.integrity.sdk.processor.ProcessorFinalizer to have the action controller clean up the resources that are used or created by the processor. If a processor does not use or create a resource, it does not implement the ProcessorFinalizer interface.
The processor defines only one method:
public void close(boolean failed);
The processor that implements the ProcessorFinalizer interface must implement this method to close all the resources used or created during the execution of this processor. This method takes an input parameter as Boolean. If there is an exception during the execution of the processors, the action controller calls the finalizer by passing True to this method; otherwise the action controller calls the finalizer by passing False to the method, in the successful case. The processor might implement the close logic differently for both successful and failed scenarios: for example, if it is a failed scenario, the close method might log an error message before closing the resources.
The following code shows how to implement the ProcessorFinalizer for a sample processor:
public class SampleProcessorImpl implements SampleProcessorInterface, ProcessorFinalizer {
         public SampleProcessorResponse invoke(SampleProcessorRequest request)
                 throws ProcessorException {
                 // Implement the Processor here…
         }

         public void close(boolean failed) {
                 if(failed) {
                           // something is failed, log extra error message here.
                 }
                 // close the InputStream here.
                 try {
                          myInputStream.close()
                 } catch(IOException ioe) {
                          // log the IOException here…
                 }
     }
}
About Memory Considerations
The action controller class calls the finalizers for both successful and failed scenarios. The finalizers that are not inside a For Each loop do not begin until the end of the action. The finalizers that are inside a For Each loop do not begin until the end of the loop. When a processor that implements the ProcessorFinalizer completes the execution, it is still in the scope of the action. The processor does not get purged by the garbage collector to release the memory.
If a processor implements the ProcessorFinalizer, it is a good practice to limit the number of member variables for that processor and ensure that the processor is not using a large amount of memory. If the processor uses a lot of memory, it is a good practice to release the memory as soon as it is no longer required. For example, if a processor is using a large HashMap, and it also implements the ProcessorFinalizer, the processor should clear the contents of the HashMap when it is done using it and assign the null pointer to this HashMap.
Implementing an Import Processor
Many deployment artifacts for the import action and its processors are generated automatically while editing. However, you must supply implementations for the import processors using the invoke method.
Two forms of this method are shown in the following code fragments:
// Signature for processor which does not have output parameters
public void invoke(DiscoveryProcessorContext context,
               ExampleProcessorRequest request) throws ProcessorException {
        // TODO Auto-generated method stub

}
// Signature for processor which has output parameters
public ExampleProcessorResponse invoke(DiscoveryProcessorContext context,
               ExampleProcessorRequest request) throws ProcessorException {
        // TODO Auto-generated method stub
        return null;
}
The parameters and return type of the invoke method are:
-
Processor_NameProcessorResponse: This is the return type, for processors that have output parameters. For processors that do not have output parameters, the return type is void. This class is generated by Design Studio. It is a value object containing values for each of the processor's output parameters. For processors that have output parameters, the invoke method must create a ProcessorResponse object, set its values and return the ProcessorResponse object.
-
Processor_NameProcessorRequest: This is a value object that has the following getters:
-
If scan parameter groups are specified for the import action, there is a getter that returns a scan parameter groups value object.
-
If properties are defined for the import processor, there is a getter that returns a Processor_NameProcessorProperties value object.
-
There is a getter for each input parameter that is defined for the processor.
-
There is a getter method called getScopeAddress. This method is not useful for import processor implementation. Instead, the inventory system address and authentication information should be retrieved using the POMS API.
See "Working with the POMS SDK" for more information.
This class is generated by Design Studio.
-
-
DiscoveryProcessorContext context: This is an SDK type that has the following methods:
-
getActionName: Returns the name of the action that the processor is executing under.
-
getProcessorName: Returns the name of the processor.
-
persistResults: Causes POMS objects to be flushed to the database. This helps to reduce memory consumption. See "About Persist Results" for more information.
-
addToResult: Adds a graph of POMS objects to the database under a result group. This method takes three parameters:
-
String resultGroupName: this is the name of a result group under which the results are persisted.
-
String resultGroupType: this is the type of the result group under which the results are persisted. This should match a category defined on the action.
-
DiscrepancyEnabled result: this is the root of result object graph to be persisted.
-
-
getResultGroup: Used to get an existing result group from your current scan if you must access the graph of POMS objects previously added to a result group. This method takes two parameters:
-
String resultGroupName: This is the name of a result group under which the results are persisted.
-
String resultGroupType: This is the type of result group under which the results are persisted. This should match a category defined on the action.
-
-
Implementing a Discovery Processor
Configuration of the discovery action and its discovery processors results in the generation of many deployment artifacts. However, you must supply implementations for the discovery processors.
The implementation needs to implement the invoke method. Two forms of this method are shown:
// Signature for processor which does not have output parameters
public void invoke(DiscoveryProcessorContext context,
                ExampleProcessorRequest request) throws ProcessorException
{
 // TODO Auto-generated method stub
}
// Signature for processor which has output parameters
public ExampleProcessorResponse invoke(DiscoveryProcessorContext context,
               ExampleProcessorRequest request) throws ProcessorException
{
 // TODO Auto-generated method stub
 return null;
}
The parameters and return type of the invoke method are:
-
Processor_NameProcessorResponse: This is the return type, for processors that have output parameters. For processors that do not have output parameters, the return type is void. This class is generated by Design Studio. It is a value object containing values for each of the processor's output parameters. For processors that have output parameters, the invoke method must create a ProcessorResponse object, set it values and return the ProcessorResponse object.
-
Processor_NameProcessorRequest: This is a value object that has the following getters:
-
If scan parameter groups are specified for the discovery action, there is a getter that returns a scan parameter groups value object.
-
If properties have been defined for the discovery processor, there is a getter that returns a Processor_NameProcessorProperties value object.
-
There is a getter method for each input parameter that is defined for the processor.
-
There is a getter method named getScopeAddress(). This method returns the scope address configured for this discovery action.
This class is generated by Design Studio.
-
-
DiscoveryProcessorContext context: This is an SDK type, which has the following methods:
-
getActionName: Returns the name of the action that the processor is executing under.
-
getProcessorName: Returns the name of the processor.
-
persistResults: Causes POMS objects to be flushed to the database. This helps to reduce memory consumption. See "About Persist Results" for more information.
-
addToResult: Adds a graph of POMS objects to the database under a result group. This method takes three parameters:
-
String resultGroupName: This is the name of a result group under which the results are persisted.
-
String resultGroupType: This is the type of the result group under which the results are persisted. This should match a category defined on the action.
-
DiscrepancyEnabled result: This is the root of result object graph to be persisted.
-
-
getResultGroup: Used to get an existing result group from your current scan if you must access the graph of POMS objects previously added to a result group. This method takes two parameters:
-
String resultGroupName: This is the name of a result group under which the results are persisted.
-
String resultGroupType: This is the type of result group under which the results are persisted. This should match a category defined on the action.
-
-
Implementation Code Example
The following Java code snippet demonstrates how to implement the invoke method for a discovery processor, and how to add results to the result group using the addToResult() method.
public SampleProcessorResponse invoke(
             DiscoveryProcessorContext context,
             SampleProcessorRequest request) throws ProcessorException {
       SampleProcessorResponse modelerResponse = new SampleProcessorResponse();
       SampleDevice device;

       // Get the input Sample Response Document from the Request.
       // This input response document models the sample device.
       SampleResponseType response = request.getSampleResponseDocument();

       try {
              // Make the Sample Device
              device = makeSampleDevice(response);
              // Add the device to the result group "Device", which matches
              // the result category configured in the Discovery Action.
              context.addToResult(device.getName(), "Device", device);
              modelerResponse.setSampleDevice(device);

       } catch (Exception e) {
              // Handle exception here…
       }
       return modelerResponse;
}
Implementing the SNMP Processor
There is no coding required for the SNMP processor. The Processor Interface, Request/Response, Properties, and the relevant helper classes of an SNMP processor are all code -generated and fully implemented.
The only configuration required for the SNMP processor is to configure the list of polled object IDs (OIDs). Before configuring the OIDs for the SNMP processor, the MIB directory must be properly specified for the Network Integrity preference. If the MIB directory is not properly specified in the preference, you cannot configure the SNMP processor.
See the Design Studio Modeling Network Integrity Help for more information about configuring SNMP processors.
About the Generated Implementation and XML Beans
The SNMP processor is a completely code-generated discovery processor. Along with the usual discovery processor implementations (see "Implementing a Discovery Processor"), Design Studio also generates the strongly-typed SNMP XML response document schema based on the OIDs configured for the SNMP processor.
The generated SNMP XML response document schemas are available at the following directory:
Project_Root\generated\SNMP_Processor_Name_snmpdiscoveryprocessor.
Under this directory, the following sub-directories exist:
-
lib: Contains the compiled XML Beans JAR file for the strongly-typed SNMP XML response document schemas
-
snmpClasses: Contains the XML Beans Java classes for the strongly-typed SNMP XML response document schemas
-
snmpSchemas: Contains the generated strongly-typed SNMP XML response document schemas
-
xmlSrc: Contains the compiled XML Beans Java source for the generated strongly-typed SNMP XML response document schemas.
It is recommended to first look at the schemas generated in this directory to understand how to access the compiled XML Beans object for the SNMP response document.
The remaining implementations for the SNMP processor are at the following directory:
Studio_Workspace\NI_Project_Root\generated\src\Project_Default_Package\snmpdiscoveryprocessors\SNMP_Processor_Implementation_Prefix
The SNMP processor always has an output parameter, which is the SNMP XML response document (XML Beans object). This is available in the Response class for the SNMP processor.
Supporting New MIBs
When the productized Network Integrity cartridges are imported into Design Studio (see "Exporting and Importing Cartridges"), Network Integrity cartridges are bundled with a set of MIB files, which is the same set of MIB files bundled with the SNMP Resource Adapter (see "Working with JCA Resource Adapters").
If you must create a Network Integrity cartridge to poll certain MIB OIDs for certain specific devices, which are not part of the bundled MIB files, you must get the MIB file (or set of MIB files) that has the definitions of those MIB OIDs required to implement the new cartridge.
The new MIB files must be manually copied to the MIB directory configured in the Design Studio preference (see the Design Studio Modeling Network Integrity Help). After the new MIB files are copied to the MIB directory, the new MIB files are available to be loaded in Design Studio. There is no need to restart Design Studio.
Note:
The MIB files in Design Studio and on the SNMP resource adapter must match. See "Working with JCA Resource Adapters" for information about supporting new MIBs for the SNMP resource adapter.Implementing an Assimilation Processor
Many deployment artifacts for the assimilation action and its processors are generated automatically while editing. However, you must supply implementations for the assimilation processors using the invoke method.
Two forms of this method are shown in the following code fragments:
// Signature for processor which does not have output parameters
public void invoke(AssimilationProcessorContext context,
                ExampleProcessorRequest request) throws ProcessorException {
       // TODO Auto-generated method stub

}
// Signature for processor which has output parameters
public ExampleProcessorResponse invoke(AssimilationProcessorContext context,
               ExampleProcessorRequest request) throws ProcessorException {
       // TODO Auto-generated method stub
       return null;
}
The parameters and return type of the invoke method are:
-
Processor_NameProcessorResponse: This is the return type, for processors that have output parameters. For processors that do not have output parameters, the return type is void. This class is generated by Design Studio. It is a value object containing values for each of the processor's output parameters. For processors that have output parameters, the invoke method must create a ProcessorResponse object, set its values and return the ProcessorResponse object.
-
Processor_NameProcessorRequest: This is a value object, which has the following getters:
-
If scan parameter groups are specified for the assimilation action, there is a getter that returns a scan parameter groups value object.
-
If properties are defined for the assimilation processor, there is a getter that returns a Processor_NameProcessorProperties value object.
-
There is a getter for each input parameter that is defined for the processor.
This class is generated by Design Studio.
-
-
AssimilationProcessorContext context: this is an SDK type, which has the following methods:
-
getActionName: Returns the name of the action under which the processor is executing
-
getProcessorName: Returns the name of the processor
-
persistResults: Causes POMS objects to be flushed to the database. This helps to reduce memory consumption. See "About Persist Results" for more information.
-
addToResult: Adds a graph of POMS objects to the database under a result group. This method takes three parameters:
-
String resultGroupName: This is the name of a result group under which the results are persisted.
-
String resultGroupType: This is the type of the result group under which the results are persisted. This should match a category defined on the action.
-
DiscrepancyEnabled result: This is the root of result object graph to be persisted.
-
-
getLatestReultGroupsInScope: Returns an IteratorDisResultGroup, which is the latest results in scope. This is essentially the discovery or assimilation scan inputs to the assimilation action.
-
getLatestScanRunsInScope: Returns an IteratorDisScanRun, which is the latest scan runs in scope.
This is also essentially the discovery or assimilation scan inputs to the assimilation action but includes several other objects from the Network Integrity model.
These additional Network Integrity model objects might be useful in performing out assimilation processing in some cases.
-
getPreviousAssimilationScanRun: Returns the latest completed scan run for the current assimilation scan. Use this to look at previous results, comparing current scope with previous scope.
-
haveAllLatestScansInScopeChanged: Returns true if any of the following conditions are met; false otherwise:
-
This is the first scan run for the assimilation scan.
-
The latest scan run of every scan that is in the scope of both the previous assimilation run and the current assimilation run is more recent than the previous assimilation run.
-
-
haveLatestScanInScopeChanged: Returns true if any of the following conditions are met; false otherwise:
-
This is the first scan run for the assimilation scan.
-
At least one scan run in scope is more recent than latest assimilation scan run.
-
The scope of the assimilation scan has changed between this run and the previous run.
This function avoids unnecessary assimilation processing.
-
-
getResultGroup: Used to get an existing result group from your current scan if you need to access the graph of POMS objects previously added to a result group. This method takes two parameters:
-
String resultGroupName: This is the name of a result group under which the results are persisted.
-
String resultGroupType: This is the type of result group under which the results are persisted. This should match a category defined on the action.
-
-
About Discrepancy Detection Processors
The discrepancy detection processor is the atomic sub-function of a discrepancy detection action. The typical tasks of a detection processor are different than the scan-related processors (discovery, import, and assimilation) and include the following:
-
Create and add filters to alter the default behavior of the base discrepancy detection action.
-
Perform post-processing on the set of discrepancies produced by the base discrepancy detection action.
See "Discrepancy Detection Processor Patterns" for more information about the various patterns for detection action-processor implementation.
Discrepancy Detection Processor Patterns
There are several patterns of processor used inside a discrepancy detection action. Each successive pattern introduces a new level of flexibility, power, and complexity. The patterns are listed below, in order from the simplest to the most complex:
-
Reusing the base detect discrepancy action.
-
Adding new filters and handlers.
-
Adding post-processors.
Reusing the Base Detect Discrepancy Action
This usage pattern provides a baseline comparison algorithm between the compare and the reference sides. A discrepancy detection action using this pattern has the ability to compare exact entity attributes and associations, and can generate five of the seven types of discrepancy. (Ordering Errors and Association Ordering Errors are not detected by the baseline comparison algorithm, because it assumes that there are no ordered relationships.)
To use this pattern, use following steps:
-
Create a discrepancy detection action.
-
Add the Detect Discrepancies action as a processor. The Detect Discrepancies action belongs to the NetworkIntegritySDK project, which all Network Integrity cartridge project are dependent on by default.
-
Set the result source.
See the Design Studio Modeling Network Integrity Help for information about the tasks above.
About the Base Detection Project and the Default Comparison Algorithm
The Base Detection project contains a reusable discrepancy detection action called Detect Discrepancies. This discrepancy detection action is abstract and cannot be deployed by itself. It is intended to be imported by virtually all other discrepancy detection actions. The Detect Discrepancies action implements a general comparison algorithm that can work with all entity types and specifications, and can detect and report all seven types of discrepancy.
This ability enables a cartridge developer to build a working discrepancy detection cartridge for arbitrary discovered data without writing code. Its behavior is customizable, by using the techniques described in the following processor patterns.
The default comparison algorithm is outlined below.
-
The detector loops over the compare root entities.
-
The detector checks if each compare root entity should be considered for discrepancy detection. If it should not, the root entity is ignored, and the detector begins processing the next compare.
-
A rootEntityHandler finds the matching reference root entity for the compare root entity. The default rootEntityLoader uses the Name field to find the matching reference root entity. If no reference root entity is found, an EXTRA_ENTITY discrepancy is generated.
-
The attributes of the matching entities are compared, and an ATTRIBUTE_VALUE_MISMATCH discrepancy is generated for each attribute with different values. If an attribute contains an ordered list of values, an ORDERING_ERROR discrepancy is generated if the order of the values does not match.
-
The associations of the matching entities are compared, and an EXTRA_ASSOCIATION or MISSING_ASSOCIATION discrepancy is generated for unmatched target entities of an association. The default relationship handler uses the Name field to match related entities of the compare and reference sides. If an association is an ordered association, an ASSOCIATION_ORDERING_ERROR discrepancy is generated if the order of the matching associated entities is different.
-
The child relationship of the matching entities is compared, and an EXTRA_ENTITY or MISSING_ENTITY discrepancy is generated for unmatched child entities. The default relationship handler uses the Name field to match child entities of the compare and reference sides. If a child relationship is an ordered association, then an ORDERING_ERROR discrepancy is generated if the order of the matching child entities is different.
-
The comparison continues by applying the above algorithm to all children entities recursively, until all entities have been checked. The comparison also stops at a given entity if one of the following is true: the entity is a compare root entity, or the entity is flagged as a shadow entity.
The Detect Discrepancy action creates discrepancies with a default severity of CRITICAL for EXTRA_ENTITY and MISSING_ENTITY, and WARNING for the other types.
Adding New Filters and Handlers
This usage pattern builds on the Reuse pattern by adding filters and handlers to customize the general comparison algorithm. The following changes can be achieved:
-
Which root discovery entities are of interest.
-
How to match discovery entities to import entities.
-
Which attributes are not significant for a particular entity type.
-
How to compare a particular attribute.
-
Which relationships to consider for a particular entity type.
-
What severity to apply to a discrepancy.
-
Define a relationship as ordered (to automatically add ORDERING checks).
-
Set a default/suggested resolution action (such as Ignore or Correct in UIM).
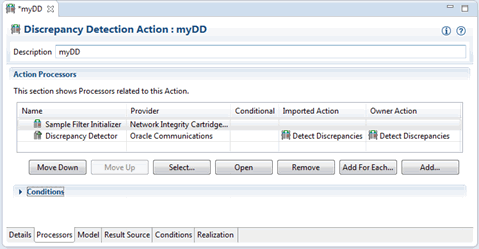
To use this pattern, follow the Reuse pattern to create your detection action, and then create one new detection processor, and move it above the discrepancy detector processor in the table. This new processor becomes the filter initializer processor for the detection action. (For example, in Figure 3-1, a new action follows this pattern by having its own Sample Filter Initializer processor placed above the imported discrepancy detector processor.)
The main task of a filter initializer Processor is to register filters and handlers for use by the subsequent discrepancy detector processor. Handlers are code that implements various behaviors used during discrepancy detection. Filters are code that manipulates the handlers to be used by discrepancy detection.
About Filters
There are four different types of filters that can be added by the processor:
-
AttributeFilter: This filter is called during the assignment of attribute handlers for the given entity type. This filter can add, modify and remove handlers from the given attributeHandlers.
-
RelationshipFilter: This filter is called during the assignment of relationship handlers for a given entity type. This filter can add, modify and remove handlers from the given relationshipHandlers.
-
DiscrepancyFilter: This filter is called during assignment of discrepancy handlers for a given entity type. This filter can modify or remove the default discrepancyHandler.
-
RootEntityFilter: This filter is called during the assignment of the root entity handler for a given entity type. This filter can replace the default rootEntityHandler with another one.
About Handlers
There are four types of handlers that can be manipulated by their associated filters:
-
AttributeHandler: This handler can change the mapping of attributes, or change the behavior of the comparison operation. For example, a string comparison is normally case-sensitive. An attributeHandler can be added to cause a case-insensitive comparison to be used instead.
Network Integrity provides a DefaultAttributeHandler class which implements the necessary AttributeHandler interface and the default case-sensitive string comparison behavior. To override this behavior, create a class which subclasses DefaultAttributeHandler, and then override the following method:
protected boolean equalsNonNull(Object a1, Object a2);
-
RelationshipHandler: This handler can change the mapping of relationships. For example, a relationship comparison would normally check the identically-named relationship on the reference entity. A relationshipHandler can be added which causes a differently-named relationship to be used instead.
Network Integrity provides a DefaultRelationshipHandler class that implements the necessary RelationshipHandler interface, and has knowledge of all relationships for each supported Oracle Communications Information Model entity type. The following method can be overridden by a new subclass to alter the default behavior.
protected Object getKey(DiscrepancyEnabled entity)
This method gets a key value that distinguishes a single entity from a set of entities within a single relationship. The DefaultRelationshipHandler implementation returns the value of the Name attribute for the input entity.
-
DiscrepancyHandler: This handler can change the fields of a discrepancy immediately after it is generated. It can also completely remove the discrepancy. An example of its use is to adjust the severity value of a discrepancy of a DeviceInterface entity based on its Speed value.
Network Integrity provides a non-accessible default DiscrepancyHandler implementation which does nothing. To override this behavior, create a class which implements the DefaultHandler interface, and implement the following method.
DisDiscrepancy processDiscrepancy(DiscrepancyEnabled currentEntity,
                                  DisDiscrepancy generatedDiscrepancy)
The overridden method should alter the input generatedDiscrepancy, and then return it.
-
RootEntityHandler: This handler changes the algorithm for finding a matching reference entity for an input compare entity. An example of its use is to change the default comparison criteria to using the ID field to find the match, instead of the default of using Name field.
See "Using Root Entity Filter and Handler" for a full example of the proper setup and usage of a root entity handler.
Filters and CimType
Filters register against one or more types of Information Model entities produced by a Discovery, Import, or Assimilation scan. Filters can also register against one of more specifications of an entity type, for more fine-grained control.
In Java code, the entity type and specification are designated by using the class CimType. To register a filter against an entity type (for example, Equipment), use the single parameter constructor for CimType:
CimType eqType = new CimType(Equipment.class);
To register a filter against a particular specification (for example, cevSensorClock, an Equipment specification defined in the Cisco UIM cartridge), use the two-parameter constructor for CimType:
CimType clockEqType = new CimType(Equipment.class, "cevSensorClock");
It is possible to take advantage of the inheritance model of the Information Model entity classes to register quickly against several classes with one call. For example, all Information Model entities that support discrepancy detection inherit from the class DiscrepancyEnabled. Therefore, the following code CimType can register a filter against everything:
CimType allType = new CimType(DiscrepancyEnabled.class);
Filter and Handler Examples
The following examples demonstrate the types of filters and handlers. The prerequisite tasks for all examples are to:
-
Create a discrepancy detection action.
-
Set the result source.
-
Add the detect discrepancy action as a processor.
-
Create a filter initializer processor.
-
Move the new processor above the discrepancy detector processor.
Using Attribute Filter and Handler (Static Attribute)
The following code fragments shows how to add an attribute filter to ignore the static attribute description on LogicalDevices. The result of this code is that the new detection action does not generate any description Attribute Value Change discrepancies on LogicalDevices.
-
Define the filter class and remove the handler for the attribute description.
private class LogicalDeviceAttributeFilter implements AttributeFilter { public void filterAttributes(CimType cimType, Map<String, AttributeHandler> attributeHandlers) { attributeHandlers.remove(”description”); } } -
In the processor invoke method, get the generic discrepancy detector from the context.
GenericDiscrepancyDetector detector = context.getDiscrepancyDetector();
-
In the invoke method, create the CIMType object to name the entity type, and add the custom filter.
CimType ldType = new CimType(LogicalDevice.class);
detector.addFilter(ldType, new LogicalDeviceAttributeFilter());
Using Attribute Filter and Handler (Characteristic)
The following code fragments show how to add an attribute filter to ignore the characteristic systemObjectId on LogicalDevice entities with the specification DemoLogicalDevice. The main difference between this example and the previous example is step 3, where the specification name must be included in the CimType constructor.
-
Define the filter class and remove the handler for the attribute systemObjectId.
private class DemoLogicalDeviceAttributeFilter implements AttributeFilter { public void filterAttributes( CimType cimType, Map<String, AttributeHandler> attributeHandlers) { attributeHandlers.remove(”systemObjectId”); } } -
In the processor invoke method, get the generic discrepancy detector from the context.
GenericDiscrepancyDetector detector = context.getDiscrepancyDetector();
-
In the invoke method, create the CIMType object to name the entity type and the specification, and add the custom filter.
CimType ldType = new CimType(LogicalDevice.class, "DemoLogicalDevice");
detector.addFilter(ldType, new DemoLogicalDeviceAttributeFilter());
Using Relationship Filter and Handler
In this example, the discrepancy detection action skips the physicalPorts relationship of all Equipment entities. By using the following code fragment, the new detection action no longer examines any children ports of equipment.
-
Define the filter class and remove the relationship handler for the relationship physicalPorts.
private class EquipmentRelationshipFilter implements RelationshipFilter { public void filterRelationships( CimType cimType, Map<String, RelationshipHandler> relationshipHandlers) { relationshipHandlers.remove("physicalPorts"); } } -
In the processor invoke method, get the generic discrepancy detector from the context.
GenericDiscrepancyDetector detector = context.getDiscrepancyDetector();
-
In the invoke method, create the CIMType object to name the entity type, and add the custom filter.
CimType eqType = new CimType(Equipment.class);
detector.addFilter(eqType, new EquipmentRelationshipFilter());
Using Discrepancy Filter and Handler
This example sets the severity to Minor on every Missing Entity and Extra Entity discrepancy generated by the new detection action. Use the following code fragment for this task:
-
Define the filter class and add a new discrepancy handler. This handler performs a discrepancy type check, and sets the severity accordingly.
private class CustomDiscrepancyFilter implements DiscrepancyFilter { public DiscrepancyHandler filterDiscrepancies( CimType cimType, DiscrepancyHandler handler) { return new DiscrepancyHandler() { public DisDiscrepancy processDiscrepancy( DiscrepancyEnabled cimBase, DisDiscrepancy disDiscrepancy) { if (DisDiscrepancyType.EXTRA_ENTITY == disDiscrepancy.getType() || DisDiscrepancyType.MISSING_ENTITY == disDiscrepancy.getType()) { disDiscrepancy.setSeverity(DisDiscrepancySeverity.MINOR); } return disDiscrepancy; } }; // end return new() } } -
In the processor invoke method, get the generic discrepancy detector from the context.
GenericDiscrepancyDetector detector = context.getDiscrepancyDetector();
-
In the same invoke method, create the CIMType object to name the entity type, and add the custom filter.
CimType allType = new CimType(DiscrepancyEnabled.class);
detector.addFilter(allType, new CustomDiscrepancyFilter());
Using Root Entity Filter and Handler
This advanced technique in this example changes the matching algorithm that finds the matching reference entity for any compare entity. The default algorithm finds matches based on a comparison of the value of the name attribute. This example changes the comparison to use the nativeEmsName attribute instead.
Note:
This feature is used in the MIB II UIM cartridge.The example is in two parts. The first part alters the root entity handler to match compare root entities with reference root entities using the nativeEmsName attribute. The second part use relationship handlers to make the discrepancy detector use nativeEmsName attribute to distinguish the children.
First, the root entity filter and handler code fragments are as follows:
-
Define a method in the new processor to create the root entity filter. This filter creates a new root entity handler and returns it.
private RootEntityFilter getRootEntityFilter() { return new RootEntityFilter() { @Override public RootEntityHandler filterRootEntities( CimType arg0, RootEntityHandler arg1) { return new MatchRootEntityByNativeEmsNameInsteadOfName(); } }; } -
Define a private class that extends from DefaultRootEntityHandler. This class is the one created in step 1. Override the getReferenceRootEntity() method as follows. Notice the use of a string array containing the string nativeEmsName to specify the use of this attribute. Also notice the use of a RuntimeException to report problems.
private class MatchRootEntityByNativeEmsNameInsteadOfName extends DefaultRootEntityHandler { @Override public DiscrepancyEnabled getReferenceRootEntity(DiscrepancyEnabled compareRoot) { try { PomsManagerFactory factory = new PomsManagerFactory(); DisResultGroupManager DisResultGroupManager = factory.getDisResultGroupManager(); DisResultGroup g = DisResultGroupManager.getDisResultGroup( (Persistent) compareRoot); return new ReferenceRootFinder(g). findReferenceRoot((Persistent) compareRoot, new String[] { "nativeEmsName" }); } catch (Exception e) { logger.log(Level.SEVERE, "Error while getting reference root, compareRoot " + compareRoot, e); throw new RuntimeException( "Error while getting reference root, Aborting discrepancy generation", e); } } } -
In the invoke method of the processor, create the CIMType object to cover all entity types, and add the root entity filter defined in step 1.
CimType allType = new CimType(DiscrepancyEnabled.class);
context.getRootEntityLoader().addFilter(allType, getRootEntityFilter());
Part two adds a relationship filter to each entity type that the detection processor expects to encounter. This code fragment example shows a change to a single entity type. It changes the LogicalDevice to DeviceInterface child relationship to match using nativeEmsName instead of name. Normally, this code pattern needs to be repeated once for each entity type. (See the MIB II UIM and Cisco UIM cartridge packs for a full example.)
-
Define the relationship handler as a class inside the processor's class. This class should inherit from DefaultRelationshipHandler, and override the getKey() method to return
public class MatchDevIntfByNativeEmsName extends DefaultRelationshipHandler { @Override protected Object getKey(DiscrepancyEnabled entity) { return ((DeviceInterface) entity).getNativeEmsName(); } } -
In the processor invoke method, get the generic discrepancy detector from the context.
GenericDiscrepancyDetector detector = context.getDiscrepancyDetector();
-
In the same invoke method, create the CIMType object to name the entity type, and add the custom filter.
CimType ldType = new CimType(LogicalDevice.class);
detector.addFilter(ldType, new RelationshipFilter() {
        @Override
        public void filterRelationships(
                CimType cimType,
                Map<String, RelationshipHandler> relationshipHandlers) {
            relationshipHandlers.put("deviceInterface",
                                     new MatchDevIntfByNativeEmsName());
        } // end filterRelationships
    } // end new RelationshipFilter
); // end addFilter
Adding Post-Processors
This usage pattern builds on the Reuse pattern and adds processors after the discrepancy detector processor. These post-processors access the full set of detected discrepancies using the getDiscrepancies() method of the DiscrepancyDetectionProcessorContext object (context). Because they are not persisted until all processors in the action have executed, the discrepancies can be manipulated completely by the post-processors. They can be modified or removed. Also, new discrepancies can be added.
Although all fields of a discrepancy can be modified by using setters, there are many fields that should not be altered. The following discrepancy fields can be safely changed by post-processors:
-
priority, notes, discrepancyOwner
-
severity, compareValue, referenceValue
-
operation + operationIdentifiedBy + status (status set to OPERATION_IDENTIFIED) (Must be set together.)
Any other discrepancy fields should not be altered; otherwise, discrepancy resolution actions may suffer errors and failures.
An example of the use of post-processors is to automatically assign all CRITICAL severity discrepancies to a specific department (using the discrepancyOwner field). The following code snippet from a post-processor shows how this is done.
@Override
public void invoke(DiscrepancyDetectionProcessorContext context,
        DiscrepancyPostProcessorProcessorRequest request)
        throws ProcessorException {

    for (DisDiscrepancy discrepancy : context.getDiscrepancies()) {
        if (discrepancy.getSeverity().equals(
                DisDiscrepancySeverity.CRITICAL)) {
            discrepancy.setDiscrepancyOwner("Sherlock Holmes");
        }
    }
}
About Discrepancy Resolution Processors
The only type of processor available to the discrepancy resolution action is the discrepancy resolution processor.
As with other types of actions, the list of processors are invoked serially from top of the table to bottom. The first processor is given the list of submitted discrepancies. This processor determines a subset of these discrepancies to handle (which can range from none to all), perform the resolution operation, and set their status to either Processed or Failed.
Then, the next processor is given the remaining discrepancies for processing, and so on. The action is complete when all the processors are invoked. If there are any discrepancies which remain at the end, their status is set to Not Implemented.
The discrepancy resolution processor is the Java implementation of a discrepancy resolution action. The processor performs the following tasks:
-
Filter through its input list of discrepancies to process only those discrepancies it can handle
-
Communicate with the discovery or import system to correct a discrepancy
-
Report the status of a correction operation
See "Implementing a Processor" for more information.
Creating a Discrepancy Resolution Processor
See the Design Studio Modeling Network Integrity Help for information about creating a discrepancy resolution processor.
Implementing a Discrepancy Resolution Processor
This section provides details about the discrepancy resolution processor implementation.
About the Implementation Interface
The processor implementation class derives from a Design Studio-generated interface class. There is a single abstract method that the implementation class must implement. The abstract method has the following interface:
public <Processor_Name>Response invoke(
            DiscoveryResolutionProcessorContext context,
            <Processor_Name>Request request)
      throws ProcessorException
{
}
About Input Parameters for the Invoke Method
Table 3-1 describes the methods provided to the developer by the first parameter, context, outlined in "About the Implementation Interface".
Table 3-1 Methods from the context Parameter
| Context method | Return Object Class | Description |
|---|---|---|
|
getActionName() |
String |
Getter for the name of the action. |
|
getProcessorName() |
String |
Getter for the name of this processor. |
|
getUnhandledDiscrepancies() |
Collection DisDiscrepancy |
Getter for a list of unprocessed discrepancies for this invocation. |
|
getAllDiscrepancies() |
Collection DisDiscrepancy |
Getter for a list of processed and unprocessed discrepancies for this invocation. |
|
discrepancyProcessed(DisDiscrepancy disc) |
void |
Sets the status of the input discrepancy to OPERATION_PROCESSED. |
|
discrepancyFailed(DisDiscrepancy disc, String failureMessage) |
void |
Sets the status of the input discrepancy to OPERATION_FAILED, and also sets the failure message. |
|
discrepancyReceived(DisDiscrepancy disc) |
void |
Sets the status of the input discrepancy to OPERATION_RECEIVED. |
The second parameter, request, contains getters for each item in the Input Parameters table. It also contains a getter to retrieve the groups and items listed in the Properties tabbed page.
Return Type of Invoke Method
The return type of the invoke method varies, depending on the output parameters setting in the Context Parameters tabbed page.
If there is no output parameter, then the return type is void.
If there are one or more output parameters, then the return type is a generated class with the name Processor_NameResponse. This Response class has getters and setters for each item in the Output Parameters table.
About the General Flow of the Discrepancy Resolution Processor
The usual pattern for implementing a discrepancy resolution processor is as follows:
-
Fetch the list of unhandled discrepancies using context.getUnhandledDiscrepancies()
-
Allocate discrepancies based on logical groupings; for example: all discrepancies on a single card and on its children port.
Keep discrepancies that can be handled by this processor, and ignore or remove other discrepancies.
-
For each group, perform operations to fix the discrepancies, Then, based on operation results, set their status to Processed or Failed.
An error message can be saved in the Failure Reason field of the discrepancy, which is displayed in the Network Integrity UI.
-
Set output parameters.
Fetching Discrepancies
The discrepancy resolution processor can use the context input parameter to fetch the list of discrepancies to process. In the general flow, the processor uses the method getUnhandledDiscrepancies() on context to retrieve a list of discrepancies that are not yet handled by any previous processors.
It is also possible to retrieve the original full list of discrepancies by using the method getAllDiscrepancies(), but this list includes discrepancies that are already handled by a prior resolution processor.
It is possible to make updates to already handled discrepancies, such as updating the Notes field to add more text.
See "About Discrepancies" for more information about the attributes of a Discrepancy object.
Grouping Discrepancies
Usually, a single resolution processor is responsible for handling the discrepancies of a single entity type; for example: logical device or device interface only, or more frequently an explicit set of specifications of an entity type.
Sometimes, a processor specializes in handling discrepancies of a very specific nature. Therefore, the next logical task is to examine each unhandled discrepancy, to determine how it should be handled by this processor.
A processor frequently uses one or more of the following discrepancy attributes as criteria for handling. Of course, it may use all other attributes as criteria for determining special handling, if necessary.
See "About Discrepancies" for a detailed explanation of these attributes:
-
Type: Indicates the error being reported; for example: attribute mismatch, missing entity, and so on.
-
externalEntityType, staticEntityType: Indicates the type and specification of the target entity.
-
attributeOrRelationshipName: Indicates the attribute or the association that has the discrepancy.
-
compareValue, referenceValue: Each attribute indicates the value of an attribute on one side of the comparison.
-
compareEntity, referenceEntity: Each attribute is a reference to one entity being compared; see "About the Compare and Reference Sides" and "About Discrepancy Types" for important information on what entity each attribute is actually referencing.
-
childTargetEntity: This is an additional entity reference used only for Association or Entity discrepancy types; see "About Discrepancy Types" for more information.
Handling Discrepancies
Now that the target has been identified and grouped, the processor can decide whether to proceed with the handling. If the processor can resolve this discrepancy, then the processor can make appropriate API calls necessary to make the desired resolution on the system, and report the result.
See "Reporting the Resolution Result".
Alternatively, the processor can decide to skip the discrepancy, and begin processing the next one. The skipped discrepancy subsequently appears in the unhandled list of discrepancies for the next processor.
Reporting the Resolution Result
When a discrepancy has resolved successfully, simply pass this discrepancy into the context using the method discrepancyProcessed. This sets the discrepancy status to Processed.
context.discrepancyProcessed( discrepancy );
If the processor fails to resolve a discrepancy, it should set the discrepancy status to Failed using the method discrepancyFailed in the context.
This method takes an additional String argument, which the processor can set a short message to be displayed in the UI. The string is stored in the reasonForFailure attribute of the discrepancy.
Note:
This error message is limited to a maximum of 255 characters.context.discrepancyFailed( discrepancy, "Sample error message.");
If the processor needs to make a series of asynchronous invocations to handle a discrepancy, it can set the discrepancy status to Received at the end of the first invocation.
This indicates to Network Integrity and to Network Integrity users that the discrepancy resolution is in progress. This is done using the method discrepancyReceived in the context.
context.discrepancyReceived( discrepancy );
See "About Discrepancy Status" for an explanation of the transition rules for status values.
Handling Discrepancies Asynchronously
There are situations in which a discrepancy resolution operation cannot be completed within a single invocation. For example, the CORBA interface for an external system to create a trouble ticket requires the caller to supply a callback object for the notification of the final operation result and ticket ID.
In this example, the resolution processor code can prepare the callback object and make the initial CORBA call to submit the trouble ticket, and then it must return from the invoke method. The subsequent resolution handling code must reside in the callback object, and receives the notification, updating the discrepancy status accordingly.
In such cases, the processor should set the status of the discrepancy to RECEIVED using context.discrepancyReceived() at the end of the handling code in the processor's invoke method. This indicates to Network Integrity and to Network Integrity users that resolution processing is in progress, and that additional status updates arrive later.
You must also save the entityID of the discrepancy (using discrepancy.getEntityId()) during the processor's invoke method. When the subsequent resolution handing operation reaches its conclusion, the status of the original discrepancy must be updated to PROCESSED or FAILED. This is done through the Network Integrity web service by first retrieving the discrepancy using the entityID, and then updating the status of the discrepancy.
The topic of how to save the entityID and how to create the subsequent code invocation is beyond the scope of this guide. You may use any techniques available in J2EE to perform these tasks.