| Oracle Health Sciences Mobile Clinical Research Associate Server Administrator's Guide Release 2.0 E61210-01 |
|
|
PDF · Mobi · ePub |
| Oracle Health Sciences Mobile Clinical Research Associate Server Administrator's Guide Release 2.0 E61210-01 |
|
|
PDF · Mobi · ePub |
The trip report you see on mobile devices such as the iPhone or iPad is called a Canonical trip report. The Canonical trip reports' generic trip report structure can accommodate different kinds of configurations for Trip Reports in the CTMS.
Different implementations configure CTMS differently, either by extending the default trip report shipped out-of-the-box in CTMS or by completely replacing the default trip report with one of their own.
You must transform the out-of-the-box CTMS trip report to the Canonical trip report by extending the default transformation. You can make this transformation through Extensible Stylesheet Language Transformations (XSLT), a unique but flexible XML transformation language.
A Canonical trip report is simple in its structure. It is composed of two basic components:
Attributes
Items
Each item can have attributes and (or) items nested inside. It supports multi-level nesting. This generic structure lets you create any kind of trip report. For example, a trip report can have a checklist item, follow-up item, and attendee apart from its attributes. The checklist item may have a nested follow-up item underneath it. Thus, you may have a 3 level nested Trip Report structure.
To extend the configurations of the default CTMS trip report to your mobile device:
Understand the CTMS trip report structure by inspecting the XML coming out of the CTMS trip report web service.
Come up with a Canonical trip report structure that may or may not be same as the CTMS trip report depending on their needs. For example, a user may default certain values in the web service so that they can come up with a minimal trip report structure to make it easy for the Mobile CRA to quickly fill in or they can design it to accommodate all the fields in CTMS.
Transform the CTMS trip report to Canonical trip report using XSLT.
Define the display characteristics for those transformed attributes in the Configuration Utility. The Configuration Utility is where the user defines the attributes, the item types, and their relationship along with the display characteristics. The items, attributes, and relationship must mirror the transformation structure in the XSLT. For example, if a trip report is defined to have two items types such as checklist.
Getting to the Mobile Trip Report Configuration Screen:
Click Trip Reports in right pane of the Home page to reach the Configuration Screen.
This section contains the following topics:
This module lets you define how a trip report is displayed on the device. You can define the various sections, attributes, and associated checks of the trip report type. You can also define the order of display.
Figure 3-1 represents the Mobile Trip Report Configuration screen. The left pane displays a list of all tasks. The right pane displays the corresponding default types in the top pane and the details of the type selected in the bottom pane.
Figure 3-1 The Mobile Trip Report Configuration Screen
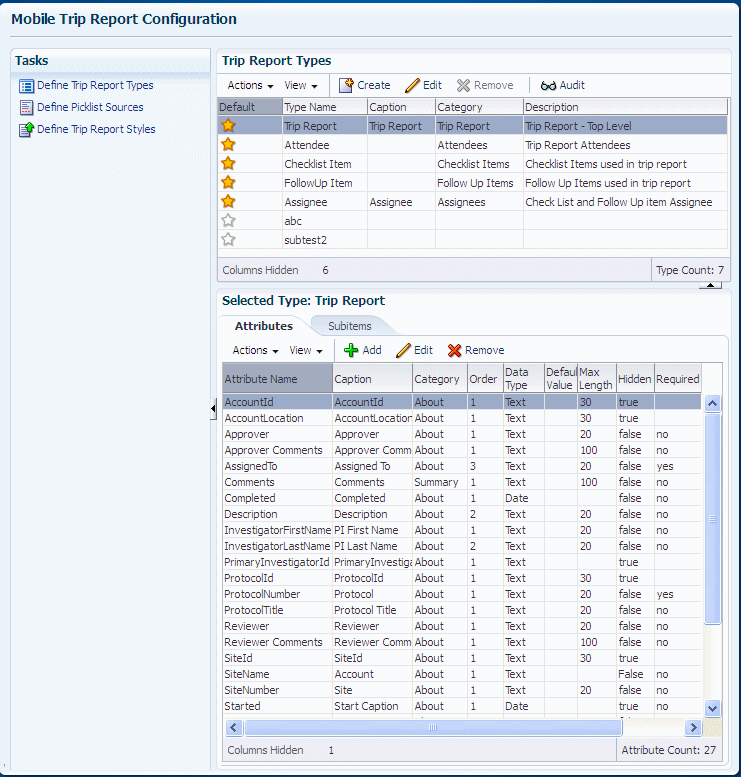
When you select a task from the left pane, the right pane displays the screens related to that particular task. The toolbar buttons are Action, View, Create, Edit, Remove, and Audit.
You can define the various sections, sub-sections, the fields among these sections and sub sections, the date type, and rules around each of these fields.
Mobile CRA has the following report types:
Trip Report
Attendees
Checklist Items
Follow-up Items
Assignees
The star icon denotes that this is a standard trip report type. You cannot delete the standard trip report types.
This section contains the following sub sections:
Figure 3-2 represents the Action drop-down list:
When you select Action, it displays the options, Create, Edit, Remove, and Audit.
Figure 3-2 represents the View drop-down list:
When you click View, it lets you control the display, and the order in which the columns are displayed.
When you click Columns, it lets you define what columns are to be displayed, and what columns are to be hidden. To do this:
Click View.
Select Columns.
Select the columns that you want to display.
Reorder lets you rearrange the order of the columns. To do this:
Click View.
Select Reorder Columns.
You can view the list of Visible columns. Use the arrow keys on the right to rearrange the order of the columns displayed.
To create a trip report type:
Click Create to create a Trip Report Type.
Figure 3-4 Create Trip Report Type Screen
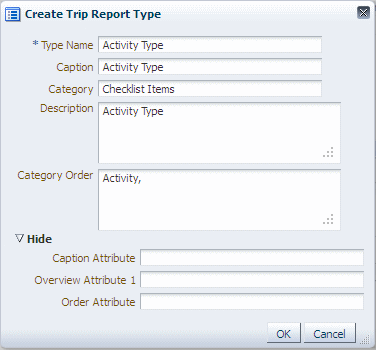
The screen displays the list of attributes required for creating a new trip report type.
Enter requisite fields in the Create Trip Report Type screen.
| Serial Number | Field Name | Description |
|---|---|---|
|
1 |
Type Name |
Provide a name for the trip report type. |
|
2 |
Caption |
Enter the name for an attribute within a section. |
|
3 |
Category |
Enter the heading title. |
|
4 |
Order |
Enter a number between 1 to 5. |
|
5 |
Description |
Add comments, details, or description around the trip report type. |
|
6 |
Category Order |
Specify the order in which the various sections appear within a trip report type. Each section has to be separated by a comma. |
|
7 |
Caption Attribute |
Defines the field from which the value is picked up by the system as a header for the Trip Report Type. |
|
8 |
Overview Attribute 1 |
Define the option that comes up for a particular attribute. You can choose the value from the list of options. |
|
9 |
Overview Attribute 2 |
Defines the pick list applicable for a particular trip report type. For example, for checklist items, status is defined as an Overview Attribute, and this brings in the values as a pick list for the user to choose a value. |
|
11 |
Order Attribute |
Defines the sequence ordering for the trip report type |
Click OK to create a trip report type.
To edit a trip report type:
Click Edit to edit a trip report.
The Edit Trip Report Type screen displays the list of attributes that can be edited in a Trip Report type. Click Show More on the screen to display additional attributes.
Click OK to save the changes.
Click Audit to view the timestamp of when the trip report component was last created and (or) modified along with the user details.
When you select a trip report in the top Trip Report Types pane, it displays the Selected Type Trip Report screen in the bottom pane.
Figure 3-7 Selected Trip Report Type Screen

The screen has two tabs: Attributes and Subitems. By default, the Attributes tab is displayed.
The toolbar displays the Actions, View, Add, Edit, and Remove icons.
The Action Drop-down List
When you click Action, it lets you view the options, Add, Edit, and Remove.
The View Drop-down List
When you click View, it lets you control the display and the order in which the columns are displayed.
When you click Columns it lets you define what columns are to be displayed and what columns are to be hidden. To do this:
Click View.
Select Columns.
Select the columns that you want to display.
Reorder lets you rearrange the order of the columns. To do this:
Click View.
Select Reorder Columns.
You can view the list of Visible columns. Use the arrow keys on the right to rearrange the order of the columns displayed.
Adding Attributes
When you click Add, it lets you add an attribute type. The Add attributes screen displays the list of attributes required for creating a new attribute type. Fields marked with a star (*) are mandatory fields.
Table 3-2 describes the Add Type Attribute field descriptions.
Table 3-2 Add Type Attribute Field Descriptions.
| Serial Number | Field Name | Descriptions |
|---|---|---|
4 |
Order |
Enter the number that is used by the system to order the attribute. |
5 |
Data Type |
Select the data type from the available options, Text, Number, Date, and Boolean. |
6 |
Max Length |
Enter the number that is used by the system to determine the maximum length of the text input on the mobile application. |
7 |
Default Value |
Enter any default value that needs to be displayed. |
8 |
Picklist Field |
Select the source of values, in case the attribute is a Picklist. |
9 |
Hidden |
Specify if the attribute has to be hidden or displayed. The values are True and False. |
10 |
Required |
Specify if the attribute has to be mandated or optional. The values are Yes and No. |
11 |
Read Only |
Specify if the attribute has to be display only or the user can type in an input. The values are Yes and No. |
|
1 |
Attribute Name |
Enter the name of the attribute. |
|
2 |
Caption |
Enter the caption for the attribute. |
|
3 |
Category |
Specify the sub-section under which the particular attribute shall be displayed. |
Editing a Type Attribute
When you click Edit, it lets you edit an attribute type. The Edit Attribute Type screen displays the list of attributes that can be edited in an attribute type.
Removing an Attribute Type
When you click Remove, it deletes the selected attribute type.
Some of the fields in the trip reports need to display a list of values. The Define Picklists Sources section lets you define the picklists and the source of values for such fields. Once defined, these can be attached to the required and relevant attributes in the trip report types.
Click Define Picklist Sources to view the Picklists screen.
When you select a picklist from the top pane, the bottom pane displays the selected Picklist details. The toolbar icons are Action, View, Create, Edit, Remove, and Audit.
The primary function of the picklist source table is to define the picklist items used for the Choice field in the Group Attribute field definition. Each picklist item is created with an associated type that corresponds to the available Web service based options, which are key-value pairs.
Define Picklist Source Operation:
To create a picklist for a Metadata field, define a Picklist Source Item:
Enter the name, description, and picklist type in the Picklist Item table.
The Picklist Type item is either a key-value pair value or a URL-based web service.
After creating the picklist item, select the corresponding Type tab for entering values.
Use constraints to prevent items from being created with different types for same item
Picklist Types:
Key-Value - Defines a list of key-value pairs.
External - Defines a web service for retrieving Picklist items.
Entity Objects:
HSM_CTMS_PICKLIST
View Object Fields:
PICKLIST_NAME is the name of Picklist source.
PICKLIST_TYPE is the type of Picklist (Key-Value or External).
PICKLIST_DESCR is the description of the Picklist item.
Defining Picklist Source Values:
The Picklist item values tabs primary function is to define the values associated with each Picklist source name. The values for a Picklist Item can be different based on the Picklist type.
Defining the Picklist Source Value Operation:
Select a picklist name and type row from the Picklist Source table.
Select the corresponding picklist type from either the Key-Value or Web Service tab.
A new record is created with required attributes pertaining to type within designated tab.
The Key-value type may contain multiple records per picklist source item.
The external web service type contains one record per Picklist source item.
Entity Objects:
HSM_ CTMS_PICKLIST_KEYVAL
HSM_ CTMS_PICKLIST_EXT
View Object Fields—Key-Value Type
PICKLIST_TYPE is the name of type (key-value).
PICKLIST_KEY is the name of the picklist value to display.
PICKLIST_VALUE is the data value of the picklist name.
PICKLIST_DESCR is the description of the Picklist name.
DISPLAY_ORDER is the sequence of items to display.
View Object Fields—External Type
PICKLIST_TYPE is the name of type (external).
URL_PATH – external REST URL to fetch data from an external source.
DATA_PATH is the path within the received data structure that points to array of options to display.
KEY_PATH is the path within the received data structure that points to a unique option key.
VALUE_PATH is the path within the received data structure that points to unique option displayable value.
The tool bar displays the Actions, View, Add, Save, and Remove icons.
The Action Drop-down List
When you click Action, it lets you view the three options: Add, Delete, and Save.
The View Drop-down List
When you click View, it lets you control the display and the order in which the columns are displayed.
When you click Columns it lets you define what columns are to be displayed and what columns are to be hidden. To do this:
Click View.
Select Columns.
Select the columns that you want to display.
Reorder lets you rearrange the order of the columns. To do this:
Click View.
Select Reorder Columns.
You can view the list of Visible columns. Use the arrow keys on the right to rearrange the order of the columns displayed.
Adding a Subitem
When you click Add, it lets you add a Subitem type. The Add Subitem screen displays the list of attributes required for creating a new Subitem type. Fields marked with a star (*) are mandatory fields.
Saving a Subitem Type
When you click Save it saves the Subitem type.
Removing a Subitem
When you click Remove, the Remove Subitem Type dialog box is displayed.
Click Yes to delete the selected Subitem type.
Order is a text field to key in the number that is used by the system to order the Category attribute.
The standard application on the iDevice comes with a default category order.
You can re-arrange the order categories per your requirements.
Click Fetch from CTMS to view the re-arranged order.
You can now view the new order on the iPad.
The four XSLTs that are needed for the creation of the trip report are:
Canonical to Custom Insert - Converts the canonical trip report from the client to the custom trip report creation XML for invoking web service on the CTMS. Since the result from the CTMS is a true or false response depending on whether the insert operation is successful or not, you do not need an XSLT for Custom to Canonical Insert.
Canonical to Custom Query - Converts the canonical trip report query request to a custom CTMS request. Since the result is the CTMS XML, another XSLT is needed to convert it back to canonical.
Custom to Canonical Query - Converts the XML that was recovered as a result from the CTMS into the canonical trip report.
Canonical to Custom Update - Converts the canonical trip report from the client to custom trip report update XML for invoking web service on the CTMS. Since the result from the CTMS is a true or false response depending on whether the update operation is successful or not, you do not need an XSLT for Custom to Canonical Update.
Click Define Trip Report Style to view the Define Trip Report Style screen.
When you select a trip report style from the top pane, the bottom pane displays the selected trip report style details mode. You can visually inspect the contents of the uploaded file. You must modify and validate the style sheet structure and data outside the Configuration Utility server. If you want to make changes in the selected style type, use the File Upload icon to re-upload a new style sheet file. See data model specifications for additional information on entity attributes.
Figure 3-19 Define Trip Report Styles Screen
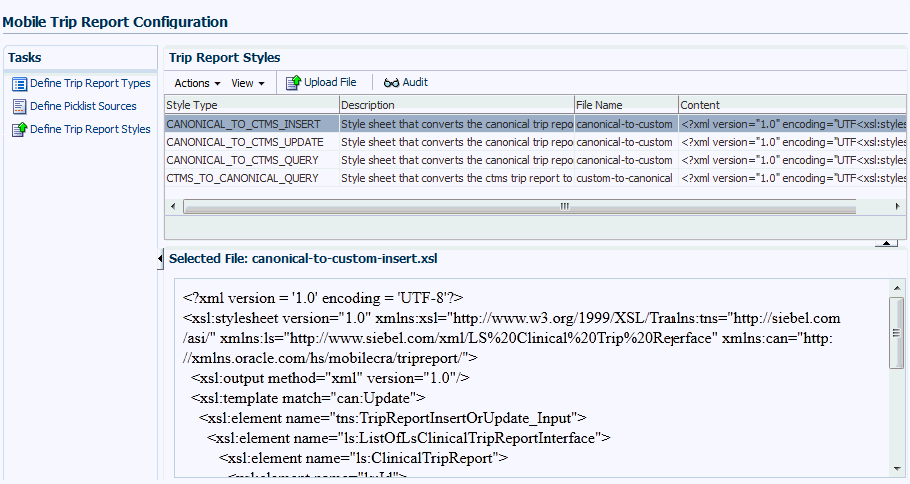
View Contents Operation
Use the Inline Frame component to display the Style Sheet file contents.
Use the Servlet applet to read the contents from the CLOB database field.
Servlet transforms XML content into HTML markup representation for display.
The contents are displayed in Inline Frame component in the read-only mode.
Entity Objects
HSM_ CTMS_STYLE
View Object Fields
CONTENT (read-only) – contents of field that contains XSLT data
Mobile CRA now supports Source Data Verification (SDV) for InForm enabled studies. You must ensure the following:
InForm must be 6.0 or above
InForm must have the data adapter and data discrepancy services installed
The CTMS site must be mapped to the InForm sites from the Mobile CRA Administration Console.
CRAs will not conduct SDV at every type of site visit. The Mobile CRA Administration Console permits the selection of which CTMS site visit template can access InForm. For example, CRAs may conduct a site visit initiation visits. A specific trip report template is created to support this type of visit. However, it is not required to conduct SDV activities during this type of visit. Mobile CRA permits the administrator to select which templates permit SDV.
All CTMS studies are pre-populated into the Study Mapping table as shown in Figure 3-20.
Additionally, the list of CTMS sites are automatically populated.
Enabling InForm Source Data Verification for a Study
To enable InForm SDV for a study in Mobile CRA, perform the following steps:
Enter the InForm URLs for the study enabled against the CTMS Study Name or ID.
Figure 3-21 CTMS Study Mapping Attributes
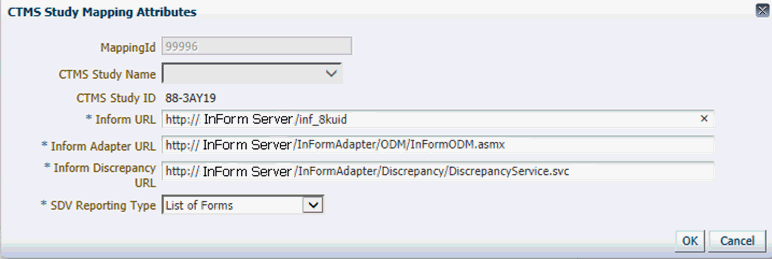
Enter the main InForm URL, the InForm Adapter URL, and the InForm Discrepancies adapter.
Select the type of SDV reporting that will be returned from SDV sessions to the trip report.
Figure 3-22 Selecting the SDV Reporting Type
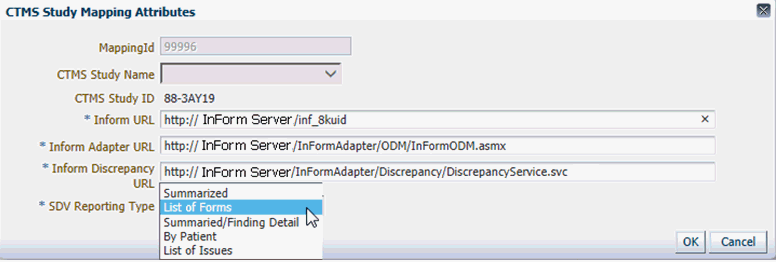
Table 3-3 SDV Reporting Options
| Reporting Type | Behavior |
|---|---|
|
List of Issues |
One checklist item is created for each form where query is created. Text for Checklist - '<Patient ID> had form for Visit <#>, <Form Name> with an issue' Text for Comment - '<Query Text>' |
|
Summarized |
One checklist item is created for each SDV session. Text for Checklist - 'SDV Completed for <x> number of forms'. Text for Comment - ' Forms SDV Complete:< # forms> : Forms Partial Verify: <# Forms> : Forms with Issues: <# Forms> |
|
List of Forms |
One checklist item is created for each form that are fully verified or partially verified. Text for Checklist - 'SDV ["Completed" or "Partial"] for Visit <#>, <Form Name>' Text for Comment - ''Record Status <Verified/Partial Verified/Issue) : <If Issue, record query text in comment>' |
|
Summarized/Finding Detail |
One checklist item is created. Text for Checklist - 'SDV completed for # forms: <#> issues found' Text for Comment - Forms with Issues: <# Forms> |
|
By Patient |
One checklist item is created for each patient that are verified for each SDV Session. Text for Checklist - 'SDV on Patient <Patient ID>: <#> of forms verified. <#> issues found' Text for Comment - ' Forms SDV Complete:< # forms> : Forms Partial Verify: <# Forms> : Forms with Issues: <# Forms> |
The system differentiates between CRF pages that are fully verified (all fields verified) and pages that are partially verified, (some fields are verified).
Since various studies operate under different SDV reporting rules, the system lets the administrator select a reporting type on a study by study basis. For example, Study 1 may be operating under strict controls, requiring individual report for each form verified, while Study 2 is operating under less strict business rules (that is, a post marketing study), which only requires a summary report.
Map the CTMS site to the InForm sites.
Figure 3-23 Mapping CTMS Sites to InForm Sites
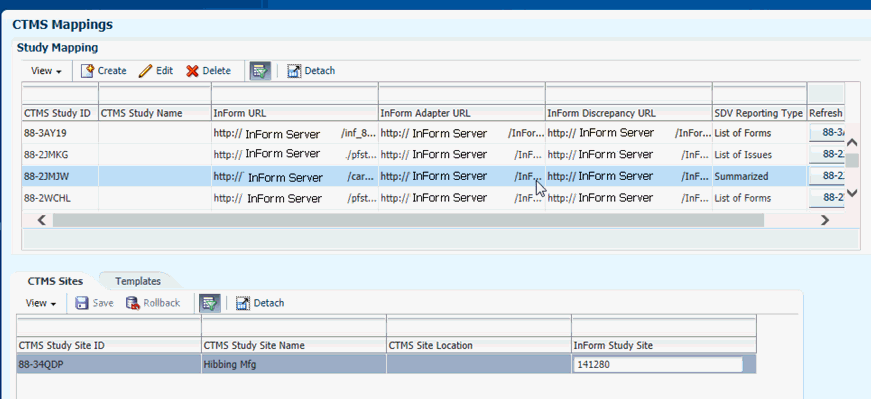
Once the Inform URLs are in place, the system selects all CTMS sites and names for the study, and displays them in the CTMS Studies tab.
The InForm Study site names that maps to the CTMS study site must be entered into the appropriate field.
Select templates where SDV will be performed.
SDV may not be performed for every template. For example, a template designed to support a Site Initiation visit may not require SDV, because patients have not yet enrolled at the site.
In the second tab, Templates, the administrator can select the templates where SDV will be accessible.
Figure 3-24 Selecting Templates to Perform Source Data Verification
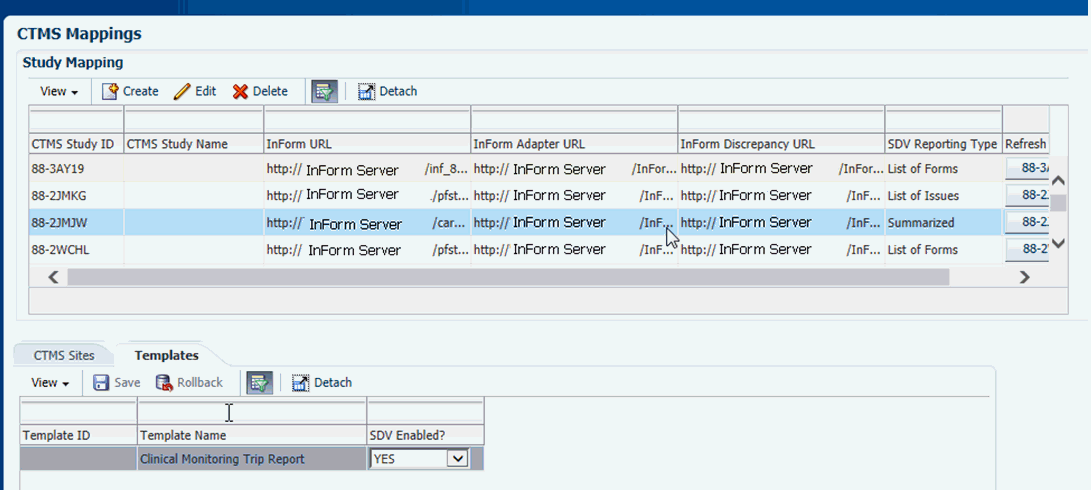
Click Yes or No for each template.
When the trip report is saved, the SDV results are automatically mapped to the default checklist section in the out-of-the-box CTMS trip report, with a Sub Activity of SDV Activity.
Note:
In CTMS, if the Sub Activity field does not permit the value of SDV Activity, add this to the picklist.If required, the XSLT mappings can be modified to direct the SDV records to CTMS applet other than checklist. For details on altering the mappings, see Section 3.1.5.
Figure 3-25 describes a sample out-of-the-box trip report in CTMS:
Figure 3-25 Sample Out-of-the-Box Trip Report in the CTMS

Figure 3-26 shows a trip report in the out-of-the-box CTMS with the trip report header section and its various subitems highlighted. This trip report has the following items:
Attendees
Check list items
Follow-up items
Comments summary
The checklist and the follow up items have the assignee items within.
These items have various attributes:
Figure 3-26 Sections within a Trip Report

Figure 3-27 displays the sections within a trip report.
Figure 3-27 CTMS Items Represented as Item Types on Mobile CRA Configuration Utility

The above items in the CTMS can be represented as various item types on the Mobile CRA Configuration Utility screen.
These items are represented as five different items in the Configuration Utility, including the trip report container element, and the assignee item, which are present under both checklist item and follow up item. All hierarchical items are represented as flat items in the Configuration Utility.
The attributes under each of these elements are defined in the hierarchical order. All the attributes under the trip report element go under trip report, all the attributes under checklist items go under checklist items, and so on.
The attributes contain various properties which control the behavior of those attributes on the mobile screen. These attributes include editable, hidden, and so on.
Figure 3-28 displays the attributes for a trip report type in the Configuration Utility.
Figure 3-28 Attributes for a Trip Report Type in MobileCRA Configuration Utility

You can display each of the attributes and items in a separate display category. You can use this functionality for representing the elements in the UI using certain logical grouping. For example, all attributes in the header section are displayed under a single display section called About. However, if you want, you can place them in different groupings. For example, Assigned To, Approver, and Reviewer in a workflow section, and all the other fields in the About section.
Figure 3-29 represents the sample canonical form. The canonical form has two basic elements, that is, items and attributes. An item can have attributes and (or) items in a hierarchical structure at any number of levels. The figure represents the out-of-the-box trip report with three levels, the trip report at the top level, the checklist, follow up, attendees at the second level with assigned to at the third level inside the checklist and follow up item.
Figure 3-30 represents the sample CTMS XML that is dispatched as part of the trip report web service XML. It mirrors the hierarchy of the trip report in the CTMS. The mobile trip report can follow the same hierarchy or a completely different hierarchy.
Figure 3-31 shows how the XSLT coding is done to transform the XML from one form to another.
In the example below, the CTMS XML that was returned is converted. As a result the CTMS web service XML is converted back to canonical XML.
For example, for every occurrence of a trip report element in the CTMS trip report, a Trip Report element is created in the canonical trip report. Also, the example below shows how to create a canonical element attribute from a CTMS attribute. In this case, whenever there is a protocol number attribute in the trip report header, an attribute is created in the canonical form, whose name is Protocol Number, and whose value is the same as the value in the CTMS.
The example below shows a special handling for trip report status attribute, which is, again, an attribute inside the trip report. Here, whenever you query the trip report from CTMS in Submitted or Submitted for Approval, it is put in the In Review status in the Mobile CRA. This is one of the normalized Trip Report statuses in the mobile client. To accommodate all kinds of workflow, the mobile client has the following recognized statuses:
Editable status - The CTMS status can be retained as is except for the below status values, which have a special meaning. In this case, the trip report is editable in the mobile client.
In Review status - The status in the CTMS for which the Mobile CRA will not update the update the trip report in the client.
Submitted status - CTMS must have a Submitted status if it wants to submit the Trip Report for approval or review workflow. Also, during the submission, the client asks for the electronic signature.
Approved status - CTMS must have an approved status. The status must be passed as is to the client. When the client sees any trip report in the approved status, it does not let the mobile client update any further. This is assumed as the final state in the mobile client.
Figure 3-32 represents the Managing Status in XSL.
Figure 3-33 shows an example similar to the trip report item and its attribute conversion, where the checklist items can be converted from the CTMS to the canonical form. The example also includes the attributes under the checklist items.
Figure 3-33 Trip Report Item and its Attribute Conversion

Figure 3-34 displays a trip report item and its attribute conversion.
Figure 3-34 Trip Report Item and its Attribute Conversion

Figure 3-35 displays assigning a picklist to the status attribute in the CRA Configuration Utility.
Figure 3-35 Assigning a Picklist to an Attribute

Figure 3-36 displays the Trip Reports About Section screen in the Ipad.
Figure 3-36 The Trip Reports About Section

Figure 3-37 shows a Trip Report on the Ipad.