| Oracle® Health Sciences Mobile Clinical Research Associate Server User's Guide Release 2.0 E61213-01 |
|
|
PDF · Mobi · ePub |
| Oracle® Health Sciences Mobile Clinical Research Associate Server User's Guide Release 2.0 E61213-01 |
|
|
PDF · Mobi · ePub |
This chapter describes how to work with trip reports. It contains the following topics:
Mobile CRA will display trip reports that are on the device or in CTMS. If the trip report is not on the device, the system will automatically fetch it.
You can create a trip report visit by entering a site visit date and selecting a site visit template. You can perform the following activities in relation to trip reports:
Access the trip reports already created in CTMS
Create a trip report
Add attendees to the trip report
Complete trip report activities by changing status, adding comments, and filling out custom fields
Depending on your implementation, add trip report activities to check list
Alter user-created trip report activities
Create trip report follow up items
Review previous trips reports
Review final trip report
Submit trip report to work flow for approval
To create a Trip Report on Mobile CRA, you must:
have access to the study and site in question.
create a site visit record when you schedule the site visit.
Every organization has different views of how trip reports should be structured. Mobile CRA supports each of the above modules out of the box. Your organization's configuration may result in different elements.
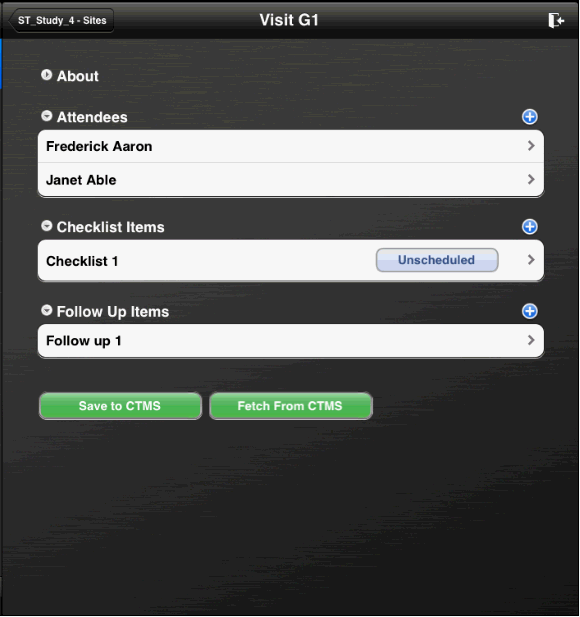
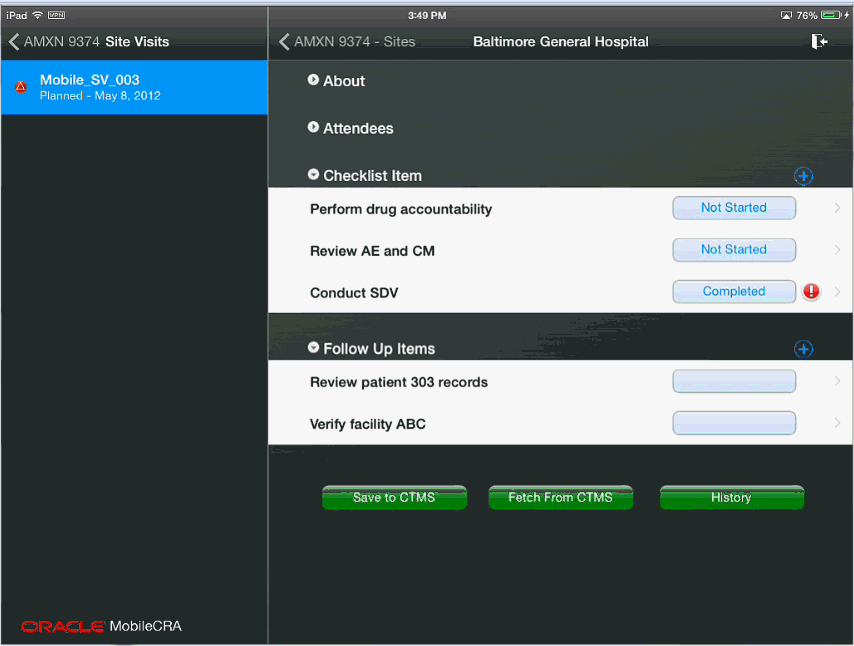
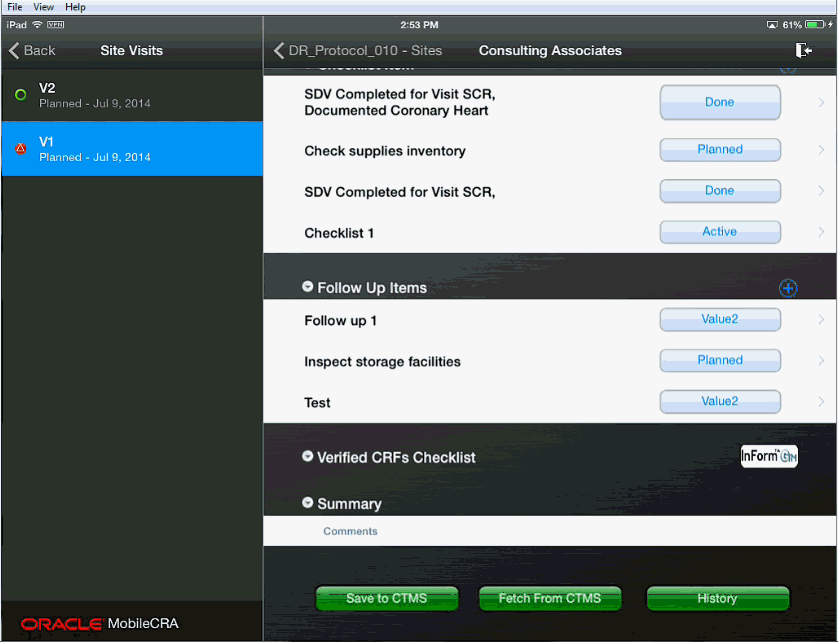
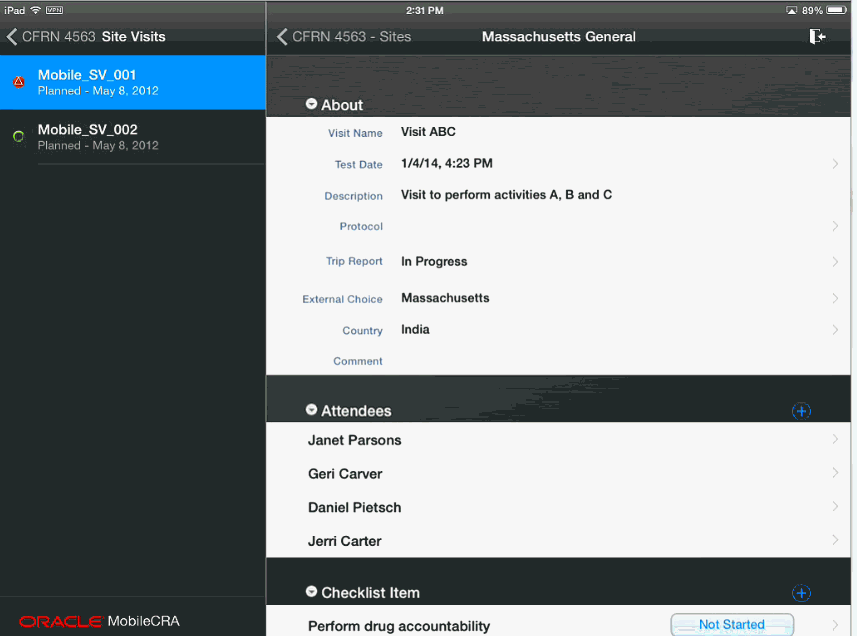
The following is an example of a trip report:
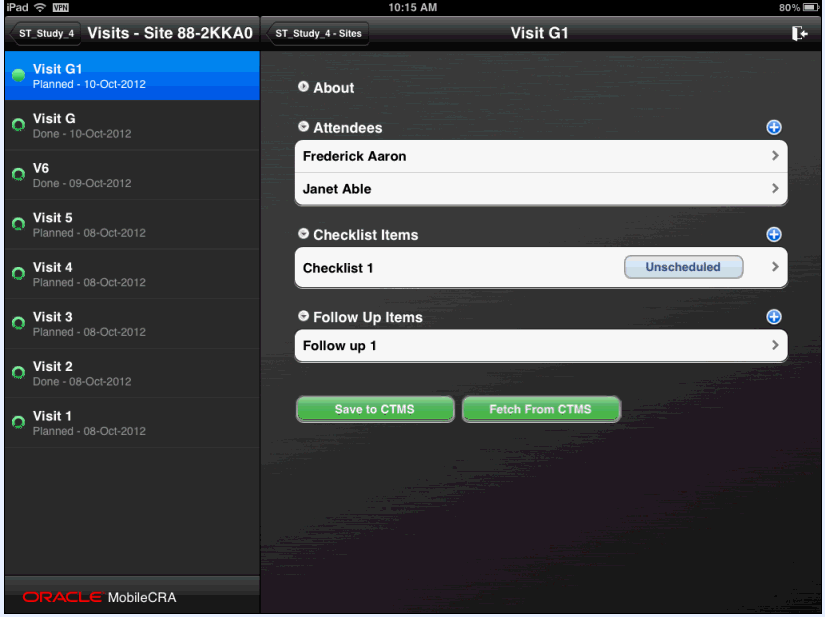
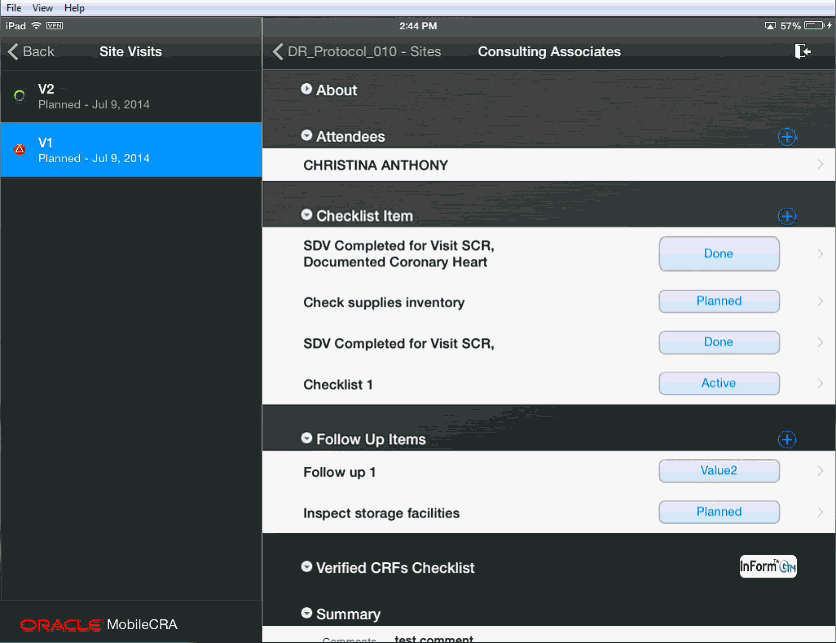
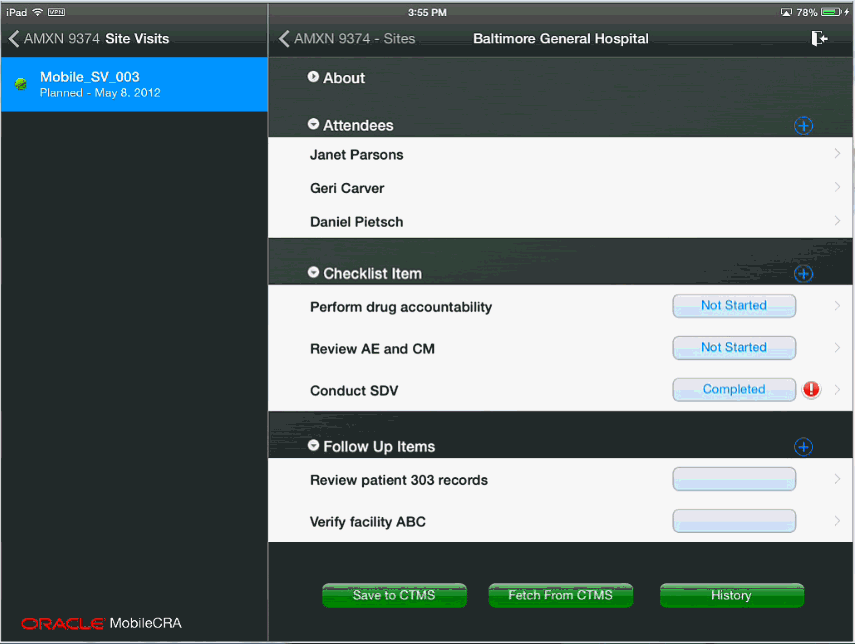
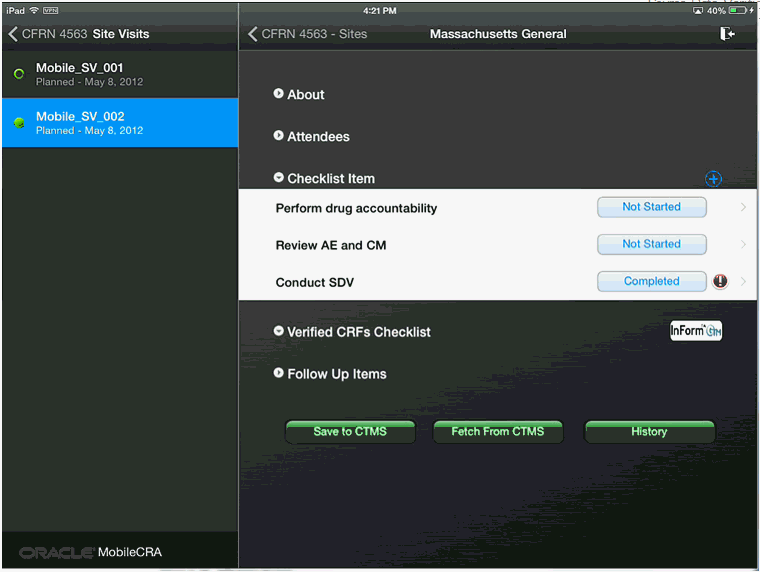
A trip report consists of the following four main areas:
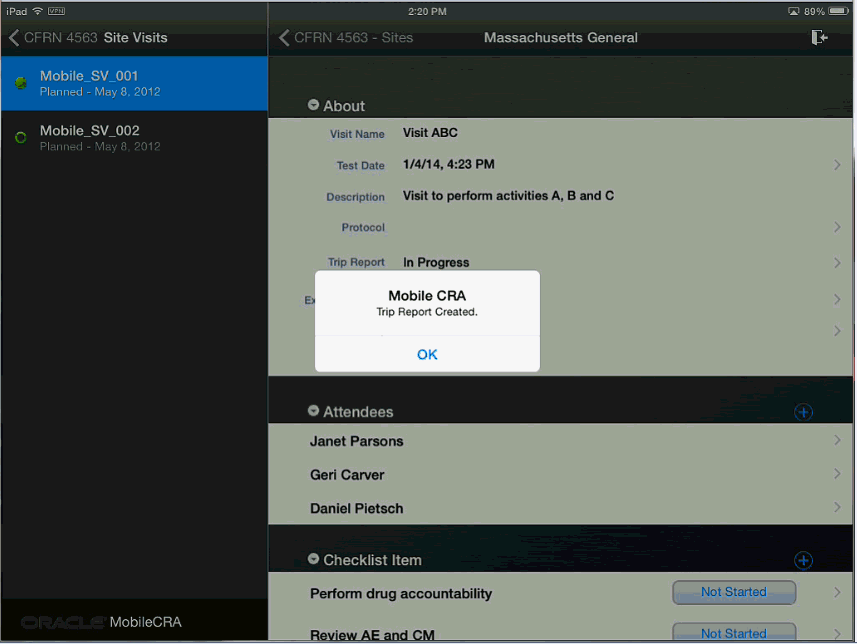
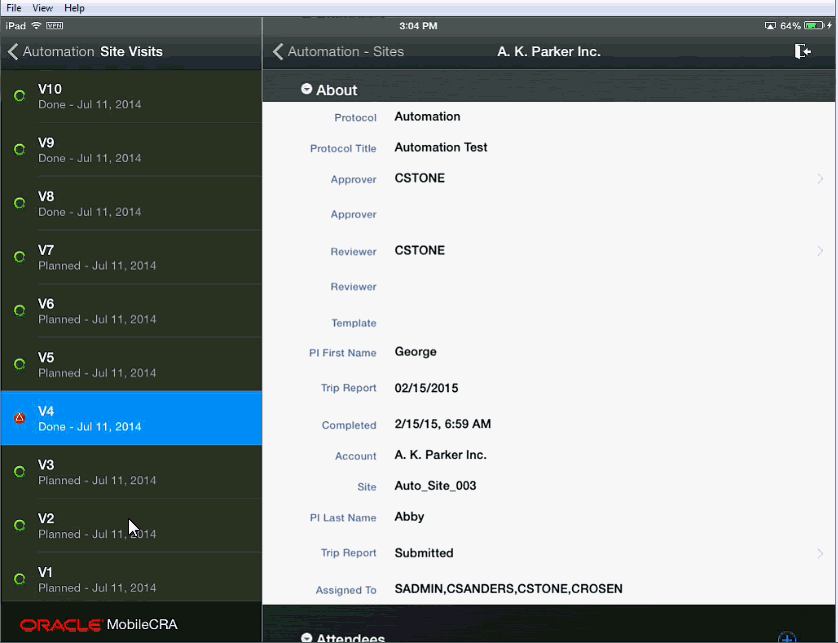
About - This section contains details of the trip report like individuals working on it, the protocol it is related to, different dates associated and so on.
Attendees - This section lists all the people associated with a particular site.
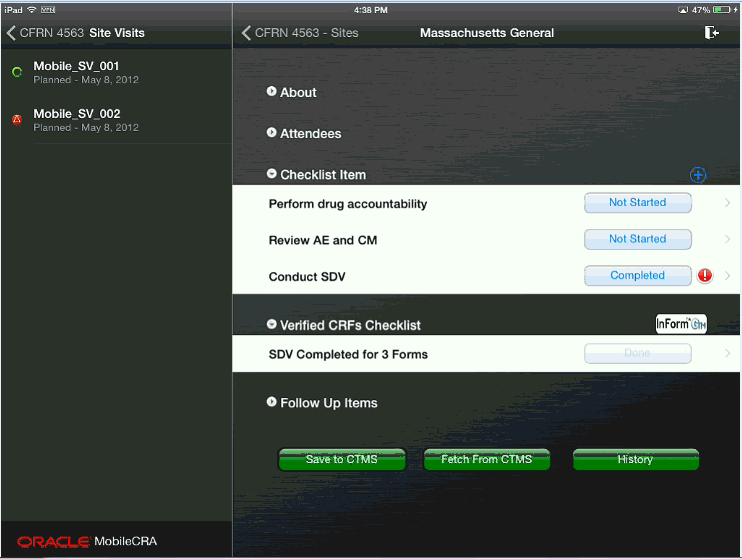
Checklist Items - This section displays the list of tasks to be accomplished for a visit.
Follow Up Items - This section displays the subsequent tasks to be performed before a visit can be completed.
For more information on the various fields in each section, refer to the Oracle Siebel Clinical Trial Management System User's Guide.
There are new icons representing the state of a trip report:
The following image indicates that the trip report is not present on the device.
The following image indicates that the trip report is on the mobile device without changes.

The following image indicates that the trip report is being tested. This icon appears after the trip report is saved, and persists until either the trip report is saved successfully, or the testing is complete.

The following image indicates that errors are present in the trip report.
The following image indicates that the trip report is in testing mode.
If the trip report has not been created for a site visit, the trip report creation screen is displayed. If the trip report is on the device, you can use it immediately, in on-line or disconnected mode.
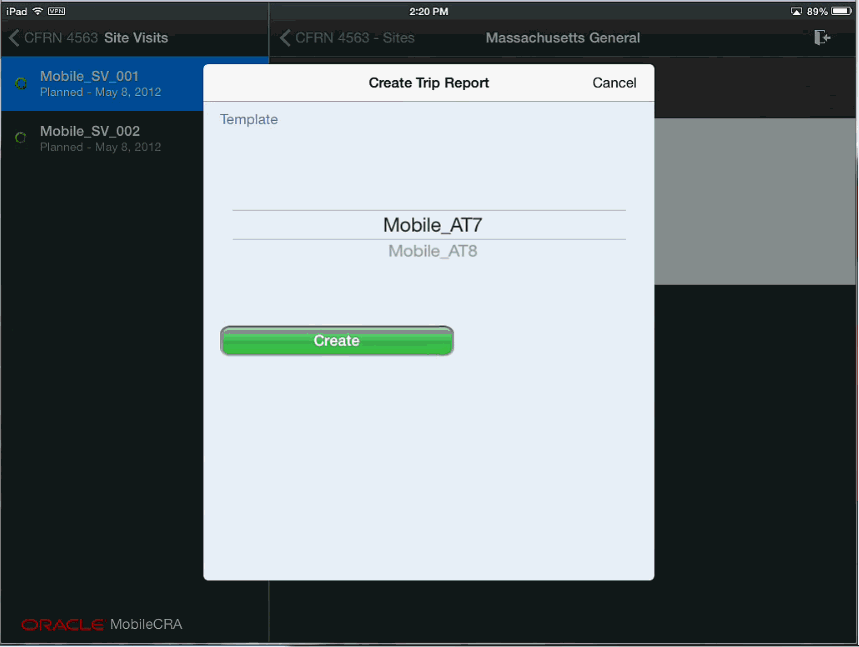
Perform the following steps to create a trip report:
In the My Studies pane, tap a study to view all the sites under it.
Tap a site to view all its details.
Tap Trip Reports. The site visits displayed.
Tap a visit to view its details.
Tap Create Trip Report. A list of trip report templates is displayed.
Select a template and tap Create.
Note:
To exit the trip report creation process, tap Cancel on the top right.A trip report is created and a confirmation screen is displayed.
Click OK to view the trip report.
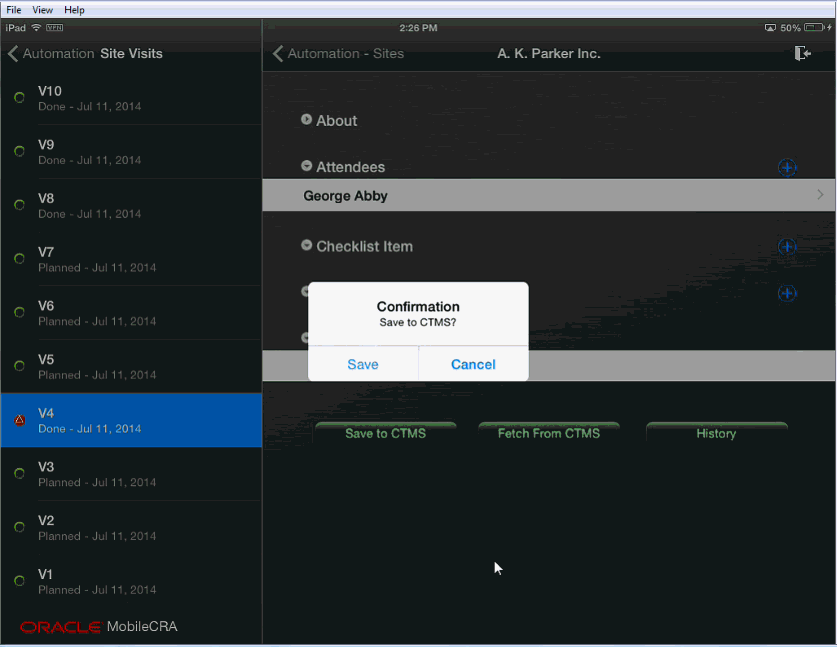
Edit the appropriate trip report fields and tap Save to CTMS.
Tap Save. Your report will be saved to CTMS and the status will change to completed. The following confirmation will be displayed:
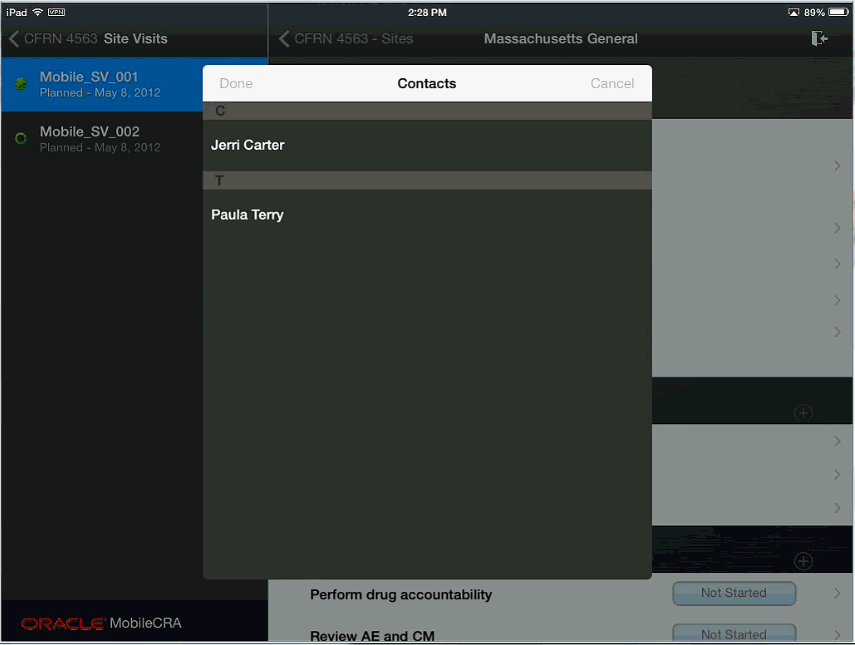
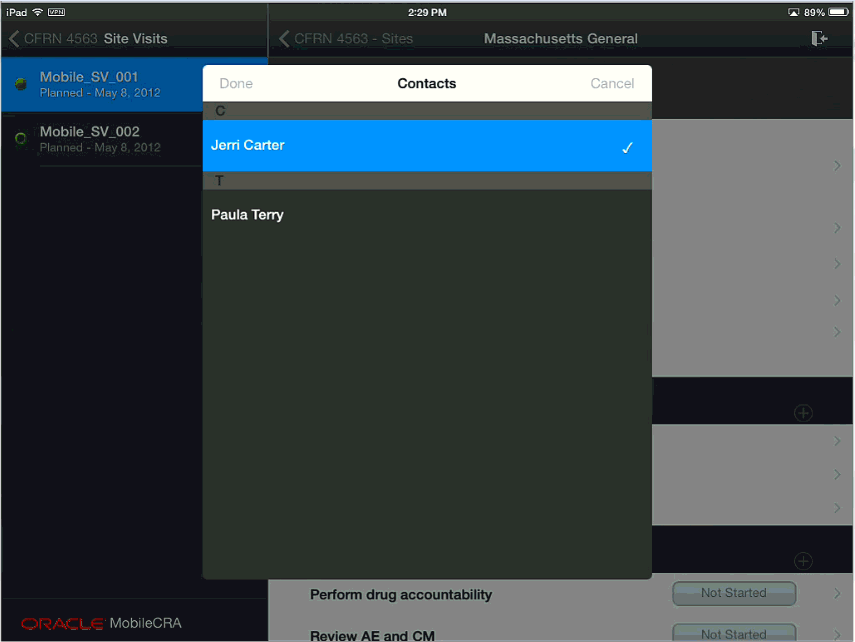
You can add attendees to the trip report by selecting a contact from your Mobile CRA contact list. Perform the following steps to add attendees to your trip report:
In the My Studies pane, select a study and study-site.
Tap Trip Reports.
Select a trip report.
Open the attendee list for that trip report. Tap the following icon to add attendees.
Your Mobile CRA contacts associated with the study-site will be displayed.
Tap the contact you want to add to the attendee list.
Note:
You can add multiple contacts by selecting them at once.Tap Done on the top left. The contact will be added.
Figure 4-11 Attendee Added to Trip Report
Perform the following steps to add an item to the trip report check list:
In the My Studies pane, select a study and study-site.
Tap Trip Reports.
Select a trip report.
Tap the icon below to add a checklist item.
Edit the required fields.
Navigate back to the trip report. The checklist item will be added.
Perform the following steps to add an item to the trip report check list:
Note:
You cannot modify an item that originated in CTMS. Doing so will display an error message.In the My Studies pane, select a study and study-site.
Tap Trip Reports.
Select a trip report.
Tap the checklist item you want to modify.
You can modify the type, display location, comments and status. You can also add an assignee. Make the modifications you require.
Note:
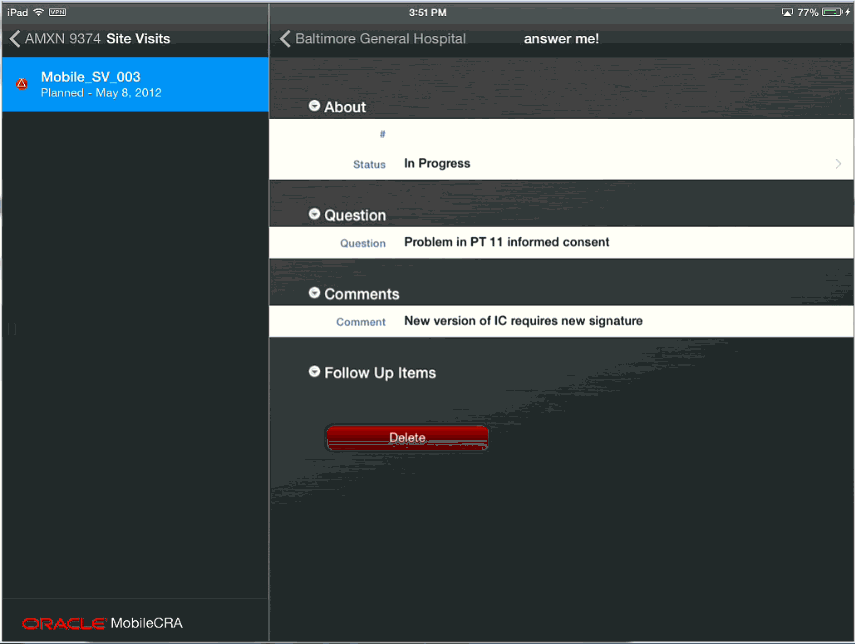
You can also change the Status of the checklist item at the top level.You can edit a follow up item for completeness until it is submitted. You can add a due date to the item and add it to the Task Calendar on the iPad. Perform the following steps to add an item to the trip report check list:
In the My Studies pane, select a study and study-site.
Tap Trip Reports.
Select a trip report.
Tap the icon below to add a follow up item.
Navigate back to the trip report, the follow up item will be added to it.
Perform the following steps to add an item to the trip report check list:
In the My Studies pane, select a study and study-site.
Tap Trip Reports.
Select a trip report.
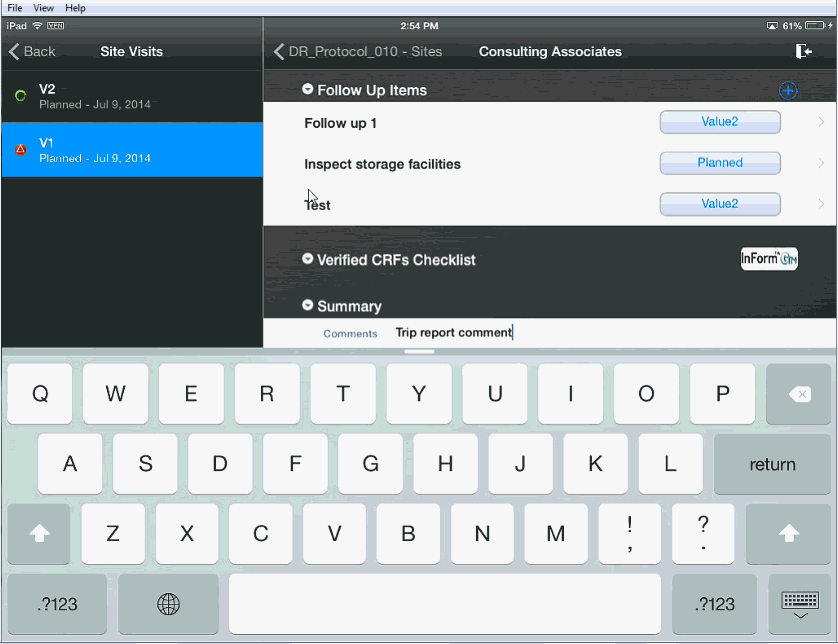
Tap the field below Summary to add comments.
Type your comments. They will be added to the trip report. To save your changes to CTMS, refer to Saving Trip Report Data to Oracle Siebel Clinical Trial Management System.
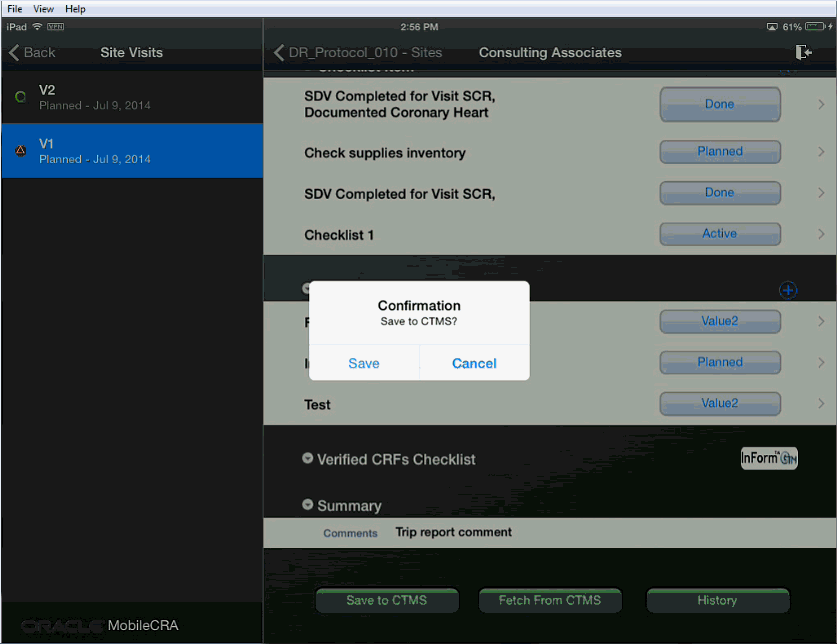
Perform the following steps to add an item to the trip report check list:
Tap a study to view all the sites under it.
Tap a site to view all its details.
Tap Trip Reports. A list of visits is displayed.
Select a trip report for which you want to save data. Visits containing unsaved data are displayed with a red M icon next to them.
Tap Save to CTMS.
Tap Save. Your changes will be saved to CTMS and the red M icon is cleared from the visit list.
Fetching Data from Siebel Clinical Trial Management System
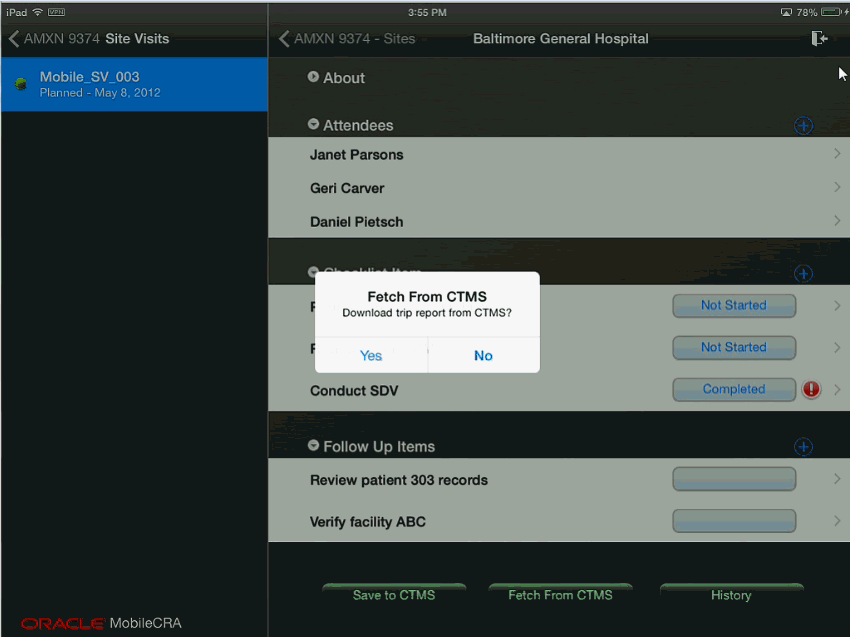
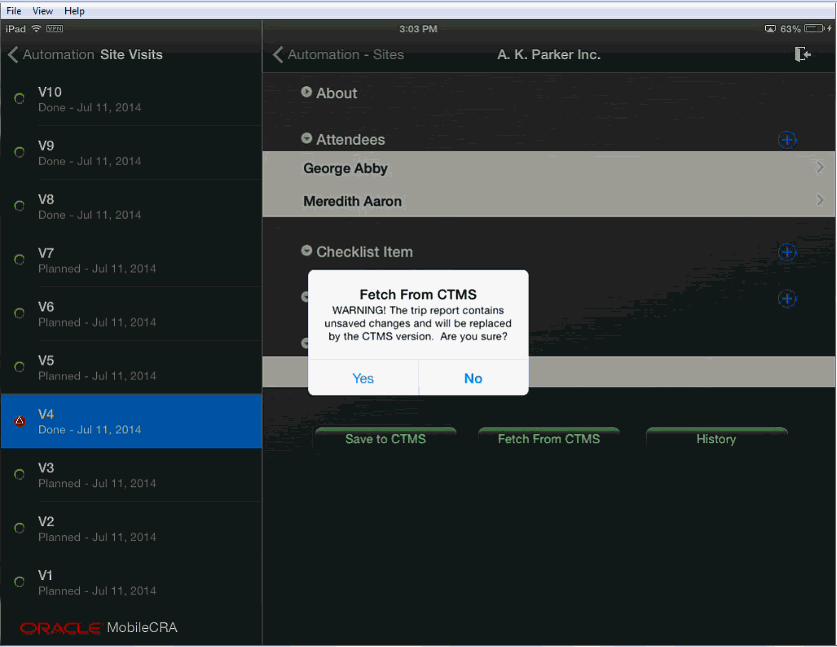
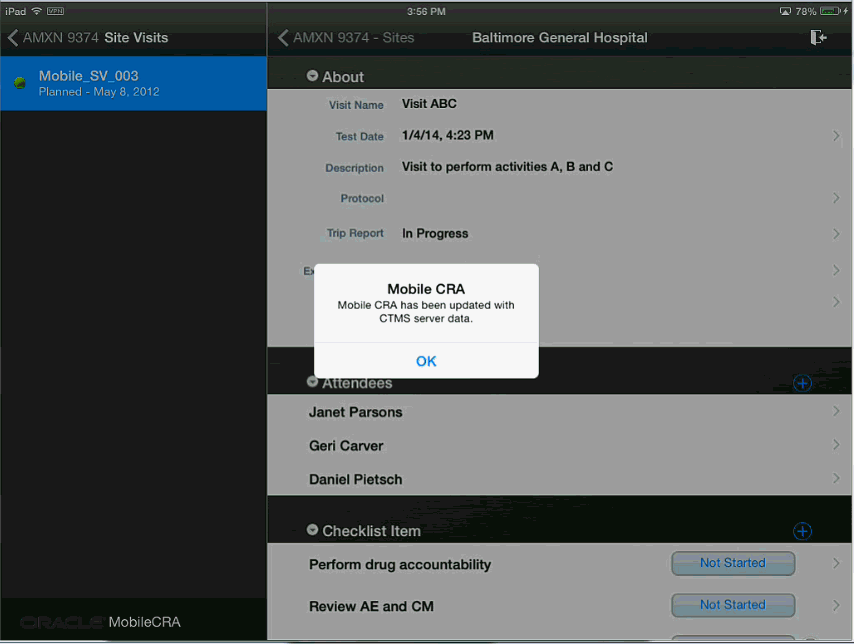
You can reset your trip report data by downloading data available on CTMS. Perform the follow steps to reset your trip report data.
Tap a study to view all the sites under it.
Tap a site to view all its details.
Tap Trip Reports. A list of visits is displayed.
Select the trip report for which you want to reset data.
Tap Fetch from CTMS.
Tap Yes.
Figure 4-29 Trip Report Data Fetched from CTMS
If your trip report has unsaved changes and you try to fetch data from CTMS, the following warning will be displayed. Tap Yes to fetch data and No to exit.
The work flow process in CTMS can be configured in Mobile CRA. For more information on your status flows, consult with your configuration teams. CTMS lets you select the reviewer and approvers for the Trip Report. Currently, this activity must be done in CTMS, and the result fetched to Mobile CRA, in order to submit from Mobile CRA to the work flow.
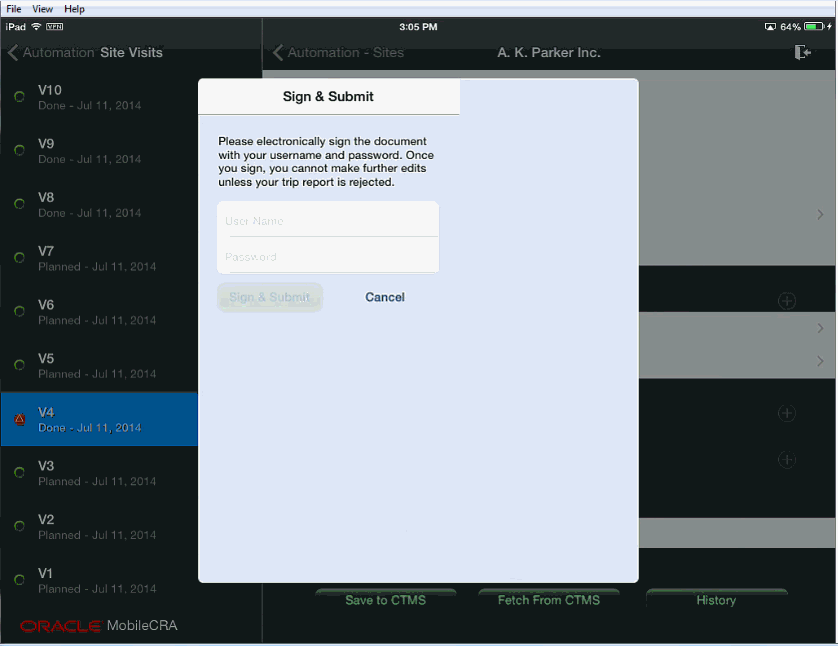
Perform the following steps to submit your trip report:
Note:
If multiple reports are submitted for the same visit, CTMS will only display the latest report.In the My Studies pane, tap a study to view all the sites under it.
Tap a site to view all its details.
Tap Trip Reports. The site visits displayed.
Select the visit whose report you want to submit. The trip report saved on CTMS is displayed.
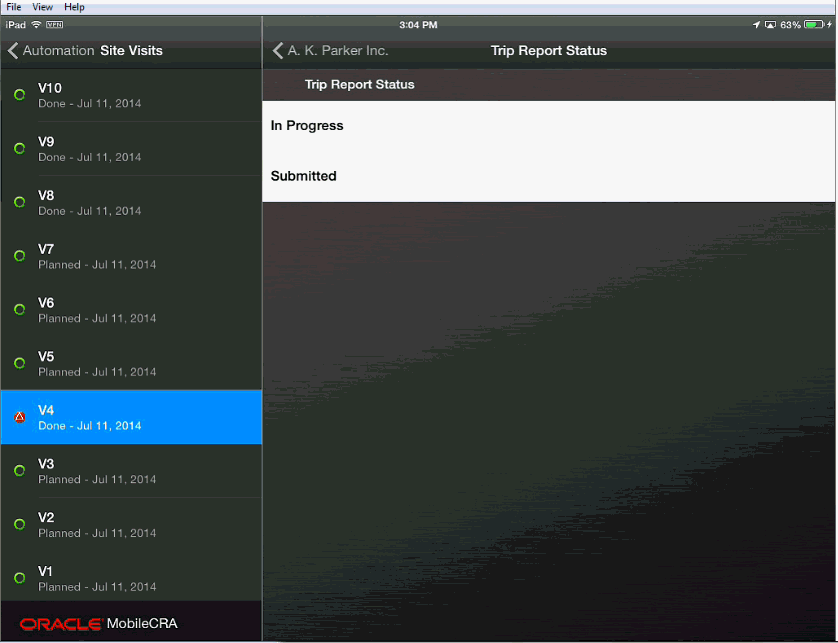
In the About section, tap Trip Report Status. The following options are displayed:
Tap Submitted. The trip report status will be changed to submitted.
Tap Save to CTMS. The Sign and Submit screen is displayed.
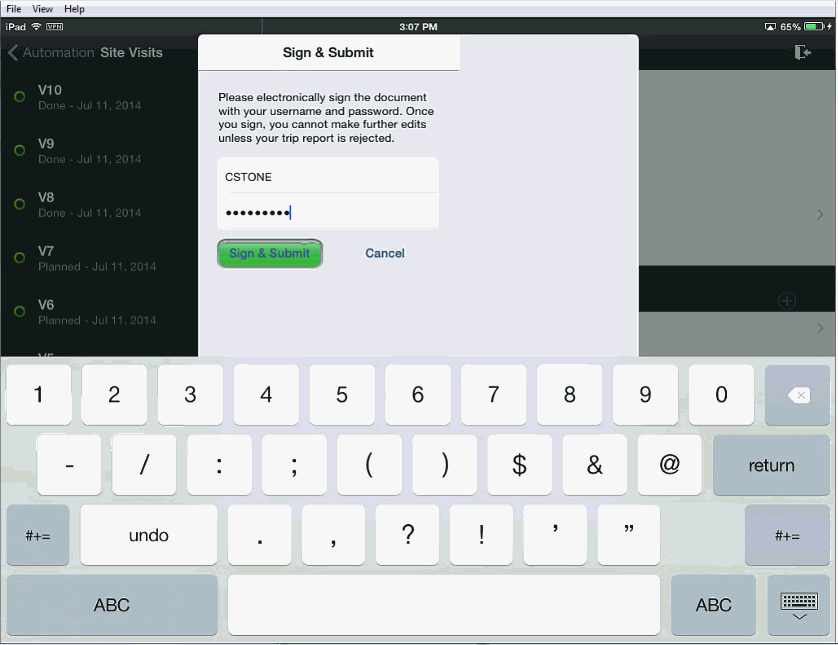
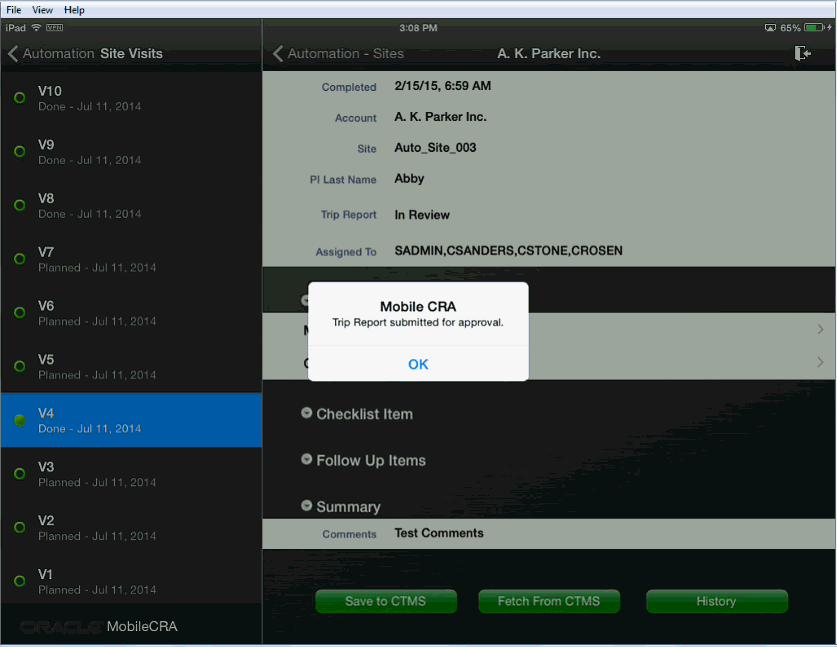
Enter your user name and password and tap Sign & Submit.
Your trip report will be submitted for approval and you will receive a confirmation.
Perform the following steps to view an approved trip report:
Tap a study to view all the sites under it.
Tap a site to view all its details.
Tap Trip Reports. A list of visits is displayed.
Select an approved trip report.
You can review all findings in the trip report. However, you may not modify it.
Mobile CRA permits the CRA conducting a site visit to access InForm data that is ready for, and selected for verification.
Pages marked Ready for SDV are displayed in the Mobile CRA SDV interface, and the CRA can then perform the following three tasks:
Mark Data as verified, or unverify data marked as verified
If you mark all the data as verified, the form is counted as fully verified. If you leave one or more item unverified, the form is considered partially verified.
Close Queries
Open Queries
On exiting Mobile CRA Source Data Verification (SDV), the SDV activity conducted during the session is automatically ecorded in the trip report. See Section X for information about the options for saving SDV activity to the trip report.
The user must have an active link to the internet. Unlike most Mobile CRA functions, SDV does not work in offline mode.
The clinical data management for the Study must be performed in Oracle InForm.
The CRA must have an user ID for the InForm Study.
The study must be identified in the Mobile CRA Administrative User Interface. Various setup tasks must be performed. For details on the setup tasks, see the Oracle Health Sciences Mobile Clinical Research Associate Server Administration Guide. This setup work must be performed from a web interface.
Once the study is properly set up, the Verified CRFs section appears in the Trip Report. At the upper right corner of the section, an InForm Icon is displayed.
Tap the InForm Icon.
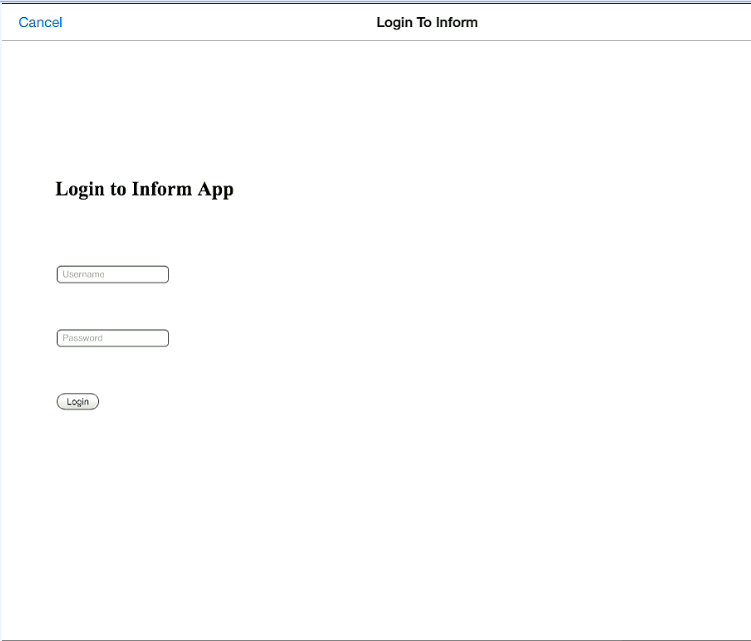
The system displays a sign on screen. Enter your InForm credentials to gain access to the InForm SDV workspace. The login credentials are stored for this study until the application is closed (you will not have to log into InForm again due to a Mobile CRA time out). This login persists until you close Mobile CRA, log out of Mobile CRA, or switch to a different study (requiring a different log in credential).
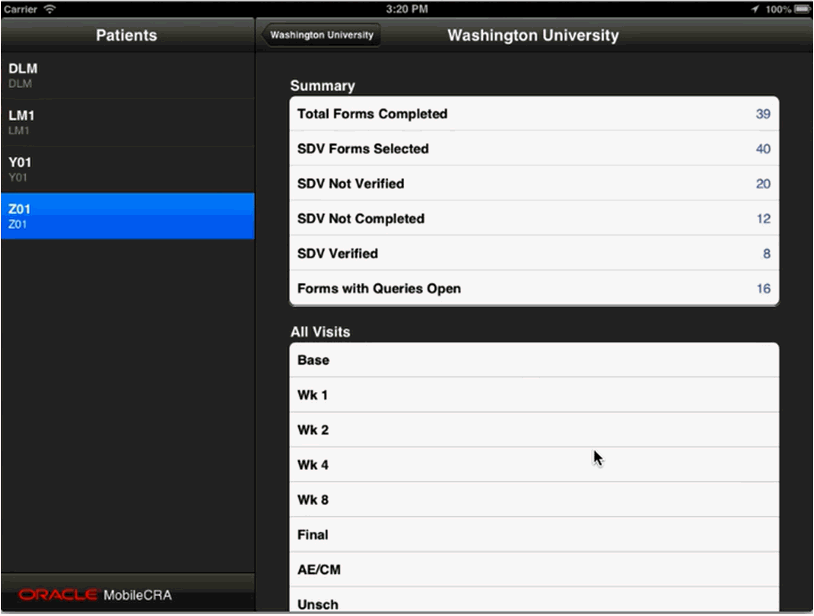
After providing your InForm login, the following screen is displayed. On the left side of the screen, you can select a patient within the site. The upper half of the screen displays a summary of SDV work remaining, while the bottom half displays the visits associated with the selected patient.
When conducting SDV in InForm, you have the option to move from Study to Study, and site to site, reviewing data and updating records. However, when conducting SDV from within Mobile CRA, the Mobile app restricts access to the data associated with the current Trip Report or Site Visit. This is done to ensure that the SDV work is completed at the current site.
The SDV Entry Screen has three displays, the Summary Screen, the Patient Listing, and the Visits Listing.
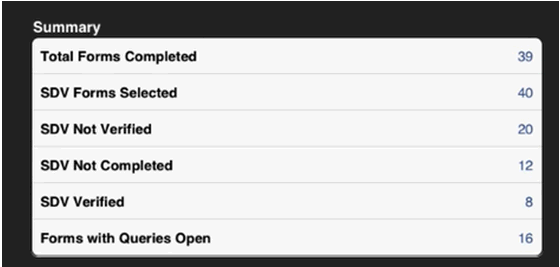
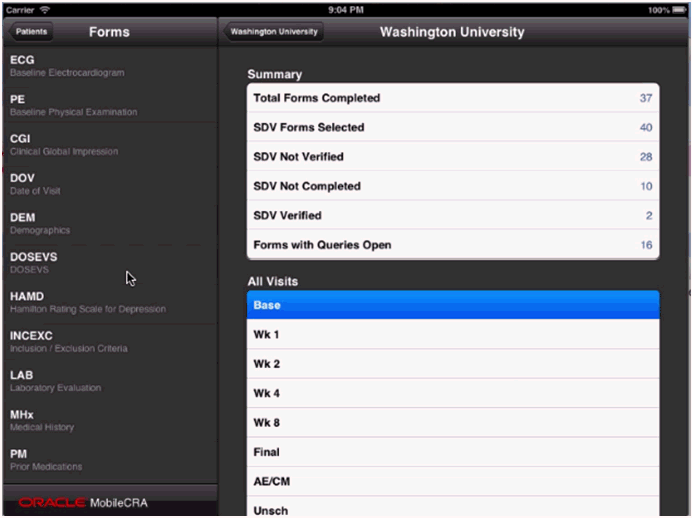
The Summary Screen (Figure 4-39) displays the summary statistics for CRF progress at the Site. This screen is display only, and should reflect the status of forms in InForm at the beginning of the session. (A session begins when the InForm Icon is selected in the app).
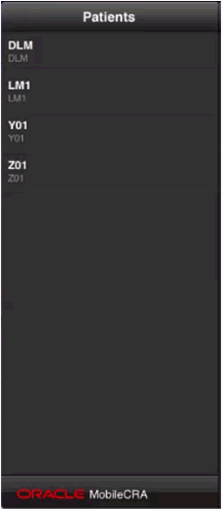
The Patient List (Figure 4-40) displays the patients with data available for SDV.
The Visit List (Figure 4-41) displays the visits for each patient, after the patient has been selected. Scroll down to see the entire list of visits.
From this entry Screen, first select the desired patient. The visit list then updates to display the visits for that patient. Then select the visit, and the Forms display replaces the patient display (Figure 4-42).
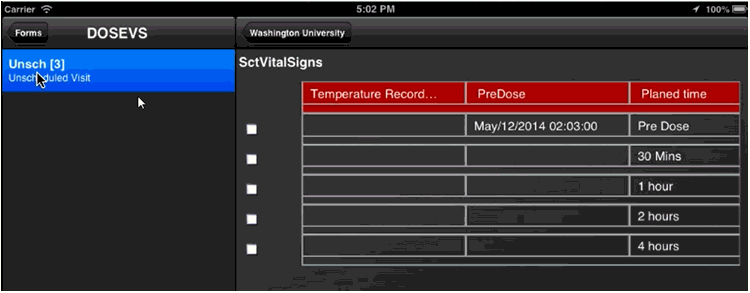
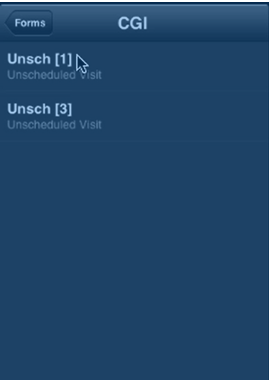
Once the Forms list appears, you can then select a form for SDV. In some cases, selecting a form results in a secondary form menu (in cases where the first form is a repeating, or unscheduled form.)
Figure 4-43 Secondary Form Menu (Unscheduled)
Once you select the form, the system freezes the form in InForm, and pulls the form data to the mobile application. The data is displayed in one of three ways - Linear, Tabular or Combined (the app selects the appropriate display type).
Once a form has been selected, and data has been delivered to the device, you can:
review the data
open, review and close queries
mark data as verified
There are three type of data displays namely:
Linear Display
Tabular Display
Combined Display
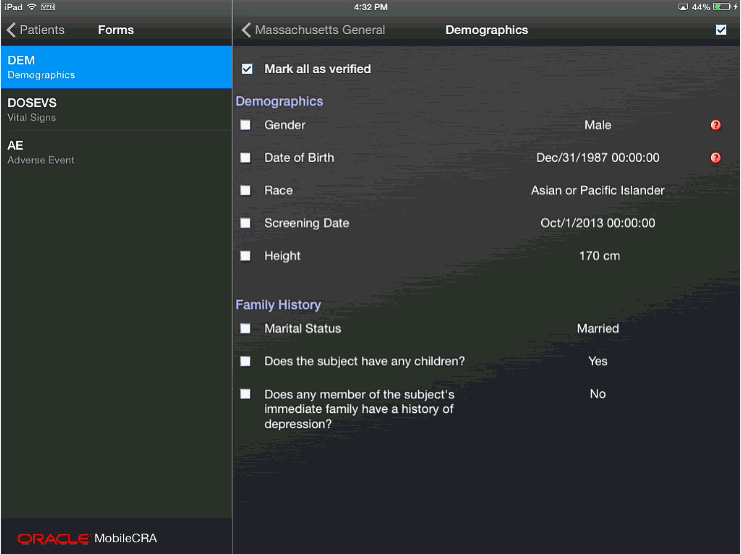
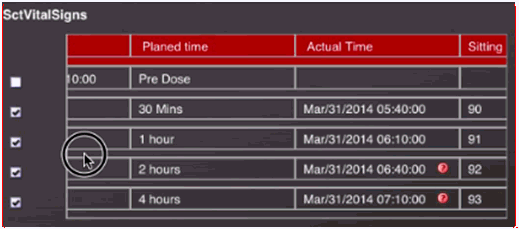
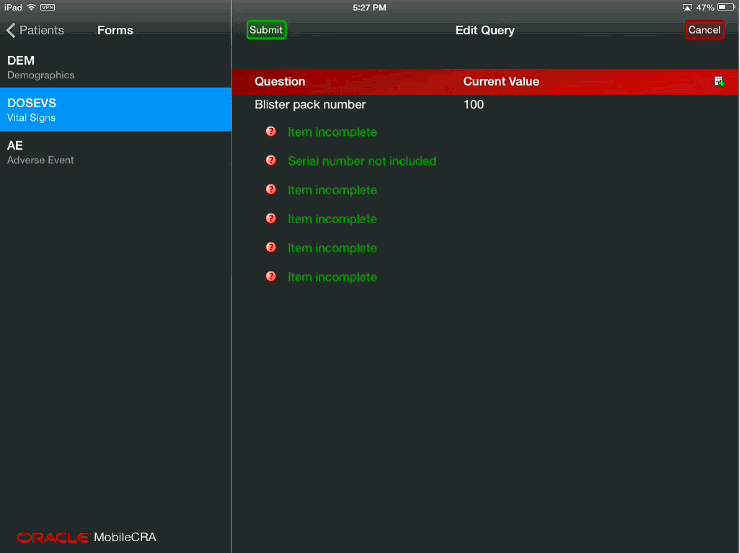
The linear display displays data in a simple columnar format, with the Question and response in the center of the screen. If a query is present against the response, a presence indicator (red circle with question mark inside) appears to the right of the response. To verify the data, tap the check box. To verify all items on the page, tap the Mark all as verified box. This action checks or unchecks all boxes at once.
The tabular display shows records of data, which can be verified on a record-by-record basis. You can scroll left and right by swiping the display.
Queries against data in the tabular display are indicated by the red circular icon with a question mark inside.
The combined display shows both tabular and linear data displays. The tabular section is scrollable. The Verify All button only works for each block. You can move from form to form in this display. Each time a new form is accessed, the data from the form is saved, and the form is unfrozen.
To access other visits, click Patient at the top of the Forms menu and return to the Entry Screen. Then select the desired visit.
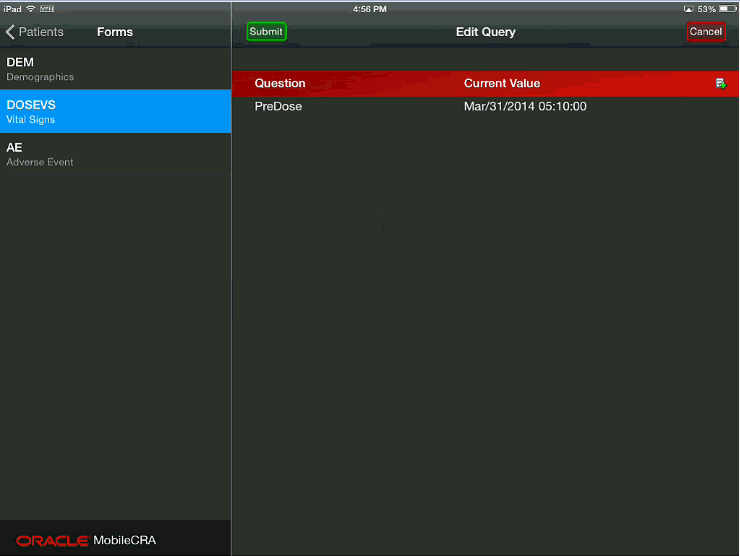
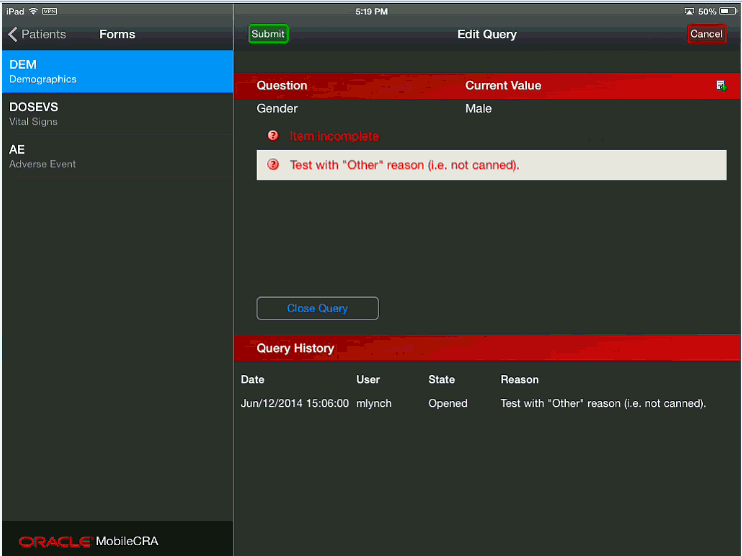
You can create, update and close an InForm query. Queries are indicated by a red icon with a question mark inside. In a linear display, this icon appears to the right side of the display, while in a tabular display, the icon appears in the cell of the value.
You can open the Query display by double tapping. For a linear display, double tap the right hand side of the record. In the tabular display, double tap the data cell where you wish to raise a query, or examine a present query.
When you double tap the data where you wish to raise the query, the Edit Query screen is displayed.
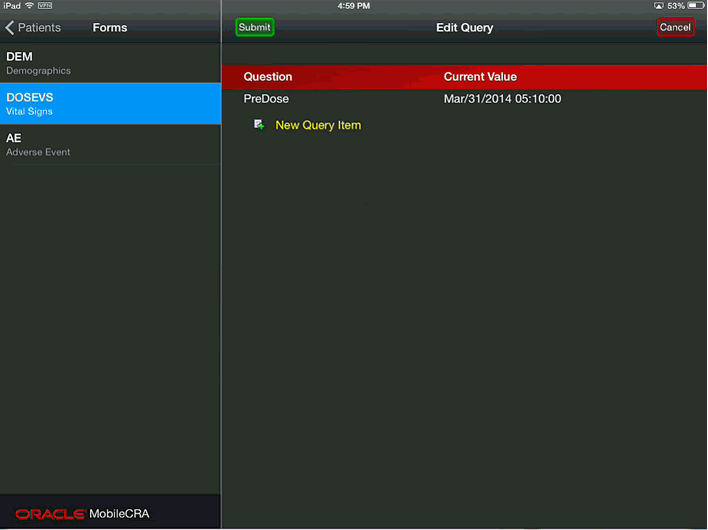
Confirm that the data you wish to raise the query against is displayed. Then tap the Create icon on the right side of the title bar. The new query is displayed as follows:
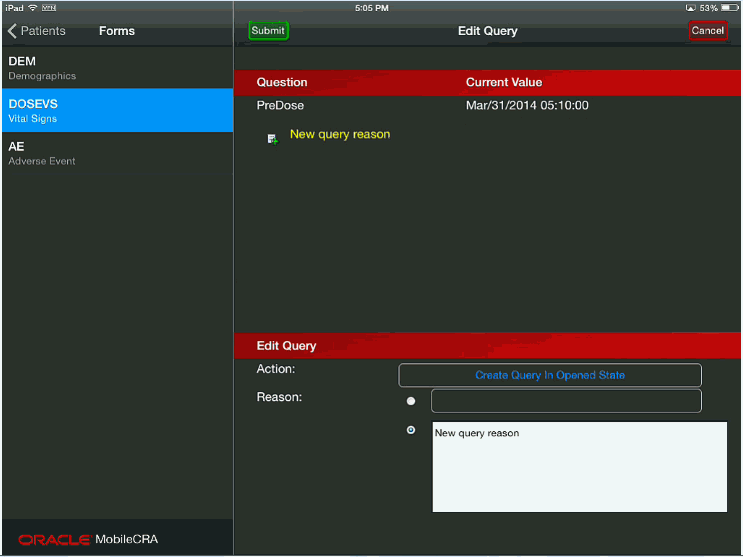
Highlighting the query lets you edit it. You have two options now, either select the available predefined query reasons, or enter a custom value.
Note:
Until you exit this screen, you cannot create another query. You can modify other queries that maybe present.Other Options include altering the action or selecting a default reason.
Using the same interface, you can open an existing query and close it.
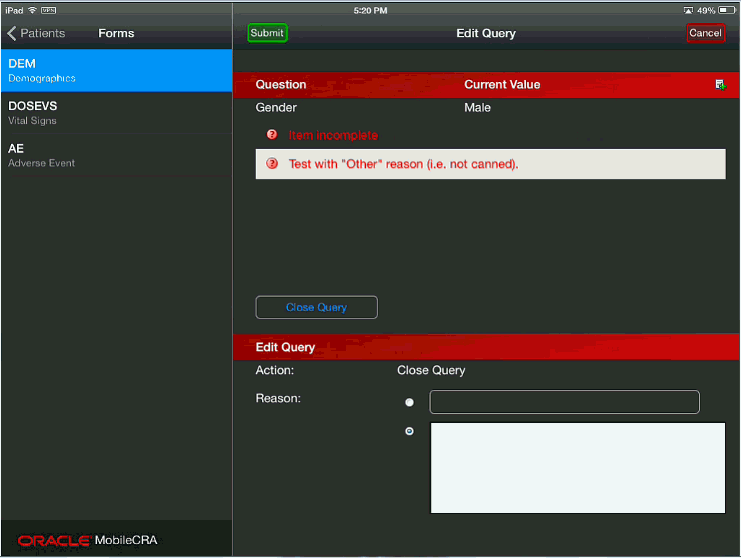
Selecting the query, and tapping Close Query opens the Close Query dialog. You can select a Default Reason, or enter a custom reason in the fields provided.
Exit the query dialog by tapping Submit or Cancel.
Selecting Submit saves the query, and cannot be cancelled.
Selecting Cancel cancels all activity within the query dialog box.
Either action lets you reenter the query dialog to create a second query as desired. However, any changes to queries are not submitted to InForm until you move to a new form or exit.
More than one query may be present against a data item.
To exit SDV, click Site at the top of the data verification screen. The system saves any verification results, unfreezes the currently frozen form and exits to the Trip Report display. The SDV activity will be recorded in the trip report activity list, according to the configuration of the trip report and Mobile CRA app.
When using the default CTMS trip report, the SDV records are created as entries in the trip report checklist area.
The Mobile CRA administrator has five different options for how SDV activity is recorded in the trip report. This selection should be made based on your business processes.
The selection of the SDV recording options is made on a study by study basis, as there may be different business rules for different study types (for example, Phase One studies may have more comprehensive SDV requirements than Phase Three studies).
Figure 4-53 Exiting Source Data Verification
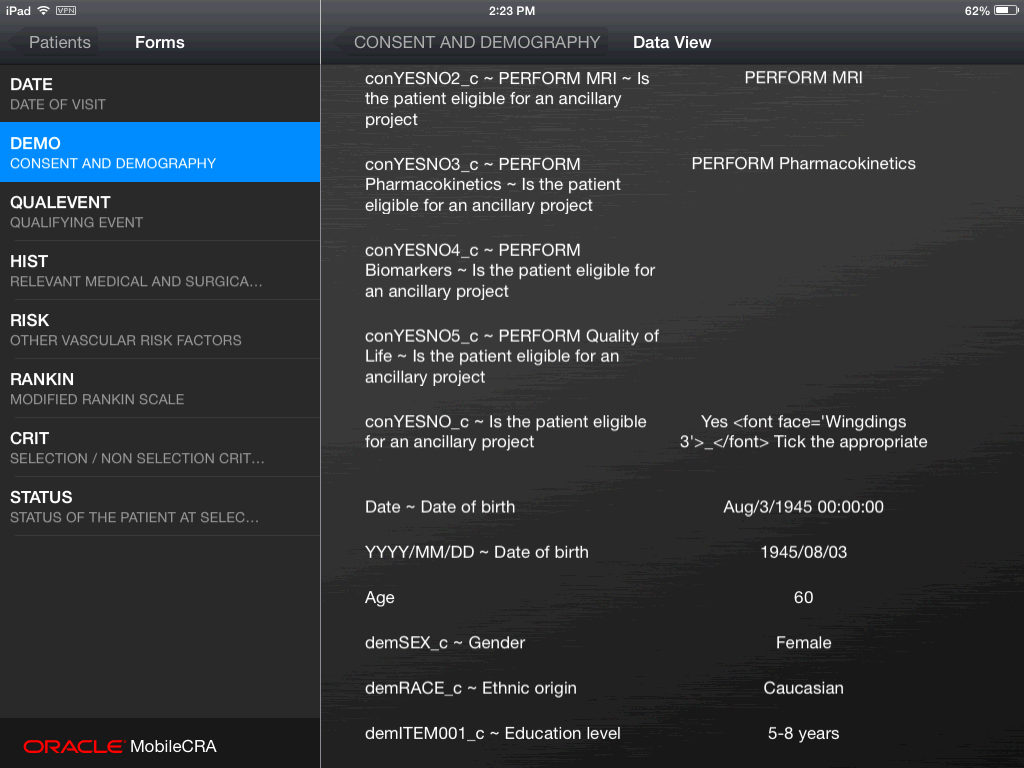
To view additional details of a CRF, click Data View.
The following screen displays the details of the CRF.
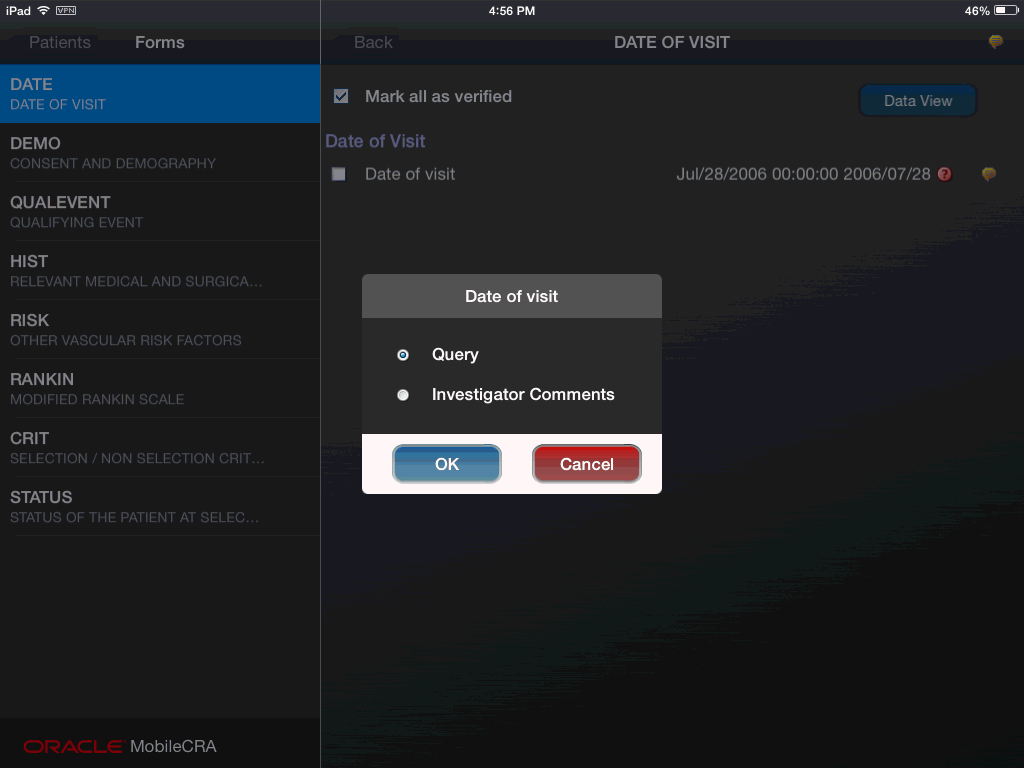
You can view the investigator comments on the Form or Item level. To view investigator comments, double tap the comment icon (yellow icon) on the form or item.
Figure 4-56 Viewing Investigator Comments
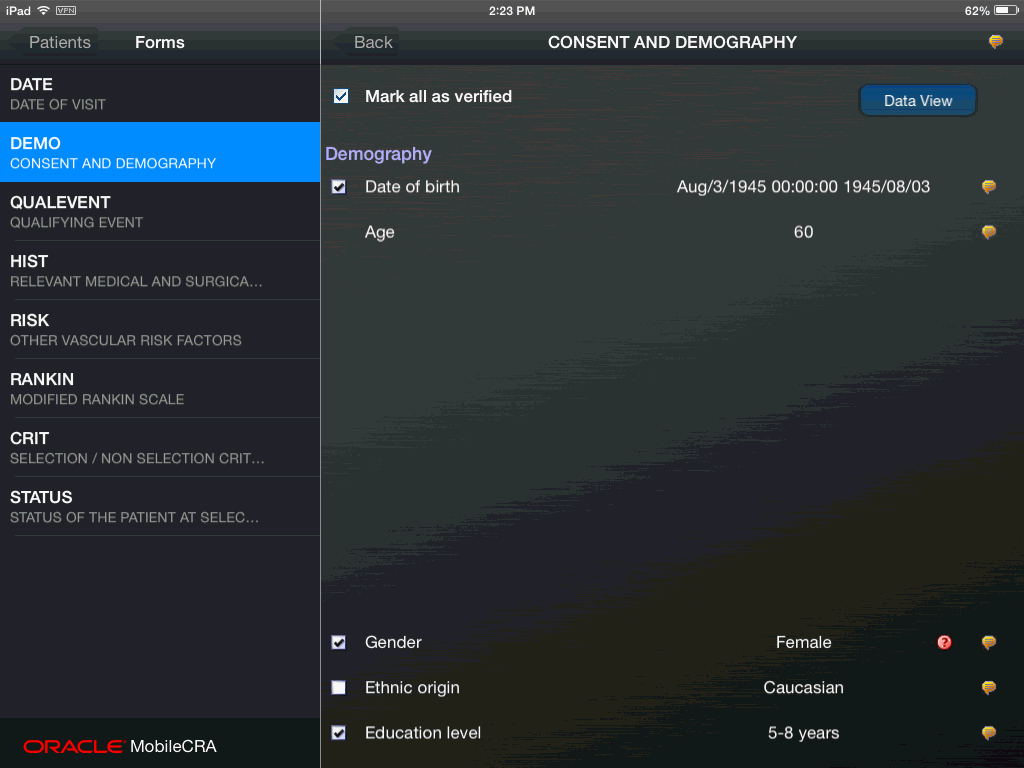
A dialog box is displayed. Click the Investigator Comments option to view the comments.
Figure 4-57 Selecting Investigator Comments Option
In the Forms page, you can also view the comment history.
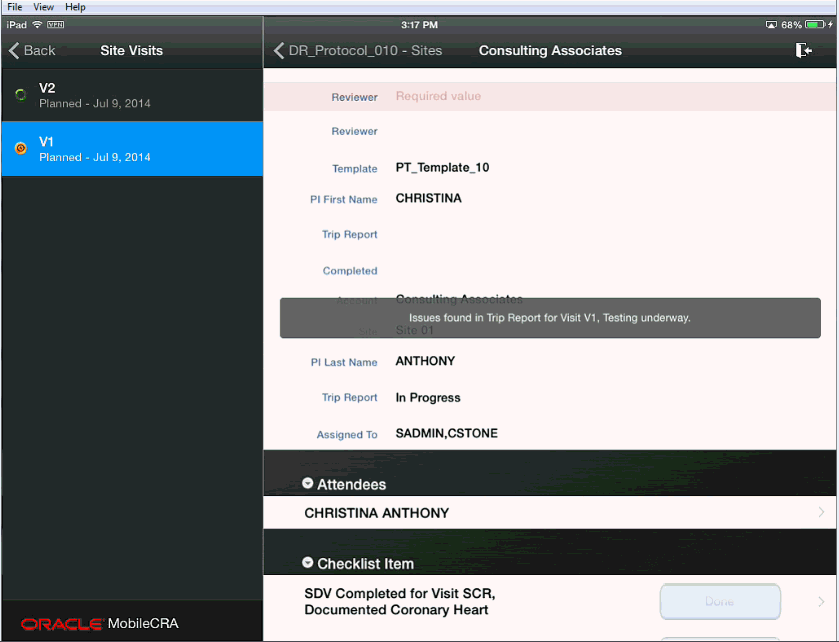
In CTMS, as you fill out your trip report, any validations assigned to a field are evaluated when you exit the field. Mobile CRA is designed to work independently from CTMS, and to work offline. This means that the validations placed again a field in CTMS are evaluated when the trip report is saved back to CTMS from Mobile CRA. During this process Mobile CRA displays the following testing icon:
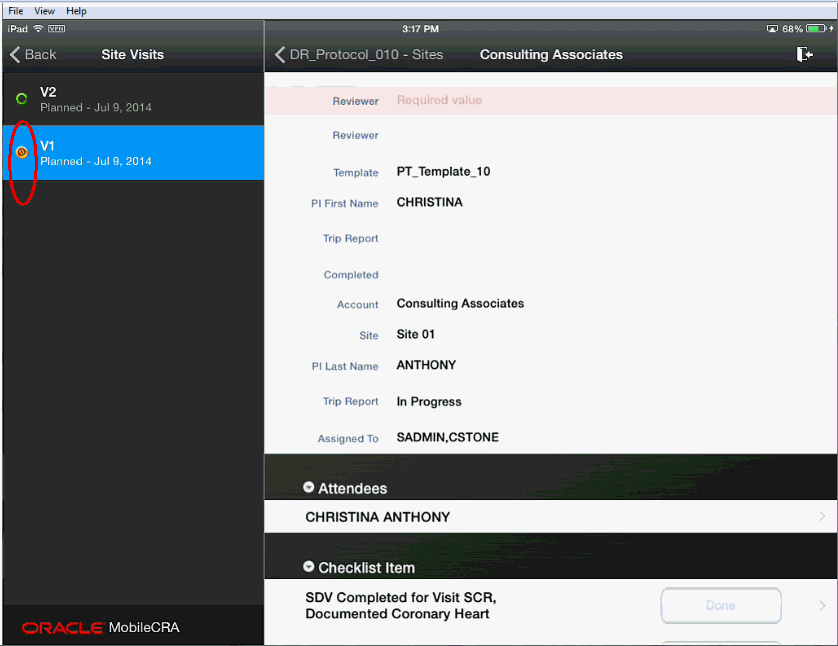
When you save a trip report, the following events occur:
The Mobile application sends the new information to Mobile CRA.
Mobile CRA then forwards the information to CTMS (after the server performs a conversion to a format CTMS can absorb).
If the data is saved successfully, CTMS sends that result to the Mobile CRA server, which forwards that success to the application.
If the Trip Report submission to CTMS fails, Mobile CRA tests each change you made to the trip report individually.
As each individual change is tested, valid (no error) responses are saved to CTMS.
If an individual change fails, the error message is captured. During this process, the system notifies you with the following message:
When all individual changes have been tested the system will have saved all valid responses, and returns all fields with error messages back to the application.
Important:
While the trip report is being tested, you cannot modify or receive it. This restriction is removed once the testing is complete. The following message is sent to your device when the trip report testing is complete.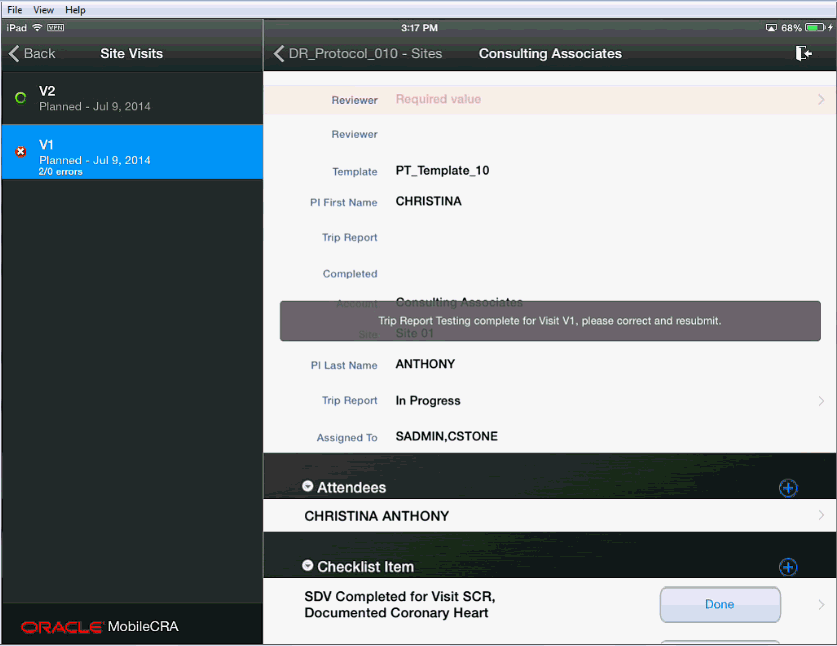
When the trip report testing is complete, the Mobile CRA server sends all errors detected with the CTMS generated error texts.
These reports are indicated by placing an exclamatory mark (!) to the left of the item or items.
Note:
Error Icons displayed on the left or right hand side have different implications.Error icons displayed on the left side represent CTMS errors. These errors must be corrected before the save can be completed.
Error icons on the right side are performed within Mobile CRA, and if uncorrected, do not block a save to CTMS.
In cases where an error has been created in a disclosure screen (that is, you must access a subordinate to see the item in question), you should move to the disclosure screen. The disclosure screen is indicated by the X icon to the left of the item as show in the following screen.
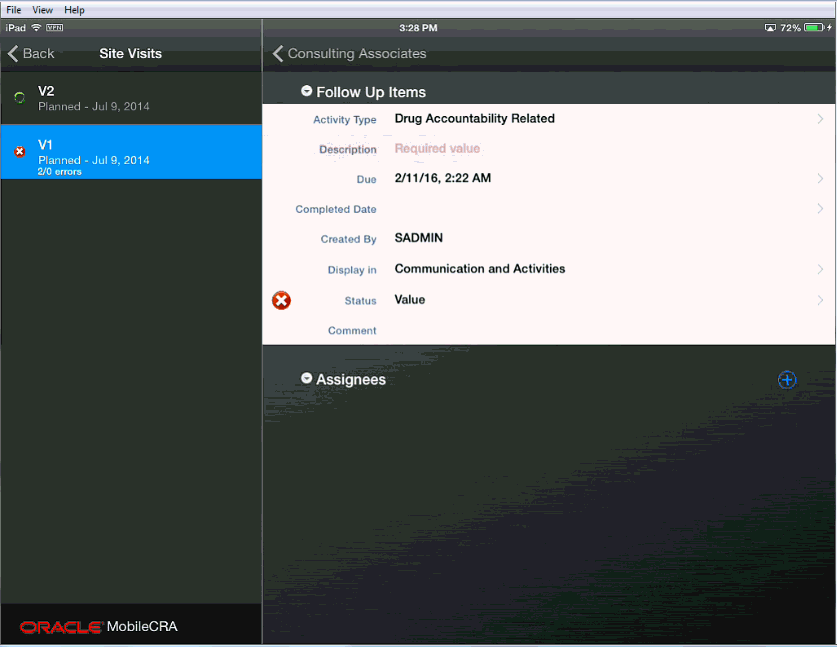
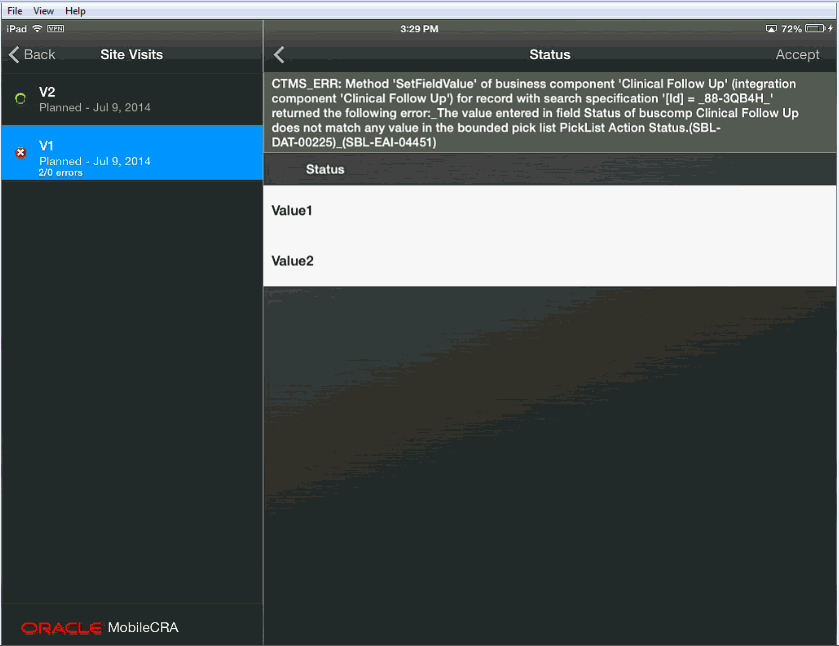
To fix an error, tap the error icon, and a screen appears that displays the error text and the item. You can change or accept the item in question. There may be items where an error is generated because of an error in a different field. In this case, you can accept the value or ignore it.)
When you fix a value in a subordinate item, the system checks if all subordinate items have been fixed or accepted. If yes, then the system indicates that all issues have been addressed by changing the error icon to a check mark.
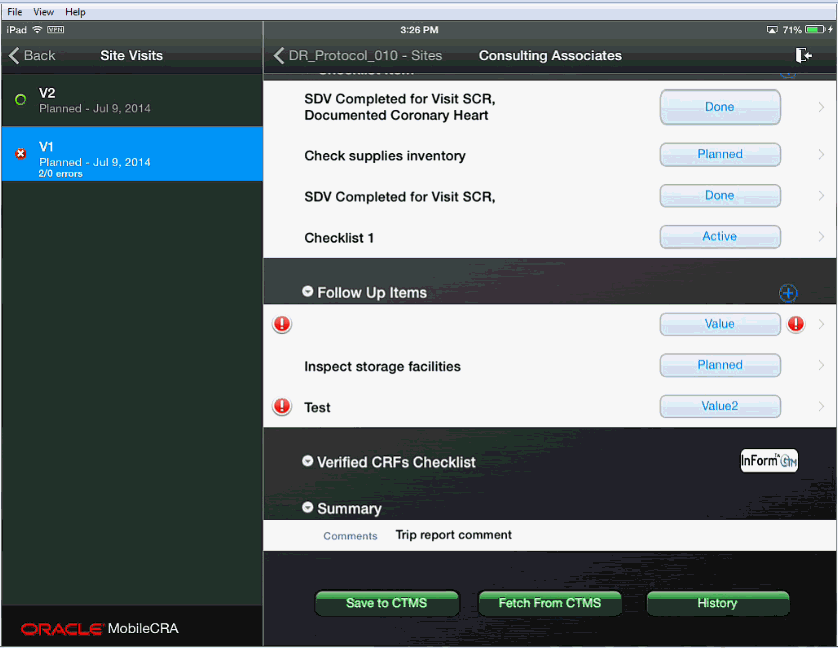
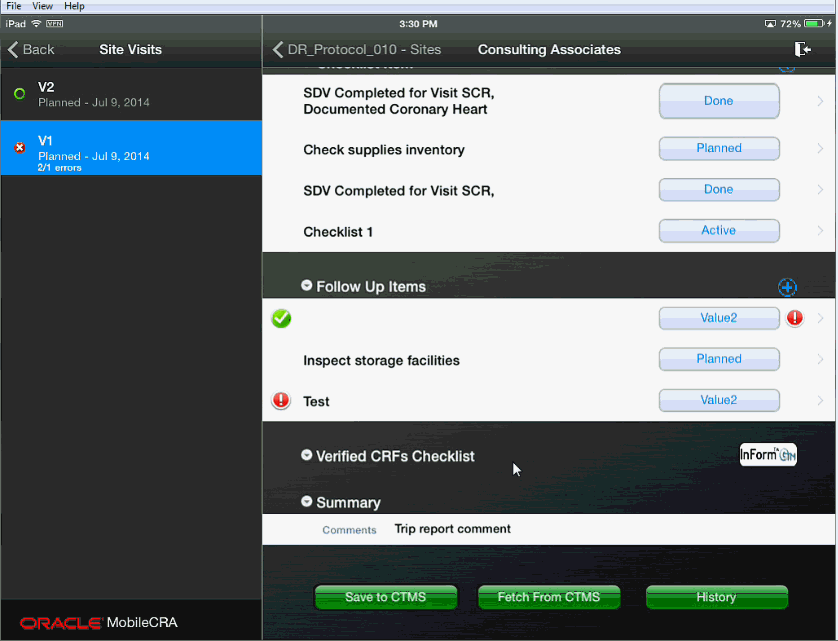
For example, in the following figure, there is one resolved item (indicated by the left hand check mark), one CTMS error that is unreviewed (indicated by the left hand error icon) and one Mobile CRA error (indicated by the right hand error icon).
The trip report can be resubmitted for checking at any time in the process, and all fields will be reassessed.
When the Trip Report is saved, and no errors are found, the solid green icon will appear.
There may be cases where an error appears, and the error message does not fully explain why this is the case. If you run into a problem where you cannot determine the cause and fix the error do not be concerned. All of the valid changes have been saved to CTMS.
For example, suppose you make updates to 50 items in your trip report and after submission you determine that 5 items are in error. The 45 changes that were not in error are now saved in CTMS, and you can review the trip report and address the errors. If after re-saving, an error does not pass testing, you have the option to continue to attempt to fix, or you can open CTMS through the web browser and fix the error there. You can then fetch the updated trip report from CTMS.
|
Copyright © 2013, 2015, Oracle and/or its affiliates. All rights reserved. Legal Notices |
|