| Oracle® Health Sciences Mobile Clinical Research Associate Server Installation and Configuration Guide Release 2.0 E61215-01 |
|
|
PDF · Mobi · ePub |
| Oracle® Health Sciences Mobile Clinical Research Associate Server Installation and Configuration Guide Release 2.0 E61215-01 |
|
|
PDF · Mobi · ePub |
This chapter provides instructions on how to upgrade database.
To upgrade the database, perform the following:
Save and unzip the file on a local folder.
Enure you have access to sqlplus and to the database to be upgraded (tnsnames.ora is updated with database information).
Run the following upgrade install scripts:
To upgrade from v1.0 to v2.0, run Install_HSM_upg_v1.0_to_v2.0_CDA.sql. For installations without CDA, run Install_HSM_upg_v1.0_to_v2.0.sql.
For example, SQL> @Install_HSM_upg_v1.0_to_v2.0_CDA.sql.
To upgrade from v1.2 to v2.0, run Install_HSM_upg_v1.2_to_v2.0_CDA.sql. For installations without CDA, run Install_HSM_upg_v1.2_to_v2.0.sql.
For example, SQL> @Install_HSM_upg_v1.2_to_v2.0_CDA.sql.
To upgrade from v1.3 to v2.0, run Install_HSM_upg_v1.3_to_v2.0_CDA.sql. For installations without CDA, run Install_HSM_upg_v1.3_to_v2.0.sql.
For example, SQL> @Install_HSM_upg_v1.3_to_v2.0_CDA.sql.
After running the preceding script, the admin user has to perform the steps mentioned in Appendix C to add the SDV section.
Upgrade the database as follows:
Change to the server/database_upg folder.
Start SQLPlus and connect to the database using SYS user or SYSTEM user.
Run the upgrade install script.
For example, Install_HSM_upg_v1.0_to_v2.0_CDA.sql.
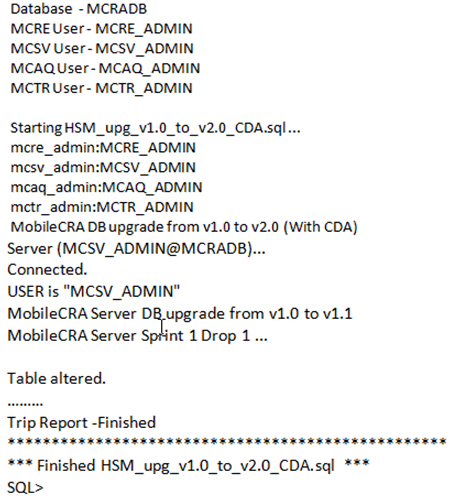
When prompted, enter user ID and password for each schema that has to be upgraded.
Following is a sample screen showing various prompts and messages during the execution of the script:
Note:
Monitor the screen for error reports, if any.
|
Copyright © 2012, 2015, Oracle and/or its affiliates. All rights reserved. Legal Notices |
|