There are two ways to remove a field from view. You can hide the field (custom or built-in fields), or you can delete the field (custom field).
You can hide a built-in field or custom field from view. To do that, first enable the Property Inspector, and then
1. Select the Property Inspector icon to enter edit mode.
2. Select the Property Inspector link to open the Property Inspector customization utility.
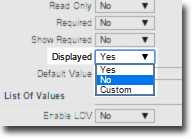
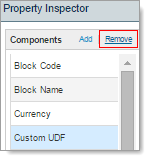
3. Select the field from the Components list.
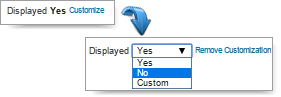
4. Change the Display value in the drop-down list to No; to hide a built-in field, select Customize next to Displayed, and then select No from the drop-down list.
|
|
|
|
Hiding a custom field
|
|
Hiding a built-in field
|
|
5. Select Save Changes, and then select Close.
6. Reselect the Property Inspector icon to toggle out of edit mode.
The screen updates, and the field no longer displays.
To show the field again, change the Display value (Displayed value for built-in) to Yes.
If the field is a custom field, you can delete it. A built-in field cannot be deleted, however, you can hide it from view.
To delete a custom field, first enable the Property Inspector, and then
- Select the Property Inspector icon to enter edit mode.
- Select the Property Inspector link to open the Property Inspector customization utility.
- Select the field from the Components list, and then select Remove.
- Select Save Changes, and the select Close.
- Reselect the Property Inspector icon to toggle out of edit mode.
The screen updates, and the field no longer displays.
 Hide the field