| Agile Product Lifecycle Management Product Collaboration User Guide Release 9.3.5 E61150-03 |
|

 Previous |
 Next |
| Agile Product Lifecycle Management Product Collaboration User Guide Release 9.3.5 E61150-03 |
|
Previous |
Next |
Variant Management is a strategic direction for Agile Product Lifecycle Management solutions.
Diversity and complexity of product variance is a cross-industry challenge, driven by strong demand among consumers for mass customization and personalization. Consequently, Variant Management continues to be a critical consideration early in the product lifecycle, especially as evolving design paradigms influence product variance.
The Variant Management solution enables Product Collaboration to store a single "Model Option BOM", which represents all variants of a product line. The Model Option BOM is the basis for deriving an Instance BOM, to validate prototypes, and establish made to stock pre-configurations. An Instance BOM can be generated either internally or externally:
Internal Configurator
Instance Manager - an Agile 9 mask and User Interface.
External Configurator
Oracle Generic Configurator User Interface - an Oracle mask and User Interface.
Depending on which Configurator you would like to work with, a setting has to be made in the Preferences tab of My Settings.
Detailed information about privileges, activating the Internal Configurator, activating the External Configurator, and Event Management for Variant Management can be found at Appendix C, "Configuring Variant Management."
|
Note: This document describes the Instance Manager in detail. The Oracle Generic Configurator User Interface is described only briefly.Further information about the Oracle Generic Configurator User Interface can be found in the Oracle Configurator Implementation Guide from OTN ( |
This section discusses how Variant Management works and how to configure Variant Management.
In Agile PLM a BOM is created that contains Items like Models, Option Classes, Parts, Assemblies, and Documents for a product range. This BOM is called Model Option BOM.
Each BOM item can be a mandatory or an optional item. Because a Model Option BOM contains all possible variants, the Internal Configurator (Instance Manager) or the external Configurator (Oracle Generic Configurator User Interface) is used to derive an individually configured product, an Instance BOM. The Model Option BOM is a superset of all potential BOMs and is not itself intended to be manufactured.
The creation of the Model Option BOM, and the configuration of the Instance BOM with the internal or external Configurator depend on rules. Further information about these rules can be found at "Combination Rules."
Table 6-1 BOM items
| Item | Description |
|---|---|
|
Model |
A Model is denoted by the Model icon.
A Model is used as the top level element of a Model Option BOM, but can also used as a generic item on lower levels under Models or Option Classes. Models cannot be added to Parts or Documents. The BOM tab of a Model contains the additional fields: Min Qty (minimum quantity) Max Qty (maximum quantity) Optional Mut Excl (mutually exclusive) A Model can contain items such as Models, Option Classes, Parts, Assemblies, and Documents in its BOM structure. These items can also be components of other objects to define a different product. A Model with an assigned BOM structure is denoted by the BOM Structure icon.
Notes: The internal or external Configurator can be opened only from a Model. The Variant Management solution does not support a site specific BOM for Models. The Agile administrator can create subclasses with the part subtype of the type Model. |
|
Option Class |
An Option Class is denoted by the Option Class icon.
An Option Class acts like a placeholder in a BOM which is later replaced by at least one of its options. The BOM tab of an Option Class contains the additional fields: Min Qty (minimum quantity) Max Qty (maximum quantity) Optional Mut Excl (mutually exclusive) An Option Class can have Models, Option Classes, Parts, Assemblies, and Documents in its BOM structure. An Option Class with an assigned BOM structure is denoted by the Option Class BOM Structure icon.
Notes: The Variant Management solution does not support a site specific BOM for Option Classes. The Agile administrator can create subclasses with the part subtype of the type Option Class. |
|
Part |
A Part is a final standard item. A Part can have Parts and Documents in its BOM structure, thus it is called Assembly. A Part is also used as the Instance for the Instance BOM. The Title Block tab of the Part contains the field Base Model that lists the number and revision of the Model to which this Part was added as Instance. |
|
Assembly |
An Assembly is a Part with a BOM. |
|
Documents |
Documents are treated as Parts. |
The possible combinations include:
The following diagrams show possible combinations of Models, Option Classes, Assemblies, and Parts in the Model Option BOM.
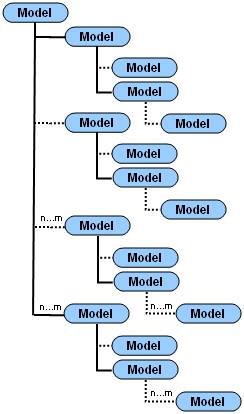
The following diagram shows all possible Model combinations.
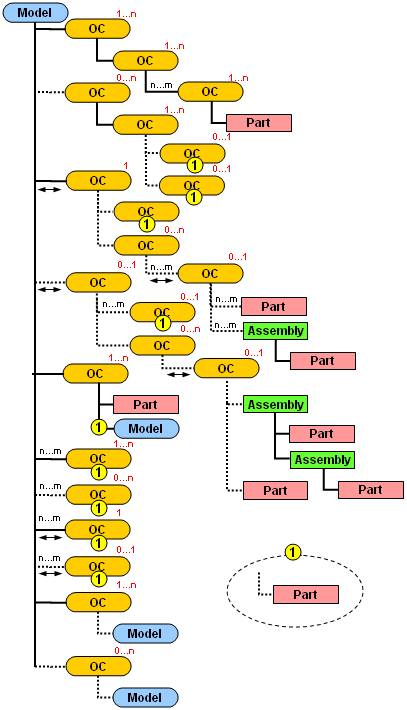
The following diagram shows all possible combinations with Option Classes.
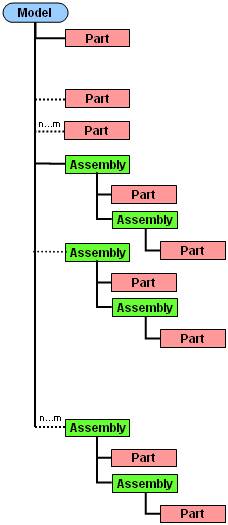
The following diagram shows all possible combinations with Parts and Assemblies.
Items that are defined as mandatory Items in the Model Option BOM, will automatically be copied to the Instance BOM. They cannot be deselected in the Instance Manager.
A detailed description of combination rules and their impact on the Instance BOM can be found under "Combination Rules."
When defining an Item as an Optional Item in the Model Option BOM, it can be selected or deselected for the Instance BOM.
By default, this field is set to Null which is equivalent to the setting No.
A detailed description of combination rules and their impact on the Instance BOM can be found under "Combination Rules."
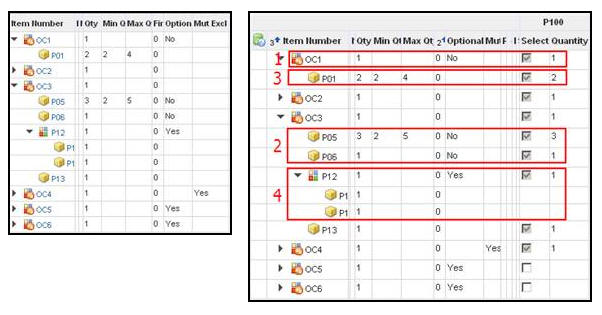
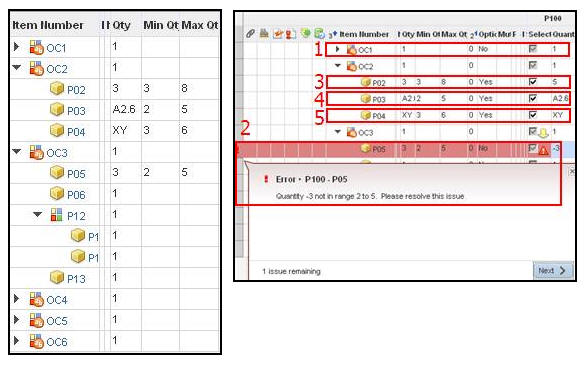
When defining a minimum and maximum quantity for an Item in the Model Option BOM, it is possible to choose a quantity value of type Floating Point Value within this range (including the minimum and maximum quantity) in the Instance Manager.
The minimum and maximum quantity value has to be >0. It cannot be a negative value.
When no minimum and maximum quantity is defined, the Quantity column in the Instance Manager is read only.
When entering only a minimum quantity, the maximum quantity can be up to the biggest possible number.
When entering only a maximum quantity, the minimum quantity has to be > 0.
A detailed description of combination rules and their impact on the Instance BOM can be found under "Combination Rules."
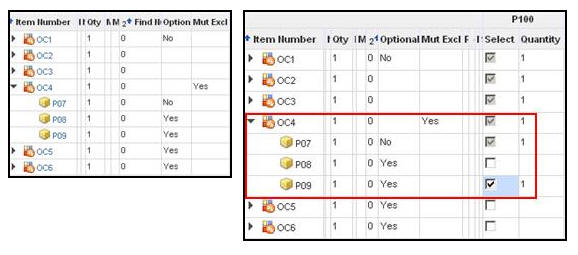
Only the BOM entries of an Option Class can be defined as Mutually Exclusive in the Model Option BOM. This defines that exactly one valid option of an Option Class has to be selected for the Instance BOM. In case the Option Class is Optional AND Mutually Exclusive, and is not selected in the Instance Manager, no option of the Option Class has to be selected.
By default, this field is set to Null which is equivalent to the setting No.
A detailed description of combination rules and their impact on the Instance BOM can be found under "Combination Rules."
|
Note: Mandatory items of an Option Class are not affected by the Mutually Exclusive regulation. |
The following rules influence the behavior of the Instance Manager and are applied when deriving an Instance BOM.
Further information about the combination rules for the Oracle Generic Configurator User Interface can be found in the Oracle Configurator Implementation Guide from OTN (http://www.oracle.com/technology/documentation/applications.html).
|
Note: The following screenshots show only possible examples. |
An Option Class has to have at least one valid option. An empty Option Class is not valid.
Options are mandatory or optional items.
An Option Class containing only mandatory options is valid.
If a mandatory Option Class has only optional options, at least one option has to be selected in the Instance Manager.
If an optional Option Class has only optional options and is selected in the Instance Manager, at least one option has to be selected in the Instance Manager.
If an optional Option Class is not selected in the Instance Manager, it is not required to select an option in the Instance Manager.
Only Option Classes can be mutually exclusive.
Mandatory items (Parts, Assemblies, Option Classes, and Models) have no influence on the mutually exclusive behavior.
Mandatory items are always selected and cannot be deselected in the Instance Manager.
All mandatory child items of a selected parent item are automatically selected.
An optional item that is the only valid option of an Option Class is automatically selected and cannot be deselected.
Child items of a Part are mandatory items. The system considers this Part as an Assembly.
|
Note: Quantities are not calculated during the configuration in the Instance Manager. The entered quantity is independent of other quantities in upper or lower levels. The quantity does not change automatically during a configuration. The quantity of an item is relative. |
For every selected item a default quantity is automatically assigned.
Entered quantities have to be >0. Otherwise, an error message is displayed.
If a minimum quantity, a maximum quantity, or both have has been defined for an item, the quantity can be entered manually, however, the quantity entered must be within the defined parameters.
If a predefined alphanumeric quantity value is not a valid number, the system ignores the minimum and maximum values and copies this predefined value into the quantity column.
The default quantity can have alphanumeric quantity values, thus the quantity is not changeable in the Instance Manager.
When selecting a child item, the parent item is automatically selected.
|
Note: When deselecting an optional parent item, all selected child items are deselected as well.When clearing the Quantity field of an entry with minimum and maximum values, this entry is deselected. |
Every item with a valid quantity (>0) in the Quantity column of the Instance Manager is selected.
Documents and their structure are treated like Parts and Assemblies.
When you create the Model Option BOM, make sure all entries are created like defined in the Combination Rules, and explained in the Possible Combination sections.
A Model Option BOM is the basis for a derived Instance BOM.
|
Important: DO NOT modify the Model Option BOM, from which the Instance BOM will be derived, once the Instance Manager is opened. Modifying the Model Option BOM when the Instance Manager is open will result in discrepancies with the actual loaded structure and the currently modified structure.Variant Management does not support:
Variant Management does not support recursive structures. |
Further information about possible combinations in the Model Option BOM can be found at "Possible Combinations."
Further regulations about combinations (for example, only Parts can be children of Parts) can be found in the Smart Rules in the Agile PLM Administrator Guide.
|
Important: Recommendation for Model Option BOMs with more than 2500 entries in total:By default, Agile A9 permits the creation of BOMs with a maximum 2500 entries. To be able to create BOMs with more than 2500 entries, the preference value can be updated through the following SQL statement:
Setting the value to 0, permits expanding BOMs with unlimited entries. You must have Administrator rights to update the SQL statements. |
For every BOM item, quantity values can be defined, either as a constant value or selectable between minimum and maximum values.
For further information about minimum and maximum quantities see "Minimum/Maximum Quantity."
See also:
Quantity fields are restricted to 20 characters and can be either Integer or Floating Point Values.
When working with the external configurator, ensure that Models and Option Classes have only Integer Values assigned for Quantity. Floating Point Values are not supported for Models and Option Classes. Otherwise, the external configurator produces warnings and sets it to an invalid configuration.
Quantity values cannot be negative values, they must be >0.
The Quantity field in the Instance Manager is a read-only field for BOM items:
with the same minimum and maximum quantity value
with a predefined alphanumeric value
The Quantity field in the Instance Manager is an editable field for BOM items:
with a defined minimum or maximum value range
An alphanumeric quantity value (for example, xy) can be entered into the Qty field of a Part as placeholder. This placeholder can be replaced by a real value in the Instance BOM.
The Quantity field in the Instance Manager shows the entered alphanumeric value and is read-only.
For detailed information about the Reference Designator, see: "Working with Reference Designators."
Reference Designator can be entered only for a BOM item of subtype Part. The quantity value in the Qty field should match the quantity of the Ref Des field. Otherwise, a warning is displayed which can be ignored or resolved.
In the Instance BOM, it can be possible that the quantity value does not match the Reference Designator. This is due to the multiplication of the quantity of Option Classes with the quantity of their options. To correct the discrepancy, you must amend either the value of the quantity or the value of the Reference Designator in the Instance BOM.
Instance tab actions include:
The Instances tab lists all created Instances with a status symbol.
Table 6-2 Instances tab symbol icons
| Symbol | Name | Description |
|---|---|---|
|
|
Has no configuration |
This symbol is assigned to an Instance that has not been configured with the Instance Manager. |
|
|
Has Configuration Draft |
This symbol is assigned to an Instance that has been configured with the Instance Manager but has not been derived. |
|
|
Has derived Instance BOM |
This symbol is assigned to an Instance that has been configured with the Instance Manager and has been derived. |
Only items of subtype 'Part' can be added as an Instance. A Part without a BOM can also be dragged and dropped from the Recently Visited folder in the left pane.
Although the drag-and-drop process of other items like Models, Option Classes, or Documents is displayed with a green drag-and-drop symbol, an error message will be displayed when dropping them onto the Instances tab. These items cannot be dropped onto the Instances tab.
A Part can only be associated to a specific revision of a specific Model. A user, who attempts to add the same Instance (Part) to another revision of the Model, or to a different Model, will get an error message.
|
Note: Performed actions on the Instances tab are not tracked on the History tab. |
To configure an Instance BOM in the Instance Manager, you must add a so-called Instance (a Part) to the Instances tab of the top level Model of the Model Option BOM.
Important guidelines and restrictions for the configuration of an Instance BOM:
A Part can only be added to the Instances tab when it does not have a BOM structure.
The added Part, which is the Instance, has to be in a state in which its BOM table can still be modified. This Part should not be assigned to a Pending Change or is in the state Released.
To avoid inconsistencies in the Instance Manager do not create a pending change or revision for a configurable Instance which is currently opened in the Instance Manager.
Do not assign a BOM manually to an Instance. When you assign a BOM manually to an Instance, the status symbol changes to ' Has derived Instance BOM', but no Configuration Graph has been created.
A BOM will automatically be assigned to an Instance once the Instance has been configured and an Instance BOM has been derived.
You can display and configure several Instances in the Instance Manager.
An Instance can only be configured by one user at a time. When you try to launch the Instance Manager for an Instance that is in use by a different user, a message is displayed.
You can load a derived Instance into the Instance Manager to compare the configuration of the derived Instance with a new Instance. If you load only the derived Instance into the Instance Manager, only the functions Expand, Collapse, personalized view, and Close are available.
Important guidelines and restrictions to note:
The Propagate button is activated if you have Modify privilege for the Configuration Graph. Otherwise, the Propagate button is grayed out.
The Propagate function can only be applied to a not derived Instance.
On the Instances tab, when clicking the Propagate button, a pop-up window is opened that lists all Instances with Configuration Graph for all Model Option BOM revisions. Selecting an Instance from this list, copies its configuration to the selected Instance of the current Model Option BOM revision.
Example of the information shown in the select menu:
|
Important: To be able to work with the Instance Manager, the setting 'Internal Configurator' must be activated in the User Preferences.To activate it, see: "Activating 'Internal Configurator' - Instance Manager." You must have the Configure Instance privilege to open the Instance Manager. Otherwise the Launch Configurator button on the Instances tab is grayed out. |
The Instance Manager is launched from the Instances tab of the Model containing the Model Option BOM. It shows the complete Model Option BOM and enables configuring the entries to derive the Instance BOM.
|
Important: Only one Instance Manager can be opened at a time.Only if the Model Option BOM is valid, the Instance Manager is opened. Otherwise, an error message is displayed. No error message is displayed when opening the Instance Manager for a Model without a BOM. |
In the Instance Manager, more than one Instance can be opened. Configurable Instances are displayed with radio button options. The Save as Draft options applies to all opened Instances. To perform any of the other options, click to select the respective Instance first.
Table 6-4 Instance Manager buttons
| Button | Description |
|---|---|
|
Validate |
Validates the selected configured instance against the combination rules. |
|
Copy Configuration |
Note: Only active when more than one instance is opened in the Instance Manager.
|
|
Reset Configuration |
Resets the configuration only for the selected instance only. Reset Configuration resets the user configuration in the user interface. Reset Configuration does not save the Configuration Graph. Note: If the Reset Configuration button is clicked a second time, and no modifications have been made since the first time the Reset Configuration button was clicked, then the reset configuration operation is not carried out again. An error message is displayed to inform the user that no reset was performed. |
|
Expand |
Permits expanding either a certain number of levels of the Model Option BOM or only the normal assembly levels of Models and Option Classes. |
|
Collapse |
Collapses the expanded structure. |
|
Personalize |
Enables a View to be:
|
|
Save as Draft |
Saves all user-modified configurations of opened Instance(s) in the Configuration Graph. The configuration graph is stored in the Configuration Graph field of the Instances tab. The Configuration Graph of an Instance is deleted if the Instances were reset and the user did not subsequently modify the instance. Note: This operation is not carried out if no modifications have been made to any of the opened Instances. Thus, no Configuration Graph will be generated or updated for those Instances. To inform the user that no save was performed, an error message will be displayed. |
|
Create Instance |
Before creating the Instance BOM, the Save as Draft operation is called implicitly for all opened instances. All user-modified configurations of opened Instances are saved in the Configuration Graph. Then, only for the selected Instance, Crate Instance saves the Configuration Graph and creates the Instance BOM based on this graph. These actions are performed even if no user modifications have been made to the selected Instance. Note: The Save as Draft operation, which is called implicitly, will not return an error in this situation if there are no user modifications to be saved. |
|
Close |
Closes the Instance Manager. If the configured instance wasn't saved before clicking the Close button, then a confirmation message is displayed. |
In the Instance Manager, quantities are displayed as entered. The correctly calculated value is only displayed in the derived Instance BOM.
|
Note: Before continuing to work in the main Agile PLM window, ensure that the Instance Manager window is closed. |
Before continuing to work in the main Agile 9 window, make sure the Instance Manager window is closed.
When configuring the Instance, open issues of BOM items are indicated by the following icons:
Table 6-5 BOM item open issue icons
| Icon | Description |
|---|---|
|
|
Indicates that there is an open issue at the respective BOM item. A detailed description of the open issue is shown in a tool tip when you place your mouse over the icon. |
|
|
Indicates that there is an open issue in the structure of the respective BOM item. |
|
|
Indicates that there is an open issue at the respective BOM item and in the structure of the respective BOM item. |
|
Important: By default, the Configuration Graph field of the Instances tab is hidden. To make it visible, use the table Personalize command to edit the view.Do not manually modify the Configuration Graph. |
In the Instance Manager, when you click the Save as Draft or Create Instance button, a Configuration Graph is created for the Instance. This Configuration Graph is stored as an XML file and contains information about all configurations that you made in the Instance Manager.
Once you have configured the Instance in the Instance Manager, you can derive the Instance BOM. For the derivation process, the Model Option BOM and the Configuration Graph are considered.
The derivation process starts when you click the Create Instance button, and no error message is returned for the configuration of the Instance.
If an error occurs during the derivation process, the derivation is stopped and the Instance BOM is not created completely. Remove manually the incomplete Instance BOM from the respective Instance, resolve the occurred error, and derive the Instance again.
During the process of deriving the Instance BOM, the Configuration Graph is stored, and the Instance BOM is saved.
The following is performed:
Models are replaced by newly created Parts.
|
Note: When a model is replaced by a newly created Part, in the Java Client, the Part subclass should have at least one Autonumber assigned to it and also AutoGenerate set to Yes. |
Option Classes are replaced by options that were selected in its structure.
The correct quantity is calculated for parts, considering the quantities of all parent Option Classes.
The Instance BOM describes a specific configuration derived from a Model Option BOM and contains only those options that have been selected in the Instance Manager. In addition, all mandatory BOM items of a Model Option BOM are also part of the Instance BOM.
|
Note: Once the Instance BOM is derived, the Instance BOM and the Model Option BOM can be modified independent of each other. |
The Instance BOM shows every Part with its correctly calculated quantity. The correct quantity for a Part that replaces an Option Class is calculated with the quantity of the Part, multiplied with the quantity of its parent Option Classes. The quantity calculation for Assemblies is done at top level, thus the quantity for children of Assemblies is not calculated. The quantity for an Assembly in the Instance BOM is the same as defined in the Model Option BOM.
|
Note: If the quantity shows an alphanumeric value, no calculation is performed with this value. The Quantity field in the Instance BOM will show the alphanumeric value. |
The Instance Manager, after clicking the Create Instance button, shows a read-only preview of the derived Instance BOM. Modifications to the Instance BOM can be made in the BOM tab of the respective Instance.
|
Important: The Model Option BOM and its objects can have different revisions, but it is strongly recommend to always use the latest revision of a Model Option BOM in the Instance Manager. |
The following guidelines apply to revisions:
The Instances tab is revision specific. Each Instance is assigned to one specific Model revision. Thus, after creating a new revision of a Model, the Instances tab is empty. Newly added Instances to the Instances tab of this Model revision are always shown with their latest released revision.
Instances on the Instances tab of older revisions of this Model are shown with their revision at the state before the revision of the Model was changed.
|
Important: Do not add and do not delete Instances from old Model revisions. Contact your Agile administrator to set the correct privileges for this behavior. |
In the just created Instance BOM, a Part is always shown with its latest released revision.
|
Note: This revision can be different to the revision shown in the Model Option BOM from which the Instance BOM is derived. |
In the just created Instance BOM, the Part, which replaces a selected Model, shows the same tab content as the tabs of the replaced Model.
The import / export behavior for Variant Management is the same as the standard import / export behavior. Variant Management import options include:
|
Note: The import from, or export into PDX files is not supported. |
For more information see Agile PLM Import/Export User Guide.
For Variant Management you can import Parts as Instances into the Instances tab of Models.
Check the Instances tab for already derived Instances before performing an import to the Instances tab.
If the Instances tab contains already derived Instances, set the Smart Rule DeleteInstanceWithBOM to Allow. Otherwise, a warning is displayed and the import process is stopped at the point where the error occurred.
|
Note: The import process will not be rolled back and may be partially performed.The import process will replace the complete Instances tab, independent of the selected import preferences for the Multi Row Update Mode. |
The Configuration Graph can only be imported into the same Agile 9 system.
When importing an Instance with Configuration Graph into a Model Option BOM, make sure the Model Option BOM contains the same BOM items and structure as the Configuration Graph.
Do not manually modify the Configuration Graph before importing it.
|
Note: You must have Modify privilege for the Configuration Graph field. Item.Instance.Configuration Graph must be included in the Applied To property of Modify Items privilege mask in your role. Contact your Agile administrator if you have questions about your assigned roles. |
For further information about the Configuration Graph format see the Appendix of the Agile PLM SDK Developer Guide.
The instructions in this section refer to Web client only, although some actions can also be performed in Java client.
The top level element of a Model Option BOM is always a Model. For a detailed description of possible combinations see Appendix C, "Configuring Variant Management."
A Model Option BOM can contain Models, Option Classes, Parts, Assemblies, and Documents.
To simplify the following examples, only Option Classes are added to the Model Option BOM.
To create a Model:
Select Create New > Items > Parts.
The Create New Parts dialog box is opened.
In the new window, select the Type Model.
Enter a unique identification number (unique identifier for the Model) in the Number field, or click for the system to generate a number based on the Auto Numbering functionality defined for Models.
Click Save.
The new Model appears with the Title Block tab showing.
Fill in information as desired.
Click Save.
You can define a minimum and maximum value for a BOM entry. The concrete value for this item is then selected in the Instance Manager for the Instance BOM.
To create a BOM Entry with Min/Max Value
Open the newly created Model.
Open the BOM tab.
Click the Add button.
Select an Option Class.
If no Option Class is selectable, create a new one.
Click the Add button.
The Option Class is added to the Model BOM list.
To edit the Min Qty field double click it.
Enter a value for the minimum quantity and hit the enter key.
To edit the Max Qty field double click it.
Enter a value for the maximum quantity and hit the enter key.
The maximum quantity value has to be greater than or equal to the minimum quantity value.
Enter a value into the Qty field that is within the defined minimum / maximum range.
The value that is defined here is the default value shown in the Instance Manager.
To save the changes click the Save button.
You can define optional BOM entries. Such entries CAN be selected for the Instance BOM.
To create an Optional BOM Entry
Open the newly created Model.
Open the BOM tab.
Click the Add button.
Select an Option Class.
If no Option Class is selectable, create a new one.
Click the Add button.
The Option Class is added to the Model BOM list.
To edit the Optional field, double click it.
A select menu is opened.
Select Yes.
To save the changes click the Save button.
You can define mutually exclusive Option Class BOM entries. Only one valid BOM entry of this Option Class must be selected for the Instance BOM.
A detailed description of combination rules and their impact on the Instance BOM can be found under"Combination Rules."
To create a Mutually Exclusive BOM Entry
Open the newly created Model.
Open the BOM tab.
Click the Add button.
Select an Option Class.
If no Option Class is selectable, create a new one.
Click the Add button.
The Option Class is added to the Model BOM list.
To edit the Mut Excl field, double click it.
A select menu is opened.
Select Yes.
To save the changes click the Save button.
|
Note: The BOM tab of this Option Class has to have at least one valid option. A detailed description of valid options can be found under Combination Rules. |
You can define mutually exclusive Option Class BOM entries that are optional. If selecting this optional Option Class for the Instance BOM, only one valid BOM entry of this Option Class has to be selected for the Instance BOM as well.
A detailed description of combination rules and their impact on the Instance BOM can be found under "Combination Rules.".
To create a Mutually Exclusive BOM Entry
Open the newly created Model.
Open the BOM tab.
Click the Add button.
Select an Option Class.
If no Option Class is selectable, create a new one.
Click the Add button.
The Option Class is added to the Model BOM list.
To edit the Mut Excl field, double click it.
A select menu is opened.
Select Yes.
To edit the Optional field, double click it.
A select menu is opened.
Select Yes.
To save the changes click the Save button.
|
Note: The BOM tab of this Option Class must have at least one valid option. A detailed description of valid options can be found under Combination Rules. |
Agile PLM does not support site-specific information for Models and Option Classes, and thus the Site tab is disabled for Models and Option Classes.
A first check of the Model Option BOM can be carried out with the Check Model-Option BOM function in the More menu of the BOM tab.
To check the Model Option BOM:
Open the Model that contains the Model Option BOM.
Open the BOM tab.
Open the More menu.
Select Check Model-Option BOM.
If the Model Option BOM is correct, no error message is displayed.
If the Model Option BOM contains errors, a list with all errors is displayed.
The information of this section applies to Web client only.
Once all BOM items have been added to the Model Option BOM, the different product variants can be derived to an Instance BOM.
The Instance BOM is referenced in the Instances tab of the Model containing the Model Option BOM. For every product variant an Instance (a Part) has to be created here. The Instance BOM, which will be derived with the help of the Instance Manager, is then added to the BOM tab of this Instance. Once the Instance BOM is derived, the Instance is displayed as an Assembly.
To Create an Instance:
Open the top level Model of the Model Option BOM.
Open the Instances tab.
Click the Add button.
Click the Create to Add button.
The Create New window for the type Part is opened.
Create a new Part.
This Part is then called Instance.
The created Part, which is the Instance, must be in a state in which it still can be modified (that is, a released part or a part with a pending change cannot be used as an Instance).
Click the Add button.
The Part is added to the Instances tab with the status Has no configuration.
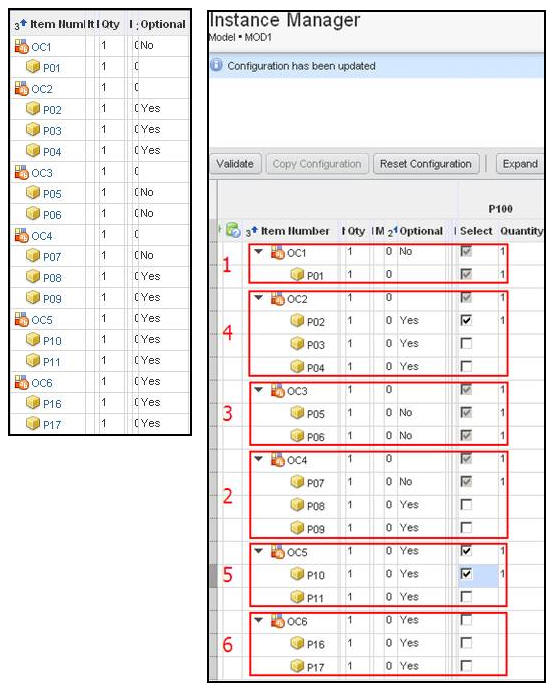
To configure one Instance:
In the Instances tab select the Instance of the respective product variant.
You can configure only Instances with no BOM assigned.
Click Launch Configurator.
Only if the Model Option BOM has been created with valid entries, then the Instance Manager is opened. Otherwise, error messages are displayed.
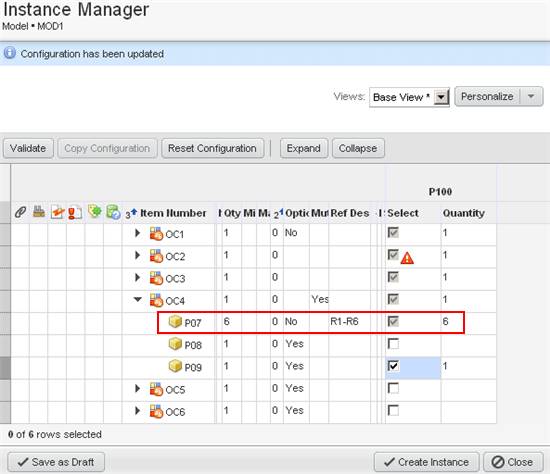
The Instance Manager is opened, showing all entries of the Model Option BOM. Guide icons are displayed next to any selections with open issues.
At the end of the table, the columns Select and Quantity have been added to an Instance.
An entered Reference Designator in the Model Option BOM is copied into the Ref Des field of the Instance Manager. Its value of the Qty field in the Model Option BOM is copied into the Quantity field of the Instance Manager.
For complete information about Reference Designator, see "Working with Reference Designators."
In the Select column, select all entries for the Instance BOM.
In the Quantity column, - where possible - enter the quantity for the Instance BOM.
Click Save as Draft to save the configured Instance BOM.
As soon as the Instance is saved, the Configuration Graph is created. The status of this Instance is set to Has Configuration Draft.
Before you can create the Instance BOM, you must validate the configured Instance.
To validate the Instance:
In the Instances tab select an Instance.
Click Launch Configurator.
The Instance Manager is opened, showing all entries of the Model Option BOM.
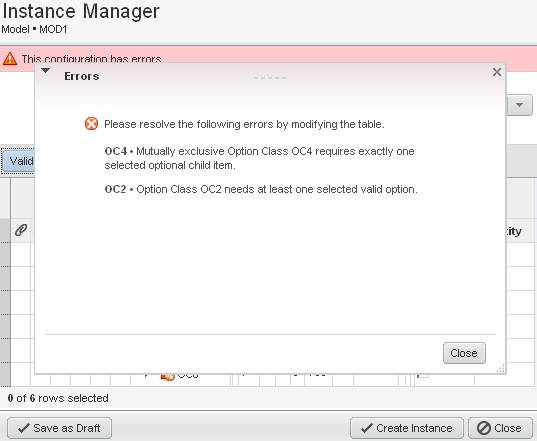
Click Validate.
This checks if the configuration complies with all combination rules.
A detailed description of combination rules and their impact on the Instance BOM can be found under "Combination Rules."
If the validation returns errors, a message similar to the following is displayed.
In this case, you must resolve the listed errors first.
|
Note: The same validation is carried out when clicking the Create Instance button. |
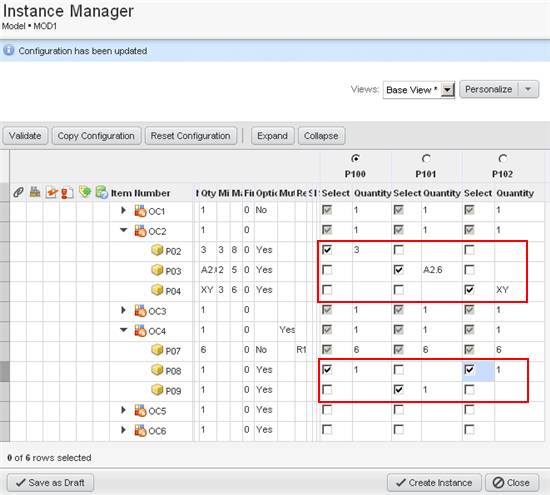
In the Instance Manager, more than one Instance can be opened. Opening multiple Instances enables you to compare the configuration of Instances with each other and modify more than one Instance at a time.
To compare the configuration of Instances:
In the Instances tab select all Instances that you want to compare.
For comparison, an already derived Instance BOM can also be opened in the Instance Manager.
Click Launch Configurator.
|
Note: Only if the Model Option BOM is valid, the Instance Manager is opened. Otherwise, an error message is displayed.An already derived Instance BOM is not validated again before opening it in the Instance Manager. |
The Instance Manager is opened, showing all entries of the Model Option BOM, and the configuration of each Instance.
|
Note: The Save as Draft operation applies to all Instances opened in the Instance Manager. The Create Instance operation applies only to the selected Instance. |
Once you have done all configurations and resolved possible errors, the Instance BOM can be created.
To create the Instance BOM:
Select the Instance.
Click Create Instance.
The Instance BOM is created and is displayed as a preview in the Instance Manager window. A Back button at the bottom left of the Instance Manager window lets you go back to the configuration window in the Instance Manager, which is displayed as read-only.
|
Note: In the Instances tab of the Model, the previously created Part for the Instance is now displayed with the Icon of an Assembly. The status of the Instance is set to Has derived Instance BOM. |
The BOM tab of this Instance shows the result of the configurations performed in the Instance Manager.
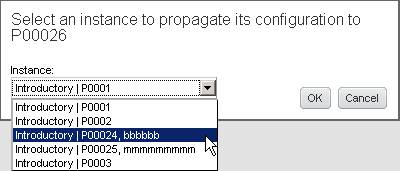
Once the Instances tab of the Model Option BOM contains a derived Instance BOM or an Instance with Configuration Graph, the Configuration Graph of this Instance BOM can be propagated to a not derived Instance.
To propagate the Configuration Graph of one Instance to another:
Open the Instances tab.
Select a not derived Instance (target Instance).
Click Propagate.
The Select an Instance for propagating a configuration to Pxxxx window is opened.
From the Instance: drop-down menu, select the source Instance from which the configuration should be propagated to the target Instance.
Click OK.
If the target Instance already contains a configuration, then a Warning is issued.
Now, the target Instance contains the same configuration as the source Instance and its status is set to Has Configuration Draft.
All items and their subclasses can be imported into, and exported from Agile PLM.
For complete information about how to import/export, see Agile Product Lifecycle Management Import/Export User Guide.
To export into aXML files:
Open the model you would like to export.
Click Actions.
Select Export.
The Export - Select Objects to Export window is opened.
From the Format field, select aXML.
Click Next.
Select Create custom filter.
Click Next.
The Export - Select Item content to export window opens.
Select Instances.
Ensure that the selection Instances is selected. Otherwise, it is not included in the exported file.
Click Next.
The Export - Specify Export Properties window opens.
Enter your information.
Click Export.
For detailed information on how to import aXML files, see the Agile Product Lifecycle Management Import/Export User Guide.
To import aXML files:
In Agile 9 from the Tools and Settings menu select Import.
In the Import Wizard, browse for the file to be imported.
Click Next.
The Import - Specify File Content window is opened.
Expand Item.
Select Item only, Bill of Material, and Instances.
Every other selection is optional.
Click Next.
The Import - Select Content Options window is opened.
Make your selections.
Click Next.
The Import - Specify Attribute Mapping window is opened.
Map the fields to be imported to the Agile Fields.
Click Next.
The Import - Review Import Definition window is opened.
Review the summary of your import definition.
Click Import.
The capability to import from and to export to PDX files is not supported for Variant Management.
To export into Text (csv) or Excel (xls) files:
Open the model you would like to export.
Click Actions.
Select Export.
The Export - Select Objects to Export window is opened.
From the Format field, select either Text (csv) or Excel (xls).
Click Next.
Select Create custom filter.
Click Next.
The Export - Select Item content to export window is opened.
Select Instances.
Ensure that the selection Instances is selected. Otherwise, it is not included in the exported file.
Click Next.
The Export - Specify Export Properties window is opened.
Enter your information.
Click Export.
For detailed information on how to import Text (csv) or Excel (xls) files, see the Agile Product Lifecycle Management Import/Export User Guide.
To import Text (csv) or Excel (xls) files:
Prepare the file to be imported.
Open the Import Wizard.
Browse for the file to be imported.
Click Next.
The Import - Specify File Content window is opened.
In the Item section, select the Instances option.
Click Next.
The Import - Select Content Options window is opened.
Make your selection.
Click Next.
The Import - Specify Attribute Mapping window is opened.
Map the fields to be imported to the Agile Fields.
Click Next.
The Import - Review Import Definition window is opened.
Review the summary of your import definition.
Click Import.
Repeat these steps to import the information from any other tab of a Model.
The following section describes how to derive an Instance BOM with the Oracle Generic Configurator User Interface.
Settings, as described in the section External Configurator - Oracle Generic Configurator User Interface must be done before working with the Oracle Generic Configurator User Interface.
After creating the Model Option BOM as described in this document, you can use the Oracle Generic Configurator User Interface to derive an Instance BOM.
For further information about how to create an Instance, see "Creating an Instance."
To create an Instance BOM:
To configure the instance in the Oracle Generic Configurator User Interface, a Change Order with the respective workflow assigned to it must be created first.
For further information about how to set up the respective workflow, see: Agile PLM Integration Pack for Oracle E-Business Suite - Design to Release 2.5 - Implementation Guide.
Select the Model that contains the Model Option BOM.
Select Actions > Create New > Change.
From the Type field select ECO.
Click Save.
On the Cover Page tab in the Workflow field select the respective workflow.
Open the Affected Item tab.
Add all items of the Model Option BOM.
Add a new revision in the NewRev column for all entries (for example, A).
In the Lifecycle Phase column select Prototype for all entries.
Set the Status of the ECO to Released.
In EBS, the released ECO must be set to Implemented. The Oracle Generic Configurator User Interface can only show those BOM items that have been set to Implemented.
In the Instances tab of the Model select the Instance of the respective product variant.
You can configure only Instances with no BOM assigned.
The created Part, which is the Instance, has to be in a state in which it still can be modified (for example, a released part or a part with a pending change cannot be used as an Instance).
Click Launch Configurator.
The Oracle Generic Configurator User Interface window is opened. A login is required for it.
Only if the Model Option BOM has been created with valid entries, the Oracle Generic Configurator User Interface is opened. Otherwise, an error message is displayed.
The Oracle Generic Configurator User Interface shows only optional BOM items. Mandatory BOM items are not displayed.
In the Select column, select all entries for the Instance BOM.
In the Quantity column, - where possible - enter the quantity for the Instance BOM.
The Oracle Generic Configurator User Interface always shows the absolute quantity values.
When changing the quantity of a child item, consider that the new value has to be a multiple of its default quantity. Further information about Quantity Cascade Calculations can be found in the Oracle Configurator Developer User Guide on OTN (http://www.oracle.com/technology/documentation/applications.html).
In the Generic Configurator User Interface click Finish to save the configured Instance BOM back to Agile A9.
In Agile A9 the Configuration Graph calculates the absolute quantity values back to relative quantity values.