| Agile Product Lifecycle Management Product Collaboration User Guide Release 9.3.5 E61150-03 |
|

 Previous |
 Next |
| Agile Product Lifecycle Management Product Collaboration User Guide Release 9.3.5 E61150-03 |
|
Previous |
Next |
A bill of material (BOM) is a listing of all the subassemblies, parts, and raw materials that go into a parent assembly. It shows the quantity of each part required to make an assembly. Items on a BOM can be single items or assemblies of several items.
Documents may or may not have BOMs, depending on your system settings.
BOM items can apply to all manufacturing sites where the product is built, some sites, or just one site. The common portion of the BOM lists all the parts that the assembly shares between sites. Each site can add other objects to the BOM table that are site-specific-for example, documents containing assembly instructions that are specific to how something is built at that site. When you select Show Sites on the BOM tab, BOM items used by multiple sites are listed multiple times on the BOM tab, once for each site.
This section includes the following topics:
The BOM tab lists all the items on a BOM.
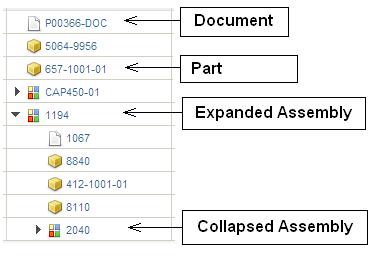
The BOM table displays the items on the BOM in a graphical hierarchy, using icons to indicate whether an item number represents:
The Agile administrator may assign to you:
Discovery privileges, which determine and limit which Agile PLM objects you can find, or discover, in the Agile PLM database.
Read privileges, which determine and limit which discovered Agile PLM objects you can open and read and which specific fields you can view on the Agile PLM objects that you can open and read.
Sites, which determine and limit the site-specific information you can see and modify on BOMs and AMLs.
If you do not have the Discovery privilege for an item, then that item may not be displayed on the BOM table, depending on which SmartRule setting the Agile administrator has selected. For the BOM table only, the SmartRule setting is also applied to the fields for which you do not have Read privilege.
The items on the BOM for which you do not have Discovery privilege and the fields on the BOM table for which you do not have Read privilege are indicated by one of the following methods:
Only the item number and rev are displayed on the BOM table. You cannot open the item if you do not have Discovery privilege.
Only the item description is displayed on the BOM table. You cannot open the item if you do not have Discovery privilege.
The item is not displayed on the BOM table. A message at the top of the BOM table tells you how many items have not been displayed.
There is no indicator for inaccessible site information.
If you have questions about your Discovery or Read privileges or the sites assigned to you, see the Agile administrator.
See also: "Opening Items on a BOM."
This section includes the topics:
See also: "BOM Table Fields."
The following table explains the BOM tab buttons that appear in Web Client.
|
Note: The Actions menu lets you print, email, export, and perform other activities from the BOM tab. |
Table 5-2 Web Client BOM tab buttons or modes
| Button or mode | Description |
|---|---|
|
Double-click an editable cell to enter table edit mode. |
Use the Web Client edit features to edit table cells. Press Tab or arrow keys to move the focus to the next editable cell. |
|
Remove |
Removes the selected rows from the BOM table. |
|
Add |
Add - Adds an item or an empty row to the BOM table. Depending on which option you choose, you can:
By default, the new item or row has a find number of zero (0) and a quantity of one (1). |
|
Expanded Display |
Lets you select the number of BOM levels to display, and then displays the expanded BOM in the separate Expanded BOM Display window. The Expanded BOM Display window includes Go To and Display Level controls and Print and Copy commands. |
|
Go To |
Locates and highlights a specific BOM item based on the criteria you enter in the Go To dialog. The Go To search can be limited to a particular BOM column and to the specified number of levels. For example, specifying level 3 searches through levels 1, 2, and 3. |
|
(place holder row icon) |
Double-click this cell to enter cell edit mode to fill in the temporary item place-holder row. |
|
|
Displays the BOM tree in the navigation pane to the left of the content pane. You can expand and collapse subassemblies and click any item number to open that item in the content pane. This button appears above the item tabs and is always visible, regardless of which tab is displayed. The BOM tree view does is not automatically refreshed to match the BOM table. For example, if you expand the BOM table, then the BOM tree in the navigation pane remains collapsed until you use the BOM tree controls. |
See also: "BOM Table Fields," "Java Client BOM Tab Buttons."
You can print, send, export, and perform other activities from the BOM tab. Use the buttons on the top of the object window, including the More Actions menu (click the More button). Or, right click in the item window to open the shortcut menu, and choose the command you want.
The following table explains the BOM tab buttons that appear in Java Client.
Table 5-3 Java Client BOM tab buttons
| Button | Description |
|---|---|
|
|
Go To - Finds and highlights a specific BOM item based on the criteria you enter in the Go To dialog. The Go To search can be limited to a particular BOM column and to the specified number of levels. For example, specifying level 3 searches through levels 1, 2, and 3. |
|
|
Expand Tree or Collapse All – Select from menu. Expands or collapses all the subassemblies in the BOM. When expanded, all levels of the BOM are displayed. |
|
|
Edit – Lets you edit the selected rows in the BOM. You can edit the find number, quantity, reference designator and BOM notes. This button is available for introductory items that are not yet released, and that have no changes pending against them. |
|
|
Add – Adds an item or an empty row to the BOM table. Depending on which option you choose, you can:
By default, the new item or row has a find number of zero (0) and a quantity of one (1). |
|
|
Remove – Removes the selected rows from the BOM table. |
|
|
View Redline – Opens the change that released this revision of the item, and displays the Affected Items tab and redline tabs. This button is disabled on pending revisions. |
|
(place holder row icon) |
Select a BOM Item – Double-click in a blank row with this symbol to select or create an item number to fill in the blank row. |
The BOM table displays BOM item fields in columns. The Agile administrator configures the BOM table fields to meet the needs of your company. The columns that you see in your Agile PLM system may differ from the list of BOM table fields presented here. If you have questions about the BOM table fields, contact the Agile administrator.
Web Client BOM table fields and icons appear as listed in the following table.
Table 5-4 Web Client BOM table columns
| Web Client BOM column name or icon | Description |
|---|---|
|
|
Has Attachment A dot icon Click the dot icon to open the BOM item with its Attachments tab displayed. |
|
|
Has Approved Manufacturers A dot icon Click the dot icon to open the BOM item with its Manufacturers tab displayed. |
|
|
Has Pending Changes A dot icon A red square icon Click the dot icon to open the BOM item with its Changes tab displayed. |
|
Item Number |
The Item Number field contains the number of the item object. Click an item number to open that item object. |
|
|
Has Product Service Requests A dot icon Click the dot icon to open the BOM item with its Quality tab displayed. |
|
Item Description |
The Item Description field contains the description of that item. |
|
Item Rev |
The Item Rev field shows the revision number of the BOM item. The latest released revision is displayed. |
|
Qty |
The Qty field shows the quantity of that item used in the assembly or subassembly. |
|
Find Num |
The Find Num field shows the internal number used to locate that item in an Agile BOM. |
|
Ref Des |
The Ref Des field contains the reference designators. |
|
Sites |
The Sites field shows which manufacturing sites are associated with the item. Items associated with multiple sites are listed on the BOM once per site. |
|
BOM Notes |
The BOM Notes field contains notes about the item. |
|
|
Has Prices A dot icon in this column indicates that the item has published prices. Click the dot icon to open the BOM item with its Prices tab displayed. |
|
|
Has Pending Declarations A dot icon in this column indicates that the item has pending declarations. Click the dot icon to open the BOM item with its Compliance tab displayed. |
|
Note: The Effective From date is different from the Rev Release Date field on the Title Block tab. The rev release date is the release date of the ECO that released the current revision of the item. |
Java Client BOM table fields and icons appear as listed in the following table.
Table 5-5 Java Client BOM table columns
| Field name | Description |
|---|---|
|
|
Has Attachment The appearance of this icon indicates that the item has an attachment. Click this icon to open the BOM item with its Attachments tab displayed. |
|
|
The appearance of this icon indicates that the item contains manufacturing data. Click this icon to open the BOM item with its Manufacturers tab displayed. |
|
|
The appearance of this icon indicates that the item has a pending change. Click this icon to open the BOM item with its Changes tab displayed. |
|
Item Number |
The Item Number field contains the item's number. Click an item number to open that item page. |
|
|
The appearance of this icon indicates that the item has a PSR (Product Service Request) or QCR (Quality Change Request) that is not closed. Click this icon to open the BOM item with its Quality tab displayed. |
|
Item Description |
The Item Description field contains the description of that item. |
|
Item Rev |
The Item Rev field shows the revision number of the BOM item. The latest released revision is displayed. |
|
Qty |
The Qty field shows the quantity of that item used in the assembly or subassembly. |
|
Find Num |
The Find Num field shows the internal number used to locate that item in an Agile BOM. |
|
Ref Des |
The Ref Des field contains the reference designators. |
|
Sites |
The Sites field shows which manufacturing sites are associated with the item. Items associated with multiple sites are listed on the BOM once per site. |
|
BOM Notes |
The BOM Notes field contains notes about the item. |
|
Note: The Effective From date is different from the Rev Release Date field on the Title Block tab. The rev release date is the release date of the ECO that released the current revision of the item. |
If your company is using distributed manufacturing, then the BOM table may include both common portions and site-specific portions. The sites listed on an item's Sites tab determine whether the item can be added to the common or site-specific portions of the BOM table.
For an item to appear on the common portion of the BOM table, then the Sites tab of the item must include all the sites that appear on the Sites tab of the parent item assembly. For example, parent assembly 4444 includes the sites India and San Jose on its Sites tab. Items added to the common portion of the BOM table must also include at least India and San Jose on their Sites tab. If these items include additional sites on their Sites tab, then it does not prevent them from being included on the common portion of the BOM table of assembly 4444.
In a similar manner, items added to a site-specific portion of the BOM table must include at least that site on their Sites tab. For example, to be included on the India site-specific portion of the BOM table, then items must include at least India on their Sites tab. If these items include additional sites on their Sites tab, then it does not prevent them from being included in the India portion of the BOM table of assembly 4444.
Items that appear on the top level of the BOM must adhere to these rules. Items that appear on the BOM tables of subassemblies must appropriately match the sites list of their own parent item, but they do not need to match the site list of the top assembly item.
|
Important: When you are creating or modifying a BOM table (adding by Search or Type in Known Numbers), if the appropriate sites are not associated with the Sites tab of added or modified items, then you will see a warning telling you that the item does not have the correct site association. Accept the warning to add the item anyway or cancel the action. |
You will need to add the site associations to the child items before the assembly item is released. When an assembly is released, the item is audited for the proper site association of the items on the BOM table. Depending on Agile PLM system SmartRule settings, you might not be able to release a change order or site change order if the site associations are not correct. See also "Site-Specific Effectivity and Obsolete Dates."
If you use Add > Create to Add (Web Client) or Add > Create (Java Client), then the appropriate site associations are automatically added during the create process.
You can view the BOM for a specific manufacturing site by selecting a site from the Site drop-down list above the tabs. Sites included in the list are the ones specified on the Sites tab of the item. (For information about manufacturing sites, see Chapter 3, "Sites and Distributed Manufacturing.")
When you select a site, the BOM tab displays the common BOM plus the BOM of the site you selected. To view the BOM for all sites at once, select ALL in the Site list.
If your organization assigns colors to sites, then the rows in the BOM table may appear in different colors, distinguishing one site from another. Site colors are assigned on the site object General Info tab.
You can perform actions only on the items that are displayed in the BOM table. For example, if you select San Francisco in the Site drop-down list, then you see all items that are part of the common and the San Francisco portions of the BOM, and you can modify the common portion of the BOM and the San Francisco portion of the BOM. However, you cannot modify the Hong Kong portion of the BOM. The Hong Kong portion of the BOM is not displayed.
The Rev and Site drop-down lists work independently. For more details, see Chapter 2, "Working with Item Revisions."
In general, you can open any item listed on a BOM by clicking its item number (Web Client) or by double-clicking its row (Java Client). When you open an item, its page appears.
This section includes the following topics:
Web Client:
You can open any item listed on a BOM by clicking its item number.
You can view any item listed in the BOM in the Quick View palette.
Place your cursor on the item number link until the Quick View tooltip appears.
Click the Quick View tooltip. The Quick View palette appears.
Use the Next and Back buttons in the Quick View palette to view the next or previous item in the BOM table.
Click the palette Close button to close the Quick View palette.
Java Client:
You can open any item listed on a BOM by double-clicking its row.
You can also view the BOM of a pending revision by selecting the pending revision (marked with parentheses, for example, Rev (B)) from the Rev drop-down list above the tabs.
See "Working with Item Revisions" for more information about viewing different revisions of the same item.
See also: "Opening Items on a BOM."
Close-up of the BOM tree, Web Client:
To expand an assembly or subassembly, click the Expand icon before its item number.
To collapse an assembly or subassembly, click the Collapse icon before its item number
Close-up of the BOM tree, Java Client:
To expand an assembly or subassembly, click the Plus icon before its item number.
To collapse an assembly or subassembly, click the Minus icon before its item number
The BOM Go To feature enables you to search for a specific item in the BOM tree.
To use the BOM Go To feature in Web Client:
On the BOM tab, click the Go To button.
|
Note: You can also use the BOM Go To feature in the Expanded BOM Display window. See also "Expanded BOM Display Window, Web Client." |
In the Go To Item in BOM dialog, define your search:
In the Find: field, enter the text you want to find. The Go To search finds any item that includes (contains) the specified text in its attribute fields. You can use any type of character, including numerals and punctuation.
In the drop-down list, choose which BOM table column you want to search. You can choose all columns or one specific column.
Check Match Case to perform a case-sensitive search where text capitalization matters.
Choose how many BOM levels you want to search: Enter a number or check All levels.
To start the search, click Find Next. The first item that matches the search criteria is highlighted in the BOM table.
Use the Find Next and Find Previous buttons to scroll up and down the BOM table, highlighting items that match the search criteria.
When you have found the item you want, click Close in the Go To Item in BOM dialog. The last item you highlighted in the BOM table remains highlighted.
To use the BOM Go To feature in Java Client:
Click the BOM tab of the item to display the BOM table.
To limit your search to a specific assembly, then expand the BOM as needed, and select the assembly you want in the BOM table. Otherwise, go to the next step.
Click the Go To button.
In the Go To dialog, define your search:
Enter the text you want to find. The Go To search finds any item that includes (contains) the specified text in its attribute fields. You can use any type of character, including numerals and punctuation.
In the drop-down list, choose which BOM table column you want to search. You can choose all columns or one specific column.
Check Match case to perform a case-sensitive search where text capitalization matters.
Choose how many BOM levels you want to search: Enter a number or check All levels.
If you selected an assembly in step 2, then check Limit the search to the selected assembly to limit your search to the selected assembly. If you did not select an assembly, then this check box is disabled.
To start the search, click Find.
The search results are displayed in a search results dialog. If it is not already expanded, then the BOM table in the object window is expanded to show the number of levels specified in the search criteria dialog.
You can sort the search results in the following ways:
Drag and drop the column headers to rearrange the order in which the columns are displayed.
In the Add: [Available Columns] drop-down list, choose more columns to display. For example, add the Sites column to the results table so you can sort items by their sites.
To remove displayed columns, use the Remove: [Displayed Columns] drop-down list.
To modify the search criteria and run the search again, click Criteria. The search results dialog closes and the search criteria dialog is displayed with the settings you last specified. To redefine the search, go to step 4 above.
Find the item you want in the search results table. Use the Next and Previous buttons to scroll up and down the search results list. You can also click an item row to select it. The selected item in the search results table is highlighted. At the same time, that item is also highlighted in the BOM table in the object window. Whenever you select a different item in the search results table, that item is then highlighted in the BOM table.
When you have found the item you want, click Close in the search results dialog. The last item you selected in the search results table remains highlighted in the BOM table in the object window.
See also: "Opening Items on a BOM."
The Web Client Expanded Display button opens the BOM in a separate window called the Expanded BOM Display window. While the Expanded BOM Display window is open, the Web Client content pane remains visible. Clicking an item link in the Expanded BOM Display window causes that item to be opened in the Web Client content pane. In the content pane, you can click and open any item tab.
By using the Expanded BOM Display feature in Web Client, you can view and edit objects in the Web Client content pane while viewing the entire BOM structure in the Expanded BOM Display window at the same time.
In addition, you can have two Expanded BOM Display windows open simultaneously. Navigate to another BOM item, and use the Expanded Display button on the BOM tab to open a second Expanded BOM Display window.
To use the Web Client Expanded Display feature:
On the BOM tab, click the Expanded Display button.
In the Select Levels to Display dialog, choose how many BOM levels you want to display: All, or from 1 to 7 levels. Click Display.
The Expanded BOM Display window opens. The following controls are available in the Expanded BOM Display window:
Go To – Use this BOM Go To feature to find a specific BOM item in the Expanded BOM Display window. See "Using BOM Go To."
Display Levels – Click this button to open the Select Levels to Display dialog. If desired, choose a different BOM level to display.
More menu - This menu includes the following commands:
Print – Choose More > Print. In the Print Options dialog, you can choose to include manufacturers, preview the print page, print, or cancel.
Copy – Select and highlight one or more rows in the Expanded BOM Display window table. Choose More > Copy. You can now paste those items into any appropriate table in the Web Client content pane.
Refresh – Click Refresh to update the BOM information in the Expanded BOM Display window according to any modifications that have been made to the BOM.
In the Expanded BOM Display window, click any item link. That item is displayed in the Web Client content pane.
Close the Expanded BOM Display window by clicking the Close button.
The revision number (or letter) that appears in the Item Rev field of the BOM table is calculated by checking the release date of the parent item (if already released), and then locating the latest revision of the child item before that date and analyzing it. If the parent item has not been released, then the most recent revision of the child item is found. For details, see "Details About Revision Display on BOMs."
|
Caution: Be aware that the unrelease and release of child items may affect the child revisions displayed on the parent BOM. |
When you create an ECO against an item, Agile PLM creates a new revision of any item affected by that ECO. The new revision has an updated BOM based on the redlines.
For example, consider the following scenario in which someone does the following:
Creates an ECO that modifies part 1000-02 by replacing the currently used 1.0 GB disk with a 2.1 GB hard disk.
Releases the ECO.
Examines the BOM of item 1000-02.
When the ECO is released, Agile PLM displays the changed item as a new revision of item 1000-02. The new revision incorporates the modifications made by the ECO.
See also: Chapter 7, "Changes," Chapter 8, "Affected Items of Changes."
If an item is not yet released, and has no changes pending against it, then you can modify the BOM table directly (add, delete, or edit items).
If the item has been released or has a pending MCO against it, then you must write an ECO against the item and redline its BOM. (If the item already has a pending ECO against it, then you can redline the BOM through the pending ECO without creating another ECO.) See "Redlining the BOM of a Released Item."
|
Note: You can use an SCO to modify the Site-specific portion of the BOM of a released item. |
The following list illustrates how the BOM table of an item can be modified as a preliminary item and as a production released item.
Phase 1:
Part_123
Lifecylcle = Preliminary
Revision = Introductory
Changes: No pending changes.
Part_123 has not yet been released. You may modify the BOM table as explained in
Phase 2:
Part_123
Lifecylcle = Preliminary
Revision = (A) ECO_001
Changes: Pending ECO_001 has not yet been released. It creates pending Revision (A).
Modify the BOM table of Part_123 by redlining the BOM through ECO_001.
Phase 3:
Part_123
Lifecylcle = Production
Revision = A ECO_001
Changes: ECO_001 releases Part_123.
You cannot modify the BOM table of Part_123 because it has been production released.
Phase 4:
Part_123
Lifecylcle = Production
Revision = (B) ECO_005
Changes: ECO_005 creates pending revision (B) of Part_123.
Part_123 is production released. You must make all changes to the BOM table by creating a change and redlining the BOM.
This section includes the following topics:
"Modifying Site-Specific Portions of the BOM of a Preliminary Item"
"Web Client, Adding Items to the BOM Table of a Preliminary Item"
"Java Client, Adding Items to the BOM Table of a Preliminary Item"
If your organization practices distributed manufacturing, then you can modify separately the site-specific portion of the BOM for each manufacturing site. To modify a site-specific item on the BOM, select the site in the Site drop-down list, and then select the site-specific item you want to modify or edit. See "Modifying the BOM Table of a Preliminary Item" When adding an item to the BOM, you select the site you want. See "Web Client, Adding Items to the BOM Table of a Preliminary Item," "Java Client, Adding Items to the BOM Table of a Preliminary Item."
|
Note: Modifying the site-specific portion of the BOM of a released item does not require a revision change and can be done through an SCO. Modifying the common portion of the BOM of a released item requires a revision change and can be done only through an ECO. For more information about modifying the BOM of an item that has been released, see Chapter 7, "Changes" and Chapter 8, "Affected Items of Changes." |
There are several different ways to add items to the BOM tab. You can:
Use the Add button on the BOM table, which enables you to:
Type in the number of an item.
See "Web Client, Type in the Number of an Item to Add to the BOM Table."
Execute a Quick Search by clicking the palette Search to Add button.
See "Web Client, Quick Search to Add Items to the BOM Table."
Create a new item by clicking the palette Create to Add button.
Execute a saved search and then, from the search results table, you can use the More... menu Copy command, or you can populate the NAVIGATOR drawer, and then drag and drop to add to the BOM table.
See "Web Client, Custom Search to Add Items to the BOM Table."
Open a custom search palette and define a search (Basic or Advanced) and search for the items you want to add.
See "Web Client, Custom Search to Add Items to the BOM Table."
Add a place-holder row with a temporary number, and select an item for that row later.
See "Web Client, Adding a Place-holder Row to the BOM Table."
Edit the blank row to enter BOM row details, including a temporary Item Number or item descriptions.
Complete a blank row by selecting the item you want to use.
See "Web Client, Completing a Place-holder Row in the BOM Table."
See also: "About Modifying the BOM Table.".
If you know the number of the item you want to add to the BOM table, then you can use the Type in Known Numbers option in Web Client. See also, "Web Client, Quick Search to Add Items to the BOM Table" and "Web Client, Create New to Add Items to the BOM Table."
|
Note: If you enter a non-existent item number, then Agile PLM displays a warning. If you accept the warning, then Agile PLM adds a placeholder row with the non-existent item number. See also "Web Client, Adding a Place-holder Row to the BOM Table." |
To add one or more known items to the BOM table in Web Client:
Click the BOM tab.
To add a site-specific item to the BOM tab, select the site you want in the Site drop-down list of the item. To add items to the common portion of the BOM, select ALL.
Click the Add button. The object addition palette appears.
In the text entry field, type the item numbers you want to add, separated by semicolons. For example:
P00487; P00259; P00264
Or, you can also use the Web Client Type-Ahead search feature:
If you type a partial item number, then Agile PLM displays a list of items that match the text typed so far.
Use the arrow up and arrow down keys to highlight the object you want.
Press the right arrow key to select the object.
Repeat steps a through c to select multiple objects to add.
In the palette drop-down list, select the site you want. To add an item to the common portion of the BOM, select Common.
If you have already selected the site you want in the Site drop-down list of the item, then it is preselected for you in the palette.
Press the Enter key to add the selected items to the table and close the palette.
The items appear in the BOM table.
To add items for a different site, select the site you want in the Site drop-down list of the item and repeat the procedure.
For information about other methods of adding items to the BOM table, see "Web Client, Adding Items to the BOM Table of a Preliminary Item."
Use Web Client Add features to perform a quick search to find the items you want to add to the BOM table.
To execute a quick search to find one or more known items to add to the BOM table in Web Client:
Click the BOM tab.
To add a site-specific item to the BOM tab, select the site you want in the Site drop-down list of the item. To add items to the common portion of the BOM, select ALL.
Click the Add button. The object addition palette appears.
Click the palette Search to Add button. The Items Search palette appears.
Enter the search criteria and click to execute the quick search.
In the results table, select one or more items, and then:
Press Enter on the keyboard to add the selected items to the BOM table.
Or, drag the selected items and drop them onto the BOM table.
The items are added to the BOM table.
To add site-specific items, use the Site drop-down list in the Items Search palette to select the site you want. Repeat step 6.
When you are finished, press Escape on the keyboard to close the Items Search palette.
To execute a Custom Search from the Quick Search palette:
Click the BOM tab.
To add a site-specific item to the BOM tab, select the site you want in the Site drop-down list of the item. To add items to the common portion of the BOM, select ALL.
Click the Add button. The object addition palette appears.
Click the palette Search to Add button. The Items Search palette appears.
Click the Custom Search button. The Basic Search palette appears.
Search for the items you want:
Enter the search criteria and click Search.
or
Click the Launch Saved Searches button.
In the Saved Searches palette, navigate to the saved search you want and double-click it.
In the Search Results table, select the rows you want and click the Copy button.
On the BOM tab, paste your selections by choosing Paste in the More menu or by pressing Ctrl-C.
You can add to a BOM an item that hasn't been created yet.
Adding nonexistent items to the BOM table using Web Client:
Click the BOM tab.
To add a site-specific item to the BOM tab, select the site you want in the Site drop-down list of the item. To add an item to the Common portion of the BOM, select ALL.
Click the Add button. The object addition palette appears.
Click the palette Create to Add button.
The Create New dialog appears.
In the Create New dialog, use the Type drop-down list to select the type (subclass) of item you want to create.
Use the number that appears, click the Autonumber button, or type a number.
Type a description in the Description field, if desired.
In the Add for Site drop-down list, select the site you want. To add an item to the common portion of the BOM, select Common.
If you have already selected the site you want in the Site drop-down list of the item, then it is preselected for you in the dialog.
Complete any required fields.
Click Add.
|
Note: If you create a new item and decide you do not want to keep it, then you should delete it from the database with the Delete command on the Actions menu. For more information about deleting items from the BOM, see the section, "Removing Items from the BOM Table.". |
For information about other methods of adding items to the BOM table, see "Web Client, Adding Items to the BOM Table of a Preliminary Item."
Web Client table addition features allow you use a saved search to find items to add to the BOM table.
To use a saved search in Web Client to locate items to add to the BOM table:
Execute the saved search.
Use one of the following methods to add search result items to the BOM table:
Copy and Paste:
In the Search Results table, select one or more item rows.
Copy the items by choosing Copy in the More... menu, or use the Ctrl + C keyboard shortcut.
Open the desired item and click the BOM tab to display the BOM table.
Choose Paste in the More... menu, or use the Ctrl + V keyboard shortcut.
NAVIGATOR Drawer:
In the Search Results table, click the Navigator button. The NAVIGATOR drawer in the left navigation pane is populated with the search results.
Select one or more items in the NAVIGATOR drawer. Click to the left of the item icon to highlight and select a NAVIGATOR link.
Drag and drop the highlighted items onto the BOM table.
Alternately, you can copy the NAVIGATOR highlighted items (Ctrl + C) and paste them into the BOM table (Choose Paste in the More... menu, or use the Ctrl + V keyboard shortcut.)
In Web Client, you can execute a custom search to locate items to add to the BOM table. Then, use copy and paste to add the items to the BOM table.
You can execute a custom search in the content pane and use the search results table features to populate the NAVIGATOR drawer or copy search results rows and paste them into the BOM table. See "Web Client, Saved Search to Add Items to the BOM Table."
You can also open a custom search palette, which enables you to view the BOM table while you search for and select the items you want to add.
To open a Custom Search palette to find items to add to the BOM table:
Click the BOM tab to display the BOM table.
On the keyboard, press Ctrl + Shift + X. The custom search palette appears. The BOM table remains visible behind the palette.
In the search palette, define a Basic search or an Advanced search. Execute the search. For more information about defining searches, see Getting Started with Agile PLM.
|
Note: In the upper left corner of the custom search palette, click to collapse the entire palette. Click to expand the palette again. |
Select one or more search results rows.
Click the Copy button.
Put the focus in the BOM table by clicking in the content pane or by selecting a BOM table row, and then choose Paste in the More... menu.
If the BOM item has sites, then Agile PLM prompts you are prompted to select a site setting for the pasted BOM rows. In the prompt drop-down list, select the site you want. To add an item to the common portion of the BOM, select Common.
You can execute multiple searches to find and select additional items.
Press the Escape key on the keyboard to close the custom search palette.
|
Note: You cannot add a site-specific row to the BOM table for an item that belongs to a subclass for which the Site-Specific BOM property is set to Disallow. If you have questions, contact the Agile administrator. |
For information about other methods of adding items to the BOM table, see "Web Client, Adding Items to the BOM Table of a Preliminary Item."
In Web Client, you can add a place-holder row to the BOM table as a place holder for an item that you want to add later. You can edit the BOM Notes field of a place-holder row to specify which type of object to add later.
For example, Bob is creating a BOM for a computer. He is not sure which specific power cord he wants to use. He adds a place-holder row to the BOM, and then edits the fields on that place-holder row. He specifies the find number, reference designator, and quantity. In the BOM Notes field, he types a note about the type of power cord that should be included in the BOM. Later, when he views the BOM again, Bob sees the place-holder row. It reminds him that he must select the appropriate item number to complete the information needed in that BOM row. See also "Web Client, Completing a Place-holder Row in the BOM Table."
To add a place-holder row to the BOM table in Web Client:
Click the BOM tab.
To add the place-holder row to a site-specific portion of the BOM, select the site from the Site drop-down list of the item. To add the place-holder row to the common portion of the BOM, select ALL in the Site drop-down list of the item. (Items or place-holder rows must be associated with the site for which you want to add them. "Associating a Site with an Item" for information.)
|
Note: You cannot add a site-specific row to the BOM table for an item that belongs to a subclass for which the Site-Specific BOM property is set to Disallow. If you have questions, contact the Agile administrator. |
Click the Add button. The object addition palette appears.
In the text entry field, type a text string that will not match an existing item number. For example:
xyz-456
Press the Enter key.
A warning appears stating that item xyz-456 does not exist.
|
Note: If you entered the number of an existing item in step 4 above, then no warning appears and that item is added to the BOM. |
Ensure that the Continue option is selected in the warning and click Finish.
A place-holder row is added to the appropriate section of the BOM table with a default find number and a default quantity. The default find number is zero (0). The default quantity is set by the Agile administrator.
A red question mark icon precedes the place-holder number to indicate that information is missing in that row. For example:
xyz-456
For information about other methods of adding items to the BOM table, see "Web Client, Adding Items to the BOM Table of a Preliminary Item."
In the same manner that you can edit any BOM row, you can also edit a place-holder row, which lets you fill in some BOM table fields before you specify the object you want to add. For example, you can fill in the Quantity, Find Number, Reference Designators, and additional custom fields that the Agile administrator has defined.
You can also provide a temporary Item Number or a temporary description for the item by following the instructions below.
To edit a place-holder row (including entering or editing a temporary Item Number or Item Description) using Web Client:
To begin editing the BOM table, double-click in any editable cell.
The table enters edit mode and the Save and Cancel buttons become active (not grayed).
Make the required changes in each field. Navigate to other fields by clicking the field, pressing the Tab key, or using the arrow keys.
When you are finished, click Save.
If you modified the temporary item number, then Agile PLM displays a Warning dialog which includes a warning that the item number does not exist. To finish specifying the temporary item number, check the Ignore this warning check box and click Finish.
For information about methods of adding items to the BOM table, see "Web Client, Adding Items to the BOM Table of a Preliminary Item."
In Web Client, you can complete a blank row in a BOM table using the procedures below. The following conditions apply:
If there is no pending change against the item, then you can edit the BOM table and remove the place-holder BOM row.
If the change order has not been released, then you can perform a redline remove of the place-holder BOM row in the change order Redline BOM tab.
Temp BOM row replacement (a blank BOM row with a name) can take place outside of the BOM table edit process:
When you create an item with that place-holder BOM row name, for example, from the main Create menu.
When an existing item is renamed to the same name as the place-holder BOM item.
On a Save As of an existing item to a new item with the same name as the place-holder BOM item.
To complete a place-holder row in the BOM table using Web Client:
On the BOM table, double-click the place-holder number in the Item Number cell of the place-holder row. For example, to complete the following place-holder row, click the xyz-456 link:
? xyz-456
The add item palette appears. The text entry field is prepopulated with the place-holder number, which is selected and highlighted.
Begin typing to enter an item number and replace the place-holder number. See "Web Client, Type in the Number of an Item to Add to the BOM Table."
Or, select a different palette option:
Click the palette Search to Add button to execute a quick search for the item you want. See "Web Client, Quick Search to Add Items to the BOM Table."
Click the palette Create to Add button to create a new item. See "Web Client, Create New to Add Items to the BOM Table."
Press Enter on the keyboard to add the item and close the add item palette.
The place-holder item number is replaced in the BOM table.
For information about methods of adding items to the BOM table, see "Web Client, Adding Items to the BOM Table of a Preliminary Item."
In Java Client, there are several different ways to add items to the BOM tab. You can:
Type in the number of an item. See "Java Client, Type in the Number of an Item to Add to the BOM Table."
Select one of the available search methods and search for the items you want to add. See "Java Client, Search for Items to Add to the BOM Table."
Create a new item. See "Java Client, Adding Nonexistent Items to the BOM Table."
Add a blank row, and select an item for that row later. See "Java Client, Adding a Blank Row to the BOM Table."
Edit the blank row to enter BOM row details, including a temporary Item Number or item descriptions. See "Java Client, Editing a Blank Row."
Complete a blank row by selecting the item you want to use. See "Java Client, Completing a Blank Row in the BOM Table."
See also: "About Modifying the BOM Table.".
If you know the number of the item you want to add to the BOM table, then you can use the Type in Known Numbers option in Java Client.
|
Note: If you enter a non-existent item number, then Agile PLM displays a warning. If you accept the warning, then Agile PLM adds a placeholder row with the non-existent item number. See also "Java Client, Adding a Blank Row to the BOM Table." |
To add one or more known items to the BOM table in Java Client:
Click the BOM tab.
To add a site-specific item to the BOM tab, select the site you want in the Site drop-down list of the item. To add items to the common portion of the BOM, select ALL.
Click the Add drop-down menu button and choose the Type in Known Numbers option. A dialog appears.
In the Item Number(s) field, enter the item numbers you want, each number on a separate row.
For example, type P00002, then press the Enter key to place the cursor on the next row. Now type P00044.
In the Add for Site drop-down list, select the site you want. To add an item to the common portion of the BOM, select Common.
If you have already selected the site you want in the Site drop-down list of the item, then it is preselected for you in the dialog.
Click Add.
The item appears in the BOM table.
To add items for a different site, select the site you want in the Site drop-down list of the item and repeat the procedure.
For information about other methods of adding items to the BOM table, see "Java Client, Adding Items to the BOM Table of a Preliminary Item."
You can use a saved search or define either a simple search or an advanced search to find items to add to the BOM table. You can also select items in your Bookmarks folder or Recently Visited folder.
To search for and add one or more items to the BOM table in Java Client:
When you add an item to the BOM, it is added below the selected item.
Click the BOM tab.
To add a site-specific item to the BOM tab, select the site you want in the Site drop-down list of the item. To add items to the common portion of the BOM, select ALL.
Click the Add drop-down menu button and choose the Search option. The Add BOM dialog appears.
To edit the item information immediately after adding items, ensure that Edit rows after adding is checked.
Search for one or more existing items. In the Add BOM dialog, select a search method. If you choose to perform a simple search, then enter the value to search for and click Search. You can also define an advanced search, run a saved search, or select a bookmarked or recently visited item (Shortcuts). (For more information about searches, see Getting Started with Agile PLM.)
In the search results, select the items you want by moving them into the Selected Item(s) list.
You can run multiple searches to find and select additional items.
If you have not already done so, then select a site in the Site field. To add the selected items to the Common portion of the BOM, select Common. If you previously selected a specific site in the Site drop-down list of the item, then that site is preselected for you in the dialog.
Click OK.
If Edit rows after adding was checked, then edit the item information in the Editing Added Rows dialog and click OK.
All the items in the Selected Item(s) list are added to the BOM. The BOM tab Site column is automatically completed with the selected site as the associated site. If you added items to the Common portion of the BOM, then the Site column is blank to indicate that the item is common to all sites, instead of being specific to one site.
To add items for a different site, select the site you want in the Site drop-down list of the item and repeat the procedure.
|
Note: You cannot add a site-specific row to the BOM table for an item that belongs to a subclass for which the Site-Specific BOM property is set to Disallow. If you have questions, contact the Agile administrator. |
For information about other methods of adding items to the BOM table, see "Java Client, Adding Items to the BOM Table of a Preliminary Item."
You can add a blank row to the BOM table as a place holder, editing the BOM Notes field to specify which type of object you want to add later.
For example, Bob is creating a BOM for a computer. He is not sure which specific power cord he wants to use. He adds a blank row to the BOM, and then edits the blank row. He specifies the find number, reference designator, and quantity. In the BOM Notes field, he types a note about the type of power cord that should be included in the BOM. Later, when he views the BOM again, Bob sees the blank row. It reminds him that he must select the appropriate item number to complete the information needed in that BOM row. See also "Java Client, Completing a Blank Row in the BOM Table."
To add a blank row to the BOM table in Java Client:
When you add a blank row to the BOM, it is added above the selected rows.
Click the BOM tab.
To add the blank row to a site-specific portion of the BOM, select the site from the Site drop-down list of the item. To add the blank row to the common portion of the BOM, select ALL in the Site drop-down list of the item. (Items or blank rows must be associated with the site for which you want to add them. See "Associating a Site with an Item."for information.)
|
Note: You cannot add a site-specific row to the BOM table for an item that belongs to a subclass for which the Site-Specific BOM property is set to Disallow. If you have questions, contact the Agile administrator. |
Click the Add drop-down menu button and choose the Add a blank row option.
A blank row is added to the appropriate section of the BOM table with a default find number and a default quantity. The default find number is zero (0). The default quantity is set by the Agile administrator.
For information about other methods of adding items to the BOM table, see "Java Client, Adding Items to the BOM Table of a Preliminary Item.".
In the same manner that you can edit any BOM row, you can also edit a blank row, which lets you fill in some BOM table fields before you specify the object you want to add. For example, you can fill in the Quantity, Find Number, Reference Designators, and additional custom fields that the Agile administrator has defined.
You can also provide a temporary Item Number or a temporary description for the item by following the instructions below.
To edit a blank row (including entering or editing a temporary Item Number or Item Description) using Java Client:
Select one or more BOM rows, including the blank rows you want to modify and click the Edit button.
The Edit BOM window appears.
Make the modifications in the table.
To provide a temporary description for the blank row, in the BOM Description field, type the text you want to use as the temporary item description.
The Item Description field of a blank row cannot be edited. However, Agile PLM uses the text in BOM Description field as a temporary description of the item when you save your modifications.
To provide a temporary item number, in the Item Number field, type a number that does not exist in the Agile PLM database.
When you are finished, click OK.
If you entered a temporary item number, then Agile PLM displays a Warnings and Errors dialog which includes a warning that the item number does not exist. To finish specifying the temporary item number, check the Accept check box and click OK.
If you entered text for a temporary description in the BOM Description field, then that text is now also displayed in the Item Description field of the blank row.
For information about methods of adding items to the BOM table, see "Java Client, Adding Items to the BOM Table of a Preliminary Item."
In Java Client, you can complete a blank row in a BOM table using the procedures below. The following conditions apply:
If there is no pending change against the item, then you can perform a blank BOM row replacement in the item BOM table.
If the change order has not been released, then you can perform a blank BOM row replacement in the change order Redline BOM tab.
Temp BOM row replacement (a blank BOM row with a name) can take place outside of the BOM table edit process:
When you create an item with that Temp name, for example, from the main Create menu.
When an existing item is renamed to the same name as the Temp BOM item.
On a Save As of an existing item to a new item with the same name as the Temp BOM item.
To complete a blank row in the BOM table using Java Client:
On the BOM table, double-click the blank row, which displays the red question mark blank row placeholder symbol. (See "Java Client BOM Tab Buttons.")
In the Replace Temporary Item dialog, select the method you want to use:
Create a new Item
In the Replace Temporary Item dialog, select Create a new Item and click OK.
In the New dialog, select the item type in the Type drop-down list, fill in the required fields, and click OK. If an autonumber is not required, then the New dialog Number field is prepopulated with the temporary number. You can use the temporary number or you can replace it. If an autonumber is required, then the temporary number is automatically replaced with an autonumber.
Search for an Item
In the Replace Temporary Item dialog, select Search for an Item and click OK.
In the Select Objects dialog, select a search method. If you choose to perform a simple search, then enter the value to search for and click Search. You can also define an advanced search, run a saved search, or select a bookmarked or recently visited item (Shortcuts). (For more information about searches, see Getting Started with Agile PLM.)
You can run multiple searches until you find the item you want.
In the search results, select the one item you want by moving it into the Selected Object(s) list and click OK.
Replace it with Item
In the Replace Temporary Item dialog, select Replace it with Item.
Enter the item number of an existing item and click OK.
For information about methods of adding items to the BOM table, see "Java Client, Adding Items to the BOM Table of a Preliminary Item."
You can add to a BOM an item that has not been created yet.
Adding nonexistent items to the BOM table using Java Client:
Click the BOM tab.
To add a site-specific item to the BOM tab, select the site you want in the item's Site drop-down list. To add an item to the Common portion of the BOM, select ALL.
Click the Add drop-down menu button and choose the Create option. The New dialog appears.
In the New dialog, use the Type drop-down list to select the type (subclass) of item you want to create.
Assign a number to the item. To do so, either accept the number that appears, click the Autonumber button to use the next autonumber, or type a number.
In the Add for Site drop-down list, select the site you want. To add an item to the common portion of the BOM, select Common.
If you have already selected the site you want in the Site drop-down list of the item, then it is preselected for you in the dialog.
Complete any required fields.
Click OK.
|
Note: If you create a new item and decide you do not want to keep it, then you should delete it from the database with the Delete button in the object window. For more information about deleting items from the BOM, see "Removing Items from the BOM Table." |
For information about other methods of adding items to the BOM table, see "Java Client, Adding Items to the BOM Table of a Preliminary Item."
You can directly modify the BOM table of an item that has not been released and has no pending changes.
When you create a new item and then click the BOM tab, Agile PLM displays a blank BOM tab.
To modify items in the BOM table of a preliminary item in Web Client:
Open the unreleased item (the item that has not been released and has no pending changes).
Click the BOM tab.
If the BOM information you need is on a site-specific portion of the BOM, then select the site from the Site drop-down list.
To begin editing the BOM table, double-click in any editable cell.
The table enters edit mode and the Save and Cancel buttons become active (not grayed).
Make the required changes in each field. Navigate to other fields by clicking the field, pressing the Tab key, or using the arrow keys.
When you are finished, click Save.
See also: "Web Client, Adding Items to the BOM Table of a Preliminary Item."
To modify items in the BOM table of a preliminary item in Java Client:
Open the unreleased item (the item that has not been released and has no pending changes).
Click the BOM tab.
If the BOM information you need is on a site-specific portion of the BOM, then select the site from the Site drop-down list.
Select one or more items to modify.
Click the Edit button.
The Edit BOM window appears.
Make the modifications in the table.
When you are finished, click OK.
See also: "Java Client, Adding Items to the BOM Table of a Preliminary Item."
To remove an item from the BOM table in Web Client:
To remove an item from a site-specific portion of the BOM that is not currently displayed, select the site (or ALL) from the Site drop-down list to display the site-specific rows.
Select one or more items to remove from the BOM table.
Click the Remove button on the BOM tab or press the Delete key on the keyboard.
The items are deleted from the BOM table.
See also: "Web Client, Adding Items to the BOM Table of a Preliminary Item."
To remove an item from the BOM table in Java Client:
To remove an item from a site-specific portion of the BOM that is not currently displayed, select the site (or ALL) from the Site drop-down list to display the site-specific rows.
Select one or more items to remove from the BOM table.
Click the Remove button on the BOM tab.
The items are deleted from the BOM table.
|
Note: Be sure to use the Remove button on the BOM tab, not the Delete button in the item window. If you use the Delete button, then the entire item is deleted. |
See also: "Java Client, Adding Items to the BOM Table of a Preliminary Item."
Reference designators are commonly used in the electronics industry as a labeling system to refer to components. If your company uses reference designators, then you can assign and edit reference designators in Agile BOMs.
This section includes the following topics:
Reference designators may appear in the BOM table in an expanded display (R1, R2, R3) or a collapsed display (R1-R3). The Agile administrator sets the following system preference to select the method of reference designator display used on your Agile PLM system.
This section includes the topics:
Depending on the setting of the Reference Designators Allow Range Expand Collapse system preference, ranges of reference designators appear in the Ref Des field as either collapsed or expanded. For example, the range of reference designators R1, R2, R3, R4, R5 appear as follows:
Expanded: R1, R2, R3, R4, R5
Each reference designator is displayed in the Ref Des field.
Collapsed: R1-R5
Ranges of three or more reference designators are represented by the first reference designator in the sequence (R1), followed by the Reference Designator Range Indicator character (- the hyphen character), followed by the last reference designator in the sequence (R5). The hyphen character is the default reference designator character, however, the Agile administrator may choose a different character, if needed.
If the reference designators include leading zeros, then in collapsed mode the reference designators are displayed in groups according to the number of leading zeros. For example, the 100 reference designators:
R0001, R0002, R0003, R0004, ... R0099, R0100
Are displayed in collapsed mode as:
R0001-R0009, R0010-R0099, R0100
See also: "Adding Reference Designators," "Viewing Reference Designators."
When there are many reference designators to display, Web Client displays the beginning of the list in the Ref Des cell. You can resize the Ref Des column width, or you can display an expanded Ref Des cell with a scroll bar.
To display all the reference designators in the Ref Des field in Web Client:
Click the Ref Des cell to select it. The cell is highlighted.
Right-click once in the highlighted cell.
The cell expands to display an expanded cell with a scroll bar. The expanded cell displays several lines of reference designators.
Use the scroll bar in the Ref Des expanded cell in the BOM table to scroll up and down to view the reference designators.
Regardless of the Expand/Collapse system preference setting, the reference designators are displayed in expanded mode in the expanded cell. Each reference designator appears in the expanded cell.
See also: "Working with Reference Designators," "Adding Reference Designators."
When there are many reference designators to display, Java Client displays one line of reference designators, followed by an ellipsis ( ... ) to indicate that there are more reference designators in the Ref Des field.
To display all the reference designators in the Ref Des field:
Click the Ref Des field cell in the BOM table.
A drop-down pane appears. The entire list of reference designators are displayed in this pane. If needed, a scroll bar is included in the pane.
Regardless of the Expand/Collapse system preference setting, the reference designators are displayed in expanded mode in the pane. Each reference designator appears in the pane.
See also: "Working with Reference Designators," "Adding Reference Designators."
This section includes the topics:
You can enter, delete, and modify reference designators, either individually or several at once. If you have very few reference designators, then you can enter them one by one (that is, R1, R2, R3). If you need to enter a larger set, then you may use the format (Rx-Ry), where x and y are any numbers, but whose difference is less than 10,000 (for example: R6-R6055).
Reference designators are limited to 10,000 per BOM row. If you need more than 10,000 reference designators, then add a duplicate item to the BOM with a different find number (use same item number) to define additional reference designators.
Reference designators are not sorted until you complete edits to the current item.
If the number in the Qty field does not match the number of reference designators, then you see a message indicating that the reference designators and quantity do not match.
If Qty is blank (null), then Agile PLM treats the contents of the Qty field as a 0 (zero), and verifies that the number of reference designators match, that is, that the number of reference designators is also 0 (zero). If there are any reference designators in the Ref Des field and Qty is blank, then you see a message indicating that the reference designators and quantity do not match.
If Qty is not an integer, then Agile PLM treats the contents of the Qty field as text characters and does not verify that the Qty and the number of reference designators match. Decimal numbers (for example, 7.8) are not integers and are therefore considered a text entry.
The length of an individual reference designator may be a minimum of 1 character and a maximum of 19 characters.
Duplicate reference designators are not allowed in the same unique single BOM row. If you enter the same reference designator twice (for example: A1, A1), then Agile PLM resolves this to one reference designator (A1).
A unique BOM row is defined by a unique find number. If BOM table rows have the same find number, then the Duplicate Ref Des SmartRule is ignored for those BOM table rows. However, if Find Number is blank for multiple BOM rows, then Agile PLM validates Duplicate Ref Des SmartRule as if all those rows have Find Number = 0. For more information about the Duplicate Ref Des SmartRule, see the Agile PLM Administrator Guide.
See also: "Deleting Reference Designators," "Modifying Reference Designators."
The following rules apply when entering reference designators:
Entering ranges - You can always use ranges when entering reference designators, regardless of the setting of the Reference Designators Allow Range Expand Collapse system preference. If the preference is set to Expand, then the reference designators are displayed in expanded format after you save your edits. For example:
Enter: R1-R5
Expanded Display: R1, R2, R3, R4, R5
Collapsed Display: R1-R5
|
Note: Whenever you edit the reference designator field, the existing reference designators are displayed in Expand format while the BOM table row is in edit mode. If, during the same edit session, you navigate away from the Ref Des edit field, and return to the Ref Des edit field again, then any ranges you entered previously are now displayed in Expanded format. |
For more information, see "Reference Designators Allow Range Expand Collapse Preference Setting."
To add groups of reference designators that begin with different letters, you must separate each letter group with commas. For example, to enter the 10 designators A1, A2, A3, B4, B5, B6, B7, C8, C9, and C10, you would type:
A1-A3,B4-B7,C8-C10
See also: "Working with Reference Designators," "Adding Reference Designators.".
You can use leading zeros when you enter individual reference designators or ranges of reference designators. For example,
R001, R002, R010
B001-B100
The number of numeric characters in each segment of the range does not need to match. For example:
R0001-R100
When the number of numeric characters in each segment of the range does not match, the number of numeric characters in the first segment is used for all the reference designators in the range. In the above example, the range is saved as:
R0001, R0002, R0003, R0004, ... R0099, R0100
When you exit edit mode, the reference designators are displayed according to the Reference Designators Allow Range Expand Collapse preference setting. For more information, see "Reference Designators Allow Range Expand Collapse Preference Setting."
See also: "Working with Reference Designators," "Adding Reference Designators."
|
Note: These rules apply when using a suffix, as defined below. |
Reference designators may be separated into a maximum of three parts:
<Prefix> <Number> <Suffix>
Prefix – may be any character that is not defined as the range indicator (for example, [ - hyphen] the default range indicator) or a delimiter (for example, [ , comma] used to separate - delimit - a list of reference designators).
Number – must be a number (numerals 0 through 9)
Suffix – may be any character that is not designated as the range indicator or a delimiter, and does not start with 0 (zero).
Only the last number string is considered the reference designator <Number>. For example,
A10B30D
<Prefix> = A10B <Number> = 30 <Suffix> = D
A segmented reference designator may also include characters that divide the segments if they meet the requirements outlined above. If the Agile administrator has selected a non-hyphen character as the range indicator, then the hyphen character can be used. Contact the Agile administrator if you have questions about which characters you may use in a multi-segmented reference designator. For example:
A*10*B30D
<Prefix> = A*10*B <Number> = 30 <Suffix> = D
|
Note: If the Agile administrator has selected a non-hyphen character as the range indicator, then the hyphen character can be used. Contact the Agile administrator if you have questions about which characters you may use in a multi-segmented reference designator. |
See also: "Working with Reference Designators," "Adding Reference Designators."
When you enter a range, Agile PLM evaluates the formats of the begin-range designator and the end-range designator to ensure that the formats are compatible and, therefore, the range is valid.
When you enter a multi-segmented range, both the prefix and the suffix must be identical in the begin-range designator and end-range designator. (For details, refer to step 3 below.)
The number segment may use leading zeros as described in"Leading Zeros in Reference Designators."
Agile PLM uses the following rules to evaluate the number portions of a multi-segmented range and the validity of the entered range:
Agile PLM determines the number segments by scanning from right to left to find the first whole number in both the begin-range designator and the end-range designator.
Agile PLM valuates the begin-range number and the end-range number to ensure that they are the same formats.
The numbers are the same precision (number of characters) from the end of the designator.
The end-range designator number is greater than the begin-range designator number.
Agile PLM evaluates the suffixes and prefixes to ensure that they match:
The string of characters to the right of the whole number (suffix) is the same in both the begin-range designator and the end-range designator.
The string of characters to the left of the whole number (prefix) is the same in both the begin-range designator and the end-range designator.
Optionally, the prefix can be omitted in the end-range designator. Agile PLM will use the same prefix as the start-range designator. This satisfies the rule that both prefixes must be the same. The following two ranges are equivalent:
A1B1C - A1B3C
<Prefix> = A1B <Number> = 1 <Suffix> = C -<Prefix> = A1B <Number> = 3 <Suffix> = C
A1B1C - 3C
<Prefix> = A1B <Number> = 1 <Suffix> = C -<Prefix> = <use start-range designator prefix><Number> = 3 <Suffix> = C
The following table shows examples of valid multi-segmented reference designator ranges. The range indicator is - (hyphen):
Table 5-6 Multi-segmented reference designator ranges
| Range entered as: | Reference designators saved as: |
|---|---|
|
A1B*A3B |
A1B*A3B |
|
A*07*FG - A*10*FG |
A*07*FG, A*08*FG, A*09*FG, A*10*FG |
|
A*001*TT - A*3*TT |
A*001*TT, A*002*TT, A*003*TT |
|
A*07 - A*10 |
A*07, A*08, A*09, A*10 |
|
A*001 - A*3 |
A*001, A*002, A*003 |
|
A1B1 - A1B3 |
A1B1, A1B2, A1B3 |
|
A1B1C - A1B3C |
A1B1C, A1B2C, A1B3C |
|
A1B1C - 3C |
A1B1C, A1B2C, A1B3C |
|
A1B1CD - A1B3CD |
A1B1CD, A1B2CD, A1B3CD |
|
A1B1CD - 3CD |
A1B1CD, A1B2CD, A1B3CD |
|
A1B1C1 - A1B1C3 |
A1B1C1, A1B1C2, A1B1C3 |
See also: "Working with Reference Designators," "Adding Reference Designators."
To add reference designators in Web Client:
To begin editing the Redline BOM table, double-click the Ref Des field you want to modify.
The table enters edit mode and the Save and Cancel buttons become active (not grayed).
|
Note: You can double-click any editable field to enter edit mode. Navigate to the fields you want to modify by clicking the field, by pressing the Tab key, or by using the arrow keys. |
Type the reference designators in the Ref Des field. Make any other required modifications to the row.
|
Note: If you need to, you can enter a new number in the Qty field. |
When you have finished your edits, click Save.
To add reference designators in Java Client:
Select the item to modify. You can select multiple items.
Click the Edit button.
The Edit BOM window appears.
Click the Ref Des field you want to modify. A drop-down edit pane appears.
Type the reference designators in this pane. Make any other required modifications to the row.
|
Note: If you need to, you can enter a new number in the Qty field. |
When you are finished, click OK.
See also: "Working with Reference Designators," "Adding Reference Designators."
The same reference designator can be used in more than one site-specific portion of the BOM, regardless of the Duplicate Ref Des SmartRule setting. (See the Agile PLM Administrator Guide.) For example, reference designator B22 can be used for Part 123 in the India portion of the BOM and also for Part 556 in the San Jose portion of the BOM.
If the SmartRule is set to Disallow, then the same reference designator cannot be used in the common portion of the BOM and in a site-specific portion of the BOM, for example, using reference designator C55 for both Part 333 on the common portion of the BOM and for Part 678 on the Milpitas portion of the BOM. Nor can the same reference designator be used more than once in the same site-specific portion of the BOM, for example, using reference designator D46 for both Part 989 on the Milpitas portion of the BOM and for Part 765, also on the Milpitas portion of the BOM.
See also: "Working with Reference Designators," "Adding Reference Designators."
You can delete reference designators either individually or several at once.
To delete reference designators in Web Client:
To begin editing the Redline BOM table, double-click the Ref Des field you want to modify.
The table enters edit mode and the Save and Cancel buttons become active (not grayed).
|
Note: You can double-click any editable field to enter edit mode. Navigate to the fields you want to modify by clicking the field, by pressing the Tab key, or by using the arrow keys. |
Select the appropriate reference designators.
To select a single reference designator, either double-click the appropriate reference designator, or use the Shift and arrow keys. To select several contiguous reference designators, use the Ctrl+Shift and arrow keys.
Press the keyboard Delete key.
When you have finished your edits, click Save.
To delete reference designators in Java Client:
Select the item to modify by clicking its row.
Click the Edit button.
The Edit BOM window appears.
Click the Ref Des field you want to modify. A drop-down edit pane appears.
Select the appropriate reference designators.
To select the appropriate single reference designator, use the Shift and arrow keys. To select several contiguous reference designators, use the Ctrl+Shift and arrow keys.
Press the keyboard Delete key.
When you have finished your edits, click OK.
|
Note: Be sure to use the keyboard Delete key, not the Remove button on the BOM tab. If you click the BOM Remove button, then the entire item is removed from the BOM. |
See also: "Working with Reference Designators," "Adding Reference Designators."
You can modify reference designators, either singly or several at once.
To modify reference designators in Web Client:
To begin editing the Redline BOM table, double-click the Ref Des field you want to modify.
The table enters edit mode and the Save and Cancel buttons become active (not grayed).
|
Note: You can double-click any editable field to enter edit mode. Navigate to the fields you want to modify by clicking the field, by pressing the Tab key, or by using the arrow keys. |
In the editable Ref Des cell, select the appropriate reference designators.
To select a single reference designator, either double-click the appropriate reference designator, or use the Shift and arrow keys.
To select several contiguous reference designators, use the Ctrl+Shift and arrow keys.
To add a reference designator, position the cursor at the end of the list of reference designators.
|
Note: Although you may position the cursor anywhere in the list to add a reference designator, it is not necessary to insert the reference designator in a particular place in the list because the list is sorted after you save your modifications. |
Type the modified reference designator.
Click Save.
To modify reference designators in Java Client:
Select one or more items to modify.
Click the Edit button.
The Edit BOM dialog appears.
Click the Ref Des field you want to modify. A drop-down edit pane appears.
Select the appropriate reference designators.
To select a single reference designator, position your cursor in the list of reference designators and use the Shift and arrow keys.
To select several contiguous reference designators, use the Ctrl+Shift and arrow keys.
To add a reference designator, position the pointer at the end of the list of reference designators.
|
Note: Although you may position the cursor anywhere in the list to add a reference designator, it is not necessary to insert the reference designator in a particular place in the list because the list is sorted after you save your modifications. |
Type the modified reference designator.
When you are finished, click OK.
See also: "Working with Reference Designators," "Adding Reference Designators."
This section includes the following topics:
To modify the BOM table, you must create a change against the item if:
The item is released.
The item is unreleased and it has a pending MCO against it.
You can use an ECO or SCO to redline the BOM:
Use an ECO to modify common or site-specific portions of the BOM on the latest released revision of the item. Using an ECO creates a new revision of the item.
Use an SCO to modify site-specific portions of the BOM on the latest released revision. Using an SCO does not create a new revision of the item. For more information about SCOs, see "Site Change Orders."
When you add an item that has pending changes to the Affected Items tab, Agile PLM displays a warning that informs you that the item has a separate pending change, and lets you choose whether to add it to the Affected Items tab. If you choose to add it, then you can open the item from the Affected Items table. To view the pending changes, click the Changes tab of the item.
|
Note: If you do not have the Discovery privilege for an item on the BOM table, then you cannot redline that item. You cannot replace an item on the BOM table with an item that you cannot discover. |
If you have the appropriate privileges, then you can modify a redlined BOM. For details, see the following sections:
|
Note: You can add nonexistent items to the Redline BOM table. See "Web Client, Adding Items to the BOM Table of a Preliminary Item" and "Java Client, Adding Items to the BOM Table of a Preliminary Item." |
You display the Redline BOM tab from the Affected Items tab of an ECO or SCO. Select an item row in the Affected Items table and the corresponding BOM is displayed in the Redline BOM tab.
When the Redline BOM tab is displayed:
If a row in the table has a red line through every cell in the row, then it means that item was deleted from the BOM.
If just a few of the cells have a short red line through them, then it means the item was modified, but not deleted. For example, redlines in only the Qty and Find Number cells indicate that the Qty and Find Number of that BOM item have been modified, while other values remain unchanged.
Any cell that was modified has a red line through the old value and the new value appears in red. For example, in the Qty cell, a numeral seven with a redline through it 7 and a red numeral ten 10 indicates that the old quantity was 7 and the new quantity is 10.
For information about other BOM redlining actions, see "Redlining the BOM of a Released Item."
To display the redline BOM for an item in Web Client:
Open the ECO or SCO through which you want to redline the BOM of an item.
Click the Affected Items tab of the change.
In the Affected Items table, click to select the row of the item for which you want to view or create redlines. If the item has already been redlined, then a dot icon appears in the Has Been Redlined column of the row.
In the redline pane under the Affected Items table, the following redline tabs appear if they have been enabled on your Agile PLM system:
Title Block - Change-controlled item attributes as defined for the item.
BOM - displays item BOM data.
Manufacturer - displays manufacturing data.
Attachments - (on ECOs only) displays item attachments.
|
Note: If your Agile PLM system does not use the Manufacturers tab or, on documents, the BOM tab, then those redline tabs do not appear in the redlines pane. The ECO redline Title Block tab appears on an ECO only if change-controlled item attributes have been enabled. |
Click the redline BOM tab to display it (if it is not already displayed).
To display the Redline BOM tab for an item in Java Client:
Open the ECO or SCO through which you want to redline the BOM of an item.
Click the Affected Items tab of the change.
In the Affected Items table, click the row of the item for which you want to view or create redlines.
In the redline pane under the Affected Items table, the Redline BOM tab, Redline Manufacturers tab, and Redline Attachments tab (on ECOs) only appear, displaying the BOM data of the item, the manufacturing data of the item, and the attachments of the item, respectively
|
Note: If your Agile PLM system does not use the Manufacturers tab or, on documents, the BOM tab, then those redline tabs do not appear in the redlines pane. The ECO redline Title Block redline tab is not displayed in Java Client. |
Click the Redline BOM tab to display it (if it is not already displayed).
The following table lists the functions and buttons on the Redline BOM tab in Web Client:
Table 5-7 Web Client Redline BOM tab buttons
| Button or function | Use |
|---|---|
|
Edit mode |
Double-click any editable cell in the table to enter edit mode. Move from one editable field to another by clicking the field, by pressing the Tab key or by pressing the arrow keys. Make the desired changes in each field and then click Save when you are finished. |
|
Add |
The Add button opens the add palette, which enables you to use one of the Web Client add options: type in a known number (with type-ahead search suggestions), click Search to Add, or click Create to Add. You can add an item or a place-holder row to the Redline BOM table. By default, the new item or row has a find number of zero (0) and a quantity of one (1). See "Web Client, Adding Items to the BOM Table of a Preliminary Item." |
|
Remove |
The Delete button removes the selected row from the Redline BOM table. |
|
Undo Redlines |
The Undo Redlines button clears the redlines from the selected rows. See "Undoing Changes to a Redline BOM Table." |
|
More... |
The More... menu button provides the following Redline BOM table editing capabilities: Copy Paste Fill-down Fill-down (selected cells) Fill-up Fill-up (selected cells) Full Display Mode and Standard Display Mode (toggle setting) |
The following table lists the buttons on the Redline BOM tab in Java Client:
Table 5-8 Java Client Redline BOM tab buttons
| Button | Use |
|---|---|
|
|
Redline BOM - Displays the selected rows in a Redline BOM window so that you can change editable fields. |
|
|
Add - Adds an item or an empty row to the Redline BOM table. Depending on which option you choose, you can:
By default, the new item or row has a find number of zero (0) and a quantity of one (1). See "Java Client, Adding Items to the BOM Table of a Preliminary Item." |
|
|
Remove - Removes the selected row from the Redline BOM table. |
|
|
Undo Redlines - Clears the redlines from the selected rows. See "Undoing Changes to a Redline BOM Table." |
For information about BOM redlining actions, see "Redlining the BOM of a Released Item."
To add an item to the Redline BOM table in Web Client:
Click the Add button.
Use one of the Web Client add options: type in a known number (with type-ahead search suggestions), click Search to Add, or click Create to Add.
Adding items to the Redline BOM table is similar to adding items to the BOM table. For more information about how to complete the dialogs, see:
To add an item to the Redline BOM table in Java Client:
Click the Add drop-down menu button and choose one of the add options: Create, Type in Known Numbers, Search, or Add Blank Row.
Adding items to the Redline BOM table is similar to adding items to the BOM table. For more information about how to complete the dialogs, see:
"Java Client, Type in the Number of an Item to Add to the BOM Table"
"Java Client, Adding a Blank Row to the BOM Table" and "Java Client, Completing a Blank Row in the BOM Table"
For information about other BOM redlining actions, see "Redlining the BOM of a Released Item."
You use the buttons on the Redline BOM tab to remove one or more rows and items.
If a selected row is red (indicating that the row is redline-added to the BOM), then it is removed.
If a selected row is black, then a red line is drawn through it, thus redline-deleting the item from the BOM.
To remove an item from a redline BOM table in Web Client:
Select one or more rows to delete.
Click the Remove button on the Redline BOM tab.
To remove an item from a redline BOM table in Java Client:
Select one or more rows to delete.
Click the Remove button on the Redline BOM tab.
For information about other BOM redlining actions, see "Redlining the BOM of a Released Item."
On the Redline BOM tab you can modify any editable BOM tab field, including any editable custom fields that the Agile administrator has enabled. Editable BOM tab fields usually describe or define the relationship between the parent item (the item BOM you are redlining) and the child item (the item that appears on the BOM table). For example, the Qty, Find Number, and Ref Des fields define the relationship between the assembly (parent item) and the BOM item (child item).
When you modify information on the Redline BOM tab, Agile PLM enters the new information, in red, below the old information.
When you redline the BOM Notes field, you can add, replace, or edit text. In the BOM Notes field, the new text and any redlined text are displayed.
You cannot modify the Redline BOM table Sites, Item Description, and Item Rev fields.
Redlining reference designators in the Redline BOM table is the same as editing reference designators on the BOM table. For more information, see "Working with Reference Designators." Any new reference designators appear in red. Any deleted reference designators have a red line drawn through them.
|
Note: You cannot use the Redline BOM tab to modify the attributes of the items that are listed on the BOM table. You cannot use the Redline BOM tab to modify non-editable BOM table fields. |
If the Agile administrator has enabled them, then the item BOM tab may also include read-through fields that allow you to conveniently view additional information derived from the items that are listed on the BOM table, for example, the Page Two fields of a child item. A read-through field contains a read-only copy of attribute data from a child item. BOM tab read-through fields cannot be edited on the BOM tab, nor can they be edited on the Redline BOM tab.
To modify the attributes of an item listed on the BOM table, if it is a Preliminary item with no pending revisions, you can open it and use the Edit feature to modify it. See "Editing an Unreleased Item." If an item listed on the BOM table has been released, then you must use a change order to modify it. See "Editing a Released Item."
For more information about read-through fields and about which fields are editable on the item BOM tab, see Agile PLM Administrator Guide.
Your assigned roles and privileges also determine which attributes you are allowed to edit.
To edit a field on the Redline BOM table in Web Client:
To begin editing the Redline BOM table, double-click in any editable cell.
The table enters edit mode and the Save and Cancel buttons become active (not grayed).
Make the required changes in each field. Navigate to other fields by clicking the field, by pressing the Tab key, or by using the arrow keys.
Click Save when you are finished.
To edit a field on the Redline BOM table in Java Client:
Select the rows to edit, and click the Edit button.
The Redline BOM dialog appears.
Make the modifications.
When you are finished, click OK.
For information about other BOM redlining actions, see "Redlining the BOM of a Released Item."
The Undo Redlines button lets you undo modifications to the Redline BOM tab. It removes the red elements from the selected row.
To undo a deletion (where Agile PLM has drawn a red line through the entire row):
Select the deleted row. You can select more than one deleted row.
Click Undo Redlines.
To undo a modification (where Agile PLM has drawn a short red line through the modified value):
Select the modified row (or rows).
Click Undo Redlines.
To undo a newly added item (remove it from the Redline BOM table):
Select the added row (or rows).
Click Undo Redlines.
For information about other BOM redlining actions, see "Redlining the BOM of a Released Item."
You can print object tabs and other data from your Agile PLM system. You can print the current tab or all tabs. Attachments are printed from their native applications or from the AutoVue for Agile viewer.
In Web Client, with the object open, choose Actions > Print.
In Java Client, with the object open, use the Print button.
For additional information about printing objects, see Getting Started with Agile PLM.
In Java Client, to print only the BOM tab data, use the Print button drop-down menu and choose BOM. Complete the BOM Printing Options dialog, including the number of BOM levels you want to print and whether to include the AML.
See also: Chapter 9, "Working with Product Reports and Process Reports."


 in this column indicates that the item has an attachment.

 in this column indicates that the item has a released Deviation or Stop Ship that has not expired.