| Agile Product Lifecycle Management Product Collaboration User Guide Release 9.3.5 E61150-03 |
|

 Previous |
 Next |
| Agile Product Lifecycle Management Product Collaboration User Guide Release 9.3.5 E61150-03 |
|
Previous |
Next |
On the Affected Items tab you add, modify, and remove items that are affected by the change. Redline modifications are initiated from the Affected Items tab and are viewed through the Affected Items tab.
This section includes the following topics:
The Affected Items tab of a change lists the items that are affected by the change. If an item belongs to multiple manufacturing sites, then the default Affected Items row values are the default value for each site row. Users with sufficient privileges can use the Affected Items tab to:
List the items affected by a change and give those items a pending revision (ECOs)
Specify the revision of the item that is affected by the change (SCOs, ECRs, Deviations, Stop Ships)
|
Note: ECOs and MCOs affect only the most recently released revision of the item. |
View items listed on the Affected Items tab
Create, view, or modify the Redline BOM tab data of affected items (ECOs and SCOs)
Create, view, or modify the Redline Manufacturers tab data of affected items (SCOs and MCOs - ECOs if SmartRule is set to allow it)
Add redlines to attachments of items through the Redline Attachments tab (ECOs only)
Specify the disposition of existing parts (ECOs, MCOs, SCOs, ECR, Deviation, and Stop Ship)
Users with Read privileges can:
Open affected items
Redline affected items (ECOs, MCOs, and SCOs)
View the disposition of existing parts (ECOs, MCOs, and SCOs). You must scroll to the right to bring the disposition fields into view.
|
Note: If you do not have the Discovery privilege for an item, then it does not appear on the Affected Items tab. You may see a message telling you how many items are not displayed. Depending on your Read privileges, you may not be able to view all the fields on the Affected Items tab. |
To open an item listed on the Affected Items tab:
In Web Client, click the item number. The item opens with the Title Block tab on top.
In Java Client, double-click the affected item row. The item opens with the Title Block tab on top.
Or, right-click the item row, choose Open, and then choose a tab. The item opens with the selected tab on top.
The revision associated with the change is selected in the Rev drop-down list.
The following buttons on the Affected Items tab in Web Client are available or unavailable, depending on your privileges and whether it is appropriate to use them.
Table 8-1 Buttons and Modes on the Affected Items tab, Web Client
| Button or Mode | Description |
|---|---|
|
(edit mode) |
Double-click any editable cell of the affected items table. The affected items table enters edit mode and the Save and Cancel buttons become active. |
|
Remove |
Deletes the selected item from the Affected Items table. |
|
Add |
Add - Adds an item below the selected item. Depending on which option you choose, you can: Create an item while adding it. Search for an existing item. Type in Known Number(s) of one or more existing items. |
|
Bulk Change |
Applies a change of an item to multiple BOMs or AMLs that use the item. |
|
More.. |
More..menu button Provides access to the following actions: Copy - Copy the selected item row to paste it into a different table. Paste - Paste a previously copied item row into the affected items table. Fill Down - Copy the contents of the highlighted cell to all the cells below it. Fill-down (selected cells) - When non-contiguous cells are selected (highlighted), copy the contents of the uppermost highlighted cell to the highlighted cells below. Fill Up - Copy the contents of the highlighted cell to all the cells above it. Fill Up (selected cells) - When non-contiguous cells are selected (highlighted), copy the contents of the uppermost highlighted cell to the highlighted cells below. Full Display Mode - Hide the redline tabs and use the full content pane to display the affected items table. Standard Display Mode - Display the previously hidden redline tabs and use the content pane to display both the affected items table and the redline tabs. |
|
Save Cancel |
Active only in table edit mode. Click the appropriate button to either save or cancel the edits to the affected items table. |
|
Views drop-down list |
Select the view you want, for example, Hide Site Rows or Base View. Select Base View to list the site-specific information for each affected item. Each item is listed in multiple rows in the table, once for the default or common display of the item (the Sites field is blank) and once for each site associated with the item (the Sites field contains the appropriate site name.) Select Hide Site Rows to list only the default or common information of the item. Each item is listed only once in the table, and the Sites field is blank. You can select other views if the Agile administrator has defined global views or if you have defined personal views. For more information about personal views, see Getting Started with Agile PLM. |
The following buttons on the Affected Items tab in Java Client are available or unavailable, depending on your privileges and whether it is appropriate to use them.
Table 8-2 Buttons on Affected Items tab, Java Client
| Button | Description |
|---|---|
|
Edit Affected Items
|
Displays the selected (checked) item in edit mode. |
|
Remove
|
Deletes the selected item from the Affected Items table. |
|
|
Add - Adds an item below the selected item. Depending on which option you choose, you can:
|
|
Fill Down Rows, Fill Up Rows
|
Copies the values in each column of the first selected row (for Fill Down) or the last selected row (for Fill Up), and pastes them into the corresponding cells of all other selected rows. See "Fill Up Rows and Fill Down Rows Buttons in Java Client." |
|
BOM Bulk Change
|
Applies a change of an item to multiple BOMs that use the item. |
|
Manufacturer Part Bulk Change
|
Applies a change of an item to multiple AMLs that use the item. |
|
View drop-down list |
Select Show Sites to list the site-specific information for each affected item. Each item is listed in multiple rows in the table, once for the default or common display of the item (the Sites field is blank) and once for each site associated with the item (the Sites field contains the appropriate site name.) Select Hide Sites to list only the default or common information of the item. Each item is listed only once in the table, and the Sites field is blank. |
The following table shows the Affected Items fields for each change class. Yes indicates that the field is included and hyphen (-) indicates that the field is not included.
Table 8-3 Fields on the Affected Items tab for each change class
| Affected Items tab field | ECO | MCO | SCO | ECR | Stop Ship | Deviation |
|---|---|---|---|---|---|---|
|
Sites |
Yes |
Yes |
Yes |
- |
- |
- |
|
Item Number |
Yes |
Yes |
Yes |
Yes |
Yes |
Yes |
|
Old Rev |
Yes |
- |
- |
- |
- |
- |
|
Old Lifecycle Phase |
Yes |
Yes |
- |
- |
- |
- |
|
Obsolete Date |
Yes |
- |
Yes |
- |
- |
- |
|
New Rev |
Yes |
- |
- |
- |
- |
- |
|
Revision |
- |
- |
Yes |
Yes |
Yes |
Yes |
|
Effective Date |
Yes |
- |
Yes |
- |
- |
- |
|
Lifecycle Phase |
Yes |
Yes |
- |
Yes |
Yes |
Yes |
|
Change Function |
Yes |
- |
- |
- |
- |
- |
|
Old Item Description (appears only if enabled) |
Yes |
- |
- |
- |
- |
- |
|
Item Description |
Yes |
Yes |
Yes |
Yes |
Yes |
Yes |
|
On Order |
Yes |
- |
Yes |
- |
- |
- |
|
Stock |
Yes |
- |
Yes |
- |
- |
- |
|
Work in Progress |
Yes |
- |
Yes |
- |
- |
- |
|
Finished Goods |
Yes |
- |
Yes |
- |
- |
- |
|
Field |
Yes |
- |
- |
- |
- |
- |
|
Note: All required fields must be completed before a change can be released. (A user with Override privilege can release a change without filling in the required fields.) The Agile administrator determines which fields are required, but the New Rev field on an ECO is always required and cannot be overridden. Perform a status audit or a release audit to verify that all required fields have been completed. For more information about auditing, see the chapter "Routing Objects with Workflows" in Getting Started with Agile PLM. See the Agile administrator if you have questions about required fields. |
The Sites field indicates the manufacturing site for which the affected item was added. When the Sites field is blank, it indicates that the row shows information about the item that is common among all sites assigned to the item.
If the Agile administrator has configured the Agile PLM system so that the Description field of a released item can be changed only by using the Affected Items tab of a change order, then the affected items table will include both the Old Item Description field and the Item Description field (which might be renamed to New Item Description).
If your Agile PLM system is configured for change order modification the Description field of an item, then the Old Item Description field is filled in automatically when you add the item to the Affected Items tab. You cannot modify the Old Item Description field on the Affected Items tab. However, if you have the appropriate privileges, then you can enter a new description in the affected items table (New) Item Description field. This description appears in the Description field of the pending revision of the item.
The Item Description field (or New Item Description field) of a released change order cannot be used to modify the Description field of an item. The Description field of a released item can only be modified through the Title Block tab of the item, with the appropriate modify item privileges. Once the change order with the item on its Affected Items tab is released, even though you may have a modify privilege for released change orders, the change order Item Description field of released change orders cannot be modified, and therefore cannot be used to modify the Description field of the item.
For more information about modifying the item Description field, see "Editing a Released Item's Description Field."
|
Note: The item Description field cannot be modified through an MCO because an MCO does not create a new item revision. The MCO uses the Description field information from the ECO revision or Introductory revision on which it is based. |
The Revision field indicates which revision of the item is affected by the change. The following table explains which item revisions can be affected by each kind of Agile PLM change.
Table 8-4 Default Revision for each Change class
| Change class | Can be edited? | Default revision when item is added to Affected Items table |
|---|---|---|
|
Change Order (ECO) |
No |
When an item is added to the Affected Items table of a change order, the most recently released revision of the item appears in the Old Rev field. You cannot edit the ECO Affected Items table Old Rev field. Change orders always affect the most recently released revision of the item. If the item has never been released, then the change order affects the Introductory revision of the item. An ECO creates a new revision of the item and you must specify a new revision number or letter in the Affected Items table New Rev field. Note: A change order is the only Agile change object that can create a new item revision. For more information about ECOs, see "Special Considerations for ECOs." |
|
Manufacturer Change Order (MCO) |
- |
Manufacturer change orders always affect the most recently released revision of the item. If the item has never been released, then the MCO affects the Introductory revision of the item. The item revision number upon which the MCO is based is not displayed on the Affected Items tab if an MCO. For more information about MCOs, see "Special Considerations for MCOs." |
|
Site Change Order (SCO) |
Yes |
When an item is added to the Affected Items table of a site change order, the most recently released revision of the item appears in the Revision field. You can edit the SCO Affected Items table Revision field to select a different item revision. An SCO can affect any released revision of the item. An SCO cannot affect an Introductory revision of an item. Only one revision of an item can be included on the Affected Items table of an SCO |
|
Engineering Change Request (ECR) |
Yes |
When an item is added to the Affected Items table of an engineering change request, the Revision field is blank. When the Revision field is blank, the ECR will affect the most recently released revision. Only released revisions are available for selection in this field. Pending revisions do not appear in this field. If the item has never been released, then the engineering change request affects the Introductory revision of the item. You can edit the ECR Affected Items table Revision field to select a different item revision. |
|
Deviation |
Yes |
When an item is added to the Affected Items table of a deviation, the Revision field is blank. When the Revision field is blank, the deviation will affect the most recently released revision of the item. If the item has never been released, then the deviation affects the Introductory revision of the item. You can edit the deviation Affected Items table Revision field to select a different item revision. |
|
Stop Ship |
Yes |
When an item is added to the Affected Items table of a stop ship, the Revision field is blank. When the Revision field is blank, the stop ship will affect the most recently released revision of the item. If the item has never been released, then the stop ship affects the Introductory revision of the item. You can edit the stop ship Affected Items table Revision field to select a different item revision. |
The Obsolete Date field applies to the prior revision of the affected item, not to the new revision. The obsolete date is the date that the old revision becomes obsolete.
The Effective Date field applies to the new revision, and reflects the date that the new revision becomes effective.
By default, the Lifecycle Phase list has the following entries (the Agile administrator can add more):
Inactive - Temporarily not in use and may be reactivated.
Obsolete - Permanently discontinue the item.
Pilot - Build with limited initial quantities as a pilot project.
Production - Release for regular production.
Prototype - Produce in very limited quantities for testing.
The Old Lifecycle Phase field is filled in automatically when you add the item to the Affected Items tab. You cannot modify the Old Lifecycle Phase field on the Affected Items tab.
If the item has been released, then when you add it to the Affected Items tab, the Lifecycle Phase field is automatically filled in with the current lifecycle phase of the item. You can then modify the Lifecycle Phase field. If the item has never been released, then when you add it to the Affected Items tab, initially both the Old Lifecycle Phase field and the Lifecycle Phase field are blank. You can then modify the Lifecycle Phase field.
|
Note: If you leave the Affected Items table Lifecycle Phase field blank and release the change order, then Agile PLM uses the Old Lifecycle Phase to determine the lifecycle phase of the released object. |
With a change order (for example, an ECO), you can view and work with affected items for a specific manufacturing site by:
Web Client – select Base View in the Views drop-down list on the Affected Items tab.
Java Client – select Show Sites in the View drop-down list on the Affected Items tab.
Each item on the table is expanded to display a row for each site associated with the item. The sites displayed are the sites to which you have access.
For example, to work with part number P345 for the Hong Kong site, select the row for part P345 with the site name Hong Kong in the Sites field of the row.
With a site change order (SCO), you view and work with items for a specific manufacturing site by selecting the appropriate site when you add the item to the Affected Items table. The modifications you specify on an SCO apply only to the site selected for the item.
The following fields in the Affected Items table can contain values that differ by site:
Disposition fields: On Order, Work in Progress, Finished Goods, Stock, Field
Effective Date
Obsolete Date
The following fields in the Affected Items table cannot contain values that differ by site:
Item Description
Old Item Description
Lifecycle Phase
Old Lifecycle Phase
Old Rev
New Rev
The Agile administrator uses the Site-Specific Field property to determine whether the other fields in the Affected Items table can contain values that differ by site.
To modify or set the effective and obsolete date for a specific site, and nothing else is being done with the ECO, add the item to the Affected Items tab and create a new revision. If you do not want to create a new revision just for this modification, then create an SCO and modify the effective and obsolete dates for the site on the SCO Affected Items tab.
ECOs and SCOs have fields on the Affected Items table that specify what to do with existing parts affected by the change: On Order, Stock, Work In Progress, or Finished Goods. ECOs also include Field (for "in the field"). Each of these fields can have a list of disposition types defined by the Agile administrator. Examples of dispositions are Use, Scrap, and Rework.
You can use the Add button to add an item to the Affected Items tab.
In Web Client, if you create a change from an open item by using Actions > Create New > Change, then that item is added to the Affected Items tab automatically.
In Java Client, you can create a change from an open item by using the Create Change command on the More Actions menu (click the More button at the top of the object window) and on the right-click shortcut menu. Then that item is added to the Affected Items tab automatically.
This section contains the following topics:
|
Note: You cannot add an item that is locked by another user. An item is locked if a user has made modifications to the item, but has not yet saved those modifications. Once the item is saved, it is unlocked. |
There are several different ways to add items to the Affected Items tab:
The Add button on the Affected Items table enables you to:
Type in the number of an item.
See "Web Client, Type in the Number of an Item to Add to the Affected Items Table."
Execute a Quick Search by clicking the palette Search to Add button.
See "Web Client, Quick Search to Add Items to the Affected Items Table."
Create a new item by clicking the palette Create to Add.
See "Web Client, Create New to Add Items to the Affected Items Table."
Execute a saved search - from the search results table, you can use the More.. menu Copy command, or you can populate the NAVIGATOR drawer, and then drag and drop to add to the Affected Items table.
See "Web Client, Saved Search to Add Items to the Affected Items Table."
Open a custom search palette and define a search (Basic or Advanced) and search for the items you want to add.
See "Web Client, Custom Search to Add Items to the Affected Items Table."
If you know the number of the item you want to add to the BOM table, then you can use the Type in Known Numbers option in Web Client. See also, "Web Client, Quick Search to Add Items to the Affected Items Table" and "Web Client, Create New to Add Items to the Affected Items Table."
To add one or more known items to the Affected Items table in Web Client:
Click the Affected Items tab.
Click the Add button. The object addition palette appears.
In the text entry field, type the items numbers you want to add, separated by semicolons. For example:
P00487; P00259; P00264
Or, you can also use the Web Client Type-Ahead search feature:
If you type a partial item number, then Agile PLM displays a list of items that match the text that you have typed so far.
Use the arrow up and arrow down keys to highlight the object you want.
Press the right arrow key to select the object.
Repeat steps a through c to select multiple objects to add.
|
Note: For SCOs, in the palette drop-down list, select the site you want. |
Press the Enter key to add the selected items to the table and close the palette.
The items appear in the Affected Items table.
For information about other methods of adding items to the Affected Items table, see "Web Client, Adding Items to the Affected Items Table."
Use Web Client Add features to perform a quick search to find the items you want to add to the Affected Items table.
To execute a quick search to find one or more known items to add to the Affected Items table in Web Client:
Click the Affected Items tab.
Click the Add button. The object addition palette appears.
Click the palette Search to Add button. The Items Search palette appears.
Enter the search criteria and click to execute the quick search.
In the results table, select one or more items, and then:
Press Enter on the keyboard to add the selected items to the Affected Items table.
Or, drag the selected items and drop them onto the Affected Items table.
The items are added to the Affected Items table.
|
Note: For SCOs, in the palette drop-down list, select the site you want. |
When you are finished, press Escape on the keyboard to close the Items Search palette.
To execute a Custom Search from the Quick Search palette:
Click the Affected Items tab.
Click the Add button. The object addition palette appears.
Click the palette Search to Add button. The Items Search palette appears.
Click the Custom Search button. The Basic Search palette appears.
Search for the items you want:
Enter the search criteria and click Search.
or
Click the Launch Saved Searches button.
In the Saved Searches palette, navigate to the saved search you want and double-click it.
In the Search Results table, select the rows you want and click the Copy button.
On the Affected Items tab, paste your selections by choosing Paste in the More menu or by pressing Ctrl-C.
You can add an item that has not yet been created to Affected Items table.
Adding nonexistent items to the Affected Items table using Web Client:
Click the Affected Items tab.
Click the Add button. The object addition palette appears.
Click the palette Create to Add button.
The Create New dialog appears.
In the Create New dialog, use the Type drop-down list to select the type (subclass) of item you want to create.
Use the number that appears, click the Autonumber button, or type a number.
Type a description in the Description field, if desired.
Complete any required fields.
Click Add.
|
Note: If you create a new item and decide that you do not want to keep it, then you should delete it from the database with the Delete command on the Actions menu. For more information about deleting items from the Affected Items table, see the section, "Removing an Item from the Affected Items Tab." |
For information about other methods of adding items to the Affected Items table, see "Web Client, Adding Items to the Affected Items Table."
Agile PLM table addition features allow you use a saved search to find items to add to the Affected Items table.
To use a saved search in Web Client to locate items to add to the Affected Items table:
Execute the saved search.
Use one of the following methods to add search result items to the Affected Items table:
Copy and Paste:
In the Search Results table, select one or more item rows.
Copy the items by choosing Copy in the More.. menu, or use the Ctrl + C keyboard shortcut.
Open the desired item and click the Affected Items tab to display the Affected Items table.
Choose Paste in the More.. menu, or use the Ctrl + V keyboard shortcut.
NAVIGATOR Drawer:
In the Search Results table, click the Navigator button. The NAVIGATOR drawer in the left navigation pane is populated with the search results.
Select one or more items in the NAVIGATOR drawer. Click to the left of the item icon to highlight and select a NAVIGATOR link.
Drag and drop the highlighted items onto the Affected Items table.
Alternately, you can copy the NAVIGATOR highlighted items (Ctrl + C) and paste them into the Affected Items table (Choose Paste in the More.. menu, or use the Ctrl + V keyboard shortcut.)
In Web Client, you can execute a custom search to locate items to add to the Affected Items table. Then, use copy and paste to add the items to the Affected Items table.
You can execute a custom search in the content pane and use the search results table features to populate the NAVIGATOR drawer or copy search results rows and paste them into the Affected Items table. See "Web Client, Saved Search to Add Items to the Affected Items Table."
You can also open a custom search palette, which lets you view the Affected Items table while you search for and select the items that you want to add.
To open a Custom Search palette to find items to add to the Affected Items table:
Click the Affected Items tab to display the Affected Items table.
On the keyboard, press Ctrl + Shift + X. The custom search palette appears. The Affected Items table remains visible behind the palette.
In the search palette, define a Basic search or an Advanced search. Execute the search. For more information about defining searches, see Getting Started with Agile PLM.
Select one or more search results rows.
Click the Copy button.
Put the focus in the Affected Items table by selecting an Affected Items table row, and then choose Paste in the More.. menu.
You can run multiple searches to find and select additional items.
Press the Escape key on the keyboard to close the custom search palette.
For information about other methods of adding items to the Affected Items table, see "Web Client, Adding Items to the Affected Items Table."
|
Note: Tip: An easy way to use the Add button on the Affected Items tab in Java Client is to click it once. The dialog appears that lets you enter the number of an item, if you know it. In this dialog, click the Create or Search link to use those add item methods. If you are adding affected items to an SCO, then the Create link is not available. |
To add an item to theAffected Items tab in Java Client:
Open a change and display the Affected Items tab.
Click the Add drop-down menu button and choose one of the add options: Search, Type in Known Numbers, or Create.
|
Note: If you are adding affected items to an SCO, then the Create option is not available. |
Depending on your menu selection, do one of the following:
Search - Search for one or more existing items. In the Add Affected Item dialog, select a search method. If you choose to perform a simple search, then enter the value to search for and click Search. You can also define an advanced search, run a saved search, or select a bookmarked or recently visited item (Shortcuts). (For more information about searches, see Getting Started with Agile PLM.) In the search results, select the items you want, and click OK. All the items in the Selected Affected Item(s) list are added to the Affected Items table.
Type in Known Numbers - enter one or more numbers and click Add.
Create - Select a type from the Type drop-down list. If appropriate, enter an object number. Click OK.
|
Note: If you are adding affected items to an SCO, then, in the Add for Site drop-down list, select the site you want. |
Adding items to the Affected Items table is similar to adding items to the BOM table. For more information about how to complete the dialogs, see "Java Client, Search for Items to Add to the BOM Table," "Java Client, Type in the Number of an Item to Add to the BOM Table," and "Java Client, Adding a Blank Row to the BOM Table."
You can create an ECO that automatically adds, replaces, or removes an item from the assemblies on several BOMs simultaneously. Likewise, you can create an ECO or MCO that automatically replaces or removes a manufacturer part on the AML (Manufacturers tab) of several assemblies simultaneously. Such changes are called bulk changes and are created with a Bulk Change wizard.
The following sections explain how to use the bulk change features:
BOM bulk changes are available only from ECOs by using the BOM Bulk Change wizard. The BOM bulk change process provides the following options:
Add an item to multiple assemblies.
Remove an item from all assemblies or from some assemblies that use the item, and automatically redline the BOM of the assemblies affected by the Bulk Change.
Replace an item in all assemblies or from some assemblies that use the item, and automatically redline the BOM of the assemblies affected by the Bulk Change.
Find assemblies related to a specific item and add them to the Affected Items tab. No BOM Bulk redlines are preformed, rather, you manually redline the BOMs after the items are added to the Affected Items table.
The Web Client BOM Bulk Change wizard lets you specify modifications to multiple assemblies simultaneously. You have the following BOM bulk change options:
Add one item to multiple assemblies.
Replace an item on multiple assemblies.
Remove an item from multiple assemblies.
Find assemblies related to an item and add them as affected items.
The procedures vary slightly, however, each wizard step guides you through the process. All the procedures are described below.
To add an item to multiple assemblies, Web Client:
From a pending or unassigned change, click the Affected Items tab to bring it forward. (You can use an existing change or create a new one.)
Click the Bulk Change button and choose BOM from the menu. The BOM Bulk Change wizard appears.
In the Select Bulk Change Option wizard step, select Add an item to multiple assemblies, and then click Next.
In the Select Item To Add wizard step, you specify the item that you want to add to multiple assemblies. Type an item number, or click the Launch the Palette button to execute a quick search for the item. After you select an item number, click Next.
In the Identify Assemblies to Add to wizard step, you specify which assemblies this bulk change will affect.
Click the Add button and type a list of item numbers separated by semi-colons and press the Return key.
Or, click the Add button, and then click to execute a quick search for the assemblies. Select the items you want by double-clicking the rows in the palette quick search results.
After you have identified the assemblies to which you want to add the item selected in step 4, click Finish.
The redlined assemblies are added to the Affected Items table. You can view the change on the Redline BOM tab.
To replace an item from multiple assemblies, Web Client:
From a pending or unassigned change, click the Affected Items tab to bring it forward. (You can use an existing change or create a new one.)
Click the Bulk Change button and choose BOM from the menu. The BOM Bulk Change wizard appears.
In the In the Select Bulk Change Option wizard step, select Replace an item on multiple assemblies, and then click Next.
In the Select Item To Replace wizard step, you specify both the item that you want to redline remove from the assemblies that use it and you specify the item that will replace the removed item. In the Item to Remove field, type an item number, or click the Launch the Palette button to execute a quick search for the item.
In the Replacement Item field, type an item number, or click the Launch the Palette button to execute a quick search for the item. Click to create a new item. When you have specified both the item to remove and its replacement item, click Next.
In the Select Assemblies on which to Replace Item wizard step, you specify which assemblies this bulk change will affect. From the displayed list of assemblies that use the item specified in step 4, select the assemblies you want to affect, and then click Finish.
The redlined assemblies (selected in step 6) will be added to the Affected Items table if they are not already in the Affected Items table. You can view the changes on the Redline BOM tab.
To remove an item from multiple assemblies, Web Client:
From a pending or unassigned change, click the Affected Items tab to bring it forward. (You can use an existing change or create a new one.)
Click the Bulk Change button and choose BOM from the menu. The BOM Bulk Change wizard appears.
In the In the Select Bulk Change Option wizard step, select Remove an item from multiple assemblies, and then click Next.
In the Select Item To Remove wizard step, you specify the item that you want to redline remove from the assemblies that use it. In the Item to Remove field, type an item number, or click the Launch the Palette button to execute a quick search for the item. After you select an item, click Next.
In the Select Assemblies on which to Replace Item wizard step, you specify which assemblies this bulk change will affect. From the displayed list of assemblies that use the item specified in step 4, select the assemblies you want to affect, and then click Finish.
The redlined assemblies (selected in step 5) will be added to the Affected Items table if they are not already in the Affected Items table. You can view the changes on the Redline BOM tab.
To find assemblies related to a specific item and then add those assemblies to the affected items table (without making any redline BOM modifications to the assemblies), Web Client:
From a pending or unassigned change, click the Affected Items tab to bring it forward. (You can use an existing change or create a new one.)
Click the Bulk Change button and choose BOM from the menu. The BOM Bulk Change wizard appears.
In the In the Select Bulk Change Option wizard step, select Find assemblies related to an item and add them as affected items, and then click Next.
In the Select Item wizard step, you specify the item that is used on the BOM of the assemblies you want to add to the affected items table. In the Item field, type an item number, or click the Launch the Palette button to execute a quick search for the item. After you select an item, click Next.
In the Select Assemblies to Add to the Affected Items Table wizard step, you specify which assemblies this bulk change will affect. From the displayed list of assemblies that use the item specified in step 4, select the assemblies you want to affect, and then click Finish.
The assemblies (selected in step 4) will be added to the Affected Items table and no redline changes will be made to them. Select an assembly in the Affected Items table, and then make the redline changes you want on the Redline BOM tab.
The Java Client BOM Bulk Change wizard lets you specify modifications to multiple assemblies simultaneously. You have two BOM bulk change options:
Add one item to multiple assemblies.
Replace or remove one item from multiple assemblies.
The two procedures vary slightly, however, each wizard dialog guides you through the process. Both procedures are described below.
To add an item to multiple assemblies, Java Client:
Select the option Add an Item to multiple Assemblies, and click Next.
In the next wizard dialog, you specify the item that you want to add to multiple assemblies. Type an item number, or click the Add by Search button to search for the item. In the Select Objects dialog, you can click the Create link to create a new item. After you specify an item number, click Next.
In the next wizard dialog, you specify which assemblies this bulk change will affect. Click the Add button to search for the assemblies to which you want to add the item selected in step 2. After you specify the assemblies, click Finish.
From a pending or unassigned change, click the Affected Items tab to bring it forward. (You can use an existing change or create a new one.)
Click the BOM Bulk Change button.
The BOM Bulk Change wizard appears.
The redlined assemblies are added to the Affected Items table. You can view the change on the Redline BOM tab.
To replace or remove an item from multiple assemblies, Java Client:
From a pending or unassigned change, click the Affected Items tab to bring it forward. (You can use an existing change or create a new one.)
Click the BOM Bulk Change button.
The BOM Bulk Change wizard appears.
Select Replace or remove and item from multiple Assemblies, and click Next.
In the next wizard dialog, you specify the item that you want to redline (replace, delete, or otherwise modify) in the assemblies that use it. Type an item number, or click to search for the item. After you specify an item number, click Next.
In the next wizard dialog, you specify which assemblies this bulk change will affect. From the displayed list of assemblies that use the item specified in step 4, select the assemblies you want to affect, and then click Next.
In the next wizard dialog, you specify which action to perform. Your options are:
Replace <item> on all selected assemblies with <item>.
That is, on the assemblies you selected in step 5, replace the item you selected in step 4 with the item you specify here. Type an item number, or click to search for the item.
When you are done, click Next.
The redlined assemblies (selected in step 5) will be added to the Affected Items table. You can view the changes on the Redline BOM tab.
Remove item from all selected assemblies
That is, remove the item you selected in step 4 from the assemblies you selected in step 5.
Click Next.
The redlined assemblies (selected in step 5) will be added to the Affected Items table if they are not already in the Affected Items table. You can view the changes on the Redline BOM tab.
Just add the selected assemblies to the Affected Items table and I will redline the BOMs myself.
That is, add the assemblies you selected in step 5 to the Affected Items table (if they are not already in the Affected Items table), but do not make any redline changes to the assemblies.
Click Finish.
The assemblies (selected in step 5) will be added to the Affected Items table if they are not already in the Affected Items table, and no redline changes will be made to them. Select an assembly in the Affected Items table, and then make the redline changes you want on the Redline BOM tab.
The assemblies are added to the Affected Items table according to the option you selected in step 6 above.
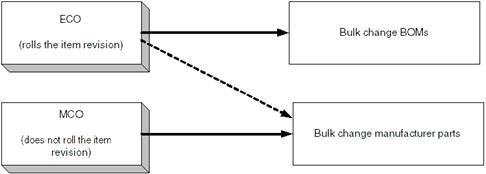
You can perform a manufacturer part bulk change from an ECO (with AML capabilities) or an MCO, which automatically replaces or removes a manufacturer part from the Manufacturers tab of several items simultaneously. Manufacturer part bulk changes are created with the Manufacturer Part Bulk Change wizard.
You can use MCOs to bulk-change manufacturers data without rolling the revision, and use ECOs to bulk-change manufacturers data when you want to roll the revision. Depending on your company policy, use an ECO or an MCO to determine if the revision of an item advances when you redline manufacturers data.
The Manufacturer Part Bulk Change wizard, from an MCO or an ECO, gives you the option to:
Remove a manufacturer part from all parts or from some parts that use it, and automatically redline the Manufacturers tab of the assemblies affected by the manufacturer part bulk change.
Replace a manufacturer part in all parts or in some parts that use it, and automatically redline the Manufacturers tab of the assemblies affected by the manufacturer part bulk change.
Just add the selected manufacturer part to the Manufacturers tabs, and then go back later to manually redline it.
To replace or remove a manufacturer part from multiple items, Web Client:
From a change that has not been released, click the Affected Items tab to bring it forward. (You can use an existing change or create a new one.)
Click the Bulk Change button and choose Manufacturer Part from the menu.
The Manufacturer Part Bulk Change wizard appears.
In the Select Bulk Change Option wizard step, choose Replace a manufacturer part on multiple items. Click Next.
In the Select Manufacturer Part to Replace wizard step, you specify the manufacturer part that you want to redline replace in the items that use it and you also select the replacement manufacturer part. In the Manufacturer Part to Remove field, begin typing a manufacturer part number, and then select the appropriate number/manufacturer combination from the displayed list, or click the Launch the Palette button to execute a quick search for the manufacturer part.
In the Replacement Manufacturer Part field, begin typing a manufacturer part number, and then select the appropriate number/manufacturer combination from the displayed list, or click the Launch the Palette button to execute a quick search for the manufacturer part. Click the Create to Add button to create a new manufacturer part. When you have specified both the manufacturer part to remove and its replacement manufacturer part, click Next.
In the Select Items on which to Replace Manufacturer Part wizard step, you specify which items this bulk change will affect. From the displayed list of items that use the manufacturer part specified in step 3, select the items you want to affect, and then click Finish.
The redlined items (selected in step 6) will be added to the Affected Items table if they are not already in the Affected Items table. You can view the changes on the redline Manufacturers tab.
To remove a manufacturer part from multiple items:
From a change that has not been released, click the Affected Items tab to bring it forward. (You can use an existing change or create a new one.)
Click the Bulk Change button and choose Manufacturer Part from the menu.
The Manufacturer Part Bulk Change wizard appears.
In the Select Bulk Change Option wizard step, choose Remove a manufacturer part from multiple items. Click Next.
In the Select Manufacturer Part to Remove wizard step, you specify the manufacturer part that you want to redline delete from the items that use it. In the Manufacturer Part to Remove field, begin typing a manufacturer part number, and then select the appropriate number/manufacturer combination from the displayed list, or click the Launch the Palette button to execute a quick search for the manufacturer part. Click Next.
In the Select Items on which to Replace Manufacturer Part wizard step, you specify which items this bulk change will affect. From the displayed list of items that use the manufacturer part specified in step 4, select the items you want to affect, and then click Finish.
The redlined items (selected in step 5) will be added to the Affected Items table if they are not already in the Affected Items table. You can view the changes on the redline Manufacturers tab.
To find items related to a specific manufacturer part and then add those items to the affected items table (without making any redline Manufacturers modifications to the items), Web Client:
From a change that has not been released, click the Affected Items tab to bring it forward. (You can use an existing change or create a new one.)
Click the Bulk Change button and choose Manufacturer Part from the menu.
The Manufacturer Part Bulk Change wizard appears.
In the Select Bulk Change Option wizard step, choose Find items related to a manufacturer part and add them as affected items. Click Next.
In the Select Manufacturer Part wizard step, you specify the manufacturer part for which you want from the items that use it. In the Manufacturer Part field, begin typing a manufacturer part number, and then select the appropriate number/manufacturer combination from the displayed list, or click the Launch the Palette button to execute a quick search for the manufacturer part. Click Next.
In the Select Items on which to Replace Manufacturer Part wizard step, you specify which items this bulk change will affect. From the displayed list of items that use the manufacturer part specified in step 4, select the items you want to affect, and then click Finish.
The items (selected in step 5) will be added to the Affected Items table and no redline changes will be made to them. Select an item in the Affected Items table, and then make the redline changes you want on the redline Manufacturers tab.
To replace or remove a manufacturer part from multiple items, Java Client:
From a change that has not been released, click the Affected Items tab to bring it forward. (You can use an existing change or create a new one.)
Click the Manufacturer Part Bulk Change button.
The Manufacturer Part Bulk Change wizard appears.
In the first wizard dialog, you specify the manufacturer part that you want to redline (replace, delete, or otherwise modify) in the items that use it. Enter a manufacturer name and manufacturer part number, or click to search for the manufacturer part you want. After you specify a manufacturer part, click Next.
In the next wizard dialog, you specify which items this bulk change will affect. From the displayed list of items that use the manufacturer part specified in step 3, select the items you want to affect, and then click Next.
In the next wizard dialog, you specify which action to perform. Your options are:
Replace <manufacturer part> on all selected assemblies with <manufacturer part>.
That is, on the items you selected in step 4, replace the manufacturer part you selected in step 3 with the manufacturer part you specify here. Enter a manufacturer name and manufacturer part number, or click to search for the manufacturer part you want.
For additional information about selecting a manufacturer name, see "How to Use Java Client Manufacturer Name Automatic Validation.".
When you are done, click Next.
The redlined items (selected in step 4) will be added to the Affected Items table if they are not already in the Affected Items table. You can view the changes on the Redline Manufacturers tab.
Remove <manufacturer part> from all selected assemblies
That is, remove the manufacturer part you selected in step 3 from the items you selected in step 4.
Click Next.
The redlined items (selected in step 4) will be added to the Affected Items table if they are not already in the Affected Items table. You can view the changes on the Redline Manufacturers tab.
Just add the selected assemblies to the affected items table.
That is, add the items you selected in step 4 to the Affected Items table (if they are not already in the Affected Items table), but do not make any redline changes to the items.
Click Finish.
The items (selected in step 4) will be added to the Affected Items table and no redline changes will be made to them. Select an item in the Affected Items table, and then make the redline changes you want on the Redline Manufacturers tab.
The items are added to the Affected Items table according to the option you selected in step 5 above.
Once items have been added to the Affected Items table, there are additional steps required to complete each type of Agile PLM change. The following sections summarize those steps.
|
Important: The Affected Items redline tab for Title Block change-controlled attributes and the Affected Files redline tab for Title block change-controlled attributes are available in Web Client only. |
When change-controlled attributes have been enabled, the Title Block redline tab appears on the Affected Items tab of ECOs and MCOs. Use the Title Block redline tab to modify the change controlled attributes.
Until the change is approved, the new attribute values are not in use. If the change is canceled, then the new values are discarded and are never used.
To view and compare attributes of different item revisions, use the "Compare Item Attributes Report" and the "Item Attribute History Report."
The Agile PLM Change Controlled Attributes feature enables an Agile PLM system to use Change objects to control how the item attribute values change.
The Agile administrator uses Agile PLM system settings to define which item attributes are under change control. An item attribute that is not change-controlled can be modified if you have the appropriate Modify privileges. By comparison, a change-controlled attribute can be modified only by using a change (ECO or MCO).
For more information, see "What are Change Controlled Attributes?."
The basic steps to complete an ECO are:
Add the items you want to modify to the Affected Items tab.
See "Adding an Item to the Affected Items Tab."
|
Note: If you add a released item that has pending changes against it, then Agile PLM tells you that the item has pending changes |
Edit the Affected Item tab fields, including the required fields, as described in "Fields Required to Release an ECO."
If you added a released item that has BOM data or manufacturing data, then you can redline the BOM data or manufacturing data and attachments (referenced in file folder objects) on the Redlines pane of the Affected Items tab.
For information about redlining attachments, see the Viewer Supplement. For more information about attachments, see Getting Started with Agile PLM.
In Web Client, if the Agile administrator has configured Change-Controlled attributes for items, then you can make redline edits to those Change-Controlled attributes. (See "What are Change Controlled Attributes?."
|
Note: If you use the Create Change command to create an ECO from an open item, then Agile PLM adds the item to the Affected Items table and, for released items, automatically prompts you to redline any BOM or manufacturer data. |
In Java Client, the Create Change command is available on the item More Actions menu (click the More button at the top of the object window) and on the right-click shortcut menu. In Web Client, use Actions > Create Change in the item Actions menu.
Required fields are defined for each status in the workflow. Use the audit feature to determine if all the required fields have been filled in.
In addition to the required fields defined in the workflow, the following Affected Items tab fields must always be completed before Agile PLM releases the ECO:
New Rev (for each item on the Affected Items table)
Item Number
|
Note: The Item Number field is completed automatically when you add the item to the Affected Items tab. |
To complete the fields required to release an ECO:
In the New Rev field, type the new revision number.
If you leave the New Rev field blank, then Agile PLM places a question mark (?) in the Rev field of the item.
You cannot release an ECO with a blank value in the affected item's Rev field.
|
Note: Other tabs may also have required fields that must be completed. The specific fields on your system may vary, depending on the workflow settings. |
In Web Client, use the Audit Release command on the Actions menu to verify that all required fields have been completed. Use the Audit Status command on the Actions menu to verify that status required fields have been completed.
In Java Client, use the Audit Release button on the object window toolbar to verify that all required fields have been completed. Use the Audit Status button to verify that status required fields have been completed.
You cannot change the New Rev field on the Affected Items tab on a released change, even if you have the appropriate privileges to modify released changes. If you do not have the appropriate privilege to modify the Lifecycle Phase on the Affected Items tab of a released change, then you can use an MCO to modify the lifecycle phase of an item without changing its revision level. See "Redlining through MCOs." or more information.
The basic steps to complete an MCO are:
Add the items you want to modify to the Affected Items tab.
Edit the Affected Item tab fields, including the required fields. MCOs allow you to select a new Lifecycle Phase.
If you added a released item that has manufacturing data, then redline the manufacturers data.
|
Note: If you use the item object Create Change command to create an MCO from an open item, then Agile PLM adds the item to the Affected Items table and, for released items, automatically prompts you to redline any manufacturer data. |
In Web Client, use Actions > Create New > Change.
In Java Client, the Create Change command is available on the item More Actions menu (click the More button at the top of the object window) and on the right-click shortcut menu.
In addition to the required fields defined in the workflow, the Item Number field on the Affected Items tab must be completed before Agile PLM releases the MCO. This field is completed automatically when you add items to the Affected Items tab.
|
Note: Other tabs also have required fields that must be completed. The specific fields on your system may vary, depending on the workflow settings. |
In Web Client, use the Audit Release command on the Actions menu to verify that all required fields have been completed.
In Java Client, use the Audit Release button on the object window toolbar to verify that all required fields have been completed.
The basic steps to complete an SCO are:
Add the items you want to modify to the Affected Items tab.
See "Adding an Item to the Affected Items Tab."
|
Note: If you add a released item that has pending changes against it, then Agile PLM tells you that the item has pending changes. |
Edit the Affected Item tab fields, including the required fields. You can modify the site-specific dispositions and the effective and obsolete dates of site-specific items for both the latest and non-latest revisions.
If you added the most recently released revision of an item to the SCO, then you can redline site-specific BOM and AML data, but only against the latest released revision.
|
Note: Only the most recently released revision of an item can be redlined with an SCO.Other tabs also have required fields that must be completed. The specific fields on your system may vary, depending on the workflow settings. |
In Web Client, use the Audit Release command on the Actions menu to verify that all required fields have been completed. Use the Audit Status command on the Actions menu to verify that status required fields have been completed.
In Java Client, use the Audit Release button on the object window toolbar to verify that all required fields have been completed. Use the Audit Status button to verify that status required fields have been completed.
The basic steps to complete an ECR are:
Add the items to the Affected Items tab.
See "Adding an Item to the Affected Items Tab."
When adding by Type in Known Numbers, you can enter the revision, preceded by a space character, when you type the number. For example:
1000-02 A
P003872 D
|
Note: If you add a released item that has pending changes against it, then Agile PLM tells you that the item has pending changes. |
Edit the Affected Item tab Revision field and any custom fields that may be defined for your Agile PLM system.
|
Note: Other tabs also have required fields that must be completed. The specific fields on your system may vary, depending on the workflow settings. |
In Java Client, use the Audit Release button on the object window toolbar to verify that all required fields have been completed.
In Web Client, use the Audit Release command on the Actions menu to verify that all required fields have been completed.
The basic steps to complete a Deviation are:
Add the items to the Affected Items tab.
See "Adding an Item to the Affected Items Tab."
When adding by Type in Knows Numbers, you can enter the revision, preceded by a space character, when you type the number. For example:
1000-02 AP003872 D
|
Note: If you add a released item that has pending changes against it, then Agile PLM tells you that the item has pending changes. |
Edit the Affected Item tab Revision field and any custom fields that may be defined for your Agile PLM system.
|
Note: Other tabs also have required fields that must be completed. The specific fields on your system may vary, depending on the workflow settings. |
In Web Client, use the Audit Release command on the Actions menu to verify that all required fields have been completed.
In Java Client, use the Audit Release button on the object window toolbar to verify that all required fields have been completed.
The basic steps to complete a Stop Ship are:
Add the items to the Affected Items tab.
See "Adding an Item to the Affected Items Tab."
When adding by Type in Knows Numbers, you can enter the revision, preceded by a space character, when you type the number. For example:
1000-02 A
P003872 D
|
Note: If you add a released item that has pending changes against it, then Agile PLM tells you that the item has pending changes. |
Edit the Affected Item tab Revision field and any custom fields that may be defined for your Agile PLM system.
|
Note: Other tabs also have required fields that must be completed. The specific fields on your system may vary, depending on the workflow settings. |
In Web Client, use the Audit Release command on the Actions menu to verify that all required fields have been completed.
In Java Client, use the Audit Release button on the object window toolbar to verify that all required fields have been completed.
When you delete an item from the Affected Items tab, any attachments added to the item under the pending revision defined in that change are lost. This is true for all pending revisions, including items that have never been released and have only one change against them. If there is only one change pending against the item, and you delete the item from that change, then the item reverts to a preliminary item with no changes against it, and any attachments added under that last change are lost.
When you remove an item from the Affected Items tab, any item redlines made through that change are dropped and discarded. Any attachments added to the pending revision created by that change are removed from the item. Agile PLM displays warnings before dropping redlines or removing attachments. Accept the warnings to complete the item removal.
To remove an item from the Affected Items tab in Web Client:
If necessary, select Base View in the Views drop-down list to expand the table to show a row for each site assigned to the item.
Select one or more rows in the table. The selected rows are highlighted.
Click the Remove button.
To remove an item from the Affected Items tab in Java Client:
If necessary, select Show Sites in the View drop-down list to expand the table to show an item row for each site assigned to the item.
Click to select the row for the item that you want to delete. (You can select multiple items.)
Click the Remove button.
|
Note: Be sure to use the Remove button on the Affected Items tab to remove items from that tab. If you use the Delete button on the object window toolbar (Java Client) or the Delete command on the object Actions menu (Web Client), then Agile PLM deletes the entire change. |
You can edit rows on the Affected Items table, including rows associated with a specific site. You can also copy and paste information between these rows.
|
Note: You cannot edit the item description from MCOs, ECRs, deviations, or stop ships. The item description is inherited from the latest released ECO. |
This section includes the topics:
To edit affected item information in Web Client:
If necessary, select Base View in the Views drop-down list to expand the table to show a row for each site assigned to the item.
Double-click any editable cell of the affected items table.
The affected items table enters edit mode and the Save and Cancel buttons become active. Press the Tab key to move to the next editable field, use the arrow keys, or click in a cell.
Make any changes, and then click Save to save the changes, or click Cancel to cancel the changes.
From the tab More menu button, Web Client provides the following Fill-Up and Fill-Down table editing commands:
Fill-down
Fill-down (selected cells)
Fill-up
Fill-up (selected cells)
To Fill-down or Fill-up:
If the table is not already in edit mode, then enter table edit mode:
Double-click any editable cell of the table. The table enters edit mode and the Save and Cancel buttons become active. To navigate from one cell to another, press the Tab key to move to the next editable field, use the arrow keys, or click in a cell.
Select one cell in the column. The selected cell is highlighted.
To fill-down, choose More > Fill-down in the tab menu or use the Ctrl + Shift + D keyboard shortcut.
The contents of the highlighted cell are copied down the column into all the cells below the highlighted cell.
To fill-up, choose More > Fill-up in the tab menu or use the Ctrl + Shift + U keyboard shortcut.
The contents of the highlighted cell are copied up the column into all the cells above the highlighted cell.
To Fill-down or Fill-up selected cells only:
If the table is not already in edit mode, then enter table edit mode:
Double-click any editable cell of the table. The table enters edit mode and the Save and Cancel buttons become active. To navigate from one cell to another, press the Tab key to move to the next editable field, use the arrow keys, or click in a cell.
Select two or more cells in the column. Use Shift-click to select contiguous cells. Use Ctrl-click to select non-contiguous cells. The selected cells are highlighted.
To fill-down, choose More > Fill-down (selected cells) in the tab menu or use the Ctrl + Shift + D keyboard shortcut.
The content of the upper-most highlighted cell is copied down the column into only the highlighted cells below the up-most highlighted cell.
To fill-up, choose More > Fill-up (selected cells) in the tab menu or use the Ctrl + Shift + U keyboard shortcut.
The content of the lower-most highlighted cell is copied up the column into only the highlighted cells above the lower-most highlighted cell.
To edit affected item information in Java Client:
If necessary, select Show Sites in the View drop-down list to expand the table to show a row for each site assigned to the item.
Click to select the rows you want to edit. You can use Ctrl-click and Shift-click to select multiple rows.
Click the Edit button.
The Edit Affected Items dialog appears.
Make the modifications you want.
When you are finished, click OK.
By selecting a group of fields in one column, you can use the Fill Up Rows button to copy the contents of the bottom-most selected field into all the selected fields above it. You can use the Fill Down Rows button to copy the contents of the top-most selected field into all the selected fields below it. You can use Ctrl-click to select non-contiguous fields, and you can use Shift-click to select contiguous fields.
You can fill up and fill down in multiple columns simultaneously. Once you have selected fields in one column, you can select multiple additional columns using Ctrl-click (non-contiguous columns) and Shift-click (contiguous columns). The Fill Up Rows button copies the contents of the bottom-most selected field in each column into all the selected fields in each column. The Fill Down Rows button copies the contents of the topmost selected fields in each column into all the selected fields in each column.
|
Note: Fill Up and Fill Down are available in edit mode for any editable table. Attributes that require unique identifier data or other unique data do not have Fill Up and Fill Down capability, for example: Item Number on the Affected Items tab, Manufacturer Name and Manufacturer Part Number on the item Manufacturers tab, or Item Number and Find Number on the item BOM tab. |
To copy information between rows in Java Client:
If necessary, select Show Sites in the View drop-down list to expand the table to show a row for each site assigned to the item.
Click to select the rows you want to edit. You can use Ctrl-click and Shift-click to select multiple rows.
Click the Edit button.
The Edit Affected Items dialog appears.
Click to select the fields you want to fill in. Use Shift-click and Ctrl-click to select the fields in each column and to select additional columns you want to fill in. The fill up and fill down action is defined by the selected (highlighted) fields in each column in the Affected Items table.
Both the source row and the target rows must be highlighted. The top-most row or the bottom-most row is the source row.
You may want to edit the top-most or bottom-most row in the Affected Items table, and then use the Fill Up Rows and Fill Down Rows buttons to complete the remaining rows in the table.
Click the Fill Up Rows or Fill Down Rows button to fill in the selected Affected Items table fields.
When you are finished, click OK.
In Web Client, if an affected item has a BOM, an AML, or attachments, and the Has Redlines icon appears in the Affected Items table if the item has any redlines, then you can view its Redlines tabs by selecting its row in the Affected Items table (click the row selector to highlight the row). The Redline tabs for the selected item appear in the bottom portion of the Affected Items tab.
In Java Client, if an affected item has a BOM, an AML, or attachments, then you can view its Redlines tabs by clicking in its row in the Affected Items table. The Redline tabs for the selected item appear in the bottom portion of the Affected Items tab.
For information about the Redline BOM tab, see "Redlining the BOM of a Released Item."
For information about the Redline Manufacturers tab, see "Modifying Manufacturing Data from the Redlines Tab."
For information about the Redline Attachment tab, see Getting Started with Agile PLM.