15 Configuring a SAN Repository
Topics
15.1 About Configuring a SAN Repository
You can configure an Oracle Audit Vault storage area network (SAN) for event data, system data, recovery data, and for high availability.
You can use storage area networks (SANs) to expand your data storage, and manage high availability.
Types of Data Supported for SANs
You have the option to configure a SAN storage repository for these data types:
-
Event Data - Data that is kept online in the Oracle Audit Vault Server for a specified duration according to archiving policies. After the online duration expires, this data is then archived.
-
System Data - Data specific to the Oracle Audit Vault and Database Firewall system
-
Recovery - Recovery data for the Oracle Audit Vault Server repository
During the Oracle Audit Vault Server installation process, your server is partitioned to store Event, System, and Recovery data in a way that works with the number of disk partitions you have set up on the server. Optionally, you can register SAN servers and configure your storage repository to use additional disks to store this data.
About Configuring a SAN Repository in High Availability Environments
In a high availability environment, you can configure the storage repository on the secondary Oracle Audit Vault Server from the primary Oracle Audit Vault Server, using either the console UI or AVCLI commands. The primary and secondary Oracle Audit Vault Servers must not share (read or write to) the same SAN disks, and you must ensure that the secondary server has at least the same amount of space in each disk group as the primary server.
15.2 Configuring a SAN Server to Communicate with Oracle Audit Vault and Database Firewall
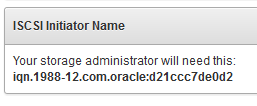
Oracle Audit Vault and Database Firewall uses Linux Open-iSCSI to communicate with SAN servers. You must ensure that the iSCSI service is enabled on the SAN server you want to use for storing Audit Vault and Database Firewall data, and provide the Audit Vault Server's iSCSI initiator name to your storage administrator to use in configuring the SAN server. The SAN server must allow iSCSI targets and LUNs (logical unit numbers) to communicate with this iSCSI initiator name. We recommend that the LUN numbers assigned to a disk should be fixed.
Note:
Ensure that you do not have more than one target mapped to the same disk on the SAN storage server.
Some SAN servers may also require the Audit Vault Server's IP address.
To find the Audit Vault Server's iSCSI initiator name and IP address:
Note:
Do not restart the iSCSI service on either the Audit Vault Server or the SAN server that is servicing the Audit Vault Server. If there is a need to restart either of these services, contact Oracle support.
15.3 Registering or Dropping SAN Servers in the Audit Vault Server
15.3.1 Registering a SAN Server
This procedure registers a SAN server in the Audit Vault Server. In a high availability environment, you can use this procedure to register a SAN server to the primary or the secondary Audit Vault Server. Note that while you can register the same SAN server to both the primary and secondary Audit Vault Servers, they must not share (read or write to) the same SAN disks.
To register a SAN server in the Audit Vault Server:
15.3.2 Dropping a SAN Server
To drop a storage area network (SAN) server from the Oracle Audit Vault Server, complete this procedure.
You can drop a SAN server if none of its disks are in use for storage in the Oracle Audit Vault Server repository. Otherwise, you must first drop the disks from any disk groups that use this SAN server.
To drop a SAN server from the Audit Vault Server:
- Log in to the Oracle Audit Vault Server as a super administrator.
- Click the Settings tab, and then click SAN.
- Select the SAN servers that you want to drop, and then click Drop.
Related Topics
15.4 Discovering Targets on a SAN Server
Topics
15.4.1 About SAN Targets and Disks
Once you have registered SAN servers in the Audit Vault Server, in order to make SAN disks available for storing Audit Vault Server data, you must discover and log in to the available target(s) on the SAN server.
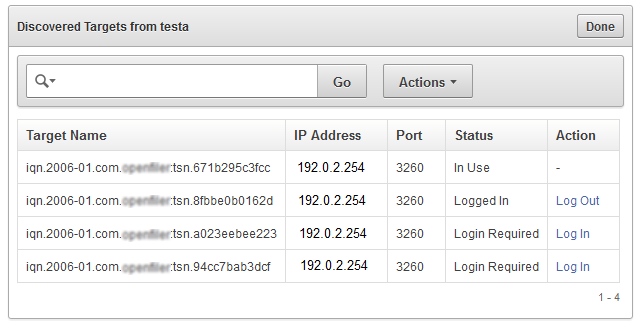
When you log in to a target on the SAN server, a number of storage disks are made available to the Audit Vault Server, corresponding to the number of LUNs available on the SAN server for that target.
15.4.3 Logging Out of Targets on SAN Servers
Learn how to log out of San server targets.
You can log out of a target if none of its disks are in use for storing Oracle Audit Vault Server data. If a disk from a target is in use, then you must first drop the disk and then log out of the target.
To log out of a target on a SAN server:
-
Log in to the Audit Vault Server as a super administrator.
-
Click the Settings tab, and then click SAN.
-
Find the SAN server you want, and then click the corresponding Discover link.
A list of targets appears, showing the status of each target.
-
Find the target you want, and then click the corresponding Log Out link in the Action column.
If there is a dash character in the Action column for the target, then disks from this target are in use.
15.5 Adding or Dropping SAN Disks in the Audit Vault Server Repository
Topics
15.5.1 About Disk Groups in the Audit Vault Server Repository
There are three disk groups used for storing Audit Vault Server data, corresponding to three data types:
-
EVENTDATA
-
SYSTEMDATA
-
RECOVERY
If desired, you can add disks from a registered SAN server to the EVENTDATA, SYSTEMDATA, and RECOVERY disk groups to increase the storage capacity for those types of data. Otherwise, these data types are stored in disk partitions on the Audit Vault Server.
Adding SAN disks to these disk groups is optional.
In a high availability environment: You must ensure that the secondary server has at least the same amount of space in each disk group as the primary server.
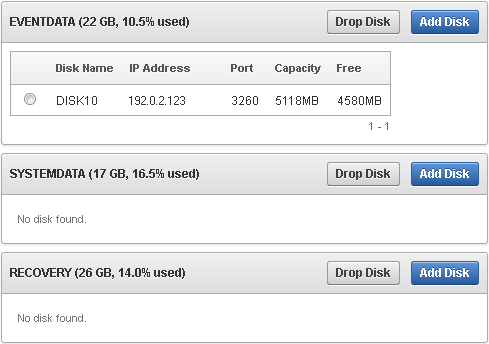
Figure 15-1 shows the Repository page, available from the Settings menu. In the repository shown here:
-
The EVENTDATA disk group uses a SAN disk for extra storage.
-
The SYSTEM DATA and RECOVERY disk groups use only the Audit Vault Server disk partitions for storage.
-
For the EVENTDATA, SYSTEMDATA, and RECOVERY disk groups, the amount of free space available on the local Audit Vault Server partitions is also shown.
The Repository Page in a High Availability Environment
In a high availability environment, you would see the above disk groups for the Primary Audit Vault Server, followed by the same disk groups for the Secondary Audit Vault Server. You must ensure that the secondary server has at least the same amount of space in each disk group as the primary server.
See Also:
15.5.2 Adding SAN Disks to the Audit Vault Server Repository
You can add SAN disks that are not already in use to any of the disk groups in the repository.
Note:
-
Adding an additional disk creates two
VG_ROOTvolume groups. This results in failure during upgrade. Ensure that any disk added to the appliance has no pre-existing LVM or other device mapper metadata. -
Fiber Channel based storage with multipath is not supported in Oracle Audit Vault and Database Firewall.
To add disks to a disk group in the repository:
15.5.3 Dropping SAN Disks from the Audit Vault Server Repository
Learn how to drop a SAN disk from a disk group.
The data on the disk being dropped is relocated to the remaining disks in the disk group. Before dropping a disk, the system checks for space on the remaining disks in the disk group for data to be relocated. If this space check fails, it results in OAV-47330 error. You cannot drop the only disk in the disk group.
To drop a SAN disk from a disk group in the repository:
- Log in to the Audit Vault Server as a super administrator.
- Click the Settings tab, and then click Repository.
- Find the disk you want to drop under one of the disk groups, select the disk, and then click Drop Disk.
- Click OK to confirm.


