1 Installing Oracle Audit Vault and Database Firewall Software

Learn how to install Oracle Audit Vault and Database Firewall (Oracle AVDF).

You can deploy the Audit Vault Agent once you have installed the Audit Vault Server.

See Also:

1.1 About the Software Installation Procedure

The Oracle Audit Vault and Database Firewall (Oracle AVDF) software is installed using four discs.

Each disc is created from .iso file downloads:

  • Three Audit Vault Server installer discs (created from three .iso files)

  • One Database Firewall installer disc (created from one .iso file)

  • There is an additional Utilities file for Oracle Advanced Security Integration and Database Interrogation setup.

Oracle AVDF release 12.2.0.13.0 software contains the avdf-12.2.0.13.0-utility.zip file in addition to three Audit Vault Server installer discs and one Database Firewall installer disc. The avdf-12.2.0.13.0-utility.zip bundle contains the following files:

  • cipher-update.zip: Oracle Audit Vault and Database Firewall 12.2.0.13.0 - Deprecated-Cipher-Removal Utility

    Note: Apply this patch on Audit Vault Server after installation or upgrade to 12.2.0.13.0 (or later). Before applying the patch, make sure that all the Audit Vault Agents and Host Monitor Agents are upgraded to 12.2.0.13.0.

  • npcap-utility.zip: Npcap installer required for Host Monitoring on Windows
  • dbfw-utility.zip: Database Firewall utilities to examine Native Network Encryption traffic for Oracle Database and to gather session information from other database types.
  • README: Instructions for deploying Npcap and Database Firewall utilities patch.

During the installation, you create an installation passphrase that protects the newly installed component until it is fully configured.

Note:

The installation process reimages the server on which you install the Audit Vault Server or Database Firewall, automatically installing the operating system.

1.2 Downloading and Verifying the Software

Learn about downloading and verifying the software to install Oracle Audit Vault and Database Firewall (Oracle AVDF).

For a fresh installation, you can download the Oracle Audit Vault and Database Firewall software from the Software Delivery Cloud. You cannot use this package to upgrade. To perform an upgrade from an existing deployment, you can download the upgrade software from the My Oracle Support website.

To download the software:

  1. Use a web browser to access the Oracle Software Delivery Cloud portal:
    https://edelivery.oracle.com

    Note:

    Ensure that the browser version you are using supports TLS 1.2 protocol. See Supported Browsers for complete information.

  2. Click Sign In, and if prompted, enter your User ID and Password.
  3. In the All Categories menu, select Release. In the next field, enter Oracle Audit Vault and Database Firewall and then click Search.
  4. From the list that is displayed, select the Oracle Audit Vault and Database Firewall version you want to install. Alternately, click the +Add to Cart button against the specific release.

    The download is added to your cart. To check the cart contents, click View Cart in the upper right of the screen.

  5. Click Checkout.
  6. In the next page, verify the details of the installation package, and then click Continue.
  7. Read the Oracle Standard Terms and Restrictions displayed on the page. Select I accept the terms in the license agreement, and click Continue.

    The download page appears and displays the list of ISO files for Oracle Audit Vault and Database Firewall. The following is an example for release 12.2.0.11.0:

    • Vpart_number.iso Oracle Audit Vault and Database Firewall 12.2.0.11.0 (AVDF 12.2 BP11) - Server - Disc 1, 4.6 GB

    • Vpart_number.iso Oracle Audit Vault and Database Firewall 12.2.0.11.0 (AVDF 12.2 BP11) - Server - Disc 2, 3.9 GB

    • Vpart_number.iso Oracle Audit Vault and Database Firewall 12.2.0.11.0 (AVDF 12.2 BP11) - Server - Disc 3, 3.0 GB

    • Vpart_number.iso Oracle Audit Vault and Database Firewall 12.2.0.11.0 (AVDF 12.2 BP11) - Firewall, 4.2 GB

    • Vpart_number.iso Oracle Audit Vault and Database Firewall 12.2.0.11.0 (AVDF 12.2 BP11) - Utilities, 9.1 KB

    Oracle AVDF release 12.2.0.13.0 software contains the avdf-12.2.0.13.0-utility.zip file in addition to three Audit Vault Server installer discs and one Database Firewall installer disc. The avdf-12.2.0.13.0-utility.zip bundle contains the following files:

    • cipher-update.zip: Oracle Audit Vault and Database Firewall 12.2.0.13.0 - Deprecated-Cipher-Removal Utility

      Note: Apply this patch on Oracle Audit Vault Server 12.2.0.13.0 after installation or upgrade. Before applying the patch, make sure that all the Audit Vault Agents and Host Monitor Agents are upgraded to 12.2.0.13.0.

    • npcap-utility.zip: Npcap installer required for Host Monitoring on Windows
    • dbfw-utility.zip: Database Firewall utilities to examine Native Network Encryption traffic for Oracle Database and to gather session information from other database types.
    • README: Instructions for deploying Npcap and Database Firewall utilities patch.
  8. To the right of the Print button, click View Digest Details.

    The listing for the ISO files expands to display the SHA-1 and SHA-256 checksum reference numbers for each ISO file.

  9. Copy the SHA-256 checksum reference numbers and store them for later reference.
  10. Click Download, to download the installer. Then click Save File.
  11. Choose a location to save the ISO files. Click Save.
  12. Alternately, you can save each file individually by clicking its name and then specifying a location for the download.
  13. The combined size of all ISO files exceeds 4 GB, and takes time to download, depending on the network speed. The estimated download time and speed are displayed in the File Download dialog box.
  14. After the ISO files are downloaded to the specified location, verify the SHA-256 checksums of the downloaded files:
    1. From a Linux or Unix machine, generate a SHA256 checksum for the first Vpart_number.iso:
      $ sha256sum Vpart_number.iso

      Ensure that the checksum matches the value that you copied from the File Download dialog box in the earlier step.

    2. Generate a SHA-256 checksum for the second Vpart_number.iso:
      $ sha256sum Vpart_number.iso

      Ensure that the checksum matches the value that you copied from the File Download dialog box in the earlier step.

  15. Optionally, burn each of the Vpart_number.iso files to a DVD-ROM disc with a capacity of 8.5 GB each. Then label the discs as below.

    For example:

    • AVDF Disc 1
    • AVDF Disc 2

    Caution:

    Do not use a standard DVD disc of capacity 4.7 GB as the iso file does not fit into it.

  16. Install the software on a server machine.

1.3 Installation Passphrase Requirements

One step in the installation of an Audit Vault Server or Database Firewall is to create an installation passphrase.

The installation passphrase protects the newly installed component from outside attack until you have done the post-install configuration tasks. To do the tasks, you must enter the installation passphrase that you created during the installation.

After doing the tasks, you no longer need the installation passphrase, and it no longer works.

The installation passphrase must have between 8 to 255 characters in these categories:

  • Uppercase letters (A-Z) - must have at least one

  • Lowercase letters (a-z) - must have at least one

  • Digits (0-9) - must have at least one

  • Space

  • At least one of the following:

    • Comma (,)

    • Period (.)

    • Colon (:)

    • Plus sign (+)

    • Underscore (_)

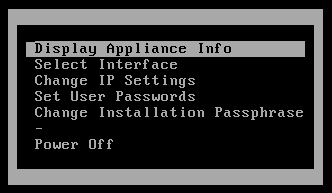
If you have created an installation passphrase for a component but not yet completed the post-install configuration tasks, then you can change the passphrase. To do so, select Change Installation Passphrase in the Audit Vault Server menu or Database Firewall menu, shown in the later steps of installation.

1.4 Installing an Audit Vault Server or Database Firewall

Steps for installing Audit Vault Server or Database Firewall.

To install an Audit Vault Server or Database Firewall:

  1. Insert either installer disk 1 for the Audit Vault Server or the single installer disk for the Database Firewall in the disk drive, and then reboot the system.

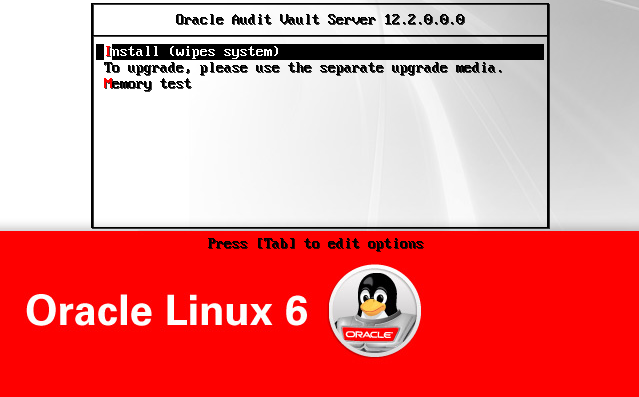
    The system is booted from the disk, and the initial splash screen appears, similar to the following:

    Your splash screen will indicate the release number you are installing.

  2. Select install, and then press the Enter key.

    The installation proceeds.

  3. (Audit Vault Server Only) Insert disk 2 when prompted, select OK, and then press Enter.

    After a time, the installer asks you to insert disk 3.

  4. Insert disk 3 when prompted, select OK, and then press Enter.

    After a time, the installer asks you to insert disk 1 again.

  5. (Audit Vault Server Only) Insert disk 1 again when prompted, select OK, and then press Enter.
  6. Type the installation passphrase, press Enter, and then confirm the passphrase.

    The screen displays this message:

    Installation passphrase was successfully configured

  7. Press Enter.

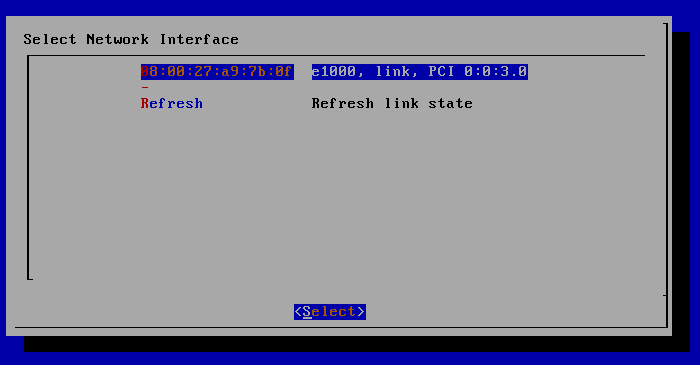
    The Select Management Interface screen appears for Database Firewall, or for the Audit Vault Server, the Select Network Interface screen appears.

    For example, for the Select Network Interface screen:

  8. If more than one interface is available, select the interface that you want to be the management interface.

    This interface is the network interface used by the Audit Vault Server or the Database Firewall.

  9. Press the key Enter.

    For a Database Firewall, a screen appears with this option selected:

    Use Use this device as the management port

    For the Audit Vault Server, a screen appears with this option selected:

    Use Use this device as the network interface

  10. Press Enter.

    For the Database Firewall, the Please enter management interface IP setting screen appears. For the Audit Vault Server, the Please enter network interface IP setting screen appears. Both screens contain the following fields:

    • IP Address

    • Network Mask

    • Gateway

  11. In the field IP Address, enter the IP address of the network interface and then press Tab.

    The cursor moves to the field Network Mask.

  12. In the field Network Mask, enter the network mask for the management interface and then press Tab.

    The cursor moves to the field Gateway.

  13. In the field Gateway, enter the gateway IP address for the management interface and then press Tab.

    The cursor moves to Reboot to complete installation.

  14. Press Enter.

    The computer restarts. This may take a long time. When the restart has finished, the system displays the menu settings.

  15. Press Enter.

    The network settings appear.

    At this point, the installation of either the Audit Vault Server or the Database Firewall is complete. You will set user passwords as part of the next step.

  16. Perform the appropriate post-install configuration tasks.

    For these tasks, you need the passphrase that you created in step 6 and the IP address that you provided in step 11.

Note:

The Audit Vault Server and the Database Firewall server are software appliances. You must not make any changes to the Linux operating system through the command line on these servers unless following official Oracle documentation or under guidance from Oracle Support.