5 Migrating the Configuration from Oracle Audit Vault to Oracle Audit Vault and Database Firewall

You can migrate the configuration from Oracle Audit Vault Release 10.3 to Oracle Audit Vault Database Firewall (Oracle AVDF) Release 12.2.

5.1 About Migrating Oracle Audit Vault to Oracle Audit Vault and Database Firewall

Process to migrate from Oracle Audit Vault to Oracle Audit Vault and Database Firewall (Oracle AVDF).

When you migrate Oracle Audit Vault Release 10.3 to Oracle Audit Vault and Database Firewall Release 12.2, you must perform tasks such as migrating the Audit Vault hosts and alert definitions, setting up the agent, and so on, for Oracle Audit Vault and Database Firewall.

To perform the migration, you use an Oracle-supplied Java migration tool, which is platform independent. You can run it on the Oracle Audit Vault Release 10.3 supported platforms, which are Microsoft Windows and UNIX, and you can run it on the Linux x64 platform for Oracle Audit Vault and Database Firewall Release 12.2.

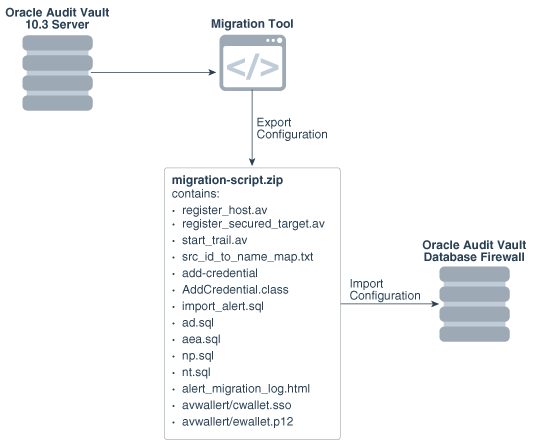
Figure 5-1 illustrates the migration path from Oracle Audit Vault Release 10.3 to Oracle Audit Vault and Database Firewall 12.2.

Figure 5-1 Migration Path for Oracle Audit Vault to Oracle Audit Vault and Database Firewall
Description of Figure 5-1 follows
Description of "Figure 5-1 Migration Path for Oracle Audit Vault to Oracle Audit Vault and Database Firewall"

Configurations Migrated

The migration process migrates the following configurations from Oracle Audit Vault 10.3 to Oracle Audit Vault and Database Firewall 12.2:

  • Oracle Audit Vault 10.3 agents to Oracle Audit Vault and Database Firewall 12.2 hosts

  • Oracle Audit Vault 10.3 sources to Oracle Audit Vault and Database Firewall 12.2 secured targets

  • Oracle Audit Vault 10.3 collectors to Oracle Audit Vault and Database Firewall 12.2 audit trails

  • Secured target credentials

  • Wallet for secured target user credentials

  • Alert definitions

  • Alert email actions

  • Alert statuses

  • Notification profiles

  • Notification templates

Migration Overview

The general steps that you will perform are as follows:

  1. Prepare Oracle Audit Vault 10.3.

  2. Run the migration tool on Audit Vault 10.3 to export the configurations.

  3. Check the migration logs for errors.

  4. Prepare Oracle Audit Vault and Database Firewall 12.2 to receive the Oracle Audit Vault 10.3 configuration.

  5. Run the migration scripts on Oracle Audit Vault and Database Firewall 12.2 to import the Oracle Audit vault 10.3 configuration.

  6. Check Oracle Audit Vault and Database Firewall 12.2 status to complete the migration process.

5.2 Step 1: Prepare Oracle Audit Vault Release 10.3 for Migration

In Step 1, before you can perform the migration, you must download the migration utility files and set the correct permissions for the AVSYS user and the migration files.

  1. Download the migration-tool.zip file to a temporary directory on the computer where there Audit Vault Server is located.

    The migration tool enables the generation of the Oracle Audit Vault 10.3 avcli scripts that are necessary for the migration. These scripts migrate the agents, sources, and collectors from Oracle Audit Vault 10.3 to the host, secured target, and audit trail used in Oracle Audit Vault and Database Firewall 12.2.

  2. Unzip migration-tool.zip file.

    The zip file contains the following files: migration.sql, README.txt, AddCredential.class, gen-migrate (which you will need to invoke to generate the final avcli scripts), add-credential, import_alert.sql, migrate_alert.sql, migrate_ad.sql, migrate_aea.sql, migrate_as.sql, migrate_noti_pro.sql, migrate_noti_temp.sql.

  3. Log in to SQL*Plus on the Audit Vault server instance as a user who has been granted the Oracle Database Vault DV_ACCTMGR role.

    Because Oracle Database Vault is enabled in this release of Oracle Audit Vault, you cannot use the SYS or SYSTEM accounts to create or modify user accounts.

    For example:

    sqlplus dbv_acctmgr
    Enter password: password
    
  4. Unlock the AVSYS account.
    ALTER USER AVSYS UNLOCK;
    
  5. Connect as the SYS user.
    connect sys as sysdba
    Enter password: password
    
  6. Grant the CREATE ANY DIRECTORY and DROP ANY DIRECTORY system privileges to user AVSYS.
    GRANT CREATE ANY DIRECTORY, DROP ANY DIRECTORY TO AVSYS;
    
  7. Grant the EXECUTE privilege to the SYS.UTL_FILE file to user AVSYS.
    GRANT EXECUTE ON SYS.UTL_FILE TO AVSYS;
    
  8. Exit SQL*Plus.
  9. If the gen-migrate tool is not executable, then change its permissions to make it an executable.

    For example:

    chmod 744 gen-migrate

5.3 Step 2: Generate the Oracle Audit Vault Release 10.3 Configuration Data

In Step 2, you run a procedure that generates two files, migration-script.zip and migration.log. The migration-script.zip file contains the Audit Vault 10.3 configuration that you are exporting, and the migration.log file contains a log of actions and possible errors that took place during this procedure.

  1. Log in to the Audit Vault Server terminal where you downloaded and unzipped the migration-tool.zip file.
  2. In the Oracle Audit Vault and Database Firewall server, set the ORACLE_HOME environment variable.

    C shell:

    setenv ORACLE_HOME fullpath 
    

    Bourne/Korn shell:

    ORACLE_HOME=fullpath
    export ORACLE_HOME
    
  3. Execute the gen-migrate tool.
    ./gen-migrate
    Enter the path: location_for_output
    Enter AVSYS password: AVSYS_password
    

    Provide the directory path where migration scripts will be generated. If you do not provide a path, then the migration script will be generated in the current directory. The path is optional but you must provide the AVSYS password.

  4. Check the migration.log file for possible errors and correct them.

    Typical errors can include the following:

    • AVSYS cannot create directory

    • Could not get IP for host "host_name": This error can occur if you try to register the host without using the with ip option. In the register_host.av script, modify the register host command to include the with ip option.

    • Can not register host "host_name". Register the host manually.

    If you cannot resolve the errors, then contact Oracle Support.

5.4 Step 3: Prepare Oracle Audit Vault and Database Firewall Release 12.2 for the Migration

In Step 3, put specific settings in place to ensure that Oracle Audit Vault and Database Firewall (Oracle AVDF) is using the same settings as Oracle Audit Vault.

  1. Verify that the SMTP server is functioning properly for alert email notifications.
  2. Set up the time zone settings and the keyboard settings.
  3. Set up the network services.

    See Also:

5.5 Step 4: Migrate the Oracle Audit Vault Configuration to Oracle Audit Vault and Database Firewall

In Step 4, unzip the migration-script.zip file to the Oracle Audit Vault and Database Firewall (Oracle AVDF) server and then complete the migration.

  1. Copy the migration-script.zip file from the Oracle Audit Vault 10.3 server to the server where the Oracle Audit Vault and Database Firewall 12.2 server is installed.
  2. If necessary, set the ORACLE_HOME variable for Audit Vault.

    If you had already set the ORACLE_HOME variable, then run the following commands.

    ssh support@avdf-ip
    su - 
    su oracle
    
  3. cd to the directory where you want to store the avcli scripts.
  4. Unzip the migration-scripts.zip file into this directory.
    unzip path_to_zip_file/migration-scripts.zip .
    

    The migration-script.zip file contains the following files:

    • register_host.av: Has all the avcli commands to register hosts

    • register_secured_target.av: Has commands to register secured targets

    • start_trail.av: Has commands to start the trails for registered secured targets

    • AddCredentail.class: Java class file to add the secured target credential into the Oracle Audit Vault and Database Firewall server.

    • add-credential: Tool to invoke the java program to add the secured target credential into the Oracle Audit Vault and Database Firewall server.

    • avwallet (directory): Has the wallet which has secured target user credential

    • src_id_to_name_map.txt: Mapping from the source ID to secured target name

    • import_alert.sql: The master script to import alert configuration into Oracle Audit Vault and Database Firewall

    • ad.sql: Alert definitions

    • aea.sql: Alert email actions

    • as.sql: Alert statuses

    • np.sql: Notification profiles

    • nt.sql: Notification templates

    • nt.sql: Notification templates

  5. Ensure that the files listed in the preceding step have all been unzipped and appear in the directory.
  6. Review the avcli scripts, register_host.av and register_secured_target.av, before you use them for the final migration, described later in this procedure.

    If there are any problems, then modify the scripts to rectify the problems.

  7. If there is a DB2 source that must be migrated using the scripts, then modify the register_secured_target.av file before using it for migration.

    Oracle Audit Vault 10.3 does not store DB2 port and database name information. The Oracle Audit Vault and Database Firewall register target setting must have this information, so therefore, you must modify the register_secured_target.av file to include it.

    For example, register_secured_target.av will have register secured target setting as follows:

    REGISTER SECURED TARGET my_target OF SECURED TARGET TYPE "IBM DB2 LUW" AT jdbc:av:db2://db2host.oracle.com 
    authenticated by administrator/password
    

    This command omits the port number and database name, which are required to connect to the DB2 source. You must then modify the command in the following way. The port number and database name are in bold.

    REGISTER SECURED TARGET my_target OF SECURED TARGET TYPE "IBM DB2 LUW" AT jdbc:av:db2://db2host.example.com:50000/SAMPLE 
    authenticated by administrator/password;
    
  8. As the Oracle Audit Vault and Database Firewall administrative user, run register_host.av using avcli.
    avcli -f register_host.av -u AVDF_admin_user_name
    

    This command registers all the hosts that are included in register_host.av with the Oracle Audit Vault Server.

  9. Manually download the agent.jar file from the Audit Vault Server to the host computers that are registered in the previous step.
  10. Start the agent on these registered hosts.

    For example:

    agentctl start -k
    Enter Activation Key: key
    

    You must perform this manually because the agent.jar file must be put on a different host from the current computer. You can find this key from the Audit Vault Server, under the host tab.

  11. After the agents start, register the secured target using register_secured_target.av.
    avcli -f register_secured_target.av -u AVDF_admin_user_name
    
  12. Run the add-credential tool to add the secured target user credential.
    ./add-credential
    AV admin user: AVDF_admin_user_name
    Password: password
    

    Errors are written to the migration log file. This log file is generated in the current directory. Check this log file after you run the add-credential tool for possible errors and how to resolve them. The migration log file is described in "Step 2: Generate the Oracle Audit Vault Release 10.3 Configuration Data".

  13. From SQL*Plus, as the Oracle Audit Vault and Database Firewall auditor or super auditor, import the alert-related definitions by running the import_alert.sql script.
    sqlplus auditor-super_auditor
    Enter password: password
    @import_alert.sql
    
  14. Check the alert_migration_log.html file for any alert definitions that must be modified.

    The alert_migration_log.html file, generated in the preceding step, lists the alert definitions and notification templates that could not be ported.

  15. Check the import.log file if there were any errors while importing alerts.
  16. Start the collection audit trails for the secured targets that you registered in Step 11, using the start_trail.av script.
    avcli -f start_trail.av -u AVDF_admin_user_name

5.6 Step 5: Perform Post-Migration Procedures

In Step 5, to complete the migration process, you should ensure that the agents, audit trails, alerts, and other components are running, as well as revoke the privileges that you had granted to the Release 10.3 AVSYS user before the migration process.

  1. Log in to SQL*Plus on the Audit Vault server instance as user who has the ALTER USER system privilege.

    For example, if Oracle Database Vault is enabled, then log in as a user who has been granted the DV_ACCTMGR role.

    sqlplus dbv_acctmgr
    Enter password: password
    
  2. Lock the AVSYS account.
    ALTER USER AVSYS LOCK;
    
  3. Connect as user SYS.
    sqlplus sys as sysdba
    Enter password: password
  4. Revoke the privileges that you had granted to AVSYS earlier.
    REVOKE CREATE ANY DIRECTORY, DROP ANY DIRECTORY FROM AVSYS;
  5. Test the Audit Vault Server system operation.
  6. Ensure that the agents are working.
  7. Ensure that the secured targets are set up properly.

    In the Audit Vault Server console, click the Secured Targets tab to check the secured targets.

  8. Ensure that the audit trails are started and running with new records archived.
  9. Check the alert definitions, alert email actions, alert statues, notification profiles, notification templates are set up properly.

    You can check the status of these alerts and notifications from the Audit Vault Server console.

  10. Ensure that the alerts are generated and notifications are sent to the correct recipients.

    See Also: