12 Developing WebRTC-Enabled Android Applications
This chapter shows how you can develop WebRTC-enabled Android applications with the Oracle Communications WebRTC Session Controller Android application programming interface (API) library.
About the Android SDK
The WebRTC Session Controller Android SDK enables you to integrate your Android applications with core WebRTC Session Controller functions. You can use the Android SDK to implement the following features:
-
Audio calls between an Android application and any other WebRTC-enabled application, a Session Initialization Protocol (SIP) endpoint, or a public switched telephone network endpoint using a SIP trunk.
-
Video calls between an Android application and any other WebRTC-enabled application, with suitable support for video conferencing.
-
Seamless upgrading of an audio call to a video call and downgrading of a video call to an audio call.
-
Support for Interactive Connectivity Establishment (ICE) server configuration, including support for Trickle ICE.
-
Transparent session reconnection following network connectivity interruption.
The WebRTC Session Controller Android SDK is built upon several other libraries and modules as shown in Figure 12-1.
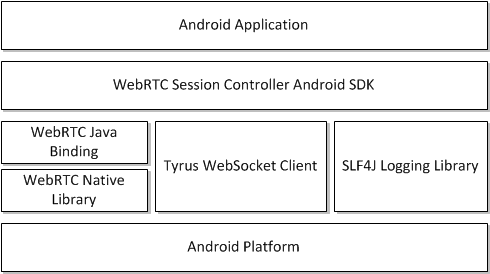
The WebRTC Java binding enables Java access to the native WebRTC library which itself provides WebRTC support. The Tyrus WebSocket client enables the WebSocket access required to communicate with WebRTC Session Controller. Finally, the SLF4J logging library enables you to plug in a logging framework of your choice to create persistent log files for application monitoring and troubleshooting.
For more information about any of the APIs described in this document, see Oracle Communications WebRTC Session Controller Android API Reference.
About the Android SDK WebRTC Call Workflow
The general workflow for using the WebRTC Session Controller Android SDK is:
-
Authenticate against WebRTC Session Controller using the HttpContext class. You initialize the HttpContext with necessary HTTP headers and optional SSLContext information in the following manner:
-
Send an HTTP GET request to the login URI of WebRTC Session Controller.
-
Complete the authentication process based on your authentication scheme.
-
Proceed with the WebSocket handshake on the established authentication context.
-
-
Establish a WebRTC Session Controller session using the WSCSession class. Two more classes must be implemented:
-
ConnectionCallback: An interface that reports on the success or failure of the session creation.
-
WSCSession.Observer: An abstract class that signals on various session state changes, including CLOSED, CONNECTED, FAILED, and others.
-
-
Once a session is established, create a CallPackage which manages Call objects in a WSCSession.
-
Create a Call using the CallPackage createCall method with a callee ID as its argument, for example, alice@example.com.
-
To monitor call events such as ACCEPTED, REJECTED, RECEIVED, create a Call.Observer class which attaches to the Call.
-
To determine the nature of the WebRTC call, whether bi or mono-directional audio or video or both, create a CallConfig object.
-
Create and configure a new PeerConnectionFactory object and start the Call using the start method of the call.
-
When the call is complete, terminate the Call object using its end method.
Prerequisites
Before continuing, make sure you thoroughly review and understand the JavaScript API discussed in the following chapters:
The WebRTC Session Controller Android SDK is closely aligned in concept and functionality with the JavaScript SDK to ensure a seamless transition.
In addition to an understanding of the WebRTC Session Controller JavaScript API, you are expected to be familiar with:
-
Java and object oriented programming concepts
-
General Android SDK programming concepts including event handling, and activities.
There are many excellent online resources for learning Java programming, and, for a practical introduction to Android programming, see http://developer.android.com/guide/index.html.
Android SDK System Requirements
In order to develop applications with the WebRTC Session Controller SDK, you must meeting the following software/hardware requirements:
-
Java Development Kit (JDK) 1.6 or higher installed with all available security patches:
http://www.oracle.com/technetwork/java/javase/downloads/java-archive-downloads-javase6-419409.htmlNote:
OpenJDK is not supported. -
The latest version of the Android SDK available from
http://developer.android.com/sdk/installing/index.html, running on a supported version of Windows, Mac OS X, or Linux. -
If you are using the Android SDK command line tools, you must have Apache Ant 1.8 or later:
http://ant.apache.org/. -
A installed and fully configured WebRTC Session Controller installation. See the WebRTC Session Controller Installation Guide.
-
An actual Android hardware device. You can test the general flow and function of your Android WebRTC Session Controller application using the Android emulator. However, a physical Android device such as a phone or tablet is required to utilize audio or video functionality.
About the Examples in This Chapter
The examples and descriptions in this chapter are kept intentionally straightforward. They illustrate the functionality of the WebRTC Session Controller Android SDK API without obscuring it with user interface code and other abstractions and indirections. It is likely that use cases for production applications will take many forms. Therefore, the examples assume no pre-existing interface schemes except when necessary, and then, only with the barest minimum of code. For example, if a particular method requires arguments such as a user name, a code example will show a plain string username such as "alice@example.com" being passed to the method. It is assumed that in a production application, you would interface with the contact manager of the Android device.
General Android SDK Best Practices
When designing and implementing your WebRTC-enabled Android application, keep the following best practices in mind:
-
Following Android application development general guidelines, do not call any networking operations in the main Application UI thread. Instead, run network operations on a separate background thread, using the supplied Observer mechanisms to handle any necessary responses.
-
The Observers themselves run on a separate background thread. Your application must not make any user interface updates on that thread, since the Android user interface toolkit is not thread safe. For more information, see
https://developer.android.com/training/multiple-threads/communicate-ui.html. -
In any class that extends or uses the android.app.Application class or any initial Activity class, initialize the WebRTC PeerConnectionFactory only once during its lifetime:
PeerConnectionFactory.initializeAndroidGlobals(context, true /* initializeAudio */, true /* initializeVideo */);
-
The signaling communications take place over a background thread. To prevent communications disruption, initialize and create WebRTC Session Controller sessions using an Android background service.
The background service can maintain a reference to the Session object and share that among the activities, fragments, and other components of your Android application. The service can also be run at a higher priority and be used to handle notifications. For more information, see
https://developer.android.com/training/best-background.html.
Installing the Android SDK
To install the WebRTC Session Controller Android SDK, do the following:
-
After you have installed your Android development environment, use the Android SDK Manager to download the required SDK tools and platform support:
http://developer.android.com/sdk/installing/adding-packages.html.Note:
Android API level 17 (4.2.2 Jellybean) is the minimum required by the WebRTC Session Controller Android SDK for full functionality. To ensure the broadest application compatibility, target the lowest API level possible. -
Configure virtual and hardware devices as required for your application:
http://developer.android.com/tools/devices/index.htmlandhttp://developer.android.com/tools/device.html. -
Create a Android project using the Android development environment of your choice:
http://developer.android.com/tools/projects/index.html. -
Download and extract the libs folder from the WebRTC Session Controller Android SDK ZIP file into the libs folder of your Android application. Create the libs folder if it does not exist.
Note:
Both debug and release versions of the WebRTC peer connection library are included. Choose the correct one for the development state of your project. -
Depending on your Android development environment, add the path to the libs folder to your Android project as indicated in your Android development environment documentation.
WebRTC Session Controller SDK Required Permissions
The WebRTC Session Controller SDK requires the following Android permissions to function correctly:
-
android.permission.INTERNET
-
android.permission.ACCESS_NETWORK_STATE
-
android.permission.CAMERA
-
android.permission.RECORD_AUDIO
Also, if your logging subsystem requires access to an external SD card (or a different storage volume) also grant the android.permission.WRITE_EXTERNAL_STORAGE permission.
Configuring Logging
The WebRTC Session Controller Android SDK includes support for the Simple Logging Facade for Java (SLF4J) which lets you plug in your preferred logging framework.
Examples in this chapter use the popular Log4j logging framework which requires the addition of the following libraries to your project, where n indicates a version number:
-
slf4j-log4jn-n.n.n.jar
-
log4j-n.n.n.jar
-
android-logging-log4j-n.n.n.jar
Example 12-1 Configuring Log4j
public class ConfigureLog4j {
  public void configureLogging() {
    Log.i(MyApp.TAG, "Configuring the Log4j logging framework...");
    final LogConfigurator logConfigurator = new LogConfigurator();
    logConfigurator.setFileName(Environment.getExternalStorageDirectory()
               + File.separator
               + "sample_android_app.log");
    logConfigurator.setRootLevel(Level.DEBUG);
    logConfigurator.setFilePattern("%d %-5p [%c{2}]-[%L] %m%n");
    logConfigurator.setMaxFileSize(1024 * 1024 * 5);
    logConfigurator.setImmediateFlush(true);
    logConfigurator.configure();
  }
}
Note:
To write log files to any location other than the internal storage of an Android device, grant the WRITE_EXTERNAL_STORAGE permission.For more information about configuring and using Log4j, see http://logging.apache.org/log4j/.
Authenticating with WebRTC Session Controller
Use the class HttpContext to set up an authentication context. The authentication context contains the necessary HTTP headers and SSLContext information, and is used when setting up a wsc.Session.
Initialize the CookieManager
To handle storage of authentication headers and URIs, initialize the cookie manager. For more information about the Android CookieManager class, see http://developer.android.com/reference/android/webkit/CookieManager.html.
Initialize a URL Connection
Create a URL object using the URI to your WebRTC Session Controller endpoint. Open a urlConnection using the URL object openConnection method.
Example 12-3 Initializing a URL Connection
try {
  url = new URL("http://server:port/login?wsc_app_uri=/ws/webrtc/myapp");
} catch (MalformedURLException e1) {
  Log.i(MyApp.TAG, "Malformed URL.");
}
try {
  urlConnection = (HttpURLConnection) url.openConnection();
} catch (IOException e) {
  Log.i(MyApp.TAG, "IO Exception.");
}
Note:
The default WebRTC Session Controller port is 7001.Configure Authorization Headers if Required
Configure authorization headers as required by your authentication scheme. The following example uses Basic authentication; OAuth and other authentication schemes are similarly configured. For more information about WebRTC Session Controller authentication, see "Setting Up Security".
Example 12-4 Initializing Basic Authentication Headers
String name = "username";
String password = "password";
        String authString = "Basic " + name + ":" + password;
byte[] authEncBytes = Base64.encode(authString.getBytes(), 0);
String authHeader = new String(authEncBytes);
urlConnection.setRequestProperty(HttpContext.AUTHORIZATION_HEADER, authHeader);
Note:
If you are using Guest authentication, no headers are required.Configure the SSL Context if Required
If you are using Secure Sockets Layer (SSL), configure the SSL context, including the TrustManager if necessary. See Example 12-5.
Example 12-5 Configuring the SSL Context
if (HTTPS.equals(url.getProtocol())) {
  Log.i(MyApp.TAG, "Configuring SSL context...");
  HttpsURLConnection.setDefaultHostnameVerifier(getNullHostVerifier());
  SSLContext ctx = null;
  try {
    ctx = SSLContext.getInstance("TLS");
  } catch (NoSuchAlgorithmException e) {
    Log.i(MyApp.TAG, "No Such Algorithm.");
  }
  try {
    ctx.init(null, getTrustAllManager(), new SecureRandom());
  } catch (KeyManagementException e) {
    Log.i(MyApp.TAG, "Key Management Exception.");
  }
  final SSLSocketFactory sslFactory = ctx.getSocketFactory();
  HttpsURLConnection.setDefaultSSLSocketFactory(sslFactory);
}
Example 12-6 is a stub method. In it, you can implement a routine to test the validity of the input URL object and handle program flow based on HTTP return codes. This method expects a URL object (shown in Example 12-5). It passes that object to a custom getNullHostVerifier method, whose job is to validate that the URL is live.
Example 12-6 Host Name Verification
private HostnameVerifier getNullHostVerifier() {
  return new HostnameVerifier() {
    @Override
    public boolean verify(final String hostname, final SSLSession session) {
      Log.i(MyApp.TAG, "Stub verification for " + hostname +
                              " for session: " + session);
      return true;
    }
  };
}
Finally, if your implementation depends upon a Java Secure Socket Extension implementation, configure the Android TrustManager class as required (and shown in Example 12-7). For more information about the Android TrustManager class, see http://developer.android.com/reference/android/webkit/CookieManager.html.
Example 12-7 Configuring the TrustManager
public static TrustManager[] getTrustAllManager() {
  return new X509TrustManager[] { new X509TrustManager() {
    @Override
    public java.security.cert.X509Certificate[] getAcceptedIssuers() {
      return null;
    }

    @Override
    public void checkClientTrusted(
      java.security.cert.X509Certificate[] certs, String authType) {
    }

    @Override
    public void checkServerTrusted(
      java.security.cert.X509Certificate[] certs, String authType) {
    }
  } };
}
Build the HTTP Context
Next, build the HTTP context, as shown in Example 12-8. Retrieve the authorization headers using the CookieManager class you instantiated in "Initialize the CookieManager".
Example 12-8 Building the HTTP Context
Log.i(MyApp.TAG, "Building the HTTP context...");
Map<String, List<String>> headers = new HashMap<String, List<String>>();

HttpContext httpContext = null;

try {
  httpContext = HttpContext.Builder.create()
                .withHeaders(cookieManager.get(url.toURI(), headers))
                .build();
} catch (IOException e) {
  e.printStackTrace();
} catch (URISyntaxException e) {
  e.printStackTrace();
}
Connect to the URL
With your authentication parameters configured, you can now connect to the WebRTC Session Controller URL using the connect method of the UrlConnection object, as shown in Example 12-9.
Configuring Interactive Connectivity Establishment (ICE)
If you have access to one or more STUN/TURN ICE servers, implement the IceServerConfig interface, as shown in Example 12-10. For information about ICE, see "Managing Interactive Connectivity Establishment Interval".
Example 12-10 Configuring the ICE Server Config Class
class MyIceServerConfig implements IceServerConfig {
  public Set<IceServer> getIceServers() {
    Log.i(MyApp.TAG, "Setting up ICE servers...");
    Set<IceServer> iceServers = new HashSet<IceServer>();
    iceServers.add(new IceServerConfig.IceServer(
           "stun:stun-relay.example.net:3478", "admin", "password"));
    iceServers.add(new IceServerConfig.IceServer(
           "turn:turn-relay.example.net:3478", "admin", "password"));
    return iceServers;
  }
}
About Monitoring Your Application WebSocket Connection
The state of the application session depends on the state of the WebSocket connection between your application and WebRTC Session Controller Signaling Engine. The WebRTC Session Controller Android API library monitors this connection.
When you instantiate your session object, configure how the functionality in WebRTC Session Controller Android API library checks the WebSocket connection of your application, by setting the following values in the WSCSession object:
-
Session.PROP_ACK_INTERVAL, which specifies the acknowledgement interval. The default is 60,000 milliseconds (ms).
-
How often the WebRTC Session Controller Android API library must ping the WebRTC Session Controller Signaling Engine:
-
WSCSession.PROP_BUSY_PING_INTERVAL, when there are subsessions inside the session. The default is 3,000 ms.
-
WSCSession.PROP_IDLE_PING_INTERVAL, when there are no subsessions inside the session. The default is 10,000 ms.
-
-
Session.PROP_RECONNECT_INTERVAL, which specifies the interval between attempts to reconnect to the WebRTC Session Controller Signaling Engine. The default is 2000 ms.
-
Session.PROP_RECONNECT_TIME, which specifies the maximum time for the interval during which the WebRTC Session Controller Android API library attempts to reconnect to the server. If the specified time is reached and the connection still fails, no further attempt is made to reconnect to the WebRTC Session Controller Signaling Engine. Instead, the session failureCallback event handler is called in your application. The default value is 60,000 ms.
Note:
Verify that the Session.reconnectTime value does not exceed the value configured for "WebSocket Disconnect Time Limit" in WebRTC Session Controller.
When your application is active, monitor these values to check the state of the connection. When there is a device handover, your application suspends the application session. The WebSocket connection closes abnormally. See "Suspending the Session on the Original Device".
Configuring Support for Notifications
Set up client notifications to enable your applications to operate without impacting the battery life and data consumption associated with the associated mobile devices.
With such a setup, whenever a user (for example, Bob) is not actively using your application, your application hibernates the client session. It does so after informing the WebRTC Session Controller server. The WebSocket connection to the WebRTC Session Controller server closes. During that hibernation period, to alert Bob of an event (such as a call from Alice on the Call feature of your Android application), the WebRTC Session Controller server sends a message (about the call invite) to the cloud messaging server.
The cloud messaging server uses a push notification, a short message that it delivers to a device (such as a mobile phone registered to Bob). This message contains the registration ID for the application and the payload. On being woken up on that device, your application reconnects with the server, uses the saved session ID to resurrect the session data, and handles the incoming event.
If no event occurs during the specified hibernation period and the period expires, there are no notifications to process. The WebRTC Session Controller server cleans up the session.
The preliminary configurations and registration actions that you perform to support client notifications in your applications provide the WebRTC Session Controller server and the cloud messaging provider the necessary information such as the device, the APIs and the application. The client application running on the mobile device or browser retrieves a registration ID from its notification provider, the Google Cloud Messaging service.
About the WebRTC Session Controller Notification Service
The WebRTC Session Controller Notification Service manages the external connectivity with the respective notification providers. It implements the Cloud Messaging Provider specific protocol such as GCM and APNS. The WebRTC Session Controller Notification Service ensures that all notification messages are transported to the appropriate notification providers.
The WebRTC Session Controller server constructs the payload in the push notification it sends by combining the received message payload from your application with the pay load configured in the application settings or the application provider settings you provide WebRTC Session Controller.
If you plan to use the WebRTC Session Controller server to communicate with the Google Cloud Messaging system, register it with the GCM. See "Enable Your Applications to Use the WebRTC Session Controller Notification Service".
About Employing Your Current Notification System
At this point, verify if your current installation has an existing notification server that talks to the Cloud Messaging system and that the installation supports applications for your users through this server.
If you currently have such a notification server successfully associated with a cloud messaging system, you can use the pre-existing notification system to send notifications using the REST interface. For more information on the REST interface, see the Oracle Communications WebRTC Session Controller Extension Developer's Guide.
How the Notification Process Works
In its simplest form, the notification process works in this manner:
-
Bob, an end user, accesses your application on a mobile device. In this scenario, your Android Audio Call application.
-
The client application running on the device/browser fetches a registration ID from its notification provider.
-
WebRTC Session Controller Android client SDK sends the information about the client device and the application settings to the WebRTC Session Controller server.
A WebSocket connection is opened.
-
When there is inactivity on the part of the end user (Bob), your application goes into the background. Your application sends a message to the WebRTC Session Controller server informing the server of its intent to hibernate and specifies a time duration for the hibernation.
The WebSocket connection closes.
-
During the hibernation period, an event occurs. For example, Alice places a call to Bob on your Android Audio Call application.
-
WebRTC Session Controller server receives this call request from Alice. It checks the session state. Since the call invite request came during the time interval set as the hibernation period, the WebRTC Session Controller server uses its notification service to send a notification to the GCM server.
-
The GCM server delivers the notification to your Android Call application on the mobile device registered to Bob.
-
On receiving this notification,
-
Your Android application reconnects with the notification service using the last session-id and receives the incoming call.
-
WebRTC Session Controller client SDK once again establishes the connection to the server WebRTC Session Controller server.
-
-
WebRTC Session Controller sends the appropriate notification to your application. The user interface logic in your application informs Bob appropriately.
-
Bob accepts the call.
-
Your application logic manages the call to its completion.
Note:
If the time set for the hibernation period completes with no event (such as a call from Alice to Bob), then, the WebRTC Session Controller server closes the session. The Session ID and its data are destroyed.Your application must create a session. It cannot use the session ID to restore the data.
Handling Multiple Sessions
If you have defined multiple applications in WebRTC Session Controller and your customer can access more than one such application. As a result, there can be multiple WebRTC Session Controller-associated sessions in the mobile application registered to the customer.
In such a scenario where more than one session data is involved, all the associated session data is stored appropriately and available to your applications.
The Process Workflow for Your Android Application
The process workflow to support notifications in your Android application are:
-
The prerequisites to using the notification service are complete. See "About the General Requirements to Provide Notifications".
-
Your application on the Android device sends the registration_Id to the WebRTC Session Controller Android client SDK, which then sends it to the WebRTC Session Controller server and saves it locally.
-
When a notification is to be sent, the WebRTC Session Controller server sends a message with the registration_id to the GCM notification provider.
-
The notification provider delivers this notification to the device.
-
When the notification is clicked on the device, your application is awakened. It re-establishes communication with the WebRTC Session Controller server again and handles the event.
About the WebRTC Session Controller Android APIs for Client Notifications
The following WebRTC Session Control Android APIs enable your applications to handle notifications related to session hibernation:
-
hibernate
The hibernate method of the WSCSession object starts a hibernate request to the WebRTC Session Controller server.
-
HIBERNATED
This enum value of the SessionState object indicates that the session is in hibernation.
-
HibernateParams
The HibernateParams object stores the parameters for the hibernating session.
-
HibernationHandler
The HibernationHandler interface is associated with a Session object. It contains the callback methods for the requests and responses to the session hibernation.
-
withDeviceToken parameter of WSCSession.Builder
When you provide the withDeviceToken parameter, the session is built with the device token obtained from GCM.
-
withSessionId parameter of WSCSession.Builder
The parameter is used for rehydration. When you provide the withSessionId parameter, the session is built with the input session ID.
-
withHibernationHandler parameter of WSCSession.Builder
When you provide the withHibernationHandler parameter, the session is built to handle hibernation.
For more on these and other WebRTC Session Controller Android API classes, see AllClasses at Oracle Communications WebRTC Session Controller Android API Reference.
About the General Requirements to Provide Notifications
Complete the following tasks as required for your application. Some are performed outside of your application:
-
Enable Your Applications to Use the WebRTC Session Controller Notification Service
-
Inform the Device to Deliver Push Notifications to Your Application
-
In your application, complete all actions associated with changes in the activity life cycle, creating, updating, and removing notifications.
Register with Google
Register your WebRTC Session Controller installation with the Google API Console and create a project to receive the following:
-
Project ID
-
API Key
For information about how to complete this task, refer to the Google Developers Console Help documentation.
Obtain the Registration ID for your Application
To obtain a registrationId, register your application with GCM. For information about how to complete this task, refer to the Google Developers Console Help documentation.
Enable Your Applications to Use the WebRTC Session Controller Notification Service
This step is performed in the WebRTC Session Controller Administration Console.
Access the Notification Service tab in the WebRTC Session Controller Administration Console and enter the information about each application for the use of the WebRTC Session Controller Notification Service. For each application, enter the application setting such as the application ID, API Key, the cloud provider for the API service. For more information about completing this task, see "Creating Applications for the Notification Service" in WebRTC Session Controller System Administration Guide.
Inform the Device to Deliver Push Notifications to Your Application
This step is performed within your Android application.
Ensure that, after your application launches successfully, your application informs the device that it requires push notifications. For information about how to complete this task, refer to the appropriate Google Developers documentation.
Store the Session ID
To persist the Session ID in your application, use the various standard storage mechanisms offered by the Android platforms. Your Android application can use this session ID to immediately present "Bob" (the end user) with the last current state of the application session. The WSCSession.getSessionId() method returns the session ID as a String.
For more information, see the description of WSCSession in Oracle Communications WebRTC Session Controller Android API Reference.
Implement Session Rehydration
To implement session rehydration in your application:
-
Persist Session IDs
To provides your end users with a seamless user experience, persist the session ID value in your Android applications. Use the various standard storage mechanisms offered by Android Platform do so.
-
Use the appropriate Session ID
Provide the same session ID that the client last successfully connected with when it hibernated. The WebRTC Session Controller Android SDK supports rehydration of its session, when given a session ID.
-
Provide the capability to trigger hydration for more than one session object.
This scenario occurs when you have multiple applications defined in WebRTC Session Controller and your customer creates a session with more than one of these applications in their mobile device. In such a scenario, the client application is using more than one WSCSession object.
Handling Hibernation Requests from the Server
At times your application receives a request to hibernate from the WebRTC Session Controller server. To respond to such a request, provide the necessary logic to handle the user interface and other elements in your application.
See "Responding to Hibernation Requests from the Server" for information about how to set up the callbacks to the specific WebRTC Session Controller Android SDK event handlers.
Tasks that Use WebRTC Session Controller Android APIs
Use WebRTC Session Controller Android APIs to do the following:
-
Associate the Device Token when Building the WebRTC Session.
-
Send Notifications to the Callee when Callee Client Session is in Hibernated State.
For information about the supported WebRTC Session Controller Android APIs, see Oracle Communications WebRTC Session Controller Android API Reference.
Associate the Device Token when Building the WebRTC Session
Associate the device token when you build a WebRTC Session Controller session using the WSCSession.Builder object. To input the device token obtained from GCM, use withdeviceToken (String token) method.
For example:
WSCSession.Builder builder = WSCSession.Builder.create(new URI(webSocketURL))
             ...
             .withDeviceToken("ASDAKSDHUWE12329KDA1233");
WSCSession session = builder.build();
See Example 12-18.
For information about WSCSession.Builder, see Oracle Communications WebRTC Session Controller Android API Reference.
Associate the Hibernation Handler for the Session
Set up the hibernation handling function when you build a WebRTC Session Controller session. Use the withHibernationHandler method of WSCSession.Builder as shown here:
WSCSession.Builder builder = WSCSession.Builder.create(new URI(webSocketURL))
             ...
             .withHiberationHandler(new MyHibernationHandler());
WSCSession session = builder.build();
Implement the HibernationHandler Interface
Implement the HibernationHandler interface to handle the hibernation requests that originate from the server or the client. This interface has the following event handlers:
-
onFailure: called when a Hibernate request from the client fails.
-
onSuccess: called when a Hibernate request from the client succeeds.
-
onRequest: called when there is a request from the server. Returns an instance of session.HibernateParams.
-
onRequestCompleted: called when the request from the server end completes. This event handler uses a StatusCode enum value as input parameter.
Example 12-11 Implementing the HibernationHandler Interface
// Handle hibernation for the session.
 class MyHibernationHandler implements HibernationCallback {

   // On success response for Hibernate requests originated from Client
   public void onSuccess() {
     // perform other cleanup
   }

   // On failure response for Hibernate requests originated from Client
   public void onFailure(StatusCode code) {
     // Hibernate request rejected..
   }

   // On request for Hibernate originated from Server.
   public HibernateData onRequest() {
     // fetch device token if not already
     return HibernateData.of(registrationId, timeToLive);
   }

   // On completion of request for Hibernate originated from Server end.
   public void onRequestCompleted(StatusCode code) {
     // process status code and clean up if OK.
   }
 }
For information about HibernationHandler and StatusCode, see Oracle Communications WebRTC Session Controller Android API Reference.
Implement Session Hibernation
When your Android application is in the background, your application must send a request back to WebRTC Session Controller stating that it wishes to hibernate the session.
Take appropriate steps to release shared resources, invalidate timers, and store the state information necessary to restore your application to its current state, in case it is terminated later.
To start a hibernate request to the WebRTC Session Controller server, call the WSCSession.hibernate method. The HibernateParams object contains the parameters for hibernating a session. Provide this object when you call the hibernate method. Example 12-12 shows how an example application creates a holder for HibernatedParams with the HibernatedParams.of method when that application starts the hibernate request.
Example 12-12 Hibernating the Session
WSCSession session = sessionbuilder.build();
...
// Hibernate the session
int timeToLiveInSecs = 3600;
session.hibernate(HibernateParams.of(timeToLiveInSecs, TimeUnit.SECONDS));
The WebRTC Session Controller server identifies the client device (going into hibernation) by the deviceToken you provided when you built the session object (Example 12-18).
When you call the hibernate method, provide the maximum period for which the client session is kept alive on the server. All notifications received within this period are sent to the client device. In Example 12-12, the session called the hibernation method and sets the hibernation period to 3600 seconds. The WebRTC Session Controller server maintains a maximum interval depending on the policy set for each type of client device. If your application sets an interval greater than this period, the server uses the policy-supported maximum interval.
When the WSCSession.hibernate method completes, the SessionState for the session is HIBERNATED. The session with the WebRTC Session Controller server closes. Your application can take no action, such as a call request.
For information about WSCSession.hibernate method, see Oracle Communications WebRTC Session Controller Android API Reference.
Send Notifications to the Callee when Callee Client Session is in Hibernated State
If the client session of the callee is in a hibernated state, any incoming event for that client session requires some time for the call setup so that the callee can accept the call. In your Android application, add the logic to the callback function to handle incoming call event when the callee session is in a hibernated state.
Note:
This section describes how to use the WebRTC Session Controller notification API to send the notification. For more information about how the payload is constructed see, "Message Payloads" in WebRTC Session Controller Extensions Developer's Guide.If your application connects to a notification system that exposes a REST API, you can use the REST API Callouts instead.
Set up a function to handle the onWSHibernated method in the Groovy Script library. This method takes NotificationContext object as a parameter.
The NotificationContext object serves as a cache and way for notifications and allows notifications to be marked for consumption after the render life cycle has completed. It allows equal access to notifications across multiple interfaces on a page. You can do the following with the NotificationContext object:
-
Retrieve
-
information about the triggering message, (such as the initiator, the target, package type).
-
Information about the application (ID, version, platform, platform version).
-
The device token.
-
The incoming message that triggered this notification, as a normalized message.
-
The REST client instance for submitting outbound REST requests (synchronized call outs only).
-
-
Dispatch the messages through the internal notification service, if configured.
For more information about NotificationContext, see All Classes in Oracle Communications WebRTC Session Controller Configuration API Reference.
Example 12-13 shows a sample code excerpt that creates the JSON message in the msg_payload object. It uses the context.dispatch method to dispatch the message payload through the local notification service.
Example 12-13 Using Groovy Method to Define the Notification Payload
/**
 * This function gets called when the client end-point is in a hibernated state when an incoming event arrives for it.
 * A typical action would be to send some trigger/Notification to wake up the client.
 *
 * @param context the notification context
 */
void onWSHibernated(NotificationContext context) {
  // Define the notification payload.
  def msg_payload = "{\"data\" : {\"wsc_event\": \"Incoming " + context.getPackageType() +
          "\", \"wsc_from\": \"" + context.getInitiator() + "\"}}"
  if (Log.debugEnabled) {
    Log.debug("Notification Payload: " + msg_payload)
  }
  // Using local notification gateway
  context.dispatch(msg_payload)
}
Provide the Session ID to Rehydrate the Session
To rehydrate an existing session, use the withSessionID property of WSCSession.Builder. You can set up an observer for incoming notifications in your application. Pass the stored session ID into the session builder.
The session builder rehydrates the session by retrieving the hibernated session out of persisted storage using the passed session ID as the key.
Important:
Call this method when attempting to rehydrate an existing session only.Respond to Hibernation Requests from the Server
When the server has to force your application to hibernate, it calls the onRequest method in the HibernationHandler interface. When the hibernation request from the server completes, it calls the onRequestCompleted method in that WSCHibernationHandler interface.
To handle the user interface and other elements in your application, provide the necessary logic in your implementation of HibernationHandler.
Example 12-15 Handling Server-originated Hibernation Requests
WSCSession.Builder builder = WSCSession.Builder.create(new URI(webSocketURL))
             ...
             .withDeviceToken("....")
             .withHiberation(new MyHibernationHandler())
...
// Handle hibernation for the session.
 class MyHibernationHandler implements HibernationCallback {

   // On success response for Hibernate requests originated from Client
   public void onSuccess() {
     // perform other cleanup
   }

   // On failure response for Hibernate requests originated from Client
   public void onFailure(StatusCode code) {
     // Hibernate request rejected..
   }

   // On request for Hibernate originated from Server.
   public HibernateData onRequest() {
     // fetch device token if not already
     return HibernateData.of(registrationId, timeToLive);
   }

   // On completion of request for Hibernate originated from Server end.
   public void onRequestCompleted(StatusCode code) {
     // process status code and clean up if OK.
   }
 }
Creating a WebRTC Session Controller Session
Once you have configured your authentication method and connected to your WebRTC Session Controller endpoint, instantiate a WebRTC Session Controller session object. Before instantiating a session object, configure the following elements:
-
To handle the results of a session creation request, you "Implement the ConnectionCallback Interface".
-
To monitor and respond to changes in session state, you "Create a Session Observer Object".
-
To set up the session, you "Build the Session Object".
-
To configure specific session object behaviors and performance parameters, you "Configure Session Properties".
Implement the ConnectionCallback Interface
You must implement the ConnectionCallback interface to handle the results of your session creation request. The ConnectionCallback interface has two event handlers:
-
onSuccess: Triggered upon a successful session creation.
-
onFailure: Returns an enum of type StatusCode. Triggered when session creation fails. For a listing of status code, see Oracle Communications WebRTC Session Controller Android API Reference.
Example 12-16 Implementing the ConnectionCallback Interface
public class MyConnectionCallback implements ConnectionCallback {
  @Override
  public void onFailure(StatusCode arg0) {
    Log.i(MyApp.TAG, "Handle a connection failure...");
  }

  @Override
  public void onSuccess() {
    Log.i(MyApp.TAG, "Handle a connection success...");
  }
}
Create a Session Observer Object
You must create a session Observer object to monitor and respond to changes in session state.
Example 12-17 Instantiating a Session Observer
public class MySessionObserver extends Observer {
  @Override
  public void stateChanged(final SessionState state) {
    runOnUiThread(new Runnable() {
      @Override
      public void run() {
        Log.i(MyApp.TAG, "Session state changed to " + state);
        switch (state) {
          case CONNECTED:
            break;
          case RECONNECTING:
            break;
          case FAILED:
            Log.i(MyApp.TAG,
                  "Send events to various active activities as required...");
            shutdownCall();
            break;
          case CLOSED:
          default:
            break;
        }
      }
    });
  }
}
Build the Session Object
With the ConnectionCallback and Session Observer configured, you now build a WebRTC Session Controller session using the session Builder method.
Example 12-18 Building the Session Object
Log.i(MyApp.TAG, "Creating a WebRTC Session Controller session...");
WSCSession.Builder builder = null;
try {
  builder = WSCSession.Builder.create(new java.net.URI(webSocketURL))
           .withUserName(userName)
           .withPackage(new CallPackage())
           .withHttpContext(httpContext)
           .withConnectionCallback(new MyConnectionCallback())
           .withIceServerConfig(new MyIceServerConfig())
           .withObserver(new MySessionObserver());
           .withDeviceToken("MyDeviceToken")
           .withHiberation(new MyHibernationHandler())
} catch (URISyntaxException e) {
  e.printStackTrace();
}

WSCSession session = builder.build();
In Example 12-18, the withPackage method registers a new CallPackage with the session that is instantiated when creating voice or video calls. The device token, ConnectionCallback, IceServerConfig, HibernationHandler and SessionObserver objects (created earlier) are also registered.
Configure Session Properties
You can configure more properties when creating a session using the withProperty method.
For a complete list of properties and their descriptions, see the Oracle Communications WebRTC Session Controller Android SDK API Reference.
Adding WebRTC Voice Support to your Android Application
This section describes adding WebRTC voice support to your Android application.
Initialize the CallPackage Object
When you created your Session, you registered a new CallPackage object using the withPackage method of the Session object. You now instantiate that CallPackage.
Example 12-20 Initializing the CallPackage
String callType = CallPackage.PACKAGE_TYPE;
CallPackage callPackage = (CallPackage) session.getPackage(callType);
Note:
Use the default PACKAGE_TYPE call type unless you have defined a custom call type.Place a WebRTC Voice Call from Your Android Application
Once you have configured your authentication scheme, created a Session, and initialized a CallPackage, you can place voice calls from your Android application.
Initialize the Call Object
With the CallPackage object created, initialize a Call object, passing the callee ID as an argument.
Note:
In a production application, integrate with the Android contacts provider or another enterprise directory system, rather than passing a bare string to the createCall method. For more information about integrating with the Android contacts provider, seehttp://developer.android.com/guide/topics/providers/contacts-provider.html">>http://developer.android.com/guide/topics/providers/contacts-provider.html.Configure Trickle ICE
To improve ICE candidate gathering performance, enable Trickle ICE in your application using the setTrickleIceMode method of the Call object. For more information, see "Enabling Trickle ICE to Improve Application Performance".
Create a Call Observer Object
You next create a CallObserver object so you can respond to Call events. Example 12-23 provides a skeleton with the appropriate call update, media, and call states. You can use it to handle updates to, and input from your application accordingly.
Example 12-23 Creating a CallObserver Object
Create a Call Observer Object
You next create a CallObserver object so you can respond to Call events. Example 12–18 provides a skeleton with the appropriate call update, media, and call states, which you can use to handle updates to, and input from, your application accordingly.
Creating a CallObserver Object
public class MyCallObserver extends oracle.wsc.android.call.Call.Observer {
  @Override
  public void callUpdated(final CallUpdateEvent state, final CallConfig callConfig, Cause cause) {
    Log.i(MyApp.TAG, "Call updated: " + state);
    runOnUiThread(new Runnable() {

      @Override
      public void run() {
        switch (state) {
          case SENT:
            break;
          case RECEIVED:
            break;
          case ACCEPTED:
            break;
          case REJECTED:
            break;
          default:
           break;
        }
      }
    });
  }

  @Override
  public void mediaStateChanged(MediaStreamEvent mediaStreamEvent, MediaStream mediaStream) {
    Log.i(MyApp.TAG, "Media State " + mediaStreamEvent
                                           + " for media stream " + mediaStream.label());
  }

  @Override
  public void stateChanged(final CallState state, Cause cause) {
    runOnUiThread(new Runnable() {
      @Override
      public void run() {
        switch (state) {
          case ESTABLISHED:
          Log.i(MyApp.TAG, "Update the UI to indicate that the call has been accepted...");
          break;
        case ENDED:
          Log.i(MyApp.TAG, "Update the UI and possibly close the activity...");
          break;
        case REJECTED:
          break;
        case FAILED:
          break;
        default:
          break;
        }
      }
    });
  }
}
Register the CallObserver with the Call Object
Once you've implemented the CallObserver, register it with the Call object.
Create a CallConfig Object
You create a CallConfig object to determine the type of call you wish to make. The CallConfig constructor takes two parameters, both named MediaDirection. The first parameter configures an audio call while the second configures a video call:
CallConfig(MediaDirection audioMediaDirection, MediaDirection videoMediaDirection)
The values for each MediaDirection parameter are:
-
NONE: No direction; media support disabled.
-
RECV_ONLY: The media stream is receive only.
-
SEND_ONLY: The media stream is send only.
-
SEND_RECV: The media stream is bi-directional.
Example 12-25 shows the configuration for a bi-directional, audio-only call.
Configure the Local MediaStream for Audio
With the CallConfig object created, you configure the local audio MediaStream using the WebRTC PeerConnectionFactory. For information about the WebRTC SDK API, see https://webrtc.org/native-code/native-apis/.
Example 12-26 Configuring the Local MediaStream for Audio
Log.i(MyApp.TAG, "Get the local media streams...");
PeerConnectionFactory pcf = call.getPeerConnectionFactory();
mediaStream = pcf.createLocalMediaStream("ARDAMS");
AudioSource audioSource = pcf.createAudioSource(new MediaConstraints());
mediaStream.addTrack(pcf.createAudioTrack("ARDAMSa0", audioSource));
Receiving a WebRTC Voice Call in Your Android Application
This section configuring your Android application to receive WebRTC voice calls.
Create a CallPackage Observer
To be notified of an incoming call, create a CallPackageObserver and attach it to your CallPackage. The CallPackageObserver lets you intercept and respond to changes in the state of the CallPackage.
Example 12-28 A CallPackage Observer
public class MyCallPackageObserver extends oracle.wsc.android.call.CallPackage.Observer {
  @Override
  public void callArrived(Call call, CallConfig callConfig, Map<String, ?> extHeaders) {

    Log.i(MyApp.TAG, "Registering a call observer...");
    call.setObserver(new MyCallObserver());

    Log.i(MyApp.TAG, "Getting the local media stream...");
    PeerConnectionFactory pcf = call.getPeerConnectionFactory();
    MediaStream mediaStream = pcf.createLocalMediaStream("ARDAMS");
    AudioSource audioSource = pcf.createAudioSource(new MediaConstraints());
    mediaStream.addTrack(pcf.createAudioTrack("ARDAMSa0", audioSource));

    Log.i(MyApp.TAG, "Accept or reject the call...");
    if (answerTheCall) {
      Log.i(MyApp.TAG, "Answering the call...");
      call.accept(callConfig, mediaStream);
    } else {
      Log.i(MyApp.TAG, "Declining the call...");
      call.decline(StatusCode.DECLINED.getCode());
    }
  }
}
In Example 12-28, the callArrived event handler processes an incoming call request:
-
The method registers a CallObserver for the incoming call. In this case, it uses the same CallObserver, myCallObserver, from the example in "Create a Call Observer Object".
-
The method then configures the local media stream, in the same manner as the example in "Configure the Local MediaStream for Audio".
-
The accept or decline method of the Call object is called based on the boolean value of answerTheCall.
Note:
The boolean value of answerTheCall can be set by a user interface element in your application such as a button or link.
Adding WebRTC Video Support to your Android Application
This section describes how you can add WebRTC video support to your Android application. While the methods are almost identical to adding voice call support to an Android application, more preparation is required.
Initializing the PeerConnectionFactory Object
You can use the org.webrtc.VideoRendererGui class to initialize the components of the PeerConnectionFactory in the following way:
Example 12-29 Initializing Android Globals
//initialize Android globals
  PeerConnectionFactory.initializeAndroidGlobals(
      /** Context */this,
      /** enableAudio */true,
      /** enableVideo */true,
      /** hw acceleration */true,
      /** egl context */null
  );

  //create the peerConnectionFactory
  pcf = new PeerConnectionFactory();


  //video controls
  mVideoView = (GLSurfaceView) findViewById(R.id.video_view);

  //set the view on the renderer
  VideoRendererGui.setView(mVideoView, null);

  //set remote and local renderers as follows (for example)
  final VideoRendererGui.ScalingType scalingType = VideoRendererGui.ScalingType.SCALE_ASPECT_FILL;
  remoteRender = VideoRendererGui.create(0, 0, 100, 100, scalingType, false);
  localRender = VideoRendererGui.create(70, 70, 25, 25, scalingType, true);
Find and Return the Video Capture Device
Before your application tries to initialize a video calling session, verify that the Android device it is running on actually has a video capture device available. Find the video capture device and return a VideoCapturer object. For more information about handling the camera of an Android device, see http://developer.android.com/guide/topics/media/camera.html.
Example 12-30 Finding a Video Capture Device
private VideoCapturer getVideoCapturer() {
  Log.i(MyApp.TAG,
      "Cycle through likely device names for a camera and return the first "
      + "available capture device. Throw an exception if none exists.");

  final String[] cameraFacing = { "front", "back" };
  final int[] cameraIndex = { 0, 1 };
  final int[] cameraOrientation = { 0, 90, 180, 270 };

  for (final String facing : cameraFacing) {
    for (final int index : cameraIndex) {
      for (final int orientation : cameraOrientation) {
        final String name = "Camera " + index + ", Facing "
                           + facing + ", Orientation " + orientation;
        final VideoCapturer capturer = VideoCapturer.create(name);
        if (capturer != null) {
           Log.i(MyApp.TAG, "Using camera: " + name);
           return capturer;
        }
      }
    }
  }
  throw new RuntimeException("Failed to open a capture device.");
}
Note:
Example 12-30 is not a robust algorithm for video capturer detection and is not recommended for production use.Create a GLSurfaceView in Your User Interface Layout
Your application must provide a container to display a local or remote video feed. To do that, you add an OpenGL SurfaceView container to your user interface layout. In Example 12-31, a GLSurfaceView container is created with the ID, video_view. For more information about GLSurfaceView containers, see http://developer.android.com/reference/android/opengl/GLSurfaceView.html.
Note:
You, of course, customize the GLSurfaceView container for the requirements of your specific application.Example 12-31 A Layout Containing a GLSurfaceView Element
<LinearLayout xmlns:android="http://schemas.android.com/apk/res/android"
  xmlns:tools="http://schemas.android.com/tools"
  android:layout_width="match_parent"
  android:layout_height="match_parent"
  android:paddingBottom="@dimen/activity_vertical_margin"
  android:paddingLeft="@dimen/activity_horizontal_margin"
  android:paddingRight="@dimen/activity_horizontal_margin"
  android:paddingTop="@dimen/activity_vertical_margin"
  tools:context=".MyActivity"
  android:orientation="vertical" >

  <android.opengl.GLSurfaceView
    android:id="@+id/video_view"
    android:orientation="horizontal"
    android:layout_width="fill_parent"
    android:layout_height="0dp"
    android:layout_weight="1" />
</LinearLayout>
Initialize the GLSurfaceView Control
Next, you initialize the GLSurfaceView container by finding its ID in the resource list in your Android application, video_view, and creating a VideoRendererGui object using the control ID as an argument.
Example 12-32 Initializing the GLSurfaceView Control
Log.i(MyApp.TAG,"Initialize the video view control in your main layout...");
//video controls
  mVideoView = (GLSurfaceView) findViewById(R.id.video_view);

  //set the view on the renderer
  VideoRendererGui.setView(mVideoView, null);

  //set remote and local renderers as follows (for example)
  final VideoRendererGui.ScalingType scalingType = VideoRendererGui.ScalingType.SCALE_ASPECT_FILL;
  remoteRender = VideoRendererGui.create(0, 0, 100, 100, scalingType, false);
  localRender = VideoRendererGui.create(70, 70, 25, 25, scalingType, true);
Note:
The VideoRendererGUI class is freely available. Use Google Code search to find the latest version.Placing a WebRTC Video Call from Your Android Application
To place a video call from your Android application, complete the coding tasks described in the earlier sections:
-
Configuring Interactive Connectivity Establishment (ICE) (if required)
In addition, complete the coding tasks for an audio call contained in the sections:
-
Configure Trickle ICE (if required)
Note:
Audio and video call work flows are identical with the exception of media directions, local media stream configuration, and the extra considerations described earlier in this section.Create a CallConfig Object
You create a CallConfig object as described in "Create a CallConfig Object", in the audio call section, setting both arguments to MediaDirection.SEND_RECV.
Configure the Local MediaStream for Audio and Video
With the CallConfig object created, you then configure the local video and audio MediaStream objects using the WebRTC PeerConnectionFactory. For information about the WebRTC SDK API, see https://webrtc.org/native-code/native-apis/.
Example 12-34 Configuring the Local MediaStream for Video
Log.i(MyApp.TAG, "Get the local media streams...");
private MediaStream getLocalMediaStreams(PeerConnectionFactory pcf) {
    if (mediaStream == null) {
      // Create audioSource, audiotrack
      AudioSource audioSource = pcf.createAudioSource(new MediaConstraints());
      AudioTrack localAudioTrack = pcf.createAudioTrack("ARDAMSa0", audioSource);
      // get frontfacingcam
      String frontFacingCam = VideoCapturerAndroid.getNameOfFrontFacingDevice();
      // get video capturer from cam above
      VideoCapturer videoCapturer = VideoCapturerAndroid.create(frontFacingCam);
      // Create videoSource, videoTrack
      localVideoSource = pcf.createVideoSource(videoCapturer, getConstraintsFromConfig());
      VideoTrack localVideoTrack = pcf.createVideoTrack("ARDAMSv0", localVideoSource);
      // get localstreams, add audio/video tracks to it
      mediaStream = pcf.createLocalMediaStream("ARDAMS");
      mediaStream.addTrack(localVideoTrack);
      mediaStream.addTrack(localAudioTrack);
      //render local video
      localVideoTrack.addRenderer(new VideoRenderer(localRender));
    }
    return mediaStream;
  }
In Example 12-34, the WebRTC SDK PeerConnectionFactory adds both an audio and a video stream to the MediaStream object.
Start the Video Call
Finally, start the audio/video call using the start method of the Call object and passing it the CallConfig object and the MediaStream object.
Receiving a WebRTC Video Call in Your Android Application
Receiving a video call is identical to receiving an audio call as described here, "Receiving a WebRTC Voice Call in Your Android Application". The only difference is the configuration of the MediaStream object, as described in "Configure the Local MediaStream for Audio and Video".
Supporting SIP-based Messaging in Your Android Application
You can design your Android application to send and receive SIP-based messages using the messaging package in WebRTC Session Controller Android SDK.
To support messaging, define the logic for the following in your application:
-
Setup and management of the various activities associated with the states of the various objects, such as the session and the message transfer.
-
Enabling users to send or receive messages.
-
Handling the incoming and outgoing message data.
-
Managing the required user interface elements to display the message content throughout the call session.
About the Major Classes Used to Support SIP-based Messaging
The following major classes and protocols of the WebRTC Session Controller Android SDK enable you to provide SIP-based messaging support in your Android application:
-
MessagingPackage
This package handler enables messaging applications. You can send SIP-based messages to any logged-in user with an object of the MessagingPackage class. This object also dispatches received messages to the registered observer.
-
MessagingPackage.Observer
This class acts as a listener for incoming messages and their acknowledgements. It holds the following event handlers:
-
onNewMessage
This event handler is called when your application receives a new SIP-based message.
-
onSuccessResponse
This event handler is called when your application receives an accept/positive acknowledgment for a sent message.
-
onErrorResponse
This event handler is called when your application receives a reject/negative acknowledgment for a sent message.
-
-
MessagingMessage
This class is used to hold the payload for SIP-based messaging.
-
withPackage
This method belongs to the WSCSession.Builder class. It is used to build a session that supports a package, such as the messaging package.
For more on these and other WebRTC Session Controller Android API classes, see AllClasses at Oracle Communications WebRTC Session Controller Android API Reference.
Setting up the SIP-based Messaging Support in Your Android Application
Complete the following tasks to setup SIP-based messaging support in your Android applications:
Enabling SIP-based Messaging
To enable SIP-based messaging in your Android application, create and assign an instance of a messaging package.
When you set up the builder for the WSCSession class, pass this messaging package in the withPackage parameter of the WSCSession builder API, as shown in Example 12-37.
Example 12-37 Building a Session with a Messaging Package
WSCSession.Builder builder = WSCSession.Builder.create(new java.net.URI(webSocketURL))
            ...
            .withPackage(new MessagingPackage())
            ...;
WSCSession session = sessionbuilder.build();
Ensure that you implement the logic for onSuccess and OnFailure event handlers in the WSCSession.ConnectionCallback object. WebRTC Session Controller Android SDK sends asynchronous messages to these event handlers, based on its success or failure to build the session.
Sending SIP-based Messages
To send a SIP-based message, call the send method of the MessagePackage object. The send method takes two arguments, the string text, and the target.
send(String content,String target)
Example 12-38 Sending a SIP-based Message
...
MessagingPackage msgPackage = (MessagingPackage) session.getPackage(MessagingPackage.PACKAGE_TYPE);
 ...
    sendMessage(String text, String destination) {
      msgPackage.send(text, destination, null);
      return true;
    }
 ...
In Example 12-38, if destination is "bob@example.com" and the text is "Hi there Bob!", Bob sees this message from the sending party. No external headers are sent with the message.
Handling Incoming SIP-based Messages
Set up your application to handle incoming messages and acknowledgements. Register a MessagingPackage.Observer to be notified when a new message is received. Use the setObserver method of the MessagePackage object, as shown in Example 12-39:
Example 12-39 Registering the Observer for the Message Package
...
WSCSession session;
// Register an observer for listening to incoming messaging events.
MessagingPackage msgPackage = (MessagingPackage) session.getPackage(MessagingPackage.PACKAGE_TYPE);
msgPackage.setObserver(new MyMessagingObserver());
...
When a new message comes in, the onNewMessage event handler of the MessagingPackage.Observer object is called. In the callback function you implement, accept or reject the message received using the appropriate APIs.
Set up the logic to handle the acknowledgements appropriately:
-
The accept method of the MessagePackage object. When the receiver of the message accepts the message, the onSuccessResponse event is triggered on the sender's side (that originated the message).
-
The reject method of the MessagePackage object. When the receiver of the message rejects the message, the onErrorResponse event is triggered on the sender's side (that originated the message).
Example 12-40 Example of an Observer Set up for a Message Package
// Class that observes for incoming messages from Messaging.
// This class either accepts or rejects the incoming message using the accept() or reject() api.
class MyMessagingObserver extends MessagingPackage.Observer {

 public void onNewMessage(MessagingMessage messagingMessage) {
    // Process message contents
    String messageContent = messagingMessage.getContent();

    // Accept the payload
    msgPackage.accept(messagingMessage);
 }

 public void onSuccessResponse(MessagingMessage messagingMessage) {
    // Message got accepted from other side.
 }

 public void onErrorResponse(MessagingMessage messagingMessage, StatusCode statusCode, String s) {
    // Message got rejected from other side.
 }
}
Adding WebRTC Data Channel Support to Your Android Application
This section describes how you can add WebRTC data channel support to the calls you enable in your Android application. For information about adding voice call support to an Android application, see "Adding WebRTC Voice Support to your Android Application".
To support calls with data channels, define the logic for the following in your application:
-
Setup and management of the various activities associated with the states of the various objects, such as the session and the data transfer.
-
Enabling users to make or receive calls with data channels set up with or without the audio and video streams
-
Handling the incoming and outgoing data
-
Managing the required user interface elements to display the data content throughout the call session.
For more on these and other WebRTC Session Controller Android API classes, see AllClasses at Oracle Communications WebRTC Session Controller Android API Reference.
About the Major Classes and Protocols Used to Support Data Channels
The following major classes and protocols enable you to provide data channel support in your Android application:
-
Call
This object represents a call with any combination of audio, video, and data channel capabilities. It creates a data channel and initializes the DataTransfer object for the data channel when the call starts or when accepting the Call if the Call has capability of data channel.
-
CallConfig
The CallConfig object represents a call configuration. It describes the audio, video, or data channel capabilities of a call.
-
DataChannelOption
The DataChannelOption object describes the configuration items in the data channel of a call such as whether ordered delivery is required, the stream id, maximum number of retransmissions and so on.
-
DataChannelConfig
The DataChannelConfig object describes the data channel of a call, including its label and DataChannelOption.
-
DataTransfer
The DataTransfer object manages the data channel. If the CallConfig object includes the data channel, the Call object creates an instance of the DataTransfer object.
Each DataTransfer object manages a DataChannel object which is identified by a string label.
-
DataSender
A nested class of DataTransfer, the DataSender object exposes the capability of a DataTransfer to send raw data over a data channel. The instance is created by DataTransfer.
-
DataReceiver
A nested class of DataTransfer, the DataReceiver object exposes the capability of a DataTransfer to receive raw data over the established data channel. The instance is created by DataTransfer.
-
DataTransfer.Observer
The DataTransfer.Observer interface acts as an observer of incoming data and state changes for the DataTransfer object.
Your application must implement the onMessage method of DataTransfer.Observer to be informed of changes in DataTransfer.
-
DataTransfer.DataTransferState
The DataTransfer.DataTransferState stores the status of the DataTransfer object as NONE, STARTING, OPEN, or CLOSED.
Your application must implement the onStateChange method of DataTransfer.Observer to be informed of changes in DataTransfer.
For more on these and other WebRTC Session Controller Android API classes, see AllClasses at Oracle Communications WebRTC Session Controller Android API Reference.
Initialize the CallPackage Object
If, when you created your Session, you registered a new CallPackage object using the Session object's withPackage method, you now instantiate that CallPackage.
Example 12-41 Initializing the ChatPackage
String callType = CallPackage.PACKAGE_TYPE;
CallPackage callPackage = (CallPackage) session.getPackage(callType);
Use the default PACKAGE_TYPE call type unless you have defined a custom call type.
Sending Data from Your Android Application
To send data from your Android application, complete the coding tasks contained in the following sections.
-
Configuring Interactive Connectivity Establishment (ICE) (if required)
Complete the coding tasks for an audio call contained in the following sections:
-
Configure Trickle ICE (if required)
Create a Call Observer
You next set up a CallObserver object in your application so that you can set up the callback function to handle the response to changes in the Call.
For information about creating the CallObserver object, see Example 12-23.
Configure the Data Channel for the Data Transfers
Configure the data channel to use before you set up the CallConfig object.
If your application supports only one data channel in a call, then, set up the label for the data channel using the DataChannelOption as shown in Example 12-43.
Example 12-43 Configuring the Single Data Channel of the Call
DataChannelOption dataChannelOption = new DataChannelOption();
DataChannelConfig dataChannelConfig = new DataChannelConfig("testDataChannel", dataChannelOption);
If your application supports multiple data channels in a call, then, define the dataChannelConfig array as a variable parity parameter, commonly known as varargs. You can add as many data channels to the dataChannelConfig array in your application.
Set up a label for each the data channels. Example 12-44 defines two data channels:
Create a CallConfig Object
Having defined the data channel setup for the call, you can now create a CallConfig object to determine the type of call you wish to make.
The following constructor sets up the CallConfig object to support local audio and video media streams and multiple data channels:
public CallConfig(final MediaDirection audioMediaDirection, final MediaDirection videoMediaDirection, DataChannelConfig... dataChannelConfigs);
The following code sample creates a CallConfig object for use with the channels defined in Example 12-45 (and no audio or video media stream):
CallConfig callConfig = new CallConfig(null, null, dataChannelConfig1, dataChannelConfig2);
If your application supports only one data channel and no audio or video, use the following statement to set up the CallConfig object
CallConfig callConfig = new CallConfig(null, null, dataChannelConfig);
where dataChannelConfig is previously defined, as seen in Example 12-43.
If in addition to the data channel, your application must support an audio and/or video stream, configure the local video and audio MediaStream objects accordingly. See Example 12-34.
Register the Observer for the Data Channel
Register the observer for the data channel in the Call object. Call the registerDataTransferObserver method for the call. Provide the label of the data channel when you do register the observer:
...
call.registerDataTransferObserver("testDataChannel", observer);
Set Up the Data Transfer Observer to Send Data
Implement the onMessage method of DataTransfer.Observer interface to handle received raw data before starting a data channel call, as shown in Example 12-46.
Example 12-46 Setting Up the Callback Function Before Starting a Call
DataTransfer.Observer observer = new DataTransfer.Observer() {
    @Override
    public void onMessage(ByteBuffer byteBuffer) {
      //handle the raw data;
      System.out.println("handle the raw data!");
    }

    @Override
    public void onStateChange(DataTransfer.DataTransferState state) {
      //Set up logic for the DataTransfer states: CLOSED, OPEN, NONE, STARTING
    ...
    }
  };
call.registerDataTransferObserver("testDataChannel", observer); //call is an object of Call class
  //Start the data channel call
  call.start(callConfig, mediaStream);
Handle Changes in the State of the Data Transfer
Whenever there is a change in the DataTransferState, the onStateChange method of DataTransfer.Observer is called. In your application, provide the logic to handle the states of the data transfer, represented by the following Enum constants:
-
NONE
-
STARTING
-
OPEN
-
CLOSED
See Example 12-46.
Start the Call
Start the call using the start method of the Call object and passing it the CallConfig object and the MediaStream object, as shown in Example 12-47.
Send the Data Content
You can send data using the send method of the DataSender in the DataTransfer object. The data can be raw data as one of the following
-
ByteBuffer, using:
send(ByteBuffer data)
-
byte array, using:
send(byte[] data)
-
String, using:
send(String data)
Use the label for the data channel to retrieve the DataTransfer object from the Call object. Set up the DataSender object. Verify that the status of the DataTransfer object is OPEN, by calling the getState method. Call the send method of this DataSender object to send data. Example 12-48 shows a text message sent by the sample code.
Note:
Call the send method, when the status of the DataTransfer object is OPEN.
DataTransfer dataTransfer = call.getDataTransfer(DATA_CHANNEL_LABEL);
// Send Data after verifying that DataTransferState is OPEN.
if(dataTransfer != null && dataTransfer.getState() == DataTransfer.DataTransferState.OPEN) {
  dataTransfer.getDataSender().send(content);
  ... // Handle any user interface related activity
} else {
  System.out.println("Data Channel not ready, please wait.");
  }
Receiving Data Content in Your Android Application
This section describes the steps specific to configuring your Android application to receive WebRTC data transfers.
Register the Observer for the Receiver of the Data Channel
Register the observer for the data channel in the Call object.
call.registerDataTransferObserver("testDataChannel", observer);
Set Up the Data Receiver to Receive Incoming Data
To set up the DataReceiver, retrieve the DataTransfer object by the data channel label in CallConfig Object. Then create an observer to register it to the DataReceiver to receive the raw data. Implement the onMessage method of DataTransfer.Observer interface to handle received raw data before accepting a data channel call, as shown in Example 12-49.
Example 12-49 Setting Up the Callback Before Accepting a Data Channel Call
DataTransfer.Observer observer = new DataTransfer.Observer() {
    @Override
    public void onMessage(ByteBuffer byteBuffer) {
      //handle the raw data;
      System.out.println("handle the raw data!");
    }

    @Override
    public void onStateChange(DataTransfer.DataTransferState state) {
      //Set up logic for the DataTransfer states: CLOSED, OPEN, NONE, STARTING
    ...
    }

  };
call.registerDataTransferObserver("testDataChannel", observer); //call is an object of Call class
  //Accept the data channel call
  call.accept(callConfig, mediaStream);
Accept the Call
The command to accept the call is:
call.accept(callConfig, mediaStream);
See Example 12-49.
Upgrading and Downgrading Calls
This section describes how you can handle upgrading an audio call to an audio video call and downgrading a video call to an audio-only call in your Android application.
Handle Upgrade and Downgrade Requests from Your Application
To upgrade from a voice call to a video call, you can bind a user interface element such as a button or link to a class containing the Call update logic using the setOnClickListener method of the interface object:
myButton.setOnClickListener(new CallUpdateHandler());
You handle the upgrade or downgrade workflow in the onClick event handler of the CallUpdateHandler class. In Example 12-50 the myButton object simply serves to toggle video support on and off for the current call object. Once the CallConfig object is reconfigured, the actual state change for the call is started using the update method of the Call object.
Example 12-50 Handling Upgrade Downgrade Requests from Your Application
class CallUpdateHandler implements View.OnClickListener {
  @Override
  public void onClick(final View v) {
    // Toggle between video on/off
    MediaDirection videoDirection;
    if (call.getCallConfig().shouldSendVideo()) {
      videoDirection = MediaDirection.NONE;
    } else {
      videoDirection = MediaDirection.SEND_RECV;
    }

    Log.i(MyApp.TAG, "Toggle Video");
    CallConfig callConfig = new CallConfig(MediaDirection.SEND_RECV,
                                           videoDirection);
    MediaStream mediaStream = getLocalMediaStreams(call
                                    .getPeerConnectionFactory());
    try {
       call.update(callConfig, mediaStream);
    } catch (IllegalStateException e) {
       Log.e(MyApp.TAG, "Invalid state", e);
    }
  }
}
Handle Incoming Upgrade Requests
You configure the callUpdated method of your CallObserver class to handle incoming upgrade requests in the case of a RECEIVED state change. See Example 12-23 for the complete CallObserver framework.
In Example 12-51, when the CallUpdateEventState is RECEIVED, the application:
-
Handles data channel activity with YourActivityClassName, an extension of the Activity class.
-
Creates an AlertDialog.Builder with a Yes/No click dialog interface determine the user preference for the upgrade.
-
When the Yes button is clicked, the code performs the upgrade.
-
When the No button is clicked, the code responds accordingly.
Example 12-51 Handling an Incoming Upgrade Request
case RECEIVED:
  String mediaConfig = "Video - " + callConfig.getVideoConfig().name();
  new AlertDialog.Builder(YourActivityClassName.this)
    .setIcon(android.R.drawable.ic_dialog_alert)
    .setTitle("Call Update Notfication")
    .setMessage("Do you wish you accept this update: " + mediaConfig + " ?")
    .setPositiveButton("Yes", new DialogInterface.OnClickListener() {
        @Override

        public void onClick(DialogInterface dialog, int which) {
          MediaStream mediaStream = getLocalMediaStreams(call.getPeerConnectionFactory());

          //Setup the call back to handle received raw data.
          DataTransfer.Observer observer = new DataTransfer.Observer() {
            @Override

            public void onMessage(ByteBuffer byteBuffer) {
              //handle the raw data
            }

            @Override
            public void onStateChange(DataTransfer.DataTransferState state) {
              //Do some handling when Datatransfer state change
            }
          };

          call.registerDataTransferObserver(DATA_CHANNEL_LABEL, observer);

          //Accept the data channel call
          call.accept(callConfig, mediaStream);
        }
      })

  // Update rejected.
    .setNegativeButton("No", new DialogInterface.OnClickListener() {
        @Override
        public void onClick(DialogInterface dialog, int which) {
          call.decline(StatusCode.DECLINED.getCode());
        }
      })
    .show();
  break;
Handling Session Rehydration When the User Moves to Another Device
When your customer is using your application on one device (a cellphone), the customer could move to another device (a laptop softphone that uses the same account and is authenticated by WebRTC Session Controller). A Session (along with its subsessions) currently active in your application on one device belonging to your customer becomes active on your application on another device belonging to the same customer.
For example, your customer Alice, accesses a web browser from a cellphone to talk about a purchase selection with Bob, a customer support representative active in that browser session. While Alice is on the call, she switches over to her laptop to look at the purchase selection in greater detail.
You can use the WebRTC Session Controller to configure applications that support handovers of session information between devices successfully. Your application then manages the rehydration of the session and all its data on the target device (in this example, the tablet laptop) such that the call from Alice to Bob continues in an uninterrupted fashion.
This section described how your application can work to present the customer with the session state recreated on another device.
Note:
In a device-handover scenario, WebRTC Session Controller manages the data associated with the subsessions of your application session. It keeps their states intact through the handovers that occur during the life of an application session.The focus of the handover logic in your application is the Session within which a call, a message, or a video session is alive.
About the Supported Operating Systems
You can design your applications using WebRTC Session Controller such that you support handover in your applications programmed for the Android, Web, and iOS systems.
Note:
For such a handover to be successful, your application must be active on the various devices belonging to a user, the associated user name and account be authenticated by WebRTC Session Controller, and the applications supported on the various operating systems.This chapter deals with setting up your Android application to support handing using the WebRTC Session Controller Android SDK. For information about supporting handovers to:
-
Web applications, see "About Using the WebRTC Session Controller JavaScript API".
-
iOS applications, see "Developing WebRTC-Enabled iOS Applications".
Configuring WebRTC Session Controller to Support Transfer of Session Data
In a device handover, the same WebSocket sessionID is used to transfer an application session state that is active in the current client device (for example, the cellphone registered to Alice) and present that state on the subsequent device (her laptop).
When one client uses another client's WebSocket sessionID to connect with WebRTC Session Controller, the WSC server checks the value in the system property, allowSessionTransfer. The default value of allowSessionTransfer is false. This value causes WebRTC Session Controller to consider the request as a hacking attack and reject the request.
In order to allow the same user or tenant to connect with the WebRTC Session Controller server using the same WebSocket session ID, set the startup command option allowSessionTransfer to true in the WebRTC Session Controller. For more information, see the description about "Supporting Session Rehydration for Device Handover Scenarios" in WebRTC Session Controller System Administrator's Guide.
About the WebSocket Disconnection
When the device handover occurs, the WebSocket connection immediately closes.
The WebRTC Session Controller signaling engine keeps the session alive for a time period specified as WebSocket Disconnect Time Limit in the WebRTC Session Controller Administration Console.
Note:
If the target device fails to pick up the session within the WebSocket Disconnect Time Limit period, the device handover fails.About the Normalized Session Data User to Support Handovers
A user could move from an application where your application uses one type of SDK to a device where your application uses a different SDK. The supported Client SDKs are:
-
Web
-
Android
-
iOS
WebRTC Session Controller supports a normalized uniform session data format to transfer the session state information between these systems. The session state information is sent as a binary large object (BLOB).
About the Handover Scenario on the Original Device
When the original device (for example, the cellphone Device A-1 registered to Alice) triggers a handover, the following events occur:
-
On the Original Device:
-
Your application on DeviceA-1 suspends the active session on the WebRTC Session Controller server.
-
Your application transfers the session data (stateInfo) to be received and processed by the application on the subsequent device Device A-2.
The WebRTC Session Controller Signaling engine keeps this session alive for a time period specified as WebSocket Disconnect Time Limit in the WebRTC Session Controller Administration Console.
-
-
On the device receiving the handover
The subsequent device that receives the handover is laptop DeviceA-2 (registered to Alice) in this discussion. The following events occur:
-
Your application on the subsequent device retrieves the stateInfo string from the Restful server. See "Requesting for the Session Data from the Application Service".
-
Your application uses the session state information to recreate the session. See "Recreating the Application Session with the StateInfo Object".
-
Your application rehydrates the call with WebRTC Session Controller Android SDK.
-
The active call resumes on the subsequent device.
-
About the WebRTC Session Controller Android APIs for Device Handover
The WebRTC Session Control Android APIs that enable your applications to handle notifications related to session Rehydration in another device are:
-
withStateInfo parameter of WSCSession.Builder
When you provide the withStateInfo parameter, the WebRTC Session Controller Android SDK rehydrates the session using the StateInfo object. If there is a call subsession in the StateInfo object, WebRTC Session Controller Android SDK rehydrates the call.
-
suspend
The suspend method of the WSCSession object suspends the active session. This method return JSON string object containing the session data to use in session rehydration
For more on these and other WebRTC Session Controller Android API classes, see AllClasses at Oracle Communications WebRTC Session Controller Android API Reference.
Completing the Tasks to Support Session Rehydration in Another Supported Device
This section described the tasks to complete in your application to hand over a session to another device and to receive a session handed over from another device. Complete the following tasks to support session transfers and rehydration with the transferred session state information:
-
Requesting for the Session Data from the Application Service
-
Recreating the Application Session with the StateInfo Object
Suspending the Session on the Original Device
In order to implement a handover, your application on the original device DeviceA-1 suspends the active session on the WebRTC Session Controller server. One scenario would be to set up a handover function and suspend the session within its logic.
Note:
The logic surrounding the detection of the actual device handover is beyond the scope of this document.The WebRTC Session Controller Android API method to suspend a session is suspend(). The WebRTC Session Controller Android SDK API returns the session data to your application in JSON string format. The WebSocket connection closes.
In your application logic that handles the user interface related to the handover, call the WebRTC Session Controller Android API method WSCSession.suspend(), as shown in Example 12-52.
Sending the Session Data to the Application Service
Your application on the original device (for example, the cellphone called Device A-1 registered to Alice) sends the session state information in a handover request to the Application Service (your application, a Web application, or a RESTful service).
You can configure how your application performs this task in the way that suits your environment. For example, your application can push the stateInfo to the other device or allow the other device to pull the stateInfo.
When the suspend method completes, your application has the session data with which to rehydrate the session. The session data is in JSON format. In your implementation of the logic for the WSCSessionHandedOver state of WSCSession, set up the information to transfer to the Application service.
Include this JSON string object and any other relevant information in the data you send with the handover request to the application service.
Requesting for the Session Data from the Application Service
In the application logic that handles this trigger, send a request to the application service asking for the session state information, as shown in Example 12-53. The application service returns the stateInfo, the session data for rehydration in a JSON String format.
Example 12-53 Requesting for StateInfo from the Application Service
StringBuilder urlSB = new StringBuilder();
    urlSB.append(SDKHelper.getInstance().getHandoverServerURL());
    urlSB.append("/");
    urlSB.append(operation);
    urlSB.append("/");
    urlSB.append(userName);
    String url = urlSB.toString();
    final HttpClient client = new DefaultHttpClient();
    HttpResponse response = null;
    try {
      final HttpGet httpGet = new HttpGet(url);
      response = client.execute(httpGet);
    } catch (IOException e) {
      Log.e(TAG, "Got exception when handling HandOver state info for: " + userName, e);
    }
String resp = null;
    if(response == null || response.getStatusLine().getStatusCode() != HttpStatus.SC_OK) {
      Log.d(TAG, "Failed to " + KEY_OPERATION_ADD_ID + " HandOver state info for: " + userName);
    } else {
      try {
        resp = EntityUtils.toString(response.getEntity());
      } catch (IOException e) {
        Log.e(TAG, "Got exception when handling HandOver state info for: " + userName, e);
      }
    }
Recreating the Application Session with the StateInfo Object
Your application on the subsequent device sends the session state information to the WebRTC Session Controller Android SDK.
In your application logic that handles session rehydration following a device handover, set up a session object with dhSessionStateInfo. This is the session state configuration you received from the application service in Example 12-53.
Set up the Builder for the WSCSession by providing the dhSessionStateInfo in the withStateInfo method of the WSCSession.Builder object. Then call the build method to recreate the session, as shown in Example 12-54.
Example 12-54 Building the Session with StateInfo
...
WSCSession.Builder builder = WSCSession.Builder.create(new URI(webSocketURL))
             ...
             .withStateInfo(dhSessionStateInfo);
WSCSession session = builder.build();
...
Ensure that you implement the logic for onSuccess and OnFailure event handlers in the WSCSession.ConnectionCallback object. WebRTC Session Controller Android SDK sends asynchronous messages to these event handlers, based on its success or failure to build the session.
Rehydrating a WebRTC Call After a Device Handover
A call session that was part of the application session on the original device, is also suspended when that device suspends the application session. In such a scenario, WebRTC Session Controller Android SDK creates the subsession objects for your application. For example, if there is a Call object, it passes the call configuration object to the CallObserver object in your application.
Note:
After the new device connects to the session, WebRTC Session Controller does not send out a new incoming call request to connect a call that is part of the handover. To recreate the call connection, the WebRTC Session Controller Android SDK uses the information in the stateInfo object.Your application can rehydrate a session where the call between the two users is in an already established state on the device receiving the handover. If there is no "re-invite" flow, the ongoing call is not established, because the client ip, port, or codec has changed.
In your application, complete the candidates re-negotiation with the peer side, as dictated by the Android system.
Implement the following logic in your Android application:
-
To be informed of the updated call configuration that results from the handover, implement the CallUpdated method in the Call.Observer object.
-
To handle the rehydrated call, implement the callResurrected(Call rehydratedCall) method in the CallPackage.Observer object.
Following a device handover, the general workflow for rehydrating a call with video streams or data channels is identical to the workflow for rehydrating a call with audio stream. Any specificity lies in how your application logic handles the CallConfig object to maintain the video streams and data transfers associated with the call.
Extending Your Applications with WebRTC Session Controller Android SDK
This section describes how you can extend the Oracle Communications WebRTC Session Controller Android application programming interface (API) library.
Note:
Before you proceed, review the discussion about how the WebRTC Session Control JavaScript APIs assist in extending WebRTC applications. See "Extending Your Applications Using WebRTC Session Controller JavaScript API" for more information.You can extend the your Android applications by adding a sub session to a WSC Session. See "About the Classes and Methods Used to Extend Android Applications".
About the Classes and Methods Used to Extend Android Applications
The following class and methods enable you to extend Android applications:
-
Frame
This class is the master data transfer object class for all JSON messages.
-
FrameFactory
This class is the helper class for creating JSON Frame instances.
-
Headers
This class is the master data transfer object class for sending a JSON string as the Message section.
-
Payload
This class is the master data transfer object class for sending a JSON string as the Payload section.
-
Control
This class is the master data transfer object class for sending a JSON string as the Control section.
-
WSCSession
-
Call
-
MessagingPackage
Extending WebRTC Session Controller Android Applications
You can override and extend methods in WebRTC Session Controller JavaScript API objects to do the following:
-
Frame
-
FrameFactory
This class is the helper class for creating JSON Frame instances.
Extending Your Session Application Using the Session Object
Your application session can have one or more subsessions. In order to send a message, you can add a subsession to a session. The following methods enable you to extend your application session.
-
sendMessage
This method sends the message as a Frame object to WebRTC Session Controller server over a WebSocket.
-
putSubSession
This method adds a sub session to the WSCSession.
-
generateSubSessionId
This method Generates random UUID according to RFC 4122 v4.
-
getSubSession
This method retrieves a subsession, when given the subsession id.
-
getSubSessions
This method retrieves a Collection of subsessions that belong to the session.
-
removeSubSession
This method removes a sub session with the input session ID from WSCSession.
Extending Your Application Using Extension Headers
When you use an extension header in a call session, set up the extension header in the following JavaScript format:
{'customerKey1':'value1','customerKey2':'value2'}
This formatted object is paced in the message formatted as:
{ "control" : {}, "header" : {...,'customerKey1':'value1','customerKey2':'value2'}, "payload" : {}}
For more information, see "About Extra Headers in Messages".
Place the extension header when you call the methods that support extension headers. The extension headers are inserted into the JSON message.
The following class elements support extension headers
-
CallPackage.Observer
The callArrived event of the CallPackage.Observer supports extension headers.
-
Call
-
accept
-
decline
-
start
-
update
-
end
-
-
MessagePackage
-
accept
-
reject
-
send
-