| Oracle® Fusion Middleware Portlet Development Guide for Oracle WebLogic Portal 10g Release 3 (10.3.6) E14244-06 |
|
|
View PDF |
| Oracle® Fusion Middleware Portlet Development Guide for Oracle WebLogic Portal 10g Release 3 (10.3.6) E14244-06 |
|
|
View PDF |
Java portlets are based on the JSR 286 specification, which provides an API and establishes rules for portlet portability. Java portlets are intended for software companies and other enterprises that are concerned with portability across multiple portlet containers.
Note:
JSR 286 or Version 2.0 of the Portlet Specification is based on Version 1.0 that was defined in JSR 168. WLP supports the Version 2.0 Java Portlet Specification.
WebLogic Portal provides capabilities for Java portlets beyond those listed in the JSR 286 spec. For example, you can set threading options, use a backing file, and so on. To implement these additional features, WebLogic Portal uses a combination of the typical .portlet file—which you create in the same way that you create other portlet types—as well as the standard portlet.xml file and the weblogic-portlet.xml file.
This chapter includes these topics:
Section 6.13, "Setting Portlet-Level Container Runtime Options"
Section 6.17, "Exporting Java Portlets for Use on Other Systems"
To create a Java portlet, follow these steps:
Right-click the folder where you want to store the portlet and select New > Portlet.
The New Portlet dialog displays.
Enter a name for the portlet and click Next.
The Portlet Wizard displays the Select Portlet Type dialog.
Select the Java Portlet radio button and click Next.
The Java Portlet Details dialog displays. Figure 6-1 shows an example.
Figure 6-1 Portlet Wizard - Java Portlet Details Dialog
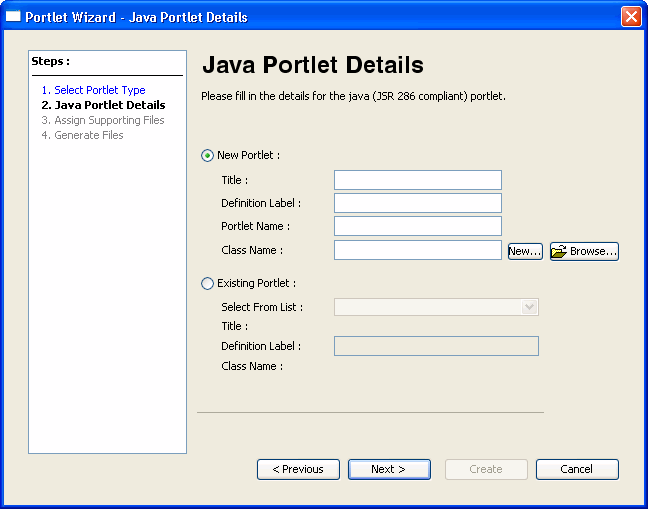
In the Java Portlet Details dialog, choose whether you want to create a new portlet or create a new instance of an existing portlet by selecting the appropriate radio button.
New Portlet – If you are creating a new portlet, WebLogic Portal uses the information that you enter in the wizard to perform these two tasks:
Create a new .portlet file
Either create a new portlet.xml file (if this is the first Java portlet that you are creating in the project), or add an entry in the portlet.xml file, which is located in the WEB-INF directory.
Existing Portlet – If you choose to refer to an existing portlet in the wizard, the wizard lets you pick a portlet already defined in the portlet.xml file. This option allows you to create a new .portlet file and associate it with an existing entry in the portlet.xml file. For the Existing Portlet option, a new portlet will be created that has a unique definition label, but that references an existing portlet name in the portlet.xml file. The Existing Portlet option allows you to create multiple configurations of one portlet to be surfaced as different portlet instances.
Specify the values you want for this portlet, following the guidelines shown in Table 6-1. All fields are required.
Table 6-1 Portlet Wizard - Java Portlet Data Entry Fields
| Field | Description |
|---|---|
|
New Portlet – Title |
The value for the Title maps to the |
|
New Portlet – Definition Label |
Specifies the definition label for the portlet. The value must be unique. The wizard automatically creates a unique ID if you enter one that is already in use. The definition label is the portlet's unique identifier. |
|
New Portlet – Portlet Name |
This string provides a value to the Note: If there is no |
|
New Portlet – Class Name |
Enter a valid class name or click Browse to navigate to the location of a Java class. This value maps to the You can also create a new class by clicking New and using the New Java Portlet Class dialog to create the Java portlet class (the dialog automatically creates a class that implements javax.portlet.Portlet.) If you enter a class name that does not currently exist, the wizard will create the javax.portlet.Portlet class when you click Create. |
|
Existing Portlet – Select From List |
The dropdown menu is populated from the When you select an existing portlet, the Title and Class Name display in read-only fields. Note: If you import an existing Java portlet into Oracle Enterprise Pack for Eclipse, you do not need to add an entry in the |
|
Existing Portlet – Definition Label |
Enter a unique definition label. If the label you enter is not unique, a unique one is created for you automatically. The definition label is used in the |
Click Create to create the portlet or, click Next to assign supporting files. For more information on assigning supporting files see Section 5.5, "Assigning Supporting Files."
Based on the values that you entered, the Wizard creates a .portlet file, and adds an entry to /WEB-INF/portlet.xml, if it already exists, or creates the file if needed.
Oracle Enterprise Pack for Eclipse displays the newly created portlet and its current properties. Figure 6-2 shows an example of a Java portlet's appearance and properties as displayed in the portlet editor.
Figure 6-2 Java Portlet Appearance and Properties
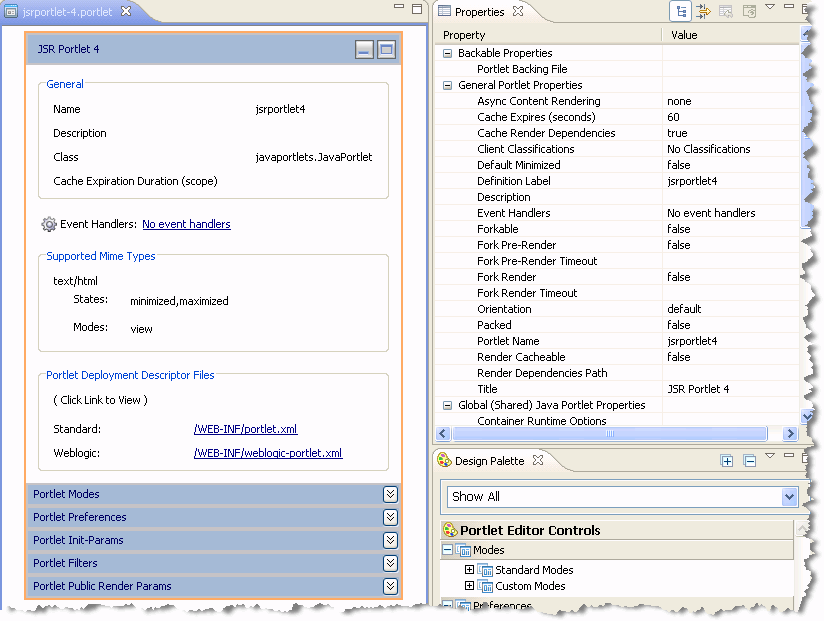
After you create the portlet, you can modify its properties in the Properties view, or double-click the portlet in the editor to view and edit the generated Java class. For more information on setting properties, see Section 9.1, "Portlet Properties."
Note:
If you delete a .portlet file, the corresponding entry remains in the portlet.xml file. You might want to clean up the portlet.xml file periodically; these extra entries do not cause problems when running the portal but do result in error messages in the log file.
The portlet.xml deployment descriptor file for Java portlets is located in the WEB-INF directory. In addition, the weblogic-portlet.xml file is an optional Oracle-specific file that you can use to inject some additional features.
Example 6-1 shows an example of how entries might look in the portlet.xml file:
Example 6-1 Example of a portlet.xml file for a Simple Hello World Java Portlet
<?xml version="1.0" encoding="UTF-8"?>
<portlet-app version="2.0"
   xmlns="http://java.sun.com/xml/ns/portlet/portlet-app_2_0.xsd"
   xmlns:xsi="http://www.w3.org/2001/XMLSchema-instance">
   <portlet>
      <description>Description goes here</description>
      <portlet-name>helloWorld</portlet-name>
      <portlet-class>aJavaPortlet.HelloWorld</portlet-class>
      <portlet-info>
         <title>Hello World!</title>
      </portlet-info>
      <supports>
         <mime-type>text/html</mime-type>
         <portlet-mode>view</portlet-mode>
      </supports>
   </portlet>
</portlet-app>
As with other types of portlets, you can configure portlet modes and states for a Java portlet. Modes allow you to affect the end user's ability to edit the portlet or display Help for the portlet. You can also create custom modes. States determine the end user's ability to affect the rendering of a portlet, such as to maximize or minimize the portlet. For more information, see Section 9.5.2, "Portlet Modes" and Section 9.5.5, "Portlet States." For information on custom modes for Java portlets, see Section 6.14, "Adding Custom Portlet Modes."
As with other types of portlets, you can configure portlet preferences for Java portlets. Portlet preferences provide the primary means of associating application data with portlets. This feature is key to personalizing portlets based on their usage. For more information, see Section 9.2, "Portlet Preferences."
Initialization parameters are specified with the <init-param> element. The <init-param> element contains a name/value pair as an initialization parameter of the portlet. You can use the getInitParameterNames() and getInitParameter() methods of the javax.portlet.PortletConfig interface to return these initialization parameter names and values in your portlet code. Initialization parameters are described in the JSR 286 specification.
You can add init-params to your Java portlet by dragging a New Init-Param icon from the Design Palette onto the Java portlet in the portlet editor. Then, click on the Portlet Init-Param section of the portlet to display the parameter's properties in the Property view. In the Property view, you can enter the following initialization parameter data:
Description
Name
Value
For example, if you created an initialization parameter called "Color" and set the default value to "green," the following entry will be made in the portlet.xml file:
<init-param>
    <description>My init param</description>
    <name>Color</name>
    <value>green</value>
</init-param>
Portlet filters are a major new feature added to the Java Portlet Specification Version 2 (JSR 286). As the specification explains, filters are Java components that allow on-the-fly transformations of information in both the request to and the response from a portlet. A portlet filter is a reusable piece of code that can transform the content of portlet requests and portlet responses. Filters do not generally create a response or respond to a request as portlets do, rather they modify or adapt the requests, and modify or adapt the response.
Tip:
For an in-depth discussion of portlet filters, refer to the Java Portlet Specification, Version 2 (JSR 286).
To add a portlet filter(s) to a Java portlet:
Create a Java portlet. (See Section 6.1, "Building a Java Portlet.")
Create a filter class. The Portlet Wizard provides a convenient mechanism for creating a Java portlet class. Click the New button in the Java Portlet Details part of the Portlet Wizard. This feature creates a class that implements the appropriate interfaces, as described in the following note.
Note:
The class must implement at least one of these interfaces in the javax.portlet.filter package, depending on the portlet lifecycle(s) to which the filter will be applied: ActionFilter, EventFilter, RenderFilter, or ResourceFilter. Each filter implements a doFilter() method that is processed when its corresponding life cycle method is called. For example, the ActionFilter.doFilter(...) method is called when the processAction life cycle method is invoked by the portlet container. Refer to the Java Portlet Specification Version 2 for more information.
Assign the filter to the portlet. Right click the Portlet Filters part of the portlet in the portlet editor, and select Add Filter, as shown in Figure 6-3. (Or, you can double-click the New Filter item in the Design Palette.)
Tip:
You can also drag and drop filters from the Design Palette view onto the Portlet editor. You can drag and drop either existing filters or the New Filter item. When you drop a filter, you can choose its position in the filter list. See Section 6.7, "Order of Portlet Filters."
Complete the Define or Choose a Portlet Filter dialog. The dialog requires that you provide a name and a class for a new filter or pick an existing one. The filter class must implement one or more of the javax.portlet.filter classes, which include ActionFilter, EventFilter, RenderFilter, and ResourceFilter.
If you create a new filter, you must select the life cycle(s) with which to associate it. To do this, click the Edit button next to the Lifecycles field. For instance, if the filter class implements RenderFilter interface, you would select the Render Phase. Figure 6-4 shows the Select Portlet Lifecycle(s) dialog where you pick the life cycle entities that are implemented in the filter class.
Tip:
If you click the New button next to the Class field after using the Select Portlet Lifecycle(s) dialog to pick one or more phases, the Java Class dialog is automatically populated with the correct interface(s) corresponding to those selected phases.
You can optionally enter a Display Name and Init Params (initialization parameters). The Display Name is the name that is displayed in the IDE. Init Params are name/value pairs that let you pass values to the init() method of the Java class. Click the Edit button next to the Init Params field to add them.
The Define or Choose a Portlet Filter dialog also lets you pick an existing filter to use with a new portlet. Use the Filter Definitions dropdown menu to select a filter to associate with the portlet. This menu is populated with a list of the filters that are specified in the portlet.xml file. You can then optionally pick a Display Name for the filter and add a description. The Display Name is only associated with the new portlet. After a filter is associated with a portlet, you can edit the display name and description in the Properties view when you select the filter in the Design view or Outline view.
Note:
When you associate an existing filter with a new portlet, you are potentially sharing that filter with one or more other portlets. When you share a filter, you need to remember that the order of filters as specified in the portlet.xml file is significant. See Section 6.7, "Order of Portlet Filters."
Click OK to add the filter to the portlet. The portlet.xml file is only saved to the disk when you save the .portlet file.
The <filter> and <filter-mapping> elements are automatically added to the portlet.xml descriptor file. These elements specify the filter name, class, life cycle phase(s), and mapping. The mapping element allows multiple portlets to share a single filter definition. For example:
<filter>
    <display-name>Test Filter</display-name>
    <filter-name>filter_1</filter-name>
    <filter-class>javaportlets.MyFilter</filter-class>
    <lifecycle>ACTION_PHASE</lifecycle>
    <lifecycle>RENDER_PHASE</lifecycle>
</filter>
<filter-mapping>
    <filter-name>filter_1</filter-name>
    <portlet-name>jsrportlet4</portlet-name>
</filter-mapping>
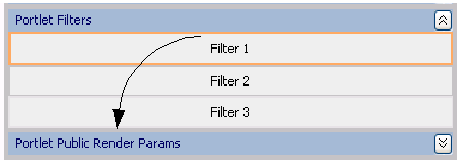
The Portlet editor presents a list of the filters that have been added to a Java portlet (see Figure 6-5). The editor shows you the names of the filters and lists them in the order in which they are defined in the portlet.xml file. This order is significant because it specifies the order in which the filters are applied to the portlet.
You can easily change the order of the filters. One way to change the order is to drag and drop the filters in the Portlet editor (see Figure 6-5). Another way to reorder the portlet filters is to right-click a filter and select Move Up or Move Down from the context menu.
Note:
Remember that filters can be mapped to multiple portlets. If you have multiple portlets mapped to (sharing) a filter, arbitrarily changing the filter order can produce undesired side effects. For example, if you change the order in which filters are applied in one portlet, the reordering will apply to all other portlets that share the filter.
Figure 6-5 You Can Drag and Drop Filters to Reorder Them
Public render parameters are a JSR 286 feature that allows portlets to share parameter values with other portlets, allowing a form of interportlet communication. For instance, if portlet A and portlet B are both configured to use a particular public render parameter, any changes in the parameter's value made by portlet A will be seen by portlet B. Unlike render parameters, which can't be read during the processAction lifecycle, public render parameters can be accessed in all lifecycles of the portlet: processAction, processEvent, render, and serveResource. Public render parameters automatically work with the asynchronous desktop rendering feature (for details, see Section 10.5, "Asynchronous Portlet Content Rendering"). Public render parameter values can also be shared with non-JSR-286 portlets, where they are called "shared parameters". For more information, see Section 9.3, "Using Shared Parameters.".
Tip:
For an in-depth discussion of public render parameters and how to access them, refer to the Java Portlet Specification, Version 2 (JSR 286).
To add public render parameters to a Java portlet:
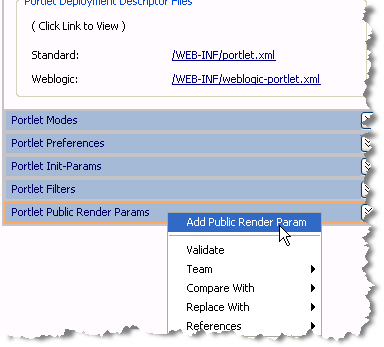
Bring up the Define or Choose a Portlet Public Render Param dialog. To do this, right-click the Portlet Public Render Params part of the Java portlet in the portlet editor and select Add Public Render Param, as shown in Figure 6-6. Or, you can double-click on the New Public Render Param item in the Design Palette.
Tip:
You can also drag and drop public render parameters from the Design Palette view onto the Portlet editor. You can drag and drop either existing render parameters or the New Public Render Param item. The order in which the parameters appear in the Portlet editor is not significant.
Figure 6-6 Adding a Public Render Parameter
The Define or Choose a Portlet Public Render Param dialog lets you define a new parameter or pick an existing one to associate with the portlet. This dialog is shown in Figure 6-7.
Figure 6-7 Define or Choose a Portlet Public Render Param Dialog
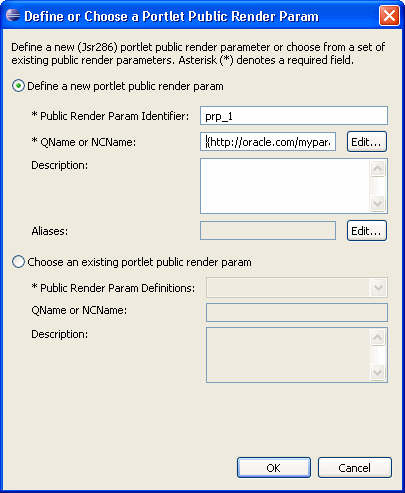
To create a new parameter, first enter an identifier as shown in Figure 6-7. The identifier is a string that identifies the public render parameter within the portlet.xml deployment descriptor. This identifier is portlet application scoped. Any portlet that wishes to share the parameter can do so by referencing this identifier in the portlet.xml file, and can access the public parameter's value at runtime using the identifier as the parameter name.
The next required field is the QName, or qualified name, that uniquely identifies the public render parameter. The QName of a public render parameter is used as the unique identifier when parameter values are being distributed between different portlet applications, such as portlets consumed through WSRP. For example, if portlet A from producer X has a public render parameter it accesses with an identifier (name) of zip, and portlet B from producer Y has a public render parameter it accesses with an identifier (name) of zipcode, these two portlets will automatically share the appropriate values as long as the QNames for their parameters are identical.
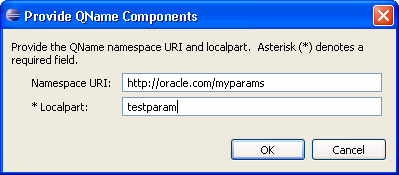
The QName consists of a required local part and a namespace URI. If you do not provide the namespace URI, the default namespace URI for the portal application is used. For information on QNames and NCNames, see Section 12.12, "About QNames and Aliases." See also Section 6.12, "Using Global (Shared) Properties" for information on setting the default namespace. Click Edit next to the QName field to bring up the Provide QName Components dialog, as shown in Figure 6-8.
Tip:
The Provide QName Components dialog automatically forms the namespace/local part identifier in the standard syntax, for example: {http://oracle.com/myparams}testparam. If you enter the QName directly in the Define or Choose a Portlet Public Render Param dialog, you must use this syntax.
The Define or Choose a Portlet Public Render Param dialog also lets you pick an existing public render parameter to use with a new portlet. Use the Public Render Param Definitions dropdown menu to select a parameter to associate with the portlet. This menu is populated with a list of the parameters that are specified in the portlet.xml file. The QName and NCName, as well as the description, are not editable from this dialog. To change these values, you can use the Properties view after the public render parameter is mapped to the portlet. For more information, see Section 12.12, "About QNames and Aliases."
Figure 6-8 Provide QName Components Dialog
You can optionally specify an alias name. For more information, see Section 12.12, "About QNames and Aliases."
To add an alias, click Edit and in the next dialog, click New. The Provide QName Components dialog appears (see Figure 6-8. Enter an optional Namespace URI and a Local Part for the QName and click OK. The alias definition appears in the Provide List of QName Alias(es) dialog (Figure 6-9). You can add as many public render parameter aliases to a portlet as you like.
You can add more than one public render parameter to a portlet. Note that the portlet.xml file is only updated and saved to the disk when you save the .portlet file.
Click OK to create the parameter.
As a result of performing the steps in this section, the portlet.xml file and the .portlet file are both updated as follows:
Changes to the portlet.xml File:
First, an application-scoped <public-render-parameter> element is added to the file. For example:
<portlet-app ...>
    <portlet> ... </portlet>
    <public-render-parameter>
        <identifier>prp_1</identifier>
        <qname xmlns:x="http://oracle.com/myparams">x:testparam</qname>
    </public-render-parameter>
</portlet-app>
In addition, the <supported-public-render-parameter> element is added to the <portlet> element in portlet.xml (the definition of the portlet to which the render parameter was added). This element configures the portlet to share the parameter. In the Java portlet class, the parameter can be set with a call like this:
public class JavaTestPortlet extends GenericPortlet {
     . . .
     public void processAction(ActionRequest req, ActionResponse res)
         throws IOException, PortletException {
     . . .
            res.setRenderParameter("prp_1", testparam);
     }
     . . .
}
The following example provides code from two portlets that share a public render parameter called "selectedBook".
Note:
This example uses java portlet tags, not WLP render tags.
Portlet A
The .portlet file for Portlet A has a public render parameter specified with the identifier "selectedBook". The .jsp file has an anchor tag that uses the renderURL tag in the Java portlet tag library.
<pz:contentSelector rule="ListBooks" id="listOfBooks"/>
<utility:notNull item="${listOfBooks}">
    <h4>Books You Might Like</h4>
    <utility:forEachInArray array="${listOfBooks}" id="node"
type="com.bea.content.Node">
        <portlet:renderURL var="selectedBookUrl">
            <portlet:param name="selectedBook" value="${node.path}"/>
        </portlet:renderURL>
        <a href="${selectedBookUrl}">
            <cm:getProperty id="node" name="xTitle" conversionType="html"/>
        </a>
    </utility:forEachInArray>
</utility:notNull>
Portlet B
The .portlet file for Portlet B has a public render parameter specified with the identifier "selectedBook". The .jsp file includes the following logic:
<c:choose>
    <c:when test="${param['selectedBook'] != null}">
        <cm:getNode id="bookNode" path="${param['selectedBook']}"/>
        <div><ad:render id="bookNode" /></div>
    </c:when>
    <c:otherwise>
        <p>No book was selected</p>
    </c:otherwise>
</c:choose>
For details on using event handling with Java Portlets, see Section 12.7, "Events in Java Portlets."
The procedure for deleting Portlet Modes, Portlet Preferences, Portlet Init-Params, Portlet Filters, and Portlet Public Render Params is the same. In the portlet editor, expand the feature menu, right-click the item you want to delete, and select Delete from the menu, as illustrated in Figure 6-10:
If you are deleting a shared filter, public render parameter, or event, a confirmation dialog appears, and you must choose one of the following options:
Remove (dissociate) the shared [feature] from this portlet only.
In this case, the feature definition remains in the portlet.xml file. Only the mapping to the current portlet is removed. Choose this case if other portlets reference the feature. For example, if multiple portlets reference the same filter, you would want to leave the filter definition in the portlet.xml file.
Delete the shared [feature] from the portlet.xml.
In this case, the entire feature and all mappings to the feature are removed from the portlet.xml file. Only pick this option if you know that no other portlets require the feature definition.
For example, Example 6-2 shows an excerpt from a portlet.xml file where a filter and filter mappings to several portlets are defined. If you delete filter_2 from the portlet named jsrportlet4 using the first delete option, the element named jsrportlet4 will be removed from the <filter-mapping> element, as shown in Example 6-3. Note that the other portlets will continue to reference the filter. If you select the second delete option, the entire <filter> definition and the <filter-mapping> will be removed. In this case, no portlets will reference the filter.
Example 6-2 Filter and Filter Mapping Elements Before Delete Operation
<filter>
   <display-name>Filter 2</display-name>
   <filter-name>filter_2</filter-name>
   <filter-class>javaportlets.MyFilter</filter-class>
   <lifecycle>RENDER_PHASE</lifecycle>
</filter>
<filter-mapping>
    <filter-name>filter_2</filter-name>
    <portlet-name>jsrportlet4</portlet-name>
    <portlet-name>jsrportlet5</portlet-name>
    <portlet-name>jsrportlet6</portlet-name>
</filter-mapping>
Example 6-3 Filter and Filter Mapping Elements After Delete Operation
<filter>
   <display-name>Filter 2</display-name>
   <filter-name>filter_2</filter-name>
   <filter-class>javaportlets.MyFilter</filter-class>
   <lifecycle>RENDER_PHASE</lifecycle>
</filter>
<filter-mapping>
    <filter-name>filter_2</filter-name>
    <portlet-name>jsrportlet5</portlet-name>
    <portlet-name>jsrportlet6</portlet-name>
</filter-mapping>
Container runtime options provide a way to change the runtime behavior of the portlet container. You can declare these options either at the portlet level or at the portlet application level. You can set container runtime options at the application level using the Global Shared Properties feature (see Section 6.12, "Using Global (Shared) Properties"). You can also set container runtime options at the portlet-level. For details on this technique, see Section 6.13, "Setting Portlet-Level Container Runtime Options."
If set at the application level, an option will apply to all portlets in the application, except for portlets which explicitly set a different value for the container runtime option at the portlet level.
Container runtime options can have one or more values, though most runtime options use only a single value. This section describes the four standard container runtime options defined in the JSR 286 specification and additional ones supported by WLP.
This section describes four standard container runtime options that are defined in the JSR 286 specification.
javax.portlet.escapeXml
Affects how URLs are XML-encoded when using the JSR 286 tag library tags actionUrl, renderUrl, and resourceUrl. See the JSR 286 specification, section 10.4.1 for a complete description. Note that this container runtime option does not have any affect on the return value of PortletURL.toString() or ResourceURL.toString(); in both cases, for JSR 286, the output will use only ampersand characters. To use ampersand entities or be able to specify the XML encoding to use when generating URLs not using the tag libraries, see the BaseURL.write() methods. The setting of this container runtime option affects only the default behavior of the URL tags; you can override it on a per-tag basis using the encodeXml attribute.
Valid Values:
true – The JSR 286 tag library actionUrl, renderUrl and resourceUrl tags will default to XML-encoding the resulting URLs (using ampersand entities for parameter separation) by default.
false – The default behavior is changed to not XML-encode (and use just ampersand characters) by default.
javax.portlet.servletDefaultSessionScope
Specifies the scope of the Session object provided to servlets or JSPs which are included or forwarded to from a Java portlet. See the JSR 286 specification, section 10.4.3 for a complete description. The default behavior (if this container runtime option is not set at all) is to map the portlet session with application scope, equivalent to setting the runtime option value to APPLICATION_SCOPE. To map instead to the portlet session scope, you can set the value for this runtime option to PORTLET_SCOPE.
Valid Values:
APPLICATION_SCOPE – Maps the session to the application scope
PORTLET_SCOPE – Maps the session to the portlet scope.
javax.portlet.actionScopedRequestAttributes
Stores request attributes that are set by the portlet code in "scopes", generally starting at a processAction and continuing until the next processAction, and provides these request attributes back to the portlet when the next lifecycle method is called. See the JSR 286 specification section 10.4.4 for a complete description and examples. The JSR 286 specification requires all portlet containers to support this container runtime option. The com.oracle.portlet.excludedActionScopeRequestAttributes container runtime option described below can be used to limit which request attributes are stored in the scopes.
Valid Values:
true – Store and provide request attribute values between calls to the portlet. If true is the first value for this container runtime option, you may further specify the number of attribute scopes the portlet container should cache by making the second value the string numberOfCachedScopes, and the third value the number of scopes to cache.
false – Do not store request attributes.
javax.portlet.renderHeaders
This option is not currently supported by WebLogic Portal. It is used to indicate that the portlet supports having its render() method called twice, setting any header information, portlet title and next possible portlet modes in the first call, and rendering the body of the portlet in the second call. See the JSR 286 specification sections 10.4.2 and 11.1.4.3 for complete details.
Valid Values:
true – Indicates the portlet supports the two-phase render.
false – Indicates that the portlet does not support two-phase render.
This section describes several other container runtime options supported by WLP.
com.oracle.portlet.compatibilityMode
Used to invoke one of the compatibility modes available in WebLogic Portal's Java portlet container. See Section 6.19, "JSR-286/JSR-168 Portlet Compatibility" for details.
Valid Values:
owlp168 – Invokes the WebLogic Portal JSR 168 compatibility mode; also automatically sets the com.oracle.portlet.disallowResourceServing runtime option to true and the com.oracle.portlet.streamingOptimized runtime option to true, if no other values for those options were specified.
owc168 – Invokes the Oracle WebCenter JSR 168 compatibility mode; also automatically sets the com.oracle.portlet.disallowResourceServing runtime option to true if no other value for that option is specified.
com.oracle.portlet.disallowResourceServing
Used to disable portlets from serving resources, which may be a security concern. See the note in Section 6.19, "JSR-286/JSR-168 Portlet Compatibility" for details.
Valid Values:
true – Portlets will not be allowed to serve resources. This is useful if JSR 168 portlets are run in the JSR 286 container, as any JSR 168 portlet extending javax.portlet.GenericPortlet will automatically inherit the JSR 286 functionality, which automatically forwards resource requests to a file in the webapp named after the resource ID, creating a potential security problem. For the same security reason, JSR 286 portlets that do not serve resources are safest to disallow resource serving.
false – Portlets will be allowed to serve resources.
com.oracle.portlet.streamingOptimized
Indicates the portlet is optimized to run in streaming mode, which may enhance performance. There are side effects to using this option:
The RenderResponse.reset() and RenderResponse.resetBuffer() methods do nothing; they will not clear the buffer or consistently throw IllegalStateExceptions. Besides cases where portlet code calls reset() or resetBuffer() directly, this also affects portlets that write data out before doing a forward using the PortletRequestDispatcher. When in streaming mode, the output written before the forward will not be cleared.
RenderResponse.getBufferSize() will always return 0.
RenderResponse.setBufferSize() has no effect.
Headers, cookies and HTML HEAD elements set by the portlet during render (in one-phase render) or during the RENDER_MARKUP render phase (in two-phase render) may not be rendered in the portal response to the client, if the underlying portal response is already committed.
To avoid the underlying portal response from being committed, use the avoid-response-commit setting in the WEB-INF/wlp-framework-common-config.xml, as described Section 9.13, "Avoiding Committing Responses."
RenderResponse.isCommitted() will return a value consistent with the portlet's behavior, but not reflective of the underlying response. For example, when the render phase is started for the portlet, isCommitted() will return false, but if MimeResponse.flushBuffer() is called, the isCommitted() method will then return true, even if the underlying response is not yet committed. This behavior is necessary to support PortletRequestDispatcher.forward() calls, which require the response to not be committed. This behavior also means that the portlet has no way of knowing whether headers being set actually make it back to the client.
RenderResponse.setProperty() calls will not clear previous values for the property being set, but will behave the same as RenderResponse.addProperty() would. This is required to allow multiple portlets being rendered to the same page to aggregate header values, rather than resetting other portlets' header values.
Note:
Portlets should never depend on the side-effects noted above. For example, if portlet caching is used, even when streaming mode is turned on some renders may occur using the default (buffering) MimeResponse object if the output is destined to be cached.
Valid Values:
true – The portlet supports being rendered in a streaming manner.
false – The output of the portlet should be buffered.
com.oracle.portlet.minimumWsrpVersion
Specifies minimum required WSRP version for the portlet to work. If the WSRP version being used is less than the value specified, the portlet will not be included in a WSRP GetServiceDescription, GetPortletDescription, GetMarkup and other WSRP responses. This may be useful for JSR 286 portlets that require the use of events, public render parameters or portlet-served resources, as these features are not present in the WSRP 1.0 specification but are supported in WSRP 2.0.
Valid Values:
1 – Any version of WSRP is acceptable.
2 – At least WSRP version 2.0 is required.
com.oracle.portlet.offerPortletOverWsrp
Used to indicate whether a portlet should be offered in the WSRP producer's service description. If this container runtime option is not specified at all, the default value specified in the WEB-INF/producer-config.xml will be used. In addition, if a Java portlet has an associated .portlet file, the offerRemote setting in the .portlet file will override the setting specified in this container runtime option.
Valid Values:
true – The portlet is offered in the WSRP producer's service description.
false – The portlet will not be included in the service description.
com.oracle.portlet.wsrpHeaderMode
Used only when portlets are being rendered as WSRP remote portlets, to indicate where cookies and headers should be put in the WSRP SOAP response as a hint to the WSRP consumer for the header or cookie's intended final destination. When portlets are run locally (not over WSRP), headers and cookies set by portlets are always assumed to go to the client. Setting this container runtime option sets a default value for the PortletRequest attribute com.oracle.portlet.wsrpHeaderMode, which can still be overridden by the portlet at runtime on a per-header basis. If no value for this container runtime option is set, the portlet container will assume the default value for the producer as specified in the WEB-INF/wsrp-producer-config.xml file.
Valid Values:
client – Headers and cookies set by the portlet will be directed to go to the client. (e.g. browser)
consumer – Headers and cookies set by the portlet will be directed to go to the consumer and not passed on to the client.
both – Headers and cookies set by the portlet will be directed to go to the client and the consumer.
com.oracle.portlet.suppressWsrpOptimisticRender
Suppresses the optimistic render of a portlet after the action and/or event lifecycles if the portlet is being run over WSRP. Normally, if a WSRP portlet receives a WSRP PerformBlockingInteraction request (processAction in JSR 168/JSR 286 portlets) and the portlet does not send any events as a result, the WSRP producer will render the portlet and return the portlet's markup in the response of the PerformBlockingInteraction SOAP message. This markup may be cached by the consumer until the consumer's page renders, and if nothing else affecting the state of the portlet happens (such as the portlet receiving an event), the cached markup can be used by the consumer, eliminating the need for a second SOAP call to GetMarkup. This assumes that the portlet's render phase is idempotent, which is always a best practice. However, if the portlet expects to receive an event, or rendering the portlet is more costly than a second SOAP message for GetMarkup, you can use this container option to suppress the optimistic render of the portlet after a processAction or handleEvent call. The portlet will still be rendered normally when the producer receives the WSRP GetMarkup request.
Valid Values:
true – Optimistic render is always suppressed.
false – Optimistic render may be performed.
com.oracle.portlet.externalScopeRequestAttributes
This is a multi-valued property, with each value being a regular expression. Request attributes which match any of the regular expressions are considered outside of portlet scope, and are shared with the underlying portal request. If the javax.portlet.actionScopedRequestAttributes option is used, any request attributes matching the regular expressions declared in externalScopeRequestAttributes are not stored in the action scope request attributes.
Default Values:
com\.bea\.netuix.*
com\.bea\.wlw\.runtime.*
com\.bea\.wsrp.*
javax\.servlet.*
weblogic\.servlet.*
com\.bea\.p13n.*
com.oracle.portlet.excludedActionScopeRequestAttributes
This is a multi-valued property, with each value being a regular expression. Request attributes which match any of the regular expressions are not stored as action-scoped request attributes if the javax.portlet.actionScopedRequestAttributes container runtime option is used, in addition to any request parameters whose values match the regular expressions defined in the com.oracle.portlet.externalScopeRequestAttributes container runtime option.
Default Values:
javax\.portlet.*
oracle\.portlet.*
com\.oracle\.portlet.*
com.oracle.portlet.allowEventPayloadsWithoutJAXBBindings
Causes the JSR286 container to send a redirect to the browser to the portlet's render URL after a processAction is run (and after events are handled) so that reloading the resulting page will not result in another processAction. The default value is "false".
Valid Values:
true – A redirect will be issued after every portlet action.
false – No redirect will be automatically issued after portlet actions.
com.oracle.portlet.redirectAfterAction
Allows event payload types declared in portlet.xml and event payload objects sent from JSR 286 portlets to bypass the JSR 286 specification requirement that these types have a valid JAXB binding. This container runtime option is valid only at the portlet application level and is ignored if specified at the portlet level. The default value is false.
Valid Values:
true – Event payloads without valid JAXB bindings are allowed.
false – Event payloads without valid JAXB bindings are not allowed, per the JSR 286 specification.
com.oracle.portlet.wsrpPortletHandle
Allows the specification of the WSRP portlet handle to be used for the portlet, which must be unique within the webapp. This container runtime option is only valid at the portlet level and will be ignored if specified at the portlet-application level. The default value is the portlet name from portlet.xml.
Valid Value:
A unique string conforming to WSRP portlet handle requirements.
com.oracle.portlet.requireIFrame
Specifies whether the portlet needs to be rendered inside an IFrame. The default value is "false".
Valid Values:
true – The portlet will be rendered inside an IFrame.
false – The portlet will not be forced to be rendered in an IFrame.
com.oracle.portlet.allowWsrpExport
Specifies whether the WSRP export-portlets operation should be supported for the webapp. If "false", this will override the setting in WEB-INF/wsrp-producer-config.xml and turn off the WSRP export-portlets operation. This option is used mainly for backward-compatibility; it is preferred to control the export-portlets operation through the wsrp-producer-config.xml setting. This container runtime option is valid only at the portlet-application level and will be ignored if specified at the portlet level. The default value is "true".
Valid Values:
true – Export-portlets will be allowed.
false – Export-portlets will not be allowed.
com.oracle.portlet.useWsrpUserContextForUserAuthenticationInfo
Specifies whether the PortletRequest methods getRemoteUser(), getUserPrincipal() and isUserInRole() are based on the WSRP user context information or on standard J2EE security. The default value is "false".
Valid Values:
true – The user information will be based on the WSRP user context. This can be a security problem so this option should be used with care.
false – The user information will be based on the J2EE authenticated user.
com.oracle.portlet.defaultServedResourceRequiresWsrpRewrite
Specifies the default WSRP requiresRewrite flag to use when generating ResourceURLs for portlet-served resources. This setting is used for all ResourceURLs created by the portlet, unless overridden by the oracle.portlet.server.resourceRequiresRewriting request attribute when the ResourceURL methods write() or toString() are called. This setting is also used to specify the WSRP requiresRewriting flag on the served resource response, but can be overridden by the presence of the oracle.portlet.server.resourceRequiresRewriting request attribute when the portlet's serveResource() method returns.
Default Values:
If unspecified – The requiresRewrite URL flag will not be given a value, and the requiresRewriting response flag for a serveResource operation will be based on the MIME type of the response.
true – The requiresRewrite URL flag and requiresRewriting response flag will be set to true, which directs the consumer to overwrite the resource.
false – The requiresRewrite URL flag and requiresRewriting response flag will be set to false, indicating that consumer does not need to rewrite the resource, though the consumer may choose to rewrite the resource.
com.oracle.portlet.defaultProxiedResourceRequiresWsrpRewrite
Specifies the default WSRP requiresRewrite flag to use when encoding URLs for resources not served by the portlet. This setting is used for all urls returned by the PortletResponse.encodeURL() method, unless overridden by the oracle.portlet.server.resourceRequiresRewriting request attribute when the PortletResponse.encodeURL() method is called.
Valid Values:
true – The requiresRewrite flag is set to true, which directs the consumer to overwrite the resource.
false – The requiresRewrite flag is set to false, indicating that the consumer does not need to rewrite the resource.
com.oracle.portlet.eventPayloadsXmlType
Specifies optional XML schema types for JAXB-bindable Java object event payloads if events are sent over WSRP. This is a multi-valued runtime option; each value consists of a Java class name / QName pair, separated by a colon (":") and with the QName specified using the standard Java String representation of a QName ("\{namespace\}localpart"). For each value specified, the QName is used as the XML schema type to annotate WSRP event payloads of the specified Java object type after the object has been marshalled to XML. This setting is useful when using events to communicate across portlets on multiple producers from different vendors.
Global (Shared) Java Portlet Properties are properties that are available to all Java portlets within the web application. WLP supports three global shared properties: Container Runtime Options, Default Namespace, and Portlet URL Listeners. The properties and their values are stored in the portlet.xml file. Refer to the Java Portlet Specification Version 2 for detailed information on accessing and using these global shared properties.
To add or modify global shared properties for a Java portlet, locate the Global (Shared) Java Portlet Properties section in the Properties view and select the property you wish to create or modify, as shown in Figure 6-11. Note that because these properties are shared among multiple portlets, you need to be careful when adding and deleting them to prevent unwanted side effects. For example, if you change the values for a shared property in one portlet, the value is changed for all portlets. If you open another portlet, you will see the changed value reflected there.
You can set these global shared properties:
Container Runtime Options
You can specify certain container runtime options for global shared parameters. For details on container runtime options, see Section 6.11, "Using Container Runtime Options." When container runtime options in the global shared properties are set, the options will take effect at the portlet application level, applying to all portlets declared in the portlet application.
Tip:
You can override container runtime option settings for global shared parameters for individual portlets by declaring container runtime options at the portlet level. For more information, see Section 6.13, "Setting Portlet-Level Container Runtime Options."
To bring up a dialog for adding runtime option name/value pairs, select Container Runtime Options in the Properties view and click Edit. The dialog is shown in Figure 6-12.
Figure 6-12 Provide List of Container Runtime Option(s) Dialog
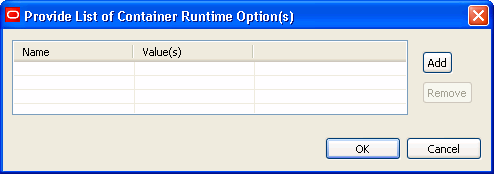
The specified runtime option(s) are added to the portlet.xml file. The global container options apply to all portlets registered in the portlet.xml file. For example:
<container-runtime-option> <name>javax.portlet.actionScopedRequestAttributes</name> <value>true</value></container-runtime-option>
You can also set container runtime options for individual portlets. See Section 6.13, "Setting Portlet-Level Container Runtime Options." Refer to the Java Portlet Specification Version 2 for more information on the container runtime options.
Default Namespace
Specifies a default namespace for the web application. The default namespace is used in cases where a public render parameter or an event is defined with only a local name. The specified namespace is added to the portlet.xml file. For example:
<default-namespace>http:example.com/events</default-namespace>
Portlet URL Listeners
Portlets can register portlet URL listeners to filter URLs before they are generated. To add a listener, click the Edit button next to the Portlet URL Listeners property. The Provide List of Portlet URL Listener(s) dialog appears, as shown in Figure 6-13. Click the New button to add a new listener, or Edit to modify the selected listener. In the dialog that appears, provide a Class name and, optionally, a display name and description for the listener.
Figure 6-13 Provide List of Portlet URL Listener(s) Dialog
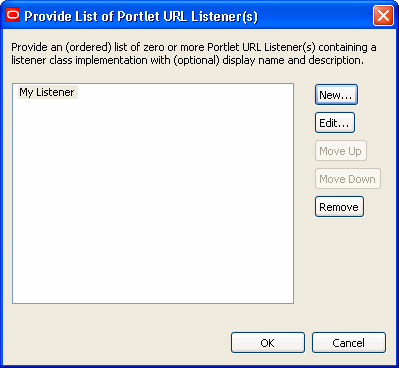
To receive a callback from the portlet container before a portlet URL is generated the listener class needs to implement the PortletURLGenerationListener interface and register it in the portlet.xml file. For example:
<listener> <display-name>MyURLListener</display-name> <listener-class>javaportlets.URLListener</listener-class></listener>
The URL listeners are called in the order they are defined in the portlet.xml file. The dialog box for adding URL listeners lets you move listeners up or down to change the order in which they are called.
You can specify container runtime options for individual portlets. These options override any application-level settings (if any) of the same container runtime options specified at the portlet-application level.
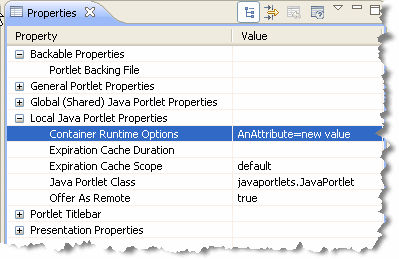
In the Java portlet Properties view, select the Container Runtime Options item under Local Java Portlet Properties, as shown in Figure 6-14. Just click in the value field to bring up a dialog for adding runtime option name/value pairs. For more information on runtime options, see the Java Portlet Specification Version 2, Section 6.12, "Using Global (Shared) Properties," and Section 6.11, "Using Container Runtime Options."
Figure 6-14 Local Container Runtime Options
A portlet mode indicates the function a portlet is performing when the portlet is rendered. The Java Portlet Specification includes three required modes: View, Edit, and Help. In addition, the specification allows for custom modes, which provide the ability to define additional modes. Custom portlet modes fall into two categories: portal managed and not portal managed. See the Java Portlet Specification Version 2 for more information.
To add a custom portlet mode:
Double-click the New Custom Mode node in the Portlet Editor Controls part of the Design Palette, as shown in Figure 6-15.
Tip:
You can also drag and drop Custom Portlet Modes from the Design Palette view onto the Portlet editor. You can drag and drop either existing modes or the Custom Modes > New Custom Mode item. The position of a mode in the list of modes in a portlet is not significant.
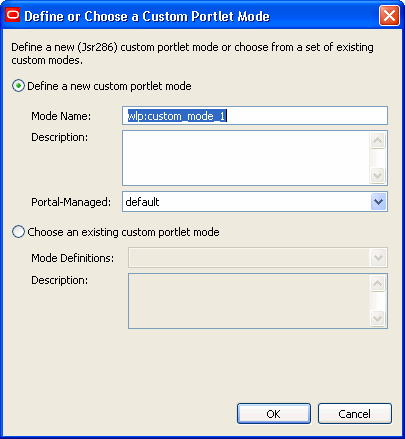
Fill out the Define or Choose a Custom Portlet Mode dialog. This dialog lets you specify a new custom mode or select an existing one for modification.
The Portal-Managed drop down menu lets you select whether or not the custom mode is portal managed or not. Select default to use the server's default. In the case of WebLogic Portal server, this default is true. Select true if you want the mode to be portal managed regardless of the server's default. Select false to if you never want the mode to be portal managed.
See Figure 6-16.
Figure 6-16 Define or Choose a Custom Portlet Mode Dialog
Custom modes are inserted into the portlet.xml file and can be shared by multiple portlets. Here is a sample custom mode definition:
<custom-portlet-mode>
    <description>My custom mode</description>
    <portlet-mode>wlp:custom_mode_1</portlet-mode>
</custom-portlet-mode>
The WLP Java portlet container supports customization of some behaviors at runtime through the use of special portlet request attributes. Set these attributes in the portlet Java code before the operation you wish to affect. Because the request values don't change until you explicitly change them, the best practice is to explicitly change them. for example:
request.setAttribute("oracle.portlet.server.resourceRequiresRewriting", Boolean.TRUE);

String url = response.encodeURL(pathToResourceForRewriting);

request.removeAttribute("oracle.portlet.server.resourceRequiresRewriting");
These special portlet request attributes are:
oracle.portlet.server.resourceRequiresRewriting
If this request attribute is set when a call to PortletResponse.encodeURL() is made, the value of the request attribute is used to determine whether the resource being referred to by the URL requires WSRP rewriting on the consumer, if the portlet is being run over WSRP. If the portlet is not being run over WSRP, this request attribute has no effect. Resource proxying is the standard way to retrieve resources with WSRP: a proxy on the consumer is used to retrieve non-portlet artifacts from the producer, such as icons or images that the producer portlet may refer to. In most cases, these proxied artifacts do not contain URLs to other things on the producer (which would also need to go through the consumer's proxy to work properly), for example, an image. By default, if this request attribute is not set or is set to Boolean.FALSE, the resource URLs will not be rewritten on the proxy. However, for proxied resources which contain URLs that need to be re-written to also go through the consumer's resource proxy, setting this request attribute to Boolean.TRUE will ensure that the consumer's resource proxy rewrites URLs in the resource itself.
Valid values are java.lang.Boolean objects:
java.lang.Boolean.TRUE – Indicates that the URL encoded with PortletResponse.encodeURL() is to a resource which itself requires URL rewriting on the consumer.
Any other value – Indicates that the URL encoded with PortletResponse.encodeURL() is to a resource which does not itself require URL rewriting on the consumer.
com.oracle.portlet.wsrpHeaderMode
If the portlet is being rendered on a WSRP producer, the value of this attribute is used to determine where the WSRP container should place the header or cookie being set on the WSRP SOAP message, as a hint to the consumer of its intended final destination. The container runtime option of the same name is used by the portlet container to set an initial value for this request attribute on each PortletRequest object, if the portlet is being rendered on a WSRP producer. If the portlet is not being rendered over WSRP, this request attribute is ignored and all headers and cookies set are assumed to be sent to the client.
Valid values are java.lang.String objects:
client – Indicates that the header or cookie is intended to go to the client.
consumer – Indicates that the header or cookie is intended to be stored on the consumer.
both – Indicates that the header or cookie should be sent to the client and stored on the consumer.
JSR 286 portlets can create two different kinds of links to resources: direct links, and portlet-served resource links. Direct links were supported by the JSR 168 specification, while portlet-served resources are new in the JSR 286 specification.
Direct links are links to a resource in the same web application as the portlet, and are constructed by the portlet and encoded with the PortletResponse.encodeURL() method. Resources accessed through direct links do not go through the portal server and will not have the portlet context available. In general, use direct links when access to the portlet context or going through the portal is not needed, as direct links are more efficient than portlet-served resource links, which go through the portal framework. Examples of resources that may be best served through direct links include static images and icons that the portlet may wish to include in its markup.
Unlike direct links, portlet-served resource links point back to the portlet, and require the portlet itself render the resource.
Tip:
For more information on portlet-served resources, see the JSR 286 specification, Section 13.
You can create portlet-served resource links using the javax.portlet.ResourceURL class, or the tag library's resourceUrl tag. When one of the portlet-served resource links is loaded by a client, the portlet container invokes a Java portlet's serveResource() method to have the portlet serve the resource. Using portlet-served resource links, the resource may be protected by portal security and has access to the portlet context. There are many examples of resources that may be best served through portlet-served resource links:
A resource which reflects the portlet's state, such as a graph or chart based on data the portlet is displaying
Any resource to which the portlet conditionally restricts access
Portlet-context dependent JSON or HTML fragments for use in Ajax use-cases
Note:
Both direct and portlet-served resource links, when properly encoded through the PortletResponse.encodeURL() method or the appropriate ResourceURL methods, will not necessarily result in a valid URL. The portal framework may instead provide a token that is turned into a proper URL to the resource when the token is rewritten on the client. The portlet should therefore never modify a link provided by the PortletResponse.encodeURL(), ResourceURL.toString(), or ResourceURL.write() methods before writing the link to the portlet's markup.
For portlet-served resources, the portlet container acts as a proxy for accessing the resource; the portlet itself has full control over the resource response. Calls to the portlet's serveResource() method usually occur after a call to render(), if the portlet's output from the render contained any portlet-served resource links. During serveResource(), the portlet has read-only access to the portlet's current render parameters, shared render parameters, mode and state. Portlets can serve more than one resource by using a resource ID: an identifier specified on the portlet-served resource link that is provided to the portlet during a call to serveResource() in the ResourceRequest.
Caution:
The javax.portlet.GenericPortlet class, which is extended by most Java portlets, has a default implementation of serveResource(). This default implementation simply forwards the resource request to a file in the same web application identified by the resource ID. If a portlet does not override this default behavior, it may be possible for a malicious user to construct a portlet-served resource URL which serves up any file in the portlet's web application, bypassing any security constraints set in the web.xml. For this reason, Oracle recommends that portlets either provide their own implementation of serveResource() or disable portlet-served resources entirely using the container runtime option com.oracle.portlet.disallowResourceServing. For more information, see Section 6.11, "Using Container Runtime Options."
WebLogic Portal produces Java portlets that conform to the JSR 286 specification and can be used universally across portals that support JSR 286 portlet containers. Oracle Enterprise Pack for Eclipse lets you export Java portlets to a supported archive file (WAR, JAR, or ZIP) that can be deployed on any supported server.
Tip:
You can also use the Import feature to import archive files containing Java portlets into your Oracle Enterprise Pack for Eclipse workspace. For details, see Section 6.18, "Importing Java Portlets."
Note:
Throughout this section, supported archive files refer to WAR, JAR, and ZIP files.
By default, Oracle Enterprise Pack for Eclipse exports the portlet.xml, any Java class files required by the portlet, and any Java source files. Also, if any class or source Java files are found within a JAR or ZIP archive, that archive is also exported. You can optionally specify additional files to be exported.
To export Java portlets to a supported archive file:
Select File > Export. You can also right-click in the Project Explorer and select Export > Export...
In the Export page of the export wizard, open the WebLogic Portal folder and select Portlet(s) to Archive.
Click Next.
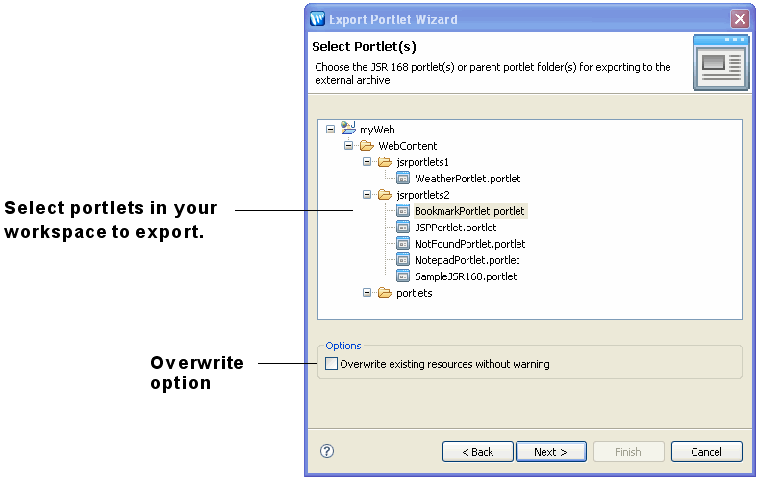
In the Select Portlets page of the export wizard, expand the web project that contains the Java portlet(s) you want to export. You can select the parent folder that contains the portlet(s) or drill down to select individual portlets, as shown in Figure 6-17. Any portlets and/or parent folders that were selected in the Project Explorer will be pre-selected by default.
Select the Overwrite existing resources without warning checkbox to force the export tool to overwrite duplicate files automatically.
Note:
All selected portlets must exist within the same web project. You cannot select portlets for export across different web projects.
Figure 6-17 Select Portlet(s) to Export Dialog
Click Next. The Edit Title(s) dialog appears, as shown in Figure 6-18.
In the Edit Title(s) dialog, you can add or modify the Title and/or Description of an exported portlet. These fields are written to the exported portlet's portlet.xml file. Click Next to continue.
Note:
Next button is disabled until you supply a title.
In the Select Archive page of the export wizard, enter a full path and name for the archive file, or use the Browse button to specify the path, and click Next. If the archive does not exist, the wizard will prompt you to create it.
In the Select Format page of the export wizard, pick an archive format from the dropdown list. WLP provides two choices:
Oracle WebLogic Server (Generic) – Outputs just the standard Java Portlet files to the archive, like portlet.xml and the Java Portlet class files. This is the default option.
Oracle WebLogic Portal – In addition to exporting the standard Java Portlet files, this formatter also exports standard WLP files, such as .porlet files, backing file classes, and .dependencies files.
In the Select Files dialog, select any optional supporting files, such as JSPs, that you wish to include in the supported archive file. Any files that are included in the selected archive format (such as portlet.xml) are automatically selected in the dialog. You can associate a Target Path path with any selected files. Those files will be placed in the specified target path within the archive file. By default, all files are stored relative to the root directory of the archive.
Click Finish. The archive file is created in the location you specified.
WLP provides two tools for importing Java (JSR 168/286) portlets. One lets you import Java portlets into the your Oracle Enterprise Pack for Eclipse workspace. You can then add the imported portlets to a portal application, modify them with the portlet editor, or perform other development functions. The other tool lets you import and deploy Java portlets using the Portal Administration Console. This section discusses these tools and techniques for importing JSR 168/286 portlets into a WLP application. This section includes these topics:
Section 6.18.1, "Importing Java Portlets Into Your Eclipse Workspace"
Section 6.18.2, "Importing and Deploying JSR 286 Portlets in the Administration Console"
This section explains how to use the Oracle Enterprise Pack for Eclipse to import portlets and includes these topics:
If you are importing JSR 286 portlets into an existing web application that contains JSR 168 portlets, see Section 6.19, "JSR-286/JSR-168 Portlet Compatibility" for important guidelines.
To start the import wizard, do the following:
Open Oracle Enterprise Pack for Eclipse.
Open the portal application into which you want to import the JSR 286 portlets.
Select File > Import or right-click on the portal application and select Import.
This section explains how to use the import wizard to import JSR 286 WAR files into an enterprise application.
On the first page of the import wizard, select WebLogic Portal > Portlet(s) from Archive. Click Next to continue
On the Select Project page of the import wizard, select the project into which the JSR 286 WAR will be imported. The list is automatically populated with the projects in the current workspace. If you would like to replace an earlier version of the portlet, select Overwrite existing resources without warning. Click Next to continue
Note:
If the selected project does not include a portlet deployment descriptor, one will be generated when the JSR 286 WAR file is imported.
On the Select Archive page of the import wizard, enter the path to the WAR file containing the JSR 286 compliant portlets to deploy. You can also use the Browse button to navigate to the WAR file. Click Next to continue
On the Select Portlet(s) page of the import wizard, choose the portlets to import from the JSR 286 WAR selected on the previous page. By default, the portlet(s) will be imported into the root folder of the portal project chosen in step 2. To import a portlet into a different location, select the portlet and enter the path in the Target Path field or click Browse to navigate to the folder. Click Next to continue
The Select Files page of the import wizard lists the artifacts that will be included in the portlet project. By default, all artifacts specified as required in the Import Template are selected, including the portlet.xml file and any class files used by the portlet. Select any additional supporting portlet artifacts to include in the portlet project (you can select directories or individual files). By default, the files will be imported into the portlet project in the structure shown. To import an artifact into a different location, select the file or directory and enter the path in the Target Path field or click Browse to navigate to the folder. Click Next to continue
Click Finish to execute the import. If the selected project does not include a portlet deployment descriptor, an error will appear to notify you that a new descriptor file will be generated.
After the WAR file is imported, you can add the portlet(s) to your portal. You can use them in file based .books, .pages, and .portals, or in desktop streaming mode using the WebLogic Administration Console once they have been published to the server from the IDE. The imported portlets can be served over WSRP if your portlet producer project is configured to do so. After a web application is added as a producer, you can incorporate the application's portlets as you would with any WSRP producer using the WebLogic Portal Administration Console. See the Oracle Fusion Middleware Federated Portals Guide for Oracle WebLogic Portal for details.
Tip:
If your producer and consumer applications share the same server, it is recommended that you enable local proxy mode. Local proxy support allows co-located producer and consumer web applications to short-circuit network I/O and "SOAP over HTTP" overhead. See the section "Using Local Proxy Mode" in the Oracle Fusion Middleware Federated Portals Guide for Oracle WebLogic Portal.
The WebLogic Portal Administration Console provides a utility for automatically deploying JSR 286 portlets that are packaged in JSR 286 WAR files. This utility lets you import JSR 286 WAR files containing JSR 286 portlets, and expose the portlets in WSRP producers. For detailed information on this utility, see the chapter "Deploying Portal Applications" in the Oracle Fusion Middleware Production Operations Guide for Oracle WebLogic Portal.
When you use Oracle Enterprise Pack for Eclipse to import JSR 286 portlets into an existing web application that contains JSR 168 portlets, the existing portlet.xml is upgraded to the JSR 286 schema. (Note that if you import portlets manually, by editing the schema files, this upgrade will not occur automatically.) In most cases, the JSR 168 portlets will continue to work exactly as they did before. However, there are a few cases in which JSR 168 portlets will behave differently in JSR 286; these portlets must invoke a JSR 168 compatibility mode to run under JSR 286.
Note:
JSR 168 portlets run in a JSR 286 container without JSR 168 compatibility mode invoked may be subject to a potential security hole through the new portlet-served resource feature in JSR 286. Because the GenericPortlet base class implements the serveResource() method by simply looking for a file in the web application with the name specified in the resource ID, malicious users could gain access to files not intended to be served. When any JSR 168 compatibility mode is used, the WLP JSR 286 container disables resource serving for these portlets by default using the com.oracle.portlet.disallowResourceServing container runtime option. If JSR 168 portlets are included in a JSR 286 portlet.xml file without specifying a JSR 168 compatibility mode, Oracle recommends that you use the com.oracle.portlet.disallowResourceServing container runtime option to disable resource serving. For information on setting this container runtime option for individual portlets, see Section 6.13, "Setting Portlet-Level Container Runtime Options."
The WLP JSR 286 portlet container invokes a JSR 168 compatibility mode for a portlet if either of the following are true:
The portlet.xml in which the portlet is defined has an XML namespace that does not contain portlet-app_2_0 (it is a JSR168 portlet.xml file). If a file exists in the web application named /WEB-INF/oracle-portlet.xml, the WebCenter JSR 168 compatibility mode is invoked; otherwise, the WLP JSR 168 compatibility mode is not invoked.
The container runtime option com.oracle.portlet.compatibilityMode is set to owlp168 (WLP JSR 168 compatibility mode) or owc168 (WebCenter JSR 168 compatibility mode). This allows JSR 286 portlets and JSR 168 portlets from WLP and/or WebCenter to co-exist in the same web application.
Any hide-portlet entries with a value of true will automatically be converted to a false value for the container runtime option com.oracle.portlet.offerPortletOverWsrp if no value for that container runtime option is specified in the portlet.xml file.
If a portlet has a JSR 168 compatibility mode invoked, the portlet container will make the modifications described in the following sections for the portlet to remain backwards-compatible with JSR 168.
To be compliant with the JSR 168 specification, the following modifications will be made if any JSR 168 compatibility mode is invoked:
| WLP JSR 168 Compatibility Mode Functionality | Standard JSR 286 Functionality |
|---|---|
|
BaseURL.setParameter(String name, String value) will throw an IllegalArgumentException if value is null. |
The parameter will be removed if it was already set on the BaseURL |
|
BaseURL.setParameter(String name, String[] values) will throw an IllegalArgumentException if values is null. |
The parameter will be removed if it was already set on the BaseURL |
|
BaseURL.setParameters(Map<String, String[]>) will throw an IllegalArgumentException if any of the map values is null. |
The parameter will be ignored. |
|
When using a PortletRequestDispatcher to dispatch to a servlet or JSP, the provided request.getProtocol() method will return null. |
The provided request.getProtocol() method will return "HTTP/1.1" |
|
RenderResponse.getWriter() and RenderResponse.getOutputStream() will throw an IllegalStateException if RenderResponse.setContentType() has not been called previously. |
Setting the content type is not required before calling getWriter or getOutputStream. |
|
PortletContext.getMajorVersion() will return 1. |
PortletContext.getMajorVersion() will return 2. |
|
The container runtime option |
The container runtime option |
The following modifications will be made in addition to the generic modifications if the WLP JSR 168 compatibility mode is invoked:
| WLP JSR 168 Compatibility Mode Functionality | Standard JSR 286 Functionality |
|---|---|
|
PortalURL.toString() will use the web application setting for ampersand entity encoding. |
BaseURL.toString() must return a URL that does not encode ampersands as XML entities. |
|
When using the JSR 168 tag library, the URLs generated by the actionUrl and renderUrl tags will always inherit the default ampersand encoding for the web application. |
URLs must not encode ampersands as XML entities. |
|
PortletResponse.encodeURL() will use the web application setting for ampersand entity encoding. |
PortletResponse.encodeURL() will always use the ampersand character, not the ampersand entity. |
|
The portlet container will generate errors if render is called on a portlet and the portlet does not implement the methods render(), doDispatch(), doView() (if portlet mode is VIEW), doEdit() (if portlet mode is EDIT), or doHelp() (if portlet mode is HELP). |
The portlet's render() method will be invoked regardless. |
|
The portlet container will generate errors if an action is invoked on a portlet and the portlet does not implement processAction(). |
The processAction() method will be called regardless. |
|
The container will automatically set the |
The container |
The following modifications will be made in addition to the generic modifications if the WebCenter JSR 168 compatibility mode is invoked:
| WebCenter JSR 168 Compatibility Mode Functionality | Standard JSR 286 Functionality |
|---|---|
|
PortalURL.toString() will always use the XML ampersand entity. |
BaseURL.toString() must return a URL that does not encode ampersands as XML entities. |
|
When using the JSR 168 tag library, the URLs generated by the actionUrl and renderUrl tags will always inherit the default ampersand encoding for the web application. |
URLs must not encode ampersands as XML entities. |
|
PortletResponse.encodeURL() will use the XML ampersand entity for encoding the URL. |
PortletResponse.encodeURL() will always use the ampersand character, not the ampersand entity. |
|
If present, the
|
|
|
The container runtime option com.oracle.portlet.useWsrpUserContextForUserAuthenticationInfo will be set to "true" unless the oracle-portlet.xml file exists and has a portlet-app-extension "strict-authentication" element value of "true". |
The container com.oracle.portlet.useWsrpUserContextForUserAuthenticationInfo runtime option will be left at the default value of "false" if no other value for that option is specified. |
To add an icon to a Java portlet, you need to edit the weblogic-portlet.xml file, as described in this section.
Place the icon in the images directory of the skin that the portal is using. For example, if the skin name is avitek, icons must be placed in:
myPortal/skins/avitek/images
In the Application panel, locate and double-click the weblogic-portlet.xml file to open it. This file is located in the portal's WEB-INF folder, for example:
myPortal/WEB-INF/weblogic-portlet.xml
Add the following lines to the weblogic-portlet.xml file:
<portlet>
  <portlet-name>myPortlet</portlet-name>
  <supports>
    <mime-type>text/html</mime-type>
    <titlebar-presentation>
      <icon-url>myIcon.gif</icon-url>
    </titlebar-presentation>
  </supports>
</portlet>
Make these substitutions:
Change myPortlet to the name of the portlet that is specified in WEB-INF/portlet.xml
Be sure the mime-type also matches the mime-type found in WEB-INF/portlet.xml
Change myIcon.gif to the name of the icon you wish to add