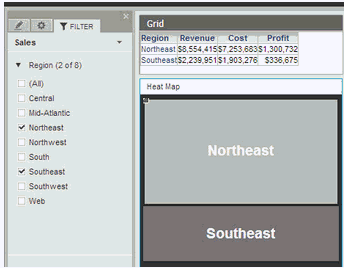
For example, a dashboard contains a grid and a heat map, which both
display sales data for a series of sales regions. Both visualizations
are displayed on the Sales sheet. If you choose to display data only for
the Northeast and Southeast regions, both the grid and the heat map will
be updated to include data only for Northeast and Southeast, as shown
in the image below.
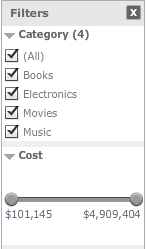
You can use the steps in the table whether your Filter
panel looks like the image above or the image below:
By default, the selections that you make in a filter affect the visualizations
and text on the sheet, and do not affect other filters. If your sheet
contains multiple filters, selections that you make in an attribute filter
can affect the choices displayed for other attribute filters. Filters
on metrics are not affected by any changes made to other filters in the
sheet.
To check whether a filter affects another filter, in the Filter panel,
hover the cursor over the filter’s name, click the arrow icon displayed
to the right, and point to Select Targets.
Any filter selected in the list of targets is affected by the filter.
To Filter a Sheet... |
Do This... |
By selecting
attribute values
|
| |
1 |
In the Filter
panel, locate the filter that contains the attribute values
(or elements) to filter based on. If the filter is collapsed,
click the arrow icon to the left of the filter's name
to expand it. |
| |
2 |
Select each
value to filter data based on, or select All
to choose all of the values at once. |
| |
• |
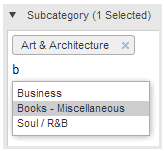
If a search
box is displayed, you can narrow the values displayed
as choices in the filter by typing the name of values
in the search box. |
| |
• |
If you are
selecting items in a filter displayed using the Check
Boxes style, you can clear all choices and select a single
value. Hover the cursor over the value and click Only. |
| |
3 |
If the Apply
button is displayed, click Apply
to filter data using your selections. You can make several
changes before applying the filter. If the designer has
created the document to automatically apply selections
in the filter, the button is not displayed and your selections
are automatically used to filter data. |
|
By searching
for attribute values
|
| |
1 |
In the Filter
panel, locate the filter that contains the attribute values
to filter based on. If the filter is collapsed, click
the arrow icon to the left of the filter's name to expand
it. |
| |
2 |
In the search
field, type the name of the value you want to use to filter.
|
| |
3 |
From the
drop-down list, select the name of the value. The value
is added to the list of values included in the filter. |
| |
4 |
Repeat the
steps above to add additional values to the filter. |
| |
5 |
You can
remove a value from the filter by clicking X
next to the value to remove. |
| |
6 |
If the Apply
button is displayed, click Apply
to filter data using your selections. You can make several
changes before applying the filter. If the designer has
created the document to automatically apply selections
in the filter, the button is not displayed and your selections
are automatically used to filter data. |
|
By typing a
date range
|
| |
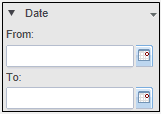
1 |
In the Filter
panel, locate the filter that contains the date attribute
to filter. If the filter is collapsed, click the arrow
icon to the left of the name of the filter’s name to expand
it. |
| |
2 |
In the From field, type the
beginning date of the date range or select it from the
calendar by clicking the Calendar
icon. |
| |
3 |
In the To field, type the end
date of the date range or select it from the calendar
by clicking the Calendar
icon. |
| |
4 |
If the Apply
button is displayed, click Apply
to filter data using your selections. You can make several
changes before applying the filter. If the designer has
created the document to automatically apply selections
in the filter, the button is not displayed and your selections
are automatically used to filter data. |
|
By choosing
metric values or ranks from a slider
|
| |
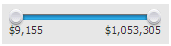
1 |
In the Filter
panel, locate the filter that contains the metric to filter
based on. If the filter is collapsed, click the arrow
icon to the left of the filter's name to expand it. |
| |
2 |
If the filter
contains a drop-down list of operators, you are filtering
on rank. Select the operator, such as Highest or Lowest. |
| |
3 |
Do one of
the following: |
| |
• |
To filter
the metric values by selecting a general range, click
and drag the endpoints of the slider to cover the range
of values to display. The selected value range is automatically
highlighted in blue. |
| |
• |
To filter
the metric values by typing a specific range of values,
hover your cursor over the endpoint of a slider. A dialog
box is displayed. Type the value to use as the new endpoint
of the value range, then press ENTER. |
| |
4 |
If the Apply
button is displayed, click Apply
to filter data using your selections. You can make several
changes before applying the filter. If the designer has
created the document to automatically apply selections
in the filter, the button is not displayed and your selections
are automatically used to filter data. |
|
By comparing
metric values or ranks to a selected number
|
| |
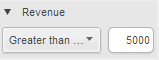
1 |
In the Filter
panel, locate the filter that contains the metric to filter
based on. If the filter is collapsed, click the arrow
icon to the left of the filter's name to expand it. |
| |
2 |
Click Greater than. From the
drop-down list, select the operator to use to compare
data, such as Less Than or Equals. If the operators include
Highest and Lowest, you are comparing the metric rank
rather than value. |
| |
3 |
In the field,
type the value to use to filter data, then press ENTER. |
| |
4 |
If the Apply
button is displayed, click Apply
to filter data using your selections. You can make several
changes before applying the filter. If the designer has
created the document to automatically apply selections
in the filter, the button is not displayed and your selections
are automatically used to filter data. |
|
By comparing
the ranked values of an attribute to a selected number
The attribute values are ranked by a metric.
|
| |
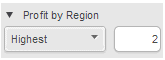
1 |
In the Filter
panel, locate the filter that contains the metric to filter
by an attribute. If the filter is collapsed, click the
arrow icon to the left of the filter’s name to expand
it. |
| |
2 |
From the
drop-down list, select the operator, such as Highest or
Lowest, to use to compare data. |
| |
3 |
In the box,
type the value to use to filter data, then press ENTER. |
| |
4 |
If the Apply
button is displayed, click Apply
to filter the data using your selections. You can make
several changes before applying the filter. If the designer
has created the document to automatically apply selections
in the filter, the button is not displayed and your selections
are automatically used to filter data. |
|
To clear all
filter selections for a single filter, and display all the data
for the filtered object |
| |
1 |
In the Filter
panel, hover the cursor over the name of the filter, then
click the arrow icon displayed in the top right, and select
Clear Selections.
All the selections in the filter are cleared, and all
data for the attribute or metric that the filter is based
on is displayed. |
|
To clear all
selections for all filters on the sheet |
| |
1 |
Hover the
cursor over the Filter panel, then click the arrow icon
displayed in the top right of the panel, select Clear All Selections
or Clear Selection.
All the selections in the Filters panel are cleared. |
|