Table of Contents Previous Next PDF


Providing Security

Providing Security
Security refers to techniques for ensuring that data stored in a computer or passed between computers is not compromised. Most security measures involve passwords and data encryption. A password is a secret word or phrase that gives a user access to a particular program or system, and data encryption is the translation of data into a form that is unintelligible without a deciphering mechanism.
This section covers the following topics:
Note:
Understanding Oracle Tuxedo Mainframe Adapter for SNA Security
Distributed applications such as those used for electronic commerce (e-commerce) offer many access points for malicious people to intercept data, disrupt operations, or generate fraudulent input. The more distributed a business becomes, the more vulnerable it is to attack. Thus, the distributed computing software or middleware, upon which such applications are built must provide security.
Oracle Tuxedo Mainframe Adapter for SNA works with the ATMI platform to enable the following security capabilities:
Mapping User IDs
User IDs are used to control access to system resources in the ATMI and mainframe environments. For user IDs to be used by those ATMI and mainframe environments, both sides must have security mechanisms in place. For the ATMI domain, the security mechanism is the Authorization Server. For the host system, the security mechanism is the External Security Manager. Figure 4‑1 shows Oracle Tuxedo Mainframe Adapter for SNA security elements.
The Oracle Tuxedo Mainframe Adapter for SNA software allows user IDs to be shared between domains in two ways:
Figure 4‑1 Oracle Tuxedo Mainframe Adapter for SNA Security Elements
Caution:
Mixed environment security is more complex than depicted in Figure 4‑1. A domain without an operational security mechanism in place accepts all transaction requests by treating user IDs as “trusted users.” Refer to the appropriate ATMI product documentation for more detailed information about domain security.
ATMI-to-Host User ID Mapping
ATMI-to-host user ID mapping associates a user ID in the local domain with a corresponding user ID in the host system. With ATMI-to-host user ID mapping, an ATMI user ID can be different from its counterpart on the host. See Figure 4‑2.
The dmadmin commands are used to create this kind of mapping. Refer to the “Using dmadmin Commands to Administer User ID Mapping” section. These commands change the binary form of the DMCONFIG file (called the BDMCONFIG file).
Figure 4‑2 Typical ATMI-to-host User ID Mapping
Direct User ID Mapping
Direct user ID mapping enables the direct mapping of an ATMI user ID to an identical host user ID. This eliminates the need to use the dmadmin commands, as with ATMI-to-host user ID mapping. When this feature is used, any user ID mappings in the BDMCONFIG file are bypassed. To enable this feature, specify a command-line parameter with the GWSNAX command when starting the Oracle Tuxedo Mainframe Adapter for SNA Gateway. Refer to the “Bypassing User ID Mapping” section.
Note:
When direct user ID mapping is used, modification or elimination of any BDMCONFIG file mapping entries is not necessary.
With direct user ID mapping, the user IDs in the ATMI and host environments must be identical as shown in Figure 4‑3. When the ATMI local domain initiates a request, the ATMI user ID is applied to the requested host service. When the host initiates a request, the host user ID is applied to the requested ATMI service.
Notes:
With direct mapping, only security level IDENTIFY can be supported.
Figure 4‑3 Direct User ID Mapping
Configuring User ID Mapping
Specify parameters bearing on local domain and Oracle Tuxedo Mainframe Adapter for SNA security in the DMCONFIG and UBBCONFIG files in the following four sections:
DM_LOCAL_DOMAINS section of the DMCONFIG file
DM_SNALINKS section of the DMCONFIG file
DM_ACCESS_CONTROL section of the DMCONFIG file
RESOURCES section of the UBBCONFIG file
Determining Security Parameters
The combined settings of the SECURITY parameters in the UBBCONFIG and the DMCONFIG files have the following effects:
When the DM_LOCAL_DOMAINS security parameter is set to NONE or APP_PW, no action is taken by the Gateway with regard to security.
However, when the UBBCONFIG file security parameter is set to APP_PW, the application password is validated by an AUTHSVC when clients join the application. The AUTHSVC is provided by the user application.
If security is to be enforced by both the local domain and the host system for each request inbound from the host system to the local domain, the following settings must be made:
The UBBCONFIG file SECURITY parameter must be set to one of USER_AUTH, ACL, or MANDATORY_ACL.
The DMCONFIG file DM_LOCAL_DOMAINS section SECURITY parameter must be set to DM_USER_PW.
The DMCONFIG file DM_SNALINKS SECURITY parameter must be set to IDENTIFY.
Determining Security Parameters for Inbound Requests
Configurations on Oracle Tuxedo Side
Table 4‑1 shows settings for the SECURITY parameters in the UBBCONFIG and DMCONFIG files required to achieve local domain and host system security combinations for inbound requests from the host system.
Note:
 

UBBCONFIG SECURITY

DM_LOCAL_DOMAINS SECURITY

DM_SNALINKS SECURITY
USER_AUTH, ACL, or
MANDATORY_ACL
For requests sent from the host system, the local domain extracts the remote user ID, or user ID and password, from the conversation start-up request and checks the domain security table. That table contains pairs of local principal user IDs and remote user IDs, maintained on a service-by-service basis. The remote user ID is mapped to the local principal user ID. The local principal user ID and password are used for further ACL checking, as specified in the UBBCONFIG file. If the direct user ID mapping option is specified, the remote user ID is used as the local principal user ID.
When a request is received from the host system, the local domain checks the ACL in the DMCONFIG file for the local service to see if requests from the remote domain are permitted. If the DMCONFIG file does not contain an ACL for the local service, the service is accessible to all requests.
Configurations on Mainframe Side
Before start, obtain the following information for each VTAM LU 6.2 pair from your VTAM system administrator:
You can choose one of the following ways to configure CRM LU in z/OS:
RDEFINE APPCLU local-netid.luid1.remote-netid.luid2 UACC(NONE) SESSION(SESSKEY(APPCPWD) CONVSEC(ALREADYV)
On another side:
RDEFINE APPCLU local-netid.luid2.remote-netid.luid1 UACC(NONE) + SESSION(SESSKEY(APPCPWD) CONVSEC(ALREADYV))
RDEFINE APPCLU local-netid.luid1.luid2 UACC(NONE) SESSION(SESSKEY(APPCPWD) CONVSEC(ALREADYV))
On another side:
RDEFINE APPCLU local-netid.luid2.luid1 UACC(NONE) + SESSION(SESSKEY(APPCPWD) CONVSEC(ALREADYV))
local-netid/remote-netid: The network ID (NETID) of the partners. These IDs are specified in the VTAM start option NETID, which is in the ATCSTRxx member of SYS1.VTAMLST.
luid1/luid2: The LU names of the partners. In each case, the first LU name specified is the local LU name, and the second LU name is the partner LU name.
Note:
Change VTAM APPL definition of CRM LU. The parameter SECACPT is required and its value should be ALREADYV.
Determining Security Parameters for Outbound Requests
If security is to be enforced by both the local domain and the host system for each request outbound from the local domain, the following settings must be made:
The UBBCONFIG file SECURITY parameter must be set to one of USER_AUTH, ACL, or MANDATORY_ACL.
The DMCONFIG file DM_LOCAL_DOMAINS section SECURITY parameter must be set to DM_USER_PW.
The DMCONFIG file DM_SNALINKS SECURITY parameter must be set to IDENTIFY or VERIFY.
The ATTACHSEC level for the connection definition in the host system must be set to IDENTIFY or VERIFY to match the DMCONFIG file DM_SNALINKS SECURITY parameter.
Configurations on Oracle Tuxedo Side
Table 4‑2 shows settings for the SECURITY parameters in the UBBCONFIG and DMCONFIG files required to achieve local domain and host system security combinations for outbound requests.
Note:
 

UBBCONFIG SECURITY

DM_LOCAL_DOMAINS SECURITY

DM_SNALINKS SECURITY
For a request sent to the host system, the local principal user ID is located in the domain security table and the associated remote user ID, or user ID and password, are put into the conversation start-up request before being sent over the LU6.2 conversation. This situation occurs if SECURITY is set to IDENTIFY or VERIFY in the DM_SNALINKS section of the DMCONFIG file. If the direct user ID mapping option is specified, the local principal user ID is put into the conversation startup request.
Configurations on Mainframe Side
On Mainframe side, set the following:
1.
Set these parameters to YES in the CICS system initialization configuration file:
SEC=YES
XTRAN=YES
When they are specified, only the users defined can access corresponding transactions.
You can define valid users in the profile using RACF, for example:
PERMIT * CLASS(TCICSTRN) ID(GUMENG) ACCESS(READ)
* can be replaced by the transaction name if you want to control individual transaction.
2.
3.
Set the ATTACHSEC level for the connection definition in the host system to IDENTIFY or VERIFY to match the DMCONFIG file DM_SNALINKS SECURITY parameter.
Setting DMCONFIG File Security Parameters
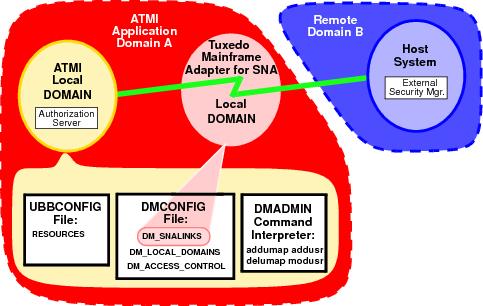
Three sections in the DMCONFIG file contain parameters affecting Oracle Tuxedo Mainframe Adapter for SNA control of access to the ATMI local domain:
DM_LOCAL_DOMAINS section contains a SECURITY parameter which specifies the type of security enforced for the ATMI local domain.
DM_SNALINKS section contains a SECURITY parameter that records the security in effect for the host system.
DM_ACCESS_CONTROL section contains local access control lists used by the ATMI local domain to associate local resources with host systems permitted to have access to them.
Caution:
Do not delete the DMCONFIG binary file before running the dmloadcf command. Tables of remote users, remote passwords, and remote mappings are stored in this file. If deleted, all security information must be re-entered.
DM_LOCAL_DOMAINS Section
The SECURITY parameter settings in this section work in conjunction with the SECURITY parameter in the RESOURCES section of the ATMI local domain’s UBBCONFIG file to establish how Oracle Tuxedo Mainframe Adapter for SNA controls access to the ATMI local domain. The parameter takes the form:
SECURITY = {value}
In this parameter, value can be set as:
NONE
No security is enforced.
APP_PW
No security is enforced.
DM_USER_PW
User and password security is enforced.
If this parameter is set to NONE or APP_PW, the local domain takes no action with regard to security. If this parameter is set to DM_USR_PW, the local domain enforces security according to the setting in the UBBCONFIG file (refer to “Setting DMCONFIG File Security Parameters”).
DM_SNALINKS Section
This section of the DMCONFIG file is dedicated to Oracle Tuxedo Mainframe Adapter for SNA parameters. It records the security in effect for the host system. It correlates to the values set for the ATTACHSEC parameter in the connection resource definition. In the following parameter definition, remote refers to the ATMI domain and local refers to the host system. The parameter takes the form:
SECURITY_TYPE = {value}
In this parameter, value can be set as:
LOCAL
Specifies that a user identifier is not to be supplied by the remote system. LOCAL is the default value.
IDENTIFY
Specifies that a user identifier is expected on every attach request. All remote users of a system must be identified to the remote external security manager.
VERIFY
Attaches a user ID and valid password to the remote region. The user ID and password are controlled by the region’s external security manager.
PERSISTENT
Not fully supported. Functions the same as VERIFY.
MIXIDPE
Not fully supported. Functions the same as VERIFY.
The values LOCAL and IDENTIFY are roughly equivalent to NONE and APP_PW for the SECURITY parameter in the DMCONFIG file.
DM_ACCESS_CONTROL Section
This section contains local ACL used by the ATMI local domain to restrict access by remote regions to local resources. Refer to the “ATMI Security Administration” section in the Oracle Tuxedo 10.0 or 10gR3 documentation.) Each entry consists of an ACL_NAME resource identifier along with a list of required parameters designating remote domains permitted to access the resource. If no entry exists for a local service, the service is accessible to all remote domains.
Setting UBBCONFIG File Security Parameters
The RESOURCES section in this file contains a SECURITY parameter that works in conjunction with the SECURITY parameter in the DMCONFIG file to establish how Oracle Tuxedo Mainframe Adapter for SNA controls access to the ATMI local domain. This parameter takes the form:
SECURITY = {value}
In this parameter, value can be set as:
NONE
No security is enforced (default).
APP_PW
Requires password authorization for the Gateway and administrative tools to connect to the local application.
USER_AUTH
Same as APP_PW, but additional authorization is required on a per-user basis.
ACL
Same as USER_AUTH, but additional access-control checks are done on service names, queue names, and event names. If no Access Control Lists (ACL) exists for a given name, access is granted.
MANDATORY_ACL
Same as ACL, but if no ACL exists for a given name, access is denied.
In most cases, the UBBCONFIG file has already been configured and you do not need to establish the SECURITY parameter settings, but examining this file enables you to see how Oracle Tuxedo Mainframe Adapter for SNA enforces security.
If this parameter is set to NONE, no security is enforced. If set to APP_PW, the local ATMI domain’s Authorization Server prompts for the application password. If set to USER_AUTH, ACL, or MANDATORY_ACL, the qualified security is enforced as specified.
Bypassing User ID Mapping
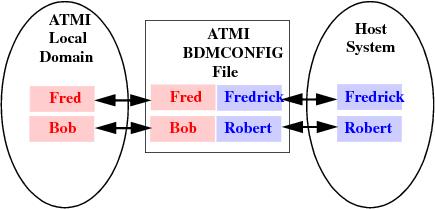
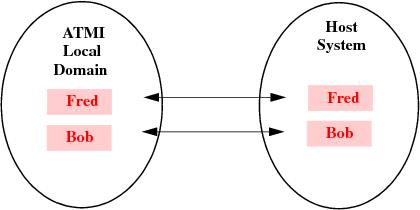
To use direct user ID mapping, use the -m parameter in the GWSNAX process start-up command line entry. This parameter allows you to establish direct user ID mapping, rather than ATMI-to-host user ID mapping.
Note:
For example, to set the Gateway server process to bypass user ID mapping, enter a command in the following format:
GWSNAX SRVGRP = <groupname> SRVID = <number> CLOPT = "-A -- -m"
Refer to GWSNAX in Appendix A, “Administrative Command Reference Pages” for more information.
Using dmadmin Commands to Administer User ID Mapping
When ATMI-to-host user ID mapping is used, you must create mappings in the BDMCONFIG file.
Note:
If the direct user ID mapping option is specified, creation of mappings in the BDMCONFIG file is not necessary. Any mappings in the BDMCONFIG file are ignored.
User ID mapping between the local domain and the host system is configured using the addumap, addusr, delumap, modusr, and delusr commands of the dmadmin utility to accomplish the following tasks:
Refer to Appendix A, “Administrative Command Reference Pages” for more information about each ATMI command.
To use these commands, enter dmadmin at the system prompt. At the dmadmin “>” prompt, enter the commands as described.
Adding a User ID and Password
Use the addusr ATMI command to add an ATMI local domain user ID and password to the remote domain user and password file. Enter the following command:
addusr {-d} local_domain_id {-R} remote_domain_id {-u} remote_userid [{-w}]
The arguments and options in this command are defined in the following way:
-d
Specifies the name of the local domain with which the user ID and password are associated.
-R
Specifies the name of the remote domain to which the user ID and password are added.
-u
Specifies the user name to be added. Enter the user’s password when prompted.
-w
Specifies not to prompt for password. Use when running with IDENTIFY.
Mapping a User ID
Use the addumap ATMI command to map a local domain principal user ID number to a remote domain user name. The user ID must be added before it can be mapped. Refer to the “Adding a User ID and Password” section. Enter the following command:
addumap {-d} local_domain_id {-R} remote_domain_id
{-p} local_principal_userid {-u} remote_userid
The arguments and options in this command are defined in the following way:
-d
Specifies the name of the local domain with which the user ID is associated.
-R
Specifies the name of the remote domain to which the user ID is mapped.
-p
Specifies the local principal user ID number defined in the tpusr.
-u
Specifies the remote user name as defined in the security application of the remote domain.
Removing User ID Mapping
Use the delumap ATMI command to remove the mapping for a local domain principal user ID to a remote domain user name. Enter the following command:
delumap {-d} local_domain_id {-R} remote_domain_id
{-p} local_principal_userid {-u} remote_userid
The arguments and options in this command are defined in the following way:
-d
Specifies the name of the local domain with which the user ID is associated.
-R
Specifies the name of the remote domain to which the user ID is mapped.
-p
Specifies the local principal user ID number defined in the tpusr.
-u
Specifies the remote user name as defined in the security application of the remote domain.
Deleting a User ID and Password
Use the delusr ATMI command to remove a local ATMI domain user ID and password from the remote domain user and password file. The mapping for a user ID must be removed before the user ID can be removed. Enter the following command:
delusr {-d} local_domain_id {-R} remote_domain_id {-u} remote_userid
The arguments and options in this command are defined in the following way:
-d
Specifies the name of the local domain with which the user ID and password are associated.
-R
Specifies the name of the remote domain from which the user ID and password are to be deleted.
-u
Specifies the user name to be deleted.
Modifying a Password
Use the modusr ATMI command to modify a local domain user’s password recorded in a remote domain’s user and password file. Enter the following command:
modusr {-d} local_domain_id {-R} remote_domain_id {-u} remote_userid [{-w}]
The arguments and options in this command are defined in the following way:
-d
Specifies the name of the local domain the user ID and password are associated with.
-R
Specifies the name of the remote domain in which the user ID and password are to be modified.
-u
Specifies the user name to be modified. Enter the user’s password when prompted.
-w
Specifies not to prompt for password. Use when running with IDENTIFY.
Setting Security Scenario
This section provides an example of step-by-step instructions for setting up security in an application that has already been configured.
Configuring Security in the ATMI Domain
1.
Edit the UBBCONFIG file.
a.
In the RESOURCES section, add SECURITY USER_AUTH.
b.
In the SERVERS section, add the AUTHSVR server.
Note:
SECURITY USER_AUTH level implies that application passwords, user IDs, and user passwords are required to join the application. AUTHSVR is the ATMI-supplied authentication server. It advertises the service AUTHSVC.
2.
Enter the tmloadcf command to load the ATMI configuration, for example:
tmloadcf -y ubbconfig.sna
3.
Set the application password. (The tmloadcf command prompts for the application password.)
4.
Add users to the ATMI domain by using the tpusradd command. The command prompts for each password, for example:
tpusradd me
(Enter password for me.)
Note:
5.
Modify the ATMI client to specify security parameters in the tpinit call. Listing 4‑1 is an example of the code to do this.
Listing 4‑1 Security Parameters Added to tpinit Call
TPINIT *tpinitbuf;
char passwd[30];
int security_level;
/* Initialize security parameters */
if ((tpinitbuf = (TPINIT *) tpalloc("TPINIT", NULL,
TPINITNEED(sizeof(passwd)))) == NULL)
{
userlog("tpalloc tpinit failed %s \n", tpstrerror(tperrno));
exit(1);
}
strcpy(tpinitbuf->usrname,"");
strcpy(tpinitbuf->cltname,"");
strcpy(tpinitbuf->passwd,"");
strcpy(tpinitbuf->grpname,"");
/* Determine level of enforced security */
security_level = tpchkauth();

if ((security_level == TPSYSAUTH) || (security_level ==
TPAPPAUTH))
{
fprintf(stdout,"\nApplication passwd required.");
fprintf(stdout,"\nApplication passwd:");
gets(tpinitbuf->passwd);
}
if (security_level == TPAPPAUTH)
{
fprintf(stdout,"\nUser Name required.");
fprintf(stdout,"\nUser Name:");
gets(tpinitbuf->usrname);

fprintf(stdout,"\nUser Password required.");
fprintf(stdout,"\nUser Password:");
gets(passwd);
strcpy(&tpinitbuf->data,passwd);
tpinitbuf->datalen=strlen(passwd);
}
if (tpinit(tpinitbuf) == -1)
{
userlog("TPINIT %s \n", tpstrerror(tperrno));
exit(1);
}
 
6.
7.
Enter the dmloadcf command to load the domain configuration. For example:
dmloadcf -y dmconfig.sna
8.
Enter the tmboot command to boot the ATMI domain, for example:
tmboot -y
9.
a.
In the DM_LOCAL_DOMAINS section, add the parameter:
SECURITY=DM_USER_PW
b.
In the DM_SNALINKS section, add the parameter for the remote link:
SECURITY=VERIFY
10.
Add the user name mapping for the remote domain by invoking dmadmin and using the addumap command to map local user IDs to remote user IDs. For example:
dmadmin
>addumap -d myldom -R myrdom -p localme -u REMOTEME
11.
Add a password for remote user IDs for the remote domain by invoking dmadmin and using the addusr command to provide remote password(s). For example:
dmadmin
>addusr -d myldom -R myrdom -u REMOTEME
(The system responds with the following prompts:
ERROR: Enter Remote User's Password:
ERROR: Re-enter Remote User's Password:
)
Configuring Security in the Local Domain
To configure security in the local domain:
Refer to the appropriate stack documentation.
Configuring Security in the Remote Domain
Change the security of connection definitions on the mainframe host by doing the following:
1.
CEDA EX GR(MYCONNGRP)
Replace MYCONNGRP with the name of the group that contains your connection definitions.
2.
Alter security of each connection definition by changing the value of ATTACHSEC to VERIFY on each connection definition.
3.
Put each connection out of service by inquiring on the connection’s CEMT I CONN(MYCN) and tabbing to the connection, then changing the INS entry to OUT.
4.
CEDA I GR(MYCONNGRP)
Replace MYCONNGRP with the name of the group that contains your connection definitions.
5.
Setting the Security Level to IDENTIFY
To configure the previous example with a security level of IDENTIFY, complete the following steps:
1.
Change the SECURITY parameter in the DMCONFIG file to IDENTIFY.
2.
Change the ATTACHSEC parameter on the connection to IDENTIFY.
Using Link-Level Encryption
To establish secure communications between the Communication Resource Manager (CRM) and the Gateway (GWSNAX) over a distributed network, Oracle Tuxedo Mainframe Adapter for SNA uses a link-level encryption process.
Illustration of Encryption Process
As illustrated in the following diagram, this encryption feature only applies to the link between the Oracle Tuxedo Mainframe Adapter for SNA Gateway and the CRM.
Note:
Figure 4‑4 Encrypted Links
The encryptions process occurs in the following way:
1.
2.
Each process has a range of acceptable encryption levels, as specified on the process start-up command line. The lowest common level of encryption is used.
Note:
Configuring the Oracle Tuxedo Mainframe Adapter for SNA Gateway and CRM
To configure the Oracle Tuxedo Mainframe Adapter for SNA Gateway:
1.
2.
Edit the GWSNAX entry in the UBBCONFIG file to add the -n option with the desired min and max.
See GWSNAX in Appendix A, “Administrative Command Reference Pages.”
To configure the CRM:
1.
2.
If the CRM is started as an ATMI server, modify the SNACRM server entry to contain the -n option with the desired min and max, as described in SNACRM in Appendix A, “Administrative Command Reference Pages.”
If crmlkoff, crmlkon, or crmdown are used with encrypted CRM, no additional command line arguments are needed.
Using SSL Encryption
To establish SSL between the Communication Resource Manager (CRM) and the Gateway (GWSNAX) over a distributed network, you need to enable SSL on both GWSNAX and CRM side in Oracle Tuxedo Mainframe Adapter for SNA.
The encryptions process occurs in the following way:
1.
2.
Each process has a range of acceptable cipher suites, as specified on the process start-up command line. The strongest supported cipher suite is used.
Configuring the Oracle Tuxedo Mainframe Adapter for SNA Gateway and CRM
To configure the Oracle Tuxedo Mainframe Adapter for SNA Gateway:
1.
Edit the GWSNAX entry in the UBBCONFIG file to add the -n option in CPLOT with the desired min and max to determine acceptable range of cipher suites.
2.
Define the SEC_PRINCIPAL_NAME, SEC_PRINCIPAL_LOCATION, and SEC_PRINCIPAL_PASSVAR parameters for the GWSNAX process in *MACHINES sections in the UBBCONFIG file.
To configure the CRM deployed on HP-UX:
1.
Define the CRM -n option with the desired min and max to determine acceptable range of cipher suites (-n SSL:min:max) in CRM command line.
2.
Define -S to specify SSL configuration file.
3.
Edit the SEC_PRINCIPAL_NAME, SEC_PRINCIPAL_LOCATION, and SEC_PRINCIPAL_PASSVAR parameters for CRM process in the SSL configuration file specified by the -S option.
To configure the CRM deployed on z/OS:
1.
Define -S to specify SSL configuration file in CRM command line.
2.
Edit GSK_KEYRING_FILE, GSK_KEYRING_PW, and GSK_KEYRING_LABEL in the SSL configuration file specified by the -S option.
GSK_KEYRING_FILE indicates the absolute certificate file path for the secure session or SSL environment.
GSK_KEYRING_PW points to the password for the certificate store file to be used for the secure session or SSL environment.
GSK_KEYRING_LABEL specifies the certificate label associated with the certificate in the certificate store to be used for the secure session or SSL environment.
Samples of SSL Encryption Configuration File for CRM
Configuration file for CRM deployed on HP-UX:
SEC_PRINCIPAL_NAME=slc05are
SEC_PRINCIPAL_LOCATION=/storage/cert
SEC_PRINCIPAL_PASSVAR=password
SEC_TRACE_LEVEL=3
Configurations file for CRM deployed on z/OS:
GSK_KEYRING_LABEL=slc05are
GSK_KEYRING_FILE=/storage/CERTDB
GSK_KEYRING_PW=password
GSK_TRACE_LEV=3
Using TCP/IP Link Authentication
In addition to encryption, Oracle Tuxedo Mainframe Adapter for SNA uses an authentication process to establish secure communications between the CRM and Gateway over a distributed network.
Table 4‑3 lists the processes that support authentication.
 
Illustration of Authentication Process
As illustrated in the following diagram, this authentication feature only applies to the link between the Gateway and the CRM.
Figure 4‑5 Authenticated Links
When the Gateway establishes a connection to the CRM, the following events occur:
1.
2.
3.
Configuring the Oracle Tuxedo Mainframe Adapter for SNA Gateway and CRM for Authentication
To configure the Gateway for authentication, complete the following steps:
1.
Store the keyfile in a protected location.
2.
[-u <keyfile>]
To configure the CRM:
1.
Store the keyfile in a protected location.
2.
If the CRM is started from the command line, add the -u<keyfile> option, as described in SNACRM in Appendix A, “Administrative Command Reference Pages.”
If the CRM is started as an ATMI server, modify the SNACRM server entry to contain the -u<keyfile> option as described in SNACRM in Appendix A, “Administrative Command Reference Pages.”
3.
If crmlkoff, crmlkon, or crmdown are used with a CRM with authentication enabled, use the -u<keyfile> command line option as described in SNACRM in Appendix A, “Administrative Command Reference Pages.”
 

Copyright © 1994, 2017, Oracle and/or its affiliates. All rights reserved.