4.1 Configuring Reports

To configure reports:
  1. Install BI Publisher 11.1.1.7 and apply patch set 5. See http://docs.oracle.com/middleware/1221/core/BIEIG/toc.htm.
  2. Apply the Oracle Automated Release Updates (ARU) patch to BI Publisher from http://aru.us.oracle.com:8080/ARU/ViewPatchRequest/process_form.
    This patch is required for the graphs to render when viewing HTML reports.
  3. Log in to BI Publisher as a user with administrative permissions. The URL for BI Publisher looks like: The URL for BI Publisher is of the format: http://<hostname>:<port>/xmlpserver/ and the default port is 9704.
  4. Navigate to Administration > Runtime Configuration > Properties.
  5. Enable the following flags under HTML section.
    1. Embed images and charts in HTML for offline viewing: True.
    2. Use SVG for charts: True.
  6. Navigate to Administration > Data Sources > JDBC Connection.
    1. Click Add Data Source and enter the following values:
      • Data Source Name: Insight

      • Driver Type: Oracle 11g

      • Database Driver Class: oracle.jdbc.OracleDriver

      • Connection String: jdbc:oracle:thin:@<hostname>:<port>:<sid>

      • User name: <RCU_PREFIX>_soainfra

      • Password: password specified in RCU when creating users.

    2. Add a Clarifier with the following values:
      • values: the username and password for schemas created by RCU during installation

        A clarifier is essential as RCU will be run for BI Publisher and any SOA or OSB that Insight integrates to.

    A database connection to the Insight database in BI Publisher is created.
  7. Click Create BI Publisher Users to create users with appropriate permissions to create and configure reports in Insight. For more information, see Adding Users/Groups to Pre-defined Roles.
  8. Click Upload to upload the Insight out-of-the-box reports in the BI Publisher.
    1. Download the file soa/reports/Oracle_Integration_Insight_Reports.xdrz from the ORACLE_HOME on the WebLogic server.
    2. Navigate to Catalog.
    3. Click Shared Folder.
    4. Click Upload Resource and upload the Oracle_Integration_Insight_Reports.xdrz file (the file you downloaded in step a).
      A Catalog folder within Shared Folders/Oracle Integration Insight Reports is created.
  9. Enter the user credentials for the BI Publisher users.
    1. Navigate to Security > Credentials in the Enterprise Manager Fusion Manager Control.

      Figure 4-2 Enterprise Manager Fusion Middleware Control Credentials Screen
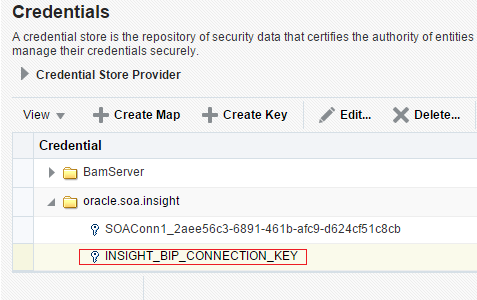
      img/GUID-345BA699-6A52-4419-A19B-906E3A0A1EC2-default.png
    2. Expand oracle.soa.insight and select INSIGHT_BIP_CONNECTION_KEY. If oracle.soa.insight does not exist, click Create Map to create it, and then create the key INSIGHT_BIP_CONNECTION_KEY using Create Key.

    3. Click Edit to enter or edit the user name and password. These credentials are for the BI Publisher.

      The Edit Key Dialog opens. Enter the following details:

      Figure 4-3 Edit Key Dialog

      img/GUID-0A0B2FD0-5DD0-41B9-A36D-556B34F1C22F-default.png
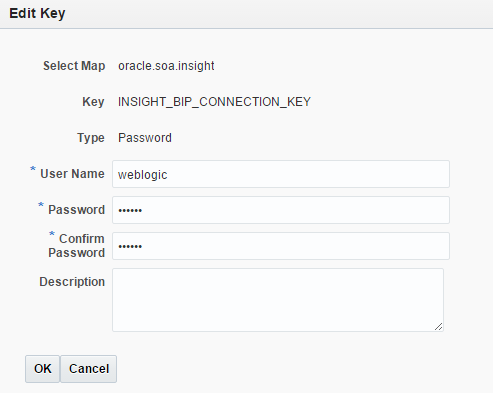
      1. User Name: enter the user name you want to use to log in to BI Publisher. This is a mandatory field.

      2. Password: enter a password to log in to BI Publisher. This is a mandatory field.

      3. Confirm Password: re-enter the password you entered in the above step. This is a mandatory field.

      4. Description: enter a suitable description for the key. This is an optional field.

      5. Click OK.

  10. Navigate to the InsightConfigBean in System MBean Browser.

    Figure 4-4 ConfigMBean:InsightConfigBean
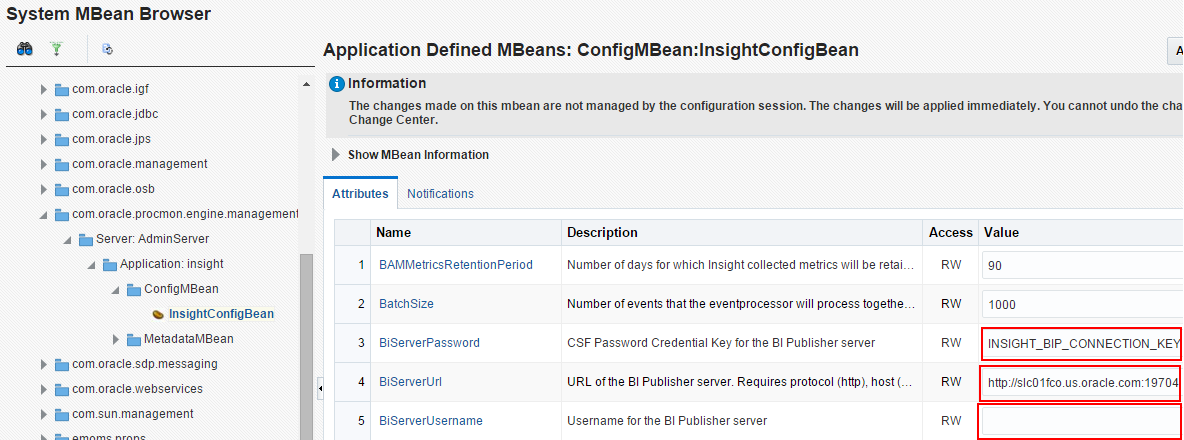
    img/GUID-9B2DF8C8-1390-4BAF-9367-82DD8D8B0D6B-default.png

    The BiUserServerName field is unused and the BiServerPassword contains INSIGHT_BIP_CONNECTION_KEY, which is the default value.

  11. Create a connection to the BI Publisher server by updating the MBean in Insight.
    1. Login to Oracle Enterprise Manager Fusion Middleware Control console in the Insight domain.
    2. Navigate to WebLogic Domain > System MBean Browser
    3. Open MBean Browser.
    4. Expand the InsightConfigBean. The attributes are:
      • BiServerPassword — The CSF Password Credential Key for the BI Publisher Server. The key should be INSIGHT_BIP_CONNECTION_KEY as created in the Credential Store.

      • BiServerUrl — URL of the BI Publisher Server. Enter a value similar to http://<host:port>/. Do not forget to include the port number in the URL. The integration will automatically append xmlpserver/ to the end of this URL, so only the protocol, host and port are included

      • BiServerUsername — this attribute is not used.

The Reports are configured.

The configuration must be validated by logging in to the Insight application. You will see reports when you navigate to Reports. The reports will start generating the data when you have created and activated models.