| Siebel CRM Configuring Siebel Open UI Siebel Innovation Pack 2016, Rev. A E52417-01 |
|


 Previous |
 Next |
View PDF |
| Siebel CRM Configuring Siebel Open UI Siebel Innovation Pack 2016, Rev. A E52417-01 |
|
Previous |
Next |
View PDF |
This topic describes how to customize applets. It includes the following information:
"Displaying Applets Differently According to the Applet Mode,"
"Customizing Applets to Capture Signatures from Desktop Applications"
"Customizing Applets to Capture Signatures for Siebel Mobile Applications"
"Customizing Applets to Display Record Counts for Navigation Links"
"Configuring Siebel Charts with a Third-Party JavaScript Chart Library"
The example in this topic describes how to configure Siebel Open UI to display a field. To view a diagram that illustrates some of the objects you modify and the relationships between these objects, see "Configuring Manifests".
This topic is similar to the "Displaying and Hiding Fields" topic, but with fewer details. It demonstrates how you can quickly modify a presentation model.
To customize the fields that are visible in an applet
Copy the JavaScript files:
Download a copy of the partialrefreshpm.js file to the following folder:
INSTALL_DIR\eappweb\PUBLIC\scripts\siebel\custom
For more information about this file, see "Text Copy of Code That Does a Partial Refresh for the Presentation Model".
Download a copy of the partialrefreshpr.js file to in the following folder:
INSTALL_DIR\eappweb\PUBLIC\scripts\siebel\custom
For more information about this file, see "Text Copy of Code That Does a Partial Refresh for the Physical Renderer".
Configure the manifest:
Log in to a Siebel client with administrative privileges.
For more information about the screens that you use in this step, see "Configuring Manifests".
Navigate to the Administration - Application screen, and then the Manifest Files view.
In the Files list, add the following files.
| Field | Value |
|---|---|
| Name | siebel/custom/partialrefreshpr.js |
| Name | siebel/custom/partialrefreshpm.js |
Navigate to the Administration - Application screen, and then the Manifest Administration view.
In the UI Objects list, specify the following applet.
| Field | Value |
|---|---|
| Type | Applet |
| Usage Type | Physical Renderer |
| Name | Contact Form Applet |
In the Object Expression list, add the following expression. The physical renderer uses this expression to render the applet in a mobile platform.
| Field | Value |
|---|---|
| Expression | Mobile |
| Level | 1 |
In the Files list, add the following file:
siebel/custom/partialrefreshpr.js
In the UI Objects list, specify the following applet.
| Field | Value |
|---|---|
| Type | Applet |
| Usage Type | Presentation Model |
| Name | Contact Form Applet |
In the Object Expression list, add a record with no value in the Expression field.
In the Files list, add the following file:
siebel/custom/partialrefreshpm.js
Test your modifications:
Open the browser in the client computer, and then clear the browser cache.
Open the Siebel application, and then navigate to the Contact Form Applet.
Delete the value in the Job Title field, and then step out of the field.
Make sure Siebel Open UI removes the values from the Work # and the Main Fax # fields.
Add a value to the Job Title field, and then step out of the field.
Make sure Siebel Open UI adds values to the Work # and the Main Fax # fields.
To get a copy of the partialrefreshpm.js file, see Article ID 1494998.1 on My Oracle Support. If you do not have access to this file on My Oracle Support, then you can open a JavaScript editor, create a new file named partialrefreshpm.js, copy the following code into this file, and then save your modifications:
if(typeof(SiebelAppFacade.PartialRefreshPM) === "undefined"){

  SiebelJS.Namespace("SiebelAppFacade.PartialRefreshPM");
  define("siebel/custom/partialrefreshpm", [], function () {(
  SiebelAppFacade.PartialRefreshPM = (function(){
    function PartialRefreshPM(proxy){
      SiebelAppFacade.PartialRefreshPM.superclass.constructor.call(this, proxy);
    }
    SiebelJS.Extend(PartialRefreshPM, SiebelAppFacade.PresentationModel);
    PartialRefreshPM.prototype.Init = function(){
      SiebelAppFacade.PartialRefreshPM.superclass.Init.call(this);
      this.AddProperty("ShowJobTitleRelatedField", "");
      this.AddMethod("ShowSelection", SelectionChange,{sequence : false, scope : this});
      this.AddMethod("FieldChange", OnFieldChange,{sequence : false, scope: this});
    };
    function SelectionChange(){
      var controls = this.Get("GetControls");
      var control = controls[ "JobTitle" ];
      var value = this.ExecuteMethod("GetFieldValue", control);
      this.SetProperty("ShowJobTitleRelatedField", (value ? true: false));
    }
    function OnFieldChange(control, value){
      if(control.GetName() === "JobTitle"){
        this.SetProperty("ShowJobTitleRelatedField", (value ? true: false));
      }
    }
    return PartialRefreshPM;
  }());
}
To get a copy of the partialrefreshpr.js file, see Article ID 1494998.1 on My Oracle Support. If you do not have access to this file on My Oracle Support, then you can open a JavaScript editor, create a new file named partialrefreshpr.js, copy the following code into this file, and then save your modifications:
if(typeof(SiebelAppFacade.PartialRefreshPR) === "undefined"){
  SiebelJS.Namespace("SiebelAppFacade.PartialRefreshPR");
  //Module with its dependencies
  define("siebel/custom/partialrefreshpr", ["order!3rdParty/jquery.signaturepad.min", "order!siebel/phyrenderer"], function () {
    SiebelAppFacade.PartialRefreshPR = (function(){
      function PartialRefreshPR(pm){
        SiebelAppFacade.PartialRefreshPR.superclass.constructor.call(this, pm);
      }
      SiebelJS.Extend(PartialRefreshPR, SiebelAppFacade.PhysicalRenderer);
      PartialRefreshPR.prototype.Init = function () {
        SiebelAppFacade.PartialRefreshPR.superclass.Init.call(this);
        // To act when FieldChange method is raised at PM level and execute our custom code
        this.AttachPMBinding( "FieldChange", FieldChange );
      };

      function ModifyLayout(){
        var controls = this.GetPM().Get("GetControls");
        var control = controls[ "JobTitle" ];
        var value = this.GetPM().ExecuteMethod( "GetFieldValue", control );
        var canShow = ( value ? true : false);
        var WorkPhoneNum = controls[ "WorkPhoneNum" ];
        var FaxPhoneNum = controls[ "FaxPhoneNum" ];
        if(canShow){
          $( "#WorkPhoneNum_Label" ).parent().show(); // We need to take the parent to get the whole div to hide
          $( "[name='" + WorkPhoneNum.GetInputName() + "']" ).parent().show();
          $( "#FaxPhoneNum_Label" ).parent().show();
          $( "[name='" + FaxPhoneNum.GetInputName() + "']" ).parent().show();
        }
        else{
          $( "#WorkPhoneNum_Label" ).parent().hide();
          $( "[name='" + WorkPhoneNum.GetInputName() + "']" ).parent().hide();
          $( "#FaxPhoneNum_Label" ).parent().hide();
          $( "[name='" + FaxPhoneNum.GetInputName() + "']" ).parent().hide();
        }
      }

      function FieldChange (control, value, index) {
        if( control.GetName() === "JobTitle" ){
        ModifyLayout.call(this);
        }
      }

      // We are overloading the standard PR ShowSelection to apply our customization
      // We ensure to first call the parent ShowSelection
      PartialRefreshPR.prototype.ShowSelection = function(index) {
        SiebelAppFacade.PartialRefreshPR.superclass.ShowSelection.call(this,index);
        ModifyLayout.call(this);
      };
      return PartialRefreshPR;
    } ());
    return "SiebelAppFacade.PartialRefreshPR";
  });
}
The example in this topic describes how to allow users to drag and drop data from a spreadsheet to the Contact List applet.
To allow users to drag and drop data into list applets
Modify the list applet:
For more information, see Using Siebel Tools.
In the Object Explorer, click Applet.
In the Applets list, query the Name property for Contact List Applet.
In the Object Explorer, expand the Applet tree, and then click Applet User Prop.
In the Applet User Properties list, add the following applet user properties.
| Name | Value |
|---|---|
| ClientPMUserProp | EnableDragAndDropInList |
| EnableDragAndDropInList | TRUE |
Compile your modifications.
Identify the columns that you must drag and drop:
Log in to the client, navigate to the Contacts screen, and then the Contacts List.
In the contact form, notice the required fields.
Siebel Open UI uses a red asterisk to indicate each required field. In the contact form, the Last Name and First Name fields are required.
Create a spreadsheet:
Open a spreadsheet application, such as Microsoft Excel.
In the first row, add the column headers for the columns that you must drag and drop.
For each column name that you include, make sure the column name is identical to the column name that the list applet displays in the client.
Siebel Open UI does not require you to include all column headers. However, you must include all the required column headers that you noticed in Step 2.
You can include column headers in any order.
Add data rows immediately below the column header row that you added in Step b.
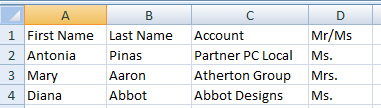
For example, add rows that include information about each contact, such as first name and last name.
Your completed work might resemble the following spreadsheet:
Drag and drop the data:
In the spreadsheet application, choose the cells that include the header and data information.
Drag and drop the cells that you chose in Step a to the Contact List Applet in the Siebel application.
Do the following to drag and drop cells in Excel. Your spreadsheet program might work differently:
Position the cursor over a corner of the selection area until Excel displays the cursor as a four-way arrow.
Right-click and hold down the right mouse button over the cursor.
Drag the selection area to the Contact List Applet.
Release the mouse button.
Verify that Siebel Open UI added the data rows to the list applet.
This topic describes how to configure Siebel Open UI to display an applet as expanded or collapsed, by default.
To expand and collapse applets
Modify the applet:
For more information about using Siebel Tools, see Using Siebel Tools.
In the Object Explorer, click Applet.
In the Applets list, query the Name property for the applet that you must modify.
For example, query for SIS Account Entry Applet.
In the Object Explorer, expand the Applet tree, and then click Applet User Property.
In the Applet User Properties list, create two new applet user properties. Use values from the following table.
| Name | Value |
|---|---|
| ClientPMUserProp | Default Applet Display Mode |
| Default Applet Display Mode | Use one of the following values:
|
Compile your work.
Modify the .swt file:
Identify the .swt file that you must modify, and then open it for editing.
Add the following code:
<swe: form>
<swe:if condition="Web Engine State Properties, IsPrintOff">
  <div class="swe:this.SelectStyle">
</swe:if>
  <div class="siebui-collapsible-applet">
    <table datatable="0" summary="" width="100%" cellpadding="0"cellspacing="0" border="0" align="center"
      <div class="siebui-collapsible-applet-header">
        swe:include file="CCTitle_Named.swt"/>
        swe:include file="CCFormButtonsTop.swt"/>
        swe:error type="Popup">
          <table datatable="0" summary="" class="swe:class AppletBack width="100%" cellpadding="0"
        </swe:error>
        <div class="siebui-collapsible-applet-content">
          <swe: form-applet-layout>
          </swe: form-applet-layout>
        <div>
      <div>
    <table>
  <div>
where:
siebui-collapsible-applet. Identifies the applet body.
siebui-collapsible-applet-header. Identifies the section where Siebel Open UI adds the expand button or the collapse button.
siebui-collapsible-applet-content. Identifies the section that Siebel Open UI expands or collapses.
Test your work:
Log in to the client.
Navigate to the applet that you modified in Step 1.
Verify that Siebel Open UI displays the applet as expanded or collapsed according to the value that you set for the Default Applet Display Mode applet user property in Step 1.
Verify that Siebel Open UI displays the expand and collapse button correctly.
If Siebel Open UI expands the applet, then it must display the following collapse icon in the upper right corner of the applet:
If Siebel Open UI collapses the applet, then it must display the following expand icon in the upper right corner of the applet:
This topic describes how to customize a list applet to display a box list. You customize how Siebel Open UI renders an applet, the content it displays, and the style that it uses in the client.
To customize list applets to display a box list
Log in to the client.
Navigate to a view that displays a typical Siebel list applet.
For example, navigate to the Accounts screen, and then the Accounts list.
Notice that Siebel Open UI displays the typical predefined list.
Open Windows Explorer, and then navigate to the following folder:
INSTALL_DIR\eappweb\PUBLIC\scripts\siebel
For example:
C:\16.0\eappweb\PUBLIC\scripts\siebel
Rename the existing jqgridrenderer.js file that resides in the folder you accessed in 3 to jqgridrenderer_original.js.
Download the jqgridrenderer_tile.js file to the folder you accessed in Step 3.
The jqgridrenderer_tile file prevents Siebel Open UI from initializing the jqgrid control and from rendering other fields in the grid. To get a copy of this file, see Article ID 1494998.1 on My Oracle Support.
Rename the jqgridrenderer_tile.js file to jqgridrenderer.js.
In the Siebel Open UI client, press the F5 key to refresh the screen.
In Windows Explorer, navigate to the following folder:
INSTALL_DIR\eappweb\PUBLIC\files\custom
Copy the following code into the theme_base.css file. This code configures Siebel Open UI to display account names in a series of vertical boxes:
/*---------------------------------------------*/
/* Styles for alternate List display demo */
/*---------------------------------------------*/
.siebui-boxlist {
  width: 100%;
  height: 100%;
  overflow: auto;
}
.siebui-boxlist-pager,.siebui-boxlist-items{
  display: table-row;
  white-space: nowrap;
  width: 100%;
}
.siebui-boxlist-item, siebui-boxlist-item-selected {
  padding: 100px 0px;
  height: 40px;
  border-radius: 5px;
  float: left;
  width: 120px;
  overflow: hidden;
  margin: 5px 12px;
  color: #222!important;
  text-shadow: 0 1px 0 rgba(255, 255, 255, 0.7);
  text-align: center;
}
.siebui-boxlist-item {
  background: rgb(250, 250, 250);
  background: -moz-linear-gradient(top, rgba(250, 250, 250, 1) 0%, rgba(225, 225, 225, 1) 100%);
  background: -webkit-gradient(linear, left top, left bottom, color-stop(0%, rgba(250, 250, 250, 1)), color-stop(100%, rgba(225, 225, 225, 1)));
  background: -webkit-linear-gradient(top, rgba(250, 250, 250, 1) 0%, rgba(225, 225, 225, 1) 100%);
  border-bottom: 1px solid #AAA;
  box-shadow: 0 0 3px rgba(0, 0, 0, 0.4);
  -webkit-box-shadow: 0 0 3px rgba(0, 0, 0, 0.4);
}
.siebui-boxlist-item-selected {
  background: rgb(250, 250, 250);
  background: -moz-linear-gradient(top, rgba(249, 238, 167, 0.5) 0%, rgba(251, 236, 136, 0.5) 100%)!important;
  background: -webkit-gradient(linear, left top, left bottom, color-stop(0%, rgba(249, 238, 167, 0.5)), color-stop(100%, rgba(251, 236, 136, 0.5)))!important;
  background: -webkit-linear-gradient(top, rgba(249, 238, 167, 0.5) 0%, rgba(251, 236, 136, 0.5) 100%)!important;
  border-bottom: 1px solid #AAA;
  box-shadow: 0 0 3px rgba(0, 0, 0, 0.4);
  -webkit-box-shadow: 0 0 3px rgba(0, 0, 0, 0.4);
}
/*---------------------------------------------*/
/* Styles for alternate List display demo */
/*---------------------------------------------*/
Navigate to the Siebel Open UI client, and then press the F5 key to refresh the screen.
The client displays the modified layout.
The example in this topic describes how to customize Siebel Open UI to render a list applet as a carousel in Siebel Call Center. To view different example carousel styles and to get the code for these styles, see the http://sorgalla.com/projects/jcarousel Web site.
To customize list applets to render as carousels
Add records in the client:
Make sure the application configuration file for Siebel Call Center includes the following setting:
[Siebel]
RepositoryFile = siebel_sia.srf
For more information, see "Modifying the Application Configuration File".
Open the client, navigate to the Contacts screen, and then click the Contact List link.
Add the following contact.
| Field | Value |
|---|---|
| Last Name | Aamos |
| First Name | Ray |
Click the link in the Last Name.
Click the Affiliations link.
In the Affiliations list, add four affiliations.
Make sure you choose a different value in the Account field for each record. Accept default values for all other fields.
Log out of the client.
Add the JavaScript files that Siebel Open UI uses to render the carousel:
Save the carouselrenderer.js file to the following folder:
INSTALL_DIR\eappweb\PUBLIC\scripts\siebel\custom
To get a copy of this file, see Article ID 1494998.1 on My Oracle Support.
The carouselrenderer.js file is a physical renderer that bridges a JCarousel third-party control plug-in to the list presentation model that the listpmodel.js file defines. The List Applet and the Carousel applet use the same presentation model for the business logic that it uses to display each user interface. The only difference is how Siebel Open UI renders each applet.
Save the jquery.jcarousel.js file to the following folder:
INSTALL_DIR\eappweb\PUBLIC\scripts\3rdParty
To get a copy of this file, see Article ID 1494998.1 on My Oracle Support. Oracle downloads and integrates this 3rdParty Carousel package into Siebel Open UI through the physical renderer. You must never modify these third-party plug-in files. If you require a configuration that the third-party plug-in does not meet, then you must modify the physical renderer instead of the third-party plug-in.
Add the CSS file that the third-party uses:
In Windows Explorer, navigate to the following folder:
INSTALL_DIR\eappweb\PUBLIC\scripts\3rdParty
Add the following subfolder hierarchy to the 3rdParty folder:
\jcarousel\skins\tango\
Save the skin.css file to the tango folder that you added in Step b:
To get a copy of this file, see Article ID 1494998.1 on My Oracle Support.
Add files to the manifest:
Log in to a Siebel client with administrative privileges.
For more information about the screens that you use in this step, see "Configuring Manifests".
Navigate to the Administration - Application screen, and then the Manifest Files view.
In the Files list, add the following files. You must add a separate record for each file:
siebel/custom/carouselrenderer.js
3rdParty/jcarousel/skins/tango/skin.css
files/theme-aurora.css
Files that reside in the files folder are predefined files that you use in this example.
Administer the manifest for the applet:
Navigate to the Administration - Application screen, and then the Manifest Administration view.
In the UI Objects list, specify the following applet.
| Field | Value |
|---|---|
| Type | Applet |
| Usage Type | Physical Renderer |
| Name | Pharma Professional Affiliation From List Applet |
In the Object Expression list, add the following expression. Siebel Open UI uses this expression to render the applet on a desktop platform.
| Field | Value |
|---|---|
| Expression | Desktop |
| Level | 1 |
In the Files list, add the following file:
siebel/custom/carouselrenderer.js
Administer the manifest for the Aurora theme:
Navigate to the Manifest Expressions view.
In the Expressions list, add the following expression.
| Field | Value |
|---|---|
| Name | Aurora Theme |
| Expression | LookupName (OUI_THEME_SELECTION, Preference ("Behavior","DefaultTheme")) = "AURORA_THEME" |
Navigate to the Manifest Administration view.
In the UI Objects list, specify the following object.
| Field | Value |
|---|---|
| Type | Application |
| Usage Type | Theme |
| Name | PLATFORM DEPENDENT |
In the Object Expression list, add the following subexpression.
| Field | Value |
|---|---|
| Group Name | Leave empty. |
| Expression | Aurora Theme |
| Level | 1 |
| Operator | Leave empty. |
| Web Template Name | Leave empty. |
In the Files list, add the following files:
files/theme-aurora.css
3rdParty/jcarousel/skins/tango/skin.css
Test your modifications:
Clear the browser cache.
Open the Siebel application, and then navigate to the contact that includes the affiliations that you added in Step 1.
Make sure the affiliations view contains carousel data that runs together because no styling is defined for the carousel content. To fix this problem, do Step 8.
Modify the styling that Siebel Open UI uses to render the view:
Use a JavaScript editor to open the carouselrenderer.js file that you copied in Step 2.
Locate the following code:
itemMarkup += "</span><br>";
Modify the code you located in Step b to the following. You remove the break:
itemMarkup += "</span>";
Use a JavaScript editor to open the skin.css file.
Locate the following code:
.jcarousel-skin-tango .jcarousel-item {
  width: 75px;
  height: 75px;
}
Modify the code you located in Step e to the following. Bold font indicates the code that you must modify:
.jcarousel-skin-tango .jcarousel-item {
  width: 318px;
  height: 75px;
}
Locate the following code:
.jcarousel-skin-tango .jcarousel-item-horizontal {
  margin-left: 0;
  margin-right: 10px;
}
Modify the code you located in Step g to the following. Bold font indicates the code that you must modify:
.jcarousel-skin-tango .jcarousel-item-horizontal {
  margin-left: 10;
  margin-right: 10px;
  color: black;
}
Test your modifications:
Clear the browser cache.
Refresh the view that you examined in Step 7.
Make sure the styling no longer contains carousel data that overlaps, and that each record is displayed in its own block.
A list applet can be configured to display a map instead of a standard list of records. When the list applet is configured to display a map, the following features are available:
Markers. A marker is displayed on the map at the location address for each record.
Contextual menu. Clicking a marker reveals a contextual menu with the following options:
View Details. Clicking this option opens a pop-up dialog box with details about the record associated with the marker.
Select. Clicking this option zooms in on the map to the location address associated with the marker record.
Tooltip. When you hover over a marker, a tooltip is revealed, showing the address associated with the record.
Map panning.
Map zooming.
The example in this topic describes how to customize Siebel Open UI to render a list applet as a map in Siebel Open UI.
To customize list applets to render as maps
Add files to the manifest:
Log in to a Siebel client with administrative privileges.
For more information about the screens that you use in this step, see "Configuring Manifests".
Navigate to the Administration - Application screen, and then the Manifest Files view.
In the Files list, add the following files. You must add a separate record for each file:
siebel/mappmodel.js
siebel/maprenderer.js
Administer the manifest for the applet:
Navigate to the Administration - Application screen, and then the Manifest Administration view.
In the UI Objects list, specify the following applet.
| Field | Value |
|---|---|
| Type | Applet |
| Usage Type | Physical Renderer |
| Name | Applet Name
Where Applet Name is the name of the applet in which you want the map to appear. |
In the Object Expression list, add the following expression. Siebel Open UI uses this expression to render the applet on a desktop platform.
| Field | Value |
|---|---|
| Expression | Desktop |
| Level | 1 |
In the Files list, add the following file:
siebel/custom/maprenderer.js
In the UI Objects list, specify the following applet.
| Field | Value |
|---|---|
| Type | Applet |
| Usage Type | Presentation Mode |
| Name | Applet Name
Where Applet Name is the name of the applet in which you want the map to appear. |
In the Object Expression list, add the following expression. Siebel Open UI uses this expression to render the applet on a desktop platform.
| Field | Value |
|---|---|
| Expression | Desktop |
| Level | 1 |
In the Files list, add the following file:
siebel/custom/mappmodel.js
Define the PM user properties:
For more information about using Siebel Tools, see Using Siebel Tools.
In the Object Explorer, click Applet.
In the Applets list, query the Name property for the applet that you must modified in Step 2.
In the Object Explorer, expand the Applet tree, and then click Applet User Property.
In the Applet User Properties list, create four new applet user properties. Use values from the following table.
| Name | Value |
|---|---|
| MapMarkerLocation | Business Component |
| MapMarkerTitle | Business Component |
| MapSelectedRowImage | The SVG image, as added in the CSS |
| MapUnSelectedRowImage | The SVG image, as added in the CSS |
When specifying the Value field for the MapMarkerLocation and the MapMarkerTitle, the business component specified must meet at least one of the following conditions in order to properly display the markers on the map:
It must be exposed in the list column of the list applet configured for the map.
It must be exposed as an applet control or list column of a sibling applet to the map applet of the same business component.
It must be set as a private field.
Compile your work.
Define the Web Template for the map:
For more information about using Siebel Tools, see Using Siebel Tools.
In the Object Explorer, expand the Applet tree, and then click Applet Web Template.
In the Applet Web Templates list, add the following applet web template.
| Property | Description |
|---|---|
| Name | Enter text that describes the visualization behavior. For example, enter Map View to describe a map visualization. |
| Type | Edit List |
| Web Template | Choose a web template that defines the desired visualization. For example, choose Applet Map. |
Make sure Siebel Tools defines a SWT file for the web template that you defined in Step c.
For example, make sure the Web Template Files list in Siebel Tools includes a record for the Applet Map web template file, and that the FileName property for this record is CCAppletList_Map.swt. If your deployment requires a new web template, then you must define it before you can define the applet web template. For more information about configuring web templates, see Configuring Siebel Business Applications.
Test your modifications:
Clear the browser cache.
Refresh the list applet that you modified in Step 2.
Make sure that it renders a map.
Oracle Maps is configured as the default display for the Contact List Applet and the Contact Form Applet. You can disable the use of Oracle Maps by removing the configuration specified in "Customizing List Applets to Render as Maps", or by using the following procedure.To disable Oracle Maps
Run the Siebel application.
Navigate to Sitemap, Administration Application, and then Manifest Application.
Query for the Contact List Applet in the Name field.
In Activate all the fields having Group Name as Map in the below "Object Expression" Applet.
Close the Siebel application.
In Siebel Tools, navigate to Applet Query for Contact Form Applet -> Go to Control.
Deactivate the Show Route control.
If you modify an applet, then you must make sure that your modification does not adversely affect how Siebel Open UI sets the focus in this applet. Siebel Open UI does the following work to set the focus in applets:
Sets the focus to the list column that includes a list column user property that specifies a default focus, such as DefaultFocus_Edit. This list column is a child object type of the list applet. For more information about default focus user properties, see the topic that describes Specifying the Default Applet Focus in Siebel Developer's Reference.
If the list column user property described in Step 1 does not exist, then Siebel Open UI examines the columns of a row from left to right, and then places the focus on the first editable control that it encounters. It continues examining rows in this way until it finds an editable control, or until it reaches the last column of the last row.
If Siebel Open UI does not find any editable controls in Step 2, then it sets the focus on the first non-editable control that the list applet displays.
If Siebel Open UI does not find any non-editable controls in Step 3, then it sets the focus on the div container that it uses to display the list applet.
Assume you do the following configuration:
Use Siebel Tools to add a large number of list columns to the SIS Account List Applet.
Make all list columns except the last list column read-only, and then compile the SRF.
Log in to the client, navigate to the Account list view, and then run a query.
In this situation, Siebel Open UI places the focus on the last list column that the list applet contains. The div container might not contain enough room to display this list column, the list column might not be visible in the applet, and you might not be able to use the applet because the focus is on a column that you cannot access.
To configure the focus in list applets
Make sure your configuration does not set the focus to a list column or field that Siebel Open UI displays only partially or does not display at all.
You can use the following guidelines:
If Siebel Open UI sets the focus to a list column that contains a DefaultFocus list column user property, then make sure it correctly displays this list column after you finish your modifications.
If Siebel Open UI sets the focus to an editable or non-editable control, then make sure Siebel Open UI correctly displays this control after you finish your modifications.
To follow these guidelines, it might be necessary for you to rearrange the top-to-bottom sequence that Siebel Open UI uses to display list columns and controls in the list applet.
This topic describes how to add a static drill-down to a form applet so that the drill down object displays the name of the destination field, such as the primary account name, in the popup label when the user clicks a drill down link. If you do not do this configuration on a custom form applet that you create, then the drill down link displays the data from the field as the label, such as the account name, and not the caption text from the control. For information about how to configure a drill down on a form applet, see Article ID 539183.1 on My Oracle Support.
To add static drilldowns to applets
Create a static drilldown object on the applet that you must modify:
For more information about using Siebel Tools, see Using Siebel Tools.
In the Object Explorer, click Applet.
In the Applets list, query the Name property for the applet that you must modify.
In the Object Explorer, expand the Applet tree, and then click Control.
In the Controls list, create the following control.
| Property | Value |
|---|---|
| Field | Specify the same field that you specified in the Hyperlink Field property of the drill down object that you created in Step a. |
| HTML Type | Text |
For more information, see the topics about creating static drill down objects in Configuring Siebel Business Applications.
In the Object Explorer, click Applet.
In the Applets list, right-click the record of the applet you are modifying, and then choose Edit Web Layout.
Add the control that you created in e to the layout.
Compile your modifications.
Test your modifications:
Log in to the client.
Navigate to the applet you modified, and then make sure it displays your new static drill down object with the correct label.
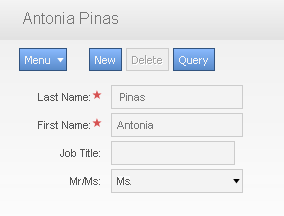
For example, the following screen capture includes the correct Last Name label, and it displays the correct data in the field. If you do not do the configuration that this topic describes, then Siebel Open UI might display Last Name - Drilldown as the label and as the data in the field.
This topic describes how to modify an applet so that the user can change the applet visualization. The applet visualization is a type of configuration that specifies the layout that Siebel Open UI uses to display the applet. List, form, tile, map, grid, and carousel are each an example of an applet visualization.
Siebel Open UI allows the user to set some user preferences that determine how it displays an applet. The user can navigate to the User Preferences screen, and then use the Behavior view to set these preferences. For example, if the user chooses a value in the Visualization field of the Behavior view, such as Tile, and then navigates to a list applet that includes a tile configuration, such as the Opportunity List Applet, then Siebel Open UI displays this applet as a set of tiles. If the user clicks Grid in this applet, then Siebel Open UI displays the applet as a grid and sets Grid as the default layout only for the Opportunity List Applet. This local setting takes precedence over the global setting that the user sets in the Visualization field in the Behavior view. Siebel Open UI continues to use a tile layout for all other applets that include a tile configuration. In this situation, it displays the Opportunity List Applet as a grid even if the user logs out and then logs back in to the client.
Figure 5-1 includes the Contacts List that you modify in this topic so that it allows the user to change the applet visualization. It illustrates how Siebel Open UI displays this list after you successfully finish the configuration. The user can click one of the applet visualization buttons, such as Tile, to change the applet visualization.
This topic describes how to configure the manifest for a custom applet visualization. For information about configuring the manifest for a predefined configuration, see "Configuring Manifests for Predefined Visualizations".
To allow users to change the applet visualization
Modify the applet in Siebel Tools:
For more information, see Using Siebel Tools.
In the Object Explorer, click Applet.
In the Applets list, query the Name property for the applet that you must modify.
For example, query the Name property for Contact List Applet.
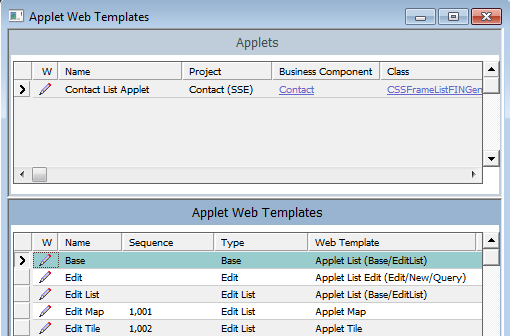
In the Object Explorer, expand the Applet tree, and then click Applet Web Template.
The Applet Web Templates list displays the applet modes that Siebel Tools defines for the applet. For example, Base, Edit, and Edit List. For more information about these modes, see "Displaying Applets Differently According to the Applet Mode".
In the Applet Web Templates list, add the following applet web template.
| Property | Description |
|---|---|
| Name | Enter text that describes the visualization behavior. For example, enter Edit Tile to describe a tile visualization that allows the user to modify field values. |
| Sequence | Enter a value of 1000 or greater. To help you quickly recognize how Siebel Open UI uses a web template, it is recommended that you use a value of:
|
| Type | Specify the applet mode, such as Edit or Edit List. |
| Web Template | Choose a web template that defines the desired visualization. For example, choose Applet Tile. |
Make sure Siebel Tools defines a SWT file for the web template that you defined in Step e.
For example, make sure the Web Template Files list in Siebel Tools includes a record for the Applet Tile web template file, and that the FileName property for this record is CCAppletList_Tile.swt. If your deployment requires a new web template, then you must define it before you can define the applet web template. For more information about configuring web templates, see Configuring Siebel Business Applications.
Repeat Step d and Step e for each web template that your deployment requires.
Your completed work in Siebel Tools must resemble the following configuration.
Compile your modifications.
Configure the manifest for the applet that you modified in Step 1:
Log in to a Siebel client with administrative privileges.
For more information about the screens that you use in this step, see "Configuring Manifests".
Navigate to the Administration - Application screen, and then the Manifest Files view.
In the Files list, add the following predefined files.
| Field | Value |
|---|---|
| Name | siebel/mappmodel.js |
| siebel/Tilescrollcontainer.js |
Navigate to the Administration - Application screen, and then the Manifest Administration view.
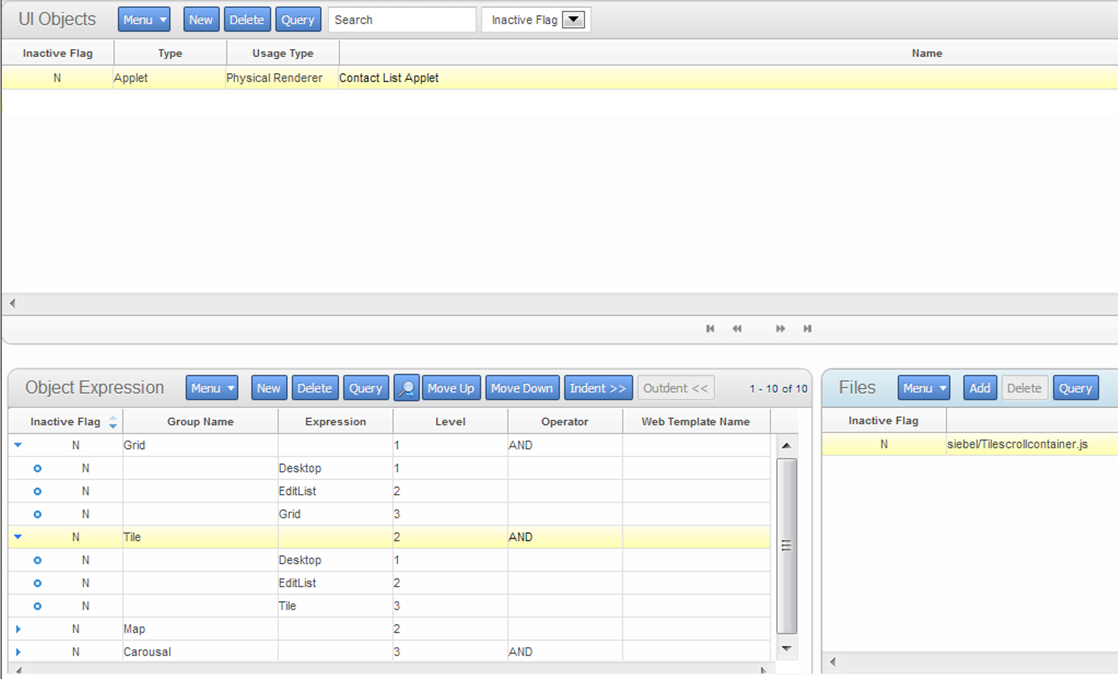
In the UI Objects list, specify the following applet.
| Field | Value |
|---|---|
| Type | Applet |
| Usage Type | Web Template |
| Name | Contact List Applet |
In the Object Expression list, add the expressions that Siebel Open UI uses to render the applet for this web template in the various visualizations and applet modes that you defined in Step 1.
Your completed work must resemble the following configuration. Use the Move Up, Move Down, Indent, and Outdent buttons to create the hierarchy. Note that you do not add files in the Files list for a web template. You only add files for a presentation model or physical renderer. For more information about how to create these object expressions, see "Configuring Manifests". 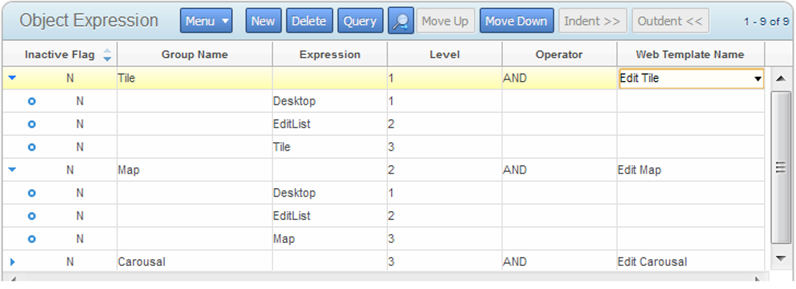
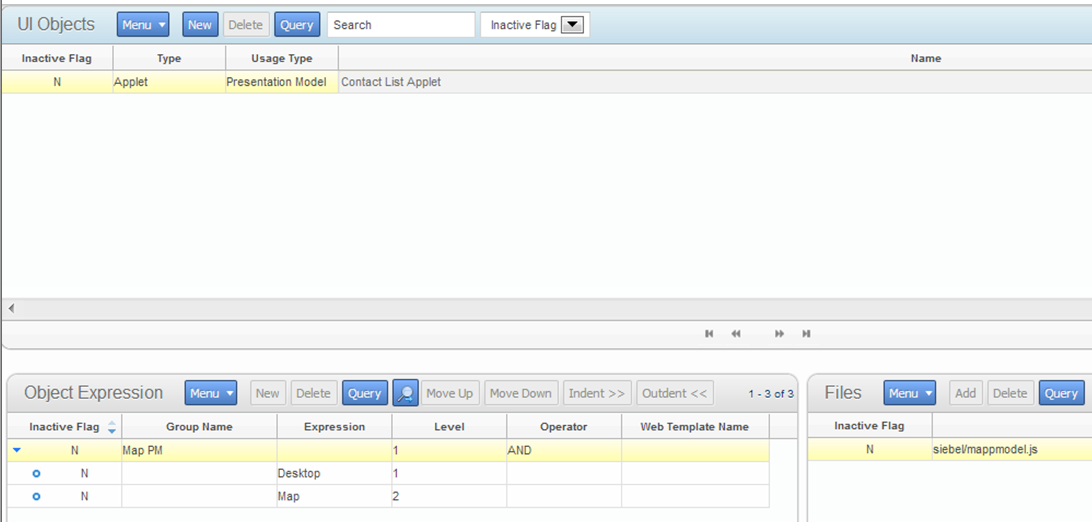
Configure the manifest for the presentation model for each applet visualization that you defined in Step 1.
You add the UI object, object expressions, and files until the Manifest Administration screen resembles the following configuration.
Repeat Step g for each applet visualization that you configured in Siebel Tools.
Configure the physical renderer for each applet visualization that you defined in Step 1.
You add the UI object, object expressions, and files until the Manifest Administration screen resembles the following configuration:
If you do not do this administration, then Siebel Open UI uses the jqgridrenderer.js file for the physical renderer for a list applet, by default.
(Optional) Modify the strings that Siebel Open UI uses for the labels of the applet visualization buttons.
Do the following:
In Siebel Tools, choose the Screens application-level menu, click System Administration, and then click List of Values.
In the List of Values list, query the Type property for OUI_MODE_VISUALIZATION.
Make sure the Language-Independent Code property for each record that Siebel Tools displays in the List of Values list includes the same string that you modified in Step g.
For example, make sure the Language-Independent Code property includes the following values:
| Type | Display Value | Language-Independent Code |
|---|---|---|
| OUI_MODE_VISUALIZATION | Tile | Tile |
| Map | Map | |
| Grid | Grid |
Siebel Open UI uses the value that the Display Value property contains as the label for each applet visualization button. To view these buttons, see Figure 5-1, "Contacts List That Allows Users to Change the Applet Visualization".
Compile your modifications.
Log in to the client.
Navigate to the Administration - Application screen, and then the Manifest Expressions view.
In the Manifest Expressions view, modify the following strings, as necessary.
| Name | Expression |
|---|---|
| Tile | GetObjectAttr("VisualMode") = 'Tile' |
| Map | GetObjectAttr("VisualMode") = 'Map' |
| Grid | GetObjectAttr("VisualMode") = 'Grid' |
For example, Siebel Open UI uses the Tile string in the Expression field for the Tile expression. You can modify these strings to meet your deployment requirements.
Test your modifications:
Log out of the client, and then log back in.
Navigate to the Contacts screen, and then the Contacts List view.
Verify that Siebel Open UI displays the Grid, Tile, and Map visualization buttons.
The visualization buttons must resemble the buttons that Figure 5-1, "Contacts List That Allows Users to Change the Applet Visualization" displays.
Click each visualization button, and then verify that Siebel Open UI displays the visualization that is associated with the button that you click.
Table 5-1 summarizes different manifest configurations for visualizations that come predefined with Siebel Open UI. It includes all the configuration required. For example, you do not configure any expressions or files for web templates.
Table 5-1 Configuring Manifests for Predefined Visualizations
| Visualization | Presentation Model | Physical Render | Web Template |
|---|---|---|---|
|
Tile |
Set Usage Type to Presentation Model. Set Name to List Applet Name. Add the following to the Files list: siebel/listpmodel.js |
Set Usage Type to Physical Renderer. Set Name to List Applet Name. Add the following to the Files list: siebel/Tilescrollcontainer.js |
Set Usage Type to Web Template. Set the Name to Edit Tile. |
|
Grid |
Same as Tile. |
Set Usage Type to Physical Renderer. Set Name to List Applet Name. Add the following to the Files list: siebel/jqgridrenderer.js |
No manifest administration is necessary. You use Siebel Tools to configure Edit List web templates. |
|
Map |
Same as Tile except add the following file: siebel/mappmodel.js |
Same as Grid except add the following file: siebel/custom/siebelmaprenderer.js |
Set Usage Type to Web Template. Set the Name to Edit Tile. |
The following physical renderer modifies the List presentation model so that it can use the Google Map plugin for jQuery:
siebel/custom/siebelmaprenderer.js
Oracle provides this file only as an example that does a map visualization for a list applet. Oracle does not support usage of siebelmaprenderer.js with Google Maps.
This topic describes how to configure Siebel Open UI to display applets differently according to the applet mode. It includes the following topics:
The applet mode is a type of behavior of an applet web template that determines whether or not the user can or cannot create, edit, query, or delete Siebel CRM records in an applet. Edit, Edit List, Base, New, and Query are examples of applet modes. This topic describes how to modify the presentation model, or to modify the physical render and web templates, to set the applet mode for an applet.
You can use a web template to modify the physical layout of objects in the client that the Siebel Server renders as containers, such as the markup for an applet container. You can also use a physical renderer to modify how the client renders objects in the client, for example, to modify the markup that it uses to display a grid, menu, or tab.
For more information about applet modes and how to configure them in Siebel Tools, see the topic that describes how to control how the user creates, edits, queries, and deletes CRM data in Configuring Siebel Business Applications.
The example in this topic configures Siebel Open UI to display the same applet differently according to the following responsibility that Siebel CRM assigns to the current user:
Display the applet as an editable list for the CEO.
Display the applet as an editable grid for a Business Analyst.
To implement this example, you configure Siebel Open UI to use more than one web template, where each of these web templates reference a different web template file:
You use the predefined Applet List (Base/EditList) web template that references the CCAppletList_B_EL.swt file. This file uses an editable list layout.
You add a new Edit Grid List web template that references the EditGridList.swt file. This file uses an editable grid layout.
You configure manifest expressions to determine the web template that Siebel Open UI uses according to the user who is currently using the client.
This example configures the Contact List Applet to include the following applet web templates:
Edit List applet web template that runs in edit list mode and uses the Applet List(Base/EditList) web template.
Edit Grid List applet web template that runs in edit list mode and uses the Applet List web template.
To configure Siebel Open UI to use different web templates according to the applet mode
Examine the predefined web template that this example uses:
For more information, see Using Siebel Tools.
In the Object Explorer, click Web Template.
In the Web Templates list, query the Name property for the following value:
"Applet List (Base/EditList)"
In the Object Explorer, expand the Web Template tree, and then click Web Template File.
Notice the value that the Filename property contains.
This example uses the predefined Applet List (Base/EditList) web template to display the applet in a list layout that the user can edit. This web template uses the CCAppletList_B_EL.swt file to display this layout. It is not necessary to modify this web template for this example.
Add a custom web template:
In the Object Explorer, click Web Template.
In the Web Templates list, add the following web template.
| Property | Value |
|---|---|
| Name | Edit Grid List |
In the Object Explorer, click Web Template File.
In the Web Template Files list, add the following web template file.
| Property | Value |
|---|---|
| Name | Edit Grid List |
| Filename | Specify the file that Siebel Open UI must use to display this applet in a grid layout that the user can edit. For example:
EditGridList.swt |
Modify the applet:
Configure the manifest:
Log in to a Siebel client with administrative privileges.
Navigate to the Administration - Application screen, and then the Manifest Expressions view.
For more information about the screens that you use in this step, see "Configuring Manifests".
In the Expressions list, add the following expressions.
| Name | Expression |
|---|---|
| Exp_User 1 | GetProfileAttr("Primary Responsibility Name") = "Admin" |
| Exp_User 2 | GetProfileAttr("Primary Responsibility Name") = "CEO" |
For more information, see "GetProfileAttr Method".
Navigate to the Manifest Administration view.
In the UI Objects list, specify the following applet.
| Field | Value |
|---|---|
| Type | Applet |
| Usage Type | Web Template |
| Name | Contact List Applet |
In the Object Expression list, add expressions until this list resembles the following configuration.
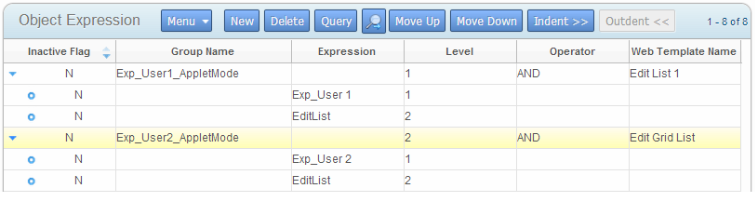
Note the following:
You specify the same name that you examined in Step 1 for the Web Template Name for user 1.
You specify the same name that you added in Step 2 . For the Web Template Name for the user 2.
You specify the expressions that you added in Step c. These expressions configure Siebel Open UI to display an edit list for a user who possesses the CEO responsibility, and a grid for a user who possesses the Business Analyst responsibility.
If the Usage Type is Web Template, then you do not specify any files in the Files list.
Test your modifications:
Log in to the client as a user that Siebel CRM associates with the CEO responsibility, and then make sure Siebel Open UI uses the Edit List web template to display the applet as a list.
Log out of the client, log back in to the client as a user that Siebel CRM associates with the Business Analyst responsibility, and then make sure Siebel Open UI uses the Edit Grid List web template to display the applet as a grid.
The example in this topic configures Siebel Open UI to download different presentation models and physical renderers depending on the following mode that the Contact List Applet must use:
Edit List mode. Download a file named list_PM.js for the custom presentation model and a file named list_PR.js for the custom physical renderer.
New mode. Download a file named new_PM.js for the custom presentation model and a file named new_PR.js for the custom physical renderer.
You can use any name for your custom presentation models and physical renderers.
To configure Siebel Open UI to use different physical renderers and presentation models according to the applet mode
Customize your presentation models and physical renderers.
In this example, assume you customized the following files:
list_PM.js
list_PR.js
new_PM.js
new_PR.js
Add your custom presentation models and physical renderers to the manifest:
Log in to the client with administrative privileges.
Navigate to the Administration - Application screen, and then the Manifest Files view.
For more information about the screens that you use in this step, see "Configuring Manifests".
In the Files list, add the following files that you customized in Step 1.
| Field | Value |
|---|---|
| Name | siebel/custom/list_PM.js |
| Name | siebel/custom/list_PR.js |
| Name | siebel/custom/new_PM.js |
| Name | siebel/custom/new_PR.js |
Configure the manifest for Edit List mode:
Navigate to the Manifest Administration view.
In the UI Objects list, specify the following applet.
| Field | Value |
|---|---|
| Type | Applet |
| Usage Type | Presentation Model |
| Name | Contact List Applet |
In the Object Expression list, add the following expression.
| Field | Value |
|---|---|
| Expression | EditList |
| Level | 1 |
In the Files list, add the following file:
siebel/custom/list_PM.js
Siebel Open UI uses the file that you specify for the presentation model that it uses to display the Contact List Applet in Edit List mode.
In the UI Objects list, specify the following applet.
| Field | Value |
|---|---|
| Type | Applet |
| Usage Type | Physical Renderer |
| Name | Contact List Applet |
In the Object Expression list, add the following expression.
| Field | Value |
|---|---|
| Expression | EditList |
| Level | 1 |
In the Files list, add the following file:
siebel/custom/list_PR.js
Siebel Open UI uses the file that you specify for the physical renderer that it uses to display the Contact List Applet in Edit List mode.
Configure the manifest for New mode:
In the UI Objects list, specify the following applet.
| Field | Value |
|---|---|
| Type | Applet |
| Usage Type | Presentation Model |
| Name | Contact List Applet |
In the Object Expression list, add the following expression.
| Field | Value |
|---|---|
| Expression | New |
| Level | 1 |
In the Files list, add the following file:
siebel/custom/new_PM.js
Siebel Open UI uses the file that you specify for the presentation model that it uses to display the Contact List Applet in New mode.
In the UI Objects list, specify the following applet.
| Field | Value |
|---|---|
| Type | Applet |
| Usage Type | Physical Renderer |
| Name | Contact List Applet |
In the Object Expression list, add the following expression.
| Field | Value |
|---|---|
| Expression | New |
| Level | 1 |
In the Files list, add the following file:
siebel/custom/new_PR.js
Siebel Open UI uses the file that you specify for the physical renderer that it uses to display the Contact List Applet in New mode.
Test your modifications.
This topic describes how to customize default applet behavior so that Siebel Open UI remembers the actions the user takes that effect this behavior. Expand and collapse is an example of this behavior. The example in this topic customizes a physical renderer to display the Opportunity List Applet applet as expanded or collapsed, by default, depending on how the user most recently displayed the applet. For example, assume the user navigates to the Opportunity List Applet, and then expands the applet.
Siebel Open UI then displays more records in the list. In the predefined behavior, if the user logs out of the client, logs back in to the client, and then navigates to this list again, then Siebel Open UI does not remember that the user expanded the list. This topic describes how to customize Siebel Open UI so that it remembers this user action.
You can use this example as a guideline to modify a predefined applet behavior or to create your own custom applet behavior.
To add custom user preferences to applets
Add the user preference to your custom physical renderer and presentation model:
Use a JavaScript editor to open your custom physical renderer that renders the Opportunity List Applet.
Add the custom user preference. You add the following code:
var pm = this.GetPM();
var inputPS = CCFMiscUtil_CreatePropSet();
inputPS.SetProperty("Key", "user_preference_name");
inputPS.SetProperty("user_preference_name", "user_preference_value");
pm.OnControlEvent(siebConsts.get("PHYEVENT_INVOKE_CONTROL"), pm.Get(siebConsts.get("SWE_MTHD_UPDATE_USER_PREF")), inputPS);
pm.SetProperty("user_preference_name", "user_preference_value");
Use a JavaScript editor to open your custom presentation model that renders the Opportunity List Applet.
Add a presentation model property that references the custom user preference. You add the following code
var pm = this.GetPM();
var value = pm.Get("user_preference_name");
You must make sure that Siebel Open UI derives your custom presentation model from the Presentation Model class. This class contains the logic that saves user preferences in presentation model properties. For more information, see "Deriving Presentation Models, Physical Renderers and Plug-in Wrappers".
Add the expand and collapse button:
Use a JavaScript editor to open the physical renderer that you edited in Step 1a.
Add the following code to the end of the Show method:
var id1 = this.GetPM().Get("GetFullId") + '-siebui-cust-expandcollapse-btn';
var expcolbtn = "<button " +
"id= '" + id1 + "' " +
"class= 'appletButton' " +
"aria-label=ExpandCollapse " +
"type=\"button\" " +
"title=ExpandCollapse " + ">" + "ExpandCollapse" + "</button>";
Add the following code to the end of the BindEvent method. This code binds the button click.
$("#" + pm.Get("GetFullId") + "-" + "siebui-cust-expandcollapse-btn").bind("click", {ctx: this},
function (e) {
var self = e.data.ctx,
pm = self.GetPM();
SiebelJS.Log("Expand");
var inputPS = CCFMiscUtil_CreatePropSet();
var value = pm.Get ("Expand-Collapse");
inputPS.SetProperty("Key", "Expand-Collapse");
if(value === "Collapse")
{
inputPS.SetProperty("Expand-Collapse", "Expand");
pm.SetProperty("Expand-Collapse", "Expand");
}
else
{
inputPS.SetProperty("Expand-Collapse", "Collapse");
pm.SetProperty("Expand-Collapse", "Collapse");
}
pm.OnControlEvent(siebConsts.get("PHYEVENT_INVOKE_CONTROL"),pm.Get(siebConsts.get("SWE_MTHD_UPDATE_USER_PREF")), inputPS);
if(value === "Collapse")
{
pm.SetProperty("Expand-Collapse", "Expand");
//Write Code to expand the applet
$("#s_" + pm.Get("GetFullId") + "_div").find(".siebui-collapsible-applet-content").show();
}
else
{
pm.SetProperty("Expand-Collapse", "Collapse");
//Write Code to collapse the applet
$("#s_" + pm.Get("GetFullId") + "_div").find(".siebui-collapsible-applet-content").hide();
}
}
);
Add the following code to the end of the ShowUI method. This code accesses the default value of the custom Expand-Collapse user preference, and then instructs Siebel Open UI to display the applet as expanded or collapsed according to the user preference value:
PhysicalRenderer.prototype.ShowUI()
{
var pm = this.GetPM();
var value = pm.Get ("Expand-Collapse");
if(value === "Collapse")
{
//Write Code to collapse the applet
$("#s_" + pm.Get("GetFullId") + "_div").find(".siebui-collapsible-applet-content").hide();
}
else
{
//Write Code to expand the applet
$("#s_" + pm.Get("GetFullId") + "_div").find(".siebui-collapsible-applet-content").show();
}
}
Use an HTML editor to open the HTML that Siebel Open UI uses to display the Opportunity List Applet, and then add the following code:
$("#s_" + this.GetPM().Get("GetFullId") + "_div").find(".siebui-collapsible-applet").append(expcolbtn);
For more information about how to edit HTML code for an applet, see "Customizing Logos, Themes, Backgrounds, Tabs, Styles, and Fonts".
Test your modifications:
Log in to the client, and then navigate to the Opportunity List Applet.
Click the expand and collapse button, and then verify that Siebel Open UI expands the applet.
Log out of the client, log back in to the client, navigate to the Opportunity List Applet, and then verify that Siebel Open UI displays the same expanded state that you set in Step b.
A signature capture is an electronic capture of a user signature. This topic describes how to customize applets to capture signatures for calls in Siebel Open UI.
|
Note: This task uses Siebel Pharma as an example, but the procedure is similar when modifying a different application. For more information about migrating signatures from High Interactivity to Siebel Open UI, see the topic about configuring the digital migration service for signatures and the topic about rendering signatures in the user interface in Siebel Life Sciences Guide. |
To customize applets to capture signatures for desktop applications
Copy a signature form applet that comes predefined with Siebel Open UI:
For more information, see Using Siebel Tools.
In the Object Explorer, click Applet.
In the Applets list, locate an applet that includes a signature capture configuration.
For this example, locate the following applet:
LS Pharma Call Signature Form Applet
Right-click the applet you located in Step c, and then click Copy Record.
Add an _PUI suffix to the name. For example:
LS Pharma Call Signature Form Applet_PUI
Add applet user properties:
In the Object Explorer, expand the Applet tree, and then click Applet User Prop.
In the Applet User Props list, add the following applet user properties.
| Name | Value |
|---|---|
| CanInvokeMethod: ClearSignature | TRUE |
| Signature Min Length | 5 |
Add controls:
In the Object Explorer, click Control.
In the Controls list, add the following controls.
| Name | Description |
|---|---|
| Clear Signature | Set the MethodInvoked property to ClearSignature. |
| Address | Set the Field property to Address. |
| Signature Capture | Set the following properties:
|
| Disclaimer Text
Signature Header Text |
Set the Read Only property to TRUE |
Add an applet web template:
In the Object Explorer, click Applet Web Template.
In the Applet Web Templates list, right-click the Base applet web template, and then click Copy Record.
Set the following properties.
| Property | Value |
|---|---|
| Name | Edit |
| Type | Edit |
Modify the drilldown objects:
In the Object Explorer, click Drilldown Object.
In the Drilldown Objects list, modify the following value of the Hyperlink Field property of the Apply Drilldown and the Cancel Drilldown drilldown objects.
| Old Value | New Value |
|---|---|
| Signature Header Text | Address |
Copy a predefined view:
In the Object Explorer, click View.
In the Views list, locate a view that includes a signature capture configuration.
For this example, locate the following view:
LS Pharma Call Signature Capture View
Right-click the view you located in Step b, and then click Copy Record.
Add an _PUI suffix to the name. For example:
LS Pharma Call Signature Capture View_PUI
Modify the view web template:
In the Object Explorer, expand the View tree, expand the View Web Template tree, and then click View Web Template Item.
In the View Web Template Items list, query the Name property for the following value:
LS Pharma Call Signature Form Applet
Modify the following value of the Name property.
| Old Value | New Value |
|---|---|
| LS Pharma Call Signature Form Applet | LS Pharma Call Signature Form Applet_PUI |
Modify the following value of the Applet Mode property.
| Old Value | New Value |
|---|---|
| Base | Edit |
Modify a call form applet that comes predefined with Siebel Open UI:
In the Object Explorer, click Applet.
In the Applets list, locate an applet that includes a call form configuration.
For this example, locate the following applet:
Pharma Professional Call Form Applet
In the Object Explorer, expand the Applet tree, and then click Applet User Prop.
In the Applet User Props list, add the following applet user property.
| Name | Value |
|---|---|
| Signature Applet NamePUI | LS Pharma Call Signature Form Applet_PUI |
In the Object Explorer, click Drilldown Object.
In the Drilldown Objects list, query the Name property for Signature Capture Drilldown.
Create a copy of this record, add the new drilldown to the record copy, and update the following field:
| Name | New Value |
|---|---|
| Signature Capture DrillDownPUI | LS Pharma Call Signature Capture View_PUI |
Modify the screen:
In the Object Explorer, click Screen.
In the Screens list, locate a screen that displays the signature form and call form applets.
For this example, locate the following screen:
LS Pharma Calls Screen
In the Object Explorer, expand the Screen tree, and then click Screen View.
In the Screen Views list, query the Name property for the following value:
LS Pharma Call Signature Capture View
Create a copy of the LS Pharma Call Signature Capture View, and update the following field:
| Old Value | New Value |
|---|---|
| LS Pharma Call Signature Capture View | LS Pharma Call Signature Capture View_PUI |
Compile your modifications.
Administer your customization:
Log in to the client with administrative privileges.
Navigate to the Administration - Application screen, and then the Views view.
In the Views list, query the Name property for the following value:
LS Pharma Call Signature Capture View
Make a note of the field values of the responsibility that the client displays in the Responsibilities list.
In the Views list, add the following view.
| Field | Value |
|---|---|
| View Name | LS Pharma Call Signature Capture View_PUI |
In the Responsibilities list, add a responsibility. Use the same field values that you noted in Step d.
Navigate to the Administration - Personalization screen, and then the Applets view.
In the Applets list, add the following applet.
| Field | Value |
|---|---|
| Name | LS Pharma Call Signature Form Applet_OUI |
In the Rule Sets list, add the following rule set.
| Field | Value |
|---|---|
| Name | Pharma Call Default |
| Sequence | 1 |
| Start Date | Any date that has already occurred. For example, 01/01/2012. |
Add the applet LS Pharma Call Signature Form Applet_PUI to the manifest administration as follows:
Log in to the client with administrative privileges.
Navigate to the Administration - Application screen, and then the Manifest Administration view.
Under UI Objects, create a new record with the following values:
| Interactive Flag | Type | Usage Type | Name |
|---|---|---|---|
| N | Applet | Physical Renderer | LS Pharma Call Signature Form Applet_PUI |
Under Object Expression, add the following child applet for the record created in Step c.
| Interactive Flag | Expression | Level |
|---|---|---|
| N | Desktop | 1 |
Under Files, set the following file values:
| Interactive Flag | Name |
|---|---|
| N | 3rdParty/jquery.signaturepad.min.js |
Test your modifications.
Log in to the Siebel Open UI client (for example, Siebel Pharma application).
Navigate to a contact call where you want to capture the signature.
Click Sign to open the Signature Capture view.
Verify that the Signature Capture view applet displays correctly - that is, according to the customizations detailed in this procedure.
A signature capture is an electronic capture of a user signature. This topic describes how to customize applets to capture signatures in Siebel Mobile applications.
|
Note: This task uses Siebel Pharma as an example, but the procedure is similar when modifying a different application. For more information about migrating signatures from High Interactivity to Siebel Open UI, see the topic about configuring the digital migration service for signatures and the topic about rendering signatures in the user interface in Siebel Life Sciences Guide. |
To customize applets to capture signatures for Siebel Mobile applications
Create a new business component and add a new field.
Create a new Signature business component with the values shown in the following table.
| Property | Value |
|---|---|
| Name | Signature BC |
| Class | CSSBCBase |
Create a new Signature business component field with the values shown in the following table.
| Property | Value |
|---|---|
| Name | Signature |
| Type | DTYPE_NOTE |
| Text Length | 16,383 |
| Force Activation | Selected |
Create a new Form Applet with the values shown in the following table, adding an _PUI suffix to the name.
| Name | Class | Business Component |
|---|---|---|
| Signature Form Applet_PUI | CSSFrameBase | Signature BC |
Add applet user properties:
In the Object Explorer, expand the Applet tree, and then click Applet User Prop.
In the Applet User Props list, add the following applet user properties as required.
| Name | Value |
|---|---|
| CanInvokeMethod: ClearSignature | TRUE |
Parent BC Name, for example:
|
For example:
|
| Signature Field | Signature |
| Signature Length | 1600 |
| Signature Min Length | 5 |
| Use Apply Drilldown | Y |
| Use Cancel Drilldown | Y |
Add controls:
In the Object Explorer, click Control.
In the Controls list, add the following controls.
| Name | Description |
|---|---|
| Clear Signature | Set the MethodInvoked property to ClearSignature. |
| Address | Set the Field property to Address.
Note: You can create other fields such as Contact First Name in addition to the Address field as required. |
| Signature Capture | Set the following properties:
|
| Apply Signature | Set the MethodInvoked property to ApplySignature. |
| Cancel Signature | Set the MethodInvoked property to CancelSignature. |
Add an applet Web template:
In the Object Explorer, click Applet Web Template.
In the Applet Web Templates list, right-click and select new record.
Set the following properties.
| Property | Value |
|---|---|
| Name | Edit |
| Type | Edit |
| Web Template | SIA Applet Form Grid Layout - No Menu_OUI |
Create the following new drilldown objects:
In the Object Explorer, click Drilldown Object.
In the Drilldown Objects list, configure the values shown in the following table as required for the Apply Drilldown and the Cancel Drilldown drilldown objects.
|
Note: The values shown in the following table (for View, Business Component, and so on) are examples only - you can choose a different view and business component as required. |
| Name | Hyperlink Field | View | Source Field | Business Component | Destination Field |
|---|---|---|---|---|---|
| Apply Drilldown | Address | LS Pharma Professional Call Execute View - Mobile | Activity Id | Pharma Professional Call - Mobile | Id |
| Cancel Drilldown | Address | LS Pharma Professional Call Execute View - Mobile | Activity Id | Pharma Professional Call - Mobile | Id |
Expose the Controls in the Applet Web Template item as follows:
In the Object Explorer, click Applet.
Select Applet "Signature Form Applet_PUI", then right click and select Edit Web Layout.
Select Edit mode.
Drag and drop the Signature field and the Apply Signature, Cancel Signature, and Clear Signature buttons on the Web Layout.
Compile your modifications.
Add the applet Signature Form Applet_PUI to the manifest administration as follows:
Log in to the client with administrative privileges.
Navigate to the Administration - Application screen, and then the Manifest Administration view.
Under UI Objects, create a new record with the following values:
| Interactive Flag | Type | Usage Type | Name |
|---|---|---|---|
| N | Applet | Physical Renderer | Signature Form Applet_PUI |
Under Object Expression, add the following child applet for the record created in Step c.
| Interactive Flag | Expression | Level |
|---|---|---|
| N | <Empty> | 2 |
| N | Mobile | 1 |
Under Files, set the following file values:
| Interactive Flag | Name |
|---|---|
| N | 3rdParty/jquery.signaturepad.min.js |
| N | siebel/signviewpr.js |
Under UI Objects, create a new record with the following values:
| Interactive Flag | Type | Usage Type | Name |
|---|---|---|---|
| N | Applet | Presentation Model | Signature Form Applet_PUI |
Under Object Expression, add the following child applet for the record created in Step f.
| Interactive Flag | Expression | Level |
|---|---|---|
| N | Mobile | 1 |
Under Files, set the following file values:
| Interactive Flag | Name |
|---|---|
| N | siebel/signviewpm.js |
Test your modifications.
Log in to the Siebel Open UI client.
Navigate to a view where the Signature Form Applet_PUI is exposed.
Verify that the Signature Capture view applet displays correctly - that is, according to the customizations detailed in this procedure.
This topic describes how to customize an applet to display record counts for navigation links. The Navigation Links Runtime business component includes fields applicable to record counts for navigation links. Also, the CCAppletList_tile_NavLink_ss.swt file includes the siebui-record-count class to hold the record count and the error image that appears when the record count cannot be retrieved.
After you complete the procedure in this topic, administrators can access the Siebel Open UI client, and use the Navigation Links view of the Administration - Application screen to display the number of records in the location to which a link navigates. For navigation links that appear in tiles, this record count appears beneath the display name for the navigation link. For navigation links that appear in lists, this record count appears in the Record Count field in the lists.
Currently, record counts for navigation links are available for only the Siebel eService application.
To customize an applet to display record counts for navigation links
Configure the manifest:
Log in to a Siebel client with administrative privileges.
For more information about the screens that you use in this step, see "Configuring Manifests".
Navigate to the Administration - Application screen, and then the Manifest Files view.
In the Files list, add the following file if it does not already exist in the list:
siebel/navlinkpr.js
Navigate to the Administration - Application screen, and then the Manifest Administration view.
In the UI Objects list, select the applet for which you want to display record counts for navigation links.
The applet must have a value in the Usage Type field of Physical Renderer.
In the Object Expression list, select the appropriate expression for the applet.
In the Files list, add the following file:
siebel/navlinkpr.js
If navigation links appear in a list, then include the Record Count field in the list:
Open Siebel Tools.
For more information about using Siebel Tools, see Using Siebel Tools.
In the Object Explorer, click Applet.
In the Applets list, query the Name property for the applet in which to include the Record Count field.
This applet has a Business Component property of Navigation Links Runtime.
In the Object Explorer, expand the Applet tree, then expand the List tree, and then click List Column.
In the List Columns list, create a new list column with a value of List Record Count for the Field property.
Compile your work.
(Optional) Change the location of the record count number from its default location in the bottom left corner of tiles:
Open the appropriate CSS file for editing.
For example, open the theme-aurora.css file, which is located at install_location\eappweb\PUBLIC\files.
Locate the siebui-record-count class in this file.
Change the information for this class to change the location of the record count number.
For example, to center the record count number in the bottom center of tiles, change the information for this class as follows:
siebel-record-count {
   text-align: center;
   padding-top: 10px;
}
You can configure Siebel Open UI to use jQuery Charts. This topic describes how to configure Siebel Charts with a third-party JavaScript chart library.
To configure Siebel Charts with a third-party JavaScript library
On the server- side, perform the following changes:
Override the Object Manager Charts Business Service - BuildChartPS using eScript.
Insert the following property in the input arguments:
| Name | Value |
|---|---|
| OutputFormat | VANILLA |
On the client-side, perform the following changes:
Create a plug-in wrapper for the control as described in "Creating the Plug-in Wrapper".
Import the third-party library as part of the defined statement.
Change the condition for the plug-in wrapper registration as follows:
control.GetApplet().GetPModel().Get("EnableClientChart") === "TRUas
control.GetApplet().GetPModel().Get("GenericFormat") === "TRUE"
padding-top: 10px;
As part of the SetValue method, invoke the third-party library for rendering the chart.
//this.Get("ChartData") will return the data sent from the server X1,Y11,Z1|X2,Y21,Z1|X1,Y12,Z2 and so on.
As part of the BindEvents method, bind the events for the chart control.
Siebel currently supports a number of chart types, which you can configure using Siebel Tools. This topic describes how to add a new Siebel supported chart to an existing view.
To configure a new chart type using jqPlot library
Check that the jqPlot plugin supports the chart type.
Create a plug-in wrapper for the control as described in "Creating the Plug-in Wrapper".
Base the plug-in wrapper on ChartBuilderPW.
Change the condition for the plug-in wrapper registration as follows:
control.GetApplet().GetPModel().Get("EnableClientChart") === "TRUE"
control.GetApplet().GetPModel().Get("CustomFormat") === "TRUE"
control.GetApplet().GetPModel().Get("Type") === "Bubble"
As part of SetValue for all default supported types, call the SetValue base class. For unsupported types, invoke the jqPlot to render charts.
On the server-side, write an eScript extension for the Object Manager Charts business service and BuildChartPS method, and pass on the control to the default implementation for supported types. For unsupported types, set the data in the output of the method.

