| Oracle® Retail Size Profile Optimization Implementation Guide Release 14.1 E55738-01 |
|

 Previous |
 Next |
| Oracle® Retail Size Profile Optimization Implementation Guide Release 14.1 E55738-01 |
|
Previous |
Next |
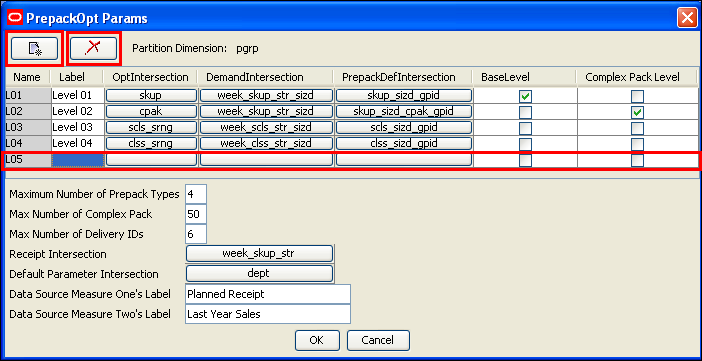
The Prepack Optimization configuration plug-in enables you to specify the partition dimension, optimization levels, and other details of the prepack configurations. Using these data, the plug-in generates the appropriate intersections, measures, rule groups, rules, and workbooks.
From the RPAS Configuration Tools, select Automation from the menu bar, then PrepackOpt, and then Specify Parameters. The PrepackOpt Params window is displayed.
Table 10-0 describes the fields in this window.
Table 10-1 Fields in the SizeOpt Params Window
| Name | Description |
|---|---|
|
Title Bar |
Title of the window. |
|
Button Bar |
The following buttons are available:
|
|
Grid Area |
Displays the optimization levels. The data is displayed in the following columns:
Note: The inputs for level 1 and level 2 are not changed in any implementation of prepack. |
|
Maximum Number of Prepack Types |
Use this field to specify the maximum number of prepack types that are to be configured in the domain. |
|
Max Number of Complex Pack |
Use this field to specify the maximum number of complex packs that are to be configured in the domain. |
|
Max Number of Delivery IDs |
Use this field to specify the maximum number of Delivery IDs that are to be configured in the domain. |
|
Receipt Intersection |
Displays the Select Intersection dialog box. Select the desired intersection of the Calendar, Product, and Location dimensions. |
|
Default Parameter Intersection |
Displays the Select Intersection dialog box. Assign the default parameter for intersection. |
|
Data Source Measure One's Label |
Use this field to specify the first of the two prepack measures that hold the data for optimization. |
|
Data Source Measure Two's Label |
Use this field to specify the second of the two prepack measures that hold the data for optimization. |
From the RPAS Configuration Tools, select Automation from the menu bar, then PrepackOpt, and then Specify Parameters. The PrepackOpt Params window is displayed. See Figure 10-1. The following sections outline the process for configuring SPO.
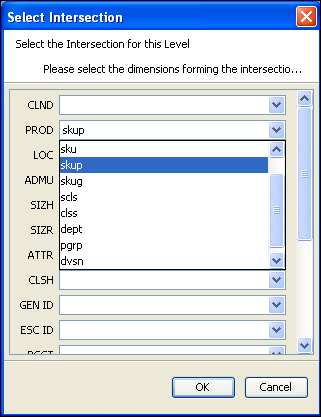
To change the optimization intersection, perform the following steps:
Click the intersection corresponding to the desired level. The Select Intersection window is displayed.
Using the list options, set the optimization intersection in the Product dimension. When finished, click OK.
If a location dimension is added into an optimization intersection, the same location dimension must be added for the following intersections:
Every level of optimization intersection
Default parameter intersection
Every level of PrepackDefIntersection
For more information on setting intersections, see the Oracle Retail Predictive Application Server Configuration Tools User Guide.
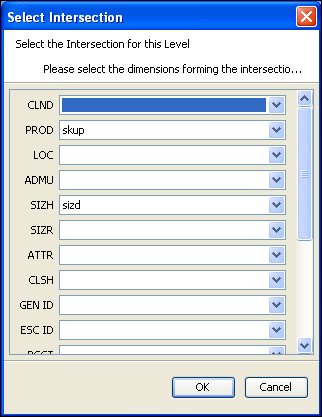
To change the demand intersection, perform the following steps:
Click the intersection corresponding to the desired level. The Select Intersection window is displayed.
Using the list options, set the demand intersection in the Calendar, Product, Location, and Size dimensions. When finished, click OK.
For more information on setting intersections, see the Oracle Retail Predictive Application Server Configuration Tools User Guide.
To change the prepack definition intersection, perform the following steps:
Click the intersection corresponding to the desired level. The Select Intersection window is displayed.
Using the list options, set the prepack definition intersection in the Product and Size dimensions. When finished, click OK.
For more information on setting intersections, see the Oracle Retail Predictive Application Server Configuration Tools User Guide.
To change the receipt intersection, perform the following steps:
Click the intersection corresponding to the desired Level. The Select Intersection window is displayed.
Using the list options, set the receipt intersection in the Calendar, Product, and Location dimensions. When finished, click OK.
For more information on setting intersections, see the Oracle Retail Predictive Application Server Configuration Tools User Guide.
|
Note: The default parameter intersection must be higher than all optimization intersections except the complex level. |
To change the default parameter intersection, perform the following steps:
Click the intersection corresponding to the desired level. The Select Intersection window is displayed.
Using the list options, set the default intersection. When finished, click OK.
For more information on setting intersections, see the Oracle Retail Predictive Application Server Configuration Tools User Guide.
To configure the optimization levels, perform the following steps:
To add an optimization level, perform the following steps:
Click the Add icon in the PrepackOpt Params window. A new entry is added in the grid area.
Enter the label for the optimization level.
To set the optimization level intersection, click the intersection. The Select Intersection window is displayed.
Using the list options, set the intersection. Click OK.
For more information on setting intersections, see the Oracle Retail Predictive Application Server Configuration Tools User Guide.
To modify the intersection for an optimization level, perform the following steps:
In the grid area, click the intersection of the optimization level to be modified. The Select Intersection window is displayed.
Using the list options, set the intersection. Click OK.
For more information on setting intersections, see the Oracle Retail Predictive Application Server Configuration Tools User Guide.
To delete an optimization level, perform the following steps:
In the grid area, select the escalation level to be deleted from the configuration.
Click the Delete icon.
To add a Prepack Type, enter a positive integer in the Maximum Number of Prepack Types box in the PrepackOpt Params window. The valid range is 1 to 6.
To specify the maximum number of complex packs, enter a positive integer in the Max Number of Complex Pack box.
To specify the maximum number of deliveries for an item planning period, enter a value in the Max Number of Delivery ID field. The valid range is 1 to 10.
To specify the data to be loaded to the datasrc1 and datasrc2 measures, specify the source in the Data Source Measure One's Label and Data Source Measure Two's Label fields. These measures are used in prepack optimization as inputs for demand at style-color/store/week. The common sources are Planned Receipts and Last Year Sales.
The following is the process, by which the system automatically generates the intersections, measures, rules, and workbook templates that are required by SPO to support the configuration entered in the prepack optimization configuration plug-in:
In the PrepackOpt Params window, configure the parameters and click OK.
The system automatically generates the following:
Intersections – All intersections necessary to support the base Prepack Optimization solution are created.
Measures – All measures necessary to support the base Prepack Optimization solution are created.
Rules – All rules and rule groups to support the base Prepack Optimization solution are created.
Workbook Templates – All pre-defined workbook templates to support the base Prepack Optimization solution are created.
You can continue to make changes to the Prepack Optimization configuration plug-in, and the autogeneration process can be repeated as often as needed prior to installation.