| Oracle® Retail Assortment Planning User Guide for the RPAS Fusion Client Release 14.1.0.4 E60636-01 |
|

 Previous |
 Next |
| Oracle® Retail Assortment Planning User Guide for the RPAS Fusion Client Release 14.1.0.4 E60636-01 |
|
Previous |
Next |
Build the wedge is the fifth step in the AP business process.
Table 6-1 Business Role in Build the Wedge
|
|
The Buyer Analyst tailors, for each wedge, the strategy inherited from the Senior Buyer's shopping list, then assorts and time-phases each wedge from the styles identified in the Shopping List. |
In the Build the Wedge task, the Buyer picks up the Assortment process from the Senior Buyer who has gone to market. In building the wedge, the Buyer makes two sets of decisions (under the Senior Buyer's guidance):
Assortment Strategy - The Senior Buyer has set the assortment strategy at the Total Subclass/Class Level or by Cluster Parent (Brick & Mortar versus Direct, and so on). The following key decisions are made by the Buyer:
Number of variants per style (colors, fragrances or flavors). This can be calculated by using sales plans (sales per item goals), fixture/page capacity, or manually entered by the Buyer.
Product attribute, color and/or customer segment level goals for the Assortment (the number or percent of total for a brand, a silhouette, a color family, and so on).
The Senior Buyer's Cluster Parent strategy will spread down to the Cluster level automatically, so the Buyer only needs to tailor those Clusters that vary from the Cluster Parent's Strategy.
Style-Color Level Assortment - Now the Buyer can use AP's Wedge Population Automation to select the appropriate style-colors from the Shopping List to meet each Cluster's Assortment Strategy (also referred to as Building the Wedge). This automation is iterative and works in near real-time to enable to Buyer to tailor each wedge in a short period of time.
In the next step, Buy Planning, the Senior Buyer or Buyer plans Sales, Margin or Markdowns, Inventory and Receipts for their assortment based on the Assortment Strategy and Wedge Population.
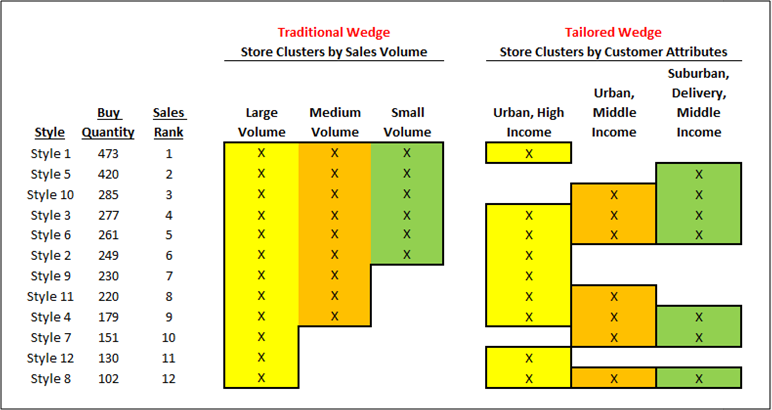
A Wedge is a traditional retail term that originated because the visual created when showing the breadth of the assortment by Cluster looked like a wedge (See the traditional wedge diagram below). Stores traditionally were clustered based on sales volume only and the assortment strategy was to give the full assortment to the larger volume stores and fewer items to the lower volume stores.
When assorting to a traditional wedge, the styles were ranked by buy quantity or sales etc. and with Clusters sorted by volume, the larger volume stores received all styles, the medium volume stores received the top 85% of the styles and the next volume band down received 75% of the styles (the percentages are examples).
There were some manual edits, of course, but for the most part, ranking on buy quantities or sales, drove the process.
However this approach, while easier to create, does not reflect the desires of the Customers shopping the stores, sites, applications, and so on, in each Cluster. Therefore, we have introduced what we are calling a Tailored Wedge. (See the figure below for an example). Tailoring the Wedge creates assortments that match the Customer characteristics of each Cluster. The nice, neat are tailored as a top seller in general, may not sell well in a particular group of stores, sites applications, and so on, and by not stocking it there, you will be able to sell something else at a fuller margin as that less desirable item will require more markdowns and clearance activity to move through it.
Creating these types of wedges manually would take a lot of extra time, so the Assortment Planning solution includes a Wedge Population Automation capability that recommends a tailor set of Wedges based on the Buyer's goals for each Wedge (and allow the Buyer to make manual edits as needed). Wedge Population Automation is described in Step 4 - Fill the Wedge.
Once the Senior Buyer has completed the Shopping List, creating the style level assortment (in total or by cluster parent), the Buyer then assorts styles from the Shopping List to each Cluster of Points of Commerce:
Determine the number of styles-colors required for each Point of Commerce cluster.
This can be inherited from the Cluster Parent level number of style-colors (created by the Senior Buyer), calculated with sales plans (sales per item goals) and/or fixture/page capacity or manually entered by the Buyer.
Create style-color level positions below the style (based on the number of colors per style identified by the Senior Buyer). As with style creation, the style color numbers only need to be set up in AP. AP sets them up automatically in a merchandising system (as Color Diffs), if this capability has been activated (called Slow Item Build in AP). For more information regarding Slow Item Build, see the Oracle Retail Assortment Planning Installation Guide.
3. Create Product Attribute and Color Assortment Goals. Product Attribute level goals created by the Senior Buyer at the Cluster Parent level in the Shopping List are copied to each cluster, then the Buyer can adjust each cluster's attribute goals as needed. Like with the Shopping List, the Buyer can use last year, recent trend, customer panels, or social network or Endeca search results to set those attribute goals by cluster.
Fill the wedge. The Buyer determines the style-color level choices for each cluster. The Assortment Planning solution includes a feature called Wedge Population Automation. The automation recommends which style-color options to carry in each cluster:
As always, Buyers can choose to utilize all, part, or none of the recommendations and/or change the goals and rerun the automation.
This automation runs in real-time, when the Buyer engages it (see Custom Menu options), not in batch.
The planned sales and buy quantity can be calculated seeded on the clusters assigned in this process.
Throughout the process, the Buyer can aggregate each cluster's assortment by attribute to compare the depth by brand, color, silhouette, and so on (for all attributes) to their goals, last year, recent trend, customer panels and/or social networks/Endeca search.
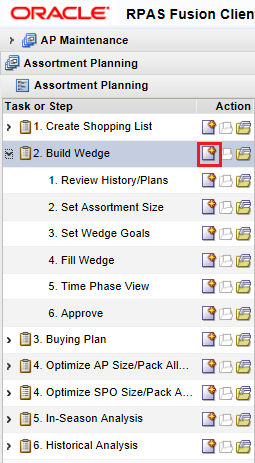
The Build the Assortment Wedge task has the following steps:
To create the Build the Wedge workbook:
Select the New Workbook icon in the Build the Wedge task.
The workbook wizard opens.
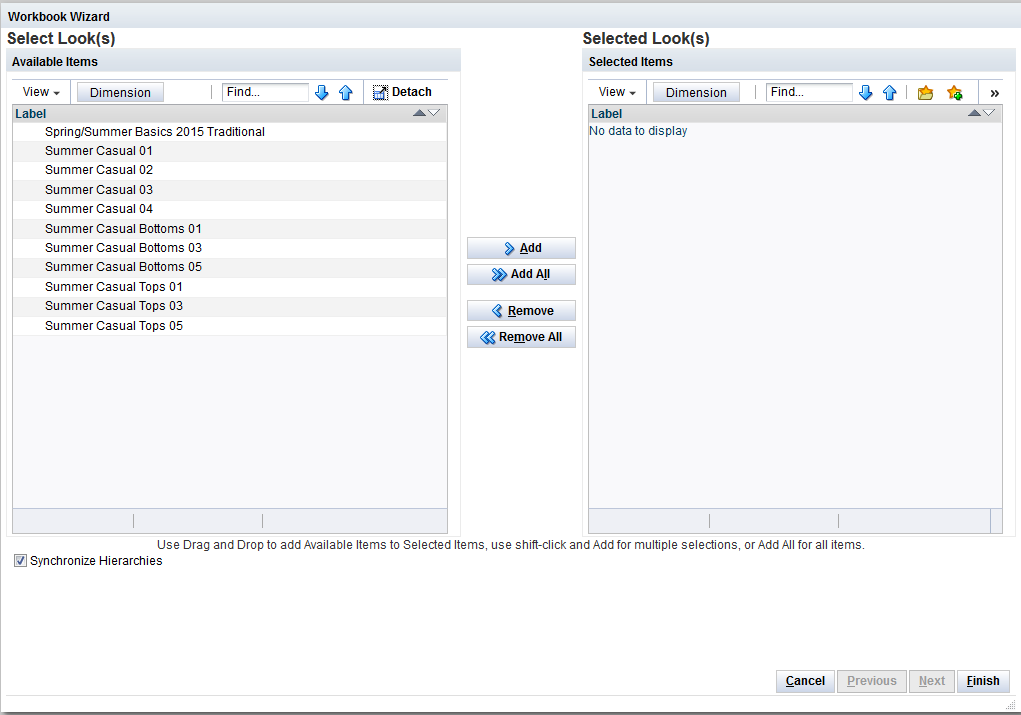
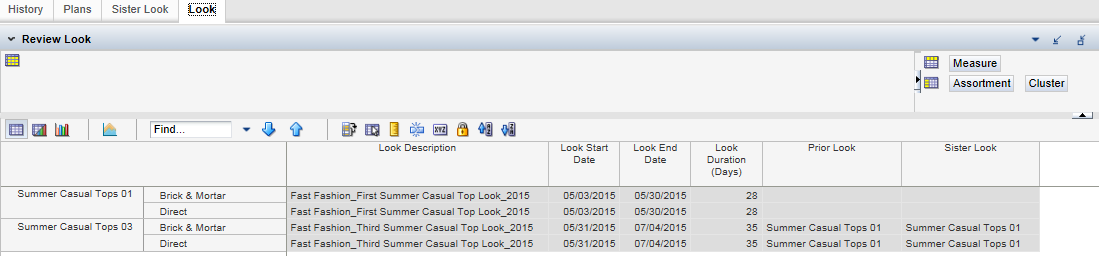
In the Select Look(s) page, select the looks to be loaded into the workbook. Click Finish.
The workbook is created.
In this step, the Buyer has access to a variety of historical and plan information as shown in the following list. This information is intended to provide a complete picture of what needs to be accomplished by this assortment and what has been accomplished by prior assortments, both in terms of sales/profitability and in terms of key trends and attributes that define each assortment.
This step has the following tabs and views:
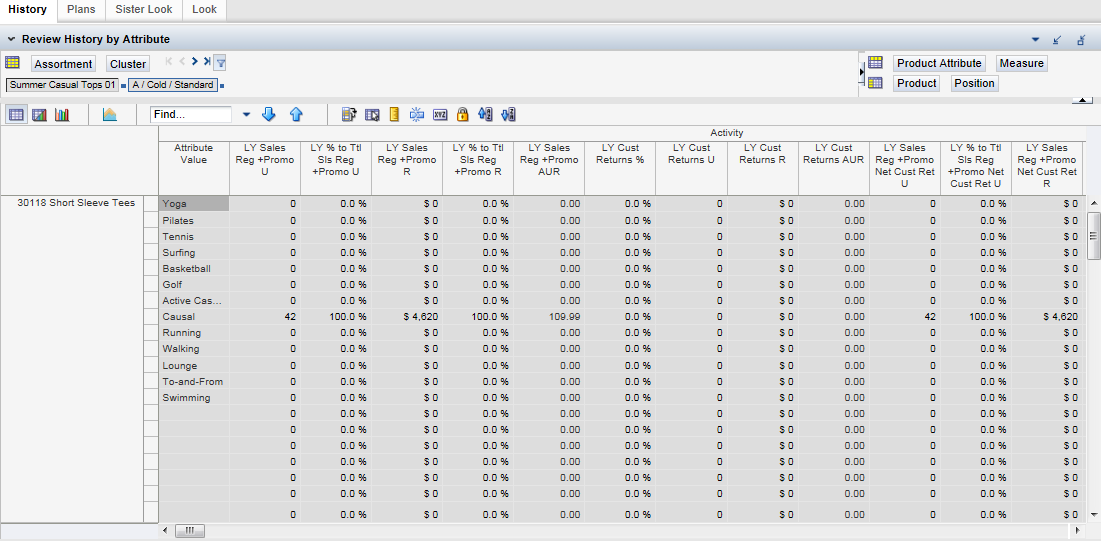
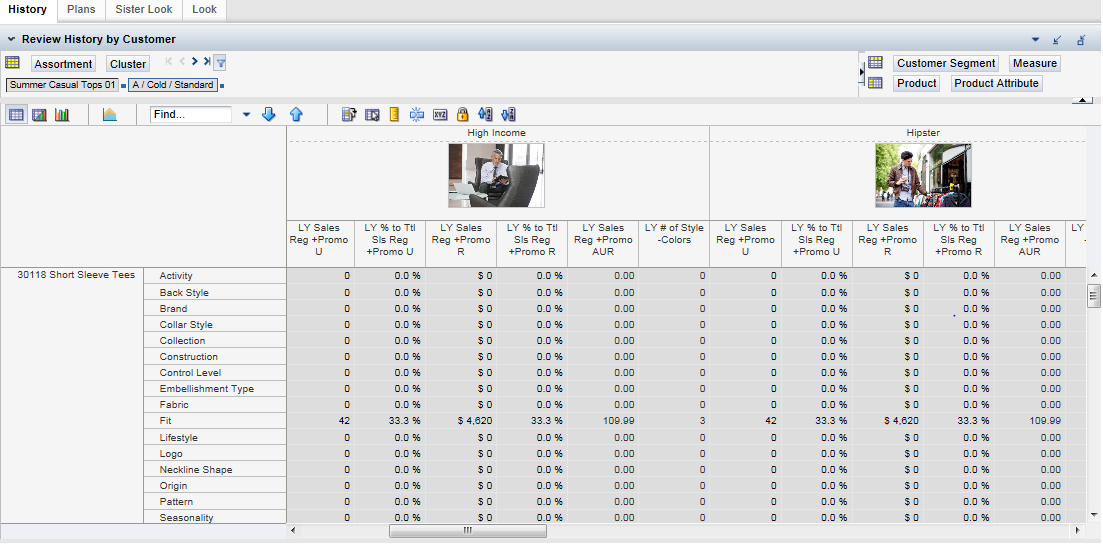
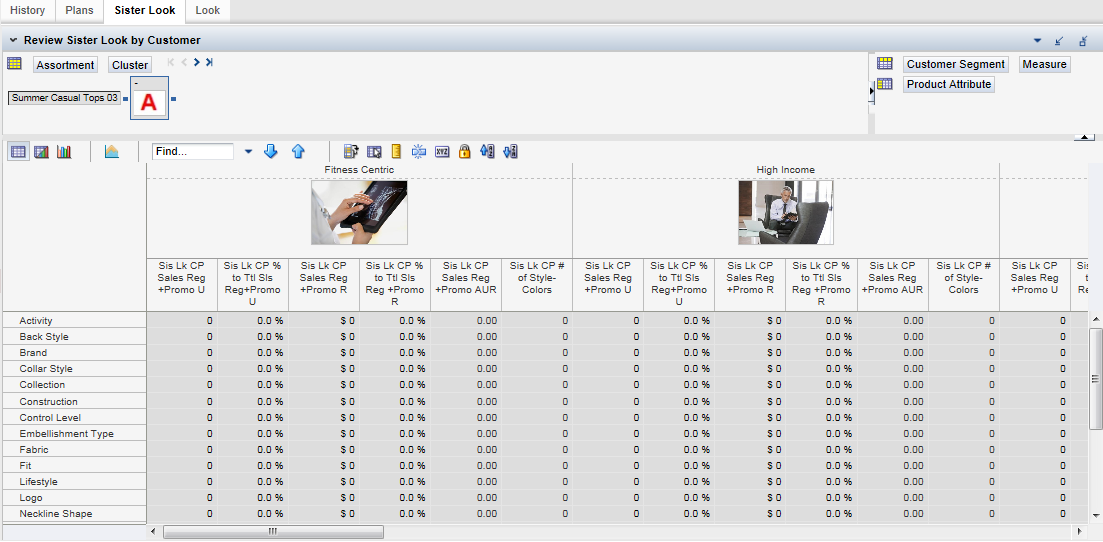
On this tab, the Buyer is able to review historical sales and profitability by product attribute or by customer segment. A number of product attributes (silhouette, heel height, sleeve length, and so on) grouped by type (general, footwear, handbags, tops, and so on) are included in this generally available release, but many more can be added. This information can be useful in thinking about which trends should be carried forward by product attribute or by customer segment into the wedges that are about to be assorted.
This view focuses on the sales and profitability history of prior assortments for the same time periods last year by product attribute, Subclass (or higher), and Cluster (or higher).
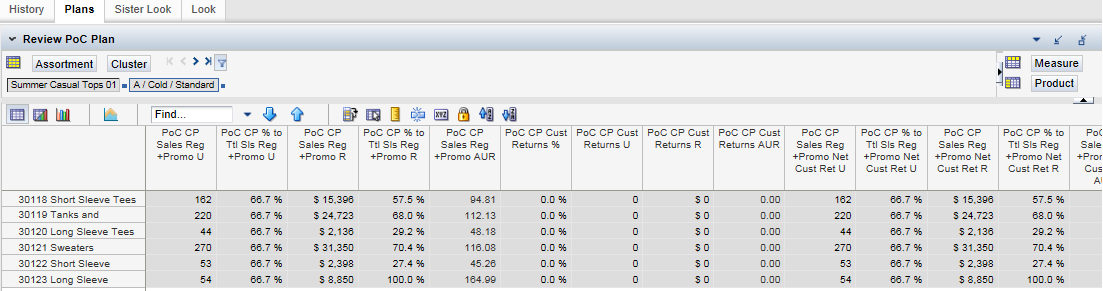
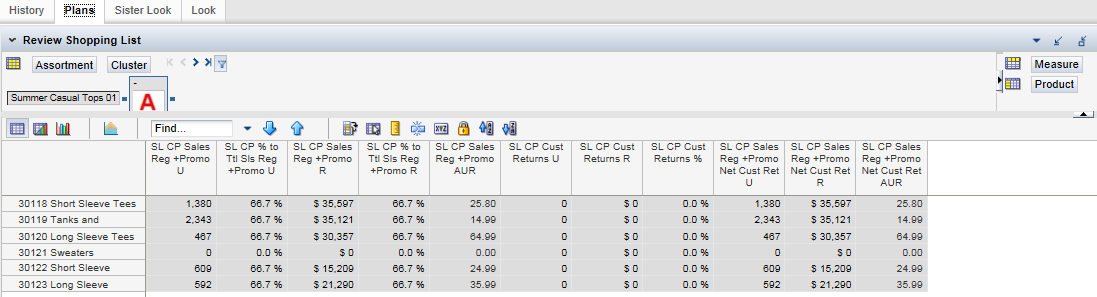
On this tab, the Buyer is able to view the sales and profitability plan for the time periods covered by each look at the intersection of Subclass (or higher) and Cluster (or higher) level. The Buyer is also able to view an aggregation of the planned gross sales, customer returns, and net sales planned in the Shopping List.
This view focuses on the sales and profitability history of prior assortments for the same time periods last year by product attribute, Subclass (or higher), and Cluster (or higher). In the Administrative section, the Merchandise Financial Plan and Location Plans (or LY) are spread down to the Subclass, Week, and PoC Levels (if they were not created originally at this level.
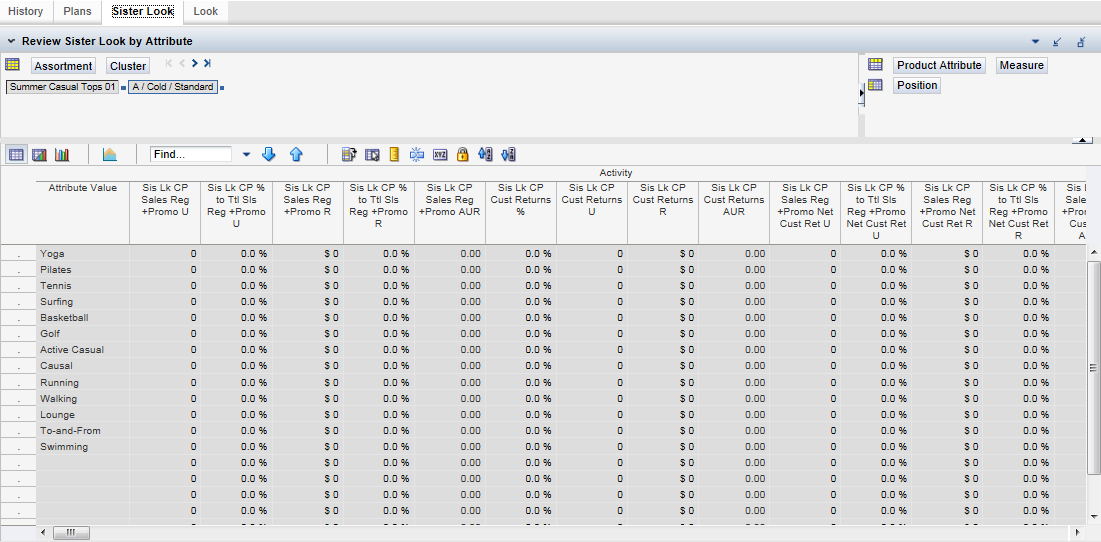
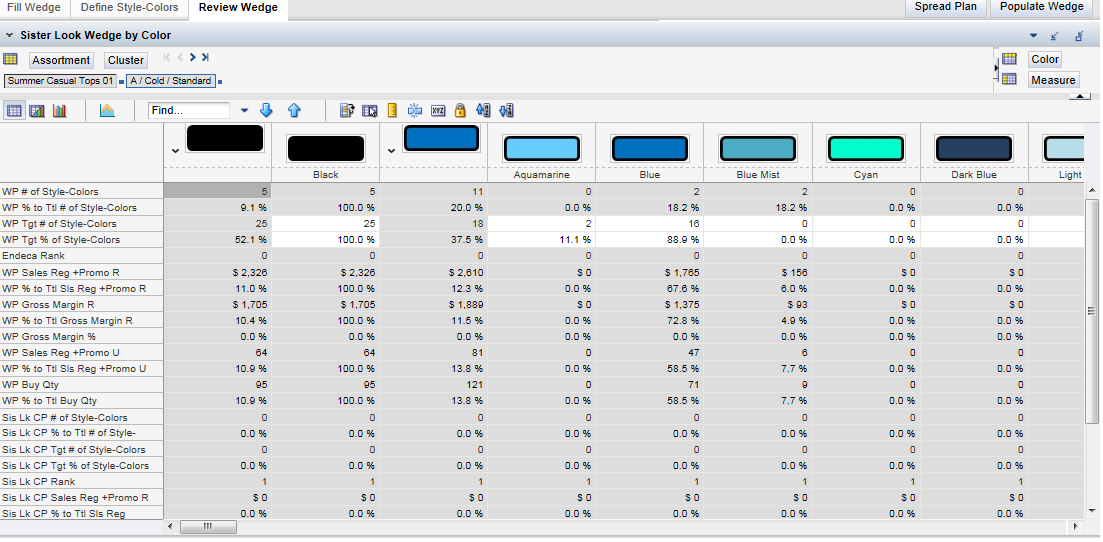
This tab shows the same measure set as on the History tab, but for the Sister Look of each look in this workbook. This enables the Buyer to evaluate the key product and customer segment trends from the Sister Look that may be relevant in building these new looks.
A Sister Look can be used to:
Maintain a consistent set of assortment themes or trends across several looks even if you plan to add/drop style-colors in each look.
Pattern the mix of key product attributes from the Sister Look to this look. For example, you may want to maintain a similar ratio of basic to classic to trend styles from one look to another. You can also do this with silhouette, fabric, price point and/or other product attributes.
Align two different groups of subclasses (such as, tops and bottoms) in different Looks for a similar time period.
This view focuses on the sales and profitability history of prior assortments for the Sister Looks by product attribute, Subclass (or higher), and Cluster (or higher).
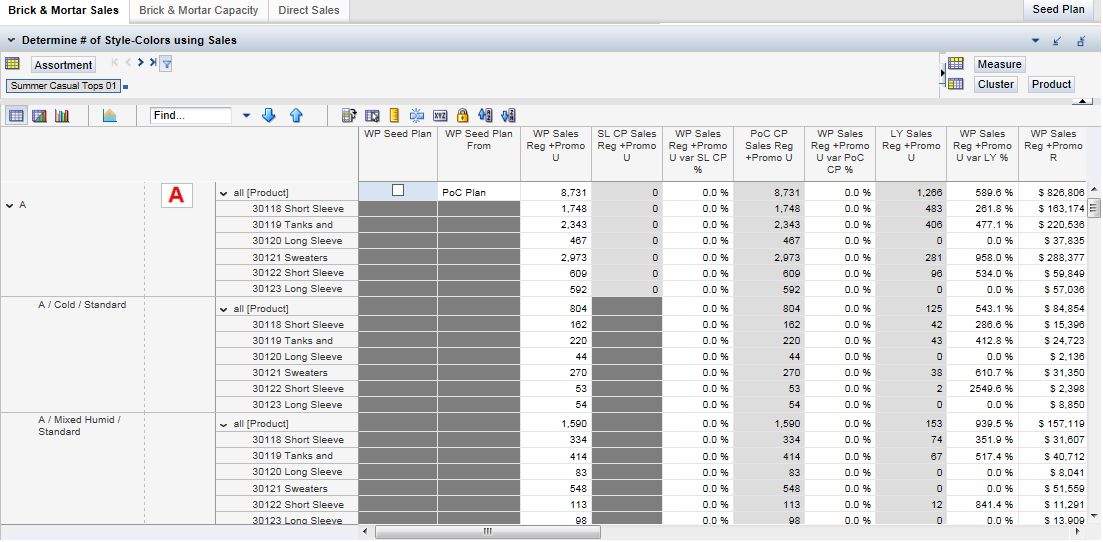
In this step, the Buyer uses planned or historical sales and/or capacity (fixtures, pages, boards, and so on) to determine (using a calculation with multiple options and an override) the targeted size of the each wedge.
There are two supported methods for setting the assortment size: Run of Sales and Fixture Capacity.
Run of Sales
There are four components to the Run of Sales approach:
Determine an average run of sales per style-color in the assortment.
Select a total sales plan for this Look.
Divide the total sales plan by the average run of sales per style-color.
Review or revise the resulting recommended assortment size.
There are a variety of ways to calculate the inputs (the first two bullets) such as allowing the Senior Buyer's decisions from the Shopping List spread down to each cluster or use last year, a Sister Look, a prior Look, or a Location Plan and so on. The Buyer is able to adjust the inputs manually as well as override the resulting style-color count.
The sales capability enables the Buyer to use gross or net sales in calculating the assortment size. Net sales equals gross sales minus customer returns (additional layers can be added to this calculation). There are two sales tabs, one for Brick & Mortar and one for Direct. Brick & Mortar uses net sales. Direct starts with gross sales to calculate net sales. All clusters can be planned on either tab, with the Net Sales measure being the same measure on both tabs, so updating Net Sales on one tab will show the same result in the Net Sales measure on the other tab. Consider the two tabs to be a difference of approaches.
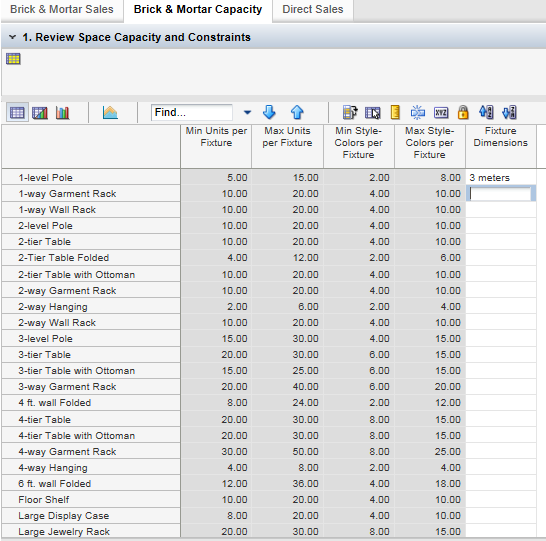
Fixture Capacity
There are four steps to the Run of Sales approach with Net Sales versus Gross Sales leading to Net Sales:
Review/assign fixtures for each Look or Look Group (this likely was defaulted from an external source or by an Administrator).
Review/revise the capacity, in units, of each fixture in units (this likely was defaulted from an external source or by an Administrator).
Much like the Run of Sales approach, you can select whether to use history, a Sister Look, or a Prior Look to determine the ratio of capacity in units to the number of style-colors.
Review/adjust the result of dividing the fixture capacity by the ratio of capacity per assorted style-color.
Set Assortment Size
Throughout the Set Assortment Size step, you are able to compare both the Run of Sales methods (Net or Gross) and Fixture Capacity approach to identify an appropriate assortment size. You also can choose to ignore those methods and just set an assortment size that you have determined externally. Either way, AP will use net out the carried over items from the assortment size so you can track how many new styles and style-colors must be found to fill out your ideal assortment size.
This step has the following tabs and views:
This step has one custom menu option.
Seed Plan
This menu option, available on all three tabs, enables the Senior Buyer to use Last Year's sales for the same time period of each look, the Shopping List plan, or the Location Plan (loaded from the Location Planning solution for the same time period as the Look or created in the administrative section by spreading the Merchandise Financial Plan to store level using historical sales and sister stores) to calculate the logical number of style-colors that should be carried in the assortment. The Senior Buyer can evaluate all three options and use any of them or override the result with another number.
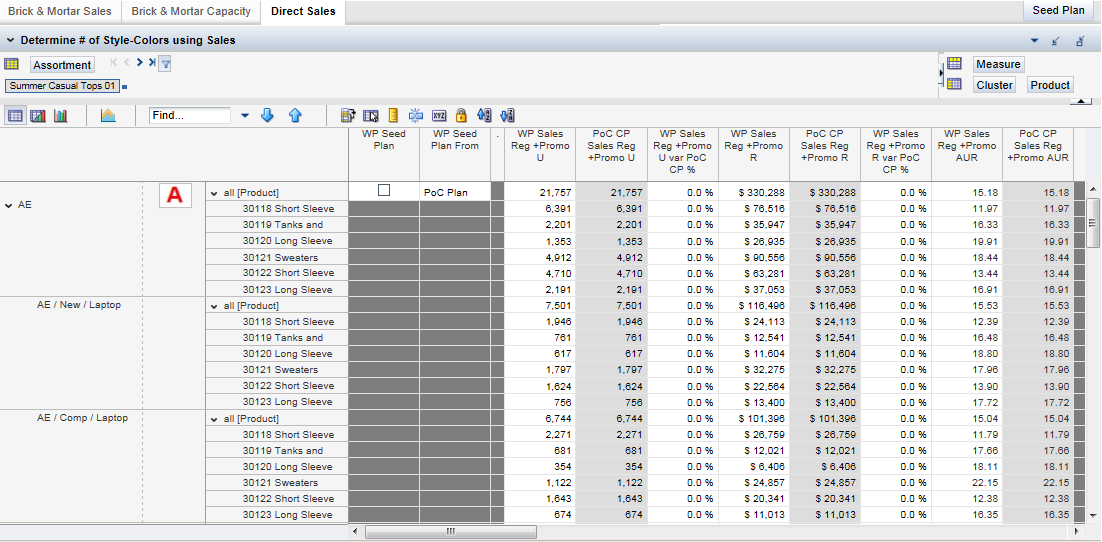
This tab defaults to a Brick & Mortar Sales approach (Net Sales) for calculating a run of sales used to estimate the assortment size for each Look, with of the option of using:
Last Year's sales for the same time period of each look.
Sales from the Sister Look of each look.
Location Plan Sales (loaded from the Location Planning solution for the same time period as the look or created in the administrative section) to calculate the logical number of style-colors that should be carried in the assortment.
If you wish to use a Gross Sales less Customer Returns process to calculate Net Sales, use the Direct Sales tab.
A Sister Look is used if you want to copy a prior look that meets your needs or if you want to maintain a consistent assortment size across several looks even though you plan to add/drop style-colors in each look.
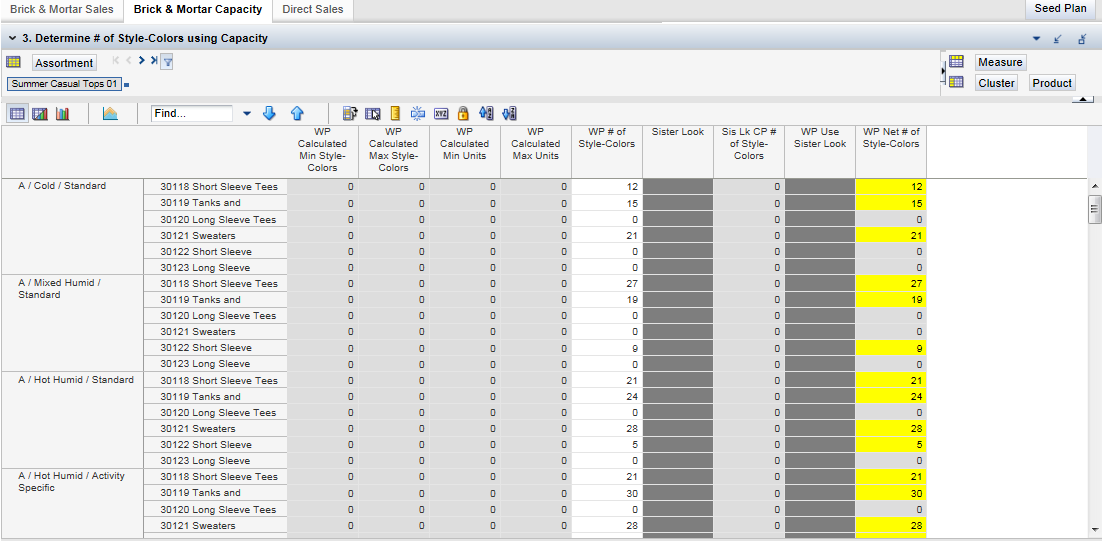
On this tab, the Buyer is able to use a capacity based approach to determine an optimal number of style-colors for each Wedge's assortment (or allows the Senior Buyer's Shopping List planned assort size spread down to the Wedge). It is a three step process:
Review the capacity and constraints for each potential fixture (or page and so on) that could be used in each Look. The capacities and constraints are set administratively or loaded from an external source.
Select (if not done administratively or loaded from a Space planning solution) the fixtures used in this Look.
Review the calculated (based on the fixtures assigned to this Look or to a Sister Look) assortment size and/or override the calculated assortment size.
A Sister Look is used if you want to copy a prior Look that meets your needs or if you want to maintain a consistent assortment size across several Looks even though you plan to add/drop style-colors in each Look.
In this view, the Buyer can review the capacity and constraints for each potential fixture that could be used in each Look. The capacities and constraints are set administratively or loaded from an external space planning solution.
In this view, the Buyer assigns the fixtures used in this Look, if not done administratively or loaded from an external space planning solution (or allows the Senior Buyer's Shopping List planned assort size decisions spread down to the Wedge).
In this view, the Senior Buyer reviews the calculated assortment size (based on the fixtures assigned to this Look or to a Sister Look) and/or overrides the calculated assortment size.
A Sister Look is used if you want to copy a prior Look that meets your needs or if you want to maintain a consistent assortment size across several Looks even though you plan to add/drop style-colors in each Look.
This tab defaults to a Net Sales approach (Gross Sales minus Returns equals Net Sales; further measures can be subtracted from Gross Sales through configuration) for calculating a run of sales used to estimate the assortment size for each wedge, (or allows the Senior Buyer's Shopping List planned assort size spread down to the Wedge), with of the option of using:
Last Year's gross sales and customer returns for the same time period of each look.
Gross Sales and customer returns from the Sister Look of each look.
Location Plan Gross Sales and customer returns (loaded from the Location Planning solution for the same time period as the look or created in the administrative section) to calculate the logical number of style-colors that should be carried in the assortment.
A Sister Look is used if you want to copy a prior Look that meets your needs or if you want to maintain a consistent assortment size across several looks even though you plan to add/drop style-colors in each look.
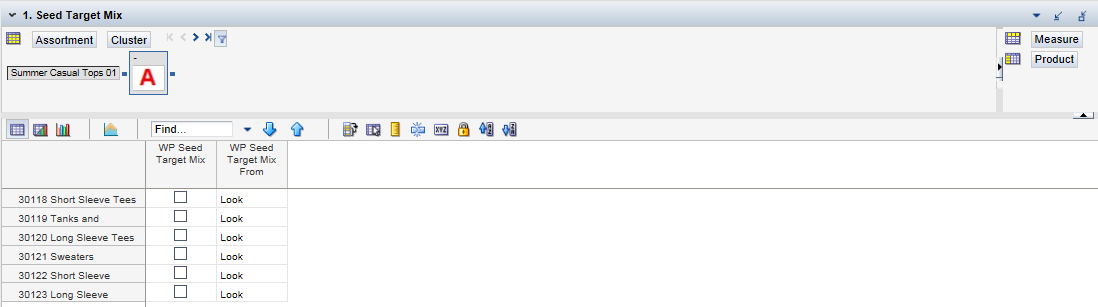
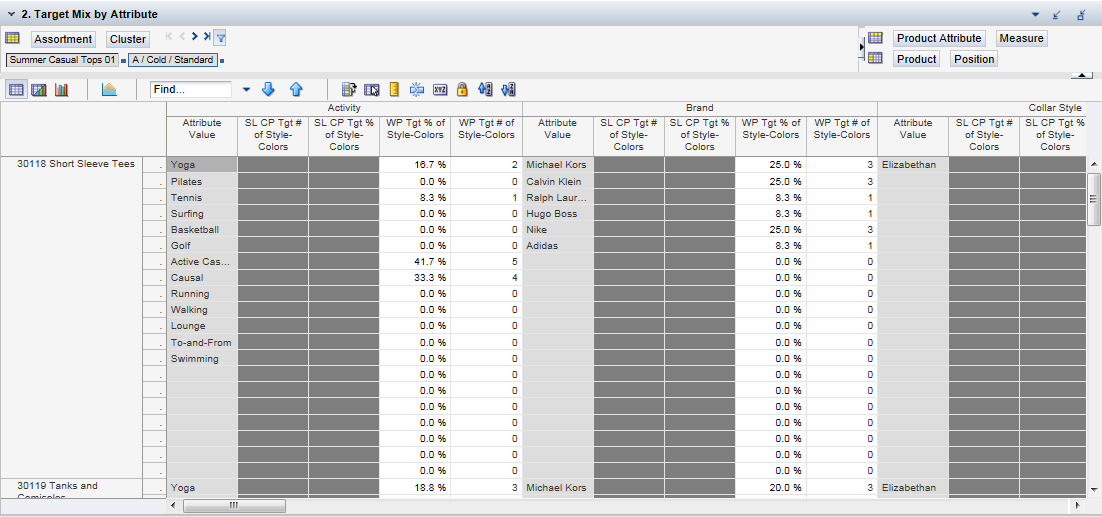
In this step, the Buyer can set goals for any or all product attributes relevant to each Look and Cluster (the level at which Wedges are created). They may be entered by the Buyer or seeded (and then edited) from the Look running the same time last year, from the Senior Buyer's Shopping List attribute goals or from targets that were loaded externally or set administratively.
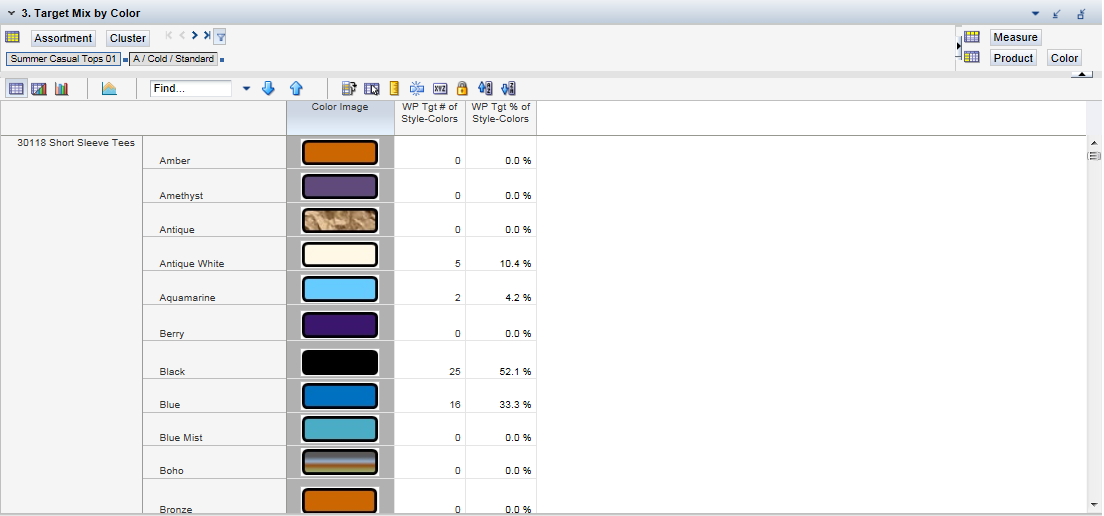
Color is added for the first time to the product attribute goals as the Senior Buyer is building a Style level Shopping List while the Buyer is assorting each Wedge at the Style-Color level.
Goals can be set in terms of the number of style-colors for a specific attribute or a percentage of the total number of style-colors.
Color is maintained on a separate attribute hierarchy as there could be hundreds of colors in the hierarchy as opposed to a just dozen or more of most other attributes.
The Buyer can use these product attribute based goals to assort each Wedge using the Wedge Automation process in Step 4.
This step has the following views:
This step has one menu option.
This custom menu seeds the product attribute and color-based goals from the Look running at the same time last year, from the Shopping List targets created by the Senior Buyer or from attribute based targets that were loaded externally or set administratively. The Buyer can choose to edit directly the results of the seeding process.
In this view, if seeding the Product Attribute Goals for each Look, the Buyer can choose whether to seed the goals from the Look running the same time last year or from administratively defined or from externally loaded attribute targets.
In this view, the Buyer can review, along with the Working Plan version of the attributes, three sets of Product Attribute goals: 1) the Look that ran during the same time Last Year; 2) the Look Targets set or loaded administratively and 3) the Working Plan version that was created by the Senior Buyer in the Shopping List). Once the assorted wedges are approved in Step 5, the Working Plan is copied into the Current Plan version of the goals.
In this view, the Buyer can review four sets of color goals: 1) the Look that ran during the same time Last Year, 2) the Look Targets set or loaded administratively, 3) the Working Plan version (that was seeded and/or edited by the Buyer), and 4) the Current Plan version. Once the assorted wedges are approved in Step 5, the Working Plan is copied into the Current Plan version of the goals.
In this step, the Buyer completes the assortment creation process by assorting each Cluster's Wedge with style-color selections from the Shopping List. The Buyer may choose to populate them manually or to use the Wedge Population Automation capability to recommend selections that can be adjusted by the Buyer.
The Buyer may also need to create some of the style-color level positions under each Style using Dynamic Position Maintenance (DPM) which is accessed on the right click menu.
This step has the following tabs and views:
This step has the following custom menu options:
The heart of the Wedge process is found on this tab. Here the Buyer can assort each Wedge from the Shopping List and make key decisions about each Wedge at the Cluster Level (or Cluster Parent) and by Look (or Look Group).
The Buyer selects by Cluster (or Cluster Parent) (which spread down to each Wedge/Cluster):
Settings used by the Wedge Population Automation to decide which styles to carry and which colors of each style (the Buyer can override the results).
Seed and then edit by style/style-color (decisions can spread down from the style) the sales potential and the sell-thru goals.
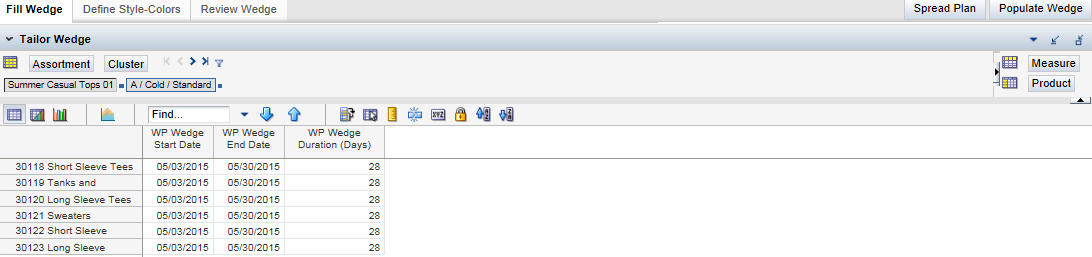
Time-phase each cluster's wedge - The look's start/end dates default each wedge's start/end dates, but the Buyer can tailor them here to reflect the climate, and so on, represented by each cluster (for example: launch heavy winter coats over several weeks by cluster).
The Buyer views by Wedge (Cluster) or by Cluster Parent (which spread down to each Wedge/Cluster):
Buy quantities committed to by the Senior Buyer.
Planned size ranges (standard, extended, and so on).
Estimated return rates may be recorded here too, if necessary.
These decisions can be made by Cluster, Cluster Parent, or in total. The decisions are spread down from Total or Cluster Parent down to the Cluster level automatically, enabling the Buyer then to tailor only those details that matter.
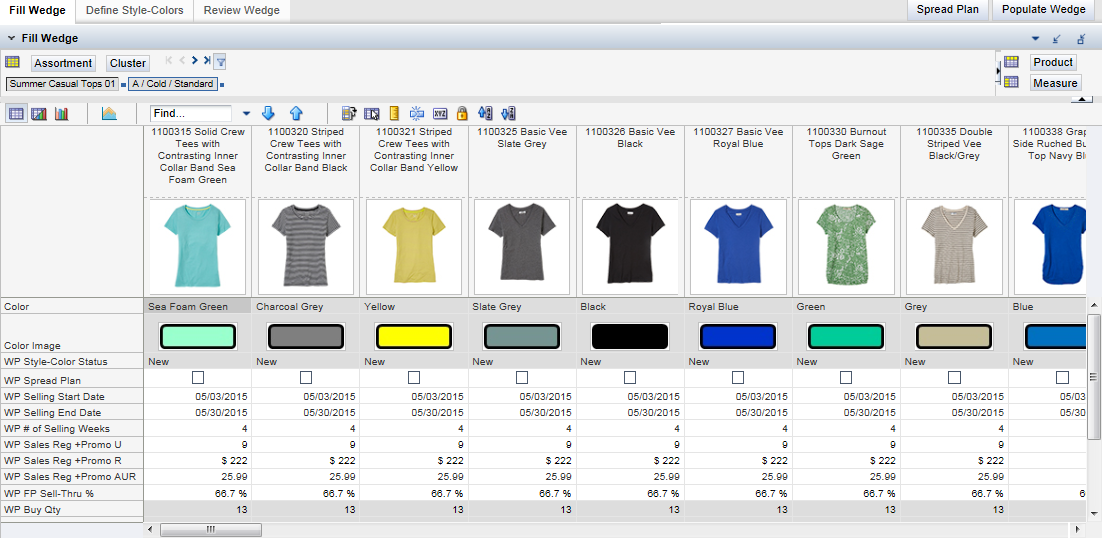
In this view, the Buyer selects style and style-color options from the Shopping List to be assorted in each Cluster's Wedge. This can be seeded using Wedge Population Automation (controlled through Buyer driven settings) and then edited by the Buyer.
The sales, returns, margin, and sell-thru numbers entered here (seeded from the Senior Buyer's Shopping List) can be used to seed the buy plan, which could save time for the Buy planner (the Buyer or the Senior Buyer).
Wedge Population Automation could save you time by using the goals and attributes defined for each Subclass (or Higher) and Look by Cluster to select the style-colors for each Wedge's Assortment.
Wedge Population Automation
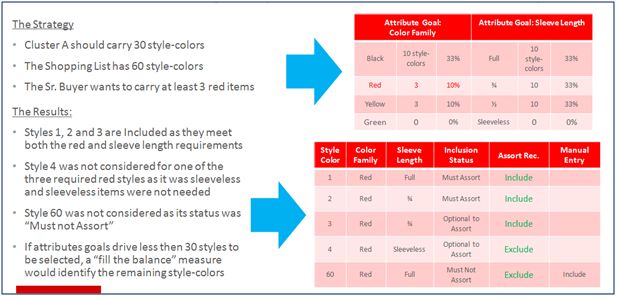
Wedge Population Automation could save you time by using the goals and attributes defined for each Subclass (or higher) and Look by Cluster to recommend the style-colors for each Wedge's assortment. Wedge Population Automation is done in near real-time and does not require a batch. It selects style-colors from the Shopping List, for each wedge, based on the following criteria:
Each wedge's assortment size strategy (number of style-colors).
Each wedge's attribute goals (5 style-colors from Brand X, 4 style-colors in 100% cashmere and so on).
Each style-color's attributes (color, fabric, price tier, and so on) from the Shopping List.
Each style-color's assortment status - Must assort (or carried over), Must not assort, or Optional to assort.
Fill the Balance measure - The Automation uses the Fill the Balance measure (buy quantity, and so on) if all attribute goals are met, but the assortment size strategy is not met. In this case, the Automation rank-sorts the remaining unasserted style-colors and adds the highest ranking style-colors until the assortment size strategy is met.
Once the assortment is built, review the results and do the following:
Override any of the results to carry or not to carry the style-color in a wedge.
Adjust the criteria listed above and rerun the automation.
The following figures shows an example of how the recommendations are made by the Wedge Population Automation capability.
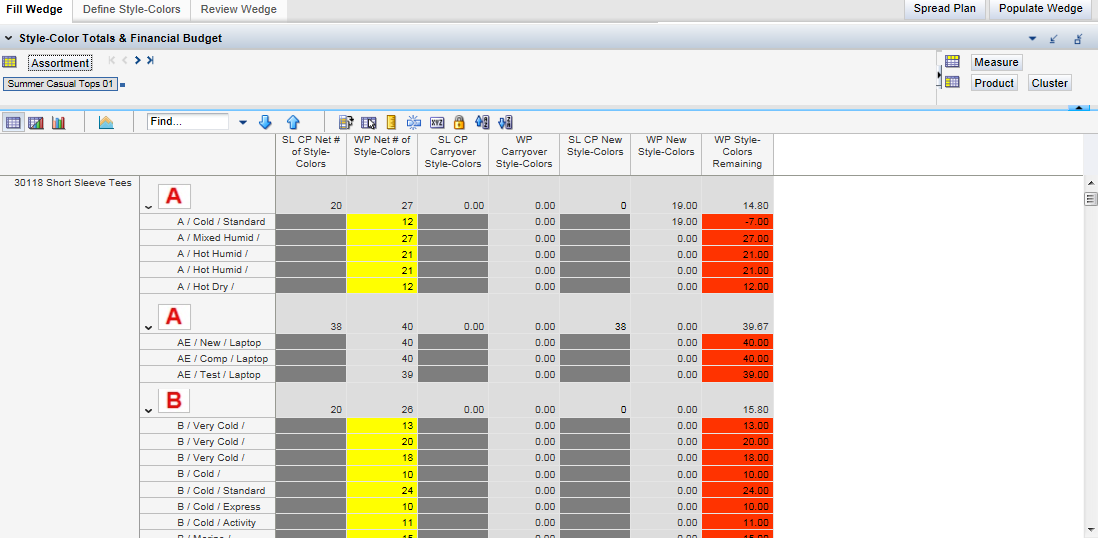
Consider this view to be an Assortment Tote-board:
Enables the Buyer to track how many style-colors are being carried over into this Look, how many new style-colors have been created for this Look, and how many style-colors remain to be created or planned for this Look.
Shows those same slices of the assortment (carry-over, new, and yet to be created) in terms of style-color counts, planned sales units, and planned sales in retail value. The sales numbers represent the sales potential referred to in this tab's introduction.
In this view, the Buyer can adjust the start and end dates of the look by cluster. This is called time phasing the wedge. Each wedge's start/end dates default to the look's dates, but the Buyer can tailor them here to reflect the climate, and so on, represented by each cluster (for example: launch heavy winter coats over several weeks by cluster from warmer to cooler clusters).
On the views on this tab, the Buyer is able to:
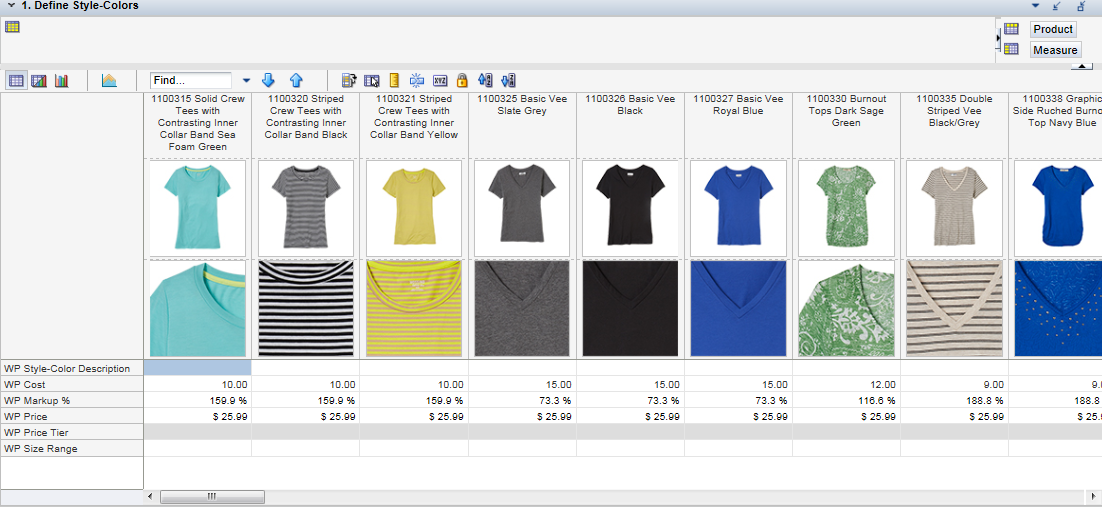
Create placeholder styles and style-colors
Define product attributes
Assign colors to style-colors
Set estimated cost/price/markup
Determine whether you plan to bring them in for a time-frame, that is different from the Look's start and end dates, by adjusting the style-color's start/end dates
In either view, the Buyer can create placeholder styles and style-colors using the Position Maintenance option on the right-click menu. Then overnight, the Slow Item Build process renames those placeholder style numbers with merchandising system style numbers and style-colors with the merchandising system color diff code. For more information on setting up the Slow Item Build process, see the Oracle Retail Assortment Planning Installation Guide.
In this view, the style-color placeholder can be created along with its description, proposed cost/price/markup. The price tier of the attribute calculates automatically once you set a proposed price point (this can be changed at any time).
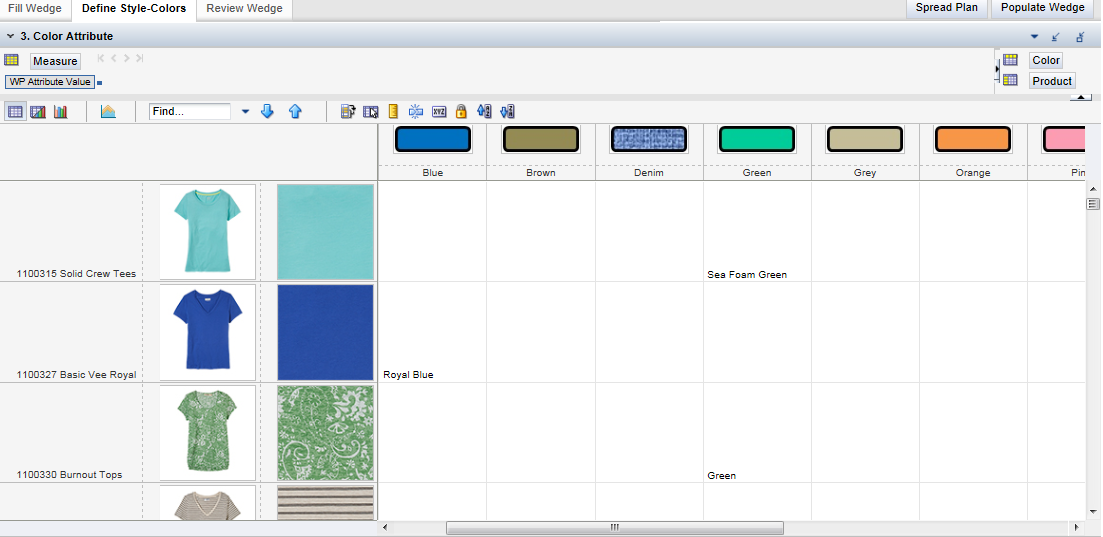
In this view, the specific color for the style-color can be selected. This view intersects the style-color level of the product hierarchy with the color hierarchy. The color family level is visible in the view. The Buyer identifies the proper color family for the style-color and then selects the detailed color from the Color picklist.
The Buyer can select colors for the newly created style-colors. For the newly created style-color, the color selected in this view will be shared with the merchandising system during the Slow Item Build process.
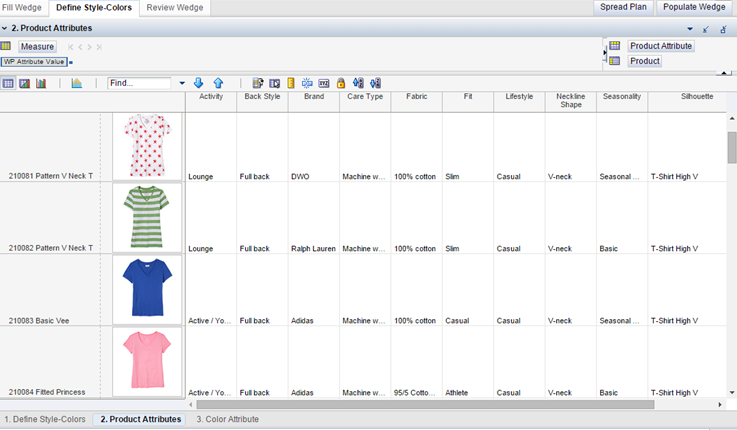
In this view, the Buyer assigns values for any of the relevant product attributes for the style (fit, silhouette, and so on). The Buyer is able to add more product attributes as needed.
Among all the available product attributes in this worksheet, for the GA version of AP, the following attributes will be shared with the merchandising system during the Slow Item Build process:
Brand
Collection
Fabric
Lifestyle
Occasion
Pattern
Price Tier
Seasonality
Silhouette
Sub-Brand
Vendor
|
Note: The product attributes can be updated while the style remains an informal position. After the new style positions are formalized, the attributes will not be editable. The merchandising system becomes the system of record. |
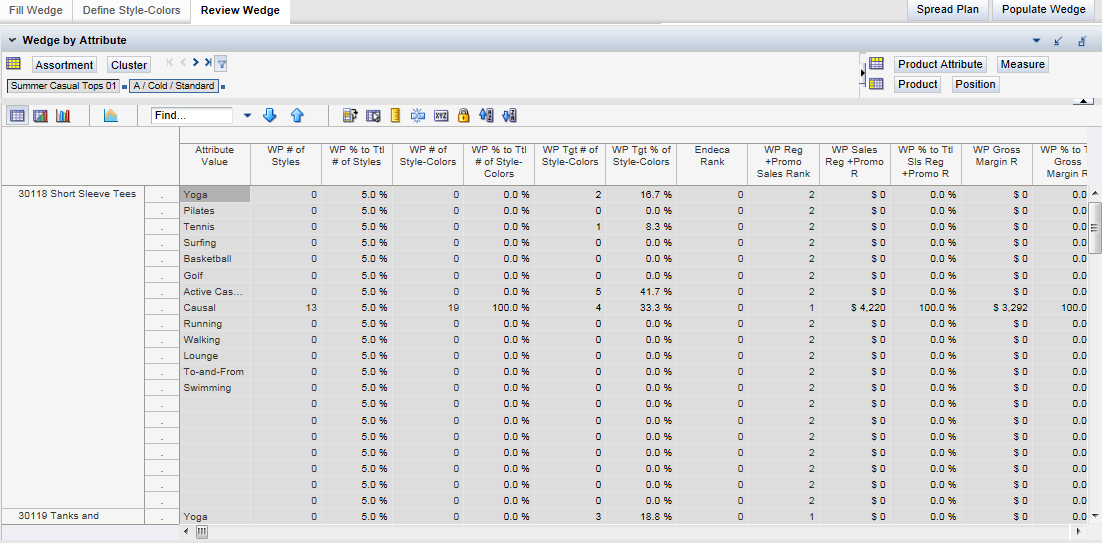
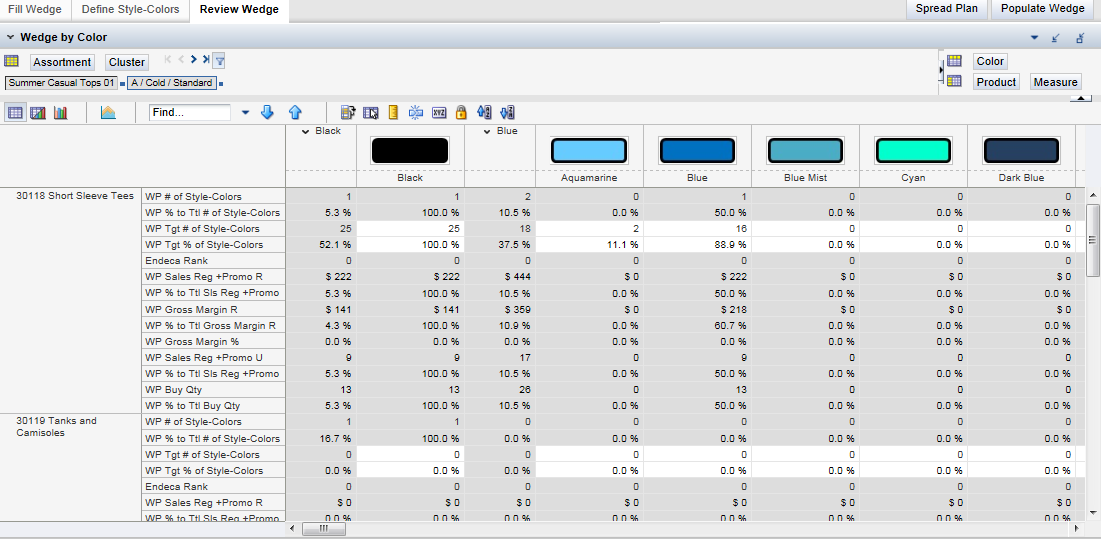
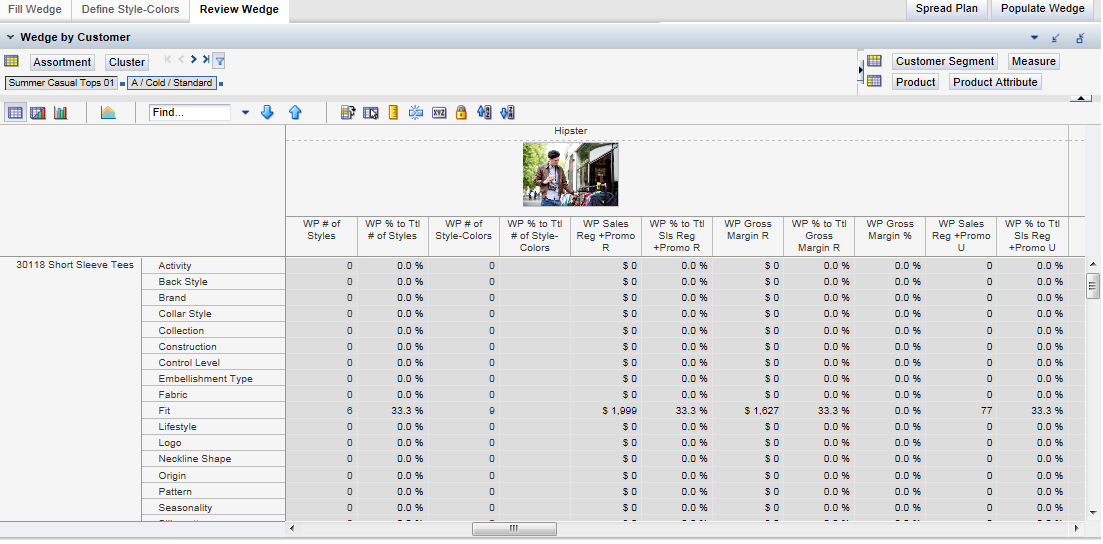
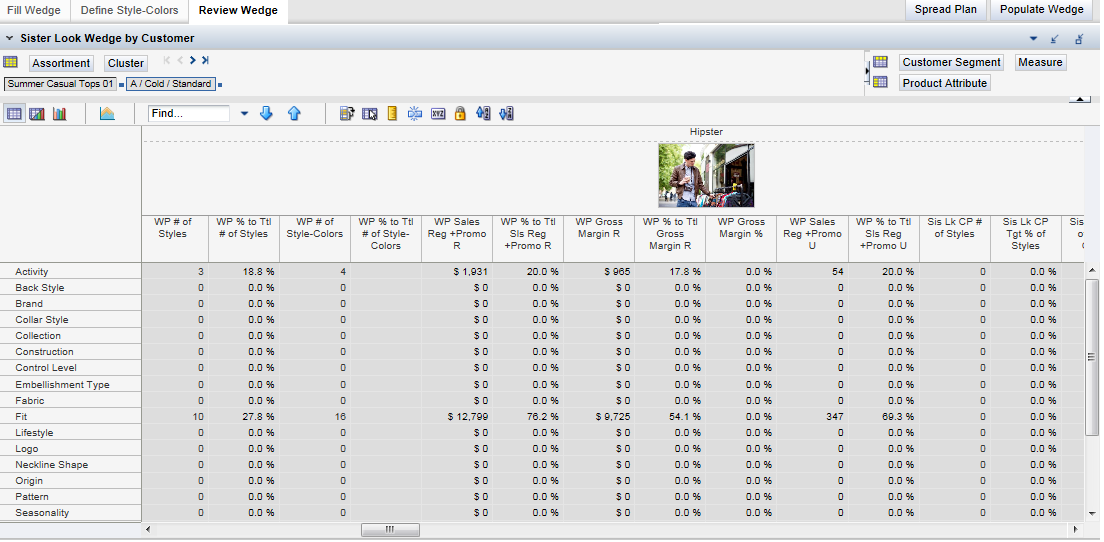
On this tab, the Buyer can view various roll ups of the style-colors (and their attributes) added to each wedge to date. The plan can be rolled up by 1) product attribute, 2) color (and compared to the attribute or color goals, to last year and to recent trend, and so on), and 3) by Customer Segment, where selected product attributes are used to determine whether each style is attractive to each Customer Segment.
The three views are also shown for the Sister Look to provide a comparison point of history or recent trend.
In this view, the style-colors assigned to the wedge (and their product attributes) are rolled up by product attribute, compared to the attribute goals as well as to last year and to Endeca search results (where available).
In this view, the style-colors assigned to the wedge are rolled up to the color (Emerald Green) and color family (Green) level, compared to color goals as well as to last year and to Endeca search results (where available).
In this view, the style-colors assigned to the wedge (and their attributes) are rolled up to the customer segment level. Each style or style-color's attributes are compared to the product attributes definitions (price, silhouette, and so on) of each customer segment. If selected product attributes are desirable for that customer segment, then the style is counted for that segment along with its sales, margin, and so on.
A common way to use this view is: Typically, Customer Segment A generates 20% of Class 10's sales, but currently only 15% of my assortment's sales represent styles or style-colors appropriate for Customer Segment A. This same analysis can also be based on the number of styles and margin.
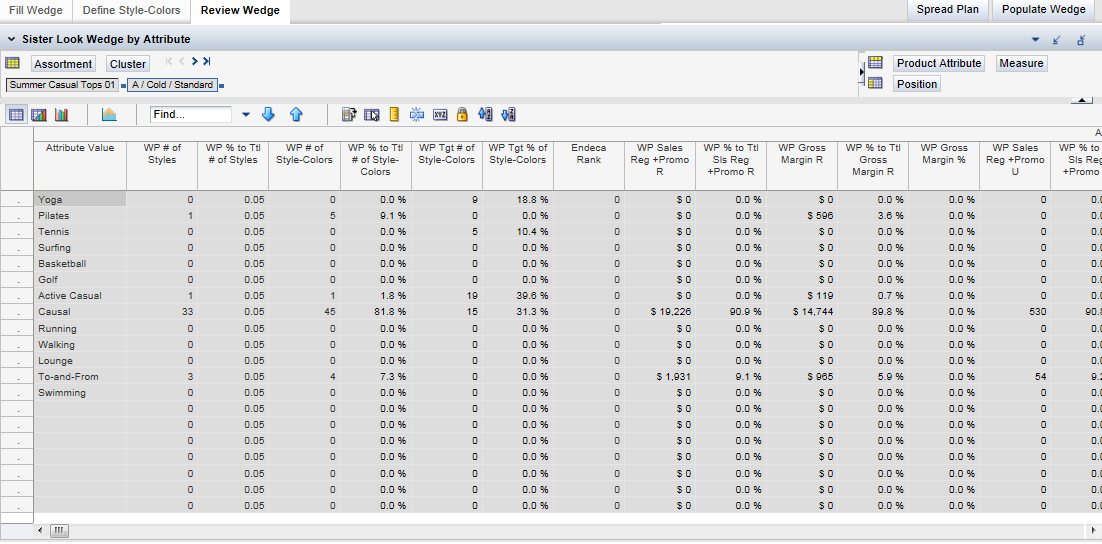
This is the same view as the Wedge by Attribute but, this view shows the Sister Look to the look being assorted.
This is the same view as the Wedge by Color but, this view shows the Sister Look to the look being assorted.
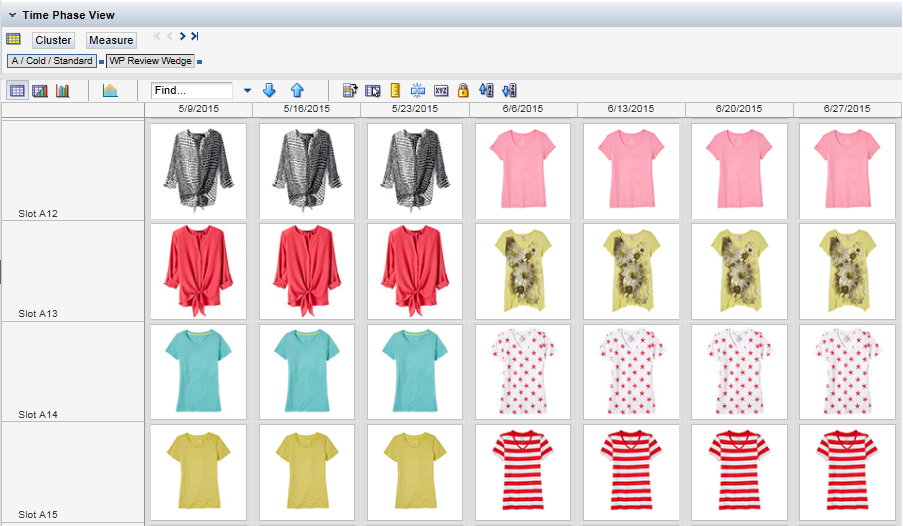
Now that the Buyer has assorted the wedge for each cluster and look, you can view the assortment in a time-phased view. This allows you to view the assortment before, during, and after the floor-set. As this is a fully visual view, you can see the trends in color, silhouette, and design visually over time.
In this final step of the Fill the Wedge process, the Buyer decides they have completed assorting the wedges and wants to make it available to other designated users, in particular to the Buyer who is building the Buy Plan or to the Planner building the Item Plan (and to Reporting as well). Some retailers create just a Buy Plan or an Item Plan or both types of plans.
This step converts the Working Plan decisions regarding wedge-level assortments, start/end dates, prices, descriptions, and attributes into Current Plan versions of the Working Plan measures. The Current Plan versions should be used for external reporting, and so on.
This step can be completed more than once, if the wedge requires additional changes after it has been approved. The Working Plan version overlays the Current Plan version if approved again.