| Oracle® Retail Merchandise Financial Planning Cloud Service and Oracle® Retail Merchandise Financial Planning Enterprise Edition Cloud Service Administration Guide Release 18.0 F10753-05 |
|

 Previous |
 Next |
| Oracle® Retail Merchandise Financial Planning Cloud Service and Oracle® Retail Merchandise Financial Planning Enterprise Edition Cloud Service Administration Guide Release 18.0 F10753-05 |
|
Previous |
Next |
The Merchandising Financial Planning (MFP) Cloud Service batch task is a powerful tool provided to the Administrator to manage periodic load/export of Data/Hierarchy from the front end, eliminating the cumbersome effort of scheduling and running the batch from the back end domain server.
MFP Cloud Service uses the Oracle Retail Predictive Application Server Cloud Edition (RPASCE) Online Administration Tools to schedule RPASCE services to run batch on the Cloud. Administrative users can view the results of the scheduled services in the log on a dashboard through the RPASCE front end.
RPASCE Online Administration Tools support the scheduling of standard RPAS utilities and, in addition, scheduling application-specific services. For a detailed understanding of the Online Administration Tools, see the Oracle Retail Predictive Application Server Cloud Edition Administration Guide.
The following sections explain the application-specific administration tasks that are pre-configured for MFP Cloud Service.
The application-specific batch tasks are a set of tasks that help the Administrator to load/export a predefined set of data and hierarchies. These tasks are found in the Online Administration Tools as Configured Batch Tasks.
Each task in turn calls predefined batch services to do the required tasks. MFP Cloud Service uses the Enterprise Edition batch framework to define the batch process.
Some tasks require input data files or hierarchy files as input. These files must be uploaded before the tasks are scheduled. Some tasks export files out of the application. Those files are copied to the SFTP export location, and Administrators can download these exported files.
The SFTP file location is a space provided to the Administrator to load import files and access exported batch files. For more information, see "Batch File Uploads/Downloads."
Administrators can set up some additional batch specific measures, such as Enable RMF CS Integration, that control the batch process in the client UI in MFP Setup -> Manage Batch -> Manage Batch.
The following table shows the list of application-specific administration tasks that are pre-configured for MFP Cloud Service:
| Configured Batch Tasks |
|---|
| Run Batch Measure Load Group |
| Run Batch Measure Export Group |
| Run Batch Calc Group |
| Run Batch Task Group |
| Clean up Task |
| Retrieve Batch Control Files |
| Upload Batch Control Files |
| Manage JSON files |
| Patch JSE Jars |
| Remove JSE Jar |
| Translation Tasks |
This task is used to load a predefined set of measures grouped as a measure set in the batch control file batch_loadmeas_list.txt. These set of measures can be loaded together. Actuals Data is a named set of load measures in the batch control file. If the Administrator decides to load the measure set for Actuals Data, the Administrator needs to load data for measures which includes measures such as Ty Sales Clr R and TY Sales Clr U. All required data files must be uploaded to the SFTP location before scheduling this task. For more information, see "Batch File Uploads/Downloads." If there is no file present to load a particular measure in that measure set, it will be logged as not found and skipped.
This process will only load the data into those measures and will not run any subsequent calculations. The Administrator may need to schedule the necessary Run Batch Calc Group task after scheduling this task in order to process the loaded data.
The Predefined Measure Load Options in MFP are listed below:
Actuals Data (load_act) - To load all the measures containing actual data as needed such as Sales, Inventory, Receipt, Shrink, and so on.
On Order Data (load_oo) - To load only On Order data files.
Admin Data (load_adm) - To load planning administration level data such as VAT %, Currency Conversion Rates, Week Mapping, and so on.
RMS Forecast (load_rms) - To load transformed RMF CS interface data files.
Translation Files (load_tran) - To load all the translation files.
For details about the list of measure files that are loaded for different measure sets and information on the data file formats, see the Oracle Retail Merchandise Financial Planning Cloud Service Implementation Guide.
With Enterprise Edition implementations, the Run Batch Measure Load group task can be configured to load different sets of measures by making changes to the batch control files. For information about changing the batch control files and how to upload them, see the Oracle Retail Merchandise Financial Planning Enterprise Edition Cloud Service and Assortment & Item Planning Enterprise Edition Cloud Service Implementation Guide.
This task exports a predefined set of measure data into flat files. The predefined set of measures to be exported are defined in the batch control file batch_exportmeas_list.txt. This set of exported data can be used for integration with other applications. Typically, the data is exported to a database that creates a report or allows a query by users. The Administrator needs to schedule the Set Export Flags under the Run Batch Calc Group task to set the required export flags before scheduling this task. Exported files for this task are put into the SFTP Export location; the Administrator can download the files from this location. For more information, see "Batch File Uploads/Downloads."
The standard exports from MFP are available to the retailer to use by any downstream applications which needs MFP plan data. Default approved plan standard exports are included as part of the daily and weekly batch.
The predefined options for these tasks are listed below:
Merch Plan - Current Plan (mpcp)
Merch Plan - Original Plan (mpop)
Merch Plan - Submitted Plan (mpwa)
Merch Plan - Working Plan (mpwp)
Merch Target - Target Plan (mttg)
Merch Target - Working Plan (mtwp)
Location Plan - Current Plan (lpcp)
Location Plan - Original Plan (lpop)
Location Plan - Working Plan (lpwp)
Location Target - Target Plan (lttg)
Location Target - Working Plan (ltwp)
For details about the different versions for export, the list of measures exported in each file, and the file name and format details, see the Oracle Retail Merchandise Financial Planning Cloud Service Implementation Guide.
With Enterprise Edition implementations, the Run Batch Measure Export group task can be configured to export new versions of data or remove a particular version from the list of measures exported by changing the batch control files. For information about changing the batch control files and how to upload them, see the Oracle Retail Merchandise Financial Planning Enterprise Edition Cloud Service and Assortment & Item Planning Enterprise Edition Cloud Service Implementation Guide.
This task is used to run a predefined set of all batch rules (as batch calc sets) against the domain to do the necessary data aggregation that is defined in the batch control file batch_calc_list.txt.
With Enterprise Edition implementations, the Run Batch Calc group task can be configured to export new versions of data or remove a particular version from the list of measures exported by changing the batch control files. For information about changing the batch control files and how to upload them, see the Oracle Retail Merchandise Financial Planning Enterprise Edition Cloud Service and Assortment & Item Planning Enterprise Edition Cloud Service Implementation Guide.
The following predefined batch calculation sets are available in MFP:
Weekly Batch Calc (batch_week)
Generate Forecast (batch_fcst)
Set Export Flags (exp_set)
This batch calc set is used to run all required batch process calculations to do the necessary data aggregation and inventory roll operations after the weekly data load. It internally runs the batch rule groups Batch_GB, Batch_AggW and Batch_InvRoll.
This allows the users to see actualized data for the current elapsed week such as sales, markdowns, and receipts as well as inventory for both current and recalculated for future periods. This also allows users to see a sales forecast based on actuals that have been loaded and apply the trend to go forward weeks.
This process runs as part of a Weekly Batch. This task may be also scheduled if a retailer has data issues and needs to reload corrected actual data files in the middle of week and reprocess the week batch calculation.
Batch_GB sets the elapsed measures and runs domain calcs for the Location Target measures. Batch_AggW copies all loaded actuals into the WP and CP versions for the elapsed periods. Batch_InvRoll rolls forward the new EOP of the elapsed periods to the future BOP and EOP for both the WP and CP versions.
This batch calc set is used to generate forecast data used by MFP Cloud Service. It uses the embedded RDF procedures by calling the internal configuration rule groups Batch_Fcst_G and Batch_Fcst_L. These rule groups call the embedded RDF forecast procedure to calculate the forecast for future periods of all versions using loaded actual and approved plan data. It calculates both the in-season forecast and pre-season forecast for all versions. Only one version of the forecast is shown in the workbook, based on the workbook build for in-season or pre-season.
This process also runs as part of the regular weekly batch, but if the retailer wants to regenerate the forecast after loading corrected actuals in the middle of the week, then they can run this task.
Following is the list of forecast measures that are calculated by this process:
Wp Fcst In Reg+Promo R
Wp Fcst In Clr R
Wp Fcst In Reg+Promo U
Wp Fcst In Clr U
Wp Fcst Pre Reg+Promo R
Wp Fcst Pre Clr R
Wp Fcst Pre Reg+Promo U
Wp Fcst Pre Clr U
This batch calc set is used to set the necessary export flags for all exports used by MFP Cloud Service. The user can control the position exported for all versions by setting the administration measure addvexportb Export Mask in the Manage Export view. If the Export Elapsed Periods flag is set to false (the default), it will not export elapsed period data. This task sets export flags for each version of exports based on the Export Mask. For approved and submitted plans, the export flag is set based on the Export Mask and Approved or Submitted Info measure. For working plans, it is set based on the Export Mask and Seeded Info measures.
By default, daily and weekly batch runs these calculations before running an export. The Administrator needs to run this task only if they have changed the export settings and wants to create an on-demand plan data export.
This task is used to schedule a predefined set of batch tasks such as load measure, batch calc, and batch exports in a sequential order. The batch control file
batch_exec_list.txt defines the steps in the specific order that will be executed during batch task execution. This task is used to schedule a typical daily or weekly MFP Cloud Service batch. If any task aborts, a log is created and the process terminates. This task has the option to restart from the last failed service rather than running all the completed services again.
|
Note: Typically, the Administrator must schedule this task within a time frame after a domain backup and when no users are logged into the domain. The Administrator must work with Oracle to find out the time of backups and any other jobs. |
The following predefined batch sets are available:
Daily Batch (batch_daily)
Weekly Batch (batch_weekly)
Transform RMS Files (batch_rms_xform)
Transform RMS Warehouse Data (batch_rms_wh)
Load Hierarchies (load_hier)
Export All Approved Plans (export_all)
Export All Working Plans (export_wp)
Exports to Retail Insights (export_ri)
Exports to Shared Services (export_ss)
Post Build Batch (postbuild)
With Enterprise Edition implementations, the Run Batch Task Group task can be configured by making changes to the batch_exec_list.txt control file. For more details about the list of internal services this task can call and how to change the order of services to this task, see the Oracle Retail Merchandise Financial Planning Enterprise Edition Cloud Service and Assortment & Item Planning Enterprise Edition Cloud Service Implementation Guide.
This task is used to schedule a daily plan data export and load on-order files. A retailer may need on-order on a daily basis during an open-to-buy for example.
If a daily load or export is not needed, this step can be skipped as they are scheduled in the weekly load/export process. Steps in this process are also part of the Weekly Batch, so they do not have to schedule this during weekly batch.
Also, if the retailer does not need exports on a daily basis, they can skip scheduling this process.
This task runs the following set of activities in this order:
Run Batch Calc: Set Export Flags
Measure Export: Export All Plan Versions
Measure Load: Load On Order and Process On Order
Refresh Dashboard
This task is used to schedule a typical weekly MFP batch, which includes loading all hierarchy files and actual data and running all batch aggregations tasks needed for inventory roll. This task is the main task that needs to be scheduled to run on a weekly basis so the Administrator can see the most up-to-date location and product structures and information. Before scheduling this task, all necessary hierarchy and data files need to be uploaded to the SFTP server. This task runs the conditional execution of different tasks based on the various batch control flags set in the application.
This task runs the following activities in this order:
Run Batch Calc: Batch Specific Flags and Set Export Flags
Measure Export: Export all Plan Versions
If Enable RMF CS Integration is set to true:
Transform RMS Files
Load Hierarchies
Load RMF CS Interface Files
Load non-RMF CS Interface Files
Run Batch Calc: Batch Agg for RMF CS data
Run Batch Calc: Transform RMF Warehouse Data
If Enable RMF CS Integration is set to false:
Load Hierarchies
Load Actuals
Load non-RMF CS Interface Files
Run Batch Calc: Weekly Batch Calc
Run Batch Calc: Generate Forecast
Refresh All Workbooks and Dashboard
Run Auto Workbook Build
This task is used to transform all hierarchy and data files from RMF CS to the MFP required format. This task transforms the RMF CS hierarchy and data files and also creates rms_hier.zip and rms_data.zip and copies them to the SFTP outgoing path. This task is mainly for creating the initial set of transformed RMF CS hierarchy files to build a new domain with the RMF CS hierarchy files using Self Service. The user does not need to use this task if there is no RMF CS integration.
This task runs the following activities in this order:
Transform RMF CS Calendar Hierarchy File
Transform RMF CS Product Hierarchy File
Transform RMF CS Location Hierarchy File
Transform RMF CS Currency Hierarchy File
Transform RMF CS Inventory File
Transform RMF CS On Order File
Transform RMF CS Tran Data File
Transform RMF CS Currency Conversion Rate File
Transform RMF CS Location File
This task is used to transform the loaded RMF CS warehouse inventory and on-order data to the mapped MFP Channels. It actually creates an internal export of loaded warehouse inventory and on-order data, transforms warehouse to channels and reloads, and then runs the batch aggregates. This task runs as part of the regular Weekly Batch with RMF CS Integration enabled. The user needs to schedule this only if the user changes the Warehouse-Channel Mapping in the middle of week and would like to reallocate the Warehouse Inventory to the newly mapped Channels for all history in the middle of the week. The user does not need to use this task if there is no RMF CS integration.
This task runs the following activities in this order:
Run Batch Calc - Initialize RMF CS Warehouse Data for Export
Exports RMF CS Warehouse Inventory Data
Transform RMF CS Warehouse Inventory with MFP Channel
Exports RMF CS Warehouse On Order Data
Transform RMF CS Warehouse On Order with MFP Channel
Exports RMF CS Warehouse Receipt Data
Transform RMF CS Warehouse Receipt with MFP Channel
Load RMF CS Warehouse data to MFP Channel
Run Batch Calc - Weekly Batch Calc
This task is used to export all submitted and approved plan versions (all non-working plan versions). This task first runs the export set flag task and then exports all the plan versions. This task also runs as part of the daily or weekly batch, so the user needs to run this task only if they need to re-export all plan data on an on-need basis. The exported data is used in reports, customer's data marts, and query programs.
Following is the list of export plan versions that are exported for both MFP Retail Cloud Service and MFP Cost Cloud Service:
Merch Plan - Current Plan
Merch Plan - Original Plan
Merch Plan - Submitted Plan
Merch Target - Target Plan
Location Plan - Current Plan
Location Plan - Original Plan
Location Target - Target Plan
For details on the versions for export, the list of measures exported in each file, and the file name and format details, see the Oracle Retail Merchandise Financial Planning Cloud Service Implementation Guide.
This task is used to export all the working plan versions. This task first runs the export set flags task and then exports all working plan versions. This task only needs to be run if the user wants an export of all working plan versions for any reporting needs.
Following is the list of export plan versions that are exported for both MFP Retail Cloud Service and MFP Cost Cloud Service:
Merch Plan - Working Plan
Merch Target - Working Plan
Location Plan - Working Plan
Location Target - Working Plan
For details on the versions for export, the list of measures exported in each file, and the file name and format details, see the Oracle Retail Merchandise Financial Planning Cloud Service Implementation Guide.
This task is used to export all approved Merch Plans for the planned periods to Oracle Retail Insights (RI) Cloud Service Suite. This can only be scheduled if the retailer has Oracle Retail Insights (RI).
Following is the list of export plan versions that are exported for both MFP Retail Cloud Service and MFP Cost Cloud Service:
Merch Plan - Current Plan
Merch Plan - Original Plan
For details about integration with RI, the list of measures exported in each file, and the file name and format details, see the Oracle Retail Merchandise Financial Planning Cloud Service Implementation Guide.
This export set is used to export all approved Merch Plans and Location Plans for the planned periods to Assortment & Item Planning Cloud Service. It exports the required measures and copies the file to the common cloud service application share location RGBU_CLOUD_DATA. Assortment & Item Planning Cloud Service can access the file from that location.
For details about integration with RI, the list of measures exported in each file, and the file name and format details, see the Oracle Retail Merchandise Financial Planning Cloud Service Implementation Guide.
This task is provided to clean up the processed files or unprocessed files from different cloud service locations to be run by the retailer on an on-need basis. This task has the following three options to select the locations to clean up when this task is scheduled:
Clean FTP Holding Area - When incoming files are sent to the FTP site, a process then moves those files to an internal holding area from which the batch framework can process them. In cases where files are sent using FTP and then not used by any batch process (for example, if the batch configuration has changed or if a file was misnamed), it becomes stranded in the internal holding area. This option is provided to remove all files from the internal holding area. Note that all files currently in the internal holding area will be removed, so this option must not be used when any scheduled batch processes are executing.
Clean FTP Export Area - Select this option to remove all files from the outgoing FTP holding area.
Clean processed folders - All processed input files are archived within the domain/input/processed folders. This option can be used to remove all the processed directories within a domain to reduce the growing domain size.
This task allows the currently configured batch control files to be retrieved, in case they must be inspected or modified. The set of files are packaged together as the archive file batch_control.tar.gz, and placed into the FTP area for retrieval. No parameters are required for this OAT task.
This task allows you to upload updated batch control files. Before running this task, upload the updated batch control files to the FTP area for batch_control. No parameters are required for this OAT task other than the task label.
JSON files are used for the Dashboard and Help links within the application. This task allows you to retrieve existing JSON files or upload updated JSON files.
If an Enterprise Edition customer is using some custom Java functions in their configuration, they can use this task to upload and register their JSE jar files.
If an Enterprise Edition customer wants to remove and un-register a custom jar file, specify the jar file and run this task to un-register and remove the file from the cloud environment.
This task has multiple sub-tasks to allow you to manage the translation files specific to your solution. Both Enterprise Edition and non-Enterprise Edition customers can upload their own custom translations. This task first applies the default GA translation and then on top of it, it will apply the custom translation. This task allows a customer to upload their own set of translation files, remove their last loaded custom translations, list the custom translations, apply custom translations, download all translations (including GA), and download custom translations.
This section walks through an example of the process for scheduling and monitoring the Configured Batch Administration task named Run Batch Measure Export Group. The steps for scheduling all other tasks are similar, and most of the tasks do not have additional input parameters specific to that task. For more details about scheduling and monitoring online administration tasks, see the Oracle Retail Predictive Application Server Cloud Edition Administration Guide.
To schedule and monitor a Configured Batch Administration task:
Log in to the MFP Retail Cloud Service (mfprcs) or MFP Cost Cloud Service (mfpccs) application as an Administration user.
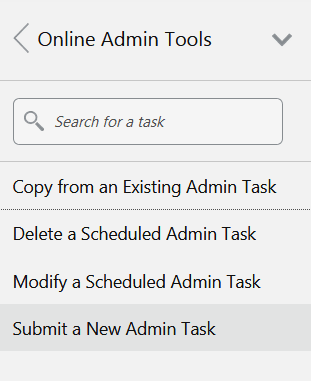
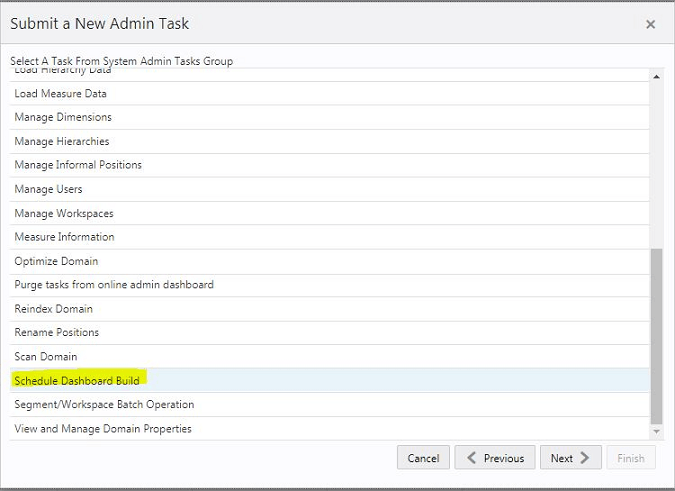
In the Tasks list, select Admin Tasks for MFP CS Retail/Cost Customer Domain and then select Online Admin Tools. Click Submit a New Admin Task.
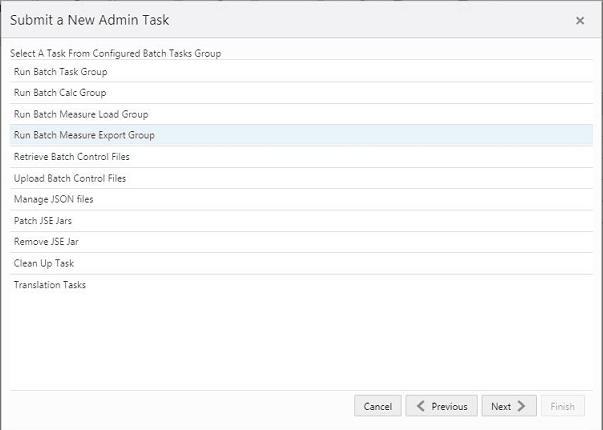
Select the Configured Batch Tasks for Task Group and click Next.
In the task list, select Run Measure Export Group and click Next.
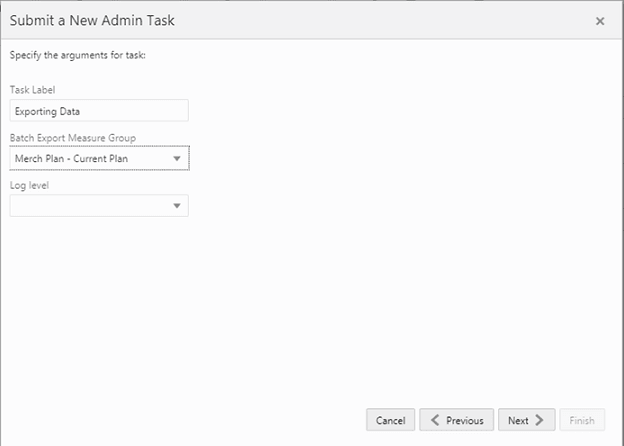
Enter the Task Label. This task has an additional parameter to choose the export measure group. In following figure, as an example, Merch Plan - Current Plan is selected. Click Next.
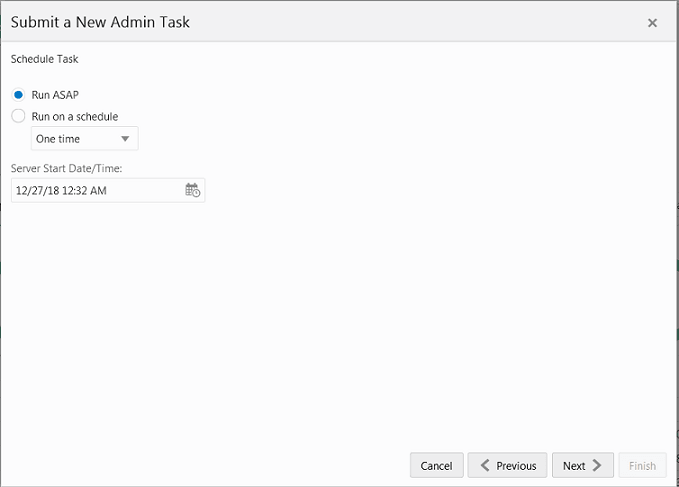
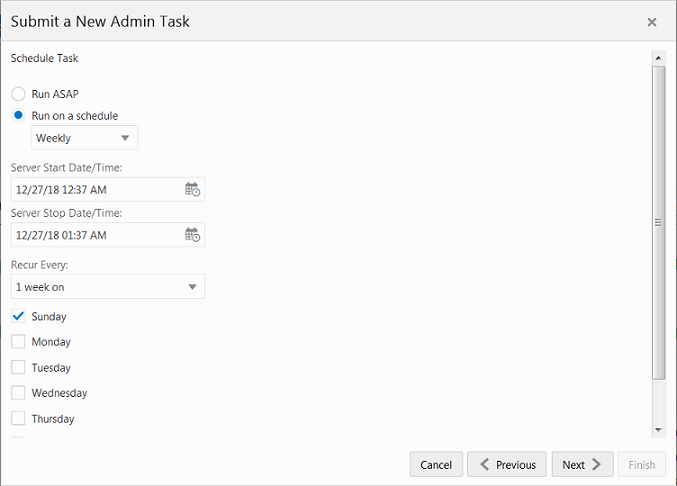
To schedule the task to run immediately, select Run ASAP and click Next. To run on a particular date and time, set that information, select Run on a Schedule (One time / Hourly /Daily/ Weekly/ Monthly). Provide the Server Start / Stop Date/Time and click Next.
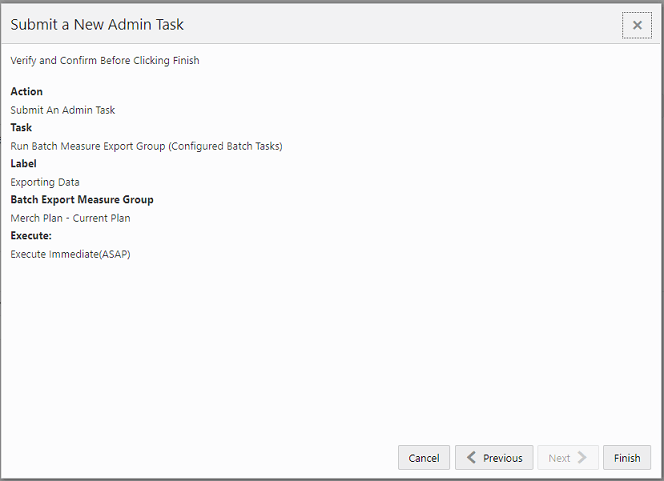
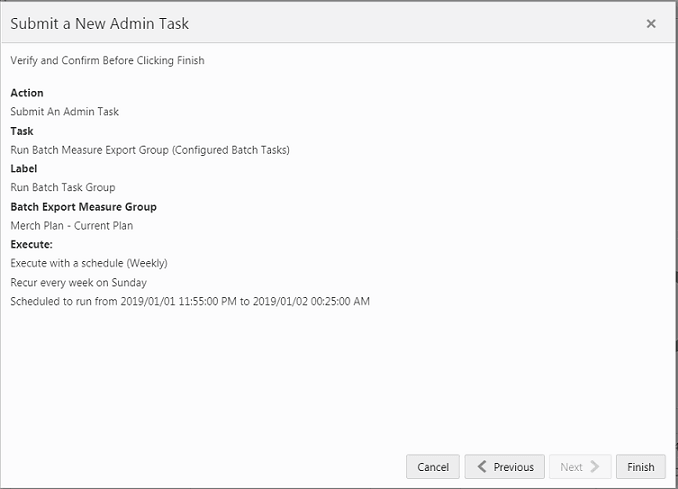
In the Confirm Action window, review the task scheduling details. To confirm the scheduling and submit the task, click Finish.
The task submitted confirmation message appears.
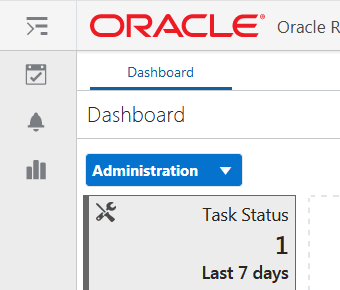
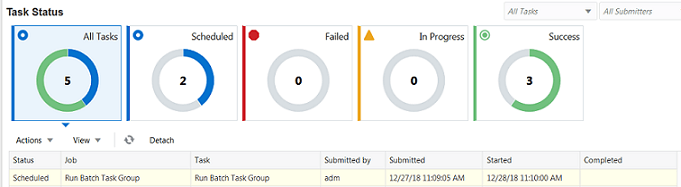
To check the status of all submitted tasks in the Dashboard, click Dashboard and select Administration from the list of Dashboard Profiles in the dropdown.
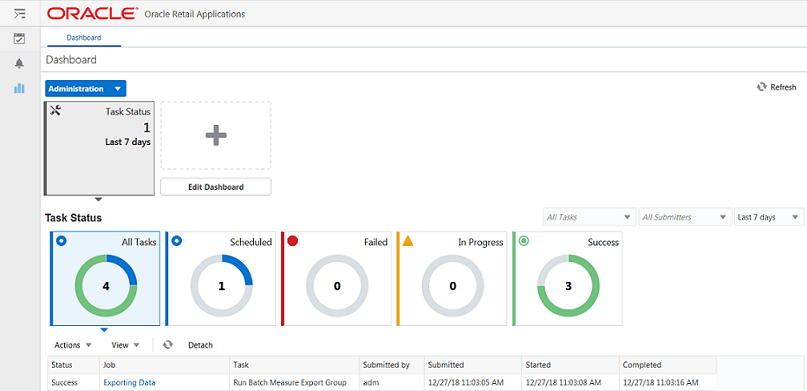
At the bottom of the dashboard, it contains the lists of tasks submitted and their status.
The Status column shows whether a job has completed successfully, failed, or is pending (Scheduled). For any completed (Success/Failed) tasks, click the job name to view the log. For failed tasks, the logs show the error details.
Following is an example of a log showing an error:

Following is an example of a log showing the cause of an error:

|
Note: The detailed log file can be found in the SFTP sever. The log file names are first appended with the text success/failure (with error code) along with the process name and control file entry set names and the time stamp for easy identification. For example:success.eebatch_calc.exp_set.20190614124917.tar.gz failure.13.eebatch_exec.setup.20190614043009.tar.gz |
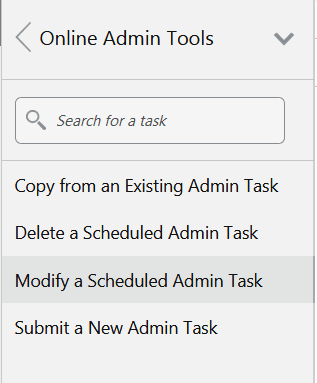
Due to a business requirement, the Administrator may need to modify a scheduled batch task. The Modify an Admin task capability of RPAS provides the Administrator the tool to handle this kind of situation.
For example, an Online Administration Tool task is currently scheduled for weekly once on Sunday, but due to a business constraint, the Administrator needs to run the specific task on Saturday instead of Sunday for a week. The Administrator can achieve the goal using the Modify an Admin task.
The alternate way of handling with any change in a scheduled task is by copying the scheduled task, changing the start date, and then deleting the original scheduled task.
The Administrator submits any configured Batch Task scheduled weekly on Sunday. The following steps walk you through the process of changing the schedule of any scheduled batch using Online Administration Tools:
Set up the Run Batch Task Group.
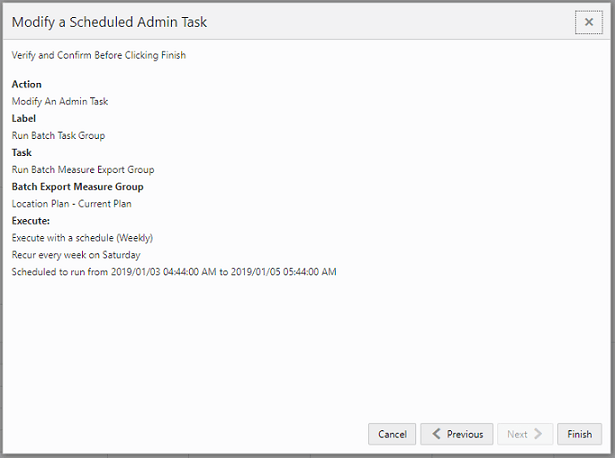
Review the selected setup.
View the submitted task on the dashboard.
Modify the task to run on Saturday rather than Sunday.
Select the task to modify.
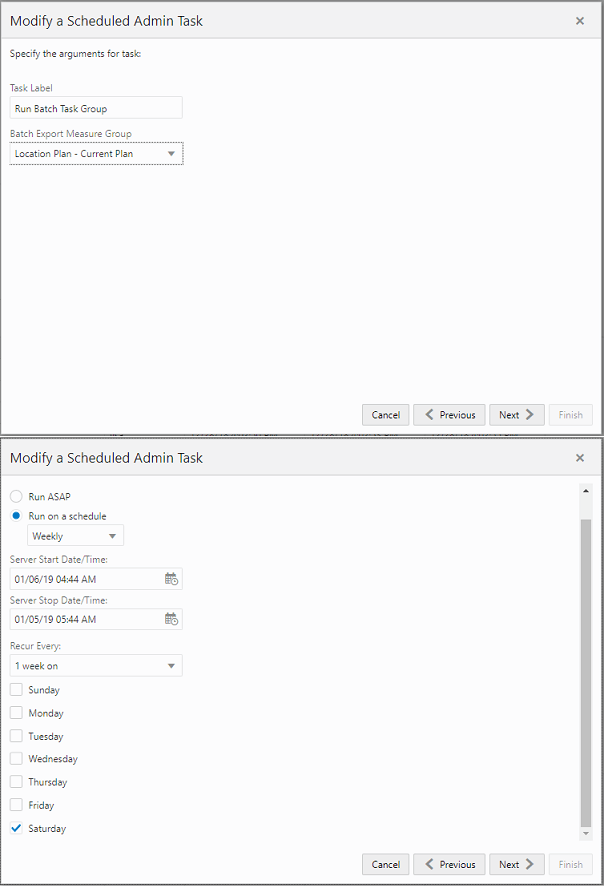
Verify the details. Enter the new parameters for modification.
Submit the modified task.
The Dashboard provides pre-configured dashboard profiles to the user once logged into the application. There are six profiles pre-configured for MFP CS:
Administration - task status
MFP: In-Season
MFP: Pre-Season
MT: Exceptions
MP: Exceptions
LP: Exceptions
For more information about the usage of Dashboards in MFP CS, see the Oracle Retail Merchandise Financial Planning Cost Cloud Service User Guide and Oracle Retail Merchandise Financial Planning Retail Cloud Service User Guide.
The dashboard pulls the data from an admin workbook built from the Online Administration Tool. In order to view the dashboard, an Administrator must schedule the dashboard builds from the System Admin Tasks.
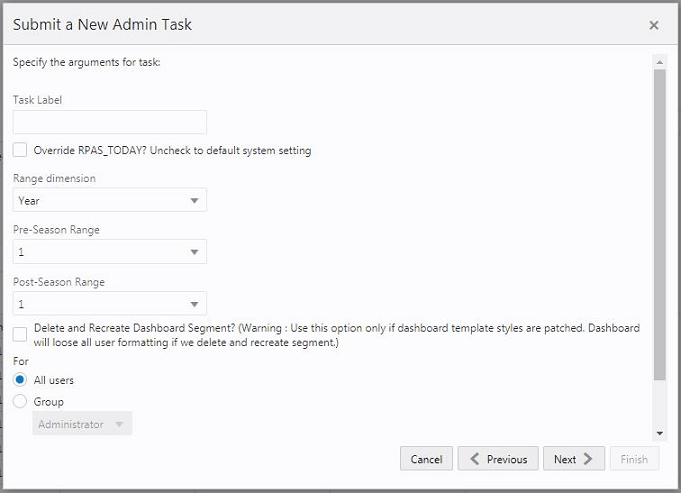
Task Label - Enter the name of the build task to review the status of build.
Select Override RPAS_TODAY - Check box and then select a date, if you need to build the dashboard as of a day other than the current date.
Range dimension - Calendar dimension against which the dashboard will be pre-ranged.
Pre-Season Range - Number of periods of the Range dimension that need to be included before the Current Period Range. The Current Period Range will always be included.
Post-Season Range - Number of periods of the Range dimension that need to be included after RPAS_TODAY.
Select Delete and Recreate Dashboard Segment check box, only if there are any changes to the dashboard template selection after patching.
Users - Select All Users, Group, or Users that can access that dashboard.
|
Note: For the configured GA profiles, the preferred selections are Range dimension: Half, Pre-Season Range: 0, and Post-Season Range: 1. |
The following sections describe the file upload/download process. For the batches that load data, the Administrator needs to upload the relevant files which load the data to the SFTP server before running the batch. After running any export task, the exported files can be found in the export location of the SFTP server.
For details regarding file contents and formatting of the upload and download files, see the Oracle Retail Merchandise Financial Planning Cloud Service Implementation Guide.
This section describes the process to generate a 2048 bit RSA key and add the same to the SFTP server. This is done with the help of the WinSCP tool on Windows. However, the same can be done using ssh-keygen on Linux as well.
Prerequisites:
The WinSCP tool must be installed before performing the following process.
The Private/Public keys must be generated and the Public key must be associated with your SFTP Account for the file upload/Download.
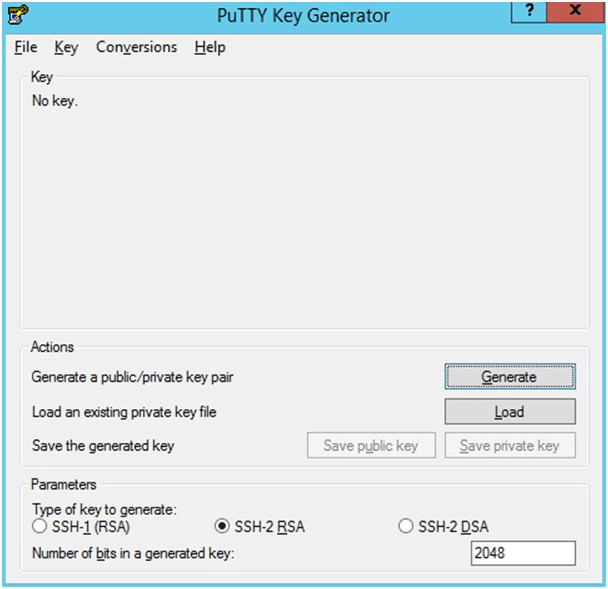
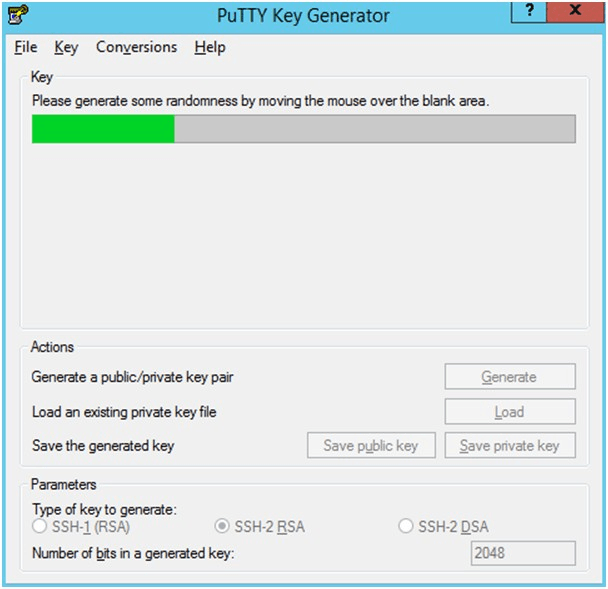
Launch WinSCP and select Tools > Run PuttyGen.
Select SSH-2 RSA for the type of key to generate and enter 2048 for the number of bits in a generated key field. Click Generate.
Move the mouse over the blank space in the window until the key is generated. Moving the mouse over the blank space creates a random pattern which is used for key generation.
Once the key is generated, click Save public key to save the public key to a file.
Click Save private key to save the private key to a file. Confirm to save it with or without a passphrase.
Open an SR with Oracle Support, to associate the public key with your SFTP account (attach the key with the SR).
The upload steps use the private key generated in the Adding Authorized Keys section.
Launch WinSCP and connect to <SFTP Server> using port 22.
Enter the user name and click Advanced.
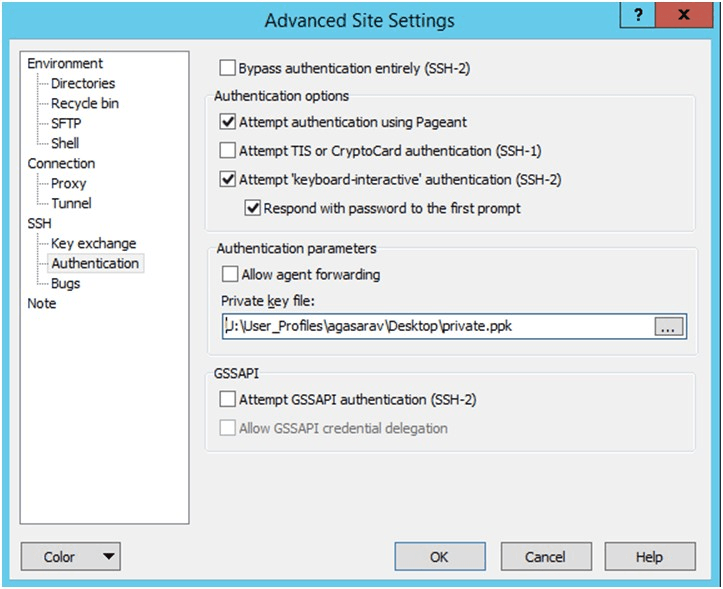
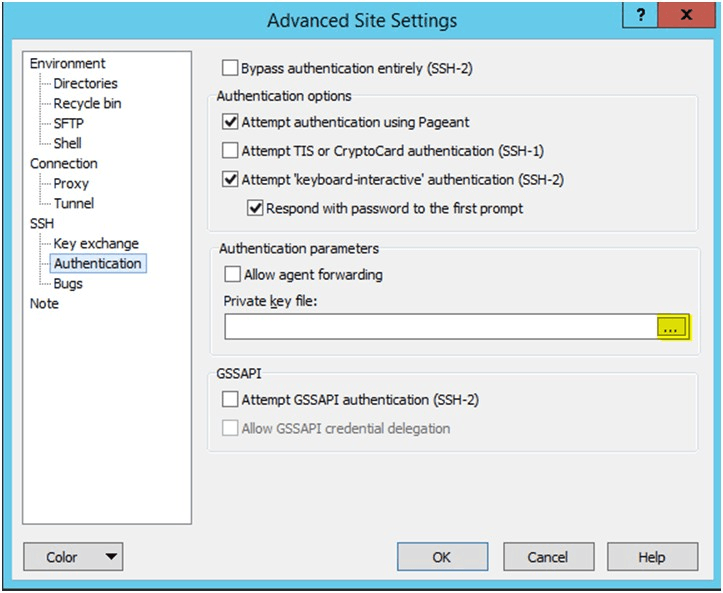
Click Authentication.
In the Private Key File field, click Browse and select the private key created in the Adding Authorized Keys section.
Figure 1-21 Advanced Site Settings Dialog
After loading the private key file, click OK.
Click Login. The window does not prompt for a password and logs in to the SFTP server. Provide a passphrase if one has been set up.
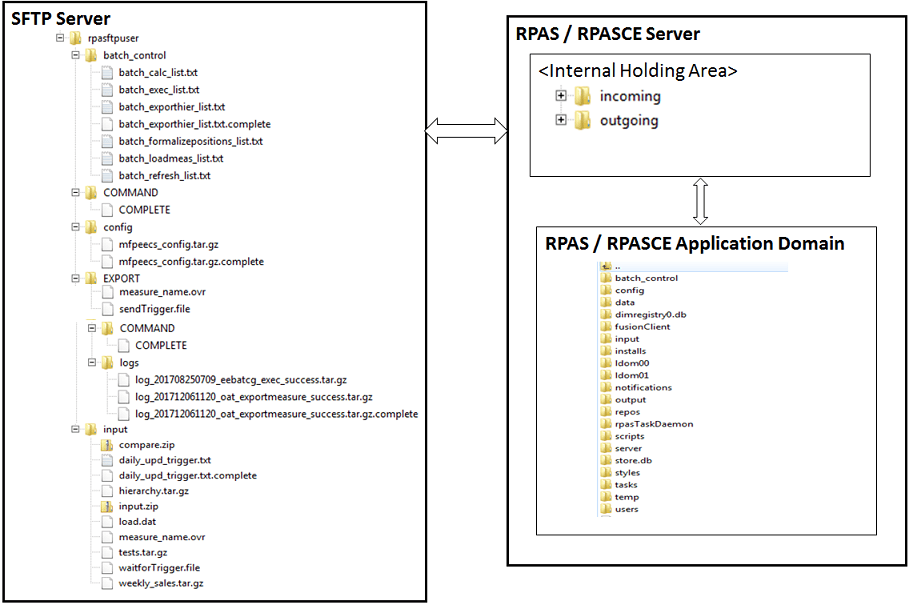
The following diagram provides an overview of the FTP/internal holding area/domain and how the files move.
Figure 1-23 File Movement Between Internal Holding Area and Domain
The following steps walk you through the process to upload batch (data/Hierarchy) file. For information about the administration tasks that require uploading batch files, see "Application-Specific Batch Tasks."
For information about the file contents of various exports and formatting, see the information on data load in the Oracle Retail Merchandise Financial Planning Cloud Service Implementation Guide.
To upload the batch file:
Log in to WinSCP. Follow the steps in "Logging In to WinSCP."
Transfer all the data files to the directory /<SFTP User>.
Create a directory named COMMAND under /<SFTP User> if it does not already exist.
Change to the /<SFTP User>/COMMAND directory.
Transfer an empty file named COMPLETE.
Run the required batch/task from the Online Administration Tools.
The following steps walk you through the process of accessing download files. For information about the administration tasks that create different exports from the applications, see "Application-Specific Batch Tasks."
For information about the file contents of various exports and formatting, see the information on exports in the Oracle Retail Merchandise Financial Planning Cloud Service Implementation Guide.
To download files:
Log in to WinSCP. Follow the steps in "Logging In to WinSCP."
Change the directory to /<SFTP User>/EXPORT or /<SFTP User>/Export/logs (for log files).
Create a directory named COMMAND under /<SFTP User>/EXPORT if it does not already exist.
Change to the /<SFTP User>/EXPORT/COMMAND directory.
Transfer an empty file named COMPLETE.
Run the required batch/task from the Online Administration Tools.
Download all the data files. The log files are in tar.gz format.
|
Note: The log file names are appended with the success/failure text in it along with the time stamp for easy identification.For example: |