| Oracle® Retail Assortment & Item Planning for Fashion/Softlines Cloud Service User Guide Release 19.0 F24864-08 |
|

 Previous |
 Next |
| Oracle® Retail Assortment & Item Planning for Fashion/Softlines Cloud Service User Guide Release 19.0 F24864-08 |
|
Previous |
Next |
This appendix covers the following topics:
The Assortment Planning Cloud Service process starts with Creating Assortment Strategy by reviewing history, defining the assortment, creating that assortment using build wedge, and creating weekly sales, and receipts at cluster level. This pre-season process can be reconciled with upstream systems.
The high-level steps to complete this process:
Planning Administration:
Planning Administration.
Currency Administration.
Validate Loaded Data.
Planning Maintenance:
Location Clustering.
Assortment Period Maintenance.
Curve Maintenance.
Create Assortment:
Perform Last Year/ Last Season/ MFP Analysis.
Set targets and then review them against fixtures plan and/or capacity.
Attribute scoring to determine the correct target mix by attributes.
Create new options, set parameters for them and assign attributes.
Select the options and compare assortment to the target.
Self-approve the targeted assortment/Shopping List.
Build Wedge:
Perform Last Year/ Last Season/ MFP Analysis.
Set targets and then review them against fixtures plan and/or capacity.
Attribute scoring to determine the correct target mix by attributes.
Build Wedge and compare Wedge to the target.
Check visual assortment across the assortment period.
Plan Buy quantity for the included options in assortment.
Plan Weekly Sales and receipts using the curve source at the cluster level.
Self-approve the targeted assortment.
Review Assortment:
Review Assortment.
The high-level Build Wedge process flow in the AP alone configuration includes reviewing historical information, seeding assortment targets, reconciling with MFP targets, seeding the target mix by attributes, building the wedge, Planning Buy Quantities, planning Weekly Sales and Receipts, and finally, approving the assortment.
As shown in the process flow, all the steps are the same as explained in the Build Wedge chapter except the additional step of creating the weekly sales and receipts plan after the Build Wedge step and before the Approve step.
The fourth step in the Build Wedge process is Weekly Sales. The Buyer seeds the sales and receipts plan with a curve source and the total projected sales created in the Wedge processes and then revises as necessary. In this step, you update key inputs such as Order Frequency and safety stock, and so on.
Tabs and Views in this Step:
In this tab, the Buyer/Planner is able to choose the curve source and seed the sales and receipts that would be calculated depending on the sell through % defined in the wedge process. You can set the values for order Frequency and safety stock weeks. After the weekly plan, you can view the receipts alerts and validate them accordingly.
In the Plan Weekly Sales view, the Buyer/Planner can select the curve source from the picklist and run the Create Weekly Plan application action menu that creates the sales and receipts plan at week level for the cluster. You can choose to override the values of sales/receipts as needed.
The steps to complete this process:
Choose the Curve Source and run the Create Weekly Plan application action menu.
Select the curve from which to seed sales. Curves were set in the Assortment Maintenance segment and can be referenced in the Review Curve Library view.
In the Order Frequency (Weeks) measure, enter how often receipts will arrive.
For example, entering 1 means that receipts arrive every week, 2 means that receipts arrive every other week.
In the Safety Stock (Weeks) measure, enter the number of weeks of sales that the safety stock should cover.
Use this measure to use future weeks of sales to generate a dynamic safety stock recommendation. It is used to generate a recommended initial buy.
Measure Table
Table A-1 1. Plan Weekly Sales View Measures
| Label | Definition |
|---|---|
|
Curve Source |
A picklist used to select the curve source for style/colors sales. |
|
Last Curve Source |
Last chosen curve source for running the weekly sales plan. |
|
Create Receipts |
Boolean flag to include the creation of receipts or not. When checked, the receipts would be created depending on the sell through and sales values. |
|
Order Frequency (Weeks) |
How often, in weeks, receipts arrive. |
|
Safety Stock (Weeks) |
The number of future weeks of sales that additional units should be maintained to mitigate the risk of stockouts, based on future sales weeks. It is used for the initial buy as well as for subsequent receipt drops. |
|
Sales U, R, AUR |
Sales Units, Retail, and Average Unit Retail. |
|
Receipts U |
Receipts Units. |
Measure Profile
Default Profile
The Default profile is used to plan the weekly sales and receipts plan.
Application Action
Create Weekly Plan
The Create Weekly Plan Application Action is used to create the weekly sales and receipts plan depending on the selected curve source.
In the Receipts Alert Validation view, the Buyer/Planner can view any differences of receipts from sales values that are planned and help to highlight the deviations.
The step to complete this process:
Review the fields highlighted and alerted in order to resolve the differences between sales and receipts.
Measure Table
Table A-2 2. Receipts Alert Validation View Measures
| Label | Definition |
|---|---|
|
Sales U |
Sales Units. |
|
Receipts U |
Receipts Units. |
Measure Profile
Default Profile
The Default profile is used to review the alerts highlighted and help in alert navigation to resolve the receipts differences to sales units.
This tab is used to review the sales curve.
In the Review Sales Curve view, the Buyer/Planner can view the available curve sources and review the distribution of the curve and can decide which curve for the weekly sales plan.
The step to complete this process:
Review the Curve Sources and how they are segregated to make sure that the correct curve is used for the process.
Measure Table
Table A-3 1. Review Sales Curve View Measure
| Label | Definition |
|---|---|
|
CP Sales Curve % |
Used to display the weekly sales percent to total of a particular curve. |
Measure Profile
Default Profile
The Default profile is used to review the available sales curves.
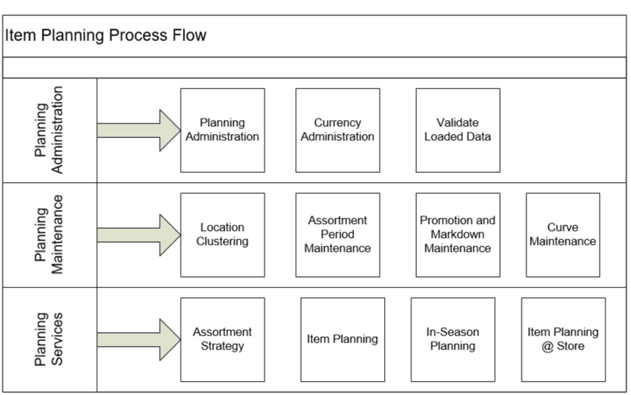
Item Planning Cloud Service represents a bottom-up planning process, complementing and working in concert with top-down assortment and merchandise financial plans. By providing the ability to create a pre-season item plan that aligns with assortment and merchandise financial plans and then weekly in-season visibility into item performance and financial targets, the item planning process increases the likelihood that merchandising strategies are successfully executed within the financial plan parameters. Item Planning Cloud Service is designed to address the needs of Grocery, Hardlines, and Fashion. Item Planning Cloud Service contains features to ensure that retailers are able to deliver targeted and hyper-localized assortments and promotions.
Item Planning Cloud Service helps the business to anticipate and proactively manage exceptions by utilizing robust real-time alerts, to highlight and focus a planner's attention on item issues that need immediate attention. In this way, the planner can manage by exception versus searching through entire data sets to locate problems, saving time and resources to focus on important issues. It also provides a dashboard, which provides a visual tool to quickly analyze ups and downs in Sales, Gross Margin, and EOP over pre-season and in-season profiles and also the exceptions in the business.
The high-level steps to complete this process:
Planning Administration:
Planning Administration.
Currency Administration.
Validate Loaded Data.
Planning Maintenance:
Location Clustering.
Assortment Period Maintenance.
Promotion and Markdown Maintenance.
Curve Maintenance.
Assortment Strategy:
Perform Last Year Analysis.
Set targets and then review them against fixtures plan and/ or capacity.
Create new options, set parameters for them, and assign attributes.
Plan targets.
Self-approve the targeted products.
Item Planning:
Review targets from Assortment Strategy or Assortment Planning and MFP to ensure that item plans will meet financial targets.
Plan Sales and Margin by item and Location Cluster.
Create promotional and markdown plans for the lifecycle of items.
Create a receipt and inventory plan by item and Location Cluster.
Reconcile to the Assortment Strategy or Assortment Plans and Merchandise Financial Planning targets.
Self-approve the item plan.
In-Season Item Planning:
Review actuals and trends.
Replan Sales and Margin by item when there are exceptions to the Original Plan.
Replan promotions and markdowns utilizing what-if simulation.
Review and resolve real-time alerts.
Reconcile to the targets.
Self-approve the item plan.
Item Planning @ Store:
Replan Sales and Margin by item for store exceptions.
Replan Receipts & Inventory by item for store exceptions.
Apply size profiles and round receipts to packs.
Approve store exception plan.
In the Item Planning alone configuration, there is an assortment strategy process that exists to create the assortment. This is not at a detailed level like Assortment planning. The workspace process for creating assortment strategy is as explained in the next section.
The Planning Administrator performs periodic administrative steps that drive some of the critical parts for the pre-season and in-season Planning process. These steps include analysis of last year sales, setting target sales and fixtures, creating new options for products, setting their parameters, assigning attributes to them, planning target sales, and approving the products targeted.
The typical business user who completes this task will be an Assortment Planner.
Local Currency
Local Currency refers to the ability to plan in more than one currency if your business operates in multiple countries with different currencies. Multiple currencies and their exchange rates can be managed within Item Planning, allowing the planner to choose which currency they would like to plan in. Data will be stored in the one global currency, and within a segment, users can switch between currencies as business needs dictate.
Last year sales data
Location hierarchy
Product hierarchy
Calendar hierarchy
Sales Retail, Sales Unit, and Cost actuals
Item attributes and attribute values
Price elasticity entered by the Administrator
Promotional lifts entered by the Administrator
Markdown lifts entered by the Administrator
Item images loaded by the Administrator (optional)
Fixture information entered by the Administrator
When working in a segment, it is a common practice to keep the wizard selections for the segment size limited to what will be worked on, to facilitate navigation and increase UI responsiveness.
To create the Assortment Strategy segment:
Click Assortment Services in the Task menu. Then, click the Item Planning activity and then the Assortment Strategy task.
The dialog to create New Plan opens. Click Create New Plan.
Enter the Plan Label in the text field. Click Ok.
In Select Product, select one or multiple sub-categories and click Next.
In Select Assortment Period, select the Assortment Period to assign curves and click Next. Multiple Assortment Periods may be brought into the segment:
The Assortment Groups visible in the wizard are pre-ranged to the subcategories selected in the previous screen.
To see the user-defined Assortment Period label, click the Dimension tile and select Assortment Label.
|
Note: Assortment Labels can vary by Sub-class. If multiple subcategories are selected, the label shown will be based on the first order Sub-class. |
In Select Location, select the Channel to be included in the segment and click Finish.
The Assortment Strategy segment is built.
The high-level steps to complete this process:
Perform Last Year Analysis of Sales, Gross Margin, Option Count, and Rate Of Sales.
Set Targets.
Create New Options.
Plan Targets.
Approve the planned targets.
The first step in the Assortment Strategy process is Last Year Analysis. The planner can analyze the Last Year Sales, Gross Margin, Option Count, and Rate of Sales. This step is helpful in setting targets in the next step.
View in this Step:
The Last Year Analysis view is used to analyze the last year Sales, Gross Margin, Option Count, and Rate of Sales for each product.
The step to complete this process:
Analyze the last year values.
Measure Table
Table A-4 Last Year Analysis View Measures
| Label | Definition |
|---|---|
|
LY Sales R, U, AUR |
Last Year Sales Retail, Units, and Average Unit Retail. |
|
LY GM R % |
Last Year Gross Margin percentage. |
|
LY Option Count |
Count of Options carried Last Year. |
|
LY Location Count |
Count of Locations assigned to each Store Cluster Last Year. |
|
LY ROS |
Last Year weekly Rate of Sales. |
Measure Profile
Default Profile
The Default profile is used to view last year sales, gross margin retail percentage, option count, and rate of sales.
Application Action
Refresh Product Rollup
The Refresh Product Rollup Application Action creates dynamically updated alternate hierarchies based on user-defined attribute selections. After running the Application Action, the user may select the alternate product hierarchy to see rollups based on the attribute selections.
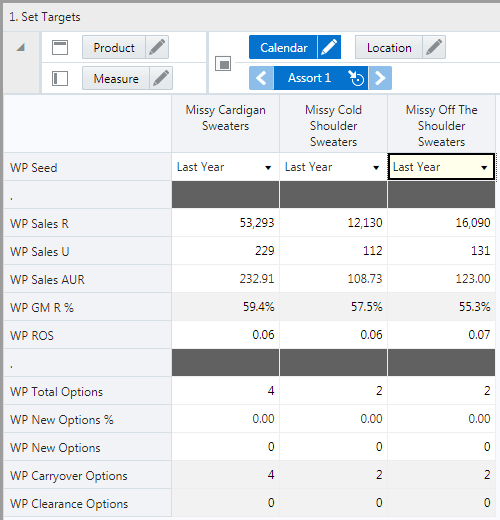
The second step in the Assortment Strategy process is Set Targets. The planner can seed the last year or MFP targets or set the values manually for Sales, Gross Margin, Rate of Sales, New Options, Total Options Last Year Sales, Option Count and Rate Of Sales. This step also helps to set target of fixtures for each location.
Views in this Step:
2. Review Targets (Fixtures) View
Application Action
Seed Sales
The Seed Sales Application Action is used to seed last year or MFP sales data in the Set Targets view.
The Set Targets view is used to set targets for Sales, Rate Of Sales, total options and new Options for each subclass (or higher level of the product hierarchy). The planner can seed the targets based on Last Year and MFP values. The planner can also override the seeded values. The Gross Margin percentage, carryover, and clearance options are calculated based on the other values.
The steps to complete this process:
Select Last Year / MFP from drop-down menu of WP Seed measure.
Run the Seed Sales Application Action.
Measure Table
Table A-5 1. Set Targets View Measures
| Label | Definition |
|---|---|
|
WP Seed |
Used to select seed from Last Year / MFP. |
|
WP Sales R, U, AUR |
Working Plan Sales Retail, Units, and Average Unit Retail. |
|
WP GM R % |
Working Plan Gross Margin percentage. |
|
WP ROS |
Working Plan weekly Rate of Sales, which can be adjusted to increase or decrease the WP Total Options. |
|
WP Total Options |
Working Plan Total Options becomes the targeted number of options in the downstream planning process. |
|
WP New Options % |
The New Options % drives how much of the assortment is carryover and how much is new for the planned assortment period. |
|
WP New Options |
Count of options which are new in the planned assortment period. |
|
WP Carryover Options |
Carryover options are those which have residual inventory when entering the planned assortment period. |
|
WP Clearance Options |
Clearance options are those which have a clearance markdown price when entering the planned assortment period. |
Measure Profiles
Default Profile
This profile is used to access the view which focuses on the Working Plan.
Last Year Profile
This profile is used to access the view that can be used when using Last Year as the basis for setting targets.
MFP Profile
This profile is used to access the view that can be used when using plans imported from Merchandise Financial Planning as the basis for setting targets.
Application Action
Seed Sales
The Seed Sales Application Action is used to seed last year or MFP sales data in the Set Targets view.
The Review Targets (Fixtures) view is used for assortment planning using capacity. It can be used to assign types of fixtures to each location for a particular product and calendar time and to reconcile the planned assortment against available capacity.
The step to complete this process:
Select the checkbox for the fixture you want to assign to a location.
Measure Table
Table A-6 2. Review Targets (Fixtures) View Measures
| Label | Definition |
|---|---|
|
Use Fixture |
Determines if a particular fixture is to be used for a particular product / location. |
|
WP # of Fixture Count |
Count of fixtures. |
|
WP Max # of Options |
Maximum number of options that can fit on a fixture. |
|
WP Min # of Options |
Minimum number of options that should be placed on a fixture. |
|
WP Below/Above # of Options |
Measures whether the number of WP options are above or below the available capacity. This information is visible at the All Fixture level of the fixture hierarchy, by subclass (or higher) and store. |
|
WP Total Options |
Working Plan Total Options becomes the targeted number of options in the downstream planning process. On this view, it is visible at the All Fixture level of the fixture hierarchy. |
|
WP Selected Options Count |
Number of options selected for WP, visible at the All Fixture level of the fixture hierarchy. |
Measure Profile
Default Profile
The Default profile is used to select types of fixtures to be used and, by scrolling through the measures, it shows the fixture count, maximum and minimum number of options.
Application Action
Seed Sales
The Seed Sales Application Action is used to seed last year or MFP sales data in the Set Targets view.
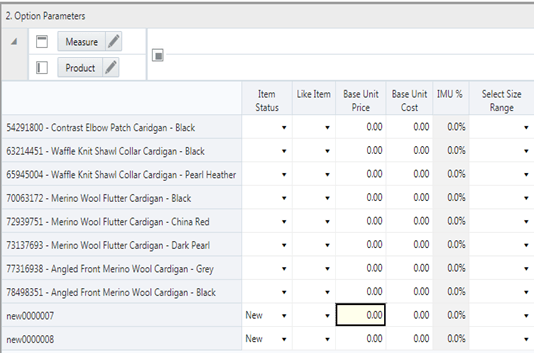
The third step in the Assortment Strategy process is Create New Options. The planner can select new options for each assortment, set the option parameters to drive item plan creation, and select product attribute values.
Views in this Step:
Application Actions
Copy Attributes
The Copy Attributes Application Action is used to copy the like items' product attributes to the new items.
Refresh Product Rollup
The Refresh Product Rollup Application Action creates dynamically updated alternate hierarchies based on user-defined attribute selections. After running the Application Action, the user may select the alternate product hierarchy to see rollups based on the attribute selections.
The Create New Options view is used to decide the items for which new options must be created.
The step to complete this process:
Select the checkbox for WP Select Option for the item you want to include as a new option in the item plans.
Measure Table
Table A-7 1. Create New Options View Measures
| Label | Definition |
|---|---|
|
WP Select Option |
Measure to select whether the option should be included in the working plan assortment. |
|
WP Clr Option |
Checked if the WP option is Clearance. |
|
WP Selected Options Count |
Total of the selected options, visible at the subclass level or higher. |
|
WP New Options Count |
Total of the new options, visible at the subclass level or higher. |
|
WP Carryover Options Count |
Total of the carryover options, visible at the subclass level or higher. |
|
WP Below/Above Total Options |
Measure to track progress of total options count against targets, visible at the subclass level or higher. |
|
WP Below/Above New Options |
Measure to track progress of new options count against targets, visible at the subclass level or higher. |
|
WP Below/Above Carryover Options |
Measure to track progress of carryover options count against targets, visible at the subclass level or higher. |
Measure Profile
Default Profile
The Default profile is used to select items for which new options must be created.
The Option Parameters view is used to create new options. You can select a like item to map the new item to an old item. Once you select a like item for the new item and run the Copy Attributes Application Action, the like item's attributes will be copied for the new item.
The step to complete this process:
Select a like item for the new item.
Measure Table
Table A-8 2. Option Parameters View Measures
| Label | Definition |
|---|---|
|
Item Status |
Provides the ability to manually override an item's status (new or carryover). |
|
Like Item |
An item used to populate the Sales R, U, and GM R of a new item being added to the assortment using an adjustment ratio. |
|
Like Item Adjustment Ratio % |
Provides a facility to adjust a new item's base sales data by using a percentage ratio to the sales of the retailer like item. |
|
Base Unit Price, Cost, IMU% |
An item's retail value, and initial markup %. |
|
Select Size Range |
Populated with size ranges available for that option, this will be used later in the planning process to break down the option's receipts by size. |
Measure Profile
Default Profile
The Default profile is used to select like items for the new items.
Application Action
Copy Attributes
The Copy Attributes Application Action is used to copy the like items' product attributes to the new items.
The Assign Attributes view is used to assign attributes to the new items. If the Copy attributes Application Action is run, the attribute values of like items will be copied for the new items. The planner can override those values.
The step to complete this process:
Set the attribute values for the new items.
Measure Table
Table A-9 3. Assign Attributes View Measure
| Label | Definition |
|---|---|
|
Product Attribute |
Picklist measure that enables the mapping of item attribute values to an item. |
Measure Profile
Default Profile
The Default profile is used to select product attributes for the new items.
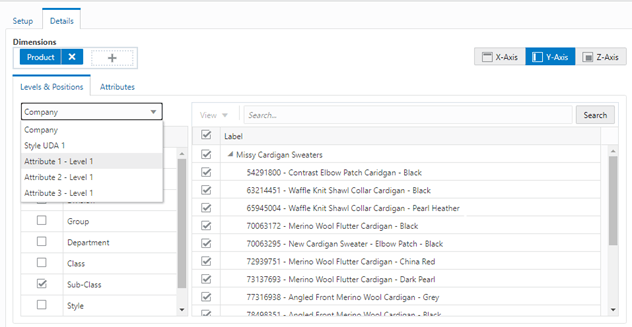
The Define Filter/Rollup view is used to select item attributes to view in an alternate hierarchy. This is available in the tab to display the item level. Nested product attribute roll up has been provided with three levels. A planner can set up to three different combinations for nested rollup with a maximum of three levels in each combination.
For example: as a first combination, you select Brand as a Level1, Color as Level2, and Fabric asLevel3 by clicking the list of attributes available at that category. This allows you to roll up your items by brand, then color inside each brand, and then by fabric inside each color.
This feature allows the planner to analyze and review the proposed assortment based on important attributes. You may select up to three attributes at a time for the dynamic rollup.
The steps to complete this process:
Select up to three dynamic product attributes from the picklist.
Run the Refresh Attributes Rollup Application Action.
To view the product attribute:
In a view that displays item level, click the Product Hierarchy tile.
Select the attribute (Attribute 1 or 2 or 3) that you would like to view in the nested dynamic rollup.
Click OK.
Measure Table
Table A-10 Define Product Rollup View Measure
| Label | Definition |
|---|---|
|
Product Attribute 1, 2, 3 |
Picklist to present product attributes for a dynamic product hierarchy rollup. |
Measure Profile
Default Profile
The Default profile is used to select dynamic product attributes.
Application Action
Refresh Product Rollup
The Refresh Product Rollup Application Action creates dynamically updated alternate hierarchies based on user-defined attribute selections. After running the application action, the user may select the alternate product hierarchy to see rollups based on the attribute selections.
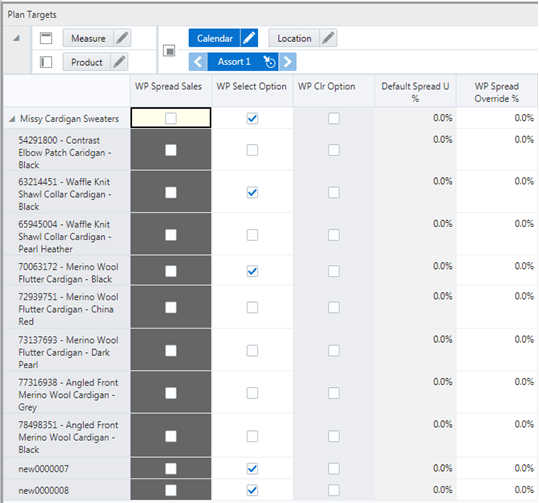
The fourth step in the Assortment Strategy process is Plan Targets at the style or style/color level. The planner establishes working plans for Sales, Gross Margin, Rate of Sales, New Options, Total Options Last Year Sales, Option Count, and Rate Of Sales. This can be done by spreading the sales from the subclass (or higher), or manually.
View in this Step:
Application Actions
Spread Sales
The Spread Sales Application Action is used to spread the planned sales value set at higher product hierarchy levels to the lower levels.
Refresh Product Rollup
The Refresh Product Rollup Application Action creates dynamically updated alternate hierarchies based on user-defined attribute selections. After running the Application Action, the user may select the alternate product hierarchy to see rollups based on the attribute selections.
The Plan Targets view is used to plan targets for sales and margin for each product. The planner can plan at a higher level of the product hierarchy and then spread sales to the lower levels. The planner can also override the spreaded values.
The steps to complete this process:
Select options to receive Sales R, U, AUR, and so on.
If overriding the default spread U%, set the Spread Override % value where needed.
Check the WP Spread Sales Boolean for the subclasses or higher that are being planned.
Run the Spread Sales Application Action.
Measure Table
Table A-11 Plan Targets View Measures
| Label | Definition |
|---|---|
|
WP Spread Sales |
Select which levels of the product hierarchy to spread sales to. |
|
WP Select Option |
Select which options to spread sales to. |
|
Default Spread U % |
Recommended Sales Spread U% based on LY Sales U (for Items with no LY, it will inherit the Like Item's LY Sales U). |
|
WP Sales R, U, AUR |
Working Plan Sales Retail, Unit and Average Unit Retail. |
|
WP GM R % |
Working Plan Gross Margin Percentage. |
|
WP ROS |
Working Plan weekly Rate of Sales. |
|
WP CMU % |
Cumulative Markup % calculated as (Sales AUR - Sales AUC) / Sales AUR. |
|
WP Sales R, U diff to Tgt |
Variance for reconciling WP sales R/U to the Targets, visible at subclass and higher levels. |
Measure Profile
Default Profile
The Default profile is used to plan targets. The planner can spread planned sales values at higher level of product hierarchy to lower levels.
Application Action
Spread Sales
The Spread Sales Application Action is used to spread the planned sales value set at higher product hierarchy levels to the lower levels. The Default Spread U% is used to spread sales unless an override % is specified. If set at subclass level or higher, the WP Override % will spread evenly. To use, select the product hierarchy using WP Spread sales, and then which options using WP Select Option. After selecting, select Calculate and then run the Spread Sales Application Action.
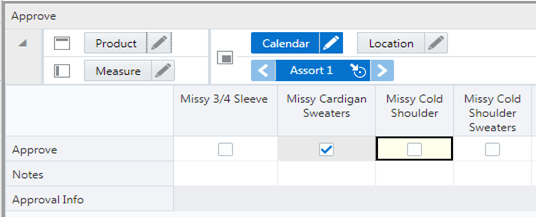
The fifth and final step in the Assortment Strategy process is Approve. This step approves the assortment strategy that you have created, analyzed, and reviewed for accuracy.
The output of this step is an approved Assortment Plan which can be brought into the item plan.
The step to complete this process:
Approve the assortment plan.
Prior to Starting this Step:
Thoroughly analyze and review the assortment strategy to ensure the plans meet the financial goals of the category.
After Completing this Step:
Begin Item Planning.
View in this Step:
Application Action
Approve Plan
The Approve Plan Application Action approves the planned targets for the selected products.
The steps to complete this process:
In the Approve measure, check the Boolean flag for the products that should be approved. If all products should be approved at once, roll up to All Product and All Location and check the Approve measure at that level.
In the Notes measure, enter approval comments.
Run the Approve Plan Application Action.
Measure Table
Table A-12 Approve Plan View Measures
| Label | Definition |
|---|---|
|
Approve |
Boolean flag measure required to be checked in order to approve the Assortment Plan. |
|
Notes |
Used to enter approval comments. |
|
Approval Info |
Provides information about the most recent plan approval. |
Measure Profile
Default Profile
The Default profile is used to approve the Assortment Plan.
Application Action
Approve Plan
The Approve Plan Application Action approves the planned targets for the selected products.
Real Time Alerts allow the planner to manage by exception. When dealing with large amounts of data at the Item/Location level, it can be difficult to search for and find items/locations that are performing outside of expectations. Real Time Alerts solve that issue by highlighting the most common issues and presenting them in an actionable format for the planner to resolve. Real Time Alerts help to simplify business processes by focusing the planner's attention on prioritized, value-based activities.
The following real time alerts are defined on the application through configuration. The Buyer/Planner can add additional alerts as needed.
The alert will activate when the assortment definition does not have a label, start date, or end date with positive duration and/or non-overlapping assortment periods. This alert is used in the Assortment Period Maintenance segment under the Planning Maintenance activity.
The alert will activate when Curve Source Year is not defined prior to selecting the seed source. This alert is used in the Curve Maintenance segment under the planning Maintenance activity.
The alert will activate when the attribute value assignment is not defined for the placeholder positions created depending on the class eligible attribute selected in the system. This alert is used in the Create Assortment segment under the Planning Services activity.
The alert will activate when the Carryover Options Shopped is less than the Target options (Carryover status) defined in the determine # of options in the shopping list. This alert is used in the Create Assortment segment under the Planning Services activity.
The alert will activate when the New Options Shopped is less than the Target options (New status) defined in the determine # of options in the shopping list. This alert is used in the Create Assortment segment under the Planning Services activity.
The alert will activate when the Option has been marked as mandatory and has not been considered in the assortment. This alert is used in the Create Assortment segment under the Planning Services activity.
The alert will activate when the Attribute Mix Total does not match the max target options determined in the Target Mix by Attribute process. This alert is used in the Create Assortment segment under the Planning Services activity.
The alert will activate when the number of Options determined does not satisfy the minimum and maximum fixture capacity. This alert is used in the Create Assortment segment under the Planning Services activity.
The alert will activate when the Option has been marked as mandatory and has not been considered in the assortment. This alert is used in the Build Wedge segment under the Planning Services activity.
The alert will activate when the Option has been checked as Mandatory in the Build Wedge process without considering it the Shopping List since the status is blank. This alert is used in the Build Wedge segment under the Planning Services activity.
The alert will activate when the total Option Count by attribute is greater than the target Attribute Mix determined in the Target Mix by Attribute process. This alert is used in the Build Wedge segment under the Planning Services activity.
The alert will activate when the Assorted Option does not have a flow assigned after including in the assortment in the Wedge process. This alert is used in the Build Wedge segment under the Planning Services activity.
The alert will activate when the receipts are less than sales for an option while doing the weekly sales plan. This alert is used in the Build Wedge segment of the AP alone configuration for the Weekly Sales Step under the Planning Services activity.
The alert will activate when current week EOP units fall below Pres Min, Safety Stock U, and Safety Stock (Weeks) measures. This alert is used in the Item Planning and In-Season Planning segments.
The alert will activate when the current week EOP units fall below Safety Stock U + Lead Time Days for an item/cluster/week. Note that lead time days are converted to week. This alert is used in the In-Season Planning segment.
The alert will activate when current week EOP units fall below Safety Stock U + Lead Time Days + Lead Time Future Days for an item/cluster/week. Note that lead time days are converted to week. This alert is used in the In-Season Planning segment.
The alert will activate when Net On Order is below MFP. This alert is used in the In-Season Planning segment.
The alert will activate when Open To Buy is below MFP. This alert is used in the In-Season Planning segment.
The alert will activate when WP WOS between current week and current week + WP Lead Time Days is greater than the TGT WOS, and there are non-zero values in Receipt U or On Order U from current week + WP Lead Time Days for an item/cluster/week. This alert is used in the In-Season Planning segment.
The alert will activate when WP On Order U is greater than zero and does not match WP Receipt U for an item/cluster/week. This alert is used in the In-Season Planning segment.
The alert will activate green when WP Sell Thru % is higher than the planner-entered TGT Sell Thru % and activate yellow when the WP Sell Thru % is lower than the TGT Sell Thru % for an item/cluster/week. This alert is used in the Item Planning and In-Season Planning segment.
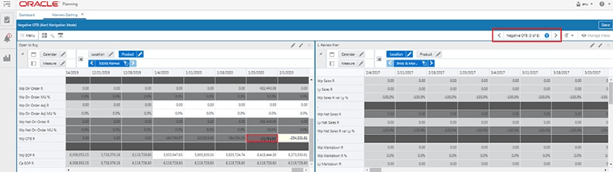
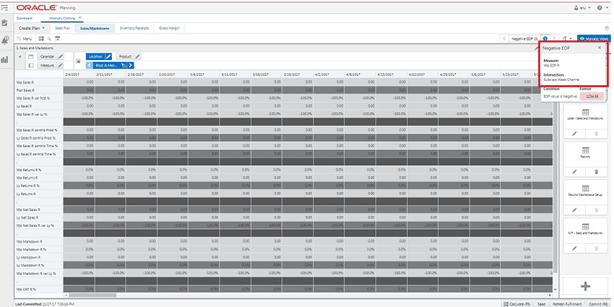
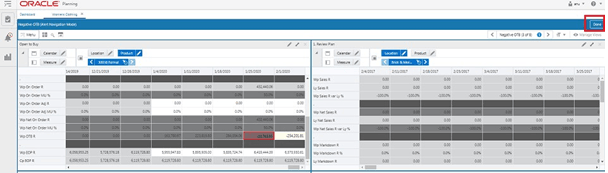
Clicking on the right arrow launches the alert navigation mode. Use this to navigate quickly and easily between the various alerted intersections present in the specified view.
You can see that you are in alert navigation mode, as highlighted in the following figure.
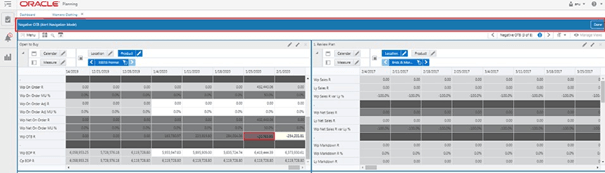
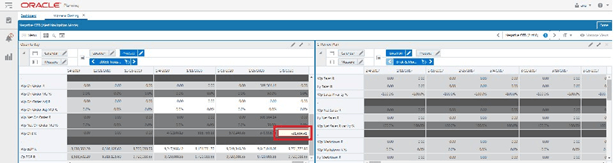
Sometimes, a warning message indicates that the alert hits are invisible. You can check the alert summary to view the alert intersection and make sure that your view reflects the same intersection so that the alerted positions can be highlighted.
Once the alerted intersections are highlighted at the required intersections as specified in the alert summary, you can resolve them one by one.
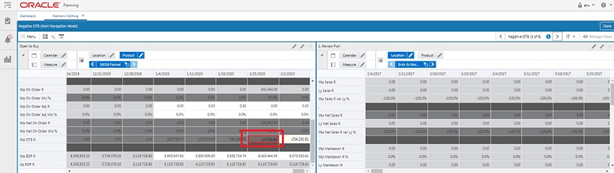
Click Next to move to the next selected alert until you resolve all the alerted positions. You can also exit from the alert navigation mode. Click the left or right arrows to move to the next or previous real time alert relative to the currently selected cell in the pivot table.
In alert navigation mode, the rows, columns, and pages in the workspace view are restricted to those with the currently selected real time alert. These rows are not dynamically updated. The same rows, columns, and pages remain visible after a calculation changes the data.
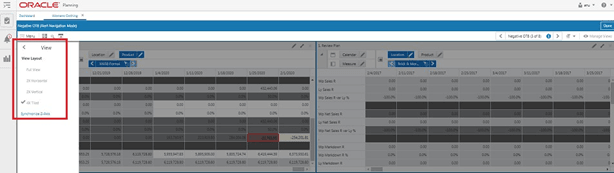
You cannot change the view layout or navigate to different view in the alert navigation mode.
You can exit the alert navigation mode by clicking Done. To hide the alerts, deselect the Alert in the Exception list.
Special Filters are used to affect the visible positions in the workspace view. These filters contain special rules, so planners can focus dynamically on the information that is important to them. Hovering over a Special Filter displays information about the filter criteria.
Once the Special Filter is applied, the positions that do not match the criteria are hidden. You can verify positions using EVO to view the positions in the hidden area. Any positions that were manually hidden previously will be un-hidden if they match the Special Filter criteria.
Following are the special filters defined in the application through configuration.
Warehouse Mapping
The Special Filter can be activated to show only the warehouse locations in the view. This is used in the Warehouse Mapping view of the Planning Administration segment under the Planning Administration activity.
Filter Weeks by Assortment Period
The Special Filter can be activated to show only the weeks associated to the Assortment Period in the view. This is used in the Curves by Assortment view of the Curve Maintenance segment under the Planning Maintenance activity.
Last Year Filter Attribute Values
The Special Filter can be activated to show only the data associated with the attribute values for the Last Year Period in the view. This is used in the Review History by Attributes view in the Create Assortment and Build Wedge segments under the Planning Services activity.
Last Season Filter Attribute Values
The Special Filter can be activated to show only the data associated with the Attribute values for the Last Assortment Period in the view. This is used in the Review History by Attributes view in the Create Assortment and Build Wedge segments under the Planning Services activity.
Filter by Selected Attributes
The Special Filter can be activated to show only the data associated with the Selected Attributes in the view. This is used in the Target Mix by Attributes view in the Create Assortment and Build Wedge segments under the Planning Services activity.
Filter Attribute Values for Score
The Special Filter can be activated to show only the data associated with the Selected Attributes for Scoring in the view. This is used in the Review Attribute Score View in the Create Assortment and Build Wedge Segments under the Planning Services activity.
Filter Attribute Values
The Special Filter can be activated to show only the data associated with the Selected Attributes for Scoring in the view in order to view any deviations from the target to the assigned. This is used in the Compare Assortment to Target view in the Create Assortment and Build Wedge segments under the Planning Services activity.
Filter by Selected Options
The Special Filter can be activated to show only the selected options associated with the Shopping List. This is used in the Review Assortment view in the Create Assortment segment under the Planning Services activity.
Filter by Carryover Options
The Special Filter can be activated to show only the Carryover options associated with the Shopping List. This is used in the Select Options view in the Create Assortment segment under the Planning Services activity.
Filter by New Options
The Special Filter can be activated to show only the New options associated with the Shopping List. This is used in the Select Options view in the Create Assortment segment under the Planning Services activity.
Filter by New/Carryover Options
The Special Filter can be activated to show only the New/Carryover options associated with the Shopping List. This is used in the Select Options view in the Create Assortment segment under the Planning Services activity.
Filter by Available Options
The Special Filter can be activated to show only the Available options associated with the Shopping List, but not yet considered in the wedge process. This is used in the Seed Assortment Targets, Build Wedge - Visual/Table, and Plan Buy Quantity views in the Build Wedge segment under the Planning Services activity.
Filter by Assorted
The Special Filter can be activated to show only the Assorted options associated with the wedge process. This is used in the Build Wedge - Table, Plan Buy Quantity, Define Parameters, Define Promotions, Reconcile to Assortment Plan, Inventory Parameters, and Receipts by Size views in the Build Wedge, Item Planning, and Item Planning @ Store segments under the Planning Services activity.
Filter by Visual Assortment
The Special Filter can be activated to show only the Visual Assortment with the assorted options depending on the flow associated with the wedge process. This is used in the Time-Phased Visual Assortment view in the Build Wedge segment under the Planning Services activity.
Filter by WP Assorted
The Special Filter can be activated to show the working plan assorted options depending on the changes done after the Assortment approval process. This is used in the WP Review Assortment view in the Review Assortment segment under the Planning Services activity.
Filter by LY Option/Location Count
The Special Filter can be activated to show all the LY options which have LY Option/Location count > 0. This is used in the Review LY History view in the Create Assortment segment and Build Wedge segment under the Planning Services activity.
Filter by LA Option/Location Count
The Special Filter can be activated to show all the LA options which have LA Option/Location count > 0. This is used in the Review LA History view in the Create Assortment segment and Build Wedge segment under the Planning Services activity.
Filter by CP Assorted
The Special Filter can be activated to show the current plan assorted options depending on the approved Assortment. This is used in the CP Review Assortment view in the Review Assortment segment under the Planning Services activity.
Filter by AP CP Assorted
The Special Filter can be activated to show the current plan assorted options depending on the approved Assortment. This is used in the Review Targets view in the Item Planning segment under the Planning Services activity.
Filter Weeks Outside of Assortment Start Week
The Special Filter can be activated to show only the weeks not included in the Assortment Period in the view. This is used in the Define Promotions view of the Item Planning segment under the Planning Services activity.
Filter for Assortment Periods
The Special Filter can be activated to show only the weeks associated with the Assortment Period in the view. This is used in the Reconcile to Assortment Plan view of the Item Planning segment under the Planning Services activity.
Filter on by Selected
The Special Filter can be activated to show only the selected options associated with the plan. This is used in the Trend Analysis view of the In-Season Item Planning segment under the Planning Services activity.
Filter by Add/Drop
The Special Filter can be activated to show only the options associated with the Add or Drop status in the plan. This is used in the Define Parameters view of the In-Season Item Planning segment under the Planning Services activity.
Filter by Selected Criteria
The Special Filter can be activated to show only the options associated with the Selected Criteria of the plan. This is used in the Plan Receipts & Inventory and Plan Sales & Margin views of the In-Season Item Planning and Item Planning @ Store segments under the Planning Services activity.
Filter by Keep/Add
The Special Filter can be activated to show only the options associated with the Add or Keep status in the plan. This is used in the Inventory Parameters view of the In-Season Item Planning segment under the Planning Services activity.
When the Special Filter exists, the Special Filter icon on the Quick Access Tool bar appears highlighted and is applied to the view in the view management drawer.
You can select the views that the selected Special Filter must apply to, either one view, multiple views, or all views under the step. Special Filters that have the same measure and query level combination are represented as one option and are applied to multiple views in a step.
You can select the views that the selected Special Filter must apply to, either one view, multiple views, or all views under the step.
You can clear all the Special filters applied by clicking the special filters LOV, clicking Clear Filters, and clicking OK.
You can clear all the Special filters applied by clicking the special filters LOV, clicking Clear All, and clicking OK.
Reclassification is the process of moving the item from one group to other for various business driven processes. During reclassification process in Assortment and Item planning, there is no impact to the clusters and their definitions. As and when items move from one department to other or one class to other, the plans of that department /class will change owning to the movement of item. Hence, it is always advisable to reclassify an item at a logical stage where the impacts to the future plans are minimal.