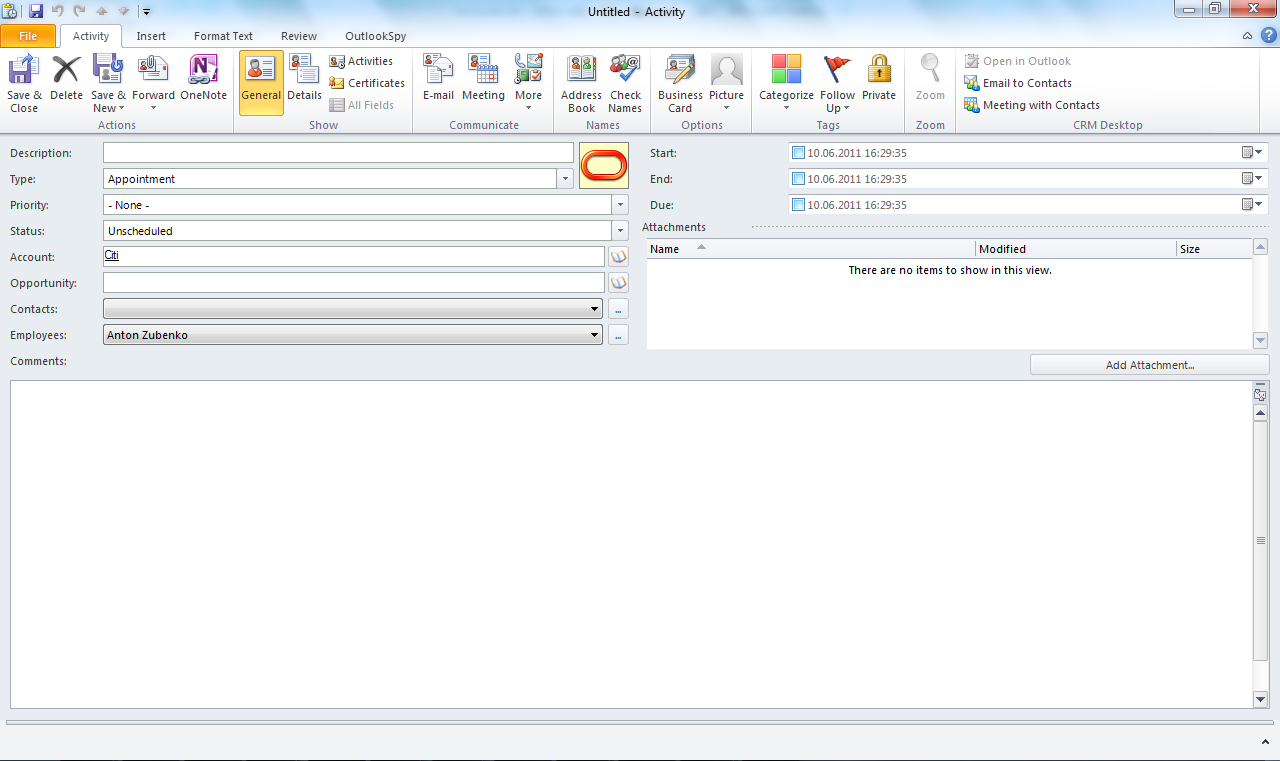
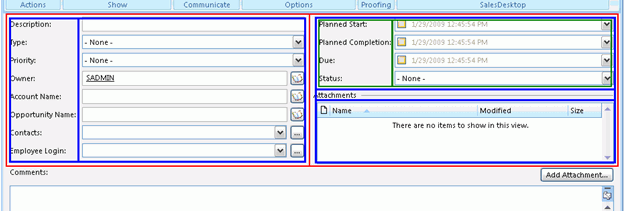
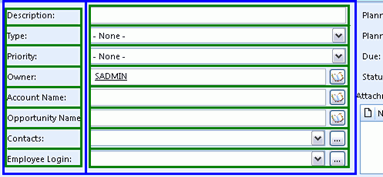
Oracle CRM On Demand Desktop Administration Guide > Customizing Oracle CRM On Demand Desktop > Process of Customizing Objects in Oracle CRM On Demand Desktop >

Defining the User Interface


This task is a step in Process of Customizing Objects in Oracle CRM On Demand Desktop.

In this topic, you define the user interface for the custom object. To provide the user with a way to work with the custom object, you must define the form that Oracle CRM On Demand Desktop uses to display the custom object. The custom object is configured to use the custom OnDemand Activity form in the od_basic_mapping.xml file that you modified in Defining the Custom Object. Therefore, you must create the OnDemand Activity form.

Figure 6 illustrates the layout of the Activity Form.

Figure 6. Layout of the Activity Form

A set of cells describes the form layout. A cell can be empty, or it can contain a control or a stack. A single stack can contain numerous cells. Therefore, the form is divided into the following two parts:

  • One part includes visible controls.
  • One part includes hidden controls.

This example uses this technique because the example uses native Microsoft Outlook forms as a base for custom forms. Although you can modify the position of a native Microsoft Outlook control, you cannot remove it entirely from the form. Therefore, you move the unused controls that are native to Microsoft Outlook to a location where the user cannot view them, which is typically a small cell.

This form is a prototype that helps to visualize the cells, stacks of cells, and the order in which you use the cells and stacks. This visualization helps to reduce the wide range of combinations of cells and stacks that you can describe. The visualization is restricted to only those cells and stacks that you can support effectively. You can add new fields, remove fields, reorder fields, and apply any other changes during development and testing.

To define the user interface

  1. Use an XML editor to open the forms_12.xml file.

    For more information, see Files in the Customization Package.

  2. To divide the form into a visible section and a hidden section, add the following XML code to the forms_12.xml file:

      <form id="OnDemand Activity">
        <page id="General" tag="0x10A6" min_height="335" min_width="520">
           <cell>
             <stack layout="horz" padding="10">
             <!-- visible section -->
                <cell>
                <!-visible fields here -->
                </cell>
             <!-- hidden section -->
                <cell size="1">
                <!-hidden fields here -->
                </cell>
             </stack>
           </cell>
        </page>
      </form>

  3. Divide the visible section into two vertical sections that include a top section and a bottom section, as illustrated in the following figure:

    Although not required, this step helps to support the current layout of the form. Add the following code:

      <form id="OnDemand Activity">
      (...............)
        <!-- visible section -->
           <cell>
             <stack layout="vert" padding="5" spacing="5">
                <!-top section-->
                <cell size="220">
                  <!-top section fields here-->
                </cell>
                <!-bottom section-->
                <cell>
                  <!-bottom section fields here-->
                </cell>
             </stack>
           </cell>
      (...............)
      </form>

  4. Divide the top section into two parts: one that displays a left column of fields and the other a right column of fields, see the following figure:

    Add the following code:

    <-- top section -->
    <cell size=220>
      <stack layout="horz" spacing="5">
        <cell>
          <stack layout="horz" spacing="3">
          <!-- left side captions -->
             <cell size="105">
             </cell>
          <!-- left side fields -->
             <cell> </cell>
          </stack>
        </cell>
        <cell>
          <stack layout="vert" spacing="5">
             <cell size="105">
                <stack layout="horz" spacing="3">
                <!-- left side captions -->
                  <cell size="110">
                  </cell>
                <!-- left side fields -->
                  <cell>
                  </cell>
                </stack>
             </cell>
             <cell size="13">
                <!-attachments caption and separator here -->
             </cell>
             <cell>
                <!-attachments view here -->
             </cell>
          </stack>
        </cell>
      </stack>
    </cell>

  5. Divide the left column into cells where you can place captions for fields, see the following figure:

    For more information, see XML Code That Creates Cells.

  6. Divide the right column into cells where you can place fields.

    Because the code that you use to complete this step is similar to the code you use in Step 5, you can copy and modify the code that is described in XML Code That Creates Cells.

  7. Define the Comments section of the Activity form, as illustrated in the following figure:

    The Comments section is divided into the following parts:

    • Comments caption and the Add Attachment button
    • Comments field

      The Add attachment button is described separately. For more information on buttons, see Adding a Label, Button, and Selector Control.

      Add the following code:

      <!-- visible section -->
        <cell>
          <stack layout="vert" padding="5" spacing="5">
          <!-top section-->
            <cell size="220">
            <!-top section fields here-->
            </cell>
            <!-bottom section-->
            <cell size="22">
              <stack layout="horz">
                <cell>
                  <control id="0x20022" class="static" tab_order="30">
                    <text>Comments:</text>
                  </control>
                </cell>
                <cell size="110" attraction="far">
                <control class="button" id="0x20059" tab_order="29"              on_click="LinkAttachment()">
                <text>Add attachment...t</text>
                  </control>
                </cell>
                <cell size="5" attraction="far"></cell>
                </stack>
              </cell>
              <cell>
                <control id="0x103f" tab_order="31"></control>
              </cell>
            </stack>
          </cell>

  8. Make sure the description you create supports the version of Microsoft Outlook that your users currently use.

    For more information, see Correct Usage of the Forms_xx.XML File and Object ID.

Correct Usage of the Forms_xx.XML File and Object ID

Microsoft Outlook 2003 and Microsoft Outlook 2007/2010 describe forms differently. Specifically, these versions use different IDs for native Microsoft Outlook controls. Because Oracle CRM On Demand Desktop supports these versions of Microsoft Outlook, you must create a different description of the form for each version that your implementation uses, where each form uses the same description of the layout, but the native Microsoft Outlook control IDs are different.

For example, if you create a set of code for Microsoft Outlook 2007/2010, then, for the code to work correctly with Microsoft Outlook 2003, you must replace object IDs that are native in Microsoft Outlook 2007/2010 with object IDs that are native in Microsoft Outlook 2003. In the example in this topic, you must replace the IDs that are in the hidden section and the ID of the body control.

Because the code in this topic supports Microsoft Outlook 2007/2010, you must add it to forms_12.xml. If you use Microsoft Outlook 2003, then use forms_11.xml, and use Object IDs that are native to Microsoft Outlook 2003.

Oracle CRM On Demand Desktop Administration Guide, Version 5.1, Rev A Copyright © 2017, Oracle and/or its affiliates. All rights reserved. Legal Notices.