Manually Controlling the LSMS Time Without an External NTP Source

If you choose not to configure the LSMS to use an NTP server, you can use the following procedure to resynchronize the LSMS system time with the NPAC time when one of the notifications described in Managing the System Clock is posted:

Generally, the following procedure is used only when the LSMS is first installed. However, if you are not able to use another method of synchronizing time with an NPAC (as described in Automatically Controlling the LSMS Time Using NTP), you can contact the NPAC administrator, inquire the time used at the NPAC, and use the following procedure to manually set the LSMS system time and date.

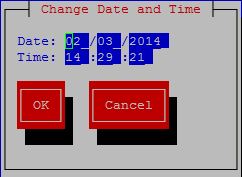
Internal system times are stored in GMT; however, the time and date are typed in the local time zone and converted automatically. If you need to check the local time zone, you can use the env command with the TZ variable.

  1. Log in to active server as lsmsmgr.

    (For information about logging in, see Logging In to LSMS Server Command Line.)

  2. From the main lsmsmgr menu, select Server Configuration > Set Clock.

    A window similar to Figure 1 displays.
    Set Clock Window

  3. If you need to change the current date or time, press Enter while the Edit button is highlighted.

    A window similar to Figure 2 displays.
    Change Date and Time Window

  4. Use the down and up arrow keys to move to the field that you want to change.

    Within a field, use the right and left arrow keys to move within a field, delete digits by pressing the Delete key and enter digits by typing them in. When you the values are what you want, press the down arrow key until the OK button is highlighted, and then press Enter. The window shown in Figure 3-11 is displayed again, and it should now display the date and time you set in this step.

  5. Log in to the standby server as lsmsmgr, and repeat steps 1 through 4.
  6. If you have changed the time by more than five minutes, it is recommended that you reboot each server.