| Oracle® Retail Advanced Inventory Planning Data Management User Guide Release 14.1 |
|

 Previous |
 Next |
| Oracle® Retail Advanced Inventory Planning Data Management User Guide Release 14.1 |
|
Previous |
Next |
This chapter provides general information about using Data Management.
The Oracle Retail Data Management (DM) online component of Oracle Retail Advanced Inventory Planning allows you to define the supply chain your organization uses. To use DM online, the following hierarchy information must be loaded into Oracle Retail Advanced Inventory Planning from your external systems:
Suppliers
Warehouses
Stores
SKU-pack-sizes
Supplier/SKU-pack-sizes
On sale/off sale dates
After this information is added you can begin to create your supply chain. This process has many dependencies, in which one area must be set up before you can proceed to the next area.
Each morning, the alerts produced by the latest overnight batch run are loaded into DM online.
Alerts can have one of the following statuses:
Open: The alert has not been worked on and is awaiting resolution.
In Progress: Someone is working on the alert.
Closed: The alert has been worked on.
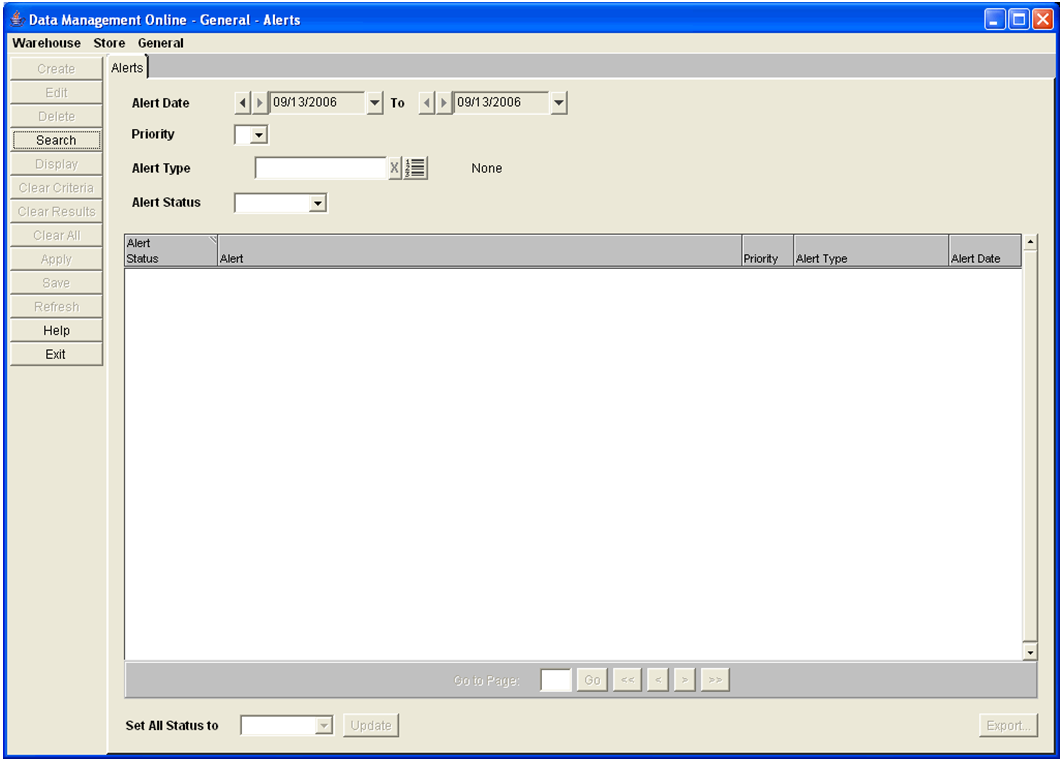
The Alerts tab allows you to view exception information that is produced by the over-night batch process. These alerts warn you about a variety of situations which may require your attention, including information about the data you have entered or failed to enter in Oracle Retail Data Management online (DM).
Navigate: Log in to Data Management. From the General menu, select Alerts. Click the Alerts Tab.
Select the criteria you want to search for:
In the Alert Day field, select the first date you want to search for.
In the To field, select the last date you want to search for.
In the Priority field, select the priority of the alert you are searching for.
In the Alert Type field, enter the ID of the ID type you are searching for.
In the Alert Status field, select the status of the alert you are searching for.
Click Search.
Navigate: Log into Data Management. From the General menu, select Alerts. Click the Alerts Tab.
Search for alerts.
In the Alert Status field, select the status you want the alerts set to.
Click Save. You are prompted to confirm your decision.
Click OK.
Navigate: Log into Data Management. From the General menu, select Alerts. Click the Alerts Tab.
Search for alerts.
In the Set All Status To field, select the status you want the alerts set to.
Click Update.
Click Save. You are prompted to confirm your decision.
Click OK.
Navigate: Log into Data Management. From the General menu, select Alerts. Click the Alerts Tab.
Search for alerts. All alerts displayed are exported when complete.
Click Export.
Select the format to save the file.
Click OK.
Select the location to save the file to.
Click Save. You are prompted to confirm your decision.
Click OK.
This section includes:
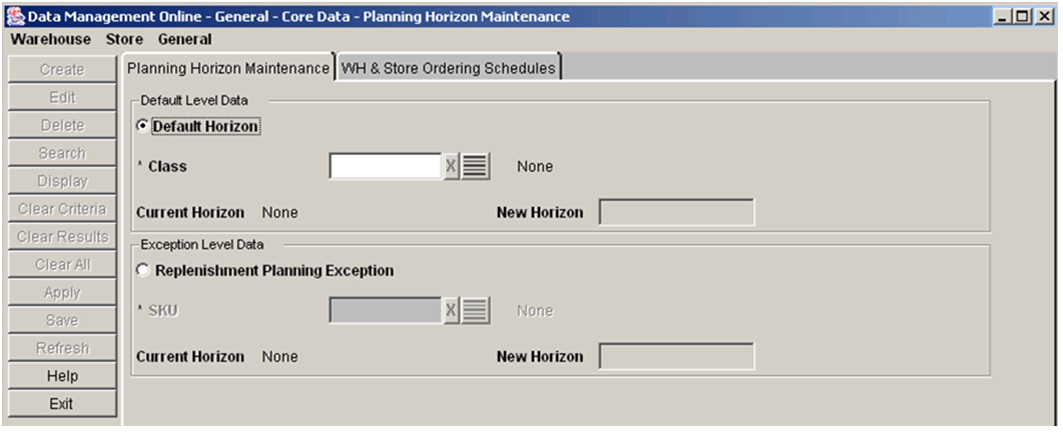
The Planning Horizon Maintenance tab allows you to define the planning horizons for the system. Planning horizons define the number of days in the future that replenishment plans are created for. Planning horizon defaults are defined at the class level and are used by Oracle Retail Replenishment Planning.
You can create the following exceptions to the planning horizon:
Exceptions to planning horizons are defined at the SKU level.
Navigate: Log into Data Management online. From the General menu, select Core Data. Click the Planning Horizon Maintenance tab.
Select the Default Horizon option.
In the Class field, enter a class ID, or click the LOV button and select a class.
Click Display. The current horizon for the class displays in the Current Horizon field.
Navigate: Log into Data Management online. From the General menu, select Core Data. Click the Planning Horizon Maintenance tab.
Search for a planning horizon for a class.
In the New Horizon field, enter the number of days that are used for the planning horizon for the class.
Click Save. You are prompted to confirm your decision.
Click OK.
Navigate: Log into Data Management online. From the General menu, select Core Data. Click the Planning Horizon Maintenance tab.
Search for a planning horizon for a class.
Click Delete. You are prompted to confirm your decision.
Click OK.
Navigate: Log into Data Management online. From the General menu, select Core Data. Click the Planning Horizon Maintenance tab.
In the Exception Level Data area, select Replenishment Planning Exception.
In the SKU field, enter a SKU ID, or click the LOV button and select a SKU.
Click Display.
|
Note: The color of the number in the Current Horizon field indicates whether the SKU currently uses the planning horizon of the class (black) or an exception has been created for the SKU (red). |
To create an exception:
In the New Horizon field, enter the number of days that are used for the planning horizon for the SKU.
Click Save. You are prompted to confirm your decision.
Click OK.
To delete an exception:
Click Delete. You are prompted to confirm your decision.
Click OK The exception is deleted and the planning horizon displays the current default value.
The Warehouse and Store Ordering Schedule tab allows you to view the scheduling information for stores and warehouses.
Warehouse and store ordering schedules are calculated by the data you enter into other areas of AIP and therefore cannot be edited from the WH & Store Ordering Schedules tab. The schedule indicates whether the store or warehouse can receive deliveries. A lead time on a particular date indicates the number of days prior to delivery that orders are placed.
Navigate: Log into Data Management Online. From the General menu, select Core Data. Click the WH & Store Ordering Schedules primary tab and the Store secondary tab.
In the Store field, enter the store ID, or click the LOV button and select a store.
In the Class field, enter the class ID, or click the LOV button and select the class.
In the SKU field, enter the SKU ID, or click the LOV button and select a SKU.
Click Search. Information pertaining to the selected store and SKU is displayed on the calendar.
Navigate: Log into Data Management Online. From the General menu, select Core Data. Click the WH & Store Ordering Schedules primary tab and the Warehouse from Source Schedule secondary tab.
In the Warehouse field, enter the warehouse ID, or click the LOV button and select a warehouse.
In the Order Source field, enter the order source ID, or click the LOV button and select the order source.
In the Class field, enter the class ID, or click the LOV button and select the class.
In the SKU field, enter the SKU ID, or click the LOV button and select a SKU.
Click Search. Information pertaining to the selected warehouse, source, and SKU is displayed on the calendar.
|
Note: Warehouse schedules are only produced for a SKU when the Location Orderable Unit has a status of Profile Ranged or Exception Ranged at the selected warehouse. |
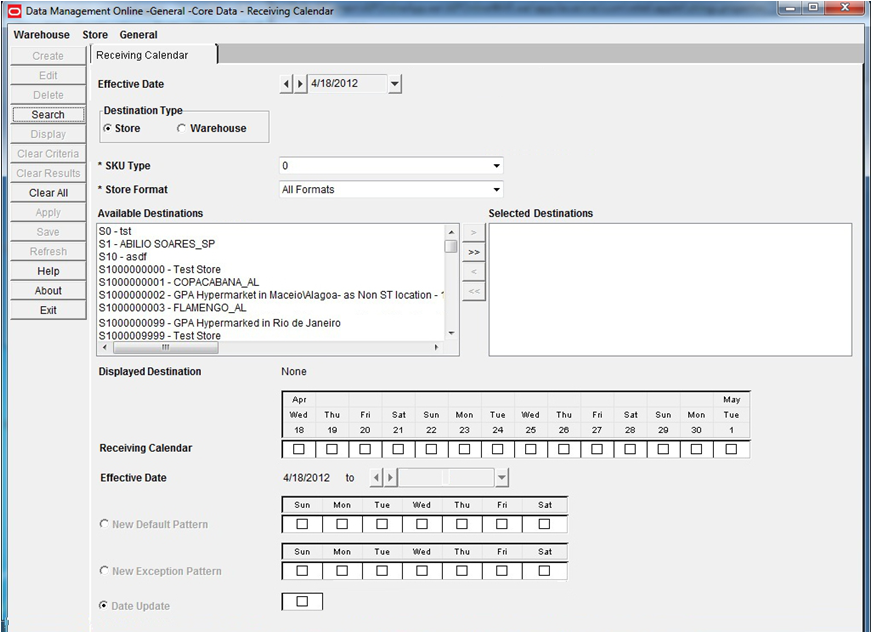
The Receiving Calendar window allows you to specify the days a location is available to receive inventory. You can define the receiving schedule in three different ways. You can create:
The default receiving pattern. This is the pattern that the store uses for all receiving for a SKU type.
An exception to the default receiving pattern. This is the pattern that the location uses for receiving during the time period you specify.
An exception to a specific date. The change you make only applies to the effective date you selected.
Navigate: Log into Data Management. From the General menu, select Core Data.
In the Effective Date field, select the date the location can begin receiving.
In the Destination Type, select either Store or Warehouse.
Enter search criteria to retrieve store calendar information.
In the SKU type field, select a SKU type.
In the Store Format field, select a location format.
Click Search.
Move the location you want to update to the Selected Destinations area.
Select a location in the Selected Destinations area.
Click Display.
Perform the following steps to establish a new Receiving Default Pattern:
Select New Default Pattern.
For each day of the week, double-click to enable the field and type:
Y to indicate the location is open for receiving.
N to indicate the location is closed for receiving.
Click Save. You are prompted to confirm your decision.
Click OK.
Perform the following steps to create a new Location Exception Pattern:
Select New Exception Pattern.
Click the To Effective Date calendar button and select the date the exception ends.
For each day of the week, double-click to enable the field and type:
Enter Y to indicate the location is open for receiving.
Enter N to indicate the location is closed for receiving.
Click Save. You are prompted to confirm your decision.
Click OK.
Perform the following steps to create a date update for a Location Receiving Schedule:
Select Date Update.
For the effective date you have selected:
Enter Y to indicate the location is open for receiving on a specific date.
Enter N to indicate the location is closed for receiving on a specific date.
Click Save. You are prompted to confirm your decision.
Click OK.
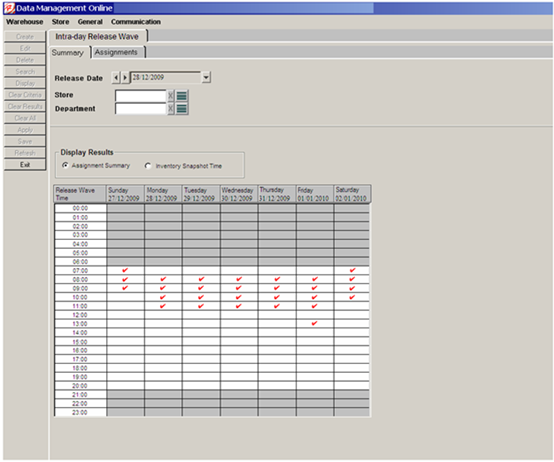
A Release Wave is a time of day when a batch process is executed to automatically release orders. All orders are released overnight except the products and stores that are assigned to a release wave later in the day By spreading product/locations across release waves, you are able to drip-feed store orders to the supplier or warehouse as they are required for execution.
Postponing release from overnight to within the day provides an opportunity for reacting to excessive sales, changing inventory positions (i.e. returns, inventory adjustment), and delivery delays or shortages that can occur during the day. By taking advantage of this information and re-planning the orders AIP can provide a new order recommendation before the order is physically executed or picked at the source.
Navigate: Log into Data Management. From the General menu, select Core Data and then click the Intra-day Release Wave tab.
Display release waves by specifying the following criteria:
| Field | Description |
|---|---|
| Release Date | Sets the date from which release waves will be displayed. |
| Store LOV | Displays all stores in the system. |
| Department LOV | Displays all Departments in the system limited by your security privileges. |
Click Search to populate the grid as shown in Figure 3-5. From the grid, you can either Manage Inventory Snapshot Times or View Release Wave Assignments.
From the populated grid in the Intra-day Release Wave window, you can edit a manage Inventory Snapshot Times (Revise Sales Intra-day functionality must be enabled).
Select the Inventory Snapshot Time option
Double-click any populated cell in the grid.
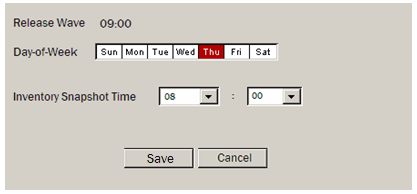
DM opens the Manage Inventory Snapshot Time Window.
Manage the Inventory Snapshot Time by updating the following fields:
| Field | Description |
|---|---|
| Day-of-Week | Set the days of the week to which the Inventory Snapshot Time will apply. |
| Inventory Snapshot Time | Select the appropriate hour and minutes from the respective dropdown lists. |
| Cancel | Click Cancel to clear all unsaved changes when confirmed on a secondary Confirm window. |
| Save | Click Save to commit changes to the database, close the Manage Inventory Snapshot Times Window, and refresh the results in the grid. |
From the populated grid in the Intra-day Release Wave window, you can edit a view assignments saved to a release wave.
Select the Assignment Summary option.
Double-click any populated cell in the grid.
DM opens the Release Wave Assignments Tab.
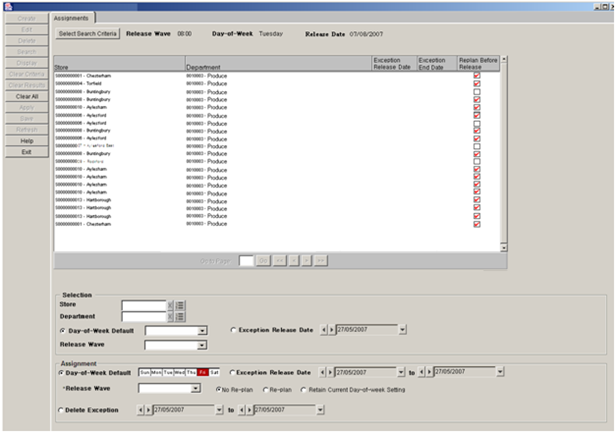
The Release Wave Assignments tab allows you to display the stores and departments assigned to a release wave as well as, add and/or edit the data.Funtionality for this tab is described in Table 3-1.
Navigate: From the Intra-day Release Wave tab click the Assignments sub-tab.
Table 3-1 Release Wave Assignments Tab Functionality
| Area | Field | Description |
|---|---|---|
|
Top |
Select Search Criteria Button |
Opens the Select Search Criteria Window. |
|
Selection |
Selection pane |
Used to specify criteria for selecting product/location combinations which will be included in the create/update save operation. |
|
Store LOV |
Contains all stores in the system and allows you to select stores to be included in the save operation. |
|
|
Department LOV |
Contains all departments in the system limited by your security privileges and allows you to select departments to be included in the save operation. |
|
|
Day-of-Week Default |
Select which day of the week the update/create save operation should be limited to. |
|
|
Exception Release Date |
Select the Exception release date that the save operation will be limited to. |
|
|
Release Wave |
Select which release wave the update/create save operation should be limited to. |
|
|
Assignment |
Assignment pane |
Must be used in conjunction with the Selection pane. The Assignment selection is used to specify the new values for the create/update save operation. |
|
Day-of-Week Default |
Creates a new default value. |
|
|
Exception Release Date |
Creates a new dated exception. |
|
|
Release Wave |
Select the Release Wave to be applied to the new Day-of-Week Default or Exception Release Date. Re-plan Indicator Select from the following options:
|
|
|
Delete Exception |
Deletes an existing dated exception. |
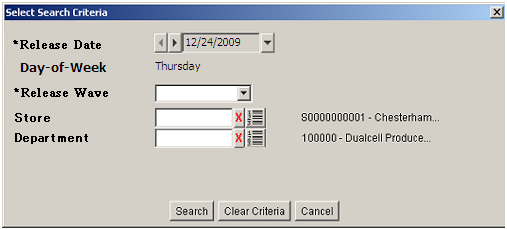
Navigate: From the Release Wave Assignments Tab, click Select Search Criteria to open the Select Search Criteria window. Functionality for this window is described in Table 3-2.
Table 3-2 Select Search Criteria Window Functionality
| Field | Description |
|---|---|
|
Release Date |
The date for which any existing data will be displayed. |
|
Release Wave |
The release wave of the existing data to be displayed for the selected date. |
|
Store |
Contains all stores in the system. |
|
Department |
Contains all departments in the system limited by your security privileges. |
|
Cancel |
Click Cancel to clear all unsaved changes when confirmed on a secondary Confirm window |
|
Clear Criteria |
Click Clear Criteria to reset all components to their default value. |
|
Search |
Click Search to populate the main grid with search results. |
Delivery-day Demand Percent (DDP) at the store describes how much of a day's sales can be addressed by a shipment that arrives during that day. It allows AIP to mimic real world supply chain operations by planning for inventory arrival at any point in the day. This should result in more optimal inventory levels. The sales that can be addressed by a shipment depend on how soon the shelves are restocked after the shipment arrives. This must be accounted for in the value set by the Retailer.
DDP Scenarios:
The retailer receives fresh baked goods every morning before the store opens. The baked goods are also stocked on the shelves before the store opens. All of the day's forecasted sales can be addressed by the shipment.
The retailer's shipments typically arrives sometime between 11:00 AM and 1:00 PM. The restocking begins at 3:00 PM and takes multiple hours to complete the entire store. (Restocking is done methodically by area so it is easy to approximate when an area will be complete).
The retailer's shipments arrives sometime during the working day but the re-stocking does not occur until overnight.
Specifying a DDP can address each scenario or a combination of scenarios. AIP will also offer Retailers the ability to derive the DDP from sales profiles instead of entering the store value. This allows Retailers with advanced sales capturing capabilities to leverage the sales information to get the most accurate percentage based on the expected on-shelf time.
Delivery-day Demand Percent at the warehouse represents a similar case however warehouses are not as space constrained as stores and as a result are less impacted by bringing in stock early to address shipments that may or may not to go out before the warehouse receives its inbound shipments. Therefore the Delivery-day Demand Percent at the warehouse will be limited to all or nothing—100% or 0% respectively.
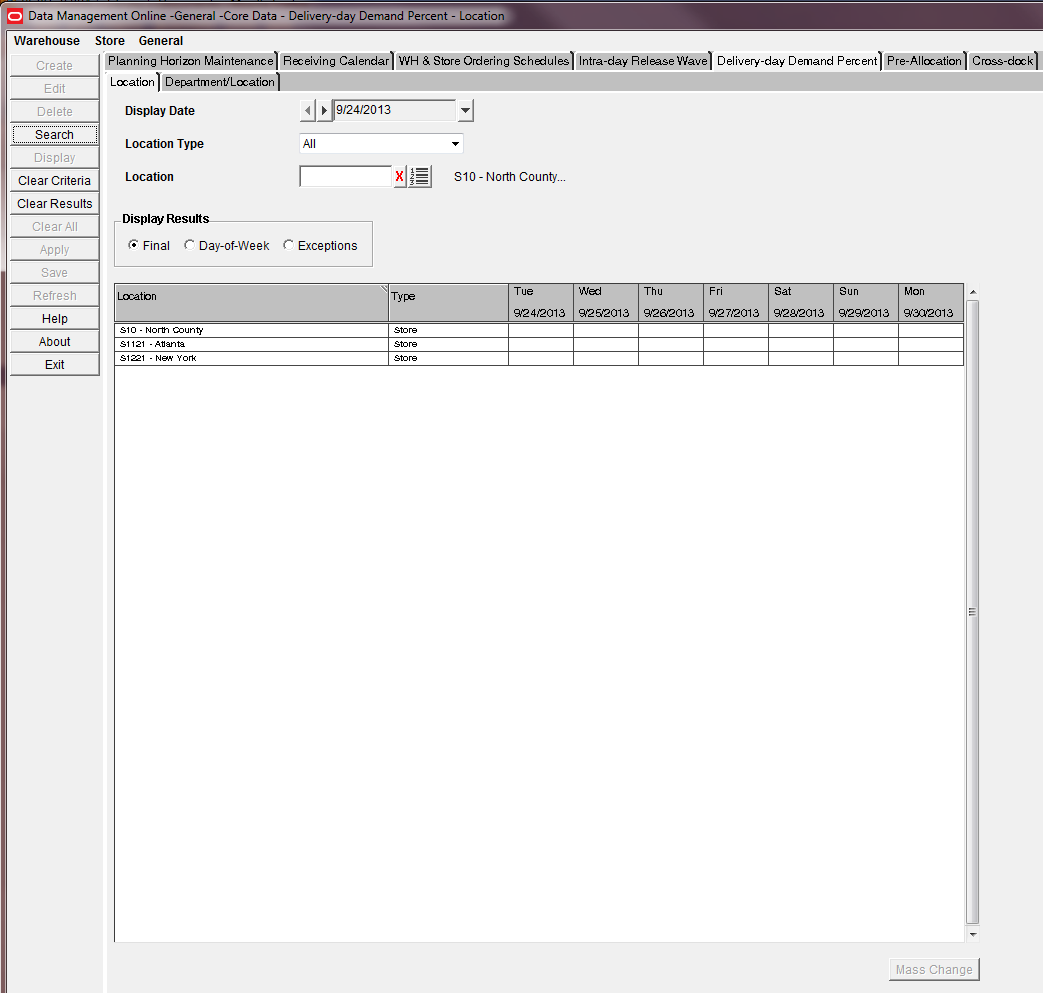
Navigate: Log into Data Management. From the General menu, select Core Data then Delivery-day Demand Percent.
Click the Location tab.
Select from the following search criteria:
| Field | Description |
|---|---|
| Display Date | Sets the date to that effective defaults and exceptions should be displayed. |
| Location Type | Set the location type or store format to search for locations.
Note: Your system settings may limit the options available in this list. |
| Location | Displays all stores and warehouse limited by the Location Type selection. |
Click Search to populate the grid.
From the Display Results area select which results you wish to work with.
Perform the following steps to establish the Delivery-day Demand Percent Default Pattern:
In the Display Results area select Day-of-Week.
In the results grid double click a location day of week to maintain.
Select Update Day of Week for each day to set or modify.
For each day of the week to set or modify double-click to enable the field and type the Delivery-day Demand Percentage.
Click Save. You are prompted to confirm your decision.
Perform the following steps to create or modify a Delivery-day Demand Percent exception:
In the Display Results area select Exception.
In the results grid double click the location date column.
Select the From Date.
Select the To Date
Select Create Exception.
Enter the Delivery-day Demand Percentage.
Click Save. You are prompted to confirm your decision.
|
Note: Any existing exception saved for the location between the From and To Dates is replaced with the exception created. |
Perform the following steps to delete a Delivery-day Demand Percent exception days:
In the Display Results area select Exception.
In the results grid double click the location date column.
Select the From Date to delete.
Select the To Date to delete
Select Delete Exception.
Click Save. You are prompted to confirm your decision.
Perform the following steps to mass create or modify a Delivery-day Demand Percent Day of Week Pattern:
In the Display Results area select Day-of-week.
In the results grid select one or more locations.
Click Mass Change.
Follow the steps in Set Location Default Pattern.
Navigate: Log into Data Management. From the General menu, select Core Data then Delivery-day Demand Percent.
Click the Department/Location tab.
Select from the following search criteria.
| Field | Description |
|---|---|
| Display Date | Sets the date to that effective defaults and exceptions should be displayed. |
| View By | Select Department to view DDP for 1 department across multiple locations.
Select Location to view DDP for 1 location across multiple departments. |
| Location Type | Set the location type or store format to search for locations.
Note: Your system settings may limit the options available in this list. |
| Location | Displays all stores and warehouse limited by the Location Type selection. When View By is Location this field is required. |
| Department | Displays the departments that contain at least one class assigned to the user. When View By is department this field is required. |
Click Search to populate the grid.
From the Display Results area select which results you wish to work with.
Perform the following steps to establish the Delivery-day Demand Percent Default Pattern:
In the Display Results area select Day-of-Week.
In the results grid double click a department or location day of week to maintain.
Select Update Day of Week for each day to set or modify.
For each day of the week to set or modify double-click to enable the field and type the Delivery-day Demand Percentage.
Click Save. You are prompted to confirm your decision.
Perform the following steps to create or modify a Delivery-day Demand Percent exception:
In the Display Results area select Exception.
In the results grid double click the department or location date column.
Select the From Date.
Select the To Date.
Select Create Exception.
Enter the Delivery-day Demand Percentage.
Click Save. You are prompted to confirm your decision.
|
Note: Any existing exception saved for the department/location between the From and To Dates is replaced with the exception created. |
Perform the following steps to delete a Delivery-day Demand Percent exception days:
In the Display Results area select Exception.
In the results grid double click the department or location date column.
Select the From Date to delete.
Select the To Date to delete.
Select Delete Exception.
Click Save. You are prompted to confirm your decision.
Perform the following steps to mass create or modify a Delivery-day Demand Percent Day of Week Pattern:
In the Display Results area select Day-of-week.
In the results grid select one or more department or locations.
Click Mass Change.
Follow the steps in Set Department/Location Default Pattern.
Perform the following steps to mass create or modify a Delivery-day Demand Percent Exception:
In the Display Results area select Exception.
In the results grid select one or more departments or locations.
Click Mass Change.
Follow the steps in Set Department/Location Exception.
Perform the following steps to mass delete a Delivery-day Demand Percent Exception:
In the Display Results area select Exception.
In the results grid select one or more departments or locations.
Click Mass Change.
Follow the steps in Delete Department/Location Exception.
Pre-allocation allows you to define the supply chain for planning pre-allocation scenarios.
The key characteristics of a Multi-level Distribution (MLD) pre-allocation scenario includes:
An inventory movement (purchase order or transfer) that drives inventory into a warehouse is released to the execution systems on its normal lead-time.
The inventory movement can be:
A transfer or a purchase order.
For all or a subset of the products available from the originating source (vendor or warehouse). Users need to directly control the extent of the subset of products to which the scenario applies.
At a pre-determined point prior to inventory arrival at the warehouse, a collection of inventory movements (allocations) is released to the warehouse.
These allocations consume the arriving inventory and are linked to the inbound transaction so that the warehouse knows not to unnecessarily put away any arriving inventory.
Any arriving inventory which is not consumed by outbound movements is assumed to be put away.
The pre-determined point at which the allocation is released is configurable as a period of time ahead of the inventory arrival point.
A period of zero time indicates that the allocation should be released at the last possible time prior to inventory arrival.
The maximum period of time is always capped during the allocation process because the allocation cannot be released before the originating inbound inventory movement is released.
Users are able to specify when it is important that all inventory due into the warehouse needs to be allocated - regardless of need.
In these situations, all inbound inventory must be allocated – regardless of exceeding the need from downstream destinations.
If unspoken for inventory suddenly appears prior:
To the point an additional allocation must be produced which consumes it.
In Current Inventory, transfers must be produced that consume it.
In situations where all of the inbound inventory need not be allocated, an allocation staging window is required to determine how many days shipments out of the warehouse can be considered when allocating the inventory before it is deemed to be put away – at which point subsequent outbound movements can be assumed to be satisfied from inventory.
Regardless of the allocation staging window, which downstream destinations are considered for the allocation or the need to ensure that all inbound inventory is pre-allocated, the day on day and over time reconciliation methods remain as the key drivers to distributing inventory in shortage and surplus situations.
The pre-allocation simply determines which outbound allocations are linked to the inbound inventory movement – not what quantities each downstream destination will receive.
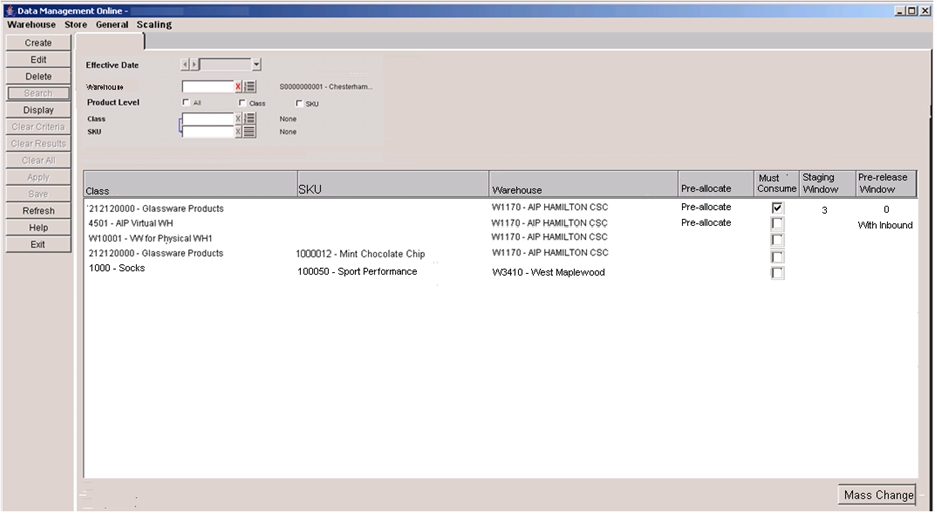
Navigate: Log into Data Management. From the General menu, select Core Data and then click the Pre-Allocation tab.
Search for possible pre-allocation scenarios by specifying the following search criteria:
| Field | Description |
|---|---|
| Effective Date | Sets the date for the search functionality. |
| Warehouse LOV | Displays all warehouses in the system. |
| Product Level | Displays the product level of the options:
|
| Class LOV | Displays all Classes in the system limited by your class-level security privileges. |
| SKULOV | Displays all SKUs in the system limited by your class-level security privileges. It is filtered by the Class selection |
| Product Level | Select at least one option:
|
| Class LOV | Displays all classes in the system limited by your security privileges. When the SKU check box is selected, then you must select at least one Class. |
| SKU LOV | Displays all classes in the system limited by your security privileges. It is also limited by selections in the Class LOV. |
Click Search to populate the grid as shown in Figure 3-11, "Pre-Allocation Window". From the grid, you can either Edit a Pre-allocation Scenario or Set Mass Change.
From the populated grid in the Pre-Allocation Window, you can edit a pre-allocation scenario.
To edit a pre-allocation scenario, either:
Select a row in the grid and click Edit.
Double-click any row in the grid.
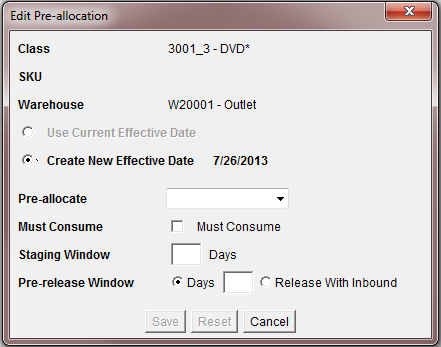
DM opens the Edit Pre-allocation Window.
Edit the pre-allocation scenarios by updating the following fields:
| Field | Description |
|---|---|
| Class | Pre-populated and reflects the Class from the selected row in the grid. |
| SKU | Pre-populated and reflects the SKU from the selected row in the grid. |
| Warehouse | Pre-populated and reflects the Warehouse from the selected row in the grid. |
| Use Current Effective Date | Option button is selected by default when the current effective date is after today. |
| Create New Effective Date | Option button is available when the current effective date is blank (from an unsaved row), or has an effective date that is less than or equal to today. |
| Pre-allocate | Drop-down options of:
|
| Must Consume | If selected, the Staging Window field is enabled and editable. |
| Staging Window | Can be set to a 3-digit integer from 0 to 999 that represents the number of days the inbound inventory can sit in a staging area before it is put away to stock. |
| Pre-release Window | Can be set to an integer number of days or set to indicate the allocation is released with the inbound PO or transfer (Release With Inbound). Valid pre-release days are from 0 to 999.
Note: Allocation can never be released before the PO/transfer. Therefore an excessively large number of days will have the same affect. |
| Cancel | Click Cancel to clear all unsaved changes when confirmed on a secondary Confirm window. |
| Reset | Click Reset to clear all unsaved changes when confirmed on a secondary Confirm window. |
| Save | Click Save to commit changes to the database, close the Edit Pre-allocation Window, and refresh the results in the grid. |
From the populated grid in the Pre-Allocation Window, you can set mass change.
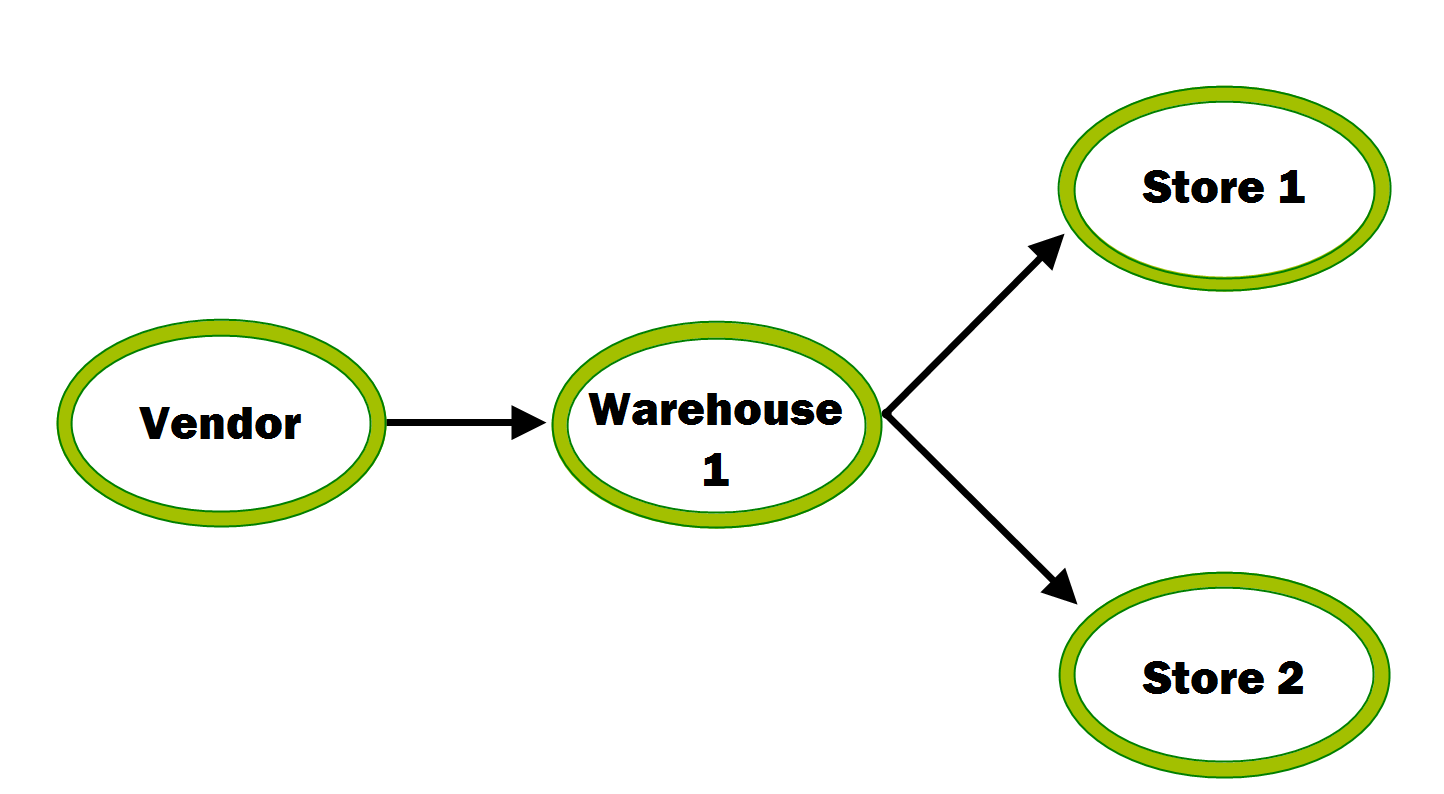
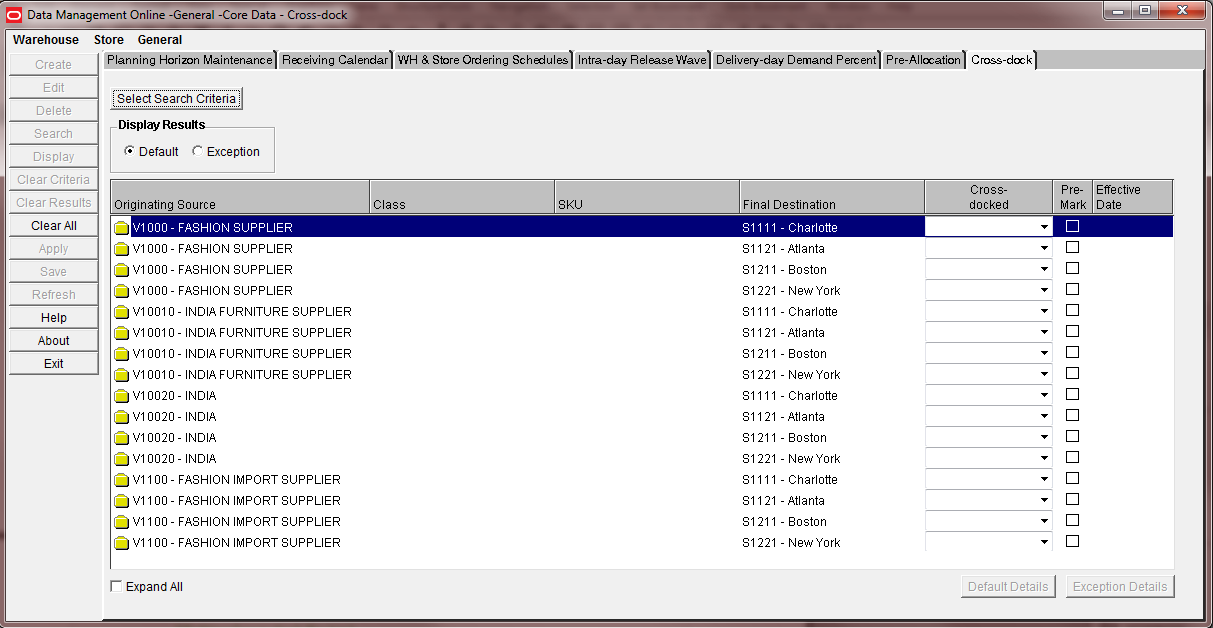
Cross-dock allows you to is to define the supply chain for planning cross-docked routes. At the cross-docking point the goods are handled and there is no long-term storage, they are typically sent to the next destination within a day from when they arrive at the cross-docking point.
Cross-docking in planning is summarized as follows:
The inbound quantity must match the outbound quantity at all cross-docking points (this is due to no storage occurring at any point).
The quantity distributed to all cross-docking points must be fixed when the initial cross-dock transaction is released. Furthermore the transactions must be linked to ensure the outbound distribution occurs once the inbound receipt begins (and not before).
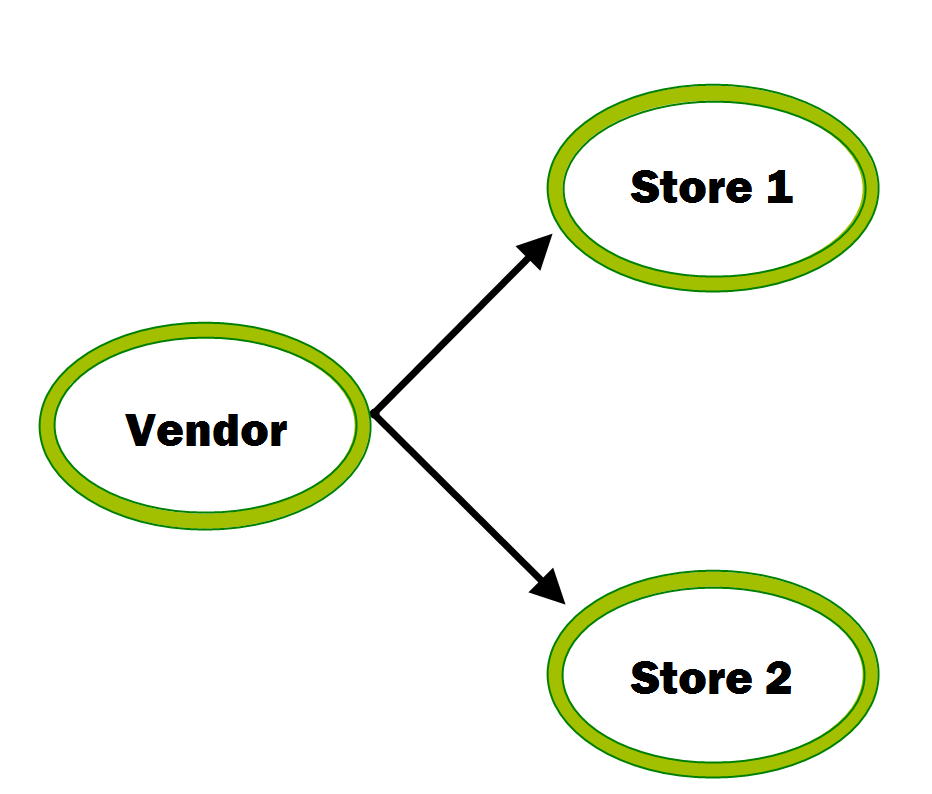
For planning, the supply chain is represented as a single movement between the originating source and final destination for cross-docked routes. In the resulting receipt plan the first source of a cross-dock appears as the source of the final cross-dock receiving destination.
The warehouses that the cross-dock flows through is hidden from planning to ensure that inbound and outbound quantities are completely aligned and there is no ability to reconcile the quantities. Additionally, it aids a replenishment user who conceptualizes a cross-docked plan in terms of ultimate source and receiving destination, not individual transfer legs.
Navigate: Log into Data Management. From the General menu, select Core Data and then click the Cross-dock tab.
Click Select Search Criteria to open the Select Search Criteria Window.
Update the fields in the Select Search Criteria Window.
| Field | Description |
|---|---|
| Effective Date | Sets the date for the search functionality. |
| Source Type | Depending on your system configuration, this drop-down list provides the options of:
Note: If your system configuration is supplier only, this drop-down list displays Supplier Only and any other selection is unavailable. Note: Selecting a Source Type limits the contents of the Order Source LOV |
| Order Source LOV | Displays valid sources of suppliers or warehouses. |
| Destination Type | This drop-down list provides the options of either:
Note: Selecting a Destination Type limits the contents of the Destination LOV |
| Destination LOV | Displays valid sources of destinations. |
| Product Level | Select at least one option:
|
| Class LOV | Displays all classes in the system limited by your security privileges. When the SKU check box is selected, then you must select at least one Class. |
| SKU LOV | Displays all classes in the system limited by your security privileges. It is also limited by selections in the Class LOV. |
Proceed by selecting one of these buttons from the Select Search Criteria Window:
| Button | Description |
|---|---|
| Search | The Search button is available when:
Clicking Search returns all combinations of Source/Product Level/Destination whether they are cross-docked or not |
| Clear Criteria | The Clear Criteria button is available when any search criteria is entered. Clicking Clear Criteria resets the Select Search Criteria Window to its original state. |
| Cancel | Clicking Cancel opens a cancel confirmation message and if accepted, then returns you to the Cross-dock Route Tab. |
Clicking Search opens the Cross-dock Route Details Window.
To edit or view the cross-dock route details, click Default Details.
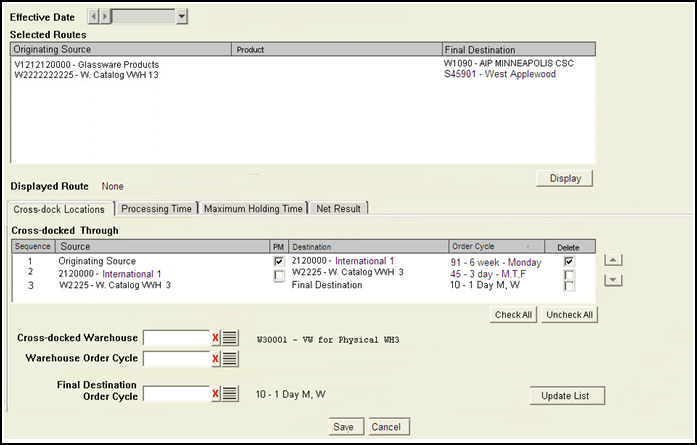
DM opens the Cross-dock Default Details Window from the Cross-dock Locations tab.
View or update the window details in the Cross-dock Default Details Window.
| Window Details | Description |
|---|---|
| Effective Date | Displays the previously set Effective Date. Use the drop-down functionality to change. |
| Selected Routes | Displays the selected routes from the Cross-dock Route Details Window. |
| Display Button | This button is unavailable until a route is selected in the grid. Clicking Display shows the saved cross-docked locations and order cycles in the Cross-dock Locations tab. It also populates the Processing Time, Maximum Holding Time, and Net Result tabs. |
| Save Button | Clicking Save updates any changes and returns you to Cross-dock Route Tab. |
| Cancel Button | Clicking Cancel clears any changes and returns you to Cross-dock Route Tab. |
The Cross-dock Default Details Window includes these tabs:
Navigate: Log into Data Management. From the General menu, select Core Data and then click the Cross-dock tab. Continue to the Cross-dock Default Details Window as described in "Setting Cross-dock Routes".
From the Cross-dock Default Details Window from the Cross-dock Locations tab, delete the desired Source by selecting its Delete check box and then clicking Update List.
Data Management removes the row from the grid.
To update any changes, click Save and return to the Cross-dock Route Tab.
To clear any changes, click Cancel and return to the Cross-dock Route Tab.
The Cross-dock Locations tab is shown in Figure 3-18, "Cross-dock Default Details Window".
This tab allows you to display default details of the cross-dock route as well as, add and/or edit the data.
Table 3-0 describes the functionality of the Cross-dock Locations tab.
|
Note: If a cross-dock warehouse is the same as any of the selected route sources or destinations, you will be unable to Save the route. |
Table 3-3 Cross-dock Locations Tab Description
| Tab Details | Description |
|---|---|
|
Cross-docked Through |
Lists the default details of the cross-dock route including sequence, source, destination and order cycle. |
|
Cross-docked Warehouse LOV |
Contains all warehouses in the system and allows you to add additional warehouses to the cross-dock route. |
|
Warehouse Order Cycle LOV |
Contains all warehouse order cycles in the system and allows you to add additional warehouse order cycles to the cross-dock route. |
|
Final Destination Order Cycle LOV |
Shows both warehouse order cycles and store order cycles. The type (Store or Warehouse) will be shown in the LOV next to the cycle code and name. |
|
Update List button |
This button is available after all three LOVs have been populated. Click Update List to add the selected warehouse and order cycles to the Cross-docked Through grid. Once you have added warehouse and order cycles the first row has a Source of Originating Source with a destination of the Cross-docked Warehouse selection and an order cycle equal to the Warehouse Order Cycle selection. The second row has a Source of the Cross-docked Warehouse selection and a destination of Final Destination. The Final Destination Order Cycle selection will be used to populate the order cycle between the last cross-dock warehouse and the final destination. |
|
Save Button |
Clicking Save saves any undefined routes in cross-docked status including the parent route and any cross-docked through locations/date/cycle. If the Selected Routes grid contains:
|
|
Cancel Button |
Clicking Cancel clears any changes prior to Save. |
Figure 3-19 shows the Processing Time tab.
The Processing Time tab allows you to edit and enter a processing time. Processing time is a number of days from receipt until the shipment can be sent outbound. This is a single digit integer value between 0 and 9.
This tab is empty until a route is displayed or cross-dock warehouses are added in the Cross-dock Locations tab.The Processing Time tab only displays the intermediate Cross-dock through warehouses.
Table 3-0 describes the functionality of the Processing Time tab.
Table 3-4 Processing Time Tab Description
| Tab Details | Description |
|---|---|
|
Day of the Week Cells |
Double-click within a day of the week cell (S,M,T,W,T,F, S) to edit or enter a processing time. |
|
Set all to field |
To set all cells to a single value, enter the value in the Set all to field and then click Update List. |
|
Update List |
Available when a valid value is entered in the Set all to field. |
|
Save Button |
Save is available when any required valid values exist for all cells. Save saves any processing time updates for the cross-docked route. |
|
Cancel Button |
Clicking Cancel clears any changes prior to Save. |
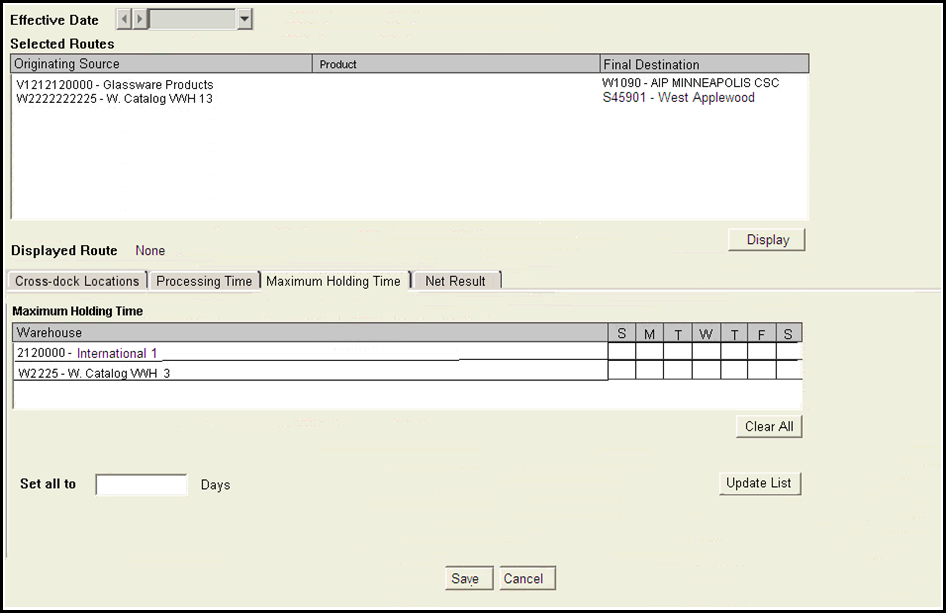
Figure 3-20 shows the Maximum Holding Time tab.
The Maximum Holding Time tab allows you to edit and enter a processing time. Maximum Holding time is a number of days from after the processing time ends that the shipment is available to ship. This is a single digit integer value between 0 and 9.
This tab is empty until a route is displayed or cross-dock warehouses are added in the Cross-dock Locations tab.The Maximum Holding Time tab only displays the intermediate Cross-dock through warehouses.
Table 3-5 describes the functionality of the Maximum Holding Time tab.
Table 3-5 Maximum Holding Time Tab Description
| Tab Details | Description |
|---|---|
|
Day of the Week Cells |
Double-click within a day of the week cell (S,M,T,W,T,F, S) to edit or enter a processing time. |
|
Set all to field |
To set all cells to a single value, enter the value in the Set all to field and then click Update List. |
|
Update List |
Available when a valid value is entered in the Set all to field. |
|
Save Button |
Save is available when any required valid values exist for all cells. Save saves any processing time updates for the cross-docked route. |
|
Cancel Button |
Clicking Cancel clears any changes prior to Save. |
Figure 3-21 shows the Net Result tab.
The Net Result tab shows the total lead time for a particular day.
This tab only uses the data entered in the details popup and not incorporate additional factors to the schedule such as receiving calendars and the like. Node-to-node schedules are the Warehouse Order Cycles set in the Cross-dock Locations Tab.
This section includes:
A profile is a collection of SKUs. The profiles describe the ordering cycle that gets an item into a store. SKUs are initially assigned to a profile by batch. They are grouped by class or vendor. A SKU can belong to a warehouse profile, or a supplier profile, or both.
Warehouse: The SKUs in the profile can be supplied to the store by a warehouse. Multiple warehouses may be assigned to a warehouse profile. All pack-sizes for a SKU are automatically ranged to the warehouses in the profile. Ranging exceptions for a particular SKU-pack must be created manually.
Supplier: The SKUs in the profile can be supplied directly to the store by the selected supplier.
You can assign SKUs to both warehouse and supplier profiles. A SKU may exist in multiple supplier profiles, but only in one warehouse profile on a particular date.
Each profile must be assigned an order cycle. You must create network and planning groups before you can associate a profile to a network group.
Navigate: Log into Data Management. From the General menu, select Profiles. From the Profile Maintenance primary tab, click the Profile Selection secondary tab.
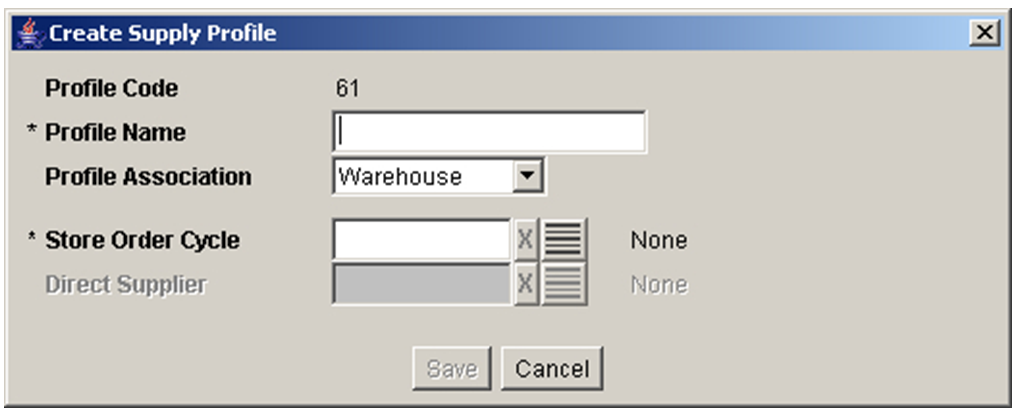
Click Create. The Create Supply Profile Window opens.
In the Profile Name field, enter a profile name.
In the Profile Association field, select the source type that the profile is associated with.
In the Store Order Cycle field, enter the store order cycle ID, or click the LOV button and select a store order cycle.
In the Direct Supplier field, enter the direct supplier ID, or click the LOV button and select a direct supplier.
|
Note: The Direct Supplier field is available only if the profile association is direct supplied. |
Click Save. You are prompted to confirm your decision.
Click OK.
Click the Edit Attributes tab.
Define the attributes of the profile.
Set a profile store order cycle
Assign SKUs to a profile
Maintain profile warehouse assignments
Assign network groups to a warehouse in a profile
Navigate: Log into Data Management. From the General menu, select Profiles. From the Profile Maintenance primary tab,click the Profile Selection secondary tab.
Set a profile as the working profile.
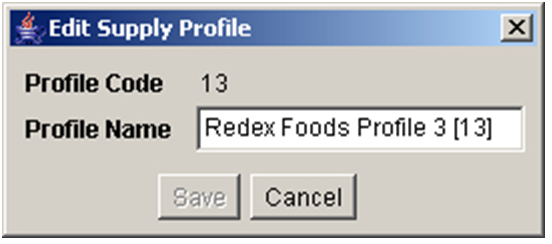
Click Edit. The Edit Supply Profile Window opens.
In the Profile Name field, enter the profile name.
Click Save. The window closes and the new name appears in the header.
This section provides information about maintaining profiles.
To edit a profile, you must select a profile in the Profile Selection window, and indicate that it is the working profile. You are then able to edit the profile attributes in the Edit Attributes window.
Among the profile attributes you can edit are:
Store order cycle for a profile: Allows you to select the store order cycle that are used when ordering the SKUs which are assigned to the working profile.
SKU assignments: Allows you to add SKUs to the grouping of SKUs assigned to the working profile. All SKUs in a profile should have similar ordering cycles. The store order cycle for the profile, and all profile exceptions are applied to all SKUs assigned to the profile.
A SKU may exist in a single warehouse profile and at the same time it may exist in one or more direct profiles. If a SKU is being placed in a warehouse profile, it must be removed from an existing warehouse profile. Placing a SKU in a warehouse profile does not remove it from any existing direct profiles.
When SKUs are added to a warehouse profile, all pack-sizes for each SKU are profile-ranged to all warehouses assigned to the working profile.
Profile warehouse assignments: Allows you to identify warehouses that can supply the SKUs in the profile to a store. When warehouses are added to a warehouse profile, all pack-sizes for each SKU are profile-ranged to all warehouses assigned to the working profile. A warehouse that is the current home warehouse for any store in the working profile may not be un-assigned.
Network groups: Allows you to associate each of the profile's warehouses with a single network group. You may set a new network group assignment or change an existing assignment.
The store order cycle displayed is the calculated order cycle day and its associated lead time for fourteen (14) days starting on the effective date. The order cycle day is calculated with a start date of January 2nd, 2000 for all cycles. All 14 and 28-day cycles are calculated against this date. For seven-day cycles, there is nothing to calculate since they run from Sunday to Saturday and repeat the same pattern through time.
Navigate: Log into Data Management. From the General menu, select Profiles. From the Profile Maintenance primary tab, click the Profile Selection secondary tab.
Specify one or more of the following criteria to retrieve the supply profile:
Order Source: In the Order Source field, enter the order source ID, or click the LOV button and select an order source.
Class: In the Class field, enter the class ID, or click the LOV button and select a class.
SKU: In the SKU field, enter the SKU ID, or click the LOV button and select a SKU.
Supply Profile: In the Supply Profile field, enter the supply profile ID, or click the LOV button and select a supply profile.
Click Search. The Supply Profile area displays profiles that match your criteria.
Select the profile you want to set as the working profile.
Click Set To Working Supply Profile. The working profile appears in the header and the Edit Attributes tab is enabled.
Navigate: Log into Data Management. From the General menu, select Profiles. From the Profile Maintenance primary tab, click the Profile Selection secondary tab.
Set a profile as the working profile.
Click Edit. The Edit Supply Profile Window opens.
In the Profile Name field, enter the profile name.
Click Save. You are prompted to confirm your decision.
Click OK.
Navigate: Log into Data Management. From the General menu, select Profiles. Fromthe Profile Maintenance primary tab, click the Profile Selection secondary tab.
Set a profile as the working profile.
Click Delete. You are prompted to confirm your decision.
Click OK.
|
Note: You must assign SKUs associated with the profile to a new profile before you can delete it. SKUs in a direct profile cannot be moved. |
Navigate: Log into Data Management. From the General menu, select Profiles. From the Profile Maintenance primary tab, click the Profile Selection secondary tab.
Set a profile as a working profile.
Click the Edit Attributes tab.
Click the Store Order Cycle tab. The store order cycle currently assigned to the profile is displayed to the right of the Store Order Cycle field.
In the Effective Date field, select the date by which the new store order cycle becomes effective.
In the Store Order Cycle field, enter the store order cycle ID, or click the LOV button and select a store order cycle.
Click Display to view the real-time order cycle and the selected order cycle's default settings.
Click Save. You are prompted to confirm your decision.
Click OK.
Navigate: Log into Data Management. From the General menu, select Profiles. From the Profile Maintenance primary tab, click the Profile Selection secondary tab.
Set a profile as a working profile.
Click the Edit Attributes tab.
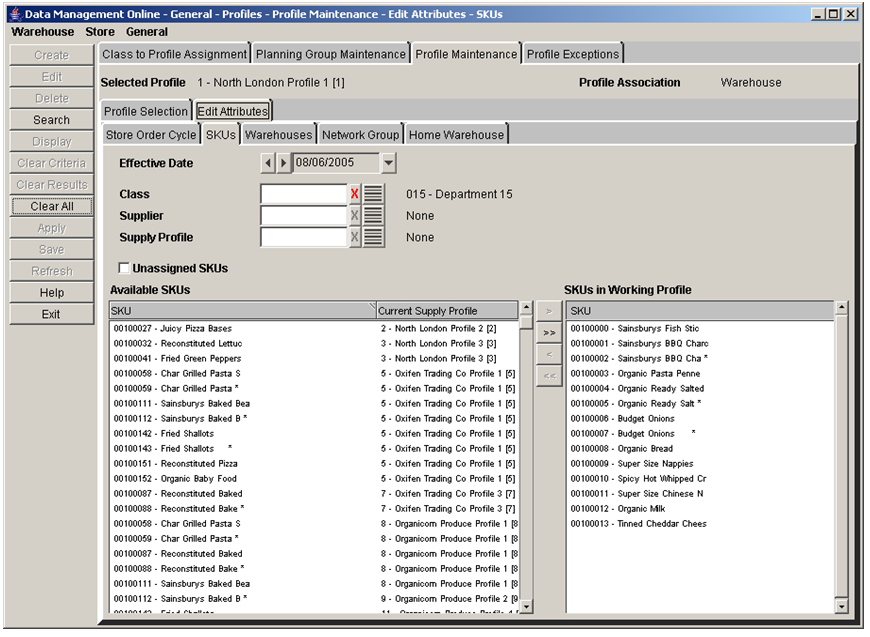
Click the SKUs tab.
Select one or more criteria to retrieve the available SKUs:
Class: In the class field, enter the class ID, or click the LOV button and select a class.
Supplier: In the Supplier field, enter the supplier ID, or click the LOV button and select a supplier.
Supply Profile: In the Supply Profile field, enter the supply profile ID, or click the LOV button and select a profile that is different from the working profile.
Select the Unassigned SKUs check box to search for SKUs that are not assigned to a profile.
|
Note: If you select the Unassigned SKUs check box, you cannot search by supply profile, since you are searching for SKUs that are currently not assigned to any profile. The Supply Profile search criteria value indicates that you are searching for SKUs currently assigned to that profile. |
Click Search.
|
Note: The Available SKUs area displays the SKUs that are not assigned to the profile. The SKUs in the Working Profile area display the SKUs that are assigned to the profile on the Effective Date. |
Move the SKUs you want in the profile to the SKUs in the Working Profile area.
|
Note: SKUs that have not been saved are displayed in green. |
Click Save. You are prompted to confirm your decision.
Click OK.
Navigate: Log into Data Management. From the General menu, select Profiles. From the Profile Maintenance primary tab, click the Profile Selection secondary tab.
Set a profile as a working profile.
Click the Edit Attributes tab.
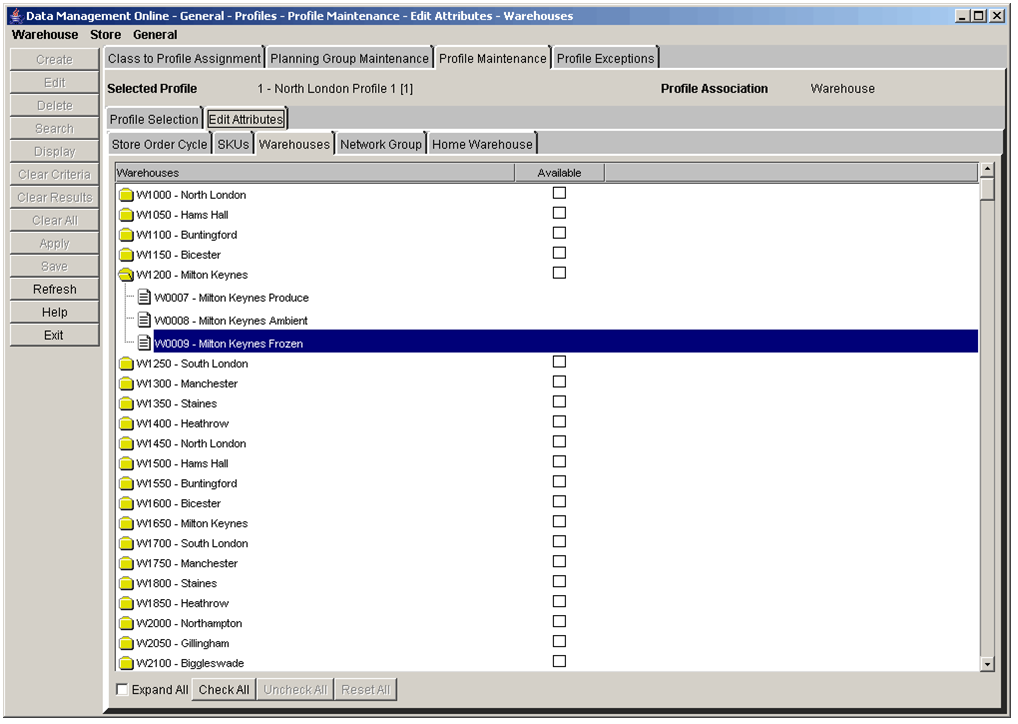
Click the Warehouses tab. The warehouses are displayed.
|
Note: The profile must have a profile association of warehouse to enable the Warehouses tab. |
Update the warehouse selections as necessary.
Select the Expand All check box to view the warehouse chambers.
Select the Available check box next to the warehouses you wish to assign to the profile.
Click Check All to select all the available warehouses in the list.
Click Uncheck All to clear all the warehouses in the list.
Click Reset All to reset all displayed warehouses back to their saved status at any time.
|
Note: The Reset All button is enabled after you make changes to the profile's warehouse associations. |
Click Save. You are prompted to confirm your decision.
Click OK.
Navigate: Log into Data Management. From the General menu, select Profiles. From the Profile Maintenance primary tab, click the Profile Selection secondary tab.
Set a profile as a working profile.
Click the Edit Attributes tab.
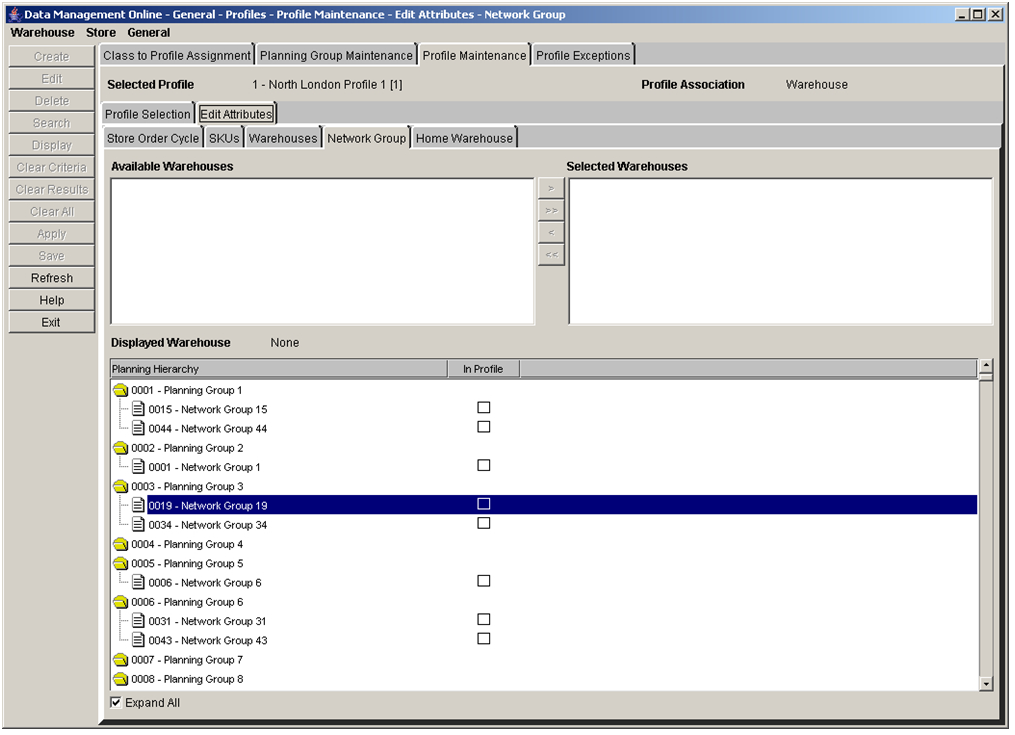
Click the Network Group tab. The warehouses assigned to the profile are displayed.
|
Note: The profile must have a profile association of warehouse to enable the Network Group tab. |
Move the warehouses to the Selected Warehouse area.
Click Display.
Select the check box next to the planning group to assign a network group.
Click Save. You are prompted to confirm your decision.
Click OK.
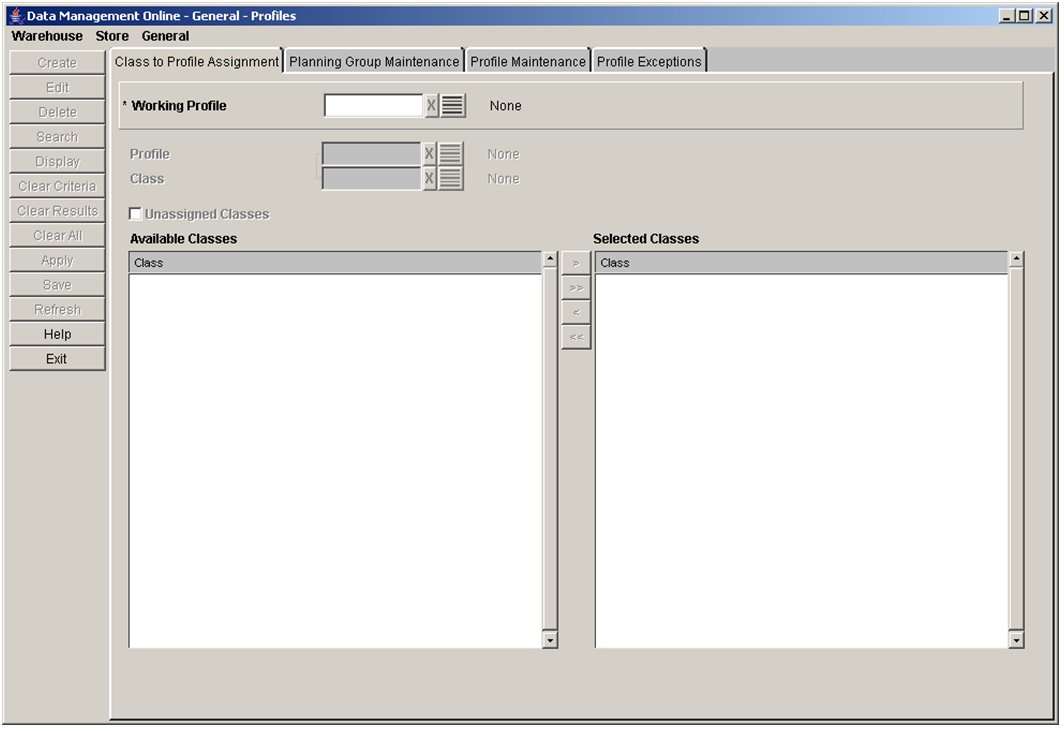
A class-to-profile assignment specifies a single warehouse profile to which new SKUs in the class are assigned when the system is configured to perform automatic assignment based on Class. Profile assignment occurs automatically each night when new SKUs arrive in the AIP system. Each class may be assigned to one profile. Assigning a class to a profile removes the class from any previous profile it was assigned to.
You can perform multiple searches to build a cumulative list of available classes.
Navigate: Log into Data Management. From the General menu, select Profiles. Click the Class to Profile Assignment tab.
In the Working Profile field, enter the ID of the working profile, or click the LOV button and select the working profile.
In the Profile field, enter the profile ID, or click the LOV button and select a profile that is currently assigned to the class you are searching for.
In the Class field, enter the class ID, or click the LOV button and select a class from the list.
Select the unassigned class check box to search for classes that are not currently assigned to a profile.
Click Search to display the classes in the Available Class list.
|
Note: Available classes not assigned to the working profile are displayed in black text. Classes already assigned to the working profile are displayed in red text. |
Move the classes you want to assign the profile to the Selected Classes area.
Click Save. You are prompted to confirm your decision.
Click OK.
Planning and network groups are used to manage and report on the capacity in a warehouse. This functionality allows you to manage information across profiles. If Oracle Retail Warehouse Replenishment Planning is enabled, network groups can create alerts when warehouse capacities are not optimized.
A network group is a collection of similar profiles that allows easier SKU management. A planning group is a collection of network groups with common characteristics. For example, all portable music players exist in one network group, and all portable audio exist in another network group. Both of these network groups (portable music players and portable audio) exist in one planning group, called small electronics.
Table 3-6 Planning and Network Groups
| Planning Group | Small Electronics | |
|---|---|---|
|
Network group |
Portable music players |
Portable audio |
|
Profiles |
Walkmans, mp3 players, discmans |
Boom box, desktop radio, clock radio |
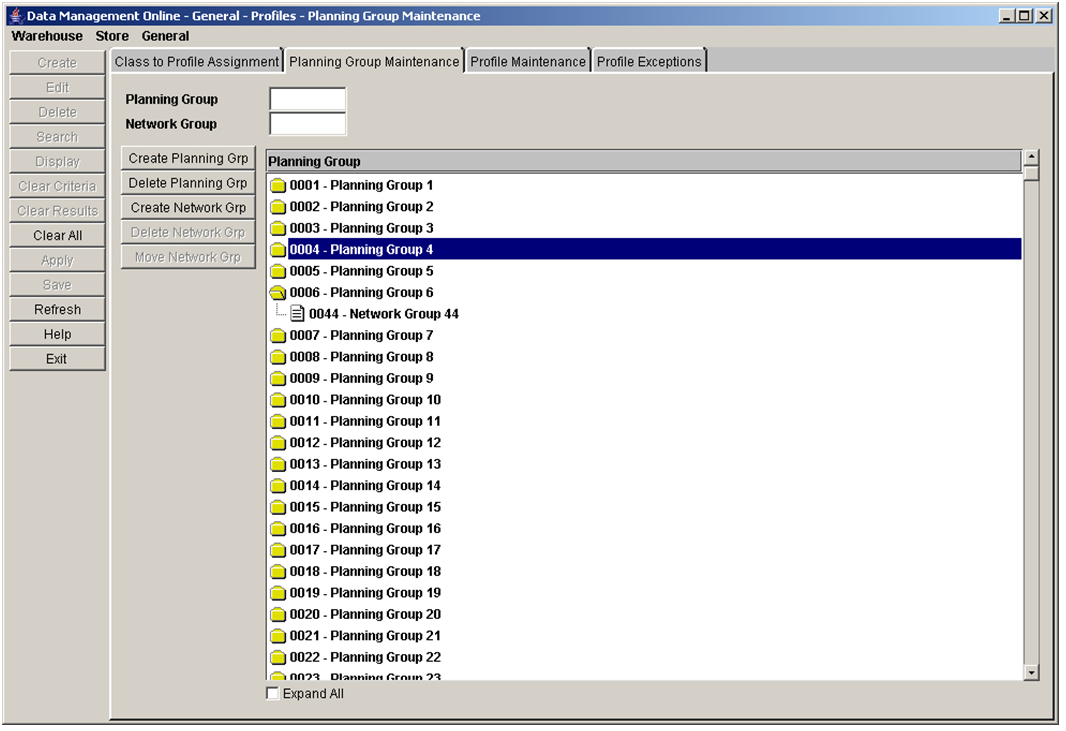
Navigate: Log into Data Management. From the General menu, select Profiles. Click the Planning Group Maintenance tab.
In the Planning Group field, enter the planning group ID.
In the Network Group field, enter the network group ID.
Press Enter. The first group that contains an ID that matches the search criteria is selected.
Navigate: Log into Data Management. From the General menu, select Profiles. Click the Planning Group Maintenance tab.
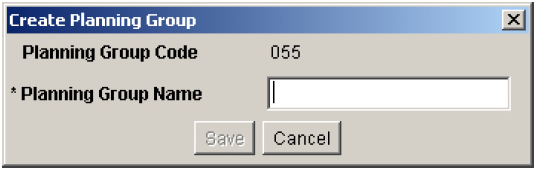
Click Create Planning Grp. The Create Planning Group Window opens.
In the Planning Group Name field, enter a name for the planning group.
Click Save. You are prompted to confirm your decision.
Click OK.
Navigate: Log into Data Management. From the General menu, select Profiles. Click the Planning Group Maintenance tab.
Select the network group you want to delete.
|
Note: You must remove profiles associated with the network group before you can delete it. |
Select the network group to delete by clicking on its name or file icon.
Click Delete Network Grp. You are prompted to confirm your decision.
Click OK.
Navigate: Log into Data Management. From the General menu, select Profiles. Click the Planning Group Maintenance tab.
Select the planning group you want to delete.
|
Note: You must remove network groups associated with the planning group before you can delete it. |
Click Delete Planning Grp. You are prompted to confirm your decision.
Click OK.
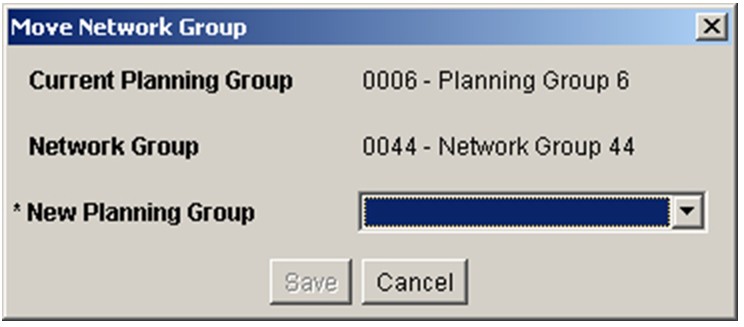
Navigate: Log into Data Management. From the General menu, select Profiles. Click the Planning Group Maintenance tab.
Select the network group you want to move.
Click Move Network Grp. The Move Network Group Window opens.
In the New Planning Group field, select the planning group you want to move the network group to.
Click Save. You are prompted to confirm your decision.
Click OK.
This section provides information on how to:
Maintain Exceptions for Release and Placement Schedule at the Profile Level
Maintain Exceptions to the Store Order Cycle at the Profile Level
The Copy Profile Exceptions window allows you to quickly set up and maintain modifications to multiple profiles. Once profile/store/day order cycle exceptions and profile/day exceptions have been set up for one profile, you can apply the same exceptions to other profiles.
Navigate: Log into Data Management. From the General menu, select Profiles. From the Profile Exceptions primary tab, click the Copy Profile Exceptions secondary tab.
In the Effective Date field, select the first date the exceptions become effective.
|
Note: The effective date is the day the copy begins. |
In the Copy From area, select the profiles you want to copy the exceptions from:
To copy store exceptions for a day, in the Store with Exceptions field, enter a store ID, or click the LOV and select a store.
To copy exceptions for a supplier with direct to store delivery profiles, in the Supplier with Direct Profiles field, enter a supplier ID, or click the LOV and select a supplier.
To copy exceptions from a profile, in the Profile with Exceptions field, enter the profile ID or click the LOV button and select a profile.
Click Search.
In the Copy To area, select the profiles you want to copy the exceptions to:
To copy to a specific supplier profile, in the Supplier with Direct Profiles field, enter the supplier ID, or click the LOV button and select a supplier.
To copy to a specific profile, in the Profile field, enter the profile ID, or click the LOV button and select a profile.
To copy to multiple profiles, move the profiles you want to edit to the Select Profiles area.
Click Save. You are prompted to confirm your decision.
Click OK.
The release schedule for a profile is defined when you create the order cycle and assign it to a profile. After you associate an order cycle to a profile, you may need to create exceptions for a period of time. An exception to the order cycle at the profile level is always used instead of the default order cycle for the profile for the exception time period specified.
The Profile Release and Placement Schedule Exceptions window allows you to set exceptions to the release and placement schedule at the profile level. Release and placement schedule exceptions are entered in whole numbers representing the days that compose a lead time.
Navigate: Log into Data Management. From the General menu, select Profiles. On the Profile Exceptions primary tab, select the Profile Release and Placement Schedule Exceptions secondary tab.
In the Effective Date field, select the date the exceptions become enabled.
In the Profile field, enter a profile ID, or click the LOV button and select a profile.
Click Display to view existing exceptions.
In the To date field, select the last date the exception is effective in the system.
Perform the following steps to create a Release Exception:
Select New Release Exception.
In the next field enter the new lead time.
|
Note: This field is a value, in days, between 0 and 366, inclusive. |
Click Save. You are prompted to confirm your decision.
Click OK.
Perform the following steps to delete a Release Exception:
Select Delete Release Exception.
Click Save. You are prompted to confirm your decision.
Click OK.
The Profile Store Schedule Exceptions window allows you to create exceptions to default order cycles at the profile/store/day level. Order cycles are created for a store when you associate an order cycle to a profile and then link the profile to the SKU and Store Source value identified for the store. The Store Source corresponds to the warehouse or supplier linked to the warehouse-profile or direct-profile, respectively.
Navigate: Log into Data Management. From the General menu, select Profiles. From the Profile Exceptions primary tab, click the Profile Store Schedule Exceptions secondary tab.
In the Effective Date field, select the date that the exceptions will be enabled in the system.
In the Profile field, enter the profile ID, or click the LOV button and select a profile.
In the Store Format field, enter the store format ID, or click the LOV button and select a store format.
Click Search.
Move the stores you want to create exceptions for to the Selected Stores area.
Select a store in the Selected Stores area.
Click Display.
In the To date field, select the last date the exceptions are enabled in the system.
Navigate: Log into Data Management. From the General menu, select Profiles. From the Profile Exceptions primary tab, click the Profile Store Schedule Exceptions secondary tab.
Select Profile - Store Exceptions option.
In the Store Order Cycle To field, enter the store order cycle ID, or click the LOV button and select a store order cycle.
Click Save. You are prompted to confirm your decision.
Click OK.
Navigate: Log into Data Management. From the General menu, select Profiles. From the Profile Exceptions primary tab, click the Profile Store Schedule Exceptions secondary tab.
Select Delete Profile - Store Exceptions option.
Click Save. You are prompted to confirm your decision.
Click OK.
This section includes:
A Scaling Group is a group of Suppliers, SKUs, and warehouses whose purchase orders can be grouped together for the purposes of meeting supplier minimums and building full containers.
Supplier Minimums: Many retailers negotiate contracts with suppliers which either require a minimum purchase or provide financial benefit to the retailer for meeting an agreed minimum purchase—usually specified as a cost or quantity.
Containers: Transportation management is generally treated as a separate business process from replenishment planning. However, some of the costs associated with the transportation of products may be reduced if the retailer orders quantities that make full use of available container capacity.
AIP is in a unique position to address Supplier Minimums and to make use of container capacity because of its forward-looking plan. Since AIP has visibility to the future planned need, it can make intelligent decisions about what items to select to meet the minimum. AIP can use the future plans to identify what the actual expected need is in the short term, whereas a system which does not have future visibility has to make an arbitrary decision about which SKUs will be ordered to meet the minimum.
Defining supplier minimums and container size enables you to pool orders together to achieve higher efficiencies in purchasing and logistics.
In contrast to ordering up to a certain amount, the desire to not exceed a warehouse receipt capacity is also an important consideration for planning. Point-in-time replenishment has limited ability to react to excessive receipts without causing a loss of sales. However, AIP's forward-looking plan can be used to anticipate such occurrences. When identified, orders can be pushed up to earlier days with open receiving capacity. This ensures all forecasted needs are met (that is, no lost sales) without straining warehouse receiving resources.
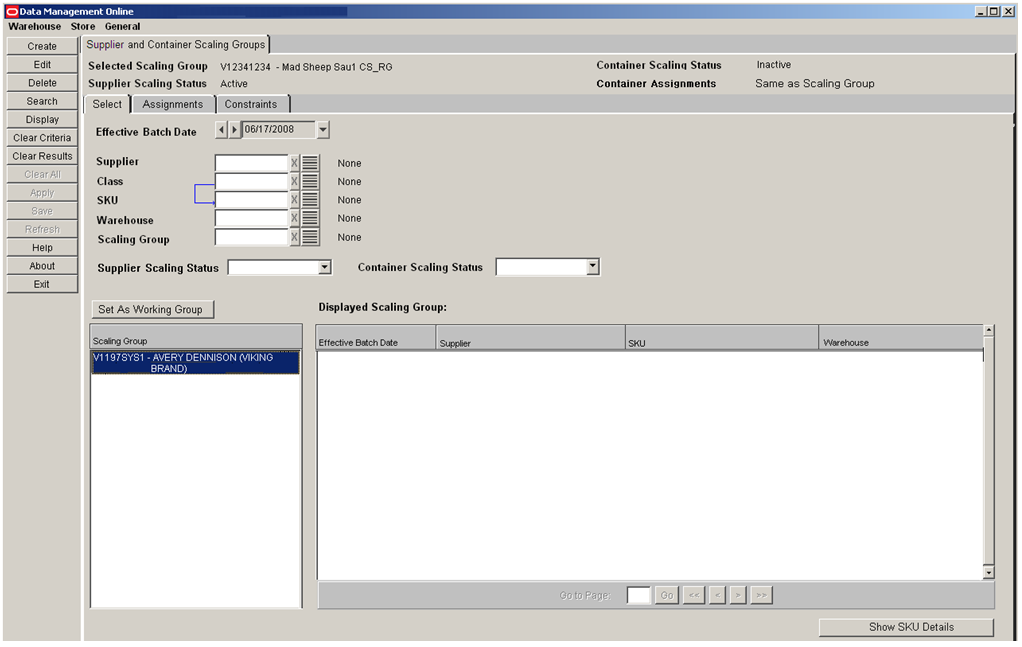
The Supplier and Container Scaling Groups tab allows you to select a working Scaling Group to view, maintain, or delete.
Navigate: Log into Data Management. From the General menu, select Scaling. OnFrom the Supplier and Container Scaling Groups primary tab click the Select tab.
In the Effective Batch Date field, select an effective date using the calendar button.
Specify one or more of the following criteria to retrieve Scaling Groups:
Supplier: Enter the supplier ID, or click the LOV button and select a supplier.
Class: In the Class field, enter the class ID, or click the LOV button and select a class.
SKU: Enter the SKU ID, or click the LOV button and select a SKU.
Warehouse: Enter the warehouse ID, or click the LOV button and select a warehouse.
Scaling Group: Enter the scaling group ID, or click the LOV button and select a scaling group.
Supplier Scaling Status: Select Active or Inactive from the drop-down list.
Container Scaling Status: Select Active or Inactive from the drop-down list.
Click Search. Scaling Groups meeting the selected criteria are listed in the Scaling Group list.
Highlight a Scaling Group from the Scaling Group list.
Click Set As Working Group.
Navigate: Log into Data Management. From the General menu, select Scaling. OnFrom the Supplier and Container Scaling Groups primary tab, click the Select tab.
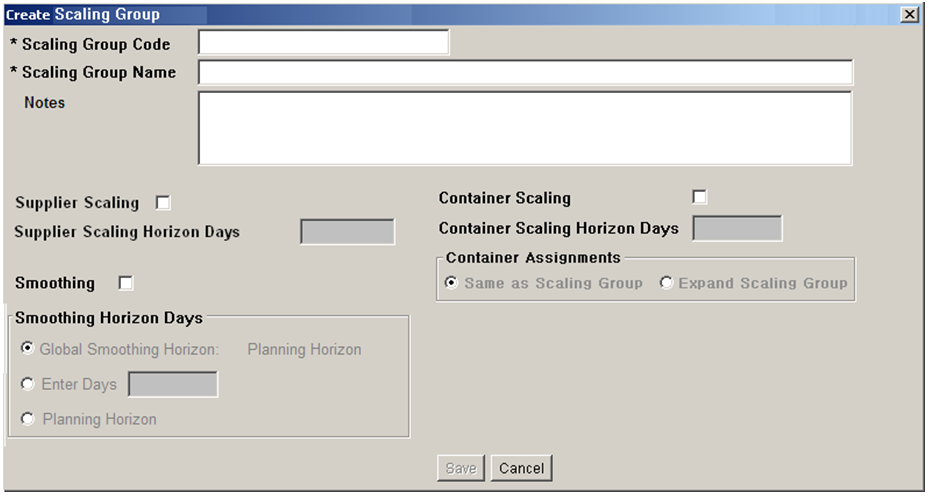
To open the Create Scaling Group window, click Create.
Complete the fields in the Create Scaling Group window as described inTable 3-7.
Table 3-7 Create Scaling Group Window Fields
| Field | Parameters | Use |
|---|---|---|
|
Scaling Group Code |
Any combination of alpha-numeric characters up to five characters in length. |
A unique code for the scaling group. |
|
Scaling Group Name |
Up to 64 characters in length. |
An identifying name for the scaling group. |
|
Notes |
Up to 1,000 characters in length. |
Informational details for the scaling group. |
|
Supplier Scaling |
Select or clear the check box. |
Enables or makes unavailable the Supplier Scaling Horizon Days. |
|
Supplier Scaling Horizon Days |
Up to three digits in length with a value greater than 0. Must be equal to or less than the Scaling Horizon Max system parameter and the maximum planning horizon. |
Available if the Supplier Scaling check box is selected. Performs supplier scaling for the number of days specified. |
|
Container Scaling |
Select or clear the check box. |
Enables or makes unavailable the Container Scaling Horizon Days and Container Assignments. |
|
Container Scaling Horizon Days |
Up to three digits in length with a value greater than 0. Must be equal to or less than the Scaling Horizon Max system parameter and the maximum planning horizon. |
Available if the Container Scaling check box is selected. Performs container scaling for the number of days specified. |
|
Container Assignments |
Select either Same as Scaling Group or Expand Scaling Groups. |
Available if the Container Scaling check box is selected. Determines whether containers are built for one source/destination each or all in the Scaling Group. |
|
Smoothing |
Select or clear the check box. |
Enables or makes unavailable the execution of order smoothing. |
|
Smoothing Horizon Days |
Use the Global Horizon, enter a number of days up to three digits in length with a value greater than 0, or use the planning horizon. |
Available if the Smoothing check box is selected. Performs smoothing for the number of days specified. |
To save your Scaling Group, click Save.
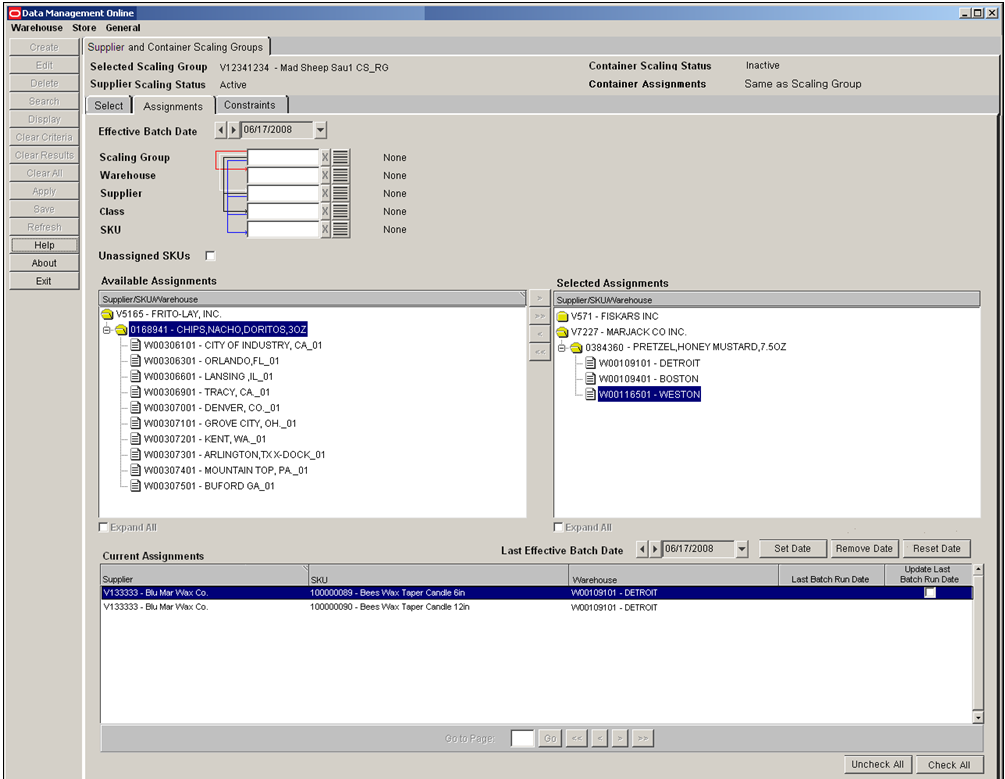
The Assignments tab allows you to view and edit assignments currently saved for a selected Effective Batch Date.
Navigate: Log into Data Management. From the General menu, select Scaling. Follow the steps to Set a Working Scaling Group. From the Supplier and Container Scaling Groups primary tab click the Assignments tab.
Perform the following steps to select and view assignments for Scaling Groups:
In the Effective Batch Date field, select an effective date using the calendar button.
Specify one or more of the following criteria to retrieve available assignments:
Scaling Group: Enter the scaling group ID, or click the LOV button and select a scaling group.
Warehouse: Enter the warehouse ID, or click the LOV button and select a warehouse.
Supplier: Enter the supplier ID, or click the LOV button and select a supplier.
Class: In the Class field, enter the class ID, or click the LOV button and select a class.
SKU: Enter the SKU ID, or click the LOV button and select a SKU.
Unassigned SKUs: Selecting this check box returns unassigned supplier, SKUs, and warehouses.
Click Search. Available Assignments meeting the selected criteria are listed in the Available Assignments list.
Use the arrow controls to move available assignments to the Selected Assignments list or back to the Available Assignments list.
Use the Expand All check boxes to display the full folder structure of the lists in the Available Assignments and Selected Assignments areas.
Click Display. The Current Assignments list shows the assignments currently saved for the selected Effective Batch Date.
|
Note: When modifying or removing the Last Batch Run Date of an assignment, the new value must not overlap the start date of an assignment to a new Scaling Group. |
Perform the following steps to edit assignments for Scaling Groups:
Display the desired assignment by Viewing Assignments for Scaling Groups.
Perform the steps in Table 3-8 to edit assignments:
Table 3-8 Editing Assignments for Scaling Groups Steps
| To... | First... | And Then Click... |
|---|---|---|
|
Remove an assignment from the scaling group without moving it into a new scaling group: |
highlight the row in the Current Assignments grid. |
Delete |
|
Remove an assignment from the scaling group in the future: |
select a Last Effective Batch Date, highlight the row in the Current Assignments grid, and select the Update Last Batch Run Date check box. |
Set Date |
|
Remove a Last Batch Run Date: |
highlight the row in the Current Assignments grid, and select the Update Last Batch Run Date check box. |
Remove Date |
|
Reset an assignment's saved Last Batch Run Date: |
highlight the row in the Current Assignments grid, and select the Update Last Batch Run Date check box. |
Reset Date |
Click Save.
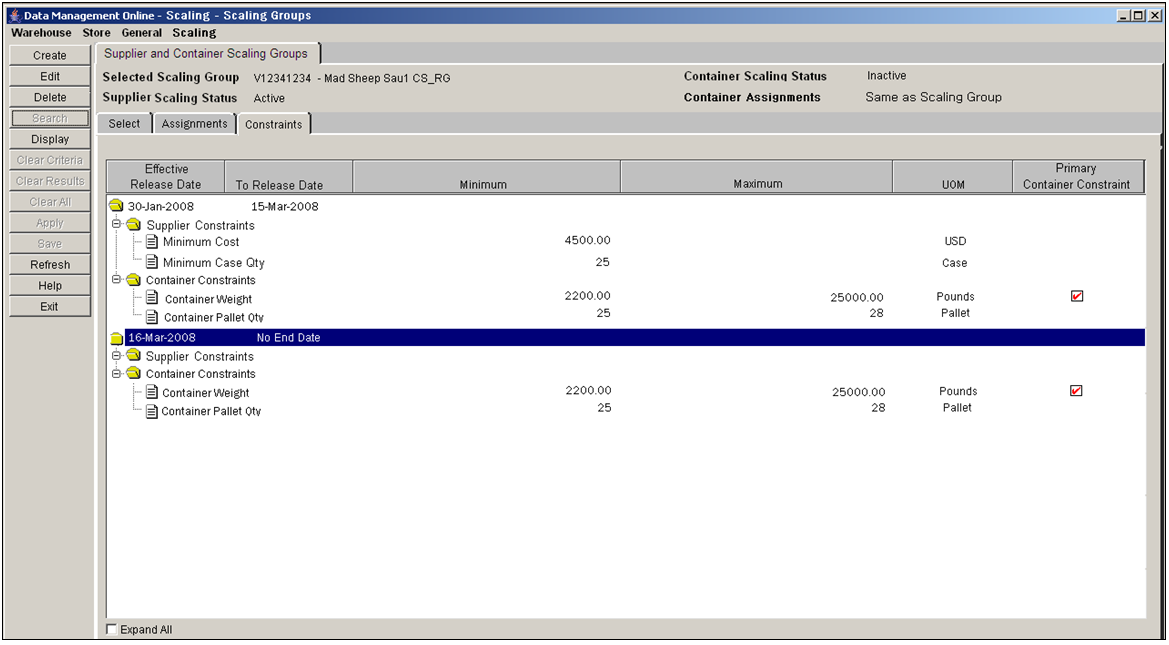
The Constraints tab allows you to view, create, edit or delete current and future constraints. The Constraints grid is pre-populated with currently saved data.
Navigate: Log into Data Management. From the General menu, select Scaling. Follow the steps to Set a Working Scaling Group. From the Supplier and Container Scaling Groups primary tab, click the Constraints tab.
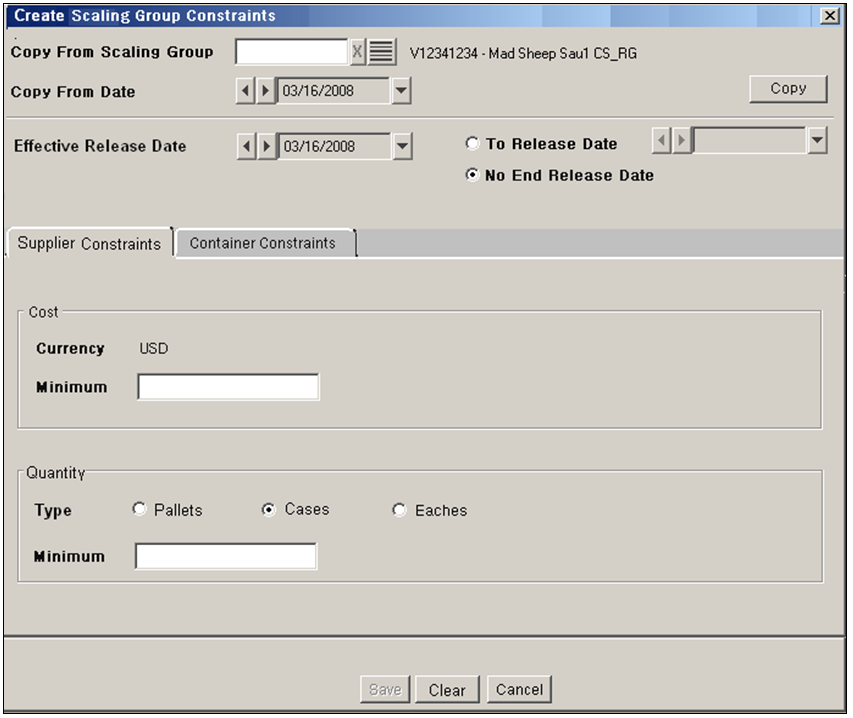
The Create Scaling Group Constraints window allows you to create constraints for a new Release Date or make additions and minor future adjustments for a different release date and/or Scaling Group.
Navigate: Log into Data Management. From the General menu, select Scaling. Follow the steps to Set a Working Scaling Group. From the Supplier and Container Scaling Groups primary tab click the Constraints tab.
From the Constraints tab, click Create. The Create Scaling Groups Constraints window opens with either the: Create Scaling Groups Constraints: Supplier Constraints Tab or Create Scaling Groups Constraints: Container Constraints Tab, depending on which scaling modules are enabled.
|
Note: You should first decide if the constraints will initially be populated based on existing constraints. To populate constraints from an existing set of constraints, you should first select the appropriate scaling group from which the existing constraints are copied. |
In the Copy from Scaling Group field, enter the Scaling Group, or click the LOV button and select a Scaling Group.
In the Copy From Date field, use the calendar button to select a desired date up to a year in the past and up to a year in the future.
Click Copy.
In the Effective Release Date field, use the calendar button to select a desired date for which all the constraints are saved.
Select a To Release Date or select No End Release Date.
Enter minimum and maximum values for these constraints:
Volume
Weight
Quantity
Cost
|
Note: These are optional constraints, but entered values must be greater than 0. At least one maximum must be entered. |
Select a Primary Constraint from the drop-down list.
In the Tolerance field, enter a percentage value between 0 and 50.
Click Save.
|
Note: If both Container and Supplier constraints are found, during a copy, you have the option to populate just the Supplier Constraints, or both. You must then reset the Effective Release Date and end date option for which all constraints are saved. |
Verify the Effective Release Date and End Date options.
Enter Supplier values for Cost and Quantity.
Click Save.
The Constraints grid is pre-populated with currently saved data. Editing allows you to:
Add additional constraints to an existing set
Modify the effective release dates
Modify existing constraints
Change the primary container constraint
|
Note: Constraints set for today's date cannot be changed. |
Navigate: Log into Data Management. From the General menu, select Scaling. Follow the steps to Set a Working Scaling Group. From the Supplier and Container Scaling Groups primary tab, click the Constraints tab.
To edit the constraints, select a folder or constraint and click Edit. The Edit Scaling Groups Constraints window opens with either the Edit Scaling Groups Constraints: Supplier Constraints Tab or Edit Scaling Groups Constraints: Container Constraints Tab, depending on which row was selected.
|
Note: Currently effective constraints can only be ended. To modify the constraints, end the current ones and create a new constraint effective the next day. |
Make any changes to the Effective Release Date.
Update any values to these constraints:
Volume
Weight
Quantity
Cost
Primary Constraint
Tolerance
|
Note: To revert to any saved values, click Reset. |
Click Save.
Navigate: Log into Data Management. From the General menu, select Scaling. From the Supplier and Container Scaling Groups primary tab click the Select tab.
Follow the steps for Selecting and Viewing Assignments for Scaling Groups.
Click the Constraints tab.
Highlight the Effective Release Date folder of the constraints to delete.
Click Delete.
|
Note: The currently effective constraints are end dated with today's date instead of deleted. Future effective constraints are permanently deleted. |
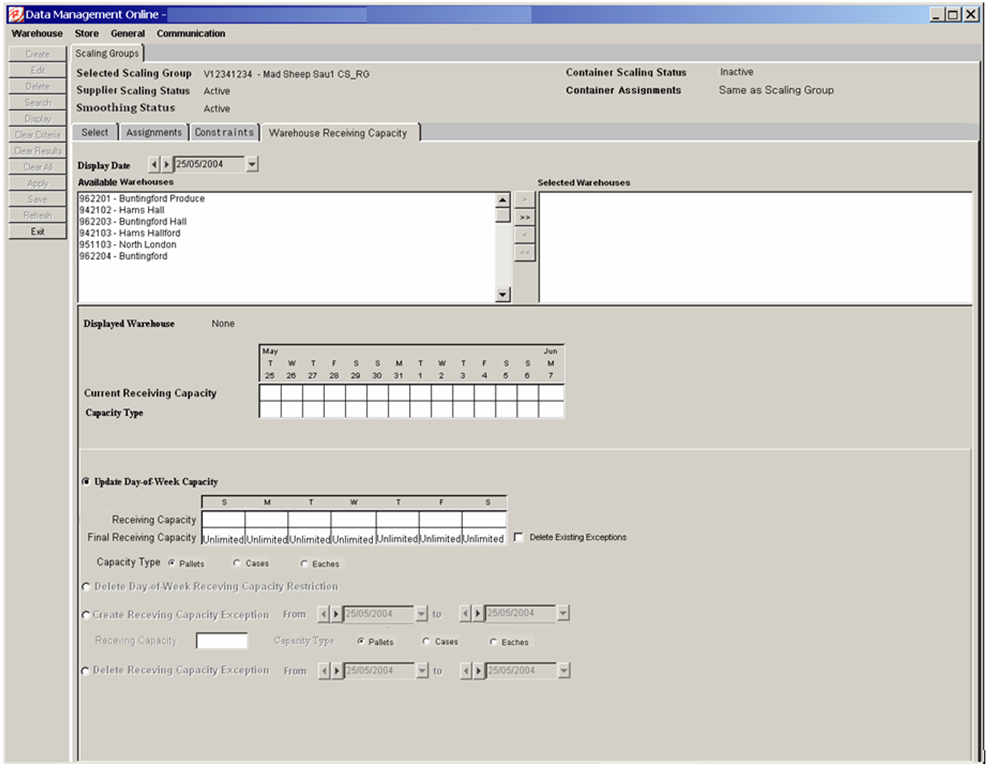
Navigate: From the General Menu click Scaling Groups. The Select tab appears. Follow the instructions in Help to Set a Working Scaling Group. Click the Warehouse Receiving Capacity tab.
To view the current receiving capacity of a warehouse, perform the following:
Select a date from the Display Date picker.
Use the dual selector to select a warehouse to display.
On the left panel, click Display to generate these actions:
Populate the current receiving capacity grid
Populate the Day-of-Week (DOW) default grid with the DOW default data in the database for the selected display date, warehouse, and working scaling group combination.
Populate both the receiving capacity and final receiving capacity pattern rows with data from the database.
The Capacity Type button which matches the Day-of-Week Receiving Capacity Type button is selected.
The Displayed Warehouse label updates to show the code and name of the highlighted location.
You can affect change by making the following button selections:
Once the Day-of-Week default grid is enabled, you can make the following changes.
| To … | Then… |
|---|---|
| Enter a value or to edit a displayed value: | Double-click in a cell in the receiving capacity row. Enter any integer value between 1 and 99,999. The display-only final receiving capacity row displays the value in the capacity cell, or Unlimited if no capacity value is entered. |
| Remove all existing receiving capacity exceptions: | Checking the delete existing exceptions removes all existing receiving capacity exceptions (for the selected warehouses) in the database from the next day onwards once the new pattern is saved. |
The Create/Delete Exception Date controls are unavailable along with the exception capacity field.
If enabled, you can make the following changes:
| To Edit the … | Then… |
|---|---|
| Create Receiving Capacity Exception From and to date controls: | The to date must always be equal to or later than the From date.
If an invalid date is selected, you receive an error message and the date is reset to its previous value. |
| Exception Receiving Capacity field: | Enter any integer value between 1 and 99,999. |
If enabled, you can make the following changes.
| To Edit the … | Then… |
|---|---|
| Delete Receiving Capacity Exception From and to date controls | The to date must always be equal to or later than the From date.
If an invalid date is selected, you receive an error message and the date is reset to its previous value. |
On the left panel, Save is enabled when one or more warehouses have been moved to the selected side of the dual selector and one of the following options is selected:
Update Day-of-Week Capacity button is selected and a valid receiving capacity is entered in one or more days.
|
Note: A capacity type must be selected as well. You will not have the ability to clear all selections. |
Delete Day-of-Week Receiving Capacity Restriction button is selected.
Create Receiving Capacity Exception button is selected and a valid capacity is entered in the capacity field.
Delete Receiving Capacity Exception button is selected.
Once you have made your changes, click Save. This only saves those changes associated with the button selections to the database.
The SKU Attribute Maintenance tab allows you to enter and modify attributes of SKUs that can be set at the Class and/or SKU level.
Pull Forward Days is a maximum number of days which a purchase order's delivery date can be moved ahead of its original delivery date during Supplier Scaling or Container Scaling. To set this value the business should first do a cost/benefit analysis of storing extra inventory versus the expected efficiencies/savings to be gained by Scaling. For example, if storage space at the warehouse is at a premium or the logistics of storing extra volume of a product quickly outweighs the savings, then the pull forward days should be smaller. If the product is inexpensive from a budgetary and/or storage perspective or is high volume, then the pull forward days might be longer relative to other products. The pull forward days is also a critical limitation for short life products which can spoil if not sold within a reasonable amount of time. All of these considerations must be taken into account when setting the Pull Forward Days.
Navigate: Log into Data Management. From the General menu, select Scaling. Click the SKU Attribute Maintenance Tab.
Specify one or more of the following criteria to retrieve Class values and SKUs:
Class: In the Class field, enter the class ID, or click the LOV button and select a class.
SKU: In the SKU field, enter the SKU ID, or click the LOV button and select a SKU.
Click Search. The Class area displays the Classes and their SKUs that match your criteria.
Navigate: Log into Data Management. From the General menu, select Scaling. Click the SKU Attribute Maintenance Tab.
Search for Classes and SKUs.
In the Set All area, select either Classes or SKUs.
Enter the number of Pull Forward Days. The number of Pull Forward Days must be a value equal to or greater than 0 and less than 100.
Click Update. All the displayed Classes or SKUs are set to the same value with the modified rows shown in green text.
Click Save. You are prompted to confirm your decision.
Click OK.
Navigate: Log into Data Management. From the General menu, select Scaling. Click the SKU Attribute Maintenance Tab
Search for Classes and SKUs.
In the Classes area, double-click the Pull Forward Days value of either a Class or SKU. The field becomes editable.
Clear the field or enter the number of Pull Forward Days. The number of Pull Forward Days must be equal to or greater than 0 and less than 100.
|
Note: At the class level, a blank value is the same as 0 which means no Pull-forward occurs by default. At the SKU level, a blank value indicates that the Class default value applies. |
Repeat until all values are set appropriately. All the modified rows are shown in green text.
Click Save. You are prompted to confirm your decision.
Click OK.
Events are created to mark out-of-the-ordinary occurrences at a location or in the supply chain that require additional monitoring by you and may require special steps in replenishment to aid a transition.
Use the Events window to find events, identify events, and to apply Promotion with Variant events, or Replacement SKU events.
These events are created with a set of event-level attributes that can be applied to all assigned stores and their related sources. The event level attributes can be overridden by applying a different value to a specific location.
Promotion with Variant Events
A Promotion with Variant Event marks a period of time where a set of stores (usually more than one) are promoting a variant SKU and the replenishment of both the variant SKU and the standard selling SKU may converge near the end of the promotion.
Replacement SKU Events
Similarly, a Replacement SKU event marks a situation where a set of stores (usually more than one) are phasing out one SKU and introducing another replacement model. Replenishment of the new SKU may converge with the inventory of the old near the end of the product's sales life.
Pack Change Events
Pack Change events may be created to aid you in creating a wide-spread pack change or assist in the transition of packs at the warehouse.
Navigate: Log into Data Management. From the General menu, select Events. Click the Event Selection tab.
Specify one or more of the following criteria to retrieve events:
From: Select the date for the beginning event period.
To: Select the date for the ending event period.
Event Type: In the Event Type list, leave blank or select either Promotion With Variant, Replacement SKU, or Pack Change
Event: In the Event field, enter the event, or click the LOV button and select an event.
Class: In the Class field, enter the class, or click the LOV button and select a class.
Event SKU: In the Event SKU field, enter the event SKU, or click the LOV button and select an event SKU.
SKU: In the SKU field, enter the SKU, or click the LOV button and select a SKU.
Location: In the Location field, enter the location, or click the LOV button and select a location.
Status: In the Status list, leave blank or select either Worksheet, Open, Changes Pending, Cancel Pending, Canceled, or Closed.
Click Search. The Event area displays the Events that match your criteria.
|
Note: Click Clear Criteria, Clear Results or Clear All to reset the search, results, or everything in the Event window. |
Navigate: Log into Data Management. From the General menu, select Events. Click the Event Selection tab.
This tab allows you to create, view, edit, modify, and delete Promotion with Variant events or Replacement SKU events
Access a previously saved event as described in the section,Search for Events and select either Promotion With Variant or Replacement SKU.
In the Event area, double-click either a Promotion with Variant or Replacement SKU event to open the Related SKUs Tab.
To create new events, perform the following:
Create a new event by clicking Create from the Related SKUs Tab to open the Create Event Window.
Enter the information needed to create your new event:
Event Name: Enter a name for your event, up to 120 characters
Type: Select an option from either: blank, Promotion With Variant SKU, or Replacement SKU).The Event SKU field is unavailable when the Type selected is blank. The Transfer Customer Order to Event SKU check box is available when the Type selected is Promotion With Variant SKU.
Status:.Select an option from either: blank, Worksheet, or Open) The Worksheet status cannot be used by Replenishment calculations. You must assign stores to the event to use the Open status.
Class: In the Class field, enter the class, or click the LOV button and select a class.
Event SKU: In the Event SKU field, enter the Event SKU, or click the LOV button and select an event SKU.For a Promotion With Variant SKU event the Event SKUs are the variant SKUs. For a Replacement SKU event the Event SKU is the old SKU being replaced by the new.
SKU: Once an Event SKU is selected the read-only SKU field is automatically populated with the related SKU.
Transfer Customer Order to Event SKU: The Transfer Customer Order to Event SKU check box is available when the Type selected is Promotion With Variant SKU.
SKU is Valid Substitute: Selecting this check box indicates that the related SKU can be sent in place of the Event SKU if a shortage occurs.
Earliest Substitution Delivery Date: This optional field is available when the SKU is Valid Substitute check box is selected.Allows you to select any date from tomorrow.
Combine Inventory: Selecting this check box enables the Combine Inventory Period text box, and the Clear Source Inventory check box. Indicates that the store inventory of the Event SKU will be added to the store inventory of the Related SKU after the store event start date, and for the period of time specified by the Combine Inventory Period.
Combine Inventory Period: Available when the Combine Inventory check box is selected. Enter up to 99 days for the time period to combine inventory.
Clear Source Inventory: Available when the Combine Inventory check box is selected. Indicates that the source should attempt to replenish and distribute the related SKU considering leftover inventory of the Event SKU at the source
Click Save to create your new event, You are prompted to confirm your decision.
To modify events, perform the following:
Access a previously saved event as described in the section,Search for Events and for Event Type, select Pack Change..
|
Note: When the event's status is either Closed or Canceled, then all fields are display-only and you cannot edit stores or exception sources |
Set or change the event's values:
For Promotion with Variant events, set or change the store's promotion start date and end date
For Replacement SKU events, set or change the merchandise changeover start date
Set or change the Combine Inventory flag.
|
Note: When the Combine Inventory flag is selected, you can override this by entering a period of 0 days for the store. The store level value takes priority over the event level, and a setting of 0 days nullifies any effects. |
Set or change the Combine Inventory Period
Click Select Stores to open the Store Selection Window to search for Stores to add or move into the currently selected event.
Click Auto Populate to open the Automatic Store Population Window
The Source area allows you to search for all suppliers and warehouses in the system and add them as exception sources.
Click the LOV button and select any suppliers and warehouses
Select the source and click Apply to add it as an exception source to the event.
Select the source and click Delete to permanently delete the source exception record from the event
Click Save. You are prompted to confirm your decision.
Navigate: Log into Data Management. From the General menu, select Events. Click the Pack Change tab.
This tab allows you to create, view and modify, Pack Change events as well as, view all locations receiving the pack change once the event is spread.
To create a new Pack Change events perform the following:
Create a new event by clicking Create from the Pack Change Tab to open the Create Event Window.
Enter the information needed to create your new event:
Event Name: Enter a name for your event, up to 120 characters
Type: Read-only field for Pack Change.
Status:.Select an option from either: blank, Worksheet, or Open) The Worksheet status cannot be used by Replenishment calculations. You must assign stores to the event to use the Open status.
Class: In the Class field, enter the class, or click the LOV button and select a class.
SKU Pack Size: In the SKU Pack Size field, enter the SKU Pack Size, or click the LOV button and select a SKU Pack Size.
New Pack Size: Once a SKU Pack Size is selected the read-only New Pack Size field is automatically populated with the list of all other packs of the SKU and blank.
Clear Warehouse Inventory: The Clear Warehouse Inventory check box is available and the default setting is clear.
First Order Date: The First Order Date editor allows selection of a date starting from tomorrow, but no further than a year ahead.
Last Order Date: The Last Order Date editor allows selection of a date starting from tomorrow, but no further than a year ahead; or the option to select No End Date.
Click Save to create your new event, You are prompted to confirm your decision.
To recreate a Pack Change event perform the following:
Access a previously saved event as described in the section, Search for Events.
|
Note: Pack Change events in either Worksheet or Changes Pending status cannot be recreated. |
Click Save if there are unsaved changes.
Click Recreate Event.
You are prompted to confirm your decision. Click OK to recreate the event or Cancel to stop.
|
Note: The event is saved in a status of Changes Pending to indicate that it should be recreated at the first available opportunity. |
To modify events, perform the following:
Access a previously saved event as described in the section, Search for Events and for Event Type, select Pack Change.
|
Note: When the event's status is either Closed or Canceled, then all fields are display-only and you cannot edit stores or exception sources |
Click Edit to open the View Created Event Window.
Set or change the event's values:
|
Note: The Event Code, Type, SKU Pack Size, and New SKU Pack Size are read-only fieldsIf the Event Status is Cancel Pending, or Canceled, then only the Status field is available. |
Set or change the Event Name.
Set or change the Status to these options: Blank, Worksheet, Open or Changes Pending, Cancel Pending or Canceled.
|
Note: Events are automatically set to a status of Closed after a predetermined period of time has passed once the pack change is completed.A permanent pack change is complete after all locations have reached the point where they are ordering the new pack. A temporary pack change is complete once all locations have reached the end date and have reverted back to ordering the old pack. When a permanent pack change is closed, the change is finalized by setting the new pack size to the orderable unit that can be viewed and maintained. |
Select or clear the Clear Warehouse Inventory check box.
Set or change the date for the First Order Date date editor. Tomorrow is the first available date.
Set or change the option and date for the Last Order Date date editor.Tomorrow is the first available date.
Click Select Source to open the Source Selection Window to search for Source to add or move into the currently selected event.
Click Edit Dates to open the Edit Dates Window
The Initiating Source area lists all initiating sources and allows you to add, edit, or remove source-specific Pack Change Event order dates.
First Order Date: The First Order Date editor allows new selections of a date starting from tomorrow, but no further than a year ahead. Click Reset to reset a pre-populated First Order Date, which may be in the past.
Last Order Date: The Last Order Date editor allows selection of a date starting from tomorrow, but no further than a year ahead.Click Reset to reset a pre-populated Last Order Date, which may be in the past.
|
Note: Select the option No End Date if you do not want a Last Order Date. |
To permanently delete any dates shown in the Initiating Source area, click Remove Dates. You are prompted to confirm your decision.
Click Save. You are prompted to confirm your decision.
To view Pack Change events, perform the following:
Access a previously saved event as described in the section, Search for Events and for Event Type, select Pack Change.
Click View Created Event to open the View Created Event Window.
|
Note: When the event's status is Worksheet, the View Created Event button is unavailable. |
DM displays any source/destination combinations that have had the pack change applied. Click OK to close the window.