| Oracle® Retail Merchandising System User Guide 14.1 E55773-01 |
|

 Previous |
 Next |
Replenishment allows retailers to manage stock levels at any of their locations. RMS provides a set of algorithms that take into account existing estimates of demand, sales, and inventory thresholds to generate automated transfers and Purchase Orders with the objective of maintaining an optimum inventory level. Auxiliary data such as Store Activity and Delivery Schedules and Investment Buy criteria that impact the replenishment process can be defined and managed. Details around definition of the various replenishment attributes, setup of items on replenishment, and viewing of the replenishment results are described in this chapter.
Investment buy is the process of purchasing inventory in excess of the replenishment recommendation to take advantage of a supplier deal or to leverage inventory against a cost increase.
To utilize the investment buy process:
Set up suppliers, indicating the level of inventory management.
Indicate that the suppliers are investment buy eligible.
Identify investment buy warehouses, indicate limiting parameters for the warehouse in a single channel or multi-channel environment.
Recommended order quantities appear on a buyer worksheet or are automatically added to purchase order, as defined in setup.
If you choose to utilize the buyer worksheet, verify replenishment recommended order quantities, determine the actual order quantities, and add items as necessary.
Select items on the buyer worksheet and create a purchase order.
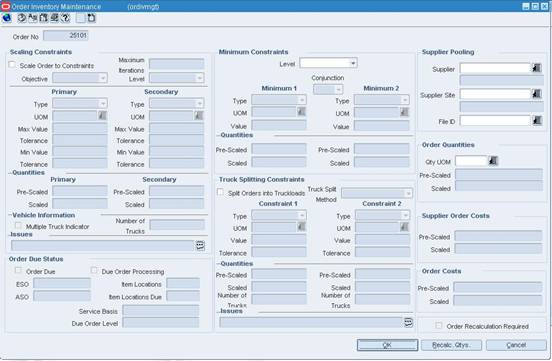
Navigate: From the main menu, select Ordering > Orders. The Order Selection window opens. Search for and retrieve a purchase order in Edit mode. Restrict the search to purchase orders in Worksheet status. The PO Header Maintenance window opens. (Optional): Click Items. The PO Item Maintenance window opens. Select an item on the table. (Optional): Click Locations. The PO Item/Location window opens. Select a location on the Order Detail table. From the Options menu, select Inventory Mgmt./Totals. The Order Inventory Maintenance window opens.
In the Scaling Constraints area, select the Scale to Order check box. The Scaling Constraints area is enabled.
In the Scaling Objective field, select whether purchase orders are scaled to the minimum or maximum values of the scaling constraints.
In the Scaling Level field, select the level at which the scaling is performed.
In the Maximum Iterations field, enter the maximum number of times that the scaling process is performed for the purchase order.
In the Scaling Constraints Primary column, complete the following fields:
Type: Select the primary type of constraint to use when scaling orders.
UOM/Currency: If you select Mass or Volume as the primary type, enter the UOM code, or click the LOV button and select the UOM. If you select Amount as the primary type, enter the currency code, or click the LOV button and select the currency code.
Max Value: Enter the maximum value of the constraint.
Max Value Tolerance: Enter the percentage tolerance for the maximum value of the constraint.
Min Value: Enter the minimum value of the constraint.
Min Value Tolerance: Enter the percentage tolerance for the minimum value of the constraint.
In the Scaling Constraints Secondary column, complete the following fields:
Type: Select the secondary type of constraint to use when scaling orders.
|
Note: The Secondary Type cannot be the same as the Primary Type. |
UOM/Currency: if you select Mass or Volume as the secondary type, enter the UOM code, or click the LOV button and select the UOM. If you select Amount as the secondary type, enter the currency code, or click the LOV button and select the currency code.
Max Value: Enter the maximum value of the constraint.
Max Value: Enter the maximum value of the constraint.
Max Value Tolerance: Enter the percentage tolerance for the maximum value of the constraint.
Min Value: Enter the minimum value of the constraint.
Min Value Tolerance: Enter the percentage tolerance for the minimum value of the constraint.
In the Level field, select the level at which the minimum order requirements of the supplier must be met
In the Minimum 1 column, complete the following fields:
Type: Select how the first minimum order requirement is expressed.
UOM/Currency: If you select Mass or Volume as the primary type, enter the UOM code, or click the LOV button and select the UOM. If you select Amount as the primary type, enter the currency code, or click the LOV button and select the currency code.
Value: Enter the value of the first minimum order requirement of the supplier.
When you define two minimum order requirements, select the relationship between the requirements in the Conjunction field.
In the Minimum 2 column, complete the following fields:
Type: Select how the second minimum order requirement is expressed.
|
Note: The Minimum 2 Type cannot be the same as the Minimum 1 Type. |
UOM/Currency: If you select Mass or Volume as the secondary type, enter the UOM code, or select it from the LOV. If you select Amount as the secondary type, enter the currency code, or select it from the LOV.
Value: Enter the value of the first minimum order requirement of the supplier.
In the Truck Splitting Constraints area, select the Split Order into Truckloads check box. The Truck Splitting Constraints area is enabled.
In the Constraint 1 column, complete the following fields:
Type: Select the primary type of constraint to use when splitting orders into truckloads.
UOM/Currency: If you select Mass or Volume as the primary type, enter the UOM code, or select it from the LOV. If you select Amount as the primary type, enter the currency code, or select it from the LOV.
Value: Enter the value of the constraint.
Tolerance: Enter the percentage tolerance for the maximum value of the constraint.
In the Constraint 2 column, complete the following fields:
Type: Select the primary type of constraint to use when splitting orders into truckloads.
|
Note: The Constraint 2 Type cannot be the same as the Constraint 1 Type. |
UOM/Currency: If you select Mass or Volume as the secondary type, enter the UOM code, or select it from the LOV. If you select Amount as the secondary type, enter the currency code, or select it from the LOV.
Value: Enter the value of the constraint.
Tolerance: Enter the percentage tolerance for the maximum value of the constraint.
In the Supplier field, enter the supplier ID or click the LOV button and select the supplier.
In the File ID field, enter the file ID or click the LOV button and select the file ID.
Navigate: From the main menu, select Control > Supplier. The Supplier Search window opens. Search for and retrieve a supplier site in Edit mode. The Supplier Maintenance window opens.
or
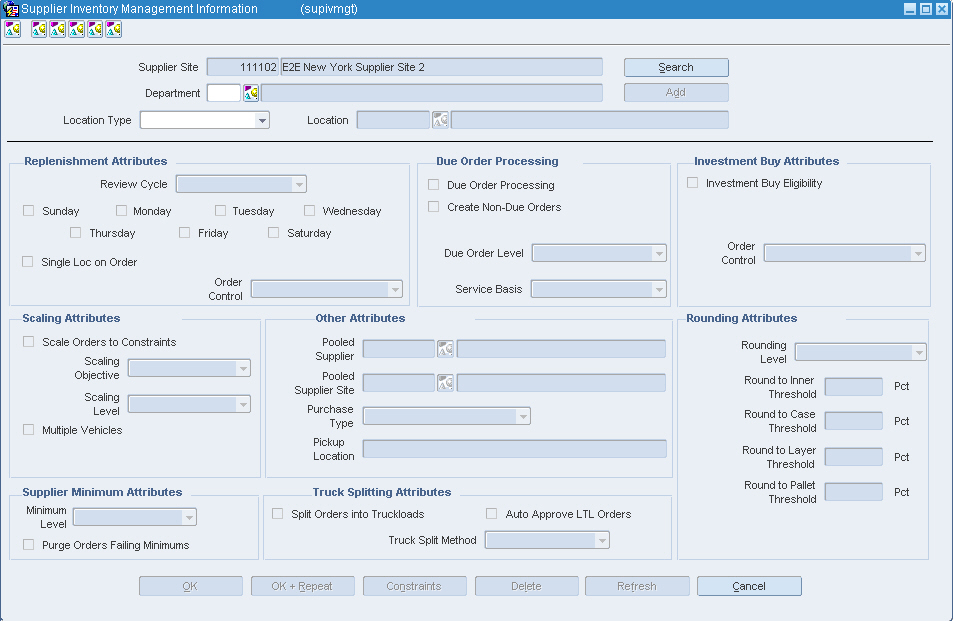
If the Financials module is installed, from the main menu, select Control > Supplier > Maintenance from the main menu. From the Options menu, select Inventory Management. The Supplier Inventory Management Information window opens.
In the Supplier, Department, and Location fields, enter the ID of the supplier, department, and location as appropriate, or click the LOV button and select supplier, department, and location as appropriate.
In the Review Cycle field, select the frequency that the item is reviewed for replenishment.
To select the day on which the item is reviewed:
If the review cycle is every day, all the days of the week are selected automatically for the delivery schedule.
If the review cycle is every week, select the days of the week. You may select more than one day.
If the frequency is every two or more weeks, select the day of the week.
In the Order Control field, select how POs are processed for the supplier.
Select the Single Loc on Order check box if only one location can be on an order.
Select the Due Order Processing check box to have due order processing performed for replenishment items from the supplier.
Select the Create Non-Due orders check box to have purchase orders created in Worksheet status for items that are not due to be ordered.
In the Due Order Level field, select the level at which the due order processing is based.
In the Service Basis field, select the parameter that is used in calculating the stock out levels.
In the Minimum Level field, select the minimum order quantity at which the supplier accepts orders.
Select the Purge Orders Failing Minimums check box to create POs that meet the supplier minimum.
Select the Scale Order to Constraints check box to have items on purchase orders for the supplier scaled to meet the scaling constraints.
In the Scaling Objective field, select whether purchase orders are scaled to the minimum or maximum values of the scaling constraints.
In the Scaling Level field, indicate if the PO should be scaled to the location need or to the entire order.
Select the Multiple Vehicles check box to indicate that multiple vehicles may be used when delivering the order.
In the Pooled Supplier field enter the ID of the supplier, or click the LOV button and select a supplier.
In the Purchase Type field, select the purchase type method.
In the Pick Up field, enter the location of the pick up. This field is enabled if Free on Board or Backhaul has been selected in the Purchase Type field.
Select the Split Orders into Truckloads checkbox to indicate that orders that exceed a truckload should be split.
To allow Less than Truckload (LTL) orders, select the Auto Approve LTL Orders check box.
In the Truck Split Method field, select the method of truck splitting used with this supplier.
Select the Investment Buy Eligibility check box to enable investment buy attributes.
In the Order Control field, select how POs are processed for the investment buy orders.
In the Rounding Level field, select the level to which quantities should be rounded.
In the Round to Inner Threshold field, enter the percent of the inner needed to round to an additional inner.
In the Round to Case Threshold field, enter the percent of the case needed to round to an additional case.
In the Round to Layer Threshold field, enter the percent of the layer needed to round to an additional level.
In the Round to Pallet Threshold field, enter the percent of the pallet needed to round to an additional pallet.
The replenishment feature allows you to automate the ordering process for items by constantly monitoring inventory conditions, and creating orders to fulfill consumer demand according to predefined replenishment parameters.
Add Inventory Management Constraints to a PO at Different Levels
See "Edit a Delivery Schedule at the Store or Warehouse Level" in the Foundation Data chapter
See "Edit a Delivery Schedule for a Supplier" in the Foundation Data chapter
See "View Inventory Management Constraints for a Supplier" in the Foundation Data chapter
See "View Inventory Management Information for a PO at the Order, Item, or Location Level" in the Foundation Data chapter
See "View Inventory Management Constraints for a Supplier" in the Foundation Data chapter
Navigate: From the main menu, select Action > Organizational Hierarchy. The Organization Hierarchy Main Form window opens. Select Store on the tree structure. The stores appear on the table. Select a store and click Edit. The Store Maintenance window opens. From the Options menu, select Delivery Schedule. The Delivery Schedule window opens.
or
Navigate: From the main menu, select Action > Organizational Hierarchy. The Organization Hierarchy Main Form window opens. Select Warehouse on the tree structure. The warehouses appear on the table. Select a warehouse and click Edit. The Warehouse Maintenance window is displayed. From the Options menu, select Delivery Schedule. The Delivery Schedule window opens.
or
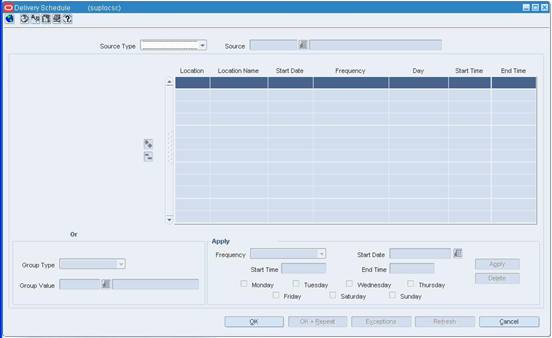
Navigate: From the main menu, select Control > Supplier > Maintenance. The Supplier Search window opens. Search for and retrieve a supplier site. The Supplier Maintenance window opens. From the Options menu, select Delivery Schedule. The Delivery Schedule window opens.
In the Source Type field, select the type of source for the delivery schedule.
In the Source field, enter the ID of the supplier or source warehouse, or click the LOV button and select the supplier or warehouse.
In the Group Type field, select the type of grouping mechanism or location for the delivery schedule.
In the Group Value field, enter the ID of the grouping mechanism or location for the delivery schedule, or click the LOV button and select a grouping mechanism or location.
|
Note: You can also use the Organizational Hierarchy Tree to navigate to the grouping mechanism or location to which you are adding a delivery schedule. The Group Type and Group Value fields are filled in automatically. |
In the Frequency field, select how often you want the supplier to deliver to the locations.
In the Start Date field, enter the date on which the delivery schedule is effective.
In the Start Time field, enter the time that the delivery is scheduled to begin at the location.
In the End Time field, enter the time that the delivery is scheduled to end at the location.
To select the delivery day for a delivery schedule:
If the frequency is every day, all the days of the week are selected automatically for the delivery schedule.
If the frequency is every week, select the day of the week.
|
Note: You can select more than one delivery day if the frequency is every week. |
If the frequency is every two or more weeks, select the day of the week.
Click Apply.
To add an exception to a delivery:
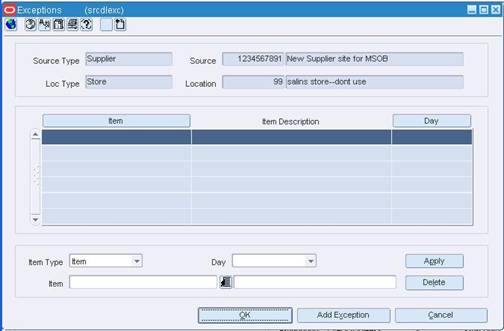
Click Exceptions. The Exceptions window opens.
Click Add Exceptions to enable the next available line.
In the Item Type field, select Item or Item List.
In the Day field, select the day on which you do not want the item or item list delivered.
In the Item field, enter the item number or the ID of the item list, or enter a partial description and click the LOV button to select the item or item list.
Click Apply.
Click OK to exit the Exceptions window.
Click OK to save your changes and close the window.
Navigate: From the main menu, select Control > Supplier. The Supplier Search window opens. Search for and retrieve a supplier site in Edit mode. The Supplier Maintenance window opens.
or
If the Financials module is installed, from the main menu, select Control > Supplier > Maintenance from the main menu. Search for and retrieve a supplier site in Edit mode. The Supplier Maintenance window opens. From the Options menu, select Delivery Schedule. The Delivery Schedule window opens.
In the Group Type field, select the type of grouping mechanism or location for the delivery schedule.
In the Group Value field, enter the ID of the grouping mechanism or location for the delivery schedule, or click the LOV button and select a grouping mechanism or location.
|
Note: You can also use the Organizational Hierarchy Tree to navigate to the grouping mechanism or location to which you are adding a delivery schedule. The Group Type and Group Value fields are filled in automatically. |
In the Frequency field, select how often you want the supplier to deliver to the locations.
In the Start Date field, enter the date on which the delivery schedule is effective.
In the Start Time field, enter the time that the delivery is scheduled to begin at the location.
In the End Time field, enter the time that the delivery is scheduled to end at the location.
To select the delivery day for a delivery schedule:
If the frequency is every day, all the days of the week are selected automatically for the delivery schedule.
If the frequency is every week, select the day of the week. You can select more than one delivery day.
If the frequency is every two or more weeks, select the day of the week.
Click Apply.
To add an exception to a delivery:
Click Exceptions. The Exceptions window opens.
Click Add Exceptions to enable the next available line.
In the Item Type field, select Item or Item List.
In the Day field, select the day on which you do not want the item or item list delivered.
In the Item field, enter the item number or the ID of the item list, or enter a partial description and click the LOV button to select the item or item list.
Click Apply.
Click OK to exit the Exceptions window.
Click OK to save your changes and close the window.
Navigate: From the main menu, select Ordering > Orders. The Order Selection window opens. Search for and retrieve a purchase order in Edit mode. Restrict the search to purchase orders in Worksheet status. The PO Header Maintenance window opens.
(Optional): Click Items. The PO Item Maintenance window opens. Select an item on the table. (Optional): Click Locations. The PO Item/Location window opens. Select a location on the Order Detail table. From the Options menu, select Inventory Mgmt./Totals. The Order Inventory Maintenance window opens.
In the Scaling Constraints area, select the Scale to Order check box. The Scaling Constraints area is enabled.
In the Scaling Objective field, select whether purchase orders are scaled to the minimum or maximum values of the scaling constraints.
In the Scaling Level field, select the level at which the scaling is performed.
In the Maximum Iterations field, enter the maximum number of times that the scaling process is performed for the purchase order.
In the Scaling Constraints Primary column, complete the following fields:
Type: Select the primary type of constraint to use when scaling orders.
UOM/Currency: If you select Mass or Volume as the primary type, enter the UOM code, or click the LOV button and select the UOM. If you select Amount as the primary type, enter the currency code, or click the LOV button and select the currency code.
Max Value: Enter the maximum value of the constraint.
Max Value Tolerance: Enter the percentage tolerance for the maximum value of the constraint.
Min Value: Enter the minimum value of the constraint.
Min Value Tolerance: Enter the percentage tolerance for the minimum value of the constraint.
In the Scaling Constraints Secondary column, complete the following fields:
Type: Select the secondary type of constraint to use when scaling orders.
|
Note: The Secondary Type cannot be the same as the Primary Type. |
UOM/Currency: if you select Mass or Volume as the secondary type, enter the UOM code, or click the LOV button and select the UOM. If you select Amount as the secondary type, enter the currency code, or click the LOV button and select the currency code.
Max Value: Enter the maximum value of the constraint.
Max Value: Enter the maximum value of the constraint.
Max Value Tolerance: Enter the percentage tolerance for the maximum value of the constraint.
Min Value: Enter the minimum value of the constraint.
Min Value Tolerance: Enter the percentage tolerance for the minimum value of the constraint.
In the Level field, select the level at which the minimum order requirements of the supplier must be met
In the Minimum 1 column, complete the following fields:
Type: Select how the first minimum order requirement is expressed.
UOM/Currency: If you select Mass or Volume as the primary type, enter the UOM code, or click the LOV button and select the UOM. If you select Amount as the primary type, enter the currency code, or click the LOV button and select the currency code.
Value: Enter the value of the first minimum order requirement of the supplier.
When you define two minimum order requirements, select the relationship between the requirements in the Conjunction field.
In the Minimum 2 column, complete the following fields:
Type: Select how the second minimum order requirement is expressed.
|
Note: The Minimum 2 Type cannot be the same as the Minimum 1 Type. |
UOM/Currency: If you select Mass or Volume as the secondary type, enter the UOM code, or select it from the LOV. If you select Amount as the secondary type, enter the currency code, or select it from the LOV.
Value: Enter the value of the first minimum order requirement of the supplier.
In the Truck Splitting Constraints area, select the Split Order into Truckloads check box. The Truck Splitting Constraints area is enabled.
In the Constraint 1 column, complete the following fields:
Type: Select the primary type of constraint to use when splitting orders into truckloads.
UOM/Currency: If you select Mass or Volume as the primary type, enter the UOM code, or select it from the LOV. If you select Amount as the primary type, enter the currency code, or select it from the LOV.
Value: Enter the value of the constraint.
Tolerance: Enter the percentage tolerance for the maximum value of the constraint.
In the Constraint 2 column, complete the following fields:
Type: Select the primary type of constraint to use when splitting orders into truckloads.
|
Note: The Constraint 2 Type cannot be the same as the Constraint 1 Type. |
UOM/Currency: If you select Mass or Volume as the secondary type, enter the UOM code, or select it from the LOV. If you select Amount as the secondary type, enter the currency code, or select it from the LOV.
Value: Enter the value of the constraint.
Tolerance: Enter the percentage tolerance for the maximum value of the constraint.
In the Supplier field, enter the supplier ID or click the LOV button and select the supplier.
In the File ID field, enter the file ID or click the LOV button and select the file ID.
Navigate: From the main menu, select Control > Supplier. The Supplier Search window opens. Search for and retrieve a supplier site. The Supplier Maintenance window opens.
or
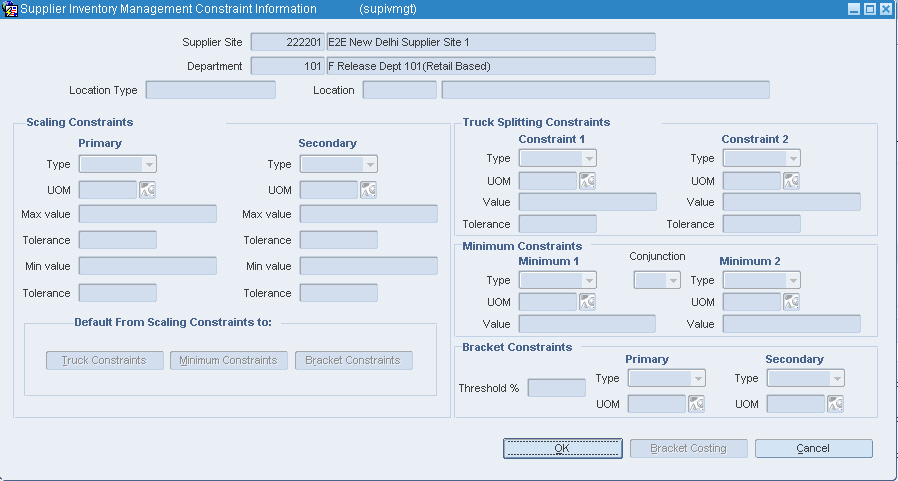
If the Financials module is installed, from the main menu, select Control > Supplier > Maintenance. The Supplier Search window opens. Search for and retrieve a supplier site. The Supplier Maintenance window opens. From the Options menu, select Inventory Management. The Supplier Inventory Management Information window opens. On the Supplier Inventory Management Information window, click Constraints. The Supplier Inventory Management Constraint Information window opens.
|
Note: To define scaling constraints, you must select the Scale Orders to Constraints check box on the Supplier Inventory Management Information window. |
In the Scaling Constraints Primary column, complete the following fields:
Type: Select the primary type of constraint to use when scaling orders.
UOM/Currency: If you select Mass or Volume as the primary type, enter the UOM code, or click the LOV button and select the UOM. If you select Amount as the primary type, enter the currency code, or click the LOV button and select the currency code.
Max Value: Enter the maximum value of the constraint.
Max Value Tolerance: Enter the percentage tolerance for the maximum value of the constraint.
Min Value: Enter the minimum value of the constraint.
Min Value Tolerance: Enter the percentage tolerance for the minimum value of the constraint.
In the Scaling Constraints Secondary column, complete the following fields:
Type: Select the secondary type of constraint to use when scaling orders.
|
Note: The Secondary Type cannot be the same as the Primary Type. |
UOM/Currency: if you select Mass or Volume as the secondary type, enter the UOM code, or click the LOV button and select the UOM. If you select Amount as the secondary type, enter the currency code, or click the LOV button and select the currency code.
Max Value: Enter the maximum value of the constraint.
Max Value Tolerance: Enter the percentage tolerance for the maximum value of the constraint.
Min Value: Enter the minimum value of the constraint.
Min Value Tolerance: Enter the percentage tolerance for the minimum value of the constraint.
To default the scaling constraints to other areas:
Click Truck Constraints to apply the scaling constraints to the Truck Splitting Constraints area.
Click Minimum Constraints to apply the scaling constraints to the Minimum Constraints area.
Click Bracket Constraints to apply the scaling constraints to the Bracket Costing Constraints area.
|
Note: To define truck splitting constraints, you must select the Split Orders Into Truckloads check box and the Truck Split method on the Supplier Inventory Management Information window. |
In the Constraint 1 column, complete the following fields:
Type: Select the primary type of constraint to use when splitting orders into truckloads.
UOM/Currency: If you select Mass or Volume as the primary type, enter the UOM code, or select it from the LOV. If you select Amount as the primary type, enter the currency code, or select it from the LOV.
Max Value: Enter the maximum value of the constraint.
Value: Enter the value of the constraint.
Tolerance: Enter the percentage tolerance for the maximum value of the constraint.
In the Constraint 2 column, complete the following fields:
Type: select the primary type of constraint to use when splitting orders into truckloads.
|
Note: The Constraint 2 Type cannot be the same as the Constraint 1 Type. |
UOM/Currency: If you select Mass or Volume as the secondary type, enter the UOM code, or select it from the LOV. If you select Amount as the secondary type, enter the currency code, or select it from the LOV.
Max Value: Enter the maximum value of the constraint.
Value: Enter the value of the constraint.
Tolerance: Enter the percentage tolerance for the maximum value of the constraint.
|
Note: To define minimum constraints, you must select an option in the Minimum Level field on the Supplier Inventory Management Information window. |
In the Minimum 1 column, complete the following fields:
Type: Select how the first minimum order requirement is expressed.
UOM/Currency: If you select Mass or Volume as the primary type, enter the UOM code, or click the LOV button and select the UOM. If you select Amount as the primary type, enter the currency code, or click the LOV button and select the currency code.
Max Value: Enter the maximum value of the constraint.
Value: Enter the value of the first minimum order requirement of the supplier.
When you define two minimum order requirements, select the relationship between the requirements in the Conjunction field.
In the Minimum 2 column, complete the following fields:
Type: Select how the second minimum order requirement is expressed.
|
Note: The Minimum 2 Type cannot be the same as the Minimum 1 Type. |
UOM/Currency: If you select Mass or Volume as the secondary type, enter the UOM code, or select it from the LOV. If you select Amount as the secondary type, enter the currency code, or select it from the LOV.
Max Value: Enter the maximum value of the constraint.
Value: Enter the value of the first minimum order requirement of the supplier.
In the Threshold % field, enter the percentage of the bracket value that the order must meet in order to be rounded up to that bracket.
In the Primary column, complete the following fields:
Type: Select how the first bracket costing constraint is expressed.
UOM: If you select Mass or Volume as the primary type, enter the UOM code, or click the LOV button and select the UOM.
In the Secondary column, complete the following fields:
Type: Select how the second bracket costing constraint is expressed.
|
Note: The Secondary Type cannot be the same as the Primary Type. |
UOM: If you select Mass or Volume as the secondary type, enter the UOM code, or click the LOV button and select the UOM.
Click OK to save your changes and exit.
The replenishment feature allows you to automate the ordering process for items by constantly monitoring inventory conditions, and creating orders to fulfill consumer demand according to predefined replenishment parameters.
To utilize replenishment, you can select one of the following replenishment methods for an item:
Constant: A stock-oriented replenishment method used without a forecasting application. Enter a maximum stock level at which you want the stock level maintained. As soon as the stock level drops below the maximum stock, a request is generated for the difference.
Min/Max: A stock-oriented replenishment method used without a forecasting application. Enter a maximum stock and minimum stock level. Once the stock level drops below the minimum stock, a request is generated to raise the stock level to the maximum stock.
Floating Point: A stock-oriented replenishment method used without a forecasting application. The system compares the sales trend of the upcoming 12 weeks to the same period one year ago, and then calculates a maximum stock amount. Once stock levels fall below the calculated maximum stock amount, a request is generated to raise the stock level to the maximum stock. It also incorporates the idea of service level, which is used to calculate safety stock. Safety stock is additional inventory carried in a location to prevent stock outs.
Time Supply: A stock-oriented replenishment method used with a forecasting application. You control stock levels through days of supply in the store rather than specifying an exact amount. Based on forecasted sales data from the Oracle Retail Demand Forecasting System, the minimum time supply number of days is used to determine the minimum stock level, while the maximum time supply number of days determines the maximum stock level. These min/max levels change based on the current forecasted sales data. The time supply horizon number of days is an optional field used to calculate an average daily sales rate that is multiplied against the minimum time supply days and maximum time supply days to determine a min/max. This field is useful if the time supply days extends past the number of days with forecasted data. A replenishment order is made when the net available inventory reaches the minimum days of supply and the order quantity placed is based on the rate of sale from forecasted sales over the specified period (time supply horizon) and the maximum days of supply value.
Time Supply - Seasonal: A stock-oriented replenishment method used with a forecasting application. Time Supply - Seasonal combines the basic Time supply algorithm with the end of season terminal stock goal. The additional fields for this algorithm include Season ID, Phase ID, and terminal stock value. This replenishment method compares the current replenishment requests and the forecasted demand until the end of the season. Replenishment requests are created according to the end of season Terminal Stock goal.
Time Supply - Issues: A stock-oriented replenishment method used with a forecasting application used exclusively for warehouses. Replenishment calculations function just as they do for stores except that the warehouse issues forecasts are used. All other calculations are consistent with store Time Supply replenishment.
Dynamic: A service-oriented replenishment method used with a forecasting application. The goal is to have only enough stock on hand in a given location to capture all sales between replenishment cycles. The time frame used to determine stock levels depends on the review time and lead time before stock levels in the location can be affected by an incoming shipment. The service level percentage is used to calculate the necessary amount of safety stock.
Dynamic - Seasonal: A service-oriented replenishment method used with a forecasting application. In the same manner as Time Supply - Seasonal, Dynamic - Seasonal combines the basic Dynamic algorithm with the end of season terminal stock goal. The additional fields for this algorithm include a Season ID, Phase ID, and Terminal stock value. This replenishment method compares the current replenishment requests and the forecasted demand until the end of the season. Replenishment requests are created according to the end of season terminal stock goal
Dynamic - Issues: A service-oriented replenishment method used with a forecasting application used exclusively for warehouses. Replenishment calculations function just they do for stores, except that the warehouses issues forecasts are used. All other calculations are consistent with store dynamic replenishment.
Store Orders - A store driven replenishment method which allows stores to place orders based on need. Orders are incorporated into RMS through an overnight batch. Recommended order quantities are based on the store request and the ability to deliver the product with in lead time.
The dynamic replenishment methods are the most complex and powerful replenishment methods. Each location that stocks the item can use a different replenishment method.
See "Edit Replenishment Attributes for an Item or Item List" in the Item Maintenance chapter
See "View Replenishment Attributes for an Item" in the Item Maintenance chapter
See "View Replenishment Attributes for Multiple Items" in the Item Maintenance chapter
View Replenishment Results Detail for an Item on the Buyer Worksheet
The Master Replenishment Attributes window maintains a record of the replenishment attributes that you identify for an item/location. When you create the replenishment parameters for an items, the Master Replenishment Attributes window automatically updates with the replenishment information. When you update the replenishment attributes for an item, you can choose to update the Master Replenishment Attributes at the same time, or not.
See "Edit Replenishment Attributes for an Item or Item List" in the Item Maintenance chapter
See "View Replenishment Attributes for an Item" in the Item Maintenance chapter
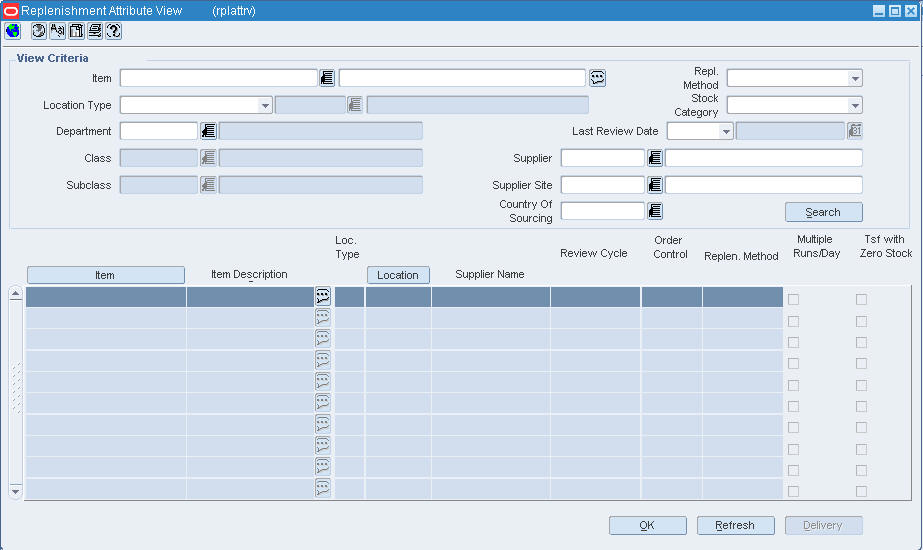
The Replenishment Attribute View window allows you to search for replenishment information for items by various criteria. You can view results of your search by criteria of each replenishment method, delivery schedules, packs on replenishment, or you can create your own custom view.
See "View Replenishment Attributes for Multiple Items" in the Item Maintenance chapter
The Replenishment Attribute History window allows you to view the history of replenishment activity for items.
See "View Replenishment Attribute History" in the Item Maintenance chapter
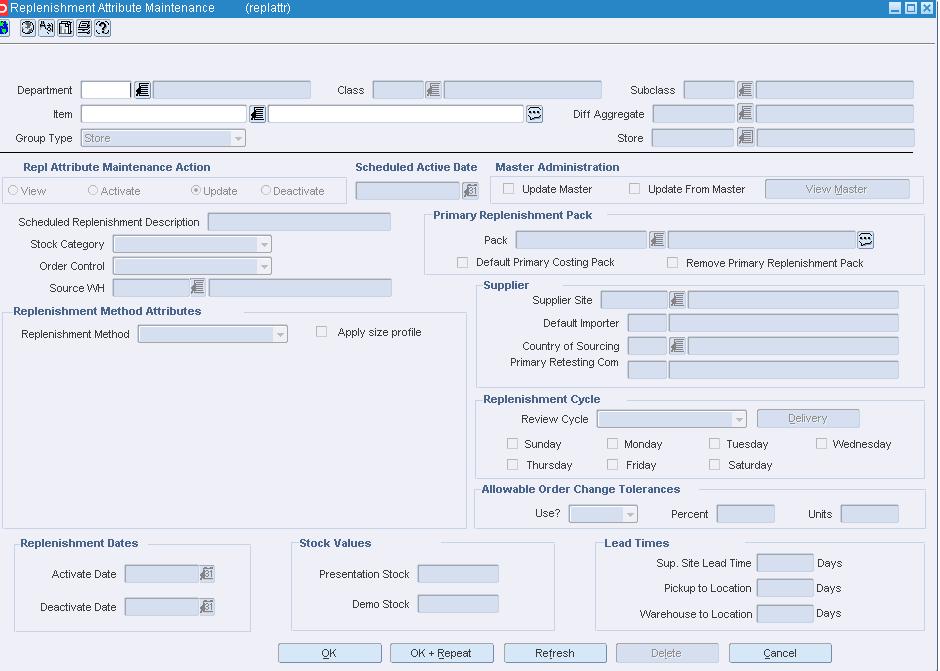
Navigate: From the main menu, select Items > Items. The Item Search window opens. Search for and retrieve an item in Edit mode. The Item Maintenance window opens. On the Options list, select the Replenishment option. The Replenishment Attribute Maintenance window opens.
or
Search for and retrieve an item list in Use mode. The Item List Header window opens. From the Options menu, select Create Mass Item Change > Replenishment. The Replenishment Attribute Maintenance window opens.
In the Group Type field, select the group type.
In the Group Type Value field, enter the ID of the group or location, or click the LOV button and select a group or location.
In the Replenishment Attribute Maintenance Action area, select Activate.
In the Scheduled Active Date field, select the date the new replenishment attributes become active.
|
Note: For a single item, leave the field blank to make the replenishment attributes effective immediately. |
In the Master Administration area, select:
Update Master to update the master replenishment attributes with the replenishment attributes you are adding.
Update From Master to update the replenishment attributes with the attributes recorded on item master.
In the Stock Category field, select the method by which the item is sourced and delivered to the stores.
In the Order Control field, select how purchase orders are created for the item.
In the Source WH field, enter the ID of the warehouse from which the item is sent, or click the LOV button and select a warehouse.
In the Replenishment Method field, select the replenishment method for the item.
Enter the replenishment parameters in the associated replenishment fields.
In the Activate Date field, enter the date on which the replenishment attributes are effective for the item, or click the calendar button and select the date.
In the Deactivate Date field, enter the date on which the replenishment attributes are no longer effective for the item, or click the calendar button and select the date.
Enter the pack ID number that identifies the pack, or click the LOV button and select the replenishment pack.
Select the Default Primary Costing Pack to indicate the pack is the costing pack for replenishment.
Select Remove Primary Replenishment Pack to indicate the primary replenishment pack is removed.
In the Supplier field, enter the ID of the supplier for the item, or click the LOV button and select a supplier.
In the Country of Sourcing field, enter the code of the country of origin, or click the LOV button and select a country.
In the Review Cycle field, select the frequency that the item is reviewed for replenishment.
To select the day on which the item is reviewed:
If the review cycle is every day, all the days of the week are selected automatically for the delivery schedule.
If the review cycle is every week, select the days of the week. You may select more than one day.
If the frequency is every two or more weeks, select the day of the week.
To view the Delivery Schedule for the item, click Delivery. The Delivery Schedule window opens.
|
Note: Order change tolerances do not apply to replenishment transfers. |
In the Use? field, select whether replenishment order quantities can be changed.
To define the amount of change allowed:
In the Percent field, enter the percentage by which you can change the order quantity.
In the Units field, enter the amount by which you can change the order quantity.
In the Presentation Stock field, enter the quantity of presentation stock for the item.
In the Demo Stock field, enter the quantity of the demonstration stock for the item.
|
Note: This field is not required when you are adding replenishment attributes for an item at a warehouse. |
In the Supplier Lead Time field, enter the number of lead days the supplier needs.
In the Pickup to Location field, enter the number of days it takes for the item to reach the store or warehouse.
|
Note: This field is required for direct to store and cross-docked items. |
In the Warehouse to Locn field, enter the number of days it takes for the item to reach the store.
|
Note: This field is required for cross-docked and warehouse stocked items. |
Click OK to save your changes and close the window.
The Replenishment Attribute Maintenance window allows you to add, edit, and view the replenishment parameters for an item/item list and location or for an item/item list and location group. In addition to setting replenishment parameters, you can also:
Select the stock category.
Indicate the type of order control used for the item at the location selected.
Select the supplier for the item.
Determine the replenishment review cycle.
To view more information on these topics, see also:
See "Edit Replenishment Attributes for an Item or Item List" in the Item Maintenance chapter
See "View Replenishment Attributes for an Item" in the Item Maintenance chapter
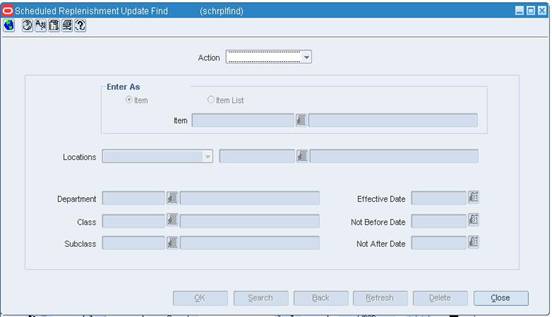
Navigate: From the main menu, select Items > Replenishment Scheduled Update. The Scheduled Replenishment Update Find window opens.
or
From the main menu, select Items > Items. The Item Search window is displayed. Search for and retrieve an item in Edit or View mode. The Item Maintenance window opens. From the options list, select Replenishment. The Replenishment Attribute Maintenance window opens.
In the Action field, select either Edit or View.
Enter additional criteria as desired to make the search more restrictive.
Click Search. The Scheduled Replenishment Update Find window displays the items that match the search criteria.
Select a task:
To perform another search, click Refresh or Back.
To display the deal information, select a record and click OK. The Replenishment Attribute Maintenance window is displayed.
Click Close to close the window.
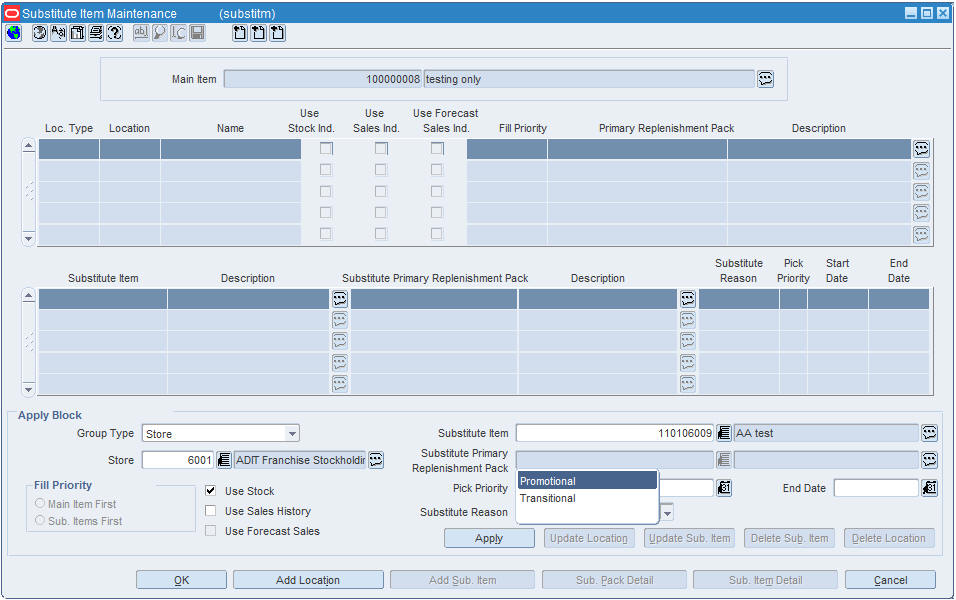
Navigate: From the main menu, select Items > Items. The Item Search window opens. Search for and retrieve an item on replenishment in Edit mode. The Item Maintenance window is displayed. From the Options list, select Substitute Items. The Substitute Items window opens.
Click Add Locations. The fields in the apply block are enabled.
In the Group Type field, select the type of grouping mechanism or location for the item substitution.
In the Group Value field, enter the ID of the grouping mechanism or location for the item substitution, or click the LOV button and select a grouping mechanism or location.
In the Fill Priority area, select the appropriate indicator to determine the basis of the item substitution.
Select the check box next to the replenishment calculation indicator.
Use Stock Ind: When selected, indicates that the substitute item is included in to determine the net inventory of the main item.
Use Sales Ind: When selected, indicates that the sales history for the substitute item is included in determining the maximum stock level.
Use Forecast Sales Ind: When selected, indicates that sales forecasts for the substitute items is used in calculation location demand for the main item.
In the Substitute Item field, enter the ID of the substitution item, or click the LOV button and select the substitution item.
|
Note: To view items the main item is a substitute item for, from the options menu, select Main Item View. The Main Item View window opens. |
In the Substitute Primary Replenishment Pack field, enter the ID of the substitute primary replenishment pack, or click the LOV button and select the substitute primary replenishment pack.
In the Pick Priority field, enter the priority level of the substitute Item.
In the Substitute Reason field, select either Promotional or Transitional from the list if AIP is integrated.
Click Apply.
To add a substitute item/location to a main item, click Add Location. Applicable fields in the Apply Block area are cleared.
To add a multiple substitute items to a main item, click Add Sub. Item. Applicable fields in the Apply Block area are cleared.
Click OK to save your changes and close the window.
The Scheduled Replenishment Update Find window allows you to enter criteria in order to search for schedule replenishment changes and view the results of the search.
The default view for the Scheduled Replenishment Update Find window opens when you open the window for the first time. You can also create a custom view.
Navigate: From the main menu, select Items > Replenishment > Edit. The Replenishment Attribute View window opens.
Enter as much information as necessary to limit the search.
Click Search. Results appear on the table.
To perform a new search, click Refresh.
To display alternate information pertinent to replenishment, from the view menu, select an applicable view.
Click Delivery. The Delivery Schedule window opens.
In the Group Type field, select the type of grouping mechanism or location for the delivery schedule.
In the Group Value field, enter the ID of the grouping mechanism or location for the delivery schedule, or click the LOV button and select a grouping mechanism or location.
|
Note: You can also use the Organizational Hierarchy Tree to navigate to the grouping mechanism or location to which you are adding a delivery schedule. The Group Type and Group Value fields are filled in automatically. |
In the Frequency field, select how often you want the supplier to deliver to the locations.
In the Start Date field, enter the date on which the delivery schedule is effective.
In the Start Time field, enter the time that the delivery is scheduled to begin at the location.
In the End Time field, enter the time that the delivery is scheduled to end at the location.
To select the delivery day for a delivery schedule:
If the frequency is every day, all the days of the week are selected automatically for the delivery schedule.
If the frequency is every week, select the day of the week.
|
Note: You can select more than one delivery day if the frequency is every week. |
If the frequency is every two or more weeks, select the day of the week.
Click Apply.
To add an exception to a delivery:
Click Exceptions. The Exceptions window is displayed.
Click Add Exceptions to enable the next available line.
In the Item Type field, select Item or Item List.
In the Day field, select the day on which you do not want the item or item list delivered.
In the Item field, enter the item number or the ID of the item list, or enter a partial description and click the LOV button to select the item or item list.
Click Apply.
Click OK to save your changes and close the window.
Click OK to save your changes and close the window.
The Replenishment Results Detail - Costs window allows you to view the unit costs and extended costs of the item on the purchase order. This window is read only.
The Replenishment Results Detail - Forecast window allows you to view forecasted quantities for replenishment items.
The Replenishment Results Detail - Inventory window allows you to inventory quantities for an item at a location.
The Replenishment Results Detail - Dates window allows you to view the replenishment dates for the item on the purchase order. This window is read only.
The Replenishment Results Detail window allows you to view and edit replenishment parameters and quantities for an item on a purchase order. You can change the replenishment method of an item on the purchase order and then recalculate the order quantities of the item based on the change. You can also override existing quantities and manually enter an order quantity for the item.
The Replenishment Results List window allows you to view a variety of statistics for each item and the location combination that is found on a replenishment order.
Navigate: From the main menu, select Ordering > Orders. The Order Selection window opens.
Search for a purchase order. Select a purchase order.
From the Options menu, select Replenishment Results List window. The Replenishment Results window opens.
Select an item from the table. Click Repl Detail Then Replenishment Results Detail window opens.
To view additional information:
To view Replenishment Results for inventory click Inventory. The Replenishment Results Detail - Inventory window opens.
To view Replenishment Results for forecasts click Forecasts. The Replenishment Results Detail - Forecast window opens.
To view Replenishment Results for dates click Dates. The Replenishment Results Detail - Date window opens.
To view Replenishment Results for costs click Costs. The Replenishment Results Detail - Costs window opens.
Click OK to close the window.
Navigate: From the main menu, select Ordering > Buyer worksheet > Edit. The Buyer Worksheet opens.
Search for and retrieve items in the Buyer Worksheet.
Select an item in the detail area.
Click Repl Results. The Replenishment Results Detail window opens.
To view additional information:
To view Replenishment Results for inventory click Inventory. The Replenishment Results Detail - Inventory window opens.
To view Replenishment Results for forecasts click Forecasts. The Replenishment Results Detail - Forecast window opens.
To view Replenishment Results for dates click Dates. The Replenishment Results Detail - Date window opens.
To view Replenishment Results for costs click Costs. The Replenishment Results Detail - Costs window opens.
Click OK to close the window.
Navigate: From the main menu, select Ordering > Orders. The Order Selection window opens.
Search for a purchase order. Select a purchase order.
From the Options menu, select Replenishment Results List window. The Replenishment Results window opens.
To filter the table, enter information in the Item, Location Type and Location field as appropriate. Click the filter button.
To view the purchase order, click Order Detail.
To view the replenishment details for a particular item, click Repl Details.
To change the table view, from the View menu, select a view to change the table column headers.
Click Close to close the window.
Items that are on investment buy and replenishment are can be set up for review by a buyer. When the inventory levels indicate that a purchase order should be created a recommended order quantity (ROQ) for a purchase order is sent to the buyer worksheet. The buyer can accept or reject the ROQ and create purchase orders.
See "Delete an Item from a Buyer Worksheet" in the Purchasing chapter
See "View the Buyer Worksheet" in the Purchasing chapter
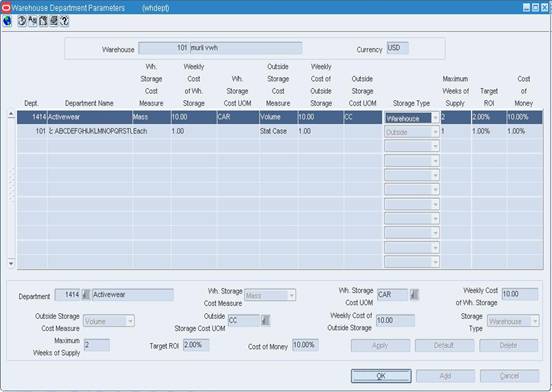
Navigate: From the main menu, select Actions > Organizational Hierarchy. The Organization Hierarchy Main Form window opens. Select Warehouse on the tree structure. The warehouses appear in the table. Select a warehouse and click Edit. The Warehouse Maintenance window is displayed.
In a multi-channel environment: From the Options menu, select Virtual Warehouse. The Virtual Warehouse Maintenance window opens. From the Options menu, select Warehouse Department Parameters > Edit. The Warehouse Department Parameters window opens.
In a single channel environment: From the Options menu, select Warehouse Department Parameters > Edit. The Warehouse Department Parameters window opens.
In the Apply area, enter the department ID, or click the LOV button and select a department.
In the Wh. Storage Cost Measure, select the warehouse storage cost measure.
|
Note: To enter the system control information for investment buy, click Default. The Wh. Storage Cost UOM, the Weekly Cost of Warehouse Storage, the Outside Storage Cost UOM, the Weekly Cost of Outside Storage, the Storage Type, the Maximum Weeks of Supply, the Target ROI, and the Cost of Money are filled in. |
In the Wh. Storage Cost UOM, select the unit of measure if appropriate.
In the Weekly Cost of Warehouse Storage field, enter the weekly cost of warehouse storage.
In the Outside Storage Cost Measure, select the outside storage cost measure.
In the Outside Storage Cost UOM, select the unit of measure if appropriate.
In the Weekly Cost of Outside Storage field, enter the weekly cost of outside storage.
Enter the Maximum Weeks of Supply, Target ROI, and Cost of Money.
Click Apply to enter the information into the table. This information will be used in investment buy calculations.
Click OK to save your changes and close the window.
Navigate: From the main menu, select Ordering > Buyer Worksheet > Edit. The Buyer Worksheet opens. Search for and retrieve items in the Buyer Worksheet.
Select the items to be included on the PO by selecting the check box for each item.
|
Note: If you wish to scale or split a PO, create the PO in Worksheet status. Submitted/Approved purchase orders cannot be scaled or split. |
Click Submitted/Approved PO.
|
Note: This button is labeled either Submitted or Approved, depending on your user privileges. |
When prompted to continue, click Yes. The system groups the line items together by the inventory management level and creates a Submitted or Approved PO. The Order Selection window opens.
Search for and retrieve the orders in Edit mode, by searching the Written Date Field, using today's date as the creation date, to search for your PO. The PO Header Maintenance window opens.
Edit the PO as necessary.
Click OK to save your changes and close the window.
Click Worksheet PO.
When prompted to continue, click Yes. The system groups the line items together by the inventory management level and creates a Submitted or Approved PO. The Order Selection window opens.
Search and retrieve the order in Edit mode, by searching the Written Date Field, using the creation date as today to search for your PO. The PO Header Maintenance window opens.
Edit the PO as necessary.
Click OK to save your changes and close the window.
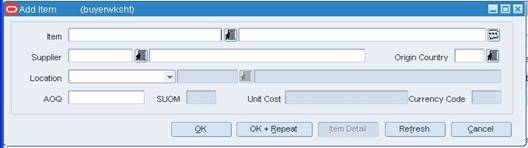
Navigate: From the main menu, select Ordering > Buyer worksheet > Edit. The Buyer Worksheet opens.
Click Add Item. The Add Item window opens.
Enter the ID of the item, or click the LOV button and select the item.
Enter the ID of the supplier, or click the LOV button and select the supplier.
Enter the ID of the country of sourcing, or click the LOV button and select the country of sourcing.
In the location field, select the location type. Enter the ID of the location, or click the LOV button and select the location.
In the AOQ field, enter the adjusted order quantity.
Modify the unit cost in the unit cost field, if required.
Click OK to add the item to the buyer worksheet, or click OK+Repeat to add the item to the buyer worksheet and add a new item.
When prompted to requery, click Yes.
Click OK to save your changes and close the window.
Navigate: From the main menu, select Ordering > Buyer worksheet > Edit. The Buyer Worksheet opens. Filter the Buyer Worksheet to retrieve items
In the Details area, select the check box next to the items you want to add to the PO.
Click Add to PO. The Purchase Order List window opens.
Enter the PO number that you would like to add the item to, or leave the field blank to display a list of valid PO's. Click Search.
Select the PO to which you wish to add the item.
Click Add to PO.
Note: Once an item is added to a PO, it can no longer be edited from the Buyer Worksheet module.
Click Yes to add the item to the PO.
Click OK to save your changes and close the window.
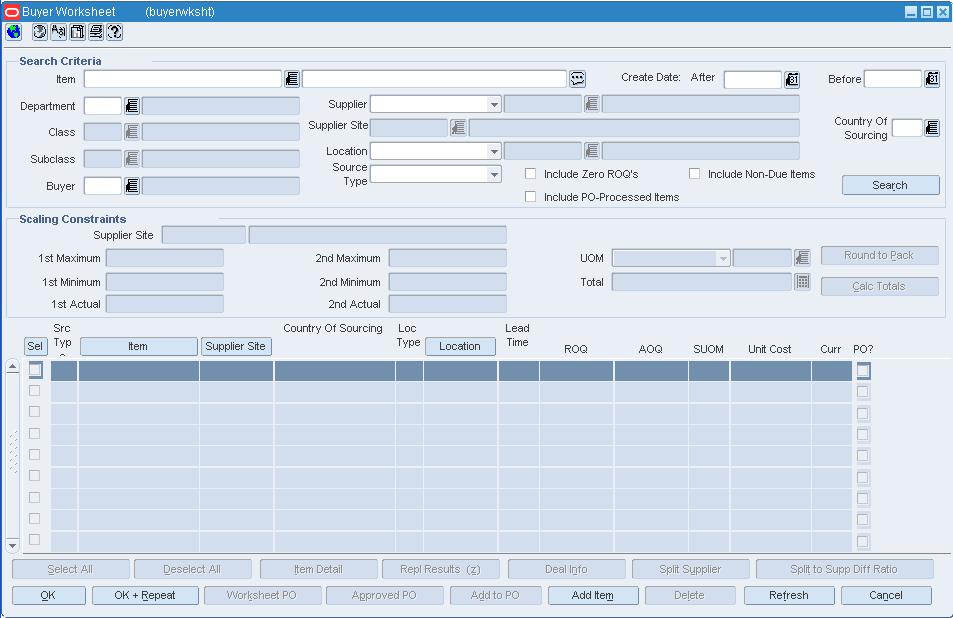
Navigate: From the main menu, select Ordering > Buyer Worksheet > Edit. The Buyer Worksheet opens.
In the Filter Criteria area, enter the search criteria as necessary, or click the LOV button and select the appropriate information.
In the Source Type field, select the origin of the requirement (replenishment, investment buy, or manual) to filter by a specific method. To select all requirements, select the blank field.
Click the filter button. The items that match the criteria appear in the details frame.
To clear search criteria, click the clear filter button. Data in all fields is cleared.
To select all items in the detail area, click Select All.
To clear all item in the detail area, click Clear All.
To view item details, highlight an item and click Item Detail.
To view replenishment results for an item, click Repl Results.
To view deal information for an item, click Deal Info.
To perform another search, click Refresh.
Click OK to save changes, or click Cancel to exit without saving changes.
Truck splitting is the process that allows you split a purchase order when a truckload is exceeded. Truck splitting is required in some industries, where protocol dictates that each truck load must have one purchase order. You can indicated truck splitting at the supplier, supplier/department, supplier/location, or supplier/department/location level.
Trucks can be split by one of two methods:
Item sequence: All quantity of one item is loaded onto a different truck. Any partial groups of an item go into a final truck.
Balanced assortment: Equal quantities of each item is loaded on to the truck.
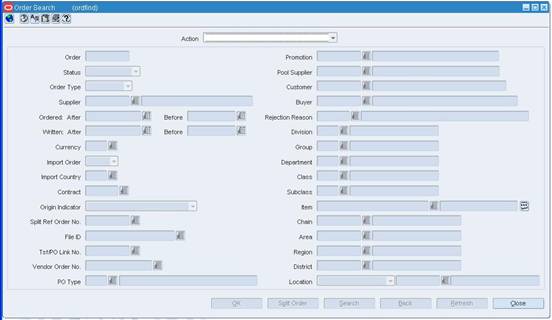
Navigate: From the main menu, select Ordering > Orders. The Order Search window is displayed. Search for an order in Worksheet status you would like to split. The Order Search window opens.
|
Note: To split an order, the order must originate from a supplier who uses truck splitting and truck splitting constraints - exceed the constraints. |
Select the order you want to split from the table. Click Split Order.
To view the newly created orders, click Yes. To continue, click No. The new orders appear in the table area.
Open each new order and submit it for approval.
|
Note: Orders created by this method are linked by a split reference order number. This link number can be used to search for all orders associated with the link. |