| Oracle® Retail Merchandising System User Guide 14.1 E55773-01 |
|

 Previous |
 Next |
The RMS financial management module primarily aims to maintain accurate stock ledger, export financial data to external financial system, and monitor a company's performance based on key performance indices. Financial management activities comprise maintaining basic financial data such as cost maintenance, formulating financial budgets, general ledger relationship maintenance, stock counts, and stock ledger.
Basic financial data includes tax information, geocodes, financial set of books, and so on. Cost maintenance deals with cost changes, Estimated landed cost (ELC), Actual landed cost (ALC), Computation value base (CVB), Obligations, and so on. Financial budgets are maintained in RMS at monthly/financial half and location level for various measures including Open to buy (OTB). Stock counts in RMS can be scheduled or requested for each location in RMS either as unit and value count or unit count. RMS stock ledger provides access to financial records based on a variety of merchandising transaction types. Some of the details are captured within RMS; other details are received from external systems. The remaining fields are calculated. The GL Cross Reference allows cross-referencing the merchandise hierarchy levels and transaction codes from RMS with the appropriate general ledger accounts within external financial system.
This chapter contains the following topics to help understand and manage financial processes in RMS:
Budgets are maintained at the half level and month level. By entering various percentages at the half level and monetary amounts at the month level, you set the goals against which performance can be tracked.
At the half level, you can maintain planned percentages for markup (cumulative markon), markdown (as a percentage of sales), shrinkage (as a percentage of sales), and gross profit (as a percentage of sales) by department/half/location. A system option may be set that disallows use of the budgeted shrinkage percentage in budget and stock ledger calculations.
At the month level, you can maintain monetary amounts for many of the same budget types that are found in the stock ledger. These include opening inventory, closing inventory, net sales, purchases, and so on. They are also maintained by department/half/location/month.
In addition to viewing and maintaining budgets at the half level and month level, you can view budgets at the budget type level by month.
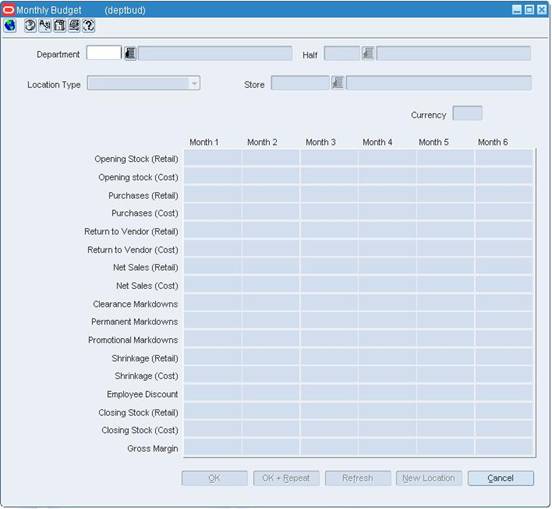
The Monthly Budget window allows you to maintain budget details at the monthly level for a specific department, half, and location.
To view the monetary values in the primary currency of the company or the currency of the location, select the appropriate option from the Options > Currency menu. Monetary amounts can only be edited in the primary currency of the company.
Navigate: From the main menu, select Finance > Monthly Budget by Budget Type. The View Monthly Budget window opens.
In the Department field, enter the ID of the department, or click the LOV button and select the department.
In the Half field, enter the ID of the half, or click the LOV button and select the half.
In the Budget Type field, select the type of budget that you want to view. The budget details appear by location.
In the Location Type field, select the type of location.
|
Note: The selection you make in this field affects the results displayed on the table. The field label on the first column in the table will display your selection from the Location Type field. Values in the Description column are limited to valid values for the selection you made in the Location Type field. |
Click OK to save your changes and close the window.
Navigate: From the main menu, select Finance > Monthly Budget Information > Edit. The Monthly Budget window opens.
In the Department field, enter the ID of the department, or click the LOV button and select the department.
In the Half field, enter the ID of the fiscal half, or click the LOV button and select the fiscal half.
In the Location Type field, select the type of location.
In the Location field, enter the ID of the location, or click the LOV button and select the location. The budget details appear by the month.
|
Note: This is a dynamic field. The field label will display your selection from the Location Type field. Values in the List of Values are limited to valid values for the selection you made in the Location Type field. |
Edit the monetary amounts under each month as necessary.
Click OK to save your changes and close the window.
The View Monthly Budget window allows you to view monthly budget details for a specific department, half, and budget type. You can view the details for either all stores or all warehouses.
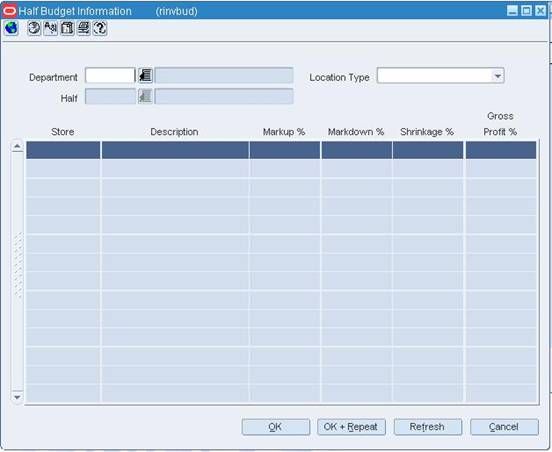
Navigate: From the main menu, select Finance > Half Budget Information > View. The Half Budget Information window opens.
In the Department field, enter the ID of the department, or click the LOV button and select the department.
In the Half field, enter the ID of the half, or click the LOV button and select the half. The budget details appear by location.
In the Location Type area, select the appropriate type of location.
Click OK to save your changes and close the window.
Navigate: From the main menu, select Finance > Half Budget Information > Edit. The Half Budget Information window opens.
In the Department field, enter the ID of the department, or click the LOV button and select the department.
In the Half field, enter the ID of the half, or click the LOV button and select the half. The budget details appear by location.
In the Location Type field, select the type of location.
|
Note: The selection you make in this field affects the results displayed on the table. The field label on the first column in the table will display your selection from the Location Type field. Values in the Description column are limited to valid values for the selection you made in the Location Type field. |
Edit the markup, markdown, and shrinkage percentages as necessary. The gross profit percentage is adjusted based on the changes that you make.
Click OK to save your changes and close the window.
The Actual Landed Cost Header window allows you to view actual landed cost (ALC) details for a purchase order and item. The costs are limited to expenses and assessments that are considered non-merchandise charges.
You can view actual and estimated landed details for each unique combination of:
Purchase order, item, pack item, and shipment
Purchase order, item, pack item, and obligation
Purchase order, item, pack item, shipment, and obligation or customs entry
Each shipment is designated by a unique combination of vessel, voyage, and estimated departure date.
If you are using Trade Management to track import costs, it is assumed that all locations have the same cost value for an item. However, if the cost of items that are being imported DO vary by location, Trade Management converts the cost values to an identical weighted average cost.
Navigate: From the main menu, select Finance > ALC Maintenance. The ALC Selection window opens.
Search for and retrieve an actual landed cost record at the purchase order/item level.
The Actual Landed Cost Header window opens. Select a shipment, obligation, or customs entry and click Component List. The ALC Component Information window opens.
Click OK to close the window.
Navigate: From the main menu, select Finance > ALC Maintenance. The ALC Selection window opens.
Search for and retrieve an actual landed cost record at the purchase order/item level. The details appear in the Actual Landed Cost Header window.
Select a shipment, obligation, or customs entry and click Component List. The ALC Component Information window opens.
Select a component and click Locations. The ALC Component Location Information window opens.
Click OK to close the window.
Navigate: From the main menu, select Finance > ALC Maintenance. The ALC Selection window opens.
Search for and retrieve an actual landed cost record at the purchase order/item level.
|
Note: To limit the search to records with errors, select Yes in the Errors field. |
From the Options menu, select Errors. The errors appear in the Error Information window.
Click OK to close the window.
The ALC Component Information window allows you to view the cost components of an actual landed cost record. The cost components are limited to the expenses and assessments that are not considered merchandise charges. The comparison is shown between the estimated landed cost components and the actual landed cost components. The amounts are denominated in the primary currency of the company.
You can view cost components for each unique combination of:
Purchase order, item, pack item, and shipment
Purchase order, item, pack item, and obligation
Purchase order, item, pack item, shipment, and obligation or customs entry
Each shipment is designated by a unique combination of vessel, voyage, and estimated departure date.
Navigate: From the main menu, select Finance > ALC Maintenance. The ALC Selection window opens.
Search for and retrieve an actual landed cost record at the purchase order/item level.
The Actual Landed Cost Header window opens.
To view ALC details by shipment, shipment/obligation, and shipment/customs entry, select the Shipment option from the Options menu.
To view ALC details by obligation, select the Obligation option from the Options menu.
Select a customs entry and click Entry Detail. The details are displayed in the Customs Entry Header window.
Click OK to close the window.
Select an obligation and click Obligation Detail. The details appear in the Obligation Maintenance window.
Click OK to close the window.
The ALC Component Location Information window allows you to view an actual landed cost component by destination location.
The ALC Order Find window allows you to enter criteria in order to search for actual landed costs by purchase order and view the results of the search. The results appear in the ALC Order Finalize window.
The default view for the ALC Order Find window opens when you open the window for the first time. You can also create a custom view.
See "Search for Actual Landed Costs by Purchase Order" in the Oracle Retail Trade Management User Guide
The ALC Order Finalize window allows you to finalize or view actual landed costs by purchase order. In addition to updating the stock ledger and open to buy based on actual landed costs, you can choose to update weighted average costs.
See "Finalize Actual Landed Costs by Purchase Order" in the Oracle Retail Trade Management User Guide
See "View Actual Landed Costs at the Purchase Order / Item Level" in the Oracle Retail Trade Management User Guide
The ALC Selection window allows you to enter criteria in order to search for actual landed costs by purchase order and item and view the results of the search. The only task you can perform is View.
The default view for the ALC Selection window opens when you open the window for the first time. You can also create a custom view.
See "Search for Actual Landed Costs by Purchase Order" in the Oracle Retail Trade Management User Guide
The Average Cost Adjustment window allows you to enter a new average cost for an item at a selected location. If you are using Trade Management to track import costs, it is assumed that all locations have the same cost value for an item. However, if the cost of items that are being imported DO vary by location, Trade Management converts the cost values to an identical weighted average cost.
See "Adjust the Average Cost of an Item at a Specified Location" in the Item Maintenance chapter
The CVB Details window allows you to add or view the specific cost components of a selected computational value base (CVB). Cost components can be included in a CVB as a group. That is, they share the same nomination flag. The alternative is to include specific cost components. You can use the CVB Details window to include specific cost components.
See "Define a Computation Value Base" in the Cost Management chapter
See "View Computation Value Bases" in the Cost Management chapter
The CVB Maintenance window allows you to add and maintain a computation value base (CVB). CVBs are used in calculations of total costs, total expenses, total duties, estimated and actual landed costs, and user-defined purposes.
There are two ways for you to include cost components in a CVB:
Include all cost components with a certain nomination flag set. To do this, you select the appropriate component nominations.
Include specific cost components. To add specific cost components, you click Details to open the CVB Detail window.
You cannot modify CVB records once they are saved to the database; but you can delete them if they are not referenced in other modules.
See "Define a Computation Value Base" in the Cost Management chapter
See "View Computation Value Bases" in the Cost Management chapter
The Transaction Data Detail window allows you to view additional details about a transaction that is selected in the Transaction Data window.
See "View Transactions" in the Deals chapter
The Transaction Data window allows you to search for and view transactions on a specific date or range of dates for a specific department. You can refine the search by class, subclass, item, location, or type of transaction.
See "View Transactions" in the Deals chapter
The Error Information window allows you to view the details of any errors that occurred during the processing of obligations and customs entries for actual landed costs.
The Half Budget Information window allows you to maintain budget information at the department and half level for either all stores or all warehouses. You can edit the following percentages as a percentage of sales:
Markup percentage (cumulative markon)
Markdown percentage
Shrinkage percentage
The gross profit percentage is automatically calculated from the markup, markdown, and shrinkage percentages that you enter.
The Locations Maintenance window allows you to view and edit the locations to which expenses and assessments are allocated. These expenses and assessments are incurred from partners and suppliers for the transportation of goods. Costs can be allocated to locations if the obligation is entered at the purchase order header or purchase order item level.
In a multi-channel environment, the expenses and assessments accrued to a warehouse are allocated at the virtual warehouse level.
Navigate: From the main menu, select Finance > Obligation Maintenance. The Obligation Search window opens.
Search for and retrieve an obligation in View mode. The Obligation Maintenance window opens.
To view the allocation of a cost component to a location:
|
Note: Allocations to locations can be viewed for obligations at the purchase order header or purchase order/item level. |
Select a cost component and click Locations. The locations appear in the Locations Maintenance window.
Click OK to close the window.
Click OK to close the window.
Navigate: From the main menu, select Finance > Obligation Maintenance. The Obligation Search window opens.
In the Action field, select New.
In the Obligation Level field, select the appropriate level.
Click OK. The Obligation Maintenance window opens.
In the variable fields, enter the appropriate ID, or click the LOV button and select the variable.
|
Note: Depending on the obligation level, the following fields are enabled: BL/AWB, Container, Entry No, Order No, Item, Vessel, Voyage/Flight, Est Depart Date. |
Select either the Partner or Supplier option.
If you select Partner, select the type of partner in the Partner Type field.
In the Partner or Supplier field, enter the ID of the vendor, or click the LOV button and select the vendor.
To enter basic invoice information, enter the invoice number, invoice date, method of payment, amount paid, payment date, check authorization number, currency code, exchange rate, and comments in the appropriate fields.
Click Add Details.
In the Component field, enter the code for the component, or click the LOV button and select the component.
In the Allocation Type field, select the appropriate option. If you select Amount in the Allocation Type field, enter the quantity, unit of measure, and amount in the appropriate fields.
If you select Unit of Measure in the Allocation Type field, enter the allocation basis, rate, per count, unit of measure, quantity, and amount in the appropriate fields.
Select the In ALC check box next to each cost component that you want to include in actual landed cost calculations.
|
Note: Costs can be allocated to locations if the obligation is entered at the purchase order header or purchase order/item level. |
Select a cost component and click Locations. The Locations Maintenance window opens.
In the Location Type field, select the type of location.
In the Location field, enter the ID of the location, or click the LOV button and select the location.
In the Quantity field, enter the number of units that were received at the location.
In the Amount field, enter the cost allocated to the location.
Click OK to save your changes and close the window.
Navigate: From the main menu, select Finance > Obligation Maintenance. The Obligation Search window opens.
Search for and retrieve an obligation in Edit mode. The Obligation Maintenance window opens.
Edit the enabled fields as necessary.
To edit the allocation of a cost component to a location:
|
Note: Allocations to locations can be edited for obligations at the purchase order header or purchase order/item level. |
Select a cost component and click Locations. The Locations Maintenance window opens.
To add a location, click Add. Next enter the details on the next available line.
To delete a location, select the location and click Delete.
When prompted to delete the location, click Yes.
Click OK to close the window.
To reallocate the edited costs, click Reallocate.
Click OK to save your changes and close the window.
Navigate: From the main menu, select Finance > Obligation Maintenance. The Obligation Search window opens.
In the Action field, select either Edit or View.
In the Obligation Level field, select the appropriate level.
|
Note: Depending on the obligation level, the following fields are available: BL/AWB, Container, Entry No, Order No, Item, Vessel, Voyage/Flight, Est Depart Date. |
Enter additional criteria as desired to make the search more restrictive.
Click Search. The Obligation Search window displays the obligations that match the search criteria.
Select a task:
To perform another search, click Refresh.
To display the details of an obligation, select a record and click OK. The Obligation Maintenance window opens.
Click Close to close the window.
The Obligation Search window allows you to enter criteria in order to search for obligations and view the results.
The default view for the Obligation Search window opens when you open the window for the first time. You can also create a custom view.
The Obligation Maintenance window allows you to create, edit, and view obligations. An obligation can be received from a partner or supplier. It contains the expenses typically incurred for the movement and handling of goods. It does not include the cost of the goods.
You can choose which expenses should be included in actual landed cost calculation. For obligations entered at the purchase order header or purchase order/item level, you can allocate each cost component to one or more locations. After you enter the details of the obligation, you can change the status to Approved.
If you are using Trade Management to import costs, it is assumed that all locations have the same cost value for an item. However, if the cost of items that are being imported DO vary by location, Trade Management will convert the cost values to an identical weighted average cost.
If you have access to Oracle Retail Invoice Matching, a non-merchandise invoice will be written in approved status and the costs will be posted to financials. After the obligation is approved, you can only reallocate the cost components.
Navigate: From the main menu, select Finance > Obligation Maintenance. The Obligation Search window opens.
Search for and retrieve an obligation in Edit mode. The details appear in the Obligation Maintenance window.
Click Delete.
When prompted to delete the record, click Yes.
Click OK to save your changes and close the window.
Navigate: From the main menu, select Finance > Obligation Maintenance. The Obligation Search window opens.
Search for and retrieve an obligation in Edit mode. The details appear in the Obligation Maintenance window.
In the Obligation Status field, select Approved. The costs are allocated to the actual landed cost module.
|
Note: If you have access to Oracle Retail Invoice Matching, an invoice is written in approved status after you approve an obligation. Subsequently, the approved costs are posted to financials. |
Click OK to close the window.
The OTB Budget Maintenance window allows you to maintain open to buy (OTB) budgets at the subclass/week level. The monetary amounts are allotted by purchasing category: order of non-basic goods, buyer replenishment of basic goods, and automatic replenishment of basic goods.
See "Edit Open To Buy Budgets" in Purchasing chapter
The OTB Forward Limits Maintenance window allows you to maintain forward limits by subclass/week. Managers may use forward limits in order to restrict how much of the OTB budget a buyer may use from any given period.
See "Edit Forward Limits for OTB Budgets" in Purchasing chapter
The Service Confirmation by Store window allows store employees to verify that a service for which your organization is being billed has been performed. Depending on the invoicing attributes of a supplier, an invoice for a service cannot be paid until the store confirms the service has been performed.
Navigate: From the main menu, select Finance > Service Confirmation by Store. The Service Confirmation by Store window opens.
In the Store field, enter the ID of the store at which the service was performed, or click the LOV button and select the store. To further limit the services that appear:
In the Invoice Date field, enter the date of the invoice document, or click the calendar button and select the date.
Select the type of vendor, either Partner or Supplier.
When the vendor is a partner, select the type of partner in the Partner field. In the next field, enter the ID of the partner or click the LOV button and select a partner.
When the vendor is a supplier, enter the ID of the supplier in the Supplier field, or click the LOV button and select the supplier.
Click Search.
Select the Service Performed check box for the service that has been performed.
Click OK to save your changes and close the window.
The Shipment Detail window allows you to view the details of a shipment by bill of lading or air waybill.
The stock ledger provides access to financial records based on a variety of transaction types. Some of the details are captured within RMS; other details are received from external systems. The remaining fields are calculated.
The stock ledger supports both the retail and cost methods of accounting. The cost method may use standard cost or average cost depending on how the system is set up. The stock ledger supports both the retail (4-5-4) and the normal (Julian) calendar. If the retail calendar is used, data can be maintained by the month and the week. If the normal calendar is used, data can be maintained only by the month.
See "View Sales History or Warehouse Issues by Item and Location" in the Inventory Control chapter
See "View Transactions" in the Deals chapter
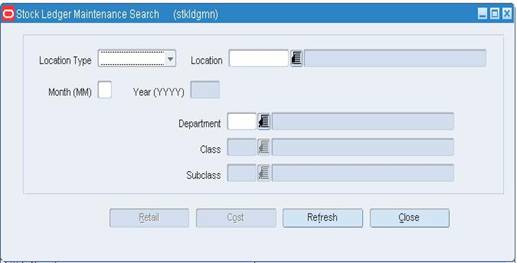
The Stock Ledger Maintenance Window allows you to view stock ledger details by subclass/location/month. Details vary based on the setup for each department.
Navigate: From the main menu, select Finance > Stock Ledger Maintenance > Edit. The Stock Ledger Maintenance Search window opens.
In the Location Type field, select the type of location.
In the Location field, enter the ID of a specific location, or click the LOV button and select the location.
In the Month and Year fields, enter the month and year for which you want to edit the stock ledger records.
In the Department, Class, and Subclass fields, enter the ID of a specific member at each product level, or click the LOV buttons and select the members.
Click either Retail or Cost. The details appear in the Stock Ledger Maintenance window.
Edit the details as necessary.
|
Note: If you are editing the retail information, click Next to view and edit additional fields. |
Click OK to save your changes and close the window.
Navigate: From the main menu, select Finance > Stock Ledger Maintenance > Edit. The Stock Ledger Maintenance Search window opens.
In the Location Type field, select the type of location.
In the Location field, enter the ID of a specific location, or click the LOV button and select the location.
In the Month and Year fields, enter the month and year for which you want to edit the stock ledger records.
In the Department, Class, and Subclass fields, enter the ID of a specific member at each product level, or click the LOV buttons and select the members.
Click Cost. The Cost Maintenance window displays.
Edit the details as necessary.
Click Next to enter any other information. You can also change EOM months
Click Next Month and Prev Month to change EOM dates.
Click OK to save your changes and close the window.
The Stock Ledger View window allows you to view the results of a search for stock ledger records. The results depend on the type of location, time period, and product level that are selected as search parameters.
Several predefined views are accessible from the View menu depending on the method of accounting.
For departments that use the retail method of accounting, you can choose from:
Retail Summary: Summarizes the value of opening stock, cost and retail additions, and reductions by month or week for the current year. Cumulative markon and gross profit margin percentages appear.
Merchandise Handled: Summarizes the value of purchases, RTVs, net transfers, and net markup by month, week, or day for the current year.
Retail Reductions: Summarizes the value of net sales, markdowns, and employee discounts by month, week, or day for the current year. The shrinkage percentage opens.
Retail TY/LY: Summarizes the value of opening stock, net sales, and markdowns by month or week for the current year and previous year. The gross profit margin percentages appear.
Inventory Report: Displays percentages for cumulative markon, markdown, shrinkage, and gross profit margin by month or week for the current year and previous year.
Markdown Report: Summarizes the value of markups, cancelled markups, various types of markdowns, cancelled markdowns, and net sales by month or week for the current year.
Intercompany Transfer: Summarizes the value of intercompany transfers by month or week for the current year and previous year.
Franchise: Summarizes sales made at the warehouse to franchise stores.
For departments that use the cost method of accounting, you can choose from:
Cost Summary: Summarizes the value of opening stock, purchases, RTVs, and net transfers by month, week, or day for the current year. Shrinkage and gross profit margin percentages appear.
Cost TY/LY: Summarizes the value of opening stock, purchases, and net sales by month or week for the current year and previous year. The gross profit margin percentages appear.
You can also create a custom view. Additional fields can be viewed when you create a custom view.
The Stock Ledger Search window allows you to enter criteria in order to search for stock ledger records. The results appear in the Stock Ledger View window.
Navigate: From the main menu, select Finance > Stock Ledger View. The Stock Ledger Search window opens.
In the Location Type field, select the type of location.
|
Note: Leave the location field blank to select all locations. |
In the Location field, enter the ID of the location, or click the LOV button and select the location.
In the Currency area, select the type of currency.
To round amounts to the nearest thousand, select the In Thousands check box.
In the View field, select the type of time period.
In the next field, enter the ID or date of the specific time period, or click the LOV button and select the time period.
In the Department field, enter the ID of the department, or click the LOV button and select the department.
Enter any additional criteria as desired to make the search more restrictive.
Click Search. The stock ledger records appear in the Stock Ledger View window.
Click OK to close the window.
Navigate: From the main menu, select Finance > Stock Ledger Maintenance > View. The Stock Ledger Maintenance Search window opens.
In the Location Type field, select the type of location.
In the Location field, enter the ID of a specific location, or click the LOV button and select the location.
In the Month and Year fields, enter the month and year for which you want to edit the stock ledger records.
In the Department, Class, and Subclass fields, enter the ID of a specific member at each product level, or click the LOV buttons and select the members.
Click either Retail or Cost. The details appear in the Stock Ledger Maintenance window.
Click OK to save your changes and close the window.
The Stock Ledger Maintenance Search window allows you to enter criteria in order to search for and retrieve stock ledger data at the subclass/location/month level. The results appear in the Stock Ledger Maintenance window.
The general ledger cross reference allows you to cross-reference the merchandise hierarchy levels and transaction codes from RMS with the appropriate general ledger accounts within your financial system.
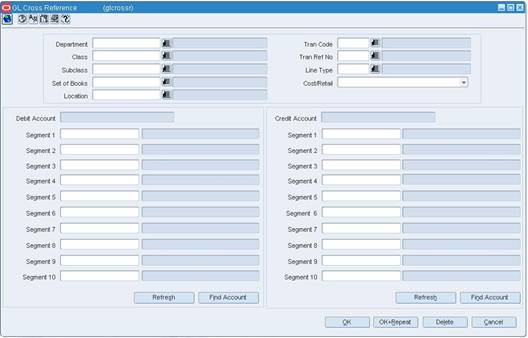
The GL Cross Reference window allows you to cross-reference the merchandise hierarchy levels and transaction codes from RMS with the appropriate general ledger accounts within your financial system.
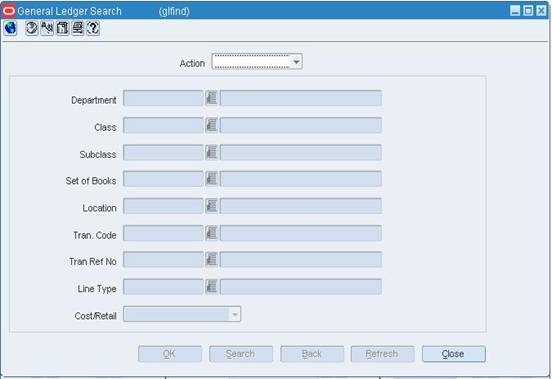
Navigate: From the main menu, select Finance > General Ledger. The General Ledger Search window opens.
Search for and retrieve a cross reference in View mode. The GL Cross Reference window opens.
Click OK to close the window.
Navigate: From the main menu, select Finance > GL Cross Reference. The General Ledger Search window opens.
In the Action field, select New.
Click OK. The GL Cross Reference window opens.
Enter the merchandise hierarchy information as necessary, or click the LOV button and select the merchandise hierarchy information.
In the Tran Code field, select the transaction type. The Line Type field is filled.
In the Tran Ref No. field, select the reference information associated with the transaction code.
|
Note: This field is enabled only for certain transactions. It is a dynamic field and will be labeled depending on the transaction code selected. |
In the Cost/Retail field, select the accounting method.
In the Debit Account area, enter the segments that make up the account.
Click Find Account. The Debit Account field is displays the account number.
In the Credit Account area, enter the segments that make up the account.
Click Find Account. The Credit Account field is displays the account number.
Click OK to save your changes and close the window.
|
Note: If the Financials module is installed, your view may differ than what is shown in the procedure. |
Navigate: From the main menu, select Finance > GL Cross Reference. The General Ledger Search window opens. Search for and retrieve a cross reference in edit mode. The GL Cross Reference window opens.
Enter the enabled fields as necessary.
Click Find Account. The system validates the entered data.
The General Ledger Search window allows you to enter criteria in order to search for General Ledger Cross References and view the results of the search.
The default view for the General Ledger Search window opens when you open the window for the first time. You can also create a custom view.
Navigate: From the main menu, select Finance > GL Cross Reference. The General Ledger Search window opens.
In the Action field, select either Edit or View.
If necessary, enter additional criteria to make the search more restrictive.
Click Search. The General Ledger Search window displays the cross references that match the search criteria.
Select a task.
To perform another search, click Refresh.
To display the cross reference information, select a record and click OK. The GL Cross Reference window opens.
Click Close to close the window.
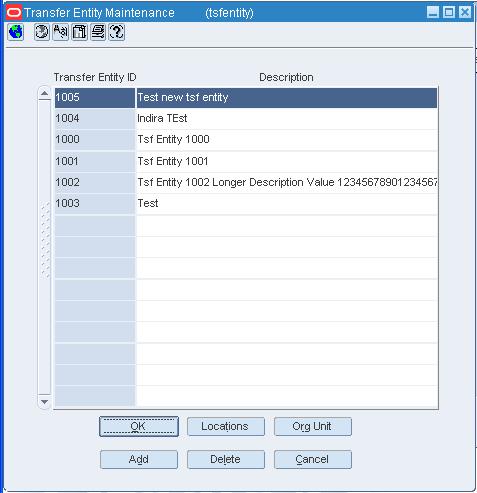
Large retailers usually operate in multiple countries, have multiple formats, multiple products lines or have multiple brands. The Transfer Entity Set of Books window allows you to associate a set of books and organizational unit to a transfer entity.
Between set of books ID and the organizational unit ID there would be one-to-many relationships. One set of books ID can be mapped to multiple organizational units, but one organizational unit will be mapped to only one set of books ID.
Navigate: From the main menu, select Control > Setup > Transfer Entities > Edit. The Transfer Entity Maintenance window opens.
Select a transfer entity with a multiple set of books.
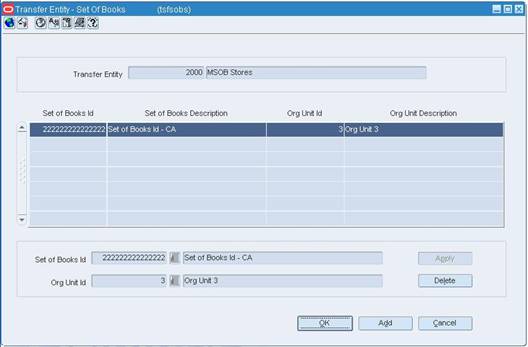
Click Org Unit. The Transfer Entity - Set of Books window opens.
Click Add.
In the Set of Books ID field, select an ID.
In the Org Unit ID field, select an ID.
Click Apply. The association is applied to the transfer entity.
Click OK to save any changes and close the window.
When you define sales tax information, you must first add geocodes to RMS. A geocode is a geographical region, such as a state or county, with its own tax codes. You can add geocodes for the following:
Countries
States
Counties
Cities
Districts
You then create the tax codes. A tax code consists of a tax jurisdiction and a tax type with associated tax rates. The tax code determines the tax rate that is applied to an item at the store. You can then associate tax codes and stores with a geocode and associate tax codes with items.
See "View a Geocode" in the Foundation Data chapter
See "View a Tax Code" in the Foundation Data chapter
Navigate: From the main menu, select Control > Sales Tax > Tax Rate Maintenance > Edit. The Tax Hierarchy window opens.
On the Tax Jurisdictions tab, select a tax jurisdiction.
Click on the Tax Codes & Rates tab.
Select a tax type in the tax type table.
Click Item/Geocode. The Tax Codes Form window opens.
Select an item in the table on the Items tab.
Click Delete.
When prompted to delete the item, click Yes.
Click Close to close the window.
When prompted to save the changes, click Yes.
Navigate: From the main menu, select Control > Sales Tax > Tax Rate Maintenance > Edit. The Tax Hierarchy window opens.
On the Tax Jurisdictions tab, select a tax jurisdiction.
Click on the Tax Codes & Rates tab.
Select a tax type in the tax type table.
Click Item/Geocode. The Tax Codes Form window opens.
Click on the Department tab.
Select a department in the table.
Click Delete.
When prompted to delete the department, click Yes.
Click Close to close the window.
When prompted to save the changes, click Yes.
Navigate: From the main menu, select Control > Sales Tax > Tax Rate Maintenance > Edit. The Tax Hierarchy window opens.
Click Add. The fields in the Apply area are cleared.
In the Tax Jurisdiction field, enter a unique ID for the tax jurisdiction in the first field and a description in the second field.
In the Tax Level field, select the tax level of the tax jurisdiction.
Click Apply. The tax jurisdiction is added to the table.
Click Close to close the window. When prompted to save the changes, click Yes.
Navigate: From the main menu, select Control > Sales Tax > Tax Rate Maintenance > Edit. The Tax Hierarchy window opens.
|
Note: You cannot delete a tax jurisdiction that is part of an active tax code. |
Select a tax jurisdiction on the Tax Jurisdictions tab.
Click Delete.
When prompted to delete the jurisdiction, click Yes.
Click Close to close the window.
When prompted to save the changes, click Yes.
Navigate: From the main menu, select Control > Sales Tax > Geocode Maintenance > Edit. The Geocode Hierarchy Maintenance window opens.
Click Search. The geocode tables and buttons are enabled.
Click Add.
In the Country field, enter the geocode for the country.
In the Country Description field, enter the description of the country.
Click on the State tab.
Click Add.
In the Country field, enter the geocode of the country, or click the LOV button and select a country.
In the State field, enter the geocode for the state.
In the State Description field, enter the description of the state.
Click on the County tab.
Click Add.
In the Country field, enter the geocode of the country, or click the LOV button and select a country.
In the State field, enter the geocode of the state, or click the LOV button and select a state.
In the County field, enter the geocode for the county.
In the County Description field, enter the description of the county.
Click on the City tab.
Click Add.
In the Country field, enter the geocode of the country, or click the LOV button and select a country.
In the State field, enter the geocode of the state, or click the LOV button and select a state.
In the County field, enter the geocode of the county, or click the LOV button and select the county.
In the City field, enter the geocode for the city.
In the City Description field, enter the description for the city.
Click on the District tab.
Click Add.
In the Country field, enter the geocode of the country, or click the LOV button and select a country.
In the State field, enter the geocode of the state, or click the LOV button and select a state.
In the County field, enter the geocode of the county, or click the LOV button and select the county.
In the City field, enter the geocode of the city, or click the LOV button and select the city.
In the District field, enter the geocode for the district.
In the District Description field, enter a description for the district.
Navigate: From the main menu, select Control > Sales Tax > Geocode Maintenance > Edit. The Geocode Hierarchy Maintenance window opens. Search and retrieve a geocode to edit.
Click Delete.
When prompted to delete the record, click Yes.
|
Note: You cannot delete a geocode with an active tax code. |
Click Close to close the window.
When prompted to save the changes, click Yes.
Click Store/Tax Code. The Geocode Tax Code window opens.
On the Stores tab, select the store.
Click Delete.
When prompted to delete the store, click Yes.
Click Close to close the window.
When prompted to save the changes, click Yes.
Click Store/Tax Code. The Geocode Tax Code window opens.
Click Add.
In the Store field, enter the ID of the store, or click the LOV button and select a store.
Click Close to close the window.
When prompted to save the changes, click Yes.
Click Store/Tax Code. The Geocode Tax Code window opens.
Click on the Tax Codes tab.
Select the tax code.
Click Delete.
When prompted to delete the store, click Yes.
Click Close to close the window.
When prompted to save the changes, click Yes.
Click Store/Tax Code. The Geocode Tax Code window opens.
Click the Tax Codes tab.
Click Add.
In the Tax Jurisdiction field, click the LOV button and select a tax code.
in the Start Date field, enter the date on which the tax code is valid for the geocode, or click the calendar button and select a date.
Click Close to close the window.
When prompted to save the changes, click Yes.
Navigate: From the main menu, select Control > Sales Tax > Geocode Maintenance > Edit or View. The Geocode Hierarchy Maintenance window opens.
Enter search criteria as desired to make the search more restrictive.
Click Search. The geocodes that match the search criteria appear on the results table.
Click on the appropriate tab in order to display a geocode level
Select the geocode with which you want to work.
Click Close to close the window.
When prompted to save any changes, click Yes to save or No to close without saving.
The sales tax feature allows you to specify the tax codes that apply to an item at a specific store. To ensure that stores have accurate sales tax information, the tax codes are sent through the nightly batch process two days in advance of when they are effective at the stores.
The association of the tax codes and stores with a geocode determines which tax codes are effective at a specific store. You associate stores with a geocode. You then associate the tax codes with a geocode. As a result, all of the tax codes associated with a geocode are effective at all of the stores associated with a geocode. When an item is sold at a specific store, the tax rates of the applicable tax codes are applied to the item.
See "View a Geocode" in the Foundation Data chapter
See "View Geocodes Associated with a Tax Code" in the Foundation Data chapter
See "View the Audit Trail for a Geocode Associated with a Tax Code" in the Foundation Data chapter
Navigate: From the main menu, select Action > Organizational Hierarchy. The Organization Hierarchy Main Form window opens. Select Store on the tree structure. The stores appear in the table. Select a store and click Edit. The Store Maintenance window opens. From the Options menu, select Geocodes. The Geocodes window opens.
To associate a country geocode with a store, in the Country ID field, enter the geocode of the country, or click the LOV button and select a country.
To associate a state geocode with a store:
Associate geocodes as described in step 1.
In the State ID field, enter the geocode of the state, or click the LOV button and select a state.
To associate a county geocode with a store:
Associate geocodes as described in step 1 - 2.
In the County ID field, enter the geocode of the county, or click the LOV button and select a county.
To associate a city geocode with a store:
Associate geocodes as described in step 1 - 3.
In the City field, enter the geocode of the city, or click the LOV button and select a city.
To associate a district geocode with a store:
Associate geocodes as described in step 1 - 4.
In the District field, enter the geocode of the district, or click the LOV button and select a district.
Click OK to save your changes and close the window.
Navigate: From the main menu, select Control > Sales Tax > Tax Rate Maintenance > Edit. The Tax Hierarchy window opens.
On the Tax Jurisdictions tab, select a tax jurisdiction.
Click on the Tax Codes & Rates tab.
Select a tax type in the tax type table.
Click Item/Geocode. The Tax Codes Form window opens.
Click on the Geocodes tab.
Select the geocode you want to delete.
Click Delete.
When prompted to delete the geocode, click Yes.
Click Close to close the window.
When prompted to save the changes, click Yes.
The sales tax feature allows you to specify the tax codes that apply to an item at a specific store. To ensure that stores have accurate sales tax information, the tax codes are sent through the nightly batch process two days in advance of when they are effective at the stores.
You apply a tax code to items, departments, and item lists. You can create tax product group item lists that include items that share the same tax codes. The tax codes that are ultimately applied to an item at a store are determined by the tax codes that the item shares with the store. The tax codes of a store are determined by the tax codes that are associated with the geocode to which the store belongs.
You can view the tax rates that apply to the item at a specific store, or you can view all of the tax codes associated with an item, department, or item list. You can only view item lists that are tax product groups.
See "View a Tax Code" in the Foundation Data chapter
See "View Departments Associated with a Tax Code" in the Foundation Data chapter
See "View Items Associated with a Tax Code" in the Foundation Data chapter
See "View Tax Codes Associated with a Geocode" in the Foundation Data chapter
See "View Tax Codes by Merchandise Level" in the Foundation Data chapter
See "View the Audit Trail for a Geocode Associated with a Tax Code" in the Foundation Data chapter
See "View the Audit Trail for a Tax Code Associated with a Department" in the Foundation Data chapter
See "View the Audit Trail for a Tax Code Associated with a Geocode" in the Foundation Data chapter
See "View the Audit Trail for a Tax Code Associated with a Tax Product Group Item List" in the Foundation Data chapter
See "View the Audit Trail for a Tax Code Associated with an Item" in the Foundation Data chapter
See "View the Audit Trail for a Geocode Associated with a Tax Code" in the Foundation Data chapter
See "View the Tax Codes for a Department" in the Foundation Data chapter
See "View the TAx Codes for a Tax Product Group Item List" in the Foundation Data chapter
See "View the Tax Codes for an Item" in the Foundation Data chapter
See "View the Tax Rates for a Sellable Pack at a Store" in the Foundation Data chapter
See "View the Tax Rates for an Item at a Store" in the Foundation Data chapter
The Audit window allows you to view the user ID of the person who associated the item, department, or geocode with the tax code. The date on which the item, department, or geocode was associated with the tax code opens as well. You also can view the user ID of the last person who modified the associated information and the date on which it was modified.
See "View the Audit Trail for a Geocode Associated with a Tax Code" in the Foundation Data chapter
See "View the Audit Trail for a Tax Code Associated with a Department" in the Foundation Data chapter
See "View the Audit Trail for a Tax Code Associated with a Geocode" in the Foundation Data chapter
See "View the Audit Trail for a Tax Code Associated with a Tax Product Group Item List" in the Foundation Data chapter
See "View the Audit Trail for a Tax Code Associated with an Item" in the Foundation Data chapter
See "View the Audit Trail for a Geocode Associated with a Tax Code" in the Foundation Data chapter
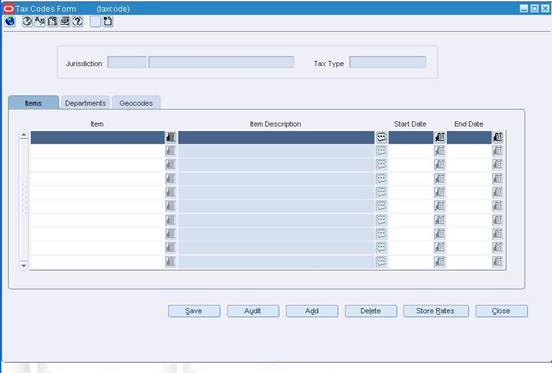
The Tax Codes Form window allows you to associate items, departments, and geocodes with a tax code. When you associate a tax code with a department, the tax code is applied to an item when it is sold at the department level. You can associate an item, department, or geocode with multiple tax codes. The tax codes that are ultimately applied to an item at a store are determined by the tax codes that the item shares with the store. The tax codes of a store are determined by the tax codes that are associated with the geocode to which the store belongs.
If you do not specify an end date for the relationship between a geocode, department, or item and a tax code, the association remains active as long as the tax code is active.
Geocodes can be uploaded into RMS using a standard batch program.
See "View Geocodes Associated with a Tax Code" in the Foundation Data chapter
See "View Geocodes Associated with a Tax Code" in the Foundation Data chapter
See "View Departments Associated with a Tax Code" in the Foundation Data chapter
The Tax Rate View window allows you to view the tax codes and associated rates that apply to either an item, a department, or the items on an item list at a specific store.
When you access the Tax Rate View window through an item maintenance window for an item or sellable pack, you can view the tax rates that apply to the item at a specific store. You can also view the total tax rate that is applied to the item at a store. When you access the Tax Rate View window from the main menu, you can view all of the tax codes associated with an item, department, or item list. You can only view tax product group item lists.
See "View the Tax Rates for an Item at a Store" in the Foundation Data chapter
See "View the Tax Rates for a Sellable Pack at a Store" in the Foundation Data chapter
See "View Tax Codes by Merchandise Level" in the Foundation Data chapter
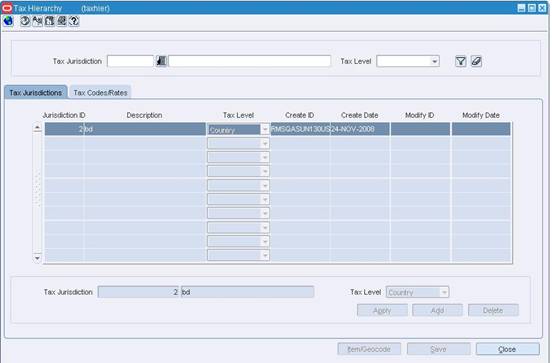
The Tax Hierarchy window allows you to create, edit, and view tax codes. A tax code consists of a tax jurisdiction and a tax type with associated tax rates. Tax codes are applied to items, departments, and item lists. The tax code determines the tax rate that is applied to an item at the store.
To create a tax code, you must first create a tax jurisdiction. When you create a tax jurisdiction, you select the tax level and the effective date for the tax jurisdiction. The tax level can be country, state, county, city, or district.
You create a tax code by associating a tax type with a tax jurisdiction. You then enter the tax rate for the tax type and the date on which the tax rate is effective. You can have multiple rates associated with a tax type; however, the effective dates of the rates may not overlap. Only one tax rate can be effective at a time for each tax type.
You can then associate tax codes with items, departments, geocodes, and item lists. At the store level, an item derives its tax rates from the tax codes that it shares with the store.
You cannot delete active tax codes. A tax code is active after it has been sent to the point of sale system through a batch process. The tax code information is sent to the point of sale system two days before the tax code is effective at a store.
See "View a Tax Code" in the Foundation Data chapter
Navigate: From the main menu, select Control > Sales Tax > Tax Rate Maintenance > Edit.
The Tax Hierarchy window opens.
On the Tax Jurisdictions tab, select a tax jurisdiction.
Click on the Tax Codes & Rates tab.
Click Add Code.
In the Tax Type field, select the type of tax.
Click Add Rate.
In the Tax Rate field, enter the tax rate.
In the Start Date field, enter the date on which the tax rate is effective, or click the calendar button and select the date.
When applicable, enter the date on which the tax rate ends in the End Date field, or click the calendar button and select the date.
|
Note: Tax rates for the same tax type cannot have overlapping start and end dates. |
Click Close to close the window.
When prompted to save the changes, click Yes.
Click Item/Geocode. The Tax Codes Form window opens.
Click the Department tab.
Click Add.
In the Department field, enter the ID of the department, or click the LOV button and select a department.
In the Start Date field, enter the date on which the tax code is effective for the department, or click the calendar button and select a date.
When applicable, enter the date on which the tax code ends in the End Date field, or click the calendar button and select the date.
Click Close to exit. When prompted to save the changes, click Yes.
|
Note: Tax codes for a department are applied when an item is sold at the department level. |
Click Item/Geocode. The Tax Codes Form window opens.
Click on the Geocodes tab.
Click Add.
To associate a country geocode with a tax code:
In the Country ID field, enter the geocode of the country, or click the LOV button and select a country.
To associate a state geocode with a tax code:
Associate geocode as described in step 4.
In the State ID field, enter the geocode of the state, or click the LOV button and select a state.
To associate a county geocode with a tax code:
Associate geocodes as described in steps 4 - 5.
In the County ID field, enter the geocode of the county, or click the LOV button and select a county.
To associate a city geocode with a tax code:
Associate geocodes as described in steps 4 - 6.
In the City field, enter the geocode of the city, or click the LOV button and select a city.
To associate a district geocode with a tax code:
Associate geocodes as described in steps 4 - 7.
In the District field, enter the geocode of the district, or click the LOV button and select a district.
In the Start Date field, enter the date on which the tax code is effective for the department, or click the calendar button and select a date.
When applicable, enter the date on which the tax code ends in the End Date field, or click the calendar button and select the date.
Click Close to close the window.
When prompted to save the changes, click Yes.
Click Item/Geocode. The Tax Codes Form window opens.
Click Add.
In the Item field, enter the item number, or enter a partial description of the item and click the LOV button to select an item.
In the Start Date field, enter the date on which the tax code is effective for the item, or click the calendar button and select a date.
When applicable, enter the date on which the tax code ends in the End Date field, or click the calendar button and select the date.
Click Close to close the window.
When prompted to save the changes, click Yes.
Navigate: From the main menu, select Control > Sales Tax > Tax Rate Maintenance > Edit. The Tax Hierarchy window opens.
On the Tax Jurisdictions tab, select a tax jurisdiction.
Click Add Code.
In the Tax Type field, select the type of tax.
Click Close to close the window.
When prompted to save the changes, click Yes.
Select a tax type.
Click Delete Code.
When prompted to delete the code, click Yes.
|
Note: You cannot delete a tax type that is part of a tax code with active tax rates. |
Click Close to close the window.
When prompted to save the changes, click Yes.
Click Add Rate.
In the Tax Rate field, enter the tax rate.
In the Start Date field, enter the date on which the tax rate is effective, or click the calendar button and select the date.
When applicable, enter the date on which the tax rate ends in the End Date field, or click the calendar button and select the date.
Click Close to close the window.
When prompted to save the changes, click Yes.
Navigate: From the main menu, select Action > Merchandise Hierarchy. The Merchandise Hierarchy Main Form window opens. Select Department on the tree structure. The departments appear in the table. Select a department and click Edit. The Department Maintenance window opens. From the Options menu, select Apply Tax Codes. The Item Tax Codes window opens.
|
Note: You cannot delete an active tax code. |
Select a tax code.
Click Delete.
When prompted to delete the tax code, click Yes.
Click OK to save your changes and close the window.
Click Add.
In the Tax Juris ID field, enter the ID of the tax jurisdiction, or click the LOV button and select the tax jurisdiction.
In the Tax Type field, select the type of tax.
In the Start Date field, enter the date on which the tax code becomes effective, or click the calendar button and select the date.
When applicable, enter the date on which the tax code end in the End Date field, or click the calendar button and select the date.
Click OK to save your changes and close the window.
Navigate: From the main menu, select Items > Items. The Item Search window opens. Search for and retrieve an item in Edit mode. The Item Maintenance window opens. Select the Apply Tax Codes option. The Item Tax Codes window opens.
|
Note: You cannot delete a tax code that is active. |
Select a tax code.
Click Delete.
When prompted to delete the tax code, click Yes.
Click OK to save your changes and close the window.
Click Add.
In the Tax Juris ID field, enter the ID of the tax jurisdiction, or click the LOV button and select the tax jurisdiction.
In the Tax Type field, select the type of tax.
In the Start Date field, enter the date on which the tax code becomes effective, or click the calendar button and select the date.
When applicable, enter the date on which the tax code end in the End Date field, or click the calendar button and select the date.
Click OK to save your changes and close the window.
Navigate: From the main menu, select Items > Item List. The Item List Search window opens. Search for and retrieve an item list in Use mode. The Item List Header window opens. From the Options menu, select Create Tax Code Change. The Item Tax Codes window opens.
|
Note: You cannot delete an active tax code. |
Select a tax code.
Click Delete.
When prompted to delete the tax code, click Yes.
Click OK to save your changes and close the window.
Click Add.
In the Tax Juris ID field, enter the ID of the tax jurisdiction, or click the LOV button and select the tax jurisdiction.
In the Tax Type field, select the type of tax.
In the Start Date field, enter the date on which the tax code becomes effective, or click the calendar button and select the date.
When applicable, enter the date on which the tax code end in the End Date field, or click the calendar button and select the date.
Click OK to save your changes and close the window.
Navigate: From the main menu, select Action > Merchandise Hierarchy. The Merchandise Hierarchy Main Form window opens Select Department on the tree structure. The departments appear in the table. Select a department and click Edit. The Department Maintenance window opens. From the Options menu, select Apply Tax Codes. The Item Tax Codes window opens.
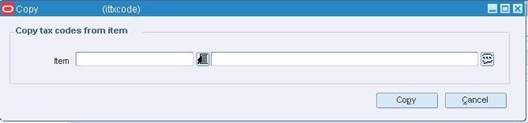
Click Copy. The Copy window opens.
Enter the item number of the item that you want to copy from. You can also enter a partial description of the item and click the LOV button to select the item.
Click Copy to copy the tax codes from the selected item to the department and close the window. The copied tax codes appear in the table on the Item Tax Codes window.
Click OK to save your changes and close the window
Navigate: From the main menu, select Items > Item List. The Item List Search window opens. Search for and retrieve an item list in Use mode. The Item List Header window opens. From the Options menu, select Create Tax Code Change. The Item Tax Codes window opens.
Click Copy. The Copy window opens.
Enter the item number of the item that you want to copy from. You can also enter a partial description of the item and click the LOV button to select the item.
Click Copy to copy the tax codes from the selected item to the current items and close the window. The copied tax codes appear in the table on the Item Tax Codes window.
Click OK to save your changes and close the window.
Navigate: From the main menu, select Items > Items. The Item Search window opens. Search for and retrieve an item in Edit mode. The Item Maintenance window opens. Select the Apply Tax Codes option. The Item Tax Codes window opens.
Click Copy. The Copy window opens.
Enter the item number of the item that you want to copy from. You can also enter a partial description of the item and click the LOV button to select the item.
Click Copy to copy the tax codes from the selected item to the current items and close the window. The copied tax codes appear in the table on the Item Tax Codes window.
Click OK to save your changes and close the window.
Navigate: From the main menu, select Control > Sales Tax > Tax Rate Maintenance > Edit. The Tax Hierarchy window opens.
Enter search criteria as desired to make the search more restrictive.
Click Search. The tax jurisdictions that match the search criteria appear on the results table.
Select a tax jurisdiction. Click the Tax Code Rates tab in order to display the tax code level with which you want to work.
Click Close to close the window.
When prompted to save any changes, click Yes to save or No to close without saving.
The Audit window allows you to view the user ID of the person who associated the tax code with the geocode. The date on which the tax code was associated with the geocode opens as well. You also can view the user ID of the last person who modified the tax code information and the date on which it was modified.
See "View the Audit Trail for a Tax Code Associated with a Geocode" in the Foundation Data chapter
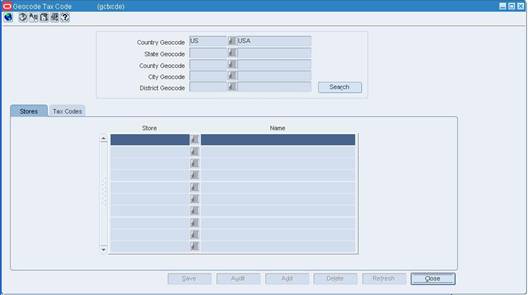
The Geocode Tax Code window allows you to associate stores and tax codes with a geocode. You also can delete stores and tax codes from geocodes.
The association of the tax codes and stores with a geocode determines which tax codes are effective at a specific store. You associate stores with a geocode. You then associate the tax codes with a geocode. As a result, all of the tax codes associated with a geocode are effective at all of the stores associated with a geocode.
You cannot delete active tax codes from a geocode. A tax code is active after it has been sent to the point of sale system through a batch process. The tax code information is sent to the point of sale system two days before the tax code is effective at a store.
If you do not specify an end date for the relationship between a geocode and a tax code, the association remains active as long as the tax code is active.
See "View Stores Associated with a Geocode" in the Foundation Data chapter
See "View Tax Codes Associated with a Geocode" in the Foundation Data chapter
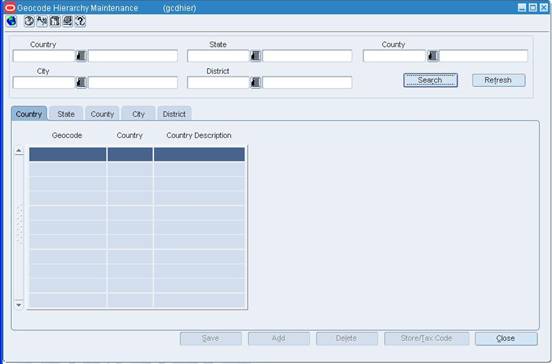
The Geocode Hierarchy Maintenance window allows you to add, delete, and view geocodes at several levels. A geocode is a geographical region, such as a state or county, with its own tax codes. You can add geocodes for the following:
Countries
States
Counties
Cities
Districts
Once you have added geocodes to RMS, you can then associate stores and tax codes with the geocode. A store can be associated with only one geocode. Multiple tax codes can be associated with multiple geocodes. The tax codes of a geocode are active at the stores of the geocode. At the store, an item derives its tax rates from the tax codes that it shares with the store.
Geocodes can be uploaded into RMS using a standard batch program.
See "View a Geocode" in the Foundation Data chapter
The Item Tax Codes window allows you to add tax codes to and delete tax codes from individual items, departments, or items in an item list.
You cannot delete active tax codes from an item or department. A tax code is active after it has been sent to the point of sale system through a batch process. The tax code information is sent to the point of sale system two days before the tax code is effective at a store. At the store level, an item derives its tax rates from the tax codes that it shares with the store.
If you do not specify an end date for the relationship between an item and a tax code, the association remains active as long as the tax code is active.
See "View the Tax Codes for an Item" in the Foundation Data chapter
See "View the Tax Codes for a Tax Product Group Item List" in the Foundation Data chapter
See "View the Tax Codes for a Department" in the Foundation Data chapter
The Audit window allows you to view the user ID of the person who associated the tax code with the item, department, or item list. The date on which the tax code was associated with the item, department, or item list opens as well. You also can view the user ID of the last person who modified the tax code information and the date on which it was modified.
See "View the Audit Trail for a Tax Code Associated with an Item" in the Oracle Retail Sales Audit User Guide
See "View the Audit Trail for a Tax Code Associated with a Department" in the Foundation Data chapter
See "View the Audit Trail for a Tax Code Associated with a Tax Product Group Item List" in the Foundation Data chapter