| Oracle® Retail Merchandising System User Guide 14.1 E55773-01 |
|

 Previous |
 Next |
This section describes the areas of user tools.
A timeline is a schedule of events. To track the life cycle of an activity, you can attach a timeline to the activity. You can enter dates with which to track the completion of the timeline steps. You can revise dates and record the reason for the revision.
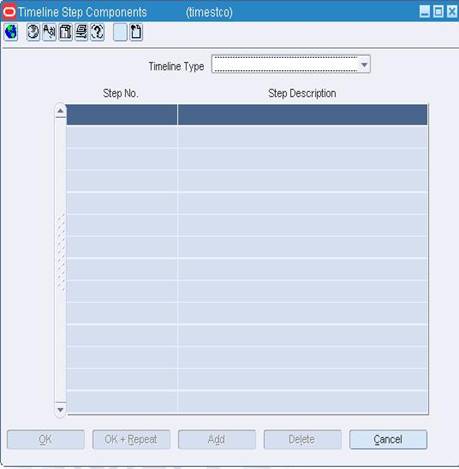
Navigate: From the main menu, select Control > Setup > Timeline Step Components > View. The Timeline Step Components window opens.
In the Timeline Type field, select the activity for which you want to view the timeline steps. The steps appear in the Step No. and Step Description fields.
Click OK to close the window.
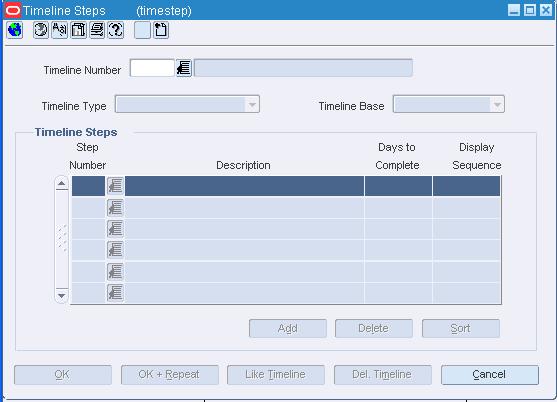
Navigate: From the main menu, select Control > Setup > Timeline > View. The Timeline Steps window opens.
In the Timeline Number field, enter the ID of the timeline that you want to view, or click the LOV button and select the timeline. The timeline information and steps are filled in automatically.
Click OK to close the window.
Navigate: From the main menu, select Ordering > Orders. The Order Selection window opens.
Search for and retrieve a purchase order in View mode. Restrict the search to purchase orders in Approved status. The PO Header Maintenance window opens.
From the Options menu, select Timelines > View. The Timeline window opens.
In the Action field, select View Order.
Enter additional criteria as desired to make the search more restrictive.
Click Search. The Order Selection window displays the purchase orders that match the search criteria.
To view fields related to due orders:
From the View menu, select Due Order. The fields that pertain to due orders appear.
Select a task:
To perform another search, click Refresh.
To display the details of the purchase order, select a record and click OK. The PO Header Maintenance window opens.
Click Close to exit.
|
Note: You may also access the Timelines window from the PO Item Maintenance window. To access the window, click Items. The PO Item Maintenance window opens.From the Options menu, select Timelines > View. The Timeline window opens. |
In the Timeline Number field, enter the timeline ID, or click the LOV button and select a timeline. The timeline information defaults into the table.
Click OK to close the window.
Navigate: From the main menu, select Inventory > Customs Entry. The Customs Entry Search window opens.
Search for and retrieve a customs entry in View mode. The Customs Entry Header window opens.
From the Options menu, select Timelines > View. The Timeline window opens.
In the Timeline Number field, enter the ID of the timeline, or click the LOV button and select the timeline you want to view. The timeline and its steps appear.
Click OK to close the window.
Navigate: From the main menu, select Items > Items. The Item Search window is displayed.
Search for and retrieve an item. The Item Maintenance window opens.
Select the Timelines option. The Timeline window opens.
In the Timeline Number field, enter the ID of the timeline, or click the LOV button and select the timeline you want to view. The timeline and its steps appear.
Click OK to close the window.
The steps used to create timelines allows you to create and maintain the timelines that are used to track an activity. The type of timeline you create determines what activities you can attach a timeline to. After you create the steps, you can define a series of steps to be used in a timeline. You can use a timeline to track the completion of an activity. When creating a timeline, you can pick which steps to include and the order of the steps. You can include any number of steps in a timeline.
Navigate: From the main menu, select Control > Setup > Timeline Step Components > Edit. The Timeline Step Components window opens.
In the Timeline Type field, select the activity for which you want to define a timeline step.
Click Add. The step number is filled in automatically in the Step No. field.
In the Step Description field, enter a description of the step.
Click OK to save your changes and close the window.
A timeline is a schedule of events. To track the life cycle of an activity, you can attach a timeline to the activity. You can enter dates with which to track the completion of the timeline steps. You can revise dates and record the reason for the revision. Timelines can be attached to activities in the following modules:
Items
Purchase orders: Timelines may be attached to purchase orders and PO/items.
|
Note: Timelines can be associated with items on a purchase order through the purchase order module in RMS; however, if you are using Oracle Retail Trade Management (RTM), you may want to use the transportation module to associate a timeline to items on a purchase order. |
Customs entries
Transportation: Timelines may be attached to transportation records, bills of lading, commercial invoices, containers, and PO/items.
Navigate: From the main menu, select Control > Setup > Timeline > New. The Timeline Steps window opens.
Enter a description of the timeline in the box to the right of the Timeline Number field.
In the Timeline Type field, select the activity for which you want to define a timeline.
If the Timeline Type is Purchase Order or Order/Item, select a base in the Timeline Base field. This field is optional.
Select the steps that you want to include in the timeline:
Enter the step number in the Step Number field, or click the LOV button and select the step.
In the Days to Complete field, enter the number of days that you want to allot for completion of the step.
In the Display Sequence field, enter the order in which you want to display the step. You may need to edit the sequence number for other steps in the timeline.
Repeat steps a through c for each additional step.
Click OK to save your changes and close the window.
Navigate: From the main menu, select Ordering > Orders. The Order Selection window opens. Search for and retrieve a purchase order in Edit mode. Restrict the search to purchase orders in Approved status. The PO Header Maintenance window opens. From the Options menu, select Timelines > Edit. The Timeline window opens.
In the Action field, select Edit Order.
Enter additional criteria as desired to make the search more restrictive.
Click Search. The Order Selection window displays the purchase orders that match the search criteria.
To view fields related to due orders:
From the View menu, select Due Order. The fields that pertain to due orders appear.
Select a task:
To perform another search, click Refresh.
To display the details of the purchase order, select a record and click OK. The PO Header Maintenance window opens.
Click Close to exit.
|
Note: You may also access the Timelines window from the PO Item Maintenance window. To access the window, click Items. The PO Item Maintenance window opens. From the Options menu, select Timelines > Edit. The Timeline window opens. |
In the Timeline Number field, enter the timeline ID, or click the LOV button and select a timeline. The timeline information defaults into the table.
In the Revised and Actual fields, enter the appropriate dates, or click the calendar button and select the date.
To enter a reason for any timeline changes, select the Reason option button and enter the reason code, or click the LOV button and select a reason.
To enter a comment for any timeline changes, select the Comments option button and enter the comments.
Navigate: From the main menu, select Control > Setup > Timeline > Edit. The Timeline Steps window opens.
In the Timeline Number field, enter the ID of the timeline that you want to edit, or click the LOV button and select the timeline.
Edit the description, timeline base, days to complete, or display sequence as needed.
In the Timeline Number field, enter the ID of the timeline that you want to delete, or click the LOV button and select the timeline.
Click Del Timeline.
When prompted to delete the timeline, click Yes.
|
Note: A timeline cannot be deleted if it is being referenced by an activity. |
Click OK to save your changes and close the window.
Navigate: From the main menu, select Inventory > Customs Entry. The Customs Entry Search window opens. Search for and retrieve a customs entry in Edit mode. The Customs Entry Header window opens. From the Options menu, select Timelines > Edit. The Timeline window opens.
In the Timeline Number field, enter the ID of the timeline, or click the LOV button and select the timeline.
To revise a date for a step, enter the date in the Revised Date field, or click the calendar button and select the date.
To record the actual completion date for a step, enter the date in the Actual Date field, or click the calendar button and select the date.
To record a reason for the revised date, select the Revised option. In the Revised field, enter the ID of the reason, or click the LOV button and select the reason.
To add a comment to a step, select the Comments option. Then type the comment in the Comments field, or click the comments button and enter the comment.
Click Calculate Dates. The Calculate Dates window opens.
In the Step field, enter the number of the step on which to base the calculation.
Select either Revised Date or Actual Date, depending on which date for the step should be used in the calculation.
Click OK to save your changes and close the window.
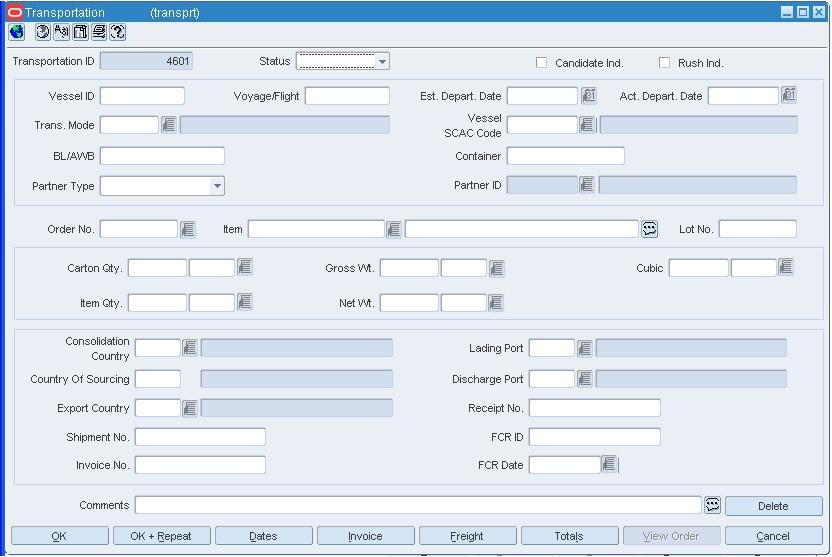
Navigate: From the main menu, select Inventory > Transportation > Maintenance. The Transportation Selection window opens.
Search for and retrieve a transportation record in View mode. The Transportation window opens.
or
From the main menu, select Inventory > Transportation > PO-Level Maintenance > Edit. The PO-Level Transportation window opens.
To view a timeline for the following levels:
Bill of lading: From the Options menu, select Timelines > BL/AWB > View. The Timeline window opens.
Commercial invoice: From the Options menu, select Timelines > Commercial Invoice > View. The Timeline window opens.
Container: From the Options menu, select Timelines > container > View. The Timeline window opens.
PO/Item: From the Options menu, select Timelines > PO/Item > View. The Timeline window opens.
Transportation record: From the Options menu, select Timelines > Transportation Record > View. The Timeline window opens.
PO-specific bill of lading: From the Options menu, select Timelines > PO/BL AWB > View. The Timeline window opens.
|
Note: This level of timeline is only available from the PO-Level Transportation window. |
In the Timeline Number field, enter the ID of the timeline, or click the LOV button and select the timeline you want to view. The timeline and its steps appear.
Click OK to close the window.
Navigate: From the main menu, select Inventory > Transportation > Maintenance. The Transportation Selection window opens. Search for and retrieve a transportation record in Edit mode. The Transportation window opens.
or
From the main menu, select Inventory > Transportation > PO-Level Maintenance > Edit. The PO-Level Transportation window opens.
To edit a timeline for a:
Bill of lading: From the Options menu, select Timelines > BL/AWB > Edit. The Timeline window opens.
Commercial invoice: From the Options menu, select Timelines > Commercial Invoice > Edit. The Timeline window opens.
Container: From the Options menu, select Timelines > container > Edit. The Timeline window opens.
PO/Item: From the Options menu, select Timelines > PO/Item > Edit. The Timeline window opens.
Transportation record: From the Options menu, select Timelines > Transportation Record > Edit. The Timeline window opens.
PO-specific bill of lading: From the Options menu, select Timelines > PO/BL AWB > Edit. The Timeline window opens.
In the Timeline Number field, enter the ID of the timeline, or click the LOV button and select the timeline.
To revise a date for a step, enter the date in the Revised Date field, or click the calendar button and select the date.
To record the actual completion date for a step, enter the date in the Actual Date field, or click the calendar button and select the date.
To record a reason for the revised date, select the Revised option. In the Revised field, enter the ID of the reason, or click the LOV button and select the reason.
To add a comment to a step, select the Comments option. Then type the comment in the Comments field, or click the comments button and enter the comment.
To delete a transportation order:
Select an order.
Click Delete.
Click Yes when the verification window displays.
Click OK to save your changes and close the window.
Click Calculate Dates. The Calculate Dates window opens.
In the Step field, enter the number of the step on which to base the calculation.
Select either Revised Date or Actual Date, depending on which date for the step should be used in the calculation.
Click OK to save your changes and close the window.
Navigate: From the main menu, select Items > Items. The Item Search window is displayed. Search for and retrieve an item in Edit mode. The Item Maintenance window opens. Select the Timelines option. The Timeline window opens.
In the Timeline Number field, enter the ID of the timeline, or click the LOV button and select the timeline.
To revise a date for a step, enter the date in the Revised Date field, or click the calendar button and select the date.
To record the actual completion date for a step, enter the date in the Actual Date field, or click the calendar button and select the date.
To record a reason for revised date, select the Revised option. In the Revised field, enter the ID of the reason, or click the LOV button and select the reason.
To add a comment to a step, select the Comments option. Then type the comment in the Comments field, or click the comments button and enter the comment.
Click Calculate Dates. The Calculate Dates window opens.
In the Step field, enter the number of the step on which to base the calculation.
Select either Revised Date or Actual Date, depending on which date for the step should be used in the calculation.
Click OK to save your changes and close the window.
Navigate: From the main menu, select Control > Setup > Timeline > New. The Timeline Steps window opens.
Enter a description of the timeline in the box to the right of the Timeline Number field.
In the Timeline Type field, select the activity for which you want to copy a timeline.
If the Timeline Type is Purchase Order or Order/Item, select a base in the Timeline Base field. This field is optional.
Click Like Timeline. The Copy Like Timeline Step window opens.
Enter the ID of the timeline that you want to copy, or click the LOV button and select the timeline.
Click OK to exit the Copy Like Timeline Step window. The description and steps of the selected timeline are copied to the Timeline Steps window.
Edit the Days to Complete and Display Sequence fields as needed.
Add, delete, or sort the steps as needed.
Click OK to save your changes and close the window.
The Timeline Steps window allows you to create and maintain the timelines that are used to track an activity. The steps used to create timelines are defined in the Timeline Step Components window. The type of timeline you create determines what activities you can attach a timeline to.
The Timeline Step Components Window allows you define a series of steps to be used in a timeline. You can use a timeline to track the completion of an activity. When creating a timeline, you can pick which steps to include and the order of the steps. You can include any number of steps in a timeline.
Navigate: From the main menu, select Control > Setup > Timeline Step Components > Edit. The Timeline Step Components window opens.
The Copy Like Timeline Step window allows you to select a timeline to copy to the timeline being created. After you copy a timeline, you can edit the timeline as needed.
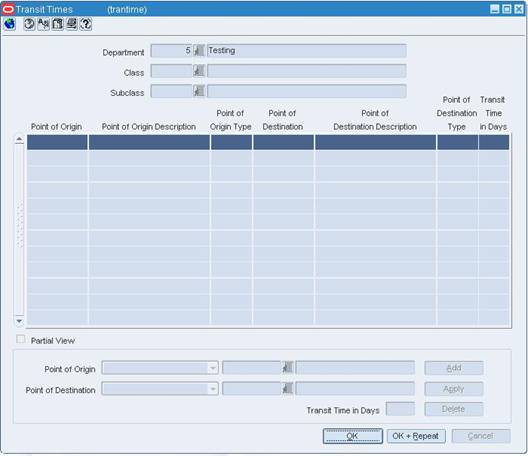
Navigate: From the main menu, select Action > Merchandise Hierarchy. The Merchandise Hierarchy Main Form window opens.
Select the hierarchy level you want to add the transit time to.
Department
Select Department on the tree structure. The departments appear in the table.
Select a department and click Edit. The Department Maintenance window opens.
Class
Select Class on the tree structure. The Department field opens.
In the Department field, enter the ID of a department, or click the LOV button and select the department. The classes appear in the table.
Click Edit. The Class Maintenance window opens.
Select a class.
Subclass
Select Subclass on the tree structure. The Department and Class fields appear.
In the Department field, enter the ID of a department, or click the LOV button and select the department.
In the Class field, enter the ID of a class, or click the LOV button and select the class. The subclasses appear in the table.
Click Edit. The Subclass Maintenance window opens.
Select a subclass.
Select Options > Transit Times. The Transit Times window opens.
The Calculate Dates window allows you to choose which date for a specified step should be used in order to recalculate revised dates for the remaining steps in a timeline.
Within RMS, timelines can be attached to an item, a purchase order, and a line item within a purchase order.
You can associate timelines with a variety of activities in Oracle Retail Trade Management (RTM). One or multiple timelines can be attached to activities in the following modules:
Customs entry records
Transportation records
Items on a purchase order
Containers
Bills of lading or air waybills
Commercial invoices
For more information regarding these topics, see also:
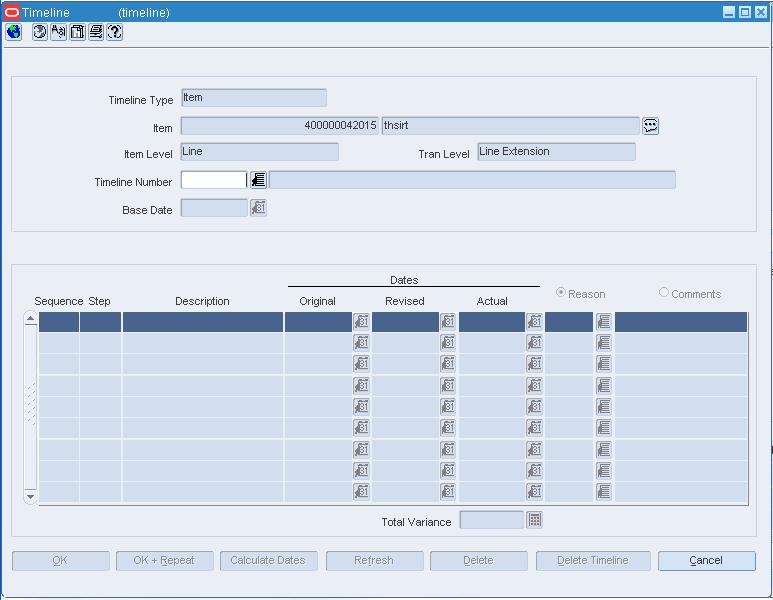
Navigate: From the main menu, select Items > Items. The Item Search window is displayed. Search for and retrieve an item in Edit mode. The Item Maintenance window opens. Select the Timelines option. The Timeline window opens.
In the Timeline Number field, enter the ID of the timeline, or click the LOV button and select the timeline.
Choose one of the following methods to enter the original dates:
In the Base Date field, enter the date on which to begin the timeline, or click the calendar button and select the date. The original dates for each step are filled in automatically.
In any one of the Original Date fields, enter a date; then click Calculate Dates. The Base Date field and remaining Original Date fields are filled in automatically.
To add a comment to a step, select the Comments option. Then type the comment in the Comments field, or click the comments button and enter the comment.
Click OK to save your changes and close the window.
Navigate: From the main menu, select Inventory > Customs Entry. The Customs Entry Search window opens. Search for and retrieve a customs entry in Edit mode. The Customs Entry Header window opens. From the Options menu, select Timelines > New. The Timeline window opens.
In the Timeline Number field, enter the ID of the timeline, or click the LOV button and select the timeline.
Choose one of the following methods to enter the original dates:
In the Base Date field, enter the date on which to begin the timeline, or click the calendar button and select the date. The original dates for each step are filled in automatically.
In any one of the Original Date fields, enter a date; then click Calculate Dates. The Base Date field and remaining Original Date fields are filled in automatically.
To add a comment to a step, select the Comments option. Then type the comment in the Comments field, or click the comments button and enter the comment.
Click OK to save your changes and close the window.
Navigate: From the main menu, select Ordering > Orders. The Order Selection window opens. Search for and retrieve a purchase order in Edit mode. The PO Header Maintenance window opens. From the Options menu, select Timelines > New. The Timeline window opens.
|
Note: You may also access the Timelines window from the PO Item Maintenance window. To access the window, click Items. The PO Item Maintenance window opens. From the Options menu, select Timelines > New. The Timeline window is displayed. |
In the Timeline Number field, enter the timeline ID, or click the LOV button and select a timeline. The timeline information opens in the table.
If necessary, click the calendar button to change the date the date.
If necessary, click Delete to remove a step from the timeline.
To enter a reason for any timeline changes, select the Reason option button and enter the reason code, or click the LOV button and select a reason.
To enter a comment for any timeline changes, select the Comments option button and enter the comments.
Click OK to save your changes and close the window.
Navigate: From the main menu, select Inventory > Transportation > Maintenance. The Transportation Selection window opens. Search for and retrieve a transportation record in Edit mode. The Transportation window opens.
or
From the main menu, select Inventory > Transportation > PO-Level Maintenance > Edit. The PO-Level Transportation window opens.
To associate a timeline with transportation records at the following levels:
Bill of lading: From the Options menu, select Timelines > BL/AWB > New. The Timeline window opens.
Commercial invoice: From the Options menu, select Timelines > Commercial Invoice > New. The Timeline window opens.
Container: From the Options menu, select Timelines > container > New. The Timeline window opens.
PO/Item: From the Options menu, select Timelines > PO/Item > New. The Timeline window opens.
Transportation record: From the Options menu, select Timelines > Transportation Record > New. The Timeline window opens.
PO-specific bill of lading: From the Options menu, select Timelines > PO/BL AWB > New. The Timeline window opens.
|
Note: This level of timeline is only available from the PO-Level Transportation window. |
In the Timeline Number field, enter the ID of the timeline, or click the LOV button and select the timeline.
Choose one of the following methods to enter the original dates.
In the Base Date field, enter the date on which to begin the timeline, or click the calendar button and select the date. The original dates for each step are filled in automatically.
In any one of the Original Date fields, enter a date; then click Calculate Dates. The Base Date field and remaining Original Date fields are filled in automatically.
To add a comment to a step, select the Comments option. Enter the comment in the Comments field, or click the comments button and enter the comment.
Click OK to save your changes and close the window.
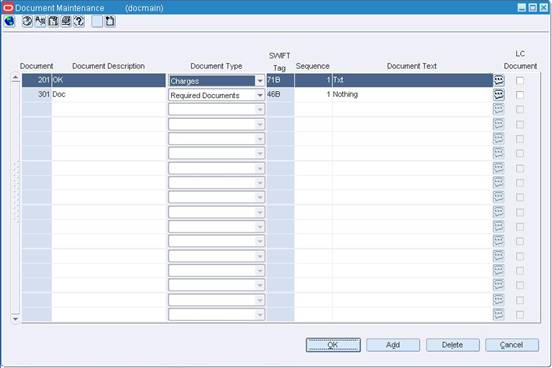
The Document Maintenance feature allows you to create, edit, and view documents required for letter of credit processing. Documents can also be designated as not required for the Letter of Credit and can be used for other purposes within the organization.
The Document Maintenance window allows you to create, edit, and view documents. These documents can be associated with suppliers, partners, countries, HTS chapters, letters of credit, items, and purchase orders.
Navigate: From the main menu, select Control > Document Maintenance > View. The Document Maintenance window opens.
Click OK to close the window.
Navigate: From the main menu, select Control > Document Maintenance > Edit. The Document Maintenance window opens.
Click Add. The Document field is filled in automatically with a unique ID number for the document.
In the Document Description field, enter a description for the document.
In the Document Type field, select the document type. The Swift Tag field is filled in automatically.
In the Sequence field, enter the sequence number, if required.
In the Document Text field, enter document text.
If this document has a letter of credit, select the LC Document check box.
Click OK to save your changes and close the window.
Navigate: From the main menu, select Control > Document Maintenance > Edit. The Document Maintenance window opens.
You may edit the following fields:
Document Description
Document Type
Sequence
Document Text
LC Document
Click OK to save your changes and close the window.
Navigate: From the main menu, select Control > Document Maintenance > Edit. The Document Maintenance window opens.
Select the document you want to delete.
Click Delete.
When prompted to delete the document record, click Yes.
Click OK to save your changes and close the window.
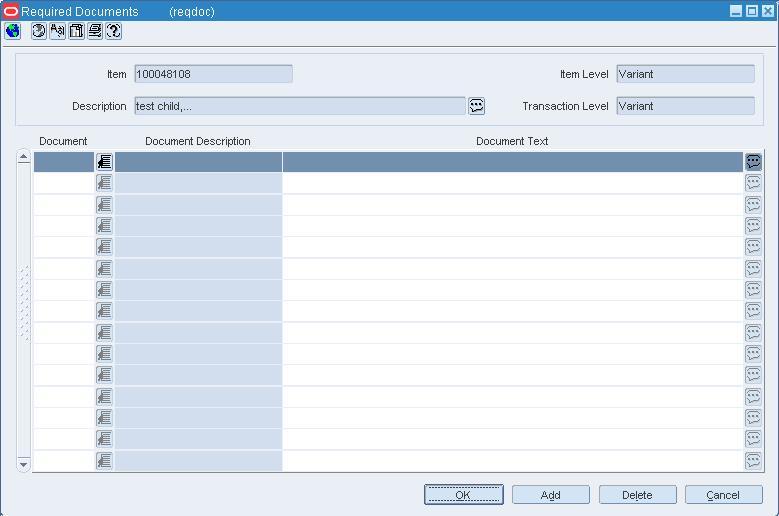
The Required Documents window allows you to add or delete required documents associated with the following entities:
Suppliers
Partners
Countries
HTS headings
Letters of credit
Items
Purchase orders
For more information about these topics, see also:
See "Delete a Required Document from an Item" in the Item Maintenance chapter
See "Delete a Required Document from a Letter of Credit" in the Letter of Credit chapter
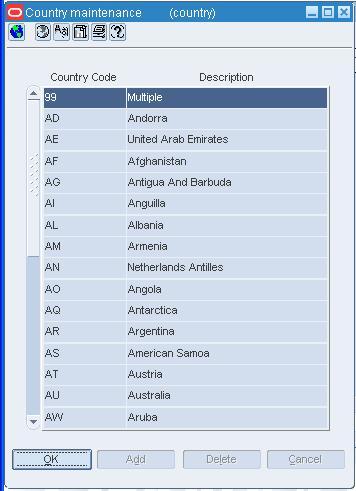
Navigate: From the main menu, select Control > Setup > Country > Edit. The Country Maintenance window opens.
Select the country.
From the Options menu, select Documents. The Required Documents window opens.
Select the document you want to delete.
Click Delete.
When prompted to delete the document record, click Yes.
Click OK to save your changes and close the window.
Navigate: From the main menu, select Control > Partner. The Partner Find window opens.
Search for and retrieve a partner in the Edit mode. The Partner Maintenance window opens.
From the Options menu, select Documents. The Required Documents window opens.
Select the document you want to delete.
Click Delete.
When prompted to delete the record, click Yes.
Click OK to save your changes and close the window.
Navigate: From the main menu, select Control > Supplier. The Supplier Search window opens.
Search for and select a supplier site. The Supplier Maintenance window opens.
or
If the Financials module is installed, from the main menu, select Control > Supplier > Maintenance. The Supplier Search window opens.
Search for and retrieve a supplier site. The Supplier Maintenance window opens.
From the Options menu, select Documents. The Required Documents window opens.
Select the document you want to delete.
Click Delete.
When prompted to delete the document record, click Yes.
Click OK to save your changes and close the window.
Navigate: From the main menu, select Control > Landed Cost > HTS Maintenance > HTS Heading Maintenance > Edit. The HTS Heading Maintenance window opens.
Select an HTS heading.
From the Options menu, select HTS Heading Documents. The Required Documents window opens.
Select a document and click Delete.
When prompted to delete the document, click Yes.
Click OK to save your changes and close the window.
Any documents associated with the following elements default to a purchase order when the purchase order is created. When you associate a purchase order with a letter of credit, the required documents are then applied to the letter of credit. Required documents applied to the letter of credit are transmitted to the bank through an electronic exchange. You can add or delete required documents associated with:
Suppliers
Partners
Countries
Items
Purchase orders
Using Oracle Retail Trade Management (RTM), you can add required documents to the letters of credit or HTS chapters. The remaining entities are accessible in the Oracle Retail Merchandising System program.
See "Delete a Required Document from an Item" in the Item Maintenance chapter
See "Delete a Required Document from a Letter of Credit" in the Letter of Credit chapter
Navigate: From the main menu, select Control > Landed Cost > HTS Maintenance > HTS Heading Maintenance > Edit. The current HTS headings appear in the HTS Heading Maintenance window.
Select an HTS heading.
From the Options menu, select HTS Heading Documents. The Required Documents window opens.
Click Add.
In the Document field, enter the document number, or click the LOV button to select the document.
Click OK to save your changes and close the window.
Navigate: From the main menu, select Items > Items. The Item Search window is displayed. Search for and retrieve a item in the Edit Item mode. The Item Maintenance window opens. Select the Required Documents option. The Required Documents window opens.
Click Add.
In the Document field, enter a document number, or click the LOV button to select a document.
Click OK to save your changes and close the window.
Navigate: From the main menu, select Control > Setup > Country > Edit. The Country Maintenance window opens.
Select the country.
From the Options menu, select Documents. The Required Documents window opens.
Click Add.
In the Document field, enter a document number, or click the LOV button to select a document.
Click OK to save your changes and close the window.
Navigate: From the main menu, select Finance > Payments > Letter of Credit. The Letter of Credit Find window opens. Search for and retrieve a letter of credit in the Edit mode. Restrict the search to letters of credit in either Worksheet status or Confirmed status. The Letter of Credit Application Header window opens. If the status is Confirmed, select Amendments from the Options menu. The Letter of Credit Amendments window opens. From the Options menu, select Required Documents. The Required Documents window opens.
Click Add.
In the Document field, enter a document number, or click the LOV button to select a document.
Click OK to save your changes and close the window.
Navigate: From the main menu, select Control > Partner. The Partner Find window opens. Search for and retrieve a partner in the Edit mode. You can add required documents only to importers, brokers, factories, consolidators, applicants, and consignees. The Partner Maintenance window opens. From the Options menu, select Documents. The Required Documents window opens.
Click Add.
In the Document field, enter the Document ID, or click the LOV button to select the document.
Click OK to save your changes and close the window.
Navigate: From the main menu, select Control > Supplier. The Supplier Search window opens. Search for and retrieve a supplier site. The Supplier Maintenance window opens.
or
If the Financials module is installed, from the main menu, select Control > Supplier > Maintenance. The Supplier Search window opens. Search for and retrieve a supplier site. The Supplier Maintenance window opens. From the Options menu, select Documents. The Required Documents window opens.
Click Add.
In the Document field, enter the Document ID, or click the LOV button to select the document.
Click OK to save your changes and close the window.
Items generally have tickets or labels affixed to them in the store. While shoppers may note the price and size, sales clerks may glean quite a bit of additional information from the tickets and labels. An item may have multiple tickets and labels.
You can choose what information is printed on tickets and labels and under what circumstances they should be automatically printed. When necessary, you can choose to print tickets on demand. Ticket requests are transmitted to an external ticketing system for printing.
Before you can use tickets and labels, you must add the types of tickets to the system. After entering a unique ID and description for a ticket type, you choose which attributes of an item are to be printed on the ticket type. You also indicate whether the ticket type is a shelf edge label. If the ticket type is a shelf edge label, only one label per request is printed.
After the ticket types are defined, you can associate one or more ticket types with an item. You can associate ticket types with multiple items by using an item list.
At this point, you indicate the circumstances under which tickets are automatically printed. The circumstances are:
When a purchase order is approved
When an order is received
When a permanent price change takes effect.
If you use an item list, the ticket types that you add to the item list supersede existing ticket types associated with the items on the item list. A message appears requesting if the same ticket types to any subordinate level items.
Should the need arise, you can request tickets on demand. The request may be for a single item, items on an item list, or items on a purchase order. Requests may be edited until the tickets are printed.
See "Edit Ticket Types" in the Item Maintenance chapter
See "View Requests for Tickets and Labels" in the Item Maintenance chapter
See "View Ticket Types" in the Item Maintenance chapter
See "View Ticket Types for an Item" in the Item Maintenance chapter
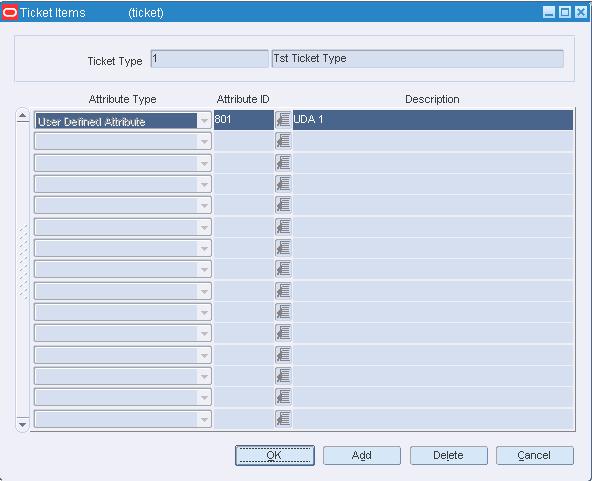
The Ticket Items window allows you to enter what type of information must be printed on the ticket. You can choose from two types of information:
Attributes: System-defined characteristics of an item. For example, you can specify that the department, class, subclass, and retail price be printed on tickets.
User Defined Attributes: User-defined characteristics of an item. For example, you can indicate that a user-defined date, free-form text, or value be printed on tickets.
Navigate: From the main menu, select Items > Request Tickets. The Request Manual Ticketing window opens.
Select a record and edit the quantity or sourcing country as necessary.
|
Note: You can edit the quantity in the table or in the Apply area. You can edit the sourcing country in the Apply area only. |
Click New. The Apply area is enabled.
Enter the details in the Apply area.
Click Apply. The ticket requests are added to the table.
Click OK to save your changes and close the window.
Select a request and click Delete.
When prompted to delete the record, click Yes.
Click OK to save your changes and close the window.
Navigate: From the main menu, select Items > Ticket Type > Edit. The Ticket Types window opens.
Click Add. The next available line is enabled.
In the Ticket Type field enter a unique ID for the ticket type.
In the Ticket Description field, enter the description of the ticket type.
In the merchandise hierarchy fields, enter the ID of the member of each hierarchy level, or click the LOV button and select a member.
If the ticket is used as shelf edge label, select the Shelf Edge Label check box.
Select the ticket type and click Detail. The Ticket Items window opens.
Click Add. The next available line is enabled.
In the Attribute field, select the type of attribute.
In the Attribute ID field, enter the ID of the attribute, or click the LOV button and select the attribute.
Click OK to save your changes and close the window.
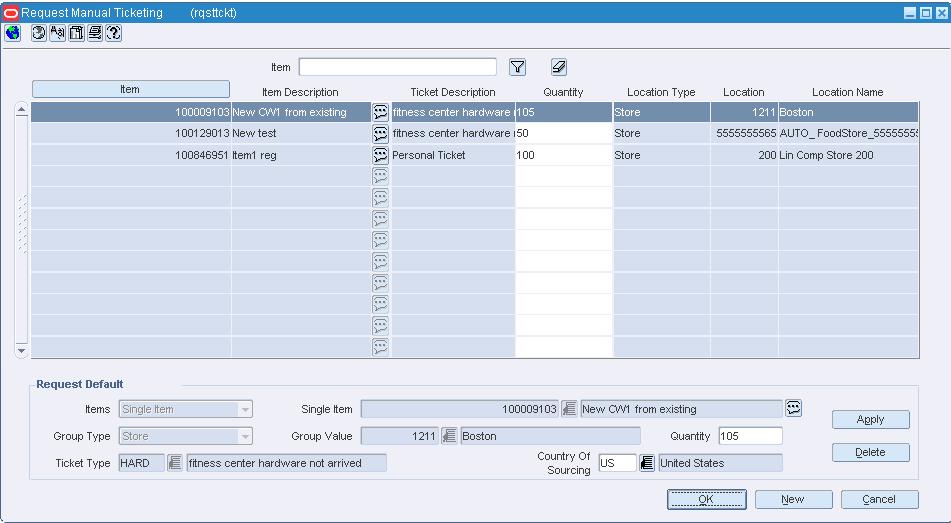
The Request Manual Ticketing window allows you to enter requests to print tickets and labels on demand. You can request tickets for a transaction-level item in Approved status, items on an item list, or items on a purchase order.
You can edit the quantity and sourcing country on a request until the tickets are actually printed. Requests are processed by a regularly scheduled batch program.
Edit requests for tickets or labels
See "View Requests for Tickets and Labels" in the Item Maintenance chapter
Navigate: From the main menu, select Items > Request Tickets. The Request Manual Ticketing window opens.
Click New. The Apply area is enabled.
In the Items field, select the grouping mechanism for the items to be ticketed.
In the next field, enter the ID of the specific item, item list, or purchase order, or click the LOV button and select the group.
In the Location Type field, select the type of location. This field is not required for purchase orders.
In the Location field, enter the ID of the specific location, or click the LOV button and select the location. This field is not required for purchase orders.
In the Quantity field, enter the number of tickets to be printed. This field is not required for purchase orders.
In the Ticket Type field, enter the ID of the ticket type, or click the LOV button and select the ticket type.
In the Country of Sourcing field, enter the code for the sourcing country, or click the LOV button and select the sourcing country. The sourcing country is optional.
Click Apply. The ticket requests are added to the table.
Click OK to save your changes and close the window.
The Ticket Types window allows you to maintain a list of ticket types. You can indicate whether the ticket type is a shelf edge label.
From this window, you can access the Ticket Items window. In the Ticket Items window, you define what information is to be printed on the tickets or labels.
When you create a ticket, you can assign the it to levels of the merchandise or organization hierarchy. You can only assign the levels of merchandise and organization hierarchy that your user group is associated to. All levels below the hierarchy level assigned are also enabled for the user groups. Users whose security settings allow them access to the same hierarchy levels can use this ticket throughout RMS. If you do not assign a merchandise or organization level all users are able to use this ticket throughout the system.
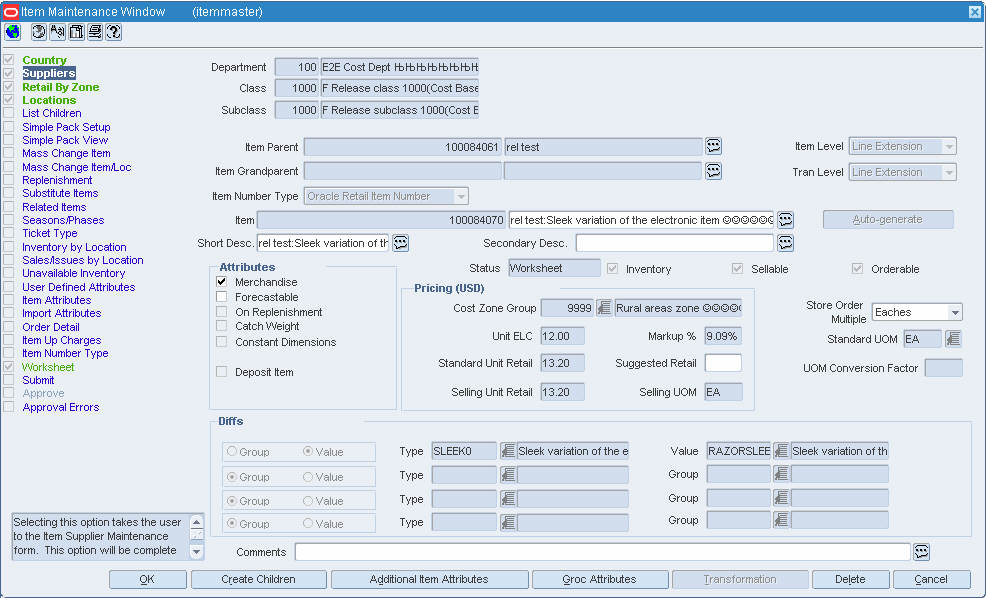
Navigate: From the main menu, select Items > Items. The Item Search window is displayed. Search for and retrieve an item in Edit mode. The Item Maintenance window opens.
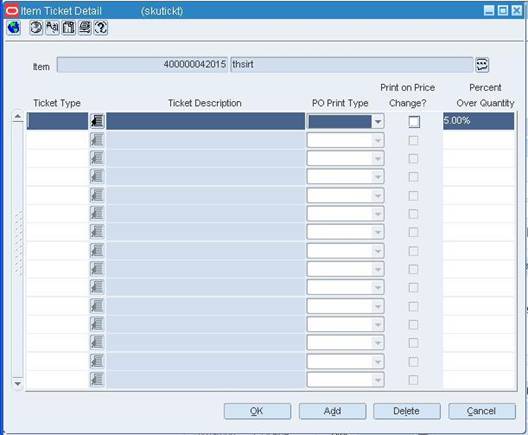
Click on the Ticket Type option on the Options list. The ticket types appear on the Item Ticket Detail window.
|
Note: To edit a ticket type for a subordinate item, click on the List Children option on the Options list. The Item Children window opens. Next, select an item; then click on the Ticket Type option on the Options list. |
Edit the PO Print Type, Print on Price Change, and Percent Over Quantity fields as necessary.
Click Add. The next available line is enabled.
In the Ticket Type field, enter the code for the ticket type, or click the LOV button and select the ticket type.
In the PO Print Type field, select when the tickets should be printed.
To indicate that the ticket type should be printed when a permanent price change becomes effective, select the Print on Price Change checkbox.
In the Percent Over Quantity field, enter or edit the percentage of extra tickets to be printed as necessary.
Navigate: From the main menu, select Items > Item List. The Item List Search window opens. Search for and retrieve an item list in Use mode. The Item List Header window opens. From the Options menu, select Create Mass Item Change > Ticket Type. The Item Ticket Detail window opens.
In the Ticket Type field, enter the ID of the ticket type, or click the LOV button and select the ticket type.
In the PO Print Type field, select when the tickets are printed.
If you want tickets printed automatically when a permanent price change becomes effective, select the Print on Price Change check box.
In the Percent Over Quantity field, enter or edit the percentage of extra tickets to be printed.
To add another ticket type, click Add.
Enter the details on the next available line.
Click OK to save your changes and close the window.
When warned about overwriting existing ticket types, click OK.
When prompted to overwrite the ticket types for children (subordinate level items) of the items on the item list, click either Yes or No as necessary.