| Oracle® Retail Merchandising System User Guide 14.1 E55773-01 |
|

 Previous |
 Next |
In order to optimally configure the application, the user is provided with a set of screens which allow viewing, editing, and maintenance of system parameters which help customize various defaults and constants that are used throughout the system. The parameters range from setting the application UI features such as the Main Menu View or a Custom View, setting up important business features that are used by retailers such as Value Added Tax (VAT), Dynamic Hierarchies, Banners, Channels, and so on as well as setting up hardware features such as viewing or editing system printers. The majority of these parameters should be defined during the system implementation and changes to any of the parameters thereafter requires careful planning.
This chapter details out the entire set of features that can be customized in order to maximize the system efficiency for a retailer.
The following topics are covered in this chapter:
The following areas can be maintained in order to optimize system performance.
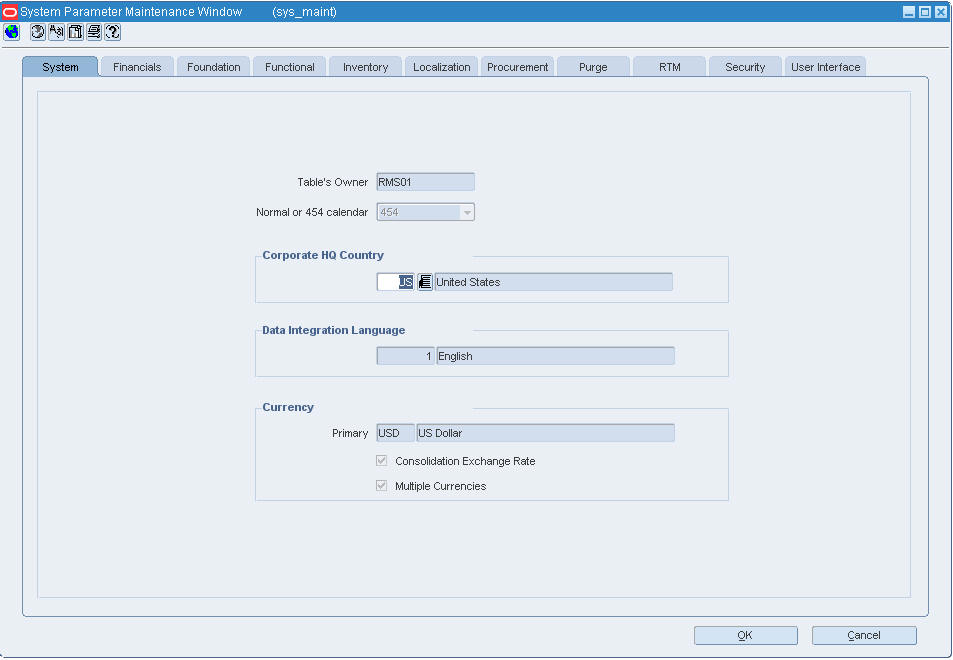
The System Parameter Maintenance window allows you to customize various parameters, defaults, and constants that are used throughout the system. Normally, these elements are set when RMS is installed by the system or database administrator. They tend to remain fixed unless a business practice is changed which necessitates a change in RMS.
Users gain the most value from software when the system is optimized to meet their needs. The system variables module provides a means of maintaining the relatively static information about a retailer's business.
Many of the system variables must be set during installation and cannot be changed without major implications. Most system variables are specific to functional areas such as ordering, pricing, transfers, stock ledger and history. While some indicators dictate the level at which these functions perform, others indicate the length of time that the data is maintained for these areas.
In addition to the functional variables, other variables span all functional areas and determine how the system must perform as a whole. Some of these variables include the multiple currency indicator, primary language, and system dates.
Navigate: From the main menu, select Control > System > System Variables. The System Parameter Maintenance window opens.
The System Parameter Maintenance window enables you to edit and enter values in the respective tabs associated with this window.
The following tabs are associated with this window:
System
Financials
Foundation
Functional
Inventory
Localization
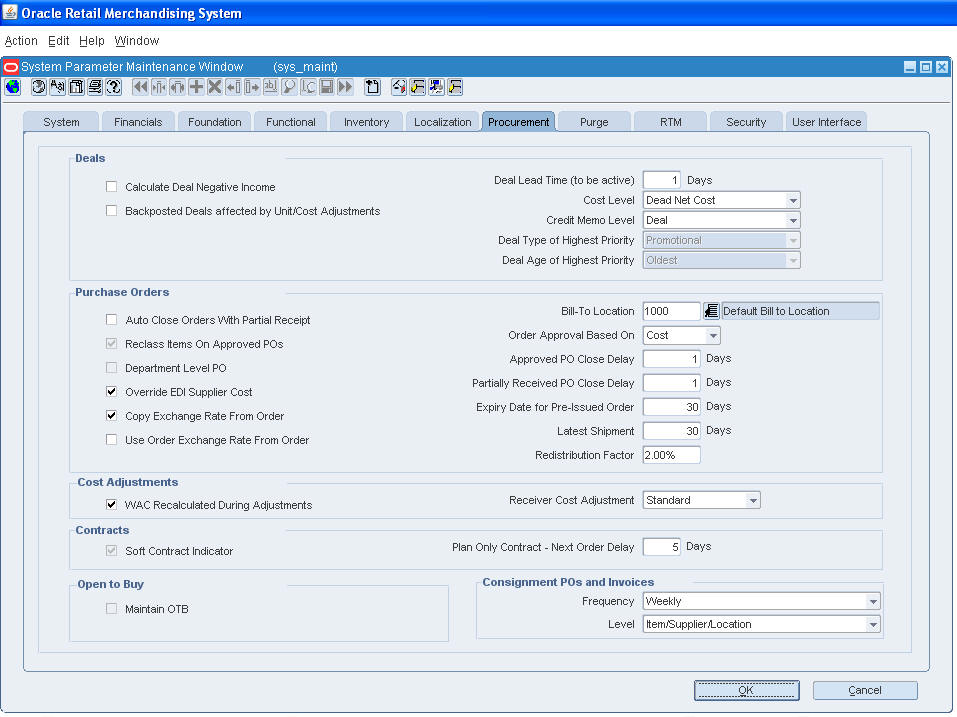
Procurement
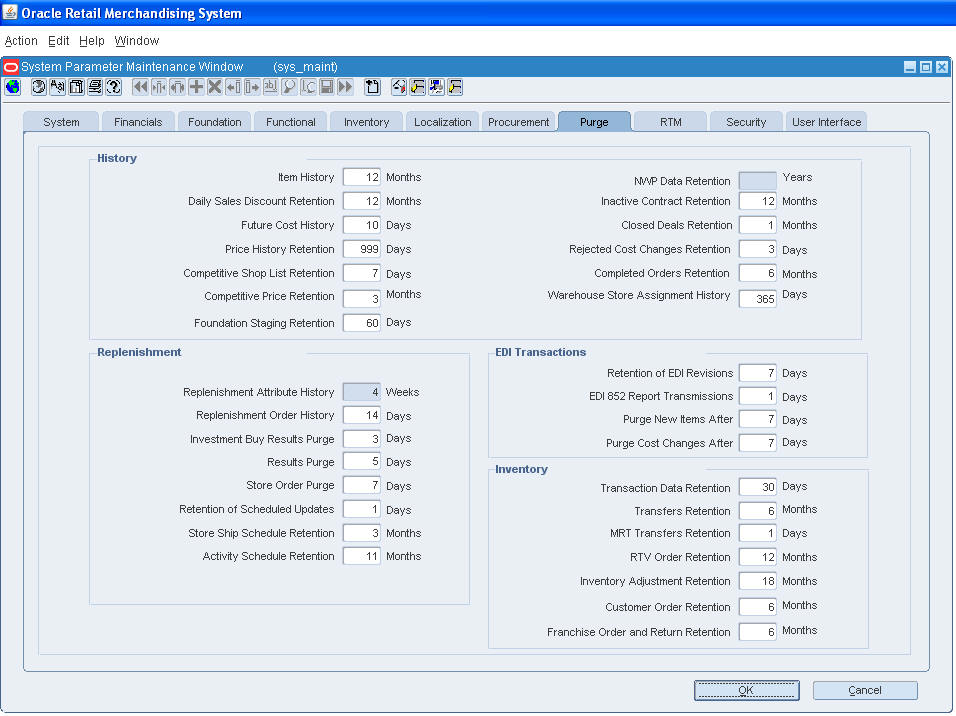
Purge
RTM
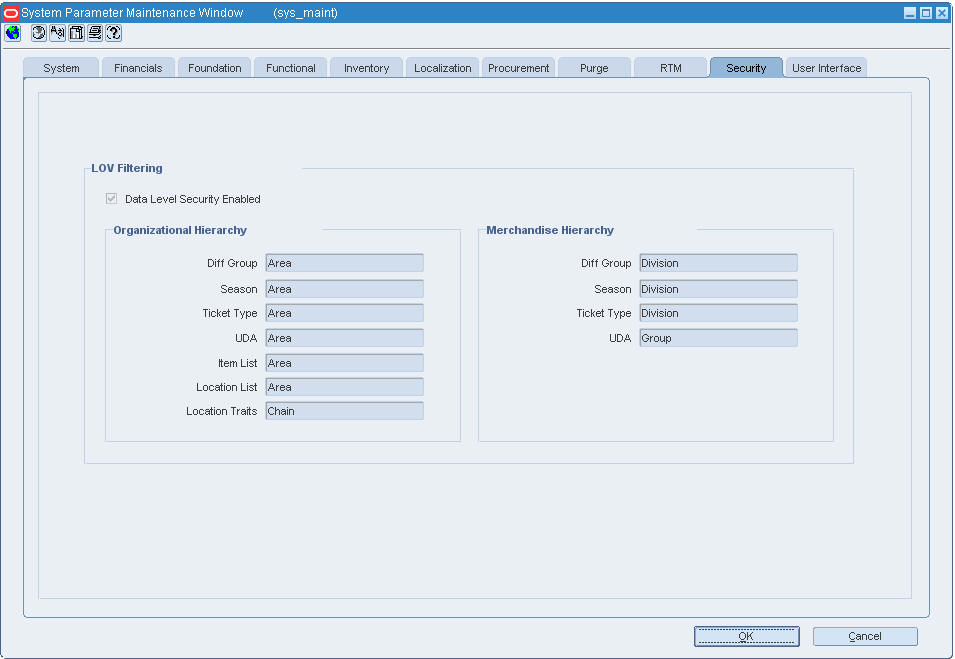
Security
User Interface
Click OK to save your changes and close the window.
The System tab contains the general information in RMS such as the language, currency, calendar, and the base country of the business.
The Financials tab contains the options for stock ledger, sales, and other financial information.
The Functional tab contains the options to determine if functions such as importing, contracts, and franchise are supported in the system and Unit of Measure (UOM) info used across the system. The System supports Franchise by default.
The Product Configuration Maintenance form is used to determine business applications that are integrated to RMS, that is Advanced Inventory Planning (AIP), Store Inventory Management (SIM), Retail Price Management (RPM), and so on.
Navigate: From the main menu, select Help > Other Products. The Product Configuration Maintenance window opens.
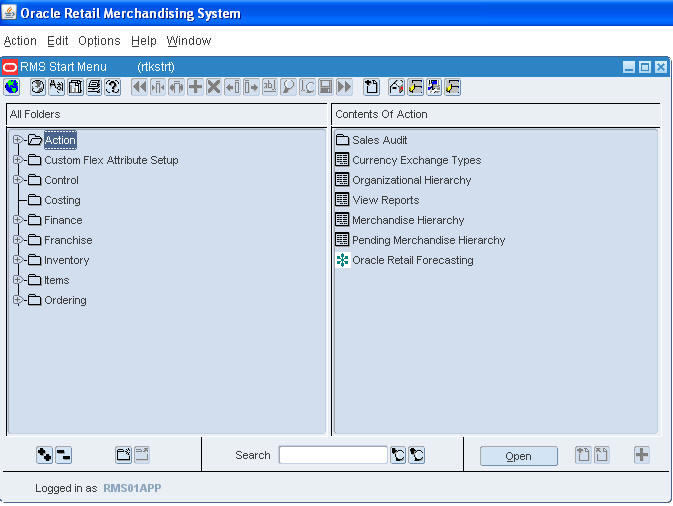
The main menu is very flexible. You can add and delete folders and elements on the tree structure. Some examples of elements are forms, internal items, Oracle reports, user applications, and web pages. You can secure any type of element so that only selected user roles have access to the element. Users inherit the permissions that are associated with their user role.
Users also can customize the main menu for their own use. As a user, you can add folders and elements in order to personalize your workspace.
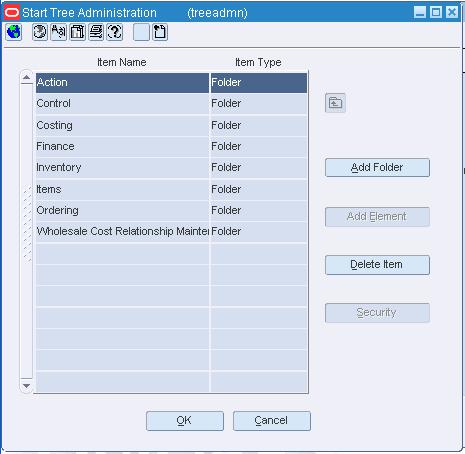
The Oracle Retail Start Tree Administration window allows you to edit and view the structure and security settings on the main menu. The settings become the system defaults for all users.
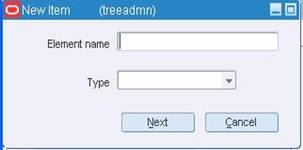
The New Item window allows you to add a folder or an element to the main menu. You can choose from the following elements: forms, internal items, Oracle reports, user applications, and web pages. When you add an element to the menu, this window becomes a wizard. On the first window of the wizard, you select the type of element. Subsequent windows prompt you for the information that is specific to the type of element.
Users are not able to access any new elements until you set up security for the elements. All settings take effect after you exit the system.
Navigate: From the main menu, select Control > System > Tree Administration. The Oracle Retail Start Tree Administration window opens. Navigate to the folder to the folder that you want to edit. Click Add Folder. The New Item window opens.
In the Folder Name field, enter the name as you want it to appear on the main menu.
Click OK to save your changes and close the window.
Navigate: From the main menu, select Control > System > Tree Administration. The Oracle Retail Start Tree Administration window opens. Navigate to the folder to the folder that you want to edit. Click Add Element. The New Item window opens.
In the Element Name field, enter the name as you want it to appear on the main menu.
In the Type field, select the type of element.
Click Next. The next window opens. The fields that you must enter next depend on the type of element that you selected in the Type field.
If you selected Form:
In the Element field, enter the name of the form, or click the LOV button and select the form.
|
Note: To add a new form to the system, click New Element and respond to the prompts. |
Click Next.
In the Mode field, enter the mode that you want to display on the main menu.
Click OK to save your changes and close the window.
If you selected Internal Item:
In the Special Code field, enter the code that calls the internal item.
Click OK to save your changes and close the window.
If you selected Oracle Report:
In the Oracle Report Filename field, enter the filename of the report.
Click OK to save your changes and close the window.
If you selected User Application:
In the Path to User's Application field, enter the path and filename of the application.
Click OK to save your changes and close the window.
If you selected Web Page:
In the URL field, enter the Internet address of the web page.
In the Component field, select the component that you want to associate the URL with.
|
Note: To add a new component to the system, click New Component and respond to the prompts. |
Click OK to save your changes and close the window.
Navigate: From the main menu, select Control > System > Tree Administration. The Oracle Retail Start Tree Administration window opens. Navigate to the folder that you want to edit.
Click Add Folder. The New Item window opens.
In the Folder Name field, enter the name of the folder.
Click OK to save your changes and close the window.
Double-click the folder in which the element belongs.
Click Add Element. The New Item window opens.
In the Element Name field, enter the name of the element.
In the Type field, select the type of element.
Click Next. Enter the details on the next window or windows.
|
Note: The windows and fields that appear next depend on the type of element that you select. |
Click OK to save your changes and close the window.
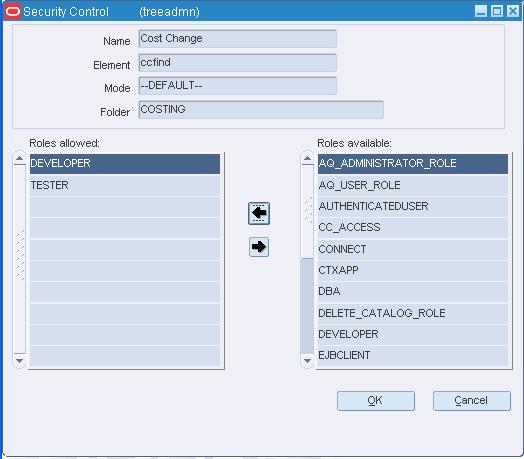
Select an element and click Security. The Security Control window opens.
To allow access to the current element, select one or more user roles on the Roles Available table. Then click the move left button.
To deny access to the current element, select one or more user roles on the Roles Allowed table. Then click the move right button.
Click OK to save your changes and close the window.
Navigate: From the main menu, select Control > System > Tree Administration. The Oracle Retail Start Tree Administration window opens.
To open a folder, double-click the folder. The elements within the folder appear.
To select an element, click the element.
To close a folder, click the move up one level button.
Click OK to save your changes and close the window.
The Add User Element window allows you to customize the main menu for yourself by adding an element.
Navigate: On the Oracle Retail Enterprise Start window, navigate to the folder that you want to edit. Click the add user element button. The Add User Element window opens.
If the element is a web page, enter the URL in the URL field.
In the New Item Name field, enter the name of the element as you want it to appear on the main menu.
Click OK to save your changes and close the window.
The Add User Folder allows you to customize the main menu for yourself by adding a folder.
Navigate: On the Oracle Retail Enterprise Start window, navigate to the folder that you want to edit.
Click the add user folder button. The Add User Folder window opens.
In the Folder Name field, enter the name of the folder as you want it to appear on the main menu.
Click OK to save your changes and close the window.
On the Oracle Retail Enterprise Start window, enter a partial description of the folder or element in the Search field.
Click the search forward button or the search backward button.
When prompted that the folder or element has been found, click OK.
If the folder or element is not the one you want, click the search forward button or the search backward button to continue the search.
When the desired folder or element is found, you can:
Select the folder to display its contents.
Select the element and click Open.
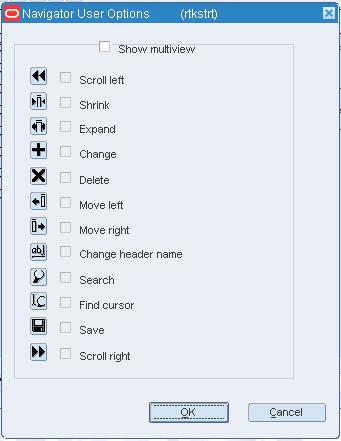
The Navigator User Options window allows you to display a Navigator toolbar on each window. You can select which buttons appear on the toolbar. The buttons provide functionality that is useful when viewing a table (also referred to as a multi-view) on a window.
Navigate: Close all windows except the Oracle Retail Enterprise Start window. From the Options menu, select Start Options. The Navigator User Options window opens.
To display and add buttons to the toolbar:
Select the Show Multiview check box. The check boxes are enabled.
Select the check box next to each toolbar button that you want to include on the toolbar.
To delete a button from the toolbar, clear the check box next to the button.
To delete the toolbar, clear the Show Multiview check box.
Click OK to save your changes and close the window.
Navigate: From the main menu, select Control > System > Tree Administration. The Oracle Retail Start Tree Administration window opens. Navigate to the element that you want to secure.
Click Security. The Security Control window opens.
To allow access to the current element:
Select one or more user roles in the Roles Available table.
Click the move left button.
To deny access to the current element:
Select one or more user roles in the Roles Allowed table.
Click the move right button.
Click OK to save your changes and close the window.
Navigate: From the View menu, select Custom. The Customize window opens.
Click Add to view the list of available fields.
Select or clear the fields for the view.
Click OK.
Change the column order as necessary:
To move a column left, click the column. Click the Move Left button.
To move a column right, click the column. Click the Move Right button.
Change the column width as necessary:
To make a column wider, click the column. Click the Expand button.
To make a column narrower, click the column. Click the Shrink button.
Click Save. The Saved view is set as the view for the next time you open the window.
|
Note: You can return to the default view by selecting View > Default. |
The Security Control window allows you to select which user roles have access to an element on the system main menu. Users inherit the permissions that are associated with their user roles.
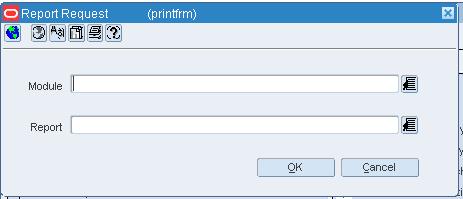
The Oracle Retail Printing window allows you to select and generate a report. You can choose to preview the results on the window (cache) or send the report to a printer (printer).
|
Note: The ability to e-mail a report to a destination (mail) or save the report to a file (file) are not currently supported. |
You can look up reports in alphabetical order or by module.
Navigate: From the main menu, select Action > View Reports. The Report Request window opens.
In the Module field, click the LOV button and select the module from which you want to generate a report.
In the Report field, click the LOV button and select the report.
|
Note: If you selected a module, only reports associated with the module are listed in the List of Reports. Otherwise, all reports are listed when you click the Report LOV button. |
Click Print. The Report Parameters web page opens.
In the Destination Type field, select where you want the finished report to be sent. Select Cache to view the report online.
If you are prompted for parameters to further define the report, enter the data in the appropriate fields.
Click Submit Query. The report is generated and sent to the destination that you selected.
Refer to the Oracle Retail Merchandising System Reports User Guide for report descriptions.
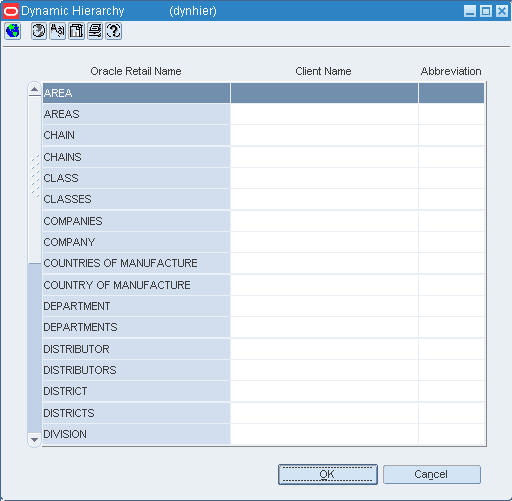
Default names are used for the elements in the merchandise, organizational, supplier, and item hierarchies. You replace the default names with customized names. For example, you may choose to replace the term Department with Category. The user-supplied term is substituted for the Oracle Retail term throughout the system.
The default names for the merchandise, organizational, and supplier hierarchies are maintained in the Dynamic Hierarchy window. The default names for the item hierarchy are maintained in the System Parameter Maintenance window.
For information to "View Dynamic Hierarchies" see Chapter 3, "Foundation Data".
Navigate: From the main menu, select Control > System > Dynamic Hierarchies > Edit. The Dynamic Hierarchy window opens.
In the Client Name, enter or edit the customized name for an element named in the Oracle Retail Name field.
|
Note: The client names in the dynamic hierarchy code will not change the link names. The link names are controlled through a table in Oracle Retail Merchandising System which can be changed as desired. |
In the Abbreviation, enter or edit the abbreviation for a customized name in the Client Name field.
|
Note: It is recommended that you do not exceed 15 characters as anything over 15 characters may not be displayed on most forms. |
Click OK to save your changes and close the window.
The batch module allows you to monitor the batch programs used by the system. You can view the history of a batch program in order to verify when it was run or how long it ran. You can maintain the number of threads used by a batch program or the number of saves performed during the run.
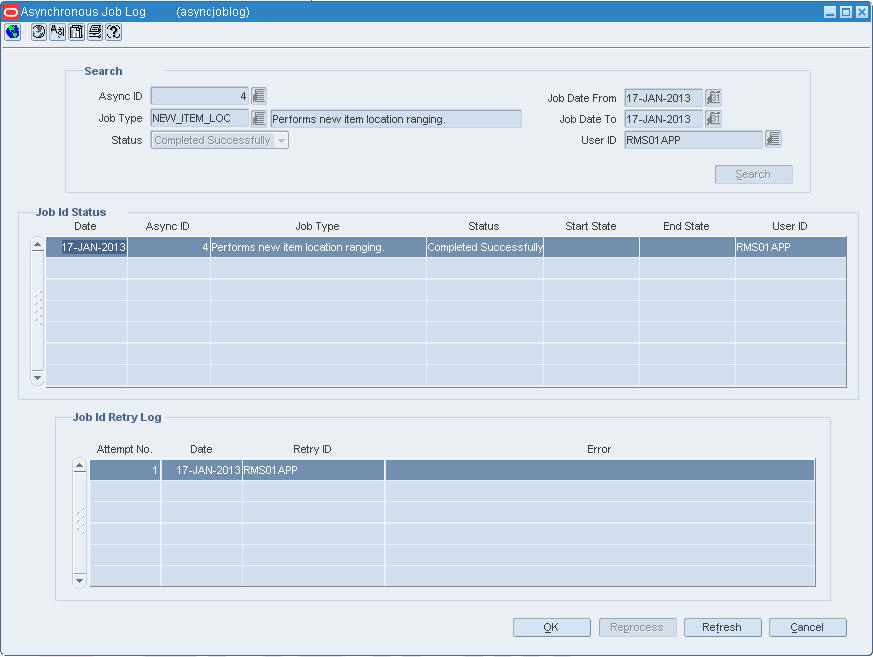
The asynchronous job log is used for viewing and reprocessing asynchronous jobs in RMS.
Navigate: From the RMS Start menu, select Control > System > Asynchronous Job Log. The Asynchronous Job Log window appears.
In the Async ID field, enter the async ID or click the LOV button and select the async job ID.
In the Job Type field, enter the job type or click the LOV button and select the job type.
Select the status of the asynchronous job log from the following Status options field:
New
Completed with Error
Completed Successfully
Retry Job
In Progress
Enter the from and to date range in the Job Date From and Job Date To fields.
In the User ID field, enter the user ID or click the LOV button and select the user ID.
Click Search to view a specific asynchronous job that match the criteria.
The matching records are displayed in the Job Id Status and Job Id Retry Log multi-record blocks.
To perform another search, click Refresh.
|
Note: The Reprocess button is enabled only for Completed with Error status. |
Click OK to save changes to return to the RMS Start Menu or click Cancel to return to the RMS Start Menu.
Two types of calendars are supported by the system:
Normal (Julian) calendar: Results in uneven yearly, quarterly, and monthly comparisons since calendar dates generally fall on different days from one year to the next. The number of weekdays differs from one year to the next. For example: There may be four Saturdays in a month one year, but five Saturdays the next year. A month may have between 28 and 31 days. Once every four years, an extra day is added to compensate for leap year.
Retail (4-5-4) calendar: Each quarter contains 13 full weeks divided into a 4-5-4 format. That is, the first month of the quarter has four weeks, the second month has five weeks, and the third month has four weeks. The number of days in the retail year, except leap year, equals only 364 days. To compensate for the missing day in non-leap years, an extra week is added to the calendar once every seven years. The retail calendar provides consistent inclusion of weekends for yearly comparisons by month and a consistent day for month-end processing.
Sales history is always based on the retail calendar. The calendar begins at least 18 months prior to the earliest stock ledger and sales history data. The calendar also contains dates at least three years into the future.
The calendar is set up by the system administrator. You can identify the half-year periods used in the system. Half-year periods are entered in the format YYYYn, where YYYY is the four-digit year and n is the period. The period may be 1 or 2. For example: The first half of 2002 is entered as 20021.
Code types provide the values that appear in drop-down lists throughout the system.The values entered on the code windows become useful when 1) windows in the system are coded to display fields containing the values and 2) the values are coded to cause some action to occur when a user selects the value.
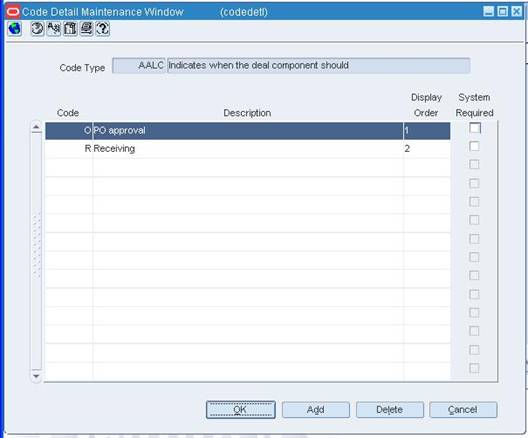
The Code Detail Maintenance window allows you to maintain a list of values for a code type. The values appear in drop-down lists that exist throughout the system.
|
Note: If a code type is required by the system and used to perform certain functions, changing the code values could produce undesired consequences. |
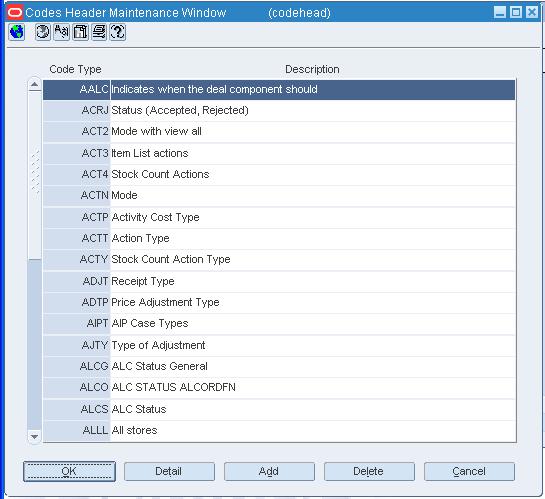
The Codes Header Maintenance window allows you to maintain a list of code types and their values. You can access the Code Detail Maintenance window in order to edit the values for a code type.
|
Note: If a code type is required by the system and used to perform certain functions, changing the code type could produce undesired consequences. |
Navigate: From the main menu, select Control > System > Codes Maintenance > View. The code types appear in the Codes Header Maintenance window.
To view the values associated with a code type:
Select a code type and click Detail. The values appear in the Code Detail Maintenance window.
Click OK to exit the Code Detail Maintenance window.
Click OK to close the window.
Navigate: From the main menu, select Control > System > Codes Maintenance > Edit. The code types appear in the Codes Header Maintenance window.
Edit the descriptions as necessary.
Click Add. The next available line is enabled.
In the Code Type field, enter a code for the code type.
In the Description field, enter a description of the code type.
Click OK to save your changes and close the window.
Select the code type and click Detail. The Code Detail Maintenance window opens.
Click Add. The next available line is enabled.
In the Code field, enter an code for the value.
In the Description field, enter the value as you want it to appear to users.
In the Display Order field, enter the sequence number to indicate the order in which the value should appear in drop-down lists.
Select the System Required check box as necessary.
Click OK to save your changes and close the window.
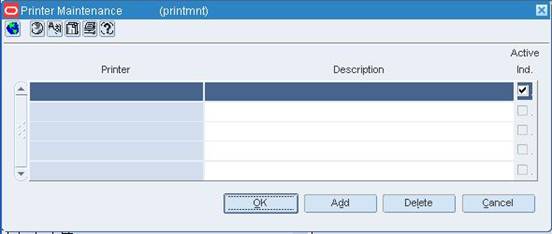
One or more printers may be set up for or by end users. Whichever printer is marked as Active becomes the default printer when the user chooses to print a report.
Navigate: From the main menu, select Control > Setup > Printer Maintenance > View. The Printer Maintenance window opens.
Click OK to close the window.
Navigate: From the main menu, select Control > Setup > Printer Maintenance > Edit. The Printer Maintenance window opens.
In the Description field, edit the brief description of the printer.
To designate that the printer is active, select the Active Ind check box. To designate that the printer is not active, clear the Active Ind check box.
Click Add. The next available row is enabled.
In the Printer field, enter the system-defined printer name.
In the Description field, enter a brief description of the printer.
If the printer is not active, clear the Active Ind. check box.
Click OK to save your changes and close the window.
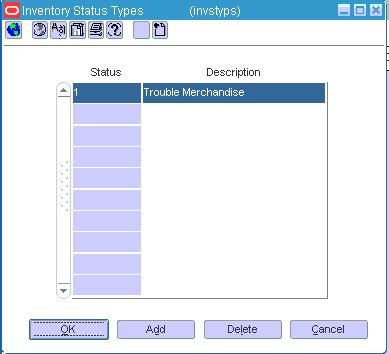
Navigate: From the main menu, select Control > Setup > Inventory Status Types > Edit. The Inventory Status Types window opens.
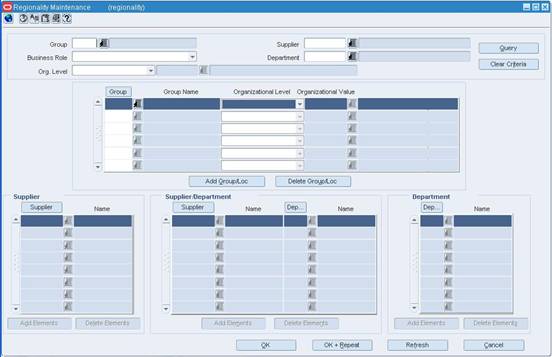
Navigate: From the Main Menu, select Control > System > Regionality > Regionality Matrix > Edit. The Regionality Maintenance window opens.
Enter the appropriate search criteria. Click Query to view the group/location records that match your criteria.
|
Note: You can query by either Group ID or Business Role. Selecting one disables the other. |
Edit the enabled fields as necessary.
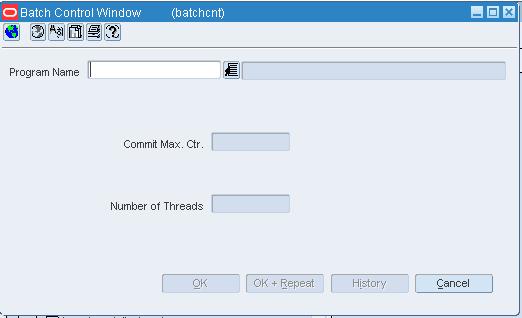
The Batch Control window allows you to monitor and control batch programs. You can view the history of a selected batch program to see when it was run last and how long it took to complete. You can also maintain the number of threads used by a batch program and the number of records that are to be processed before the commit command is invoked.
The Batch Bookmark window allows you to view additional details about an incomplete batch program.
Navigate: From the main menu, select Control > System > Batch Maintenance > Batch Restart. The Batch Restart window opens.
To view details about completed batch programs, select Completed from the View menu.
To view details about incomplete batch programs, select Not Completed from the View menu.
To view additional information about an incomplete batch program:
Select a batch program and click Bookmark. The details appear in the Batch Bookmark window.
Click OK to exit the Batch Bookmark window.
Click OK to close the window.
The Batch Restart window allows you to view the status of batch programs. Depending on which command you select from the View menu, you can view the status of completed or uncompleted batch programs or customized information. You can access the Batch Bookmark window in order to view at what point an incomplete batch program stopped running.
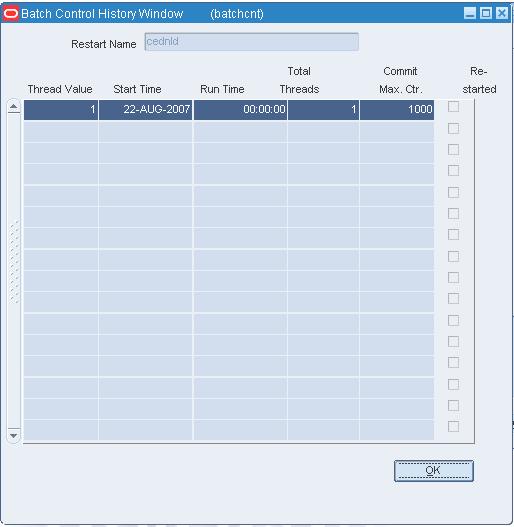
The Batch Control History window allows you to view the history of a selected batch program. You can view the dates on which the batch program was run and the length of time it took to complete.
Navigate: From the main menu, select Control > System > Batch Maintenance > Batch Control. The Batch Control window opens.
In the Program Name field, enter the name of a batch program, or click the LOV button and select the batch program.
In the Commit Max Ctr field, enter or edit the maximum value for the commit counter as necessary.
In the Number of Threads field, enter or edit the number of threads.
To view details about previous executions of the batch program:
Click History. The Batch Control History window opens.
Click OK to exit the Batch Control History window.
Click OK to save your changes and close the window.
The following section contains information about buyers.
The Buyer Worksheet allows you to add, edit, and view information that is generated from the Replenishment and Investment Buy processes. You can:
Modify the line items' suggested order quantities and costs.
For Replenishment quantities, change the supplier that will source the item, and/or split the order quantity amongst multiple suppliers.
Manually scale order quantities as well as round to pack.
Add a line item to an existing purchase order or create purchase orders in Worksheet, Submitted, or Approved status.
The Item Requirements default view for the Buyer Worksheet window opens when you open the window for the first time. You can also create a custom view.
See "Filter the Buyer Worksheet" in the Replenishment chapter
See "Review Scaling Constraints for an Item" in the Purchasing chapter
See "Add an Item to the Buyer Worksheet" in the Replenishment chapter
See "Create a PO from a Buyer Worksheet" in the Replenishment chapter
See "Add an Item to an Existing PO from the Buyer Worksheet" in the Replenishment chapter
See "Split Order Quantities for an Item Across Suppliers" in the Purchasing chapter
See "Split to Supplier Diff Ratio" in the Purchasing chapter
See "Delete an Item from a Buyer Worksheet" in the Purchasing chapter
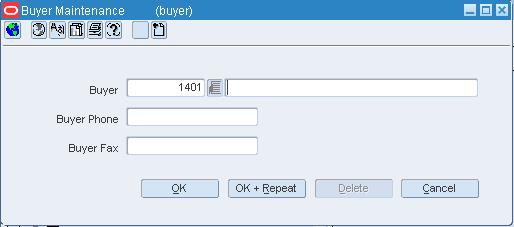
The Buyer Maintenance Window allows you to create, edit, view, and delete a buyer. In addition to a name and ID, you can enter the buyer's telephone and fax numbers. After a buyer is entered, you can assign the buyer to a division, group, or department. Store grade groups and purchase orders can be created for or by a buyer.
See "Create a Buyer" in the Purchasing chapter
See "View a Buyer" in the Purchasing chapter
Navigate: From the main menu, select Control > Buyer > Edit. The Buyer Maintenance window opens.
Navigate: From the main menu, select Control > Competitor > New. The Competitor window opens.
Enter the following information about the competitor:
Required
Name
Optional
Address
City
State
Postal Code
Country
Jurisdiction
Phone number
Fax number
Web site
Click OK to save your changes and close the window.
Navigate: From the main menu, select Control > Competitor > Edit. The Competitor window opens.
In the Competitor field, enter a competitor number, or click the LOV button and select a competitor.
Enter or edit the enabled fields as necessary.
Click OK to save your changes and close the window.
Navigate: From the main menu, select Control > Competitor > Edit. The Competitor window opens.
In the Competitor field, enter a competitor number, or click the LOV button and select a competitor.
Click Delete. You are prompted to delete the record.
Click Yes.
Click OK to save your changes and close the window.
Navigate: From the main menu, select Control > Competitor > Edit. The Competitor window opens.
In the Competitor field, enter the ID of the competitor, or click the LOV button and select the competitor.
From the Options menu, select Competitor Stores > New. The Competitor Store Maintenance window is displayed.
|
Note: The Competitor Store ID is filled in automatically. |
Enter the description of the competitor's store.
In the following fields, enter the competitor's store information:
Address
City
Postal code
State
Country
Jurisdiction
Phone
Fax
Store format
Currency
Total area
Selling area
Estimated yearly sales volume
Date the store opened for business
Date the store closed (if applicable)
Click OK to save your changes and close the window.
Navigate: From the main menu, select Control > Competitor > Edit. The Competitor window opens.
In the Competitor field, enter the ID of the competitor, or click the LOV button and select the competitor.
From the Options menu, select Competitor Stores > Edit. The Competitor Store Maintenance window is displayed.
In the Competitor Store field, enter the ID of the competitor's store, or click the LOV button and select the store.
Enter or edit the appropriate information about the competitor's store.
Click OK to save your changes and close the window.
Navigate: From the main menu, select Control > Competitor > Edit. The Competitor window opens.
In the Competitor field, enter the ID of the competitor, or click the LOV button and select the competitor.
From the Options menu, select Competitor Stores > Edit. The Competitor Store Maintenance window is displayed.
In the Competitor Store field, enter the ID of the competitor's store, or click the LOV button and select the store.
Click Delete. You are prompted to delete the record.
Click Yes.
Click OK to save your changes and close the window.
Navigate: From the main menu, select Control > Competitive Shopper > New. The Competitive Shopper Maintenance window opens.
In the Name field, enter the name of the shopper.
In the Shopper Phone field, enter the shopper's phone number.
In the Shopper Fax field, enter the shopper's fax number, if applicable.
Click OK to save your changes and close the window.
Navigate: From the main menu, select Control > Competitive Shopper > Edit. The Competitive Shopper Maintenance window opens.
In the Shopper field, enter the ID of the competitive shopper, or click the LOV button and select the shopper.
Enter or edit the appropriate information about the shopper.
Click OK to save your changes and close the window.
Navigate: From the main menu, select Control > Competitive Shopper > Edit. The Competitive Shopper Maintenance window opens.
In the Shopper field, enter the ID of the competitive shopper, or click the LOV button and select the shopper.
Click Delete. You are prompted to delete the record.
Click Yes.
Click OK to save your changes and close the window.
Navigate: From the main menu, select Control > Competitive Pricing > Competitive Price Entry. The Competitor Price Entry window opens.
|
Note: This procedure explains how to enter competitor prices manually. If your company uses personal digital devices (PDA) to record competitor prices, this window may be unavailable. |
Enter search criteria in the appropriate search fields. The Shop Date and Competitor search fields are required.
Click Search. The competitor price records that match the search criteria appear.
Select the record that you want to edit.
|
Note: You can edit pricing information either directly on the table or in the Apply area. |
In the Date field, enter the date on which the competitor price was recorded, or click the calendar button and select the date.
For a single unit item, enter the retail price in the Competitor Retail (table) or Retail New Value (Apply area) field. Enter the amount in the local currency of the competitor store.
For a multi-unit item, enter the number of units that make up a multi-unit in the Multi Units (table) or Multi Units New Value (Apply area) field.
For a multi-unit item, enter the retail price in the Multi-Unit Retail (table) or Multi-Unit Retail New Value (Apply area) field.
In the Price Type field, indicate whether the price is a regular, promotional, or clearance price.
For a regular or promotional price, select the appropriate offer type in the Offer Type field.
For a promotional price, enter the start and end dates of the promotion in the appropriate fields.
If the details were entered in the Apply area, click Apply to add the updated information to the table.
Click OK to save your changes and close the window.
Navigate: From the main menu, select Control > Competitive Pricing > Competitive Price History > Edit.
In the From Date and To Date fields, select dates to create a range for your search.
In the other Search Criteria fields, enter any other information to restrict your search.
Click Search. RMS displays all pricing records that match your search criteria.
Review the price history information displayed.
To change the type of information displayed for a record, select View > Default, Promotion, Ref Item, Custom, or Saved.
Edit any price history information (Competitor Retail, Price Type, Start Date, or End Date).
Click OK to save your changes and close the window.
The Cost Component Maintenance window allows you to add and maintain expenses, up charges, and assessments. Expenses are components that make up the cost of an item. Assessments are components that make up the total duty charges for an item. Up charges are incurred when transferring goods between warehouses and stores.
If you are using Trade Management to track import costs, all locations must have the same cost value. If the cost of items that are being imported DO vary by location, Trade Management will convert the cost values to an identical weighted average cost.
See "Define an Assessment" in the Cost Management chapter
See "Define an Expense" in the Cost Management chapter
The Non-Merchandise Cost Components window allows you to associate non-merchandise cost codes with the non-merchandise codes. The cost codes are used to track costs related to the movement of the merchandise. You can access this window only when you are using Oracle Retail Trade Management with RMS.
See "Add a Cost Component for a Non-Merchandise Code" in the Cost Management chapter
See "Delete a Cost Component from a Non-Merchandise Code" in the Cost Management chapter
See "View Cost Components from a Non-Merchandise Code" in the Foundation Data chapter
The Cost Change Reason Maintenance window allows you to add, delete, edit, and view the reasons for cost changes.
See "Add a Cost Change Reason" in the Cost Management chapter
See "Edit a Cost Change Reason" in the Cost Management chapter
See "View a Cost Change Reason" in the Cost Management chapter
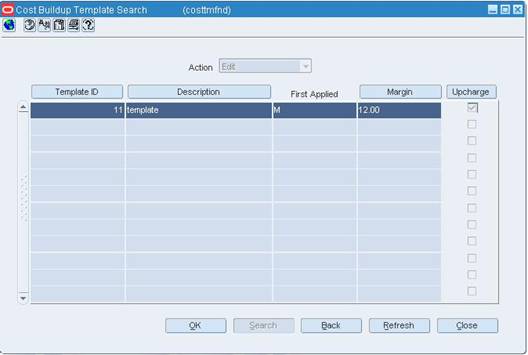
The Cost Buildup Template Search window allows you to search for, create, edit, and view the cost buildup template.
Navigate: From the main menu, select Franchise > Cost Buildup Template > Cost Buildup Template. The Cost Buildup Template Search window opens.
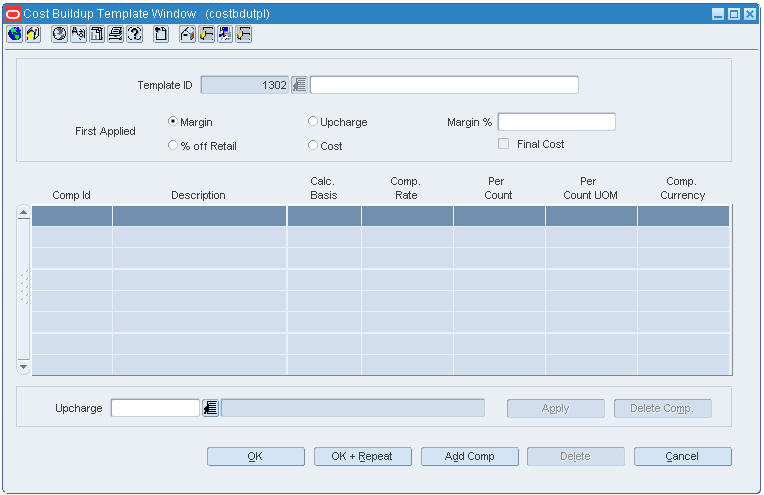
The Cost Buildup Template window allows you to view, edit, or create cost templates used to determine customer cost for franchise.
At a high level, the cost buildup template allows the retailer to determine customer cost for franchise by setting up the following:
A margin percentage and associating upcharges for Cost Buildup template
% off Retail for cost buildup template
Cost with or without Final cost for Cost Buildup template
The template can be applied to department/class/subclass/item/franchise locations combination using "Edit the Franchise Cost Relationship Maintenance" window in the Franchise chapter.
Navigate: From the main menu, select Franchise > Cost Buildup Template > Cost Buildup Template. The Cost Buildup Template Search window opens.
Navigate: From the main menu, select Franchise > Cost Buildup Template > Cost Buildup Template. The Cost Buildup Template Search window opens.
In the Action field, select either New, Edit, or View.
Enter additional criteria as desired to make the search more restrictive.
Click Search. The Cost Buildup Template Search results window displays the templates that match the search criteria.
Select a template:
To perform another search, click Refresh.
To display the details of a template, select a record and click OK. The Cost Buildup Template window opens.
Click Cancel to exit.
To create a new Cost Buildup Template, do the following:
In the Cost Buildup Template Search Window, select New in the Action field.
Click OK.
The Cost Buildup Template Window opens.
The Template ID is displayed by default. However, you can enter the description in the Template ID field.
In the First Applied section, the following options are available:
Margin
Upcharge
% off Retail - This is one of the method to define cost. You can define the % off retail used to calculate the customer cost for an item. If you select this option, you cannot define upcharges, margin, or cost for calculating the customer cost.
Cost - This is also one of the method to define cost. You can define the final customer cost for an item. Select the Final Cost check box. The Final Cost signifies if this is the final cost for the item/franchise location or deal pass through will have to be applied on the cost to derive the final customer cost for the item/franchise location. If you select this option, you cannot define the upcharges, margin, or % off retail for calculating the customer cost. You can select the Final Cost check box only for Cost method.
|
Note: The Margin % field will be enabled for Margin, Upcharge options. The Margin % field will change to Retail %, if you select the % off Retail option. The Margin % field will change to Cost, if you select the Cost option. |
Enter the upcharge in the Upcharge field, or select from the LOV.
Update as necessary and click Apply. You can see the cost buildup records in the multi-record block.
Click OK.
The Contents of Cost Buildup Template appears.
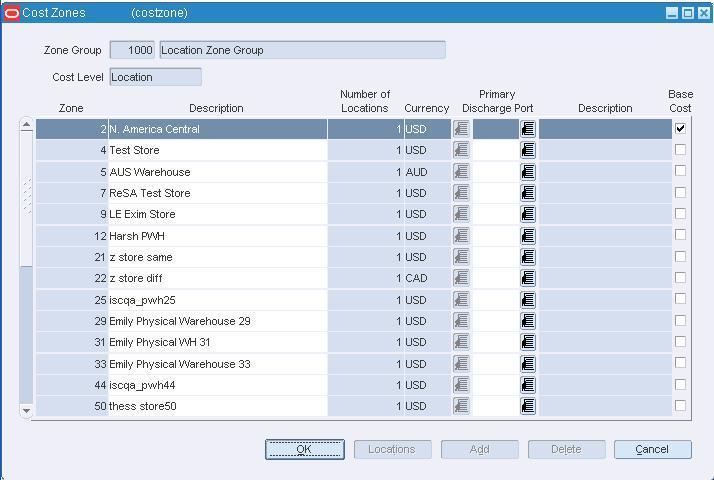
The Cost Zones window allows you to create, maintain, and view the cost zones for a selected cost zone group.
In Edit mode, you may edit the zone description and change the location that determines the base cost for an item. For each cost zone group, you must select one cost zone as the base cost zone. The base cost zone indicates that the price for the item is based on the price of the item in the zone
If a cost zone exists without any locations, the cost zone is deleted when you click OK.
See "Add a Cost Zone Group" in the Cost Management chapter
See "View a Cost Zone Group" in the Cost Management chapter
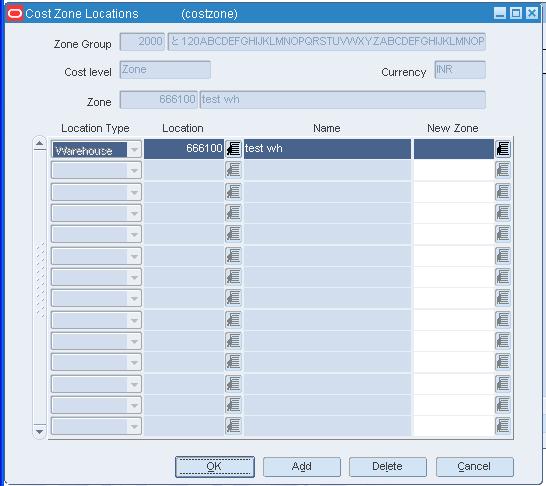
The Cost Zone Locations window allows you to edit or view the locations in the cost zone. In Edit mode, you may add locations to a cost zone or move locations to a different cost zone.
Locations cannot be edited for any cost zone group at the location level because locations is a cost zone group.
See "Add a Cost Zone Group" in the Cost Management chapter
See "View a Cost Zone Group" in the Cost Management chapter
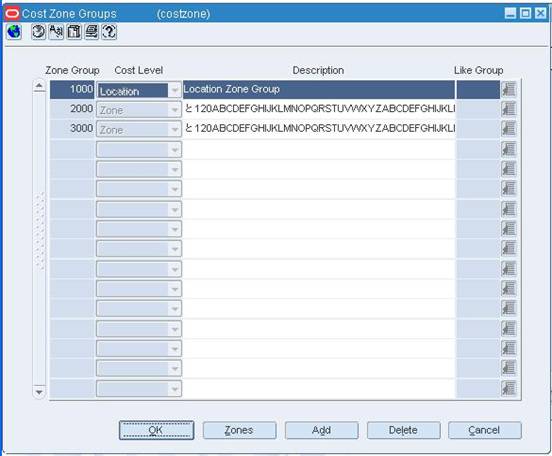
The Cost Zone Groups window allows you to enter, edit, or view cost zone groups. A cost zone group is a grouping mechanism that allows you to categorize stores into zones based on a costing strategy. This grouping mechanism is available only when you are tracking Estimate Landed Costs (ELC).
When you enter a new cost zone group, all locations must be added to the group. The locations can exist individually with in a group, or you can group the locations into cost zones.
To copy cost zone groups, their zones, and their locations, select a like group when creating a cost zone group at the zone level.
For zone level cost zone groups, you can create cost zones and corresponding locations by clicking Zones.
See "Add a Cost Zone Group" in the Cost Management chapter
See "View a Cost Zone Group" in the Cost Management chapter
Navigate: From the main menu, select Control > Setup > Cost Zone Group > Edit. The Cost Zone Groups window opens.
Edit the description for the cost zone group.
To delete a cost zone group, select the zone and click Delete.
When prompted to delete the record, click Yes.
|
Note: The cost zone group will be deleted by a batch program. |
On the Cost Zone Groups window, select a cost zone group.
Click Zones. The Cost Zones window opens.
Edit the cost zone information as necessary.
To delete a cost zone from a cost zone group:
Select a cost zone and click Locations. The Cost Zone Locations window opens.
Reassign locations in the cost zone to a different cost zone.
In the New Zone field, enter the ID of the new zone, or click the LOV button and select a different cost zone.
Click OK to return to the Cost Zones window.
Click Delete to remove the cost zone from the cost zone group.
When prompted to confirm deletion, click OK.
Click OK to save your changes and close the window.
To edit location information, click Locations. The Cost Zone Locations window opens.
To add locations, click Add. Select the location type.
In the Location field, enter the location ID or click the LOV button and select the location.
To remove a location from a zone, select a location.
In the New Zone field, enter the ID of the new zone, or click the LOV button and select the new zone.
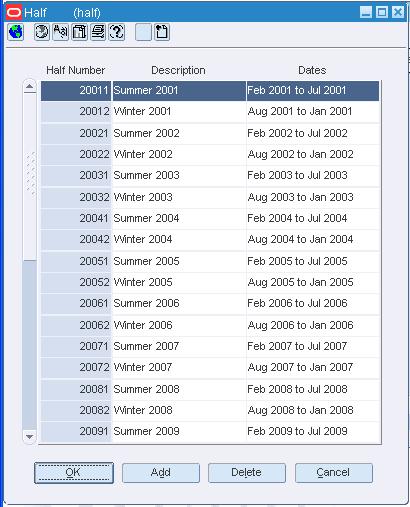
Navigate: From the main menu, select Control > Setup > Half > View. The current halves appear in the Half window.
Click OK to close the window.
Navigate: From the main menu, select Control > Setup > Half > Edit. The current halves appear in the Half window.
Edit the descriptions or dates as necessary.
Click OK to save your changes and close the window.
Click Add. The next available line is enabled.
In the Half Number field, enter an ID for the half. Use the format YYYYn, where YYYY is the 4-digit year and n is the half-year period (either 1 or 2).
In the Description field, enter a description for the half.
In the Dates field, enter the date range for the half.
Click OK to save your changes and close the window.
The Printer Maintenance window allows you to maintain the available printers within the system.
Navigate: From the main menu, select Control > System > Multiview Search Tool. The Multisearch Editor window opens. Search for and retrieve a multi-view column. The results appear in the table.
Select the form and column and click Edit. The details appear in the Multiview Editor window.
Enter or edit the details as necessary.
Click OK to save your changes and close the windows.
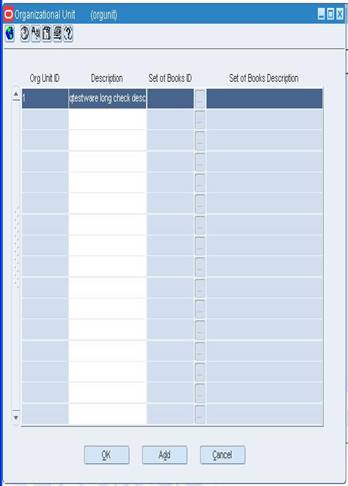
Navigate: From the main menu, select Control > Setup > Org Unit > Edit. The Organizational Unit window opens.
Select the field you want to update.
Edit the enabled fields as necessary.
Click OK to save any changes and close the window.
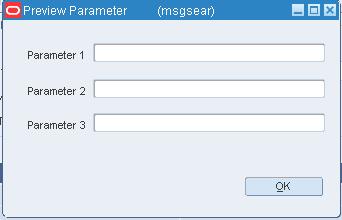
The Preview Parameter window allows you to display the error message as it will appear to users of a radio frequency (RF) device. If the message contains any variables, enter parameters in the Parameters 1 to 3 fields. The parameters appear in the message.
The Preview Parameter window allows you to display the error message as it will appear to users of RMS. If the message contains any variables, enter parameters in the Parameters 1 to 3 fields. The parameters appear in the message.
Implementation personnel have access to an error message tool and a multi-view tool. The error message tool is used to maintain the RTK_ERRORS table. By placing error messages in a table, the messages are more easily maintained and internationalized. The RTK_ERRORS table is usually populated during system installation.
The multi-view tool is used to maintain the MULTIVIEW_DEFAULT_45 and MULTIVIEW_SAVED_45 tables. Multi-views allow the user to view predefined subsets of columns on a form when the number of available columns exceeds the available space. The MULTIVIEW tables are usually populated during system installation. However, a user may also choose to customize and save the content of a multi-view from within a form that contains a multi-view.
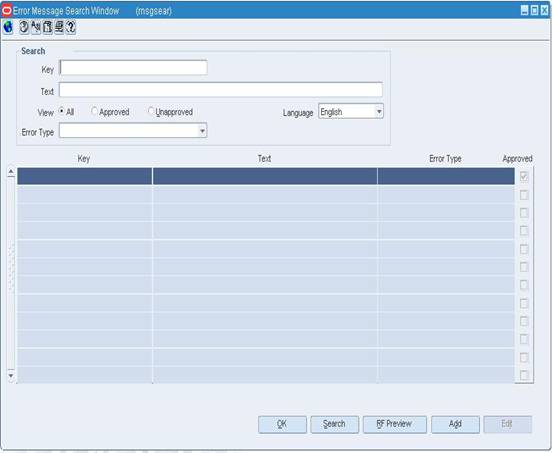
The Error Message Search window allows you to search for and maintain the error messages that are used in system. This window is used primarily by software implementation personnel.
Navigate: From the main menu, select Control > System > Message Search Tool. The Error Message Search window opens.
Enter search criteria in the Key, Text, View, and Language fields as necessary.
Click Search. The error messages that match the search criteria appear.
Select an error message and click Edit. The Error Message Maintenance window opens.
Edit the details as necessary.
Click OK to save your changes and close the window.
Click Add. The Error Message Maintenance window opens.
Enter the details of the message.
To see how the message will be displayed, click Preview. On the Preview Parameter window, enter one to three parameters as necessary and click OK. The message opens.
To see how the message will be displayed on an RF device, click RF Preview. On the Preview Parameter window, enter one to three parameters as necessary and click OK. The message opens.
Click OK to save your changes and close the window.
The Error Message Maintenance window allows you to maintain the error messages that are used in the system.
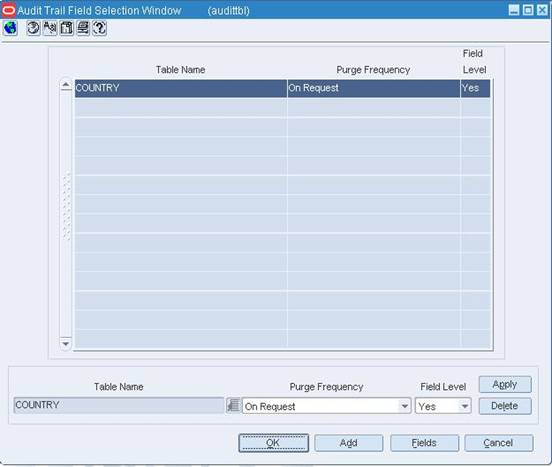
Audit trails can be set up to track who makes changes to a selected table and when such changes are made. Whenever a record is added, changed, or deleted on the selected table, a record is added to the audit table. The record includes the primary key, date/time stamp, and user ID. If fields are audited, the before and after values, as well as the standard audit information, are tracked. It is recommended that you do not audit the primary key field.
For information on 'Creating Audit Trails', see the Oracle Sales Audit User Guide.
Navigate: From the main menu, select Control > System > Audit Trail > Edit. The list of audited tables appear in the Audit Trail Field Selection window.
Select a table.
Edit the Purge Frequency and the Field Level fields as necessary.
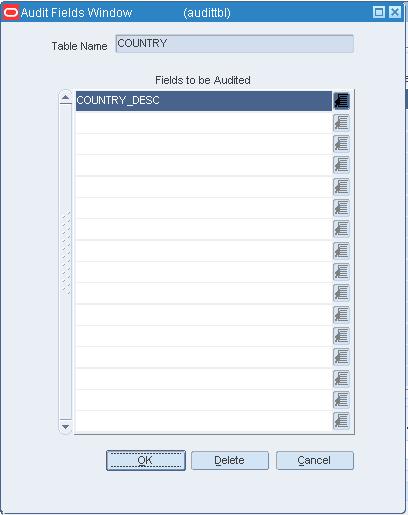
Select a table and click Fields. The Audit Fields window opens.
In the Fields to be Audited field, enter the name of the field, or click the LOV button and select the field.
To delete a field, select the field and click Delete.
Click OK to save your changes and close the window.
Navigate: From the main menu, select Control > POS Configuration > Touch Button.
The Touch Button window opens.
In the Action field, select New. The Enter/Maintain tab opens.
In the Button Configuration ID field, enter a description for the touch button configuration.
In the Effective Date field, enter the date on which the configuration is active at the stores, or click the calendar button and select a date.
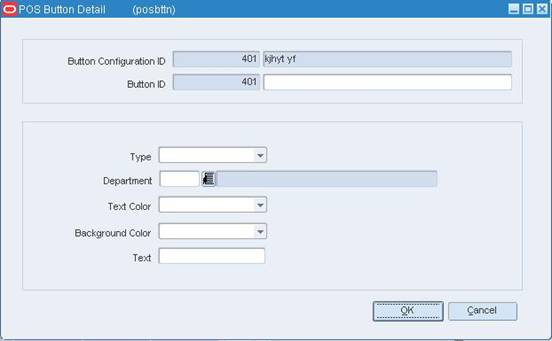
Select a block and click Detail. The POS Button Detail window opens.
In the Button ID field, enter the description of the touch button.
In the Type field, select the type of touch button.
In the Text Color field, select the color of the text on the touch button.
In the Background Color field, select the color of the touch button.
In the Text field, enter the text that opens on the touch button.
Click OK to save your changes and close the window.
Select a touch button on the First Layer palette.
Click the move down button.
Select a block and click the Detail button. The POS Button Detail window opens.
In the Button ID field, enter the description of the touch button.
In the Type field, select the type of touch button.
In the Text Color field, select the color of the text on the touch button.
In the Background Color field, select the color of the touch button.
In the Text field, enter the text that opens on the touch button.
Click OK to save your changes and close the window.
|
Note: You can associate items with a primary button when it has no secondary buttons. |
Select a touch button on the First or Second Layer palette.
Click the appropriate move right button.
Click Add Item.
In the Item field, enter the item number. You can also enter a partial description of the item in the Description field, and click the LOV button to select an item.
Click OK to save your changes and close the window.
Navigate: From the main menu, select Control > POS Configuration > Touch Button. The Enter/Maintain tab on the Touch Button window opens. Search for and retrieve a touch button configuration in Edit mode.
Select the Enter/Maintain tab.
Edit the Button Configuration ID field and the Effective Date field as necessary.
Select a block and click Detail. The POS Button Detail window opens.
In the Button ID field, enter the description of the touch button.
In the Type field, select the type of touch button.
In the Text Color field, select the color of the text on the touch button.
In the Background Color field, select the color of the touch button.
In the Text field, enter the text that opens on the touch button.
Click OK to save your changes and close the window.
Select a touch button on the First Layer palette.
Click the move down button.
Select a block in the Second Layer palette and click Detail. The POS Button Detail window opens.
In the Button ID field, enter the description of the touch button.
In the Type field, select the type of touch button.
In the Text Color field, select the color of the text on the touch button.
In the Background Color field, select the color of the touch button.
In the Text field, enter the text that opens on the touch button.
Click OK to save your changes and close the window.
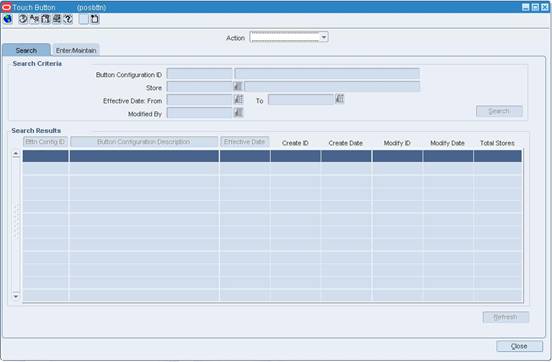
Navigate: From the main menu, select Control > POS Configuration > Touch Button. Touch Button. The Touch Button window opens.
In the Action field, select Edit, View, or Create from Existing.
Enter additional criteria as desired to make the search more restrictive.
Click Search. The configurations that match the criteria appear in the search results table.
Select a task:
To perform another search, click Refresh.
To display the configuration information, select a configuration and click on the Enter/Maintain tab.
Click Close to exit.
Navigate: From the main menu, select Control > POS Configuration > Touch Button. The Enter/Maintain tab on the Touch Button window opens. Search for and retrieve a touch button configuration in Edit mode.
Edit the Button Configuration ID field and the Effective Date field as necessary.
To delete a primary touch button on the First Layer palette:
Select a touch button.
Click Delete Button.
When prompted to delete the record, click Yes.
To delete a secondary touch button on the Second Layer palette:
Select a touch button on the First Layer palette.
Click the move down button.
Select a touch button in the Second Layer palette.
Click Delete Button.
When prompted to delete the record, click Yes.
Click Save to save your changes and close the window.
Navigate: From the main menu, select Control > POS Configuration > Touch Button. The Enter/Maintain tab on the Touch Button window opens. Search for and retrieve a touch button configuration in Create from Existing mode.
In the Button Configuration ID field, enter a description for the configuration.
Edit the touch buttons and associated items as necessary.
To associate stores with the configuration:
In the Location Type field, enter the ID of the location or group, or click the LOV button and select a location or group.
Click Apply.
Click OK to save your changes and close the window.
Click Save to save your changes and close the window.
Navigate: From the main menu, select Control > POS Configuration > Touch Button. The Enter/Maintain tab on the Touch Button window opens. Search for and retrieve a touch button configuration in Edit mode.
Edit the Button Configuration ID field and the Effective Date field as necessary.
To edit the properties of a primary touch button on the First Layer palette:
Select a touch button on the First Layer palette.
Click Detail. The POS Button Detail window opens.
Edit the enabled fields as necessary.
Click OK to save your changes and close the window.
To edit the properties of a secondary touch button on the Second Layer palette:
Select a touch button on the First Layer palette.
Click the move down button.
Select a touch button on the Second Layer palette.
Click Detail. The POS Button Detail window opens.
Edit the enabled fields as necessary.
Click OK to save your changes and close the window.
Click Save to close the window and save your changes.
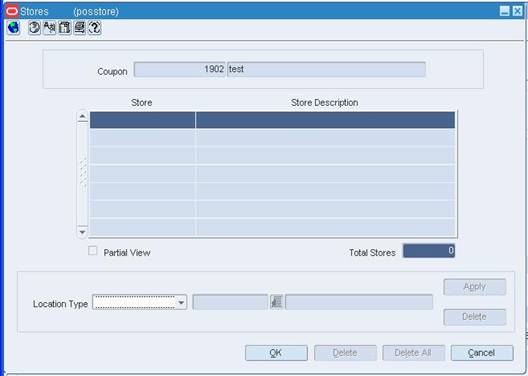
Navigate: From the main menu, select Control > POS Configuration > Touch Button. The Enter/Maintain tab on the Touch Button window opens. Search for and retrieve a touch button configuration in Edit mode.
Edit the enabled fields as necessary.
Click Stores. The Stores window opens.
In the Location Type field, enter the ID of the location or group, or click the LOV button and select a location or group.
Click Apply.
Click OK to save your changes and close the window.
Select the store in the table.
Click Delete.
Click OK to save your changes and close the window.
In the Location Type field, enter the ID of the location or group, or click the LOV button and select a location or group.
Click Delete.
Click OK to save your changes and close the window.
Navigate: From the main menu, select Control > POS Configuration > Touch Button. The Enter/Maintain tab on the Touch Button window opens. Search for and retrieve a touch button configuration in Edit mode.
Click Delete.
When prompted to delete the record, click Yes.
Click Close to close the window.
The following section contains information about VAT.
The VAT Item Maintenance window allows you to view and maintain the value added tax (VAT) codes that are associated with an item at or above the transaction level.
An audit record is kept of who added the VAT code to the item and when the VAT code was added.
See "Edit VAT Codes for an Item" in the Foundation Data chapter
See "View VAT Codes for an Item" in the Foundation Data chapter
The VAT Code Maintenance window allows you to view and maintain a list of value added tax (VAT) codes. You can access the Rates Maintenance window in order to view and maintain tax rates for a selected VAT code.
See "Edit VAT Codes for an Item" in the Foundation Data chapter
See "View VAT Codes for an Item" in the Foundation Data chapter
The VAT Region Maintenance window allows you to view and maintain a list of VAT regions.
See "Edit VAT Codes for an Item" in the Foundation Data chapter
See "View VAT Codes for an Item" in the Foundation Data chapter
The VAT Department Maintenance window allows you to view and maintain value added tax (VAT) regions and VAT codes that are associated with a department. The VAT regions and VAT codes that are entered at the department level become the default VAT regions and VAT codes for items within the department.
See "Edit VAT Codes for an Item" in the Foundation Data chapter
See "View VAT Codes for an Item" in the Foundation Data chapter
The Rates Maintenance window allows you to view and maintain tax rates for a selected VAT code. An audit record is kept of who entered the tax rate and when the tax rate was entered.
See "Edit VAT Codes for an Item" in the Foundation Data chapter
See "View VAT Codes for an Item" in the Foundation Data chapter
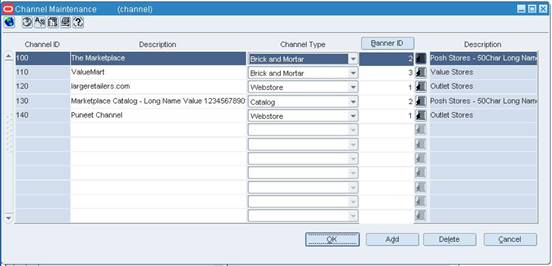
The Channel Maintenance window allows you to maintain a list of channels in a multi-channel environment. You can associate a channel with a location when you create or edit a store or virtual warehouse.
Navigate: From the main menu, select Control > Setup > Channels > Edit. The current channels appear in the Channel Maintenance window.
Click Add.
In the Channel ID field, enter the ID.
In the Description field, enter the description.
From the Channel Type drop down list, select a type.
In the Banner ID field, select an ID, or select the LOV button to select an ID.
Click OK to save your changes and close the window.
Navigate: From the main menu, select Control > Setup > Channels > Edit. The current channels appear in the Channel Maintenance window.
Navigate: From the main menu, select Control > Setup > Channels > View. The current channels appear in the Channel Maintenance window.
Click OK to close the window.
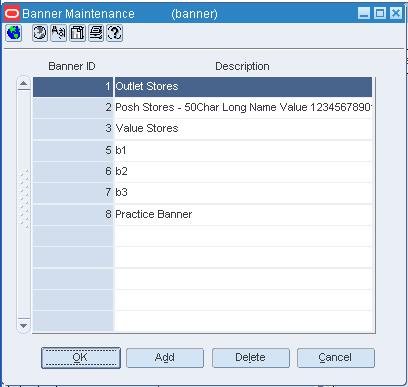
The Banner Maintenance window is used to create banners that can be used to distinguish one area of your business or corporation from another. Banner categories do not impact the organizational hierarchy structure.
Navigate: From the main menu, select Control > Setup > Banner> Edit. The Banner Maintenance window opens.
Click Add. The next available line is enabled.
Enter a unique ID for the new banner.
Enter a description for the Banner ID.
Click OK to save your changes and close the window.
Navigate: From the main menu, select Control > Setup > Banner> Edit.
The current banners appear in the Banner Maintenance window.
Navigate: From the main menu, select Control > Setup > Banner > View. The Banner Maintenance window opens.
Click OK to close the window.
The Add Item window allows you to manually add items to the buyer worksheet.
Added items are saved with a recommended order quantity of zero and a Manual source type. They appear in the Buyer Worksheet details area.
The Unit of Measure window allows you to view the units of measure that can be used throughout the system.
See "View Units of Measure" in the Item Maintenance chapter
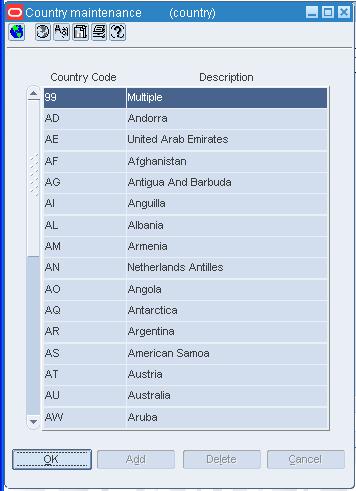
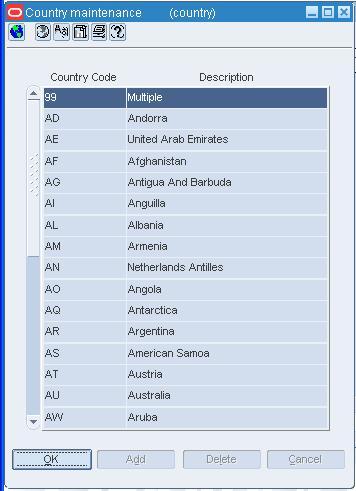
The Country Maintenance window allows you to view and maintain the list of countries and country codes that are used in the system. You can indicate whether the item cost entered is inclusive of taxes (NIC) or exclusive of taxes (BC).
Under a global tax scenario, the unit cost may or may not be tax exclusive. during item setup, to derive the cost inclusive of tax or the cost exclusive of tax, the system must determine the tax amount. To determine the right tax amount, RMS must pass the appropriate tax attributes to the tax engine (MTR). To achieve this, RMS requires some mechanism to designate a location as the Default Location so that system can use the tax attributes of the Default Location to derive the right tax amount, and thus, the cost exclusive/inclusive value for the item.
You can accomplish the following tasks by accessing additional windows from the Options menu:
Select the fiscal attributes at the country level. See "Maintaining Country Attributes".
Select the documents that are required at the country level.
Select the tariff treatments to be applied to items at the country level.
Set up an expense profile at the country level.
Navigate: From the main menu, select Control > Setup > Country > View. The Country Maintenance window opens.
Select a country.
Make a selection from the Options menu.
View the country details.
Click OK to close the window.
Navigate: From the main menu, select Control > Setup > Country > Edit. The Country Maintenance window opens.
Select a country.
From the Options menu, select Attributes. The Country Attributes window opens.
Make updates to the window as necessary.
Item Cost Tax Include defines whether the item cost entered by the user is inclusive (NIC) or exclusive (BC) of taxes.
Default Purchase Cost defines which cost should be used to raise a PO.
Default Location informs the system to derive the right tax amount, cost exclusive/inclusive value for the item.
Localized Indicator indicates whether the correct tax information is installed in the system.
Click OK to save and close the Country Attributes window.
Click OK to close the Country Maintenance window.
The Country Tariff Treatment window allows you to maintain tariff treatments and their activation dates by country.
See "Edit a Tariff Treatment at the Country Level" in the a Purchasing chapter
See "View a Tariff Treatment at the Country Level" in the Purchasing chapter
Navigate: From the main menu, select Control > Setup > Country > View. The Country Maintenance window opens.
Select a country.
From the Options menu, select Expenses. The Expense Profile Maintenance window opens.
Select an expense profile in the Expense Profile Header table. Details appear in the Expense Profile Details table.
Click OK to close the window.
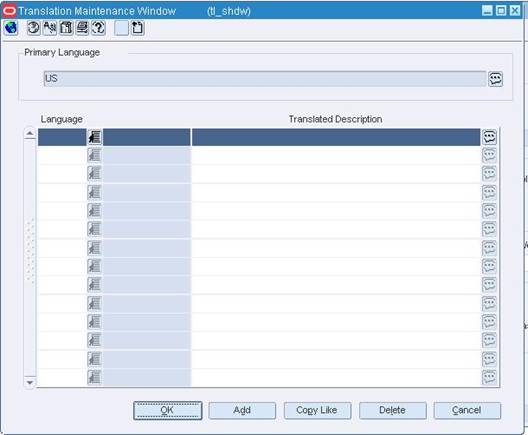
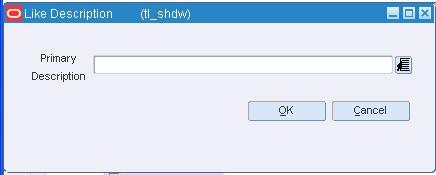
The Like Description window allows you to copy translations from a similar value to the current value.
Editing a Value in Multiple Languages
The Store Format Maintenance window allows you to define the store formats that can be applied to the stores in your organization. Some examples are mall, strip mall, and kiosk. After the formats are defined, you can associate a format with each store in your organization. This association is made at the store level in the organizational hierarchy.
See "Add a Store Format" in the Foundation Data chapter
See "Delete a Store Format" in the Foundation Data chapter
See "Edit a Store Format" in the Foundation Data chapter
See "View a Store Format" in the Foundation Data chapter
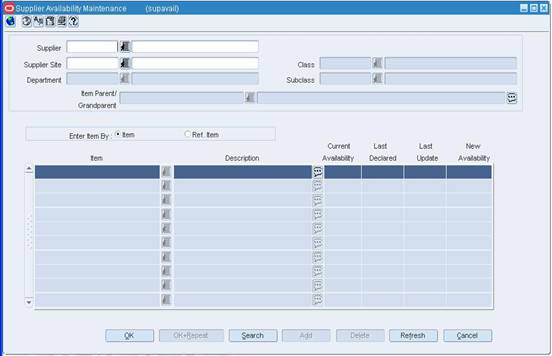
Navigate: From the main menu, select Control > Supplier Availability > Edit. The Supplier Availability Maintenance window opens.
In the Supplier field, enter the ID of the supplier, or click the LOV button and select the supplier.
In the Merchandise field, select the type of merchandise.
Enter additional criteria as desired to make the search more restrictive.
Click Search. The items that match the search criteria appear.
Edit the New Availability field as necessary.
Click OK to save your changes and close the window.
Navigate: From the main menu, select Control > Setup > Country > Edit. The Country Maintenance window opens. Select a country. From the Options menu, select Expenses. The Expense Profile Maintenance window opens.
Select an expense profile in the Expense Profile Header table. Details appear in the Expense Profile Details table.
Edit any enabled fields.
Click OK to save your changes and close the window.
In the Expense Profile Header area, select an expense profile.
Click Delete. You are prompted to delete the record.
Click Yes.
Click OK to save your changes and close the window.
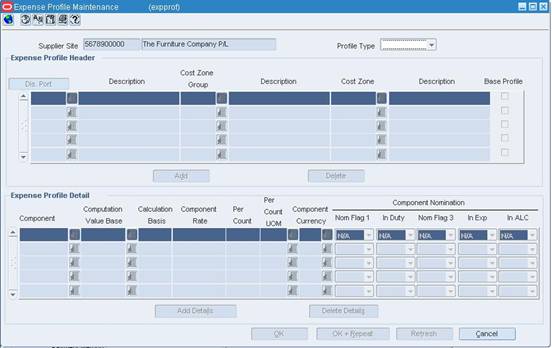
Navigate: From the main menu, select Control > Supplier > Maintenance. The Supplier Search window opens. Search for and retrieve a supplier site. The Supplier Maintenance window opens. From the Options menu, select Expenses. The Expense Profile Maintenance window opens.
In the Profile Type field, select:
Zone to make changes to the expense profile at the supplier/cost zone level.
Country to make changes to the expense profile at the supplier/sourcing country level.
Select an expense profile in the Expense Profile Header table. Details appear in the Expense Profile Details table.
Edit any enabled fields as necessary.
Select an expense profile in the Expense Profile Header table.
Click Delete. You are prompted to delete the record
Click Yes.
Click OK to save your changes and close the window
In the Expense Profile Detail area, click Add Details. The next available line becomes enabled.
In the Component field, enter the code for the expense component, or click the LOV button and select the expense component.
In the enabled fields, enter or edit the default details as necessary.
In the Component Nomination fields, select the status of the expense in relation to the other components:
Select N/A, if the expense is not included in the calculation.
Select + (plus sign), to add the expense.
Select - (minus sign), to subtract the expense.
Click OK to save your changes and close the window.
The Freight Size window allows you to edit and view the freight sizes that are most likely to be used to move imported goods. Freight sizes are informational; they are not used in processing. Freight size refers to the size of the container in which goods are shipped.
Adding a Freight Size
Maintaining a Freight Size
Viewing a Freight Size
Navigate: From the main menu, select Control > Setup > Freight Size Maintenance > Edit. The Freight Size Maintenance window opens.
In the Freight Size field, enter the size of the freight.
In the Freight Size Description field, enter the description of the container.
Click Add to add the freight size to the table.
Click OK to save the changes and close the window.
Navigate: From the main menu, select Control > Setup > Freight Size Maintenance > Edit. The Freight Size Maintenance window opens.
In the Freight Size field and description field, enter the changes.
Or, to delete a freight size item, select the item from the table and click Delete.
Click OK to save the changes and close the window.
Navigate: From the main menu, select Control > Setup > Freight Size Maintenance > View. The Freight Size Maintenance window opens.
Click OK to close the window.
The Freight Type window allows you to edit and view the freight types that are most likely to be used to move imported goods. Freight types are informational; they are not used in processing. Freight type refers to the method by which goods are shipped. The method determines how an importer will be charged.
Adding a Freight Type
Maintaining a Freight Type
Viewing a Freight Type
Navigate: From the main menu, select Control > Setup > Freight Type Maintenance > Edit. The Freight Type Maintenance window opens.
In the Freight Type field, enter the size of the freight.
In the Freight Type Description field, enter the description of the container.
Click Add to add the freight type to the table.
Click OK to save the changes and close the window.
Navigate: From the main menu, select Control > Setup > Freight Type Maintenance > Edit. The Freight Type Maintenance window opens.
In the Freight Type field and description field, enter the changes.
Or, to delete a freight type item, select the item from the table and click Delete.
Click OK to save the changes and close the window.
Navigate: From the main menu, select Control > Setup > Freight Type Maintenance > View. The Freight Type Maintenance window opens.
Click OK to close the window.
On the Partner Org Unit window, you can change the partner organization unit information.
See "Edit the Partner Organization Unit Information" in the Purchasing chapter
The Half window allows you to maintain a list of fiscal halves. Each year is split into two six-month periods. The halves are represented by the four-digit year followed by 1 or 2.
The halves are used to maintain budget details. The actual start and end dates are controlled by the calendar module, which is set up at installation time.
Editing Halves
Viewing Halves
The Inventory Adjustment Reason Code Maintenance window allows you to maintain a list of reasons for inventory adjustments. You use the reasons to indicate why the total stock on hand is increased or decreased. For example, you may need to decrease the stock on hand due to shrinkage.
See "Add Inventory Adjustment Reason" in the Inventory Control chapter
See "Maintain Inventory Adjustment Reason" in the Inventory Control chapter
See "View Inventory Adjustment Reason" in the Inventory Control chapter
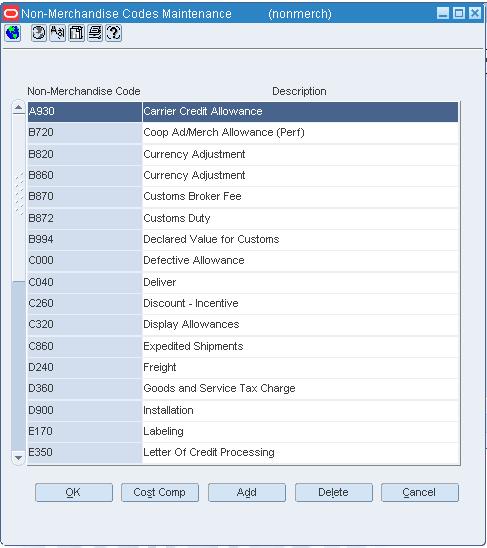
Navigate: From the main menu, select Control > Setup > Non-Merchandise Codes > Edit. The Non-Merchandise Codes Maintenance window opens.
Edit the Description field, and select or clear the Service Indicator check box, as necessary.
Click OK to save your changes and close the window.
The Non-Merchandise Codes Maintenance window allows you to create codes that represent non-merchandise costs from a supplier or partner. The costs can be for services that a supplier or partner performs or for costs associated with the delivery of merchandise. There are also three default non-merchandise tax codes for escheatment costs, tax costs, and freight costs. You cannot delete these codes.
When you are using Oracle Retail Trade Management with RMS, you can associate non-merchandise cost codes with the non-merchandise codes. The cost codes are used to track costs related to the movement of the merchandise.
See "Add a Cost Component for a Non-Merchandise Code" in the Cost Management chapter
See "Delete a Non-Merchandise Code" in the Foundation Data Management chapter
See "View Non-Merchandise Code" in the Harmonized Tariff Schedules chapter
The Invoicing Attributes window allows you to specify how invoices from the partner are handled. You can indicate where an invoice is received and where an invoice is paid. You can also indicate that the stores must confirm that the service was performed before the invoice from the partner is approved. You can select invoicing attributes for a partner if the Oracle Retail Invoice Matching product is installed.
See "Create a Bank/Store Relationship" in the Oracle Retail Sales Audit User Guide
See "Edit a Bank/Store Relationship" in the Oracle Retail Sales Audit User Guide
See "Create a Partner" in the Foundation Data chapter
See "Maintain Partners" in the Foundation Data chapter
See "View a Partner" in the Foundation Data chapter
The Locations window opens when you click OK on the Cost Zones window and not all locations have been added to a cost zone group.
See "Add a Cost Zone Group" in the Cost Management chapter
See "View a Cost Zone Group" in the Cost Management chapter
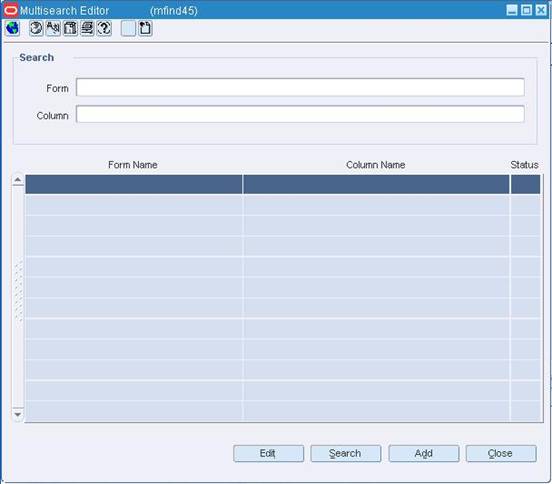
The Multisearch Editor window allows you to search for columns on a multi-view. You can then add, edit, or delete a selected column on the multi-view.
Multi-views allow users to view predefined or user-defined blocks of columns where the number of columns is greater than the number that can be physically displayed due to limitations on window size.
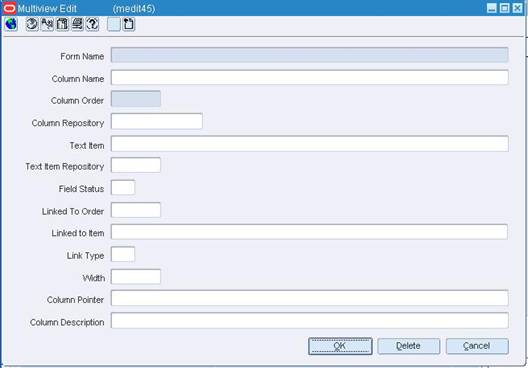
The Multiview Edit window allows you to add or edit a multi-view column on a selected form.
Multi-views allow users to view predefined or user-defined blocks of columns where the number of columns is greater than the number that can be physically displayed due to limitations on window size.
Navigate: From the main menu, select Control > System > Multiview Search Tool. The Multisearch Edit window opens.
Enter search criteria in either or both of the Form and Column fields.
Click Search. The results appear in the table.
Select a task:
To perform another search, enter new search criteria and click Search.
To edit a column on a multi-view, select the form and column and click Edit. The Multiview Edit window opens.
To add a column to a multi-view, click Add. The Multiview Edit window opens.
Click Close to close the window.
The Transfer Work Order - Activity Setup Window allows you to define the activities that can be associated with a transfer work order. Work order are created for transfers when finishing is required. Additionally, you can associate a cost and accounting resolution with each activity that you create.
See "Add a Transfer Work Order Activity" in the Inventory Control chapter
See "Edit a Transfer Work Order Activity" in the Inventory Control chapter
See "View a Transfer Work Order Activity" in the Inventory Control chapter
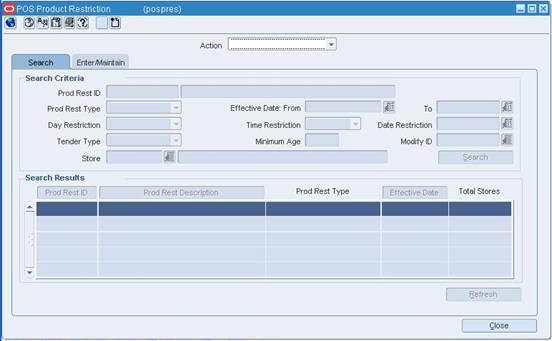
Navigate: From the main menu, select Control > POS Configuration > Product Restriction. The POS Product Restriction window opens.
In the Action field, select Edit, View, or Create from Existing.
Enter additional criteria as desired to make the search more restrictive.
Click Search. The configurations that match the criteria appear in the search results table.
Select a task:
To perform another search, click Refresh.
To display the configuration information, select a configuration and click on the Enter/Maintain tab.
Click Close to close the window
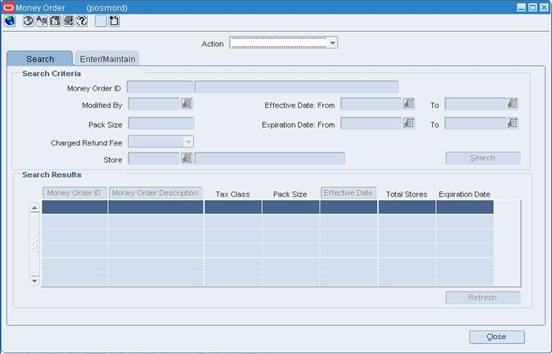
Navigate: From the main menu, select Control > POS Configuration > Money Order. The Money Order window opens.
In the Action field, select Edit, View, or Create from Existing.
Enter additional criteria as desired to make the search more restrictive.
Click Search. The configurations that match the criteria appear in the search results table.
Select a task:
To perform another search, click Refresh.
To display the configuration information, select a configuration and click on the Enter/Maintain tab.
Click Close to close the window.
The Outside Locations window allows you to create, edit, view, and delete an outside location. Outside locations are those locations that are not part of the organizational hierarchy but must be recorded. Some examples of outside locations are entry ports, discharge ports, lading ports, return centers, and bill-to locations.
See "Create an Outside Location" in the Cost Management chapter
See "Edit an Outside Location" in the Cost Management chapter
See "View an Outside Location" in the Cost Management chapter
The Partner Find window allows you to enter criteria in order to search for partners and view the results of the search.
The default view for the Partner Find window opens when you open the window for the first time. You can also create a custom view.
See "Search for a Partner" in the Foundation Data chapter
The Partner Maintenance window allows you to create, edit, and view a partner. Partner status may be active or inactive. You can enter the currency, language, status, and primary contact information. Use this window to track the following information for specific types of partners:
Bank partners: Track a line of credit.
Import authority partners: Indicate whether they are the primary import authority for the principal country.
All partners except banks: Track manufacturer ID, principal country, Tax ID, and terms.
In some countries, inventory maintained with a third party must be controlled by the retailer. A retailer may send goods to the external finisher or supplier for finishing the work (such as printing, dying, and embroidery) or repair (in case of damaged goods). After the job is done, the finisher or the supplier returns the goods back to the same or a different location. All such movements must be accompanied by a Nota Fiscal.
Auto Receive Stock Indicator: Available only if the partner type is an external finisher.
This flag is used in the two-legged transfer process to indicate that, when the warehouse/store ships the stock for the first leg, the system should automatically update the stock at the external finisher. The system will not wait for the confirmation from the external finisher, regardless of whether it has received the merchandise. If this indicate is unchecked, when the first leg transfer is shipped, the system should not update the stock at the external finisher until the external finisher sends across a message that has received the merchandise.
At the system level, you can determine if partner IDs are unique to all partners or unique to a partner type. If IDs are unique to partner type, partners with different partner types may have the same ID.
See "Create a Bank/Store Relationship" in the Oracle Retail Sales Audit User Guide
See "Create a Partner" in the Foundation Data chapter
See "Edit a Bank/Store Relationship" in the Oracle Retail Sales Audit User Guide
See "View a Partner" in the Foundation Data chapter
See "Maintain Partners" in the Foundation Data chapter
See "Maintain Flexible Attributes for a Partner" in the Foundation Data chapter
See "View Invoice Matching Attributes for a Partner" in the Foundation Data chapter
See "Maintain an Address for a Vendor" in the Foundation Data chapter
The Purchase Order List window allows you to match purchase orders in Worksheet status with the selected item.
You can select the purchase order to add the items to. The quantities being added are combined with the quantity of the item if it currently exists on the purchase order with the same location, cost, and so on. If the item is not yet on the purchase order, a new line item with the quantity is added.
See "Add an Item to an Existing PO from the Buyer Worksheet" in the Replenishment chapter
The Split Supplier window allows you to split item requirements among suppliers or change the supplier of an item.
RMS verifies proper association of line items to suppliers and locations. After you select a supplier, the supplier field is disabled and the sourcing country and AOQ fields are enabled.
See "Split Order Quantities for an Item Across Suppliers" in the Purchasing chapter
RMS has several built in methods that you can use to leverage system security.
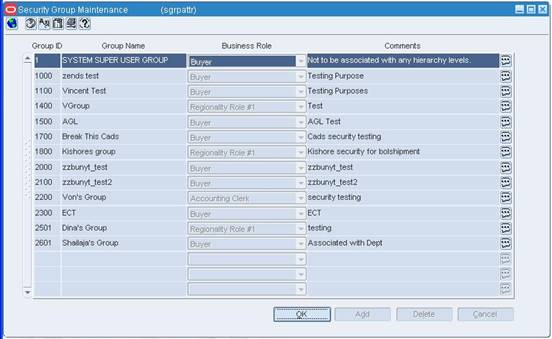
The Security feature allows you to give users either full or limited access to certain areas of RMS. The users must be valid system users.
The Security feature allows you to group users by access. Users with limited access can be linked to one or more groups. The users within the groups share the same permissions to view, add, edit, and delete records.
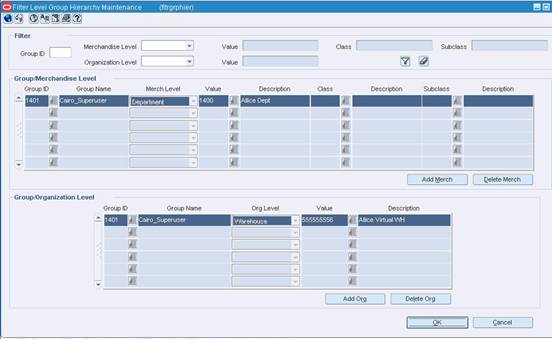
You can further secure RMS by assigning regions to a user. The users within the groups share the same permissions to specified functional areas, merchandise levels, and organizational levels.
You can assign access to groups at the product level, or location level. The security restrictions that you set up at the group level are applied to all users that are linked to the group.
See "View LOV Restrictions to a User Group" in the Foundation Data chapter
See "View a Regionality Relationship" in the Inventory Control chapter
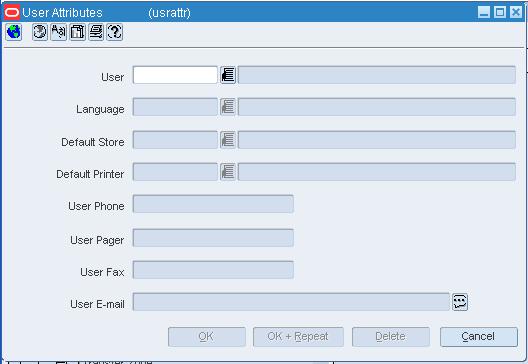
Navigate: From the main menu, select Control > Setup > User Attributes > View. The User Attributes window opens.
In the User field, enter the ID of the user, or click the LOV button and select the user.
Click OK to close the window.
Navigate: From the main menu, select Control > Setup > User Attributes > New. The User Attributes window opens.
In the User fields, enter the ID and name of the user. The user must be a valid system user.
In the Lang field, enter the ID of the user's language, or click the LOV button and select the language.
Enter information in the optional fields as necessary.
Click OK to save any changes and close the window.
Navigate: From the main menu, select Control > Setup > User Attributes > New. The User Attributes window opens.
In the User field, enter the ID of the user, or click the LOV button and select the user.
Edit the language, default store, and contact information as necessary.
In the User field, enter the ID of the user, or click the LOV button and select the user.
Click Delete.
When prompted to delete the record, click Yes.
Click OK to save your changes and close the window.
Navigate: From the main menu, select Control > Setup > User Role Privileges. The User Role Privileges window opens.
Navigate: From the main menu, select Control > Setup > User Role Privileges. The User Role Privileges window opens.
Click Add. The next available line becomes enabled.
In the Role field, enter the description of the user role, or click the LOV button and select the user role.
In the Order Appr Limit field, enter the maximum amount the user role is permitted to approve on a purchase order.
In the Appr Xfer field, select the check box if the user role is authorized to approve transfers.
Click OK to save your changes and close the window.
Navigate: From the main menu, select Control > Setup > User Role Privileges. The User Role Privileges window opens.
Edit the Order Appr Limit and Appr Xfer fields as necessary.
To add a user role:
Click Add.
Enter the user role and privileges on the next available line.
To delete a user role, select a user role and click Delete.
Click OK to save your changes and close the window.
The User Role Privileges window allows you to add and maintain the privileges of user roles. You can set a maximum amount that a user role is authorized to approve on a purchase order. You can also indicate whether a user roles is authorized to approve transfers. All users that are members of the secured user role inherit the characteristics of the user role.
Navigate: From the main menu, select Control > Setup > User Role Privileges. The User Role Privileges window opens.
Select a user role and click Delete.
Click OK to save your changes and close the window.
The User Attributes window allows you to add, edit, and view secured users. Users can have limited or full access to secured records. You can assign users who share the same security privileges to one or more security groups. Any changes made to the privileges of the group are passed on to the users that are linked to the group. If a user is assigned to more than one group and inherits conflicting permissions, the user inherits the least restrictive permissions.
The Security User/Group Link window allows you to add, delete, or view the links between users and security groups. You can access this window independently or when you add or edit a user or a group. All users that are linked to a security group inherit the privileges of the group.
Navigate: From the main menu, select Control > System > Location/Product Security > Group Hierarchy Link > Edit. The Filter Level Group Hierarchy Maintenance window opens.
In the area you want to add to:
In the Group/Merchandise Level area, click Add Merch.
In the Group/Organization Level area, click Add Org.
In the Group ID field, enter the ID of the group, or click the LOV button and select a group.
In the Merch/Org Level field, select the hierarchical level you are limiting the group to.
|
Note: You can associate a group with multiple hierarchy levels. |
In the Value field, enter the ID of the level you want to limit the group to.
Click OK to save any changes and close the window.
Navigate: From the main menu, select Control > System > Location/Product Security > Group > View. The Security Group Maintenance window opens.
|
Note: This window can also be accessed from Control > System > Regionality > Group > Edit. |
Click OK to close the window.
Navigate: From the main menu, select Control > System > Location/Product Security > User/Group Link > View. The Security User/Group Link window opens.
|
Note: You can also access the Security User/Group Link window from:- Control > System > Regionality > User/Group Link> Edit, or - From the Security menu, when you add or edit a user or a group. |
To view a subset of the user and security group links:
Enter criteria in the Group ID and User ID filter criteria fields.
Click the filter button. The security groups and users that match the criteria appear.
To view all the user and security group links:
Click the clear filter button. The criteria are cleared from the Group ID and User ID fields.
Click the filter button. All records appear.
Click OK to close the window.
Navigate: From the main menu, select Control > System > Location/Product Security > Group > Edit. The Security Group Maintenance window opens.
Click Add. The Group ID is filled in automatically.
In the Group Name field, enter a description of the security group.
Select a Business Role for the new security group.
In the Comments field, enter a comment, or click the comments button and enter the comment.
Click OK to save any changes and close the window.
Navigate: From the main menu, select Control > System > Location/Product Security > Group Hierarchy Link > Edit. The Filter Level Group Hierarchy Maintenance window opens.
|
Note: If you add hierarchy levels to a group that has not previously had LOV limits, or if you remove all hierarchy levels from a group that had LOV limits, you must first log out of the system and log back in before your changes are applied. |
Enter the search criteria:
In the Group ID field, enter the group you want to search for.
In the Merchandise Level field, enter the level you want to search for. Enter a corresponding ID in the value field as necessary.
In the Organization Level field, enter the level you want to search for. Enter a corresponding ID in the value field as necessary.
Click the filter button to return the results that meet the criteria you entered.
On the table, select a record you want to delete.
Click Delete Merch or Delete Org.
You are prompted to confirm the deletion. Click OK.
|
Note: You can not edit an existing record. You must delete the existing record, and add a new record. |
Click OK to save any changes and close the window.
Navigate: From the main menu, select Control > System > Location/Product Security > Location Security Matrix > View. The Location Security Matrix window opens.
To view a subset of the groups and secured entities:
Enter criteria in the filter criteria fields.
Click the filter button. The groups and secured entities that match the criteria appear.
To view all the groups and secured entities:
Click the clear filter button. The criteria are cleared from the filter criteria fields.
Click the filter button. All records appear.
Click OK to close the window.
Navigate: From the main menu, select Control > System > Location/Product Security > Location Security Matrix > Edit. The Location Security Matrix window opens.
Click Add. The fields in the Apply area are cleared.
In the Group field, enter the ID of the security group, or click the LOV button and select the group.
In the Functional Area field, select the area to be secured.
Select the Select check box in order to allow the group of users to view the selected entities.
Select the Update check box in order to allow the group of users to add, edit, and delete the selected entities.
In the Hierarchy Level field, select the organizational level to be secured.
In the value field, enter the ID of the region, district, or warehouse, or click the LOV button and select the value.
|
Note: RMS data security does not allow location-level security to be defined at the store level. |
Click Apply. The selected group and entities are added to the table.
Click OK to save your changes and close the window.
Navigate: From the main menu, select Control > System > Location/Product Security > Location Security Matrix > Edit. The Location Security Matrix window opens.
Enter criteria in the filter criteria fields as necessary.
Click the filter button. The groups and secured entities that match the criteria appear.
Select or clear the Sel (Select) and Upd (Update) check boxes as necessary.
Navigate: From the main menu, select Control > System > Location/Product Security > Group > Edit. The Security Group Maintenance window opens.
|
Note: This window can also be accessed from Control > System > Regionality > Group > Edit. |
Edit the Group Name, Business Role, and Comments fields as necessary.
Navigate: From the main menu, select Control > System > Location/Product Security > User/Group Link > View. The Security User/Group Link window opens.
|
Note: You can also access the Security User/Group Link window from: - Control > System > Regionality > User/Group Link> Edit, or - From the Security menu, when you add or edit a user or a group. |
Click Add. A new line is added to the table and the cursor appears in the Group ID column.
In the Group ID field, enter the ID of the security group, or click the LOV button and select the group.
In the User ID field, enter the ID of the user, or click the LOV button and select the user.
Click OK.
The Location Security Matrix window allows you to add, delete, edit, and view location security records by security group. You can filter the records by a variety of criteria and view or delete the records that match the criteria. You can also edit the permissions. Users with Select permission can view the secured entities. Users with Update permission can add, edit, and delete the secured entities.
You can secure entities within a functional area and at the organizational hierarchy level. The functional areas are Promotions, Transfers To, Transfers From, Allocations To, Allocations From, Shipments, Orders, Stock Counts, Ticket Requests, Inventory Adjustments, Returns to Vendors (RTV), and Store. If the Oracle Retail Sales Audit software is installed, the Sales Audit Store Day and Sales Audit Store ACH options are also available. The organizational hierarchy levels are Region, District, Store, and Warehouse.
When changes are made to the location security records, the records are rebuilt by a batch program.
The Security Group Maintenance window allows you to add, edit, and view security groups. You can use a security group to link users who share the same security privileges. If a user is assigned to more than one group and inherits conflicting permissions, the user inherits the least restrictive permissions.
Navigate: From the Main Menu, select Control > System > Regionality > Regionality Matrix > Edit. The Regionality Maintenance window opens.
Click Add Group/Loc.
Enter a group ID, or click the LOV button to select a group.
Select an organizational level.
Enter an organizational value, or click the LOV button to select a value.
Click OK to save your changes and close the window.
Select a group/location record.
Click Add Elements under the Supplier, Supplier/Department, or Department table.
Enter the supplier and/or department IDs to add to the selected group/location combination, or click the LOV button to select a supplier and/or department.
Click OK to save your changes and close the window.
Navigate: From the main menu, select Control > System > Location/Product Security > User/Group Link > View. The Security User/Group Link window opens.
|
Note: You can also access the Security User/Group Link window from: - Control > System > Regionality > User/Group Link> Edit, or - From the Security menu, when you add or edit a user or a group. |
You may need to maintain the internationalized aspects of RMS.
You can maintain a list of country codes and descriptions. Country codes are used when entering:
Origin, import, export, and consolidating countries
Supplier, partner, outside location, and customer addresses
Company, store, and warehouse addresses
Company and store addresses of competitors
Country level geocodes and sales taxes
If the system is set up to support multiple currencies, monetary amounts may be displayed in any of the currencies that are defined in the system. In addition to identifying the currencies, the number of decimal places to display and the format for both cost and retail amounts must be entered for each currency.
One or more types of exchange rates may be entered for each currency. The types of exchange rates are: operational, consolidated, letter of credit/bank, purchase order, customs entry, and transportation. Exchange rates are used to convert a monetary amount from any currency to the primary currency of the company.
If the exchange rates are shared with an external system, you can map the types of exchange rates found in the external system to the types of exchange rates in RMS. The types of exchange rates are: operational, consolidated, letter of credit/bank, purchase order, customs entry, and transportation.
In many areas of the system, monetary values can be viewed in the primary currency of the company, the currency of the European Union, or the local currency of the location.
By default, all values appear in the primary language of the company. However, you can choose to:
Translate a value when you encounter it in a window. You have the option of translating the value into one or multiple target languages, or you can copy existing translations from a similar value.
Translate one or multiple values of the same type, such as item or department descriptions, into one target language.
Users who are set up to view values in the target language will see the translated version, rather than the primary language version, of the values.
You can view, but not edit, a list of the units of measure that are available in the system for defining area, dimension, volume, and weight. Units of measure are used in a variety of ways:
Standard unit of measure (SUOM): The unit of measure by which stock is tracked at the corporate level. The SUOM may be measured by weight, volume, area, or dimension. The size of the standard unit of measure is set up at the item level. If a measurement, rather than the term "each", is selected as the SUOM, a conversion factor must be entered. The conversion factor indicates many units of the selected SUOM make up an each. For example: If the size of an each is 5 kilograms, then the SUOM is kilogram and the conversion factor is 5.
Store order multiple: The unit of measure by which items are shipped to stores. The store order multiple may be each, inner, or case. The default store order multiple is set up at the item level. Store order multiples for specific locations are set up at the item/location level.
Unit of purchase (UOP): The unit of measure by which an item is purchased. The UOP may be each, case, or pallet. The default UOP is set up at the item/supplier/sourcing country level. The default UOP may be superceded when adding items to a purchase order.
Unit of Transfer: The unit of measure by which an item is transferred. The unit of transfer may be each, case, or pallet. The unit of transfer is entered when adding items to a transfer.
Unit of Receipt (UOR): The unit of measure by which an item is received on a shipment. The UOR may be each, case, or pallet. The UOR is entered when receiving items.
The standard unit of measure is the equivalent of an each. A case (or its equivalent, such as a box, bushel, barrel, or roll) may correlate with a supplier's pack size. The unit of purchase, unit of transfer, and unit of receipt may default to either the standard unit of measure or case. If a quantity is entered by the pallet for the unit of purchase, unit of transfer, or unit of receipt, the quantity is converted to the default measurement.
The terms inner, case, and pallet are used as generic terms in RMS. You can select different terms for the same concepts at the item/supplier level.
See "View Units of Measure" in the Item Maintenance chapter
The Language Maintenance window allows you to view and maintain the list of languages used in the system. You can enter the standard abbreviation for the language and references to the WebHelp server, Web Report server, and Report server. The standard two-character and three-character abbreviations approved by the International Organization for Standardization (ISO) can be found in ISO 639-1 and ISO 639-2.
Place the cursor in the Description field of a window.
Click Translator located on the toolbar. The current translations of the value appear in the Translation Maintenance window.
Edit the translations as necessary.
Click Add. The next available line is enabled.
In the Language field, enter the ID of the target language, or click the LOV button and select the target language.
In the Translated Description field, enter the translation of the value.
Click OK to save your changes and close the window.
The Currency Exchange Rates window allows you to view and maintain exchange rates for a selected currency. The exchange rates are used to convert monetary amounts to the primary currency of the company.
The Currency Exchange Type Mapping window allows you to view and maintain relationships between currency exchange types. Exchange types may be received from external sources. You can choose which exchange types in RMS should be mapped to the external exchange types. After these relationships are mapped, exchange rates can be effectively communicated between RMS and the external source.
The Currency Maintenance window allows you to view and maintain the list of currencies used in the system. You also enter the number of decimal places used in currency conversions for cost and retail amounts. You can access the Currency Exchange Rates window to enter several types of exchange rates for a selected currency.
Navigate: From the main menu, select Control > Setup > Currency > View. The Currency Maintenance window opens.
To view the rates of exchange for a currency:
Select a currency and click Exchange Rates. The exchange rates appear in the Currency Exchange Rates window.
Click OK to close the window.
Click OK to close the window.
Navigate: From the main menu, select Control > Setup > Currency > Edit. The Currency Maintenance window opens.
Edit the enabled fields as necessary.
Navigate: From the main menu, select Control > Setup > Currency > Edit. The Currency Maintenance window opens.
|
Note: If your organization uses Oracle Financials, version 11.5.10 or later you cannot add or edit an exchange rate. This form opens in view mode. |
Select a currency and click Exchange Rates. The rates of exchange appear in the Currency Exchange Rates window.
Edit the exchange rates as necessary.
Click Add. The next available line is enabled.
In the Exchange Type field, select the type of exchange rate.
In the Exchange Rate field, enter the value of the exchange rate to be used for currency conversions.
In the Effective Date field, enter the date on which the exchange rate becomes effective.
Click OK to save your changes and close the window.
Navigate: From the main menu, select Action > Currency Exchange Types. The Currency Exchange Type Mapping window opens.
Next to each external exchange type, select the appropriate RMS exchange type.
Click OK to save your changes and close the window.
The Translation Maintenance window allows you to translate a value found in a description field into one or more target languages. You can also access the Like Description window in order to copy translations from a similar value.
Users who are set up to view values in the target language will see the translated version, rather than the primary language version, of the values.
The Language Translation window allows you to translate one or more values of the same type from a primary language into a target language. For example: You can choose to translate all or a subset of store names, such as those beginning with a through c.
Users who are set up to view values in the target language will see the translated version, rather than the primary language version, of the values.
Navigate: From the main menu, select Control > System > Language Translation. The Language Translation window opens.
In the Action field, select View.
In the Language to Translate Into field, enter the ID of the target language, or click the LOV button and select the target language.
In the Description Type to Translate field, enter the ID of the type of values to be translated, or click the LOV button and select the type.
To restrict the search to a subset of values, enter partial descriptions in the From and To fields as necessary. These entries are made in the primary language.
Click Search. The values that match the search criteria appear.
Click OK to save your changes and close the window.
Navigate: From the main menu, select Control > Setup > Language Maintenance > Edit. The Language Maintenance window opens.
Click OK to close the window.
Navigate: From the main menu, select Control > System > Language Translation. The Language Translation window opens.
In the Action field, select a task:
To translate values of the same type that were not yet translated, select New.
To edit existing translations only, select Edit.
To enter new and edit existing translations, select Edit All.
In the Language to Translate Into field, enter the ID of the target language, or click the LOV button and select the target language.
In the Description Type to Translate field, enter the ID of the type of the type of values to be translated, or click the LOV button and select a type.
To restrict the search to a subset of values, enter partial descriptions in the From and To fields as necessary. These entries are made in the primary language.
Click Search. The values that match the search criteria appear.
In the Target Language field, enter or edit the translation for each value.
Click OK to save your changes and close the window.
Navigate: From the main menu, select Control > Setup > Language Maintenance > Edit. The Language Maintenance window opens.
Edit the enabled fields as necessary.
Click Add. The next available line is enabled.
In the Language field, enter the ID of the language.
In the Description field, enter the description of the language.
In the ISO code field, enter the code for the language.
In the Server fields, enter the server addresses as necessary.
Click OK to save your changes and close the window.
Navigate: From the main menu, select Control > Setup > Country > Edit. The Country Maintenance window opens.
Edit the codes or descriptions as necessary.
Navigate: From the main menu, select Control > Setup > Country > Edit. The Country Maintenance window opens. Select a country. From the Options menu, select Expenses. The Expense Profile Maintenance window opens.
Click Add. The next line in the Expense Profile Header table is enabled.
In the Lading Port and Dis Port fields, enter the codes for the locations, or click the LOV buttons and select the locations.
Click Add Details. The next available line in the Expense Profile Detail table is enabled.
In the Component field, enter the code for the expense component, or click the LOV button and select the expense component.
In the enabled fields, enter or edit the default details as necessary.
In the Component Nomination fields, select the status of the expense in relation to the other components:
Select N/A, if the expense is not included in the calculation.
Select + (plus sign), to add the expense.
Select - (minus sign), to subtract the expense.
Click OK to save your changes and close the window.
The point of sale (POS) configurations feature allows you to create and maintain configurations that are downloaded to the POS registers at stores. You can create the following types of configurations:
Touch button: You can use this configuration to determine the appearance of touch buttons on the point of sale register. You can associate items with each button.
Coupon: You can create a configuration for each expense coupon that can be used at stores. You can also indicate the items for which the coupon can be used.
Money order: You can use this configuration to enable stores to sell money orders on the point of sale register.
Product restriction: You can restrict the sale of items for various reasons with this configuration.
Pay in/pay out: You can use this configuration to enable stores to remove or add money to the register for miscellaneous services and items received or sold.
Supplier payment type: You can use this configuration to specify the method of payment that may be used at each store to pay suppliers.
Tender type: You can create configurations that provide information about how each type of tender is handled at the POS register.
You can also view these topics for more information:
Editing the Properties of Touch Buttons in a Touch Button Configuration
See "View a Payment Type Configuration for a Supplier" in the Foundation Data chapter
The POS Coupon window allows you to create, edit, and copy point of sale (POS) coupon configurations. You can specify for each expense coupon that can be used at the stores. You specify the coupon type, the coupon amount, and the tax class for the coupon. You also select the dates on which the configuration is valid at the stores.
You can associate stores and items with the configuration. You indicate what items the coupon can be used for by associating items with the configuration. You can only associate stores that have the same currency as the configuration. The configuration then is downloaded to the POS registers of the associated stores in a nightly batch process. How the coupon configuration is interpreted depends on the type of POS system your organization uses.
When you copy a configuration, the basic configuration information, such as coupon type and amount, is copied into a new configuration and assigned a new ID. However, the associated stores and items are not copied, so you must add stores and items to the new configuration.
You can re-sequence the coupon configurations to change the order in which the coupons appear on the POS register. This allows you to group similar coupons together.
Navigate: From the main menu, select Control > POS Configuration > Coupon. The POS Coupon window opens.
In the Action field, select New. The Enter/Maintain tab opens, and a unique coupon configuration ID is filled in automatically.
In the Coupon ID field, enter a description for the coupon.
In the Currency Code field, enter the code for the currency, or click the LOV button and select a currency.
In the Coupon Type/Amt field, select the type of coupon. Then enter the value of the coupon.
In the Tax Class field, select the tax code for the coupon.
In the Effective Date field, enter the date on which the coupon configuration is active, or click the calendar button and select a date.
In the Expiration Date field, enter the date on which the coupon configuration expires, or click the calendar button and select a date.
Enter optional information as necessary.
To associate stores with the configuration:
Click Stores. The Stores window opens.
In the Location Type field, enter the ID of the location or group, or click the LOV button and select a location or group.
Click Apply.
Click OK to save your changes and close the window.
Associate items with a POS configuration.
Exclude items from a POS configuration.
Click Save to save your changes and close the window.
The List of Classes window allows you to associate all of the items in multiple classes to a POS configuration. You must first select a department in the Department field on the POS Merchandise Criteria window to access this window. You can limit the classes that appear in the List of Classes window by entering a partial description of the classes in the Class field on the POS Merchandise Criteria window.
The List of Departments window allows you to associate all of the items in multiple departments with a POS configuration. You can limit the departments that appear in the List of Departments window by entering a partial description of the departments in the Department field on the POS Merchandise Criteria window. You can also select a group in the Groups field on the POS Merchandise Criteria window to limit which departments appear.
The List of Groups window allows you to associate all of the items in multiple groups with a POS configuration. You can limit the groups that appear in the List of Groups window by entering a partial description of the groups in the Groups field on the POS Merchandise Criteria window.
The List of Items window allows you to associate multiple items with a POS configuration when you access the window through the Include area on the POS Merchandise Criteria window. When you access this window through the Exclude area on the POS Merchandise Criteria window, you can use this window to exclude multiple items from a POS configuration.
You can limit the items that appear in the List of Items window by selecting a group, department, class, and subclass on the POS Merchandise Criteria window. You also can limit the items by entering a partial description of the items in the Item field on the POS Merchandise Criteria window.
The List of Included Items window allows you to view all of the items associated with a POS configuration.
The List of Subclasses window allows you to associate all of the items in multiple subclasses with a POS configuration. To access this window, you must first select a department and a class on the POS Merchandise Criteria window. You can limit the subclasses that appear in the List of Classes window by entering a partial description of the subclasses in the Subclass field on the POS Merchandise Criteria window.
The Money Order window allows you to create, edit, and copy point of sale (POS) money order configurations. You create a money order configuration to enable stores to sell money orders on the point of sale register. You specify the tax class, the maximum sale amount of a money order, and the maximum amount for which a money order can be sold for the configuration. You also select the dates on which the configuration is valid at the stores.
You must associate stores with the configuration. You can only associate stores that have the same currency as the configuration. The configuration then is downloaded to the POS registers of the associated stores in a nightly batch process. How the money order configuration is interpreted depends on the type of POS system your organization uses.
When you copy a configuration, the basic configuration information, such as currency and money order amounts, are copied into a new configuration and assigned a new ID. However, the associated stores are not copied, so you must add stores to the new configuration.
Navigate: From the main menu, select Control > POS Configuration > Money Order. The Money Order window opens.
In the Action field, select New. The Enter/Maintain tab opens.
In the Money Order ID field, enter a description for the configuration.
In the Effective Date field, enter the date on which the configuration is effective, or click the calendar button and select the date.
In the Expiration Date field, enter the date on which the configuration expires, or click the calendar button and select the date.
In the Fee Amount field, enter the amount of the fee.
In the Max Sale Amt field, enter the maximum amount allowable per transaction.
In the Max Face Amt field, enter the maximum amount for which a money order can be sold.
In the Tax Class, select the tax class for the money order.
In the Pack Size field, enter the number of money orders in a pack of money orders.
To associate stores with the configuration:
Click Stores. The Stores window opens.
In the Location Type field, enter the ID of the location or group, or click the LOV button and select a location or group.
Click Apply.
Click OK to save your changes and close the window.
Click Save to save your changes and close the window.
The Pay In/Out window allows you to create, edit, and copy point of sale (POS) pay in/pay out configurations. With pay in/pay out configurations, money can be removed or added to the register. You can create two types of pay in/pay out configurations:
Paid Out: This type of configuration is used when money is paid out of the register for services performed for the store.
Paid In: This type of configuration is used when money is received and put into the register for miscellaneous services provided by the store.
You specify the profit center, the export code, and the tax chart code for the configuration. You also select the dates on which the configuration is valid at the stores.
You can associate stores with the configuration. The configuration is then downloaded to the POS registers of the associated stores in a nightly batch process. How the pay in/pay out configuration is interpreted depends on the type of POS system your organization uses.
When you copy a configuration, the basic configuration information, such as pay in/pay out type and tax chart code, are copied into a new configuration and assigned a new ID. However, the associated stores are not copied, so you must add stores to the new configuration.
Navigate: From the main menu, select Control > POS Configuration > Pay In/Pay Out. The Pay In/Out window opens.
In the Action field, select New. The Enter/Maintain tab opens, and a unique pay in/pay out configuration ID is filled in automatically.
In the Pay In/Out ID field, enter a description for the configuration.
In the Pay In/Out Type field, select the type of configuration.
In the Effective Date field, enter the date on which the pay in/pay out configuration is active, or click the calendar button and select a date.
Enter optional information as necessary.
To associate stores with the configuration:
Click Stores. The Stores window opens.
In the Location Type field, enter the ID of the location or group, or click the LOV button and select a location or group.
Click Apply.
Click OK to save your changes and close the window.
Click Save to save your changes and close the window.
The POS Button Configuration window allows you to create, edit, and copy point of sale (POS) touch button configurations. The touch button configurations determine the appearance of touch buttons on the point of sale register.
When you create touch buttons, you specify:
The touch button color
Text that will appear on the touch button and the color of the text
The touch button type, which determines how the touch button functions on the POS register.
The position of the touch button on the POS register.
You can create two layers of touch buttons and define the properties of each touch button. Touch buttons on the First Layer palette appear on primary windows in your POS system. Touch buttons on the Second Layer palette appear on secondary windows on your POS system.
When you associate stores with the configuration, the touch button configuration is downloaded to the POS registers of the associated stores in a nightly batch process. How the touch button configuration is interpreted depends on the type of POS system your organization uses.
When you copy a configuration, basic configuration information, such as the touch buttons and the associated items, are copied into a new configuration and assigned a new ID. However, the associated stores are not copied, so you must associate stores with the new configuration.
The POS Button Detail window allows you to enter the properties of the touch button. You can specify the text that appears on the touch button, the color of the touch button, and the color of text. You can also specify the type of touch button.
The POS Button Move window allows you to position the touch buttons on the First Layer and Second Layer palettes. When you move the touch button on the palette, the position of the touch button on the POS register is changed accordingly.
The POS Merchandise Criteria window allows you to associate items with the following point of sale (POS) configurations:
Coupon
Product restriction
You can associate all the items in a group, department, class, or subclass with the configuration. You can also associate an individual item or all items on an item list with the configuration.
After you associate items with a configuration, you can exclude items from the configuration. You can exclude individual items or all items on an item list.
The POS Day/Time/Date window allows you specify times, days of the week, and dates on which the items associated with the configuration cannot be sold. You can specify the following restrictions:
Day: You can select one or more days of the week on which items cannot be sold.
Time: You can select a time before which the items cannot be sold. You can also select a time after which the items cannot be sold.
Date: You can select a date on which the items cannot be sold.
You can also restrict the sales of the items by a combination of times, days, and dates. For example, you can specify that items cannot be sold after 4:00 PM on Sundays.
The POS Product Restriction window allows you to create, edit, and copy point of sale (POS) product restriction configurations. With product restriction configurations, you can restrict the sale of items for various reasons. You select the dates on which the configuration is valid at the stores.
You can associate stores and items with the configuration. You indicate what items the coupon can be used for by associating items with the configuration. You can only associate stores that have the same currency as the configuration. The configuration then is downloaded to the POS registers of the associated stores in a nightly batch process. How the coupon configuration is interpreted depends on the type of POS system your organization uses.
You create a product restriction configuration for each restriction type. You can create product restrictions for the following restriction types:
Food stamp: Customers can use food stamps to purchase the associated items.
Minimum age: Customer must be at least a specified age to purchase the associated items. You specify the minimum age.
Container deposit: Customers must pay a deposit when purchasing the associated items. You specify the amount of the deposit.
Container redemption value: Customers may receive a refund if they return the containers for the associated items. You specify the amount of the refund.
Day/time/date: Customers cannot purchase the associated items before or after a specific time, on a specific day of the week, or on a specific date. You can also specify a combination of these time restrictions.
Tender type: Customers cannot use a specific type of tender to purchase the associated items.
Non-discountable: Customers cannot receive a discount on the associated items.
Returnable: Customers cannot return the associated items.
Quantity Limit: Customers are limited to a maximum quantity of the associated items that they can purchase in a single sale. You specify the quantity limit.
When you copy a configuration, the basic configuration information, such as product restriction type, are copied into a new configuration and assigned a new ID. However, the associated stores and items are not copied, so you must add stores and items to the new configuration.
The Stores window allows you to associate stores with the following POS configurations:
Supplier payment type
Touch button
Coupon
Money order
Product restriction
Pay in/pay out
Tender type
The configuration then is downloaded to the POS registers of the associated stores in a nightly batch process. You can associate individual stores to a configuration, or you can associate all the stores in your organization. You can also associate stores using the following groups:
Area
Region
District
Location list
The Resend to Stores window allows you to send types of point of sale (POS) configurations to stores. All of the configurations of the selected type are sent during the next batch process. You select one or all of the following types of configurations:
Tender type
Product restriction
Touch button
Money orders
Pay in/pay out
Coupon
Supplier payment type
You then select the stores to which you want to send the type of configurations. You can select all of the stores in a chain, area, region, or district. You can also select a single store.
The Supplier Payment Types window allows you to add point of sale (POS) payment type configurations for suppliers at specific stores. Employees at the stores can use this payment type information to pay suppliers. You create a configuration for each supplier. You specify one or more payment types and the date on which the configuration is effective at the stores. The payment types are cash, money order, and invoice.
You associate stores with each payment type. The configuration then is downloaded to the POS registers of the associated stores in a nightly batch process. How the supplier payment type configuration is interpreted depends on the type of POS system your organization uses.
Navigate: From the main menu, select Control > POS Configuration > Product Restriction. The POS Product Restriction window opens.
In the Action field, select New. The Enter/Maintain tab opens, and a unique product restriction configuration ID is filled in automatically.
In the Prod Rest ID field, enter a description for the product restriction configuration.
In the Prod Rest Type field, select the appropriate restriction type.
In the Currency field, enter the currency code of the configuration, or click the LOV button and select a currency.
For the following restriction types, additional information is required:
Container Deposit Restriction: Enter the deposit amount.
Container Redemption Value Restriction: Enter the amount.
Minimum Age Restriction: Enter the age a customer must be to purchase the product.
Day/Time/Date Restriction: Enter the Day/Time/Date that goods cannot be sold.
Tender Type Restriction: Select the tender type.
Quantity Limit Restriction: Enter the maximum a customer can purchase.
Enter optional information as necessary.
To associate stores with the configuration:
Click Stores. The Stores window opens.
In the Location Type field, enter the ID of the location or group, or click the LOV button and select a location or group.
Click Apply.
Click OK to save your changes and close the window.
Associate items with a POS configuration.
Exclude items from the configuration.
Click Save to save your changes and close the window.
The Tender Type window allows you to create, edit, and copy point of sale (POS) tender type configurations. Tender type configurations provide information about how each method of payment is handled at the POS register.
You can specify the amount at which authorization is required, authorization service, and the currency. Several indicators can be selected to determine the specific attributes of the tender type at the POS register. You can also indicate that the register drawer will open automatically when this tender type is used and that a cashier at the POS register is required to ask for an invoice when this tender type is used. You can specify that payment with this tender type must be the exact amount of the purchase. You also select the dates on which the configuration is valid at the stores and the currency of the configuration.
You can associate stores with the configuration. You can only associate stores that have the same currency as the configuration. The configuration then is downloaded to the POS registers of the associated stores in a nightly batch process. How the configuration is interpreted depends on the type of POS system your organization uses.
When you copy a configuration, the basic configuration information, such as tender type group and currency, are copied into a new configuration and assigned a new ID. However, the associated stores are not copied, so you must add stores to the new configuration.
Navigate: From the main menu, select Control > POS Configuration > Tender Type. The Tender Type window opens.
In the Action field, select New. The Enter/Maintain tab opens, and a unique tender type configuration ID is filled in automatically.
In the Tender Type ID field, enter a description for the tender type.
In the Tender Type Group, select the type of tender group.
In the Effective Date field, enter the date on which the tender type configuration is active, or click the calendar button and select a date.
In the Currency Code field, enter the code for the currency, or click the LOV button and select a currency.
In the Processor Type field, select the type of credit card processor.
Enter or select optional information as necessary.
To associate stores with the configuration:
Click Stores. The Stores window opens.
In the Location Type field, enter the ID of the location or group, or click the LOV button and select a location or group.
Click Apply.
Click OK to save your changes and close the window.
Click Save to save your changes and close the window.
After you have created a configuration, you may associate items with the POS configurations.
Click Items. The POS Merchandise Criteria window opens.
To associate a single item with the configuration:
In the Include area, enter the item number in the Item field, or enter a partial description and click the LOV button to select an item.
Click Apply Inclusions.
|
Note: You can limit the items that appear when you click the LOV button by selecting the group, department, class, and subclass to which the item belongs. |
To associate multiple items with the configuration:
In the Include area, click List of Items. The List of Items window opens.
Select the Include check box next to the items you want to associate with the configuration. To associate all of the items with the configuration, click Include All.
Click Apply.
|
Note: You can limit the items that appear in the List of Items window by selecting a group, department, class, and subclass. You can also limit the items by entering a partial description of the item in the Item field. |
To associate all items within a single group, department, class, or subclass with the configuration:
In the Include area, enter the ID of the group, department, class, or subclass in the appropriate field, or click the LOV button and select a group, department, class, or subclass.
Click Apply Inclusions.
|
Note: To associate all items in a class or subclass with the configuration, you must first specify the department. |
To associate all items within a multiple groups, departments, classes, or subclasses with the configuration:
In the Include area, click the appropriate List of button, depending on the hierarchy level you want to associate with the configuration.
Select the Include check box next to the members of the hierarchy level you want to associate with the configuration. To associate all of the members of the hierarchy level with the configuration, click Include All.
Click Apply.
|
Note: To associate all items within multiple classes or subclasses with the configuration, you must first specify the department. |
To associate all items within an item list with the configuration:
In the Include area, enter the ID of the item list in the item list field, or click the LOV button and select an item list.
Click Apply Inclusions.
Click Save to save your changes and close the window.
To exclude a single item from the configuration:
In the Exclude area, enter the item number in the Item field, or enter a partial description and click the LOV button to select an item.
Click Apply Exclusions.
|
Note: You can limit the items that appear when you click the LOV button by selecting the group, department, class, and subclass to which the item belongs. |
To exclude multiple items from the configuration:
In the Exclude area, click List of Items. The List of Items window opens.
Select the Exclude check box next to the items you want to exclude from the configuration. To exclude all of the items from the configuration, click Exclude All.
Click Apply.
|
Note: You can limit the items that appear in the List of Items window by selecting a group, department, class, and subclass. You can also limit the items by entering a partial description of the item in the Item field. |
To exclude all items within an item list from the configuration:
In the Exclude area, enter the ID of the item list in the item list field, or click the LOV button and select an item list.
Click Apply Exclusions.
Click Save to exit.
Navigate: From the main menu, select Control > POS Configuration > Resend to Stores. The Resend to Stores window opens.
In the POS Configuration field, select the type of configurations you want to send to the store.
|
Note: To send all of the configuration types, select All. |
To send the configurations to all the stores in a chain, enter the ID of the chain, or click the LOV button and select a chain in the Chain field.
To send the configurations to all the stores in an area, enter the ID of the area, or click the LOV button and select an area in the Area field.
To send the configurations to all the stores in a region, enter the ID of the region, or click the LOV button and select a region in the Region field.
To send the configurations to all the stores in a district, enter the ID of the district, or click the LOV button and select the district.
To send the configuration to a single store, enter the ID of the store, or click the LOV button and select the store.
Click OK to save your changes and close the window.
Navigate: From the main menu, select Control > POS Configuration > Coupon. The POS Coupon window opens.
In the Action field, select Edit, Create From Existing, or View.
Enter criteria as desired to make the search more restrictive.
Click Search. The configurations that match the search criteria appear on the table.
Select a task:
To display the coupon information, select the coupon, and then click on the Enter/Maintain tab.
To perform another search, click Refresh.
Click Close to close the window.
Navigate: From the main menu, select Control > POS Configuration > Coupon. The POS Coupon window opens. Search for and retrieve a coupon configuration in Edit mode.
Edit the enabled fields as necessary.
Click Stores. The Stores window opens.
In the Location Type field, enter the ID of the location or group, or click the LOV button and select a location or group.
Click Apply.
Click OK to save your changes and close the window.
Select the store in the table.
Click Delete.
Click OK to save your changes and close the window.
In the Location Type field, enter the ID of the location or group, or click the LOV button and select a location or group.
Click Delete.
Click OK to save your changes and close the window.
Click Delete All.
When prompted to delete the records, click Yes.
Click OK to save your changes and close the window.
Navigate: From the main menu, select Control > POS Configuration > Coupon. The Enter/Maintain tab on the POS Coupon window opens. Search for and retrieve a coupon configuration in Edit mode.
Edit the enabled fields as necessary.
Click Stores. The Stores window opens.
In the Location Type field, enter the ID of the location or group, or click the LOV button and select a location or group.
Click Apply.
Click OK to save your changes and close the window.
Select the store in the table.
Click Delete.
Click OK to save your changes and close the window.
In the Location Type field, enter the ID of the location or group, or click the LOV button and select a location or group.
Click Delete.
Click OK to save your changes and close the window.
Navigate: From the main menu, select Control > POS Configuration > Coupon. The Enter/Maintain tab on the POS Coupon window opens. Search for and retrieve a coupon configuration in Edit mode.
Edit the enabled fields as necessary.
Click Items. The POS Merchandise Criteria window opens.
To delete a single item or hierarchy level member from the merchandise criteria list:
Select an item or hierarchy level member in the Criteria table.
Click Delete Criterion.
When prompted to delete the record, click Yes.
Click OK to exit.
To delete all of the items and hierarchy level members from the merchandise criteria list:
Click Delete All.
When prompted to delete the records, click Yes.
Click OK to exit.
Click Save to save your changes and close the window.
Navigate: From the main menu, select Control > POS Configuration > Coupon. The POS Coupon window opens.
In the Action field, select Resequence Coupons.
Click Search. The Search Results table is filled in with all of the coupon configurations in the system.
Select a coupon configuration and click Move Up or Move Down to change the order in which the coupons appear on the POS register.
Click Save to save your changes and close the window.
Navigate: From the main menu, select Control > POS Configuration > Coupon. The Enter/Maintain tab on the POS Coupon window opens. Search for and retrieve a coupon configuration in Create from Existing mode.
Edit the enabled fields as necessary.
Click Items to edit the items for the configuration.
To associate stores with the configuration:
Click Stores. The Stores window opens.
In the Location Type field, enter the ID of the location or group, or click the LOV button and select a location or group.
Click Apply.
Click OK to save your changes and close the window.
Associate items with the coupon configuration.
Exclude items from the coupon configuration.
Click Save to save your changes and close the window.
Navigate: From the main menu, select Control > POS Configuration > Money Order. The Money Order window opens. Search for and retrieve a money order configuration in Edit mode.
Edit the enabled fields as necessary.
Click Delete.
When prompted to delete the configuration, click Yes.
Click Save to save your changes and close the window.
Click Stores. The Stores window opens.
In the Location Type field, enter the ID of the location or group, or click the LOV button and select a location or group.
Click Apply.
Click OK to save your changes and close the window.
Click Stores. The Stores window opens.
Select the store in the table.
Click Delete.
Click OK to save your changes and close the window.
Click Stores. The Stores window opens.
In the Location Type field, enter the ID of the location or group, or click the LOV button and select a location or group.
Click Delete.
Click OK to save your changes and close the window.
Navigate: From the main menu, select Control > POS Configuration > Money Order. The Money Order window opens. Search for and retrieve a money order configuration in Edit mode.
Edit the enabled fields as necessary.
To associate stores with the configuration:
Click Stores. The Stores window opens.
In the Location Type field, enter the ID of the location or group, or click the LOV button and select a location or group.
Click Apply.
Click OK to save your changes and close the window.
Click Save to save your changes and exit the window.
Navigate: From the main menu, select Control > POS Configuration > Pay In/Pay Out. The Pay In/Out window opens. Search for and retrieve a pay in/pay out configuration in Create from Existing mode.
Edit the enabled fields as necessary.
To associate stores with the configuration:
Click Stores. The Stores window opens.
In the Location Type field, enter the ID of the location or group, or click the LOV button and select a location or group.
Click Apply.
Click OK to save your changes and close the window.
Click Save to save your changes and close the window.
Navigate: From the main menu, select Control > POS Configuration > Pay In/Pay Out. The Pay In/Out window opens. Search for and retrieve a pay in/pay out configuration in Edit mode.
Edit the enabled fields as necessary.
Click Delete.
When prompted to delete the configuration, click Yes.
Click Save to save your changes and close the window.
Click Stores. The Stores window opens.
In the Location Type field, enter the ID of the location or group, or click the LOV button and select a location or group.
Click Apply.
Click OK to save your changes and close the window.
Select the store in the table.
Click Delete.
Click OK to save your changes and close the window.
In the Location Type field, enter the ID of the location or group, or click the LOV button and select a location or group.
Click Delete.
Click OK to save your changes and close the window.
Navigate: From the main menu, select Control > POS Configuration > Pay In/Pay Out. The Pay In/Out window opens.
In the Action field, select Edit, View, or Create from Existing.
Enter additional criteria as desired to make the search more restrictive.
Click Search. The configurations that match the criteria appear in the search results table.
Select a task:
To perform another search, click Refresh.
To display the configuration information, select a configuration and click on the Enter/Maintain tab.
Click Close to close the window.
Navigate: From the main menu, select Control > POS Configuration > Tender Type. The Tender Type window opens. Search for and retrieve a tender type configuration in Edit mode.
Edit the enabled fields as necessary.
To delete a tender type configuration:
Click Delete.
When prompted to delete the configuration, click Yes.
Click Close to close the window.
Click Stores. The Stores window opens.
In the Location Type field, enter the ID of the location or group, or click the LOV button and select a location or group.
Click Apply.
Click OK to save your changes and close the window.
Click Stores. The Stores window opens.
Select the store in the table.
Click Delete.
Click OK to save your changes and close the window.
Click Stores. The Stores window opens.
In the Location Type field, enter the ID of the location or group, or click the LOV button and select a location or group.
Click Delete.
Click OK to save your changes and close the window.
Navigate: From the main menu, select Control > POS Configuration > Tender Type. The Tender Type window opens.
In the Action field, select Edit, View, or Create from Existing.
Enter additional criteria as desired to make the search more restrictive.
Click Search. The configurations that match the criteria appear in the search results table.
Select a task:
To perform another search, click Refresh.
To display the configuration information, select a configuration and click on the Enter/Maintain tab.
Click Close to close the window.
Navigate: From the main menu, select Control > POS Configuration > Tender Type. The Tender Type window opens. Search for and retrieve a tender type configuration in Create from Existing mode.
Edit the enabled fields as necessary.
To associate stores with the configuration:
Click Stores. The Stores window opens.
In the Location Type field, enter the ID of the location or group, or click the LOV button and select a location or group.
Click Apply.
Click OK to save your changes and close the window.
Click Save to save your changes and close the window.
Navigate: From the main menu, select Control > POS Configuration > Product Restriction. The POS Product Restriction window opens. Search for and retrieve a product restriction configuration in Edit mode.
In the Prod Rest ID field, edit the description for the product restriction configuration.
In the Currency field, edit the currency code of the configuration, or click the LOV button and select a currency.
For the following restriction types, additional information is required:
Container Deposit Restriction: Edit the deposit amount.
Container Redemption Value Restriction: Edit the amount.
Minimum Age Restriction: Edit the age a customer must be to purchase the product.
Day/Time/Date Restriction: Edit the Day/Time/Date that goods cannot be sold.
Tender Type Restriction: Edit the tender type.
Quantity Limit Restriction: Edit the maximum a customer can purchase.
Enter optional information as necessary.
To edit stores associated with the configuration:
Click Stores. The Stores window opens.
In the Location Type field, enter the ID of the location or group, or click the LOV button and select a location or group.
Click Apply.
Click OK to save your changes and close the window.
Associate items with a POS configuration.
Exclude items from the configuration.
Click Save to save your changes and close the window.
Navigate: From the main menu, select Control > POS Configuration > Product Restrictions. The Enter/Maintain tab on the POS Product Restriction window opens. Search for and retrieve a product restriction configuration in Edit mode.
Edit the enabled fields as necessary.
Click Items to edit the items for the configuration.
To associate stores with the configuration:
Click Stores. The Stores window opens.
In the Location Type field, enter the ID of the location or group, or click the LOV button and select a location or group.
Click Apply.
Click OK to save your changes and close the window.
Associate items with the configuration.
Exclude items from the configuration.
Click Save to save your changes and close the window.
Navigate: From the main menu, select Control > POS Configuration > Product Restrictions. The Enter/Maintain tab on the POS Product Restriction window opens. Search for and retrieve a product restriction configuration in Edit mode.
|
Note: Use this procedure to edit the day/time/date restrictions for a product restriction configuration with the restriction type of day/time/date. |
Click Day/Time/Date. The POS Day/Time/Date window opens.
To add times, days of the week, and dates on which the items cannot be sold:
In the Day field, select one or more days of the week on which the items cannot be sold.
In the Time Before field, select the time before which the items cannot be sold.
In the Time After field, select the time after which the items cannot be sold.
In the Date field, enter the date on which the items cannot be sold, or click the calendar button and select the date.
Click Apply.
|
Note: You can specify a single day, time, or date restriction, or you can select a combination of day, time, and date restrictions. |
To delete a day/time/date restriction from a configuration:
Select the restriction in the table.
Click Delete.
When prompted to delete the restriction, click Yes.
Click OK to save your changes and close the window.
Navigate: From the main menu, select Control > POS Configuration > Product Restrictions. The Enter/Maintain tab on the POS Product Restriction window opens. Search for and retrieve a product restriction configuration in Edit mode.
Edit the enabled fields as necessary.
Click Stores. The Stores window opens.
In the Location Type field, enter the ID of the location or group, or click the LOV button and select a location or group.
Click Apply.
Click OK to save your changes and close the window.
Select the store in the table.
Click Delete.
Click OK to save your changes and close the window.
In the Location Type field, enter the ID of the location or group, or click the LOV button and select a location or group.
Click Delete.
Click OK to save your changes and close the window.
Navigate: From the main menu, select Control > POS Configuration > Product Restrictions. The Enter/Maintain tab on the POS Product Restriction window opens. Search for and retrieve a product restriction configuration in Edit mode.
Click Delete.
When prompted to delete the record, click Yes.
Click Close to close the window.
Navigate: From the main menu, select Control > POS Configuration > Product Restrictions. The Enter/Maintain tab on the POS Product Restriction window opens. Search for and retrieve a product restriction configuration in Edit mode.
Edit the enabled fields as necessary.
To delete a single item or hierarchy level member from the merchandise criteria list:
Select an item or hierarchy level member in the Criteria table.
Click Delete Criterion.
When prompted to delete the record, click Yes.
To delete all of the items and hierarchy level members from the merchandise criteria list:
Click Delete All.
When prompted to delete the records, click Yes.
Click Save to save your changes and close the window.
Navigate: From the main menu, select Control > POS Configuration > Touch Button. The Enter/Maintain tab on the Touch Button window opens. Search for and retrieve a touch button configuration in Edit mode.
Edit the Button Configuration ID field and the Effective Date field as necessary.
|
Note: You can associate items with a primary button when it has no secondary buttons. |
Select a touch button on the First Layer palette.
Click the upper move right button.
Click Add Item.
In the Item field, enter the item number of the item. You can also enter a partial description of the item in the Description field, and click the LOV button to select an item.
Click Save to save your changes and close the window.
Select a touch button on the First Layer palette.
Click the move down button.
Select a touch button on the Second Layer palette.
Click the lower move right button.
Click Add Item.
In the Item field, enter the item number of the item. You can also enter a partial description of the item in the Description field, and click the LOV button to select an item.
Click Save to save your changes and close the window.
Select a touch button on the First Layer palette.
Click the upper move right button.
Select the item.
Click Delete Item.
When prompted to delete the record, click Yes.
Click Save to save your changes and close the window.
Select a touch button on the First Layer palette.
Click the move down button.
Select a touch button on the Second Layer palette.
Click the lower move right button.
Select the item.
Click Delete Item.
When prompted to delete the record, click Yes.
Click Save to save your changes and close the window.
Navigate: From the main menu, select Control > POS Configuration > Touch Button. The Enter/Maintain tab on the Touch Button window opens. Search for and retrieve a touch button configuration in Edit mode.
Edit the Button Configuration ID field and the Effective Date field as necessary.
To move a primary touch button on the First Layer palette:
Select a touch button.
Click Move. The POS Button Move window opens.
Click the appropriate arrow button to position the selected touch button on the palette.
Click OK to exit.
To move a secondary touch button on the Second Layer palette:
Select a touch button on the First Layer palette.
Click the move down button.
Select a touch button on the Second Layer palette.
Click Move. The POS Button Move window opens.
Click the appropriate arrow button to position the selected touch button on the palette.
Click OK to exit.
Click Save to save your changes and close the window.
The Jurisdiction Maintenance window is used to create jurisdictions that can be used to distinguish one area of your business or corporation from another. Jurisdiction categories do not impact the organizational hierarchy structure.
In some countries, the tax rates for some taxes can vary from city to city. Taxes can also be based on "from" location and "to" location where the transaction is taking place. To support this, the following changes have been made.
Navigate: From the main menu, select Control > Setup > Country Tax Jurisdiction > Edit. The Country Tax Jurisdiction Maintenance window opens.
Click Add. The next available line is enabled.
Enter a country tax jurisdiction.
Enter a description for the Country Tax Jurisdiction.
Click OK to save your changes and close the window.
Navigate: From the main menu, select Control > Setup > Country Tax Jurisdiction > Edit.
The current cities appear in the Country Tax Jurisdiction Maintenance window.
Click in any field to change the content of an existing country tax jurisdiction or description.
Click OK to save your changes and close the window.
Click on the line of the country tax jurisdiction you want to delete. The line is highlighted.
Click Delete. You are prompted to confirm the deletion of the country tax jurisdiction.
Click Yes.
To delete another jurisdiction, repeat the steps above.
Click OK to save your changes and close the window.
Navigate: From the main menu, select Control > Setup > Country Tax Jurisdiction > View. The Country Tax Jurisdiction opens.
Click OK to close the window.