| Oracle® Retail Merchandising System User Guide 16.0 E65443-01 |
|

 Previous |
 Next |
This chapter discusses the Purchase Ordering function that controls procurement of stock for retail. Open to Buy limits are discussed as a precursor to order creation. Purchase Orders can be raised in RMS through various automated, as well as manual means. Manual Orders may be raised for adhoc purchases against contracts and from replenishment generated Buyer worksheets. Automated orders are largely generated by the replenishment batches. Purchase orders in RMS provide support for capture and view of several ordering related attributes such as shipping information, import attributes, Harmonized Tariff Schedule (HTS), expenses, letter of credit information, and partner information. Inventory Management parameters such as scaling, truck splitting, supplier minimum, and rounding percentages may also be defined and enforced at the order level. The ordering screens also provide usability enhancers such as diff distribution and pack templates to ease the process of order creation.
Window details and specific navigation to achieve these functions is elaborated in the following sections of this chapter.
Purchase orders may be automatically generated through several ways:
Replenishment: When inventory levels reach a point determined by the replenishment method assigned to an item, a purchase order can be created in Worksheet or Approved status.
Investment Buying: When the investment buy calculations indicate a benefit to the company by purchasing additional inventory, a purchase order can be created in Worksheet or Approved status.
Vendor managed inventory (VMI): If your supplier uses a VMI system, the supplier can create purchase orders in Worksheet or Approved status.
Truck splitting: When a purchase order is split into two purchase orders to accommodate truck splitting, a purchase order can be created in Worksheet status.
Warehouse Stocked/Cross Dock Docked Stock: Accumulates store need at the item/location level. If the need cannot be fulfilled by the warehouse, a worksheet PO is created.
In addition to auto generation, purchase orders can also be created manually in RMS. After creating the purchase order and specifying the header details, you would then need to add one or more items to the purchase order and distribute those items to one or more locations.
You can create the following purchase orders in RMS.
Order/Import Order
Contract Order
Order for Contracted Items
DSD Order
Pre-issued Order
Purchase Order for a Pack
Customer Order
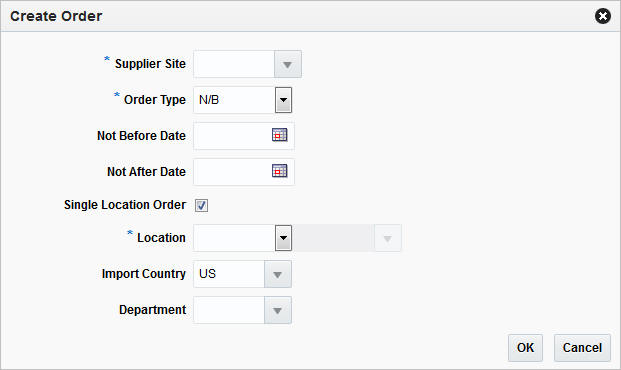
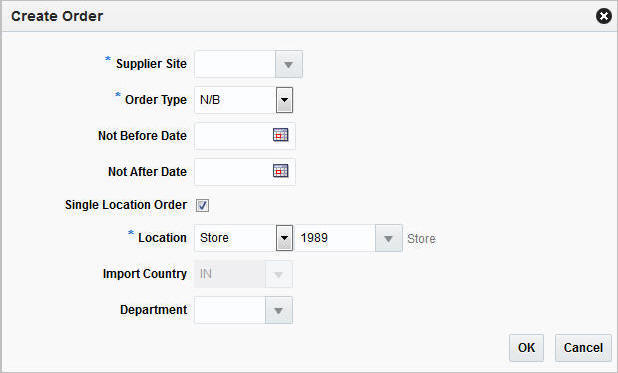
The creation of a purchase order starts with the Create Order window. You can open the Create Order window in two different ways.
From the Tasks menu, select Orders > Manage Orders > Actions > Create. The Create Order window opens.
From the Tasks menu, select Orders > Create Order. The Create Order window opens.
To create a purchase order follow the steps below.
In the Supplier Site field, enter, select or search for the desired supplier site. This field is required to create a purchase order.
In the Order Type field, enter or select an order type form the list. This field is required to create a purchase order. Possible order types are:
ARB - Automatic replenishment of basic goods
BRB - Buyer replenishment of basic goods
Customer Order - For more information about how to create a customer order, see the Creating a Customer Order section.
N/B - Order of non-basic goods
In the Not Before Date field, enter the date before which the order deliveries are not expected, or use the Calendar icon to select a date.
In the Not After Date field, enter the date after which the order deliveries are not accepted, or use the Calendar icon to select a date.
Check the Single Location Order check box, if the items on the purchase order are distributed to only one location.
In the Location field, select the location type from the drop down list, for example, Store or Warehouse. Then the location list is enabled. Enter, select or search for the corresponding location.
|
Note: The Location field is only shown, if you check the Single Location Order check box.If you select the Single Location Order check box, a location is required to create a purchase order. |
In the Import Country field, enter, select or search for the import country.
|
Note: When you create an import order, make sure all locations on the order exist within the import country. |
In the Department field, enter, select or search for the department.
After you have entered all the information for the order, you have the following options.
Click OK to create the purchase order and close window. The Order window opens in a new tab. For more information about the order window, see the Order section.
Click Cancel to reject all entries and close the window.
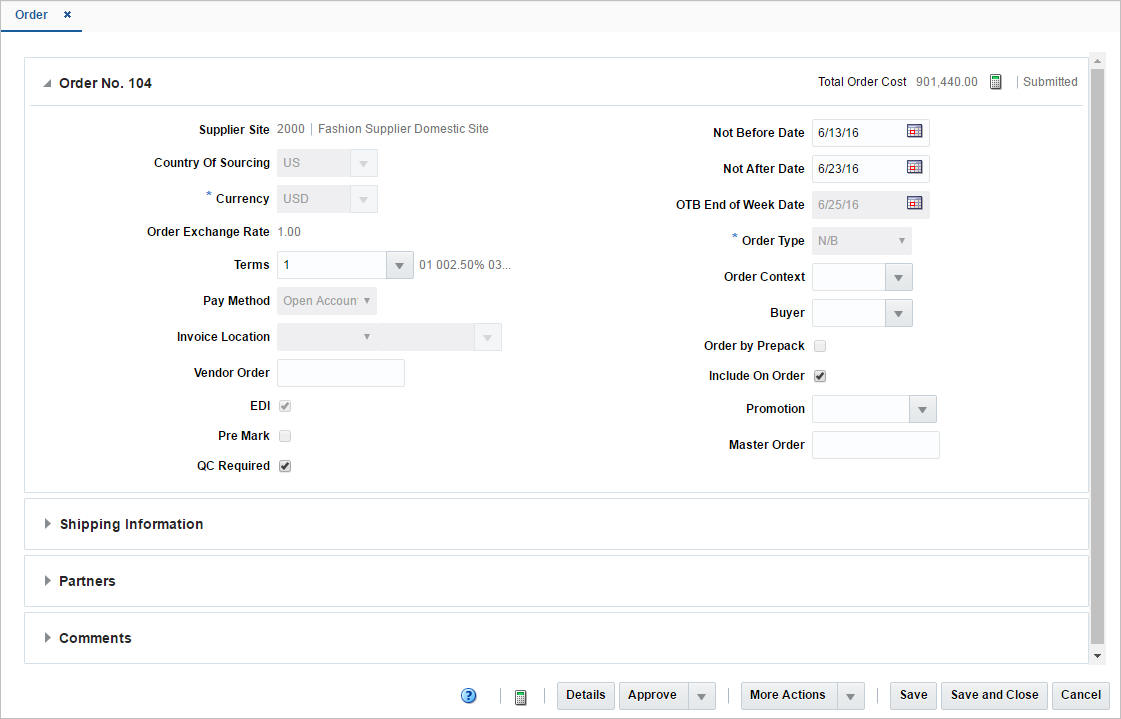
The Order window allows you to edit and view purchase orders. You can select special characteristics for a purchase order. Depending on which characteristics you select, you may be prompted to enter additional information.
Some of the special characteristics may be:
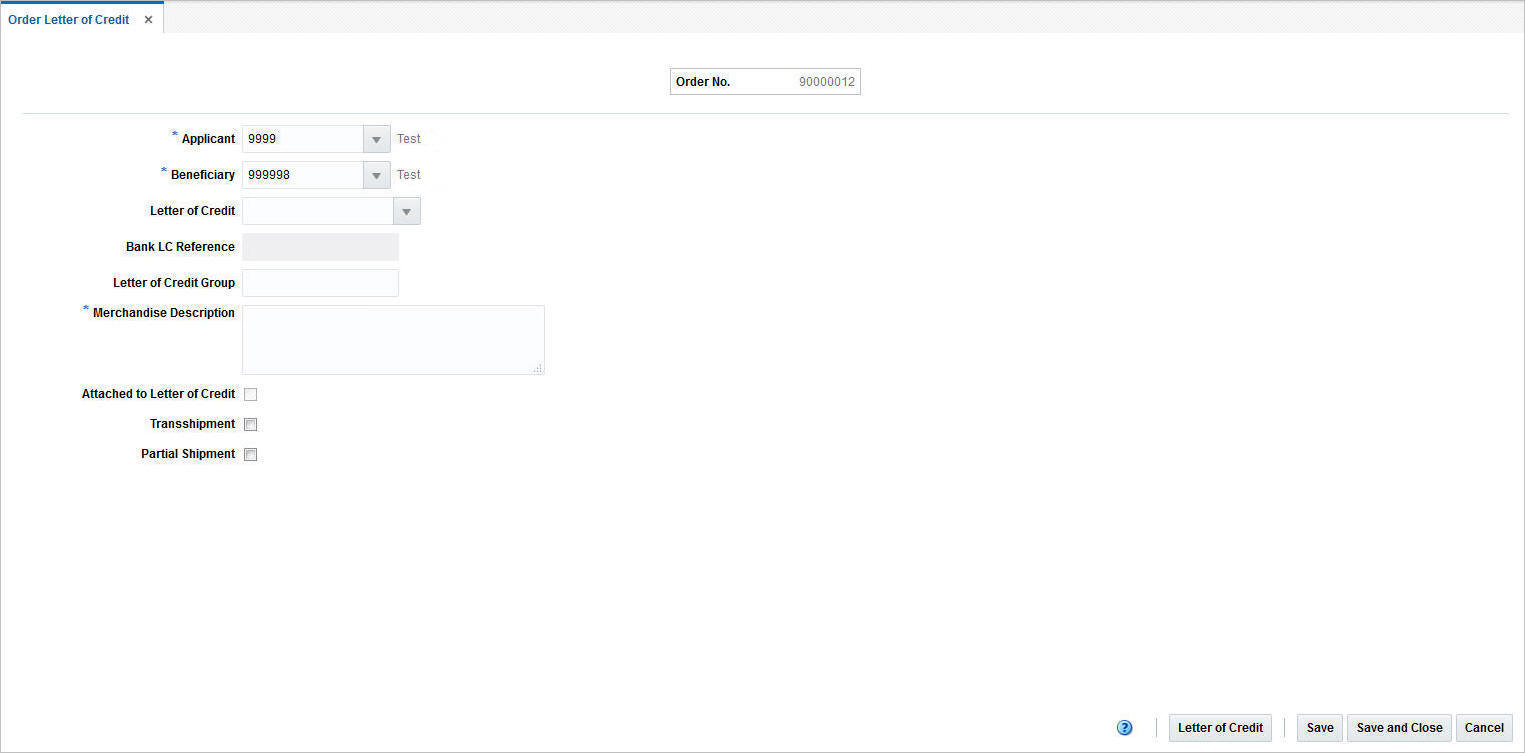
If you create an import order and pay by letter of credit, you must provide additional information for the letter of credit.
If you create an order for a prepack, you must provide the details for the prepack.
If you create a purchase order for a customer, you must provide customer details.
The Order window is called either through creating an order, or through the order search, for more information about how to create an order, see the Creating an Order section, and for more information on the order search refer to the Managing Orders section.
The Order window is divided in the following sections:
The Order or Import Order section contains the following fields.
Table 4-1 Order or Import Order Section Fields and Description
| Field | Description |
|---|---|
|
Order/Import Order |
The Order/Import Order field contains the order number by default. |
|
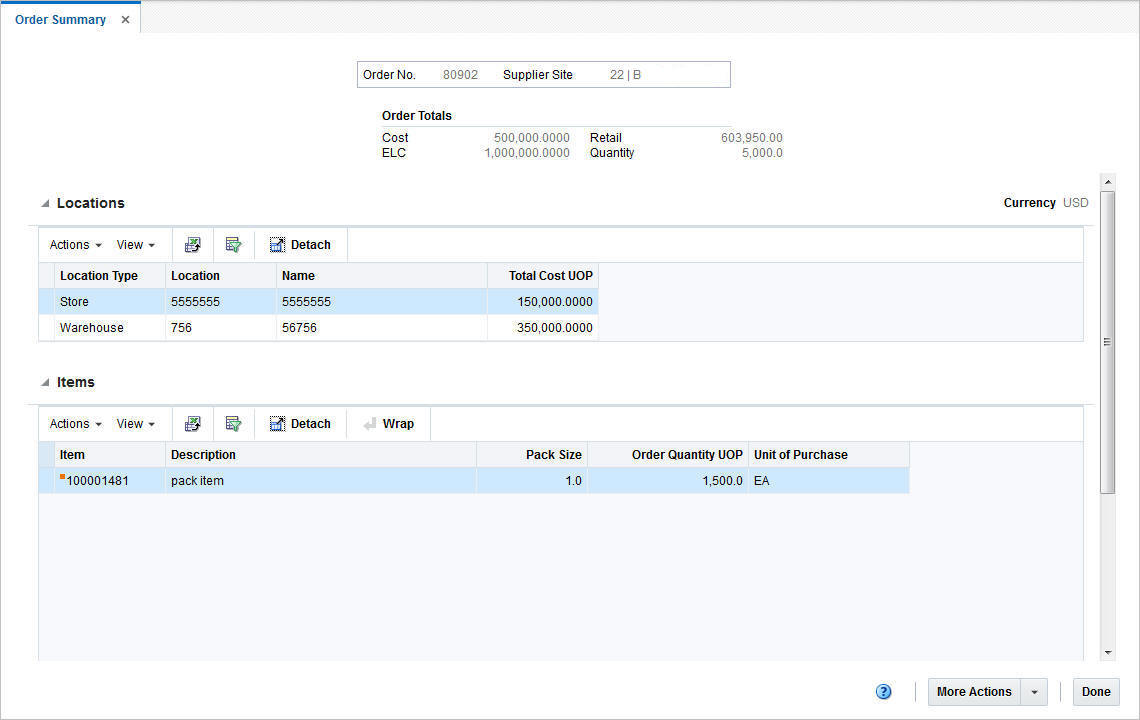
Total Order Cost |
The Total Order costs are only displayed when items have been added to the order. If you hover over the Total Order Cost amount, the Totals hover window is displayed. For more information about this window see Table 4-2, "Totals Hover Window Fields and Description". |
|
Recalculate Totals Icon |
Use the Recalculate Totals icon to recalculate the total amounts. |
|
Revisions Exist |
The Revisions Exist text is only shown, if revisions are available for the order. |
|
Order Status |
The Order Status is displayed as text. Upon order creation, the purchase order is in Worksheet status. |
|
Supplier Site |
This field displays the supplier site. The supplier site can only be selected in the Create Order window. Once you have selected the supplier site in the Create Order window, you can no longer change this entry. |
|
Country of Sourcing |
Enter or select the country from which the items are sourced. |
|
Location |
This field displays the location, when the order is a single location order. The location can only be selected in the Create Order window. Once you have selected the location in the Create Order window, you can no longer change the entry. |
|
Department |
This field displays the department. A department entered at this level signifies the order is a single department order. The department can only be selected in the Create Order window. Once you have selected the Department in the Create Order window, you can no longer change the entry. |
|
Currency |
Enter, select or search for a currency for the order from the list. The Currency field is a required field. |
|
Exchange Rate |
This field shows the exchange rate for import orders. You can update the Exchange Rate when the currency is not the same as the primary currency. If you click the Edit Exchange Rate icon, the Edit Exchange Rate window opens. For more details, see the Editing an Exchange Rate section. |
|
Terms |
Enter, select or search for the payment terms, for example, Net 30 Days. |
|
Pay Method |
Select the payment method, for example, Wire Transfer or Letter of Credit. |
|
Invoice Location |
The store or warehouse where the invoice is issued. This field is only enabled for import purchase orders. |
|
Vendor Order |
Enter the Vendor Order number. |
|
EDI |
Select the EDI check box, if the data exchange between retailer and supplier are done via electronic data interchange. |
|
Pre Mark |
Select the Pre Mark check box, if the supplier has agreed to break orders into separately marked boxes that can be shipped directly to stores. |
|
QC Required |
Select the QC Required check box, if quality control is required for shipments. |
|
Not Before Date |
Enter the date before which the order deliveries are not expected, or click the Calendar button to select the date. |
|
Not After Date |
Enter the date after which the order deliveries are not accepted, or click the Calendar button to select the date. |
|
OTB End of Week Date |
Enter the open to buy end of week date or click the Calendar to select the date. |
|
Order Type |
Select the Order Type from the list. Possible order types are:
If you have created a customer order, this field is defaulted to order type Customer Order and can not be changed. For more information about how to create a Customer Order, see the Creating a Customer Order section. The Order Type field is a required field. |
|
Order Context |
Enter, select or search for the Order Context from the list. |
|
Buyer |
Enter, select or search for a buyer from the list. |
|
Order by Prepack |
Select the Prepack check box, to enable pack creation for the purchase order. |
|
Include On Order |
This field determines, if the order's quantities should be included in On Order calculations. |
|
Promotion |
Enter, select or search for the promotion you want to add to the purchase order. |
|
Contract |
The Contract field displays the contract number associated to the purchase order, if any. |
|
Franchise Order |
The Franchise Order field displays the franchise order number. |
|
Master Order |
Enter the master order number. |
The Totals Hover window shows the cost break up.
The Totals hover window contains the following fields.
Table 4-2 Totals Hover Window Fields and Description
| Fields | Description |
|---|---|
|
Total Order Cost |
This field shows the total cost of the order. |
|
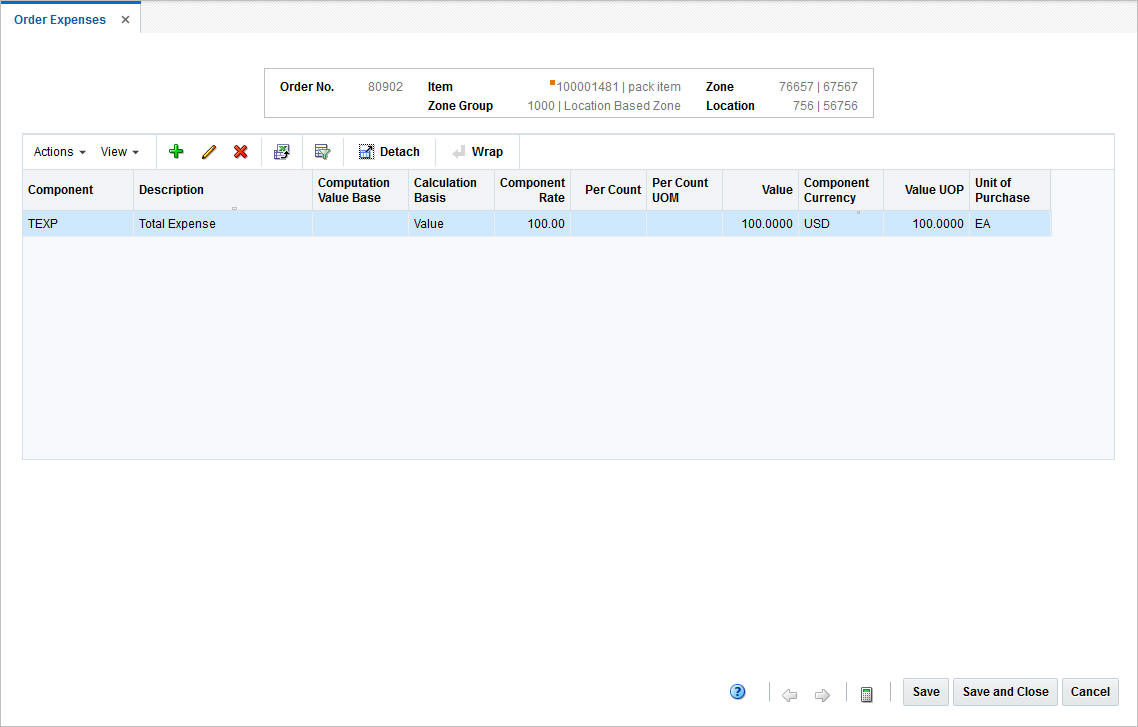
Expenses |
This field shows the value of the expenses occurred for this order. |
|
Duty |
This field shows the duties, taxes, and fees the retailer must pay to import the goods on this purchase order. |
|
Landed Cost |
This field shows the sum of the cost, duty, and expenses for the shipments of the purchase order. |
|
Outstanding Cost |
This field shows the amount that is still open for this order. |
|
Cancelled Cost |
This field shows the value of any cancelled merchandise on the order. |
|
Discount % Off |
This field shows the price reduction in %. |
|
Backhaul Allowance |
The Backhaul Allowance is only displayed when you select the purchase type backhaul in the Shipping Information section. |
|
Markup % Retail |
This field shows the markup in %. When the retailer uses Simple VAT or Global Tax, this value excludes VAT. |
|
Total Retail |
This field shows the total retail value of all items on the purchase order, excluding the VAT amount. When the retailer uses Simple VAT or Global Tax, this value excludes VAT. |
|
Total VAT |
This field shows the total VAT of the purchase order. This field only displays, if the retailer uses Simple VAT or Global Tax. |
|
Total Retail (Incl. VAT) |
This field shows the total retail value of all items on the purchase order, including the VAT amount. This field only displays, if the retailer uses Simple VAT or Global Tax. |
If the order currency is different from the system's primary currency, the totals will be displayed in both currencies, otherwise only the order currency is shown.
The Shipping Information section contains the following fields.
Table 4-3 Shipping Information Section fields and Description
| Field | Description |
|---|---|
|
Purchase Type |
Select the purchase type, such as Free on Board or Backhaul. |
|
Pickup Date |
Enter the pick up date or click the Calendar button to select a date. |
|
Backhaul Allowance |
The Backhaul Allowance field is only displayed, if the purchase type is Backhaul, otherwise the field is not available.
|
|
Pickup Location |
The Pickup Location field is only available, if the purchase type is Pickup. Enter the pickup location. |
|
Pickup No. |
The Pickup No. field is only available, if the purchase type is Pickup. Enter the pickup number. |
|
Freight Terms |
Enter, select or search for the freight terms. For example, select 2% of Total Cost. |
|
Freight Payment Method |
Select the freight payment method. For example, select Prepaid Only. |
|
Freight Contract |
Enter the freight contract number. |
|
Transportation Responsibility |
The transportation responsibility refers to the location point where the buyer becomes responsible for transportation related costs.
|
|
Title Pass Location |
The title pass location, refers to the location where the ownership of the goods changes from the seller to the buyer of the goods.
|
|
Import Country |
Enter, select or search for the import country of the goods. |
|
Shipment Method |
Select the shipment method. For example, select Rail Container. |
|
Earliest Ship Date |
Enter the earliest ship date or click the Calendar button to select a date. |
|
Latest Ship Date |
Enter the latest ship date or click the Calendar button to select a date. |
|
Appointment Date/Time |
Enter the appointment date or click the Calendar button to select a date. |
|
Estimated In Stock Date |
Enter a date or click the Calendar button to select an estimated date. |
|
Lading Port |
The port where goods are loaded onto the vessel. Enter, select or search for the lading port of the goods. |
|
Discharge Port |
The location where the goods are unloaded from the shipment vessel. Enter, select or search for the discharge port of the goods. |
|
Clearing Zone |
The field Clearing Zone is only available if the import country has one ore more clearing zones outside a location. Enter or select the clearing zone. |
In the Partners section you can enter additional partner information. This section contains the following fields. For more information about partners, see the Foundation Data chapter, section "Managing Partners".
Table 4-4 Partners Section Fields and Description
| Field | Description |
|---|---|
|
Factory |
Enter, select or search for the factory information. |
|
Agent |
Enter, select or search for the agent information. |
|
Routing Location |
Enter, select or search for the routing location. |
|
Partner 1 - 3 |
These fields can contain up to three partners, that can be associated with the order. Any type of partner can be added in these fields, such as consolidator, freight forwarder, or if desired additional factories or agents.
|
The Comments section holds the comments field. You can enter any comments for the purchase order.
The Toolbar displays the icons and buttons for actions that can be performed for the order such as deleting an order or navigating to the Order Details window to view details of the order. The Toolbar contains the following icons and buttons.
Table 4-5 Toolbar - Icons/Buttons and Description
| Action Icons/Buttons | Description |
|---|---|
|
Help icon |
You can access the online help for a particular page by clicking the Help icon. |
|
Calculate Dates icon |
The Calculate Dates icon calculates the Not Before, Not After, OTB End of Week and Pickup Dates. |
|
Delete icon |
The Delete icon deletes the current purchase order. For more information about deleting a purchase order, see Deleting a Purchase Order section. |
|
Details |
To view the details of the purchase oder, click Details. The Order Details window opens. For more information about order details, see the Order Details section. If no items have been added to the purchase order yet, the Details button opens the Order Distribution window. For more information about distributing items, see the Order Distribution section. |
|
Status |
If you click the Status button, the status of the purchase order changes to the status specified on the button. When there is more than one status to which the order can be changed, click the arrow on the right side of the button to display the additional status options. Possible purchase order status are:
|
|
More Actions |
Click More Actions to see a list of additional actions that can be performed in the Order window. For more information about the More Action Menu for orders, see the Order - More Actions Menu section. |
|
Save |
Click Save, to save changes to the purchase order and stay in the Order window. |
|
Save and Close |
Click Save and Close, to save changes to the purchase order and exit the Order window. |
|
Cancel |
Click Cancel, to cancel any changes made to the purchase order and exit the Order window. |
Use the More Actions menu to navigate to the following windows. The More Actions menu contains the following options.
Table 4-6 More Actions Menu - Buttons and Description
| Action Buttons | Description |
|---|---|
|
More Actions |
You can navigate to the following windows by using the More Actions menu. |
|
|
|
|
|
|
|
|
|
|
|
|
|
|
|
|
|
|
|
|
|
|
|
|
|
|
|
|
|
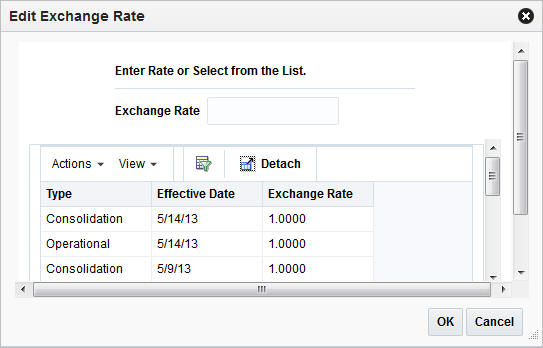
The Edit Exchange Rate window allows you to view and maintain exchange rates for a selected currency. The exchange rates are used to convert monetary amounts to and from the primary currency of the company. You can only edit the exchange rate when the order's currency is different from the system's primary currency.
To edit the displayed exchange rate, follow the steps listed below.
Click the Edit Exchange Rate icon ![]() .
.
The Edit Exchange Rate window opens.
In the Exchange Rate field, enter the exchange rate manually or select a record in the Exchange Rate table.
|
Note: The Exchange Rate table lists the following exchange rates - LC/bank, consolidation or operational. The consolidation exchange rate is only shown, if enabled. |
After you have entered or selected the exchange rate, choose one of the following options.
Click OK. The system overwrites the value in the Letter of Credit window.
Click Cancel to reject your entries and close the window.
To view a purchase order follow the steps below.
From the Tasks menu, select Orders > Manage Orders. The Order Search window opens.
Enter or select search criteria as desired to make the search more restrictive. For more information about the order search function, see the Managing Orders section.
Click Search. The orders that match the search criteria are displayed in the Results section.
Select a record.
Next select Actions > View, or use the View icon ![]() in the table toolbar. The Order window opens.
in the table toolbar. The Order window opens.
To exit the Order window click Done or use the Close tab.
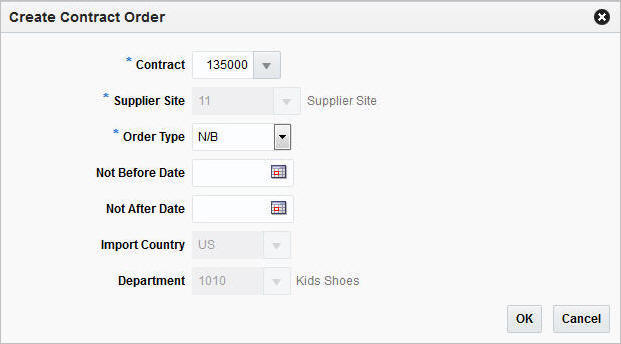
To create a contract order follow the steps below.
From the Tasks menu, select Orders > Create Contract Order. The Create Contract Order window opens.
In the Contract field, enter, select or search for the contract number. This field is required to create a contract order.
The Supplier Site field is populated with the contract's supplier site, once you select a contract number. This field is required to create a contract order.
In the Order Type field, select an Order Type from the drop down list. This field is required to create a contract order. Possible order types are:
ARB - Automatic replenishment of basic goods
BRB - Buyer replenishment of basic goods
N/B - Order of non-basic goods
In the Not Before Date field enter or use the Calendar to select the date before which the order deliveries are not expected.
In the Not After Date field enter or use the Calendar to select the date after which the order deliveries are not accepted.
The Import Country field is populated with the contract's import country, once you select a contract number.
The Department field is populated with the contract's department, once you select a contract number.
After you have entered all the information for the contract order, you have the following options.
Click OK to create the contract order and close Order window. The Order window opens automatically in a new tab.
Enter the necessary order information. For more details about the Order window, see the Order section.
Click Cancel to reject the contract order and close the Create Contract Order window.
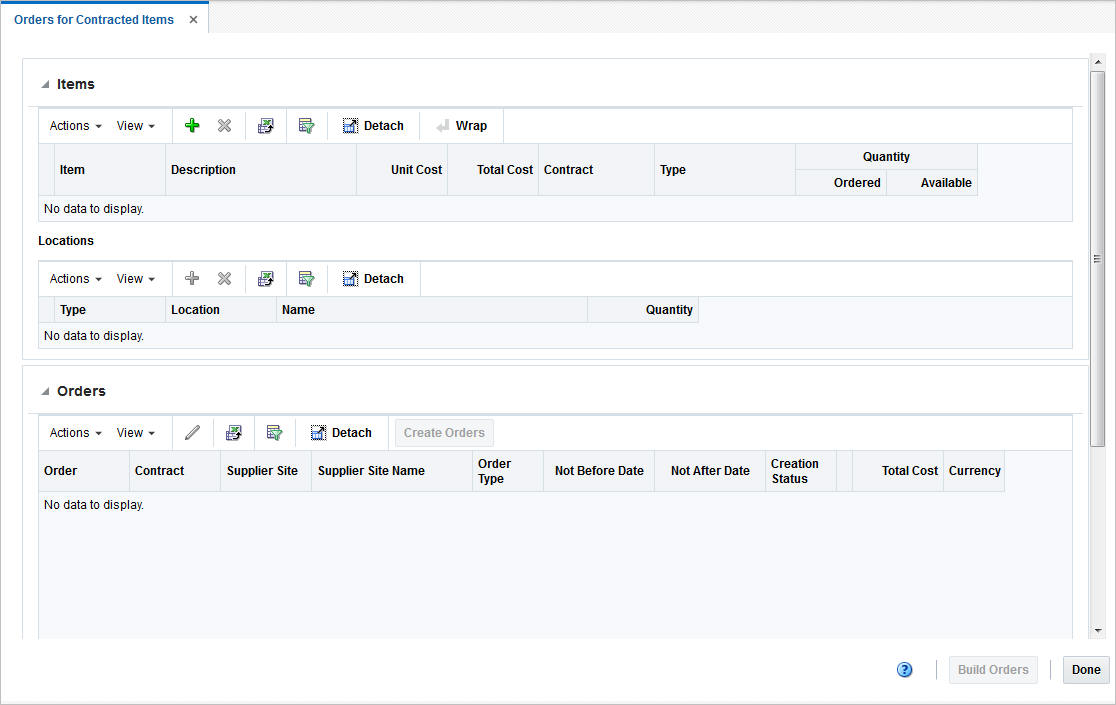
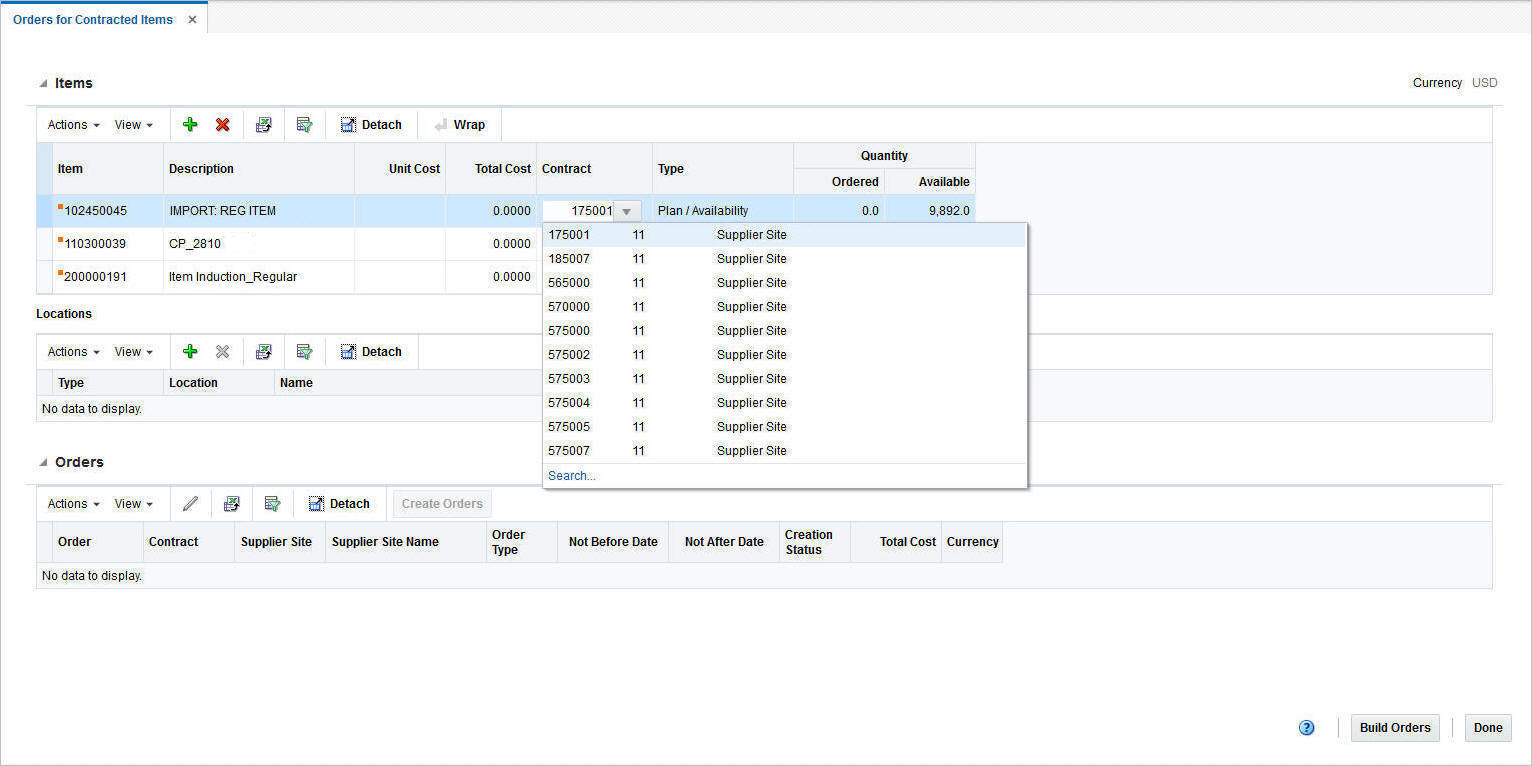
In the Orders for Contracted Items window you can manually create orders with a contract. You can choose the items, associate them with a contract, select order locations, and quantities as well as create orders for the items.
The Orders for Contracted Items window consists of the following three sections:
Items
Locations
Orders
To create orders for contracted items follow the steps below.
From the Tasks menu, select Orders > Create Orders for Contracted Items. The Orders for Contracted Items window opens.
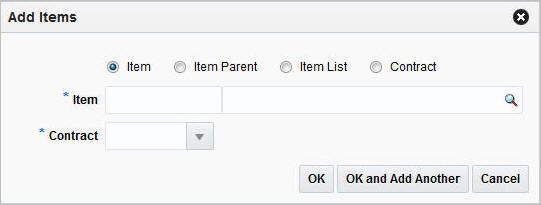
In the Items section select Actions > Add or use the Add Item ![]() icon to add an item. The Add Items window opens.
icon to add an item. The Add Items window opens.
You can add contracted items by selecting:
a transaction level item
an item parent
an item list
a contract
Check the corresponding radio button.
|
Note: If the Item/Item Parent/Item List radio button is selected, the corresponding fields are displayed. If the Contract radio button is selected, then only the Contract field is shown. |
In the Item/Item Parent/Item List field, enter, select or search for the item/item parent or item list.
Table 4-7 Add Items Window
| Field | Description |
|---|---|
|
Item |
Enter or search for the item. If you select the contract before you enter any items, only items from this particular contract are available. |
|
Item Parent |
Enter or search for the item parent. All contracted item parents are available for selection. After you have entered the item parent, all diffs associated with the item are displayed. All diff IDs will be available for selection. If there is no valid item for a particular diff ID then nothing is shown in the Items section. If no diffs are selected, all transaction level items are shown in the Items section. If not all parent diffs are selected all items fitting the criteria are added. If you enter the contract before you enter the item parent, all contracted item parents are available for selection. If the combination of item parent and contract is not valid, then nothing is populated in the table. If all the child items are not part of the selected contract, you receive a warning message that one or more child items are not part of the contract. |
|
Item List |
Enter or search for the item list. All item lists, which have at least one contracted item, are available for selection. If you enter the contract before you enter the item list, all item lists having at least one contracted item are available. As long as at least one valid combination of item-contract is possible, all the contracted items of the item list are populated in the items table. If all the items in the item list are not part of the selected contract, you receive a warning message that one or more items are not part of the contract. |
|
Contract |
Enter the contract number. All the items of the selected contract are populated in the Items table. |
In the Contract field, enter, select or search for the contract.
|
Note: If you enter the item parent first, only contracts containing the item/item parent are available for selection. For item lists, all contracts associated with at least one item of the item list are available for selection. |
After you have entered all the item information, choose one of the following options.
Click OK to add the selected item to the Items section and exit the Add Item window.
Click OK and Add Another to add further entries.
Click Cancel to reject all entries and exit the Add Item window.
|
Note: To delete an item, mark the corresponding record in the Items section. Then select Actions > Delete or use the Delete IconIf an item is associated with multiple contracts or in the case of a parent item or item list, the selected contract combination is not valid. You can select the contract number in the Contract column from the drop down list. |
After you have added items, assign a location or more locations to each item. Locations can only be assigned to one item at a time. Select an item on the table to assign locations to it.
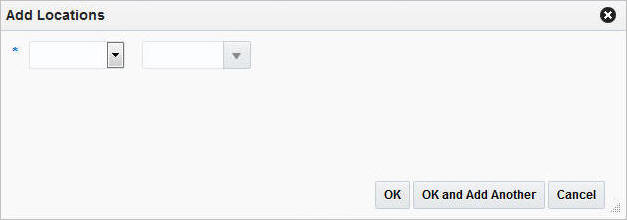
In the Locations section select Actions > Add or use the Add icon ![]() to add a location. The Add Location window opens.
to add a location. The Add Location window opens.
In the Location field, select a location type and enter, select or search for a location.
In the Quantity field, enter the corresponding quantity to be ordered.
|
Note: If you want to apply the location and the corresponding quantity to all items, check the Apply to all the items check box. |
After you have entered all the location information, choose one of the following options.
Click OK to confirm the location and close the Add Location window.
Click OK and Add Another to add additional locations.
Click Cancel to reject all entries and close the Add Location window.
|
Note: To delete a location, mark the corresponding row in the Locations section. Then select Actions > Delete or use the Deleteicon If you want to edit the quantity for a location, enter the new quantity in the Quantity column. |
After you have selected the location, you need to generate purchase orders for the selected contracted items.
In the Toolbar, click Build Orders to populate the Order section with pending orders.
|
Note: The Build Orders button is only enabled, after you have associated each item with a location and a quantity. |
Click the Create Order button or select Actions > Create Orders to create orders for the contracted items. The status of the order changes to Created.
|
Note: The Order Type field is set to N/B by default.The Not Before and Not After Date fields contain the dates specified in the contract. You can edit the Order Type, Not Before and Not After Date fields in the Orders section. |
To edit the created purchase order, select the corresponding order. Then use one of the following options.
Click Done, to exit the Orders for Contracted Items window.
The Direct Store Delivery (DSD) is the delivery of merchandise and/or services directly to a store. In the DSD Order window you can create direct store deliveries.
The DSD Order window consists of the following sections:
DSD Order
Items
Invoice
Non-Merchandise Expenses
To create a DSD order follow the steps below.
From the Tasks menu, select Orders > Create DSD Order. The DSD Order window opens.
In the DSD Order section the title contains the order number as well as the order currency. In this section enter or select the following DSD order information.
Store - This field is required to create a DSD order.
Supplier Site
Department
Furthermore, select the following check boxes, if necessary.
Apply Deals
Receive
Invoice
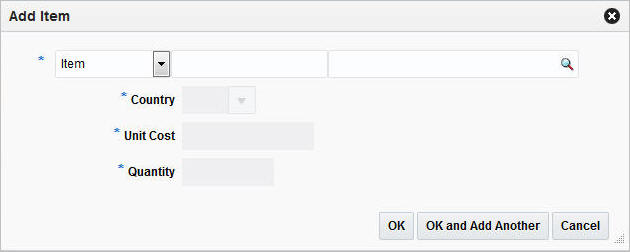
In the Items section, you can associate the item with the DSD order. To add an item select Actions > Add, or use the Add icon ![]() . The Add Item window opens.
. The Add Item window opens.
Select the item level. Then enter or search for the item/reference item number.
In the Country field, enter, select or search for the country information for the item.
In the Unit Cost field, enter the unit cost for the item.
In the Quantity field, enter the quantity for the item.
After you have entered all necessary information, choose one of the following options.
Click OK to add the entered item to the Item section and close the Add Item window.
Click OK and Add Another to add the entered item to the Item section and stay in the Add Item window to add additional items.
Click Cancel to reject all entries and close the Add Item window.
|
Note: To delete the item from the DSD order, select Actions > Delete or use the Delete icon |
The Invoice section displays invoice related information for the DSD order.
In the Status field, select the valid status, paid or not paid, for the invoice.
In the Vendor Invoice No. field, enter the vendor invoice number.
In the Proof of Delivery field, enter the proof of delivery number.
In the Payment Reference No. field, enter the payment reference number.
In the Payment Date field, enter the payment date or click the Calendar button to select the date.
|
Note: To delete an entered invoice, use the Delete Invoice icon in the top right corner of the Invoice section. |
In the Non-Merchandise Expenses section, select Actions > Add or use the Add icon. The Add Non-Merchandise Expense window opens.
In the Code field, enter or search for the expense code of the non-merchandise expense, for example, select M (Miscellaneous).
In the Amount field, enter the expense amount.
In the VAT section, in the Code field, enter, select or search for the VAT code, for example, select Standard.
In the Rate field, the VAT rate is populated once you enter the VAT code.
In the Amount field, the VAT amount is populated once you enter the VAT code.
After you have entered all necessary information, choose one of the following options.
Click OK to add the entered expense information to the Non-Merchandise Expense section and close the window.
Click OK and Add Another to add the entered expense information to the Non-Merchandise Expense section and stay in the window to add additional non-merchandise expenses.
Click Cancel to reject all changes and close the window.
|
Note: To delete non-merchandise expenses from the DSD order, select Actions > Delete or use the Delete icon |
After you have entered all necessary information for the DSD order, choose one of the following options.
Click Save and Close to create the DSD order and close the DSD order window.
Click Save and Create Another to create the DSD order and stay in the DSD Order window to create additional DSD orders.
Click Cancel to reject all entries and close the DSD order window.
To create a purchase order for a pack item follow the steps below.
From the Tasks menu, select Orders > Create Order. The Create Order window opens.
In the Supplier Site field, enter, select or search the desired supplier site. This field is required to create a purchase order.
In the Order Type field, select an order type form the list. This field is required to create a purchase order. Possible order types are:
ARB - Automatic replenishment of basic goods
BRB - Buyer replenishment of basic goods
Customer Order - For more information about how to create a customer order, see the Creating a Customer Order section.
N/B - Order of non-basic goods
In the Not Before Date field, enter or use the Calendar icon to select the date before which the order deliveries are not expected.
In the Not After Date field, enter or use the Calendar icon to select the date after which the order deliveries are not accepted.
Select the Single Location Order check box, if the items on the purchase order are distributed to only one location.
In the Location field, select the location type from the drop down list, for example, Store or Warehouse. Then the location list is enabled. Select or search for the corresponding location.
|
Note: The Location field is only shown, if you have selected the Single Location Order check box. |
In the Import Country field, enter, select or search for the import country.
|
Note: When creating an import order, make sure that the import country and the import location are the same. |
In the Department field, enter, select or search for the department.
After you have entered all the information for the order, you have the following options.
Click OK to create the purchase order and close the Create Order window. The Order window opens in a new tab. Refer to step 11 to complete the purchase order.
Click Cancel to reject all entries and close the Create Order window.
In the Order window enter or edit the enabled fields, as necessary. For more information see the Order section.
In the Order Head section, you need to select the Order by Prepack check box to create an order for a pack item.
|
Note: To immediately add a prepack to the purchase order, click Details. The Order Distribution window opens. For more details about how to add a prepack to a PO, see the Adding a Prepack to the Purchase Order section, step 5. |
To complete the order for a pack item, choose one of the following options.
Click Save to save the created purchase order for a pack item.
Click Save and Close to save the created purchase order for a pack item and close the Order window.
Click Cancel to reject all entries and close the Order window.
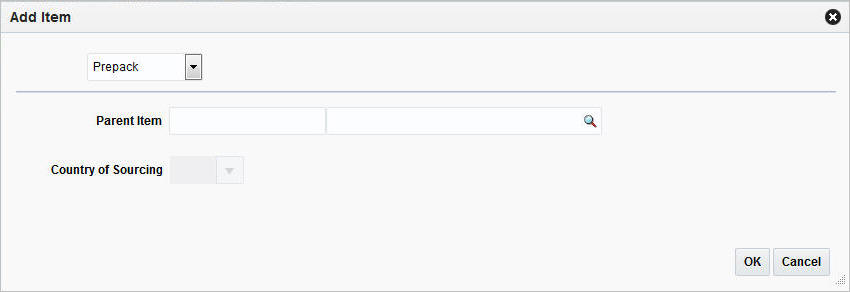
To add a prepack to a purchase order follow the steps below.
From the Tasks menu, select Orders > Manage Orders. The Order Search window opens.
Enter or select search criteria as desired to make the search more restrictive.
Click Search. The orders that match the search criteria are displayed in the Results section.
In the Order No. column, click the order number link, or mark a record and select Actions > Edit, or use the Edit icon ![]() . The Order window opens.
. The Order window opens.
In the Toolbar, click Details to open the Order Distribution window.
Select Actions > Add or use the Add icon ![]() to add a prepack to the purchase order. The Add Item window opens.
to add a prepack to the purchase order. The Add Item window opens.
In the Item Type field select Prepack.
|
Note: The Prepack Item Type is only available, if you selected the Order by Prepack check box in the Order window. For more details about creating orders for pack items, see the Creating a Purchase Order for a Pack Item section. |
In the Parent Item field, enter or search for the parent item.
In the Country of Sourcing field, enter, select or search for a country.
To complete the process, choose one of the following options.
Click OK to add the prepack the purchase order and open the Prepack Creation window. For more details see the Creating a Prepack Template section.
Click Cancel to reject all entries and close the Add Item window.
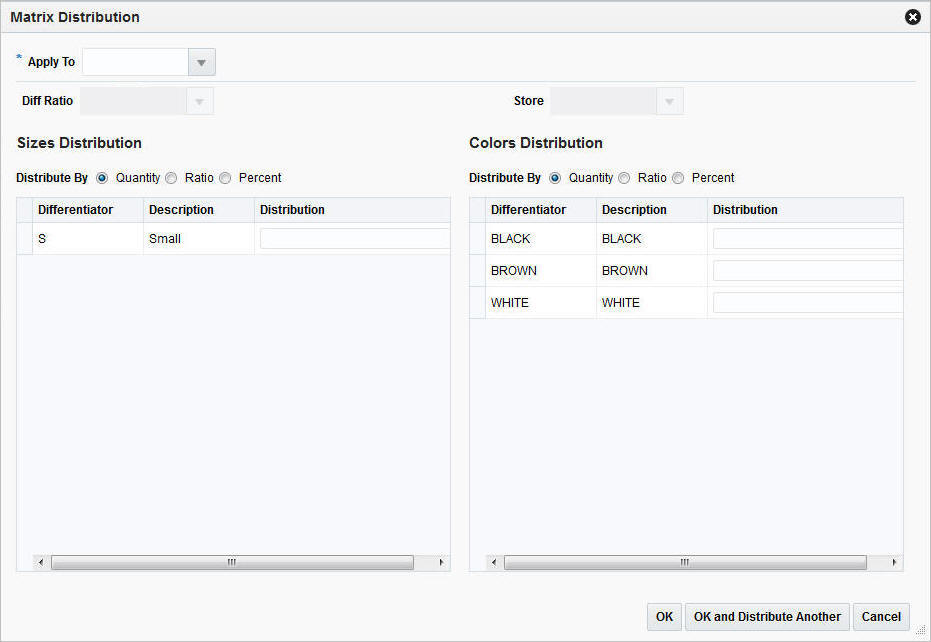
The Prepack Creation window allows you to create a pack for a purchase order. A prepack is a pack item that contains an assortment of diffs. You can add a diff, diff range, or diff template. You also enter a sequence number (for buyer packs) and the quantity that is to be distributed among the diff combinations.
You can create buyer packs or vendor packs. If you select buyer pack, you must indicate whether the pack is ordered and received as a pack or as eaches. If you select vendor pack, you must enter a unit cost for the pack. The unit cost for buyer packs is derived from the component items of the pack. The pack templates that you create here cannot be re-used for another purchase order.
In the Prepack Creation window enter the following information.
In the Pack Type field, select Buyer or Vendor.
If you select Buyer in the Pack Type field, select an option in the Order As and Receive As fields.
If you select Vendor in the Pack Type field, enter the cost per component unit in the Unit Cost field.
In the Differentiations section click Actions > Add or use the Add icon to add differentiators to the prepack template. The Add Differentiator window opens.
In the Differerentiator fields, for example, flavor, enter, select or search for the diff you want to add.
|
Note: If the item parent is assigned to a Diff ID instead of a Diff Group, then these fields are populated with the diffs of the item parent. You can not edit these diffs. |
In the Quantity field, enter the quantity that you want to distribute among the diff combinations.
To complete the entry of the diff details, choose one of the following options.
Click OK to add the differentiator to the Differentiator section and close the Add Differentiator window.
Click OK and Add Another to add the differentiator to the Differentiator section and add additional diffs to the template.
Click Cancel to reject all entries and close the Add Differentiator window.
In the Prepack Creation window, click Build Cost to calculate the unit cost of the prepack.
Click Save and Close. A confirmation prompt is shown.
Confirm the prompt with Yes to create the diff combinations for the item parent. The Order Distribution window opens.
The Buyer or Vendor Pack is shown in the Order Distribution window.
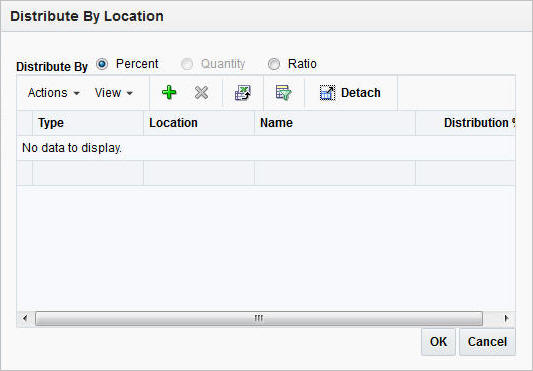
In the Order Distribution window select a distribution method and enter the appropriate information in the window that opens.
To distribute the prepacks by location, click Location. The Location Distribution window opens. For more details, see the Distributing Items by Location section.
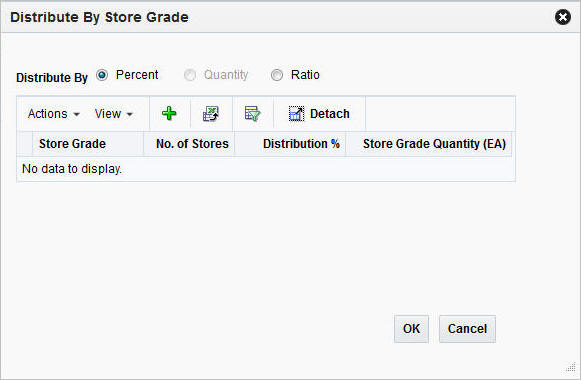
To distribute the items by store grade, click Store Grade. The Store Grade Distribution window opens. Fore more details, see the Distributing Items by Store Grade section.
In the Edit Differentiator window you can update the diffs, sequences and the quantity of each record in the Differentiator section.
To edit an existing differentiator in a prepack template follow the steps below.
In the Prepack Creation window enter the following information.
Select an entry in the Differentiator section.
Select Actions > Edit or use the Edit icon to update the selected differentiator. The Edit Differentiator window opens.
The Differentiator fields are populated with the diffs of the selected diff. Edit the fields, if necessary.
|
Note: All diffs that hold any value are disabled. |
In the Quantity field, edit the quantity.
Select the Apply to All check box, to apply the quantity or set the value of a possible missing diff to the records in the Differentiator table with the same diffs.
|
Note: If the differentiator you are trying to apply already exists, you receive a corresponding message. |
After all necessary updates are made, choose one of the following options.
Click OK to update the selected differentiator in the table and close the Edit Differentiator window. The system returns to the Prepack Creation window
Click Cancel to reject all entries and close the Edit Differentiator window. The system returns to the Prepack Creation window.
In the Prepack Creation window, choose one of the following options.
Click Save and Close to save the updated prepack and return to the Order Details window.
Click Cancel to reject the prepack updates and return to the Order Details window.
In the Apply Range window you can add the range, or apply the range for all records or to just the selected record in the Differentiator table.
To apply a range for a prepack template follow the steps below.
In the Prepack Creation window enter the following information.
Select an entry in the Differentiator section.
Select Actions > Apply Range or use the Apply Range button to add or update the differentiator of the selected record. The Apply Range window opens.
|
Note: If the differentiator you are trying to apply already exists, you receive a corresponding message. |
In the Diff Range field, enter or select the desired diff range.
In the Quantity field, enter the quantity.
Depending on whether you want to add or update a range in the prepack template, choose one of the following check boxs.
Select Add Range to add a new range to the prepack.
Select Apply to Selected to apply the update range to a selected diff.
Select Apply to All to apply the range to all records in the Differentiator section with the same diffs.
|
Note: The Apply to All check box and the Apply to All button are only enabled, if a differentiator has already been added to the prepack template. |
After you have added/updated the diff range, choose on of the following options.
Click OK to apply the new/updated range to the prepack and close the Apply Range window. The system returns to the Prepack Creation window.
Click Cancel to reject all entries and close the Apply Range window. The system returns to the Prepack Creation window.
In the Prepack Creation window, choose one of the following options.
Click Save and Close to save the updated prepack and return to the Order Details window.
Click Cancel to reject the prepack updates and return to the Order Details window.
In the mass update you can update the quantity of the records set in the diff filter. The quantity is applied to all entries with this diff value.
To carry out a mass update for diffs, follow the steps below.
In the Prepack Creation window, select Mass Update. The Mass Update window opens.
In the Apply Update To section. Update all necessary Diff fields.
|
Note: For item parents with assigned diff IDs, the Diff fields are populated and disabled. |
If you select the Apply Update to All check box, all diffs are cleared and disabled. The entered quantity is applied to all entries.
In the Quantity field, enter the quantity.
After you have entered all necessary information, choose one of the following options.
Click OK to update the quantity for the diffs and close the Mass Update window. The system returns to the Prepack Creation window.
Click OK and Edit Another to update the quantity for the diffs and edit other diffs.
Click Cancel to reject all entries and close the Mass Update window. The system returns to the Prepack Creation window.
In the Prepack Creation window, choose one of the following options.
Click Save and Close to save the updated prepacks and return to the Order Details window.
Click Cancel to reject the prepack updates and return to the Order Details window.
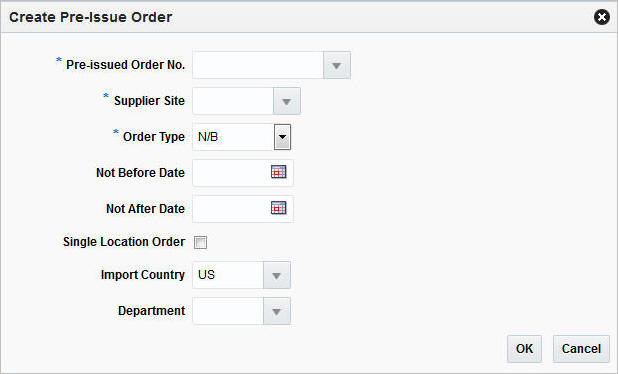
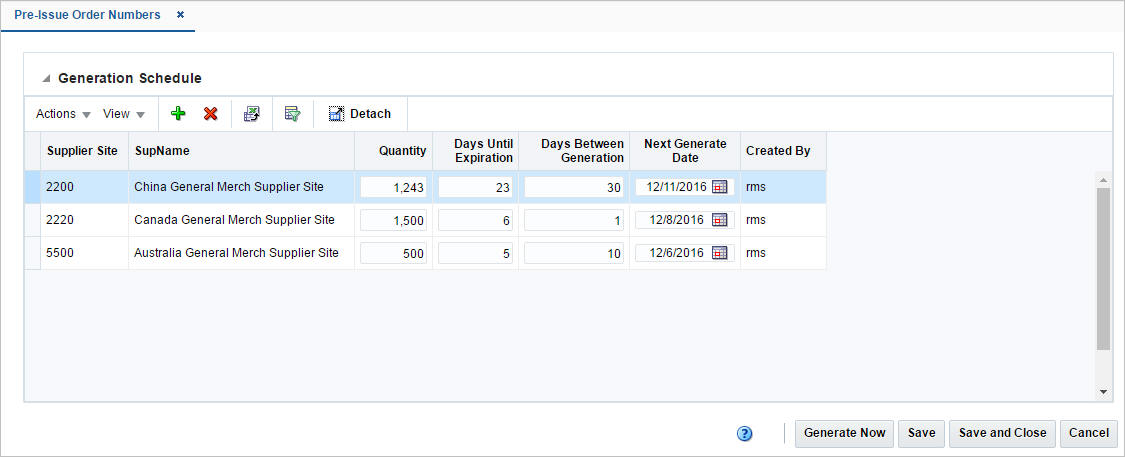
In RMS you can create a purchase order using a pre-issued order number. For more details about how to generate pre-issue order numbers, see the Pre-Issued Order Numbers section.
To create a pre-issue order follow the steps below.
From the Tasks menu, select Orders > Create Pre-Issue Order. The Create Pre-Order window opens.
In the Pre-Issued Order No. field, enter, select or search for the previously created pre-issued order number.
In the Supplier Site field, enter, select or search for the supplier site.
In the Order Type field, select an order type form the list. Possible order types are:
ARB - Automatic replenishment of basic goods
BRB - Buyer replenishment of basic goods
Customer Order - For more information about how to create a customer order, see the Creating a Customer Order section.
N/B - Order of non-basic goods
In the Not Before Date field, enter the date before which the order deliveries are not expected, or use the Calendar icon to select a date.
In the Not After Date field, enter the date after which the order deliveries are not accepted, or use the Calendar icon to select a date.
Select the Single Location Order check box, if the items of the purchase order are shipped to only one location.
In the Location field, select the Location Type, for example, select Warehouse. Once you select the Location Type, enter, select or search for the location. After you have selected the location, the Location Name is displayed.
|
Note: The Location fields are only shown, if you have selected the Single Location Order check box. |
In the Import Country field, enter, select or search for the import country.
|
Note: The Import Country field, is enabled when you create pre-issue orders. |
In the Department field, enter, select or search for the department.
After you have entered all information for the pre-issue order, you have the following options.
Click OK to create the pre-issue order and close the Create Order window. The Order window opens in a new tab. Enter the necessary order information. For more details about creating orders, see the Creating an Order section.
Click Cancel to reject all entries and close the Create Order window.
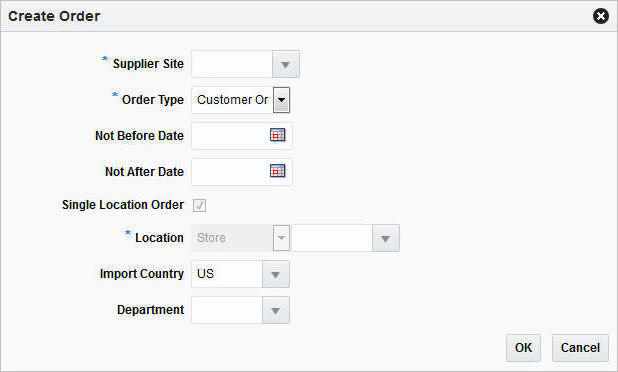
To create an order for a customer follow the steps below.
From the Tasks menu, select Orders > Create Order. The Create Order window opens.
In the Supplier Site field, enter, select or search for the supplier site. This field is required to create a purchase order.
In the Order Type field, select Customer Order.
In the Not Before Date field, enter the date before which the order deliveries are not expected, or use the Calendar icon to select a date.
In the Not After Date field, enter the date after which the order deliveries are not accepted, or use the Calendar icon to select a date.
The Single Location Order check box is checked by default, when you create a customer order. You cannot change this entry.
In the Location type field, the Location Type is set to Store by default, when you create a Customer Order. You cannot change the Location Type. Enter, select or search for the corresponding store location.
In the Import Country field, enter or select the import country.
|
Note: The Import Country field, is only available for import orders. |
In the Department field, enter, select or search for the department.
After you have entered all information for the customer order, choose one of the following options.
Click OK to create the customer order and close the Create Order window. The Order window opens in a new tab. Enter the necessary order information. For more details about creating orders, see the Order section. To add Customer Details, see the Customer Details section.
Click Cancel to reject all entries and close the Create Order window.
In the Customer Details window you can view, add or edit customer details for the created customer purchase order.
The Customer Details window contains the following sections.
The Customer header section contains the following fields.
Table 4-8 Customer Header Section
| Field | Description |
|---|---|
|
Customer |
Enter the customer in this field. |
|
Customer Order |
This field contains the created Customer Order Number. The Customer Order will be the same as the Order Number of the Customer Order in RMS. |
|
Fulfillment |
This field contains the Fulfillment Number. The Fulfillment will be the same as the Order Number of the Customer Order in RMS. |
The Billing Information section contains the following fields. Enter the details for the billing information in this section.
Table 4-9 Billing Information Section
| Field/Button | Description |
|---|---|
|
Address |
Enter the billing address. This field is a required field. |
|
City |
Enter the city. This field is a required field. |
|
State |
Enter, select or search for the state. |
|
Postal Code |
Enter the postal code of the city. |
|
Country |
Enter, select or search for the country. This field is a required field. |
|
Jurisdiction |
Enter, select or search for the jurisdiction information. This further breaks down the tax rate, if the location is different from the transaction location. |
|
First Name |
Enter the first name of the customer. |
|
Phonetic First Name |
Enter the customer's phonetic first name. |
|
Last Name |
Enter the last name of the customer. |
|
Phonetic Last Name |
Enter the customer's phonetic last name. |
|
Company |
Enter the company name. |
|
Preferred Name |
Enter the preferred name of the billing address. |
|
Phone |
Enter the phone number of the billing location. |
|
Copy from Billing Address |
The Copy from Billing Address button copies the Billing Address details to the Delivery Information section. |
The Delivery Information section contains the following fields. Enter the details for the delivery information in this section.
Table 4-10 Delivery Information Section
| Field/Button | Description |
|---|---|
|
Address |
Enter the delivery address. This field is a required field. |
|
City |
Enter the city. This field is a required field. |
|
State |
Enter, select or search for the state. |
|
Postal Code |
Enter the postal code of the city. |
|
Country |
Enter, select or search for the country. This field is a required field. |
|
Jurisdiction |
Enter, select or search for the jurisdiction information. This further breaks down the tax rate, if the location is different from the transactio location. |
|
First Name |
Enter the first name of the customer. |
|
Phonetic First Name |
Enter the customer's phonetic first name. |
|
Last Name |
Enter the last name of the customer. |
|
Phonetic Last Name |
Enter the customer's phonetic last name. |
|
Company |
Enter the company name. |
|
Preferred Name |
Enter the preferred name of the delivery address. |
|
Phone |
Enter the phone number of the delivery location. |
The Other Information section contains the following fields. Enter additional delivery information in this section.
Table 4-11 Other Information Section
| Field | Description |
|---|---|
|
Partial Delivery |
This check box is unchecked by default. Note: You cannot change the value of the Partial Delivery field. This field is only enabled when the window is accessed from the Transfer window. |
|
Delivery Date |
Enter the delivery date or use the Calendar button to select a date. |
|
Delivery Time |
Enter or select the delivery time. |
|
Delivery Charge |
This field contains the sum of all charges associated with the delivery of the order. |
|
Currency |
Indicates the currency of the order. |
|
Delivery Type |
Indicates the delivery type of the order. |
|
Carrier Code |
Indicates the carrier the order is shipped with, if specified on the order. |
|
Carrier Service Code |
Indicates the method selected for shipping by the customer placing the order. For example, Standard Shipping, Overnight and so on. |
|
Comments |
Enter any comments or special instructions that you might want to capture against the customer order. For example, services. |
The toolbar contains the following icons and buttons.
Table 4-12 Customer Details Toolbar - Icons/Buttons and Description
| Icons/Buttons | Description |
|---|---|
|
Help icon |
You can access the online help for a particular page by clicking the Help icon |
|
Save |
Click Save to save the entered records. |
|
Save and Close |
Click Save and Close to save the entered records and close the window. |
|
Cancel |
Click Cancel to reject all entries and close the window. |
|
Done |
If you open the window in view mode, the Done button is displayed. Click Done to close the window. |
To view, add or edit customer details follow the steps below.
From the More Actions menu of the Order window, select Customer. The Customer Details window opens.
Add, edit or view the customer details information.
For more information about how to maintain the customer details, see the Customer Details section.
After you have entered all necessary information, choose one of the following options from the Toolbar.
Click Save to save the entered customer details.
Click Save and Close to save the entered customer details and close the Customer Details window and return to the Order window.
Click Cancel to reject all entries and close the Customer Details window and return to the Order window.
The Manage Orders option opens the Order Search window. In the Order Search window you can perform the following actions:
Search for purchase orders by various search criteria
View the entered search results
View a purchase order
Create a purchase order
Create a purchase order from an existing order
Edit a purchase order
Split a purchase order
You can access the Order Search window from the Task menu, select Orders > Manage Orders. The Order Search window appears.
The Order Search window contains the following sections:
Search
For more information about how to search for an order, see the Searching for an Order section.
To search for an order:
From the Task menu, select Orders > Manage Orders. The Order Search window appears.
You can search for an order using basic or advanced search criteria, depending on the requirement. The basic mode is the default search mode.
Click Advanced to access the search section in advanced mode.
Click Basic to return to basic mode.
To search for an order using basic search criteria:
Enter, select or search for one or all of the following basic search criteria.
Table 4-13 Order Search - Basic Search Criteria and Description
| Search Field | Description |
|---|---|
|
Match |
Check radio button All or Any. All - only purchase orders matching all entered search criteria are shown. Any - purchase orders matching any of the entered search criteria are shown. |
|
Order No. |
Enter the order number. |
|
Status |
Select the status of the purchase order, for example, approved. |
|
Supplier Site |
Enter or select the supplier site number. |
|
Item |
Enter or search for an item. |
|
Location Type |
Select the location type of a purchase order, for example, store or warehouse. |
|
Not Before Date |
Enter the date before which the item will be picked up by the customer or click the Calendar button to select the date. |
|
Not After Date |
Enter the date after which the item cannot be picked up by the customer or click the Calendar button to select the date. |
|
Department |
Enter, select or search for the department. |
|
Class |
Enter, select or search for the class. |
|
Subclass |
Enter, select or search for the subclass. |
|
Location |
Enter or select the location for the purchase order. |
Click the Saved Search list to select one of the saved search criteria. Selecting a saved search populates the search section with the saved search criteria. If the run automatically function is enabled for the search, the search is executed immediately.
You can also personalize your saved searches by selecting Personalize. The Personalize Saved Searches window appears.
For more information about the Personalized Saved Search, see the Common User Interface Controls chapter, section "Personalize Saved Search".
Click Search. The purchase orders that match the search criteria are displayed in the Results section.
Click Reset to clear the search section and results.
Click Save As... to save the current search criteria. The Create Saved Search window appears.
For more information about how to save your search criteria, see the Common User Interface Controls chapter, section "Create Saved Search".
Click Done to close the window.
To search for an order using advanced search criteria:
To search using advanced search criteria, enter or select one or all of the advanced search criteria.
To narrow down the search, use the list next to the search fields. For example, determine if the entered value should equal or not equal the search result.
Click the Saved Search list to select one of the saved search criteria. Selecting a saved search populates the search section with the saved search criteria. If the run automatically function is enabled for the search, the search is executed immediately.
You can also personalize your saved searches by selecting Personalize. The Personalize Saved Searches window appears.
For more information about the Personalized Saved Search, see the Common User Interface Controls chapter, section "Personalize Saved Search".
Click Search. The purchase orders that match the search criteria are displayed in the Results section.
Click Reset to clear the search section and results.
Click Save As... to save the current search criteria. The Create Saved Search window appears.
For more information about how to save your search criteria, see the Common User Interface Controls chapter, section "Create Saved Search".
Click Add Fields to add more fields for the advanced search. To remove the field from the search, click the x right next to the field.
Click Reorder to change the order of the available search fields. The Reorder Search Fields window appears.
Select the desired search field and use the up and down arrows to rearrange the order of the fields.
Click OK to confirm the new order of the fields and close the window.
Click Cancel to reject any changes and close the window.
Click Done to close the window.
The Results section lists the retrieved orders.
Use the Actions Menu and icons to apply actions to the Results table. You can perform the actions listed below.
Table 4-14 Results - Actions Menu/Icons and Description
| Actions Menu/Icons | Description |
|---|---|
|
Create and Create icon |
Select Actions > Create, or use the Create icon For more details about how to create an order, see the Creating an Order section. |
|
Create from Existing and Create from Existing icon |
Use an existing purchase order as a template for a new purchase order, select a record in the Results section and choose Actions > Create from Existing, or use the Create from Existing icon For more information about the Order window, see the Order section. |
|
Edit nd Edit icon |
To edit a purchase order:
For more information about how to edit an order, see the Order section. |
|
View and View icon |
To view a purchase order:
|
|
Export to Excel and Export to Excel icon |
You can export the records in the table to a Microsoft Excel spreadsheet by selecting Actions > Export to Excel or by using the Export to Excel icon |
|
Split Order |
To split a purchase order:
The order must be in status Worksheet and truck splitting constraints must be set up for the order you want to split. For more information about splitting the order quantities for an item across suppliers, see the Splitting an Order section. |
You can customize the view of the table. Use the View Menu and icons to customize the view as listed below.
Table 4-15 Results - View Menu/Icons and Description
| View Menu/Icons | Description |
|---|---|
|
Currency |
Toggle between the currency of the order and the system's primary currency. |
|
Columns |
You can manage which of the columns will be shown in the table by clicking the Show All and Manage Columns options. |
|
Detach and Detach icon |
You can view the tables in the application in a separate window by clicking Detach or using the Detach icon |
|
Sort |
You can sort columns by the following options:
|
|
Reorder Columns |
You can reorder columns by clicking the Reorder Columns option. |
|
Query by Example and Query by Example icon |
You can filter the items by one or multiple column values by clicking Query by Example or using the Query by Example icon |
You can split order quantities for an item across suppliers in RMS. Follow the steps below to split the order quantities of your order.
From the Tasks menu, select Orders > Manage Orders. The Order Search window opens.
Enter or select search criteria as desired to make the search more restrictive.
Click Search. The orders that match the search criteria are displayed in the Results section.
Select a record in the Results section.
Select Actions > Split Orders, the Split by Supplier window opens.
Click Actions > Add or use the Add icon, to add an additional supplier.
To remove the supplier, click Delete to remove the primary supplier from the table.
In the Supplier Site field, enter, select or search for the supplier ID.
In the Country of Sourcing field, enter, select or search for the country of sourcing ID.
In the Unit Cost field, enter the unit cost for the item.
In the Order Quantity, enter the quantity of the item for the selected supplier site.
After you have entered the supplier site information, choose one of the following options.
Click OK to save your changes.
Click OK and Add Another to enter an additional supplier site.
Click Cancel to reject all changes and exit the Add Supplier Site window.
|
Note: If the Recommended Order Quantity does not equal the Actual Order Quantity, a warning message appears. Click Yes to continue, or No to return to the Split Supplier window and correct the order quantity. |
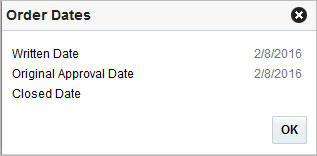
The Order Dates window, displays important order dates such as when the order has been created (Written Date), when the order is originally approved (Original Approval Date) as well as the Closed date.
To view the order dates of a purchase order follow the steps below.
From the Tasks menu, select Orders > Manage Orders. The Order Search window opens.
Enter or select search criteria as desired to make the search more restrictive.
Click Search. The orders that match the search criteria are displayed in the Results section.
In the Order No. column, click the order number link, or mark a record and select Actions > Edit/View. The Order window opens.
In the Toolbar select More Actions > Order Dates. The Order Dates window opens. The order dates are displayed.
Click OK, to exit the Order Dates window.
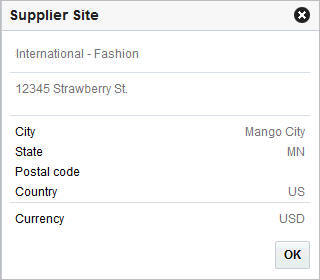
The Supplier Site window, displays supplier site details, including the name, address and currency.
To view the supplier site details follow the steps below.
From the Tasks menu, select Orders > Manage Orders. The Order Search Window opens.
Enter or select search criteria as desired to make the search more restrictive.
Click Search. The orders that match the search criteria are displayed in the Results section.
In the Order No. column, click the order number link, or mark a record and select Actions > Edit/View, or use the corresponding icons. The Order window opens.
In the Toolbar select More Actions > Supplier Details. The Supplier Site window opens. The supplier site details are displayed.
Click OK to close the Supplier Site window.
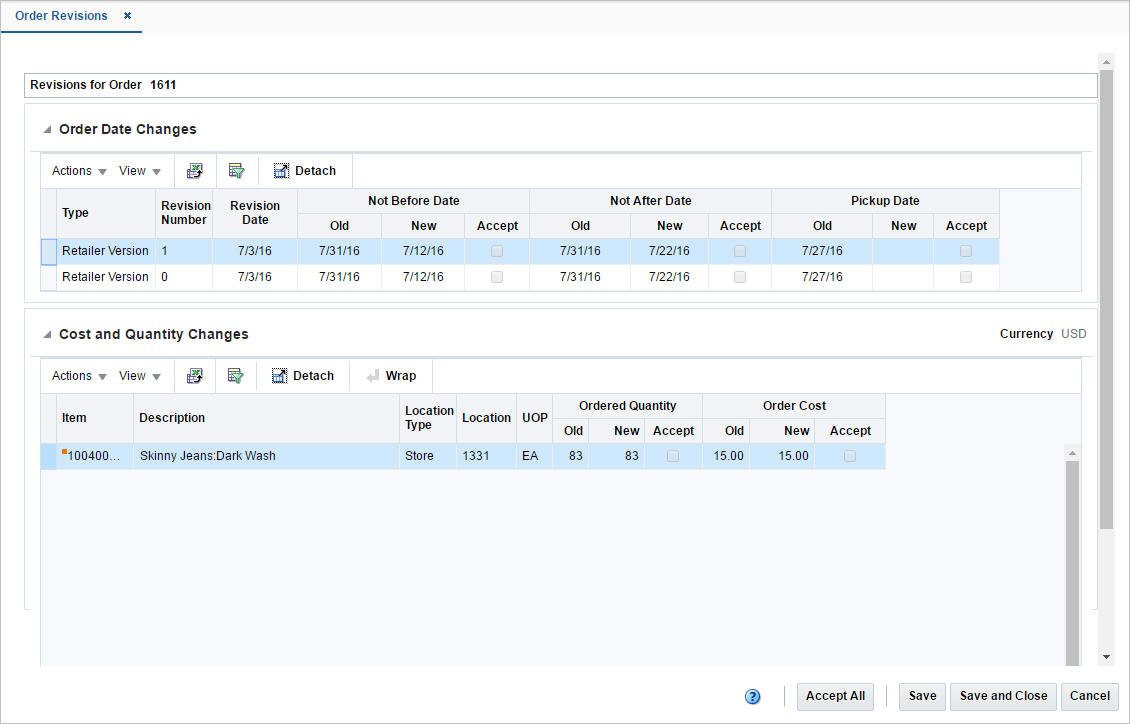
In the Order Revisions window you can view past changes and accept new changes for an approved purchase order. Changes can be made by the buyer, indicated as Retailer Version or by the supplier, indicated as Supplier Revision. The first version is the original purchase order. Changes are transmitted to and from the supplier through electronic data interchange (EDI). Versions or revisions can only be created for approved purchase orders.
The Order Date Changes section displays the following changes:
Old and New Not Before Date, date before which the order deliveries are not expected.
Old and New Not After Date, date after which the order deliveries are not accepted.
Old and New Pickup Date, date when the item will be picked up.
Use the Actions Menu and icons to apply actions to the table. You can perform the actions listed below.
You can customize the view of the table by using the options in the View Menu.
Table 4-18 Order Date Changes - View Menu/Icons and Description
| View Menu/Icons | Description |
|---|---|
|
Columns |
You can manage which of the columns will be shown in the table by clicking the Show All and Manage Columns options. |
|
Detach and Detach icon |
You can view the tables in the application in a separate window by clicking Detach or by using the Detach icon |
|
Reorder Columns |
You can reorder columns by clicking the Reorder Columns option. |
|
Query by Example and Query by Example icon |
You can filter the items by one or multiple column values by clicking the Query by Example option or by using the Query by Example icon |
The Cost and Quantity Changes section displays the following changes:
Old and New Ordered Quantity
Old and New Order Cost
Use the Actions Menu and icons to apply actions to the table. You can perform the actions listed below.
Table 4-19 Cost and Quantity Changes - Actions Menu/Icons and Description
| Actions Menu/Icons | Description |
|---|---|
|
Export to Excel and Export to Excel icon |
You can export the records in the table to a Microsoft Excel spreadsheet by selecting Actions > Export to Excel or by using the Export to Excel icon |
|
Wrap icon |
You can wrap the values in the table column by first clicking the column on which you would like the text to wrap and then using the Wrap icon |
You can customize the view of the table by using the options in the View Menu.
Table 4-20 Cost and Quantity Changes - View Menu/Icons and Description
| View Menu/Icons | Description |
|---|---|
|
Currency |
Toggle between the order's currency and the system's primary currency. |
|
Columns |
You can manage which of the columns will be shown in the table by clicking the Show All and Manage Columns options. |
|
Detach and Detach icon |
You can view the tables in the application in a separate window by clicking Detach or by using the Detach icon |
|
Reorder Columns |
You can reorder columns by clicking the Reorder Columns option. |
|
Query by Example and Query by Example icon |
You can filter the items by one or multiple column values by clicking the Query by Example option or by using the Query by Example icon |
The toolbar contains the following icons and buttons.
Table 4-21 Order Revisions Toolbar - Icons/Buttons and Description
| Icons/Buttons | Description |
|---|---|
|
Help icon |
You can access the online help for a particular page by clicking the Help icon |
|
Accept All |
Click Accept All to accept the changes for an approved purchase order. For more information about how to accept the changes, see the Accepting a Revision Order section. |
|
Save |
Click Save to save the entered records. |
|
Save and Close |
Click Save and Close to save the entered records and close the window. |
|
Cancel |
Click Cancel to reject all entries and close the window. |
|
Done |
If you open the window in view mode, the Done button is displayed. Click Done to close the window. |
To view an order revision follow the steps below.
From the Tasks menu, select Orders > Manage Orders. The Order Search window opens.
Search for and retrieve a purchase order. Restrict the search to purchase order in Approved or Closed status. Click Search. The search results are shown in the Results section.
In the Results section, select a record.
Next select Actions > View. The Order window opens.
In the Toolbar, select More Actions > Order Revisions.
The Order Revisions window opens. You can view all past order date, cost and quantity changes for the selected purchase order.
|
Note: RMS displays the latest changes at the top of the list, followed by the revision number in descending order. |
Click Done or use the Close Tab icon to close the Order Revisions window.
To accept changes for an approved purchase order follow the steps below.
From the Tasks menu, select Orders > Manage Orders. The Order Search window opens.
Search for and retrieve a purchase order. Restrict the search to purchase orders in Approved status. Click Search. The search results are shown in the Results section.
In the Order No. column, click the order number link, or mark a record and select Actions > Edit or use the Edit icon ![]() . The Order window opens.
. The Order window opens.
In the Toolbar select More Actions > Order Revisions.
The Order Revisions window opens. All Order Dates as well as Cost and Quantity Changes are displayed.
Select the Accept checkbox next to each change you want to accept. If you want to accept all of the changes, highlight the entire row, and click Accept All.
|
Note: The Accept All button is only enabled, if there are unaccepted changes for the selected purchase order available. |
After you have accepted the desired changes, you have the following options.
Click Save to save the accepted changes.
Click Save and Close to save the accepted changes and close the Order Revisions window.
Click Cancel to reject all changes and close the Order Revisions window.
For more information about appointments, see the Inventory chapter, section "Appointments".
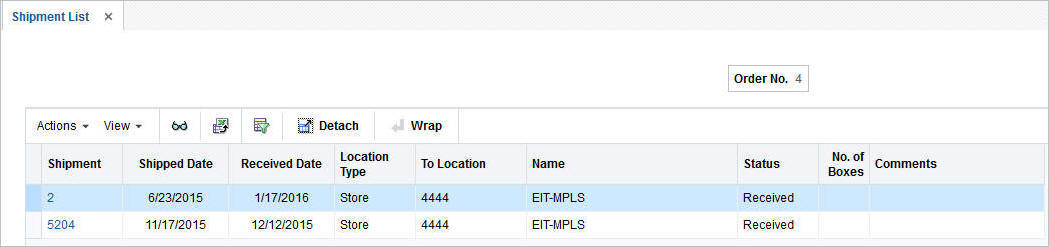
The Shipment List window displays shipping details for purchase order shipments and franchise shipments, when accessed through the order windows. Three different ways to access the Shipment List are available.
From the Tasks menu, select Orders > Manage Orders (Search for the order)> More Actions > Shipments. The Shipment List opens.
You can also access the Shipment List for vendor sourced franchise orders.
From the Tasks menu, select Inventory > Franchise Orders > Manage Franchise Orders. The Franchise Order Search window appears. Search for the franchise order.
In the Results section click the franchise order link, or mark a record and select Actions > Edit/View. The Franchise Order window appears.
Then select More Actions > Shipments. The Shipment List window opens.
Additionally, you can access the Shipment List for franchise returns.
From the Tasks menu, select Inventory > Franchise Orders > Manage Franchise Returns. The Franchise Return Search window appears. Search for the franchise return.
In the Results section click the RMA (Return Merchandise Authorization) link, or mark a record and select Actions > Edit/View. The Franchise Return window appears.
Then select More Actions > Shipments. The Shipment List window opens.
The Shipment List contains the following information:
Shipment number
Shipped Date
Received Date
Location Type, for example, Store or Warehouse
To Location
Name, name of the location
Status, for example, Submitted.
No. of Boxes
Comments
To open the Shipment window and view further shipment details follow one of the options below.
In the Shipment List window, go to column Shipment and click the shipment number link. The Shipment window opens. For more information about shipment details, see the Inventory chapter, section "Shipments".
In the Shipment List window, select Actions > View or use the View icon. The Shipment window opens. For more information about shipment details, see the Inventory chapter, section "Shipments".
Click Done to exit the Shipment List.
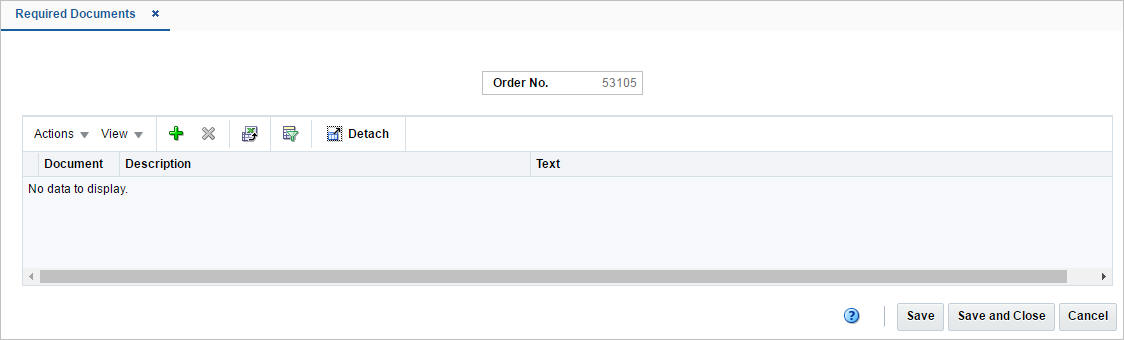
The Required Documents function allows you to add or delete required documents, for example, to a selected purchase order.
To add a required document to a purchase order follow the steps below.
From the Tasks menu, select Orders > Manage Orders. The Order Search window opens.
Enter or select search criteria as desired to make the search more restrictive.
Click Search. The orders that match the search criteria are displayed in the Results section.
In the Order No. column, click the order number link, or mark a record and select Actions > Edit, or use the Edit icon ![]() . The Order window opens.
. The Order window opens.
In the Toolbar, select More Actions > Required Documents. The Required Documents window opens.
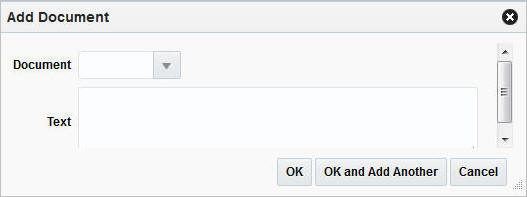
Select Actions > Add or use the Add icon ![]() . The Add Document window opens.
. The Add Document window opens.
In the Document field, enter, select or search for the document type you want to add to the purchase order.
The Text field populates automatically.
After you have selected the desired document, you have the following options.
Click OK to add the document to the table and exit the Add Document window.
Click OK and Add Another to add the current document to the table and stay in the Add Document window to add further documents.
Click Cancel to reject the selected document and exit the Add Document window.
After you have added all the desired documents to the table, you have the following options.
Click Save to save the document changes for the purchase order and remain in the Required Documents window.
Click Save and Close to save the document changes for the purchase order and exit the Required Documents window.
Click Cancel to reject all the document changes for the purchase order and exit the Required Document window.
To delete a required document to a purchase order follow the steps below.
From the Tasks menu, select Orders > Manage Orders. The Order Search window opens.
Enter or select search criteria as desired to make the search more restrictive.
Click Search. The orders that match the search criteria are displayed in the Results section.
In the Order No. column, click the order number link, or mark a record and select Actions > Edit, or use the Edit icon ![]() . The Order window opens.
. The Order window opens.
In the Toolbar, select More Actions > Required Documents. The Required Documents window opens.
In the table select the document you want to delete. The selected record is marked blue.
Select Actions > Delete or use the Delete icon ![]() .
.
You are prompted to confirm that you want to delete the selected document.
Click Yes to delete the selected document. The document is deleted from the table.
Click No to keep the selected document. The document is still shown in the table.
After you have deleted all desired documents from the table, you have the following options.
Click Save to save the document changes for the purchase order and remain in the Required Documents window.
Click Save and Close to save the document changes for the purchase order and exit the Required Documents window.
Click Cancel to reject all the document changes for the purchase order and exit the Required Document window.
To view required documents of a purchase order follow the steps below.
From the Tasks menu, select Orders > Manage Orders. The Order Search window opens.
Enter or select search criteria as desired to make the search more restrictive.
Click Search. The orders that match the search criteria are displayed in the Results section.
In the Results section, select a record.
Next select Actions > View. The Order window opens.
In the Toolbar, select More Actions > Required Documents. The Required Documents window opens. The documents for the selected purchase order are displayed.
Click Done to exit the Required Document window.
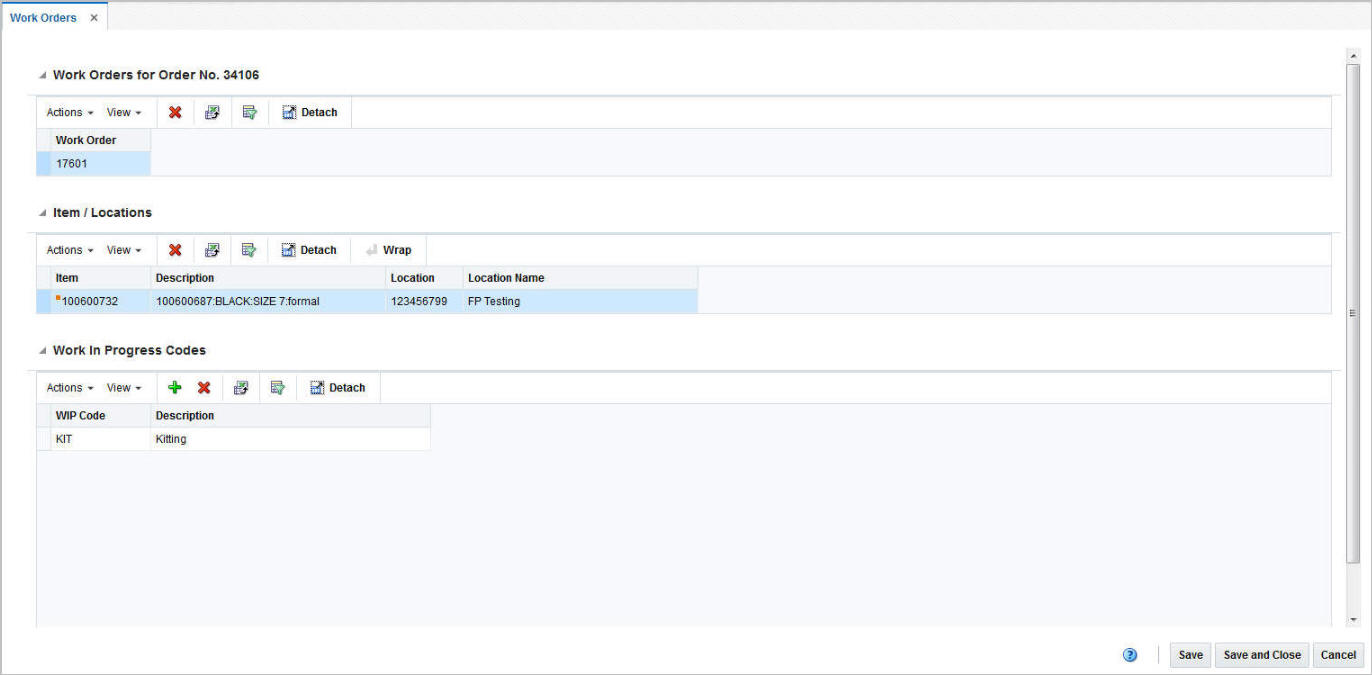
Work Orders are requests for certain activities to be done to an item in a warehouse before the delivery of an item to the final locations.
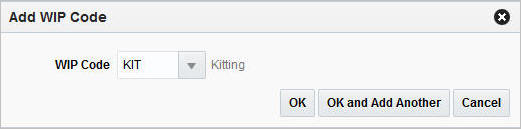
The Work Order window allows you to view or maintain one or more work orders for the purchase order. Next you assign work in progress codes (WIP) and indicate in which sequence the task must be completed.
The Work Orders window contains the following sections.
The Work Orders for the Order No. table displays all work orders associated with the current purchase order.
Use the Actions Menu and icons to apply actions to the table. You can perform the actions listed below.
Table 4-22 Work Orders for Order No. Table - Actions Menu/Icons and Description
| Actions Menu/Icons | Description |
|---|---|
|
Delete and Delete icon |
You can delete work orders from a purchase order by selecting Actions > Delete or by using the Delete icon You cannot delete an existing work order while creating a new work order. For more information about how to delete work orders, see the Deleting a Work Order section. |
|
Export to Excel and Export to Excel icon |
You can copy the records in the table to a Microsoft Excel spreadsheet by selecting Actions > Export to Excel or using the Export to Excel icon |
You can customize the view of the table. Use the View Menu to customize the view as listed below.
Table 4-23 Work Orders for Order No. Table - View Menu and Description
| View Menu | Description |
|---|---|
|
Columns |
You can manage which of the columns will be shown in the table by clicking the Show All and Manage Columns options. |
|
Sort |
You can sort columns by the following options:
|
|
Detach and Detach icon |
You can view the tables in the application in a separate window by clicking Detach or by using the Detach icon |
|
Reorder Columns |
You can reorder columns by clicking the Reorder Columns option. |
|
Query by Example and Query by Example icon |
You can filter the items by one or multiple column values by clicking the Query by Example option or by using the Query by Example icon |
The Item/Locations table displays items and locations associated with the work order. The items and locations are populated automatically.
Use the Actions Menu and icons to apply actions to the table. You can perform the actions listed in below.
Table 4-24 Item/Location Table - Actions Menu/Icons and Description
| Actions Menu/Icons | Description |
|---|---|
|
Delete and Delete icon |
You can delete item/locations combinations from a purchase order by selecting Actions > Delete or by using the Delete icon You can not delete item/locations combinations from a purchase while creating a new work order. For more information about how to delete item/locations combinations, see the Deleting an Item/Locations Combination section. |
|
Export to Excel and Export to Excel icon |
You can copy the records in the table to a Microsoft Excel spreadsheet by selecting Actions > Export to Excel or using the Export to Excel icon |
|
Wrap icon |
You can wrap the values in the table column by using the Wrap icon |
You can customize the view of the table. Use the View Menu to customize the view as listed below.
Table 4-25 Item/Location Table - View Menu and Description
| View Menu | Description |
|---|---|
|
Columns |
You can manage which of the columns will be shown in the table by clicking the Show All and Manage Columns options. |
|
Sort |
You can sort columns by the following options:
|
|
Detach and Detach icon |
You can view the tables in the application in a separate window by clicking Detach or by using the Detach icon |
|
Reorder Columns |
You can reorder columns by clicking the Reorder Columns option. |
|
Query by Example and Query by Example icon |
You can filter the items by one or multiple column values by clicking the Query by Example option or by using the Query by Example icon |
The Work In Progress (WIP) Codes Table holds the WIP codes assigned to the item locations on the work order.
Use the Actions Menu and icons to apply actions to the table. You can perform the actions listed below.
Table 4-26 WIP Codes Table - Actions Menu/Icons and Description
| Actions Menu/Icons | Description |
|---|---|
|
Add and Add icon |
You can add a WIP Code to a work order by selecting Actions > Add or using the Add icon For more information about how to add WIP code to a work order, see the Adding a WIP Code section. |
|
Delete and Delete icon |
You can delete a WIP code from a work order by selecting Actions > Delete or using the Delete icon For more information about how to delete a WIP code from a work order, see the Deleting a WIP Code section. |
|
Export to Excel and Export to Excel icon |
You can save the table to an Microsoft Excel spreadsheet by selecting Actions > Export to Excel or using the Export to Excel icon |
You can customize the view of the table. Use the View Menu to customize the view as listed below.
Table 4-27 WIP Codes Table - View Menu and Description
| View Menu | Description |
|---|---|
|
Columns |
You can manage which of the columns will be shown in the table by clicking the Show All and Manage Columns options. |
|
Sort |
You can sort columns by the following options:
|
|
Detach and Detach icon |
You can view the tables in the application in a separate window by clicking Detach or by using the Detach icon |
|
Reorder Columns |
You can reorder columns by clicking the Reorder Columns option. |
|
Query by Example and Query by Example icon |
You can filter the items by one or multiple column values by clicking the Query by Example option or by using the Query by Example icon |
The Toolbar displays the icons and buttons for actions that can be performed in the Work Orders window. The Toolbar contains the following icons and buttons.
Table 4-28 Work Orders Toolbar - Icons/Buttons and Description
| Action Icons/Buttons | Description |
|---|---|
|
Help icon |
You can access the online help for a particular page by clicking the Help icon. |
|
Save |
Click Save, to save your changes and stay in the Work Orders window. |
|
Save and Close |
Click Save and Close, to save your changes and exit the Work Orders window. |
|
Cancel |
Click Cancel, to reject all entries and exit the Work Orders window. |
To create a work order, follow the steps below.
|
Note: The system displays already existing work orders, if you add a new work order. However, you can not modify existing work orders during the creation of a new work order. |
From the Tasks menu, select Orders > Manage Orders. The Order Search window opens.
Enter or select search criteria as desired to make the search more restrictive.
Click Search. The orders that match the search criteria are displayed in the Results section.
In the Order No. column, click the order number link, or mark a record and select Actions > Edit, or use the Edit icon ![]() . The Order window opens.
. The Order window opens.
Select More Actions > Work Order > Create. The Order Distribution window opens.
In the table click Actions > Work Orders or use the Work Orders button. The Work Orders window opens.
In the Work in Progress Codes table, select Actions > Add WIP Code, or use the Add icon ![]() . The Add WIP Code window opens.
. The Add WIP Code window opens.
Select, enter or search for the WIP code, for example, quality control.
Click OK to add the selected WIP code to the Work In Progress Code section.
Click OK and Add Another to add the current WIP code and create another.
Click Cancel to reject the WIP entry and exit the Add WIP window.
To save or reject the created work order, choose one of the following options.
Click Save to save the created work order.
Click Save and Close to save the created work order and exit the Work Orders window. The Order Distribution window is displayed without the item/locations that were associated to the new work order.
Click Cancel to reject all entries and close the Work Orders window.
To edit a work order, follow the steps below.
From the Tasks menu, select Orders > Manage Orders. The Order Search window opens.
Enter or select search criteria as desired to make the search more restrictive.
Click Search. The orders that match the search criteria are displayed in the Results section.
In the Order No. column, click the order number link or select Actions > Edit, or use the Edit icon ![]() . The Order window opens.
. The Order window opens.
Select More Actions > Work Order > Manage. The Work Orders window opens. The work orders for the selected purchase order are displayed. Choose one of the following options.
To delete a work order, follow the steps below.
In the Work Orders for Orders No. table, select a record.
Then select Actions > Delete or use the Delete icon ![]() to delete a work order from a purchase order.
to delete a work order from a purchase order.
A confirmation prompt is displayed. Select Yes to confirm the prompt. The work order is deleted from the purchase order.
|
Note: The Work Orders window will close automatically, after you select Yes to confirm the deletion of the last work order for the purchase order. |
To save or reject your changes, choose one of the following options.
Click Save to save your changes.
Click Save and Close to save your changes and exit the Work Orders window.
Click Cancel to reject all entries and close the Work Orders window.
To delete an item/locations combination from the work order, follow the steps below.
In the Item/Locations table, select a record.
Then select Actions > Delete or use the Delete icon ![]() to delete the item/locations combination from the purchase order.
to delete the item/locations combination from the purchase order.
A confirmation prompt is displayed. Select Yes to confirm he prompt. The item/locations combination is deleted from the purchase order.
|
Note: You are not allowed to delete the last item/locations combination of a work order. You have to delete the whole work order instead. For more information about how to delete a work order, see the Deleting a Work Order section. |
To save or reject your changes, choose one of the following options.
Click Save to save your changes.
Click Save and Close to save your changes and exit the Work Orders window.
Click Cancel to reject all entries and close the Work Orders window.
To add a WIP code to the work order, follow the steps below.
In the Work in Progress Codes section, select Actions > Add WIP Code, or use the Add icon ![]() . The Add WIP Code window opens.
. The Add WIP Code window opens.
Select, enter or search for the WIP code, for example, quality control.
Click OK to add the selected WIP code to the Work In Progress Code section.
Click OK and Add Another to add the current WIP code and create another.
Click Cancel to reject the WIP entry and exit the Add WIP window.
To save or reject your changes, choose one of the following options.
Click Save to save your changes.
Click Save and Close to save your changes and exit the Work Orders window.
Click Cancel to reject all entries and close the Work Orders window.
To view a work order, follow the steps below.
From the Tasks menu, select Orders > Manage Orders. The Order Search window opens.
Enter or select search criteria as desired to make the search more restrictive.
Click Search. The orders that match the search criteria are displayed in the Results section.
In the Results section, select a record.
Next select Actions > View or use the View icon ![]() . The Order window opens.
. The Order window opens.
Select More Actions > Work Order > Manage. The Work Orders window opens. All work orders associated with the selected purchase order are displayed.
Click Done to exit the Work Orders window.
To delete a WIP code from the work order, follow the steps below.
In the WIP Codes table, select a record.
Then select Actions > Delete or use the Delete icon ![]() to delete the WIP code from the purchase order.
to delete the WIP code from the purchase order.
A confirmation prompt is displayed. Select Yes to confirm the prompt. The WIP code is deleted from the purchase order.
To save or reject your changes, choose one of the following options.
Click Save to save your changes.
Click Save and Close to save your changes and exit the Work Orders window.
Click Cancel to reject all entries and close the Work Orders window.
The Order Letter of Credit window allows you to maintain letter of credit information for a purchase order. You must enter letter of credit information, when you select Letter of Credit as the method of payment on a purchase order.
|
Note: The Letter of Credit function is only available, if you selected Letter of Credit as the method of payment. |
To add Letter of Credit information to a purchase order follow the steps below.
From the Tasks menu, select Orders > Manage Orders. The Order Search window opens.
Enter or select search criteria as desired to make the search more restrictive.
Click Search. The orders that match the search criteria are displayed in the Results section.
In the Order No. column, click the order number link, or mark a record and select Actions > Edit, or use the Edit icon ![]() . The Order window opens.
. The Order window opens.
In the Toolbar, select More Actions > Letter of Credit. The Order Letter of Credit window opens.
In the Order No. field the order number is shown at the top of the window.
In the Applicant field, enter, select or search for the applicant.
In the Beneficiary field, enter, select or search for the beneficiary.
In the Letter of Credit field, enter, select or search for the letter of credit reference.
The Bank Letter of Credit field populates automatically.
In the Letter of Credit Group field, enter the letter of credit group.
In the Merchandise Description, enter a description of the goods.
If necessary select the following check boxes:
Attached to Letter of Credit
Transshipment
Partial Shipment
Click the Letter of Credit button to navigate to the Letter of Credit head window. For more information about Letter of Credit, see the Import Management chapter, section "Letter of Credit Window".
After you have entered all Letter of Credit information, you have the following options.
Click Save to save the entered Letter of Credit information for the purchase order and stay in the Order Letter of Credit window.
Click Save and Close to save the entered Letter of Credit information for the purchase order and exit the Order Letter of Credit window.
Click Cancel to reject all Letter of Credit entries and exit the Order Letter of Credit window.
To view letter of credit information follow the steps below.
From the Tasks menu, select Orders > Manage Orders. The Order Search window opens.
Search for and retrieve a purchase order. Enter or select search criteria as desired to make the search more restrictive.
Click Search. The search results are shown in the Results section.
In the Results section, select a record.
Next select Actions > View. The Order window opens.
In the Toolbar, select More Actions > Letter of Credit. The Order Letter of Credit window opens. The Letter of Credit information for the selected purchase order is displayed.
Click the Letter of Credit button to navigate to the Letter of Credit window. For more information about Letter of Credit, see the Import Management chapter, section "Letter of Credit Window".
Click Done to close the Order Letter of Credit window.
The Order Recalculation window allows you to change components of the current order that affect its price. These components include: the base cost of the items, scaling, replenishment, bracket costs, deals, and landed cost. The Order Recalculation window allows you to recalculate the total order cost. You can decide which component to choose when calculating the total cost of the order.
To recalculate costs of the current purchase order follow the steps below.
From the Tasks menu, select Orders > Manage Orders. The Order Search window opens.
Enter or select search criteria as desired to make the search more restrictive.
Click Search. The orders that match the search criteria are displayed in the Results section.
In the Order No. column, click the order number link, or mark a record and select Actions > Edit, or use the Edit icon ![]() . The Order window opens.
. The Order window opens.
In the Toolbar select More Actions > Recalculation. The Order Recalculation window opens.
In the Order Recalculation window, choose between the following recalculation options.
Recalculate Replenishment
|
Note: The Recalculate Replenishment option is only displayed, if the order is a replenishment order. |
Apply Bracket Costs
Apply Deals - online or offline
Order Scaling
Select the options you want to recalculate.
To complete the recalculation, choose one of the following options.
Click OK to recalculate the selected options and close the Order Recalculation window.
Click Cancel to reject all recalculation options and exit the Order Recalculation window.
The Order Inventory Maintenance window allows you to maintain and view inventory management information for purchase orders, for items on a purchase order, and for locations on a purchase order.
You can view the following inventory management information:
Purchase order quantities before and after scaling
Net cost of the purchase order before and after scaling
Due order processing parameters for replenishment orders
You can edit the following inventory management information:
Purchase order scaling
Minimum constraints
Truck splitting
Supplier Pooling
Order Quantity
The Order Inventory Management window contains the following sections.
Order Header
The header displays the order number, item, location and order costs.
|
Note: The fields Item and Location are only displayed if you enter the Order Inventory Management window through Order Details. |
Scaling Constraints
For more information about the scaling constraints, see the Maintaining Scaling Constraints section.
Minimum Constraints
For more information about the minimum constraints, see the Maintaining Minimum Constraints section.
Truck Splitting Constraints
For more information about the truck splitting constraints, see the Maintain Truck Splitting Constraints section.
Supplier Pooling
For more information about the supplier pooling, see the Maintaining Supplier Pooling section.
To maintain inventory information of a purchase order follow the steps below.
From the Tasks menu, select Orders > Manage Orders. The Order Search window appears.
Restrict the search to purchase order in Worksheet status.
Click Search. The orders that match the search criteria are displayed in the Results section.
In the Order No. column, click the order number link or select Actions > Edit, or use the Edit icon ![]() . The Order window appears.
. The Order window appears.
To apply inventory management details to the entire purchase order:
In the Toolbar select More Actions > Inventory Management. The Order Inventory Management window appears.
To apply inventory management details to an item on the purchase order:
In the Toolbar select Details. The Order Details window appears.
In the Items section, select an item. Then select Actions > Inventory Management. The Order Inventory Management window appears.
To apply inventory management details to an item and location on the purchase order:
In the Toolbar select Details. The Order Details window appears.
In the Locations section, select an location. Then select Actions > Inventory Management. The Order Inventory Management window appears.
To maintain the scaling constraints, follow the steps below.
In the Scaling Constraints area, select the Scale Order to Constraints check box. The Scaling Constraints area is enabled.
In the Objective field, select whether purchase orders are scaled to the minimum or maximum values of the scaling constraints.
In the Maximum Iterations field, enter the maximum number of times that the scaling process is performed for the purchase order.
In the Level field, select the level at which the scaling is performed. For example, select order or location level.
In the Scaling Constraints Primary column, edit the following fields:
Type: Enter or select the primary type of constraint to use when scaling orders. For example, Amount or Each.
UOM: If you select, Mass or Volume as the primary type, edit the unit of measure (UOM) code. Enter, select or search for the UOM.
Maximum Value: Edit the maximum value of the constraint. If you select Amount as the primary type, the currency is displayed next to this field.
Tolerance: Edit the percentage tolerance for the minimum value of the constraint.
Minimum Value: Edit the minimum value of the constraint. If you select Amount as the primary type, the currency is displayed next to this field.
Tolerance: Edit the percentage tolerance for the maximum value of the constraint.
In the Scaling Constraints Secondary column, edit the following fields:
Type: Select the secondary type of constraint to use when scaling orders.
|
Note: The Secondary Type cannot be the same as the Primary Type. |
UOM: If you select, Mass or Volume as the secondary type, edit the UOM code. Enter, select or search for the UOM.
Maximum Value: Edit the maximum value of the constraint. If you select Amount as the secondary type, the currency is displayed next to this field.
Tolerance: Edit the percentage tolerance for the minimum value of the constraint.
Minimum Value: Edit the minimum value of the constraint. If you select Amount as the secondary type, the currency is displayed next to this field.
Tolerance: Edit the percentage tolerance for the maximum value of the constraint.
Quantities: Displays the primary and secondary pre-scaled and scaled quantities.
Vehicle Information:
The Multiple Trucks checkbox determines if an order should be scaled to one or multiple trucks. Select the checkbox to inidcate that the order should be scaled to multiple trucks.
The Number of Trucks fields contains the number of trucks required for the order.
Issues: Displays any issues that were encountered during the order scaling process.
To maintain the minimum constraints, follow the steps below.
In the Level field, select the level at which the minimum order requirements of the supplier must be met.
When you define two minimum order requirements, select the relationship between the requirements in the Conjunction field.
In the Minimum 1 column, complete the following fields:
Type: Select how the first minimum order requirement is expressed.
UOM: If you select Mass or Volume as the primary type, edit the UOM code. Enter, select or search for the UOM.
Value: Edit the value of the first minimum order requirement of the supplier. If you select Amount as the first minimum, the currency is displayed next to the field.
In the Minimum 2 column, complete the following fields:
Type: Select how the second minimum order requirement is expressed.
|
Note: The Minimum 2 Type cannot be the same as the Minimum 1 Type. |
UOM: If you select Mass or Volume as the secondary type, edit the UOM code. Enter, select or search for the UOM.
Value: Edit the value of the first minimum order requirement of the supplier. If you select Amount as the second minimum, the currency is displayed next to the field.
Quantities: Displays the primary and secondary pre-scaled and scaled quantities.
To maintain truck splitting constraints, follow the steps below.
In the Truck Splitting Constraints section, select the Split Order into Truckloads check box. The Truck Splitting Constraints area is enabled.
In the Truck Split Method field, select the desired method from the list.
In the Constraint 1 column, complete the following fields:
Type: Select the primary type of constraint to use when splitting orders into truckloads.
UOM: If you select Mass or Volume as the primary type, edit the UOM code. Enter, select or search for the UOM.
Value: Edit the value of the constraint.
Tolerance: Edit the percentage tolerance for the maximum value of the constraint.
In the Constraint 2 column, complete the following fields:
Type: select the primary type of constraint to use when splitting orders into truckloads.
|
Note: The Constraint 2 Type cannot be the same as the Constraint 1 Type. |
UOM: If you select Mass or Volume as the secondary type, edit the UOM. Enter, select or search for the UOM.
Value: Edit the value of the constraint.
Tolerance: Edit the percentage tolerance for the maximum value of the constraint.
Quantities: Displays the primary and secondary pre-scaled and scaled quantities as well as the number of trucks.
Issues: Displays any issues that were encountered during the split order process.
This section displays the following fields.
Order Due checkbox
This checkbox determines if the Due Order Processing will be used when creating orders for the supplier or supplier/department. The checkbox is only used for replenishment orders.
Estimated Stock Out
Accepted Stock Out
Service Basis
Due Order Processing checkbox
This checkbox determines if the Due Order Processing will be used when building the order. It is only used for replenishment orders.
Item Locations Due
Due Order Level
To maintain the supplier pooling, follow the steps below.
In the Supplier Site field, enter, select or search for the supplier site.
In the File ID field, enter, select or search for the file ID.
After you have entered all constraints, follow the steps below:
Click the Recalculate icon ![]() to recalculate the quantities.
to recalculate the quantities.
|
Note: When an order must be recalculated, a corresponding message is displayed. |
Then choose one of saving options from the Order Inventory Management Toolbar.
The toolbar contains the following icons and buttons.
Table 4-29 Order Inventory Management Toolbar - Icons/Buttons and Description
| Icons/Buttons | Description |
|---|---|
|
Help icon |
You can access the online help for a particular page by clicking the Help icon |
|
Recalculate Quantities icon |
Recalculate the pre-scaled and scaled quantities by using the Recalculate Quantities icon |
|
Save |
Click Save to save your changes. |
|
Save and Close |
Click Save and Close to save the entered records and close the window. |
|
Cancel |
Click Cancel to reject all entries and close the window. |
|
Done |
If you open the window in view mode, the Done button is displayed. Click Done to close the window. |
To view inventory management information follow the steps below.
From the Tasks menu, select Orders > Manage Orders. The Order Search window appears.
Restrict the search to purchase order in Worksheet status.
Click Search. The orders that match the search criteria are displayed in the Results section.
In the Results section, select a record.
Next select Actions > View. The Order window appears.
To view inventory management details to the entire purchase order:
In the Toolbar select More Actions > Inventory Management. The Order Inventory Management window appears.
To view inventory management details to an item on the purchase order:
In the Toolbar select Details. The Order Details window appears.
In the Items section, select an item. Then select Actions > Inventory Management. The Order Inventory Management window appears.
To view inventory management details to an item and location on the purchase order:
In the Toolbar select Details. The Order Details window appears.
In the Locations section, select an location. Then select Actions > Inventory Management. The Order Inventory Management window appears.
The inventory management information for the selected purchase order is displayed.
Click Done to close the Order Inventory Management window.
In the Deal Summary window you can to view deals with transaction level discounts that apply to a purchase order. The screen provides details on the order discount, item/location discount and the total discount.
To view a deal summary follow the steps below.
From the Tasks menu, select Orders > Manage Orders. The Order Search window opens.
Enter or select search criteria as desired to make the search more restrictive.
Click Search. The orders that match the search criteria are displayed in the Results section.
In the Order No. column, click the order number link or select Actions > Edit/View, or use the corresponding icons. The Order window opens.
In the Toolbar, select More Actions > Deal Summary.
The Deal Summary window opens. The header section displays the selected order number, the total discount amount and the currency. The bottom section contains deal details, such as deal component, discounts on item/location level as well as on the order level.
|
Note: If the selected order has a different currency than the system's primary currency, RMS also displays the field Total Discount Primary. This field displays the total discount amount in the system's primary currency.If the currency of the selected order has the same currency than the system's primary currency, only the Total Discount field is displayed. |
Click OK to exit the Deal Summary window and return to the Order window.
Pre-issued order numbers are used to provide a supplier with a valid purchase order number. The items may be delivered to a warehouse or store against this pre-issued order number. In the Pre-Issue Order Numbers window you can create purchase order numbers immediately or create a schedule to generate purchase order numbers, through a batch process.
The Pre-Issue Order Numbers window contains the following sections.
In the Generation Schedule table you can create or delete a schedule, to generate PO numbers by a batch program.
Use the Actions Menu and icons to apply actions to the table. You can perform the actions listed below.
Table 4-30 Generation Schedule Table - Actions Menu/Icons and Description
| Actions Menu/Icons | Description |
|---|---|
|
Add and Add icon |
You can add a schedule to generate PO numbers by selecting Actions > Add or by using the Add icon For more information about how to generate a schedule, see the Creating a Schedule for Pre-Issue Order Numbers section. |
|
Delete and Delete icon |
You can delete schedules to generate PO numbers in the Pre-Issue Order Numbers window.
|
|
Export to Excel and Export to Excel icon |
You can copy the records in the table to a Microsoft Excel spreadsheet by selecting Actions > Export to Excel or using the Export to Excel icon |
You can customize the view of the table. Use the View Menu to customize the view as listed below.
Table 4-31 Generation Schedule Table - View Menu and Description
| View Menu | Description |
|---|---|
|
Columns |
You can manage which of the columns will be shown in the table by clicking the Show All and Manage Columns options. |
|
Detach and Detach icon |
You can view the tables in the application in a separate window by clicking Detach or by using the Detach icon |
|
Reorder Columns |
You can reorder columns by clicking the Reorder Columns option. |
|
Query by Example and Query by Example icon |
You can filter the items by one or multiple column values by clicking the Query by Example option or by using the Query by Example icon |
The Toolbar displays the icons and buttons for actions that can be performed in the CE Forms and Protest window. The Toolbar contains the following icons and buttons.
Table 4-32 Pre-Issue Order Numbers Toolbar - Icons/Buttons and Description
| Action Icons/Buttons | Description |
|---|---|
|
Help icon |
You can access the online help for a particular page by clicking the Help icon. |
|
Generate Now |
Click Generate Now to immediately create a purchase order number. For more information about manually creating a purchase order number, see the Generating Order Numbers section. |
|
Save |
Click Save, to save your changes and stay in the Pre-Issue Order Numbers window. |
|
Save and Close |
Click Save and Close, to save your changes and exit the Pre-Issue Order Numbers window. |
|
Cancel |
Click Cancel, to reject all entries and exit the Pre-Issue Order Numbers window. |
To create a schedule to generate pre-issue order numbers, follow the steps below.
From the Tasks menu, select Orders > Pre-Issue Order Numbers. The Pre-Issue Order Numbers window opens.
To create a schedule to generate pre-issue order numbers, select Actions > Add or use the Add icon ![]() . The Add Generation Schedule window opens.
. The Add Generation Schedule window opens.
In the Supplier Site field, enter, select or search for the supplier site for which you want to create pre-issue order numbers.
In the Quantity field, enter the quantity of pre-issue order numbers you want to create.
In the Days Until Expiration field, enter the number of days that should elapse between the date each set of pre-issue order numbers is created and the date when the pre-issue order numbers expire.
In the Days Between Generation field, enter the days between one generation to the next.
In the Next Generate Date, enter the date when this set of pre-issue order numbers should be generated.
Click OK, to add the current schedule to the Generation Schedule section and exit the Add Generation Schedule window.
Click OK and Add Another to add the current schedule to the Generation Schedule section and create another schedule.
Click Cancel to reject all changes and exit the Add Generation Schedule window.
After you have entered the information for the pre-issue order numbers, you have the following options.
Click Save, to save the pre-issue order number schedule and/or pre-issue order number.
Click Save and Close, to save the pre-issue order number schedule and/or pre-issue order number and exit the Pre-Issue Order Numbers window.
Click Cancel, to reject all changes and exit the Pre-Issue Order Numbers window.
To generate a pre-issue order number immediately, follow the steps below.
From the Tasks menu, select Orders > Pre-Issue Order Numbers. The Pre-Issue Order Numbers window opens.
In the toolbar, click Generate Now. The Generate Order Numbers Now window opens.
In the Supplier Site field, enter, select or search for the supplier site you want to generate a pre-issue order number for.
In the Quantity field, enter the quantity of pre-issue order numbers you want to generate.
In the Days Until Expiration field, enter the number of days that should elapse between the date, the pre-issue order number is created and the date when the pre-issue order number expires.
After you have entered the required information, choose one of the following options.
Click OK, to add the pre-issue order number to the Generation Schedule section and exit the Generate Order Numbers Now window.
Click OK and Add Another, to add the pre-issue order number to the Generation Schedule section and create another pre-issue order number.
Click Cancel, to reject all changes and exit the Generate Order Numbers Now window.
After you have entered the information for the pre-issue order numbers, you have the following options.
Click Save, to save the pre-issue order number schedule and/or pre-issue order number.
Click Save and Close, to save the pre-issue order number schedule and/or pre-issue order number and exit the Pre-Issue Order Numbers window.
Click Cancel, to reject all changes and exit the Pre-Issue Order Numbers window.
On a single purchase order, the same item might be delivered to different locations and can have different costs. In the Order Details window you can view and maintain the items, locations and allocation of a purchase order.
The Order Details window contains the following sections.
The Order Header contains the order number, supplier site and department.
The Item section displays the total cost, total retail, currency as well as the Recalculate Totals icon ![]() in the top the right corner of the section. The table holds information about the item, country of sourcing, and quantities as well as the standard UOM/UOP, costs and ship dates.
in the top the right corner of the section. The table holds information about the item, country of sourcing, and quantities as well as the standard UOM/UOP, costs and ship dates.
Use the Actions Menu and icons to apply actions to the table. You can perform the actions listed below.
Table 4-33 Items - Actions Menu, Icons and Description
| Actions Menu/Icons | Description |
|---|---|
|
Add and Add icon |
Opens the Order Distribution window. You can add further items to the purchase order. For more information about adding items to a purchase order, see the Order Distribution section. |
|
Edit and Edit icon |
Opens the Edit Item window. For more information about editing items of a purchase order, see the Editing Items on an Existing Purchase Order section. |
|
Delete and Delete icon |
You can delete items from the purchase order:
The Delete option as well as the Delete icon are only enabled, when the order is in Worksheet status and was not previously approved. |
|
Export to Excel and Export to Excel icon |
You can export the records in the table to a Microsoft Excel spreadsheet by selecting Actions > Export to Excel or by using the Export to Excel icon |
|
Appointments |
Opens the Appointments window. For more information on appointments, see the Appointments section. |
|
HTS |
Opens the HTS window. For more information about Harmonized Tariff Schedule, see the Order HTS section. |
|
Required Documents |
Opens the Required Documents window. For more information about required documents for a purchase order, see the Required Documents section. |
|
Timelines |
Opens the Timeline window. For more information about Timelines, see the Import Management chapter, section "Timelines". |
|
Inventory Management |
Opens the Inventory Management window. For more information about inventory management, see the Inventory Management section. |
|
Prepack |
Only enabled, if you open a prepack order. Opens the Prepack Creation window. For more information about prepacks, see the Creating a Prepack Template section. |
|
Replenishment Results |
Opens the Replenishment Results window. For more information about replenishment results for orders, see the Replenishment chapter, section "Replenishment Results". |
|
Wrap icon |
You can wrap the values in the table column by first clicking the column on which you would like the text to wrap and then using the Wrap icon |
You can customize the view of the table. Use the View Menu to customize the view as listed below.
Table 4-34 Items - View Menu and Description
| View Menu | Description |
|---|---|
|
Columns |
You can manage which of the columns will be shown in the table by clicking the Show All and Manage Columns options. |
|
Detach and Detach icon |
You can view the tables in the application in a separate window by clicking Detach or by using the Detach icon |
|
Sort |
You can sort columns by the following options:
|
|
Reorder Columns |
You can reorder columns by clicking the Reorder Columns option. |
|
Query by Example and Query by Example icon |
You can filter the items by one or multiple column values by clicking the Query by Example option or by using the Query by Example icon |
The Locations section contains information about the location type and name, quantities, costs, discounts, currency as well as estimated in-stock date.
Use the Actions Menu and icons to apply actions to the table. You can perform the actions listed in below.
Table 4-35 Locations - Actions Menu/Icons and Description
| Actions Menu/Icons | Description |
|---|---|
|
Edit and Edit icon |
Opens the Edit Locations window. For more information about editing order locations, see the Editing Locations section. |
|
Delete and Delete icon |
You can delete locations from the purchase order:
The Delete option as well as the Delete icon is only enabled, if the order has the status Worksheet and has not been approved yet. |
|
Export to Excel and Export to Excel icon |
You can copy the records in the table to a Microsoft Excel spreadsheet by selecting Actions > Export to Excel or using the Export to Excel icon |
|
Pack Components |
This option is only enabled, if the selected item in the Items table is a pack item. Opens the Order Pack Details window. For more information about the pack components of a prepack, see the Order Pack Details section. |
|
Expenses |
Opens the order Expenses window. For more information about expenses, see the Order Expenses section. |
|
Discounts |
Opens the Discounts window. For more information about discounts, see the Order Discounts section. |
|
Inventory Management |
Opens the Inventory Management window. For more information about the Inventory Management window, see the Inventory Management section. |
You can customize the view of the table. Use the View Menu to customize the view as listed below.
Table 4-36 Locations - View Menu and Description
| View Menu | Description |
|---|---|
|
Saved Views |
Toggle between the following views:
Select Reset Views to return to the Default view. |
|
Columns |
You can manage which of the columns will be shown in the table by clicking the Show All and Manage Columns options. |
|
Detach and Detach icon |
You can view the tables in the application in a separate window by clicking Detach or by using the Detach icon |
|
Sort |
You can sort columns by the following options:
|
|
Reorder Columns |
You can reorder columns by clicking the Reorder Columns option. |
|
Query by Example and Query by Example icon |
You can filter the items by one or multiple column values by clicking the Query by Example option or by using the Query by Example icon |
The Allocations section contains information about the allocation number and description, location type and name as well as quantities.
Use the Actions Menu and icons to apply actions to the table. You can perform the actions listed below.
Table 4-37 Allocation - Actions Menu/Icons and Description
| Actions Menu/Icons | Description |
|---|---|
|
Delete and Delete icon |
You can delete allocations from the purchase order:
The Delete option in the Actions menu as well as the Delete icon are only enabled, if the order has the status Worksheet and has not been approved yet. |
|
Export to Excel and Export to Excel icon |
You can copy the records in the table to a Microsoft Excel spreadsheet by selecting Actions > Export to Excel or using the Export to Excel icon |
You can customize the view of the table. Use the View Menu to customize the view as listed below.
Table 4-38 Allocation - View Menu and Description
| View Menu | Description |
|---|---|
|
Columns |
You can manage which of the columns will be shown in the table by clicking the Show All and Manage Columns options. |
|
Detach and Detach icon |
You can view the tables in the application in a separate window by clicking Detach or by using the Detach icon |
|
Sort |
You can sort columns by the following options:
|
|
Reorder Columns |
You can reorder columns by clicking the Reorder Columns option. |
|
Query by Example and Query by Example icon |
You can filter the items by one or multiple column values by clicking the Query by Example option or by using the Query by Example icon |
The Toolbar displays the icons and buttons for actions that can be performed in the Order Details window. The Toolbar contains the following icons and buttons.
Table 4-39 Order Details Toolbar - Icons/Buttons and Description
| Buttons | Description |
|---|---|
|
Help icon |
You can access the online help for a particular page by clicking the Help icon. |
|
Redistribute |
Opens the Order Redistribution window. For more information about redistributing items, see the Redistributing Items on a Purchase Order section. |
|
Recalculation |
Opens the Order Recalculation window. For more information on recalculating a purchase order, see the Recalculation section. |
|
Explode Pack |
The Explode Pack button is only enabled when you select a pack item, which can be ordered by eaches. The Explode Pack button explodes all pack items on the purchase order which can be ordered by eaches into its component items. If you select an item or a pack item, which can only be ordered by pack, the button is disabled. |
|
More Actions |
The More Actions Menu lists the following further options:
|
|
Save |
Click Save to save the item, location and allocation changes and stay in the Order Details window. |
|
Save and Close |
Click Save and Close to save the item, location and allocation changes and exit the Order Details window. |
|
Cancel |
Click Cancel to reject all entries and exit the Order Details window. |
To edit an item to a purchase order follow the steps below.
From the Tasks menu, select Orders > Manage Orders. The Order Search window opens.
Enter or select search criteria as desired to make the search more restrictive.
Click Search. The orders that match the search criteria are displayed in the Results section.
In the Order No. column, click the order number link or select Actions > Edit, or use the Edit icon ![]() . The Order window opens in a new tab.
. The Order window opens in a new tab.
In the Toolbar, click Details. The Order Details window opens in a new tab.
In the Items section, select Actions > Edit or use the Edit icon ![]() . The Edit Item window opens.
. The Edit Item window opens.
In the Item field, edit or search for a new item number.
In the Country of Sourcing field, edit, select or search for another country of sourcing.
In the Supplier Pack Size field, edit the pack size.
In the Earliest Ship Date field, enter or click the Calendar button to select the earliest possible ship date.
In the Latest Ship Date field, enter or click the Calendar button to select the latest possible ship date.
Check the Scaling Exempt check box to indicate whether or not the order quantity of the item/location should be scaled during the order scaling process.
After you have made all necessary changes, choose one of the following options.
Click OK to save the changes and exit the Edit Items window.
Click OK and Edit Another to save the changes and edit the next item in the table.
Click Cancel to reject all changes and exit the Edit Items window.
In the Edit Location window you can edit either one or all locations of the selected purchase order. To edit the locations of a purchase order follow the steps below.
From the Tasks menu, select Orders > Manage Orders. The Order Search window opens.
Enter or select search criteria as desired to make the search more restrictive.
Click Search. The orders that match the search criteria are displayed in the Results section.
In the Order No. column, click the order number link or select Actions > Edit, or use the Edit icon ![]() . The Order window opens.
. The Order window opens.
In the Toolbar, click Details to open the Order Details window.
In the Locations section select the location you want to update.
Select Actions > Edit or use the Edit icon ![]() to update the selected location. The Edit Location window opens.
to update the selected location. The Edit Location window opens.
In the Apply Updates To section enter, select or search either for a single location in the Location field, or select the All Locations check box.
If you selected a single location the fields of the Edit location window are populated with the information of the selected location.
If the All Locations check box is checked, all fields of the Edit Location window are empty.
In the Unit Cost field, edit the unit costs, if necessary.
In the Ordered Quantity field, edit the quantity, if necessary.
In the Estimated In Stock Date field enter or use the Calendar button to select a date.
Select the Scaling Exempt check box, if necessary.
|
Note: If the All Locations checkbox is selected, the Scaling Exempt field contains a drop down list. If the scaling exempt is null, no change is applied to the locations. Otherwise, the selected scaling exempt is applied to all locations of the selected item. |
Select the Cancel Remaining checkbox, if you want to cancel the available remaining item/location quantity.
In the Cancelled Quantity field, enter the quantity if you want to cancel a part of the available remaining item/location quantity.
In the Cancelled Code field, select the appropriate code from the list.
To complete the edit location process, choose one of the following options.
Click OK to save the location changes and exit the Edit Locations window.
Click OK and Edit Another to save the current location changes and edit further locations.
Click Cancel to reject all location changes and exit the Edit Locations window.
Within RTM, HTS codes are used to classify goods or products (that is assign one or more tariff classification numbers to an item) based on such things as its name, use, and/or the material used in its construction. HTS code definitions include formulas and rates for assessment calculations, as well as which, if any, taxes and fees must be paid. HTS codes have associated codes called Tariff Treatments or Special Programs. The codes indicate the free trade agreements or tariff preference programs for which the special rates are applicable. Assessments are charges incurred when clearing goods through customs. Assessments include duties, fees (Merchandise Processing Fee, Cotton Fee), and taxes (Tobacco, Alcohol).
In the Order HTS window you can add and delete HTS codes as well as add, edit and delete assessments for the selected order.
The Order HTS window contains the following sections.
The Order HTS header contains the order number, the import country and the item or pack information. The pack information is only displayed, when the item of the order is a pack item.
The HTS section contains the HTS associated to the order.
The Country of Sourcing is displayed in the top right corner of the section. The HTS tracking level determines if the Country of Manufacture is displayed. When the HTS is tracked at an item/supplier/country of manufacture level the Country of Manufacture is displayed next to the Country of Sourcing.
The HTS table shows HTS description, quota category, effective from/to dates as well as the status of the HTS.
Use the Actions Menu and icons to apply actions to the table. You can perform the actions listed below.
Table 4-40 HTS - Actions Menu/Icons and Description
| Actions Menu/Icons | Description |
|---|---|
|
Add and Add icon |
Opens the Add HTS window. For more information about how to add a HTS code to an order, see the Adding HTS section. |
|
Delete and Delete icon |
Deletes the HTS code from the order. The Delete option as well as the Delete icon are only enabled when the order is in Worksheet status and was not previously approved. For more information about how to delete HTS codes from an order, see the Deleting HTS section. |
|
Export to Excel and Export to Excel icon |
You can copy the records in the table to a Microsoft Excel spreadsheet by selecting Actions > Export to Excel or using the Export to Excel icon |
|
Wrap icon |
You can wrap the values in the table column by using the Wrap icon |
You can customize the view of the table. Use the View Menu to customize the view as listed below.
Table 4-41 HTS - View Menu and Description
| View Menu | Description |
|---|---|
|
Columns |
You can manage which of the columns will be shown in the table by clicking the Show All and Manage Columns options. |
|
Detach and Detach icon |
You can view the tables in the application in a separate window by clicking Detach or by using the Detach icon |
|
Sort |
You can sort columns by the following options:
|
|
Reorder Columns |
You can reorder columns by clicking the Reorder Columns option. |
|
Query by Example and Query by Example icon |
You can filter the items by one or multiple column values by clicking the Query by Example option or by using the Query by Example icon |
The Details section displays the Clearing Zone in the top right corner of the section. Additionally, the section contains the following three columns.
Item Quantity in HTS Reporting Units of Measure
This column lists the applicable units of measure 1-3.
Tariff Treatment Rates
This column lists rates, for example, specific or ad valorem rate.
HTS Details
This column lists the duty computation code, anti-dumping case and countervailing duty case number.
The Assessments section displays the Currency and the Unit of purchase (UOP) in the top right corner of the section. You can add, edit or delete assessments in this section. The Assessments table shows the following columns by default.
Component ID and description
Computation Value Base
Calculation Basis
Rate
Per Count and Per Count UOM
Estimated Value and Estimated Value UOP
Use the Actions Menu and icons to apply actions to the table. You can perform the actions listed below.
Table 4-42 Assessments - Actions Menu/Icons and Description
| Actions Menu/Icons | Description |
|---|---|
|
Add and Add icon |
Opens the Add Assessment window. For more information about how to add assessments to an order, see the Adding Assessment section. |
|
Edit and Edit icon |
Opens the Edit Assessment window. For more information about how to edit an assessment, see the Editing Assessment section. |
|
Delete and Delete icon |
Deletes the Assessment from the purchase order. The Delete option as well as the Delete icon are only enabled when the order is in Worksheet status and was not previously approved. For more information about how to delete assessments from a purchase order, see the Deleting Assessment section. |
|
Export to Excel and Export to Excel icon |
You can copy the records in the table to a Microsoft Excel spreadsheet by selecting Actions > Export to Excel or using the Export to Excel icon |
|
Recalculate icon |
Recalculates the values of the Assessment table. |
You can customize the view of the table. Use the View Menu to customize the view as listed below.
Table 4-43 Assessments - View Menu and Description
| View Menu | Description |
|---|---|
|
Currency |
You can toggle between the Import, Order or Primary currency. The assessments are displayed in the selected currency. |
|
Saved Views |
Toggle between the following views:
Select Reset Views to return to the Default view. |
|
Columns |
You can manage which of the columns will be shown in the table by clicking the Show All and Manage Columns options. |
|
Detach and Detach icon |
You can view the tables in the application in a separate window by clicking Detach or by using the Detach icon |
|
Sort |
You can sort columns by the following options:
|
|
Reorder Columns |
You can reorder columns by clicking the Reorder Columns option. |
|
Query by Example and Query by Example icon |
You can filter the items by one or multiple column values by clicking the Query by Example option or by using the Query by Example icon |
The Toolbar displays the icons and buttons for actions that can be performed in the Order HTS window. The Toolbar contains the following icons and buttons.
Table 4-44 Order HTS Toolbar - Icons/Buttons and Description
| Icons/Buttons | Description |
|---|---|
|
Help icon |
You can access the online help for a particular page by clicking the Help icon. |
|
Next and Previous icon |
Only enabled for pack items. Use the Next and Previous icon to toggle between the components of a pack item. |
|
Save |
Click Save to save the HTS and assessment changes and stay in the Order HTS window. |
|
Save and Close |
Click Save and Close to save the HTS and assessment changes and exit the Order HTS window. |
|
Cancel |
Click Cancel to reject all entries and exit the Order HTS window. |
|
Done |
Only enabled in view mode. Click Done to exit the Order HTS window. |
To view HTS information follow the steps below.
From the Tasks menu, select Orders > Manage Orders. The Order Search window opens.
Enter or select search criteria as desired to make the search more restrictive.
Click Search. The orders that match the search criteria are displayed in the Results section.
In the Order No. column, click the order number link or select Actions > View or use the View icon ![]() . The Order window opens.
. The Order window opens.
In the Toolbar, click Details to open the Order Details window.
In the Item section, click Actions > HTS to open the Order HTS window.
Click Done to exit the Order HTS window.
The Add HTS window allows you to add quota categories by import country. Customs agencies group items with related characteristics into quota categories. Restrictions can then be placed on the category rather than on individual items.
To add a HTS to a purchase order follow the steps below.
In the HTS section, select Actions > Add or use the Add icon ![]() to add an HTS code to the selected purchase order. The Add HTS window opens.
to add an HTS code to the selected purchase order. The Add HTS window opens.
The Quota Category field is populated automatically, once you select the HTS code.
In the HTS field, enter, select or search for the HTS code you want to add to the purchase order. This field is a required field.
The Effective From field is populated automatically, once you select the HTS code.
The Effective To field is populated automatically, once you select the HTS codes.
In the Status field, select the status of the HTS. For example, select Worksheet. This field is a required field.
Choose one of the following options.
Click OK to add the selected HTS code to the purchase order and exit the Add HTS window.
Click OK and Add Another to add the selected HTS code to the purchase order and exit the Add HTS window.
Click Cancel to reject the entered HTS code and exit the Add HTS window.
To delete a HTS code from a purchase order follow the steps below.
In the HTS section select a record.
You are prompted to delete the HTS code, choose one of the following options.
Click Yes. The HTS code is removed from the HTS section.
Click No. No HTS code is not deleted.
To add an assessment to the selected purchase order follow the steps below.
In the Assessments section, click Actions > Add or use the Add icon ![]() to add assessments. The Add Assessment window opens.
to add assessments. The Add Assessment window opens.
In the Component field, enter or select the cost component. This field is a required field.
The Computation Value Base field is populated automatically, once you select the cost component.
The Calculation Basis field is populated automatically, once you select the cost component.
The Rate field is populated automatically, once you select the cost component. This field is a required field.
The Per Count field is populated automatically, once you select the cost component.
The Per Count UOM field is populated automatically, once you select the cost component.
In the Component Nomination section, the following fields are populated automatically, once you select the cost component. These fields are required fields.
Nom Flag 1,
In Duty
Nom Flag 3
In Exp
In ALC
Choose one of the following options.
Click OK to add the assessment to the purchase order and exit the Add Assessment window.
Click OK and Add Another to add the assessment to the purchase order and exit the Add Assessment window.
Click Cancel to reject all entered values and exit the Add Assessment window.
To edit an assessment for the selected purchase order follow the steps below.
In the Assessments section, click Actions > Edit or use the Edit icon ![]() to add assessments. The Edit Assessment window opens.
to add assessments. The Edit Assessment window opens.
The Component field is populated with the selected component of the Assessment table.
The Computation Value Base field is populated automatically. If necessary edit the value.
The Calculation Basis field is populated automatically.
The Rate field is populated automatically. If necessary, edit the value. This field is a required field.
The Per Count field is populated automatically. If necessary, edit the value.
The Per Count UOM field is populated automatically. If necessary, edit the value.
In the Component Nomination section, the following fields are populated automatically. Edit the values, if necessary. These fields are required fields.
Nom Flag 1
In Duty
Nom Flag 3
In Exp
In ALC
Choose one of the following options.
Click OK to add the assessment to the purchase order and exit the Add Assessment window.
Click Cancel to reject all entered values and exit the Add Assessment window.
To delete an assessment from a purchase order follow the steps below.
In the Assessment section select a record.
You are prompted to delete the assessment, choose one of the following options.
Click Yes. The assessment is removed from the assessment section.
Click No. The assessment is not deleted.
In the Order Pack Details window you can view the details of the component items of a pack on a purchase order.
The Order Pack Details window contains the following sections.
The Order Pack Details header contains the order number, the supplier site, and the pack as well as the location.
The Pack Components section displays the Pack Ordered Quantity (quantity ordered for the pack/location) and Currency in the top right corner of the section.
The table displays the following columns by default.
Item and Item Description
Quantity In Pack
Displays the quantity of the component item in the pack.
Ordered and Received Quantity
Standard UOM
Supplier Unit Cost
Displays the supplier unit cost of the component item, if bought individually.
Pack Component Cost
Displays the cost of the item as a component of the pack.
Use the Actions Menu and icons to apply actions to the table. You can perform the actions listed in below.
Table 4-45 Pack Components- Actions Menu/Icons and Description
| Actions Menu/Icons | Description |
|---|---|
|
Export to Excel and Export to Excel icon |
You can copy the records in the table to a Microsoft Excel spreadsheet by selecting Actions > Export to Excel or using the Export to Excel icon |
|
Wrap icon |
You can wrap the values in the table column by using the Wrap icon |
You can customize the view of the table. Use the View Menu to customize the view as listed below.
Table 4-46 Pack Components - View Menu and Description
| View Menu | Description |
|---|---|
|
Currency |
Toggle between the following currencies:
|
|
Columns |
You can manage which of the columns will be shown in the table by clicking the Show All and Manage Columns options. |
|
Detach and Detach icon |
You can view the tables in the application in a separate window by clicking Detach or by using the Detach icon |
|
Sort |
You can sort columns by the following options:
|
|
Reorder Columns |
You can reorder columns by clicking the Reorder Columns option. |
|
Query by Example and Query by Example icon |
You can filter the items by one or multiple column values by clicking the Query by Example option or by using the Query by Example icon |
The Toolbar displays the icons and buttons for actions that can be performed in the Order Pack Detials window. The Toolbar contains the following icons and buttons.
To view the components of a pack on a purchase order follow the steps below.
From the Tasks menu, select Orders > Manage Orders. The Order Search window opens.
Enter or select search criteria as desired to make the search more restrictive.
Click Search. The orders that match the search criteria are displayed in the Results section.
In the Order No. column, click the order number link or select Actions > Edit or View or use corresponding icons. The Order window opens.
In the Order Toolbar, click Details. The Order Details window opens.
In the Locations section, click Actions > Order Pack Details to open the Order Pack Details window. The component items of the pack, the quantity of a pack, the ordered as well as the received quantity, the supplier unit cost and the pack component cost (the cost of the item as a component of the pack) are displayed.
Click Done to close the Order Pack Details.
An expense is a cost component associated with moving a product from a supplier to the retailer, primarily dealing with importing. It is one of the components used to define landed costs in RMS. Examples include freight costs, shipping insurance, and so on.
Expenses can be set up to apply to different legs of the shipment. For example, there may be an ocean freight charged for transporting goods across the ocean (between the discharge and lading ports) and then other charges associated with moving the goods from the lading port to the warehouse that is inland (for example, land freight). The Order Location Expense Maintenance window allows users to maintain and view the importing and exporting expenses associated with a purchase order. The Order Location Expense Maintenance window may also be used to create and edit expense components for each order/item/location combination. Changes that are made at one location can be defaulted to all other locations within the same zone.
The Order Expense window contains the following sections.
The Header section contains the order number, pack and item information, zone and zone group as well as the location. The pack information is only displayed when the item is a pack item.
Order Expense Table contains the following columns by default.
Component ID and Description
Computation Value Base
Calculation Basis
Component Rate
Per Count and Per Count UOM
Value (estimated)
Component Currency
Value UOP (estimated)
Unit of Purchase
The Toolbar displays the icons and buttons for actions that can be performed in the Order Details window. The Toolbar contains the following icons and buttons.
Table 4-48 Order Expenses Toolbar - Icons/Buttons and Description
| Buttons | Description |
|---|---|
|
Help icon |
You can access the online help for a particular page by clicking the Help icon. |
|
Next and Previous button |
Only enabled when the item on the order is a pack item. Use the Next and Previous icon to toggle between the components of a pack item. |
|
Save |
Click Save to save the changes and stay in the Order Expenses window. |
|
Save and Close |
Click Save and Close to save changes and exit the Order Expense window. |
|
Cancel |
Click Cancel to reject entries and exit the Order Expenses window. |
To view the order expenses follow the steps below.
From the Tasks menu, select Orders > Manage Orders. The Order Search window opens.
Enter or select search criteria as desired to make the search more restrictive.
Click Search. The orders that match the search criteria are displayed in the Results section.
In the Order No. column, click the order number link. The Order window opens in a new tab.
In the Toolbar, click Details. The Order Details window opens in a new tab.
In the Item section, select an item and from the Location section select the corresponding location.
In the Location section, select Actions > Expenses. The Order Expense window opens in a new tab.
To add an expense to a purchase order follow the steps below.
Click Actions > Add or use the Add icon ![]() to add an expense to the selected purchase order. The Add Expense window opens.
to add an expense to the selected purchase order. The Add Expense window opens.
In the Component field, enter or select the type of expense component. This field is a required field.
The Calculation Basis field is populated, once you select the component.
|
Note: Country level expenses have a specific as a calculation basis. Zone level expenses have a value as a calculation basis, exclusive CVB. |
The Computation Value Base field is populated, once you select the component. You can change the value, if necessary.
In the Cost Basis field is populated, once you select the component. You can change the value, if necessary.
The Component Rate field is populated, once you select the component. You can change the value, if necessary. This field is a required field.
The Per Count field is populated, once you select the component. You can change the value, if necessary. This field is a required field.
The Per Count UOM field is populated, once you select the component. You can change the value, if necessary.
The Component Currency field is populated, once you select the component. You can change the value, if necessary. This field is a required field.
The Exchange Rate field is populated, once you select the component. This field is a required field. Follow the steps below to change the value, if necessary.
Select the Edit Exchange Rate icon ![]() . The system displays the Exchange Rate Type and Exchange Rate field. Additionally, the Revert icon
. The system displays the Exchange Rate Type and Exchange Rate field. Additionally, the Revert icon ![]() is displayed.
is displayed.
In the Exchange Rate Type field, select the corresponding type from the list. Available types are Existing and Manual.
If you select Existing, the Exchange Rate field is enabled. Enter, select or search for an already existing rate.
If you select Manual, the Exchange Rate field is enabled. Enter the corresponding rate manually.
In the Component Nomination section enter or select the following fields. These fields are required fields.
Flag 1
Flag 3
In ALC
In Duty
In Exp
After you have entered all values, choose one of the following options.
Click OK to add the expense to the selected purchase order and exit the Add Expense window.
Click OK and Add Another to add the current expense to the selected purchase order and exit the Add Expense window.
Click Cancel to reject all entered values and exit the Add Expense window.
In the Order Expense window, click the Recalculate icon ![]() .
.
The estimated expense value of individual expense components is recalculated.
For TEXP components the estimated value is calculated as a sum of estimated value of individual expense.
For Country level expenses the estimated expense value is recalculated based on the component rate/per count and per count UOM.
For zone level expenses the estimated expense value is calculated as a percentage of the order cost.
To edit an expense of a purchase order follow the steps below.
In the Order Expense table, select a record.
Then click Actions > Edit or use the Edit icon ![]() to edit an expense already associated with the selected order. The Edit Expense window opens. The current values of the selected expense are shown.
to edit an expense already associated with the selected order. The Edit Expense window opens. The current values of the selected expense are shown.
The Component field is populated.
The Calculation Basis field is populated.
|
Note: Country level expenses have a specific as a calculation basis. Zone level expenses have a value as a calculation basis, exclusive CVB. |
The Computation Value Base field is populated. Change the value, if necessary.
In the Cost Basis field is populated. Change the value, if necessary.
The Component Rate field is populated. Change the value, if necessary.
The Per Count field is populated. Change the value, if necessary.
The Per Count UOM field is populated. Change the value, if necessary.
The Component Currency field is populated. Change the value, if necessary.
The Exchange Rate field is populated. Follow the steps below to change the value, if necessary.
Select the Edit Exchange Rate icon ![]() . The system displays the Exchange Rate Type and Exchange Rate field. Additionally, the Revert icon
. The system displays the Exchange Rate Type and Exchange Rate field. Additionally, the Revert icon ![]() is displayed.
is displayed.
In the Exchange Rate Type field, select the corresponding type from the list. Available types are Existing and Manual.
If you select Existing, the Exchange Rate field is enabled. Enter, select or search for an already existing rate.
If you select Manual, the Exchange Rate field is enabled. Enter the corresponding rate manually.
In the Component Nomination section edit the following fields, if necessary.
Flag 1
Flag 3
In ALC
In Duty
In Exp
After you have changed all necessary values, choose one of the following options.
Click OK to save the expense changes for the selected purchase order and exit the Edit Expense window.
Click Cancel to reject all entered values and exit the Edit Expense window.
In the Order Summary window you can view a summary of items on a purchase order for a particular location. Select the location to view the details of the items which are sent to the selected location.
The Order Summary window contains the following sections.
The Order Summary Header contains the order number, supplier, the order totals such as cost, estimated landed cost, retail value and order quantity.
The Locations section lists the available locations of the selected order. The section displays the currency in the top right corner. Additionally the section contains the Locations table. The table shows the location type and name as well as the total cost UOP by default.
Use the Actions Menu and icons to apply actions to the table. You can perform the actions listed in below.
You can customize the view of the table. Use the View Menu to customize the view as listed below.
Table 4-50 Locations - View Menu and Description
| View Menu | Description |
|---|---|
|
Columns |
You can manage which of the columns will be shown in the table by clicking the Show All and Manage Columns options. |
|
Detach and Detach icon |
You can view the tables in the application in a separate window by clicking Detach or by using the Detach icon |
|
Reorder Columns |
You can reorder columns by clicking the Reorder Columns option. |
|
Query by Example and Query by Example icon |
You can filter the items by one or multiple column values by clicking the Query by Example option or by using the Query by Example icon |
The Items section contains the Item table. This table displays all the items for the selected location. The item and item description, pack size, order quantity UOP and unit of purchase are shown by default.
Use the Actions Menu and icons to apply actions to the table. You can perform the actions listed below.
Table 4-51 Items - Actions Menu/Icons and Description
| Actions Menu/Icons | Description |
|---|---|
|
Export to Excel and Export to Excel icon |
You can copy the records in the table to a Microsoft Excel spreadsheet by selecting Actions > Export to Excel or using the Export to Excel icon |
|
Wrap icon |
You can wrap the values in the table column by using the Wrap icon |
You can customize the view of the table. Use the View Menu to customize the view as listed below.
Table 4-52 Items - View Menu and Description
| View Menu | Description |
|---|---|
|
Columns |
You can manage which of the columns will be shown in the table by clicking the Show All and Manage Columns options. |
|
Detach and Detach icon |
You can view the tables in the application in a separate window by clicking Detach or by using the Detach icon |
|
Reorder Columns |
You can reorder columns by clicking the Reorder Columns option. |
|
Query by Example and Query by Example icon |
You can filter the items by one or multiple column values by clicking the Query by Example option or by using the Query by Example icon |
The Toolbar displays the icons and buttons for actions that can be performed in the Order Summary window. The Toolbar contains the following icons and buttons.
Table 4-53 Order Summary Toolbar - Icons/Buttons and Description
| Buttons | Description |
|---|---|
|
Help icon |
You can access the online help for a particular page by clicking the Help icon. |
|
More Actions |
Click More Actions to see the following additional action.
|
|
Done |
Click Done to close the Order Summary window. |
To view an order summary by location follow the steps below.
From the Tasks menu, select Orders > Manage Orders. The Order Search window opens.
Enter or select search criteria as desired to make the search more restrictive.
Click Search. The orders that match the search criteria are displayed in the Results section.
In the Order No. column, click the order number link, or mark a record and select Actions > Edit/View, or use the corresponding icon. The Order window opens.
In the Toolbar, click Details to open the Order Details window.
In the Toolbar, click More Actions > Summary by Location to open the Order Summary window.
In the Locations section, select the desired location.
The items, sent to the selected location, are shown in the Items section.
|
Note: Select More Actions > Currency > Order or Primary to change the currency in the Order Totals section. The Retail label will not change regardless of the default tax type, only the value changes. |
Close the tab or click Done to close the Order Summary window.
The Order Distribution window allows you to add items to a purchase order. You can add items by item number, reference item, or item list. You can choose to apply a template to an item parent or you can expand a buyer pack and item parent to their component items. You may also distribute the items, or a subset of the items, by diff values, store grade, and location.
The Order Distribution Window contains the following sections:
Header
The header contains the order number as well as the supplier site.
Distribute By
In the Distribute By section you can distribute/redistribute the items of a purchase order by individual differentiators (diffs), diff matrix, location and store grade
Table
The item table displays the item parent, item, item description, diffs, location, country of sourcing, UOP/UOM and the worksheet quantity.
Use the Actions Menu and icons to apply actions to the table. You can perform the actions listed below.
Table 4-54 Table Actions/Icons/Buttons
| Actions/Icons | Description |
|---|---|
|
Add and Add icon |
Adds items to the purchase order. For more information about adding items, see the Adding Items to a Purchase Order section. |
|
Edit and Edit icon |
Updates the Country of Sourcing of the selected item. For more information about editing items of a purchase order, see the Editing Items on a new Purchase Order section. |
|
Delete and Delete icon |
You can delete items:
|
|
Export to Excel and Export to Excel icon |
You can copy the records in the table to a Microsoft Excel spreadsheet by selecting Actions > Export to Excel or using the Export to Excel icon |
|
Advanced Filter and Advanced Filter icon |
Opens the Oder Distribution Advanced Filter window. For more information about the advanced filter, see the Order Distribution Advanced Filter section. |
|
Clear Filter and Clear Filter cion |
Clears the advanced search filter. |
|
Delete All and Delete All button |
Deletes all items in the Item table. For more information about how to delete all item from the Item table, see the Deleting All Items from a new Purchase Order section. |
|
Create Item |
Opens the Create Item window. For more information about creating an item, see the Items chapter, section "Creating Items". |
|
Round to Pack |
Rounds the items to the required order quantity. The quantities are rounded based on the item's ordering restrictions from the supplier. |
You can customize the view of the table by using the options in the View Menu.
Table 4-55 Table - View Menu/Icons and Description
| View Menu/Icons | Description |
|---|---|
|
Columns |
You can manage which of the columns will be shown in the table by clicking the Show All and Manage Columns options. |
|
Detach and Detach icon |
You can view the tables in the application in a separate window by clicking Detach or by using the Detach icon |
|
Reorder Columns |
You can reorder columns by clicking the Reorder Columns option. |
|
Query by Example and Query by Example icon |
You can filter the items by one or multiple column values by clicking the Query by Example option or by using the Query by Example icon |
The toolbar contains the following icons and buttons.
Table 4-56 Order Distribution Toolbar - Icons/Buttons and Description
| Icons/Buttons | Description |
|---|---|
|
Help icon |
You can access the online help for a particular page by clicking the Help icon |
|
Save and Close |
Click Save and Close to save the entered records and close the window. |
|
Cancel |
Click Cancel to reject all entries and close the window. |
|
Done |
If you open the window in view mode, the Done button is displayed. Click Done to close the window. |
To access the Order Distribution window and maintain items for a purchase order, follow the steps below.
From the Tasks menu, select Orders > Manage Orders. The Order Search window opens.
Enter or select search criteria as desired to make the search more restrictive.
Click Search. The orders that match the search criteria are displayed in the Results section.
In the Order No. column, click the order number link or select Actions > View. The Order window opens in a new tab.
In the Toolbar, click Details. The Order Distribution window opens, if the purchase order is still in status Worksheet and no items have been distributed yet.
If items have already been added, distributed and the order is still in Worksheet status, the Details button opens the Order Details window.
In the Items section, select Actions > Add or use the Add icon ![]() to add items to the order. The Order Distribution window opens.
to add items to the order. The Order Distribution window opens.
After you have added, edited, deleted or distributed items, choose one of the following options.
Click Save and Close to add the selected item to the purchase order and exit the Order Distribution window.
Click Cancel to reject the added items and exit the Order Distribution window.
To add an item to a new or already existing purchase order follow the steps below.
In the Order Distribution window, select Actions > Add or use the Add icon ![]() to add items to the purchase order. The Add Item window appears.
to add items to the purchase order. The Add Item window appears.
Select either the Item, Reference Item, or Item List option from the list.
Enter the item number of the item or the ID of the item list, or click the search icon to retrieve the desired item.
In the Country of Sourcing field, edit or select the country of sourcing, if required.
In the Quantity field, enter the number of units to be distributed for the item or among the components of an item list or item parent.
In the UOP field, enter or edit the unit of purchase as necessary.
If you want to edit the supplier pack size, check the Supplier Pack Override check box.
In the Supplier Pack Size field, edit the value accordingly.
To add the component items of an item parent or pack, click Expand Item.
After you have entered all the item information, choose one of the following options.
Click OK to add the current item, reference item, or item list and close the window. The system returns to the Order Distribution window. The item is shown in the table.
Click Cancel to reject all entries and close the window. The system returns to the Order Distribution window.
In the Order Distribution window, choose one of the following options.
Distribute the items according to individual diffs, diff matrix, location or store grade. For more information about distributing items, see the Distributing a Purchase Order section.
Click Save and Close to add the selected item to the purchase order and close the Order Distribution window.
Click Cancel to reject the added items and close the Order Distribution window.
To edit items on a new purchase order follow the steps below.
In the Order Distribution window, select Actions > Edit or use the Edit icon ![]() to edit the items of the created purchase order. The Edit Item window opens.
to edit the items of the created purchase order. The Edit Item window opens.
In the Country of Sourcing field, edit the country of sourcing.
Then choose one of the following options.
Click OK to add the current item, reference item, or item list and close the Add Item window. The system returns to the Order Distribution window.
Click Cancel to reject all entries and close the Add Item window. The system returns to the Order Distribution window.
To delete all items from the created purchase order, follow the steps below.
In the Order Distribution window, select Actions > Delete All or use the Delete All button to delete all items from the Item table.
The system displays a warning prompt.
Click Yes to delete all items. All items are removed from the Item table.
Click No. The items are not deleted.
You have several options for distributing items when a purchase order is created. Before distributing items, you can filter the items in order to display a subset of the items. Any distribution instructions that you enter are then applied only to the subset of items.
The options for distribution may be:
First select whether you want to distribute the items by UOP or Standard UOM. Then choose one of the following options.
Distribution by individual diffs: Distribute items by the differentiator groups attached to it.
Distribution by diff matrix: Distribute items by any diff value associated with the purchase order.
Distribution by store grade: Select the final destinations by store grade group and store grade. Enter the distribution amounts by percentage or ratio.
Distribution by location: Select the final destinations one-by-one or by a list of values. Enter the distribution amounts by percentage or ratio.
The Order Distribution Filter window allows you to filter the items that appear on the Order Distribution window. You can then edit or distribute the resulting subset of items.
To filter the items on a purchase order follow the steps below.
To filter the items shown in the Item table, select Actions > Advanced Filter or use the Advanced Filter icon. The Order Distribution Advanced Filter window opens.
Enter, select or search for the criteria by which you want to filter the Item table.
Select Add Filter Criteria. The filter criteria are added to the Filter Criteria table.
To delete a criterion from the Filter Criteria table:
Select the record.
Select Actions > Delete or use the Delete icon ![]() . You are prompted to delete the record.
. You are prompted to delete the record.
Confirm with Yes. The record is removed from the Filter Criteria table.
After you have added all filter criteria, choose one of the following options.
Click Apply Filter to display the results of the filter in the Order Distribution window and close window.
Click Cancel, to reject the filter criteria and close the window.
Edit the filter results as needed.
To clear the filter, select Actions > Clear Filter or use the Clear Filter icon. All items are displayed in the Item table again.
The Distribute by Diff window allows you to distribute an item by the differentiator groups attached to the item. The user may use differentiator ranges and ratios while performing the distribution or perform the process manually. For each selected differentiator, the distribution can be carried out on the basis of quantity, percentage or ratio.
To distribute an item by individual diffs, follow the steps below.
From the Tasks menu, select Orders > Manage Orders. The Order Search window opens.
Restrict the search to orders with the status Worksheet.
Click Search. The orders that match the search criteria are displayed in the Results section.
In the Order No. column, click the order number link or select Actions > Edit, or use the Edit icon. The Order window opens in a new tab.
In the Toolbar, click Details. The Order Distribution window opens.
Add items to the purchase order. For more information about adding items to the purchase order, see the Adding Items to a Purchase Order section.
In the Distribute by section go to Differentiator. Select a diff from the list. The Differentiator Distribution window opens.
The Differentiator Distribution contains the following sections.
Header: The header contains the selected diff group.
Diff Range: The Diff Range section contains all the available differentiator values.
Diff Ratio: The Diff Ratio section shows applied differentiator values, once the values are selected.
To limit the available diffs, go to the Diff Range field and enter or select a diff range ID.
Click Apply. The Availalbe Differentiator column now only contains diff IDs limited to the chosen range.
|
Note: To apply multiple diff ranges, choose more than one valid range. |
In the Available Differentiator area, choose one of the following options.
Select a diff and click the right arrow button. The diff is moved to the Diff Ratio section to the Applied Differentiator column.
Select all diffs and click the move all right arrow button. All diffs are moved to the Diff Ratio section to the Applied Differentiator column.
|
Note: To deselect diffs, select the individual diff or all diffs. Then use the left arrow or move all left arrow buttons. The selected diffs move from the Applied Differentiator to the Available Differentiator column. |
Select one of the following distribution methods.
Percent: Enter the percentage of the items you want for each diff.
Quantity: Enter the number of items you want for each diff.
|
Note: You can only distribute by quantity, if you did not enter a quantity in the Order Distribution window. |
Ratio: Enter the proportion of the items you want for each diff.
|
Note: You can distribute the diffs and enter a percentage, quantity or ratio of zero (0). |
After you have selected the diffs and the distribution method, choose one of the following options.
Click OK to distribute by the selected diffs and close the Differentiator Distribution window. The system returns to the Order Distribution window. The individual diff distributions are shown in the table.
Click Cancel to reject all entries and close the Differentiator window. The system returns to the Order Distribution window.
In the Diff Matrix window you can design a purchase order distribution based on up to three different group values.
To distribute items with a diff matrix follow the steps below.
From the Tasks menu, select Orders > Manage Orders. The Order Search window opens.
Restrict the search to orders with the status Worksheet.
Click Search. The orders that match the search criteria are displayed in the Results section.
In the Order No. column, click the order number link or select Actions > Edit, or use the Edit icon. The Order window opens in a new tab.
In the Toolbar, click Details. The Order Distribution window opens.
Add items to the purchase order. For more information about adding items to the purchase order, see the Adding Items to a Purchase Order section.
Then select Diff Matrix. The Order Diff Matrix window opens in a new tab.
The Order Diff Matrix Window contains the following sections:
Header: The header displays the order number.
Diff Selection
Distribution Matrix
Go to the Diff Selection section. In the Distribute By area indicate that you want to enter values in either Quantity, Ratio, or Percent.
|
Note: Quantity is automatically selected, if you do not enter the Worksheet Quantity in the Order Distribution window. |
The Distribute by Selected Diffs column displays the available diffs, for example, colors, size or pattern. Each diff has a drop down list. Use the drop down list to assign an axis to the diff.
|
Note: The values in the drop down list depend on the number of available diffs. |
In the Apply Diff Range column you can apply diff Ranges for the selected diffs, for example, the color range.
|
Note: The fields in the Apply Diff Range column are only enabled, once you select, the axis for the diffs. |
Click Apply.
In the Distribution Matrix section the Actions menu and the buttons are only enabled, once you select and apply the diffs. The Distribution Matrix Actions menu contains the following options.
Click Matrix Distribution to display the matrix distribution. The Matrix Distribution window opens. For more information about the matrix distribution, see the Matrix Distribution section.
Click Copy to copy a diff, for example, Copy Color. Only one diff can be selected as copy form. The Copy window opens. For more information about the Copy window, see the Copying Z Axis section.
|
Note: The Copy function is only available, if the parent item has three or more associated diffs. |
Click Apply Diff Ratio to modify the ratio. The Apply Diff Ratio window opens. For more information about applying diff Ratios, see the Applying Diff Ratio section.
|
Note: The Apply Diff Ratio function is only available, if the parent item has three or more associated diffs. |
Click Recalculate Totals or use the Recalculate icon ![]() to recalculate all the totals in the distribution matrix.
to recalculate all the totals in the distribution matrix.
Click Convert to Quantity to convert the Worksheet quantity, entered in the Order Distribution window, according to the ratio/percentage set for the individual diffs.
|
Note: If you select distribute by quantity, the function is not available. |
After you have entered all necessary information, choose one of the following options.
Click Save and Close to save your entries and close the Order Diff Matrix Window.
Click Cancel to reject all entries and close the Order Diff Matrix window.
The Matrix Distribution window contains two sections, the Y axis distribution, for example size option distribution such as S small and the X axis distribution, for example, color distribution such as black, brown, white.
The valid combinations of Distribute By values for X axis and Y axis distribution is based on the values you selected in the Order Distribution window. If no quantity was identified in the Order Distribution window, all three Distribute By options are available in the Matrix Distribution. If you entered a quantity in the Order Distribution window, only the Ratio and Percent distribution option is available.
To apply a distribution to a diff follow the steps below.
In the Apply To field, enter, select or search for the matrix distribution you want to apply to one or more Z axis diffs.
|
Note: The Apply To field is only available, if you select three diffs. |
In the Diff Ratio field, enter or select a X axis and/or Y axis diff.
|
Note: Once you select the diff ratio, the details are displayed in the X or Y Distribution, in case the diff ratio is an X or a Y diff ratio. |
In the Store field, enter, select or search for the store. This field is only enabled, if the Diff Ratio is associated to stores.
In the Y Axis Distribution section, select the desired distribute by option, for example, percentage.
The differentiators and description are shown in the table. In the Distribution column, enter the distribution value.
In the X Axis Distribution section, select the desired distribute by option, for example, ratio.
The differentiators and description are shown in the table. In the Distribution column, enter the distribution value.
After you have entered all values, choose one of the following options.
Click OK to save the entered distribution values and close the Matrix Distribution window.
Click OK and Distribute Another to save the entered distribution and enter additional distribution values for other diffs.
Click Cancel to reject all entries and close the Matrix Distribution window.
The Copy window allows you to copy a matrix distribution. Select one row on the Z Axis Distribution section as basis and copy the matrix distribution to rows that have distribution values, if you enter no distribution nothing is copied to that diff.
|
Note: Only one basis may be selected. If no basis is selected then no matrix distribution is copied to the rows with distribution values. |
To copy the matrix distribution follow the steps below.
In the Distribute By area select the distribution option, for example, quantity, ratio or percent.
The differentiator and description are listed in the table.
Check the Copy from check box to identify the base diff.
|
Note: The base diff is the diff whose Distribution Matrix is copied to the identified diffs. |
After you have selected the desired diffs, choose one of the following options.
Click OK to copy the matrix distribution of the selected diffs and close the Copy window.
Click Cancel. No matrix distribution is copied, the Copy window is closed.
If you selected Ratio in the Distribute By field, you can use an existing diff ratio to modify data in the diff matrix table.
In the Diff Basis field, enter or select a diff basis.
In the Diff Ratio field, enter or select a diff ratio.
|
Note: If the selected diff ratio is associated to all three axis, the diff basis field is not needed. |
The Store field is populated automatically, after you enter a diff basis and a diff ratio.
After you have selected diff basis and diff ratio, you choose one of the following options.
Click OK to apply the diff ratio and close the Apply Diff Ratio window.
Click Cancel to reject all entries and close the Apply Diff Ratio window.
To distribute items by location follow the steps below.
From the Tasks menu, select Orders > Manage Orders. The Order Search window opens.
Restrict the search to orders with the status Worksheet.
Click Search. The orders that match the search criteria are displayed in the Results section.
In the Order No. column, click the order number link or select Actions > View. The Order window opens in a new tab.
In the Toolbar, click Details. The Order Distribution window opens.
Add items to the purchase order. For more information about adding items to the purchase order, see the Adding Items to a Purchase Order section.
In the Distribute by section select Location. The Distribute by Location window opens.
In the Distribute by section, select if you want to distribute by percent, quantity or ratio.
Select Actions > Add or use the Add icon ![]() to add locations for distribution. The Add Locations window opens.
to add locations for distribution. The Add Locations window opens.
In the Location Type field, select the type of location, for example, store or warehouse.
In the Location field, enter, select or search for the location ID.
After you have selected the location, choose one of the following options.
Click OK to add the current location and exit the Add Locations window. The system returns to the Distribute by Location window. The location is shown in the table.
Click OK and Add Another to add further locations.
Click Cancel to reject all entries and exit the Add Locations window. The system returns to the Distribute by Location window.
|
Note: To delete a location from the table in the Distribute By Location window, mark the location. Then select Actions > Delete. |
If you select the following distribution method:
Percent: Enter the percentage of the items you want at each location.
Quantity: Enter the number of items you want at each location, or the total items you want at each location.
|
Note: You can distribute by quantity only if you did not enter a quantity on the Order Distribution window. |
Ratio: Enter the proportion of items that you want at each location.
|
Note: You can distribute to a location and enter a quantity, distribution or ratio of zero (0). |
Choose one of the following options.
Click OK to save your changes and close the Distribute by Location window. The distributions by location are shown in the table.
Click Cancel to reject your entries and close the Distribute by Location window. The system returns to the Order Distribution window.
To distribute items by store grade follow the steps below.
From the Tasks menu, select Orders > Manage Orders. The Order Search window opens.
Restrict the search to orders with the status Worksheet.
Click Search. The orders that match the search criteria are displayed in the Results section.
In the Order No. column, click the order number link or select Actions > View. The Order window opens in a new tab.
In the Toolbar, click Details. The Order Distribution window opens.
Add items to the purchase order. For more information about adding items to the purchase order, see the Adding Items to a Purchase Order section.
In the Distribute by section select Store Grade. The Distribute by Store Grade window opens.
In the Distribute By section, select if you want to distribute by percent, quantity or ratio.
Select Actions > Add or use the Add icon ![]() to add a store grades for distribution. The Add Store Grades window opens.
to add a store grades for distribution. The Add Store Grades window opens.
In the Buyer field, enter, select or search for the buyer ID.
In the Store Grade Group field, enter, select or search for the store grade group. The store grade is added to the table.
After you have enter the buyer and store grade group, choose one of the following options.
Click OK to add the store grade and exit the Add Store Grades window. The system returns to the Distribute By Store Grade window. The store grade is shown in the table.
Click Cancel to reject all entries and exit the Add Store Grades window. The system returns to the Distribute By Store Grade window.
If you select the following distribution method:
Percent: Enter the percentage of the items you want at each store grade.
Quantity: Enter the number of items you want at each store, or the total items you want for each store grade.
|
Note: You can distribute by quantity only if you did not enter a quantity on the Order Distribution window. |
Ratio: Enter the proportion of items that you want at each store grade.
Choose one of the following options.
Click OK to save your changes and close the Distribute By Store Grades window. The system returns to the Order Distribution window.
Click Cancel to reject all entries and close the Distribute By Store Grades window. The system returns to the Order Distribution window.
In the Order Redistribution window you can select the items on a purchase order which you want to redistribute. You can redistribute items on a purchase order as long as the purchase order is in the Worksheet or Approved status, the items have not been received, there are no associated contracts, no advance shipment notifications (ASN) have been received, and none of the items have an associated appointment or allocation.
To redistribute items on a purchase order follow the steps below.
From the Tasks menu, select Orders > Manage Orders. The Order Search window opens.
Enter or select search criteria as desired to make the search more restrictive.
Click Search. The orders that match the search criteria are displayed in the Results section.
In the Order No. column, click the order number link or select Actions > View. The Order window opens in a new tab.
In the Toolbar, click Details. The Order Details window opens in a new tab.
Click Redistribute. The Order Redistribution window opens.
Select Actions > Add or use the Add icon ![]() to add an item to the redistribution list. The Add Items window opens.
to add an item to the redistribution list. The Add Items window opens.
In the Item type field, select the type of item.
Enter or search for the item/item parent.
After you have selected the item/item parent, choose one of the following options.
Click OK to exit the Add Item window and add the current item to the Order Redistribution window.
Click OK and Add Another to add the current item Order Redistribution window and add further items.
Click Cancel to reject the item and exit the Add Item window.
In the Order Redistribution window select OK.
A confirmation prompt to re-apply the following entries for the selected item after the redistribution is shown.
Expenses
Deals
Order scaling
Work orders
Confirm the prompt with Yes. The system opens the Order Distribution window.
If you select No, the system returns to the Order Redistribution window.
Go to the Distribute By section. Open the Redistribution list.
Select if you want to redistribute the selected item/item parent by Location or by Store Grade.
If you choose by Location, the Distribute by Location window opens. For further details, see the Distributing Items by Location section.
If you choose by Store Grade, the Distribute by Store Grade window opens. For further details, see the Distributing Items by Store Grade section.
After you have entered all necessary information, you will return to the Order Distribution window.
Click Save and Close to save your changes and close the Order Distribution window. The system returns to the Order Details window. Verify, if the items/item parent were added to the Items section with the appropriate quantity.
In the Order Download from Staging window you can download orders from RMS to a spreadsheet.
From the Tasks menu, select Orders > Download from Staging. The Order Download from Staging window displays.
Search for the order you want to download according to basic or advanced search criteria.
For more details regarding the basic and advanced search function in RMS see the Managing Orders section. The search results are shown in the Result section.
To download all orders displayed in the Result section, select Actions > Download. The Download window opens.
In the Template field, select, enter or search for the template you want to download.
The Process Description field displays the default process name with the date and timestamp. You can edit the name of the download process in this field.
After you have entered the download information, choose one of the following options.
Click OK to open the spreadsheet with the selected orders on your desktop.
Click Cancel to reject all entries and close the Upload/Download.
Click Done to exit the Order Download from Staging window.
In the Order Upload from Staging window you can upload orders into RMS from staging tables, where additional details can be added to the order before loading them to RMS.
From the Tasks menu, select Orders > Upload from Staging. The Order Upload from Staging window displays.
Search for the order you want to upload according to basic or advanced search criteria.
For more details regards the basic and advanced search function in RMS, see the Managing Orders section. The search results are shown in the Result section.
To upload all orders displayed in the Result section, select Actions > Upload. The Upload window opens.
In the Template field, select, enter or search for the template you want to upload to RMS.
The Process Description field displays the default process name with the date and timestamp. You can edit the name of the upload process in this field.
After you have entered the upload information, choose one of the following options.
Click OK to upload the order to RMS. The Result section is cleared.
Click Cancel to cancel the upload and close the Upload window.
Click Done to close the Order Upload from Staging window.
In the Order Download from RMS window you can download orders from RMS to a spreadsheet.
From the Tasks menu, select Orders > Download Orders from RMS. The Order Download from RMS window appears.
Search for the orders you want to download according to basic or advanced search criteria. The search results are shown in the Result section.
For more details regards the basic and advanced search function in RMS, see the Managing Orders section. The search results are shown in the Result section.
To download all orders displayed in the Result section, select Actions > Download, or use the Download button. The Download window appears.
In the Template field, select the template you want to download. This field is a required field.
The Process Description field displays the default process name with the date and timestamp. You can edit the name of the download process in this field. This field is a required field.
Then choose one of the following options.
Click OK to open the spreadsheet with the selected orders on your desktop.
Click Cancel to reject all entries and close the window.
Click Done to close the Order Download from RMS window.
In the Orders Upload from File window you can upload a file.
From the Tasks menu, select Orders > Upload Orders from File. The Upload Orders from File window appears.
In the Template field, select the template you want to upload to RMS tables or Staging tables.
The Process Description field displays the default process name with the date and timestamp. You can edit the name of the upload process in this field.
In the Source field, click the Browse button to upload the file.
In the Destination field, choose either RMS Tables or Staging Tables from the list.
Then choose one of the following options:
Click Upload to upload the file to RMS Tables or Staging Tables.
Click Revert to undo any changes.
Click Done to close the Upload Orders from File window.
In the Order Issues window you can view issues that occurred during the upload or download process. The Order Issue window displays the information on the upload that had an error, which column and row in the upload is in error, and a short description of the issue. Once the errors have been corrected, the data can be re-uploaded into the staging area or RMS as needed, using the corrected file. For errors linked to data that has already been uploaded into RMS, the hyper link on the order number on this screen allows a user to access the order in RMS to make the correction there, provided the user has edit privilege.
To view order issues which occurred during the up- or download follow the steps below.
From the Tasks menu, select Orders > Manage Orders. The Order Search window opens.
Enter or select search criteria as desired to make the search more restrictive.
Click Search. The orders that match the search criteria are displayed in the Results section.
In the Order No. column, click the order number link. The Order window opens.
In the Toolbar, click Details to open the Order Details window.
Select Action > Order Issues. The Order Issues window opens. All errors which occurred during the up- or download process are listed in the table.
Click Done to close the Order Issues window.
The Order Discounts window displays deal information that apply to an item on a purchase order.
From the Tasks menu, select Orders > Manage Orders. The Order Search window opens.
Search for and retrieve a purchase order. Enter or select the corresponding search criteria and click Search. The search results are displayed.
In the Results section, go to column Order No. and click the order number link. The Order window opens.
In the Toolbar click the Details button. The Order Details window opens.
In the Location section, select Actions > Discounts. The Order Discount window opens. The header section shows the item location information for the selected order, such as order number, Unit of purchase (UOP), currency, item, location, supplier site cost, total discount and order cost. The bottom section displays deal details, such as deal components (discounts or rebates), deal class, discount type and graduated order cost.
|
Note: Use the More Actions button to toggle from one currency to another. |
Click Done to exit the Order Discounts window.
When a purchase order is added to the system, it must go through a series of checks before it is accessible in the system. Depending on your user role, you may not be able to move the purchase order to the next status. A purchase order may be in any of the following statuses:
| Status | Definition |
|---|---|
| Worksheet | The purchase order has been started, but not completed. |
| Submitted | The purchase order has been completed and is pending review. |
| Approved | The purchase order has been reviewed and has been approved. |
| Delete | The purchase order is marked for deletion. It will be deleted by a regularly scheduled batch program. |
| Closed | The purchase order is complete. |
To move a purchase order to the next step follow the steps below.
Submitting a Purchase Order for Approval
To submit a purchase order for approval follow the steps below.
From the Tasks menu, select Orders > Manage Orders. The Order Search window opens.
Restrict the search to status Worksheet.
Click Search. The orders that match the search criteria are displayed in the Results section.
In the Order No. column, click the desired order number link. The Order window opens.
In the Toolbar the Submit button is displayed. Click Submit.
You are prompted to submit the purchase order.
Click Yes. The status of the purchase order changes to Submitted.
Choose one of the following options.
Click Save to save and submit the purchase order for approval.
Click Save and Close to save and submit the purchase order for approval. The Order window is closed.
Click Cancel to reject your changes and exit the Order window.
To approve a purchase order follow the steps below.
From the Tasks menu, select Orders > Manage Orders. The Order Search window opens.
Restrict the search to status Submitted.
Click Search. The orders that match the search criteria are displayed in the Results section.
In the Order No. column, click the desired order number link. The Order window opens.
In the Toolbar the Approve button is displayed. Click Approve.
You are prompted to approve the purchase order.
Click Yes. The status of the purchase order changes to Approved.
|
Note: You can change the status back to Worksheet at this stage. Open the Status list and select the Worksheet. |
Choose one of the following options.
Click Save to save and approve the purchase order.
Click Save and Close to save and approve the purchase order. The Order window is closed.
Click Cancel to reject your changes and exit the Order window.
To delete a purchase order follow the steps below. Only purchase orders holding the status Worksheet and Submitted can be deleted.
From the Tasks menu, select Orders > Manage Orders. The Order Search window opens.
Restrict the search to status Worksheet or Submitted. Enter or select further search criteria as desired to make the search more restrictive.
Click Search. The orders that match the search criteria are displayed in the Results section.
In the Order No. column, click the desired order number link. The Order window opens.
In the Toolbar, click the Delete Order icon.
You are prompted, if you want to delete the purchase order.
Click Yes. The status of the purchase order changes to Closed.
Choose one of the following options.
Click Save to delete the purchase order.
Click Save and Close to delete the purchase order and exit the Order window.
Click Cancel to reject your changes and exit the Order window.
The Cancel All Items option is only available, if the order was previously submitted for approval or approved. To cancel all items of a purchase order and close the order follow the steps below.
From the Tasks menu, select Orders > Manage Orders. The Order Search window opens.
Restrict the search to status Submitted or Approved. Enter or select further search criteria as desired to make the search more restrictive.
Click Search. The orders that match the search criteria are displayed in the Results section.
In the Order No. column, click the desired order number link. The Order window opens.
In the Toolbar select the Status list and select Cancel All Items.
You are prompted, if you want to cancel all items of the purchase order.
Click Yes to cancel all items of the purchase order.
The Cancel All Items window opens.
In the Cancel Reason field, enter or select the reason for cancelling all items on the purchase order.
Confirm your entry with OK. All the items of the purchase order are cancelled and the status of the purchase order changes to Closed.
After you have cancelled all items on the purchase order, choose one of the following options.
Click Save to save the purchase order.
Click Save and Close to save and close the purchase order. The Order window is closed.
Click Cancel to reject your changes and exit the Order window.
If the purchase order holds the status Closed, you can reinstate all items with the Reinstate All Items button. Follow the steps below to reinstate all items of a closed purchase order.
From the Tasks menu, select Orders > Manage Orders. The Order Search window opens.
Restrict the search to status Closed. Enter or select further search criteria as desired to make the search more restrictive.
Click Search. The orders that match the search criteria are displayed in the Results section.
In the Order No. column, click the desired order number link. The Order window opens.
In the Toolbar select Reinstate All Items.
You are prompted, if you want to reinstate all the items on the selected purchase order.
Click Yes. The status of the purchase order changes to Worksheet.
After you have reinstated all items on the purchase order, choose one of the following options.
Click Save to save the purchase order in Worksheet status.
Click Save and Close to save the purchase order in Worksheet status and exit the Order window.
Click Cancel to reject your changes and exit the Order window. The purchase order stays closed.