| Oracle® Retail Merchandising System User Guide 16.0 E65443-01 |
|

 Previous |
 Next |
Replenishment is an order for additional goods from a warehouse or supplier, in order to replenish depleted stock in a store or warehouse. Replenishment in RMS allows retailers to set up the automatic ordering of items, and RMS can monitor the inventory positions at locations throughout a retail enterprise, down to the item/location levels. Depending on the algorithm used, RMS replenishment can be configured to make recommendations, which can be manually added to a purchase order or transfer, or it can create purchase orders or transfers directly, depending on the level of automation desired.
This chapter includes the following topics:
The RMS replenishment attributes are held at the item/location level. However, RMS supports activating, updating, and deactivating items for replenishment at numerous levels, using item lists, location lists, parent items, and so on. Any stockholding location, including company and franchise stores, and virtual warehouses, can be placed on replenishment.
To create replenishment attributes follow the steps listed below.
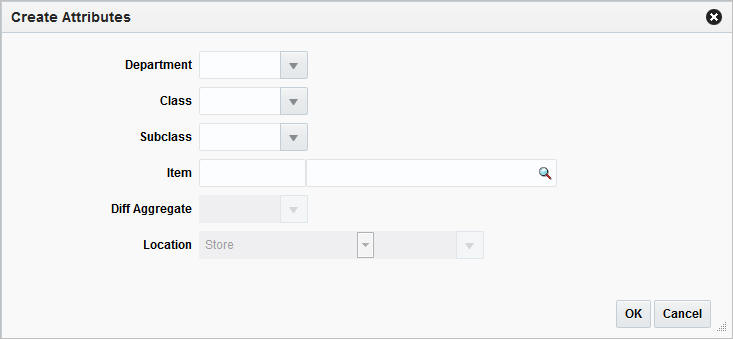
From the Tasks menu, select Replenishment > Create Attributes. The Create Attributes window appears.
In the Department field, enter, select or search for the desired department.
In the Class field, enter, select or search for the desired class.
In the Subclass field, enter, select or search for the desired subclass.
In the Item field, enter, select or search for the item to be replenished.
In the Diff Aggregate field, enter, select or search for the differentiator associated with the selected item.
|
Note: This field is only enabled, if the Diff Aggregate Indicator is selected for the item chosen for replenishment. |
In the Location field, select the location type from the list. Then enter, select or search for the location ID.
Check the Rebuild Location List checkbox, if you wish to rebuild the location list.
|
Note: This field is only enabled, if you have selected location list as location type. |
Then choose one of the following options.
Click OK to create the attribute. The Replenishment Attributes window appears in a new tab.
For more information about the Replenishment Attributes window, see the Replenishment Attributes Window section.
|
Note: Also the location list will be rebuilt, if you have selected the Rebuild Location List checkbox. |
Click Cancel to reject all entries and close the window.
To manage attributes at the item level, item child level or item child by diff level, follow the steps below.
From the Tasks menu, select Items > Manage Items. The Item Search window appears.
Enter or select search criteria as desired to make the search more restrictive.
Click Search. The items that match the search criteria are displayed in the Results section.
In the Item column, click the item link, or mark a record and select Actions > Edit, or use the Edit icon ![]() . The Item window appears.
. The Item window appears.
For Items:
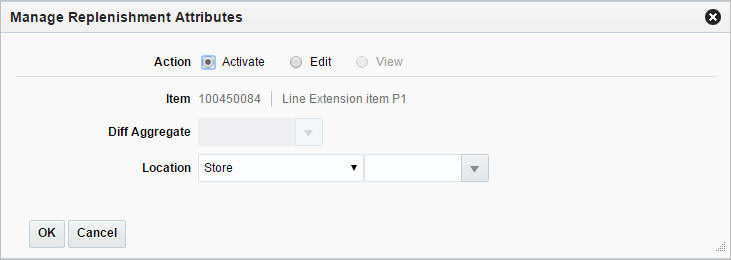
Select More Actions > Replenishment. The Manage Replenishment Attributes window appears.
For Item Children:
Select More Actions > List Children. The Item Children or Item Children by Diff window appears.
Then select Actions > Replenishment. The Manage Replenishment Attributes window appears.
Select if you want to activate, edit or view the replenishment attributes for the item.
The Item field displays the item number and description of the selected item.
In the Diff Aggregate field, enter, select or search for the differentiator associated with the selected item.
|
Note: This field is enabled only if the Diff Aggregate Indicator is selected for the item chosen for replenishment. |
In the Location field, select the location type from the list. Then enter, select or search for the location.
Check the Rebuild Location List checkbox, if you wish to rebuild the location list.
|
Note: This field is only enabled, if you have selected Location List as location type. |
Select the Update from Master checkbox, to update the item/location from the existing master replenishment attributes, if available.
|
Note: The checkbox is only available if you have selected Edit as action. |
Then choose one of the following options.
Click OK to create the attribute. The Replenishment Attributes window appears in a new tab.
For more information about the Replenishment Attributes window, see the Replenishment Attributes Window section.
|
Note: Also the location list will be rebuilt, if you have selected the Rebuild Location List checkbox. |
Click Cancel to reject all entries and close the window.
To manage attributes at the item list level, follow the steps below.
From the Tasks menu, select Foundation Data > Items > Manage Item Lists. The Item List Search window appears.
Enter or select search criteria as desired to make the search more restrictive.
Click Search. The item lists that match the search criteria are displayed in the Results section.
Select a record in the Results section.
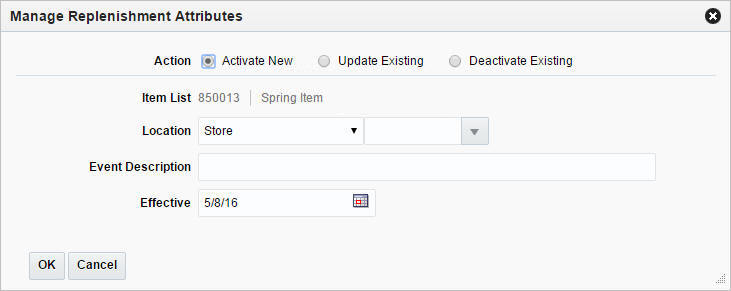
Then select Actions > Mass Change > Replenishment. The Manage Replenishment Attributes window appears.
Select if you want to activate new, update existing or deactivate replenishment attributes for the item list.
The Item List field displays the selected item list number and description.
In the Location field, select the location type from the list. Then enter, select or search for the location.
Check the Rebuild Location List checkbox, if you wish to rebuild the location list.
|
Note: This field is only enabled, if you have selected Location List as location type. |
In the Event Description field, enter the event description.
In the Effective field, enter an effective date for the replenishment attribute or use the Calendar icon to select an effective date.
Select the Update from Master checkbox, to update the item/location from the existing master replenishment attributes, if available.
|
Note: The checkbox is only available if you have selected Update Existing as action. |
Then choose one of the following options.
Click OK to create the attribute. The Replenishment Attributes window appears in a new tab.
For more information about the Replenishment Attributes window, see the Replenishment Attributes Window section.
|
Note: Also the location list will be rebuilt, if you have selected the Rebuild Location List checkbox. |
Click Cancel to reject all entries and close the window.
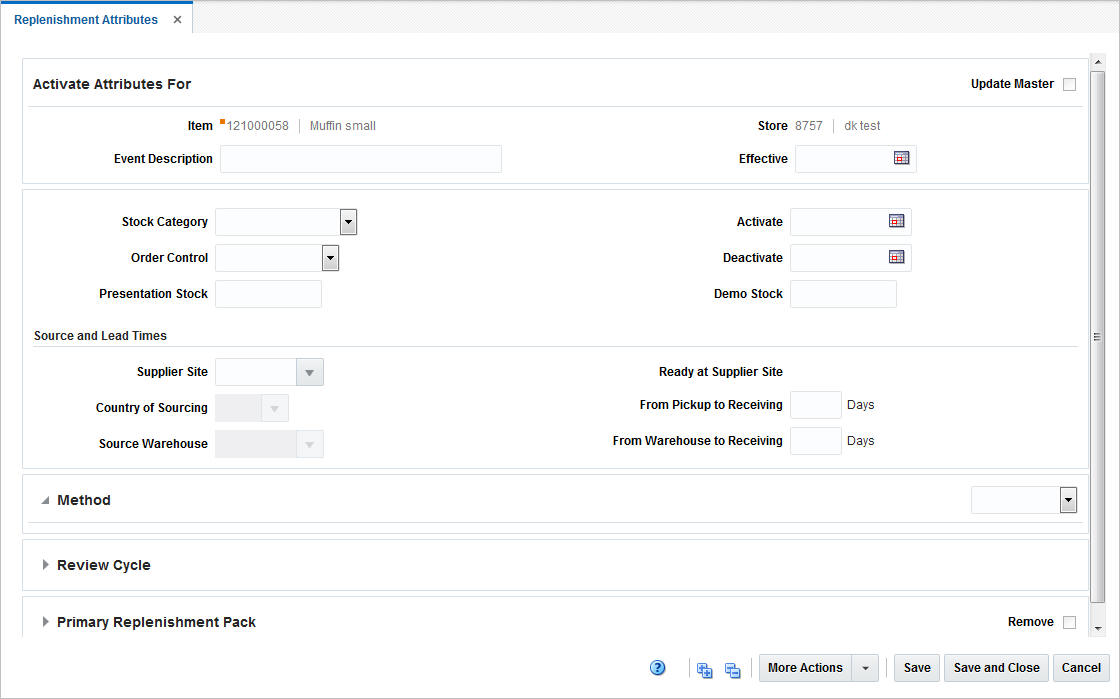
The Replenishment Attributes window allows you to add, edit, and view various replenishment parameters for the defined merchandise hierarchy and location hierarchy level.
In order to set up the replenishment parameters, you need to carry out the following functions in this window:
Select the stock category and type of order control
Specify effective dates
Define source and lead time days
Specify replenishment method and parameters
Determine the replenishment review cycle.
When you update the replenishment attributes for an item, you can choose to update the Master Replenishment Attributes at the same time.
The Replenishment Attributes window consists of the following sections:
The title of this section indicates the mode, in which you enter the window, for example, possible headers are Activate Attributes For, Deactivate Attributes For or View Attributes For.
The Header section contains the Update Master checkbox and the values you entered in the Create Attributes window in addition to other fields.
For more information about how to create attributes, see the Creating Attributes section.
Table 11-1 Attributes For - Fields and Description
| Fields | Description |
|---|---|
|
Update Master checkbox |
Check the Update Master checkbox to indicate that you want to update the master replenishment attributes with the replenishment attributes you are adding or updating. |
|
Department |
Only enabled for department, department/class, or department/class/subclass level maintenance. View only field. You cannot edit this field. Displays the value entered in the Create Attributes window. |
|
Class |
Only enabled for department/class or department/class/subclass level maintenance. View only field. You cannot edit this field. Displays the value entered in the Create Attributes window. |
|
Subclass |
Only enabled for department/class/subclass level maintenance. View only field. You cannot edit this field. Displays the value entered in the Create Attributes window. |
|
Item |
Only enabled for item or item/diff aggregate level maintenance. View only field. You cannot edit this field. Displays the value entered in the Create Attributes window. |
|
Diff Aggregate |
Only enabled for item/diff aggregate level maintenance. View only field. You cannot edit this field. Displays the value entered in the Create Attributes window. |
|
Item List |
Only enabled for item list level maintenance. View only field. You cannot edit this field. Displays the value entered in the Create Attributes window. |
|
Event Description |
This field contains the scheduled replenishment event description, entered in the Create Scheduled Update or Manage Replenishment Attributes window. Edit the event description, if necessary. |
|
Location |
Displays the location type and location ID. When the location type is All Stores or All Warehouses, the location ID field is disabled. View only field. You cannot edit this field. Displays the value entered in the Create Attributes window |
|
Created |
Displays the created date and created by values. View only field. You cannot edit this field. |
|
Effective |
Displays the effective date for when the scheduled event will take place. Enter the effective date or use the Calendar icon to select a date. |
|
Stock Category |
The Stock Category refers to the method in which merchandise is sourced and delivered to a location on replenishment. Valid values are Direct to Store, Cross-Docked, Warehouse Stocked, and WH/Cross Link. For example, select Cross-Docked. Select the stock category from the list. |
|
Order Control |
The Order Control parameter determines whether or not purchase orders and transfers should be created during the replenishment process, and if so, in what status they should be created. Valid values are Manual, Buyer Worksheet, Semi Automatic and Automatic. Select the order control method from the list. |
|
Presentation Stock |
Presentation Stock is the minimum amount of stock required to fill a facing in the store. RMS uses the presentation stock as a component in the determination of net inventory and order quantity calculations, as at a minimum replenishment tries to ensure shelves are full. Enter the quantity of the presentation stock for the item. Replenishment algorithm uses the presentation stock quantity in calculating ROQ. |
|
Activate Date |
The Activate Date is the date on which an item/location becomes active for replenishment. Enter an activate date or use the Calendar icon to select a date. |
|
Deactivate Date |
The Deactivate Date is the date on which an item/location becomes inactive for replenishment. Enter a deactivate date or use the Calendar icon to select a date. |
|
Demo Stock |
Demo Stock is the quantity of an item at a location considered not available for sale. Commonly, this is used for a particular product that is made available to customers to demo in the store, but could be used for other purposes as well. Enter the quantity of the demonstration stock for the item. The replenishment algorithm uses the demo stock quantity in calculating ROQ. This field is not required when you are adding replenishment attributes for an item at a warehouse. |
Below the stock information the source and lead times information is displayed. The following fields are shown.
Table 11-2 Source and Lead Times - Fields and Description
| Fields | Description |
|---|---|
|
Supplier Site |
Enter, select or search for the supplier site, which will be the source for this replenishment. |
|
Country of Sourcing |
Enter, select or search for the country of sourcing. |
|
Source Warehouse |
This attribute must be defined for stores, if the selected stock category is Cross-Docked, Warehouse Sourced, or WH/Cross Link. The attribute is not used for warehouse replenishment. This attribute designates the warehouse that will be used as either the source or the interim destination for the inventory on its way to the store. Only stockholding warehouses associated with the item can be designated as the source warehouse. Enter, select or search for the warehouse. |
|
Ready at Supplier Site |
The supplier site lead time is defaulted from the item supplier country lead time. |
|
From Pickup to Receiving |
The pickup to receiving lead time is the amount of time needed to ship the merchandise from the supplier to the initial receiving location, which can either be a store or a warehouse. Enter the number of days it takes for the item to reach the store or warehouse. This field is required for direct to store and cross-docked items. |
|
From Warehouse to Receiving |
The warehouse to receiving lead time is the amount of time needed to ship the merchandise from the warehouse to the store. Enter the number of days it takes for the item to reach the store. This field is required for cross-docked, warehouse cross-link and warehouse stocked items. |
The Method section contains information on the replenishment method. The replenishment method allows you to automate the ordering process for items by constantly monitoring inventory conditions, and creating orders to fulfill consumer demand according to predefined replenishment parameters. RMS supports a total of ten replenishment methods.
The upper right hand corner of this section displays the Method field, select a method from the list for the section to expand.
To utilize replenishment, select one of the following replenishment methods:
Constant
A stock-oriented replenishment method used without a forecasting application.
This method is a simple algorithm in which an order is placed when inventory levels fall below a user-defined maximum stock level. This strategy does not consider demand trends, future forecasts, or seasonality. However, this approach is effective for slow selling items, or items that are typically bought in multiples.
Min/Max
A stock-oriented replenishment method used without a forecasting application.
This method is a simple algorithm in which an order is placed to get the inventory level to the maximum, or order up to point, when inventory levels fall below the order point, or the minimum. Similar to the constant method, the min/max method does not consider demand trends, future forecasts, or seasonality. However, it is effective for slow selling items, or items that are typically bought in multiples.
Floating Point
A stock-oriented replenishment method used without a forecasting application.
Floating point is very similar to the constant replenishment method; however instead of a user-entered maximum stock level, historic sales (for stores) or issues (for warehouses) are used to calculate the value. This method is referred to as floating point because the maximum stock is regularly recalculated and in essence "floats" up and down based on historic sales or issues. It also incorporates the idea of service level, which is used to calculate safety stock. Safety stock is additional inventory carried in a location to prevent stock outs.
Time Supply
A stock-oriented replenishment method used with a forecasting application.
This method controls inventory based on the desired days of supply of inventory and uses forecasted sales to calculate recommended order quantities. This method is useful for replenishing items where the objective is to prevent stock outs and maintain a constant inventory. This method works similar to the min/max method described above in which an order is recommended to get the inventory level to the order up to point, or maximum, when inventory levels fall below the order point, or minimum. In this case, the order point and order up to point are calculated using the forecasted sales and the minimum and maximum days of supply defined. For stores set up on this method, the forecasted sales for the individual stores are used. For warehouses set up on this method, the total need for all the stores, which are set up for warehouse-stocked replenishment from a particular warehouse, is used. Then, the ROQ for all these stores is compared to the available inventory at the warehouse to determine the ROQ for the warehouse.
Time Supply - Seasonal
A stock-oriented replenishment method used with a forecasting application.
Time Supply - Seasonal combines the basic Time supply algorithm with the end of season terminal stock goal. The additional fields for this algorithm include Season ID, Phase ID, and terminal stock value. This replenishment method compares the current replenishment requests and the forecasted demand until the end of the season. Replenishment requests are created according to the end of season Terminal Stock goal.
Time Supply - Issues
A stock-oriented replenishment method used with a forecasting application designed exclusively for warehouses. Replenishment calculations function just as they do for stores except that warehouse issued forecasts are used. All other calculations are consistent with store Time Supply replenishment.
Dynamic
This replenishment method performs dynamic calculations of the order point and order up to points based upon a number of factors including current sales, sales trends, seasonal demand patterns, and desired service level objectives. It is the most complex and powerful of the RMS supported replenishment methods. The Dynamic method of replenishment is useful when a user wants to minimize the quantity of stock on hand, while preventing stock outs. Through this method, the system attempts to replenish only the quantity required from one replenishment cycle to the next, taking into account the lead times of the product, and forecast prediction intervals for safety stock calculations.
Dynamic - Seasonal
A service-oriented replenishment method used with a forecasting application.
In the same manner as Time Supply - Seasonal, Dynamic - Seasonal combines the basic Dynamic algorithm with the end of season terminal stock goal. The additional fields for this algorithm include a Season ID, Phase ID, and Terminal stock value. This replenishment method compares the current replenishment requests and the forecasted demand until the end of the season. Replenishment requests are created according to the end of season terminal stock goal.
Dynamic - Issues
A service-oriented replenishment method used with a forecasting application designed exclusively for warehouses. Replenishment calculations function just they do for stores, except that warehouses issued forecasts are used. All other calculations are consistent with store dynamic replenishment.
Store Orders
A store driven replenishment method which allows stores to place orders based on need. Orders are incorporated into RMS through an overnight batch. Recommended order quantities are based on the store's request and the ability to deliver the product within the lead time.
|
Note: If you do not select a method, the section is collapsed. The displayed fields in this section, depend on the selected method. |
The method Constant enables the following fields.
Table 11-3 Constant - Fields and Description
| Fields | Description |
|---|---|
|
Apply Size Profile checkbox |
The Size Profile function is used for fashion items. If you set up replenishment parameters for a style/color item (item parent/diff), selecting this checkbox spreads the minimum and maximum value entered for the parent item /diff, based on the size profile of the transaction items. |
|
Maximum |
Enter the maximum value. The maximum stock level is defined as both the order point and the order up to point for this method. |
|
Increment |
Enter the increment value in percent. The increment percent is a way for the user to inflate or deflate the maximum stock value to account for temporary and expected demand fluctuations without actually losing the original maximum stock value. |
|
Scaling Exempt |
Select, if you do not want to use scaling. |
|
Maximum Scale Amount |
Enter the maximum scale amount. |
The method Min/Max enables the following fields.
Table 11-4 Min/Max - Fields and Description
| Fields | Description |
|---|---|
|
Apply Size Profile checkbox |
The Size Profile function is used for fashion items. If you set up replenishment parameters for a style/color item (item parent/diff), selecting this checkbox spreads the minimum and maximum value entered for the parent item /diff, based on the size profile of the transaction items. |
|
Minimum |
The minimum stock level is the order point for this method. When the inventory level drops below this point at an item/location, an order must be placed. Enter the minimum value. |
|
Maximum |
The maximum stock level is the order up to point for this method. Enter the maximum value. |
|
Increment |
The increment percent is a way for the user to inflate or deflate the minimum and maximum stock values to account for temporary and expected demand fluctuations without actually losing the original maximum stock value. Enter the increment value in percent. |
|
Scaling Exempt |
Select, if you do not want to use scaling. |
|
Maximum Scale Amount |
Enter the maximum scale amount. |
The method Floating Point enables the following fields.
Table 11-5 Floating Point - Fields and Description
| Fields | Description |
|---|---|
|
Apply Size Profile checkbox |
The Size Profile function is used for fashion items. If you set up replenishment parameters for a style/color item (item parent/diff), selecting this checkbox spreads the minimum and maximum value entered for the parent item /diff, based on the size profile of the transaction items. |
|
Minimum |
For this method, the minimum stock represents the minimum value for the maximum stock calculation. If the calculated value for maximum stock is less than the minimum, the minimum value is used as the maximum stock value. Enter the minimum stock value. |
|
Maximum |
The maximum stock level is defined as both the order point and the order up to point for this method. Enter the maximum stock value. |
|
Increment |
The increment percent is a way for the user to inflate or deflate the minimum and maximum stock values to account for temporary and expected demand fluctuations without actually losing the original maximum stock value. Enter the increment stock value in percent. |
|
Scaling Exempt |
Select, if you do not want to use scaling. |
|
Maximum Scale Amount |
Enter the maximum scale amount. |
|
Service Level Type |
Select the service level type from the list. |
|
Service Level Percentage |
Enter the service level percentage. |
The methods Time Supply, Time Supply - Seasonal and Time Supply -Issues enable the following fields.
Table 11-6 Time Supply/Seasonal/Issues - Fields and Description
| Fields | Description |
|---|---|
|
Apply Size Profile checkbox |
The Size Profile function is used for fashion items. If you set up replenishment parameters for Style Color (item parent/diff), selecting this checkbox spreads the minimum and maximum value entered for the parent item /diff, based on the size profile of the transaction items. |
|
Minimum |
The minimum time supply days indicates the minimum desired days of inventory. Enter the minimum value. |
|
Maximum |
The maximum time supply days indicates the maximum desired days of inventory. Enter the maximum value. |
|
Horizon |
Horizon refers to the number of days used to calculate an average sales rate based on sale forecasts. Enter the number of days. This attribute is optional. |
|
Add Lead Time checkbox |
Select the checkbox to indicate whether or not lead times should be included in the calculations of the order point and order up to point. If selected, the lead time day will be added to the minimum and maximum time supply days prior to the order and calculated order up to points. |
|
Scaling Exempt |
Select, if you do not want to use scaling. |
|
Maximum Scale Amount |
Enter the maximum scale amount. |
|
Only for Time Supply - Seasonal: |
|
|
Season |
Enter, select or search for the appropriate season to control the end date for replenishing the item. |
|
Phase |
Enter, select or search for the appropriate phase to control the end date for replenishing the item. Only enabled, if you select a season. |
|
Terminal Stock Quantity |
Enter the terminal stock quantity. The terminal stock quantity determines the amount of stock the user wishes to have on-hand by the end of the season. |
The methods Dynamic, Dynamic - Seasonal and Dynamic - Issues enable the following fields.
Table 11-7 Dynamic/Seasonal/Issues - Fields and Description
| Fields | Description |
|---|---|
|
Apply Size Profile checkbox |
The Size Profile function is used for fashion items. If you set up replenishment parameters for Style Color (item parent/diff), selecting this checkbox spreads the minimum and maximum value entered for the parent item /diff, based on the size profile of the transaction items. |
|
Inventory Selling Days |
Inventory Selling Days refers to the number of days of supply desired when a replenishment order is made. Enter the appropriate number of days. |
|
Service Level Type |
The service level type is considered when calculating the maximum stock quantity. The valid values are Standard and Simple Sales. If the service level type is Standard, this value can be either 85% or 98%. If the service level type is Simple Sales, you can set this value to any percent between 0 and 100. This percentage is then used in the calculation of the maximum stock. Select the service level type from the list. |
|
Service Level |
Enter the service level in percent. |
|
Lost Sales Factor |
The lost sales factor refers to the percentage of lost sales, included when generating dynamic replenishment recommended order quantities. Lost sales are sales which could have occurred, if the inventory had been available throughout the order lead time. Enter the lost sales factors in percent. |
|
Scaling Exempt |
Select, if you do not want to use scaling. |
|
Maximum Scale Amount |
Enter the maximum scale amount. |
|
Only for Dynamic - Seasonal: |
|
|
Season |
Enter, select or search for the appropriate season to control the end date for replenishing the item. |
|
Phase |
Enter, select or search for the appropriate phase to control the end date for replenishing the item. Only enabled, if you select a season. |
|
Terminal Stock Quantity |
Enter the terminal stock quantity. The terminal stock quantity determines the amount of stock the user wishes to have on-hand by the end of the season. |
The method Store Orders enables the following fields.
Table 11-8 Store Orders - Fields and Description
| Fields | Description |
|---|---|
|
Apply Size Profile checkbox |
The Size Profile function is used for fashion items. If you set up replenishment parameters for a style/color item (item parent/diff), selecting this checkbox spreads the minimum and maximum value entered for the parent item /diff, based on the size profile of the transaction items. |
|
Reject Past Due Orders |
This attribute determines whether or not RMS will accept store orders that are received ’late', meaning that the requested date for the store order is after the next delivery date. Select, if you want to reject past due orders. |
|
Scaling Exempt |
Select, if you do not want to use scaling. |
|
Maximum Scale Amount |
Enter the maximum scale amount. |
The Review Cycle section allows you to select the frequency that the item is reviewed for replenishment.
Table 11-9 Review Cycle - Fields and Description
| Fields | Description |
|---|---|
|
Review |
The review cycle defines the scheduled time in days between examinations of inventory by RMS replenishment for reorder opportunities. Select the time span for the review cycle from the list.
|
|
Day of the Week checkboxes |
Select the corresponding day/days for review. |
The Primary Replenishment Pack section allows you to define the primary replenishment pack. The section contains the following fields and checkbox.
Table 11-10 Primary Replenishment Pack - Fields and Description
| Fields | Description |
|---|---|
|
Remove checkbox |
This function is used to remove the primary replenishment pack at the item/location level when attributes are being updated. Select remove to indicate the primary replenishment pack is removed. |
|
Pack |
If you wish to replenish with simple packs, instead of ordering the component item, use this parameter to designate which simple pack for the component item should be ordered. Enter, select or search for the pack ID number. |
|
Default Primary Costing Pack |
This function is used to default the primary costing pack to the item/location whose attributes are being updated. This is especially useful when you update at a level above item/location, where different primary costing packs may be applicable at the lowest level. Select the checkbox to indicate the pack is the costing pack for replenishment. |
The toolbar contains the following icons and buttons.
Table 11-11 Replenishment Attributes Toolbar - Icons/Buttons and Description
| Icons/Buttons | Description |
|---|---|
|
Help icon |
You can access the online help for this page by clicking the Help icon |
|
Expand and Collapse icons |
You can expand all the sections and collapse all the sections in the window by clicking the Expand and Collapse icons |
|
Delete icon |
This icon is only available when you edit a replenishment attribute. Use the icon to delete replenishment attributes subject to existing constraints. |
|
More Actions |
Click More Actions to see a list of additional actions that can be performed in the Replenishment Attributes window.
|
|
Save |
Click Save to save the entered records. |
|
Save and Close |
Click Save and Close to save the entered records and close the window. |
|
Cancel |
Click Cancel to reject all entries and close the window. |
|
Done |
If you opened the window in view mode, the Done button is displayed. Click Done to close the window. |
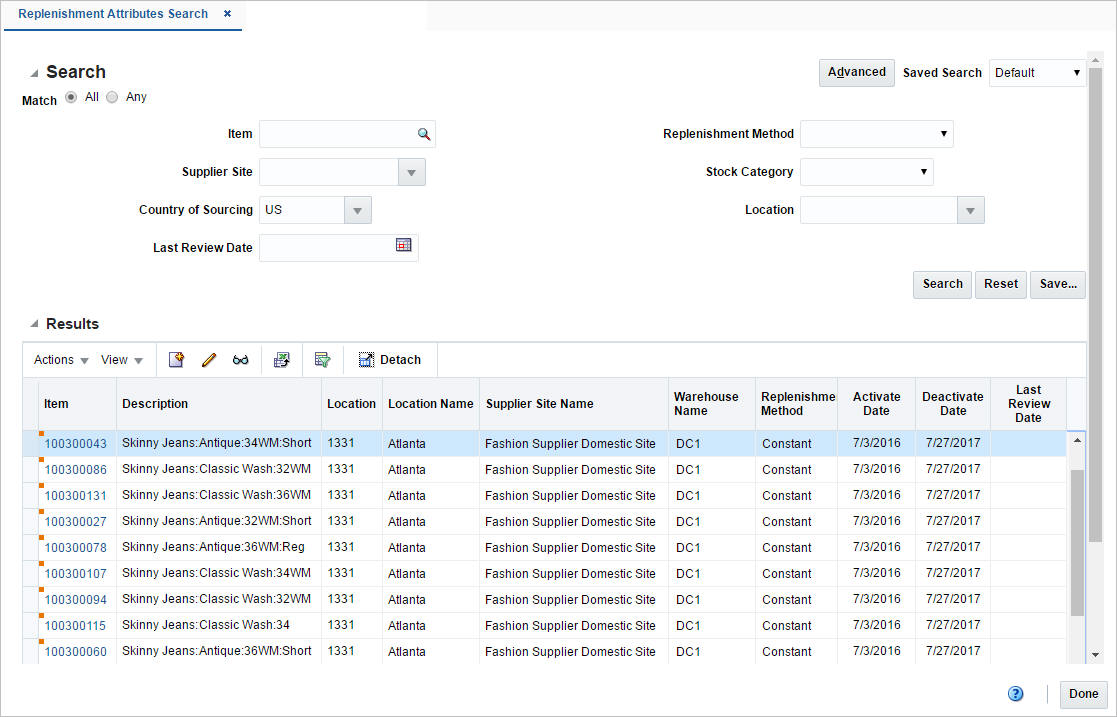
The Manage Attributes option opens the Replenishment Attributes Search window. This window allows you to search for replenishment attributes, as well as view and edit the results of the search.
The Replenishment Attributes Search window contains the following sections:
Search
For more information about how to search for replenishment attributes, see the Searching for a Replenishment Attribute section.
To search for a replenishment attribute:
From the Task menu, select Replenishment > Manage Attributes. The Replenishment Attributes Search window appears.
You can search for replenishment attributes using basic or advanced search criteria, depending on the requirement. The basic mode is the default search mode.
Click Advanced to access the search section in advanced mode.
Click Basic to return to the basic mode.
To search for a replenishment attribute using basic search criteria.
Enter, select or search for one or all of the following basic search criteria.
Table 11-12 Replenishment Attributes Search - Basic Search Criteria and Description
| Fields | Description |
|---|---|
|
Match option |
Check radio button All or Any. All - only attribute/attributes matching all entered search criteria are shown. Any - attribute/attributes matching any of the entered search criteria are shown. |
|
Item |
Enter, select or search for an item ID. |
|
Location |
Enter, select or search for a location. |
|
Supplier Site |
Enter, select or search for the supplier site. |
|
Country of Sourcing |
Enter, select or search for the country of sourcing. |
|
Last Review Date |
Enter a date or use the Calendar icon to select the last review date. |
|
Replenishment Method |
Select a replenishment method from the list. |
|
Stock Category |
Select a stock category from the list. |
Click the Saved Search list to select one of the saved search criteria. Selecting a saved search populates the search section with the saved search criteria. If the run automatically function is enabled for the search, the search is executed immediately.
You can also personalize your saved searches by selecting Personalize. The Personalized Saved Search window appears.
For more information about the Personalized Saved Search, see the Common User Interface Controls chapter, section "Personalize Saved Search".
Click Search. The replenishment attributes that match the search criteria are displayed in the Results section.
Click Reset to clear the search section and results.
Click Save As... to save the current search criteria. The Create Saved Search window appears.
For more information about how to save your search criteria, see the Common User Interface Controls chapter, section "Create Saved Search".
Click Done to close the window.
To search for a replenishment attribute using advanced search criteria, follow the steps below.
To search using advanced search criteria, enter or select one or all of the advanced search criteria.
To narrow down the search, use the list next to the search fields. For example, determine if the entered value should be equal or not equal to the search result.
Click the Saved Search list to select one of the saved search criteria. Selecting a saved search populates the search section with the saved search criteria. If the run automatically function is enabled for the search, the search is executed immediately.
You can also personalize your saved searches by selecting Personalize. The Personalized Saved Search window appears.
For more information about the Personalized Saved Search, see the Common User Interface Controls chapter, section "Personalize Saved Search".
Click Search. The replenishment attributes that match the search criteria are displayed in the Results section.
Click Reset to clear the search section and results.
Click Save As... to save the current search criteria. The Create Saved Search window appears.
For more information about how to save your search criteria, see the Common User Interface Controls chapter, section "Create Saved Search".
Click Add Fields to add more fields for the advanced search. To remove the field from the search, click the x right next to the field.
Click Reorder to change the order of the available search fields. The Reorder Search Fields window appears.
Select the desired search field and use the up and down arrows to rearrange the order of the fields.
Click OK to confirm the new order of the fields and close the window.
Click Cancel to reject any changes and close the window.
Click Done to close the window.
The Results section lists the retrieved item/location combinations. The Results table shows the following columns by default.
Item
Description
Location
Location Name
Supplier Site Name
Warehouse Name
Replenishment Method
Activate Date
Deactivate Date
Review Date
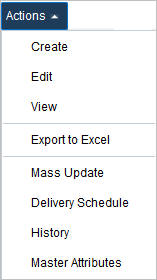
Use the Actions Menu and icons to apply actions to the Results table. You can perform the actions listed below.
Table 11-13 Results - Actions Menu/Icons and Description
| Actions Menu/Icons | Description |
|---|---|
|
Create and Create icon |
Select Actions > Create or use the Create icon For more information about how to create an attribute, see the Creating Attributes section. |
|
Edit and Edit icon |
To edit the attributes of the selected item:
For more detailed information about the Replenishment Attributes window, see the Replenishment Attributes Window section. |
|
View and View icon |
To view replenishment attributes for an item:
For more details about the Replenishment Attributes window, see the Replenishment Attributes Window section. |
|
Export to Excel and Export to Excel icon |
You can copy the records in the table to a Microsoft Excel spreadsheet by selecting Actions > Export to Excel or by using the Export to Excel icon |
|
Mass Update |
Opens the Mass Update Attributes window to create mass updates for replenishment attributes. For more information about how to create mass updates for replenishment attributes, see the Mass Update section. |
|
Delivery Schedule |
Opens the Location Delivery Schedule window to view and maintain delivery schedules for a supplier to several locations. For more information about the delivery schedule, see the Foundation Data chapter, section "Location Delivery Schedules Window". |
|
History |
Opens the Replenishment Attribute History window to view the history of a replenishment attribute. For more information about viewing the replenishment attribute history, see the Replenishment Attribute History section. |
|
Master Attributes |
Opens the Master Attributes window to view and maintain the master replenishment attributes for an item/location combination. For more information about master attributes, see the Master Replenishment Attributes section. |
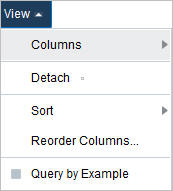
You can customize the view of the table by using the options in the view menu.
Table 11-14 Results - View Menu/Icons and Description
| View Menu/Icons | Description |
|---|---|
|
Columns |
You can manage which of the columns will be shown in the table by clicking the Show All and Manage Columns options. |
|
Detach and Detach icon |
You can view the tables in the application in a separate window by clicking Detach or by using the Detach icon |
|
Sort |
You can sort columns by the following options:
|
|
Reorder Columns |
You can reorder columns by clicking the Reorder Columns option. |
|
Query by Example and Query by Example icon |
You can filter the attributes by one or multiple column values by clicking the Query by Example option or by using the Query by Example icon |
The toolbar contains the following icons and buttons.
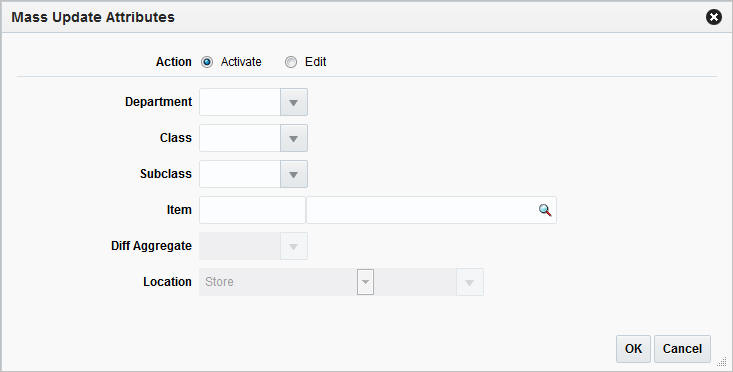
To update multiple attributes follow the steps below.
From the Tasks menu, select Replenishment > Manage Attributes. The Replenishment Attributes Search window appears.
Then select Actions > Mass Update. The Mass Update Attributes window appears.
In the Action section, select if you want to activate or edit the attributes.
In the Department field, enter, select or search for the department.
In the Class field, enter, select or search for the class.
In the Subclass field, enter, select or search for the subclass.
In the Item field, enter, select or search for the item ID.
In the Diff Aggregate field, select the differentiator for the parent items with the diff aggregate defined.
|
Note: This field is only enabled for Item/Diff Aggregate level maintenance. |
In the Location field, select the location type from the list. Then enter, select or search for the location ID.
Then choose one of the following options.
Select OK to apply your updates and close the window.
Select Cancel to reject all entries and close the window.
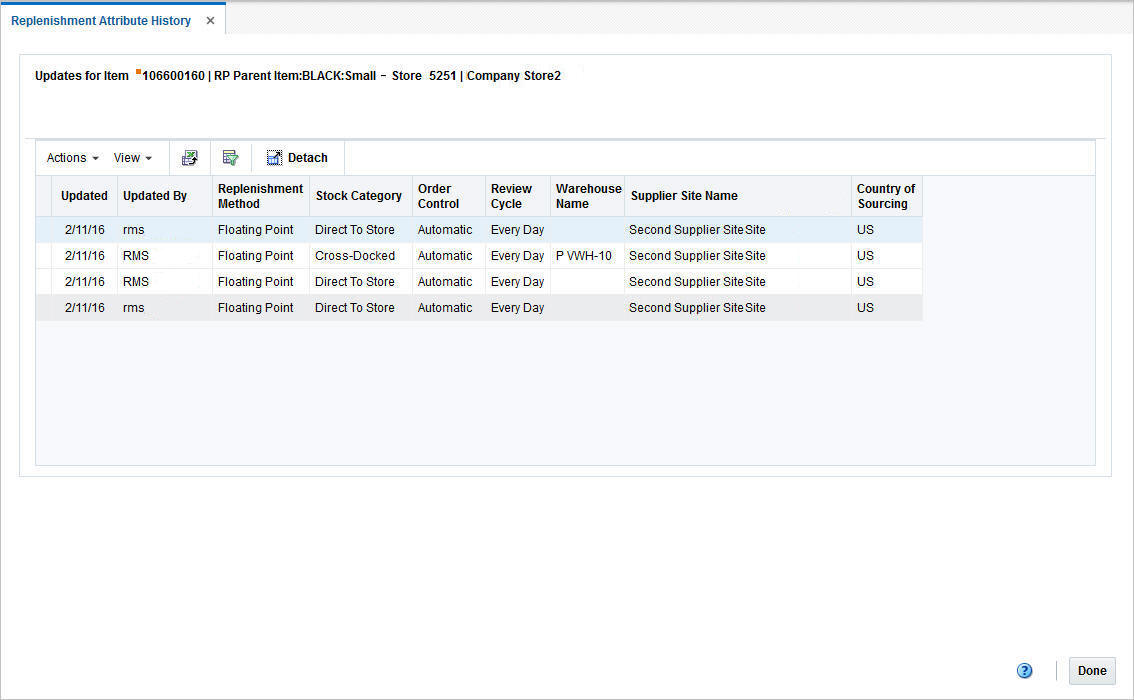
The Replenishment Attribute History window allows you to view the update history of a replenishment attribute for item/location.
The Replenishment Attribute contains the following sections.
Header
The header displays the item ID and description as well as the location type, the location ID and location name.
The table lists all the completed updates for the item/location.
Use the Actions Menu and icons to apply actions to the table. You can perform the actions listed below.
Table 11-16 Replenishment Attribute History - Actions Menu/Icon and Description
| Actions Menu/Icon | Description |
|---|---|
|
Export to Excel and Export to Excel icon |
You can export the records in the table to a Microsoft Excel spreadsheet by selecting Actions > Export to Excel or by using the Export to Excel icon |
You can customize the view of the table by using the options in the View menu.
Table 11-17 Replenishment Attribute History - View Menu/Icons and Description
| View Menu/Icons | Description |
|---|---|
|
Columns |
You can manage which of the columns will be shown in the table by clicking the Show All and Manage Columns options. |
|
Detach and Detach icon |
You can view the tables in the application in a separate window by clicking Detach or by using the Detach icon |
|
Sort |
You can sort columns by the following options:
|
|
Reorder Columns |
You can reorder columns by clicking the Reorder Columns option. |
|
Query by Example and Query by Example icon |
You can filter the items by one or multiple column values by clicking the Query by Example option or by using the Query by Example icon |
The toolbar contains the following icons and buttons.
To view the replenishment attribute history, follow the steps listed below.
From the Tasks menu, select Replenishment > Manage Attributes. The Replenishment Attributes Search window appears.
Enter or select search criteria as desired to make the search more restrictive.
Click Search. The attributes that match the search criteria are displayed in the Results section.
Select a record in the Results section.
Then select Actions > History. The Replenishment Attribute History window appears. View the updates for the selected item.
Click Done to close the window.
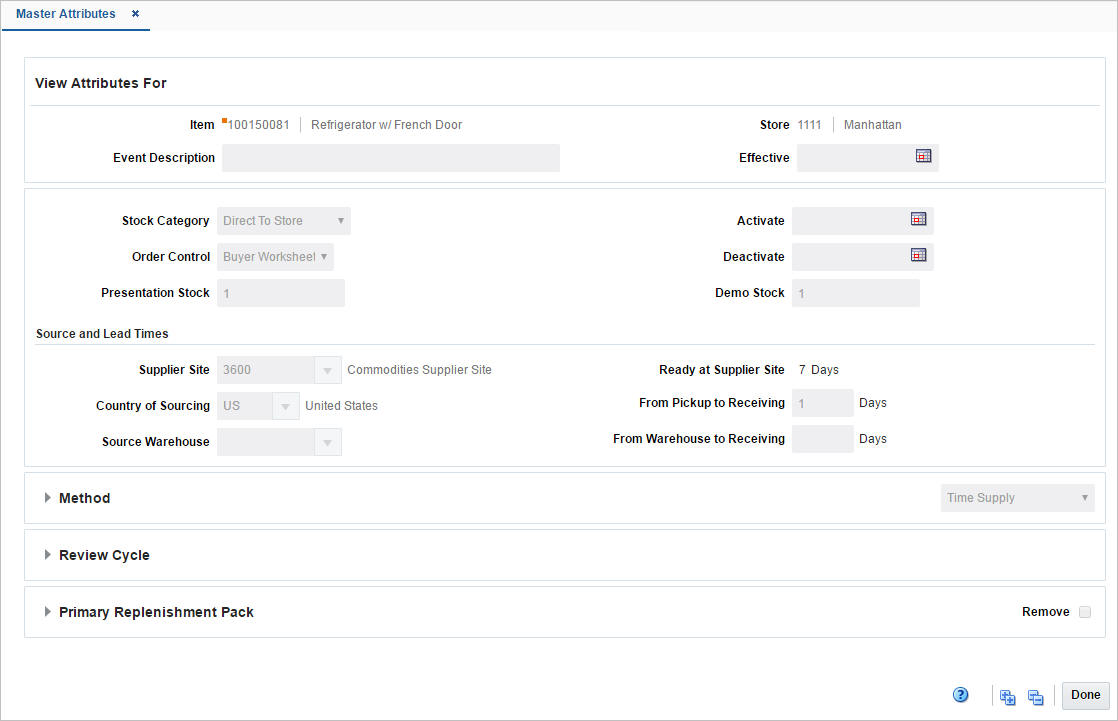
The Master Replenishment Attributes window maintains a record of the master attribute that can be used to restore item/location settings after a temporary change.
When you create the replenishment parameters for an item/location, the master replenishment attributes are created automatically.
For more information about how to create replenishment parameters for an item, see the Creating Attributes section.
When you update the replenishment attributes for an item/location, you can choose to update the master replenishment attributes at the same time, by selecting the Update Master checkbox in the Replenishment Attributes window. For more information about the individual fields displayed in this window, see the Replenishment Attributes Window section.
The toolbar contains the following icons and buttons.
Table 11-19 Master Attributes Toolbar - Icons/Buttons and Description
| Icons/Buttons | Description |
|---|---|
|
Help icon |
You can access the online help for a particular page by clicking the Help icon |
|
Expand and Collapse icons |
You can expand all the sections and collapse all the sections in the window by clicking the Expand and Collapse icons. |
|
Done |
Click Done to close the window. |
To view master replenishment attributes for an item/location follow the steps below.
From the Tasks menu, select Replenishment > Manage Attributes. The Replenishment Attributes Search window appears.
Enter or select search criteria as desired to make the search more restrictive.
Click Search. The items that match the search criteria are displayed in the Results section.
Select a record in the Results section.
Then select Actions > Master Attributes. The Master Replenishment Attributes window appears.
You can also access the Master Replenishment Attributes window through the Replenishment Attributes window:
In the Item column, click the item link, or mark a record and select Actions > Edit/View or use corresponding icons. The Replenishment Attributes window appears.
In the Replenishment Attributes toolbar, select More Actions > Master Attributes. The Master Replenishment Attributes are displayed.
View the master replenishment attributes for the selected item/location.
Click Done to close the window.
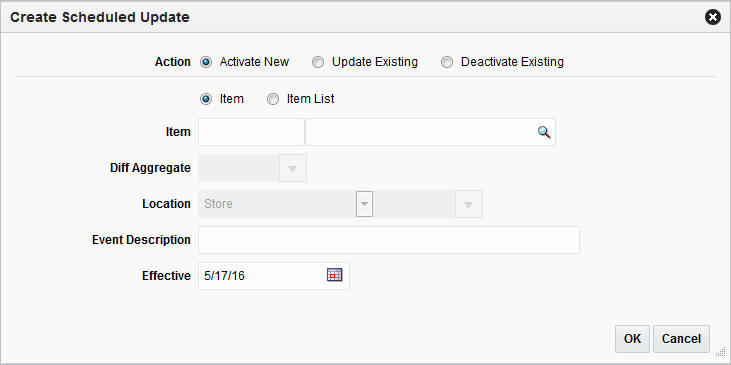
The Create Scheduled Update window allows you to create a new scheduled replenishment and scheduled event to activate a new replenishment attribute, or to update, or deactivate an existing attribute.
To create a scheduled update, follow the steps below.
From the Tasks menu, select Replenishment > Create Scheduled Update. The Create Scheduled Update window appears.
In the Action section, select if you want to activate a new, update or deactivate an existing replenishment attribute.
Select, if the scheduled update is to be created by using item or item list.
In the Item/Item List field, enter, select or search for the item/item list.
In the Diff Aggregate field, enter, select or search for the differentiator associated with the selected item.
In the Location field, select the location type from the list. Then, enter, select or search for the location.
In the Event Description field, enter a description.
In the Effective field, enter the date the update takes place or use the Calendar icon to select an effective date.
Then choose one of the following options.
Click OK to create the scheduled update.
|
Note: If you select the action Activate New or Update Existing, the Replenishment Attribute window appears, allowing you to enter additional information. |
Click Cancel to reject all entries and close the window.
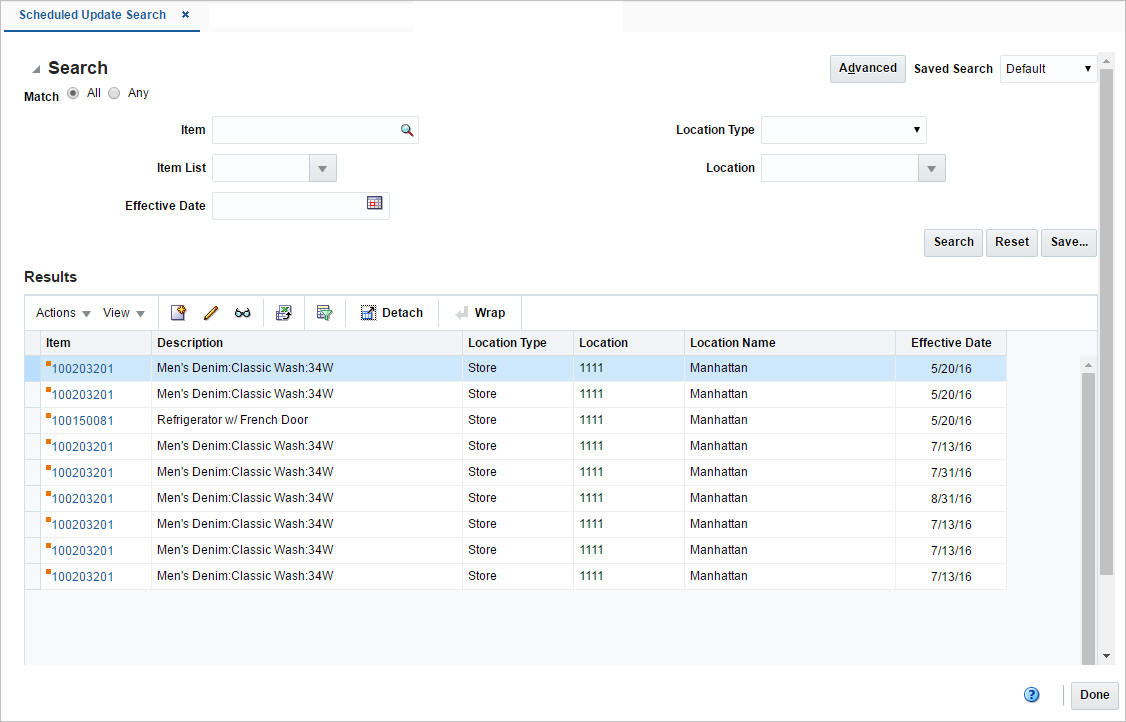
The Manage Scheduled Update option opens the Scheduled Update Search window. This window allows you to search for scheduled replenishment changes and view the results of the search.
The Scheduled Update Search window contains the following sections:
Search
For more information about how to search for a scheduled update, see the Searching for a Scheduled Update section.
To search for a scheduled update:
From the Task menu, select Replenishment > Manage Scheduled Update. The Scheduled Update Search window appears.
You can search for a scheduled update using basic or advanced search criteria, depending on the requirement. The basic mode is the default search mode.
Click Advanced to access the search section in advanced mode.
Click Basic to return to the basic mode.
To search for a scheduled update using basic search criteria
Enter, select or search for one or all of the following basic search criteria.
Table 11-20 Scheduled Update Search - Basic Search Criteria and Description
| Fields | Description |
|---|---|
|
Match option |
Check radio button All or Any. All - only item/items matching all entered search criteria are shown. Any - item/items matching any of the entered search criteria are shown. |
|
Item |
Enter or search for the item. |
|
Item List |
Enter, select or search for an item list. |
|
Effective Date |
Enter a date or use the Calendar icon to select an effective date. |
|
Location Type |
Select the location type from the list. |
|
Location |
Enter, select or search for a location. |
Click on the Saved Search list to select one of the saved search criteria. Selecting a saved search populates the search section with the saved search criteria. If the run automatically function is enabled for the search, the search is executed immediately.
You can also personalize your saved searches by selecting Personalize. The Personalized Saved Search window appears.
For more information about the Personalized Saved Search, see the Common User Interface Controls chapter, section "Personalize Saved Search".
Click Search. The scheduled updates that match the search criteria are displayed in the Results section.
Click Reset to clear the search section and results.
Click Save As... to save the current search criteria. The Create Saved Search window appears.
For more information about how to save your search criteria, see the Common User Interface Controls chapter, section "Create Saved Search".
Click Done to close the window.
To search for a supplier using advanced search criteria, follow the steps below.
To search using advanced search criteria, enter or select one or all of the advanced search criteria.
To narrow down the search, use the list next to the search fields. For example, determine if the entered value should be equal or not equal to the search result.
Click on the Saved Search list to select one of the saved search criteria. Selecting a saved search populates the search section with the saved search criteria. If the run automatically function is enabled for the search, the search is executed immediately.
You can also personalize your saved searches by selecting Personalize. The Personalized Saved Search window appears.
For more information about the Personalized Saved Search, see the Common User Interface Controls chapter, section "Personalize Saved Search".
Click Search. The scheduled updates that match the search criteria are displayed in the Results section.
Click Reset to clear the search section and results.
Click Save As... to save the current search criteria. The Create Saved Search window appears.
For more information about how to save your search criteria, see the Common User Interface Controls chapter, section "Create Saved Search".
Click Add Fields to add more fields for the advanced search. To remove the field from the search, click the x right next to the field.
Click Reorder to change the order of the available search fields. The Reorder Search Fields window appears.
Select the desired search field and use the up and down arrows to rearrange the order of the fields.
Click OK to confirm the new order of the fields and close the window.
Click Cancel to reject any changes and close the window.
Click Done to close the window.
The Results section lists the retrieved item/location combinations. The Results table shows the following columns by default.
Item
Description
Location Type
Location ID
Location Name
Effective Date
Use the Actions Menu and icons to apply actions to the Results table. You can perform the actions listed below.
Table 11-21 Results - Actions Menu/Icons and Description
| Actions Menu/Icons | Description |
|---|---|
|
Create and Create icon |
Select Actions > Create or use the Create icon For more details about how to create scheduled updates, see the Creating Scheduled Update section. |
|
Edit and Edit icon |
To edit scheduled updates for an item/location:
|
|
View and View icon |
To view a replenishment attributes for an item/location:
For more details about the Replenishment Attributes window, see the Replenishment Attributes Window section. |
|
Export to Excel and Export to Excel icon |
You can export the records in the table to a Microsoft Excel spreadsheet by selecting Actions > Export to Excel or by using the Export to Excel icon |
You can customize the view of the table by using the options in the View Menu.
Table 11-22 Results - View Menu/Icons and Description
| View Menu/Icons | Description |
|---|---|
|
Columns |
You can manage which of the columns will be shown in the table by clicking the Show All and Manage Columns options. |
|
Detach and Detach icon |
You can view the tables in the application in a separate window by clicking Detach or by using the Detach icon |
|
Sort |
You can sort columns by the following options:
|
|
Reorder Columns |
You can reorder columns by clicking the Reorder Columns option. |
|
Query by Example and Query by Example icon |
You can filter the items by one or multiple column values by clicking the Query by Example option or by using the Query by Example icon |
|
Wrap icon |
You can wrap the values in the table column by first clicking the column on which you would like the text to wrap and then using the Wrap icon |
The toolbar contains the following icons and buttons.
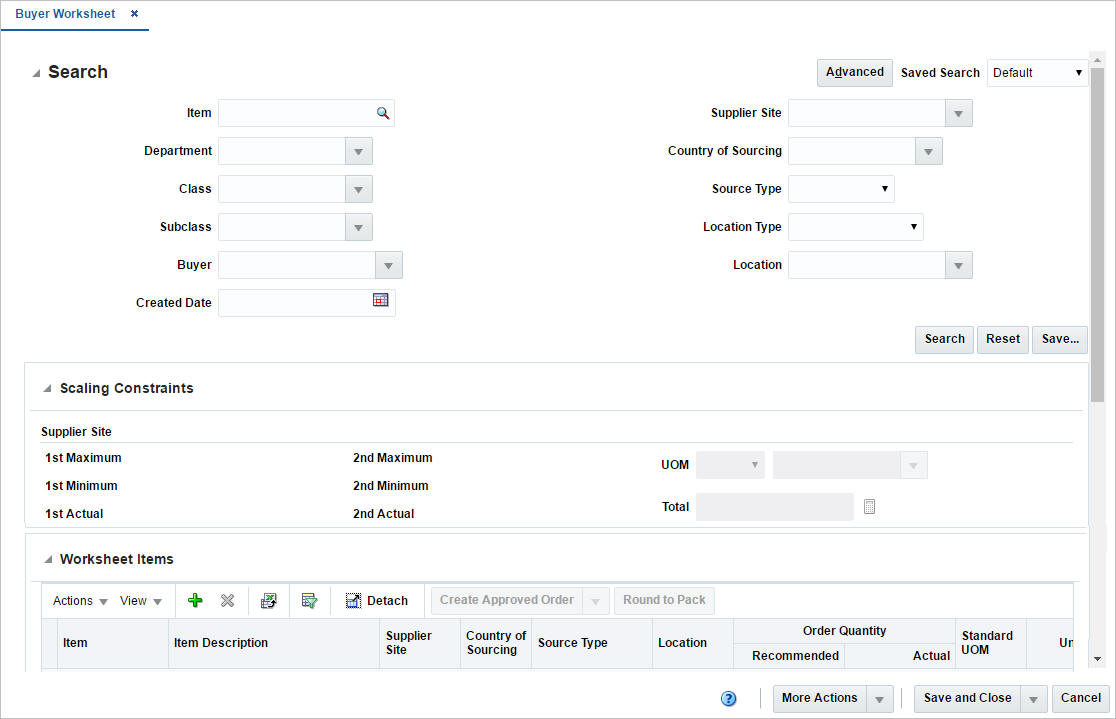
The Buyer Worksheet is a tool in RMS to help create replenishment orders using the outputs of replenishment and investment buy. Recommended order quantities are written for review before order creation.
The Buyer Worksheet window allows you to review the replenishment results of item/locations, and review replenishment and investment buy recommendations before making purchase orders. You can also add or edit item quantities manually.
The Buyer Worksheet window contains the following sections:
Search
For more information about how to search for a buyer worksheet, see the Searching for a Buyer Worksheet section.
To search for a buyer worksheet
From the Task menu, select Replenishment > Buyer Worksheet. The Buyer Worksheet Search window appears.
You can search for a buyer worksheet using basic or advanced search criteria, depending on the requirement. The basic mode is the default search mode.
Click Advanced to access the search section in advanced mode.
Click Basic to return to the basic mode.
To search for a buyer worksheet using basic search criteria.
Enter, select or search for one or all of the following basic search criteria.
Table 11-24 Buyer Worksheet Search - Basic Search Criteria and Description
| Fields | Description |
|---|---|
|
Item |
Enter, select or search for the item ID. |
|
Department |
Enter, select or search for the department. |
|
Class |
Enter, select or search for the class. |
|
Subclass |
Enter, select or search for the subclass. |
|
Buyer |
Enter, select or search for the buyer. |
|
Created Date |
Enter the date or use the Calendar icon to select the created date. |
|
Supplier Site |
Enter, select or search for the Supplier Site. |
|
Country of Sourcing |
Enter, select or search for the country of sourcing. |
|
Source Type |
Select a source type from the list. For example, select Replenishment. |
|
Location Type |
Select a location type from the list. For example, select Store. |
|
Location |
Enter, select or search for the location ID. |
Click on the Saved Search list to select one of the saved search criteria. Selecting a saved search populates the search section with the saved search criteria. If the run automatically function is enabled for the search, the search is executed immediately.
You can also personalize your saved searches by selecting Personalize. The Personalized Saved Search window appears.
For more information about the Personalized Saved Search, see the Common User Interface Controls chapter, section "Personalize Saved Search".
Click Search. The items of the buyer worksheet are displayed in the Worksheet Items section.
Click Reset to clear the search section and results.
Click Save As... to save the current search criteria. The Create Saved Search window appears.
For more information about how to save your search criteria, see the Common User Interface Controls chapter, section "Create Saved Search".
Click Done to close the window.
To search for a buyer worksheet using advanced search criteria, follow the steps below.
To search using advanced search criteria, enter or select one or all of the advanced search criteria.
Table 11-25 Buyer Worksheet Search - Advanced Search Criteria and Description
| Fields | Description |
|---|---|
|
Item |
Enter, select or search for the item ID. |
|
Department |
Enter, select or search for the department. |
|
Class |
Enter, select or search for the class. |
|
Subclass |
Enter, select or search for the subclass. |
|
Buyer |
Enter, select or search for the buyer. |
|
Created Date |
Enter the date or use the Calendar icon to select the created date. |
|
Supplier Site |
Enter, select or search for the Supplier Site. |
|
Country of Sourcing |
Enter, select or search for the country of sourcing. |
|
Source Type |
Select a source type from the list. For example, select Replenishment. |
|
Location Type |
Select a location type from the list. For example, select Store. |
|
Location |
Enter, select or search for the location ID. |
To narrow down the search, use the list next to the search fields. For example, determine if the entered value should be equal or not equal to the search result.
Click on the Saved Search list to select one of the saved search criteria. Selecting a saved search populates the search section with the saved search criteria. If the run automatically function is enabled for the search, the search is executed immediately.
You can also personalize your saved searches by selecting Personalize. The Personalized Saved Search window appears.
For more information about the Personalized Saved Search, see the Common User Interface Controls chapter, section "Personalize Saved Search".
Click Search. The items on the buyer worksheet are displayed in the Worksheet Items section.
Click Reset to clear the search section and results.
Click Save As... to save the current search criteria. The Create Saved Search window appears.
For more information about how to save your search criteria, see the Common User Interface Controls chapter, section "Create Saved Search".
Click Add Fields to add more fields for the advanced search. To remove the field from the search, click the x right next to the field.
Click Reorder to change the order of the available search fields. The Reorder Search Fields window appears.
Select the desired search field and use the up and down arrows to rearrange the order of the fields.
Click OK to confirm the new order of the fields and close the window.
Click Cancel to reject any changes and close the window.
Click Done to close the window.
The Scaling Constraints section displays the scaling information from the supplier inventory management constraints, if defined.
To view the scaling constraints of an item or several items:
Select a record or several records in the Worksheet Items table.
Select the unit of measure (UOM) type and the UOM.
Then click the Calculate Scaling Constraints Totals icon ![]() .
.
The Scaling Constraints are displayed.
If the selected items do not share a common inventory management level and hierarchy, you receive a warning when you click the Calculate icon, informing you that the constraints cannot be displayed.
For example, if the inventory management level of all the selected rows is at the supplier/department level, and all selected rows are for the same supplier/department, the scaling constraints are displayed.
However, if one item is in a different department, or is for a different supplier, then the constraints cannot be displayed.
The Scaling Constraints section contains the following fields.
Table 11-26 Scaling Constraints - Fields and Description
| Fields | Description |
|---|---|
|
1st Maximum |
Displays the 1st maximum value of the constraint. |
|
1st Minimum |
Displays the 1st minimum value of the constraint. |
|
1st Actual |
Displays the 1st actual value of the constraint. |
|
2nd Maximum |
Displays the 2nd maximum value of the constraint. |
|
2nd Minimum |
Displays the 2nd minimum value of the constraint. |
|
2nd Actual |
Displays the 2nd actual value of the constraint. |
|
UOM |
Select the unit of measure (UOM) from the list. For example, select Amount. Then enter, select or search for the desired unit. For example, enter USD. |
|
Total and Calculate Scaling Constraints Totals icon |
Use the Calculate Scaling Constraints Totals icon |
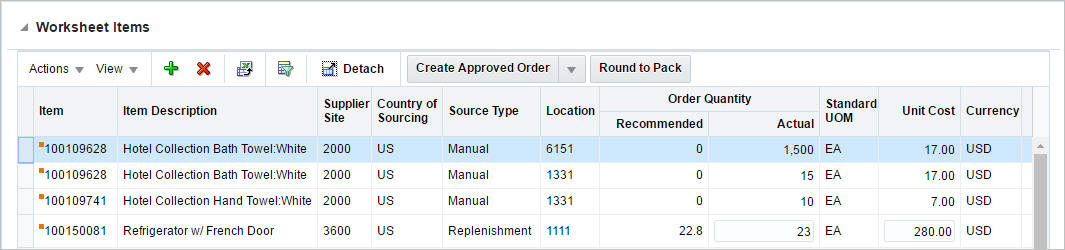
This section displays the items of the buyer worksheet. You can add and delete items from the buyer worksheet as well as create orders in this section.
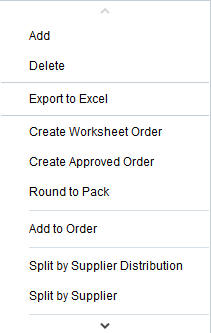
Use the Actions Menu, buttons and icons to apply actions to the table. You can perform the actions listed below.
Table 11-27 Worksheet Items - Actions Menu/Icons and Description
| Actions Menu/Icons | Description |
|---|---|
|
Add and Add icon |
You can manually add items to the buyer worksheet by selecting Actions > Add or by using the Add icon For more information on how to add items to a buyer worksheet, see the Adding an Item to a Buyer Worksheet section. |
|
Delete and Delete icon |
You can delete an item from a buyer worksheet:
|
|
Export to Excel and Export to Excel icon |
You can export the records in the table to a Microsoft Excel spreadsheet by selecting Actions > Export to Excel or by using the Export to Excel icon |
|
Create Order and Create Order button |
With the Create Order option or Create Order button you can create the following orders, depending on the current status of the order:
|
|
Round to Pack and Round to Pack button |
You can round the quantities of an item to the defined pack, based on the order rounding rules:
|
|
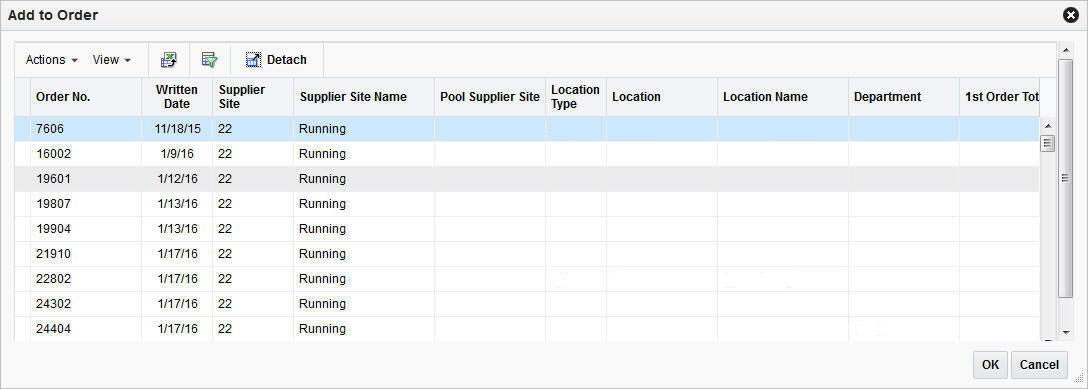
Add to Order |
Opens the Add to Order window. You can add the selected item to an existing order. For more information about how to add an item to an existing order, see the Add to Order section. |
|
Split by Supplier Distribution |
Splits the actual order quantity of the item proportional to the percentage defined in the Supplier Distribution. |
|
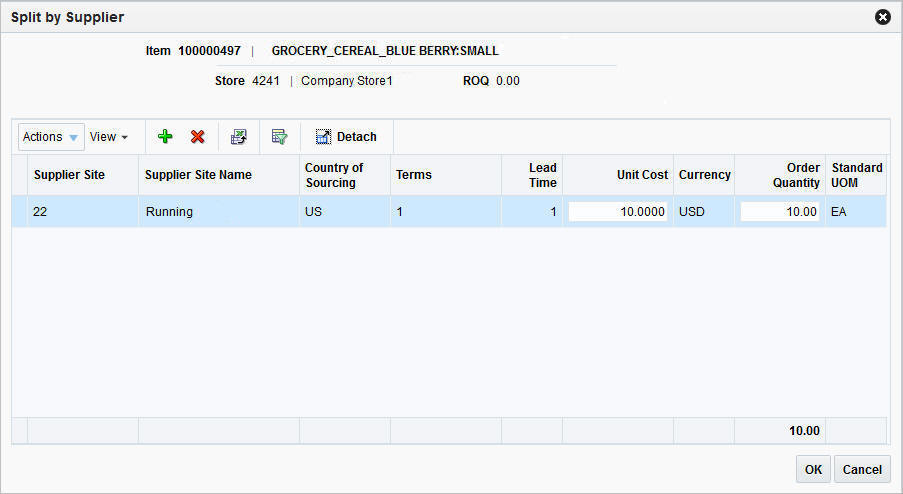
Split by Supplier |
Opens the Split Supplier window. You can split the ordered quantity by multiple suppliers in this window. For more information about how to split quantities of an item by supplier, see the Split by Supplier section. |
|
Replenishment Results |
Opens the Replenishment Results window. You can view statistics for each item/location combination that is found on a replenishment order. Replenishment results can only be viewed, if the item has the source type Replenishment. For more information about how to view replenishment results, see the Replenishment Results section. |
|
Deal Information |
Opens the Deal Search window with Vendor Type, Vendor, Location and Item No. of the selected row pre-populated in the search criteria section. For more information about how to search for a deal, see the Deals chapter, section "Managing a Deal". |
You can customize the view of the table by using the options in the View Menu and icons listed below.
Table 11-28 Worksheet Items - View Menu/Icons and Description
| View Menu/Icons | Description |
|---|---|
|
Columns |
You can manage which of the columns will be shown in the table by clicking the Show All and Manage Columns options. |
|
Detach and Detach icon |
You can view the tables in the application in a separate window by clicking Detach or by using the Detach icon |
|
Sort |
You can sort columns by the following options:
|
|
Reorder Columns |
You can reorder columns by clicking the Reorder Columns option. |
|
Query by Example and Query by Example icon |
You can filter the items by one or multiple column values by clicking the Query by Example option or by using the Query by Example icon. |
The Toolbar contains the following icons and buttons.
Table 11-29 Buyer Worksheet Toolbar - Icons/Buttons and Description
| Icons/Buttons | Description |
|---|---|
|
Help icon |
You can access the online help for a particular page by clicking the Help icon |
|
More Actions |
Click More Actions to see a list of additional actions that can be performed in the Buyer Worksheet window.
|
|
Save and Close |
Click the Save and Close to save your changes and close the window. For further save options, click the drop down option of the Save and Close button. The following options are displayed.
|
|
Cancel |
Click Cancel to reject all entries and close the window. |
To add an item to a buyer worksheet follow the steps listed below.
From the Tasks menu, select Replenishment > Buyer Worksheet. The Buyer Worksheet window appears.
Enter or select search criteria as desired to make the search more restrictive.
The search results are displayed in the Worksheet Items section.
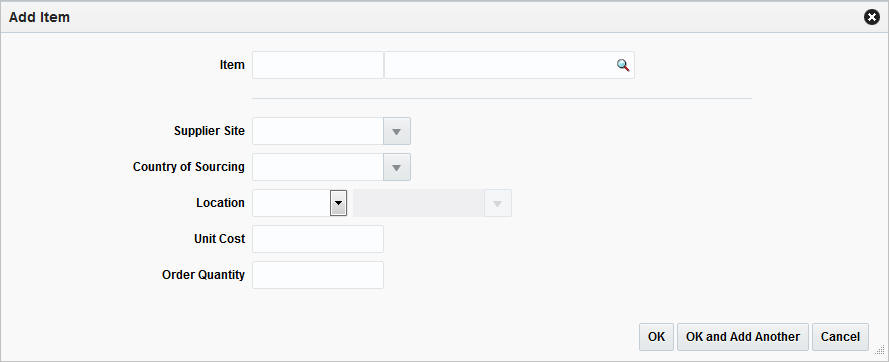
Select Actions > Add or use the Add icon ![]() . The Add Item window appears.
. The Add Item window appears.
In the Item field, enter, or search for the item.
In the Supplier Site field, enter, select or search for the corresponding supplier site.
In the Country of Sourcing field, enter, select or search for the corresponding country.
In the Location field, select the location type from the list. Then enter, select or search for the location.
In the Unit Cost field, enter the unit cost of the item.
In the Order Quantity field, enter the order quantity of the item.
Then choose one of the following options.
Click OK to save the current item and close the window.
Click OK and Add Another to add additional items.
Click Cancel to reject all entries and close the window.
To create a worksheet order from a buyer worksheet follow the steps below.
From the Tasks menu, select Replenishment > Buyer Worksheet. The Buyer Worksheet window appears.
Enter or select search criteria as desired to make the search more restrictive.
The search results are displayed in the Worksheet Items section.
Select the items which should be included on the order.
Then select Actions > Create Worksheet Order or select the Create Worksheet Order in the drop down action button in the table. The Order Search window appears with the following search criteria populated.
Order Type
Not Before and Not After Date, populated with the current system date
Origin, populated with Buyer Worksheet
Click Search. The search results are shown in the Results section.
In the Order column, click the order number link, or mark a record and select Actions > Edit, or use the Edit icon ![]() . The Order window appears.
. The Order window appears.
The order status is Worksheet. The items previously selected are attached to the order with the defined unit cost and ordered quantity. Edit the order, as necessary.
Then choose one of the following options.
Click Save to save the current order.
Click Save and Close to save the current order and close the window.
Click Cancel to reject all entries and close the window.
To create a submitted/approved order from a buyer worksheet follow the steps below.
|
Note: The Create Order button is labeled either Create Submitted Order or Create Approved Order, depending on your user privileges. |
From the Tasks menu, select Replenishment > Buyer Worksheet. The Buyer Worksheet window appears.
Enter or select search criteria as desired to make the search more restrictive.
The search results are displayed in the Worksheet Items section.
Select the items which should be included on the order.
Then select Actions > Create Submitted/Approved Order or use the Create Submitted/Approved Order button. The Order Search window appears with the following search criteria populated.
Order Type
Not Before and Not After Date, populated with the current system date
Origin, populated with Buyer Worksheet
Click Search. The search results are shown in the Results section.
In the Order column, click the order number link, or mark a record and select Actions > Edit, or use the Edit icon. The Order window appears.
The order status is Submitted/Approved. The items previously selected are attached to the order with the defined unit cost and ordered quantity. Edit the PO as necessary.
Then choose one of the following options.
Click Save to save the current order.
Click Save and Close to save the current order and close the window.
Click Cancel to reject all entries and close the window.
To add items of a buyer worksheet to an existing order, follow the steps below.
From the Tasks menu, select Replenishment > Buyer Worksheet. The Buyer Worksheet window appears.
Enter or select search criteria as desired to make the search more restrictive.
The search results are displayed in the Worksheet Items section.
Select the items which should be included on the order.
Then select Actions > Add to Order. The Add to Order window appears.
Use the Query by Example icon ![]() to search for the order number.
to search for the order number.
Select the order to which you wish to add the item.
Then, choose one of the following options.
Click OK to add the selected items to the order.
Click Cancel to close the window.
To split items of a buyer worksheet by supplier follow the steps below.
From the Tasks menu, select Replenishment > Buyer Worksheet. The Buyer Worksheet window appears.
Enter or select search criteria as desired to make the search more restrictive.
The search results are displayed in the Worksheet Items section.
Select the item you want to split by supplier.
Then select Actions > Split by Supplier. The Split by Supplier window appears.
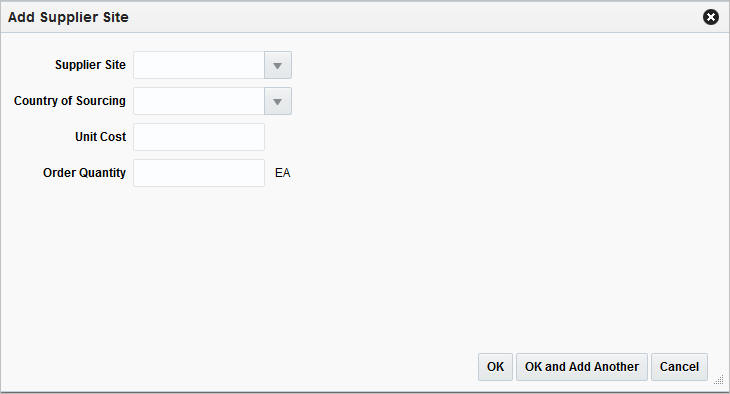
Then add a new supplier by selecting Actions > Add or by using the Add icon ![]() . The Add Supplier Site window appears.
. The Add Supplier Site window appears.
In the Supplier Site field, enter, select or search for the supplier site.
In the County of Sourcing field, enter, select or search for the corresponding country.
In the Unit Cost field, enter the unit cost for the item.
In the Order Quantity field, enter the ordered quantity of the item.
Then choose one of the following options.
Click OK to add the supplier site to the table and close the window.
Click OK and Add Another to add additional supplier sites.
Click Cancel to reject all entries and close the window.
In the Split by Supplier window, edit the Order Quantity and Unit Cost columns as necessary.
Then, choose one of the following options.
Click OK to split the order quantity as defined and close the window.
Click Cancel to reject all entries and close the window.
The Replenishment Results window allows you to review all the data related to an item/location replenishment after the replenishment batches are run.
The Replenishment Results window allows you to view and edit replenishment parameters and quantities for an item on a purchase order. You can change the replenishment method of an item on the purchase order and then recalculate the order quantities of the item based on the change. You can also override existing quantities and manually enter an order quantity for the item.
|
Note: The Replenishment Results function is only available from the Buyer Worksheet window, when the selected source type is Replenishment. |
You can access the Replenishment Results window in three different ways:
From the Task menu, select Orders > Manage Order, search for desired PO. Open the Order window. Then select Details > More Actions > Replenishment Results.
From the Task menu, select Orders > Manage Order, search for desired PO. Open the Order window. Then select Details > in the Items table Actions > Replenishment Results.
From the Task menu, select Replenishment > Buyer Worksheet > in the Worksheet Items table, select Actions > Replenishment Results.
The Replenishment Results window contains the following sections:
In the Results for Order table you can view items/location combinations on the order for which replenishment results exists. The information shown in the remaining sections depends on the record you selected in the Results for table.
The table displays the following columns by default:
Item
Item Description
Location
Location Type
Location Name
Replenishment Date
Cross Dock Warehouse Name
Allocation
Order Quantity
Order Cost
Total Cost
Country of Sourcing
Pre scaled CostPrescaled Quantity
Use the Actions Menu and icons to apply actions to the table. You can perform the actions listed below.
You can customize the view of the table. Use the View Menu and icons to customize the view as listed below.
Table 11-31 Results for Order Table - View Menu/Icons and Description
| View Menu/Icons | Description |
|---|---|
|
Columns |
You can manage which of the columns will be shown in the table by clicking the Show All and Manage Columns options. |
|
Detach and Detach icon |
You can view the tables in the application in a separate window by clicking Detach or by using the Detach icon |
|
Sort |
You can sort columns by the following options:
|
|
Reorder Columns |
You can reorder columns by clicking the Reorder Columns option. |
|
Query by Example and Query by Example icon |
You can filter the items by one or multiple column values by clicking the Query by Example option or by using the Query by Example icon. |
This section contains information about the replenishment method.
The right hand corner of this section displays the Method field, select a method from the list for the section to expand. For more information about the available methods, see the Replenishment Methods section.
The fields displayed in the Method section are based on the selected method.
This section contains information about the order process defined for the item. The section displays the following fields.
Table 11-32 Ordering Time - Fields and Description
| Fields | Description |
|---|---|
|
Ready at Supplier Site |
Contains the supplier lead time, the number of lead days the supplier needs. |
|
From Pickup to Receiving |
Contains the number of days it takes for the item to reach the receiving location, either store or warehouse. |
|
From Warehouse to Receiving |
Contains the number of days it takes for the item to reach the store. |
|
Next Order Lead Time |
Contains the calculated lead time for the next review cycle used in the replenishment calculations. Contains the number of days it takes to place the next order. |
|
Order Lead Time Date |
Contains the number of days, when the next order is placed. |
|
Review |
Contains the information on how often the order is reviewed. |
|
Next Review in |
Contains the number of days when the next review of the order takes place. |
This section contains information about the order of the selected item.
In the right hand corner of the section the standard unit of measure of the selected item as well as the pack size information is displayed.
To view the pack size information hover over the View Pack Sizes.
The hover window displays the inner, case, cases per pallet and store order multiple information.
The Results section further displays the fields shown in the table below.
Table 11-33 Results - Fields and Description
| Fields | Description |
|---|---|
|
Order Point |
Determines at what point an order needs to be placed for an item/location. Contains the minimum number of units you want on hand for the item. When the net available inventory falls below the order point, the item is replenished. |
|
Order Up to Point |
Determines the level to which inventory needs to be ordered – often the maximum quantity for the item/location. Contains the maximum number of units you want on hand for the item. |
|
Recommended Order Quantities: Contains the original recommended order quantity before any recalculations were performed on the quantity. |
|
|
Original Raw |
Contains the raw recommended order quantity (ROQ) calculated by the system before any pack size rounding, proration and so on was performed on the quantity. |
|
Simple Pack Original Raw |
Contains the original recommended order quantity (ROQ) for the item's simple pack before any recalculations were performed on the quantity. |
|
Simple Pack Raw |
Contains the raw recommended order quantity (ROQ) for the item's simple pack calculated by the system before any pack size rounding, proration, and so on was performed on the quantity. |
|
Prescaled |
Contains the recommended order quantity (ROQ) for the item/location before order scaling processing was performed on the quantity and after pack size rounding, proration, and so on was performed. |
|
Order |
Contains the actual recommended order quantity (ROQ) for the item/location after all pack size rounding, proration and scaling logic is performed on the order quantity |
|
Sourced to Contract |
Contains the recommended order quantity (ROQ) for the item/location that was to be sourced using contracts. |
|
Contract |
Displays the contract number, if applicable. |
|
Generated Forecast Result: This section is only displayed for items with a forecast. The fields in this section depend on the selected replenishment method. |
|
|
Minimum Supply |
Contains the forecasted amount over the minimum time supply days. Used for the time supply replenishment methods. |
|
Time Supply Horizon |
Contains the forecasted amount over the time supply horizon. Used for the time supply replenishment methods. |
|
Maximum Supply |
Contains the forecasted amount over the maximum time supply days. Used for the time supply replenishment methods. |
|
Next Order Lead Time |
Contains the Next review cycles lead time forecast. This value is used in the dynamic order quantity calculations. |
|
Current Order Lead Time |
Contains the forecasted amount over the order lead time. Used for the dynamic replenishment methods. |
|
Review Time |
Contains the forecasted amount over the review time. Used for the dynamic replenishment methods. |
|
Days Added to Forecast |
Contains the number of days added to the next or current order lead time during the replenishment calculation due to a location being closed for delivery. |
|
Safety Stock |
Contains the quantity of the calculated safety stock for the item/location. |
|
Lost Sales |
Contains the quantity of the calculated lost sales for the item/location. |
|
Inventory Selling Days |
Contains the quantity of the calculated lost sales for the item/location. |
This section contains inventory information.
This section displays the following quantities of the selected item:
On Hand
Contains the current stock on hand position of the item at the location.
Pack on Hand
Contains the current stock on hand position of the item at the location as a component of a pack.
This field is only available, if the location is a warehouse.
This section contains the quantity of incoming items for the selected item/location combination.
Table 11-34 Inbound - Fields and Description
| Fields | Description |
|---|---|
|
In Transit |
Displays the number of items in transit to the current location. |
|
Pack in Transit |
Contains the quantity of the item that is currently in transit to the location as a component of a pack. This field is only displayed when the location is a warehouse. |
|
Transfer Expected |
Contains the quantity of the item expected for transfers to the location. |
|
Pack Transfer Expected |
Contains the quantity of the item expected for transfers to the location as a component of a pack. This field is only displayed when the location is a warehouse. |
|
Inbound Allocations |
Contains the quantity of the item on allocations to the location. |
|
On Order |
Contains the current on-order position of the item at the location |
This section contains the quantity of outgoing items for the selected item/location combination.
Table 11-35 Outbound - Fields and Description
| Fields | Description |
|---|---|
|
Return to Vendor |
Contains the quantity of the item waiting to be returned to the vendor from the location. |
|
Outbound Allocations |
Contains the quantity of the item on allocations out of the location. |
|
Transfer Out Reserved Quantity |
Contains the quantity of the item reserved for transfers from the location. |
|
Pack Transfer Out Reserved Expected |
Contains the quantity of the item reserved for transfers from the location as a component of a pack. |
This section displays the quantity of the item that cannot be sold. This includes items that failed quality control and demonstration stock.
This section is displayed, if the due order processing is set for the item/supplier combination. The section contains the following fields and checkbox:
Location Due checkbox
Select the Location Due checkbox to indicate if the item/location is due.
Estimated Stock Out
Contains the estimated stock out (ESO) quantity for the item/location.
Accepted Stock Out
Contains the accepted stock out (ASO) quantity for the item/location.
The Toolbar contains the following icons and buttons.
Table 11-36 Replenishment Results Toolbar - Icons/Buttons and Description
| Icons/Buttons | Description |
|---|---|
|
Help icon |
You can access the online help for a particular page by clicking the Help icon |
|
Expand and Collapse icons |
You can expand all the sections and collapse all the sections in the window by clicking the Expand and Collapse icons |
|
More Actions |
Click More Actions to see a list of additional actions that can be performed in the Replenishment Results window.
|
|
Save |
Click Save to save your entries. |
|
Save and Close |
Click Save and Close to save your entries and close the window. |
|
Cancel |
Click Cancel to reject all entries and close the window. |
To recalculate an order, follow the steps below.
In the Replenishment Results window, select More Actions > Recalculate > Orders. The Recalculate Order window appears.
Select, if you want to recalculate the Order Quantity or the Replenishment Attributes.
If you select Order Quantity, enter the corresponding quantity in the Order Quantity field.
If you select Replenishment Attributes, the Order Quantity field is disabled.
Then choose one of the following options.
Click OK to recalculate the order and close the window.
Click Cancel to reject all entries and close the window.
You can add, maintain and delete priority groups in RMS. The priority group, description and priority are displayed by default.
The Priority Groups window contains the following sections:
The Priority Groups table displays the priority group, and group description as well as the priority by default.
Use the Actions menu, buttons and icons to apply actions to the table. You can perform the actions listed below.
Table 11-37 Priority Groups Table - Actions Menu/Icons/Buttons and Description
| Actions Menu/Icons/Buttons | Description |
|---|---|
|
Add and Add icon |
You can add priority groups by selecting Actions > Add or by using the Add icon For more information about how to add priority groups, see the Adding a Priority Group section. |
|
Edit and Edit icon |
You can edit priority groups by selecting Actions > Edit or by using the Edit icon For more information about how to edit priority groups, see the Editing a Priority Group section. |
|
Delete and Delete icon |
Delete priority groups.
|
|
Export to Excel and Export to Excel icon |
You can export the records in the table to a Microsoft Excel spreadsheet by selecting Actions > Export to Excel or by using the Export to Excel icon |
|
Locations and Locations button |
Opens the Priority Group Locations window. For more information about how to maintain priority group locations, see the Priority Group Locations section. |
|
Translate and Translate icon |
Opens the Translate window. For more information about how to maintain translations, see the Application Administration chapter, section "Online Data Translation". |
You can customize the view of the table. Use the View menu and icons to customize the view as listed below.
Table 11-38 Priority Groups Table - View Menu/Icons and Description
| View Menu/Icons | Description |
|---|---|
|
Columns |
You can manage which of the columns will be shown in the table by clicking the Show All and Manage Columns options. |
|
Detach and Detach icon |
You can view the tables in the application in a separate window by clicking Detach or by using the Detach icon |
|
Sort |
You can sort columns by the following options:
|
|
Reorder Columns |
You can reorder columns by clicking the Reorder Columns option. |
|
Query by Example and Query by Example icon |
You can filter the items by one or multiple column values by clicking the Query by Example option or by using the Query by Example icon |
The Toolbar contains the following icons and buttons.
Table 11-39 Priority Groups Toolbar - Icons/Buttons and Description
| Icons/Buttons | Description |
|---|---|
|
Help icon |
You can access the online help for a particular page by clicking the Help icon |
|
Save |
Click Save to save your changes. |
|
Save and Close |
Click Save and Close to save your changes and close the window. |
|
Cancel |
Click Cancel to reject all entries and close the window. |
To add a priority group, follow the steps below.
From the Tasks menu, select Replenishment > Priority Groups. The Priority Group window appears.
Select Actions > Add or use the Add icon ![]() . The Add Priority Group window appears.
. The Add Priority Group window appears.
In the Description field, enter the desired description of the group.
In the Priority field, enter the desired priority level.
Then choose one of the following options.
Click OK to add the new priority group to the table.
Click OK and Add Another to add additional groups.
Click Cancel to reject all entries and close the window.
To edit a priority group, follow the steps below.
From the Tasks menu, select Replenishment > Priority Groups. The Priority Group window appears.
Select Actions > Edit or use the Edit icon ![]() . The Edit Priority Group window appears.
. The Edit Priority Group window appears.
In the Description field, edit the description of the group, if necessary.
In the Priority field, edit the priority level, if necessary.
Then choose one of the following options.
Click OK to save your changes and close the window.
Click Cancel to reject all entries and close the window.
You can add and delete priority group locations in this window. The title of the table displays the priority group ID and description.
The Priority Groups window contains the following sections:
The Priority Group Locations table displays the priority location, name and type.
Use the Actions menu and icons to apply actions to the table. You can perform the actions listed below.
Table 11-40 Priority Group Locations Table - Actions Menu/Icons and Description
| Actions Menu/Icons | Description |
|---|---|
|
Add and Add icon |
You can add priority group location by selecting Actions > Add or by using the Add icon For more information about how to add priority groups, see the Adding a Priority Group Location section. |
|
Delete and Delete icon |
You can delete priority group locations by selecting Actions > Delete or by using the Delete icon
|
|
Export to Excel and Export to Excel icon |
You can export the records in the table to a Microsoft Excel spreadsheet by selecting Actions > Export to Excel or by using the Export to Excel icon |
You can customize the view of the table. Use the View menu and icons to customize the view as listed below.
Table 11-41 Priority Group Locations Table - View Menu/Icons and Description
| View Menu/Icons | Description |
|---|---|
|
Columns |
You can manage which of the columns will be shown in the table by clicking the Show All and Manage Columns options. |
|
Detach and Detach icon |
You can view the tables in the application in a separate window by clicking Detach or by using the Detach icon |
|
Sort |
You can sort columns by the following options:
|
|
Reorder Columns |
You can reorder columns by clicking the Reorder Columns option. |
|
Query by Example and Query by Example icon |
You can filter the items by one or multiple column values by clicking the Query by Example option or by using the Query by Example icon. |
The Toolbar contains the following icons and buttons.
Table 11-42 Priority Group Locations Toolbar - Icons/Buttons and Description
| Icons/Buttons | Description |
|---|---|
|
Help icon |
You can access the online help for a particular page by clicking the Help icon |
|
Save |
Click Save to save your changes. |
|
Save and Close |
Click Save and Close to save your changes and close the window. |
|
Cancel |
Click Cancel to reject all entries and close the window. |
To add a priority group location, follow the steps below.
From the Tasks menu, select Replenishment > Priority Groups. The Priority Groups window appears.
Then select Actions > Locations or use the Locations button. The Priority Group Locations window appears.
In the table, select Actions > Add or use the Add icon ![]() . The Add Locations window appears.
. The Add Locations window appears.
In the Location Type field, select the desired location type from the list.
The Location field is enabled. In the Location field, enter, select or search for the desired location ID.
Then choose one of the following options.
Click OK to add the new location and close the window.
Click OK and Add Another to add additional locations.
Click Cancel to reject all entries and close the window.