| Oracle® Retail Merchandising System User Guide 16.0 E65443-01 |
|

 Previous |
 Next |
This chapter describes the support for the Franchise business model wherein a business partner (franchisee) leverages the retailer's brand (or products) in return for a margin or fee. Franchise Stores can be defined in RMS and managed by grouping them by franchise customer. The store creation process allows setup of both stockholding franchise stores, whose inventory is managed by RMS and non-stockholding franchise stores, for which inventory is not managed. Specific pricing structures, credit checks, and deal pass-through options that are required for franchise business transactions can also be managed. Requests for stock from franchise stores are accepted through Franchise Orders and can be fulfilled through stores, warehouses or vendors linked to the retailer. Returns from Franchise stores are similarly managed through the Franchise Returns process. Window details and specific navigation to achieve these functions is elaborated in the following sections of this chapter.
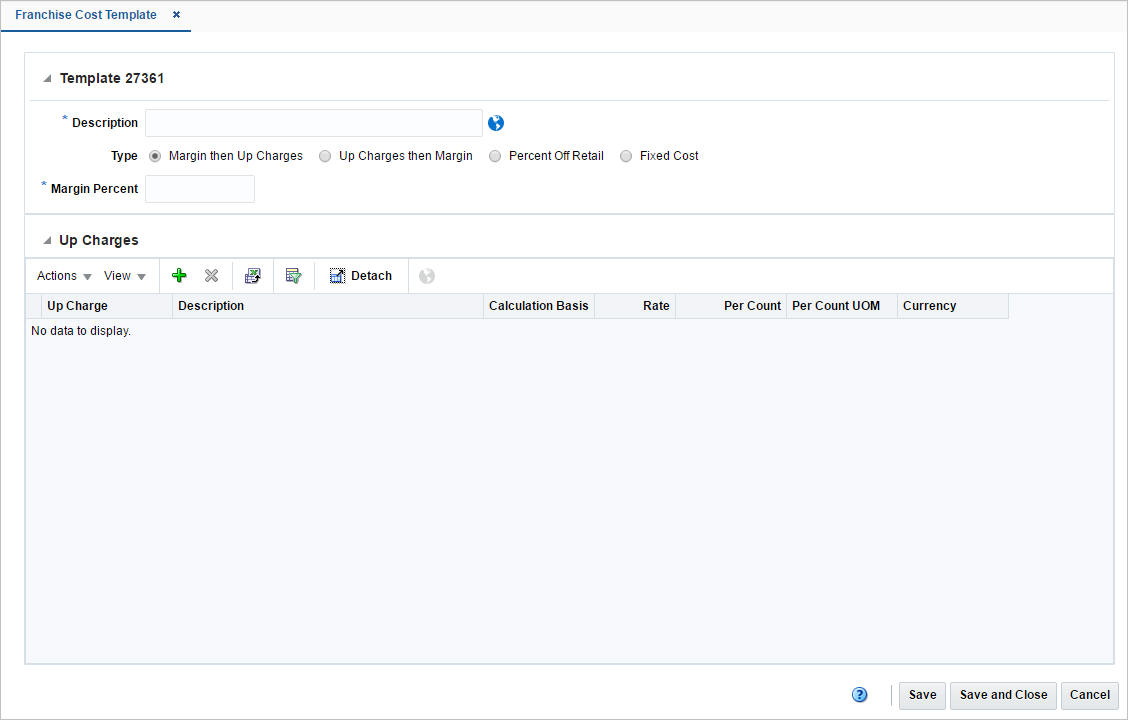
The Franchise Cost Template is used to apply the same pricing concept to multiple item/franchisee location combinations. Each template defines the method by which costing for the Franchisee will be calculated. The Franchise Cost Templates window allows you to view, edit, or create cost templates used to determine customer costs for franchise.templates used to determine customer cost for franchise.
The following template types are available:
Margin then Up Charges
Up Charges then Margin
Percent off Retail
Fixed Cost
The Franchise Cost Templates window contains the following sections.
This section is only available if you select Margin then Up Charges or Up Charges then Margin as the calculating method.
The Template section contains the template ID that is that is automatically generated. Depending on the calculation type selected, the section contains the following fields. The system defaults to the Margin then to the Up Charges type.
Table 10-1 Template - Fields and Description
| Fields | Description |
|---|---|
|
Description |
Enter a description. This field is a required field. |
|
Translate icon |
You can create a translation by using the Translate icon |
|
Type |
Select the method by which the costing will be calculated. The following template types are available:
|
|
Margin Percent |
Only available if you select one of the following template types:
Enter the margin in percent. |
|
Percent Off Retail |
Only available if you select the template type Percent Off Retail. Enter the percent off retail used to calculate the customer cost for an item. This field is a required field. |
|
Fixed Cost |
Only available if you select the template type Fixed Cost. Enter the fixed cost. This field is a required field. |
|
Final Cost checkbox |
Only available if you select the template type Fixed Cost. You can define the final customer cost for an item. Select the Final Cost check box. The Final Cost option signifies if this is the final cost for the item/franchise location or deal pass through will have to be applied on the cost to derive the final customer cost for the item/franchise location. |
The Up Charges section contains the list of up charges associated with the template. This section is only available when the template type is either Margin then Up Charges or Up Charges then Margin. You can add new up-charges or delete existing up-charges from the template in this section.
Use the Actions Menu and icons to apply actions to the table. You can perform the actions listed below.
Table 10-2 Up Charges - Actions Menu/Icons and Description
| Actions Menu/Icons | Description |
|---|---|
|
Add and Add icon |
You can add up charges to the template by selecting Actions > Add or by using the Add icon For more information about how to add up charges to the template, see the Adding Up Charges to a Franchise Cost Template section. |
|
Delete and Delete icon |
You can delete up charges from the template:
|
|
Export to Excel and Export to Excel icon |
You can export the records in the table to a Microsoft Excel spreadsheet by selecting Actions > Export to Excel or by using the Export to Excel icon |
|
Translate and Translate icon |
You can create a translation by selecting Actions > Translate or by using the Translate icon |
You can customize the view of the table by using the options in the View Menu.
Table 10-3 Up Charges - View Menu/Icons and Description
| View Menu/Icons | Description |
|---|---|
|
Columns |
You can manage which of the columns will be shown in the table by clicking the Show All and Manage Columns options. |
|
Detach and Detach icon |
You can view the tables in the application in a separate window by clicking Detach or by using the Detach icon |
|
Sort |
You can sort columns by the following options:
|
|
Reorder Columns |
You can reorder columns by clicking the Reorder Columns option. |
|
Query by Example and Query by Example icon |
You can filter the items by one or multiple column values by clicking the Query by Example option or by using the Query by Example icon |
The toolbar contains the following icons and buttons.
Table 10-4 Franchise Cost Toolbar - Icons/Buttons and Description
| Icons/Buttons | Description |
|---|---|
|
Help icon |
You can access the online help for a particular page by clicking the Help icon |
|
Delete icon |
You can delete a franchise cost template:
|
|
Save |
Click Save to save the entered records. |
|
Save and Close |
Click Save and Close to save the entered records and close the window. |
|
Cancel |
Click Cancel to reject all entries and close the window. |
|
Done |
Only available in View mode. Click Done to close the window. |
To create a franchise cost template, follow the steps below.
From the Tasks menu, select Inventory > Franchise Orders > Create Cost Template. The Franchise Cost Template window appears.
Enter the required fields.
For more information about the possible template options, see the Template section.
Then choose one of the following options.
Click Save to save the franchise cost template.
Click Save and Close to save the template and close the window.
Click Cancel to reject all entries and close the window.
To add up charges to a franchise cost template, follow the steps below.
In the Up Charges section, select Actions > Add, or use the Add icon ![]() . The Add Up Charges window appears.
. The Add Up Charges window appears.
In the Up Charges field, enter, select or search for the up charge you want to add to the template. This field is a required field.
Then choose one of the following options.
Click OK to add the up charge and close the window.
Click OK and Add Another to add additional up charges
Click Cancel to reject all entries and close the window.
The Manage Cost Template option opens the Franchise Cost Template Search window. In this window you can perform the following actions.
Search for cost templates by various search criteria
View search results
View cost template information
Create cost templates
Edit cost templates
Export Query Results to Excel
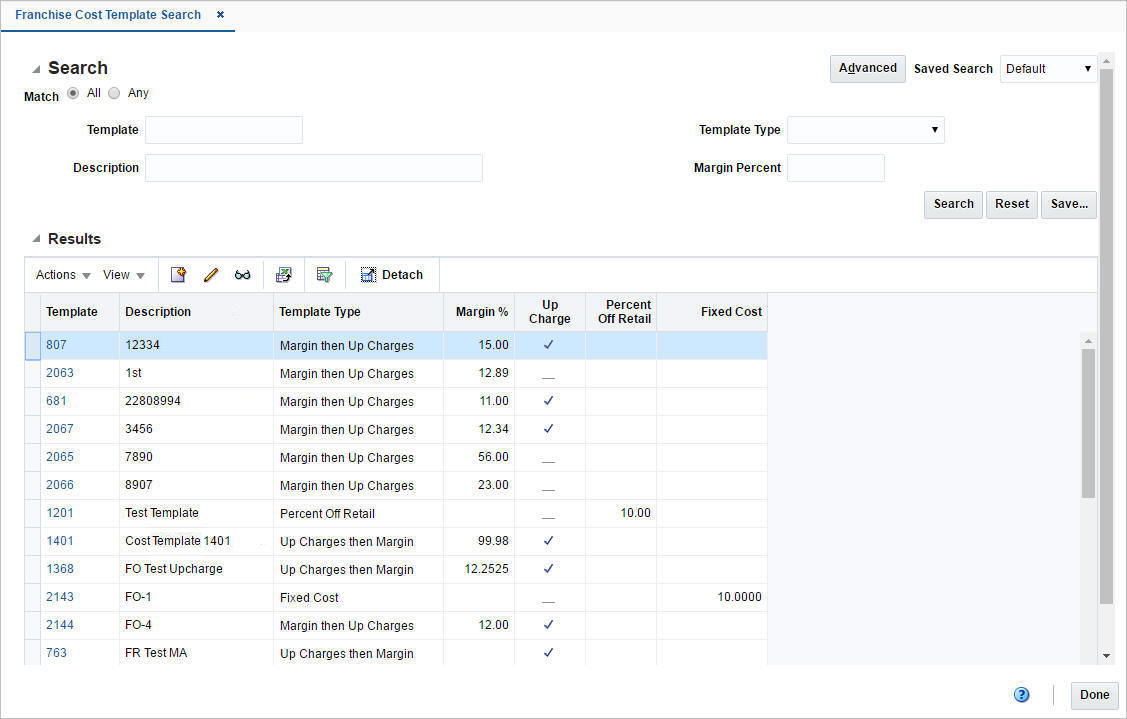
You can access the Franchise Cost Template Search window from the Task menu, select Inventory > Franchise Orders > Manage Cost Template. The Franchise Cost Template Search window appears.
The Franchise Cost Template Search window contains the following sections.
Search
For more information about how to search for cost templates, see the Searching for a Franchise Cost Template section.
To search for a franchise cost template:
From the Task menu, select Inventory > Franchise Orders > Manage Cost Templates. The Franchise Cost Template Search window appears.
You can search for a franchise cost template using basic or advanced search criteria, depending on the requirement. The basic mode is the default search mode.
Click Advanced to access the search section in advanced mode.
Click Basic to return to basic mode.
To search for a franchise cost template using basic search criteria:
Enter, select or search for one or all of the following basic search criteria.
Table 10-5 Franchise Cost Template Search - Basic Search Criteria and Description
| Fields | Description |
|---|---|
|
Match option |
Check radio button All or Any. All - only franchise cost templates matching all entered search criteria are shown. Any - franchise cost templates matching any of the entered search criteria are shown. |
|
Template |
Enter the template ID. |
|
Description |
Enter the template description. |
|
Template Type |
Select the template type from the list. |
|
Margin Percent |
Enter the margin in percent. |
Click the Saved Search list to select one of the saved search criteria. Selecting a saved search populates the search section with the saved search criteria. If the run automatically function is enabled for the search, the search is executed immediately.
You can also personalize your saved searches by selecting Personalize. The Personalize Saved Searches window appears.
For more information about the Personalized Saved Search, see the Common User Interface Controls chapter, section "Personalize Saved Search".
Click Search. The franchise cost templates that match the search criteria are displayed in the Results section.
Click Reset to clear the search section and results.
Click Save As... to save the current search criteria. The Create Saved Search window appears.
For more information about how to save your search criteria, see the Common User Interface Controls chapter, section "Create Saved Search".
Click Done to close the window.
To search for a franchise cost template using advanced search criteria:
To search using advanced search criteria, enter or select one or all of the advanced search criteria.
To narrow down the search, use the list next to the search fields. For example, determine if the entered value should equal or not equal the search result.
Click the Saved Search list to select one of the saved search criteria. Selecting a saved search populates the search section with the saved search criteria. If the run automatically function is enabled for the search, the search is executed immediately.
You can also personalize your saved searches by selecting Personalize. The Personalize Saved Searches window appears.
For more information about the Personalized Saved Search, see the Common User Interface Controls chapter, section "Personalize Saved Search".
Click Search. The franchise cost templates that match the search criteria are displayed in the Results section.
Click Reset to clear the search section and results.
Click Save As... to save the current search criteria. The Create Saved Search window appears.
For more information about how to save your search criteria, see the Common User Interface Controls chapter, section "Create Saved Search".
Click Add Fields to add more fields for the advanced search. To remove the field from the search, click the x right next to the field.
Click Reorder to change the order of the available search fields. The Reorder Search Fields window appears.
Select the desired search field and use the up and down arrows to rearrange the order of the fields.
Click OK to confirm the new order of the fields and close the window.
Click Cancel to reject any changes and close the window.
Click Done to close the window.
The Results section lists the retrieved cost templates.
Use the Actions Menu and icons to apply actions to the Results table. You can perform the actions listed below.
Table 10-6 Results - Actions Menu/Icons and Description
| Actions Menu/Icons | Description |
|---|---|
|
Create and Create icon |
Select Actions > Create, or use the Create icon For more details about how to create a franchise cost template, see the Creating a Franchise Cost Template section. |
|
Edit and Edit icon |
Select Actions > Edit, use the Edit icon For more information about how to edit a franchise cost template, see the Editing a Franchise Cost Template section. |
|
View and View icon |
To view a franchise cost template:
|
|
Export to Excel and Export to Excel icon |
You can export the records in the table to a Microsoft Excel spreadsheet by selecting Actions > Export to Excel or by using the Export to Excel icon |
You can customize the view of the table by using the options in the View Menu.
Table 10-7 Results - View Menu/Icons and Description
| View Menu/Icons | Description |
|---|---|
|
Columns |
You can manage which of the columns will be shown in the table by clicking the Show All and Manage Columns options. |
|
Detach and Detach icon |
You can view the tables in the application in a separate window by clicking Detach or by using the Detach icon |
|
Sort |
You can sort columns by the following options:
|
|
Reorder Columns |
You can reorder columns by clicking the Reorder Columns option. |
|
Query by Example and Query by Example icon |
You can filter the items by one or multiple column values by clicking the Query by Example option or by using the Query by Example icon |
The toolbar contains the following icons and buttons.
To edit a franchise cost template, follow the steps below.
From the Tasks menu, select Inventory > Franchise Orders > Manage Cost Template. The Franchise Cost Template Search window appears.
Enter or select search criteria to make the search more restrictive.
Click Search. The franchise cost templates that match the search criteria are displayed in the Results section.
Select a franchise cost template in the Results section.
Then select Actions > Edit, or use the Edit icon ![]() , or click on the template link. The Franchise Cost Template window appears.
, or click on the template link. The Franchise Cost Template window appears.
Edit the information in the individual sections.
For more information about the available sections of the Franchise Cost Template window, see the Franchise Cost Template Window section.
Then choose one of the following options.
Click Save to save your changes.
Click Save and Close to save your changes and close the window.
Click Cancel to reject all entries and close the window.
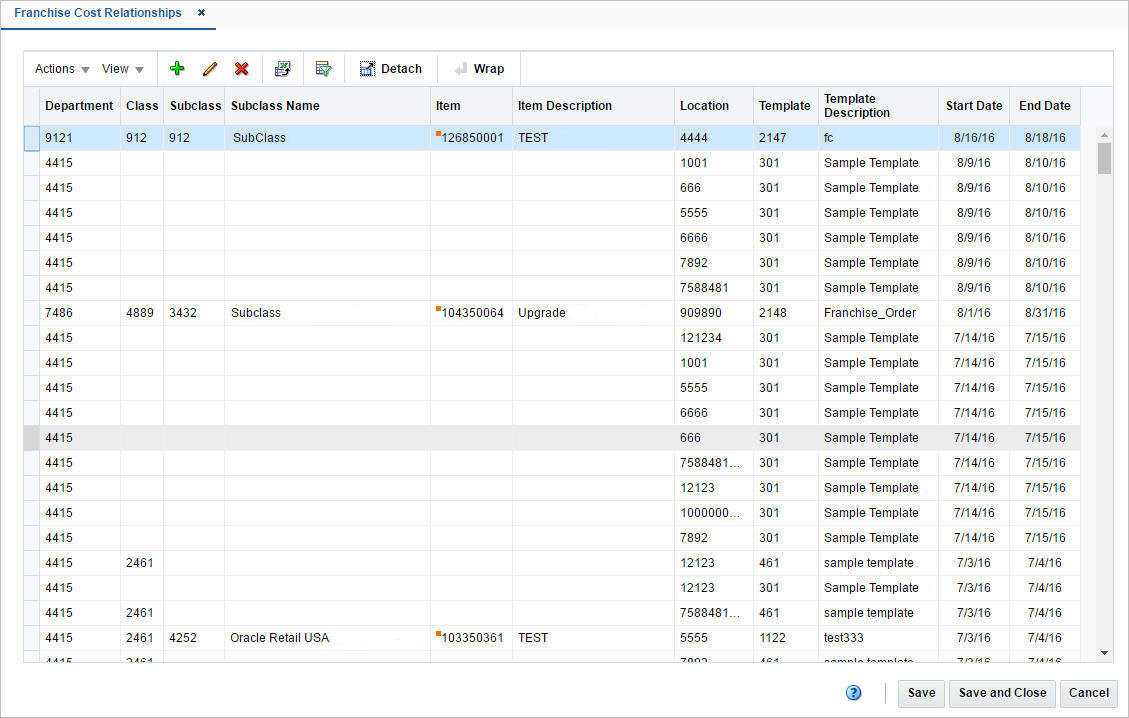
The Franchise Cost Relationships window allows you to maintain the franchise cost relationships between departments/items and locations.
The Franchise Cost Relationships window contains the following sections.
The table contains the cost templates associated with a department/class/subclass or item for one or more franchise stores. You can only associate an item with a template if the selected template uses the fixed cost pricing method. These relationships, which also include start and end dates, are used to calculate the pricing cost for franchise stores.
Use the Actions Menu and icons to apply actions to the table. You can perform the actions listed below.
Table 10-9 Table - Actions Menu/Icons and Description
| Actions Menu/Icons | Description |
|---|---|
|
Add and Add icon |
You can add new relationships by selecting Actions > Add or by using the Add icon For more information about how to add new relationships, see the Adding Cost Relationships section. |
|
Edit and Edit icon |
Select Actions > Edit or use the Edit icon For more information about how to edit a relationship, see the Editing Cost Relationships section. |
|
Delete and Delete icon |
You can delete relationships from the table:
|
|
Export to Excel and Export to Excel icon |
You can export the records in the table to a Microsoft Excel spreadsheet by selecting Actions > Export to Excel or by using the Export to Excel icon |
|
Wrap icon |
You can wrap the values in the table column by first clicking the column on which you would like the text to wrap and then using the Wrap icon |
You can customize the view of the table by using the options in the View Menu.
Table 10-10 Items - View Menu/Icons and Description
| View Menu/Icons | Description |
|---|---|
|
Columns |
You can manage which of the columns will be shown in the table by clicking the Show All and Manage Columns options. |
|
Detach and Detach icon |
You can view the tables in the application in a separate window by clicking Detach or by using the Detach icon |
|
Sort |
You can sort columns by the following options:
|
|
Reorder Columns |
You can reorder columns by clicking the Reorder Columns option. |
|
Query by Example and Query by Example icon |
You can filter the items by one or multiple column values by clicking the Query by Example option or by using the Query by Example icon |
The toolbar contains the following icons and buttons.
Table 10-11 Franchise Cost Relationships Toolbar - Icons/Buttons and Description
| Icons/Buttons | Description |
|---|---|
|
Help icon |
You can access the online help for a particular page by clicking the Help icon |
|
Save |
Click Save to save the entered records. |
|
Save and Close |
Click Save and Close to save the entered records and close the window. |
|
Cancel |
Click Cancel to reject all entries and close the window. |
To add cost relationships, follow the steps below.
From the Tasks menu, select Inventory > Franchise Orders > Cost Relationships. The Franchise Cost Relationships window appears.
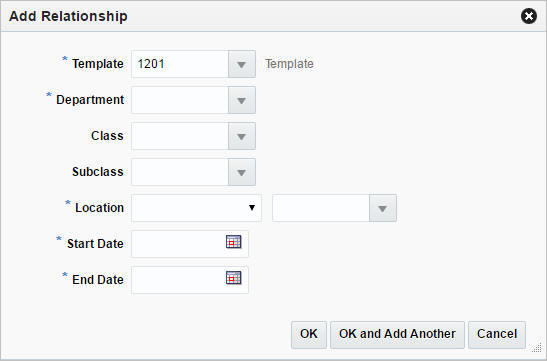
In the table, select Actions > Add, or use the Add icon ![]() . The Add Relationships window appears.
. The Add Relationships window appears.
In the Template field, enter, select or search for the template. This field is a required field.
In the Department field, enter, select or search for the department you want to associate the template with. This field is a required field.
In the Class field, enter, select or search for the class.
In the Subclass field, enter, select or search for the subclass.
In the Location field, select the location type from the list. Then enter, select or search for the location. This field is a required field.
In the Start Date field, enter the start date or use the Calendar icon to select a date. This field is a required field.
In the End Date field, enter the end date or use the Calendar icon to select a date. This field is a required field.
Then choose one of the following options.
Click OK to add the cost relationship to the table and close the window.
Click OK and Add Another to add additional cost relationships.
Click Cancel to reject all entries and close the window.
To edit cost relationships, follow the steps below.
From the Tasks menu, select Inventory > Franchise Orders > Cost Relationships. The Franchise Cost Relationships window appears.
Select a record in the table.
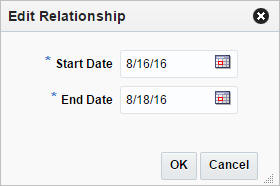
Then select Actions > Edit, or use the Edit icon ![]() . The Edit Relationships window appears. The start and end date of the selected template are displayed.
. The Edit Relationships window appears. The start and end date of the selected template are displayed.
In the Start Date field, edit the start date, if necessary.
In the End Date field, edit the end date, if necessary.
Then choose one of the following options.
Click OK to save your changes and close the window.
Click Cancel to reject all entries and close the window.
Franchise orders, which are considered sales orders between the retailer and the franchise customer, need to be raised in order to fulfill demand from a franchise customer. A franchise order contains the item requisition to be sourced from a certain location (supplier, company warehouse or store) and fulfilled at one or more franchise stores by one or more required need dates. A franchise order also contains the price at which the items on the order will be sold to the franchise customer.
This Franchise Orders window allows you to take orders from franchise customers and fulfill those orders from store or warehouse inventory or by orders from suppliers.
The Franchise Order window contains the following sections.
Only available if the Bill to individual Shipment Location checkbox is not selected in the Franchise Order section.
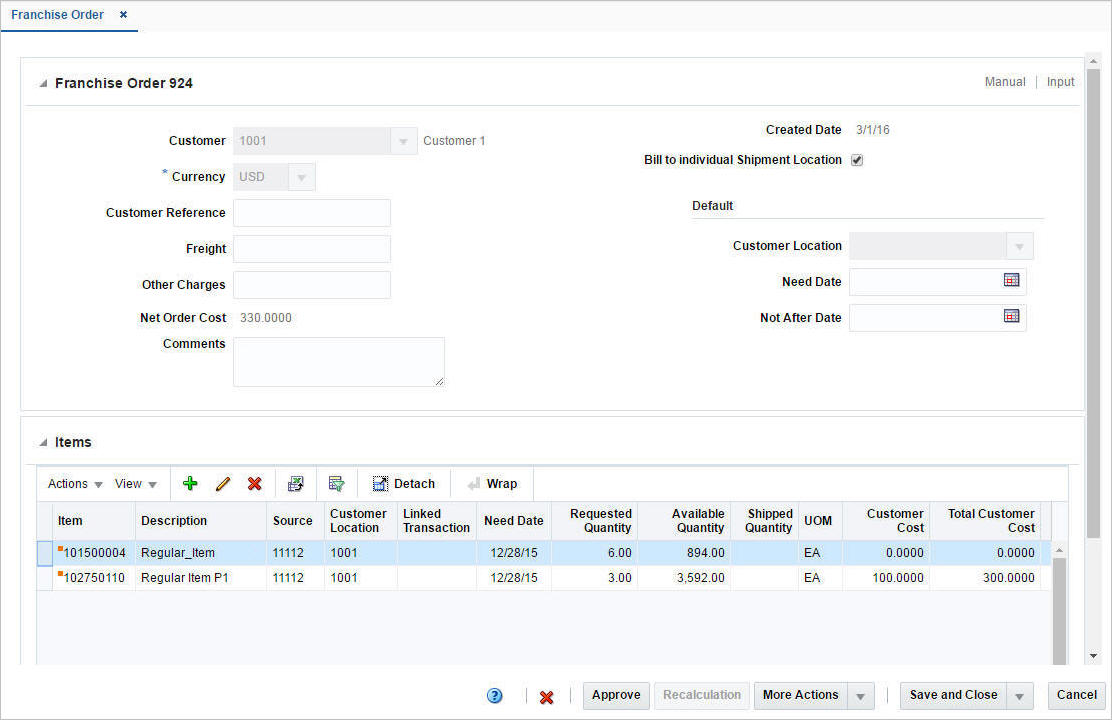
The title of the Franchise Order section contains the franchise order ID by default. Additionally, the order type and order status are displayed in the right hand corner.
The section contains the following fields.
Table 10-12 Franchise Order - Fields and Description
| Fields | Description |
|---|---|
|
Customer |
Enter, select or search for the customer. |
|
Currency |
Enter, select or search for the currency for the order. This field is a required field. |
|
Customer Reference |
Enter a customer reference. |
|
Freight |
Enter any freight charges associated to the franchise order. |
|
Other Charges |
Enter other miscellaneous charges associated to the franchise order. |
|
Net Order Cost |
Displays the net order costs. |
|
Comments |
Enter comments for the franchise order, if necessary. |
|
Created Date |
Displays the order create date. |
|
Cancel Reason |
Displays the cancel reason. This field is displayed when the Franchise Order has been cancelled at the header level. Only 40 characters of the cancel reason are displayed. |
|
Bill to individual Shipment Location checkbox |
This checkbox is selected by default. If not selected, the Bill to Address section is displayed and expanded, otherwise, the Bill to Address section is cleared, collapsed and hidden. For more information about the Bill to Address section, see the Bill to Address section. |
|
Default: |
|
|
Customer Location |
Enter, select or search for the customer location. |
|
Need Date |
Enter, select or search for the need date. |
|
Not After Date |
Enter, select or search for the date or use the Calendar icon to select a date. |
The Items section contains item information such as the item number, item description, customer location, and linked transactions like transfers or orders. The table also contains quantity and cost information.
Additionally, you can add, edit and delete items from the franchise order in this section. You can also view cost details and the stock on hand of the selected item.
Use the Actions Menu and icons to apply actions to the table. You can perform the actions listed below.
Table 10-13 Items - Actions Menu/Icons and Description
| Actions Menu/Icons | Description |
|---|---|
|
Add and Add icon |
You can add new items to the franchise order by selecting Actions > Add or by using the Add icon For more information about how to add new items to the franchise order, see the Adding Items to a Franchise Order section. |
|
Edit and Edit icon |
Select Actions > Edit or use the Edit icon For more information about how to edit an item, see the Editing Items on a Franchise Order section. |
|
Delete and Delete icon |
You can delete items from the franchise order:
|
|
Cost Details |
Opens the Cost Details window. To view the cost details of an item on the franchise order:
|
|
Stock on Hand |
Opens the Inventory by Location window. For more information about this window, see the Inventory chapter, section "Inventory by Location". |
|
Export to Excel and Export to Excel icon |
You can export the records in the table to a Microsoft Excel spreadsheet by selecting Actions > Export to Excel or by using the Export to Excel icon |
|
Wrap icon |
You can wrap the values in the table column by first clicking the column on which you would like the text to wrap and then using the Wrap icon |
You can customize the view of the table by using the options in the View Menu.
Table 10-14 Items - View Menu/Icons and Description
| View Menu/Icons | Description |
|---|---|
|
Columns |
You can manage which of the columns will be shown in the table by clicking the Show All and Manage Columns options. |
|
Detach and Detach icon |
You can view the tables in the application in a separate window by clicking Detach or by using the Detach icon |
|
Sort |
You can sort columns by the following options:
|
|
Reorder Columns |
You can reorder columns by clicking the Reorder Columns option. |
|
Query by Example and Query by Example icon |
You can filter the items by one or multiple column values by clicking the Query by Example option or by using the Query by Example icon |
The Linked Transaction column displays the order, transfer or allocation associated to the Franchise Order. For associated transfers and orders this column contains an order number or transfer number link. This link takes you to the Order or Transfer window.
For line items with multiple associated transfers, this field displays 'Multiple', instead of showing the transfer number link.
Click 'Multiple', and the Franchise Order Transfers window opens. The window displays all the transfers associated to the line item. The table shows the following columns:
Transfer
Created Date
Delivery Date
Status
Click Done to close the window.
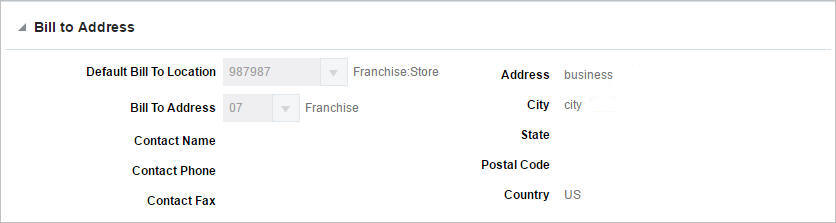
The Bill to Address section is only available if the Bill to individual Shipment Location checkbox is not selected in the Franchise Order section. In this section you can specify a bill to address for the franchise order.
In the Default Bill Location field, enter, select or search for the location.
In the Bill to Address field, enter, select or search for an address.
The toolbar contains the following icons and buttons.
Table 10-15 Franchise Order Toolbar - Icons/Buttons and Description
| Icons/Buttons | Description |
|---|---|
|
Help icon |
You can access the online help for a particular page by clicking the Help icon |
|
Delete icon |
You can delete the selected franchise order:
|
|
Status |
If you click the Status button, the status of the franchise order changes to the status specified on the button. Possible franchise order statuses are:
|
|
Recalculation |
Opens the Order Recalculation window. This window allows you to scale, or undo scaling of the supplier sourced franchise orders. For more information about how to recalculate franchise orders, see the Recalculating Franchise Orders section. |
|
More Actions |
Click More Actions to see a list of additional actions that can be performed in the Franchise Order window.
|
|
Save |
Click Save to save the entered records. |
|
Save and Close |
Click Save and Close to save the entered records and close the window. |
|
Save and Create Another |
Click Save and Create Another to save the entered records and add additional entries. This option is only available, if you create a new expense profile. |
|
Save and Edit Another |
Click Save and Edit Another to save the entered records and edit additional entries. This option is only available in Edit mode. |
|
Cancel |
Click Cancel to reject all entries and close the window. |
|
Done |
If you open the window in view mode, the Done button is displayed. Click Done to close the window. |
To create a franchise order, follow the steps below.
From the Tasks menu select, Inventory > Franchise Orders > Create Order. The Franchise Order window appears.
Enter the franchise order information, as required.
For more details about the available fields in this section, see the Franchise Order section.
For more information about how to add items to a franchise order, see the Adding Items to a Franchise Order section.
Then choose one of the following options.
Click Save to save the current franchise order.
Click Save and Close to save the current franchise order and close the window.
Click Save and Create Another to create additional franchise orders.
Click Cancel to reject all entries and close the window.
You can add the following item types to a franchise order:
Item or Reference Item
To add an item or a reference item, see the Adding an Item or Reference Item section.
Item as a Complex Buyer Pack Item with the Order Type of Eaches
To add a complex buyer pack item, see the Adding a Complex Buyer Pack Item section.
Item Parent or Item List
To add a parent item, see the Adding a Parent Item section.
To add an item list, see the Adding an Item List section.
To add an item or a reference item, follow the steps below.
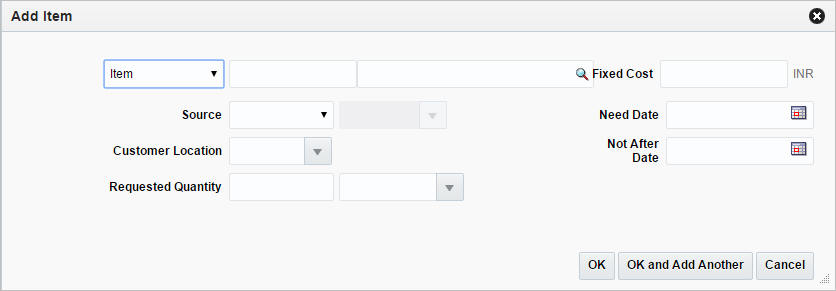
In the Items section, select Action > Add, or use the Add icon ![]() . The Add Item window appears.
. The Add Item window appears.
In the Item field, select the item type from the list. Then enter or search for the item or reference item.
In the Source field, select the source from the list. Then enter, select or search for the source.
In the Customer Location field, enter, select or search for the customer location.
In the Requested Quantity field, enter the quantity. Select the unit of measure.
In the Fixed Cost field, enter the fixed cost for the item.
|
Note: A fixed cost value overrides the customer cost computed through templates. This field is an optional field. |
In the Need Date, enter the need date or use the Calendar icon to select a date.
In the Not After Date, enter the date or use the Calendar icon to select a date.
The Supplier Pack Size field, displays the pack size of the selected supplier. This field is only displayed, if you select supplier as a source type.
Then choose one of the following options.
Click OK to add the current item to the table.
Click OK and Add Another to add additional items.
Click Cancel to reject all entries and close the window.
To add a complex buyer back item to a franchise order, follow the steps below.
In the Items section, select Action > Add, or use the Add icon ![]() . The Add Item window appears.
. The Add Item window appears.
In the Item field, select Item as the item type from the list. Then enter or search for a complex buyer pack item.
In the Source field, select the source from the list. Then enter, select or search for the source.
In the Customer Location field, enter, select or search for the customer location.
In the Requested Quantity field, enter the quantity. Select Eaches as unit of measure.
In the Fixed Cost field, enter the fixed cost for the item.
In the Need Date field, enter the need date or use the Calendar icon to select a date.
In the Not After Date field, enter the date or use the Calendar icon to select a date.
The Supplier Pack Size field, displays the pack size of the selected supplier. This field is only displayed, if you select supplier as a source type.
Click Display Items. In the Distribute Complex Buyer Pack section all the components of the complex buyer pack item are displayed.
|
Note: The table will only be populated when you have entered a requested quantity. |
In the Quantity column enter the distribution quantity as required for the component items.
Then choose one of the following options.
Click OK to add the current item to the table.
Click OK and Add Another to add additional items.
Click Cancel to reject all entries and close the window.
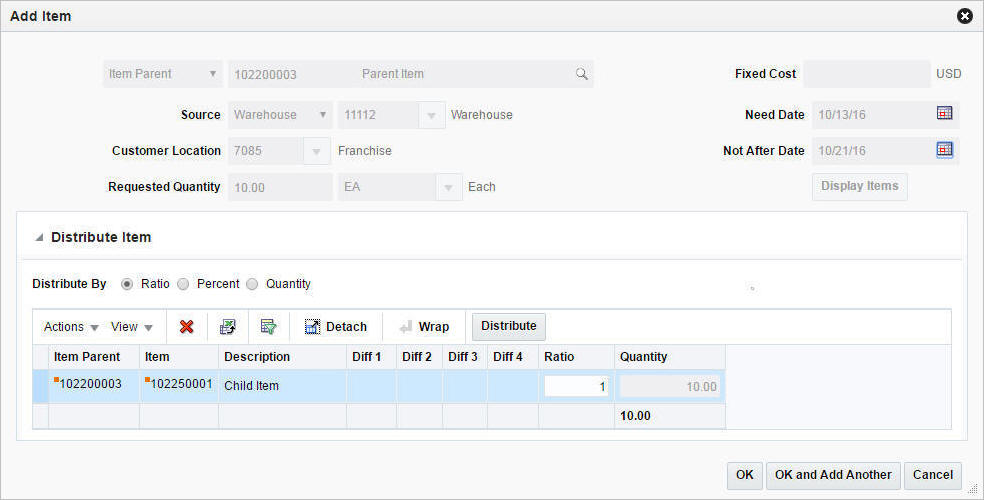
To add a parent item to a franchise order, follow the steps below.
In the Items section, select Action > Add, or use the Add icon ![]() . The Add Item window appears.
. The Add Item window appears.
In the Item field, select the Item Parent as the item type from the list. Then enter or search for the item.
In the Source field, select the source from the list. Then enter, select or search for the source.
In the Customer Location field, enter, select or search for the customer location.
In the Requested Quantity field, enter the quantity. Select Eaches as the unit of measure.
In the Need Date field, enter the need date or use the Calendar icon to select a date.
In the Not After Date field, enter the date or use the Calendar icon to select a date.
The Supplier Pack Size field, displays the pack size of the selected supplier. This field is only displayed, if you select supplier as a source type.
Click Display Items. In the Distribute Item section all the children of the selected parent item are displayed.
In the Distribute Item section, choose one of the following distribution methods.
Choose Ratio. Then enter the ratio for the individual child items in the ratio column.
Choose Percentage. Then enter the percent for the individual child items in the percentage column.
Choose Quantity. Then enter the quantity for the individual child items in the quantity column.
Click Distribute to distribute the items according to the entered ratio or percentage.
|
Note: The Distribute button is not available, if you have selected the distribution method Quantity. |
Then choose one of the following options.
Click OK to add the current item to the table.
Click OK and Add Another to add additional items.
Click Cancel to reject all entries and close the window.
To add an item list to a franchise order, follow the steps below.
In the Items section, select Action > Add, or use the Add icon ![]() . The Add Item window appears.
. The Add Item window appears.
In the Item field, select Item List as the item type. Then enter or search for the item list.
In the Source field, select the source from the list. Then enter, select or search for the source.
In the Customer Location field, enter, select or search for the customer location.
In the Requested Quantity field, enter the quantity. Then select the unit of measure.
In the Need Date field, enter the need date or use the Calendar icon to select a date.
In the Not After Date field, enter the date or use the Calendar icon to select a date.
The Supplier Pack Size field, displays the pack size of the selected supplier. This field is only displayed, if you select supplier as a source type.
Click Display Items. In the Distribute Item section all the items of the selected item list are displayed.
In the Distribute Item section, choose one of the following distribution methods.
Choose Ratio. Then enter the ratio for the individual child items in the ratio column.
Choose Percentage. Then enter the percent for the individual child items in the percentage column.
Choose Quantity. Then enter the quantity for the individual child items in the quantity column.
Click Distribute to distribute the items according to the entered ratio or percentage.
|
Note: The Distribute button is not available, if you have selected the distribution method Quantity. |
If one of the items in the item list is a complex buyer pack item, the Distribute Complex Buyer Pack section is displayed. This section displays all the components of the complex buyer pack item.
|
Note: The table will only be populated when you have entered a requested quantity. |
In the Quantity column enter the distribution quantity as required for the component items.
Then choose one of the following options.
Click OK to add the current item to the table.
Click OK and Add Another to add additional items.
Click Cancel to reject all entries and close the window.
To edit a franchise order, follow the steps below.
From the Tasks menu, select Inventory > Franchise Orders > Manage Orders. The Franchise Order Search window appears.
Enter or select search criteria as desired to make the search more restrictive.
Click Search. The franchise orders that match the search criteria are displayed in the Results section.
In the Order No. column, click the order number link, or mark a record and select Actions > Edit, or use the Edit icon ![]() . The Franchise Order window appears.
. The Franchise Order window appears.
Edit the fields as necessary.
For more details about the available fields in this section, see the Franchise Order section.
|
Note: You can add new items to a franchise order in Input status. For more information about adding items to a franchise order, see the Adding Items to a Franchise Order section.For existing items on an order, you can modify the Fixed Cost, Requested Quantity, Need Date, and Not After Date when the order is in Input status. In Approved status, you can modify the Requested Quantity and Fixed Cost. You can modify the Requested Quantity in the In Progress status. For more information about how to edit items on a franchise order, see the Editing Items on a Franchise Order section. |
Then choose one of the following options.
Click Save to save your changes to the franchise order.
Click Save and Close to save your changes to the franchise order and close the window.
Click Save and Edit Another to edit additional franchise orders.
Click Cancel to reject all entries and close the window.
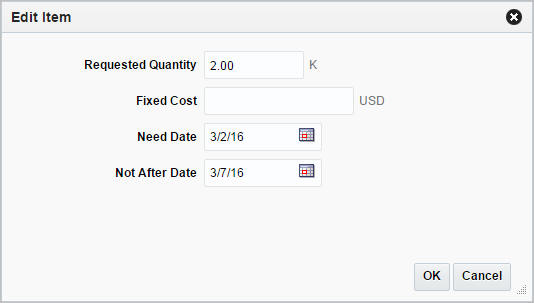
To edit items on a franchise order, follow the steps listed below.
Select a record in the Items section.
Then select Action > Edit, or use the Edit icon ![]() . The Edit Item window appears.
. The Edit Item window appears.
Edit the following fields, as necessary.
Requested Quantity
Fixed Cost
Need Date
Not After Date
In the Cancel Reason field, select reason for cancelling the item, if necessary.
|
Note: This field is only available when the order status is Approved or In Progress, and the entered requested quantity is less than the original requested quantity, otherwise this field is not available. |
Then choose one of the following options.
Click OK to add your changes to the table.
Click Cancel to reject all entries and close the window.
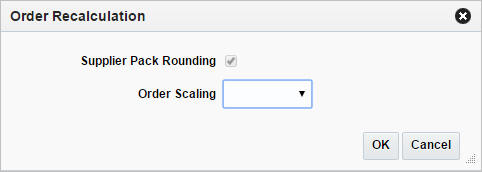
To change the scaling or to undo the scaling of the franchise order, follow the steps below.
In the Franchise Order window, select a record in the Items section.
|
Note: The Recalculation function is only available if the selected order line item is sourced from a supplier. |
Then select the Recalculation button. The Order Recalculation window appears.
The Supplier Pack Rounding checkbox is selected by default.
In the Order Scaling field, select one of the following options.
Select Scale Order to scale the order.
Select Undo Order Scaling to revert any scaling done for this order.
Then choose one of the following options.
Click OK to save your changes.
Click Cancel to reject all entries and close the window.
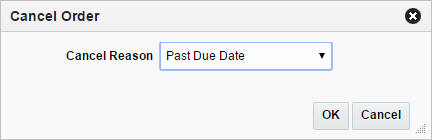
To cancel a franchise order, follow the steps below.
From the Tasks menu, select Inventory > Franchise Orders > Manage Orders. The Franchise Order Search window appears.
Restrict your search to franchise orders with the status Approved, In-Progress, or Pending Credit.
Click Search. The franchise orders that match the search criteria are displayed in the Results section.
In the Order No. column, click the order number link, or mark a record and select Actions > Edit, or use the Edit icon ![]() . The Franchise Order window appears.
. The Franchise Order window appears.
Select Cancel Order. The Cancel Order window appears.
In the Cancel Reason field, select a reason for cancelling the order from the list.
Then choose one of the following options.
Click OK to cancel the franchise order and close the window.
|
Note: For franchise orders in Approved status the entire ordered quantity is canceled. For orders in In Progress status only the outstanding quantity is cancelled. |
Click Cancel to reject your entries and close the window.
The Manage Franchise Orders option opens the Franchise Order Search window. In this window you can perform the following actions.
Search for franchise orders by using various search criteria
View the search results
View franchise order information
Create a franchise order
Edit franchise order information
You can access the Franchise Order Search window from the Task menu, by selecting Inventory > Franchise Orders > Manage Franchise Orders. The Franchise Order Search window appears.
The Franchise Order Search window contains the following sections.
Search
For more information about how to search for franchise orders, see the Searching for a Franchise Order section.
To search for a franchise order:
From the Task menu, select Inventory > Franchise Orders > Manage Orders. The Franchise Order Search window appears.
You can search for a franchise order using basic or advanced search criteria, depending on the requirement. The basic mode is the default search mode.
Click Advanced to access the search section in advanced mode.
Click Basic to return to basic mode.
To search for a franchise order using basic search criteria:
Enter, select or search for one or all of the following basic search criteria.
Table 10-16 Franchise Order Search - Basic Search Criteria and Description
| Fields | Description |
|---|---|
|
Match option |
Check radio button All or Any. All - only franchise orders matching all entered search criteria are shown. Any - franchise orders matching any of the entered search criteria are shown. |
|
Status |
Select the status of the franchise order from the list. |
|
Customer |
Enter, select or search for the customer. |
|
Supplier Site |
Enter, select or search for the supplier site. |
|
Supplier Site Name |
Enter the supplier site name. |
|
Item |
Enter, select or search for the item of the order. |
|
Item Description |
Enter the item description. |
|
Store |
Enter, select or search for the store. |
|
Warehouse |
Enter, select or search for the warehouse. |
|
Customer Location |
Enter, select or search for the customer location. |
Click the Saved Search list to select one of the saved search criteria. Selecting a saved search populates the search section with the saved search criteria. If the run automatically function is enabled for the search, the search is executed immediately.
You can also personalize your saved searches by selecting Personalize. The Personalize Saved Searches window appears.
For more information about the Personalized Saved Search, see the Common User Interface Controls chapter, section "Personalize Saved Search".
Click Search. The franchise orders that match the search criteria are displayed in the Results section.
Click Reset to clear the search section and results.
Click Save As... to save the current search criteria. The Create Saved Search window appears.
For more information about how to save your search criteria, see the Common User Interface Controls chapter, section "Create Saved Search".
Click Done to close the window.
To search for a franchise order using advanced search criteria:
To search using advanced search criteria, enter or select one or all of the advanced search criteria.
To narrow down the search, use the list next to the search fields. For example, determine if the entered value should equal or not equal the search result.
Click the Saved Search list to select one of the saved search criteria. Selecting a saved search populates the search section with the saved search criteria. If the run automatically function is enabled for the search, the search is executed immediately.
You can also personalize your saved searches by selecting Personalize. The Personalize Saved Searches window appears.
For more information about the Personalized Saved Search, see the Common User Interface Controls chapter, section "Personalize Saved Search".
Click Search. The franchise orders that match the search criteria are displayed in the Results section.
Click Reset to clear the search section and results.
Click Save As... to save the current search criteria. The Create Saved Search window appears.
For more information about how to save your search criteria, see the Common User Interface Controls chapter, section "Create Saved Search".
Click Add Fields to add more fields for the advanced search. To remove the field from the search, click the x right next to the field.
Click Reorder to change the order of the available search fields. The Reorder Search Fields window appears.
Select the desired search field and use the up and down arrows to rearrange the order of the fields.
Click OK to confirm the new order of the fields and close the window.
Click Cancel to reject any changes and close the window.
Click Done to close the window.
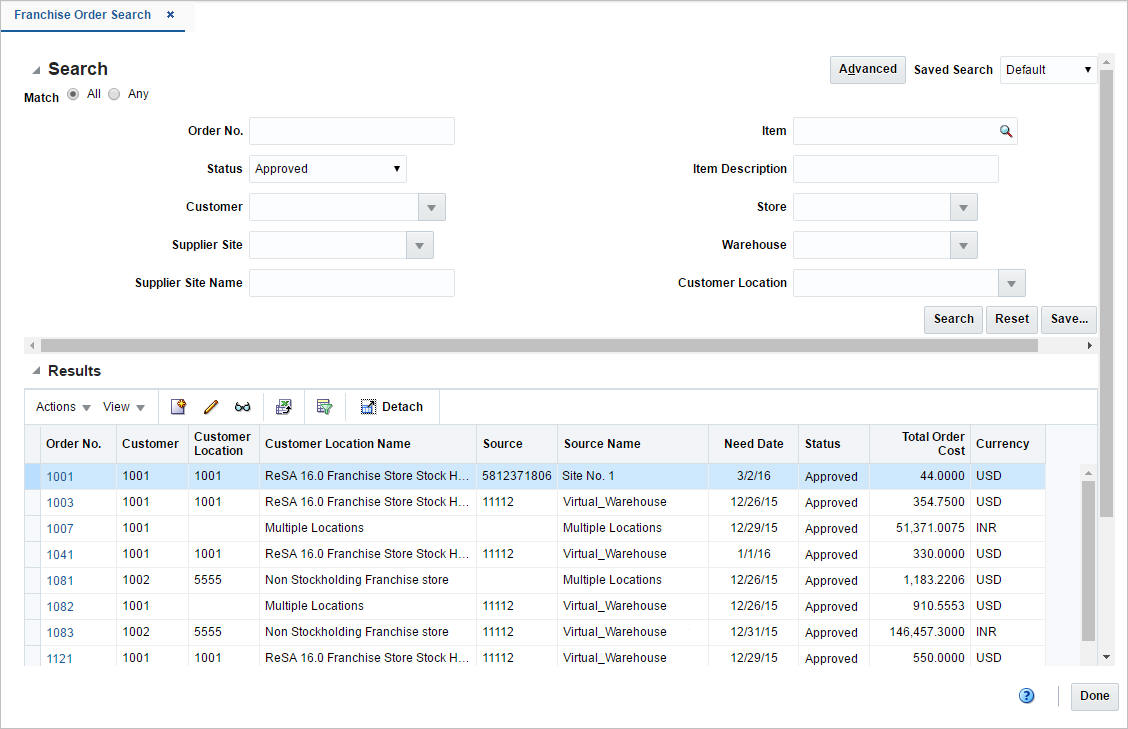
The Results section lists the retrieved franchise orders. The following columns are displayed by default.
Order Number
Customer
Customer Location
Customer Location Name
Source
Source Name
Need Date
Status
Total Order Cost
Currency
Use the Actions Menu and icons to apply actions to the Results table. You can perform the actions listed below.
Table 10-17 Results - Actions Menu/Icons and Description
| Actions Menu/Icons | Description |
|---|---|
|
Create and Create icon |
Select Actions > Create, or use the Create icon For more details about how to create a franchise order, see the Creating a Franchise Order section. |
|
Edit and Edit icon |
Select Actions > Edit, use the Edit icon For more information about how to edit a franchise order, see the Editing a Franchise Order section. |
|
View and View icon |
To view a franchise order:
|
|
Export to Excel and Export to Excel icon |
You can export the records in the table to a Microsoft Excel spreadsheet by selecting Actions > Export to Excel or by using the Export to Excel icon |
You can customize the view of the table by using the options in the View Menu.
Table 10-18 Results - View Menu/Icons and Description
| View Menu/Icons | Description |
|---|---|
|
Columns |
You can manage which of the columns will be shown in the table by clicking the Show All and Manage Columns options. |
|
Detach and Detach icon |
You can view the tables in the application in a separate window by clicking Detach or by using the Detach icon |
|
Sort |
You can sort columns by the following options:
|
|
Reorder Columns |
You can reorder columns by clicking the Reorder Columns option. |
|
Query by Example and Query by Example icon |
You can filter the items by one or multiple column values by clicking the Query by Example option or by using the Query by Example icon |
The toolbar contains the following icons and buttons.
Franchise Returns are defined as any return of stock from a franchise store to a company warehouse or store. The return can contain items from multiple orders, but must be from a single franchise store.
Two different types of returns can be created: either a return that brings inventory back to a company store or warehouse, or a return for which the returning store will destroy the goods on site. The latter may be used in the case where the goods are damaged beyond repair or perishable, such that the retailer does not want to take them back into inventory, but has agreed to refund the franchise customer.
The Franchise Returns window allows you to create and modify franchise returns. The window contains the following sections.
RMA (Return Merchandise Authorization)
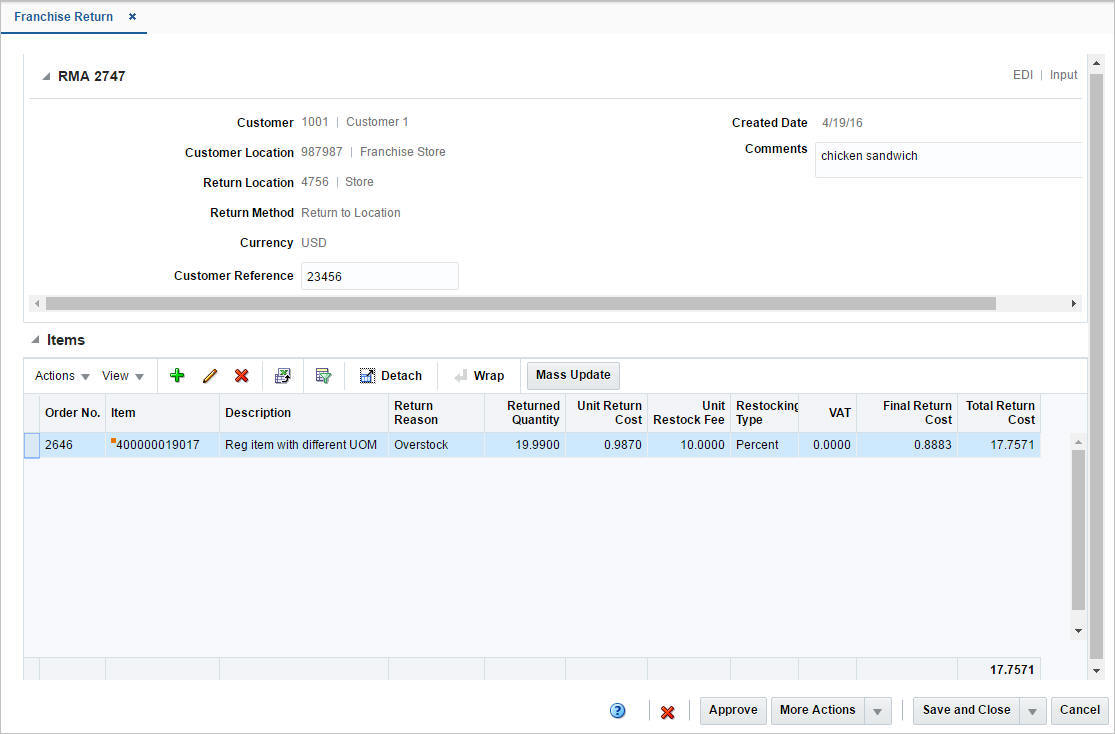
The RMA (Return Merchandise Authorization) section includes the RMA number in the title. The return type and status is displayed in the right hand corner of the section.
The RMA section contains the following fields.
Table 10-20 RMA - Fields and Description
| Fields | Description |
|---|---|
|
Customer |
Displays the customer. |
|
Customer Location |
Displays the customer location. |
|
Return Location |
Displays the return location. |
|
Return Method |
Displays the return method. |
|
Currency |
Displays the currency of the franchise return. |
|
Customer Reference |
Displays the customer reference, if available. This field remains enabled until the franchise return is approved. |
|
Create Date |
Displays the date the franchise return has been created. |
|
Cancel Reason |
Displays the cancel reason. This field is only displayed when the franchise return has been cancelled at the header level. Only 40 characters of the cancel reason are displayed. |
|
Transfer |
Displays the transfer number linked to the return. The transfer number link takes you to the Transfer window in view mode. This field is only available when the franchise return has been approved. |
|
Comments |
Displays comments for the franchise return. |
In the Items section you can maintain the items for the franchise return.
Use the Actions Menu and icons to apply actions to the table. You can perform the actions listed below.
Table 10-21 Items - Actions Menu/Icons and Description
| Actions Menu/Icons | Description |
|---|---|
|
Add and Add icon |
You can add new items to the franchise return by selecting Actions > Add or by using the Add icon This option is only available for franchise returns in Input status. For more information about how to add items to a franchise return, see the Adding Items to a Franchise Return section. |
|
Edit and Edit icon |
Select Actions > Edit or use the Edit icon For more information about how to edit an item on a franchise return, see the Editing Items on a Franchise Return section. |
|
Delete and Delete icon |
You can delete an item from the franchise return:
This option is only available for franchise returns in Input status. |
|
Export to Excel and Export to Excel icon |
You can export the records in the table to a Microsoft Excel spreadsheet by selecting Actions > Export to Excel or by using the Export to Excel icon |
|
Wrap icon |
You can wrap the values in the table column by first clicking the column on which you would like the text to wrap and then using the Wrap icon |
|
Mass Update and Mass Update button |
Opens the Mass Update window. This option is only available for franchise returns in Input status. For more information about the mass update option, see the Applying a Mass Update for Items on a Franchise Return section. |
|
Stock on Hand |
Opens the Inventory by Location window. For more information about this window, see the Inventory chapter, section "Inventory by Location". |
The toolbar contains the following icons and buttons.
Table 10-22 Franchise Return Toolbar - Icons/Buttons and Description
| Icons/Buttons | Description |
|---|---|
|
Help icon |
You can access the online help for a particular page by clicking the Help icon |
|
Delete icon |
You can delete a franchise return:
|
|
Status |
If you click the Status button, the status of the franchise return changes to the status specified on the button. Possible franchise return statuses are:
|
|
More Actions |
Click More Actions to see a list of additional actions that can be performed in the Franchise Return window.
|
|
Save |
Click Save to save the entered records. |
|
Save and Close |
Click Save and Close to save the entered records and close the window. |
|
Cancel |
Click Cancel to reject all entries and close the window. |
|
Done |
If you open the window in view mode, the Done button is displayed. Click Done to close the window. |
To create a franchise return, follow the steps below.
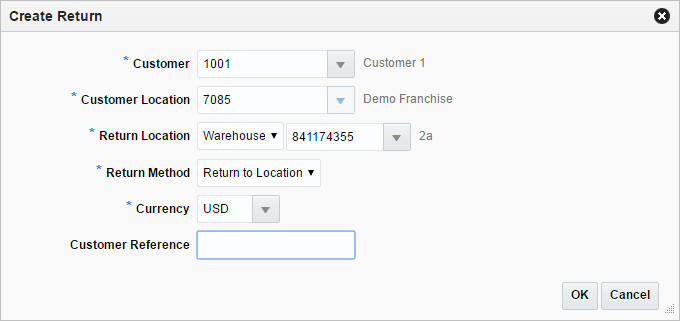
From the Tasks menu, select Inventory > Franchise Orders > Create Return. The Create Return window appears.
In the Customer field, enter, select or search for the customer. This field is a required field.
In the Customer Location field, enter select or search for the customer location. This field is a required field.
In the Return Location field, select a return location type from the list. Then enter, select or search for the return location. This field is a required field.
In the Return Method field, select if you want to return the item to the location or destroy the item on site. This field is a required field.
In the Currency field, enter, select or search for the currency of the franchise return. This field is a required field.
In the Customer Reference field, enter a customer reference, if available.
Then choose one of the following options.
Select OK to create the franchise return and close the window. The Franchise Return window appears in a new tab. The RMA section of the window contains the information you have entered.
For more information about the Franchise Return window, see the Franchise Return Window section.
Then add items to the franchise return. For more information about how to add items to the franchise return, see the Adding Items to a Franchise Return section.
|
Note: Select Cancel to reject all entries and close the window. |
To add an item to a franchise return, follow the steps below.
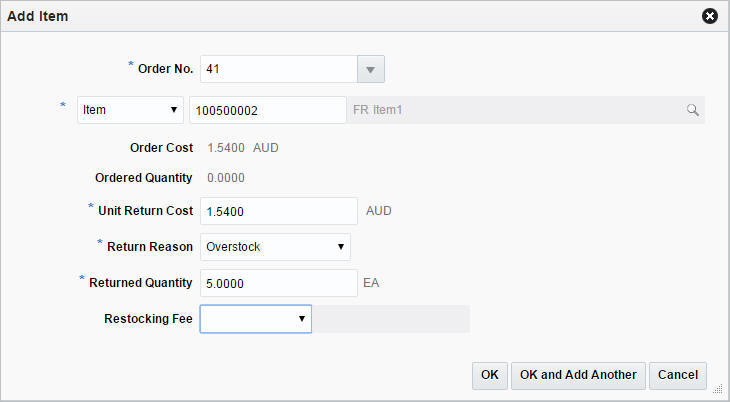
In the Items section, select Actions > Add, or use the Add icon ![]() . The Add Item window appears.
. The Add Item window appears.
In the Order No. field, enter, select or search for the franchise order number. This field is a required field.
In the Item field, select if you want to return an item or reference item. Then enter, select or search for the item. This field is a required field.
The following fields are populated, depending on the selected item.
Order Cost
If the selected item is a component of a pack item on the order, the cost is calculated based on its percentage of the pack item.
If the selected item is both a component of a pack item on the order and a regular item on the order, the regular item's cost is the cost displayed as the order cost.
Ordered Quantity
If the selected item is a component of a pack item on the order, the ordered quantity is calculated based on the pack item.
If the selected item is both a component of a pack item on the order and a regular item on the order, the ordered quantity displays the sum of the component pack item and the regular item on the order.
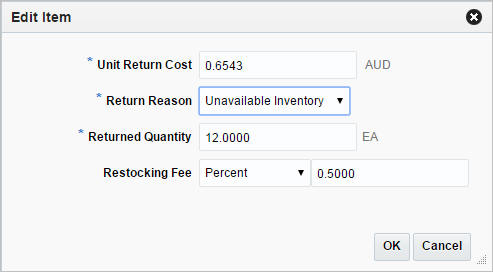
In the Unit Return Cost field, enter the unit return cost. This field is a required field.
In the Return Reason field, select a return reason from the list.
In the Returned Quantity field, enter the return quantity.
In the Restocking Fee field, select either the restocking type percent or specific amount from the list. Then enter the desired value.
Then choose one of the following options.
Click OK to add the item and close the window.
Click OK and Add Another to add additional items to the franchise return.
Click Cancel to reject all entries and close the window.
In the Franchise Order Return window, choose a saving option to save your franchise return.
To edit a franchise return, follow the steps below.
From the Tasks menu, select Inventory > Franchise Orders > Manage Returns. The Franchise Return Search window appears.
Enter or select search criteria as desired to make the search more restrictive.
Click Search. The franchise returns that match the search criteria are displayed in the Results section.
In the RMA column, click the RMA link, or mark a record and select Actions > Edit, or use the Edit icon ![]() . The Franchise Return window appears.
. The Franchise Return window appears.
In the RMA section:
Edit the Customer Reference field, or a comment to the franchise return.
|
Note: You can only edit these fields when the franchise return is still in Input status. |
In the Items section:
Add an Item
For more information about how to add an item to a franchise return, see the Adding Items to a Franchise Return section
Edit an Item
For more information about how to edit an item on a franchise return, see the Editing Items on a Franchise Return section.
Delete an Item
Apply a Mass Update for all items on the franchise return
For more information about how to apply a mass update for items on a franchise order, see the Applying a Mass Update for Items on a Franchise Return section.
|
Note: You can only add, delete or apply mass updates for items on a franchise return when the return is still in Input status. |
Then choose one of the following options.
Click Save to save your changes.
Click Save and Close to save your changes and close the window.
Click Cancel to reject all entries and close the window.
To edit an item on a franchise return, follow the steps below.
In the Items section, select Actions > Edit, or use the Edit icon ![]() . The Edit Item window appears.
. The Edit Item window appears.
Edit the following fields, as necessary.
Unit Return Cost
Return Reason
Returned Quantity
Restocking Fee
Cancel Reason
This field is only available, if the franchise return is in Approved status and the returned quantity is less than the original quantity.
Then choose one of the following options.
Click OK to add your changes to the table.
Click Cancel to reject all entries and close the window.
To apply a mass update for all items on the franchise return, follow the steps below.
|
Note: This option is only available for franchise returns in Input status. |
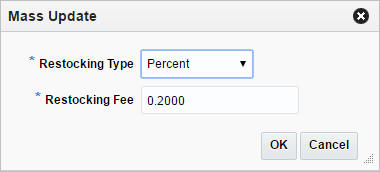
In the Items section, select Actions > Mass Update, or use the Mass Update button. The Mass Update window appears.
In the Restocking Type field, select either the restocking type percent or specific amount from the list. This field is a required field.
In the Restocking Fee field, enter the desired value.
Then choose one of the following options.
Click OK to update the restocking type and fee for all items on the franchise return.
Click Cancel to reject all entries and close the window.
To cancel a franchise order, follow the steps below.
From the Tasks menu, select Inventory > Franchise Orders > Manage Returns. The Franchise Return Search window appears.
Restrict your search to franchise returns with the status Approved and In Progress.
Click Search. The franchise returns that match the search criteria are displayed in the Results section.
In the RMA column, click the RMA number link, or mark a record and select Actions > Edit, or use the Edit icon ![]() . The Franchise Return window appears.
. The Franchise Return window appears.
Select Cancel Return. The Cancel Return window appears.
In the Cancel Reason field, select the reason for cancelling the franchise return.
Then choose one of the following options.
Click OK to cancel the franchise return.
Click Cancel to reject your entry and close the window.
The Manage Franchise Returns option opens the Franchise Return Search window. In this window you can perform the following actions.
Search for franchise returns by various search criteria
View the search results
View franchise return information
Create a franchise return
Edit franchise return information
You can access the Franchise Return Search window form the Task menu, select Inventory > Franchise Orders > Manage Franchise Returns. The Franchise Return Search window appears.
The Franchise Return Search window contains the following sections.
Search
For more information about how to search for a franchise return, see the Searching for a Franchise Return section.
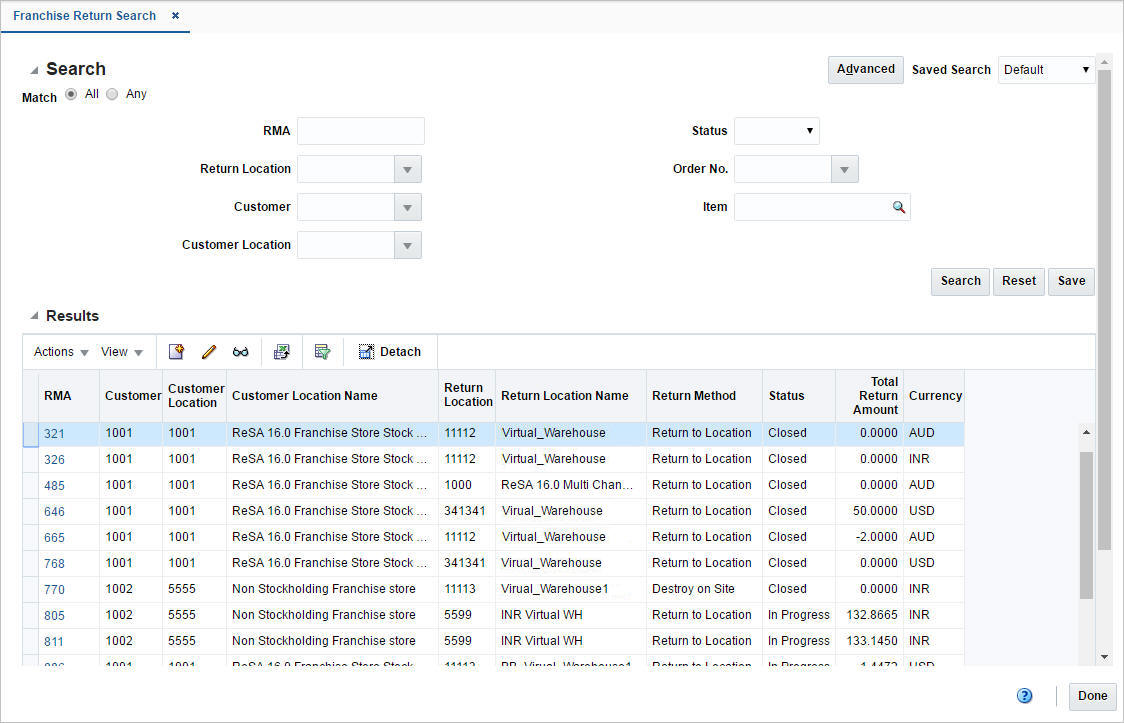
To search for a franchise return:
From the Task menu, select Inventory > Franchise Orders > Manage Returns. The Franchise Return Search window appears.
You can search for a franchise return using basic or advanced search criteria, depending on the requirement. The basic mode is the default search mode.
Click Advanced to access the search section in advanced mode.
Click Basic to return to basic mode.
To search for a franchise return using basic search criteria:
Enter, select or search for one or all of the following basic search criteria.
Table 10-23 Franchise Return Search - Basic Search Criteria and Description
| Fields | Description |
|---|---|
|
Match option |
Check radio button All or Any. All - only franchise returns matching all entered search criteria are shown. Any - franchise returns matching any of the entered search criteria are shown. |
|
RMA |
Enter the RMA. |
|
Return Location |
Enter, select or search for the return location. |
|
Customer |
Enter, select or search for the customer. |
|
Customer Location |
Enter, select or search for the customer location. |
|
Supplier Site |
Enter, select or search for the supplier site. |
|
Supplier Site Name |
Enter the supplier site name. |
|
Status |
Select the status of the franchise return from the list. |
|
Order No. |
Enter, select or search for the order number. |
|
Item |
Enter, select or search for the return item. |
Click the Saved Search list to select one of the saved search criteria. Selecting a saved search populates the search section with the saved search criteria. If the run automatically function is enabled for the search, the search is executed immediately.
You can also personalize your saved searches by selecting Personalize. The Personalize Saved Searches window appears.
For more information about the Personalized Saved Search, see the Common User Interface Controls chapter, section "Personalize Saved Search".
Click Search. The franchise returns that match the search criteria are displayed in the Results section.
Click Reset to clear the search section and results.
Click Save As... to save the current search criteria. The Create Saved Search window appears.
For more information about how to save your search criteria, see the Common User Interface Controls chapter, section "Create Saved Search".
Click Done to close the window.
To search for a franchise return using advanced search criteria:
To search using advanced search criteria, enter or select one or all of the advanced search criteria.
To narrow down the search, use the list next to the search fields. For example, determine if the entered value should equal or not equal the search result.
Click on the Saved Search list to select one of the saved search criteria. Selecting a saved search populates the search section with the saved search criteria. If the run automatically function is enabled for the search, the search is executed immediately.
You can also personalize your saved searches by selecting Personalize. The Personalize Saved Searches window appears.
For more information about the Personalized Saved Search, see the Common User Interface Controls chapter, section "Personalize Saved Search".
Click Search. The franchise returns that match the search criteria are displayed in the Results section.
Click Reset to clear the search section and results.
Click Save As... to save the current search criteria. The Create Saved Search window appears.
For more information about how to save your search criteria, see the Common User Interface Controls chapter, section "Create Saved Search".
Click Add Fields to add more fields for the advanced search. To remove the field from the search, click the x right next to the field.
Click Reorder to change the order of the available search fields. The Reorder Search Fields window appears.
Select the desired search field and use the up and down arrows to rearrange the order of the fields.
Click OK to confirm the new order of the fields and close the window.
Click Cancel to reject any changes and close the window.
Click Done to close the window.
The Results section lists the retrieved franchise returns.
Use the Actions Menu and icons to apply actions to the Results table. You can perform the actions listed below.
Table 10-24 Results - Actions Menu/Icons and Description
| Actions Menu/Icons | Description |
|---|---|
|
Create and Create icon |
Select Actions > Create, or use the Create icon For more details about how to create a franchise return, see the Creating a Franchise Return section. |
|
Edit and Edit icon |
Select Actions > Edit, use the Edit icon For more information about how to edit a franchise return, see the Editing a Franchise Return section. |
|
View and View icon |
To view a franchise return:
|
|
Export to Excel and Export to Excel icon |
You can export the records in the table to a Microsoft Excel spreadsheet by selecting Actions > Export to Excel or by using the Export to Excel icon |
You can customize the view of the table by using the options in the View Menu.
Table 10-25 Results - View Menu/Icons and Description
| View Menu/Icons | Description |
|---|---|
|
Columns |
You can manage which of the columns will be shown in the table by clicking the Show All and Manage Columns options. |
|
Detach and Detach icon |
You can view the tables in the application in a separate window by clicking Detach or by using the Detach icon |
|
Sort |
You can sort columns by the following options:
|
|
Reorder Columns |
You can reorder columns by clicking the Reorder Columns option. |
|
Query by Example and Query by Example icon |
You can filter the items by one or multiple column values by clicking the Query by Example option or by using the Query by Example icon |
The toolbar contains the following icons and buttons.