| Oracle® Retail Merchandising Foundation Cloud Service Oracle Retail Merchandising System User Guide Release 19.3.000 F83161-01 |
|

 Previous |
 Next |
| Oracle® Retail Merchandising Foundation Cloud Service Oracle Retail Merchandising System User Guide Release 19.3.000 F83161-01 |
|
Previous |
Next |
The Merchandising financial management module primarily aims to maintain an accurate stock ledger, export financial data to an external financial system, and monitor a company's performance based on key performance indices. Financial management activities include maintaining basic financial data (such as cost), formulating financial budgets, general ledger relationship maintenance, and stock ledger.
The stock ledger in Merchandising records the financial results of the merchandising processes such as buying, selling, price changes, and transfers. All of these transactions are recorded in the Merchandising stock ledger and rolled up to the subclass/location level for days, weeks, and months, depending on calendar settings. The aggregate levels in the stock ledger are used to measure inventory amounts and merchandise profitability. The stock ledger is mainly used for reporting purposes in Merchandising; however, there is some online visibility as well.
The stock ledger supports multiple currencies. All transaction-level information is stored in the local currency of the store or warehouse where the transaction occurred. As transaction-level information is rolled up to the aggregated levels in the stock ledger, records are kept in local currency and converted to primary currency. This allows corporate reporting to be performed in the primary currency of the company, while still providing visibility by location to the profitability in the local currency.
The stock ledger supports both the retail and cost methods of accounting. The cost method can use standard cost or average cost, depending on how the system is configured. The stock ledger supports both the retail (4-5-4) and the normal (Gregorian) calendar. If the retail calendar is used, data is maintained by the 4-5-4 month and the week. If the normal calendar is used, data is maintained only by the Gregorian month. Data can also be maintained daily using the retail (4-5-4) or normal (Gregorian) calendar.
Merchandising supports multiple sets of books. Clients that use multiple sets of books assign Merchandising locations to a particular set of books defined in an external financial system. Changes to the stock ledger affect the set of books with which a particular transaction is associated.
The Transaction Data page allows you to search for and view transactions on a specific date or range of dates for a specific department. Additionally you can perform the following functions:
Search for transactions by various search criteria
Search for transactions by reference trace ID
View the transactions in your finance system
Open Drill Back to Report
You can access the Transaction Data page from the Task menu:
Select Finance > Transaction Data. The Transaction Data page appears.
Select Finance > Average Cost Adjustment. In the Average Cost Adjustment page, select Tran Data. The Transaction Data page appears.
Select Finance > Receipt Adjustment by Cost. In the Receipt Adjustment by Cost page, select Transaction Data. The Transaction Data page appears.
To view data for a transaction:
From the Task menu, select Finance > Transaction Data. The Transaction Data page appears.
Select if you want to search for a transaction by:
Transaction Data Fields
Click Advanced to access the search section in advanced mode.
Click Basic to return to the basic mode.
Reference Trace ID
|
Note: In the search by transaction data fields, basic mode is the default search mode. |
To search for a transaction using basic search criteria:
Enter, select or search for one or all of the following basic search criteria.
|
Note: You must enter a transaction date to carry out the search. Additionally you must enter either the department, the item or the location to search for transaction data. |
Table 12-1 Transaction Data Search - Basic Search Criteria and Description
| Fields | Description |
|---|---|
|
Match option |
Check radio button All or Any. All - only transactions matching all entered search criteria are shown. Any - transactions matching any of the entered search criteria are shown. |
|
Transaction Date |
Enter the transaction date or use the Calendar icon to select a date. This field is a required field. |
|
Transaction Type |
Enter, select or search for the transaction type. |
|
Department |
Enter, select or search for the department. You need to enter either the department, the item or the location for the transaction search. |
|
Class |
Enter, select or search for the class. |
|
Subclass |
Enter, select or search for the subclass. |
|
Item |
Enter, or search for the item. You need to enter either the item, the location or the department for the transaction search. |
|
Location |
Enter, select or search for the location. You need to enter either the location, the department or the item for the transaction search. |
Click Search. The transactions that match the search criteria are displayed in the Results section.
Click Reset to clear the search section and results.
Click Done to close the page.
To search for a transaction using advanced search criteria:
To search using advanced search criteria, enter or select one or all of the advanced search criteria.
To narrow down the search, use the list next to the search fields. For example, determine if the entered value should equal or not equal the search result.
Click Search. The transactions that match the search criteria are displayed in the Results section.
Click Reset to clear the search section and results.
Click Add Fields to add more fields for the advanced search. To remove the field from the search, click the x right next to the field.
Click Done to close the page.
To search for a transaction by reference trace ID, follow the steps below.
In the Reference Trace ID field, enter, select or search for the reference trace ID.
Click Search. The transactions for the selected reference trace ID are displayed in the Results section.
Click Reset to clear the search section and results.
Click Done to close the page.
The Results section lists the retrieved transactions.
Use the Actions Menu and icons to apply actions to the Results table. You can perform the actions listed below, as well as actions described in ”Action Menu and Icons” in the Oracle Retail Merchandising Do the Basics User Guide.
Table 12-2 Results - Actions Menu/Icons and Description
| Actions Menu/Icons | Description |
|---|---|
|
Drill to Finance and Drill to Finance button |
Select Actions > Drill to Finance or use the Drill to Finance button to initiate a drill forward Web service call to an external finance system (Peoplesoft) to retrieve detailed information about the financial posting made for a source transaction. The details retrieved will be displayed in a separate page. |
|
Drill Back Report and Drill Back Report button |
You can open the Drill Back report in a new tab by selecting Actions > Drill Back Report or by using the Drill Back Report button. |
The Merchandising Stock Ledger records and summarizes the financial results and records of merchandising processes such as buying, selling, price changes, stock adjustments, transfers, and so on. The individual transactions from the transaction data are aggregated at the subclass/location level for days, weeks, months, and financial half, based on the primary currency and calendar settings in the system.
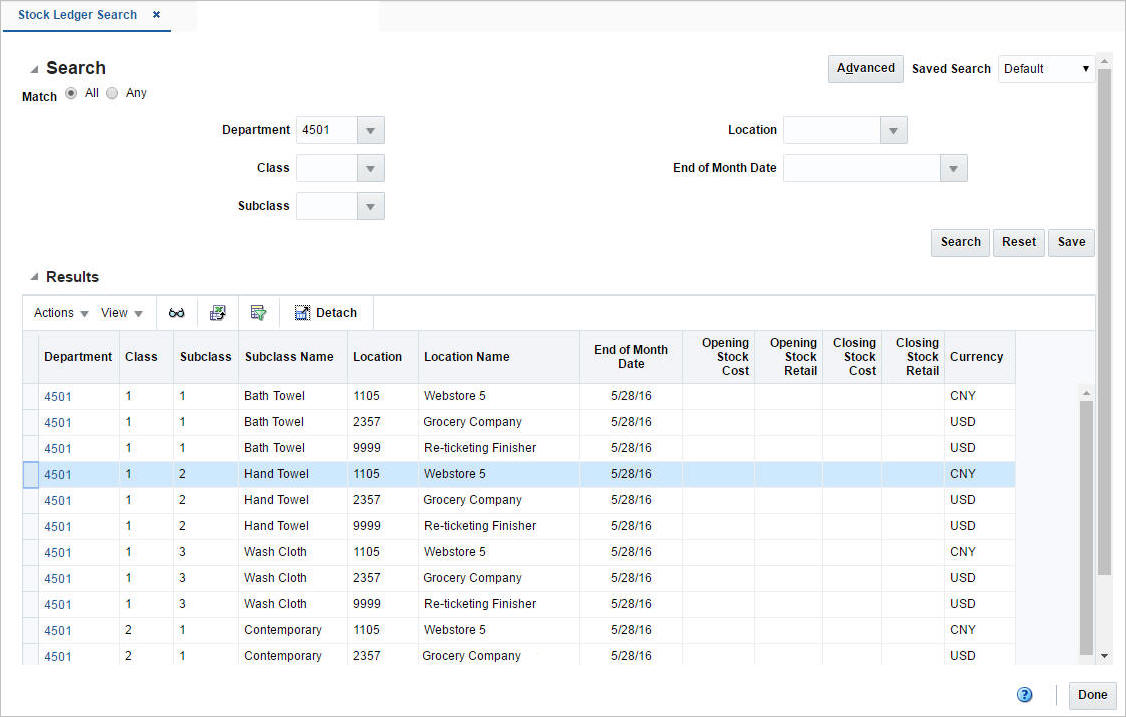
The Stock Ledger option opens the Stock Ledger Search page. The Stock Ledger Search page allows you to enter criteria in order to search for stock ledger records. Additionally you can perform the following functions in this page:
Search for stock ledger records by various search criteria
View the search results
View stock ledger records information
You can access the Stock Ledger Search page from the Task menu, select Finance > Stock Ledger. The Stock Ledger Search page appears.
To search for stock ledger records:
From the Task menu, select Finance > Stock Ledger. The Stock Ledger Search page appears.
You can search for a stock ledger record using basic or advanced search criteria, depending on the requirement. The basic mode is the default search mode.
Click Advanced to access the search section in advanced mode.
Click Basic to return to the basic mode.
To search for a stock ledger record using basic search criteria:
Enter, select or search for one or all of the following basic search criteria.
Table 12-3 Stock Ledger Search - Basic Search Criteria and Description
| Fields | Description |
|---|---|
|
Match option |
Check radio button All or Any. All - only stock ledger records matching all entered search criteria are shown, after the search is executed. Any - stock ledger records matching any of the entered search criteria are shown, after the search is executed. |
|
Department |
Enter, select or search for the department. |
|
Class |
Enter, select or search for the class. |
|
Subclass |
Enter, select or search for the subclass. |
|
Location |
Enter, select or search for the location. |
|
End of the Month Date |
Enter, select or search for the end of the month date. |
Click Search. The stock ledger records that match the search criteria are displayed in the Results section.
In the Department column, click the department link, or mark a record and select Actions > View, use the View icon ![]() . The Stock Ledger page appears.
. The Stock Ledger page appears.
Click Reset to clear the search section and results.
Click Done to close the pop-up.
To search for a stock ledger record using advanced search criteria:
To search using advanced search criteria, enter or select one or all of the advanced search criteria.
To narrow down the search, use the list next to the search fields. For example, determine if the entered value should equal or not equal the search result.
Click Search. The stock ledger records that match the search criteria are displayed in the Results section.
In the Department column, click the department link, or mark a record and select Actions > View, use the View icon ![]() . The Stock Ledger page appears.
. The Stock Ledger page appears.
Click Reset to clear the search section and results.
Click Add Fields to add more fields for the advanced search. To remove the field from the search, click the x right next to the field.
Click Done to close the page.
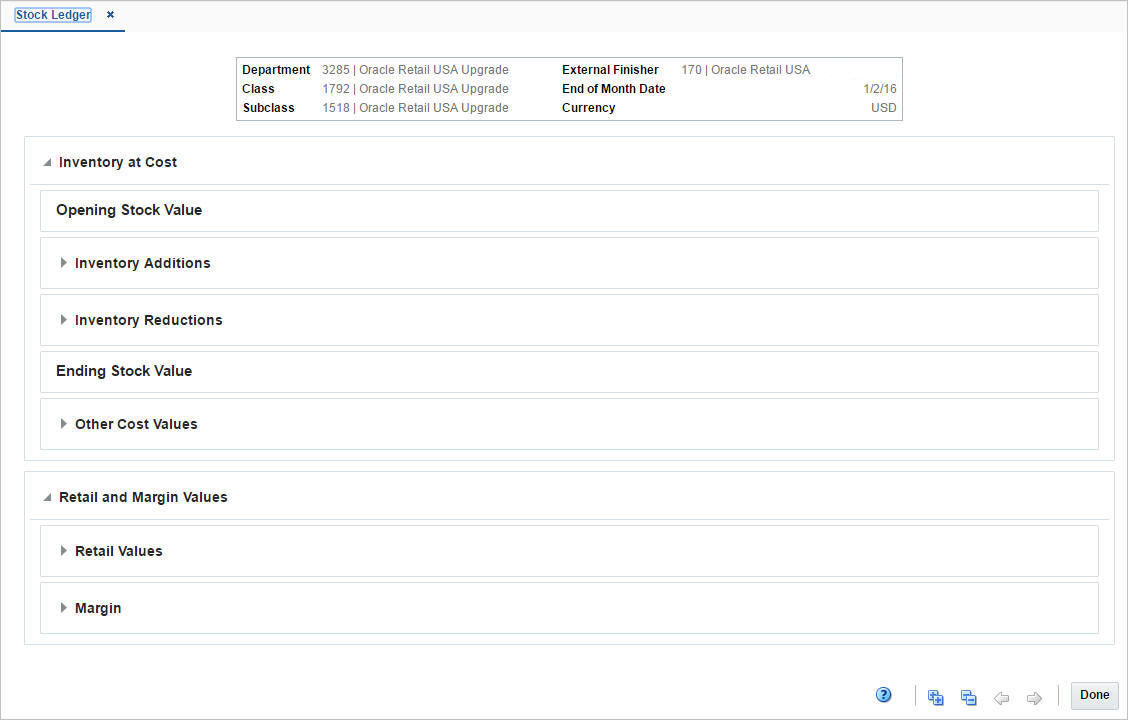
The Stock Ledger page allows you to view stock ledger details by subclass/location/month. The details shown on the page may vary, based on the finance related setup for each department. This page for a particular subclass/location/month can be opened by clicking on the Department column of the result table in the Stock Ledger Search screen or clicking on View option in the Actions menu after selecting a record.
The Stock Ledger page contains the following sections:
Header
The Header section displays the department, class, subclass, location, end of month date, and the primary currency set at the system level.
Inventory at Retail
This section is only displayed for departments configured to use the retail method of accounting. This section summarizes the value of the opening and ending stock valued at retail. It also shows the calculation used for determining the stock values by detailing the calculation of Inventory Additions and Inventory Reductions for the month or week. In addition this section shows other retail values such as VAT and Non-inventory sales.
Inventory at Cost
This section is displayed for departments using cost and retail method of accounting with slightly different calculation elements. This section summarizes the value of the opening and ending stock valued at cost. It also shows the calculations used for determining the stock values by detailing the calculation of Inventory Additions and Reductions for the month or week. In addition this section shows other values such as Workroom, Cash Discounts and Cost Variance.
Retail Calculations
This section is only displayed for departments that use the retail method of accounting.
This section holds information about cumulative markon and Gross Margin including the goods available to sell values in both cost and retail terms.
Retail and Margin Values
This section is only displayed for departments that use the cost method of accounting. It displays retail values such as net sales, franchise sales, outgoing intercompany transfers as well as net sales (non-inventory). Additionally the section displays margin values such as gross margin and intercompany margin.
The toolbar contains the following icon and button, as well as icons and buttons described in ”Screen Level Action - Icons and Buttons” in the Oracle Retail Merchandising Do the Basics User Guide.
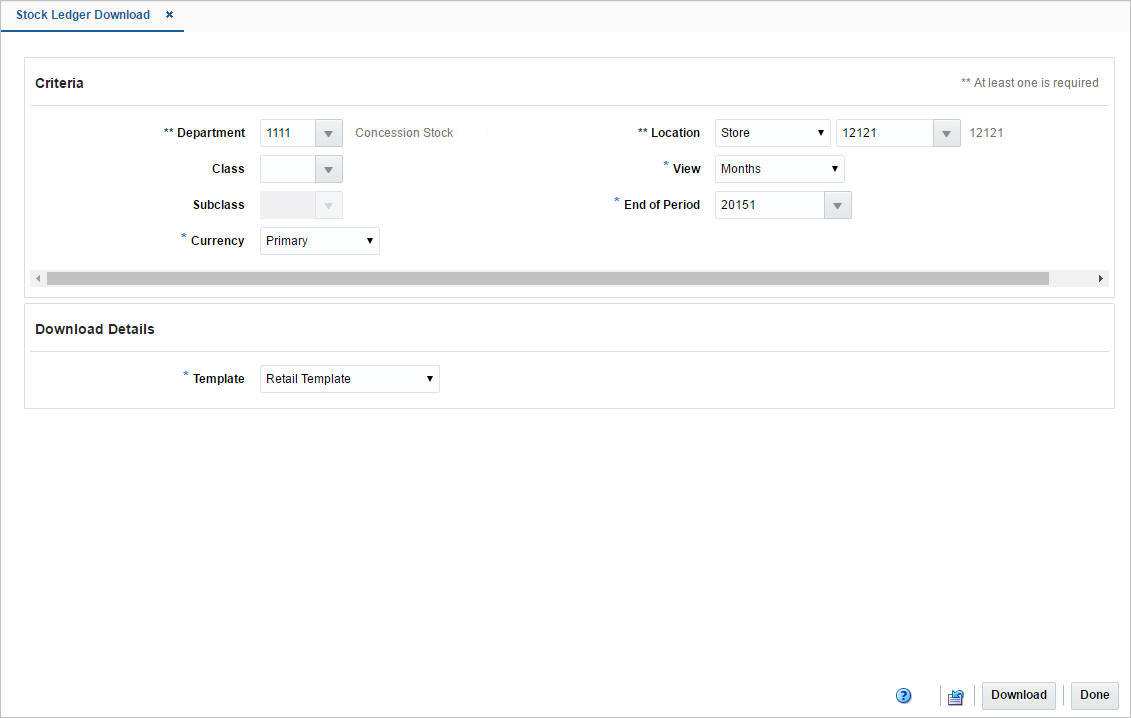
In the Stock Ledger Download page you can download stock ledger records from Merchandising to a spreadsheet.
To download stock ledger records, follow the steps below.
From the Task menu, select Finance > Stock Ledger Download. The Stock Ledger Download page appears.
In the Criteria section, filter the data by the following criteria.
|
Note: You must enter the values in the View, Currency and End of Period field to carry out the search. Additionally you must enter either the department or the location to search for stock ledger records. |
Table 12-5 Stock Ledger Download - Filter Criteria
| Fields | Description |
|---|---|
|
Department |
Enter, select or search for the department. You must enter either the department or the location for the download. |
|
Class |
Enter, select or search for the class. |
|
Subclass |
Enter, select or search for the subclass. |
|
Currency |
Select if you want to download the data in the local or the retailer's primary currency. This field is a required field. |
|
Location |
Select the location type. Then enter, select or search for the location. You must enter either the location or the department for the download. |
|
View |
Select if you want to view the data by days, months, or weeks. This field is a required field. |
|
End of Period |
Enter, select or search for the end of period date. This field is a required field. |
In the Download Details section, select the template from the list. The Template field is a required field. The following templates are available.
Cost Template
This option will generate a file that contains only cost columns of the selected View.
Retail Template
This option will generate a file that contains only retail columns of the selected View.
Cost-Retail Template
This option will generate a file that contains both cost and retail columns of the selected View.
Click Download to download the spreadsheet with the selected stock ledger records on your desktop.
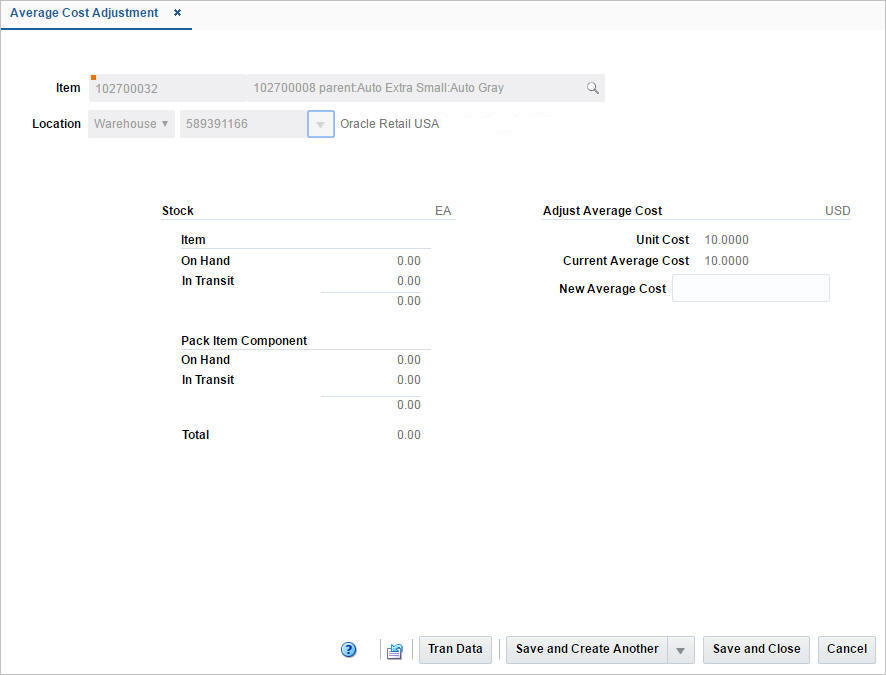
The Average Cost Adjustment page allows you to enter a new average cost for an item at a selected location.
The Average Cost Adjustment Page displays the following fields.
Table 12-6 Average Cost Adjustment - Fields and Description
| Fields | Description |
|---|---|
|
Item |
Enter, or search for the item for which you want to adjust the average cost. |
|
Location |
Select the location type (valid values are store and warehouse). Then enter, select or search for the location for which you want to adjust the average cost. |
|
Stock: |
This section allows you to view the item and pack item component on hand and in transit quantities at a location. Right side of the section header displays the UOM (unit of measure) for the stock quantities shown. |
|
Item - On Hand |
Displays the stock on hand of the item at the selected location. |
|
Item - In Transit |
Displays the stock of the item in transit to the selected location. |
|
Pack Item Component - On Hand |
Displays the stock on hand of the pack item component at the selected location. |
|
Pack Item Component - In Transit |
Displays the stock of the pack item component in transit to the selected location. |
|
Total |
Displays the total stock on hand of the item at the selected location. |
|
Adjust Average Cost: |
This section allows you to view the current costs of an item at a location and allows you to change the average cost. Right side of the section header shows the location currency. |
|
Unit Cost |
Displays the unit cost of the item at the selected location. |
|
Current Average Cost |
Displays the current average cost of the item at the selected location. |
|
New Average Cost |
Enter the new average cost for the selected item/location. |
The toolbar contains the following button, as well as icons and buttons described in ”Screen Level Action - Icons and Buttons” in the Oracle Retail Merchandising Do the Basics User Guide.
Table 12-7 Average Cost Adjustment Toolbar - Icons/Buttons and Description
| Icons/Buttons | Description |
|---|---|
|
Tran Data button |
Opens the Transaction Data page. The item/location information is populated in the search criteria in the Search section. For more information about the Transaction Data page, see "View Transaction Data". |
|
Save and Close |
Click Save and Close to save the entered records and close the page. |
|
Save and Create Another |
Click Save and Create Another to save the entered records and create a new average cost adjustment. The menu contains the following options. In both cases, the new average cost field is reset and the user has to enter a new value.
|
To adjust the average cost for an item at a selected location, follow the steps below.
From the Tasks menu, select Finance > Average Cost Adjustment. The Average Cost Adjustment page appears.
In the Item field, enter, or search for the item.
In the Location field, select the location type from the list. Then enter, select or search for the location.
In the New Average Cost field, enter the new cost for the item at the selected location.
Then choose one of the saving options. For more information about the available options, see the Average Cost Adjustment Toolbar section.
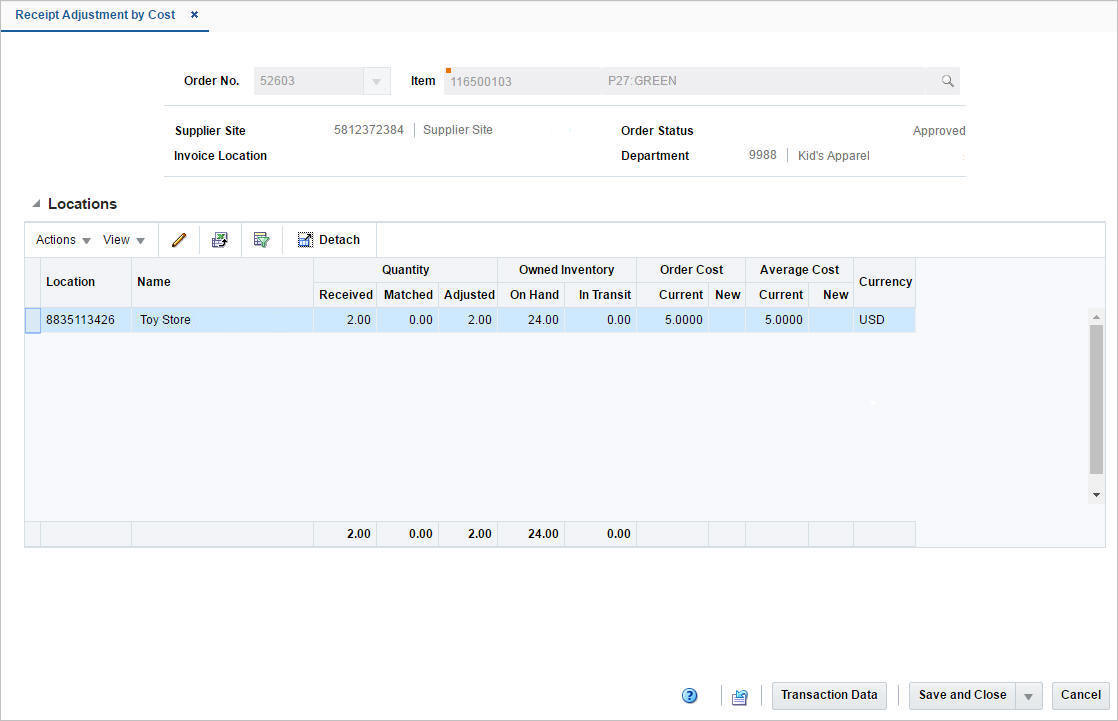
The Receiver Adjustment by Cost page allows you to adjust the order cost of an item by purchase order and location after it has been received. Additionally, while changing the order cost, this page also provides options for creating supplier cost change for the item location.
Cost adjustment is performed at an item location level that exists in a purchase order.
In the header section you can choose a purchase order and an item on the order. The supplier site, invoice location, department and order status is displayed automatically.
The Locations section displays details such as received/matched/adjusted quantity, on hand/in transit inventory, order cost and average cost of the selected item in the chosen purchase order across all locations in the order. You can adjust the order cost of an item in this section.
The toolbar contains the following button, as well as icons and buttons described in ”Screen Level Action - Icons and Buttons” in the Oracle Retail Merchandising Do the Basics User Guide.
Table 12-8 Receipt Adjustment by Cost Toolbar - Icons/Buttons and Description
| Icons/Buttons | Description |
|---|---|
|
Transaction Data button |
Opens the Transaction Data page. The following fields are populated in the search criteria, when the transaction data page appears:
For more information about the Transaction Data page, see the "View Transaction Data" section. |
To adjust the unit cost of an item by purchase order and location after it has been received, follow the steps below.
From the Tasks menu, select Finance > Receipt Adjustment by Cost. The Receipt Adjustment by Cost pop-up appears.
In the Order No. field, enter, select or search for the purchase order.
In the Item field, enter, or search for the item.
The locations for the item are displayed in the Locations section.
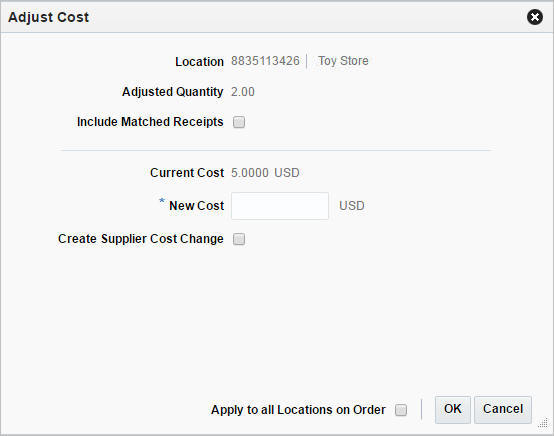
Select a record in the table
Then select Actions > Edit, or use the Edit icon ![]() . The Adjust Cost pop-up appears. The location, the adjusted quantity and the current cost of the item on the order are displayed.
. The Adjust Cost pop-up appears. The location, the adjusted quantity and the current cost of the item on the order are displayed.
Select the Include Matched Receipts checkbox to adjust the cost of those receipts which have already been matched in Invoice Matching.
In the New Cost field, enter the new unit cost for the selected item. This field is a required field.
Select the Create Supplier Cost Change checkbox to update the supplier unit cost with the cost specified in this pop-up.
Select the Apply to all Locations on Order checkbox to indicate that the cost adjustment is applied to all locations on the selected order, not just the selected ones.
Then choose one of the following options.
Click OK to adjust the unit cost and close the pop-up.
Click Cancel to reject all entries and close the pop-up.
Merchandising uses budgets to manage forecasts, expenses, and expected losses.
Budgeted Shrink is an optional function of the Merchandising stock ledger that allows you to accrue shrink based on a percentage of sales. You can input an initial budgeted shrink value for use by the stock ledger, and can also update it manually after implementation, if desired. When budgeted shrink is turned on in stock ledger, the monthly processes will accrue an amount of shrink at a subclass location level based on the net sales in the period and the budgeted shrink % value. The completion of unit and value stock counts will recalculate the budgeted shrink percentage value based on the actual shrink determined as part of the stock count. This value is then used until the next unit and value count. You can overwrite the calculated budgeted shrink value, if desired.
Budgeted Shrink is a value held on records that are created and managed automatically by Merchandising processes, so maintenance of a budgeted shrink value can be done by users, but records on the table where the budgeted shrink is held cannot be added or deleted. These updates are done through spreadsheet download and upload processes, which are accessed through the main Merchandising task list under Foundation Data > Download Foundation Data and Foundation Data > Upload Foundation Data.
To modify Budgeted Shrink, select the template type of Financial Control from the Download Data screen and then the template Half Data Control. When downloading records, you can optionally filter on department, set of books, or location to limit the number of records to those you are interested in updating. Click the Download button and, when prompted, choose to either open the .ods file that is generated or save the file and open it separately in the spreadsheet application of your choice.
Once opened, there is a single sheet with several fields that can be modified. The sheet will show all the existing Half Data Budget records in the system currently organized by Department, Half, Location and set of Books.
If you would like to update the Budgeted Shrink % for any department/location, enter or update the value in the Shrinkage % column, and enter the value ”Update” in the Action column. Any line uploaded with an Action of Update will make any changes that were included. You can also update the Markup % and Markdown % columns in this table, but these are optional.
Once all the updates have been made to the data in the spreadsheet, save the file and close it. Then, return to the Merchandising screens and select Foundation Data > Upload Foundation Data from the main task list. In this screen, you'll again select the template type Financial Control and the template Half Data Control. This will generate a process description automatically, but this can be updated if desired. Lastly, you'll select the Browse button and navigate to the directory where you saved the updated spreadsheet.
To review the status of the upload and check whether any errors occurred, select the Foundation Data > Review Status task from the main task list.
Merchandising allows you to enter month-by-month data for budget forecasts. The system contains one record for each department/location/half/month combination within the company. New records are added when a new location or department is added to the system or in the end-of-half processing which adds rows for the new half for all department/location combinations. Users can update the budget values, but cannot add or delete records as these are maintained by system processes.
To update budget values, you will select the template type of Budget from the Download Data screen and then the template Monthly Budget. Filters exist on Department, Set of Books, and Location in order to download a subset of records, so optionally you can make filter selections if desired. Next, click the Download button and, when prompted, choose to either open the .ods file that is generated or save the file and open it separately in the spreadsheet application of your choice. Once opened, there will be a sheet that where budgets can be modified.
If you would like to update any budget values for a record, navigate to the appropriate row where you would like to make your updates and set the action to Update. The following columns can be updated:
Opening Stock (Retail and Cost)
Purchases (Retail and Cost)
Returns to Vendor (Retail and Cost)
Net Sales (Retail and Cost)
Clearance Markdowns (Retail)
Permanent Markdowns (Retail)
Promotional Markdowns (Retail)
Shrinkage (Retail and Cost)
Employee Discounts (Retail)
Closing Stock (Retail and Cost)
Gross Margin
You cannot add records or delete records, but it you want to remove existing budget values, you can set the cells to blank and then upload the updates.
For all actions defined above, once all the updates have been made to the data in the spreadsheet, save the file and close it. Then, return to the Merchandising screens and select Foundation Data > Upload Foundation Data from the main task list. In this screen, select the template type Budgets and the template Monthly Budgets. This will generate a process description automatically, but this can be updated if desired. Lastly, select the Browse button and navigate to the directory where you saved the updated spreadsheet.
To review the status of the upload and check whether any errors occurred, select the Foundation Data > Review Status task from the main task list.
The General Ledger (GL) setup information in Merchandising provides essential information that is used in the GL integration process. For every ledger or set of books that Merchandising will be posting to in a GL, a record needs to exist on this table. These records are used in populating data on journals posted from Merchandising and Sales Audit. The data on the table also provides some controls to processing in Merchandising. This table is typically populated at implementation, but as a business changes, records may be added or deleted, or some of the data may also change over time; however the data on the table is usually fairly static.
All of the updates that can be made for GL setup are done through spreadsheet download and upload processes, which are accessed through the main Merchandising task list under Foundation Data > Download Foundation Data and Foundation Data > Upload Foundation Data.
To add or update records, select the template type of Financial Control from the Download Data screen and then the template Financials General Ledger Setup. Click the Download button and, when prompted, choose to either open the .ods file that is generated or save the file and open it separately in the spreadsheet application of your choice.
To add a new GL Setup record, select the action type of Create on the GL Setup tab. Next, enter the Set of Books ID, a description for the Segment 1-10 values, values for Category ID, Deliver To and Destination Ord ID. Also add a Period Name, a description for the Ledger or Set of Books, the Currency for that Ledger/Set of Books and values for Category and Source. The Category and Source are typically set to ”Oracle Retail”, but can be varied if there is a desire to have different values shown in the GL Journals generated from Oracle Retail. The Category ID, Deliver To and Destination Ord ID values are required, but drive no processing so a default value of 1 can be entered. For each set of books defined enter the debit and credit clearing account details. The details should include account number and the segment values for both the credit and debit accounts. These accounts will be validated upon upload and will be used to post transactions that remain unmapped at the time of month closure.
If you would like to update existing GL Setup records, then a similar process will be followed to that described above for entering new GL Setup records. First, download the spreadsheet, and then find the GL Setup combination that you want to update. In that row select the action type of Update, and then update the one or more of the records in the spreadsheet.
If you wish to delete a GL Setup record because it is not used by your business any longer, then a similar process will be followed to that described above for entering or updating GL Setup records. First, download the spreadsheet, and then find the GL Setup record that you want to delete. In that row select the action type of Delete, and then update the one or more of the records in the spreadsheet.
For all actions defined above, once all the updates have been made to the data in the spreadsheet, save the file and close it. Then, return to the Merchandising screens and select Foundation Data > Upload Foundation Data from the main task list. In this screen, you'll again select the template type Financial Control and the template Financials General Ledger Setup. This will generate a process description automatically, but this can be updated if desired. Lastly, select the Browse button and navigate to the directory where you saved the updated spreadsheet.
The General Ledger (GL) cross reference information in Merchandising provides essential information that is used in the GL integration process. The records that are included in this process provide the basis for mapping Merchandising Stock ledger information to the GL to create journals in terms of the GL structure. From the Merchandising perspective, the source data has the following data elements that identify what the information is from a retail perspective: Set of Books, Location, Department, Class, Subclass, Transaction Code, Cost or Retail, and for some transaction codes a Transaction Reference Number. Each combination of those data elements from the retail side will need to be mapped to a set of GL accounts segments for both a debit and a credit. How many segments need values and what those values are will depend on how the GL has been setup.
While a record should exist for every combination of retail data elements where you expect transactions to exist, the mapping can be done at a higher level than subclass/location level. If for example, all subclasses within a department/class will have the same mappings, then rather than set up a record for each subclass, a single record for the department/class can be entered with "-1" for the subclass. Using -1 can be done for subclass, class, department, location, and transaction reference number.
All of these updates that can be made for GL cross references are done through a spreadsheet download and upload processes, which are accessed through the main Merchandising task list under Foundation Data > Download Foundation Data and Foundation Data > Upload Foundation Data.
To add or update GL cross reference records, select the template type of Financial Administration from the Download Data screen and then the template GL Cross Reference. Optionally, you can download a subset of records by using the filter criteria, which includes department, set of books and location. Click the Download button and when prompted, choose to either open the .ods file that is generated or save the file and open it separately in the spreadsheet application of your choice.
To add a new GL cross reference record, navigate to a blank row in the GL Cross Reference tab and select the action type of Create. Next, enter the Set of Books ID, the Department, Class, Subclass, Location, Tran Code for the mapping. Also, indicate whether the value in this mapping will represent cost or retail in the Cost/Retail column. For certain Tran Codes, you will also need to enter a value for Tran Ref No. The transaction codes which require this mapping are:
Purchases (20) – the reference value here will either indicate a record for the merchandise on a PO receipt or the values of the landed cost components for the PO receipt
Non-COGS Stock Adjustments (22) – the reference value will represent the reason for the adjustment
COGS Stock Adjustments (23) – the reference value will represent the reason for the adjustment
Intercompany Transfer In (37) – the reference value will represent the "from" location on the intercompany transfer
Intercompany Transfer Out (38) – the reference value will represent the "to" location on the intercompany transfer
Work Order Activity – Update inventory (63) – the reference value will represent the work order activity ID
Work Order Activity – Post to Financials (64) – the reference value will represent the work order activity ID
VAT In (87) – the reference value will represent the tax code
VAT Out (88) – the reference value will represent the tax code
Values will also need to be added in the Debit Account and Credit Account fields. Depending on the number of GL segments being used, values will also need to be entered into the Debit Segment and Credit Segment fields.
If you would like to update existing GL Cross Reference records, then a similar process will be followed to that described above for entering new GL Cross Reference records. First, download the spreadsheet, and then find the GL Cross Reference combination that you want to update. In that row select the action type of Update, and then update the one or more of the records in the spreadsheet.
If you wish to delete a GL Cross Reference record because it is not used by your business any longer, then a similar process will be followed to that described above for entering or updating GL Cross Reference records. First, download the spreadsheet, and then find the GL Cross Reference combination that you want to delete. In that row select the action type of Delete, and then update the one or more of the records in the spreadsheet.
For all actions defined above, once all the updates have been made to the data in the spreadsheet, save the file and close it. Then, return to the Merchandising screens and select Foundation Data > Upload Foundation Data from the main task list. In this screen, you'll again select the template type Financial Administration and the template GL Cross Reference. This will generate a process description automatically, but this can be updated if desired. Lastly, select the Browse button and navigate to the directory where you saved the updated spreadsheet.
See also Download/Upload Data from Spreadsheets and View Data Loading Status.
Non-Merchandise codes are used on invoices, both in Import Management and in Invoice Matching to represent costs that are not specifically merchandise, such as freight, insurance, and so on. The costs can be for services that a supplier or partner performs or for costs associated with the delivery of a purchase order. Non-merchandise codes are associated with cost components, which are a more granular definition of non-merchandise costs for the purchasing and importation process in the form of expenses and assessments. Multiple cost components can be associated with a single non-merchandise code. Financial mapping to the GL for these costs is done through non-merchandise codes. Cost components themselves are created separately and are entered through the Foundation template type and Cost Components template.
All of the updates that can be made by the retailer for non-merchandise codes, their association with cost components as well as adding translations for non-merchandise code descriptions are done through a spreadsheet download and upload processes, which are accessed through the main Merchandising task list under Foundation Data > Download Foundation Data and Foundation Data > Upload Foundation Data.
To add or update non-merchandise codes or add cost components to non-merchandise codes, select the template type of Financial Administration from the Download Data screen and then the template Non-Merchandise Codes. Click the Download button and, when prompted, choose to either open the .ods file that is generated or save the file and open it separately in the spreadsheet application of your choice.
|
Note: Non-Merchandise codes for escheatment cost, tax cost and freight cost cannot be deleted using this functionality as they are system required. |
To add a new non-merchandise code, start in the Non-Merchandise Codes tab, and, in a blank line in the template, select the action type of Create. Next enter a Code value, which can be a character field of up to 6 characters. Also enter the description for the Non-Merchandise Code in the primary language (as defined in the Merchandising system options) of up to 250 characters and a unique code for the reason of up to 6 characters.
If you wish to add Non-Merchandise Code descriptions in any other languages, then select the Non-Merchandise Code Trans tab and in a blank row select an action type of Create. Then, enter the non-merchandise code and language for the translated description, and then a translated description. The translated description can also be up to 250 characters long. This is an optional step.
If you wish to associate Cost Components to the Non-Merchandise Code, then select the Non-Merchandise Cost Components tab, and in a blank row select an action type of Create. Then enter the Non-Merchandise Code and the ID and the Cost Component you want to associate together. You can associate multiple cost components with a single non-merchandise code, but a cost component can only be associated with a single non-merchandise code. This is an optional step.
If you would like to update an existing non-merchandise code then a similar process will be followed to that described above for entering new codes. First, download the spreadsheet, and then find the code that you want to update and the tab that contains the data that you want to update. In that row select the action type of Update, and then update one or more of the values for that record. You can update the Description of the non-merchandise codes or the language translations.
If you wish to delete a non-merchandise code because it is not used by your business any longer, update the action column to select Delete for the selected non-merchandise code in the Non-Merchandise Codes tab. When deleting a non-merchandise code, you will also need to delete any Translations for that code in the Non-Merchandise Code Translation tab, and any cost component associations for that code in the Non-Merchandise Cost Component tab.
If you wish to delete a Cost Component association with a non-merchandise code because that cost component is not used by your business any longer or if it should be associated with a different code, update the action column to select Delete for the non-merchandise code/cost component record you wish to delete. This action will not delete the actual cost component, only it's association with that non-merchandise code.
For all actions defined above, once all the updates have been made to the data in the spreadsheet, save the file and close it. Then, return to the Merchandising screens and select Foundation Data > Upload Foundation Data from the main task list. In this screen, you'll again select the template type Financial Administration and the template Non-Merchandise Codes. This will generate a process description automatically, but this can be updated if desired. Lastly, select the Browse button and navigate to the directory where you saved the updated spreadsheet.
To review the status of the upload and check whether any errors occurred, select the Foundation Data > Review Status task from the main task list.
Freight and payment terms are industry codes that are used in trade between a seller and buyer to define and agree to how responsibility for freight is set and what the expectation for payment is, including whether there are any discounts for prompt payment of an invoice. Freight and payment terms are included on purchase orders to vendors and also on invoices from vendors. Both sets of terms are ”owned” by the financial system, so any freight or payment term values entered into Merchandising should mirror the terms available in the associated financial system and use the same codes or IDs to ensure successful integration of the values to financials on transactional data.
All of the updates that can be made by the retailer for freight and payment terms, as well as adding translations for descriptions of the terms, is done through a spreadsheet download and upload processes, which are accessed through the main Merchandising task list under Foundation Data > Download Foundation Data and Foundation Data > Upload Foundation Data.
To add or update freight or payment terms, select the template type of Financial Administration from the Download Data screen and then the template Terms. Click the Download button and when prompted, choose to either open the .ods file that is generated or save the file and open it separately in the spreadsheet application of your choice.
The Terms template has several tabs including; Freight Terms, Freight Terms Translations, Payment Terms, Payment Terms Detail and Payment Terms Translation.
To add a new freight term, start in the Freight Terms tab, and in a blank line in the template, select the action type of Create. Next enter a Freight Term value, which can be a character field of up to 30 characters. Also, enter the description for the Freight Terms in the primary language (as defined in the Merchandising system options) of up to 240 characters. Then, optionally enter date values for Active Start Date and Active End Date and enter a Yes or No value for the Enabled Flag.
If you wish to add freight terms descriptions in any other languages, then select the Freight Terms Translations tab and in a blank row select an action type of Create. Then, enter the Freight Terms code and language for the translated description, and then translated description. The translated description can also be up to 240 characters long. This is an optional step.
If you would like to update any details for existing freight terms, a similar process will be followed as that described above for creating new reasons. First, download the spreadsheet, and then navigate to the tab where you would like to make your updates.
The following columns can be updated in each tab:
Freight Terms – Description, Active Start Date, Active End Data, Enabled Flag
Freight Terms Translations – Description
In the tab where you are going to make your updates, select the action type of Update, and then correct the value in the spreadsheet.
If you wish to delete a freight term because it is not used by your business any longer, update the action column to select Delete for the selected freight term in the Freight Terms tab. Any associated freight terms translations should also be deleted in the Freight Terms translation tab. If you wish to delete a translated freight term description, you can take a similar action to set the action column to Delete on the Freight Terms Translation tab for a record. For Freight Terms, this table also includes the description in the primary language, so that language record cannot be deleted unless the entire freight term is being deleted.
|
Note: A Freight Term cannot be deleted if it is currently associated with an active Purchase Order, so an error will be raised if this occurs when the changes are uploaded. |
To add a new payment term, start in the Payment Terms tab, and in a blank line in the template, select the action type of Create. Next, enter a Terms value that matches the same term in the Financials system, which can be up to 15 characters. Also enter the Terms Code, which can be up to 50 characters used to provide a short description of the terms, and a description for the Payment Terms in the primary language (as defined in the Merchandising system options) of up to 250 characters. Additionally enter a Rank value, which is numeric and provides a priority ranking for terms when determining ”best terms”.
If you wish to add payment terms descriptions in any other languages, then select the Payment Terms Translation tab and in a blank row select an action type of Create. Then, enter the Terms ID and select the language you are adding a translation for. Next, enter the translated descriptions for Terms Code and Terms Description. The translated description can also be up to 250 characters long. This is an optional step.
You will also need to add a detail to a payment term. Merchandising currently only supports a single active detail record for a payment term; it does not support complex payment terms that manage things like partial payments. To add a detail to a payment term, select the Payment Term Details tab, and in a blank line in the template, select the action type of Create. Next enter the Terms value for which you are adding a detail, and also add a sequence value. In addition to these, you will need to add the details of the terms that define the payment term and how it functions. These include the Due Days, Due Max Amount, Due Day of Month Forward, Due Months, Discount Days, Discount Percentage, Discount Day of Month and Fixed Due Date and Cutoff Day. Also indicate whether it is enabled (Y/N), and Start and End Active Days.
If you would like to update existing payment terms then a similar process will be followed to that described above for entering new payment terms. First, download the spreadsheet, and then find the Payment Term, Payment Term Details or Payment Terms Translation that you want to update and the tab that contains the data that you want to update. In that row select the action type of Update, and then update one or more of the values for that record. At the payment terms level you can update the Description and the Rank for the term. At the detail level, you can update all values except the term itself.
If you wish to delete a payment term because it is not used by your business any longer, update the action column to select Delete for the selected term in the Payment Terms tab. You will also need to delete the related records on the Payment Terms Detail and Payment Terms Translation tabs with a similar update of the Action field to Delete.
For all actions defined above, once all the updates have been made to the data in the spreadsheet, save the file and close it. Then, return to the Merchandising screens and select Foundation Data > Upload Foundation Data from the main task list. In this screen, select the template type Financial Admin and the template Terms. This will generate a process description automatically, but this can be updated if desired. Lastly, select the Browse button and navigate to the directory where you saved the updated spreadsheet.
To review the status of the upload and check whether any errors occurred, select the Foundation Data > Review Status task from the main task list.
When value added tax (VAT) functionality is enabled in Merchandising, certain VAT entities are required to be setup so that they can be associated with locations, suppliers, partners and items to support proper VAT calculations on transactions across the Merchandising suite. The primary VAT entities are VAT codes and their associated rates, as well as VAT regions.
VAT codes represent the different categories of VAT that are used in the system. Each of these categories will also have VAT rates associated with them. While VAT codes are normally country specific, the VAT codes and rates set up in Merchandising are not specifically associated with a specific country or VAT region. So if multiple VAT regions use the same rate, they could share a VAT code. But, if there is a need to differentiate by country, even though the rates are the same, different codes should be set up for the different countries/VAT regions. There is also a system required VAT code of Exempt, which is associated with a 0% VAT rate. This code cannot be deleted. VAT codes and rates are managed through spreadsheet download and upload processes. These processes are accessed through the main Merchandising task list under Foundation Data > Download Foundation Data and Foundation Data > Upload Foundation Data.
To add, update, or remove VAT regions, codes, and rates, you will select the template type of Financial Admin from the Download Data screen and then the template VAT. Click the Download button and, when prompted, choose to either open the .ods file that is generated or save the file and open it separately in the spreadsheet application of your choice. Once opened, there will be 5 sheets that can be modified – VAT Codes, VAT Code Translations, VAT Rates, VAT Regions and VAT Regions Translations.
To add a new VAT code, start in the VAT Code tab, and, in a blank line in the template, select the action type of Create. Next, enter the Code Value up to 6 characters and a description for the code in the primary language (as defined in the Merchandising system options) of up to 120 characters. Also include a value in the Incl. in NIC column. Normally this should be set to No. Only in the case of an implementation with Brazilian Localization enabled would this be a value other than No.
If you wish to add VAT Code descriptions in any other languages, then select the VAT Code Translations tab and in a blank row select an action type of Create. Then, enter the language for the translated description, the code added in the VAT Codes tab, and then translated description. The translated description can also be up to 120 characters long. This is an optional step.
For every VAT Code added, there should be at least on VAT rate associated with the code. Only a single rate can be active for a VAT code at any given time, but the rate associated with a VAT code can change over time, so the rates are effective dated. To add a new VAT rate, start in the VAT Rates tab, and, in a blank line in the template, select the action type of Create. Next, enter the code value for the VAT code that you want to add a rate to and include a Rate Value, which represents a percentage, and an Active Date. Also include a value for the New Active Date. As the rate associated with a VAT code changes over time, new records will be added for the changed rates and Merchandising will use the New Active Date to determine when those rates become effective.
To add a new VAT Region, start in the VAT Region tab, and, in a blank line in the template, select the action type of Create. Next enter the VAT Region ID of up to 4 characters and a VAT Region Description in the primary language (as defined in the Merchandising system options) of up to 120 characters. Also include values for the VAT Region Type (E = Base EU Region, M = EU-Member, and N = Non-Member), Acquisition VAT (Yes or No), and VAT Calc Type (Simple, Exempt, or Custom). Finally, if reverse charge domestic VAT is used for certain items in the region, then include a threshold value in the Reverse VAT Threshold field.
|
Note: Acquisition VAT is currently only enabled for regions flagged as Base EU Regions or EU Members. |
If you wish to add VAT region descriptions in any other languages, then select the VAT Region Translations tab and in a blank row select an action type of Create. Then, enter the language for the translated description, the code added in the VAT Regions tab, and then translated description. The translated description can also be up to 120 characters long. This is an optional step.
If you would like to update any details for existing VAT codes or rates, a similar process will be followed as that described above for creating new reasons. First, download the spreadsheet, and then navigate to the tab where you would like to make your updates.
The following columns can be updated in each tab:
VAT Codes – Description, Include in NIC
VAT Code Translations – Description
VAT Rates – Active Date, New Active Date, Rate
In the tab where you are going to make your updates, select the action type of Update, and then correct the value in the spreadsheet.
If you wish to delete a VAT Code because it is not used by your business any longer, update the action column to select Delete in each of the tabs where it occurs. This includes the VAT Codes, VAT Codes Translations and VAT Rates tabs.
|
Note: A VAT code cannot be deleted if it is currently associated with any items or departments, so an error will be raised if this occurs when the changes are uploaded. Additionally, as noted above, the system generated code Exempt cannot be deleted. |
For all actions defined above, once all the updates have been made to the data in the spreadsheet, save the file and close it. Then, return to the Merchandising screens and select Foundation Data > Upload Foundation Data from the main task list. In this screen, select the template type Financial Admin and the template VAT. This will generate a process description automatically, but this can be updated if desired. Lastly, select the Browse button and navigate to the directory where you saved the updated spreadsheet.
To review the status of the upload and check whether any errors occurred, select the Foundation Data > Review Status task from the main task list.
Within Merchandising, org units are an equivalent concept to Operating Units in Oracle Financials, which exists within a set of books in the General Ledger. Org units are associated with suppliers, partners, stores, and warehouses within Merchandising. The financial operating unit is generally a geographic area of a business and it allows the business to control which supplier addresses a particular operating unit and its locations can do business. Org units can be added, updated or deleted through spreadsheet download and upload processes. These processes are accessed through the main Merchandising task list under Foundation Data > Download Foundation Data and Foundation Data > Upload Foundation Data.
To add or update org units, you will select the template type of Administration from the Download Data screen and then the template Org Units. Click the Download button and, when prompted, choose to either open the .ods file that is generated or save the file and open it separately in the spreadsheet application of your choice. Once opened, there will be two sheets that can be modified – Org Units and Org Units TL.
To add a new org unit, start in the Org Units tab, and, in a blank line in the template, select the action type of Create. Next enter a unique org unit ID (up to 15 numbers, no spaces), enter the General Ledger set of books ID for the new org unit to reside under, along with a description for the org unit in the primary language (as defined in the Merchandising system options) of up to 120 characters.
If you wish to add translations for the org unit in languages other than the primary language, this can be done in the Org Units TL tab. Navigate to a blank row and select the action type of Create and the language in which the translated description will be entered. Then, enter the org unit for which the translation applies. Finally, enter the translated description. The translated description can also be up to 120 characters long. This is an optional step.
If you would like to update any details for existing org units, a similar process will be followed as that described above for creating new org units. First, download the spreadsheet, and then navigate to the tab where you would like to make your updates.
The following columns can be updated in each tab:
Org Units – Description
Org Units TL - Description
In the tab where you are going to make your updates, select the action type of Update, and then correct the value in the spreadsheet.
If an existing org unit is not referenced by a supplier, partner, store, or warehouse it can be deleted by selecting the Delete action type for the row containing the org unit you wish to delete.
For all actions defined above, once all the updates have been made to the data in the spreadsheet, save the file and close it. Then, return to the Merchandising screens and select Foundation Data > Upload Foundation Data from the main task list. In this screen, select the template type Administration and the template Org Units. This will generate a process description automatically, but this can be updated if desired. Lastly, select the Browse button and navigate to the directory where you saved the updated spreadsheet.
To review the status of the upload and check whether any errors occurred, select the Foundation Data > Review Status task from the main task list.
Transfer entities are part of the Merchandising structure around locations used to control when transfers are considered to be intra-company transfers as opposed to inter-company transfers, which indicate a sale/purchase movement between different entities in a business. Store and warehouse locations, along with external finishers, are associated with transfer entities. Business logic for transfers will look at the transfer entities for the sending and receiving locations of the transfer and this will help to determine whether a transfer is intra-company or inter-company. There is also a relationship in Merchandising between transfer entities, org units and sets of books, which is also maintained through this process. The list of valid transfer entities as well as the relationships with the org units and sets of books is managed through spreadsheet download and upload processes. These processes are accessed through the main Merchandising task list under Foundation Data > Download Foundation Data and Foundation Data > Upload Foundation Data.
To add, update, or remove transfer entities, you will select the template type of Financial Admin from the Download Data screen and then the template Transfer Entities. Click the Download button and when prompted, choose to either open the .ods file that is generated or save the file and open it separately in the spreadsheet application of your choice.
Once opened, there will be 3 sheets that can be modified – Transfer Entities and Transfer Entities Translations and Transfer Entity Set of Books. The main tab is the Transfer Entities tab, which is where new transfer entities can be created and existing transfer entities can be updated or deleted. Optionally, you can also add translated descriptions in the Transfer Entities Translations tab and set of the relationship of the transfer entity with org units and sets of books.
To add a new transfer entity, start in the Transfer Entity tab, and, in a blank line in the template, select the action type of Create. Next enter the ID for the transfer entity (number up to 10 digits) as well as a Description and Secondary name in the primary language (as defined in the Merchandising system options). These values can be up to 120 characters.
If you wish to add Transfer Entity descriptions in any other languages, then select the Transfer Entity Translations tab and in a blank row select an action type of Create. Then, enter the language for the translated description, the transfer entity ID added in the Transfer Entity tab, and then translated description. The translated description can also be up to 120 characters long. This is an optional step.
Transfer entities, org units and sets of books in Merchandising are related. In general, the set of books is the highest level of the three, where a single transfer entity or org unit cannot be associated with more than one set of books. However, multiple org units or transfer entities can be associated with a single set of books. Transfer entities and org units are not necessarily related to each other and a 1-to-many or many-to-1 relationship can exist between these two entities.
To add a new Transfer Entity Set of Books relationship, start in the Transfer Entity Set of Books tab and, in a blank line in the template, select the action type of Create. Next, enter the IDs for the Transfer Entity, Org Unit and Set of Books.
If you would like to update any details for transfer entities, a similar process will be followed as that described above for creating new transfer entities. First, download the spreadsheet, and then navigate to the tab where you would like to make your updates.
Transfer Entity – Description, Secondary Name
Transfer Entity Translations – Description
In the tab where you are going to make your updates, select the action type of Update, and then correct the value in the spreadsheet.
If you wish to delete a transfer entity because it is not used by your business any longer, update the action column to select Delete in each of the tabs where it occurs. This includes the Transfer Entity and Transfer Entity Translations tabs, as well as the Transfer Entity Set of Books. Additionally, as noted above, the system generated codes cannot be deleted.
|
Note: A Transfer Entity cannot be deleted if it is currently associated with a location, so an error will be raised if this occurs when the changes are uploaded. |
For all actions defined above, once all the updates have been made to the data in the spreadsheet, save the file and close it. Then, return to the Merchandising screens and select Foundation Data > Upload Foundation Data from the main task list. In this screen, select the template type Financial Admin and the template Transfer Entities. This will generate a process description automatically, but this can be updated if desired. Lastly, select the Browse button and navigate to the directory where you saved the updated spreadsheet.
To review the status of the upload and check whether any errors occurred, select the Foundation Data > Review Status task from the main task list.