| Oracle® Retail Merchandising Foundation Cloud Service Oracle Retail Merchandising System User Guide Release 19.3.000 F83161-01 |
|

 Previous |
 Next |
| Oracle® Retail Merchandising Foundation Cloud Service Oracle Retail Merchandising System User Guide Release 19.3.000 F83161-01 |
|
Previous |
Next |
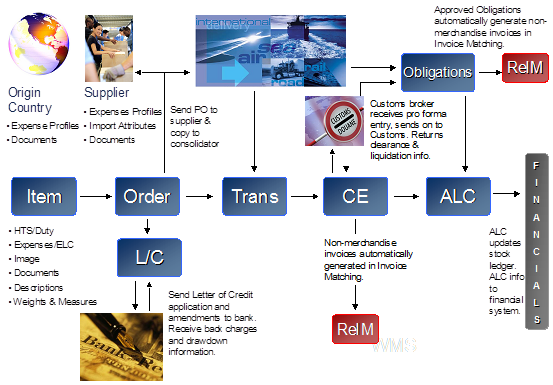
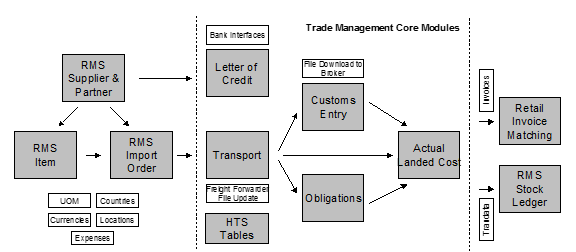
The Oracle Retail Trade Management application allows retailers to perform the following Trade Management tasks.
Build an accurate estimated landed cost.
Opens purchase orders at the point of origin.
Automatically issue a Letter of Credit application and amendment requests.
Classify merchandise for clearance through customs.
Track merchandise from landing to receipt.
Generate an actual landed cost and cost variance analysis.
The Retail Trade Management Product/Solution:
Builds an accurate estimated landed cost
Opens purchase orders at the point of origin
Automatically issues a Letter of Credit application and amendment requests
Classifies merchandise for clearance through Customs
Tracks merchandise from lading to receipt
Generates an actual landed cost and cost variance analysis
Letters of credit (LCs) are a widely used form of payment when dealing with imported goods. They provide importers with a secure method to pay for merchandise and vendors as well as a secure method to receive payment for merchandise. Letters of credit can be created and applied to purchase orders. Activities against the letter of credit can also be tracked.
The following types of letters of credit can be created:
Normal: The letter of credit is applied to one purchase order.
Master: The letter of credit is applied to multiple purchase orders.
Revolving: Purchase orders may be added until the agreed upon term of the LC is reached. The term is typically one to two years, at which point the letter of credit is closed. Revolving LC is used to support multiple shipments and payments/drawdowns over a period of time, either from a single PO or multiple POs. Adding a PO to a letter of credit after confirmation is a change in the ”terms” of the letter of credit, which will result in an amendment to the letter of credit.
Open: An open account is a way to pay a vendor without restrictions. When the goods are shipped, payment will be drawn out of the buyer's account. Technically this is not a letter of credit, but the function is facilitated through the letter of credit dialog within Trade Management. This method of payment is not as secure as letters of credit. No details are added to this type of letter of credit in Trade Management, the amount to be paid is entered directly.
You can choose from two letter of credit formats.
Long: The long form includes details at the purchase order and item level.
Short: The short form includes details at the purchase order level.
Completed applications and amendments can be transmitted to bank partners. Confirmations, drawdowns, and charges can also be received from bank partners.
To create a letter of credit, follow the steps listed below.
From the Tasks menu, select Trade Management > Create Letter of Credit. The Letter of Credit window appears.
|
Note: An open letter of credit does not require the existence of a purchase order. It can be opened to a beneficiary for a monetary amount. |
The Letter of Credit ID is populated automatically. The status of the letter of credit is displayed in the top right corner of the window. The default status is Worksheet.
Enter, select or search for LC data in the individual sections. For more information about the individual sections, see the Letter of Credit Window section.
After you have entered all necessary LC data, choose one of the following options.
Select Save to save the LC.
Select Save and Close to save the LC and close the Letter of Credit window.
Select Cancel to reject all entries and close the Letter of Credit window.
The Letter of Credit window allows you to view, create and edit a letter of credit. The window contains the following sections:
The Letter of Credit ID is populated automatically. The status of the letter of credit is displayed in the top right corner of the window, for example, Worksheet.
In the Letter of Credit section enter the following data.
Table 13-1 Letter of Credit - Fields and Description
| Field | Description |
|---|---|
|
Bank LC Reference |
Enter the Bank LC Reference. |
|
Type |
Select the Letter of Credit type from the list. Possible types are:
For more detailed information about possible letter of credit types, see the Letter of Credit Types section. This field is a required field. |
|
Form Type |
Choose between the following two letter of credit formats.
This field is a required field. |
|
Country of Sourcing |
Only available, if you select the LC Type Open. Enter, select or search for the appropriate country. |
|
Currency |
Enter, select or search for the currency of the LC. This field is a required field. |
|
Exchange Rate |
The exchange rate is populated automatically, based on the selected currency. By default the effective LC/bank rate is displayed in this field. If no LC/bank rate is found, the rate is either defaulted to the consolidation or operational exchange rate. If necessary, edit the displayed exchange rate with the Edit Exchange Rate icon. For more information about how to edit an exchange rate, see the Edit the Exchange Rate section. This field is a required field. |
In the Partners section enter the following data.
In the Banks section select, enter or search for the banks that are involved with the letter of credit transaction.
Table 13-3 Banks - Fields and Description
| Field | Description |
|---|---|
|
Issuing Bank |
The issuing bank opens the letter of credit when contacted by the retailer who intends to import goods. Enter, select or search for the corresponding bank. This field is a required field. |
|
Bank LC Applicable Rule |
The set of rules on the issuance and use of letters of credit. Select the set of rules from the list. If you select OTHER from the list, an entry field is displayed next to the Bank LC Applicable Rule field. Enter the used rule set. |
|
Advising Bank |
The foreign bank that advises the seller (vendor) that a letter of credit has been opened in their favor. Collects the documents required for compliance to the terms and conditions of the letter of credit so that payment can be made. Enter, select or search for the advising bank. |
|
Confirming Bank |
The bank that guarantees that funds are necessary to pay claims against a letter of credit. Enter, select or search for the confirming bank. |
|
Transferring Bank |
The bank which is asked by the beneficiary (first beneficiary) to transfer, in part or in full, its rights under the letter of credit to the second beneficiary. Enter, select or search for the transferring bank. |
|
Negotiating Bank |
The bank that is responsible for negotiating the letter of credit between the seller and the advising bank. Enter, select or search for the negotiating bank. |
|
Drawee |
The bank that is responsible for paying claims against a letter of credit. Enter, select or search for the drawee. |
In the Conditions section, select the conditions that apply to the letter of credit.
Table 13-4 Conditions - Fields and Description
| Field | Description |
|---|---|
|
With Recourse |
The With recourse term defines the situation in which the paying bank will be able to claim refunds from the beneficiary in case the letter of credit documents are not paid by the issuing bank. Check the With Recourse checkbox. |
|
Transferable |
A letter of credit can be transferred to the second beneficiary at the request of the first beneficiary, only if it expressly states that the letter of credit is ”transferable”. Check the Transferable checkbox. |
|
Transshipment |
Transshipment means unloading from one means of conveyance and reloading to another means of conveyance (whether or not in different modes of transport) during the carriage from the place of dispatch, taking in charge or shipment to the place of final destination stated in the credit. Check the Transshipment checkbox. |
|
Partial Shipment |
Partial shipment means shipping a lesser amount than what is stated in the letter of credit when only one set of transport documents presented; or making less amount of shipment than what is stated in the letter of credit or using multiple means of conveyance when more than one set of transport documents presented. Check the Partial Shipment checkbox. |
In the Dates section, enter or select the relevant dates for the letter of credit as shown in the following table.
Table 13-5 Dates - Fields and Description
| Field | Description |
|---|---|
|
Application Date |
Enter the application date or click the Calendar icon to select the date. This field is a required field. |
|
Confirmation Date |
Enter the confirmation date or click the Calendar icon to select a date. |
|
Expiration Date |
Enter the expiration date or click the Calendar icon to select a date. This field is a required field. |
|
Earliest Ship Date |
Enter the earliest ship date or click the Calendar icon to select a date. This field is only available, if you select the LC Type Open in the Letter of Credit header. This field is a required field for an open letter of credit. |
|
Latest Ship Date |
Enter the latest ship date or click the Calendar icon to select a date. This field is only available, if you select the LC Type Open in the Letter of Credit header. This field is a required field for an open letter of credit. |
The LC Value section contains the following fields. Enter the variance percent or specification value, depending on your selection in the Amount Type field.
Table 13-6 LC Value - Fields and Description
| Fields | Description |
|---|---|
|
Amount Type |
Select the amount type from the list. Possible types are:
This field is a required field. |
|
Variance % |
Enter the variance value in percent. If you select the Amount Type Exact, this field is disabled. |
|
Specification |
Select a specification, from the list. For example, select Maximum. If you select the Amount Type Approximately, this field is disabled. |
|
Amount |
Enter the amount. If you select the Amount Type Approximately, this field is disabled. This field is a required field |
|
Amount Word |
If you select the Amount Type Exact, this field is disabled. |
|
Net Amount |
This field displays the net value of the letter of credit, calculated as the total amount of the letter of credit plus or minus any amendments. You cannot edit this value. |
|
Open Amount |
This field displays the open amount of the letter of credit; calculated as the net amount minus any drawdowns issued against the letter of credit. You cannot edit this value. |
|
Amendments |
This field displays the total of all accepted amendments attached to the letter of credit. You cannot edit this value. |
|
Drawdown |
This field displays the total of all drawdowns executed against the letter of credit. You cannot edit this value. |
|
Charges |
This field displays the total of all charges incurred against the letter of credit. You cannot edit this value. |
The Terms section contains the following fields.
Table 13-7 Terms - Fields and Description
| Fields | Description |
|---|---|
|
Title Pass Location Type |
Select the location type from the list. |
|
Title Pass Location |
Enter the location. |
|
Transport To |
Enter, select or search for the transport to location. |
|
Lading Port |
Enter, select or search for the lading port. |
|
Discharge Port |
Enter, select or search for the discharge port. |
|
Place of Expiry |
Enter, select or search for the place of expiry. This field is a required field. |
|
Credit Available With |
Enter, select or search for the bank at which credit is available. |
|
Purchase Type |
Select the purchase type from the list. For example, select Backhaul or Pick-up. This field is a required field. |
|
Issuance |
Select the issuance from the list. |
|
Advice Method |
Select the advice method from the list. |
|
Drafts At |
Select the draft at entry from the list. For example, select 60 Days. |
|
Presentation Terms |
Select the presentation terms from the list. For example, select By Payment. This field is a required field. |
|
Negotiation Days |
Enter the negotiation days. |
The Comments section holds the comments field. You can enter any comments for the letter of credit.
The Toolbar displays the icons and buttons for actions that can be performed for the letter of credit such as changing the status of the letter of credit or navigating to the LC Details window to view details of the letter of credit and the PO attached to it. The Toolbar contains the following icons and buttons.
Table 13-8 Letter of Credit Toolbar - Icons/Buttons and Description
| Action Icons/Buttons | Description |
|---|---|
|
Help icon |
You can access the online help for a particular page by clicking the Help icon. |
|
Expand and Collapse icons |
You can expand all the sections and collapse all the sections in the Letter of credit window by clicking the Expand or Collapse icons. |
|
Status |
If you click the Status button, the status of the letter of credit changes to the status specified on the button. When there is more than one status to which the LC can be changed, click the arrow on the right side of the button to display the additional status options. Possible letter of credit status are:
Letters of credit move to the Extracted status when you send them to banks from the Send Letters of Credit window. Therefore, the status Extracted does not appear in the status option list. |
|
Details |
Click Details to view the details of the letter of credit. The LC Details window appears. For more information about LC details, see the Details section. |
|
More Actions |
Click More Actions to see a list of additional actions that can be performed in the Letter of Credit window. For more information about the More Action Menu for LCs, see the Letter of Credit - More Actions Menu section. |
|
Save |
Click Save to save changes to the letter of credit. |
|
Save and Close |
Click Save and Close to save changes to the letter of credit and close the window. |
|
Cancel |
Click Cancel to reject all entries and close the window. |
|
Done |
Only available in view mode. Click Done to close the window. |
Use the More Actions menu to navigate to the following windows. The More Actions menu contains the following options.
Table 13-9 More Actions Menu - Buttons and Description
| Action Buttons | Description |
|---|---|
|
Activities |
Opens the LC Activities window. This window displays a list of all activities created against the LC, for example, purchase orders, amendments, bank charges and drawdowns. For more information about this function, see the Activity section. |
|
Amendments |
Opens the LC Amendments window. This window allows you to manage amendments to the LC. For more information about this function, see the Amendments section. |
|
Required Documents |
Opens the Required Documents window. This window displays all required documents for the LC. For more information, see ”Required Documents” in the Oracle Retail Merchandising Purchase Orders and Contracts User Guide. |
|
Letter of Credit Report |
Opens the Letter of Credit Report. You can print the report, in case a hard copy is needed. |
|
Currency |
You can toggle between the letter of credit and the primary currency, to view the LC amounts in either the LC or the system's primary currency. The currency is set to LC by default. |
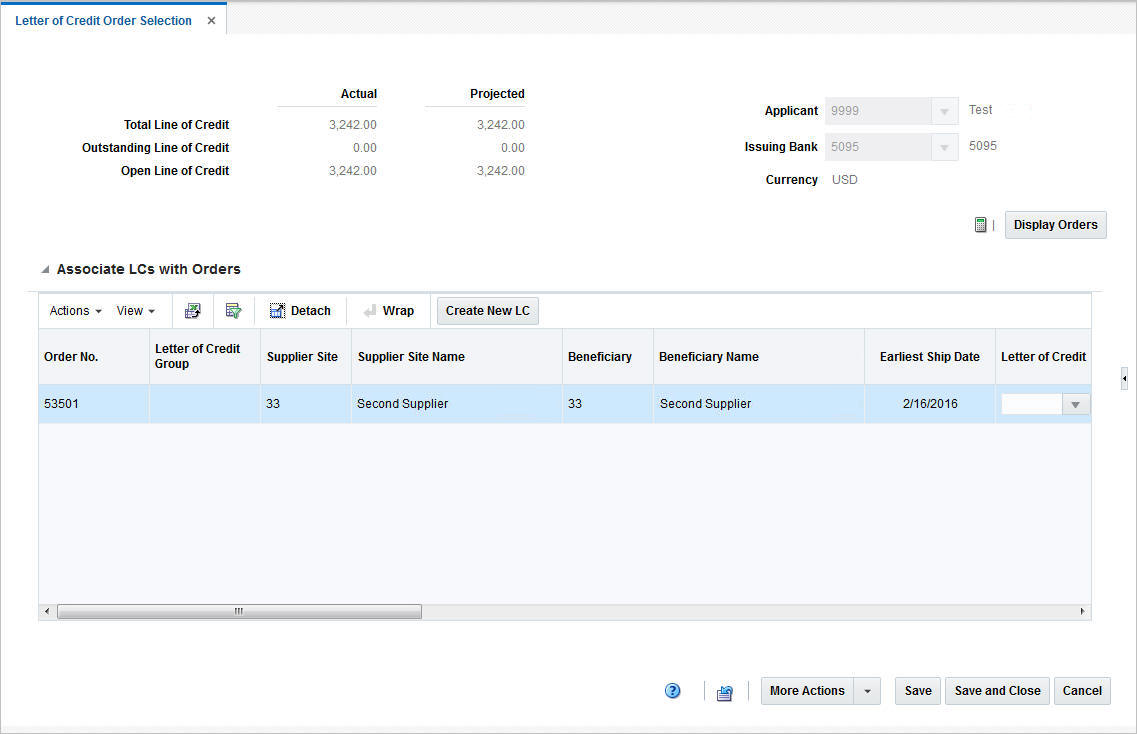
The Letter of Credit Order Selection window allows you to associate purchase orders to letters of credit.
The Letter of Credit Order Selection window contains the following sections.
The LC Order Selection header displays the following information.
Table 13-10 LC Order Selection Header - Fields and Description
| Fields | Description |
|---|---|
|
Total Line of Credit |
This field is auto-populated, after you have selected the issuing bank. |
|
Outstanding Line of Credit |
This field is auto-populated, after you have selected the issuing bank. |
|
Open Line of Credit |
This field is auto-populated, after you have selected the issuing bank. |
|
Applicant |
Enter, select or search for the applicant. |
|
Issuing Bank |
Enter, select or search for the issuing bank. |
|
Currency |
This field is auto-populated, after you have selected the issuing bank. |
Additionally, the LC Order Selection header contains the following icon and action button.
Table 13-11 LC Order Selection Header - Icons/Action Buttons and Description
| Icons/Action Buttons | Description |
|---|---|
|
Recalculate icon |
If you create a new letter of credit, use the Recalculate icon to update the displayed credit values such as Total Line of Credit, Outstanding of Credit and Open Line of Credit. |
|
Display Orders |
Starts the order search. For more information about the how to search for orders and associate LCs with them, see the Associate LCs with Purchase Orders section. |
In this table you can associate LCs with orders. The table displays the following columns by default.
Order No.
Letter of Credit Group
Supplier Site and Supplier Site Name
Beneficiary and Beneficiary Name
Earliest Ship Date
Letter of Credit
In the Letter of Credit column you can search for the corresponding letter of credit, by Letter of Credit ID, Bank LC Reference and LC Type.
Errors
The Errors column displays a checkbox, if checked the purchase order contains an error. To view the individual error message, add the Error Message column to the table and view the message.
Use the Actions Menu, icons and button to apply actions to the table. You can perform the actions listed below, as well as actions described in ”Screen Level Action - Icons and Buttons” in the Oracle Retail Trade Management Do the Basics User Guide.
Table 13-12 Associate LCs with Orders Table - Actions Menu/Icons/Button and Description
| Actions Menu/Icon/Button | Description |
|---|---|
|
Create New LC and Create New LC button |
Select Actions > Create New LC, or use the Create New LC button to create a new letter of credit. The Letter of Credit window appears. For more details about how to create an LC, see Create a Letter of Credit. |
To associate an LC with a purchase order, follow the steps below.
From the Tasks Menu select, Trade Management > Letter of Credit Order Selection. The Letter of Credit Order Selection window appears.
In the Applicant field, enter, select or search for the corresponding applicant.
In the Issuing Bank field, enter, select or search for the bank.
Click Display Orders. The results are shown in the Purchase Order table.
|
Note: Only POs created for the selected applicant, with the status Approved and payment method LC are displayed. All shown POs are also not yet associated to a letter of credit. |
In the Letter of Credit column, enter select or search for the corresponding LC.
The Letter of Credit ID is shown in the Purchase Order table.
Then choose one of the following options.
Select Save to save your changes.
Select Save and Close to save your changes and close the Letter of Credit Orders Selection window.
Select Cancel to reject all entries and close the Letter of Credit Orders Selection window.
To create a new LC and associate it with a purchase order follow the steps below.
From the Tasks Menu select, Trade Management > Letter of Credit Order Selection. The Letter of Credit Order Selection window appears.
In the Applicant field, enter, select or search for the corresponding applicant.
In the Issuing Bank field, enter, select or search for the bank.
Click Display Orders. The results are shown in the Associate LCs with Orders table below.
Select a record in the table.
Then select Actions > Create New LC, or use the Create New LC button.
The system generates a letter of credit ID and populates the Letter of Credit field for the selected purchase order. Additionally, the system defaults the Type and Form Type column.
|
Note: You can change the values of the Type and Form Type columns. You can also associate additional POs to the newly created LC by selecting the created LC from the list in the Letter of Credit column. |
Use the Recalculate icon, to recalculate the Actual and Projected Credit values.
After you have associated the LCs with the purchase orders, choose one of the following options.
Select Save to save your changes.
Select Save and Close to save your changes and exit the Letter of Credit Orders Selection window.
Select Cancel to reject all entries and close the Letter of Credit Orders Selection window.
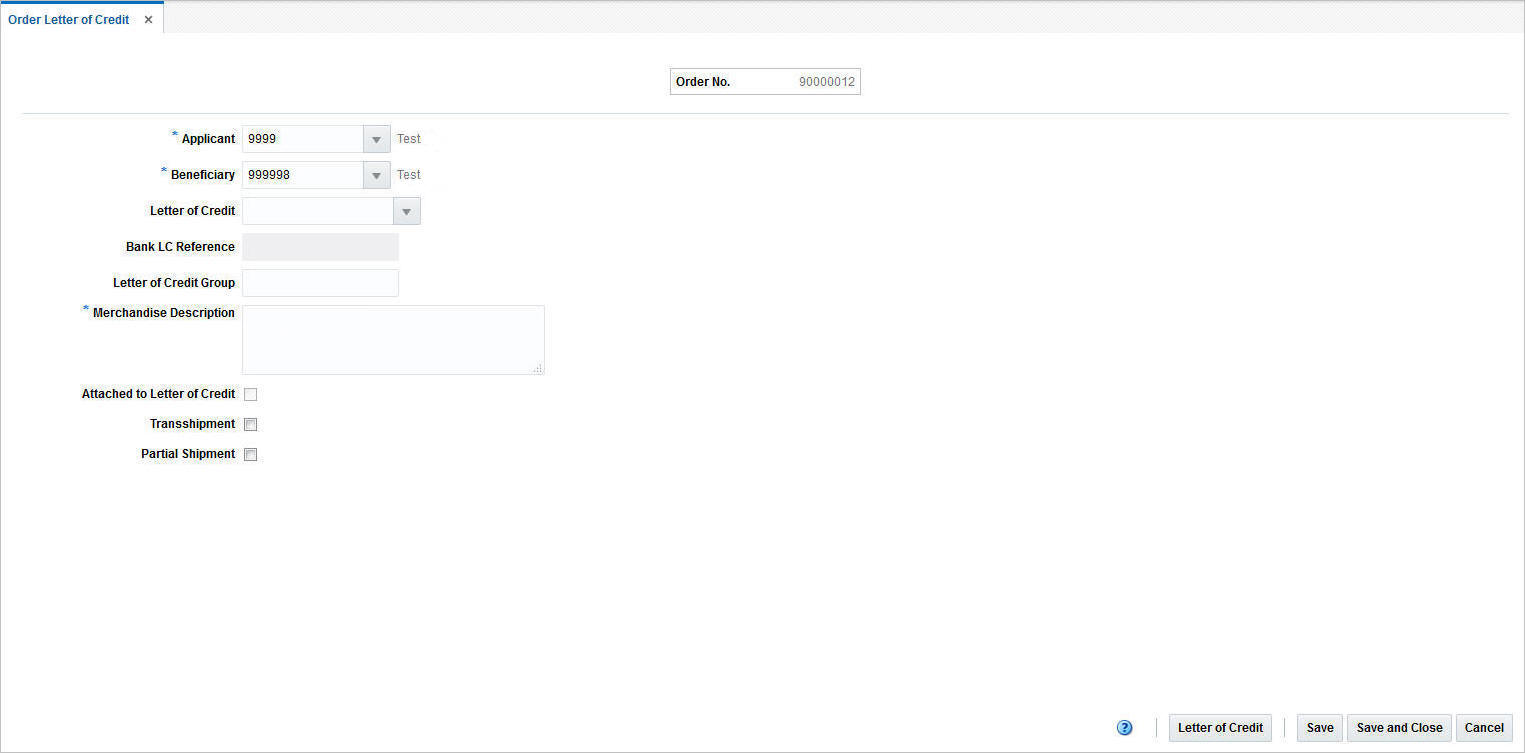
For information about adding an LC to purchase order from within a purchase order, see "Letter of Credit" in the Oracle Retail Merchandising Purchase Orders and Contracts User Guide
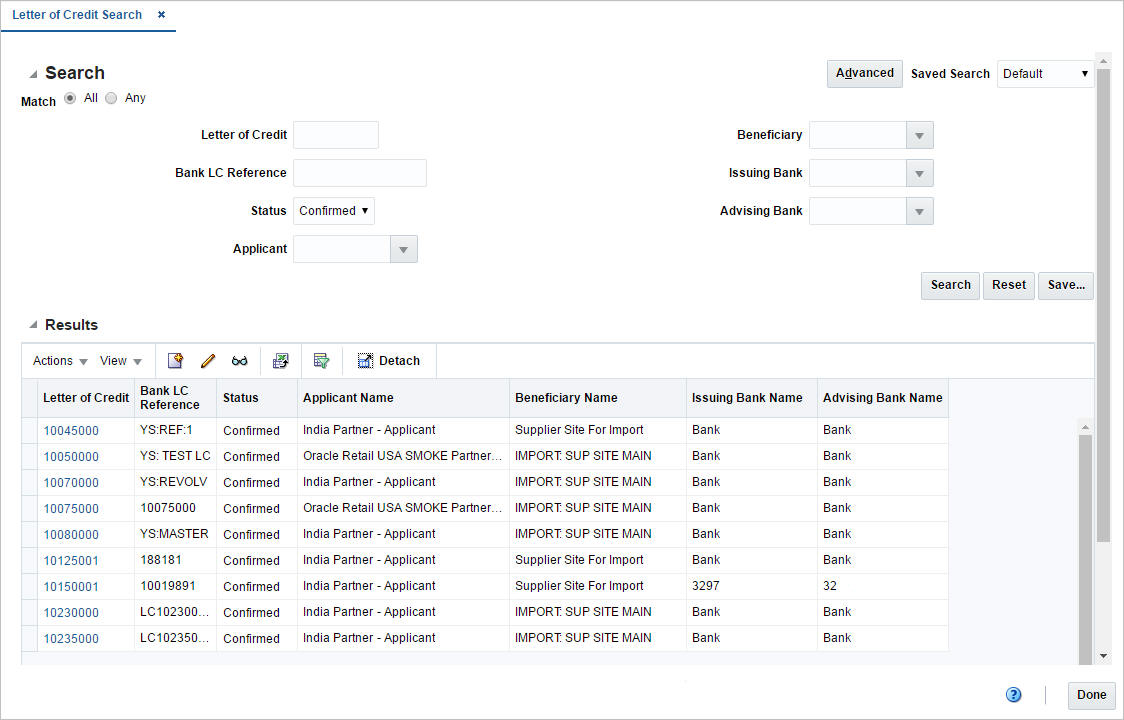
The Manage Letter of Credit option opens the Letter of Credit Search window. In the Letter of Credit Search window you can search for, maintain and view letters of credit.
You can access Letter of Credit search window form the Task menu, Trade Management > Manage Letter of Credit. The Letter of Credit Search window appears
The Letter of Credit Search window contains the following two sections.
Search
For more information about how to search for an LC, see the Search for an LC section.
To search for an LC:
From the Task menu, select Trade Management > Manage Letter of Credit. The Letter of Credit Search window appears.
You can search for an LC using basic or advanced search criteria, depending on the requirement. The basic mode is the default search mode.
Click Advanced to access the search section in advanced mode.
Click Basic to return to the basic mode.
To search for an LC using basic search criteria:
Enter, select or search for one or all of the following basic search criteria.
Table 13-13 Letter of Credit Search - Basic Search Criteria and Description
| Fields | Description |
|---|---|
|
Match option |
Check radio button All or Any. All - only LCs matching all entered search criteria are shown. Any - LCs matching any of the entered search criteria are shown. |
|
Letter of Credit |
Enter the Letter of Credit ID. |
|
Bank LC Reference |
Enter the bank LC reference. |
|
Status |
Select the LC status. Possible statuses are:
|
|
Applicant |
Enter, select or search for the applicant. |
|
Beneficiary |
Enter, select or search for the beneficiary. |
|
Issuing Bank |
Enter, select or search for the issuing bank. |
|
Advising Bank |
Enter, select or search for the advising bank. |
Click Search. The LCs that match the search criteria are displayed in the Results section.
Click Reset to clear the search section and results.
Click Done to close the window.
To search for an LC using advanced search criteria:
To search using advanced search criteria, enter or select one or all of the advanced search criteria.
To narrow down the search, use the list next to the search fields. For example, determine if the entered value should be equal or not equal the search result.
Click Search. The LCs that match the search criteria are displayed in the Results section.
Click Reset to clear the search section and results.
Click Add Fields to add more fields for the advanced search. To remove the field from the search, click the x right next to the field.
Click Done to close the window.
The Results section lists the retrieved letters of credit. The Results table shows the following columns by default.
Letter of Credit
Bank LC Reference
Status
Applicant Name
Beneficiary Name
Department Name
Issuing Bank Name
Advising Bank Name
To edit an already existing LC, follow the steps below.
From the Tasks menu, select Trade Management > Manage Letter of Credit. The Letter of Credit Search window appears.
Enter or select search criteria as desired to make the search more restrictive.
Click Search. The letters of credit that match the search criteria are displayed in the Results section.
Select a record in the Results section.
In the Letter of Credit column, click on the LC link, or mark a record and select Actions > Edit or use the Edit icon. The Letter of Credit window appears. The data of the selected LC is shown.
Edit the data as necessary.
After you have entered the necessary information, choose one of the following options.
Select Save to save your changes.
Select Save and Close to save your changes and close the Letter of Credit window.
Select Cancel to reject all entries and close the Letter of Credit window.
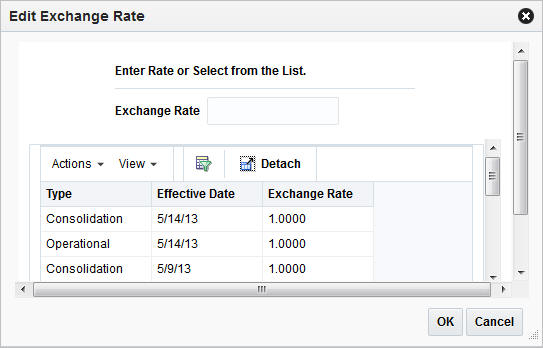
To edit the displayed exchange rate, follow the steps listed below.
Click on the Edit Exchange Rate icon.
The Edit Exchange Rate window appears.
In the Exchange Rate field, enter the exchange rate manually or select a record in the Exchange Rate table.
|
Note: The Exchange Rate table lists the following exchange rates types - LC/bank, consolidation or operational. The consolidation exchange rate is only shown, if enabled. |
Then choose one of the following options.
Click OK. The system overwrites the current value.
Click Cancel to reject all entries and close the Edit Exchange Rate window.
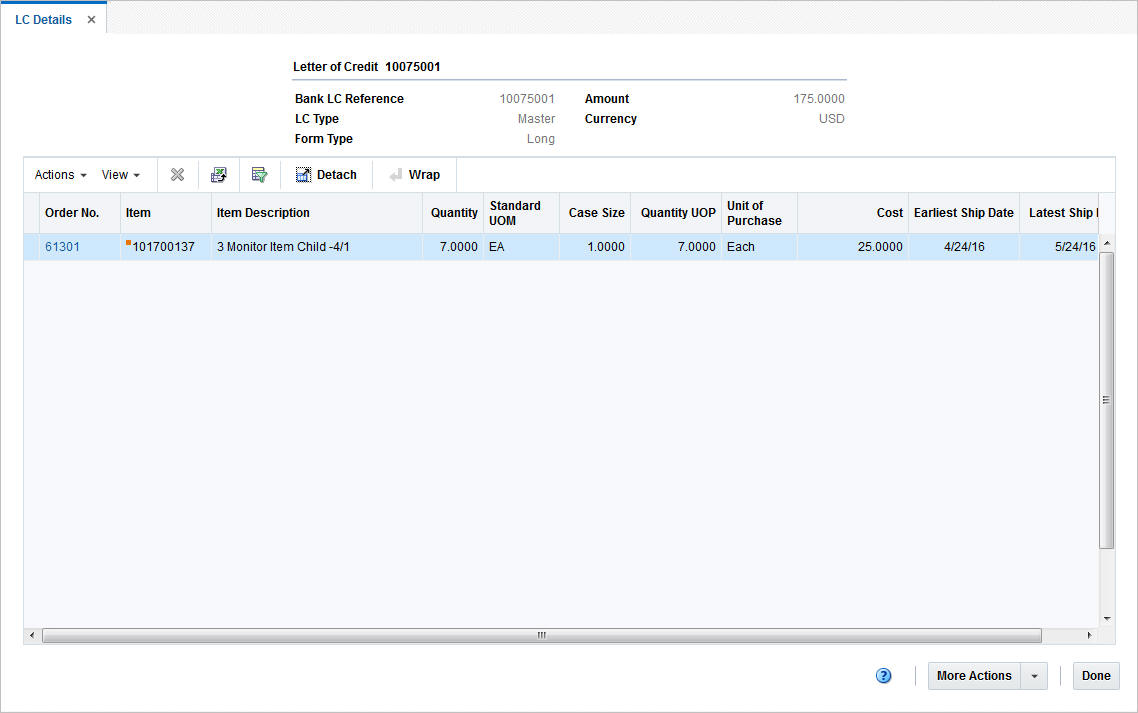
The LC Details window allows you to view details of a letter of credit and delete attached purchase orders. The window contains the following sections:
The LC Details Header section contains the following fields:
Letter of Credit ID
Bank LC Reference
LC Type
Form Type
LC Amount
When you delete a PO from the LC, the value of the Amount field is recalculated.
LC Currency
Depending on the selected LC Form Type, the LC Details table has two views.
If you select the LC Form Type Long, the table displays the following columns by default:
Order No.
Item
Item Description
Quantity
Standard UOM
Case Size
Quantity UOP
Unit of Purchase
Cost
Earliest Ship Date
Latest Ship Date
If you select the LC Form Type Short, the table displays the following columns by default:
Order No.
Merchandise Description
Cost
Earliest Ship Date
Latest Ship Date
Use the Actions Menu and Icons to apply actions to the table. You can perform the actions listed below.
Table 13-14 LC Details Table - Actions Menu/Icons and Description
| Actions Menu/Icons | Description |
|---|---|
|
Delete and Delete icon |
You can delete POs from an LC by selecting Actions > Delete, or by using the Delete icon. For more information about hod to delete POs from an LC, see the Delete a PO from a Letter of Credit section. |
|
Export to Excel and Export to Excel icon |
You can export the records in the table to a Microsoft Excel spreadsheet by selecting Actions > Export to Excel or by using the Export to Excel icon. |
|
View Order |
You can view the attached PO by selecting Actions > View Order. The Order window appears. For more information, about how to view the attached PO of an LC, see the View PO attached to a Letter of Credit section. |
|
Wrap icon |
You can wrap the values in the table column by first clicking the column on which you would like the text to wrap and then use the Wrap icon. |
You can customize the view of the table. Use the View Menu and icons to customize the view as listed below.
Table 13-15 LC Details Table - View Menu and Description
| View Menu | Description |
|---|---|
|
Columns |
You can manage which of the columns will be shown in the table by clicking the Show All and Manage Columns options. |
|
Detach or Detach icon |
You can view the tables in the application in a separate window by clicking the Detach or by using the Detach icon. |
|
Sort |
You can sort columns by the following options:
|
|
Reorder Columns |
You can reorder columns by clicking the Reorder Columns option. |
|
Query by Example or Query by Example icon |
You can filter the records by one or multiple column values by clicking the Query by Example option or by using the Query by Example icon. |
The Toolbar displays the icons and buttons for actions that can be performed in the LC Details window. The Toolbar contains the following icons and buttons.
Table 13-16 LC Details Toolbar - Icons/Buttons and Description
| Action Icons/Buttons | Description |
|---|---|
|
Help icon |
You can access the online help for a particular page by clicking the Help icon. |
|
More Actions |
Click More Actions to see additional actions that can be performed in the LC Details window. The following action is available:
|
|
Save |
Click Save to save your changes to the letter of credit. |
|
Save and Close |
Click Save and Close to save your changes and close window. |
|
Cancel |
Click Cancel to reject all entries and close the window. |
|
Done |
Only available in view mode. Click Done to close the window. |
To delete a purchase order from a letter of credit, follow the steps listed below.
From the Tasks menu, select Trade Management > Manage Letter of Credit. The Letter of Credit Search window appears.
Enter or select search criteria as desired to make the search more restrictive.
Click Search. The letters of credit that match the search criteria are displayed in the Results section.
Select a record in the Results section.
In the Letter of Credit column, click on the LC link, or mark a record and select Actions > Edit or use the Edit icon. The Letter of Credit window appears.
In the LC Toolbar select Details. The LC Details window appears.
In the LC Details table, select a purchase order.
Then click Actions > Delete or use the Delete icon to delete the selected purchase order.
|
Note: If the LC is in Confirmed status, the Delete option is still available, however, you receive a message that an amendment is created, if you confirm the prompt with Yes. The selected PO remains in the LC Details table.You need to accept the amendment and generate an amendment number for the change in the LC Amendments screen. For more information about amendments, see the Amendments section. |
You are prompted if you want to delete the selected purchase order from the LC Details table. Confirm the displayed prompt with Yes.
The purchase order is removed from the LC Details table and the amount in the LC Details Header is recalculated.
After you have deleted all necessary POs, choose one of the following options.
Click Save to save your changes.
Click Save and Close to save your changes and close the LC Details window.
Click Cancel to reject all entries and close the LC Details window.
To view a particular purchase order attached to the selected LC, follow the steps below.
From the Tasks menu, select Trade Management > Manage Letter of Credit. The Letter of Credit Search window appears.
Enter or select search criteria as desired to make the search more restrictive.
Click Search. The Letters of Credit that match the search criteria are displayed in the Results section.
Select a record in the Results section.
In the Letter of Credit column, click on the LC link, or mark a record and select Actions > Edit or use the Edit icon. The Letter of Credit window appears.
In the LC Toolbar select Details. The LC Details window appears.
In the LC Details table, select a purchase order.
Then select Actions > View Order. The Order window appears. You can view the details of the attached purchase order.
Click Done to close the Order window.
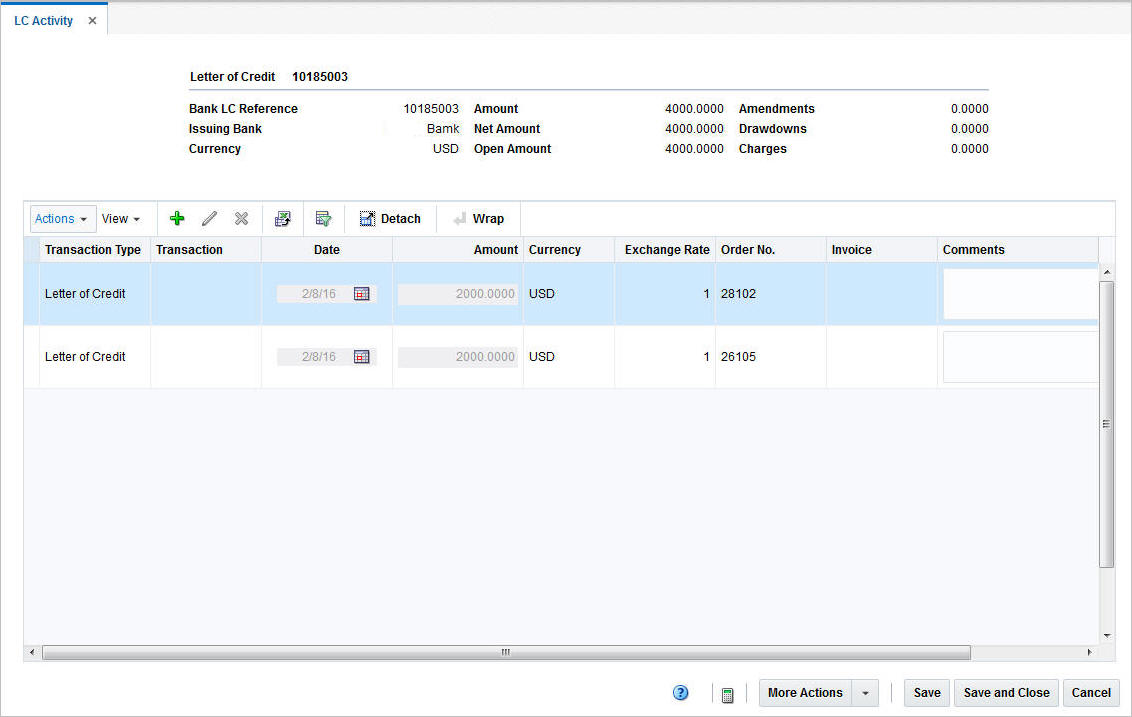
The LC Activities window allows you to view, add, edit and delete activities that have occurred against a letter of credit. Activities include purchase orders, amendments, bank charges and drawdowns.
|
Note: The LC Activity function is only available, if the LC is in the status Confirmed. |
The LC Activity window contains the following sections:
The LC Activity header contains LC information such as the LC ID, bank LC reference, issuing bank, LC currency and amounts (open and net) as well as amendments, drawdowns and charges.
The LC Activity Table shows the following columns by default:
Transaction Type
Transaction
Date
Amount
Currency
Exchange Rate
Order No.
Invoice
Comments
To add an activity to the LC, follow the steps listed below.
From the Tasks menu, select Trade Management > Manage Letter of Credit. The Letter of Credit Search window appears.
Restrict your search to LCs with the status Confirmed.
Click Search. The Letters of Credit that match the search criteria are displayed in the Results section.
Select a record in the Results section.
In the Letter of Credit column, click on the LC link, or mark a record and select Actions > Edit or use the Edit icon. The Letter of Credit window appears.
In the LC Toolbar, select More Actions > Activities. The LC Activity window appears.
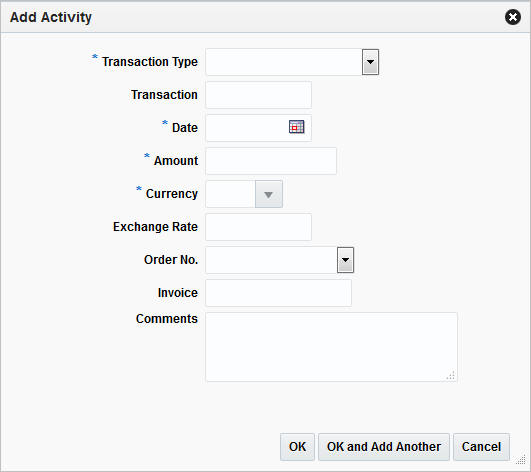
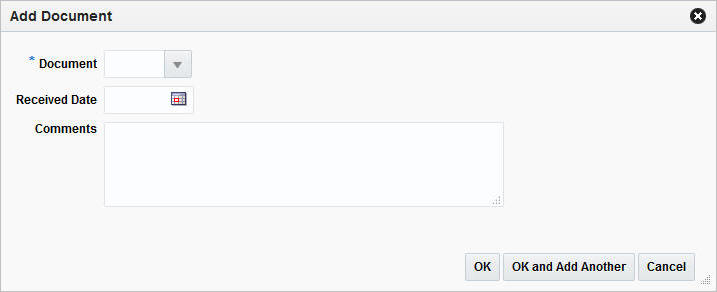
In the LC Activity table, select Actions > Add or use the Add icon. The Add Activity window appears.
In the Transaction Type field, select the transaction type from the list. For example, select Bank Charges. This is a required field
In the Transaction field, enter the transaction number.
In the Date field, enter a date or use the Calendar icon to select a date. This field is a required field.
In the Amount field, enter the amount of the activity. This field is a required field.
In the Currency field, enter, select or search for the currency. This field is a required field.
The Exchange Rate field is populated automatically, depending on your selected currency. If you need to change the exchange rate, see the Edit the Exchange Rate section.
In the Order No. field, select the PO number from the list.
In the Invoice field, enter the invoice number.
In the Comments field, enter comments for the current activity, if necessary.
Then choose one of the following options.
Click OK to save the current activity to the LC and close the Add Activity window. The activity is shown in the LC Activity table.
Click OK and Add Another to add additional activities to the LC.
Click Cancel to reject all entries and close the Add Activity window.
|
Note: If want to see the impact of the added activity, use the Recalculate icon to recalculate the values of the LC Activity header. |
To update LC activities, follow the steps listed below.
From the Tasks menu, select Trade Management > Manage Letter of Credit. The Letter of Credit Search window appears.
Restrict your search to LCs with the status Confirmed.
Click Search. The Letters of Credit that match the search criteria are displayed in the Results section.
Select a record in the Results section.
In the Letter of Credit column, click on the LC link, or mark a record and select Actions > Edit or use the Edit icon. The Letter of Credit window appears.
In the LC Toolbar, select More Actions > Activities. The LC Activity window appears.
In the LC Activity table, you can edit the following fields.
Date: Enter the date or use the Calendar icon to change the date.
Amount: Edit the amount.
|
Note: If you edit the amount of an activity, you need to use the Recalculation icon to update the values shown in the LC Activity header. |
Comments: Edit the Comment column for the selected activity, if necessary.
To update any other values of an activity, select an activity in the LC Activity table.
Select Actions > Edit or use the Edit icon. The Edit Activity window appears.
Edit the fields, if necessary.
|
Note: You cannot edit the Transaction Type field. The field is disabled once an activity has been saved. |
Then choose one of the following options.
Click OK to save your changes and close the Edit Activity window. The system returns to the LC Activity window.
Click Cancel to reject all entries and close the Edit Activity window.
After you have made all necessary changes, choose one of the following options.
Click Save to save your changes.
Click Save and Close to save your changes and close the LC Activity window.
Click Cancel to reject all entries and close the LC Activity window.
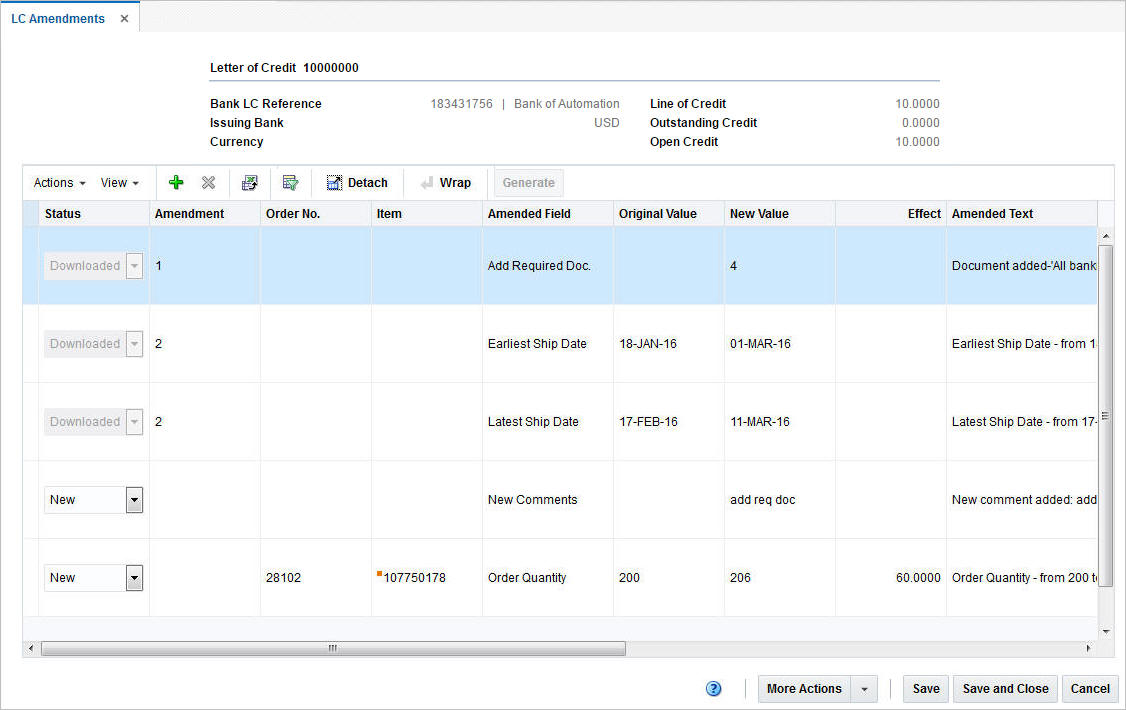
The LC Amendments window allows you to manage amendments to letters of credit. Amendments are any changes made to letters of credit after they have been confirmed.
You can carry out the following actions in the LC Amendments window:
Add
View
Delete
Update the status
Amendments are either created manually in this window, or are system-generated when any of the following changes are made to a purchase order:
Another order is added to a confirmed letter of credit.
An item is added to a PO.
An item is deleted from a PO.
Earliest and latest ship dates are changed.
POs are cancelled.
Transshipment or partial shipment options are changed.
Unit cost or order quantity are updated.
Required documents are updated.
|
Note: You cannot change the content of the document, only whether the documents is included or not. |
The LC Amendments window contains the following sections.
The LC Amendments header displays LC information such as LC ID, bank LC reference, issuing bank, currency as well as line of credit information.
The LC Amendments table contains all amendments created against the LC. The table contains the following columns by default:
Status
In the Status field you can select the status of the amendment from the list. Possible status are:
New
Accept
Hold
Download
Amendment
Order No.
Item
Amended Field
Original Value
New Value
Effect
Amended Text
Use the Actions Menu, icons and button to apply actions to the table. You can perform the actions listed below, as well as actions described in ”Screen Level Action - Icons and Buttons” in the Oracle Retail Trade Management Do the Basics User Guide.
Table 13-17 LC Amendments Table - Actions Menu/Icons/Button and Description
| Actions Menu/Icons/Button | Description |
|---|---|
|
Generate and Generate button |
Select Actions > Generate or use the Generate button to generate an Amendment ID. If you click Generate, the system generates the next sequential Amendment ID and populates the ID in the Amendment column for all line(s) in Accept status. For more information about how to generate amendment IDs, see the Generate Amendment IDs section. When you select the Send Amendments link in the Tasks menu and search for letters of credit to send, only amendments that have been generated in the LC Amendments window are transmitted. |
Use the More Actions menu to navigate to the following windows.
Table 13-18 LC Amendments - More Actions Menu and Description
| Actions Menu | Description |
|---|---|
|
Required Documents |
Opens the Required Documents window. This window displays all required documents for the LC. For more information, see ”Required Documents” in the Oracle Retail Merchandising Purchase Orders and Contracts User Guide. |
|
Amendments Report |
Opens the Amendments Report. You can print the report, in case a hard copy is needed. |
|
Currency |
You can toggle between the letter of credit and the primary currency, to view the LC amounts in either the LC or the system's primary currency. The currency is set to LC by default. |
To add amendments to an LC follow the steps below.
From the Tasks menu, select Trade Management > Manage Letter of Credit. The Letter of Credit Search window appears.
Enter or select search criteria as desired to make the search more restrictive.
Click Search. The Letters of Credit that match the search criteria are displayed in the Results section.
Select a record in the Results section.
In the Letter of Credit column, click on the LC link, or mark a record and select Actions > Edit or use the Edit icon. The Letter of Credit window appears.
In the More Actions menu select Amendments. The LC Amendments window appears.
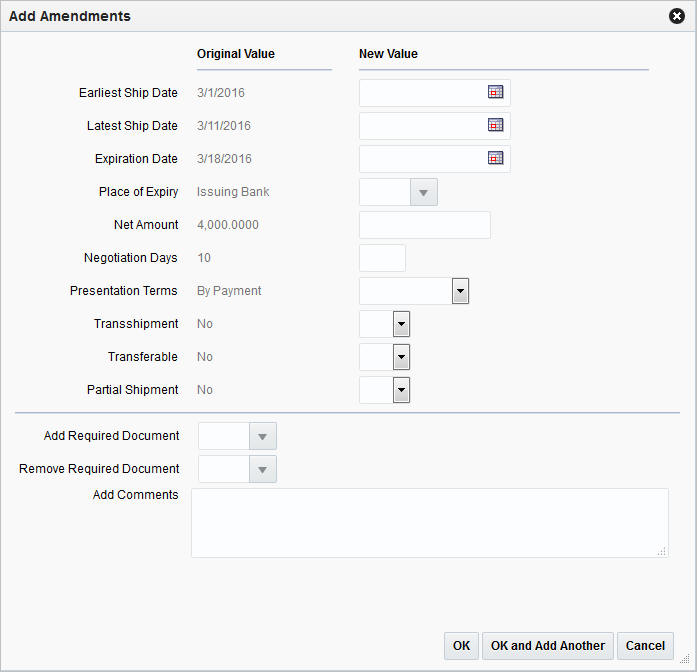
In the LC Amendments table, select Actions > Add or use the Add icon. The Add Amendments window appears.
The following two columns are displayed:
Original Value, containing the current values
New Value
Enter new values, if necessary.
In the Add Required Documents field, use the list to add documents to the LC.
In the Remove Required Document field, use the list to delete documents from the LC.
In the Add Comments field, enter your remarks for the amendments, if necessary.
Then choose one of the following options.
Click OK to add your changes and close the Add Amendments window. The system returns to the LC Amendments window. All changes are shown in the LC Amendment table with the status New. The Amendment column is blank.
Click OK and Add Another to add additional amendments.
Click Cancel to reject all entries and close the Add Amendments window.
To delete amendments from an LC follow the steps below:
From the Tasks menu, select Trade Management > Manage Letter of Credit The Letter of Credit Search window appears.
Enter or select search criteria as desired to make the search more restrictive.
Click Search. The Letters of Credit that match the search criteria are displayed in the Results section.
Select a record in the Results section.
In the Letter of Credit column, click on the LC link, or mark a record and select Actions > Edit or use the Edit icon. The Letter of Credit window appears.
In the More Actions menu select Amendments. The LC Amendments window appears.
In the LC Amendments table select a record. Choose Actions > Delete or use the Delete icon.
You are prompted if you want to delete the record. Confirm the displayed prompt with Yes.
|
Note: Amendments can only be deleted up until the time they are generated and an amendment ID is created. Additionally, you can only delete manually created amendments. System-generated amendments cannot be deleted. Therefore, the Delete option is only enabled for manually created amendments. |
The record is deleted from the LC Amendments table.
Then choose one of the following options.
Click Save to save your changes to the letter of credit.
Click Save and Close to save your changes to the letter of credit and close the LC Amendments window.
Click Cancel to reject all entries and close the LC Amendments window.
To generate Amendment IDs follow the steps below.
In the LC Amendments window, go to the LC Amendments table.
In the Status column, select the status Accept from the list, for all amendments you want to create an ID for.
Select Actions > Generate or use the Generate button to create Amendment IDs for all records with a status Accept. The system generates the next sequential Amendment ID and populates the Amendment column.
Then choose one of the following options.
Click Save to save your changes to the letter of credit.
Click Save and Close to save your changes to the letter of credit and close the LC Amendments window.
Click Cancel to reject all entries and close the LC Amendments window.
When a letter of credit is added to the system, it must go through a series of checks before it is accessible in the system. Depending on your user role, you may not be able to move the letter of credit to the next status. A letter of credit may be in any of the following statuses.
| Status | Definition |
|---|---|
| Worksheet | The letter of credit has been started, but not completed. |
| Submitted | The letter of credit has been completed and is pending review. |
| Approved | The letter of credit has been reviewed and approved. |
| Extracted | The details of the letter of credit were sent to the external entity affected by the letter of credit. |
| Confirmed | The letter of credit has been confirmed by the bank and a reference number has been assigned to the letter of credit. |
| Closed | The letter of credit is complete. |
To submit a letter of credit for approval follow the steps below.
From the Tasks Menu, select Trade Management > Manage Letter of Credit. The Letter of Credit Search window appears.
Restrict your search to letters of credit in the status Worksheet.
Click Search. The LCs that match the search criteria are displayed in the Results section.
In the Letter of Credit column, click on the LC ID link, or mark a record and select Actions > Edit, or use the Edit icon. The Letter of Credit window appears.
In the LC Toolbar, select Submit.
When prompted to submit the letter of credit, click Yes.
After you have submitted the LC, choose one of the following options.
Select Save to save your changes.
Select Save and Close to save your changes and exit the Letter of Credit window.
Select Cancel to reject all entries and exit the Letter of Credit window.
To approve a letter of credit follow the steps below.
From the Tasks Menu, select Trade Management > Manage Letter of Credit. The Letter of Credit Search window appears.
Restrict your search to letters of credit in the status Submit.
Click Search. The LCs that match the search criteria are displayed in the Results section.
In the Letter of Credit column, click on the LC ID link, or mark a record and select Actions > Edit, or use the Edit icon. The Letter of Credit window appears.
In the LC Toolbar, select Approve.
When prompted to approve the letter of credit, click Yes.
After you have approved the LC, choose one of the following options.
Select Save to save your changes.
Select Save and Close to save your changes and exit the Letter of Credit window.
Select Cancel to reject all entries and exit the Letter of Credit window.
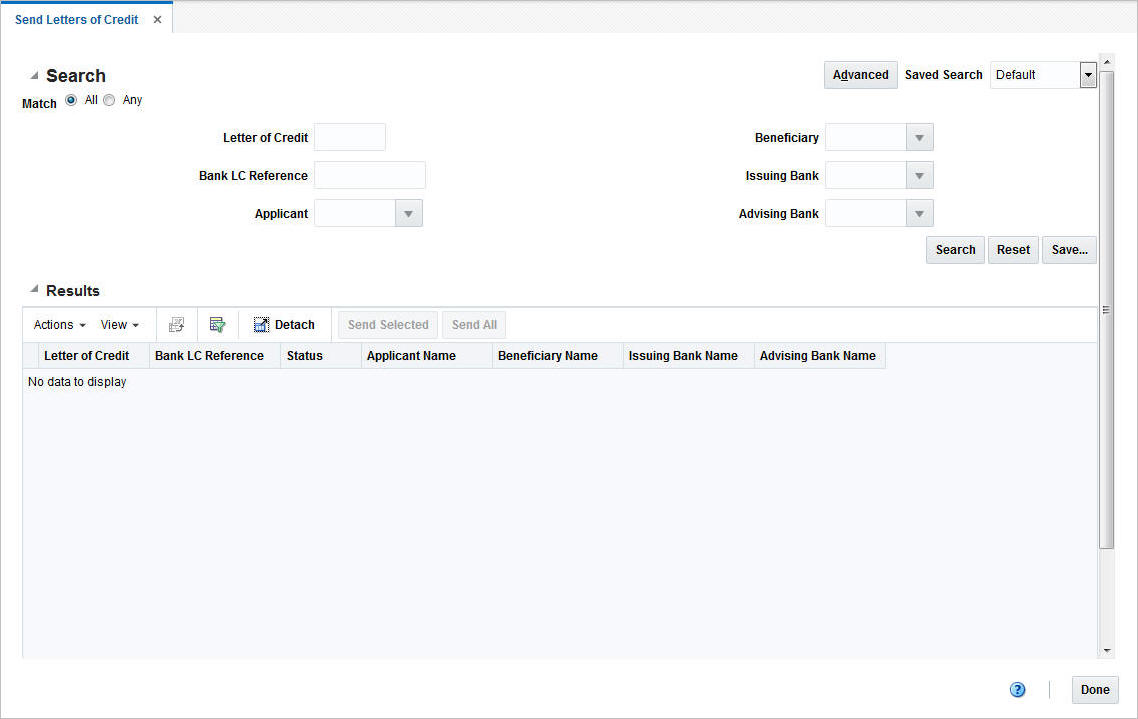
The Send Letter of Credit option opens the Send Letters of Credit window. The Send Letters of Credit window allows you to search for letter(s) of credit and send them to the bank.
You can access Send Letter of Credit window form the Task menu, select Trade Management > Send Letter of Credit. The Supplier Search window appears.
The Send Letters of Credit window contains the following sections:
Search
For more information about how to search for send letters of credit, see the Search for a Letter of Credit to Send section.
To search for an LC to send to the bank:
From the Task menu, select Trade Management > Send Letter of Credit. The Send Letters of Credit window appears.
You can search for an LC using basic or advanced search criteria, depending on the requirement. The basic mode is the default search mode.
Click Advanced to access the search section in advanced mode.
Click Basic to return to the basic mode.
To search for an LC using basic search criteria:
Enter, select or search for one or all of the following basic search criteria.
Table 13-19 Send Letters of Credit - Basic Search Criteria and Description
| Fields | Description |
|---|---|
|
Match option |
Check radio button All or Any. All - only LCs matching all entered search criteria are shown. Any - LCs matching any of the entered search criteria are shown. |
|
Letter of Credit |
Enter the Letter of Credit ID. |
|
Bank LC Reference |
Enter the bank LC reference. |
|
Applicant |
Enter, select or search for the applicant. |
|
Beneficiary |
Enter, select or search for the beneficiary. |
|
Issuing Bank |
Enter, select or search for the issuing bank. |
|
Advising Bank |
Enter, select or search for the advising bank. |
Click Search. The LCs that match the search criteria are displayed in the Results section.
Click Reset to clear the search section and results.
Click Done to close the window.
To search for an LC using advanced search criteria:
To search using advanced search criteria, enter or select one or all of the advanced search criteria.
To narrow down the search, use the list next to the search fields. For example, determine if the entered value should be equal or not equal the search result.
Click Search. The LCs that match the search criteria are displayed in the Results section.
Click Reset to clear the search section and results.
Click Add Fields to add more fields for the advanced search. To remove the field from the search, click the x right next to the field.
Click Done to close the window.
The Results section lists the retrieved letters of credit. The Results table shows the following columns by default.
Letter of Credit
Bank LC Reference
Status
Applicant Name
Beneficiary Name
Department Name
Issuing Bank Name
Advising Bank Name
Use the Actions Menu, icons and buttons to apply actions to the Results table.You can perform the actions listed below, as well as actions described in ”Screen Level Action - Icons and Buttons” in the Oracle Retail Trade Management Do the Basics User Guide.
Table 13-20 Results - Actions Menu/Icons/Buttons and Description
| Actions Menu/Icons/Buttons | Description |
|---|---|
|
Send Selected and Send Selected button |
Select Actions > Send Selected or use the Send Selected button to send the selected LCs to the bank. For more details about how to send selected LCs to the bank, see the Send Selected LCs section. |
|
Send All and Send All button |
Select Actions > Send All or use the Send All button to send all LCs shown in the Results table to the bank. For more information about how to send all LCs to the bank, see the Send All LCs section. |
To send the selected LCs shown in the Results table to the bank, follow the steps below.
From the Tasks menu, select Trade Management > Send Letters of Credit. The Send Letters of Credit window appears.
Enter or select search criteria as desired to make the search more restrictive.
Click Search. The LCs that match the search criteria are displayed in the Results section.
|
Note: Only LCs with status Approved are displayed. |
Select the LCs you want to send to the bank.
Then select Actions > Send Selected, or use the Send Selected button.
You are prompted to download the LC(s). Confirm the prompt with Yes.
You are informed that the selected LCs will be sent during the next batch process. Confirm the prompt with OK.
|
Note: Once the LCs are sent, the status changes to Extracted. |
After you have send all LCs, click Done.
To send all LCs shown in the Results table to the bank, follow the steps below.
From the Tasks menu, select Trade Management > Send Letters of Credit. The Send Letters of Credit window appears.
Enter or select search criteria as desired to make the search more restrictive.
Click Search. The LCs that match the search criteria are displayed in the Results section.
|
Note: Only LCs with status Approved are displayed. |
Select Actions > Send All, or use the Send All button.
You are prompted to download the LCs. Confirm the prompt with Yes.
You are informed that the LCs will be sent during the next batch process. Confirm the prompt with OK.
|
Note: Once the LCs are sent, the status changes to Extracted. |
After you have sent all LCs, click Done.
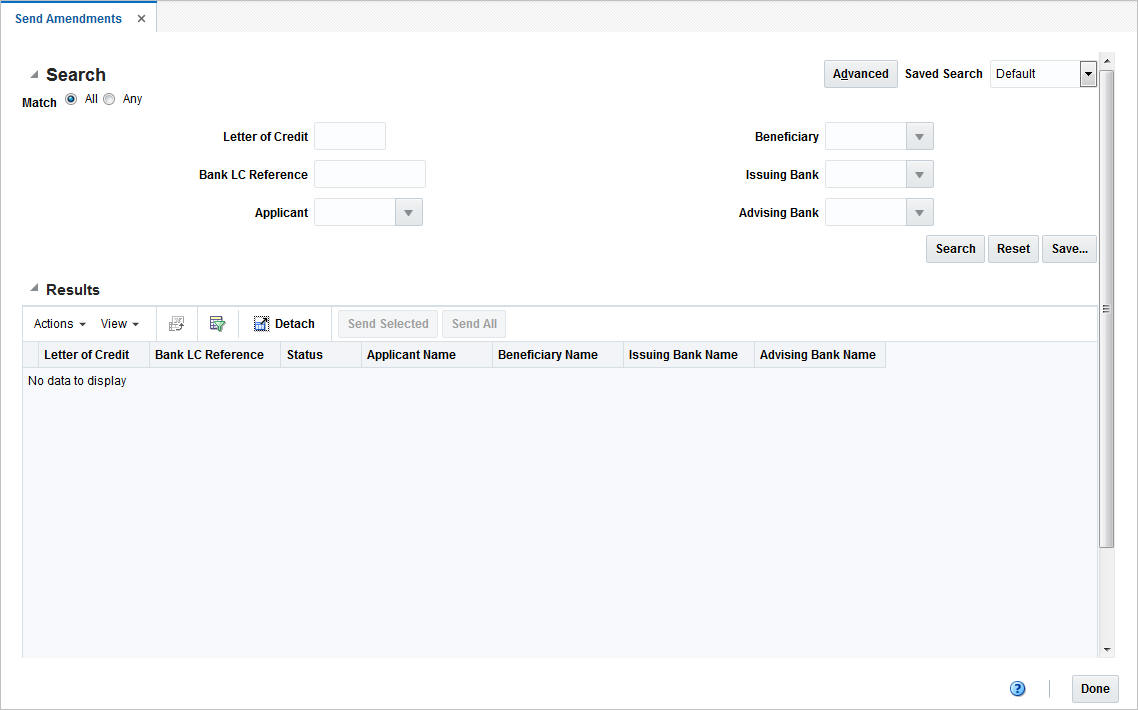
The Send Amendments option opens the Send Amendments window. The Send Amendments window allows you to search for amended Letters of Credit and send them to the bank.
The Send Amendments window contains the following sections.
Search
For more information about how to search for amended LCs, see the Search for an Amended LC section.
To search for amended LCs:
From the Task menu, select Trade Management > Send Amendments. The Send Amendments window appears.
You can search for amended LCs using basic or advanced search criteria, depending on the requirement. The basic mode is the default search mode.
Click Advanced to access the search section in advanced mode.
Click Basic to return to the basic mode.
To search for an amended LC using basic search criteria:
Enter, select or search for one or all of the following basic search criteria.
Table 13-21 Send Amendments - Basic Search Criteria and Description
| Fields | Description |
|---|---|
|
Match option |
Check radio button All or Any. All - only LCs matching all entered search criteria are shown. Any -LCs matching each entered search criteria are shown. |
|
Letter of Credit |
Enter the Letter of Credit ID. |
|
Bank LC Reference |
Enter the bank LC reference. |
|
Applicant |
Enter, select or search for the applicant. |
|
Beneficiary |
Enter, select or search for the beneficiary. |
|
Issuing Bank |
Enter, select or search for the issuing bank. |
|
Advising Bank |
Enter, select or search for the advising bank. |
Click Search. The amended LCs that match the search criteria are displayed in the Results section.
Click Reset to clear the search section and results.
Click Done to close the window.
To search for an amended LC using advanced search criteria:
To search using advanced search criteria, enter or select one or all of the advanced search criteria.
To narrow down the search, use the list next to the search fields. For example, determine if the entered value should be equal or not equal the search result.
Click Search. The LCs that match the search criteria are displayed in the Results section.
Click Reset to clear the search section and results.
Click Add Fields to add more fields for the advanced search. To remove the field from the search, click the x right next to the field.
Click Done to close the window.
The Results section lists the amended letters of credit. The Results table shows the following columns by default.
Letter of Credit
Bank LC Reference
Status
Applicant Name
Beneficiary Name
Department Name
Issuing Bank Name
Advising Bank Name
Use the Actions Menu, icons and buttons to apply actions to the Results table. You can perform the actions listed below, as well as actions described in ”Screen Level Action - Icons and Buttons” in the Oracle Retail Trade Management Do the Basics User Guide.
Table 13-22 Results - Actions Menu/Icons /Buttons and Description
| Actions Menu/Icons/ Buttons | Description |
|---|---|
|
Send Selected and Send Selected button |
Select Actions > Send Selected or use the Send Selected button to send the selected amended LCs to the bank. For more details about how to send an LC, see the Send Selected Amended LCs section. |
|
Sent All and Send All button |
Select Actions > Send All or use the Send All button to send all amended LCs shown in the Results table to the bank. For more information about how to send all LCs to the bank, see the Send All Amended LCs section. |
To send the selected amended LCs shown in the Results table to the bank, follow the steps below.
From the Tasks menu, select Trade Management > Send Amendments. The Send Amendments window appears.
Enter or select search criteria as desired to make the search more restrictive.
Click Search. The LCs that match the search criteria are displayed in the Results section.
Select the LCs you want to send to the bank.
Then select Actions > Send Selected, or use the Send Selected button.
You are prompted to download the LC(s). Confirm the prompt with Yes.
You are informed that the selected LC amendments will be sent during the next batch process. Confirm with OK.
|
Note: Once the LCs are sent, the status changes to Download. |
Click Done to close the window.
To send all amended LCs shown in the Results table to the bank, follow the steps below.
From the Tasks menu, select Trade Management > Send Amendments. The Send Letters of Credit window appears.
Enter or select search criteria as desired to make the search more restrictive.
Click Search. The LCs that match the search criteria are displayed in the Results section.
Select Actions > Send All, or use the Send All button.
You are prompted to download the LCs. Confirm the prompt with Yes.
You are informed that the LC amendments will be sent during the next batch process. Confirm with OK.
|
Note: Once the LCs are sent, the status changes to Download. |
Click Done to close the window.
The movement of goods from origin country to final destination can be tracked through the transportation module.
You can track the following information in the transportation module:
Shipments
Countries and ports
Departure, arrival, and delivery dates
Commercial invoices
Freight sizes, SCAC codes, and freight types
Measurements, weights, and quantities
Deliveries to final destinations
Packing methods
Licenses and visas
Claims against trading partners
Missing documents
Timelines
Members of an item family
A transportation upload batch program converts data received from trading partners into a standard Oracle Retail file format. As additional information is acquired, it can be entered manually. When a transportation record is complete, you can finalize the record. Finalized transportation records are used to automatically create customs entries. The goods can then be tracked as they move through customs.
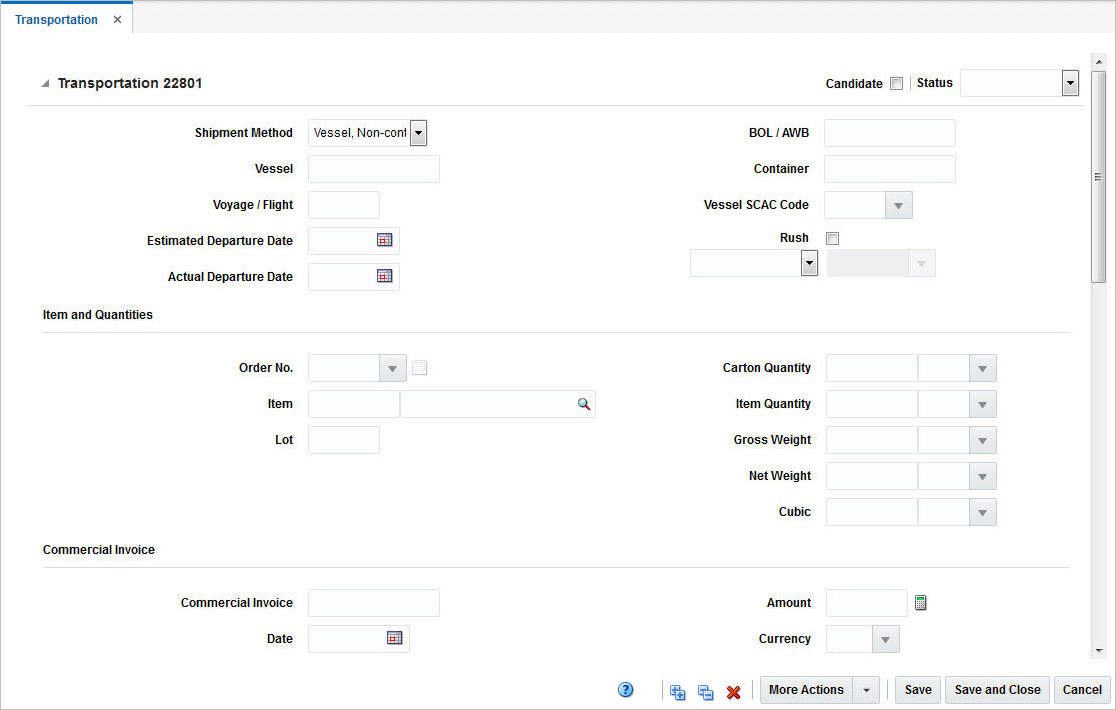
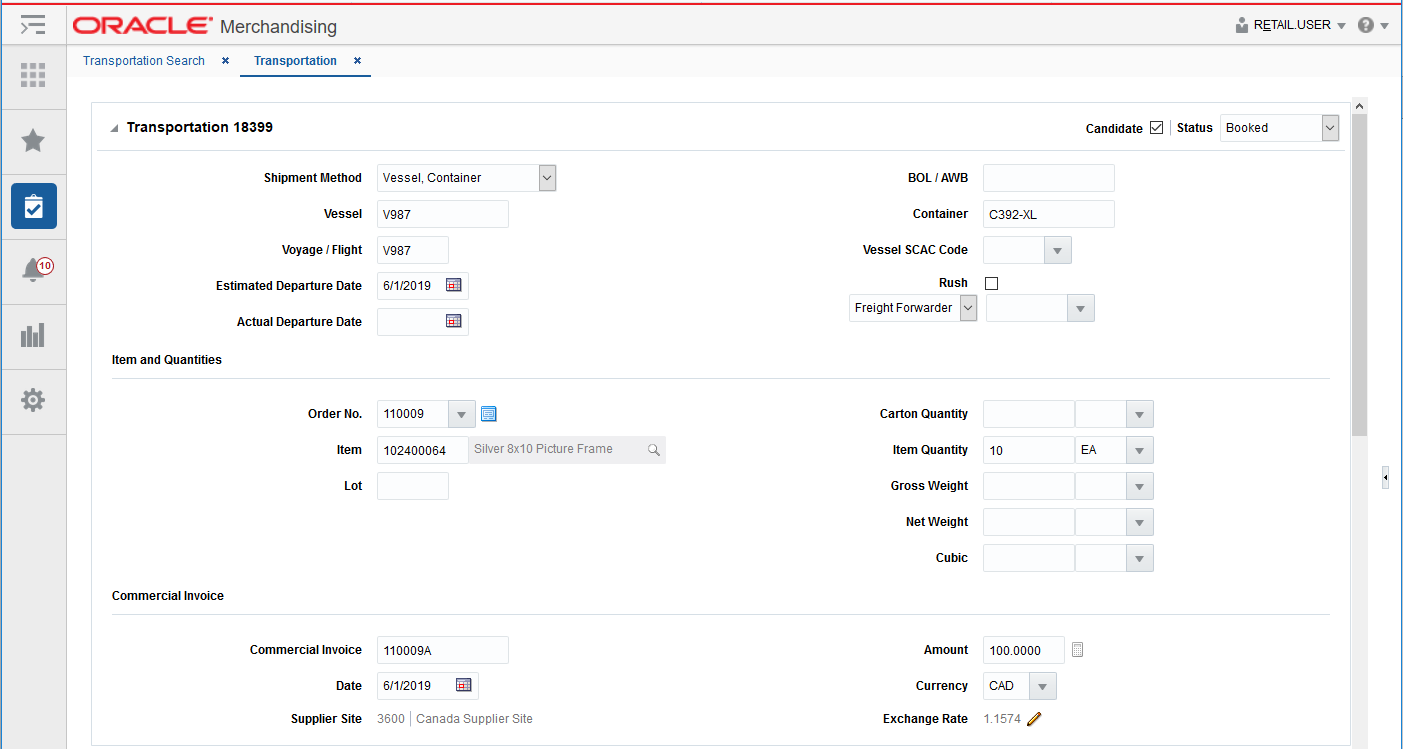
The Transportation window contains the following sections.
The Transportation section contains the transportation ID. In the top right corner of the section the Candidate checkbox and the Status list for the transportation is displayed.
|
Note: The Candidate checkbox can only be elected for items that have an approved HTS code. |
The Status field displays the status of the transport. Possible values for the Status field are booked, delivered, loaded, sailed or finalized.
The Transportation section contains the following fields.
Table 13-23 Transportation - Fields and Description
| Fields | Description |
|---|---|
|
Shipment Method |
Select a shipment method from the list. |
|
Vessel |
Enter the vessel ID. |
|
Voyage/Flight |
Enter the voyage or flight number. |
|
Estimated Departure Date |
Enter or use the Calendar icon to select the estimated departure date. |
|
Actual Departure Date |
Enter or use the Calendar icon to select the actual departure date. |
|
BOL/AWB |
Enter the Bill of Lading (BOL) or the Airway Bill (AWB). |
|
Container |
Enter the container ID. |
|
Vessel SCAC Code |
Enter, select or search for the standard carrier alpha code. |
|
Rush checkbox |
Check the Rush checkbox, to indicate that it is a rush shipment. |
|
Partner Type/Partner |
Select a partner type from the list. For example, select Agent. Then the Partner field next to the Partner Type field enables. Enter, select or search for the appropriate partner. |
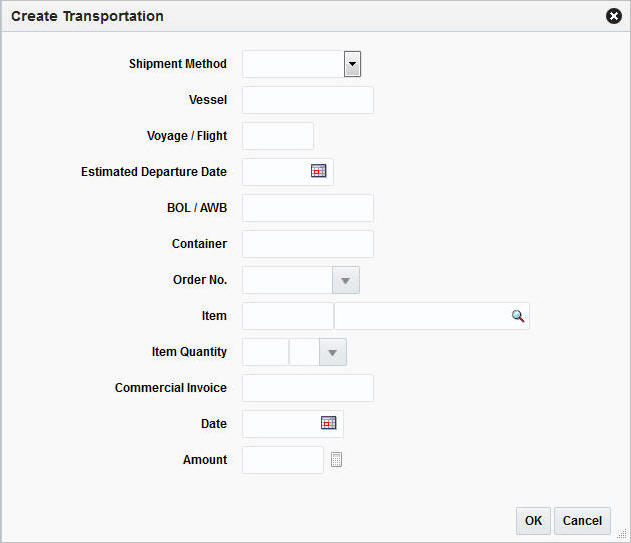
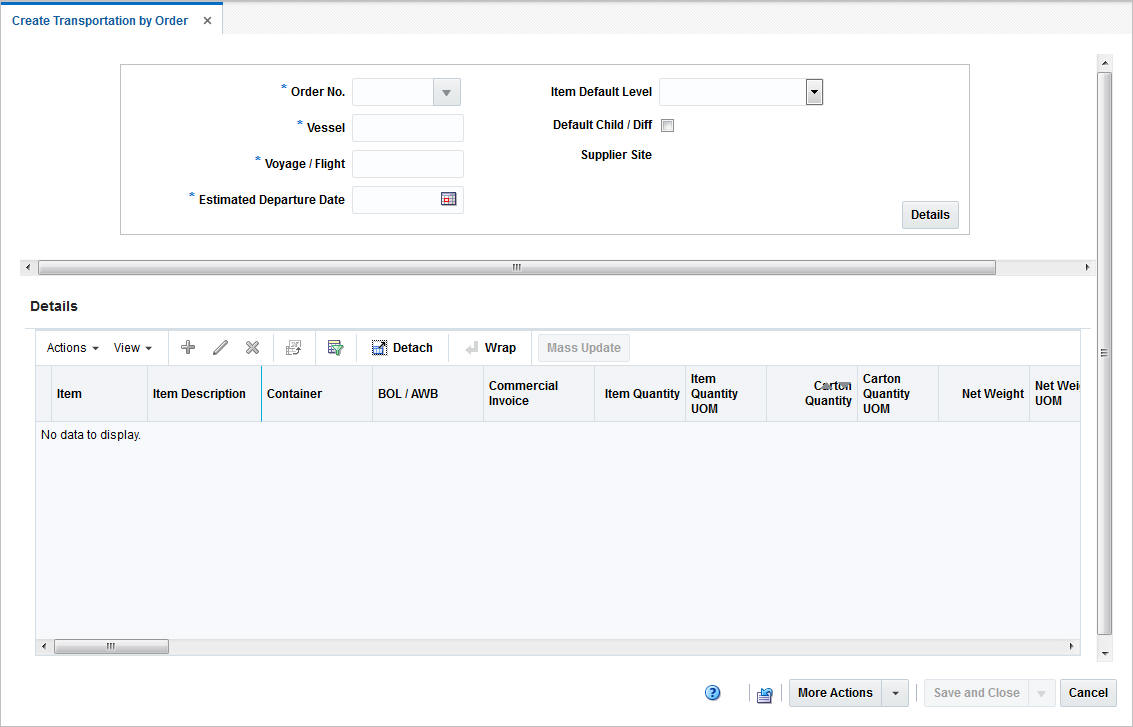
To create a transportation follow the steps below.
From the Tasks menu, select Trade Management > Create Transportation. The Create Transportation window appears.
In the Shipment Method field, enter, select or search for the appropriate shipment method.
In the Vessel field, enter the vessel ID.
In the Voyage/Flight field, enter, the voyage/flight ID.
In the Estimated Departure Date, enter the estimated departure date or use the Calendar icon to select the date.
In the BOL/AWB field, enter the bill of lading number or the airway bill number.
In the Container field, enter the container ID.
In the Order No. field, enter, select or search for the appropriate order number.
In the Item field, enter the item number or use the Search icon to search for the appropriate icon.
In the Item Quantity field, enter the quantity of the item and enter, select or search for the appropriate unit of measure.
In the Commercial Invoice field, enter the commercial invoice number.
In the Date field, enter the date or use the Calendar icon to select the date.
In the Amount field, enter the amount of the transportation.
After you have entered all necessary transportation information, choose one of the following options.
Select OK to save the transportation and close the Create Transportation window. The Transportation window appears.
For more information about the Transportation window, see the Define a Transportation section.
Select Cancel to reject all entries and exit the Create Transportation window.
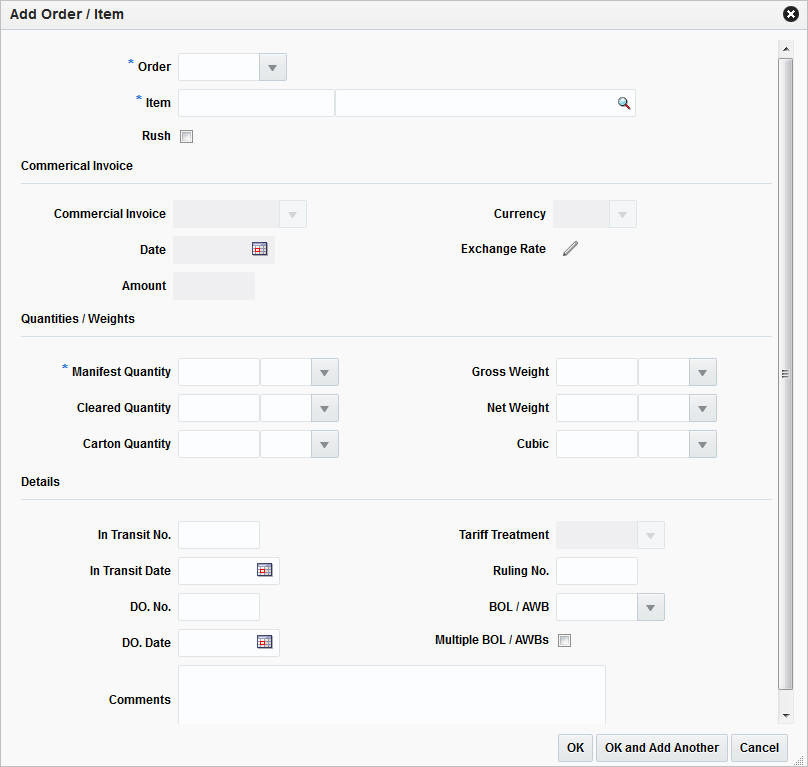
The Item and Quantities section contains the following fields.
Table 13-24 Item and Quantities - Fields and Description
| Fields | Description |
|---|---|
|
Order No. |
Enter, select or search for the appropriate order number. The Details icon opens the Order Details window. For more information about the Order Details window, see the ”Order Details” section in the Oracle Retail Merchandising Purchase Orders and Contracts User Guide. |
|
Item |
Enter the item number or use the Search icon to search for the appropriate item. |
|
Lot |
Enter the lot number. |
|
Carton Quantity |
Enter the carton quantity. Then select or search for the carton unit of measure (UOM). |
|
Item Quantity |
Enter the item quantity. Then select or search for the item unit of measure (UOM). |
|
Gross Weight |
Enter the gross weight. Then select or search for the gross weight unit of measure (UOM). |
|
Net Weight |
Enter the net weight. Then select or search for the net weight unit of measure (UOM). |
|
Cubic |
Enter the cubic quantity. Then select or search for the cubic unit of measure (UOM). |
The Commercial Invoice section contains the following fields.
Table 13-25 Commercial Invoice - Fields and Description
| Fields | Description |
|---|---|
|
Commercial Invoice |
Enter the commercial invoice ID. |
|
Date |
Enter or use the Calendar icon to select the date of the commercial invoice. |
|
Supplier Site |
The supplier site is displayed automatically. |
|
Amount |
Enter the amount of the commercial invoice. Use the Recalculate icon to recalculate the invoice amount. |
|
Currency |
Enter, select or search for the appropriate currency. |
|
Exchange Rate |
Use the Edit Exchange Rate icon to change the rate, if necessary. If you click the icon, the Edit Exchange Rate window appears. For more information about how to edit the Exchange Rate, see the ”Editing the Exchange Rate” section in the Oracle Retail Trade Management Letters of Credit User Guide. |
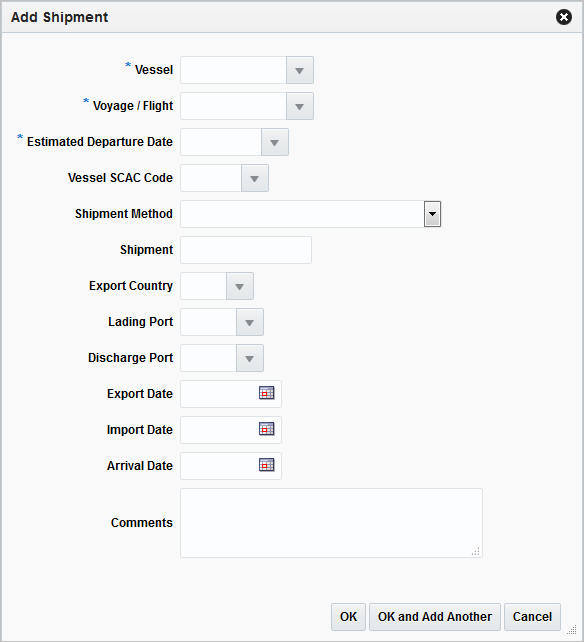
The Shipment and Receipt section contains the following fields.
Table 13-26 Shipment and Receipt - Fields and Description
| Fields | Description |
|---|---|
|
Country of Sourcing |
The country of sourcing is displayed automatically. |
|
Consolidation Country |
Enter, select or search for the consolidation country. |
|
Export Country |
Enter, select or search for the export country. |
|
Shipment |
Enter the shipment ID. |
|
Lading Port |
Enter, select or search for the lading port. |
|
Discharge Port |
Enter, select or search for the discharge port. |
|
Receipt |
Enter the receipt number. |
|
Forwarder's Cargo Receipt |
Enter the forwarder's cargo receipt. |
|
Forwarder's Cargo Receipt Date |
Enter or use the Calendar icon to select the Forwarder's Cargo Receipt Date. |
|
Estimated Arrival Date |
Enter or use the Calendar icon to select the estimated arrival date. |
|
Actual Arrival Date |
Enter or use the Calendar icon to select the actual arrival date. |
|
Delivery Date |
Enter or use the Calender icon to select the delivery date. |
The Freight section contains the following fields.
Table 13-27 Freight - Fields and Description
| Fields | Description |
|---|---|
|
Type |
Enter, select or search for the freight type of the shipment. |
|
Size |
Enter, select or search for the freight size of the shipment. |
|
In Transit No. |
Enter the in transit number. |
|
In Transit Date |
Enter the in transit date or use the Calendar icon to select a date. |
|
Service Contract |
Enter the service contract. |
|
Seal |
Enter the seal. |
|
Container SCAC Code |
Enter, select or search for the container standard carrier alpha code (SCAC). |
|
Packing Method |
Select the packing method from the list. |
|
Level |
Select the level from the list. |
The Totals section contains the following fields.
Table 13-28 Totals - Fields and Description
| Fields | Description |
|---|---|
|
Total Units |
Enter, select or search for the total units of measure. |
|
Total Cartons |
Enter, select or search for the total cartons units of measure. |
|
Total Gross Weight |
Enter, select or search for the total gross weight units of measure. |
|
Total Net Weight |
Enter, select or search for the total net weight units of measure. |
|
Total Cube |
Enter, select or search for the total cube units of measure. |
|
Total Value |
The total value is displayed automatically. |
The Comments section contains the comment field. You can enter any comments for the created transport, if necessary.
Use the More Actions menu to navigate to the following windows. The More Actions menu contains the following options.
Table 13-29 More Actions Menu - Action Buttons and Description
| More Actions Buttons | Description |
|---|---|
|
Details |
Opens the Transportation Details window. This window displays details of the delivery, packing, and license/visa information as well as claims. For more information about Details, see the Details section. |
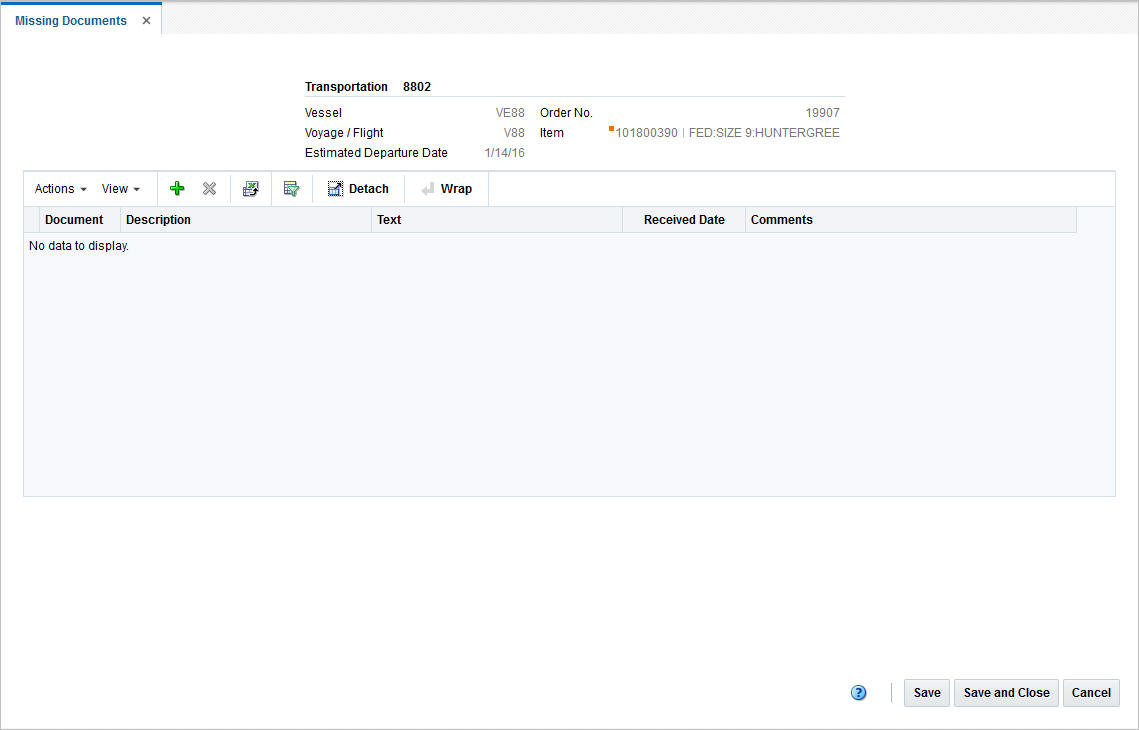
|
Missing Documents |
Opens the Missing Documents window. You can add and delete all the missing documents for the current transport in this window. For more information about Missing Documents, see the ”Missing Documents” section in the Oracle Retail Trade Management Customs Entry User Guide. |
|
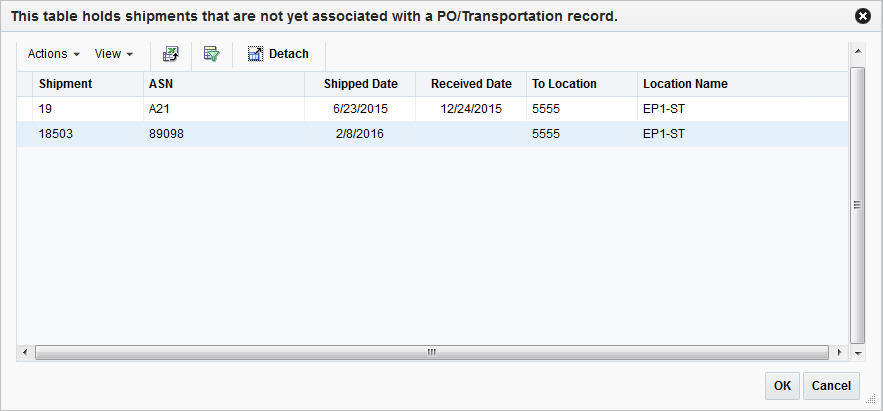
Shipments |
Opens the Transportation Shipments window. This window displays shipment information such as ASNs, shipped and received date, to location and location name. For more information about Shipments, see the Shipments section. |
|
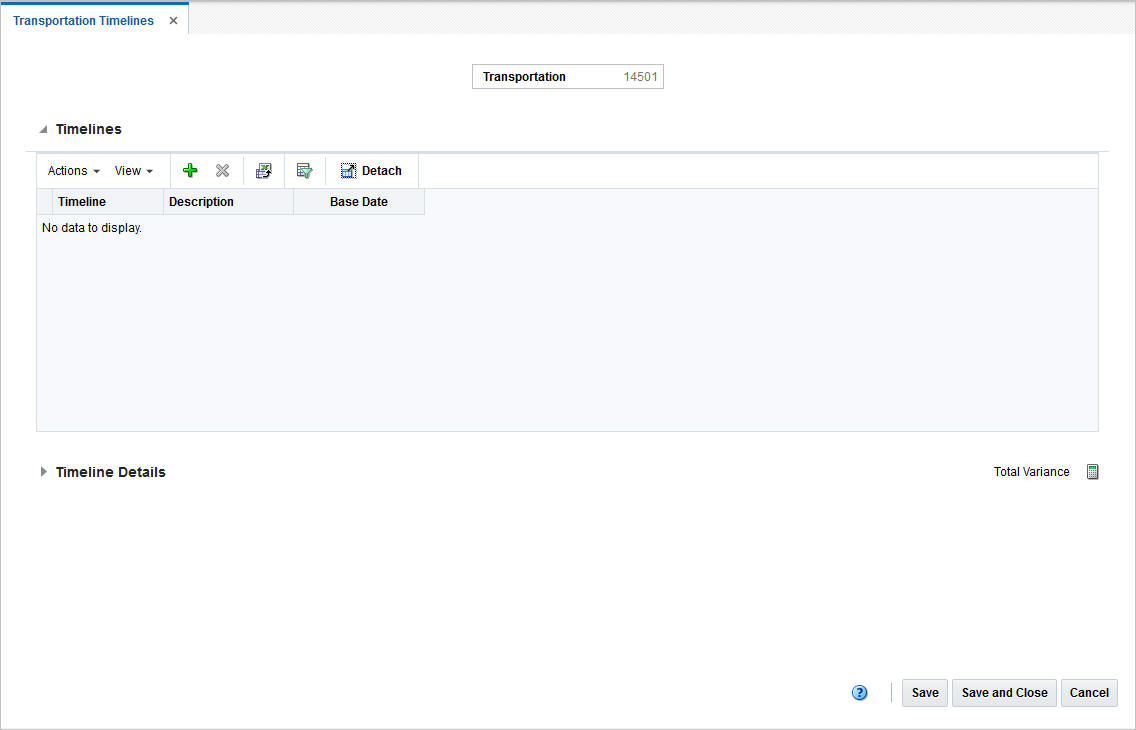
Timelines |
Opens the Timelines menu. The menu contains the following options.
For more information about timelines, see the Timelines section. |
|
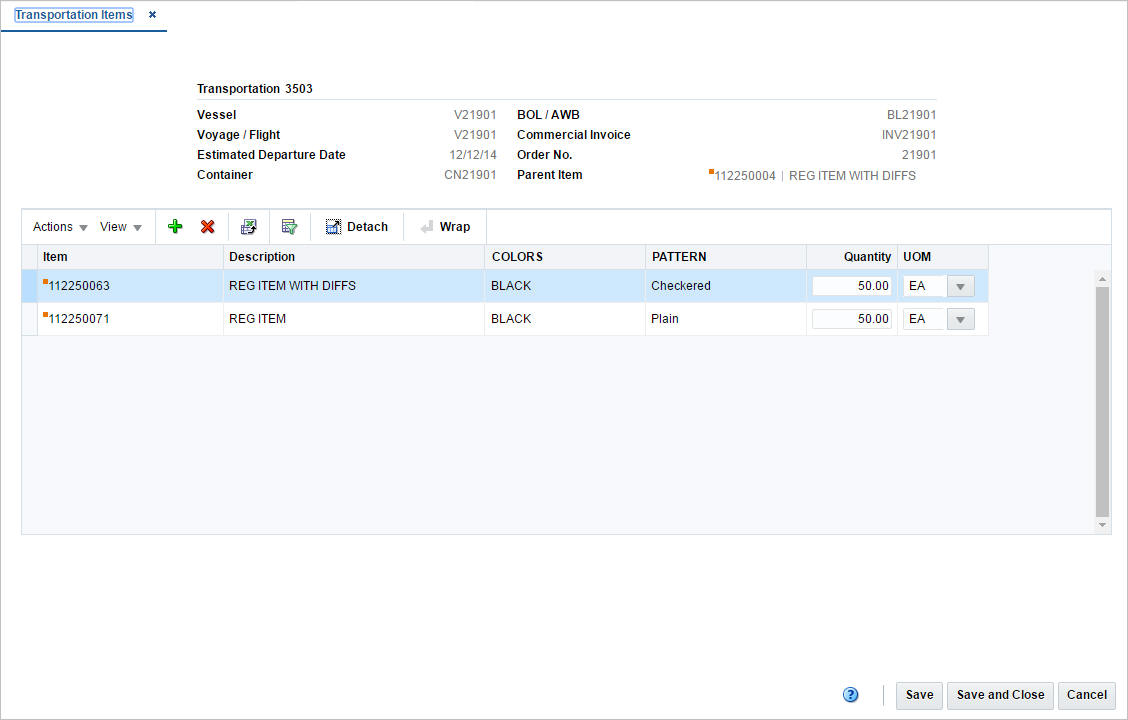
Items |
Opens the Transportation Items window. For more information about Items, see the Items section. |
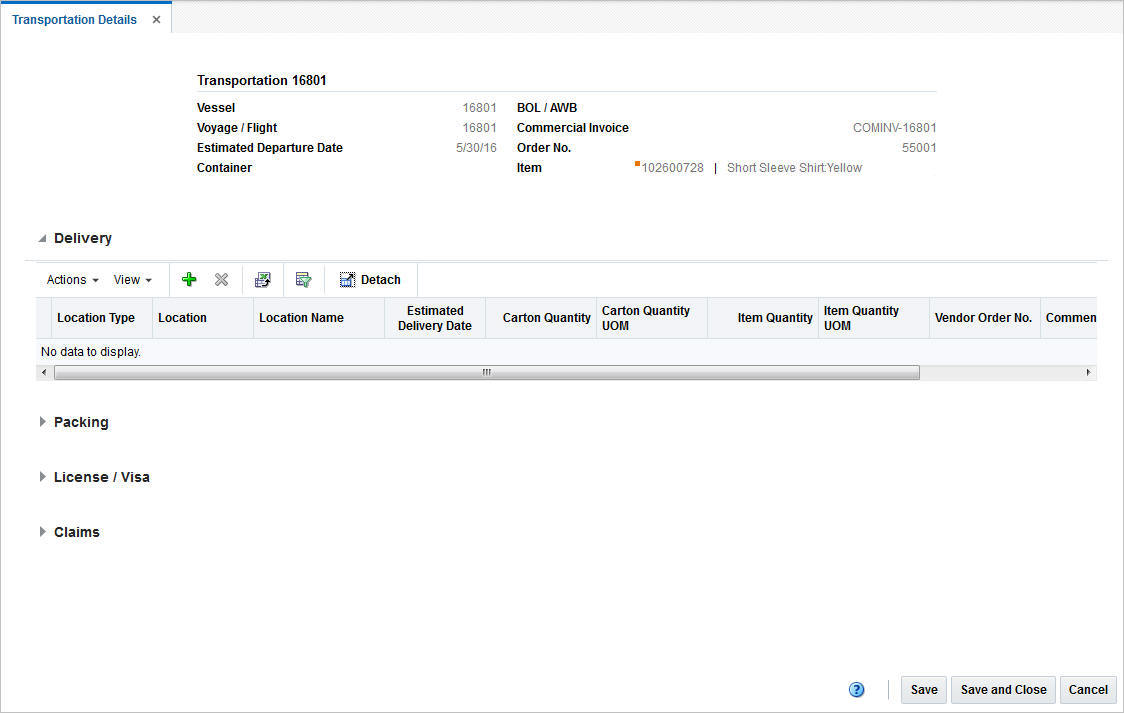
In the Transportation Details window you can edit and view delivery, packing, license/visa and claims information related to a transportation record.
Delivery information is edited and viewed at the final destination level. You can indicate how many units and cartons of an item were delivered to which locations.
You can edit and view packing information at the container level. To display the shipped and received quantities for the packing records, select the appropriate option from the View menu.
The Claims table contains claims against a partner. Claims can be created for damaged merchandise and inadequate quantities. A single claim can span multiple cartons.
The Transportation Details window contains the following sections.
The Transportation Details header displays transportation information such as transportation ID, vessel, voyage/flight number, estimated departure date, container, bill of lading/airway bill, commercial invoice, order number and item information.
The Delivery section lists delivery information such as location, location type and description, estimated delivery date, carton and item quantities as well as the vendor order number.
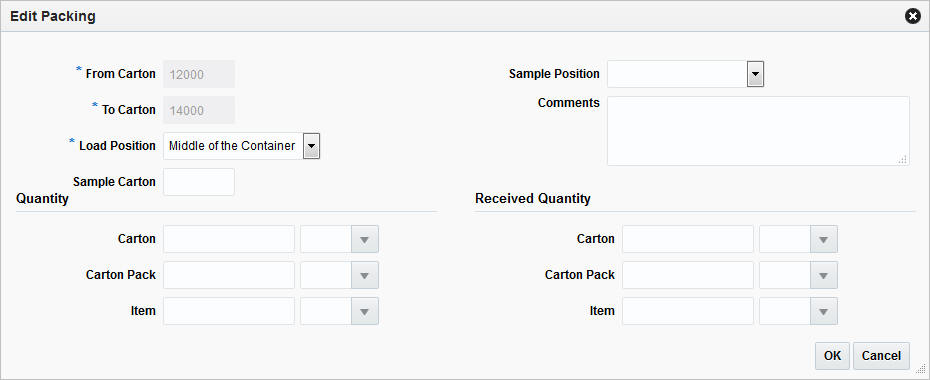
The Packing section lists packing information such as ID of the first (From Carton) and the last carton (To Carton), the position of a load in the series of containers (Load Position), location of a sample carton, and sample position as well as comments.
Use the Actions Menu, icons and buttons to apply actions to the table. You can perform the actions listed below, as well as action described in ”Action Menu and Icons” in the Oracle Retail Trade Management Do the Basics User Guide.
Table 13-30 Packing Table - Actions Menu/Icons/Buttons and Description
| Actions Menu/Icons/Button | Description |
|---|---|
|
Default Received Quantities and Default Received Quantities button |
You can default the received quantities to the value of the shipped quantities by selecting Actions > Default Received Quantities or by using the Default Received Quantities button. |
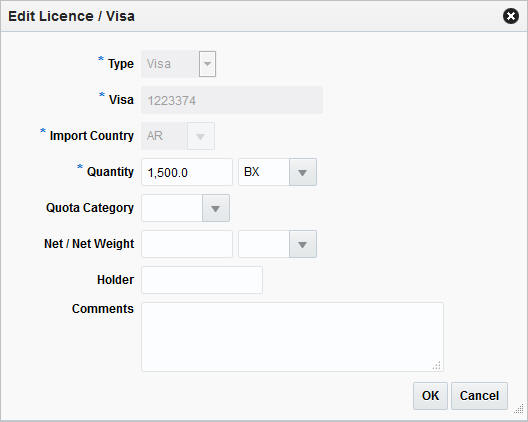
The Licence/Visa section lists license/visa information such as license/visa type, import country, licence/visa quantity and quantity unit of measure, quota category, net weight, and weight UOM as well as possible comments.
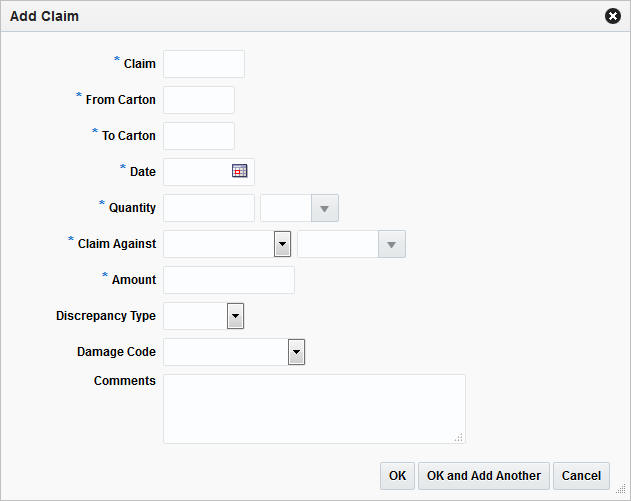
The Claims section contains claims information such as claim ID, ID of the first (From Carton) and the last carton (To Carton), claim date, item quantity and unit of measure, claim against type and ID, as well as the claim amount and comments.
To add a delivery information to a transportation follow the steps listed below.
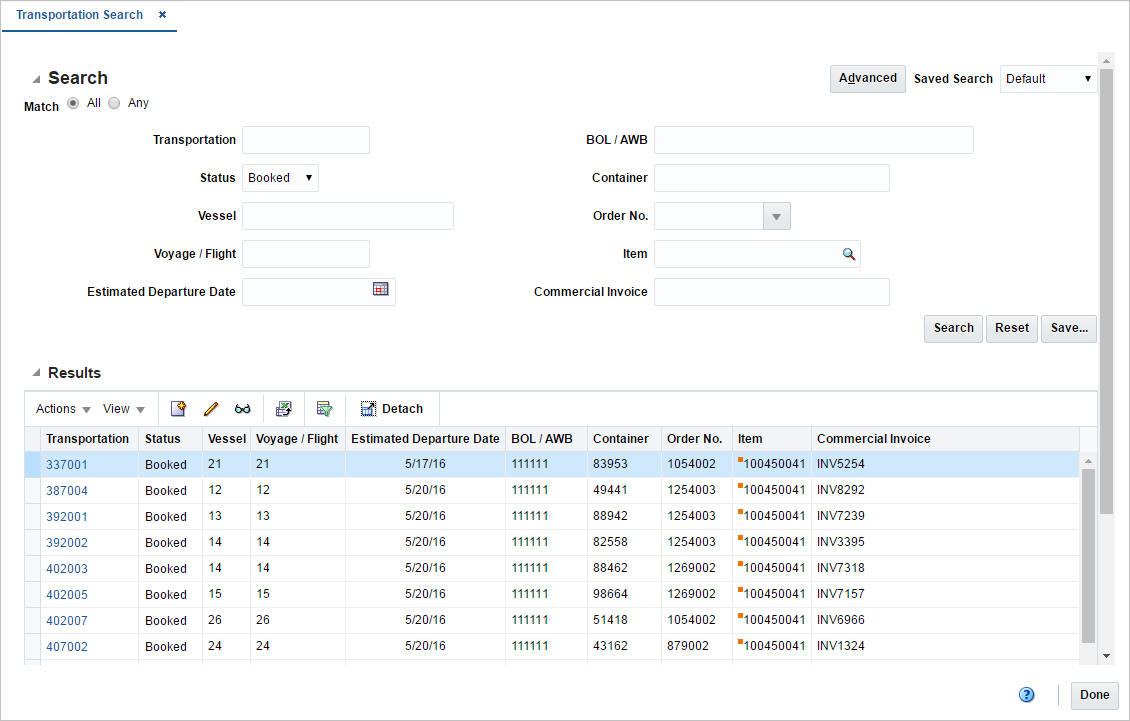
From the Tasks menu, select Trade Management > Transportation > Manage Transportation. The Transportation Search window appears.
Enter or select search criteria as desired to make the search more restrictive.
Click Search. The transportations that match the search criteria are displayed in the Results section.
Select a record in the Results section.
In the Transportation column, click on the transportation link, or mark a record and select Actions > Edit or use the Edit icon. The Transportation window appears.
In the More Actions menu select Details. The Transportation Details window appears.
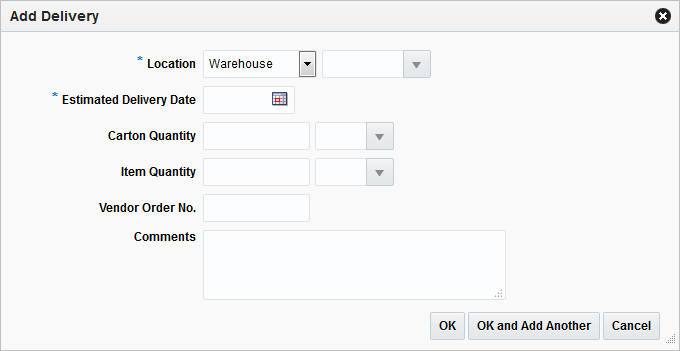
In the Delivery table, select Actions > Add or use the Add icon. The Add Delivery window appears.
In the Location type field, select a location type from the list.The field next to the Location type field enables, enter, select or search for the location. The Location field is a required field.
In the Estimated Delivery Date field, enter the estimated delivery date or use the Calendar icon to select the date.
In the Carton Quantity field, enter the appropriate carton quantity. Then enter, select or search for the carton quantity UOM.
In the Item Quantity field, enter the appropriate carton quantity. Then enter, select or search for the item quantity UOM.
In the Vendor Order No. field, enter the vendor order number.
In the Comments field, enter comments for the delivery, if necessary.
Then choose one of the following options.
Click OK to add the delivery and close the Add Delivery window. The system returns to the Transportation Details window. The new delivery is added to the Delivery table.
Click OK and Add Another to add additional deliveries.
Click Cancel to reject all entries and exit the Add Delivery window. The system returns to the Transportation Details window.
After you have added all necessary deliveries, choose one of the following options.
Click Save to save your changes.
Click Save and Close to save your changes and close the Transportation Details window.
Click Cancel to reject all changes and close the Transportation Details window.
To delete a delivery from a transportation follow the steps listed below.
From the Tasks menu, select Trade Management > Transportation > Manage Transportation. The Transportation Search window appears.
Enter or select search criteria as desired to make the search more restrictive.
Click Search. The transportations that match the search criteria are displayed in the Results section.
Select a record in the Results section.
In the transportation column, click on the transportation link, or mark a record and select Actions > Edit or use the Edit icon. The Transportation window appears.
In the Transportation Toolbar select Details. The Transportation Details window appears.
In the Delivery table, select a delivery.
Click Actions > Delete or use the Delete icon to delete the selected delivery.
You are prompted if you want to delete the selected delivery from the Delivery table. Confirm with Yes.
The delivery is removed from the Delivery table.
After you have deleted all necessary records, choose one of the following options.
Click Save to save your changes.
Click Save and Close to save your changes and close the Transportation Details window.
Click Cancel to reject all changes and close the Transportation Details window.
To add a packing information to a transportation follow the steps listed below.
From the Tasks menu, select Trade Management > Transportation > Manage Transportation. The Transportation Search window appears.
Enter or select search criteria as desired to make the search more restrictive.
Click Search. The transportations that match the search criteria are displayed in the Results section.
Select a record in the Results section.
In the Transportation column, click on the transportation link, or mark a record and select Actions > Edit or use the Edit icon. The Transportation window appears.
In the More Actions menu select Details. The Transportation Details window appears.
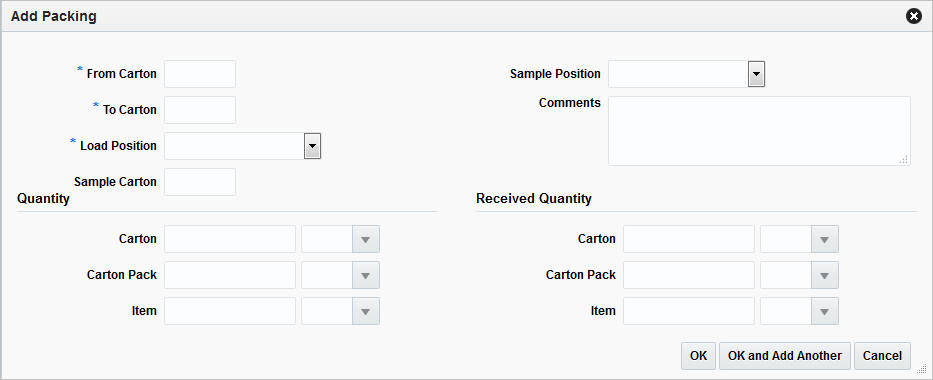
In the Packing table, select Actions > Add or use the Add icon. The Add Packing window appears.
In the From Carton field, enter the ID of the first carton of a series. This field is a required field.
In the To Carton field, enter the ID of the last carton of a series. This field is a required field.
In the Loaded Position field, select the position of a load within a series from the list.
In the Sample Carton field, enter the sample carton.
In the Sample Position field, select the sample position from a list.
In the Comments field, enter a comment for the packing information, if necessary.
In the Quantity column, enter one of following options.
In the Carton field, enter the carton quantity. Then enter, select or search for the carton quantity UOM.
In the Carton Pack field, enter the carton pack quantity. Then enter, select or search for the carton pack quantity UOM.
In the Item field, enter the item quantity. Then enter, select or search for the item quantity UOM.
In the Received Quantity column, enter one of the following options.
In the Carton field, enter the received carton quantity. Then enter, select or search for the carton quantity UOM.
In the Carton Pack field, enter the received carton pack quantity. Then enter, select or search for the carton pack quantity UOM.
In the Item field, enter the received item quantity. Then enter, select or search for the item quantity UOM.
Then choose one of the following options.
Click OK to add the delivery and close the Add Packing window. The system returns to the Transportation Details window. The new packing information is added to the Packing table.
Click OK and Add Another to add further records.
Click Cancel to reject all entries and close the Add Packing window. The system returns to the Transportation Details window.
After you have added all necessary records, choose one of the following options.
Click Save to save your changes.
Click Save and Close to save your changes and close the Transportation Details window.
Click Cancel to reject all changes and close the Transportation Details window.
To edit a packing information follow the steps below.
From the Tasks menu, select Trade Management > Transportation > Manage Transportation. The Transportation Search window appears.
Enter or select search criteria as desired to make the search more restrictive.
Click Search. The transportations that match the search criteria are displayed in the Results section.
Select a record in the Results section.
In the Transportation column, click on the transportation link, or mark a record and select Actions > Edit or use the Edit icon. The Transportation window appears.
In the More Actions menu select Details. The Transportation Details window appears.
In the Packing table, select Actions > Edit or use the Edit icon. The Edit Packing window appears.
All previously entered fields are populated. Change the values in the appropriate fields, if necessary.
Then choose one of the following options.
Click OK to save the changes and close the Edit Packing window. The system returns to the Transportation Details window. The packing information is updated.
Click Cancel to reject all entries and close the Edit Packing window. The system returns to the Transportation Details window.
After you have added all necessary records, choose one of the following options.
Click Save to save your changes.
Click Save and Close to save your changes and close the Transportation Details window.
Click Cancel to reject all changes and close the Transportation Details window.
To delete a packing information from a transportation follow the steps listed below.
From the Tasks menu, select Trade Management > Transportation > Manage Transportation. The Transportation Search window appears.
Enter or select search criteria as desired to make the search more restrictive.
Click Search. The transportations that match the search criteria are displayed in the Results section.
Select a record in the Results section.
In the transportation column, click on the transportation link, or mark a record and select Actions > Edit or use the Edit icon. The Transportation window appears.
In the Transportation Toolbar select Details. The Transportation Details window appears.
In the Packing table, select a packing information.
Click Actions > Delete or use the Delete icon to delete the selected packing information.
You are prompted if you want to delete the selected packing from the Packing table. Confirm with Yes.
The packing information is removed from the Packing table.
After you have deleted all necessary records, choose one of the following options.
Click Save to save your changes.
Click Save and Close to save your changes and close the Transportation Details window.
Click Cancel to reject all changes and close the Transportation Details window.
To add a licence/visa information to a transportation follow the steps listed below.
From the Tasks menu, select Trade Management > Transportation > Manage Transportation. The Transportation Search window appears.
Enter or select search criteria as desired to make the search more restrictive.
Click Search. The transportations that match the search criteria are displayed in the Results section.
Select a record in the Results section.
In the Transportation column, click on the transportation link, or mark a record and select Actions > Edit or use the Edit icon. The Transportation window appears.
In the More Actions menu select Details. The Transportation Details window appears.
In the Licence/Visa table, select Actions > Add or use the Add icon. The Add Licence/Visa window appears.
In the Type field, select licence or visa from the list. This field is a required field.
In the Licence/Visa field, enter the licence or visa number. This field is a required field.
In the Import Country field, enter, select or search for the import country. This field is a required field.
In the Quantity field, enter the appropriated quantity. Then enter, select or search for the quantity unit of measure.
In the Quota Category field, enter, select or search for the appropriate quota category.
In the Net/Net Weight field, enter the net weight. Then enter, select or search for the weight unit of measure.
In the Holder field, enter the holder of the licence/visa.
In the Comments field, enter a comment for the licence/visa, if necessary.
Then choose one of the following options.
Click OK to add the licence/visa and close the Add Licence/Visa window. The system returns to the Transportation Details window. The new licence/visa information is added to the Licence/Visa table.
Click OK and Add Another to add additional records.
Click Cancel to reject all entries and exit the Add Licence/Visa window. The system returns to the Transportation Details window.
After you have added all necessary records, choose one of the following options.
Click Save to save your changes.
Click Save and Close to save your changes and close the Transportation Details window.
Click Cancel to reject all changes and close the Transportation Details window.
To edit a licence/visa information follow the steps below.
From the Tasks menu, select Trade Management > Transportation > Manage Transportation. The Transportation Search window appears.
Enter or select search criteria as desired to make the search more restrictive.
Click Search. The transportations that match the search criteria are displayed in the Results section.
Select a record in the Results section.
In the Transportation column, click on the transportation link, or mark a record and select Actions > Edit or use the Edit icon. The Transportation window appears.
In the More Actions menu select Details. The Transportation Details window appears.
In the Licence/Visa table, select Actions > Edit or use the Edit icon. The Edit Licence/Visa window appears.
All previously entered fields are populated. Change the values in the appropriate fields, if necessary.
Then choose one of the following options.
Click OK to save the changes and close the Edit Licence/Visa window. The system returns to the Transportation Details window. The licence/visa information is updated.
Click Cancel to reject all entries and exit the Edit Licence/Visa window. The system returns to the Transportation Details window.
Then choose one of the following options.
Click Save to save your changes.
Click Save and Close to save your changes and close the Transportation Details window.
Click Cancel to reject all changes and close the Transportation Details window.
To delete a licence/visa information from a transportation follow the steps listed below.
From the Tasks menu, select Trade Management > Transportation > Manage Transportation. The Transportation Search window appears.
Enter or select search criteria as desired to make the search more restrictive.
Click Search. The transportations that match the search criteria are displayed in the Results section.
Select a record in the Results section.
In the transportation column, click on the transportation link, or mark a record and select Actions > Edit or use the Edit icon. The Transportation window appears.
In the Transportation Toolbar select Details. The Transportation Details window appears.
In the Licence/Visa table, select the licence/visa information.
Click Actions > Delete or use the Delete icon to delete the selected licence/visa information.
You are prompted if you want to delete the selected licence/visa from the Licence/Visa table. Confirm with Yes.
The licence/visa information is removed from the Licence/Visa table.
Then choose one of the following options.
Click Save to save your changes.
Click Save and Close to save your changes and exit the Transportation Details window.
Click Cancel to reject all changes and exit the Transportation Details window.
To add a claim to a transportation follow the steps listed below.
From the Tasks menu, select Trade Management > Transportation > Manage Transportation. The Transportation Search window appears.
Enter or select search criteria as desired to make the search more restrictive.
Click Search. The transportations that match the search criteria are displayed in the Results section.
Select a record in the Results section.
In the Transportation column, click on the transportation link, or mark a record and select Actions > Edit or use the Edit icon. The Transportation window appears.
In the More Actions menu select Details. The Transportation Details window appears.
In the Claims table, select Actions > Add or use the Add icon. The Add Claim window appears.
In the Claim field, enter the claim ID. This field is a required field.
In the From Carton, enter the ID of the first carton of a series. This field is a required field.
In the To Carton, enter the ID of the last carton in a series. This field is a required field.
In the Date field, enter the claim date or use the Calendar icon to select the date. This field is a required field.
In the Quantity field, enter the quantity. Then enter, select or search for the quantity unit of measure. These fields are required fields.
In the Claim Against field, select who you want to add a claim against. For example, select Agent. Then select the claim against ID. These fields are required fields.
In the Amount field, enter the amount of the claim.
In the Discrepancy Type field, select the appropriate type from the list. Possible types are Overage or Shortage.
In the Damage Code field, select the appropriate code from the list. For example, select external damage.
In the Comments field, enter a comment for the licence/visa, if necessary.
Then choose one of the following options.
Click OK to add the claim and close the Add Claim window. The system returns to the Transportation Details window. The new claim is added to the Claims table.
Click OK and Add Another to add additional records.
Click Cancel to reject all entries and close the Add Claims window. The system returns to the Transportation Details window.
After you have added all necessary records, choose one of the following options.
Click Save to save your changes.
Click Save and Close to save your changes and close the Transportation Details window.
Click Cancel to reject all changes and close the Transportation Details window.
To edit a claim follow the steps below.
From the Tasks menu, select Trade Management > Transportation > Manage Transportation. The Transportation Search window appears.
Enter or select search criteria as desired to make the search more restrictive.
Click Search. The transportations that match the search criteria are displayed in the Results section.
Select a record in the Results section.
In the Transportation column, click on the transportation link, or mark a record and select Actions > Edit or use the Edit icon. The Transportation window appears.
In the More Actions menu select Details. The Transportation Details window appears.
In the Claims table, select Actions > Edit or use the Edit icon. The Edit Claim window appears.
All previously entered fields are populated. Change the values in the appropriate fields, if necessary.
Then choose one of the following options.
Click OK to save the changes and close the Edit Claim window. The system returns to the Transportation Details window. The claim information is updated.
Click Cancel to reject all entries and close the Edit Claim window. The system returns to the Transportation Details window.
After you have added all necessary records, choose one of the following options.
Click Save to save your changes.
Click Save and Close to save your changes and close the Transportation Details window.
Click Cancel to reject all changes and close the Transportation Details window.
To delete claim from a transportation follow the steps listed below.
From the Tasks menu, select Trade Management > Transportation > Manage Transportation. The Transportation Search window appears.
Enter or select search criteria as desired to make the search more restrictive.
Click Search. The transportations that match the search criteria are displayed in the Results section.
Select a record in the Results section.
In the transportation column, click on the transportation link, or mark a record and select Actions > Edit or use the Edit icon. The Transportation window appears.
In the Transportation Toolbar select Details. The Transportation Details window appears.
In the Claims table, select a claim.
Click Actions > Delete or use the Delete icon to delete the selected claim.
You are prompted if you want to delete the selected claim from the Claims table. Confirm with Yes.
The claim is removed from the Claims table.
After you have deleted all necessary records, choose one of the following options.
Click Save to save your changes.
Click Save and Close to save your changes and close the Transportation Details window.
Click Cancel to reject all changes and close the Transportation Details window.
In the Transportation Shipments window you can manage associations of shipments with a PO or a transportation record.
The Transportation Shipments window contains the following sections.
The Transportation Shipments header contains the following transportation information.
Vessel ID
Voyage/Flight number
Estimated Departure Date
Container
Bill of Lading/Airway Bill
Commercial Invoice
Order Number
Item
The Transportation Shipments table contains information such as shipment, advanced shipping notice (ASN), and shipped as well as received date, the to location and the location name.
To add a shipment to a transportation follow the steps listed below.
From the Tasks menu, select Trade Management > Transportation > Manage Transportation. The Transportation Search window appears.
Enter or select search criteria as desired to make the search more restrictive.
Click Search. The transportations that match the search criteria are displayed in the Results section.
Select a record in the Results section.
In the Transportation column, click on the transportation link, or mark a record and select Actions > Edit or use the Edit icon. The Transportation window appears.
In the More Actions menu select Shipments. The Transportation Shipments window appears.
In the table, select Actions > Add or use the Add icon. The Add Shipment window appears.
The Add Shipments table displays shipments that are not associated with the PO/transportation record.
In the table select all the shipments you want to associate with the current transportation.
Then choose one of the following options.
Click OK to add the shipments and close the Add Shipments window. The system returns to the Transportation Shipments window. The new shipments are added to the Transportation Shipments table.
Click Cancel to reject all entries and close the Add Shipments window. The system returns to the Transportation Shipments window.
After you have added all necessary shipments, choose one of the following options.
Click Save to save your changes.
Click Save and Close to save your changes and close the Transportation Shipments window.
Click Cancel to reject all changes and close the Transportation Shipments window.
To delete a shipment from a transportation follow the steps listed below.
From the Tasks menu, select Trade Management > Transportation > Manage Transportation. The Transportation Search window appears.
Enter or select search criteria as desired to make the search more restrictive.
Click Search. The transportations that match the search criteria are displayed in the Results section.
Select a record in the Results section.
In the transportation column, click on the transportation link, or mark a record and select Actions > Edit or use the Edit icon. The Transportation window appears.
In the More Actions menu select Shipments. The Transportation Shipments window appears.
In the Transportation Shipments table, select a shipment.
Click Actions > Delete or use the Delete icon to delete the selected shipment.
You are prompted if you want to delete the selected shipment from the Transportation Shipments table. Confirm with Yes.
The shipment is removed from the Transportation Shipments table.
After you have deleted all necessary records, choose one of the following options.
Click Save to save your changes.
Click Save and Close to save your changes and close the Transportation Shipments window.
Click Cancel to reject all changes and close the Transportation Shipments window.
A timeline refers to a schedule of events that can be attached to an activity to track its life cycle. Possible timeline types are.
Item
Purchase Order
Order/Item
Customs Entry
Transportation
Transportation PO/Item
Container
BOL/AWB
Commercial Invoice
PO BOL/AWB
You can add timelines to the values listed above. You can attach a date to each step linked with an activity and monitor the completion of the activity. You can also modify the dates based on the changes in the schedule of related activity and add a relevant reason/comment for the change.
The Timelines Window contains the following sections.
Timeline Header
The Timeline header varies according to your selected timeline type. For example, if you want to add a timeline for a purchase order, the purchase order number is displayed in the Timeline header.
In the timelines section you can add or delete a timeline to/from the selected timeline type.
In the Timeline Details section you can view the reason and comments for a modified step within a timeline. You can also delete a timeline detail from the entry.
Use the Actions Menu and Icons to apply actions to the table. You can perform the actions listed below, as well as action described in ”Action Menu and Icons” in the Oracle Retail Trade Management Do the Basics User Guide.
Table 13-31 Timeline Details Table - Actions Menu/Icons and Description
| Actions Menu/Icons | Description |
|---|---|
|
Calculate Revised Dates |
Use the Calculate Revised Dates button to recalculate Base or Original dates. Follow the steps below.
If you enter the Original Date, the Base Date is recalculated. If you enter both, Base and Original date, you receive an error message. |
To add a timeline to an entry, follow the steps listed below.
From the Tasks menu, select Trade Management > Transportation > Manage Transportation. The Transportation window appears.
Enter or select search criteria as desired to make the search more restrictive.
Click Search. The transportations that match the search criteria are displayed in the Results section.
Select a record in the Results section.
In the Transportation column, click on the transportation link, or mark a record and select Actions > Edit or use the Edit icon. The Transportation window appears.
In the More Actions menu select Timelines. In the submenu choose for which entry you want to add timelines.
Transportation
Order/Item
Container
BOL/AWB
Commercial Invoice
The Timeline window appears.
In the Timeline table, select Actions > Add or use the Add icon. The Add Timeline window appears.
In the Timeline field, enter, select or search for the step number you want to add a timeline for. This field is a required field.
In the Base Date field, enter or use the Calendar icon to select a date.
Then choose one of the following options.
Click OK to add the timeline and close the Add Timeline window. The system returns to the Timeline window. The new timeline is added to the Timeline table.
Click OK and Add Another to add additional timelines.
Click Cancel to reject all entries and exit the Add Timeline window. The system returns to the Timelines window.
After you have added all necessary timelines, choose one of the following options.
Click Save to save your changes.
Click Save and Close to save your changes and close the Timelines window.
Click Cancel to reject all changes and close the Timelines window.
To delete a timeline from an entry, follow the steps listed below.
From the Tasks menu, select Trade Management > Transportation > Manage Transportation. The Transportation Search window appears.
Enter or select search criteria as desired to make the search more restrictive.
Click Search. The transportations that match the search criteria are displayed in the Results section.
Select a record in the Results section.
In the Transportation column, click on the transportation link, or mark a record and select Actions > Edit or use the Edit icon. The Transportation window appears.
In the More Actions menu select Timelines. In the sub menu select the appropriate timeline type. The Timelines window appears.
In the Timeline table, select Actions > Delete or use the Delete icon.
Confirm the displayed prompt with Yes. The record is deleted from the table.
After you have deleted all necessary records, choose one of the following options.
Click Save to save your changes.
Click Save and Close to save your changes and exit the Timeline window.
Click Cancel to reject all changes and exit the Timeline window.
To edit a timeline detail of an entry, follow the steps listed below.
In the Timeline Details table, select a record and edit the following columns, if necessary.
Revised Date
Enter or use the Calendar icon to select a new date for an activity.
Actual Date
Enter or use the Calendar icon to select the actual date for an activity.
Reason
Enter, select or search for a reason for the timeline change.
Comments
Enter or change comments for the activity.
|
Note: The original date is populated, when you enter the base date in the Add Timeline window. You can only modify the Base and Original Date field during the timeline definition. Once a timeline has been attached to an activity, you can no longer update these fields. |
After you have changed all necessary data, choose one of the following options.
Click Save to save your changes.
Click Save and Close to save your changes and close the Timeline window.
Click Cancel to reject all entries and close the Timeline window.
To delete a timeline detail from an entry, follow the steps listed below.
In the Timeline Details table, select a record.
Then select Actions > Delete or use the Delete icon.
Confirm the displayed prompt with Yes. The record is deleted from the table.
After you have deleted all necessary records, choose one of the following options.
Click Save to save your changes.
Click Save and Close to save your changes and exit the Timeline window.
Click Cancel to reject all changes and exit the Timeline window.
The Transportation Items window allows you to add, edit and view child items for an item parent on an order.
|
Note: This menu option is only enabled, if you entered a parent item in the Item field in the Transportation window. |
The Transportation Item window contains the following sections.
Transportation Items Header
The header displays the transportation ID, the vessel and voyage/flight number, the estimated departure date, container, bill of lading/airway bill, the commercial invoice, and order number as well as parent item information.
The Transportation Items table lists the child items added to the transportation record. You can add and delete records from this table. Furthermore, you can edit the Quantity and UOM field values directly in the table.
The Transportation Item table contains the following columns by default.
Item
Description
Diff 1-4
Quantity
You can edit the quantity of the child item directly in the table.
UOM (Unit of Measure)
You can edit the UOM of the child item directly in the table.
To add child items to a transportation of an order, follow the steps below.
From the Tasks menu, select Trade Management > Transportation > Manage Transportation. The Transportation Search window appears.
Enter or select search criteria as desired to make the search more restrictive.
Click Search. The transportations that match the search criteria are displayed in the Results section.
Select a record in the Results section.
In the Transportation column, click on the transportation link, or mark a record and select Actions > Edit or use the Edit icon. The Transportation window appears.
In the More Actions menu select Items. The Transportation Items window appears.
In the Transportation Items table, select Actions > Add or use the Add icon. The Add Item window appears.
Select if you want to add the child items individually or if you want to add all the child items on the order.
In the Items field, enter or use the Search icon to search for the appropriate child item.
|
Note: If you have selected the Add All Child Items on Order checkbox, the Item field is disabled. |
In the Quantity field, enter the appropriate quantity. Then enter, select or search for the item quantity UOM.
Then choose one of the following options.
Click OK to add the child item and close the Add Item window. The system returns to the Transportation Items window. The new child items is added to the Transportation Items table.
Click OK and Add Another to add additional child items.
Click Cancel to reject all entries and exit the Add Items window. The system returns to the Transportation Items window.
After you have added all necessary child items, choose one of the following options.
Click Save to save your changes.
Click Save and Close to save your changes and close the Transportation Items window.
Click Cancel to reject all changes and close the Transportation Items window.
To delete a child item of a transportation, follow the steps below.
From the Tasks menu, select Trade Management > Transportation > Manage Transportation. The Transportation Search window appears.
Enter or select search criteria as desired to make the search more restrictive.
Click Search. The transportations that match the search criteria are displayed in the Results section.
Select a record in the Results section.
In the Transportation column, click on the transportation link, or mark a record and select Actions > Edit or use the Edit icon. The Transportation window appears.
In the More Actions menu select Items. The Transportation Items window appears.
In the Transportation Items table, select the child item you want to delete.
Then select Actions > Delete or use the Delete icon.
You are prompted if you want to delete the selected record. Confirm the prompt with Yes.
The selected child item is removed from the Transportation Items table.
After you have deleted all necessary child items, choose one of the following options.
Click Save to save your changes.
Click Save and Close to save your changes and close the Transportation Items window.
Click Cancel to reject all changes and close the Transportation Items window.
In the Create Transportation by Order window you can enter and edit items, related shipments and other information for a specific purchase order. After populating all the information in the header you can query the details. In addition, you can edit or mass edit records.
The Create Transportation by Order window contains the following sections.
The header contains the following fields and button.
Table 13-32 Create Transportation by Order Header - Fields/Buttons and Description
| Fields/Buttons | Description |
|---|---|
|
Order No. |
Enter select or search for the appropriate order number. This field is a required field. |
|
Vessel |
Enter the vessel ID. This field is a required field. |
|
Voyage/Flight |
Enter the voyage/flight number. This field is a required field. |
|
Estimated Departure Date |
Enter or use the Calendar icon to select an estimated departure date. This field is a required field. |
|
Item Default Level |
Select the item default level from the list. Possible levels are Transaction Level and Above Transaction Level. |
|
Default Child/Diff checkbox |
Select the Default Child/Diff checkbox to indicate that all transaction-level values (child/diffs) associated with the parent items will be defaulted. The quantity/UOM values will be rolled-up and displayed for each parent item. The parent item qty/UOM is non-editable when child records exist. The Child/Diff values may be edited by clicking the Items option. If the you delete all of the quantity values from the Item window, the Parent level quantities can then be edited. The parent-level Item quantity will be calculated based on the sum of child-level quantities in the Item window, the Item UOM value will also default to the parent-level. |
|
Supplier Site |
The supplier site is displayed. You cannot edit the supplier site. |
|
Details button |
Use the Details button, to query the details for the entered order information. The transportation details are displayed in the Details section. For more information about transportation details, see the Details section. |
The Details section lists details for the entered order information. You can add, edit and delete item information for the transportation.
Use the Actions Menu, icons and buttons to apply actions to the table. You can perform the actions listed below, as well as action described in ”Action Menu and Icons” in the Oracle Retail Trade Management Do the Basics User Guide.
Table 13-33 Details Table - Actions Menu/Icons/Buttons and Description
| Actions Menu/Icons/Buttons | Description |
|---|---|
|
Mass Update or Mass Update button |
Opens the Mass Update window. For more information about how to perform a mass update, see the Mass Update section. |
|
Transportation |
Opens the Transportation window. For more information about this function, see the Define a Transportation section. |
|
Items |
Opens the Transportation Items window. For more information about this function, see the Items section. |
Use the More Actions menu to navigate to the following windows. The More Actions menu contains the following options.
Table 13-34 Create Transportation by Order - More Actions Menu
| More Actions Menu | Description |
|---|---|
|
Shipments |
Opens the Transportation Shipments window. This window displays shipment information such as ASN, shipped and received date, to location and location name. For more information about shipments, see the Shipments section. |
|
Details |
Opens the Transportation Details window. This window displays a details of the delivery, packing, license/visa information as well as claims. For more information about transportation details, see the Details section. |
|
Missing Documents |
Opens the Missing Documents window. You can add and delete all the missing documents for the current transport in this window. For more information about missing documents, see the ”Missing Documents” section in the Oracle Retail Trade Management Customs Entry User Guide. |
|
Timelines |
Opens the Timelines menu. The menu contains the following options.
For more information about timelines, see the Timelines section. |
To create a transportation by order follow the steps below.
From the Tasks menu, select Trade Management > Create Transportation by Order. The Create Transportation by Order window appears.
Enter, select or search for the necessary order information. For more information, about what do add in the Create Transportation header, see the Create Transportation by Order Header section.
Click Details. The details for the entered order information is displayed in the Detail section.
Add items to the transportation by order. For more information about how to add items to the transportation by order, see the Add Items section.
Edit item of the transportation by order. For more information about how to edit items of a transportation by order, see the Edit Items section.
Delete items form the transportation by order. For more information about how to delete items from a transportation by order, see the Delete Items section.
Update multiple items of a transportation by order. For more information about how to update multiple items from a transportation by order, see the Mass Update section.
After you have made all the necessary changes, choose one of the following options.
Click Save and Close, to save changes to the transportation and exit the Create Transportation by Order window.
Click the arrow on the right side of the button to display the additional save options.
Click Save to save your entries.
Click Save and Create Another to save the current transportation and create additional entries.
To add an item to a transportation by order, follow the steps below.
In the Details table, select Actions > Add or use the Add icon. The Add Item window appears.
In the Item field, enter or use the Search icon to search for the appropriate item. This field is a required field.
In the Container field, enter the container ID.
In the BOL/AWB field, enter the bill of lading or airway bill number.
In the Commercial Invoice field, enter the commercial invoice number. This filed is a required field.
In the Invoice Date field, enter or use the Calendar icon to select a date. This field is a required field.
In the Invoice Amount field, enter the invoice amount.
In the Exchange Rate field the current rate is displayed. If you need to edit the displayed exchange rate, see the ”Editing the Exchange Rate” section in the Oracle Retail Trade Management Letters of Credit User Guide.
In the Item Quantity field, enter the appropriate quantity. Then select the item quantity unit of measure.
In the Carton Quantity field, enter the appropriate quantity. Then select the carton quantity unit of measure.
In the Gross Weight field, enter the appropriate weight. Then select the weight unit of measure.
In the Net Weight field, enter the appropriate weight. Then select the weight unit of measure.
In the Cubic field, there appropriate cubic amount. Then select the cubic unit of measure.
Then choose one of the following options.
Click OK to save your entries and close the Add Item window.
Click OK and Add Another to add additional records.
Click Cancel to reject all entries and close the Add Item window.
After you have made all the necessary changes, choose one of the following options.
Click Save and Close, to save changes to the transportation and close the Create/Manage Transportation by Order window.
Click the arrow on the right side of the button to display the additional save options.
Click Save to save your entries.
Click Save and Create Another/Save and Edit Another to save the current transportation and create additional entries.
Click Cancel to reject all entries and close the Create/Manage Transportation by Order window.
To edit items of a transportation by order, follow the step listed below.
In the Details table, select Actions > Edit or use the Edit icon. The Edit Item window appears.
The item information of the current item is displayed. Update the field as necessary.
Then choose one of the following options.
Click OK to save your entries and close the Edit Item window.
Click Cancel to reject all entries and close the Edit Item window.
After you have made all the necessary changes, choose one of the following options.
Click Save and Close, to save changes to the transportation and close the Create/Manage Transportation by Order window.
Click the arrow on the right side of the button to display the additional save options.
Click Save to save your entries.
Click Save and Create Another/Save and Edit Another to save the current transportation and create additional entries.
Click Cancel to reject all entries and exit the Create/Manage Transportation by Order window.
To delete items from an transportation by order follow the steps below.
In the Details table, select the item you want to delete from the transportation.
Then select Actions > Delete or use the Delete icon.
You are prompted if you want to delete the record. Confirm the prompt with Yes.
The item is deleted from the Details table.
Then choose one of the following options.
Click Save and Close, to save changes to the transportation and close the Create/Manage Transportation by Order window.
Click the arrow on the right side of the button to display the additional save options.
Click Save to save your entries.
Click Save and Create Another/Save and Edit Another to create additional entries.
Click Cancel to reject all entries and close the Create/Manage Transportation by Order window.
The Manage Transportation option opens the Transportation Search window. In the Transportation Search window you can search, maintain and view transportations.
You can access the Transportation Search window from the Task menu, select Trade Management > Transportation > Manage Transportation. The Transportation Search window appears.
The Transportation Search window contains the following two sections.
Search
For more information about how to search for a transportation, see the Search for a Transportation section.
To search for a transportation:
From the Task menu, select Trade Management > Transportation > Manage Transportation. The Transportation Search window appears.
You can search for a transportation by using basic or advanced search criteria, depending on the requirement. The basic mode is the default search mode.
Click Advanced to access the search section in advanced mode.
Click Basic to return to the basic mode.
To search for a transportation using basic search criteria:
Enter, select or search for one or all of the following basic search criteria.
Table 13-35 Transportation Search - Basic Search Criteria and Description
| Fields | Description |
|---|---|
|
Match option |
Check radio button All or Any. All - only transportations matching all entered search criteria are shown. Any - transportations matching each entered search criteria are shown. |
|
Transportation |
Enter the transportation ID. |
|
Status |
Select the transportation status. For example, select Booked. |
|
Vessel |
Enter the vessel ID. |
|
Voyage/Flight |
Enter the voyage/flight number. |
|
Estimated Departure Date |
Enter or use the Calendar icon to select the estimated departure date. |
|
BOL/AWB |
Enter the bill of lading or airway bill. |
|
Container |
Enter the container ID. |
|
Order No. |
Enter, select or search for the order number. |
|
Item |
Enter the item number or use the Search icon to search for the appropriate item. |
|
Commercial Invoice |
Enter the commercial invoice number. |
Click Search. The transportations that match the search criteria are displayed in the Results section.
Click Reset to clear the search section and results.
Click Done to close the window.
To search for a transportation using advanced search criteria:
To search using advanced search criteria, enter or select one or all of the advanced search criteria.
To narrow down the search, use the list next to the search fields. For example, determine if the entered value should equal or not equal the search result.
Click Search. The transportations that match the search criteria are displayed in the Results section.
Click Reset to clear the search section and results.
Click Add Fields to add more fields for the advanced search. To remove the field from the search, click the x right next to the field.
Click Done to close the window.
The Results section lists the retrieved transportations. The Results table shows the following columns by default.
Transportation ID
Status
Vessel
Voyage/Flight
Estimated Departure Date
BOL/AWB
Container
Order No.
Item
Commercial Invoice
Transportation records must be marked as candidates to be used to systematically generate customs entries. To be eligible for marking as a candidate, the transportation record must contain the following information at a minimum:
Vessel
Voyage/Flight
Estimated Departure Date
Purchase Order
Item
Item Quantity and Unit of Measure
Commercial Invoice
Commercial Invoice Date
Commercial Invoice Amount, Currency, and Exchange Rate
To mark the transportation record as a candidate, after the minimum data and any additional data has been entered, check the Candidate checkbox at the top of the Transportation page.
A separate transportation record will be created for each Vessel, Voyage/Flight, Bill of Lading/Airway Bill, Container, Purchase Order, Item, Commercial Invoice combination. Therefore, a single shipment may be represented by multiple transportation records. When all of the transportation records for a given shipment have been marked as candidates, the transportation shipment can be finalized through the Transportation Finalization page, which will generate customs entries based on the data defined on the transportation records. See Finalize Transportation for more information about finalizing a transportation.
The Manage Transportation by Order window allows you to search and maintain transportations for an order.
The Manage Transportation by Order window contains the same sections and functions as the Create Transportation by Order window.
For more information about the available sections and functions to manage transportations by order, see Create a Transportation by Order.
To search for transportations by order follow the steps below.
From the Tasks menu, select Trade Management > Transportation > Manage Transportation by Order. The Manage Transportation by Order window appears.
Enter or select search for the appropriate order number, vessel ID, voyage/flight number and estimated departure date for which the transportation record needs to be edited.
Click Details. The transportation details are displayed in Details table.
Then update the transportations as necessary.
Add items to the transportation by order. For more information about how to add items to the transportation by order, see the Add Items section.
Edit item of the transportation by order. For more information about how to edit items of a transportation by order, see the Edit Items section.
Delete items from the transportation by order. For more information about how to delete items from a transportation by order, see the Delete Items section.
Update multiple items of a transportation by order. For more information about how to update multiple items from a transportation by order, see the Mass Update section.
Then choose one of the following options.
Click Save and Close, to save changes to the transportation and close the Create/Manage Transportation by Order window.
Click the arrow on the right side of the button to display the additional save options.
Click Save to save your entries.
Click Save and Create Another/Save and Edit Another to save the current transportation and create additional entries.
Click Cancel to reject all entries and exit the Create/Manage Transportation by Order window.
In the Mass Update window you can edit multiple items.
The Mass Update window contains the following sections.
In the Apply Updates to section, enter, select or search for the values you want to apply the updates to.
Table 13-36 Apply Updates to - Fields and Description
| Fields | Description |
|---|---|
|
Item |
Choose one of the following options from the list.
|
|
Container |
Enter, select or search for the appropriate container ID, you want to apply the update to. |
|
BOL/AWB |
Enter, select or search for the bill of lading or airway bill, you want to apply the update to. |
|
Commercial Invoice |
Enter, select or search for the commercial invoice, you want to apply the update to. |
In the Set Initial Values section you can enter only initial values for the container, the BOL/AWB and the commercial invoice. You cannot edit these values later.
In the Update section, enter new values for those fields you want to update. The Update section displays the following fields.
Table 13-37 Updates - Fields and Description
| Fields | Description |
|---|---|
|
Status |
Select the appropriate status from the list. For example, select status Loaded. |
|
Commercial Invoice Date |
Enter or use the Calendar icon to select the date. |
|
Actual Departure Date |
Enter or use the Calendar icon to select the date. |
|
Estimated Arrival Date |
Enter or use the Calendar icon to select the date. |
|
Actual Arrival Date |
Enter or use the Calendar icon to select the date. |
|
Delivery Date |
Enter or use the Calendar icon to select the date. |
|
Shipment |
Enter the shipment ID. |
|
Receipt |
Enter the receipt number. |
|
Forwarder's Cargo Receipt |
Enter the forwarder's cargo receipt number. |
|
Forwarder's Cargo Receipt Date |
Enter or use the Calendar icon to select the date. |
|
In Transit |
Enter In Transit number for shipments cleared at inland locations, or other than Discharge Port. |
|
In Transit Date |
Enter or use the Calendar icon to select the date. |
|
Service Contract No. |
Enter the service contract number. |
|
Lot |
Enter the lot number. |
|
Seal |
Enter the seal number |
|
Packing Method |
Select the packing method from the list. For example, select Flat. |
|
Partner Type |
Select the partner type from the list. For example, select Agent. |
|
Partner |
This field is only enabled, if you have selected a partner type. Enter, select or search for the appropriate partner. |
|
Lading Port |
Enter, select or search for the lading port. |
|
Discharge Port |
Enter, select or search for the discharge port. |
|
Container SCAC Code |
Enter, select or search for the container SCAC code. |
|
Vessel SCAC Code |
Enter, select or search for the vessel SCAC code. |
|
Freight Type |
Enter, select or search for the freight type. |
|
Freight Size |
Enter, select or search for the freight size. |
|
Consolidation Country |
Enter, select or search for the consolidation country. |
|
Origin Country |
Enter, select or search for the origin country. |
|
Export Country |
Enter, select or search for the export country. |
|
Shipment Method |
Select the shipment method from the list. |
|
Rush checkbox |
Select the Rush checkbox to indicate that the transport is a rush shipment. |
|
Candidate checkbox |
Select the Candidate checkbox, if the record is complete and ready for finalization. The Candidate checkbox can only be selected for items that have an approved HTS code. |
|
Comments |
Enter comments, if necessary. |
|
Note: All fields are enabled by default. Check the Clear Value checkbox to disable the selected field. The field Commercial Invoice can not be cleared. |
The Toolbar displays the icons and buttons for actions that can be performed in the Mass Update window. The Toolbar contains the following icons and buttons.
Table 13-38 Mass Update Toolbar - Icons/Buttons and Description
| Action Icons/Buttons | Description |
|---|---|
|
Preserve Selected Values checkbox |
Select the Preserve Selected Values checkbox, if you want to keep the values for later mass updates. |
|
Refresh icon |
Use the Refresh icon to clear all entered values in the Mass Update window. No values are saved. |
|
OK |
Click OK to perform the updates as indicated and exit the Mass Update window. |
|
Cancel |
Click Cancel to reject all entries and exit the Mass Update window. |
In the Transportation Finalize window you can enter the entry number, import country, broker, and currency code to finalize the transportation record. When you enter the information in the Finalize Transportation window, the information is added to all records that match the vessel, voyage, and estimated departure date criteria.
|
Note: A transportation record must be marked as a Candidate before it can be finalized. |
If no search criteria is entered, all transportation records that are marked as candidates are finalized and you cannot apply an entry number, import country, broker, or currency information.
The Finalize Transportation window contains the following sections.
In the Transportation Selection you can enter search criteria for the transportation record to be finalized. To clear the Transportation Selection use the Reset icon.
In the Assign Values section enter, select or search for the customs entry values that you want to apply to the transportation record.
Table 13-40 Assign Values - Fields an Description
| Fields | Description |
|---|---|
|
Entry No. |
Enter the entry number assigned by the customs agency. |
|
Broker |
Enter, select or search for the ID of the broker. |
|
Import Country |
Enter, select or search for the ID of the import country. |
|
Currency |
Enter, select or search for the code for the currency of the import country. |
The Toolbar displays the icons and buttons for actions that can be performed in the Finalize Transportation window. The Toolbar contains the following icons and buttons.
Table 13-41 Finalize Transportation Toolbar - Icons/Buttons and Description
| Action Icons/Buttons | Description |
|---|---|
|
Help icon |
You can access the online help for a particular page by clicking the Help icon. |
|
Delete icon |
You can delete a transport by clicking the Delete icon. |
|
Finalize |
Click Finalize to change the status of the transportation to finalized. |
|
Done |
Click Done to close the Finalize Transportation window. |
To finalize transportation records, follow the steps below.
From the Tasks menu, select Trade Management > Transportation > Finalize Transportation. The Finalize Transportation window appears.
|
Note: A transportation record must be marked as a Candidate before it can be finalized. |
Enter the criteria for the transportation record to be finalized. Enter, select or search for the following values.
Vessel ID
Voyage/Flight number
Estimated departure date
|
Note: If you leave all fields empty and click Finalize, all transportation records marked as candidates are finalized. |
Enter the customs entry values that you want to apply to the record. Enter, select or search for following values.
Entry number assigned by customs agency
Import country ID
Broker ID
Currency Code
After you have entered all necessary information, choose one of the following options.
Select Finalize. The transportation records that match the criteria are copied to the Customs Entry module. The status of the transportation records are automatically changed to Finalized.
Select Done to close the Finalize Transportation window.
The movement of goods through customs in the import country can be tracked through the customs entry module.
You can track the following information in the customs entry module:
Forms
Protests
Timelines
Shipments, orders, and items
Departure, arrival, export, and import dates
Missing documents
Bills of lading and containers
Charges and assessments
Licenses and visas
A customs entry batch program transmits data to brokers so they can prepare the necessary documentation. When you finalize transportation records in the transportation module, the customs entries are created automatically. As additional information is acquired, it can be entered manually.
When the charges and assessments are complete, you can choose to allocate the costs to the actual landed cost module. When the customs entry is complete, you can confirm the record. If you have access to the Oracle Retail Invoice Matching product, non-merchandise invoices are created automatically from confirmed customs entries.
To create a customs entry, follow the steps listed below.
From the Tasks menu, select Trade Management > Import Financials > Create Customs Entry. The Customs Entry window appears.
In the Customs Entry header, the customs entry number is auto-generated, if you create a customs entry. The ALC status as well as the status of the customs entry are displayed in the top right corner of the window. If you create a customs entry the ALC status defaults to Pending and the status of the customs entry to Worksheet.
Enter, select or search for customs entry data, in the individual sections. For more information about the individual sections of the Customs Entry window, see the Define/Enter a Customs Entry section.
Then select one of the following options.
Click Save and Close to save you entries and close the Customs Entry window.
Click the arrow on the right side of the button to display the additional save options.
Click Save to save your entries.
Click Save and Create Another to create additional entries.
Click Cancel to reject all entries and close the Customs Entry window.
You can track the movement of goods through customs in the import country through the Customs Entry (CE) module.
The Create Customs Entry option opens the Customs Entry window. This window allows you to view and maintain customs entries. You can also calculate assessments and allocate them to actual landed cost (ALC).
The Customs Entry window contains the following sections.
The Customs Entry header displays the Customs Entry ID. In the top right corner of the section the ALC status as well as the status of the customs entry are displayed. Additionally, the section contains the following entry fields.
Table 13-42 Customs Entry Header - Fields and Description
| Field | Description |
|---|---|
|
Entry No. |
Enter the entry number. |
|
Entry Date |
Enter the entry date or use the Calendar icon to select an entry date. |
|
Import Country |
Enter the country into which the merchandise is being imported. Defaults to the corporate headquarters country as defined in system options. |
|
Currency |
Enter the currency in which the customs entry charges will be paid. Defaults to the primary currency as defined in system options. |
|
Exchange Rate |
Enter the exchange rate used to convert from the primary currency to the currency of the customs entry. If you need to edit the current Exchange Rate, see ”Editing the Exchange Rate” in the Oracle Retail Trade Management Letters of Credit User Guide. |
|
Entry Status |
Enter, select or search for the status of the customs entry. |
|
Entry Port |
Enter, select or search for the entry port. |
|
Entry Type |
Enter, select or search for the entry type. |
|
Summary Date |
Enter the summary date or use the Calendar icon to select the date. |
|
Release Date |
Enter the release date or use the Calendar icon to select the date. |
Furthermore, the Customs Entry Header contains the Totals section. You can view the following totals in this section.
Table 13-43 Totals - Fields an Description
| Field | Description |
|---|---|
|
Total Actual Assessments |
The Actual Assessments column lists the following values:
|
|
Value for Duty |
Displays the dutiable value of the merchandise on the customs entry. |
|
Estimated Assessments |
Displays the estimated value of the assessments on the customs entry. |
The Details section contains the following fields.
Table 13-44 Details - Fields and Description
| Field | Description |
|---|---|
|
Importer |
Enter, select or search for the importer. |
|
Consignee |
Enter, select or search for the consignee. |
|
Broker |
Enter, select or search for the broker. |
|
Broker Ref. No. |
Enter the broker reference number. |
|
File No. |
Enter the file number. |
|
Bond Type |
Select the bond type from the list. |
|
Bond No. |
This field is only enabled, if you selected a bond type. Enter the bond number. |
|
Payee Type |
Select the payee type from the field. |
|
Payee |
This field is only enabled, if you selected a payee type. Enter, select or search for the payee. |
|
Liquidation Amount |
Enter the liquidation amount. |
|
Liquidation Date |
Enter the liquidation date or use the Calendar icon to select the date. |
|
Re-liquidation Amount |
Enter the re-liquidation amount. |
|
Re-liquidation Date |
Enter the re-liquidation date or use the Calendar icon to select a date. |
|
Surety Code |
Select a surety code from the list. |
|
Entry Team |
Enter the entry team. |
|
Live Cargo |
Select the Live Cargo checkbox, to indicate the entry is live in accordance to the U.S. 7501 form. |
|
Merchandise Location |
Enter the merchandise location. |
|
Location Code |
Enter the location code. |
The Comments section holds the Comments field. You can enter any comments for the customs entry.
The Customs Entry Toolbar displays the icons and buttons for actions that can be performed for the customs entry such as changing the status of the customs entry or navigating to the CE Details window to edit and view shipments, orders, items or charges information related to the customs entry. The Customs Entry Toolbar contains the following icons and buttons.
Table 13-45 Customs Entry Toolbar - Icons/Buttons and Description
| Action Icons/Buttons | Description |
|---|---|
|
Help icon |
You can access the online help for a particular page by clicking the Help icon. |
|
Delete icon |
Deletes the current customs entry. Only possible, if the Customs Entry is still in the status Worksheet. |
|
Recalculate icon |
Use this icon to recalculate the totals in the Customs Entry window, after you have changed CE Details such as order/items or charges. |
|
Status |
If you click the Status button, the status of the customs entry changes to the status specified on the button. When there is more than one status to which the customs entry can be changed to, click the arrow on the right side of the button to display the additional status options. Possible customs entry statuses are:
|
|
Details |
Click Details to view the details of the customs entry. The CE Details window appears. For more information about CE details, see the Custom Entry Details section. |
|
Allocate ALC |
Click Allocate ALC to allocate the costs to the actual landed costs module. |
|
More Actions |
Click More Actions to see a list of additional actions that can be performed in the Customs Entry window. For more information about the More Action Menu for customs entries, see the Customs Entry - More Actions Menu section. |
|
Save and Close |
Click Save and Close to save your changes and close the window. Click the arrow on the right side of the button to display the additional save options.
|
|
Cancel |
Click Cancel to reject all entries and close the window. |
|
Done |
Only displayed in view mode. Click Done to close the window. |
|
Note: If you enter the Customs Entry window in view mode, only the following icons and buttons are available:
All other icons and buttons are disabled in view mode. |
Use the More Actions menu to navigate to the following windows. The More Actions menu contains the following options.
Table 13-46 More Actions Menu - Buttons and Description
| Action Buttons | Description |
|---|---|
|
Forms and Protests |
Opens the CE Forms and Protests window. For more information about this function, see the Forms and Protests section. |
|
Timelines |
Opens the Customs Entry Timelines window. For more information about this function, see the Timelines section. |
In the CE Forms and Protests window you can create, edit and view forms and protest information related to the selected customs entry.
The CE Forms and Protests window contains the following sections.
The CE Forms and Protests header displays the customs entry, the entry number and the import country.
In the Forms table you can maintain forms records. The table displays the following columns by default.
Form Type
OGA Code and Description
Issues
Dates such as Notice, Due and Response Date
Comments
Use the Actions Menu and Icons to apply actions to the table. You can perform the actions listed below.
Table 13-47 Forms Table - Actions Menu/Icons and Description
| Actions Menu/Icons | Description |
|---|---|
|
Add and Add icon |
You can add forms to a customs entry by selecting Actions > Add or by using the Add icon. For more information about how to add forms, see the Add Forms section. |
|
Delete and Delete icon |
You can delete a form from a customs entry:
|
|
Export to Excel and Export to Excel icon |
You can export the records in the table to a Microsoft Excel spreadsheet by selecting Actions > Export to Excel or by using the Export to Excel icon. |
You can customize the view of the table. Use the View Menu to customize the view as listed below.
Table 13-48 Forms Table - View Menu and Description
| View Menu/Icons | Description |
|---|---|
|
Columns |
You can manage which of the columns will be shown in the table by clicking the Show All and Manage Columns options. |
|
Detach and Detach icon |
You can view the tables in the application in a separate window by clicking Detach or by using the Detach icon. |
|
Reorder Columns |
You can reorder columns by clicking the Reorder Columns option. |
|
Query by Example and Query by Example icon |
You can filter the items by one or multiple column values by clicking the Query by Example option or by using the Query by Example icon. |
In the Protests table you can maintain protest records. The table displays the following columns by default.
Protest Number
Protest Code
Description
Protest Date
Comments
Use the Actions Menu and Icons to apply actions to the table. You can perform the actions listed below.
Table 13-49 Protests Table - Actions Menu/Icons and Description
| Actions Menu/Icons | Description |
|---|---|
|
Add and Add icon |
You can add protests to a customs entry by selecting Actions > Add or by using the Add icon. For more information about how to add protests, see the Add Protests section. |
|
Delete and Delete icon |
You can delete a protest from a customs entry:
|
|
Export to Excel and Export to Excel icon |
You can export the records in the table to a Microsoft Excel spreadsheet by selecting Actions > Export to Excel or by using the Export to Excel icon. |
You can customize the view of the table. Use the View Menu and icons to customize the view as listed below.
Table 13-50 Protests Table - View Menu/Icons and Description
| View Menu/Icons | Description |
|---|---|
|
Columns |
You can manage which of the columns will be shown in the table by clicking the Show All and Manage Columns options. |
|
Detach and Detach icon |
You can view the tables in the application in a separate window by clicking Detach or by using the Detach icon. |
|
Reorder Columns |
You can reorder columns by clicking the Reorder Columns option. |
|
Query by Example and Query by Example icon |
You can filter the items by one or multiple column values by clicking the Query by Example option or by using the Query by Example icon. |
The Toolbar displays the icons and buttons for actions that can be performed in the CE Forms and Protest window. The Toolbar contains the following icons and buttons.
Table 13-51 CE Forms and Protests Toolbar - Icons/Buttons and Description
| Action Icons/Buttons | Description |
|---|---|
|
Help icon |
You can access the online help for a particular page by clicking the Help icon. |
|
Save |
Click Save to save your changes. |
|
Save and Close |
Click Save and Close to save your changes and close the window. |
|
Cancel |
Click Cancel to reject all entries and close the window. |
To add a form to a customs entry, follow the steps listed below.
From the Tasks menu, select Trade Management > Import Financials > Manage Customs Entry. The Customs Entry Search window appears.
Enter or select search criteria as desired to make the search more restrictive.
Click Search. The Customs Entries that match the search criteria are displayed in the Results section.
Select a record in the Results section.
In the Customs Entry column, click on the customs entry link, or mark a record and select Actions > Edit or use the Edit icon. The Customs Entry window appears.
In the More Actions menu select Forms and Protests. The CE Forms and Protests window appears.
In the Forms table, select Actions > Add or use the Add icon. The Add Form window appears.
In the Form Type field, select the form from the list. This field is a required field.
In the OGA field, enter, select or search for the ID of the other government agency. This field is a required field.
In the Issues field, enter the issue raised be the government agency. This field is a required field.
In the Notice Date field, enter or select the appropriate date or use the Calendar icon to select the date. This field is a required field.
In the Due Date field, enter or select the appropriate date or use the Calendar icon to select the date.
In the Response Date field, enter or select the appropriate date or use the Calendar icon to select the date.
In the Comments field, enter your comments, if necessary.
Then choose one of the following options.
Click OK to add your changes and close the Add Form window. The system returns to the CE Forms and Protests window. The new form is added to the Form table.
Click OK and Add Another to add additional forms.
Click Cancel to reject all entries and close the Add Form window. The system returns to the CE Forms and Protests window.
After have added all necessary forms, choose one of the following options.
Click Save to save your changes.
Click Save and Close to save your changes and close the CE Forms and Protests window.
Click Cancel to reject all changes and close the CE Forms and Protests window.
After you have added a form to a customs entry, you can edit the form as shown below.
In the Forms table, select a record and edit the following columns, if necessary.
Issues
Add, change or delete the shown entry.
Notice, Due and/or Response Date
Enter or use the Calendar icon to select the notice, due and/or response date.
Comments
Add, change or delete the shown entry.
After you have changed all necessary data, choose one of the following options.
Click Save to save your changes.
Click Save and Close to save your changes and close the CE Forms and Protests window.
Click Cancel to reject all entries and close the CE Forms and Protests window.
To add protests to a customs entry, follow the steps listed below.
From the Tasks menu, select Trade Management > Import Financials > Manage Customs Entry. The Customs Entry Search window appears.
Enter or select search criteria as desired to make the search more restrictive.
Click Search. The Customs Entries that match the search criteria are displayed in the Results section.
Select a record in the Results section.
In the Customs Entry column, click on the customs entry link, or mark a record and select Actions > Edit or use the Edit icon. The Customs Entry window appears.
In the More Actions menu select Forms and Protests. The CE Forms and Protests window appears.
In the Protest table, select Actions > Add or use the Add icon. The Add Protest window appears.
In the Protest No. field, enter the number of the protest. This field is a required field.
In the Protest Code field, enter, select or search for appropriate protest code.
In the Protest Date field, enter or use the Calendar icon to select the date of the protest. This field is a required field.
In the Comments field, enter your comments, if necessary.
Then choose one of the following options.
Click OK to add the protest and close the Add Form window. The system returns to the CE Forms and Protests window. The new protest is added to the Protests table.
Click OK and Add Another to add additional protests.
Click Cancel to reject all entries and exit the Add Protest window. The system returns to the CE Forms and Protests window.
After have added all necessary protests, choose one of the following options.
Click Save to save your changes.
Click Save and Close to save your changes and close the CE Forms and Protests window.
Click Cancel to reject all changes and close the CE Forms and Protests window.
After you have added a protest to the customs entry, you can edit the protest as shown below.
In the Protests table, select a record and edit the following columns, if necessary.
Protest Code
Enter, select or search for a another protest code.
Protest Date
Enter or use the Calendar icon to select the corresponding date of the protest.
Comments
Add, change or delete the comments of the displayed protest.
Then choose one of the following options.
Click Save to save your changes.
Click Save and Close to save your changes and close the CE Forms and Protests window.
Click Cancel to reject all entries and close the CE Forms and Protests window.
In this window you can add timelines to a customs entry. You can attach a date to each step linked with an activity and monitor the completion of the activity. You can also modify the dates based on the changes in the schedule of related activity and add a relevant reason/comment for the change.
The Customs Entry Timelines Window contains the following sections.
Customs Timeline Header
This section contains the customs entry number.
In the timelines section you can add or delete a timeline to/from the selected customs entry.
Use the Actions Menu and icons to apply actions to the table. You can perform the actions listed below.
Table 13-52 Timelines Table - Actions Menu/Icons and Description
| Actions Menu/Icons | Description |
|---|---|
|
Add and Add icon |
You can add timelines to a customs entry by selecting Actions > Add or by using the Add icon. For more information about how to add a customs timeline, see the Add a Timeline to a Customs Entry section. |
|
Delete and Delete icon |
You can delete timelines from a customs entry by selecting Actions > Delete or by using the Delete icon. For more information about how to delete a timeline from a customs entry, see the Delete Timelines from a Customs Entry section. |
|
Export to Excel and Export to Excel icon |
You can copy the records in the table to a Microsoft Excel spreadsheet by selecting Actions > Export to Excel or by using the Export to Excel icon. |
You can customize the view of the table. Use the View Menu and icons to customize the view as listed below.
Table 13-53 Timeline Table - View Menu/Icons and Description
| View Menu/Icons | Description |
|---|---|
|
Columns |
You can manage which of the columns will be shown in the table by clicking the Show All and Manage Columns options. |
|
Detach and Detach icon |
You can view the tables in the application in a separate window by clicking Detach or by using the Detach icon. |
|
Sort |
You can sort columns by the following options:
|
|
Reorder Columns |
You can reorder columns by clicking the Reorder Columns option. |
|
Query by Example and Query by Example icon |
You can filter the items by one or multiple column values by clicking the Query by Example option or by using the Query by Example icon. |
In the Timeline Details section you can view the reason and comments for a modified step within a timeline. You can also delete timeline details from the custom entry.
Use the Actions Menu and icons to apply actions to the table. You can perform the actions listed below.
Table 13-54 Timeline Details Table - Actions Menu/Icons and Description
| Actions Menu/Icons | Description |
|---|---|
|
Delete and Delete icon |
You can delete timeline details from a customs entry by selecting Actions > Delete or by using the Delete icon. For more information about how to delete protests, see the Delete Timeline Details from a Customs Entry section. |
|
Export to Excel and Export to Excel icon |
You can save the table to a Microsoft Excel spreadsheet by selecting Actions > Export to Excel or by using the Export to Excel icon. |
|
Calculate Revised Dates button |
Use the Calculate Revised Dates button, after you have made timeline changes. |
|
Wrap icon |
You can wrap the values in the table column by first clicking the column on which you would like the text to wrap and then using the Wrap icon. |
You can customize the view of the table. Use the View Menu to customize the view as listed below.
Table 13-55 Timeline Details Table - View Menu and Description
| View Menu/Icons | Description |
|---|---|
|
Columns |
You can manage which of the columns will be shown in the table by clicking the Show All and Manage Columns options. |
|
Detach |
You can view the tables in the application in a separate window by clicking Detach. |
|
Sort |
You can sort columns by the following options:
|
|
Reorder Columns |
You can reorder columns by clicking the Reorder Columns option. |
|
Query by Example and Query by Example icon |
You can filter the items by one or multiple column values by clicking the Query by Example option or by using the Query by Example icon. |
The Toolbar displays the icons and buttons for actions that can be performed in the Customs Timelines window. The Toolbar contains the following icons and buttons.
Table 13-56 Customs Entry Timelines Toolbar - Icons/Buttons and Description
| Action Icons/Buttons | Description |
|---|---|
|
Help icon |
You can access the online help for a particular page by clicking the Help icon. |
|
Save |
Click Save to save your changes. |
|
Save and Close |
Click Save and Close to save your changes and exit the Customs Timeline window. |
|
Cancel |
Click Cancel to reject all entries and exit the Customs Timeline window. |
To add a timeline to a customs entry, follow the steps listed below.
From the Tasks menu, select Trade Management > Import Financials > Manage Customs Entry. The Customs Entry Search window appears.
Enter or select search criteria as desired to make the search more restrictive.
Click Search. The Customs Entries that match the search criteria are displayed in the Results section.
Select a record in the Results section.
In the Customs Entry column, click on the customs entry link, or mark a record and select Actions > Edit or use the Edit icon. The Customs Entry window appears.
In the More Actions menu select Timelines. The Customs Timeline window appears.
In the Timeline table, select Actions > Add or use the Add icon. The Add Timeline window appears.
In the Timeline field, enter, select or search for the step number you want to add a timeline for. This field is a required field.
In the Base Date field, enter or use the Calendar icon to select a date.
Then choose one of the following options.
Click OK to add the timeline and close the Add Timeline window. The system returns to the Customs Timeline window. The new timeline is added to the Timeline table.
Click OK and Add Another to add additional timelines.
Click Cancel to reject all entries and close the Add Timeline window. The system returns to the Customs Timeline window.
After you have added all necessary timelines, choose one of the following options.
Click Save to save your changes.
Click Save and Close to save your changes and close the Customs Timeline window.
Click Cancel to reject all changes and close the Customs Timeline window.
To delete a timeline from a customs entry, follow the steps listed below.
From the Tasks menu, select Trade Management > Import Financials > Manage Customs Entry. The Customs Entry Search window appears.
Enter or select search criteria as desired to make the search more restrictive.
Click Search. The Customs Entries that match the search criteria are displayed in the Results section.
Select a record in the Results section.
In the Customs Entry column, click on the customs entry link, or mark a record and select Actions > Edit or use the Edit icon. The Customs Entry window appears.
In the More Actions menu select Timelines. The Timelines window appears.
In the Timeline table, select Actions > Delete or use the Delete icon.
Confirm the displayed prompt with Yes. The record is deleted from the table.
Then choose one of the following options.
Click Save to save your changes.
Click Save and Close to save your changes and close the Customs Timeline window.
Click Cancel to reject all changes and close the Customs Timeline window.
To edit timeline details of a customs entry, follow the steps listed below.
In the Timeline Details table, select a record and edit the following columns, if necessary.
Revised Date
Enter or use the Calendar icon to select a new date for an activity.
Actual Date
Enter or use the Calendar icon to select the actual date for an activity.
Reason
Enter, select or search for a reason for the timeline change.
Comments
Enter or change comments for the activity.
Then choose one of the following options.
Click Save to save your changes.
Click Save and Close to save your changes and close the Customs Timeline window.
Click Cancel to reject all entries and close the Customs Timeline window.
To delete timeline details from a customs entry, follow the steps listed below.
From the Tasks menu, select Trade Management > Import Financials > Manage Customs Entry. The Customs Entry Search window appears.
Enter or select search criteria as desired to make the search more restrictive.
Click Search. The Customs Entries that match the search criteria are displayed in the Results section.
Select a record in the Results section.
In the Customs Entry column, click on the customs entry link, or mark a record and select Actions > Edit or use the Edit icon. The Customs Entry window appears.
In the More Actions menu select Timelines. The Timelines window appears.
In the Timeline Details table, select Actions > Delete or use the Delete icon.
Confirm the displayed prompt with Yes. The record is deleted from the table.
After you have deleted all necessary records, choose one of the following options.
Click Save to save your changes.
Click Save and Close to save your changes and exit the Customs Timeline window.
Click Cancel to reject all changes and exit the Customs Timeline window.
The CE Details window allows you to add, edit and view shipments, order/items and charges information related to a customs entry.
A transportation shipment is represented as a vessel/voyage or flight/estimated departure date combination. You can add, edit and view vessel/voyage/ETD details such as lading and discharge ports, SCAC code (standard carrier alpha code), shipment method, export country, relevant dates and shipment number.
For each transportation shipment on the CE you can add, edit and view the order/item information. You can edit or view the item level information needed for clearing customs. Use the Actions menu to edit or view related license/visa details, BOLs/containers and missing documents.
The charges table displays any charges against an order/item on a particular transportation shipment. All HTS components or a single component (expense or assessment) can be added as a charge for the item.
The CE Details window contains the following sections.
The CE Details Header contains the following information.
Customs Entry ID
Entry No.
Import Country
The CE Details Toolbar displays the icons and buttons for actions that can be performed in the CE Details window. The CE Details Toolbar contains the following icons and buttons.
Table 13-57 CE Details Toolbar - Icons/Buttons and Description
| Action Icons/Buttons | Description |
|---|---|
|
Help icon |
You can access the online help for a particular page by clicking the Help icon. |
|
More Actions |
Click More Actions to see a list of additional actions that can be performed in the CE Details window.
|
|
Save |
Click Save to save the changes to the customs entry. |
|
Save and Close |
Click Save and Close to save changes to the customs entry and close the CE Details window. |
|
Cancel |
Click Cancel to reject all changes and close the CE Details window. |
|
Done |
Only displayed in view mode. Click Done to close the CE Details window. |
The Shipments section displays the following columns by default.
Vessel
Voyage/Flight
Estimated Departure Date
Vessel SCAC Code
Discharge Port
Shipment Method
Export Country
Shipment
Comments
Use the Actions Menu to apply actions to the table. You can perform the actions listed below.
Table 13-58 Shipments - Actions Menu/icons and Description
| Actions Menu/Icons | Description |
|---|---|
|
Add and Add icon |
You can add shipments to the table by selecting Actions > Add or by using the Add icon. For more information about how to add shipments to a customs entry, see the Add Shipments to a Customs Entry section. |
|
Edit and Edit icon |
You can edit shipments for a customs entry by selecting Actions > Edit or by using the Edit icon. For more information about how to edit shipments for a customs entry, see the Edit Shipments of a Customs Entry section. |
|
Delete and Delete icon |
You can delete shipments from a customs entry by selecting Actions > Delete or by using the Delete icon. For more information about how to delete shipments from a customs entry, see the Delete Shipments from a Customs Entry section. |
|
Export to Excel and Export to Excel icon |
You can export the records in the table to a Microsoft Excel spreadsheet by selecting Actions > Export to Excel or by using the Export to Excel icon. |
|
Wrap icon |
You can wrap the values in the table column by first clicking the column on which you would like the text to wrap and then using the Wrap icon. |
You can customize the view of the table. Use the View Menu and icons to customize the view as listed below.
Table 13-59 Shipments - View Menu/Icons and Description
| View Menu/Icons | Description |
|---|---|
|
Columns |
You can manage which of the columns will be shown in the table by clicking the Show All and Manage Columns options. |
|
Detach and Detach icon |
You can view the tables in the application in a separate window by clicking Detach or by using the Detach icon. |
|
Sort |
You can sort columns by the following options:
|
|
Reorder Columns |
You can reorder columns by clicking the Reorder Columns option. |
|
Query by Example and Query by Example icon |
You can filter the items by one or multiple column values by clicking the Query by Example option or by using the Query by Example icon. |
To add a shipment to a customs entry, follow the steps listed below.
From the Tasks menu, select Trade Management > Import Financials > Manage Customs Entry. The Customs Entry Search window appears.
Enter or select search criteria as desired to make the search more restrictive.
Click Search. The Customs Entries that match the search criteria are displayed in the Results section.
Select a record in the Results section.
In the Customs Entry column, click on the customs entry link, or mark a record and select Actions > Edit or use the Edit icon. The Customs Entry window appears.
In the Toolbar, click the Details button. The CE Details window appears.
In the Shipments table, select Actions > Add or use the Add icon. The Add Shipment window appears.
In the Vessel field, enter, select or search for the vessel ID. This field is a required field.
In the Voyage/Flight field, enter, select or search for the voyage/flight number. This field is a required field.
In the Estimated Departure Date field, enter, select or search for the appropriate date. This field is a required field.
In the Vessel SCAC Code field, enter, select or search for the vessel standard carrier alpha code.
In the Shipment Method field, select the appropriate shipment method from the list.
In the Shipment field, enter the shipment reference number.
In the Export Country field, enter, select or search for the appropriate country.
In the Lading Port field, enter, select or search for the lading port.
In the Discharge Port field, enter, select or search for the discharge port.
In the Export Date field, enter or use the Calendar icon to select an export date.
In the Import Date field, enter or use the Calendar icon to select an import date.
In the Arrival Date field, enter or use the Calendar icon to select an arrival date.
In the Comments field, enter comments for the shipment, if necessary.
Then choose one of the following options.
Click OK to add the shipment and close the Add Shipment window. The system returns to the CE Details window. The shipment is added to the Shipments table.
Click OK and Add Another to add additional shipments.
Click Cancel to reject all entries and exit the Add Shipments window. The system returns to the CE Details window.
After have added all necessary shipments, choose one of the following options.
Click Save to save your changes.
Click Save and Close to save your changes and close the CE Details window.
Click Cancel to reject all changes and close the CE Details window.
The Order/Items section displays the following columns by default.
Order No.
Item
Item Description
Commercial Invoice
Invoice Amount
You can edit the invoice amount in the column.
Currency
Manifest Quantity
Manifest UOM
Cleared Qty
Cleared UOM
Comments
Use the Actions Menu, icons and buttons to apply actions to the table. You can perform the actions listed below.
Table 13-60 Order/Items - Actions Menu/Icons and Description
| Actions Menu/Icons/Buttons | Description |
|---|---|
|
Add and Add icon |
You can add order/item combination to the table by selecting Actions > Add or by using the Add icon. For more information about how to add order/items to a customs entry, see the Add Order/Item to Customs Entry section. |
|
Edit and Edit icon |
You can edit order/item combination for a customs entry by selecting Actions > Edit or by using the Edit icon. For more information about how to edit order/items for a customs entry, see Edit Order/Item of a Customs Entry section. |
|
Delete and Delete icon |
You can delete an order/items combination from a customs entry by selecting Actions > Delete or by using the Delete icon. For more information about how to delete order/items from a customs entry, see the Delete Order/Item from a Customs Entry section. |
|
Export to Excel and Export to Excel icon |
You can copy the records in the table to a Microsoft Excel spreadsheet by selecting Actions > Export to Excel or by using the Export to Excel icon. |
|
BOLs/Container and BOLs/Container button |
Opens the CE BOLs/Containers window. For more information about this function, see the View BOLs/Containers section. |
|
ASN and ASN button |
Opens the Transportation Shipments window. The ASN option is only displayed when the retailer allocates transportation level obligations to an ALC, using quantities found on their associated ASNs. For more information about this function, see ”Shipments” in the Oracle Retail Trade Management Transportation User Guide. |
|
Licence/Visa |
Opens the CE License/Visa window. For more information about this function, see the Licence/Visa section. |
|
Missing Documents |
Opens the Missing Documents window. For more information about this function, see the Missing Documents section. |
You can customize the view of the table. Use the View Menu to customize the view as listed below.
Table 13-61 Order/Items - View Menu and Description
| View Menu/Icons | Description |
|---|---|
|
Columns |
You can manage which of the columns will be shown in the table by clicking the Show All and Manage Columns options. |
|
Detach and Detach icon |
You can view the tables in the application in a separate window by clicking Detach or by using the Detach icon. |
|
Sort |
You can sort columns by the following options:
|
|
Reorder Columns |
You can reorder columns by clicking the Reorder Columns option. |
|
Query by Example and Query by Example icon |
You can filter the items by one or multiple column values by clicking the Query by Example option or by using the Query by Example icon. |
To add an order/items combination to a customs entry, follow the steps listed below.
From the Tasks menu, select Trade Management > Import Financials > Manage Customs Entry. The Customs Entry Search window appears.
Enter or select search criteria as desired to make the search more restrictive.
Click Search. The Customs Entries that match the search criteria are displayed in the Results section.
Select a record in the Results section.
In the Customs Entry column, click on the customs entry link, or mark a record and select Actions > Edit or use the Edit icon. The Customs Entry window appears.
In the Toolbar, click the Details button. The CE Details window appears.
In the Order/Item table, select Actions > Add or use the Add icon. The Add Order/Item window appears.
In the Order field, enter, select or search for the order number. This field is a required field.
In the Item field, enter the item number. If you do not know the item number you can enter a full or partial item description and click the Search icon, or click the Search icon directly to search for the appropriate item. This field is a required field.
Select the Rush checkbox, to indicate if the item is on a rush shipment.
The fields in the Commercial invoice section are populated with the values from the transportation record. Change the values, if necessary.
In the Manifest Quantity field, enter the appropriate quantity. Then enter, select or search for the manifest unit of measure (UOM).
In the Cleared Quantity field, enter the appropriate quantity. Then enter, select or search for the cleared UOM.
In the Carton Quantity field, enter the appropriate quantity. Then enter, select or search for the carton UOM.
In the Gross Weight field, enter the appropriate weight. Then enter, select or search for the gross weight UOM.
In the Net Weight field, enter the appropriate weight. Then enter, select or search for the net weight UOM.
In the Cubic field, enter the appropriate cubic value. Then enter, select or search for the cubic UOM.
In the In Transit No. field, enter the transit number.
In the In Transit Date field, enter or use the Calendar icon to select the in transit date.
In the DO. No. field, enter the due order number.
In the DO. Date field, select due order date.
In the Tariff Treatment field, enter the tariff treatment. This field is only enabled when the item and origin country fields are populated, and the customs entry is not in Confirmed status.
In the Ruling No. field, enter ruling number.
In the BOL/AWB field, enter, select or search for the bill of lading or the airway bill.
Select the Multiple BOL/AWBs checkbox, to indicate that there is more than one bill of lading or airway bill.
In the Comments field, enter comments for the order/item information, if necessary.
Then choose one of the following options.
Click OK to add the order/item and close the Add Order/Item window. The system returns to the CE Details window. The order/item information is added to the Order/Item table.
Click OK and Add Another to add additional order/item information.
Click Cancel to reject all entries and exit the Add Order/Item window. The system returns to the CE Details window.
After have added all necessary order/item information, choose one of the following options.
Click Save to save your changes.
Click Save and Close to save your changes and close the CE Details window.
Click Cancel to reject all changes and close the CE Details window.
The Charges section displays the following columns by default.
HTS
Description
Effective Form
Effective To
Component
Rate
Per Count UOM
CVB
Value
|
Note: The component item information displays when the highlighted item in the Order/Items table is a buyer pack. In that case the Charges related to an individual component item of the pack are displayed. Use the displayed arrow buttons to move from one component item of the pack to another to see the charges. |
Use the Actions Menu, icons and button to apply actions to the table. You can perform the actions listed below.
Table 13-62 Charges - Actions Menu/Icons/Button and Description
| Actions Menu/Icons/Button | Description |
|---|---|
|
Add and Add icon |
You can add charges to an order/items combination by selecting Actions > Add or by using the Add icon. For more information about how to add charges to an order/items combination, see the Add Charges to Order/Items section. |
|
Edit and Edit icon |
You can edit charges of an order/items combination by selecting Actions > Edit or by using the Edit icon. For more information about how to edit charges of an order/items combination, see the Edit Charges of Order/Items section. |
|
Delete and Delete icon |
You can delete charges from an order/items combination by selecting Actions > Delete or by using the Delete icon. For more information about how to delete charges from an order/items combination, see the Delete Charges from Order/Items section. |
|
Export to Excel and Export to Excel icon |
You can copy the records in the table to a Microsoft Excel spreadsheet by selecting Actions > Export to Excel or by using the Export to Excel icon. |
|
Wrap icon |
You can wrap the values in the table column by first clicking the column on which you would like the text to wrap and then using the Wrap icon. |
|
Delete HTS |
Use the Delete HTS button to delete HTS codes from the table. For more information about how to delete an HTS code from the table, see the Delete Charges from Order/Items section. |
|
Next and Previous icons |
Only available in the Charges title bar, when the selected item in the Order/Items table is a buyer pack. Use the Next and Previous icons to navigate between component items of the buyer pack. |
You can customize the view of the table. Use the View Menu and icons to customize the view as listed below.
Table 13-63 Charges - View Menu/Icons and Description
| View Menu/Icons | Description |
|---|---|
|
Columns |
You can manage which of the columns will be shown in the table by clicking the Show All and Manage Columns options. |
|
Detach and Detach icon |
You can view the tables in the application in a separate window by clicking Detach or by using the Detach icon. |
|
Sort |
You can sort columns by the following options:
|
|
Reorder Columns |
You can reorder columns by clicking the Reorder Columns option. |
|
Query by Example and Query by Example icon |
You can filter the items by one or multiple column values by clicking the Query by Example option or by using the Query by Example icon. |
To add charges to an order/items combination, follow the steps listed below.
From the Tasks menu, select Trade Management > Import Financials > Manage Customs Entry. The Customs Entry Search window appears.
Enter or select search criteria as desired to make the search more restrictive.
Click Search. The Customs Entries that match the search criteria are displayed in the Results section.
Select a record in the Results section.
In the Customs Entry column, click on the customs entry link, or mark a record and select Actions > Edit or use the Edit icon. The Customs Entry window appears.
In the Toolbar, click the Details button. The CE Details window appears.
In the Charges - Component Item table, select Actions > Add or use the Add icon. The Add Charge window appears.
In the HTS field, enter the HTS code or use the Search icon to search for the appropriate HTS code. The remaining fields are auto-populated. This field is a required field.
Select if you want to apply the HTS code to all HTS components or a single assessment.
If you select the All HTS Components checkbox, all remaining fields are disabled.
If you select the Single Assessment checkbox, the Component field enables.
In the Component field, enter, select or search for the appropriate component.
In the CBV field, enter, select or search for the appropriate calculation basis of value.
In the Rate field, enter the appropriate rate.
In the per field, enter, select or search for the Per Count UOM.
Then choose one of the following options.
Click OK to add the charge and close the Add Charge window. The system returns to the CE Details window. The charge is added to the Charges - Component Item table.
Click OK and Add Another to add additional charges.
Click Cancel to reject all entries and exit the Add Charge window. The system returns to the CE Details window.
After have added all necessary charges, choose one of the following options.
Click Save to save your changes.
Click Save and Close to save your changes and close the CE Details window.
Click Cancel to reject all changes and close the CE Details window.
In the CE License/Visa window you can create, edit and view license and visa information related to a customs entry.
The CE Licence/Visa window contains the following sections.
The CE Licence/Visa header contains the following information:
Customs Entry
Entry No.
Vessel
Voyage/Flight
Estimated Departure Date
Import Country
Order No.
Item
In the CE License/Visa table you can maintain license and visa records.
The CE Licence/Visa table contains the following columns by default:
Type
License/Visa
Quantity
Quantity UOM
Weight UOM
Quota Category
Quota Category Description
Comments
Use the Actions Menu and icons to apply actions to the table. You can perform the actions listed below.
Table 13-64 CE Licence/Visa Table - Actions Menu/Icons and Description
| Actions Menu/Icons | Description |
|---|---|
|
Add and Add icon |
You can add a licence or a visa to a customs entry by selecting Actions > Add or by using the Add icon. For more information about how to add a licence or a visa, see the Add a Licence or a Visa to a Customs Entry section. |
|
Edit and Edit icon |
You can edit a licence or a visa for a customs entry by selecting Actions > Edit or by using the Edit icon. For more information about how to edit licence and visa entries for a custom entry, see the Edit a Licence or Visa for a Customs Entry section. |
|
Delete and Delete icon |
You can delete a licence or a visa from a customs entry by selecting Actions > Delete or by using the Delete icon. For more information about how to delete a licence or a visa from a customs entry, see the Delete a Licence/Visa from a Customs Entry section. |
|
Export to Excel and Export to Excel icon |
You can copy the records in the table to a Microsoft Excel spreadsheet by selecting Actions > Export to Excel or by using the Export to Excel icon. |
You can customize the view of the table. Use the View Menu and icons to customize the view as listed below.
Table 13-65 CE Licence/Visa Table - View Menu/Icons and Description
| View Menu/Icons | Description |
|---|---|
|
Columns |
You can manage which of the columns will be shown in the table by clicking the Show All and Manage Columns options. |
|
Detach and Detach icon |
You can view the tables in the application in a separate window by clicking Detach or by using the Detach icon. |
|
Reorder Columns |
You can reorder columns by clicking the Reorder Columns option. |
|
Query by Example and Query by Example icon |
You can filter the items by one or multiple column values by clicking the Query by Example option or by using the Query by Example icon. |
The Toolbar displays the icons and buttons for actions that can be performed in the CE Licence/Visa window. The Toolbar contains the following icons and buttons.
Table 13-66 CE Licence/Visa - Icons/Buttons and Description
| Action Icons/Buttons | Description |
|---|---|
|
Help icon |
You can access the online help for a particular page by clicking the Help icon. |
|
Save |
Click Save to save your changes. |
|
Save and Close |
Click Save and Close to save your changes and exit the CE Licence/Visa window. |
|
Cancel |
Click Cancel to reject all entries and exit the CE Licence/Visa window. |
To add a licence or a visa to a customs entry, follow the steps listed below.
From the Tasks menu, select Trade Management > Import Financials > Manage Customs Entry. The Customs Entry Search window appears.
Enter or select search criteria as desired to make the search more restrictive.
Click Search. The Customs Entries that match the search criteria are displayed in the Results section.
Select a record in the Results section.
In the Customs Entry column, click on the customs entry link, or mark a record and select Actions > Edit or use the Edit icon. The Customs Entry window appears.
In the Toolbar, click the Details button. The CE Details window appears.
In the Order/Items section select Actions > Licence/Visa. The CE Licence/Visa window appears.
In the Licence/Visa table, select Actions > Add or use the Add icon. The Add Licence/Visa window appears.
In the Type field, select either the document type from the list. This field is a required field.
In the Licence/Visa field, enter the ID of the licence or visa. This field is a required field.
In the Import Country field, enter, select or search for the appropriate country.
In the Quantity field, enter the number of units included on the licence or visa. Then, enter, select or search for the quantity unit of measure (UOM). This field is a required field.
In the Quota Category field, enter, select or search for the ID of the quota category.
In the Net Weight field, enter the net weight. Then, enter, select or search for the weight unit of measure (UOM). This field is a required field.
In the Holder field, enter, select or search for the ID of the person or organization that holds the licence or visa.
In the Comments field, enter a comment for the licence or visa, if necessary.
Then choose one of the following options.
Click OK to add the licence/visa and exit the Add Licence/Visa window. The system returns to the CE Licence/Visa window. The licence or visa is added to the CE Licence/Visa table.
Click OK and Add Another to add additional licences/visas.
Click Cancel to reject all entries and exit the Add Licence/Visa window. The system returns to the CE Licence/Visa window.
After have added all necessary licences/visas, choose one of the following options.
Click Save to save your changes.
Click Save and Close to save your changes and close the CE Licence/Visa window.
Click Cancel to reject all changes and close the CE Licence/Visa window.
To edit a licence or visa for a customs entry, follow the steps below.
From the Tasks menu, select Trade Management > Import Financials > Manage Customs Entry. The Customs Entry Search window appears.
Enter or select search criteria as desired to make the search more restrictive.
Click Search. The Customs Entries that match the search criteria are displayed in the Results section.
Select a record in the Results section.
In the Customs Entry column, click on the customs entry link, or mark a record and select Actions > Edit or use the Edit icon. The Customs Entry window appears.
In the Toolbar, click the Details button. The CE Details window appears.
In the Order/Items section select Actions > Licence/Visa. The CE Licence/Visa window appears.
In the Licence/Visa table, select Actions > Edit or use the Edit icon. The Add Licence/Visa window appears.
The Type, Licence/Visa and Import Country fields are disabled. You cannot edit these fields.
If necessary, edit one of the following fields.
Quantity
Quota Category
Net Weight
Holder
Comments
|
Note: You can also add, change or delete a comment for a licence and/or visa directly in the CE Licence/Visa table. |
Then choose one of the following options.
Click OK to save your changes and close the Add Licence/Visa window. The system returns to the CE Licence/Visa window. Your changes are displayed in the CE Licence/Visa window.
Click Cancel to reject all entries and close the Add Licence/Visa window. The system returns to the CE Licence/Visa window.
After have made all necessary licence/visa changes, choose one of the following options.
Click Save to save your changes.
Click Save and Close to save your changes and close the CE Licence/Visa window.
Click Cancel to reject all changes and close the CE Licence/Visa window.
To delete a licence/visa from a customs entry, follow the steps listed below.
From the Tasks menu, select Trade Management > Import Financials > Manage Customs Entry. The Customs Entry Search window appears.
Enter or select search criteria as desired to make the search more restrictive.
Click Search. The Customs Entries that match the search criteria are displayed in the Results section.
Select a record in the Results section.
In the Customs Entry column, click on the customs entry link, or mark a record and select Actions > Edit or use the Edit icon. The Customs Entry window appears.
In the Toolbar, click the Details button. The CE Details window appears.
In the Order/Items section select Actions > Licence/Visa. The CE Licence/Visa window appears.
In the CE Licence/Visa table, select a record.
Then select Actions > Delete or use the Delete icon.
Confirm the displayed prompt with Yes. The record is deleted from the table.
Then choose one of the following options.
Click Save to save your changes.
Click Save and Close to save your changes and close the CE Licence/Visa window.
Click Cancel to reject all changes and close the CE Licence/Visa window.
In the Missing Documents window you can edit and view the documents that are required by the customs agency for each order and item combination. You can track missing documents in both the Transportation module and the Customs Entry module.
The Missing Documents window contains the following sections.
The Missing Documents Header contains the following information.
Vessel ID
Voyage/Flight ID
Estimated Departure Date
Order Number
Item and Item Description
The Missing Documents Table contains the following columns.
Document
Description
Text
Received Date
You can edit the received date directly in the table.
Comments
You can add, edit or delete comments directly in the table.
Use the Actions Menu and icons to apply actions to the table. You can perform the actions listed below.
Table 13-67 Missing Documents Table - Actions Menu/Icons and Description
| Actions Menu/Icons | Description |
|---|---|
|
Add and Add icon |
You can add document to a customs entry or transport by selecting Actions > Add or by using the Add icon. For more information about how to add a document, see the Add a Missing Document section. |
|
Delete and Delete icon |
You can delete documents from a customs entry or transport by selecting Actions > Delete or by using the Delete icon. For more information about how to delete missing documents, see the Delete a Missing Document section. |
|
Export to Excel and Export to Excel icon |
You can copy the records in the table to a Microsoft Excel spreadsheet by selecting Actions > Export to Excel or by using the Export to Excel icon. |
|
Wrap icon |
You can wrap the values in the table column by first clicking the column on which you would like the text to wrap and then using the Wrap icon. |
You can customize the view of the table. Use the View Menu and icons to customize the view as listed below.
Table 13-68 Missing Documents Table - View Menu/Icons and Description
| View Menu/Icons | Description |
|---|---|
|
Columns |
You can manage which of the columns will be shown in the table by clicking the Show All and Manage Columns options. |
|
Detach and Detach icon |
You can view the tables in the application in a separate window by clicking Detach or by using the Detach icon. |
|
Reorder Columns |
You can reorder columns by clicking the Reorder Columns option. |
|
Query by Example and Query by Example icon |
You can filter the items by one or multiple column values by clicking the Query by Example option or by using the Query by Example icon. |
The Toolbar displays the icons and buttons for actions that can be performed in the Missing Documents window. The Toolbar contains the following icons and buttons.
Table 13-69 Missing Documents Toolbar - Icons/Buttons and Description
| Action Icons/Buttons | Description |
|---|---|
|
Help icon |
You can access the online help for a particular page by clicking the Help icon. |
|
Save |
Click Save to save your changes. |
|
Save and Close |
Click Save and Close to save your changes and close the Missing Documents window. |
|
Cancel |
Click Cancel to reject all entries and close the Missing Documents window. |
You can add a missing document to a customs entry or a transportation.
To open the Missing Documents window for a Customs Entry follow the steps below.
From the Tasks menu, select Trade Management > Import Financials > Manage Customs Entry. The Customs Entry Search window appears.
Enter or select search criteria as desired to make the search more restrictive.
Click Search. The Customs Entries that match the search criteria are displayed in the Results section.
Select a record in the Results section.
In the Customs Entry column, click on the customs entry link, or mark a record and select Actions > Edit or use the Edit icon. The Customs Entry window appears.
In the Toolbar, click the Details button. The CE Details window appears.
In the Order/Items section select Actions > Missing Documents. The Missing Documents window appears.
To open the Missing Documents window for a transportation, follow the steps below.
From the Tasks menu, select Trade Management > Transportation > Manage Transportation. The Transportation Search window appears.
Enter or select search criteria as desired to make the search more restrictive.
Click Search. The transportations that match the search criteria are displayed in the Results section.
Select a record in the Results section.
In the Transportation column, click on the transportation link, or mark a record and select Actions > Edit or use the Edit icon. The Transportation window appears.
In the More Actions menu select Missing Documents. The Missing Documents window appears.
To add a document to a customs entry or a transportation follow the steps below.
In the Missing Documents table, select Actions > Add or use the Add icon. The Add Document window appears.
In the Document field, enter, select or search for the ID of the missing document. This field is a required field.
In the Received Date field, enter or use the Calendar icon to select the received date.
In the Comments field, enter a comment for the document, if necessary.
Then choose one of the following options.
Click OK to add the missing document and close the Add Documents window. The system returns to the Missing Documents window. The document is added to the Missing Documents table.
Click OK and Add Another to add additional documents.
Click Cancel to reject all entries and exit the Add Documents window. The system returns to the Missing Documents window.
After have added all necessary documents, choose one of the following options.
Click Save to save your changes.
Click Save and Close to save your changes and close the Missing Documents window.
Click Cancel to reject all changes and close the Missing Documents window.
You can delete a missing document from a customs entry or a transportation.
To open the Missing Documents for a customs entry, follow the steps below.
From the Tasks menu, select Trade Management > Import Financials > Manage Customs Entry. The Customs Entry Search window appears.
Enter or select search criteria as desired to make the search more restrictive.
Click Search. The Customs Entries that match the search criteria are displayed in the Results section.
Select a record in the Results section.
In the Customs Entry column, click on the customs entry link, or mark a record and select Actions > Edit or use the Edit icon. The Customs Entry window appears.
In the Toolbar, click the Details button. The CE Details window appears.
In the Order/Items section select Actions > Missing Documents. The Missing Documents window appears.
To open the Missing Documents window for a transportation, follow the steps below.
From the Tasks menu, select Trade Management > Import Financials > Transportation > Manage Transportation. The Transportation Search window appears.
Enter or select search criteria as desired to make the search more restrictive.
Click Search. The transportations that match the search criteria are displayed in the Results section.
Select a record in the Results section.
In the Transportation column, click on the transportation link, or mark a record and select Actions > Edit or use the Edit icon. The Transportation window appears.
In the More Actions menu select Missing Documents. The Missing Documents window appears.
To delete a missing document from a customs entry or a transportation follow the steps below.
In the Missing Documents table, select a record.
Then select Actions > Delete or use the Delete icon.
Confirm the displayed prompt with Yes. The record is deleted from the table.
Then choose one of the following options.
Click Save to save your changes.
Click Save and Close to save your changes and close the Missing Documents window.
Click Cancel to reject all changes and close the Missing Documents window.
The Manage Customs Entries option opens the Customs Entry Search window. The Customs Entry Search window allows you to search for customs entry as well as view and edit the search results.
You can access the Customs Entry Search window from the Task menu, select Trade Management > Import Financials > Manage Customs Entries. The Customs Entry Search window appears.
The Customs Entry Search window contains the following sections.
Search
For more information about how to search for customs entries, see the Search for a Customs Entry section.
To search for a customs entry:
From the Task menu, select Inventory Management > Manage Customs Entries. The Customs Entry Search window appears.
You can search for a customs entry by using basic or advanced search criteria, depending on the requirement. The basic mode is the default search mode.
Click Advanced to access the search section in advanced mode.
Click Basic to return to the basic mode.
To search for a customs entry by using basic search criteria:
Enter, select or search for one or all of the following basic search criteria.
Table 13-70 Customs Entry Search - Basic Search Fields and Description
| Fields | Description |
|---|---|
|
Match option |
Check radio button All or Any. All - only CEs matching all entered search criteria are shown. Any - CEs matching each entered search criteria are shown. |
|
Customs Entry |
Enter the customs entry ID. |
|
Entry No. |
Enter the customs entry number. |
|
Status |
Select the customs entry status. Possible customs entry statuses are:
|
|
Import Country |
Enter, select or search for the import country. |
|
Entry Status |
Enter, select or search for the entry status. |
|
Entry Date |
Enter a date or use the Calendar icon to select a date. |
|
Entry Port |
Enter, select or search for the entry port. |
Click Search. The customs entries that match the search criteria are displayed in the Results section.
Click Reset to clear the search section and results.
Click Done to close the window.
To search for a customs entry by using advanced search criteria:
To search using advanced search criteria, enter or select one or all of the advanced search criteria.
Table 13-71 Customs Entry Search - Advanced Search Criteria and Description
| Fields | Description |
|---|---|
|
Division |
Enter, select or search for the division. |
|
Group |
Enter, select or search for the group. |
|
Department |
Enter, select or search for the department. |
|
Class |
Enter, select or search for the class. |
|
Subclass |
Enter, select or search for the subclass. |
To narrow down the search, use the list next to the search fields. For example, determine if the entered value should equal or not equal the search result.
Click Search. The custom entries that match the search criteria are displayed in the Results section.
Click Reset to clear the search section and results.
Click Add Fields to add more fields for the advanced search. To remove the field from the search, click the x right next to the field.
Click Done to close the window.
The Results section lists the retrieved customs entries. The Results table shows the following columns by default.
Customs Entry
Entry No.
Status
Import Country
Entry Status
Entry Date
Entry Port Description
To edit a customs entry, follow the steps listed below.
From the Tasks menu, select Trade Management > Manage Customs Entry. The Customs Entry Search window appears.
Enter or select search criteria as desired to make the search more restrictive.
Click Search. The Customs Entries that match the search criteria are displayed in the Results section.
Select a record in the Results section.
In the Customs Entry column, click on the customs entry link, or mark a record and select Actions > Edit or use the Edit icon. The Customs Entry window appears.
The values of the selected customs entry are displayed. Change the values, if necessary. For more details about the values of the Customs Entry window, see the Define/Enter a Customs Entry section.
Then select one of the following options.
Click Save and Close to save you entries and close the Customs Entry window.
Click the arrow on the right side of the button to display the additional save options.
Click Save to save your entries.
Click Save and Create Another to create further entries.
Click Cancel to reject all entries and close the Customs Entry window.
To download a customs entry, follow the steps below:
From the Tasks menu, select Trade Management > Import Financials > Manage Customs Entries.
The Customs Entry Search page appears.
Enter criteria to find the entry you wish to confirm. Click Search.
The entries that match the search criteria are displayed in the Results section.
In the Customs Entry column, click the customs entry link, or select Actions > Edit, or use the Edit icon ( ![]() ).
).
The Customs Entry page appears.
Select the Send option from the Status field. The status of the customs entry changes to Send.
Click Save to save your changes or click Save and Close to save your changes and close the page. The customs entry will be downloaded by the system during the nightly batch run. When this process completes the status will automatically be updated to Downloaded.
The duties, taxes, and fees which must be paid to the import authority to clear merchandise through customs are captured on customs entries. These charges, along with the merchandise cost of the item and any expenses incurred when transporting, make up an item/location's actual landed cost. The customs entry charges can be allocated to the actual landed cost module where they can be compared to the estimated charges and subsequently finalized. This adjusts weighted average cost and the stock ledger with the difference between the estimated and actual values.
To allocate customs entry charges to actual landed cost, after the shipments, order, items and charges have been entered on the entry, select the Allocate ALC button at the bottom of the Customs Entry page. The ALC Status will change from Pending to Allocated. For more information about Actual Landed Costs, see ”Actual Landed Cost Overview” in the Oracle Retail Trade Management Actual Landed Cost User Guide.
When all of the charges for the shipment/purchase order/items have been accurately captured on the customs entry, the entry can be confirmed. Confirming an entry indicates it is accurate and complete. Upon confirmation, non-merchandise invoices will be automatically generated and transmitted to Retail Invoice Matching. Once a customs entry is confirmed, it cannot be set back to Worksheet and the details can no longer be modified.
To confirm a customs entry, follow the steps below:
From the Tasks menu, select Trade Management > Import Financials > Manage Customs Entries.
The Customs Entry Search page appears.
Enter criteria to find the entry you wish to confirm. Click Search.
The entries that match the search criteria are displayed in the Results section.
In the Customs Entry column, click the customs entry link, or select Actions > Edit, or use the Edit icon ( ![]() ).
).
The Customs Entry page appears.
Select the Confirmed option from the Status field.
If the entry is currently in Worksheet status a message will display confirming that you wish to bypass the downloading and sending of the entry for review.
If the customs entry charges have not yet been allocated to actual landed cost (ALC), a message will display asking if you wish to confirm without allocating the charges.
If you wish to allocate the charges to ALC, select No in the message, click the Allocate ALC button to allocate the charges and the select Confirmed from the Status field again.
If you do not want to allocate the charges to ALC, select Yes in the message. The status of the customs entry changes to Confirmed and cannot be changed.
Click Save to save your changes or click Save and Close to save your changes and close the page.
To edit shipments of a customs entry, follow the steps listed below.
From the Tasks menu, select Trade Management > Manage Customs Entry. The Customs Entry Search window appears.
Enter or select search criteria as desired to make the search more restrictive.
Click Search. The Customs Entries that match the search criteria are displayed in the Results section.
Select a record in the Results section.
In the Customs Entry column, click on the customs entry link, or mark a record and select Actions > Edit or use the Edit icon. The Customs Entry window appears.
In the Toolbar, click the Details button. The CE Details window appears.
In the Shipments table, select a record.
|
Note: You can change the shipment and the comments directly in the Shipments table. |
Then select Actions > Edit or use the Edit icon. The Edit Shipment window appears.
The values of the selected shipment are displayed. Change the values, if necessary.
|
Note: You cannot change the vessel ID, voyage/flight number and estimated departure date. |
Then choose one of the following options.
Click OK to save your changes and close the Edit Shipment window. The system returns to the CE Details window.
Click Cancel to reject all entries and close the Edit Shipments window. The system returns to the CE Details window.
After have made all necessary changes, choose one of the following options.
Click Save to save your changes.
Click Save and Close to save your changes and close the CE Details window.
Click Cancel to reject all changes and close the CE Details window.
To delete a shipment from a customs entry, follow the steps listed below.
From the Tasks menu, select Trade Management > Manage Customs Entry. The Customs Entry Search window appears.
Enter or select search criteria as desired to make the search more restrictive.
Click Search. The Customs Entries that match the search criteria are displayed in the Results section.
Select a record in the Results section.
In the Customs Entry column, click on the customs entry link, or mark a record and select Actions > Edit or use the Edit icon. The Customs Entry window appears.
In the Toolbar, click the Details button. The CE Details window appears.
In the Shipments table, select a record.
Then select Actions > Delete or use the Delete icon.
You are prompted if you want to delete the selected record. Confirm the prompt with Yes.
Then choose one of the following options.
Click Save to save your changes.
Click Save and Close to save your changes and close the CE Details window.
Click Cancel to reject all changes and close the CE Details window.
To edit an order/items combination of a customs entry, follow the steps listed below.
From the Tasks menu, select Trade Management > Manage Customs Entry. The Customs Entry Search window appears.
Enter or select search criteria as desired to make the search more restrictive.
Click Search. The Customs Entries that match the search criteria are displayed in the Results section.
Select a record in the Results section.
In the Customs Entry column, click on the customs entry link, or mark a record and select Actions > Edit or use the Edit icon. The Customs Entry window appears.
In the Toolbar, click the Details button. The CE Details window appears.
In the Order/Item table, select a record.
|
Note: You can change the comments directly in the Order/Item table. |
Then select Actions > Edit or use the Edit icon. The Edit Order/Item window appears.
The values of the selected order/item information are displayed. Change the values, if necessary.
|
Note: You cannot change the order number and the item. If you need to change the Exchange Rate, see ”Editing the Exchange Rate” in the Oracle Retail Trade Management Letters of Credit User Guide. |
Then choose one of the following options.
Click OK to save your changes and close the Edit Order/Item window. The system returns to the CE Details window.
Click Cancel to reject all entries and close the Edit Order/Item window. The system returns to the CE Details window.
After have made all necessary changes, choose one of the following options.
Click Save to save your changes.
Click Save and Close to save your changes and close the CE Details window.
Click Cancel to reject all changes and close the CE Details window.
To delete an order/items combination from a customs entry, follow the steps listed below.
From the Tasks menu, select Trade Management > Manage Customs Entry. The Customs Entry Search window appears.
Enter or select search criteria as desired to make the search more restrictive.
Click Search. The Customs Entries that match the search criteria are displayed in the Results section.
Select a record in the Results section.
In the Customs Entry column, click on the customs entry link, or mark a record and select Actions > Edit or use the Edit icon. The Customs Entry window appears.
In the Toolbar, click the Details button. The CE Details window appears.
In the Order/Item table, select a record.
Then select Actions > Delete or use the Delete icon.
You are prompted if you want to delete the selected record. Confirm the prompt with Yes.
Then choose one of the following options.
Click Save to save your changes.
Click Save and Close to save your changes and close the CE Details window.
Click Cancel to reject all changes and close the CE Details window.
To edit an charge of an order/items combination, follow the steps listed below.
From the Tasks menu, select Trade Management > Manage Customs Entry. The Customs Entry Search window appears.
Enter or select search criteria as desired to make the search more restrictive.
Click Search. The Customs Entries that match the search criteria are displayed in the Results section.
Select a record in the Results section.
In the Customs Entry column, click on the customs entry link, or mark a record and select Actions > Edit or use the Edit icon. The Customs Entry window appears.
In the Toolbar, click the Details button. The CE Details window appears.
In the Charges - Component Item table, select a record.
Then select Actions > Edit or use the Edit icon. The Edit Charge window appears.
The values of the selected charge are displayed. Change the values, if necessary.
|
Note: You cannot change the HTS code and component. |
Then choose one of the following options.
Click OK to save your changes and close the Edit Charge window. The system returns to the CE Details window.
Click Cancel to reject all entries and close the Edit Charge window. The system returns to the CE Details window.
After have made all necessary changes, choose one of the following options.
Click Save to save your changes.
Click Save and Close to save your changes and close the CE Details window.
Click Cancel to reject all changes and close the CE Details window.
To delete a charge from an order/items combination, follow the steps listed below.
From the Tasks menu, select Trade Management > Manage Customs Entry. The Customs Entry Search window appears.
Enter or select search criteria as desired to make the search more restrictive.
Click Search. The Customs Entries that match the search criteria are displayed in the Results section.
Select a record in the Results section.
In the Customs Entry column, click on the customs entry link, or mark a record and select Actions > Edit or use the Edit icon. The Customs Entry window appears.
In the Toolbar, click the Details button. The CE Details window appears.
In the Charges - Component Item table, select a record.
Then select Actions > Delete or Delete HTS. You can also use the Delete icon, or the Delete HTS button.
You are prompted if you want to delete the selected record. Confirm the prompt with Yes.
Then choose one of the following options.
Click Save to save your changes.
Click Save and Close to save your changes and close the CE Details window.
Click Cancel to reject all changes and close the CE Details window.
To view bill of lading and/or container information of a customs entry, follow the steps listed below.
From the Tasks menu, select Trade Management > Manage Customs Entry. The Customs Entry Search window appears.
Enter or select search criteria as desired to make the search more restrictive.
Click Search. The Customs Entries that match the search criteria are displayed in the Results section.
Select a record in the Results section.
In the Customs Entry column, click on the customs entry link, or mark a record and select Actions > Edit or use the Edit icon. The Customs Entry window appears.
In the Toolbar, click the Details button. The CE Details window appears.
In the Order/Item table, select a record.
Then select Actions > BOLs/Containers or use the BOLs/Containers button.
The CE BOLs/Containers Window appears. View the bill of lading and container information.
Click OK to exit the CE BOLs/Containers window.
In the Obligation window you can create, edit and view obligations. An obligation can be received from a partner or supplier, and contains the expenses typically incurred for the movement and handling of goods. An obligation does not include the cost of the goods.
You can choose which expenses should be included in the actual landed cost calculation. For obligations entered at the Purchase Order header or Purchase Order/Item level, you can allocate each cost component to one or more locations. After entering the details of the obligation, you can set the status of the obligation to Approved.
If Trade Management is being used to import costs, it is assumed that all locations have the same cost value for an item. However, if the cost of the items that are being imported do vary by location, Trade Management will convert the cost values to an identical weighted average cost.
As commercial invoices are received from trading partners and suppliers, they can be recorded in the obligations module. The expenses can be recorded at a variety of levels. The levels are:
Applies to a unique shipment and container combination.
Applies to a unique shipment, container and purchase order combination.
Applies to a unique shipment, container, purchase order, and item combination.
Applies to a unique shipment and bill of lading or air waybill combination.
Applies to a unique shipment, bill of lading or air waybill and purchase order combination.
Applies to a unique shipment, bill of lading or air waybill, purchase order, and item combination.
Applies to a unique shipment.
Applies to a unique shipment and purchase order combination.
Applies to a unique shipment, purchase order, and item combination.
Applies to a unique purchase order.
Applies to a unique purchase order and item combination.
Applies to all transportation records associated with a unique purchase order.
Applies to a unique customs entry.
Applies to an ASN.
Applies to a unique ASN and purchase order combination.
Applies to a unique ASN and carton combination.
Each shipment is designated by a unique combination of vessel, voyage, and estimated departure date. For obligations at the purchase order header and purchase order/item level, you can allocate costs to one or more locations.
When the obligation is complete, you can approve the costs. The costs are transmitted to the actual landed cost module. If you have access to the Oracle Retail Invoice Matching product, non-merchandise invoices are created automatically from approved obligations.
The Obligation window contains the following sections.
To create a new obligation follow the steps below.
From the Tasks menu, select Trade Management > Import Financials > Create Obligation. The Create Obligation window appears.
In the Level field, select the level of the obligation from the list. For example, select ASN.
Click OK to create the obligation. The Obligation window appears.
Click Cancel to exit the Obligation window.
In the Obligation window fill out the sections as necessary. For more information about the Obligation window, see the Define/Enter an Obligation section.
After you have entered all necessary information, choose one of the following options.
Click Save and Close, to save changes to the obligation and exit the Obligation window.
Click the arrow on the right side of the button to display the additional save options.
Click Save to save your entries.
Click Save and Create Another to save the current obligation and create further entries.
The header of the Obligation section displays the obligation ID, the level and the status of the obligation. For example, the level of the ASN and the status Pending are displayed in the top right corner of the section.
The fields of the Obligation section vary depending on the selected level of the obligation. Only fields necessary for the specific level are displayed. The table below lists the possible fields.
Table 13-72 Obligation - Fields and Description
| Fields | Description |
|---|---|
|
Vessel |
Enter, select or search for the vessel. |
|
Voyage/Flight |
Enter, select or search for the voyage/flight number. |
|
Estimated Departure Date |
Enter, select or search for the estimated departure date. |
|
Container |
Enter, select or search for the container. |
|
Order No. |
Enter, select or search for the order number. |
|
Item |
Enter the item number or use the Search icon to search for an item. |
|
BOL/AWB |
Enter the bill of lading or airway bill. |
|
Entry No. |
Enter, select or search for the entry number. |
|
ASN |
Enter, select or search for the Advanced Shipping Notice (ASN). |
|
Carton |
Enter, select or search for the carton. |
In the Invoice and Payment container you can identify the partner or supplier site the obligation is being received from.
If Partner is selected, a choice list will be enabled, which will enable the user to select a Partner Type. Once a Partner Type is selected, the LOV will enable and will allow the user to select partners for the selected partner type. If Supplier Site is selected, the Partner Type choice list will not be enabled, and the LOV will contain Supplier Site values.
It will also contain fields for Invoice, Invoice Date, Payment Method, Check Authorization No., Amount Paid, Paid Date, Currency and Exchange Rate. The Exchange Rate field will be auto-populated upon selecting a Currency Code value, but will remain editable.
Table 13-73 Invoice and Payment - Fields and Description
| Fields | Description |
|---|---|
|
Partner checkbox |
If you check the Partner checkbox, the Partner Type field is enabled. After have selected a partner type, you can enter, select or search for the partner. |
|
Supplier Site checkbox |
If you check the Supplier Site checkbox, the Supplier field is enabled. Enter, select or search for the Supplier. |
|
Invoice |
Enter the invoice number. |
|
Invoice Date |
Enter the invoice date or use the Calendar icon to select the date. |
|
Payment Method |
Enter, select or search for the payment method. |
|
Check Authorization No. |
Enter the authorization number. |
|
Amount Paid |
Enter the amount paid. |
|
Paid Date |
Enter the paid date or use the Calendar icon to select the date. |
|
Currency |
Enter, select or search for the currency. |
|
Exchange Rate |
This field is populated automatically, after you have selected the currency. For more information about how to edit the exchange rate, see ”Editing the Exchange Rate” in the Oracle Retail Trade Management Letters of Credit User Guide. |
The Comments section holds the comments field. Enter any comments for the obligation, if necessary.
In the Components section you can add, edit or delete components from the obligation. The section contains the following columns by default.
Component
Allocation Type and Basis
Rate
Per Count and Per Count UOM
Quantity and Quantity UOM
Amount
Allocate to ALC checkbox
Use the Actions Menu, icons and button to apply actions to the table. You can perform the actions listed below.
Table 13-74 Components Table - Actions Menu/Icons/Button and Description
| Actions Menu/Icon/Button | Description |
|---|---|
|
Add and Add icon |
You can add components to an obligation by selecting Actions > Add or by using the Add icon. For more information about how to add components to an obligation, see the Add a Component to an Obligation section. |
|
Edit and Edit icon |
You can edit components of an obligation by selecting Actions > Edit or by using the Edit icon. For more information about how to edit components of an obligation, see the Edit a Component of an Obligation section. |
|
Delete and Delete icon |
You can delete components from an obligation by selecting Actions > Delete or by using the Delete icon. For more information about how to delete components from an obligation, see the Delete a Component from an Obligation section. |
|
Update Quantities and Update Quantities button |
You can update the quantities of the table by selecting Actions > Update Quantities or by clicking the Update Quantities button. |
|
Export to Excel and Export to Excel icon |
You can copy the records in the table to a Microsoft Excel spreadsheet by selecting Actions > Export to Excel or by using the Export to Excel icon. |
In the Locations section you can add and delete locations from a component of the obligation. The section is only available, if the level of the obligation is Purchase Order Header or Purchase Order/Item. The Location table contains the location type, location and location name as well as quantity and amount columns by default.
The Toolbar displays the icons and buttons for actions that can be performed for the obligation. The Obligations Toolbar contains the following icons and buttons as well as actions described in ”Screen Level Action - Icons and Buttons” in the Oracle Retail Trade Management Do the Basics User Guide.
To add a component to an obligation follow the steps below.
From the Tasks menu, select Trade Management > Manage Obligation. The Obligation window appears.
Enter or select search criteria as desired to make the search more restrictive.
Click Search. The obligations that match the search criteria are displayed in the Results section.
Select a record in the Results section.
In the Obligation column, click on the obligation link, or mark a record and select Actions > Edit or use the Edit icon. The Obligation window appears. The data of the selected obligation is shown.
In the Component section, select Actions > Add or use the Add icon. The Add Component window appears.
In the Component field, enter, select or search for the corresponding component. This field is a required field.
The Allocate to ALC checkbox is selected by default. Deselect the checkbox, if the components should not be included in the actual landed cost calculation.
The Allocation Type field is populated with the allocation type, depending on the component you selected. Possible allocation types are Unit of Measure and Amount. Change the allocation type, if necessary. This field is a required field.
If you select Amount as the allocation type, only the Quantity and Amount fields are enabled. Change the values of these fields, if necessary.
If you select Unit of Measure as the allocation type, the Allocation Basis, the Rate, the Per Count, and the Quantity as well as the Amount field are enabled. Change the values of these fields, if necessary.
Then choose one of the following options.
Click OK to add the component to the obligation and close the Add Component window.
Click OK and Add Another to add additional entries.
Click Cancel to reject all entries and close the Add Component window.
After you have added all necessary components to the obligation, choose one of the following options.
Click Save and Close to save changes to the obligation and close the Obligation window.
Click the arrow on the right side of the button to display the additional save options.
Click Save to save your entries.
Click Save and Create Another to create additional entries.
To edit a component of an obligation, follow the steps listed below.
From the Tasks menu, select Trade Management > Manage Obligation. The Obligation window appears.
Enter or select search criteria as desired to make the search more restrictive.
Click Search. The obligations that match the search criteria are displayed in the Results section.
Select a record in the Results section.
In the Obligation column, click on the obligation link, or mark a record and select Actions > Edit or use the Edit icon. The Obligation window appears. The data of the selected obligation is shown.
In the Component section, select a record in the table.
Then select Actions > Edit or use the Edit icon. The Edit Component window appears.
The Component field is populated with the component you selected. The field is disabled, you cannot change the component.
The Allocate to ALC checkbox is selected or deselected, depending the previous entry of the component. Change the entry, if necessary.
The Allocation Type field is populated with the allocation type, depending on the component. Possible allocation types are Unit of Measure and Amount. Change the allocation type, if necessary. This field is a required field.
If the selected allocation type is Amount, only the Quantity and Amount fields are enabled. The fields are populated with the current values of the component. Change the values of these fields, if necessary.
If the selected allocation type is Unit of Measure, the Allocation Basis, the Rate, the Per Count, and the Quantity as well as the Amount field are enabled. The fields are populated with the current values of the component. Change the values of these fields, if necessary.
Then choose one of the following options.
Click OK to save the changes and exit the Edit Component window.
Click Cancel to reject all entries and exit the Edit Component window.
After you have made all necessary changes to the obligation, choose one of the following options.
Click Save and Close to save changes to the obligation and exit the Obligation window.
Click the arrow on the right side of the button to display the additional save options.
Click Save to save your entries.
Click Save and Create Another to create additional entries.
To delete a component from an obligation, follow the steps below.
From the Tasks menu, select Trade Management > Manage Obligation. The Obligation window appears.
Enter or select search criteria as desired to make the search more restrictive.
Click Search. The obligations that match the search criteria are displayed in the Results section.
Select a record in the Results section.
In the Obligation column, click on the obligation link, or mark a record and select Actions > Edit or use the Edit icon. The Obligation window appears. The data of the selected obligation is shown.
In the Component section, select a record in the table.
Then select Actions > Delete or use the Delete icon.
You are prompted to delete the component. Confirm the prompt with Yes.
After you have deleted all necessary components from the obligation, choose one of the following options.
Click Save and Close to save changes to the obligation and exit the Obligation window.
Click the arrow on the right side of the button to display the additional save options.
Click Save to save your entries.
Click Save and Create Another to create additional entries.
To add a location to a component follow the steps below.
From the Tasks menu, select Trade Management > Manage Obligation. The Obligation window appears.
Enter or select search criteria as desired to make the search more restrictive.
Click Search. The obligations that match the search criteria are displayed in the Results section.
Select a record in the Results section.
In the Obligation column, click on the obligation link, or mark a record and select Actions > Edit or use the Edit icon. The Obligation window appears. The data of the selected obligation is shown.
In the Location section, select Actions > Add or use the Add icon. The Add Location window appears.
In the Location Type field, enter, select or search for the corresponding location.
After you have entered the location type, the Location field is enabled. Enter, select or search for the appropriate location.
In the Quantity field, enter the quantity.
In the Amount field, enter the amount.
Then choose one of the following options.
Click OK to add the location to the component and close the Add Location window.
Click OK and Add Another to add additional entries.
Click Cancel to reject all entries and close the Add Location window.
After you have added all necessary locations to the component, choose one of the following options.
Click Save and Close to save changes to the obligation and exit the Obligation window.
Click the arrow on the right side of the button to display the additional save options.
Click Save to save your entries.
Click Save and Create Another to save the current obligation and create further entries.
To delete a location from a component, follow the steps below.
From the Tasks menu, select Trade Management > Manage Obligation. The Obligation window appears.
Enter or select search criteria as desired to make the search more restrictive.
Click Search. The obligations that match the search criteria are displayed in the Results section.
Select a record in the Results section.
In the Obligation column, click on the obligation link, or mark a record and select Actions > Edit or use the Edit icon. The Obligation window appears. The data of the selected obligation is shown.
In the Locations section, select a record in the table.
Then select Actions > Delete or use the Delete icon.
You are prompted to delete the location. Confirm the prompt with Yes.
After you have deleted all necessary locations from the component, choose one of the following options.
Click Save and Close to save changes to the obligation and exit the Obligation window.
Click the arrow on the right side of the button to display the additional save options.
Click Save to save your entries.
Click Save and Create Another to save the current obligation and create further entries.
To delete an obligation follow the steps below.
From the Tasks menu, select Trade Management > Manage Obligation. The Obligation window appears.
Enter or select search criteria as desired to make the search more restrictive.
Click Search. The obligations that match the search criteria are displayed in the Results section.
Select a record in the Results section.
In the Obligation column, click on the obligation link, or mark a record and select Actions > Edit or use the Edit icon. The Obligation window appears. The data of the selected obligation is shown.
In the Obligation Toolbar, select the Delete icon.
You are prompted to delete the obligation. Confirm the prompt with Yes.
Then choose one of the following options.
Click Save and Close to save changes to the obligation and exit the Obligation window.
Click the arrow on the right side of the button to display the additional save options.
Click Save to save your entries.
Click Save and Create Another to save the current obligation and create further entries.
The Manage Obligations option opens the Obligation Search window. In the Obligation window you can search, create, maintain and view obligations.
You can access the Obligation Search window from the Task menu, select Trade Management > Import Financials > Manage Obligations. The Obligation Search window appears.
The Obligation Search window contains the following two sections.
Search
For more information about how to search for obligations, see the Search for an Obligation section.
To search for an obligation:
From the Task menu, select Trade Management > Import Financials > Manage Obligations. The Obligation Search window appears.
You can search for an obligation by using basic or advanced search criteria, depending on the requirement. The basic mode is the default search mode.
Click Advanced to access the search section in advanced mode.
Click Basic to return to the basic mode.
To search for an obligation using basic search criteria:
Enter, select or search for one or all of the following basic search criteria.
Table 13-76 Obligation Search - Basic Search Criteria and Description
| Fields | Description |
|---|---|
|
Match option |
Check the radio button All or Any. All - only obligations matching all entered search criteria are shown. Any - obligations matching any of the entered search criteria are shown. |
|
Obligation |
Enter the obligation. |
|
Level |
Select the level of the obligation from the list. For example, select ASN. |
|
Status |
Select the status of the obligation. Possible statuses are:
|
|
Supplier Site |
Enter, select or search for the supplier site. |
|
Partner Type |
Select the partner type from the list. |
|
Partner |
Enter, select or search for the partner ID. |
|
Invoice |
Enter, select or search for the invoice ID. |
|
Invoice Date |
Enter the invoice date or use the Calendar icon to select a date. |
Click Search. The obligations that match the search criteria are displayed in the Results section.
Click Reset to clear the search section and results.
Click Done to close the window.
To search for an obligation using advanced search criteria:
To search using advanced search criteria, enter or select one or all of the advanced search criteria.
To narrow down the search, use the list next to the search fields. For example, determine if the entered value should equal or not equal the search result.
Click Search. The obligations that match the search criteria are displayed in the Results section.
Click Reset to clear the search section and results.
Click Add Fields to add more fields for the advanced search. To remove the field from the search, click the x right next to the field.
Click Done to close the window.
The Results section lists the retrieved obligations. The Results table shows the following columns by default.
Obligation
Level
Invoice
Invoice Date
Status
Partner Type
Partner
Partner Name
Supplier Site
Supplier Site Name
The actual landed cost module provides a view of the expenses and assessments that are accumulated as goods move from origin country, through customs, to their final destination. Estimated and actual landed costs are summarized for analysis. After analysis, you can choose to not finalize the actual landed costs, which means the estimated values are accepted, or to finalize the actual landed costs, accepting the adjustment between the estimated and actual values. Finalizing the actual landed costs results the updating of the stock ledger, open to buy, and weighted average costs with the difference between the estimated and actual costs.
The Review ALC option opens the ALC Search window. In the ALC Search window you can search for an order/item for which to view the ALC values.
You can access the ALC Search window from the Task menu, select Trade Management > Import Financials > Review ALC. The ALC Search window appears.
The ALC Search window contains the following sections.
Search
For more information about how to search for order/items to view ALC values, see the Search for Order/Items section.
To search for order/items:
From the Task menu, select Trade Management > Import Financials > Review ALC. The ALC Search window appears.
You can search for order/items by using basic or advanced search criteria, depending on the requirement. The basic mode is the default search mode.
Click Advanced to access the search section in advanced mode.
Click Basic to return to the basic mode.
To search for order/items using basic search criteria:
Enter, select or search for one or all of the following basic search criteria.
Table 13-77 ALC Search - Basic Search Criteria and Description
| Fields | Description |
|---|---|
|
Match option |
Check radio button All or Any. All - only orders matching all entered search criteria are shown. Any - orders matching any of the entered search criteria are shown. |
|
Order No. |
Enter, select or search for an order number. |
|
Item |
Enter the item number or use the Search icon to search for the particular item |
|
Obligation |
Enter, select or search for an obligation. |
|
Entry No. |
Enter, select or search for an entry number. |
|
Status |
Select the ALC status from the list. Possible status are:
|
|
Vessel |
Enter, select or search for the vessel number. |
|
Voyage/Flight |
Enter, select or search for the voyage/flight number. |
|
Estimated Depart. Date |
Enter or use the Calendar icon to select the estimated departure date of the transport. |
Click Search. The order/items that match the search criteria are displayed in the Results section.
Click Reset to clear the search section and results.
Click Done to close the window.
To search for order/items using advanced search criteria:
To search by using advanced search criteria, enter or select one or all of the advanced search criteria.
To narrow down the search, use the list next to the search fields. For example, determine if the entered value should equal or not equal the search result.
Click Search. The order/items that match the search criteria are displayed in the Results section.
Click Reset to clear the search section and results.
Click Add Fields to add more fields for the advanced search. To remove the field from the search, click the x right next to the field.
Click Done to close the window.
The Results section lists the retrieved order/items. The Results table shows the following columns by default.
Order Number
Item and Item Description
Obligation
Entry Number
Vessel
Voyage/Flight
Estimated Departure Date
Quantity
In the ALC window you can view the actual landed cost details of an item on a purchase order. The costs are limited to the expenses and assessments that are non-merchandise charges. The comparison between the estimated landed cost and the actual landed cost are listed in the primary currency of the company.
The estimate to actual comparisons can be viewed for each of the following unique combinations.
Purchase order, item
Purchase order, pack item, component item
Purchase order, item, and transportation shipment (vessel/voyage/estimated departure date)
Purchase order, pack item, component item, and transportation shipment (vessel/voyage/estimated departure date)
Purchase order, item, and obligation
Purchase order, pack item, component item, and obligation
Purchase order, item, and customs entry
Purchase order, pack item, component item, and customs entry
The ALC window contains the following sections.
To view the ALC Details of an item on an order follow the steps below.
From the Tasks menu, select Trade Management > Import Financials > Review ALC. The ALC Search window appears.
Enter or select search criteria as desired to make the search more restrictive.
Click Search. The orders that match the search criteria are displayed in the Results section.
Select a record in the Results section.
In the Order No. column, click on the order number link, or mark a record and select Actions > View or use the View icon. The ALC window appears.
View the actual landed cost details of an item on an order.
Click Done to exit the ALC window.
The ALC Header displays the following information:
Order No.
Pack
Pack is only displayed, if the item on the purchase order is a buyer pack with an order type of pack.
Item
Standard UOM
Next and Previous button
The Next and Previous buttons are only displayed, if a pack item exists.
Furthermore, the ALC header displays the unit cost, unit retail, markup, quantities such as ordered, shipped and received, the unit and total ELC, the currency, the unit and total ALC as well as the variance in percent.
The Estimates with no Actuals section displays estimates that are available, but where the retailer has not yet been billed for the actuals, either via obligations or customs entries. When a PO is approved, a record is written to ALC for each estimated cost component. The total of each estimated cost component is shown in this section.
The following fields are displayed:
Unit
Displays the per unit value of all estimated expenses and assessments without an actual.
Total
Displays the total value of all estimated expenses and assessments without an actual.
|
Note: If there are no estimated components for which actuals have not been entered, this section is not displayed. |
Use Component List button to open the ALC Component window. The component list shows each component without an actual. For more information about the ALC Component window, see the ALC Components section.
The Estimates Backed Out During ALC Finalization section displays estimates for which the retailer has indicated they will not be charged. When a PO is received, the estimated landed cost is written to the transaction data table and the weighted average cost of the item/locations on the order are updated. When an estimate is on a purchase order for a particular expense, but the retailer ultimately does not get charged, the retailer can choose to back out any remaining estimates during the ALC finalization process. In this case the actual value will be set to 0.00 for any estimates for which actuals were not received. These zero value actuals will be finalized along with those that did receive actuals, allowing the estimated values to be backed out of the stock ledger and weighted average cost. This section will only display when after ALC finalization in which the Back out Estimates with no Actuals checkbox is checked. At this point there will no longer be any estimates waiting for actuals, therefore the Estimates with no Actuals section will be hidden
The following fields are displayed:
Unit
Displays the per unit value of all estimated expenses and assessments that were backed out because no actual value will be charged.
Total
Displays the total value of all estimated expenses and assessments that were backed out because no actual value will be charged.
|
Note: If there are still estimates waiting for actuals and the estimates were not backed out during ALC finalization, this section is not displayed. |
Use the Component List button to open the ALC Component window. The component list shows each component that was backed out. For more information about the ALC Component window, see the ALC Components section.
This section displays the actual values directly nominated on the PO for inclusion in the ALC, for which the retailer does not expect to pay either via obligations or customs entries.
The following fields are displayed:
Unit
Displays the unit value. If this value is zero the section is not displayed.
Total
Displays the total value.
Use the Component List button to open the ALC Component window. The component list shows each component with an actual, where it is a direct nomination.
The Transportation Shipments table displays the following columns by default:
Vessel
Voyage/ Flight
Estimated Departure Date
Quantity
Unit and Total ELC
Unit and Total ALC
% Variance
Use the Actions Menu, icons and button apply actions to the table. You can perform the actions listed below, as well as actions in ”Action Menu and Icons” in the Oracle Retail Trade Management Do the Basics User Guide.
Table 13-78 Transportation Shipments - Actions Menu/Icons/Button and Description
| Actions Menu/Icons/Button | Description |
|---|---|
|
View Shipment |
Opens the Shipment Detail window to view the details of the selected shipment. For more information about this window, see Shipment Detail. |
|
Component List and Component List button |
Opens the ALC Component window. For more information about this window, see ALC Components. |
The Shipment Detail window displays shipment information.
The Shipment Detail window contains the following sections.
Shipment Detail Header
The Shipment Details header displays shipping information such as vessel, voyage/flight as well as the estimated departure date.
The Shipment Detail Table displays the following columns by default.
BOL/AWB
Container
Landing Port and Landing Port Description
Discharge Port and Discharge Port Description
Shipment Method
To view shipment details follow the steps listed below.
From the Tasks menu, select Trade Management > Import Financials > Review ALC. The ALC Search window appears.
Enter or select search criteria as desired to make the search more restrictive.
Click Search. The orders that match the search criteria are displayed in the Results section.
Select a record in the Results section.
In the Order No. column, click on the order number link, or mark a record and select Actions > View or use the View icon. The ALC window appears.
In the Transportation Shipment section, select Actions > Shipment Detail or go to the vessel column and click on the vessel number link. The Shipment Detail window appears.
View the shipment details of an item on an order.
Click OK to exit the Shipment Detail window.
The Transportation Related Obligations/Entries table contains the following columns:
Obligation
Entry Number
Shipment
Vendor Name
Invoice
Quantity
Unit ELC and Total ELC
Unit ALC and Total ALC
%Variance
Status
An Error icon will be shown for each row at the row header if there are errors. If you click on the Error icon, the Interface Errors window appears.
For more information about the Interface Errors window, see the Review ALC Allocation Errors section.
Use the Actions Menu, icons and button to apply actions to the table. You can perform the actions listed below.
Table 13-79 Transportation Related Obligations/Entries - Actions Menu/Icons/Button and Description
| Actions Menu/Icons/Button | Description |
|---|---|
|
View Obligation |
Opens the Obligation window to view the obligation. For more information about this window, see the Oracle Retail Trade Management Obligation User Guide. |
|
View Customs Entry |
Opens the Customs Entry window to view the customs entry. For more information about this window, see the Oracle Retail Trade Management Customs Entry User Guide. |
|
Component List and Component List button |
Opens the ALC Component window. For more information about this window, see the ALC Components section. |
|
Export to Excel and Export to Excel icon |
You can copy the records in the table to a Microsoft Excel spreadsheet by selecting Actions > Export to Excel or by using the Export to Excel icon. |
Non-Transportation Related Obligations include those at the Purchase Order Header, Purchase Order/Item, ASN Shipment and ASN Container levels. The Non-Transportation Related Obligations table displays the following columns by default:
Obligation
Shipment
Vendor Name
Invoice and Invoice Date
Quantity
Unit ELC and Total ELC
Unit ALC and Total ALC
% Variance
Status
An Error icon will be shown for each row at the row header if there are errors. If you click on the Error icon, the Interface Errors window appears.
For more information about the Interface Errors window, see the Review ALC Allocation Errors section.
Use the Actions Menu, icons and button apply actions to the table. You can perform the actions listed below, as well as actions in ”Action Menu and Icons” in the Oracle Retail Trade Management Do the Basics User Guide.
Table 13-80 Non-Transportation Related Obligations - Actions Menu/Icons/Button and Description
| Actions Menu/Icons/Button | Description |
|---|---|
|
View Obligation |
Opens the Obligations window. For more information about this window, see the Oracle Retail Trade Management Obligation User Guide. |
|
Component List and Component List button |
Opens the ALC Component window. For more information about this window, see the ALC Components section. |
In ALC Component window you can view the cost components of an item on a purchase order. The cost components are limited to the expenses and assessments that are non-merchandise charges. The comparison between the estimated and the actual landed cost components are listed in the primary currency of the company.
The cost components can be viewed for each of the following unique combinations.
Purchase order, item, and transportation shipment (vessel/voyage/estimated departure date)
Purchase order, pack item, component item, and transportation shipment (vessel/voyage/estimated departure date)
Purchase order, item, and obligation
Purchase order, pack item, component item, and obligation
Purchase order, item, and customs entry
Purchase order, pack item, component item, and customs entry
The ALC Components window contains the following sections.
The ALC Components Header varies depending on from which table you select the Component List function. The pack information is only displayed when the item on the order is a buyer pack with the order type Pack.
The Components table contains the following columns by default.
Component and Description
Last Calculated
Quantity (UOM)
Estimated and Actual Unit Value
Estimated and Actual Total Value
% Variance
The first record in the table is selected by default and the respective cost component by location is displayed in the Locations table.
This table lists the cost by locations, based on the cost component selected in the Components table. The Location table displays the following columns by default.
Location Type, Location and Location Name
Last Calculated
Quantity (UOM)
Estimated and Actual Unit Value
Estimated and Actual Total Value
% Variance
To view ALC components follow the steps listed below.
From the Tasks menu, select Trade Management > Import Financials > Review ALC. The ALC Search window appears.
Enter or select search criteria as desired to make the search more restrictive.
Click Search. The orders that match the search criteria are displayed in the Results section.
Select a record in the Results section.
In the Order No. column, click on the order number link, or mark a record and select Actions > View or use the View icon. The ALC window appears.
In the ALC window choose one of the following options.
In the Transportation Shipments section, select Actions > Component List. The ALC Components window appears.
In the Transportation Related Obligations/Entries section, select Actions > Component List. The ALC Components window appears.
In the Non-Transportation Related Obligations section, select Actions > Component List. The ALC Components window appears.
|
Note: Depending on from which section you entered the Component List, the information in the header of the ALC Components window varies. |
In the Components table the first record is selected by default and the respective cost component by location is displayed in the Locations table below.
Click Done to close the ALC Components window.
The Interface Error window allows you to view the details of any errors that occurred during the allocating of obligations and customs entries to actual landed cost.
The table displays the program name, date, unit of work and the error.
The Finalize ALC option opens the ALC Finalization window. In the ALC Finalization window you can search for an order or order/shipments to review the variance between the estimated landed cost and actual landed cost and determine whether or not to finalize the ALC resulting in the update of the stock ledger and weighted average cost of all item/locations on the associated order/shipment.
You can access the ALC Finalization window from the Task menu, select Trade Management > Import Financials > Finalize ALC. The ALC Finalization window appears.
The ALC Finalization window contains the following sections.
Search
For more information about how to search for orders or order/shipments, see the Search for Orders or Order/Shipments section.
To search for orders or order/shipments:
From the Task menu, select Trade Management > Import Financials > Finalize ALC. The ALC Finalization window appears.
Enter, select or search for one or all of the following search criteria.
Table 13-81 ALC Finalization Search - Search Criteria and Description
| Fields | Description |
|---|---|
|
Order No. |
Enter, select or search for the order number. |
|
Order Status |
Select the order status from the list. Possible statuses are:
|
|
Item |
Enter the item number or use the Search icon to search for the particular item. |
|
Pack |
Enter the pack item or use the Search icon to search for the pack item. |
|
Obligation |
Enter, select or search for an obligation. |
|
Entry No. |
Enter, select or search for an entry number. |
|
ALC Status |
Select the ALC status from the list. Possible statuses are:
|
|
Vessel |
Enter, select or search for the vessel number. |
|
Voyage/Flight |
Enter, select or search for the voyage/flight number. |
|
Estimated Departure Date |
Enter, select or search for the estimated departure date. |
|
ASN |
Enter, select or search for the Advanced Shipping Notice (ASN). |
|
Variance % |
In this field you can search on a range of % variance values. Enter the first and second Variance % value in the corresponding field. |
Click Search. The orders or order/shipments that match the search criteria are displayed in the Results section.
Click Reset to clear the search section and results.
The Results section lists the retrieved orders. The Results table shows the following columns by default.
Order Number and Order Status
Shipment
ASN
Total ELC
Total ALC
% Variance
ALC Status
Comments
Use the Actions Menu and icons to apply actions to the Results table. You can perform the actions listed below, as well as actions in ”Action Menu and Icons” in the Oracle Retail Trade Management Do the Basics User Guide.
Table 13-82 Results - Actions Menu/Icons and Description
| Actions Menu/Icons | Description |
|---|---|
|
Finalize button |
Opens the Finalize ALC window. For more information about how to finalize the actual landed costs, see the Finalize the Actual Landed Costs section. |
|
ALC Detail button |
Opens the ALC Search window.
|
To finalize the actual landed costs, follow the steps below:
In the Results section, select one or more records.
Then press the Finalize button. The Finalize ALC window appears.
In the Method of Finalization field, select the method from the list.
In the Comments field, edit or enter comments as necessary.
If there are estimates for which no actuals will be received select to back out the estimates by checking the Back out Estimates with no Actuals checkbox. This will assign an actual value of zero for any estimates where no actual has been entered.
Then choose one of the following options.
Click OK to finalize the ALC and close the window.
Click Cancel to reject all entries and close the window.
Foundation data for Trade Management is managed through other software solutions. For more information:
”Outside Locations” in the Oracle Retail Merchandising Data User Guide.
”Partner” in the Oracle Retail Merchandising Data User Guide.
”Documents” in the Oracle Retail Merchandising Data User Guide.
”Timelines” in the Oracle Retail Merchandising Data User Guide.
For information about cost zones, see ”Manage Cost Zones” in the Oracle Retail Merchandising Data User Guide.
For more information about outside locations, see ”Outside Locations” in the Oracle Retail Merchandising Data User Guide.
Within the customs entry module, the Entry Status is used to capture the detailed steps of the entry through the customs clearance process, such as, Accepted/Not Liquidated, Liquidated, Rejected, or Cancelled. Entry Types indicate the purpose or classification of the entry, such as, Immediate Exportation, Informal – Free and Dutiable, Rejected Merchandise Drawback, or Trade Fair.
Entry statuses and types are maintained for each country of import through the upload/download process. This functionality is accessed from the main Merchandising task list under Foundation Data > Download Foundation Data and Foundation Data > Upload Foundation Data.
To add, update, or remove entry statuses and types, select the template type of Import from the Download Data screen and then the Entry Status and Types template. Click the Download button and, when prompted, choose to either open the .ods file that is generated or save the file and open it separately in the spreadsheet application of your choice.
To add a new entry status and type, start in the Entry Status tab, and, in a blank line in the template, select the action type of Create. Next enter a unique entry status identifier (up to 6 characters) and the country of import for which the status is being created. Next, enter the description for the entry status in the primary language (as defined in the Merchandising system options) of up to 250 characters.
Next, if you wish to add translations for the entry status in languages other than the primary language, this can be done in the Entry Status TL tab. Navigate to a blank row and select the action type of Create and enter the entry status and import country for which the translation applies. Next, select the language in which the translated description will be entered. Finally, enter the translated description. The translated description can also be up to 250 characters long. This is an optional step.
Next, entry types can be added. To do this, move to the Entry Type tab in the spreadsheet. Again, navigate to a blank row in the sheet and select an action type of Create. Next enter a unique entry type identifier (up to 6 characters) and the country of import for which the type is being created. Next, enter the description for the entry type in the primary language (as defined in the Merchandising system options) of up to 250 characters.
Lastly, if you wish to add translations for the entry type in languages other than the primary language, this can be done in the Entry Type TL tab. Navigate to a blank row and select the action type of Create and enter the entry type and import country for which the translation applies. Next, select the language in which the translated description will be entered. Finally, enter the translated description. The translated description can also be up to 250 characters long. This is an optional step.
If you would like to update any entry status or entry type descriptions or translations, a similar process will be followed as that described above for creating new entry statuses and types. First, download the spreadsheet, and then navigate to the tab where you would like to make your updates.
The following columns can be updated in each tab:
Entry Status – Entry Status Description
Entry Status TL – Entry Status Description
Entry Type – Entry Type Description
Entry Type TL – Entry Type Description
In the tab where you are going to make your updates, select the action type of Update, and then correct the value in the spreadsheet.
If you wish to delete an entry status or type, update the action column to select Delete in each of the tabs where it occurs. Entry status or type translations can be deleted in the same manner.
For all actions defined above, once all the updates have been made to the data in the spreadsheet, save the file and close it. Then, return to the Merchandising screens and select Foundation Data > Upload Foundation Data from the main task list. In this screen, select the template type Import and the template Entry Status and Types. This will generate a process description automatically, but this can be updated if desired. Lastly, select the Browse button and navigate to the directory where you saved the updated spreadsheet.
To review the status of the upload and check whether any errors occurred, select the Foundation Data > Review Status task from the main task list.
For more information, see ”Download/Upload Data from Spreadsheets” in the Oracle Retail Trade Management Do the Basics User Guide.
Within the transportation module, the Freight Size is used to capture the size of vessel or container being used to transport the merchandise, such as 20 Foot Container or 40 Foot Container. Freight Types related to a bill of lading can be noted on a transportation record, such as, Container Freight Station to Container Freight Station, Container Yard to Container Yard, Less than Container Load, or Less than Truckload.
Freight sizes and types are maintained through the upload/download process. This functionality is accessed from the main Merchandising task list under Foundation Data > Download Foundation Data and Foundation Data > Upload Foundation Data.
To add, update, or remove freight sizes and types, select the template type of Import from the Download Data screen and then the Freight Sizes and Types template. Click the Download button and, when prompted, choose to either open the .ods file that is generated or save the file and open it separately in the spreadsheet application of your choice.
To add a new freight size or type, start in the Freight Sizes tab, and, in a blank line in the template, select the action type of Create. Next enter a unique freight size identifier (up to 6 characters) and the description for the freight size in the primary language (as defined in the Merchandising system options) of up to 250 characters.
Next, if you wish to add translations for the freight size in languages other than the primary language, this can be done in the Freight Size Translations tab. Navigate to a blank row and select the action type of Create and enter the freight size for which the translation applies. Next, select the language in which the translated description will be entered. Finally, enter the translated description. The translated description can also be up to 250 characters long. This is an optional step.
Next, freight types can be added. To do this, move to the Freight Types tab in the spreadsheet. Again, navigate to a blank row in the sheet and select an action type of Create. Next enter a unique freight type identifier (up to 6 characters) and the description for the freight type in the primary language (as defined in the Merchandising system options) of up to 250 characters.
Lastly, if you wish to add translations for the freight type in languages other than the primary language, this can be done in the Freight Type Translations tab. Navigate to a blank row and select the action type of Create and enter the freight type for which the translation applies. Next, select the language in which the translated description will be entered. Finally, enter the translated description. The translated description can also be up to 250 characters long. This is an optional step.
If you would like to update any freight size or freight type descriptions or translations, a similar process will be followed as that described above for creating new freight sizes and types. First, download the spreadsheet, and then navigate to the tab where you would like to make your updates.
The following columns can be updated in each tab:
Freight Sizes – Freight Size Description
Freight Size Translations – Freight Size Description
Freight Types – Freight Type Description
Freight Type Translations – Freight Type Description
In the tab where you are going to make your updates, select the action type of Update, and then correct the value in the spreadsheet.
If you wish to delete a freight size or type, update the action column to select Delete in each of the tabs where it occurs. Freight size or type translations can be deleted in the same manner.
For all actions defined above, once all the updates have been made to the data in the spreadsheet, save the file and close it. Then, return to the Merchandising screens and select Foundation Data > Upload Foundation Data from the main task list. In this screen, select the template type Import and the template Freight Sizes and Types. This will generate a process description automatically, but this can be updated if desired. Lastly, select the Browse button and navigate to the directory where you saved the updated spreadsheet.
To review the status of the upload and check whether any errors occurred, select the Foundation Data > Review Status task from the main task list.
For more information, see ”Download/Upload Data from Spreadsheets” in the Oracle Retail Trade Management Do the Basics User Guide.
Oracle Retail Trade Management supports the capturing of standard carrier alpha codes, also referred to as SCAC codes. A SCAC code is a unique code used to identify transportation companies. A SCAC code is typically two to four alphabetic letters long and was developed by the National Motor Freight Traffic Association in the 1960s to help the transportation industry computerize data and records. A container can have a different SCAC code than the vessel. The container SCAC code can be entered on transportation records. The vessel SCAC code can be captured on transportation and customs entry shipment records.
SCACs are maintained through the upload/download process. This functionality is accessed from the main Merchandising task list under Foundation Data > Download Foundation Data and Foundation Data > Upload Foundation Data.
To add, update, or remove SCAC information, select the template type of Import from the Download Data screen and then the SCACs template. Click the Download button and when prompted, choose to either open the .ods file that is generated or save the file and open it separately in the spreadsheet application of your choice.
To add a new SCAC, start in the SCACs tab, and, in a blank line in the template, select the action type of Create. Next enter a unique standard carrier alpha code (up to 6 characters) and the description for the SCAC in the primary language (as defined in the Merchandising system options) of up to 120 characters.
Next, if you wish to add translations for the SCAC in languages other than the primary language, this can be done in the SCAC Translations tab. Navigate to a blank row and select the action type of Create and the language in which the translated description will be entered. Then, enter the SCAC for which the translation applies. Finally, enter the translated description. The translated description can also be up to 120 characters long. This is an optional step.
If you would like to update any SCAC descriptions or translations, a similar process will be followed as that described above for creating new SCACs. First, download the spreadsheet, and then navigate to the tab where you would like to make your updates.
The following columns can be updated in each tab:
SCACs – SCAC Code Description
SCAC Translations – SCAC Code Description
In the tab where you are going to make your updates, select the action type of Update, and then correct the value in the spreadsheet.
If you wish to delete a SCAC, update the action column to select Delete in each of the tabs where it occurs. SCAC translations can be deleted in a similar manner.
For all actions defined above, once all the updates have been made to the data in the spreadsheet, save the file and close it. Then, return to the Merchandising screens and select Foundation Data > Upload Foundation Data from the main task list. In this screen, select the template type Import and the template SCACs. This will generate a process description automatically, but this can be updated if desired. Lastly, select the Browse button and navigate to the directory where you saved the updated spreadsheet.
To review the status of the upload and check whether any errors occurred, select the Foundation Data > Review Status task from the main task list.
For more information, see ”Download/Upload Data from Spreadsheets” in the Oracle Retail Trade Management Do the Basics User Guide.
Harmony Tariff Schedules (HTS) are set up through the spreadsheet upload/download process. For a description of this process, see ”Download/Upload Data from Spreadsheets” in the Oracle Retail Trade Management Do the Basics User Guide.
Harmony Tariff Schedules (HTS) are defined through the spreadsheet upload/download process. For a description of this process, see ”Download/Upload Data from Spreadsheets” in the Oracle Retail Trade Management Do the Basics User Guide.