| Oracle® Retail Merchandising Foundation Cloud Service Oracle Retail Merchandising System User Guide Release 19.3.000 F83161-01 |
|

 Previous |
 Next |
| Oracle® Retail Merchandising Foundation Cloud Service Oracle Retail Merchandising System User Guide Release 19.3.000 F83161-01 |
|
Previous |
Next |
In order to optimally configure the application, the user is provided with a set of windows which allow viewing, editing, and maintenance of system parameters which help customize various defaults and constants that are used throughout the system. The parameters range from setting the application UI features such as the decimal precision in which quantity values should be displayed, setting up important business features that are used by retailers such as Value Added Tax (VAT), Banners, Channels, and so on. The majority of these parameters should be defined during the system implementation and changes to any of the parameters thereafter requires careful planning.
The system options module provides a means of maintaining the relatively static information about a retailer's business.
Many of the system variables must be set during installation and cannot be changed without major implications. Most system variables are specific to functional areas such as ordering, pricing, transfers, stock ledger and history. While some indicators dictate the level at which these functions perform, others indicate the length of time that the data is maintained for these areas.
In addition to the functional variables, other variables span all functional areas and determine how the system must perform as a whole. Some of these variables include the multiple currency indicator, primary language, and system dates.
You can access the System Options window from the Task menu, select Application Administration > System Options. The System Options window appears.
The System Options window contains the following sections.
The System section contains the general information in Merchandising such as the language, currency, calendar, and the base country of the business.
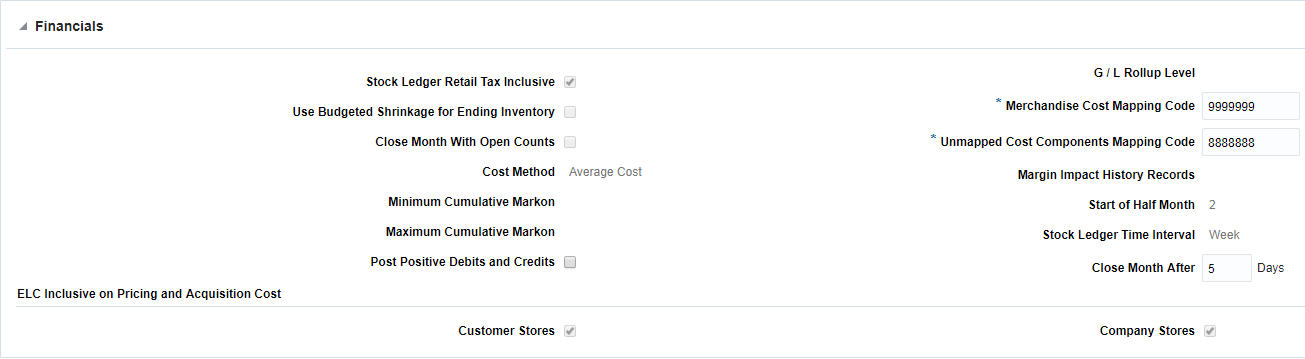
The Financials section contains the options for stock ledger, sales, and other financial information.
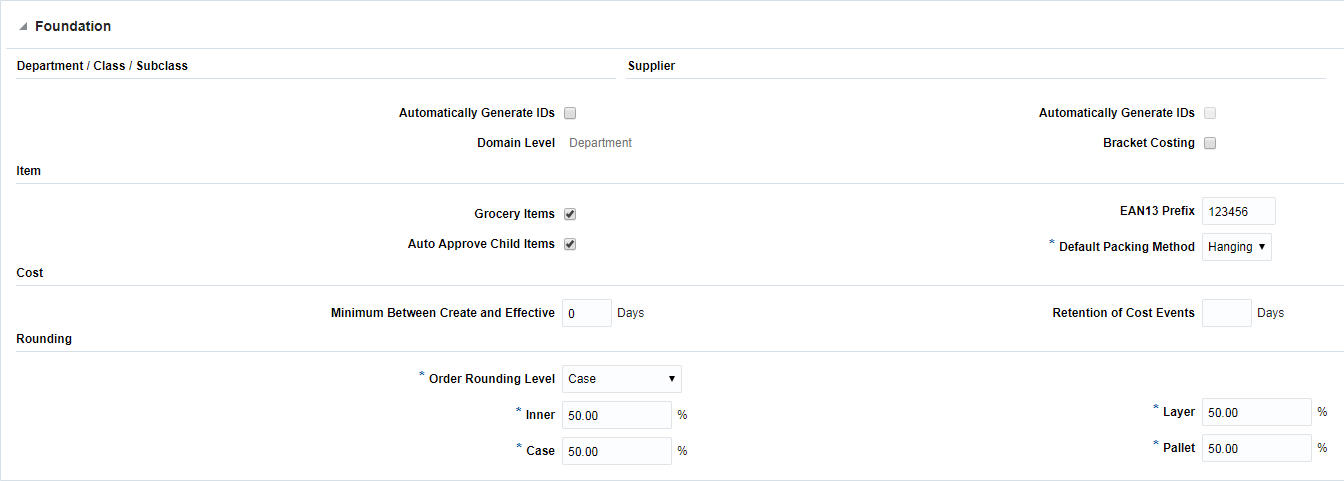
The Foundation section contains the merchandise level settings.
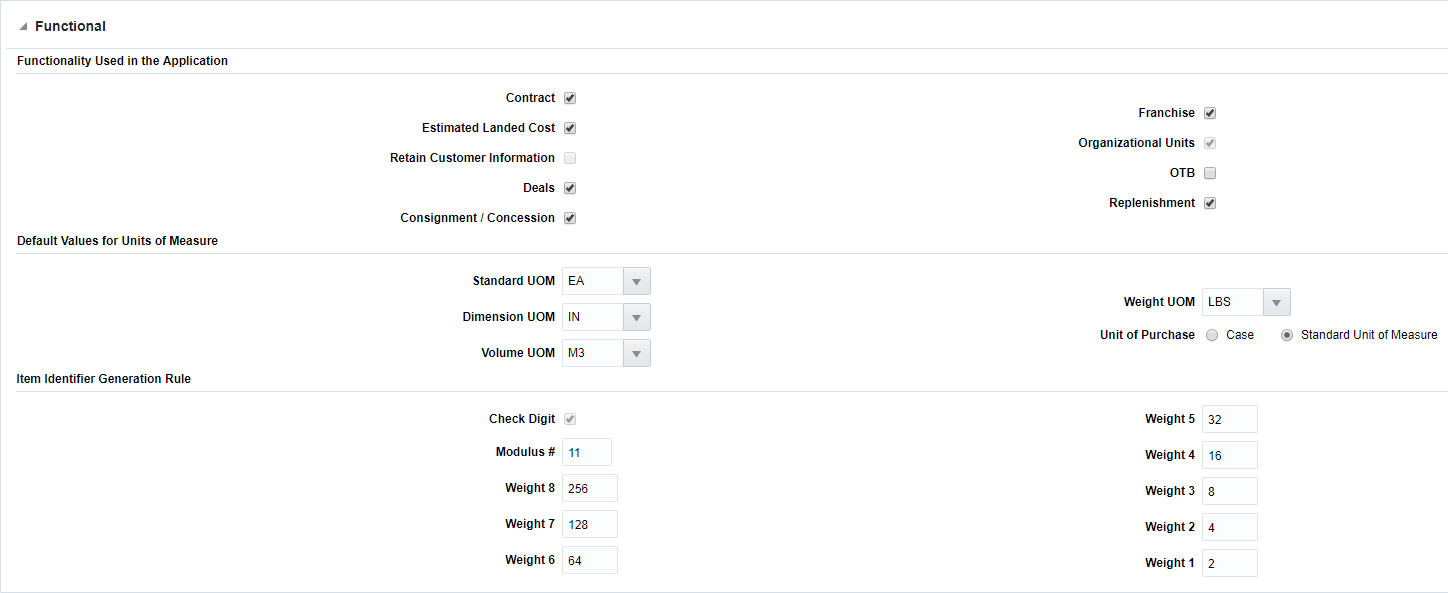
The Functional section contains the options to determine if functions, such as importing, contracts, franchise, deals, and replenishment are supported in the system. It also determines the unit of measure (UOM) information used across the system.
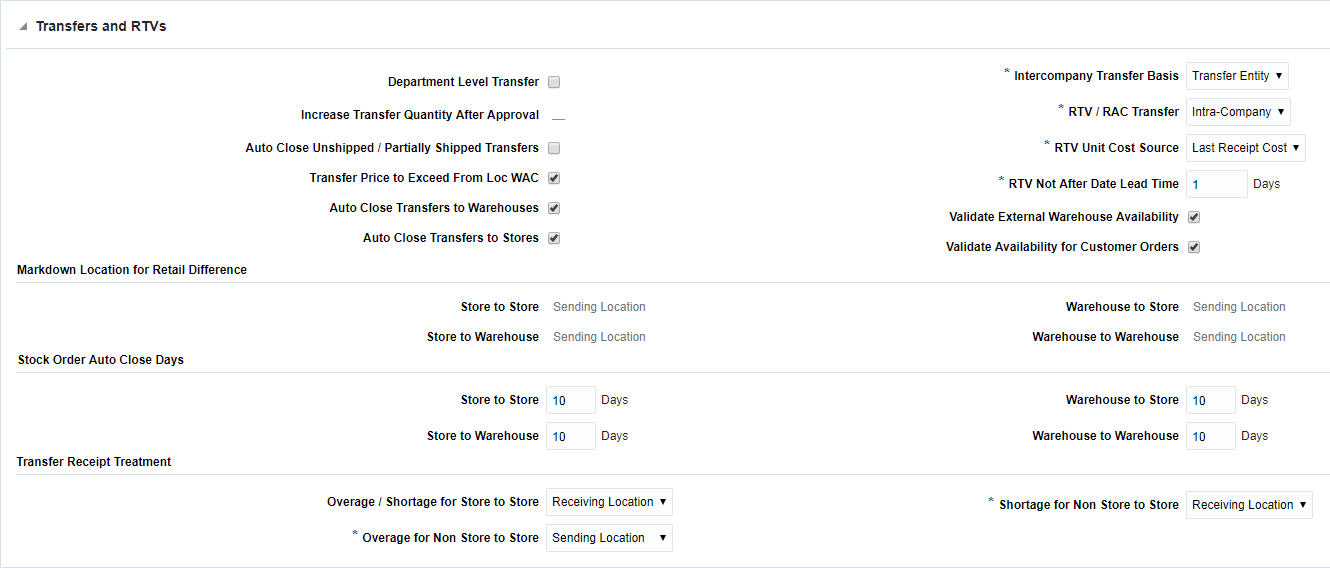
The Inventory section contains the options for inventory movements. This section is divided into the following subsections.
This section displays transfer and returns to vendor variables.
This section contains sales and returns variables.
The Localization section contains the options for taxations in Merchandising.
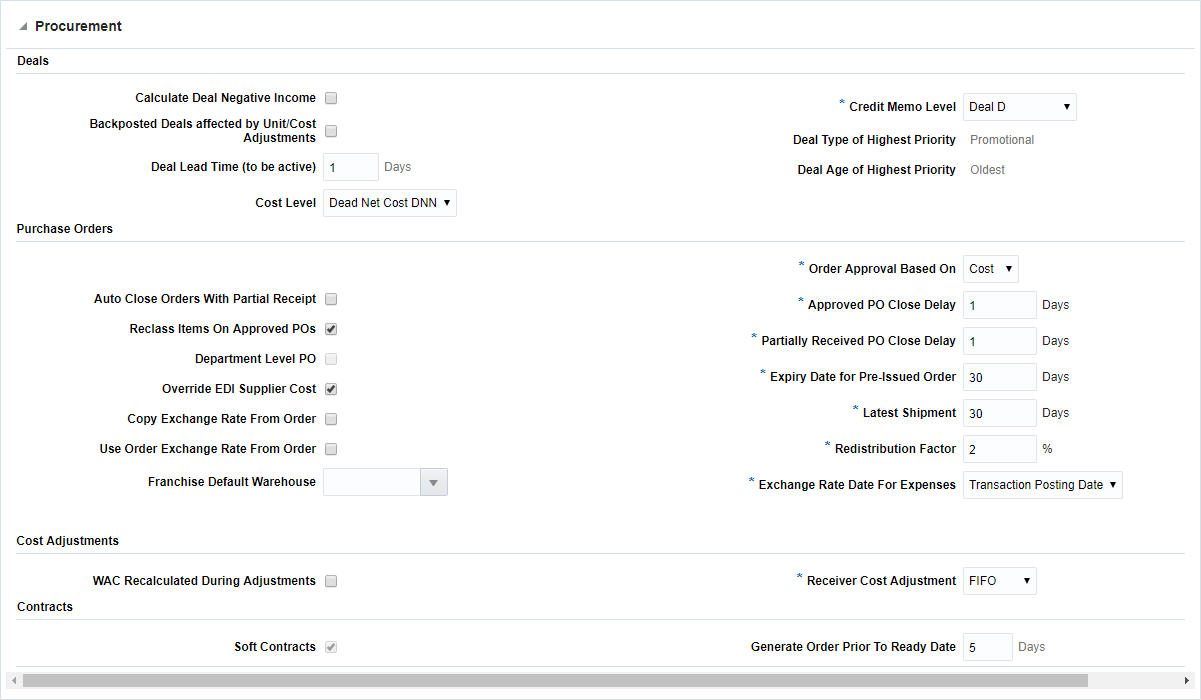
The Procurement section contains the settings for order related options.
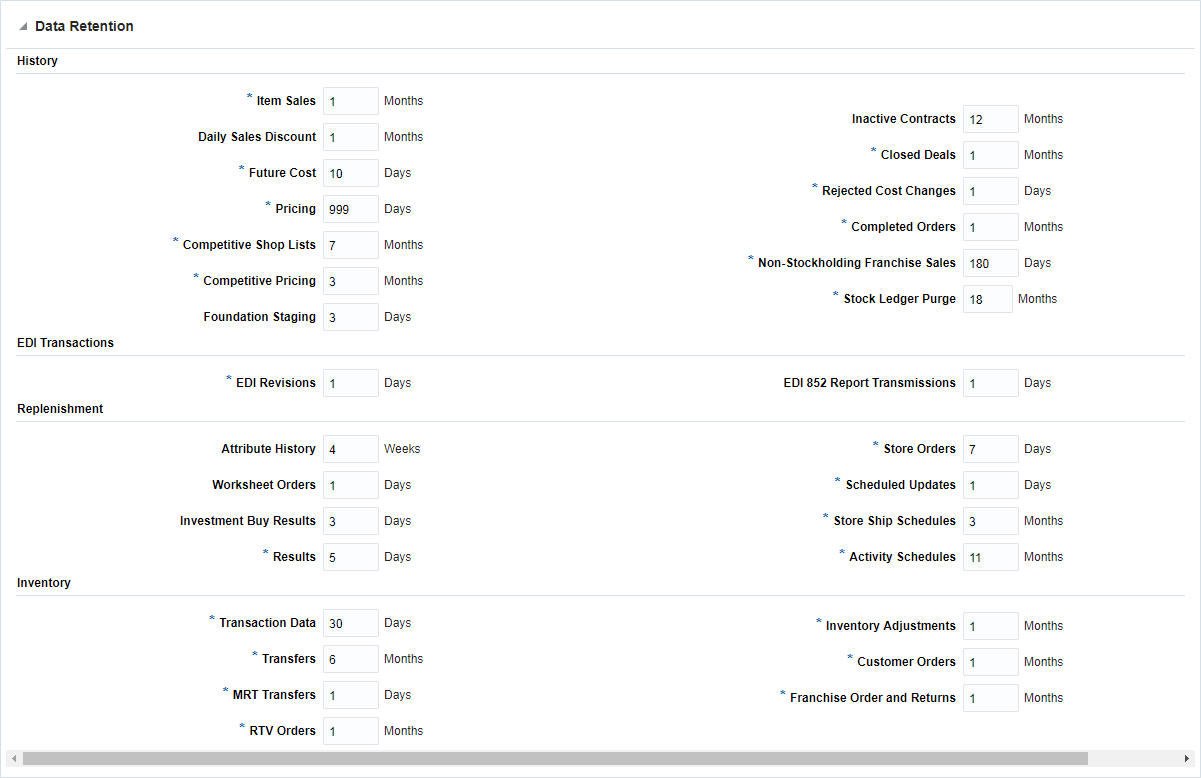
The Data Retention section contains the options for setting the data retention.
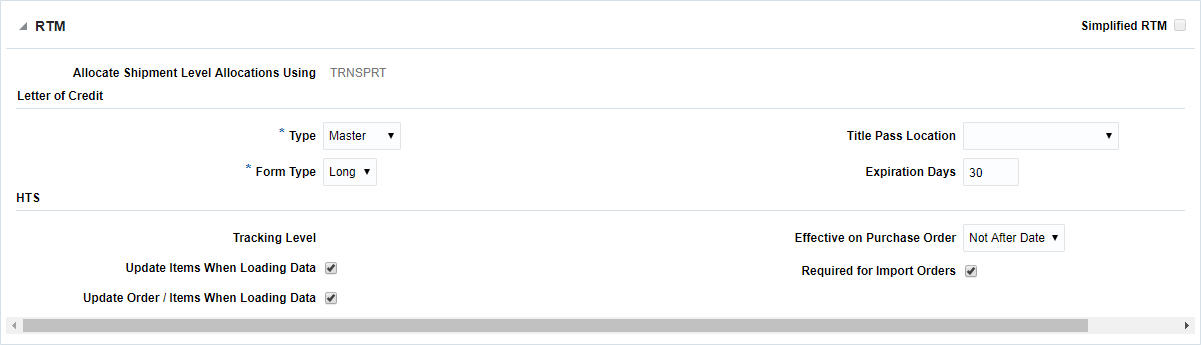
The RTM section contains the Retail Trade Management (RTM) related options.
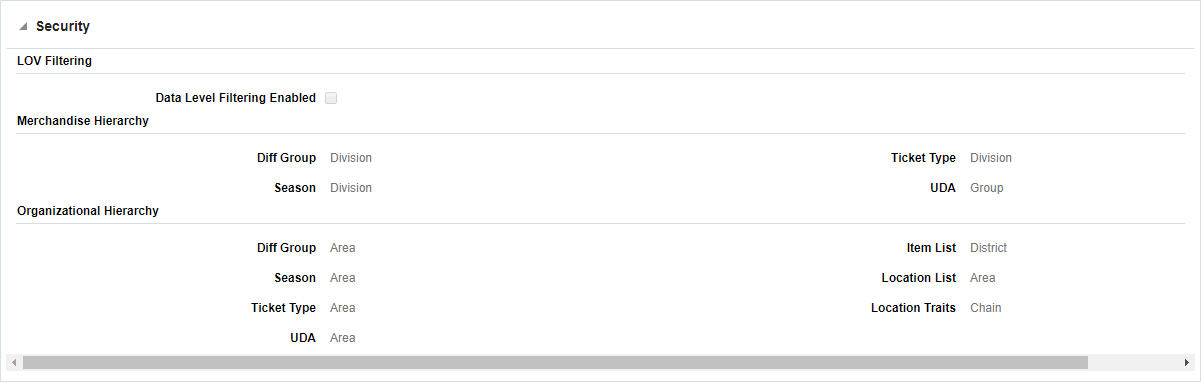
The Security section contains the options for setting how the data is maintained in the system.
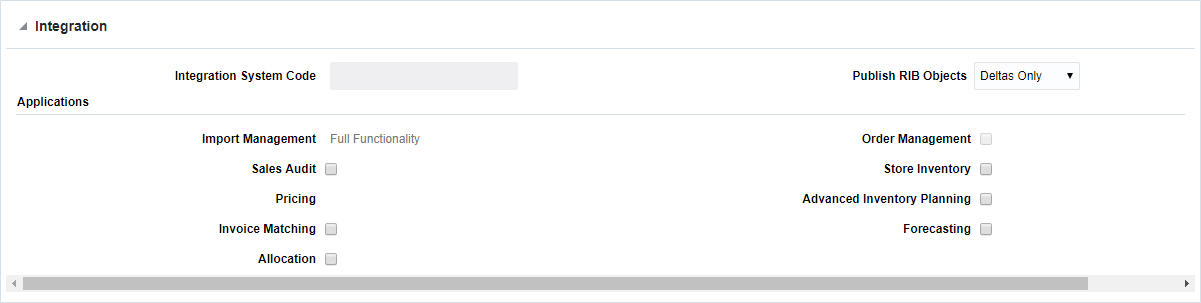
The Integration section determines which business applications are integrated with Merchandising (for example, Advanced Inventory Planning (AIP), Store Inventory, Sales Audit, and so on). This section also contains configurations for the software integrations.
The toolbar contains the following icons and buttons.
Table 14-1 System Options Toolbar - Icons/Buttons and Description
| Icons/Buttons | Description |
|---|---|
|
Help icon |
You can access the online help for a particular page by clicking the Help icon |
|
Expand and Collapse icon |
You can expand all the sections and collapse all the sections in the window by clicking the Expand and Collapse icon |
|
Save |
Click Save to save the entered records. |
|
Save and Close |
Click Save and Close to save the entered records and close the window. |
|
Cancel |
Click Cancel to reject all entries and close the window. |
|
Done |
If you open the window in view mode, the Done button is displayed. Click Done to close the window. |
The report options module helps you configure/setup the options available for the Dashboard and the Contextual Reports.
You can access the Report Options window from the Task menu, select Application Administration > Report Options. The Report Options window appears.
The Report Options window contains the following sections.
The Cross Report Option section contains inventory variance to forecast and order alerts, filter location type, stock count location exception count information.
The Cumulative Markon Variance Report section contains the options variance threshold and minimum variance information.
The Early/Late Shipments Report section contains the beginning of week to estimated arrival date, estimated arrival date top open to buy date, not after date to end of week, and display OTB information.
The Inactive Items and Inactive Item Locations Report section contains display items created and display items last transferred information.
The Incomplete Items Report section contains the different attributes of an item, based on which the item can be categorized as an incomplete item.
The Inventory Variance to Forecast Report section contains lower inventory variance and upper inventory variance information.
The Late Posted Transactions Report section contains transaction count threshold, location count threshold, and organizational hierarchy display level information.
The Negative Inventory Report section contains quantity threshold information.
The Order Alerts Report section contains the validate reference items check box and include factory check related options.
The Orders Pending Approval Report section contains the show worksheet orders.
The Overdue Shipments Report section contains the past expected receipt date.
The Shrinkage Variance Report section contains the maximum variance, variance tolerance, and variance count options.
The Stock Count Unit Variance Report section contains variance threshold option.
The Stock Count Value Variance Report section contains variance threshold option.
The Stock Counts Missing Report section contains past count date days option.
The Stock Orders Pending Close Report section contains past receipt date days option.
The Transfers Pending Close Report section contains past creation date days option.
The Unexpected Inventory Report section contains the configurations such as the threshold inventory level above which the item/location will appear in this report. Other configurations can also be made to make the item/location records be pulled in this report.
The WAC Variance Report section contains maximum variance, variance tolerance, and variance count information.
The toolbar contains the following icons and buttons.
Table 14-2 Report Options Toolbar - Icons/Buttons and Description
| Icons/Buttons | Description |
|---|---|
|
Help icon |
You can access the online help for a particular page by clicking the Help icon |
|
Expand and Collapse icon |
You can expand all the sections and collapse all the sections in the window by clicking the Expand and Collapse icon |
|
Save |
Click Save to save the entered records. |
|
Save and Close |
Click Save and Close to save the entered records and close the window. |
|
Cancel |
Click Cancel to reject all entries and close the window. |
|
Done |
If you open the window in view mode, the Done button is displayed. Click Done to close the window. |
You can create, modify and delete translations of data in Merchandising. This can be done in two different ways.
for a single entity at a time
by viewing all entities that have translatable values and translate them in a centralized page.
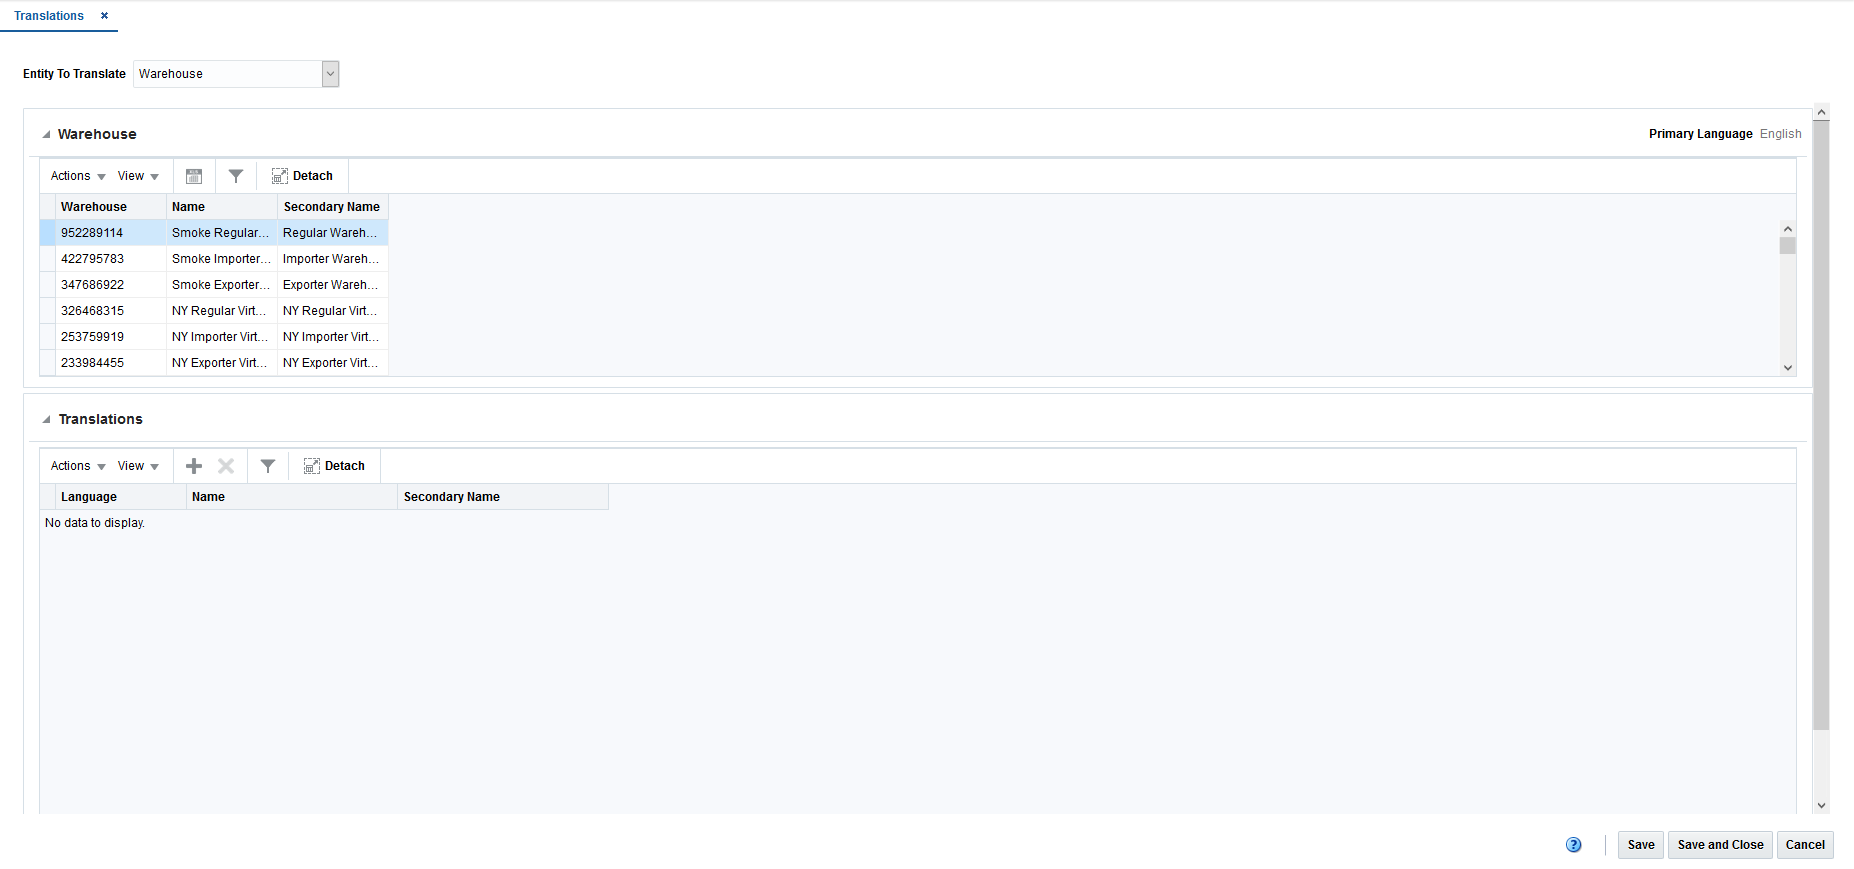
The Translations page is a centralized page where you can see all entities that have translatable values in Merchandising.
Perform the following procedure to translate an entity:
From the Tasks menu, select Application Administration > Translations. The Translations page appears.
Depending on the entity to translate you have selected in the header, the title of the search results section varies.
For example, if you select an Entity to Translate of 'Warehouse', the title of this section will be 'Warehouse' and a list of all existing warehouses in the system will display in the table. You can select the row containing the desired warehouse to see any existing translations in the Translations table below.
The Translations section contains all available translations of the selected entity to translate. Existing translations can be modified directly in the table.
Use the Actions Menu and icons to apply actions to the table. In addition to editing existing translations, you can add new translations or delete existing translations. For more information about how to add translations, see the Add a Translation section.
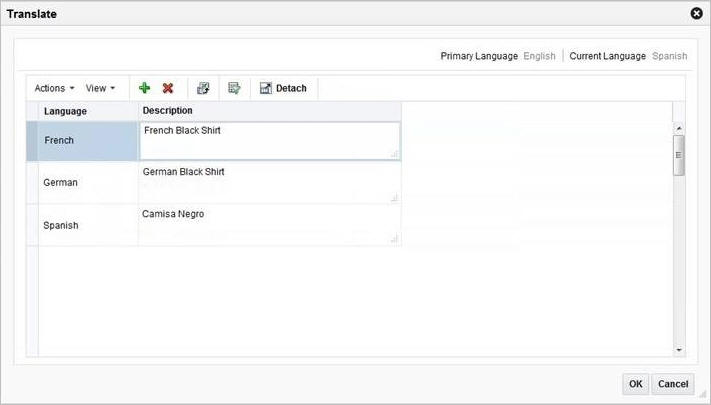
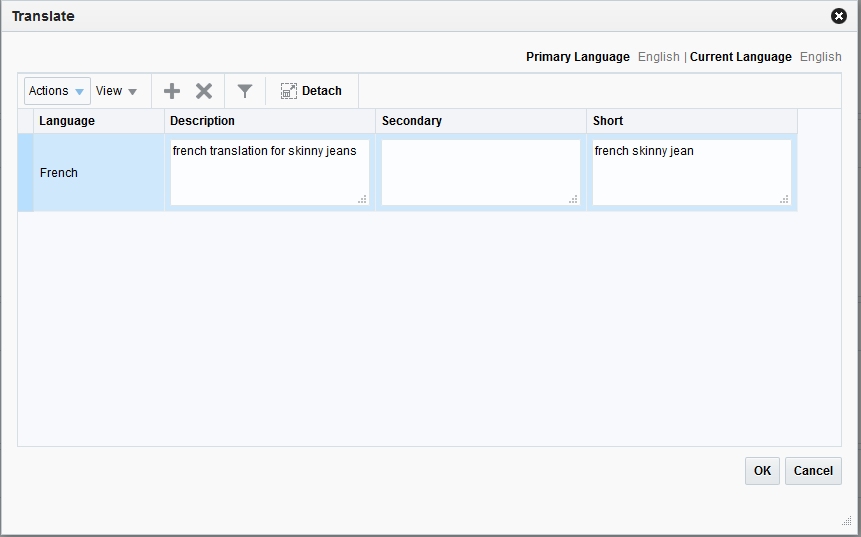
The Translate page for a single entry displays the primary language and the current language in the top right corner. The table of the Translate page displays the language and the corresponding description for the entry. Existing translations can be modified directly in the table.
There are two scenarios you may encounter when translating a single entity:
To add a translation, follow the steps below.
Select Actions > Translate or use the Translate icon ![]() , if available. The Translate page appears.
, if available. The Translate page appears.
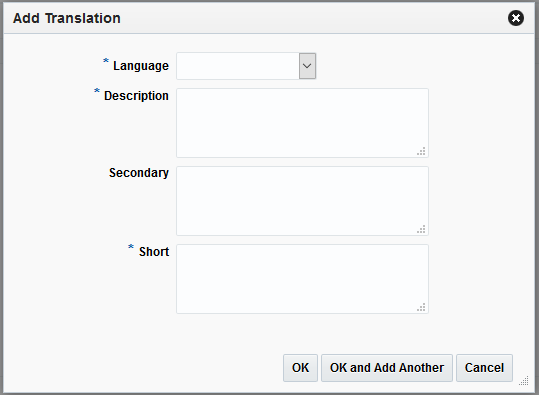
In the table, select Actions > Add, or use the Add icon ![]() . The Add Translation pop-up appears.
. The Add Translation pop-up appears.
In the Language field, select the desired language from the list. This field is a required field.
In the Description field, enter the desired translation. This field is a required field. Depending on the entity being translated, there may be more than one translation field that is required to be entered. For example, item descriptions have up to three descriptions that can be translated - the long description, the secondary description, and the short description.
Then choose one of the following options.
Click OK to add the translation to the table and close the page.
Click OK and Add Another to add additional translations.
Click Cancel to reject all entries and close the page.
To edit a translation, follow the steps below.
Select Actions > Translate or use the Translate icon ![]() , if available. The Translate page appears.
, if available. The Translate page appears.
Edit the description directly in the table (the fields are in-line editable).
|
Note: The Language field cannot be edited. If a desired language is no longer wanted, the row should be deleted and a new row added for the desired language. |
Click OK to update the translation and close the page.
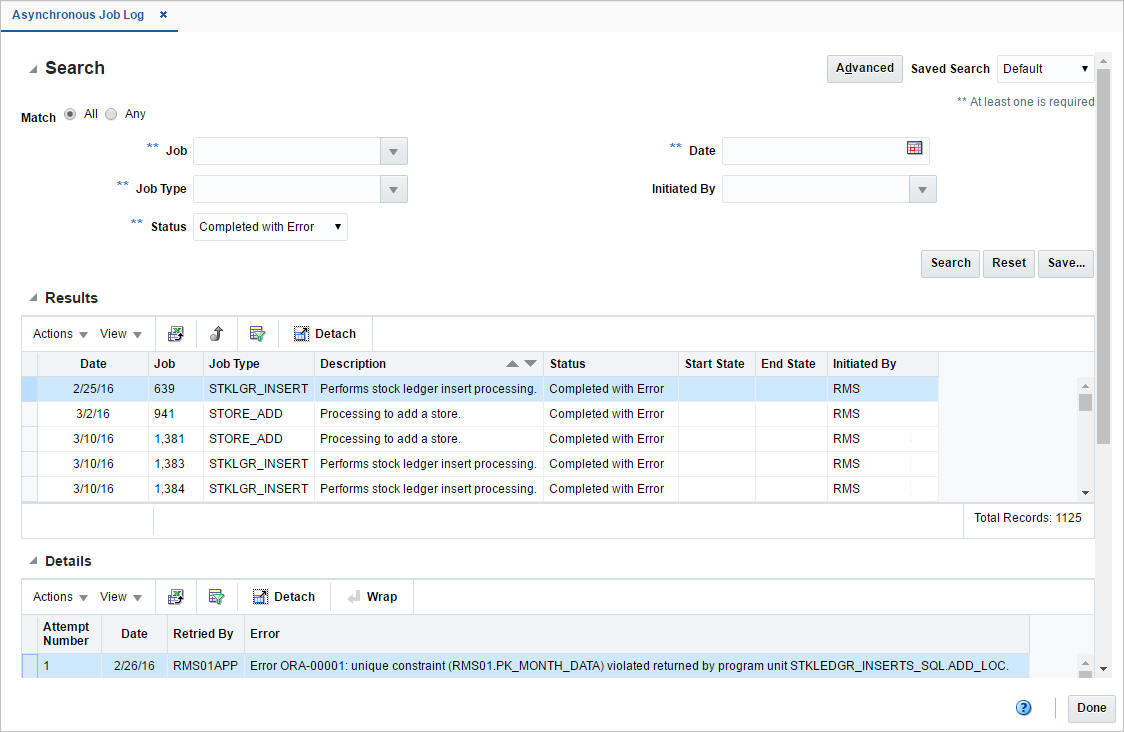
The asynchronous job log is used for viewing and reprocessing asynchronous jobs in Merchandising.
Search for asynchronous jobs by various search criteria
View the search results
You can access the Asynchronous Job Log window from the Task menu, select Application Administration > Asynchronous Job Log. The Asynchronous Job Log window appears.
The window contains the following two sections.
Search
For more information about how to search for an asynchronous job, see the Search for an Asynchronous Job section.
To search for an asynchronous job:
From the Task menu, select Application Administration > Asynchronous Job. The Asynchronous Job Log window appears.
You can search for an asynchronous job by using basic or advanced search criteria, depending on the requirement. The basic mode is the default search mode.
Click Advanced to access the search section in advanced mode.
Click Basic to return to the basic mode.
To search for an asynchronous job by using basic search criteria
Enter, select or search for one or all of the following basic search criteria.
Table 14-3 Asynchronous Job Log Search - Basic Search Criteria and Description
| Fields | Description |
|---|---|
|
Match option |
Check radio button All or Any. All - only jobs matching all entered search criteria are shown. Any - jobs matching any of the entered search criteria are shown. |
|
Job |
Enter, select or search for the job. |
|
Job Type |
Enter, select or search for the job type. |
|
Status |
Select a status from the list. |
|
Date |
Enter a date or use the Calendar icon to select a date. |
|
Initiated By |
Enter, select or search for the user, the job has been initiated by. |
Click on the Saved Search list to select one of the saved search criteria. Selecting a saved search populates the search section with the saved search criteria. If the run automatically function is enabled for the search, the search is executed immediately.
You can also personalize your saved searches by selecting Personalize. The Personalize Saved Searches window appears.
For more information about the Personalized Saved Search, see the Common User Interface Controls chapter, section "Manage Saved Searches".
Click Search. The jobs that match the search criteria are displayed in the Results section.
Click Reset to clear the search section and results.
Click Save As... to save the current search criteria. The Create Saved Search window appears.
For more information about how to save your search criteria, see the Common User Interface Controls chapter, section "Create a Saved Search".
Click Done to close the window.
To search for an asynchronous job by using advanced search criteria, follow the steps below.
To search by using advanced search criteria, enter or select one or all of the advanced search criteria.
To narrow down the search, use the list next to the search fields. For example, determine if the entered value should equal or not equal the search result.
Click on the Saved Search list to select one of the saved search criteria. Selecting a saved search populates the search section with the saved search criteria. If the run automatically function is enabled for the search, the search is executed immediately.
You can also personalize your saved searches by selecting Personalize. The Personalize Saved Searches window appears.
For more information about the Personalized Saved Search, see the Common User Interface Controls chapter, section "Manage Saved Searches".
Click Search. The jobs that match the search criteria are displayed in the Results section.
Click Reset to clear the search section and results.
Click Save As... to save the current search criteria. The Create Saved Search window appears.
For more information about how to save your search criteria, see the Common User Interface Controls chapter, section "Create a Saved Search".
Click Add Fields to add more fields for the advanced search. To remove the field from the search, click the x right next to the field.
Click Reorder to change the order of the available search fields. The Reorder Search Fields window appears.
Select the desired search field and use the up and down arrows to rearrange the order of the fields.
Click OK to confirm the new order of the fields and exit the Reorder Search Fields window.
Click Cancel to reject any changes and close the window.
Click Done to close the window.
The Results section lists the retrieved asynchronous jobs.
Use the Actions Menu and icons to apply actions to the table. You can perform the actions listed below.
Table 14-4 Results - Actions Menu/Icons and Description
| Actions Menu/Icons | Description |
|---|---|
|
Export to Excel and Export to Excel icon |
You can copy the records in the table to a Microsoft Excel spreadsheet by selecting Actions > Export to Excel or by using the Export to Excel icon |
|
Reprocess or Reprocess icon |
Use the Reprocess option or the Reprocess icon |
You can customize the view of the table. Use the View Menu and icons to customize the view as listed below.
Table 14-5 Results - View Menu/Icons and Description
| View Menu/Icons | Description |
|---|---|
|
Columns |
You can manage which of the columns will be shown in the table by clicking the Show All and Manage Columns options. |
|
Detach and Detach icon |
You can view the tables in the application in a separate window by clicking Detach or using the Detach icon |
|
Sort |
You can sort columns by the following options:
|
|
Reorder Columns |
You can reorder columns by clicking the Reorder Columns option. |
|
Query by Example and Query by Example icon |
You can filter the items by one or multiple column values by clicking the Query by Example option or by using the Query by Example icon |
The Details section displays job details such as attempt number, date, retried by and errors.
Use the Actions Menu and icons to apply actions to the table. You can perform the actions listed below.
Table 14-6 Details - Actions Menu/Icons and Description
| Actions Menu/Icons | Description |
|---|---|
|
Export to Excel and Export to Excel icon |
You can export the records in the table to a Microsoft Excel spreadsheet by selecting Actions > Export to Excel or by using the Export to Excel icon |
|
Wrap icon |
You can wrap the values in the table column by first clicking the column on which you would like the text to wrap and then using the Wrap icon |
You can customize the view of the table. Use the View Menu and icons to customize the view as listed below.
Table 14-7 Details - View Menu/Icons and Description
| View Menu/Icons | Description |
|---|---|
|
Columns |
You can manage which of the columns will be shown in the table by clicking the Show All and Manage Columns options. |
|
Detach and Detach icon |
You can view the tables in the application in a separate window by clicking Detach or using the Detach icon |
|
Sort |
You can sort columns by the following options:
|
|
Reorder Columns |
You can reorder columns by clicking the Reorder Columns option. |
|
Query by Example and Query by Example icon |
You can filter the items by one or multiple column values by clicking the Query by Example option or by using the Query by Example icon |
The toolbar contains the following icons and buttons.
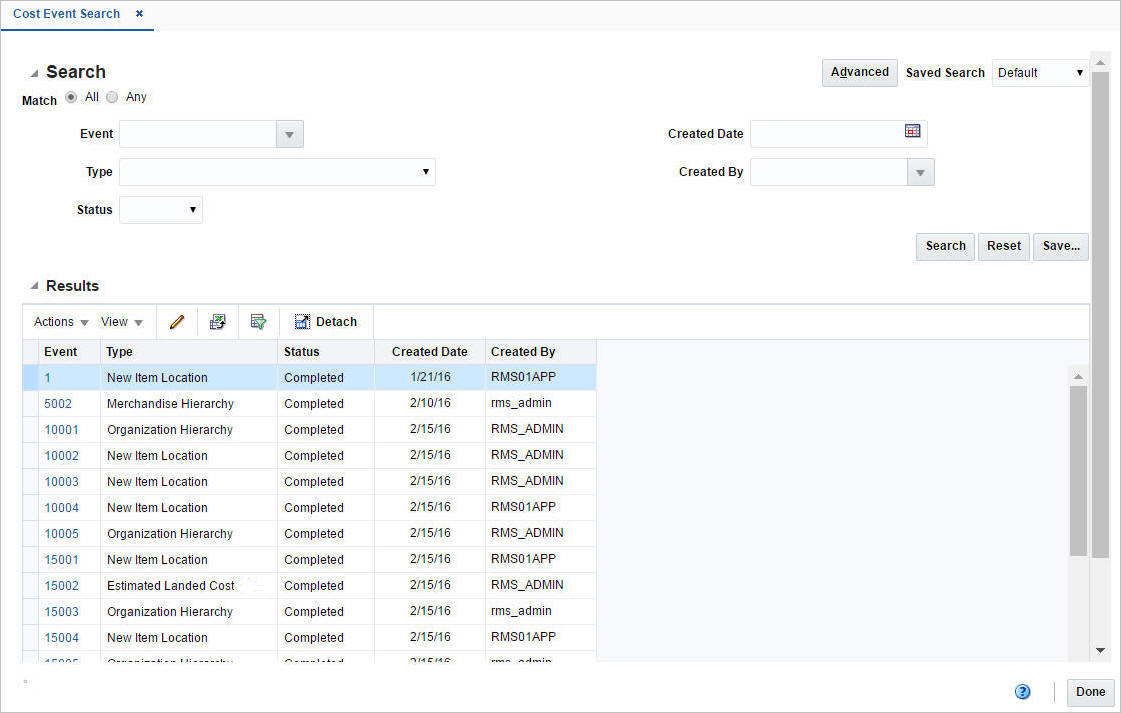
The Future Cost Events option opens the Cost Event Search window. In this window you can perform the following actions.
Search for cost events by various search criteria
View the search results
View cost events
Edit cost events
You can access the Cost Event Search window from the Task menu, select Foundation Data > Application Administration > Future Cost Events. The Cost Event Search window appears.
The Cost Event Search window contains the following sections.
Search
For more information about this section, see the Search for a Cost Event section.
To search for a cost event:
From the Task menu, select Foundation Data > Application Administration > Future Cost Events. The Cost Event Search window appears.
You can search for a cost event by using basic or advanced search criteria, depending on the requirement. The basic mode is the default search mode.
Click Advanced to access the search section in advanced mode.
Click Basic to return to the basic mode.
To search for a cost event using basic search criteria:
Enter, select or search for one or all of the following basic search criteria.
Table 14-9 Cost Event Search - Basic Search Criteria and Description
| Fields | Description |
|---|---|
|
Match option |
Check radio button All or Any. All - only cost events matching all entered search criteria are shown. Any - cost events matching any of the entered search criteria are shown. |
|
Event |
Enter, select or search for the cost event ID. |
|
Type |
Select the cost type from the list. |
|
Status |
Select the status from the list. |
|
Created Date |
Enter a create date or use the Calendar icon to select a date. |
|
Created By |
Enter, select or search for user. |
Click on the Saved Search list to select one of the saved search criteria. Selecting a saved search populates the search section with the saved search criteria. If the run automatically function is enabled for the search, the search is executed immediately.
You can also personalize your saved searches by selecting Personalize. The Personalize Saved Searches window appears.
For more information about the Personalized Saved Search, see the Common User Interface Controls chapter, section "Manage Saved Searches".
Click Search. The cost events that match the search criteria are displayed in the Results section.
Click Reset to clear the search section and results.
Click Save As... to save the current search criteria. The Create Saved Search window appears.
For more information about how to save your search criteria, see the Common User Interface Controls chapter, section "Create a Saved Search".
Click Done to close the window.
To search for a cost event using advanced search criteria:
To search using advanced search criteria, enter or select one or all of the advanced search criteria.
To narrow down the search, use the list next to the search fields. For example, determine if the entered value should equal or not equal the search result.
Click on the Saved Search list to select one of the saved search criteria. Selecting a saved search populates the search section with the saved search criteria. If the run automatically function is enabled for the search, the search is executed immediately.
You can also personalize your saved searches by selecting Personalize. The Personalize Saved Searches window appears.
For more information about the Personalized Saved Search, see the Common User Interface Controls chapter, section "Manage Saved Searches".
Click Search. The cost events that match the search criteria are displayed in the Results section.
Click Reset to clear the search section and results.
Click Save As... to save the current search criteria. The Create Saved Search window appears.
For more information about how to save your search criteria, see the Common User Interface Controls chapter, section "Create a Saved Search".
Click Add Fields to add more fields for the advanced search. To remove the field from the search, click the x right next to the field.
Click Reorder to change the order of the available search fields. The Reorder Search Fields window appears.
Select the desired search field and use the up and down arrows to rearrange the order of the fields.
Click OK to confirm the new order of the fields and close the window.
Click Cancel to reject any changes and close the window.
Click Done to close the window.
The Results section lists the retrieved suppliers and supplier sites.
Use the Actions Menu and icons to apply actions to the table. You can perform the actions listed below.
Table 14-10 Results - Actions Menu/Icons and Description
| Actions Menu/Icons | Description |
|---|---|
|
Edit and Edit icon |
Select Actions > Edit, use the Edit icon For more information about how to edit a cost event, see the Edit a Cost Event section. |
|
Export to Excel and Export to Excel icon |
You can export the records in the table to a Microsoft Excel spreadsheet by selecting Actions > Export to Excel or by using the Export to Excel icon |
You can customize the view of the table by using the options in the View Menu.
Table 14-11 Results - View Menu/Icons and Description
| View Menu/Icons | Description |
|---|---|
|
Columns |
You can manage which of the columns will be shown in the table by clicking the Show All and Manage Columns options. |
|
Detach and Detach icon |
You can view the tables in the application in a separate window by clicking Detach or using the Detach icon |
|
Reorder Columns |
You can reorder columns by clicking the Reorder Columns option. |
|
Query by Example and Query by Example icon |
You can filter the items by one or multiple column values by clicking the Query by Example option or by using the Query by Example icon |
The toolbar contains the following icons and buttons.
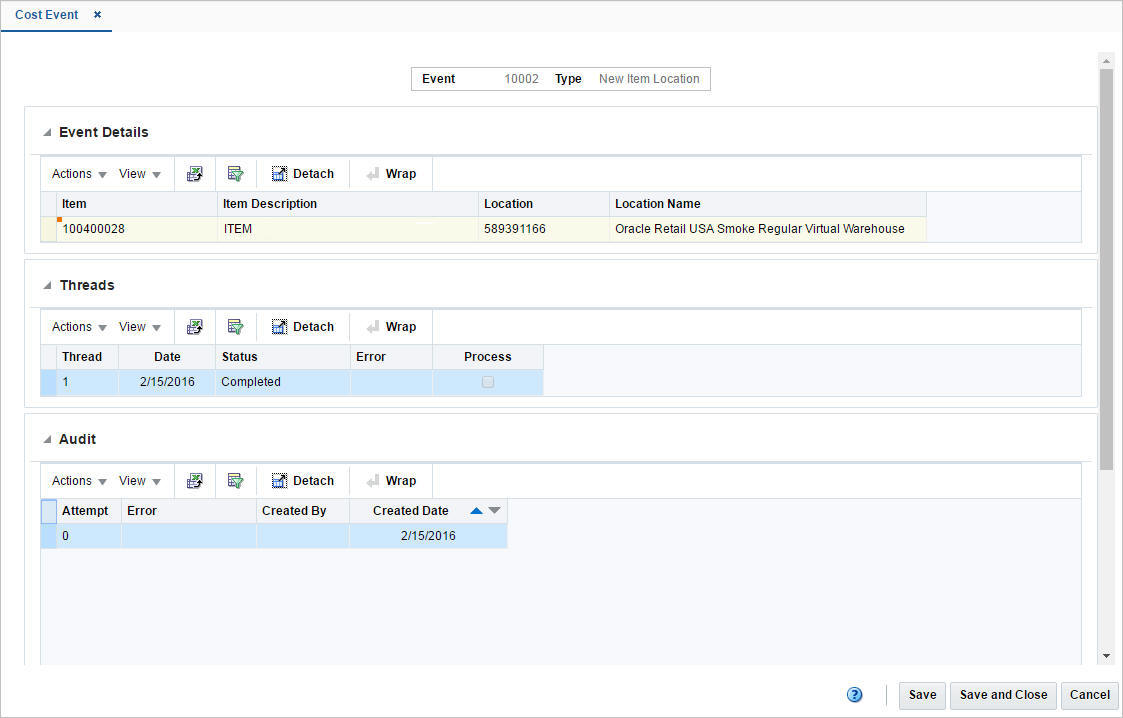
The Cost Event window displays the status of all events being processed or already processed by the future cost engine. The window allows you to view any issues that occurred during the process.
The Cost Event window contains the following sections.
The Event Details section displays a table with the future cost event details. The information shown in this section depends on the selected event type.
Possible event types are:
Deal
Cost Change
Cost Zone Location Move
Deal Passthrough
Estimated Landed Cost Component
Item Cost Zone Changes
Merchandise Hierarchy
New Item Location
Organizational Hierarchy
Primary Pack Cost
Reclassification
Item Supplier Country Location Relationship Changes
Supplier Hierarchy
WF Cost Template
WF Cost Template Relationship
Change of Costing Location
Retail Change
Use the Actions Menu and icons to apply actions to the table. You can perform the actions listed below.
Table 14-13 Event Details - Actions Menu/Icons and Description
| Actions Menu/Icons | Description |
|---|---|
|
Export to Excel and Export to Excel icon |
You can export the records in the table to a Microsoft Excel spreadsheet by selecting Actions > Export to Excel or by using the Export to Excel icon |
|
Wrap icon |
You can wrap the values in the table column by first clicking the column on which you would like the text to wrap and then using the Wrap icon |
You can customize the view of the table by using the options in the View Menu.
Table 14-14 Event Details - View Menu/Icons and Description
| View Menu/Icons | Description |
|---|---|
|
Columns |
You can manage which of the columns will be shown in the table by clicking the Show All and Manage Columns options. |
|
Detach and Detach icon |
You can view the tables in the application in a separate window by clicking Detach or by using the Detach icon |
|
Sort |
You can sort columns by the following options:
|
|
Reorder Columns |
You can reorder columns by clicking the Reorder Columns option. |
|
Query by Example and Query by Example icon |
You can filter the items by one or multiple column values by clicking the Query by Example option or by using the Query by Example icon |
The Threads section displays all threads for the given event. You can choose to process a thread by clicking the Process checkbox. Upon clicking the Save or Save and Close button the checked thread is processed.
Use the Actions Menu and icons to apply actions to the table. You can perform the actions listed below.
Table 14-15 Threads - Actions Menu/Icons and Description
| Actions Menu/Icons | Description |
|---|---|
|
Export to Excel and Export to Excel icon |
You can export the records in the table to a Microsoft Excel spreadsheet by selecting Actions > Export to Excel or by using the Export to Excel icon |
|
Item Supplier Country Locations per Thread |
You can view the item supplier locations per thread:
For more information about this window, see the Item Supplier Country Locations per Thread section. |
|
Wrap icon |
You can wrap the values in the table column by first clicking the column on which you would like the text to wrap and then using the Wrap icon |
You can customize the view of the table by using the options in the View Menu.
Table 14-16 Threads - View Menu/Icons and Description
| View Menu/Icons | Description |
|---|---|
|
Columns |
You can manage which of the columns will be shown in the table by clicking the Show All and Manage Columns options. |
|
Detach and Detach icon |
You can view the tables in the application in a separate window by clicking Detach or by using the Detach icon |
|
Sort |
You can sort columns by the following options:
|
|
Reorder Columns |
You can reorder columns by clicking the Reorder Columns option. |
|
Query by Example and Query by Example icon |
You can filter the items by one or multiple column values by clicking the Query by Example option or by using the Query by Example icon |
The Audit section displays an audit of the processing attempts for a given thread.
Use the Actions Menu and icons to apply actions to the table. You can perform the actions listed below.
Table 14-17 Audit - Actions Menu/Icons and Description
| Actions Menu/Icons | Description |
|---|---|
|
Export to Excel and Export to Excel icon |
You can export the records in the table to a Microsoft Excel spreadsheet by selecting Actions > Export to Excel or by using the Export to Excel icon |
|
Wrap icon |
You can wrap the values in the table column by first clicking the column on which you would like the text to wrap and then using the Wrap icon |
You can customize the view of the table by using the options in the View Menu.
Table 14-18 Audit - View Menu/Icons and Description
| View Menu/Icons | Description |
|---|---|
|
Columns |
You can manage which of the columns will be shown in the table by clicking the Show All and Manage Columns options. |
|
Detach and Detach icon |
You can view the tables in the application in a separate window by clicking Detach or by using the Detach icon |
|
Sort |
You can sort columns by the following options:
|
|
Reorder Columns |
You can reorder columns by clicking the Reorder Columns option. |
|
Query by Example and Query by Example icon |
You can filter the items by one or multiple column values by clicking the Query by Example option or by using the Query by Example icon |
The toolbar contains the following icons and buttons.
Table 14-19 Cost Event Toolbar - Icons/Buttons and Description
| Icons/Buttons | Description |
|---|---|
|
Help icon |
You can access the online help for a particular page by clicking the Help icon |
|
Save |
Click Save to save the entered records. |
|
Save and Close |
Click Save and Close to save the entered records and close the window. |
|
Cancel |
Click Cancel to reject all entries and close the window. |
|
Done |
If you open the window in view mode, the Done button is displayed. Click Done to close the window. |
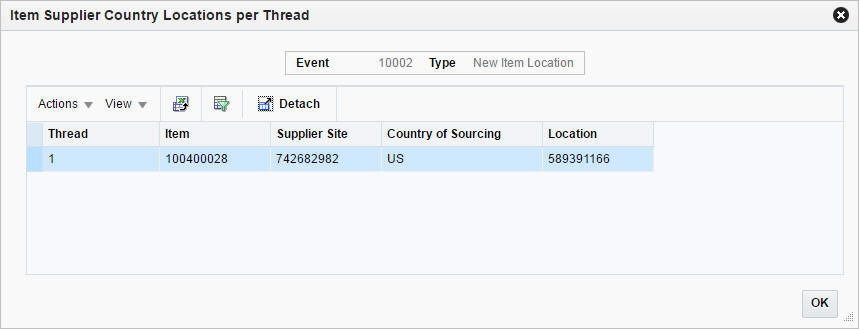
The Item Supplier Country Locations per Thread window displays the item supplier location per thread. The header displays the event ID and event type.
Use the Actions Menu and icons to apply actions to the table. You can perform the actions listed below.
Table 14-20 Item Supplier Locations per Thread - Actions Menu/Icons and Description
| Actions Menu/Icons | Description |
|---|---|
|
Export to Excel and Export to Excel icon |
You can export the records in the table to a Microsoft Excel spreadsheet by selecting Actions > Export to Excel or by using the Export to Excel icon |
You can customize the view of the table by using the options in the View Menu.
Table 14-21 Item Supplier Locations per Thread - View Menu/Icons and Description
| View Menu/Icons | Description |
|---|---|
|
Columns |
You can manage which of the columns will be shown in the table by clicking the Show All and Manage Columns options. |
|
Detach and Detach icon |
You can view the tables in the application in a separate window by clicking Detach or by using the Detach icon |
|
Sort |
You can sort columns by the following options:
|
|
Reorder Columns |
You can reorder columns by clicking the Reorder Columns option. |
|
Query by Example and Query by Example icon |
You can filter the items by one or multiple column values by clicking the Query by Example option or by using the Query by Example icon |
To edit a cost event, follow the steps below.
From the Tasks menu, select Application Administration > Future Cost Events. The Cost Event Search window appears.
Enter or select search criteria as desired to make the search more restrictive.
Click Search. The cost events that match the search criteria are displayed in the Results section.
In the Event column, click the event link, or mark a record and select Actions > Edit, or use the Edit icon ![]() . The Cost Event window appears.
. The Cost Event window appears.
Edit the records, as necessary.
Then choose one of the following options.
Click Save to save your changes.
Click Save and Close to save your changes and close the window.
Click Cancel to reject all entries and close the window.
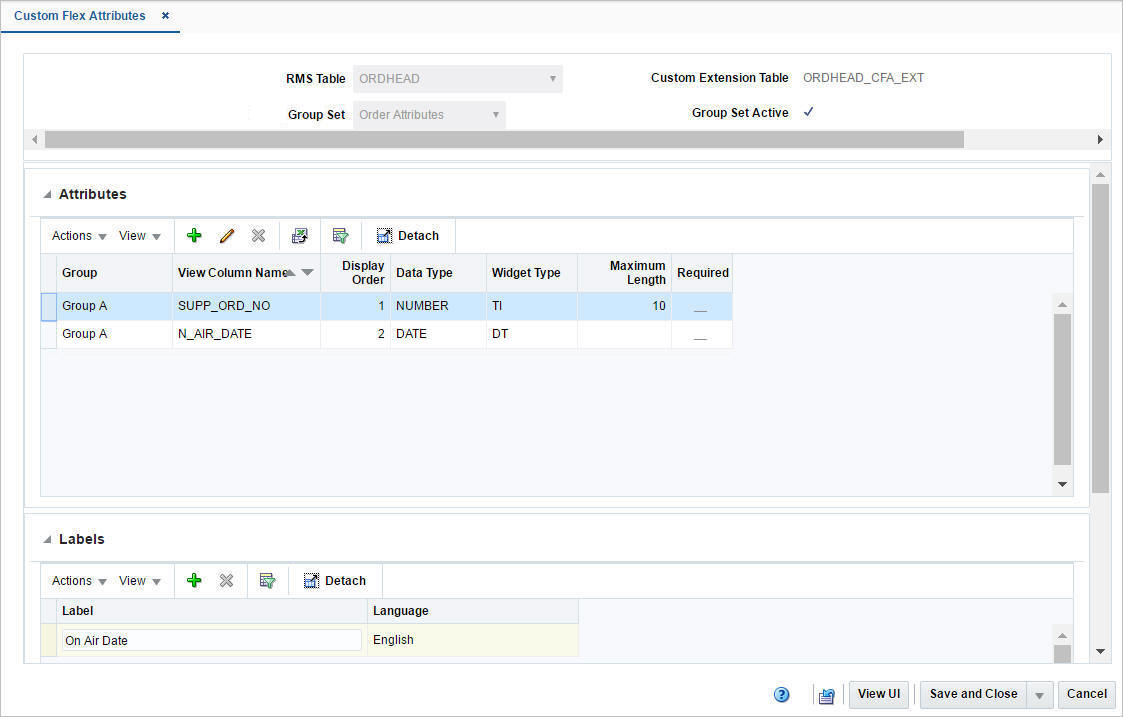
The Custom Flex Attributes window allows you to create and maintain Custom Flex Attributes. Custom Flex Attributes are used to customize attributes for pre-defined entities in Merchandising. A customer can group attributes which are to be created for an entity using group sets and groups. Once the retailer defines the attribute hierarchy such as entities, group sets and groups, the Admin API can be used to load these hierarchy details into Merchandising. The Custom Flex Attributes window only allows you to create and maintain attributes for an already defined attribute hierarchy.
The Custom Flex Attributes window contains the following sections.
The header displays the following fields.
Table 14-22 Header - Fields and Description
| Fields | Description |
|---|---|
|
RMS Table |
Select the Merchandising table you want to extend from the list. |
|
Group Set |
Lists the defined group sets. Select the group set name from the list. |
|
Customs Extension Table |
Displays the custom extension table associated with the selected Merchandising table. |
|
Group Set Active checkbox |
Indicates, if the selected group set is active. |
|
Display Attributes button |
Queries the details of the entered information. If you press the Display Attributes button, without selecting an Merchandising table and group set name, all available attributes set up in the system are displayed. |
In the Attribute section you can maintain attributes.
Use the Actions Menu and icons to apply actions to the table. You can perform the actions listed below.
Table 14-23 Attributes - Actions Menu/Icons and Description
| Actions Menu/Icons | Description |
|---|---|
|
Add and Add icon |
You can add new attributes by selecting Actions > Add or by using the Add icon For more information about how to add new attributes, see the Add Attributes section. |
|
Edit and Edit icon |
Select Actions > Edit or use the Edit icon For more information about how to edit an attribute, see the Edit Attributes section. |
|
Delete and Delete icon |
You can delete attributes:
|
|
Export to Excel and Export to Excel icon |
You can export the records in the table to a Microsoft Excel spreadsheet by selecting Actions > Export to Excel or by using the Export to Excel icon |
You can customize the view of the table by using the options in the View Menu.
Table 14-24 Attributes - View Menu/Icons and Description
| View Menu/Icons | Description |
|---|---|
|
Columns |
You can manage which of the columns will be shown in the table by clicking the Show All and Manage Columns options. |
|
Detach and Detach icon |
You can view the tables in the application in a separate window by clicking Detach or by using the Detach icon |
|
Sort |
You can sort columns by the following options:
|
|
Reorder Columns |
You can reorder columns by clicking the Reorder Columns option. |
|
Query by Example and Query by Example icon |
You can filter the items by one or multiple column values by clicking the Query by Example option or by using the Query by Example icon |
In the Labels section you can view and maintain the labels for a given group/attribute combination. Labels in each desired language can be edited directly in the table.
Use the Actions Menu and icons to apply actions to the table. You can perform the actions listed below.
Table 14-25 Labels- Actions Menu/Icons and Description
| Actions Menu/Icons | Description |
|---|---|
|
Add and Add icon |
You can add new labels by selecting Actions > Add or by using the Add icon For more information about how to add new labels, see the Add Labels section. |
|
Delete and Delete icon |
You can delete attributes:
|
You can customize the view of the table by using the options in the View Menu.
Table 14-26 Labels - View Menu/Icons and Description
| View Menu/Icons | Description |
|---|---|
|
Columns |
You can manage which of the columns will be shown in the table by clicking the Show All and Manage Columns options. |
|
Detach and Detach icon |
You can view the tables in the application in a separate window by clicking Detach or by using the Detach icon |
|
Sort |
You can sort columns by the following options:
|
|
Reorder Columns |
You can reorder columns by clicking the Reorder Columns option. |
|
Query by Example and Query by Example icon |
You can filter the items by one or multiple column values by clicking the Query by Example option or by using the Query by Example icon |
The toolbar contains the following icons and buttons.
Table 14-27 Custom Flex Attributes Toolbar - Icons/Buttons and Description
| Icons/Buttons | Description |
|---|---|
|
Help icon |
You can access the online help for a particular page by clicking the Help icon |
|
Refresh icon |
You can refresh the window by clicking the Refresh icon. All entries are reset and not saved. |
|
View UI button |
Opens the test window. The window displays all new attributes in addition to the existing attributes. |
|
Save |
Click Save to save the entered records. |
|
Save and Close |
Click Save and Close to save the entered records and close the window. |
|
Save and Edit Another |
Click Save and Edit Another to save the entered records and edit additional entries. This option is only available in Edit mode. |
|
Cancel |
Click Cancel to reject all entries and close the window. |
To add a custom flex attribute, follow the steps below.
From the Tasks menu, select Application Administration > Custom Flex Attributes. The Custom Flex Attributes window appears.
In the RMS Table field, select the table you want to extend.
In the Group Set Name, select the group set from the list.
Press the Display Attributes button. All available attributes for the selected Merchandising table and group set are displayed.
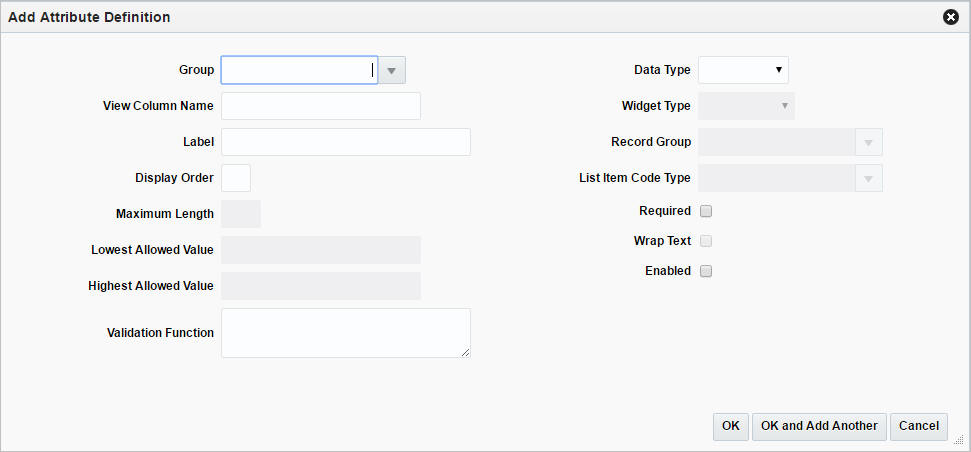
In the Attributes section, select Actions > Add, or use the Add icon ![]() . The Add Attribute Definition window appears.
. The Add Attribute Definition window appears.
In the Group field, enter, select or search for the group of the attribute. The field contains all group names associated with the selected Merchandising table/group set.
In the View Column Name, enter the view column name.
In the Label field, enter the label in the primary language for the attribute.
In the Display Order field, enter the sequence number to indicate the order in which the attribute should be displayed on the window within the group section.
The attributes within the group will display in the group's section in the order specified here.
The Maximum Length field, allows you to enter the maximum field length for the data types Varchar and Number.
The Lowest Allowed Value field, allows you to enter the lowest allowed value for the data types Number and Date.
The Highest Allowed Value field, allows you to enter the highest allowed value for the data types Number and Date.
In the Validation Function field, enter the name of the package function to be called to validate the attribute if one has been developed.
In the Data Type field, select the data type from the list.
In the Widget Type field, select the widget type from the list.
In the Record Group field, enter, select or search for the record group.
In the List Item Code Type, enter, select or search for the code type to be used to populate the drop down list when the attribute is defined as a list.
Select the Required checkbox to indicate that the attribute is required for each entity to which the attributes are associated.
Select the Wrap Text checkbox to indicate that soft wrap is enabled for the field.
Select the Enabled checkbox to indicate that the attribute is enabled.
Then select one of the following options.
Click OK to add the attribute to the table and close the window.
Click OK and Add Another to add additional attributes.
Click Cancel to reject all entries and close the window.
To edit custom flex attributes, follow the steps below.
From the Tasks menu, select Application Administration > Custom Flex Attributes. The Custom Flex Attributes window appears.
In the RMS Table field, select the table you want to extend.
In the Group Set Name, select the group set from the list.
Press the Display Attributes button. All available attributes for the selected Merchandising table and group set are displayed.
Select a record in the Attribute section.
Then select Actions > Edit, or use the Edit icon ![]() . The Edit Attributes Definition window appears.
. The Edit Attributes Definition window appears.
Edit the fields as necessary.
Then choose one of the following options.
Select OK to save your changes and close the window.
Select Cancel to reject all entries and close the window.
To add a label for an attribute, follow the steps below.
From the Tasks menu, select Application Administration > Custom Flex Attributes. The Custom Flex Attributes window appears.
In the RMS Table field, select the table you want to extend.
In the Group Set Name, select the group set from the list.
Press the Display Attributes button. All available attributes for the selected Merchandising table and group set are displayed.
In the Attribute section, select a record. The corresponding labels for the selected attribute are displayed in the Labels section.
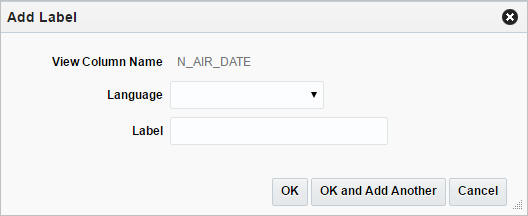
In the Labels section, select Actions > Add, or use the Add icon ![]() . The Add Label window appears.
. The Add Label window appears.
The View Column Name field, is populated, based on the selected attribute.
In the Language field, select the corresponding language from the list.
In the Label field, enter the label.
Then choose one of the following options.
Select OK to add the label to the table and close the window.
Select OK and Add Another to add additional labels.
Select Cancel to reject all entries and close the window.
The Customs Flex Attributes Display window is dynamically rendered. A single window opens for each group set. The title of the Customs Flex Attributes Display window is dynamically set to the group set name. You can create Custom Flex Attributes for the following entities:
Supplier
Store
Physical/Virtual Warehouse
Department
Class
Subclass
Item
Item/Location
Item/Supplier
Item/Supplier/Country
Item/Supplier/Country/Location
Address
ELC Components
VAT Codes
Purchase Order
Purchase Order Details
RTV
Deals
Transfer
Partner
Cost Changes
Diff Types
You can open Customs Flex Attributes Display window in two different ways.
From the calling window, select More Actions > Other Attributes > Group Set Name.
In the table of the calling window, select Actions > Other Attributes > Group Set Name.
The Custom Flex Attributes Display window contains the following sections.
The key values of the entity in the calling window are displayed in the Header of the Custom Flex Attributes Display window. For example, if you access window through the Item widow, the item ID and associated description are displayed in the Header.
The Attribute Sections hold the individual attributes for each group.
The toolbar contains the following icons and buttons.
Table 14-28 Custom Flex Attributes Display Toolbar - Icons/Buttons and Description
| Icons/Buttons | Description |
|---|---|
|
Help icon |
You can access the online help for a particular page by clicking the Help icon |
|
Save and Close |
Click Save and Close to save the entered records and close the window. |
|
Cancel |
Click Cancel to reject all entries and close the window. |
|
Done |
If you open the window in view mode, the Done button is displayed. Click Done to close the window. |