| Oracle® Retail Merchandising Foundation Cloud Service Oracle Retail Merchandising System User Guide Release 19.3.000 F83161-01 |
|

 Previous |
 Next |
| Oracle® Retail Merchandising Foundation Cloud Service Oracle Retail Merchandising System User Guide Release 19.3.000 F83161-01 |
|
Previous |
Next |
This chapter describes the foundation data within Merchandising.
The organizational hierarchy allows you to create the relationships that are necessary in order to support the operational structure of a company. You can create a preferred organizational structure to support consolidated reporting at various levels of the company. Also, you can assign responsibility for any level of the hierarchy to a person or persons in order to satisfy internal reporting requirements.
The following are the levels of the organizational hierarchy in Merchandising:
Company: The highest default organizational and merchandise hierarchy level defined in Merchandising. Only one company can be defined.
Chain: The first level below the company level in the organizational hierarchy. The definition of a chain is based on the needs of the company, but a chain can be used to group various store formats, concepts, and geographical locations within the organization.
Area: The second level below the company level in the organizational hierarchy. The definition of an area is based on the needs of the company, but an area is used typically to define a geographical group within the organization. An area can belong to only one chain.
Region: The third level below the company level in the organizational hierarchy. The definition of a region is based on the needs of the company, but a region can be used to group geographical locations within the organization. A region can belong to only one area.
District: The fourth level below the company level in the organizational hierarchy. The definition of a district is based on the needs of the company, but a district is used typically to group geographical locations within the organization. A district can belong to only one region.
Store: The fifth and lowest level of the organizational hierarchy. A store, which is associated with a single district, can represent a physical selling location, a virtual selling location (e.g. e-commerce site), or a customer (e.g. franchisee) location.
Warehouse: Considered the bottom of the organizational hierarchy, but unlike stores, it does not roll up under a specific level of the hierarchy, as it can source many store, districts, areas, and so on. Warehouses can be physical or virtual. Physical warehouses are meant to represent the physical building, whereas virtual warehouses are where inventory is held. One or more virtual warehouses can exist in one physical warehouse.
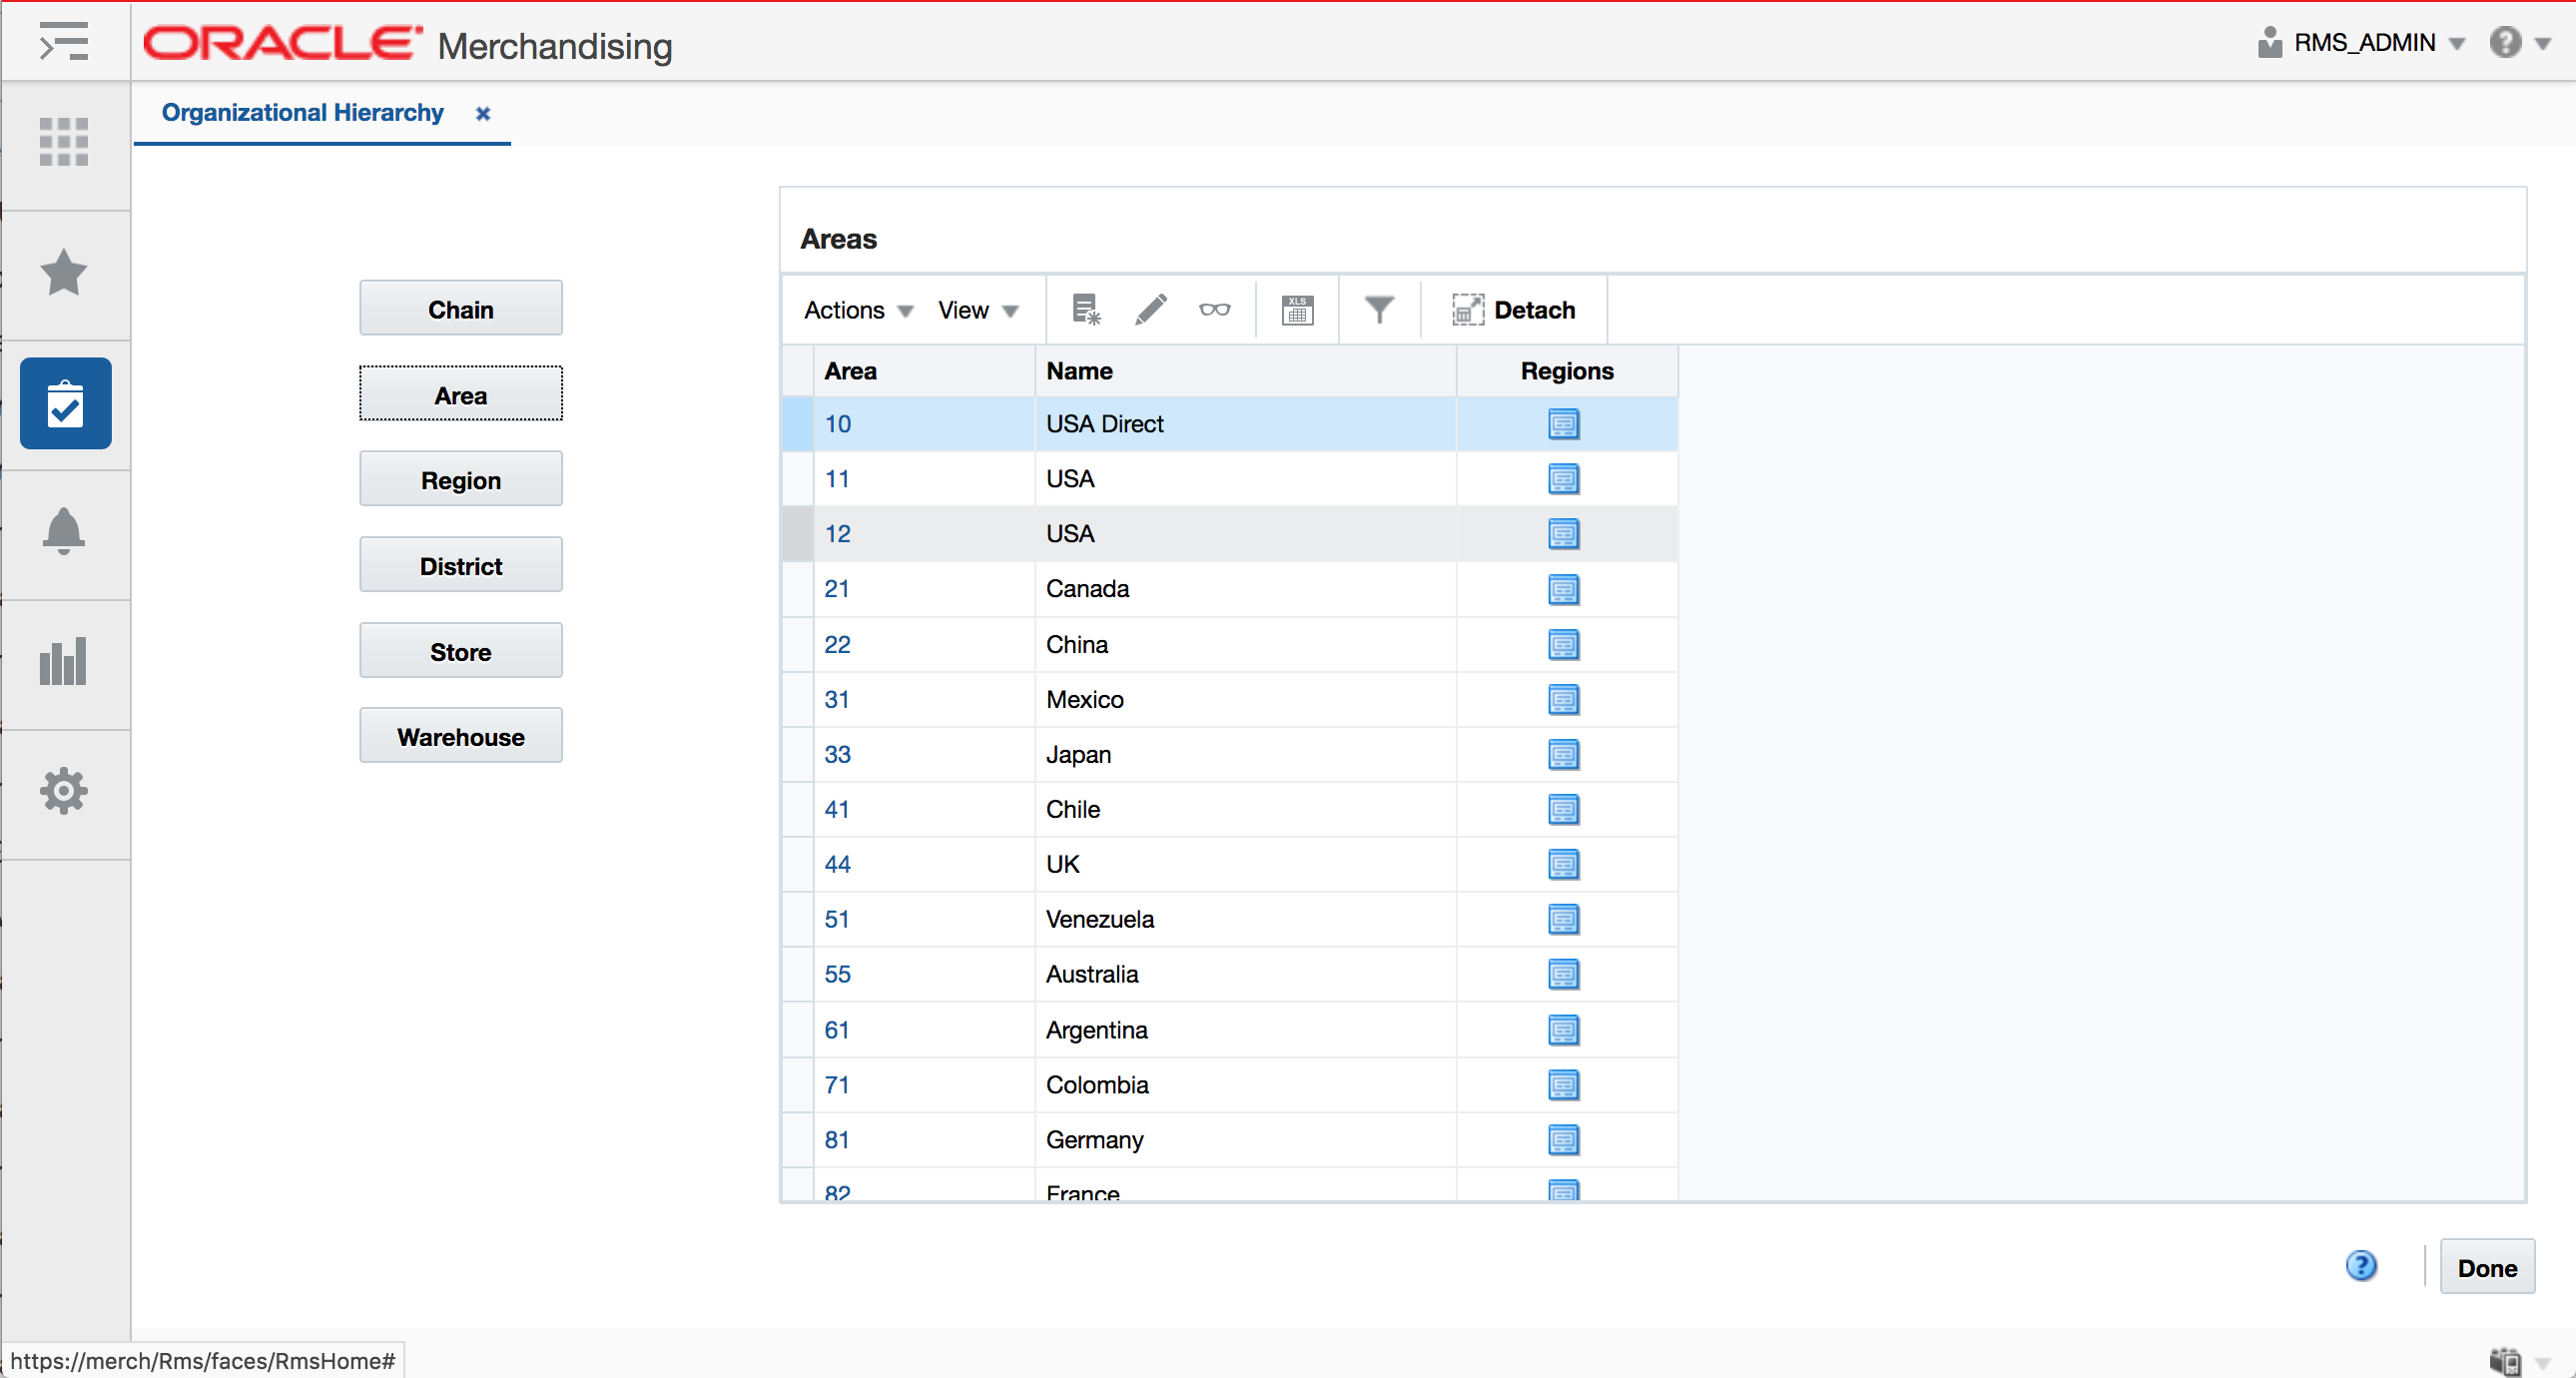
The Organizational Hierarchy page allows you to create, edit and view the organizational hierarchy of the company.
To access the Organizational Hierarchy page from the Task menu, select Foundation Data > Location Foundation > Organizational Hierarchy.
The Organizational Hierarchy structure on the left side of the page contains the following buttons.
Table 2-1 Hierarchy Structure - Buttons and Description
| Buttons | Description |
|---|---|
|
Chain |
Displays the available chains in the table. |
|
Area |
Displays the available areas in the table. |
|
Region |
Displays the available regions in the table. |
|
District |
Displays the available districts in the table. |
|
Store |
Displays the available stores in the table. |
|
Warehouse |
Displays the available warehouse in the table. |
The Hierarchy table displays the available entries of the selected hierarchy level. For example, if you select the Chain button, all available chains are displayed in this table.
The table displays the following columns by default.
Hierarchy ID, depending on the selected hierarchy button.
Name of the hierarchy level, for example, the name of the chain.
Next hierarchy level, for example, Area.
This column contains either the Create or the Details icon.
If the next level has been created, the Detail icon is displayed. Use the icon to maintain or view the details of the next level.
If the next level has not been created, the Create icon is displayed. Use the icon to create the next level.
This column is not available for stores and warehouses.
Company is the highest level of the organization and merchandise hierarchies defined in Merchandising. Only one company can be defined in the Merchandising and is initially setup in the installation process. Since the company is required, and only one company is allowed, the upload/download process only allows the company to be updated; you cannot add or delete a company. However, the company information can be referenced in multiple languages, so you can add, update, or remove translations of the company information through the upload/download process. This functionality is accessed from the main Merchandising task list under Foundation Data > Download Foundation Data and Foundation Data > Upload Foundation Data.
To update the company, select the template type of Foundation from the Download Data screen and then the template Company. Click the Download button and when prompted, choose to either open the .ods file that is generated or save the file and open it separately in the spreadsheet application of your choice.
Updating a Company
To update a company, select the action type of Update on the populated row on the Company tab. Next, update the column you wish to change. Note that the Company column cannot be changed, but any of the other columns can be updated. Any of the entries on the company translations tab can also be updated in a similar manner. This facilitates the ability to translate the company information into multiple languages.
Adding a Company Translation
Although only a single company is allowed, the system does support translation of the company information in multiple languages. If you would like to add a company translation, then a similar process will be followed to that described above for updating the company. First, download the spreadsheet, then select the Create action from the dropdown on a blank row of the Company Translations tab. Next, select the language you wish to add from the dropdown in the language column. Enter the Company ID matching the Company ID from the Company tab, and then enter the translated company information in the remaining columns.
Removing a Company Translation
A company translation can be removed from the Merchandising system. If you would like to remove a company translation, then a similar process will be followed to that describe above for updating the company. First, download the spreadsheet, then select the Delete action on the row you which to delete on the Company Translations tab.
Uploading Changes
For all actions defined above, once all the updates have been made to the data in the spreadsheet, save the file and close it. Then, return to the Merchandising screens and select Foundation Data > Upload Foundation Data from the main task list. In this screen, you will again select the template type Foundation and the template Company. This will generate a process description automatically, but this can be updated if desired. Lastly, select the Browse button and navigate to the directory where you saved the updated spreadsheet.
To review the status of the upload and check whether any errors occurred, select the Foundation Data > Review Status task from the main task list.
See also Download/Upload Data from Spreadsheets and View Data Loading Status.
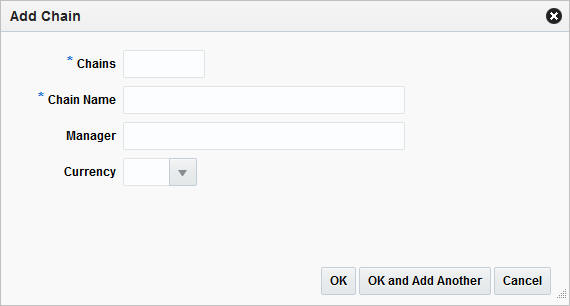
To create a chain, follow the steps below.
From the Tasks menu, select Foundation Data > Location Foundation > Organizational Hierarchy. The Organizational Hierarchy page appears.
Select the Chain button. All available chains are displayed in the table.
In the table, select Actions > Create, or use the Create icon. The Chains page appears.
Then select Actions > Add, or use the Add icon. The Add Chain page appears.
In the Chains field, enter a unique number. This field is a required field.
In the Chain Name field, enter the name of the chain. This field is a required field.
In the Manager field, enter the name of the manager who is responsible for the chain.
In the Currency field, enter, select or search for the chain's currency code.
Then choose one of the following options.
Click OK to save the chain and close the page.
Click OK and Add Another to save the current chain and add additional entries.
Click Cancel to reject all entries and close the page.
To edit a chain, follow the steps below.
From the Tasks menu, select Foundation Data > Location Foundation > Organizational Hierarchy. The Organizational Hierarchy page appears.
Select the Chain button. The available chains are displayed in the table.
Select a record in the table.
Then click the chain ID link, or select Actions > Edit, or use the Edit icon. The Chains page appears.
Select a record in the table.
Select Actions > Edit, or use the Edit icon. The Edit Chain page appears.
The Chain field displays the selected chain ID.
Edit the chain name, manager and/or currency, if necessary.
Then choose one of the following options.
Click OK to add your to the table and close the page.
Click Cancel to reject all entries and close the page.
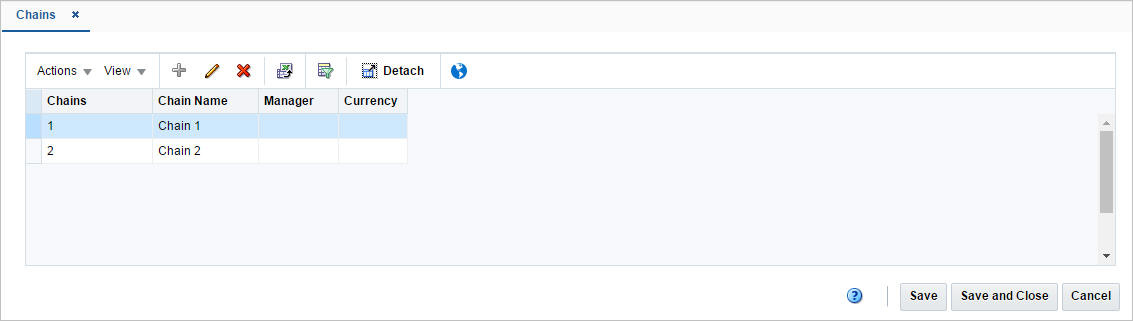
The Chain page allows you to create, edit, view, and delete a chain in the organizational hierarchy. A chain is below the company and above the area in the organizational hierarchy. You can use the chain level to define a variety of store formats, concepts, or geographical groupings.
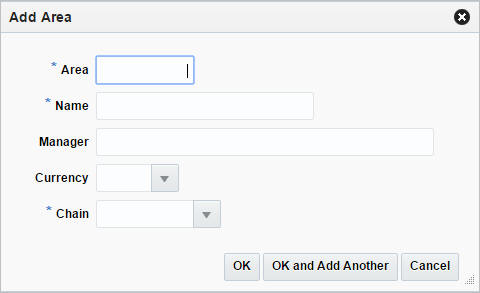
To create an Area, follow the steps below.
From the Tasks menu, select Foundation Data > Location Foundation > Organizational Hierarchy. The Organizational Hierarchy page appears.
Select the Area button. All available areas are displayed in the table.
In the table, select Actions > Create, or use the Create icon. The Areas page appears.
Then select Actions > Add, or use the Add icon. The Add Area page appears.
In the Area field, enter a unique number. This field is a required field.
In the Name field, enter the name of the area. This field is a required field.
In the Manager field, enter the name of the manager who is responsible for the area.
In the Currency field, enter, select or search for the area's currency code.
In the Chain field, enter, select or search for the chain ID which is associated with the area. This field is a required field.
Then choose one of the following options.
Click OK to save the area and close the page.
Click OK and Add Another to save the current area and add additional entries.
Click Cancel to reject all entries and close the page.
To edit an area, follow the steps below.
From the Tasks menu, select Foundation Data > Location Foundation > Organizational Hierarchy. The Organizational Hierarchy page appears.
Select the Area button. The available areas are displayed in the table.
Select a record in the table.
Then click the area ID link, or select Actions > Edit, or use the Edit icon. The Areas page appears.
Select a record in the table.
Select Actions > Edit, or use the Edit icon. The Edit Area page appears.
The Area field displays the selected area ID.
Edit the area name, manager, currency and/or chain, if necessary.
Then choose one of the following options.
Click OK to add your changes to the table and close the page.
Click Cancel to reject all entries and close the page.
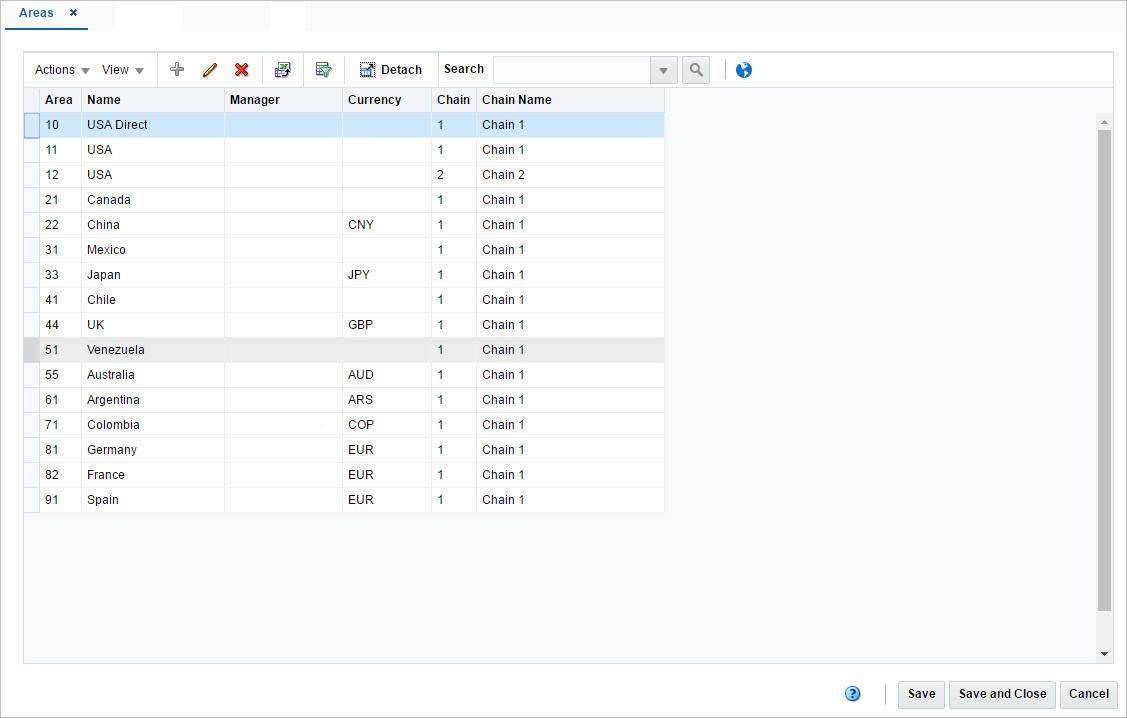
The Areas page allows you to create, edit, delete, or view an area in the organizational hierarchy. Area is below chain and above region in the organizational hierarchy. Typically, an area is used to define a geographical grouping within the organization. An area can belong to only one chain within the organizational hierarchy.You can associate location traits with an area. Location traits that are applied to an area are applied automatically to the regions, districts, and stores within the area.
To create a region, follow the steps below.
From the Tasks menu, select Foundation Data > Location Foundation > Organizational Hierarchy. The Organizational Hierarchy page appears.
Select the Region button. All available regions are displayed in the table.
In the table, select Actions > Create. The Regions page appears.
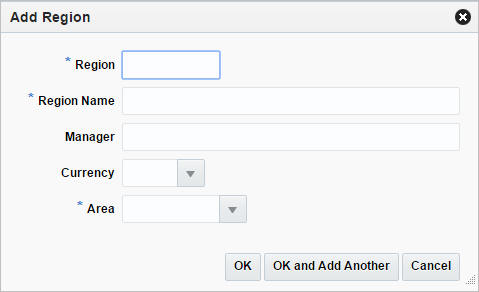
Then select Actions > Add, or use the Add icon. The Add Region page appears.
In the Region field, enter a unique number. This field is a required field.
In the Region Name field, enter the name of the region. This field is a required field.
In the Manager field, enter the name of the manager who is responsible for the region.
In the Currency field, enter, select or search for the region's currency code.
In the Area field, enter, select or search for the area ID which is associated with the region. This field is a required field.
Then choose one of the following options.
Click OK to save the region and close the page.
Click OK and Add Another to save the current region and add additional entries.
Click Cancel to reject all entries and close the page.
To edit a region, follow the steps below.
From the Tasks menu, select Foundation Data > Location Foundation > Organizational Hierarchy. The Organizational Hierarchy page appears.
Select the Region button. The available regions are displayed in the table.
Select a record in the table.
Then click the region ID link, or select Actions > Edit, or use the Edit icon. The Regions page appears.
Select a record in the table.
Select Actions > Edit, or use the Edit icon. The Edit Region page appears.
The Region field displays the selected region ID.
Edit the region name, manager, currency and/or area, if necessary.
Then choose one of the following options.
Click OK to add your changes to the table and close the page.
Click Cancel to reject all entries and close the page.
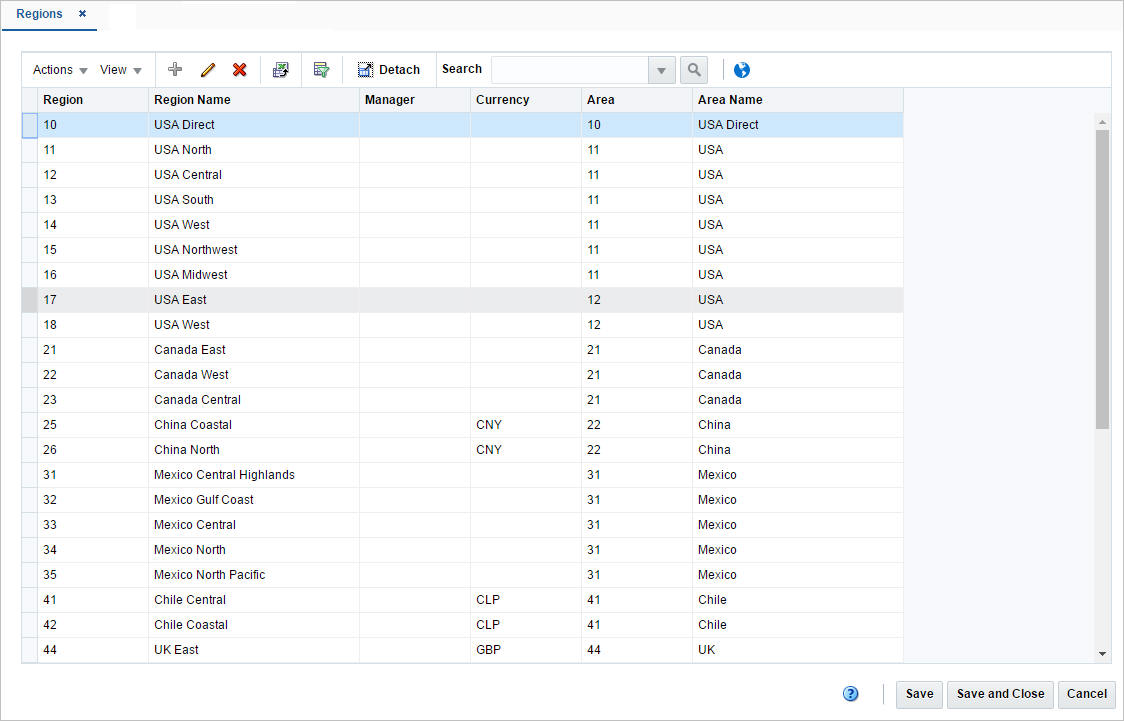
The Regions page allows you to add, edit, delete, and view a region in the organizational hierarchy. A region is below the area and above the district in the organizational hierarchy. Typically, the region is used to define a geographical grouping within the organization.
To create a district, follow the steps below.
From the Tasks menu, select Foundation Data > Location Foundation > Organizational Hierarchy. The Organizational Hierarchy page appears.
Select the District button. All available districts are displayed in the table.
In the table, select Actions > Create. The Districts page appears.
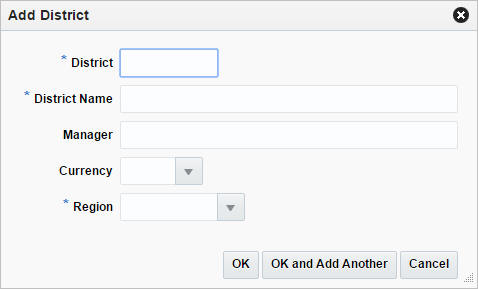
Then select Actions > Add, or use the Add icon. The Add District page appears.
In the District field, enter a unique number. This field is a required field.
In the District Name field, enter the name of the district. This field is a required field.
In the Manager field, enter the name of the manager who is responsible for the district.
In the Currency field, enter, select or search for the district's currency code.
In the Region field, enter, select or search for the region ID which is associated with the district. This field is a required field.
Then choose one of the following options.
Click OK to save the district and close the page.
Click OK and Add Another to save the current district and add additional entries.
Click Cancel to reject all entries and close the page.
To edit a district follow the steps below.
From the Tasks menu, select Foundation Data > Location Foundation > Organizational Hierarchy. The Organizational Hierarchy page appears.
Select the District button. The available districts are displayed in the table.
Select a record in the table.
Then click the district ID link, or select Actions > Edit, or use the Edit icon. The Districts page appears.
Select a record in the table.
Select Actions > Edit, or use the Edit icon. The Edit District page appears.
The District field displays the selected region ID.
Edit the district name, manager, currency and/or region, if necessary.
Then choose one of the following options.
Click OK to add your changes to the table and close the page.
Click Cancel to reject all entries and close the page.
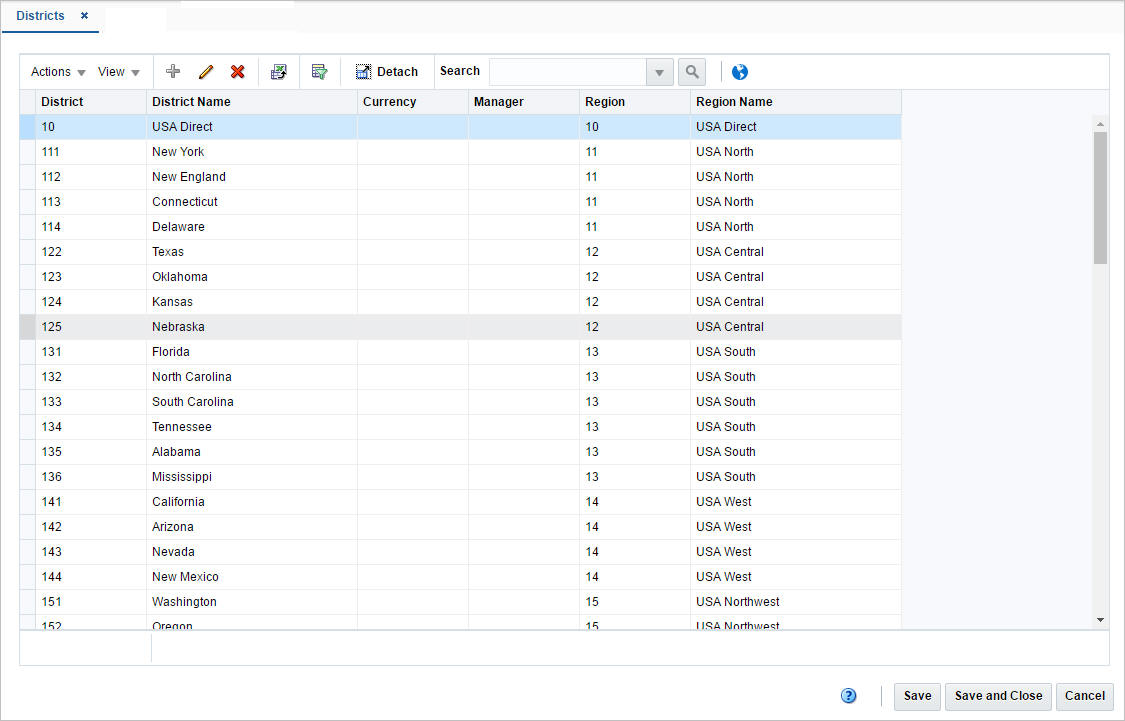
The Districts page allows you to add, edit, delete, and view a district in the organizational hierarchy. A district is below the region and above the store in the organizational hierarchy. Typically, the district is used to define a geographical grouping within the organization.
To create a store, follow the steps listed below.
From the Tasks menu, select Foundation Data > Location Foundation > Organizational Hierarchy. The Organizational Hierarchy page appears.
Select the Store button. All available stores are displayed in the table.
In the table, select Actions > Create, or use the Create icon. The Store page appears.
Enter the necessary information for the store. For more information about the available fields in the Store page, see the Store Page section.
To edit a store, follow the steps below.
From the Tasks menu, select Foundation Data > Location Foundation > Organizational Hierarchy. The Organizational Hierarchy page appears.
Select the Store button. The available regions are displayed in the table.
Select a record in the table.
Then click the store ID link, or select Actions > Edit, or use the Edit icon. The Store page appears.
Edit the fields, if necessary. For more information about the available fields in the Store page, see the Store Page section.
|
Note: You cannot edit the Company Store ID, Currency, Org Unit and Transfer Entry. Additionally you cannot select or deselect the Stockholding checkbox in edit mode. |
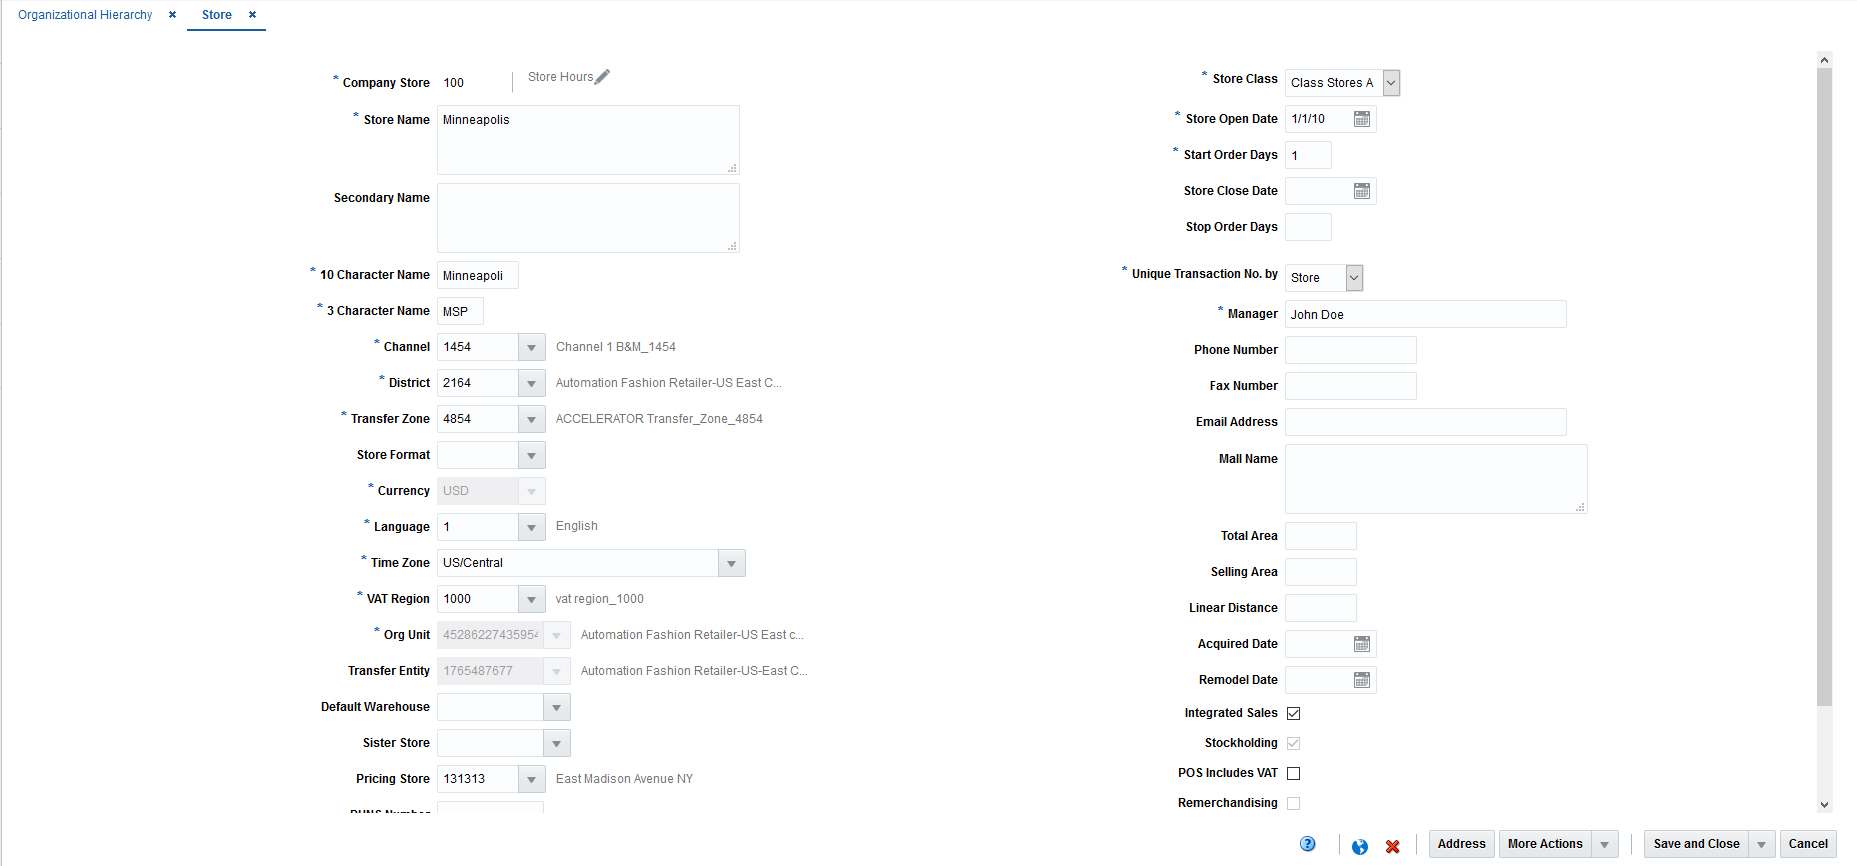
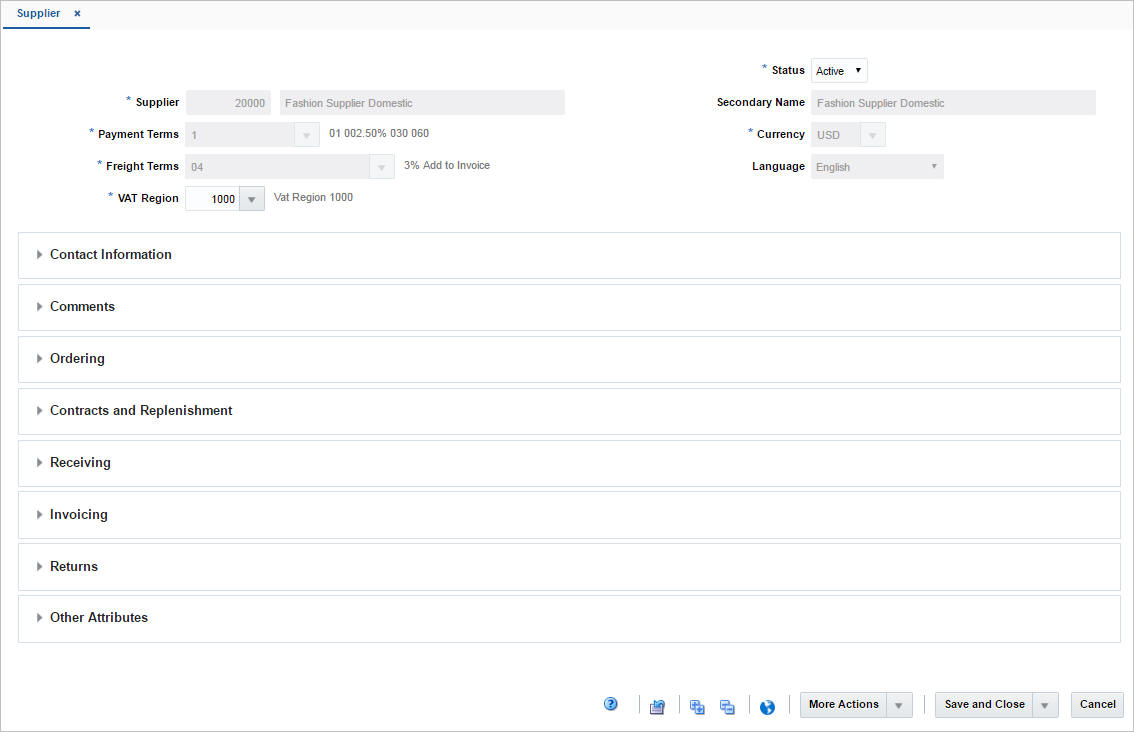
The Store page allows you to create, edit, delete, and view a store in the organizational hierarchy. The store is the lowest level of the organizational hierarchy. The store may be defined as the selling entity. The store is crucial because it is the level at which business transactions are processed. A store can belong to only one district within the organizational hierarchy.
You can navigate to other pages in order to set up attributes, the square area of the store's departments, location traits, associations with competitors' stores, activity and delivery schedules, and geocodes.
Table 2-2 Store Page - Fields and Description
| Fields | Description |
|---|---|
|
Store |
Select the store type from the list. Possible store types are:
The Store field next to the store type enables. Enter a unique ID for the store. This field is a required field. |
|
Store Name |
Enter a unique description for the store. This field is a required field. |
|
Secondary Name |
Enter the secondary name for the store. |
|
10 Character Name |
Enter up to 10 character abbreviation for the store. This field is a required field. |
|
3 Character Name |
Enter up to 3 character abbreviation for the store. This field is a required field. |
|
Channel |
Enter, select or search for the channel of business to which the store belongs. This field is a required field. |
|
District |
Enter, select or search for the district ID. This field is a required field. |
|
Transfer Zone |
Enter, select or search for the transfer zone. This field is a required field. |
|
Store Format |
Enter, select or search for the store format ID. For example, select Mall. |
|
Currency |
Enter, select or search for the currency code. This field is a required field. |
|
Language |
Enter, select or search for the language code for the store. This field is a required field. |
|
Time Zone |
Enter, select or search for the time zone of the store. This field is a required field. |
|
VAT Region |
Enter, select or search for the VAT region code for the store. This field is a required field. |
|
Org Unit |
Enter, select or search for the organizational unit ID. This field is available if Oracle Financials is integrated. This field is a required field, if available. |
|
Transfer Entity |
Enter, select or search for the transfer entity ID. This field is a required field. |
|
Default Warehouse |
Enter, select or search for the default warehouse of the store. This field is only enabled, if you have specified a channel ID. For Franchise stores, this field is a required field. |
|
Sister Store |
Enter, select or search for the store number. This field is used to copy the store's history when defining allocations for new stores. |
|
DUNS Number |
Enter the Dun & Bradstreet Data Universal Numbering System (DUNS) number. The DUNS number is a nine digit code that identifies your store. |
|
DUNS Location Number |
Enter the DUNS location number. The DUNS location number is a four digit code that identifies the locations of your store. This field is only enabled, if you have entered the DUNS number for your store. |
|
Store Class |
The Store Class field is enabled, if you selected the store type Company. The Store Class field is defaulted to Class X and disabled if you selected the store type Franchise. Select the Store Class from the list. A store is grouped under the class based on the sale or the location. |
|
Store Open Date |
Enter the date when the store opens or use the Calendar icon to select a date. This field is a required field. |
|
Start Order Days |
Enter the number of days before the store opens to start ordering merchandise. |
|
Store Close Date |
Enter the date when the store closes or use the Calendar icon to select a date. |
|
Stop Order Days |
Enter the number of days before the store closes to stop ordering merchandise. |
|
Unique Transaction No. by |
Select the store or register for the Unique Transaction Number By from the list. This field indicates if the transaction number in the store is generated uniquely across store or at each register. This field is a required field. |
|
Manager |
Enter the name of the store manager. |
|
Phone Number |
Enter the phone number. |
|
Fax Number |
Enter the fax number. |
|
Email Address |
Enter the email address. |
|
Mall Name |
Enter the mall name, if necessary. |
|
Total Area |
Enter the total space of the store. |
|
Selling Area |
Enter the selling space available at the store. |
|
Linear Distance |
Enter the shelving space available at the store. |
|
Acquired Date |
Enter the date when the store has been acquired or use the Calendar icon to select a date. |
|
Remodel Date |
Enter the date when the store has been remodeled or use the Calendar icon to select a date. |
|
Integrated Sales |
The Integrated Sales checkbox is selected by default. You cannot load the sales for that store in ReSa, if the Integrated Sales option is not selected. |
|
Stockholding |
If the store is intended to be stockholding, this option must be selected. The Stockholding option is selected by default. |
|
Remerchandising |
Select the Remerchandising checkbox, if the store is undergoing a significant remerchandising effort as an indicator to Advanced Inventory Planning (AIP) application. |
|
Customer Order Location |
This option is available if the store type is Company and also for stock holding Franchise Stores. If the option is enabled, the store can be used to source or fulfill customer orders. |
|
Customer |
Only enabled, if the store type Franchise has been selected. Enter, select or search for the customer the franchise store belongs to. |
|
Customer Shipping |
This option allows the retailer to specify if the location supports shipping to the customer for customer orders. The Customer Shipping option is unselected by default. |
|
Gift Wrapping |
This option allows the retailer to specify if the location supports gift wrapping. The Gift Wrapping option is unselected by default. |
The Store Hours dialog allows retailers to capture and manager store operation timings.
In the Store page, click the Store Hours icon. The Edit Store Hours dialog appears.
Enter the time at which the selected store opens and closes for each day. Times should be entered in the HH:MM AM/PM format. For example, 9:00 AM. If no time is entered for a day, the store is assumed to be closed.
Click OK to save the updated store hours and return to the Store page.
The Like Store section of the Store page allows you to create a store with the same assortment of items as another store. Also, you can choose to copy replenishment information, delivery schedules, and dates when closed as well as items on clearance from the existing store to the new store.
In the Store page, expand the Like Store section.
In the Like Store field, enter, select or search for the desired store ID.
In the Information to Copy section, select the desired checkboxes to copy the following information from the selected store:
Select the Replenishment Information to copy the replenishment information.
Select Delivery Schedule to copy delivery schedules.
Select Activity Schedule to copy dates when the store is closed.
Select Clearance Items to copy items on clearance to the new store.
In the Zoning Location section of the Store page you can associate a store with a retail price and a cost location. To add this information follow the steps below.
In the Store page, expand the Zoning Location section.
In the Pricing Store field, enter, select or search for the pricing store ID.
In the Cost Location field, select the location type from the list.
The field next to the location type enables. Enter, select or search for the cost location ID.
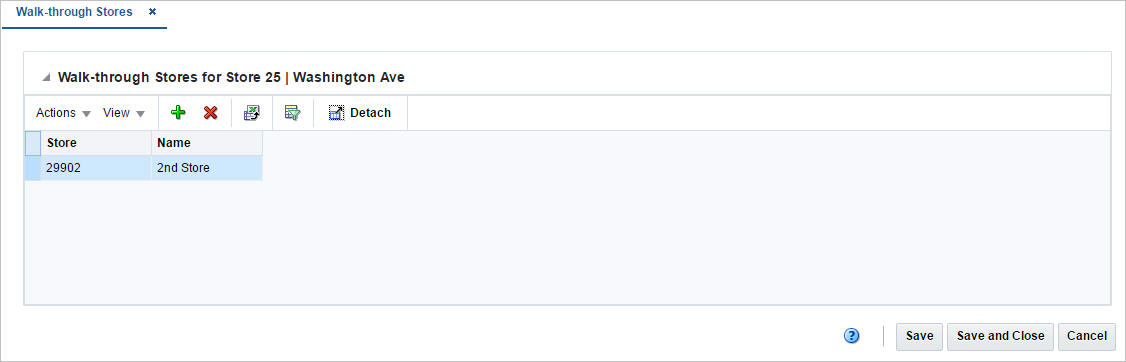
The Walk-through Stores page allows you to define several stores in one location. Each store may operate as a separate entity, however the stores are located in the same physical location. You can associate multiple stores as walk through locations. Walk-through stores can be uploaded into the system, or you can add walk through locations to a store. You must set up the stores and then associate one with another.
To add walk through stores to a store, follow the steps below.
From the Tasks menu, select Foundation Data > Location Foundation > Organizational Hierarchy. The Organizational Hierarchy page appears.
Select the Store button. The available stores are displayed in the table.
In the Store column, click the store ID link, or mark a record and select Actions > Edit, or use the Edit icon. The Store page appears.
In the Store page, select More Actions > Walk Through. The Walk-through Stores page appears.
Then select Actions > Add or use the Add icon. The Add Walk-through Stores page appears.
In the Store field, enter the store ID.
In the Name field, enter the store name.
Then choose one of the following options.
Click OK to save the current store as walk-through store and close the page.
Click OK and Add Another to save the current store and add additional entries.
Click Cancel to reject all entries and close the page.
In the Walk-through Stores page, choose one of the following options.
Click Save to save your changes.
Click Save and Close to save your changes and close the page.
Click Cancel to reject all entries and close the page.
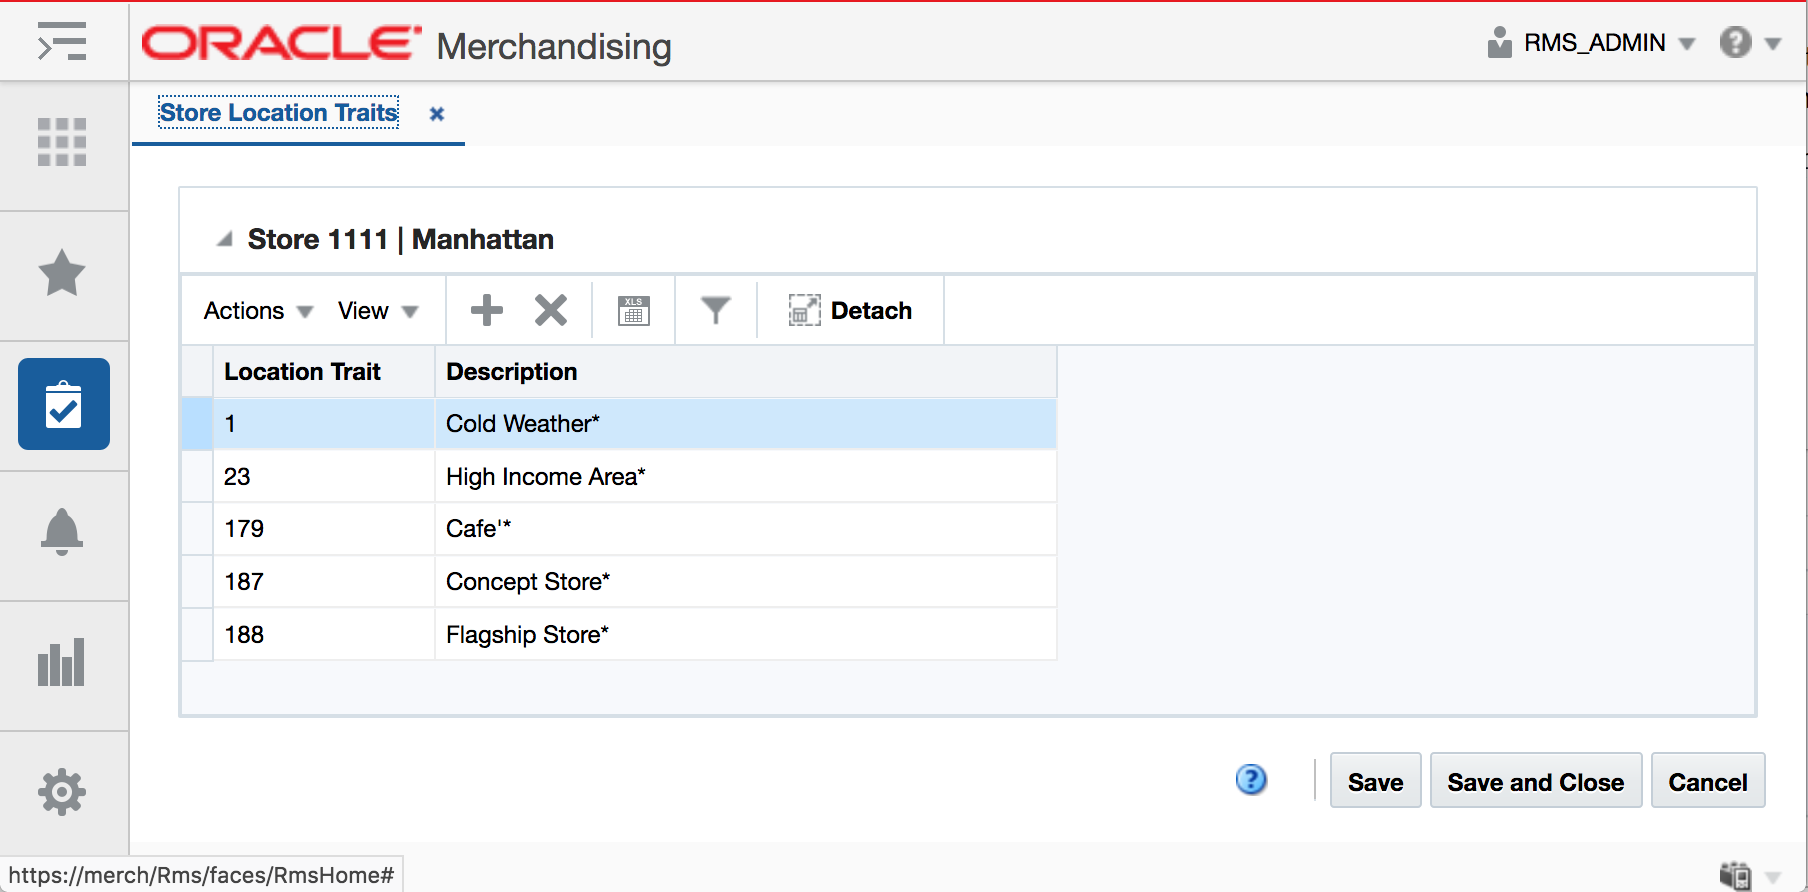
The Store Location Traits page allows you to add, delete, and view location traits. You can group areas, regions, districts, or stores by location traits.
At the store level, location traits can be used as a grouping mechanism when you:
Record Attributes for a Store
Add Locations to a Location List
To add a location trait to the store, follow the steps below.
From the Tasks menu, select Foundation Data > Location Foundation > Organizational Hierarchy. The Organizational Hierarchy page appears.
Select the Store button. The available stores are displayed in the table.
In the Store column, click the store ID link, or mark a record and select Actions > Edit, or use the Edit icon. The Store page appears.
In the Store page, select More Actions > Location Traits. The Store Location Traits page appears.
Then select Actions > Add or use the Add icon. The Add Location Trait page appears.
In the Location Trait page. Enter, select or search for the desired location trait ID.
Then choose one of the following options.
Click OK to add the location trait and close the page.
Click OK and Add Another to save the current record and add additional entries.
Click Cancel to reject all entries and close the page.
To create a warehouse, follow the steps listed below.
From the Tasks menu, select Foundation Data > Location Foundation > Organizational Hierarchy. The Organizational Hierarchy page appears.
Select the Warehouse button. All available warehouses are displayed in the table.
In the table, select Actions > Create. The Warehouse page appears.
Enter all the necessary information. For more information about the available fields in the Warehouse page, see the Warehouse Page section.
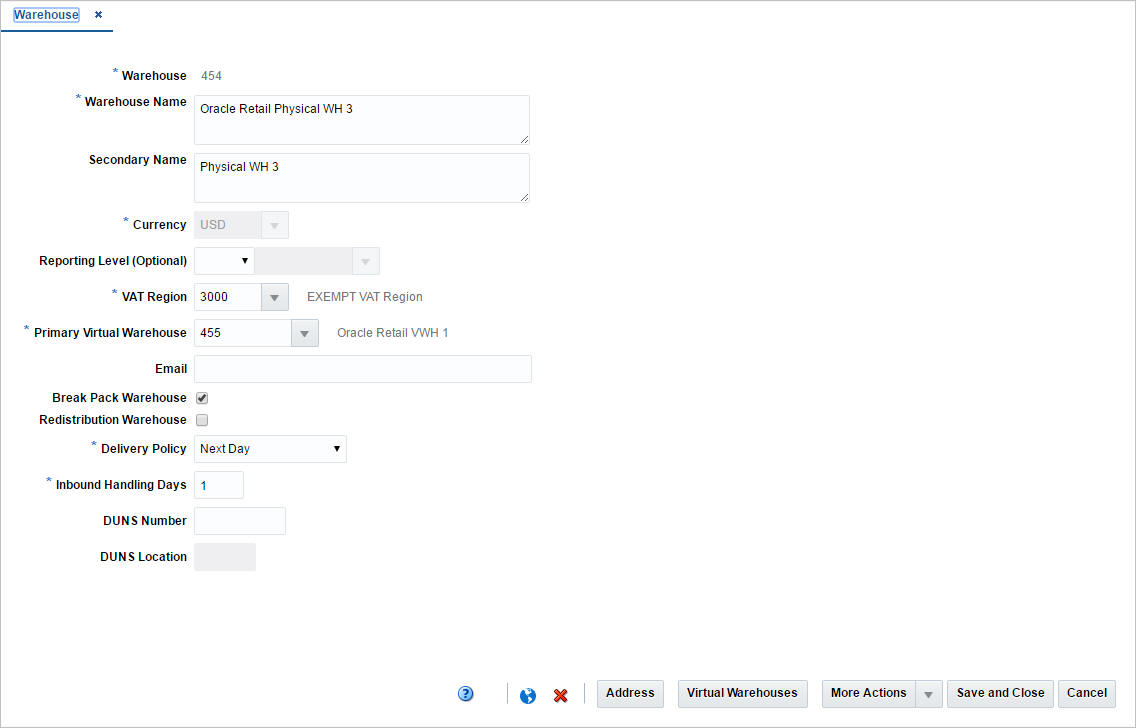
The Warehouse page allows you to create, edit, delete, and view a warehouse. The warehouse is the entity within Merchandising that defines the physical storage, cross-dock, or distribution facility in an organization. The warehouse has all of the transaction capability of the store, except for sales and price changes. You can specify at which organizational level a warehouse is reported.
You also have the option to designate a warehouse as a redistribution warehouse. A redistribution warehouse does not actually hold stock and cannot be used as a distribution center. With the existence of a redistribution warehouse, you can create purchase orders before the distribution center is known. Orders must be redistributed to actual warehouses or stores when the locations become known and before the merchandise is shipped.
You can access additional pages in order to set up attributes, activity schedules, and delivery schedules.
Table 2-3 Warehouse Page - Fields and Description
| Fields | Description |
|---|---|
|
Warehouse |
Enter a unique ID for the warehouse. This field is a required field. |
|
Warehouse Name |
Enter a unique description for the warehouse. This field is a required field. |
|
Secondary Name |
Enter the secondary name for the warehouse. |
|
Currency |
Enter, select or search for the currency code. This field is a required field. |
|
Reporting Level (Optional) |
Select a reporting level from the list. |
|
VAT Region |
Enter, select or search for a VAT region for the warehouse. This field is a required field. |
|
Primary Virtual Warehouse |
This field is enabled when at least one virtual warehouse is created. Enter, select or search for the primary virtual warehouse. |
|
|
Enter an email address for the warehouse. |
|
Break Pack Warehouse checkbox |
Select the checkbox to indicate that the warehouse is capable of distributing less that the supplier case quantity. |
|
Redistribution Warehouse checkbox |
Select the checkbox to indicate that the warehouse distributes to other warehouses. |
|
Delivery Policy |
Select a delivery policy from the list. |
|
Inbound Handling Days |
Enter the number of days that the warehouse requires to receive any item and move the item to the shelf, so that it is ready to be picked. Next Day indicates that the if a location is closed, the warehouse will deliver on the next day. Next Valid Delivery Day indicates that the warehouse will wait until the next scheduled delivery day before delivering the item. |
|
DUNS Number |
Enter the Dun & Bradstreet Data Universal Numbering System (DUNS) number. The DUNS number is a nine digit code that identifies your store. |
|
DUNS Location Number |
Enter the DUNS location number. The DUNS location number is a four digit code that identifies the locations of your store. This field is only enabled, if have entered the DUNS number for your store. |
|
Zoning Location section: This section is only available, when you create a new warehouse |
|
|
Cost Location |
Select a cost location type from the list. The location ID field enables, enter, select or search for the location. |
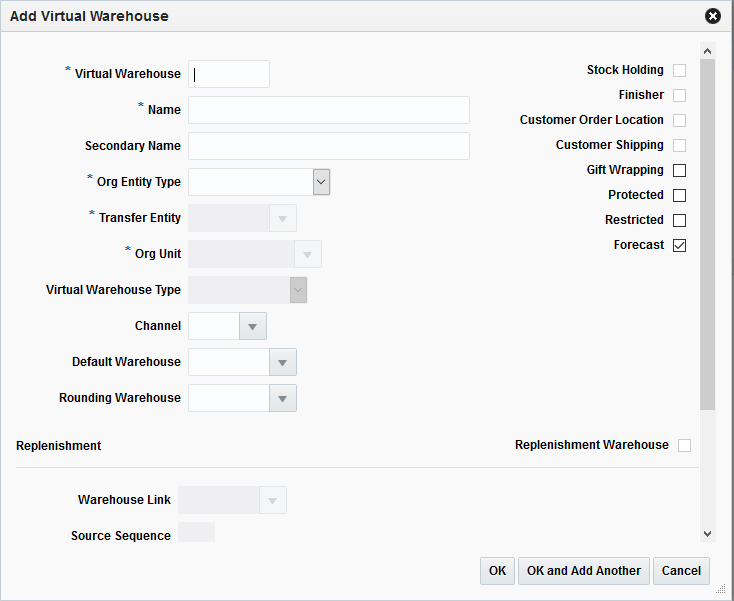
To add a virtual warehouse to a physical warehouse, follow the steps below.
From the Tasks menu select Foundation Data > Location Foundation > Organizational Hierarchy. The Organizational Hierarchy page appears.
Select the Warehouse button. The available warehouses are displayed in the table.
Select a record in the table.
Then, select Actions > Edit or use the Edit icon. The Warehouse page appears.
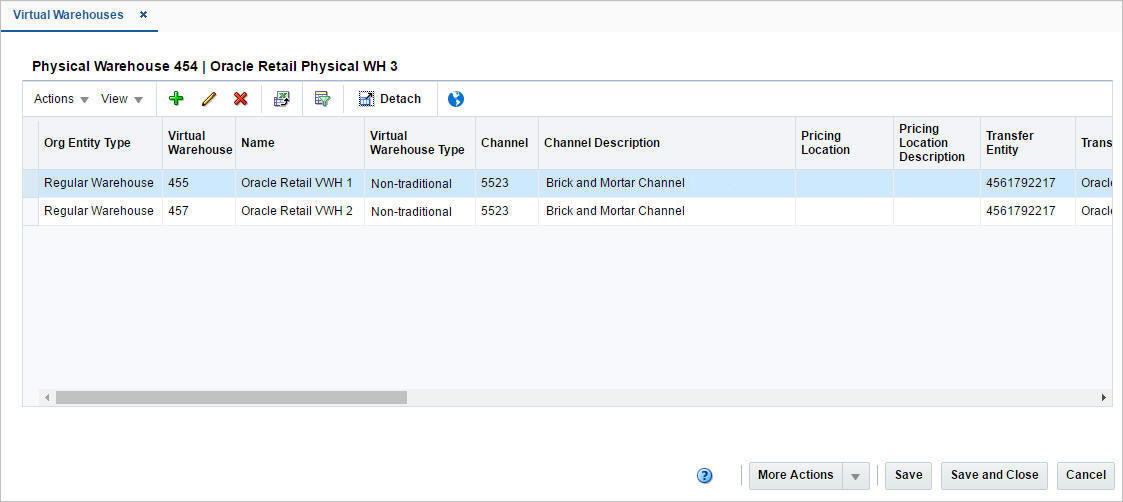
Click the Virtual Warehouses button. The Virtual Warehouses page appears.
Select Actions > Add or use the Add icon. The Add Virtual Warehouse page appears.
In the Virtual Warehouse field, enter a unique warehouse ID. This field is a required field.
In the Name field, enter the name of the warehouse. This field is a required field.
In the Secondary Name field, enter the secondary name for the warehouse.
In the Org Entity Type field, select the org entity type from the list. This field is a required field.
In the Transfer Entity field, enter, select or search for the transfer entity. This field is a required field.
In the Org Unit field, enter, select or search for the org unit. This field is a required field.
In the Virtual Warehouse Type field, select a warehouse type from the list. This field is a required field.
In the Channel field, enter, select or search for a channel. This field is a required field.
In the Default Warehouse field, enter, select or search for the warehouse.
In the Pricing Location field, enter, select or search for the pricing location ID. This field is a required field.
In the Rounding Warehouse field, enter select or search for the warehouse.
Select the Stock Holding checkbox to indicate that the warehouse is a stock holding one.
|
Note: If you select Regular Warehouse as the Org Entity Type, the Stock Holding checkbox is selected and disabled. You cannot deselect this checkbox. |
Select the Finisher checkbox to indicate that the warehouse is a finisher location.
Select the Customer Order Location checkbox to indicate that the warehouse is a location where the customer places orders.
Select the Customer Shipping checkbox to specify if the warehouse supports shipping to the customer for customer orders.
Select the Gift Wrapping checkbox to specify if the warehouse supports gift wrapping.
Select the Protected checkbox to indicate that the warehouse is affected last in transactions where inventory is removed or affected first in short-shipment type transactions where inventory is being added.
Select the Restricted checkbox to indicate that the virtual warehouses is restricted from receiving stock during an inbound transaction.
Select the Forecast checkbox to indicate that the warehouse should be included in forecast calculations.
Select the Replenishment checkbox to indicate that the virtual warehouse is included in the net inventory calculations for the replenish able warehouse.
In the Warehouse Link field, enter, select or search for the corresponding link.
Then select one of the following options.
Click OK to add the current warehouse and close the page.
Click OK and Add Another to add the current warehouse and add additional warehouses.
Click Cancel to reject all entries and close the page.
The Virtual Warehouse page allows you to divide a physical warehouse into one or more virtual warehouses. Virtual warehouses are used in a multi-channel environment to track ownership of inventory by channel. You associate each virtual warehouse with a channel. If the virtual warehouse contains a finishing location, you can indicate an additional virtual warehouse within the channel.
Virtual warehouses are considered stockholding locations, while the physical warehouse is considered a non-stockholding location.
Editing Virtual Warehouses
To edit a virtual warehouse to a physical warehouse, follow the steps below.
From the Tasks menu select Foundation Data > Location Foundation > Organizational Hierarchy. The Organizational Hierarchy page appears.
Select the Warehouse button. The available warehouses are displayed in the table.
Select a record in the table.
Select Actions > Edit or use the Edit icon. The Warehouse page appears.
Click the Virtual Warehouses button. The Virtual Warehouses page appears.
Select a record in the table.
Select Actions > Edit or use the Edit icon. The Edit Virtual Warehouse page appears.
Edit the fields, if necessary.
Then select one of the following options.
Click OK to save your changes and close the page.
Click Cancel to reject all entries and close the page.
To edit a warehouse, follow the steps below.
From the Tasks menu, select Foundation Data > Location Foundation > Organizational Hierarchy. The Organizational Hierarchy page appears.
Select the Warehouse button. The available warehouses are displayed in the table.
Select a record in the table.
Then click the warehouse ID link, or select Actions > Edit, or use the Edit icon. The Warehouse page appears.
Edit the fields, if necessary. For more information about the fields in the Warehouse page, see the Warehouse Page section.
|
Note: You cannot edit the Warehouse ID, Currency, and Primary Virtual Warehouse fields. |
To edit a virtual warehouse to a physical warehouse, follow the steps below.
From the Tasks menu select Foundation Data > Location Foundation > Organizational Hierarchy. The Organizational Hierarchy page appears.
Select the Warehouse button. The available warehouses are displayed in the table.
Select a record in the table.
Select Actions > Edit or use the Edit icon. The Warehouse page appears.
Click the Virtual Warehouses button. The Virtual Warehouses page appears.
Select a record in the table.
Select Actions > Edit or use the Edit icon. The Edit Virtual Warehouse page appears.
Edit the fields, if necessary.
Then select one of the following options.
Click OK to save your changes and close the page.
Click Cancel to reject all entries and close the page.
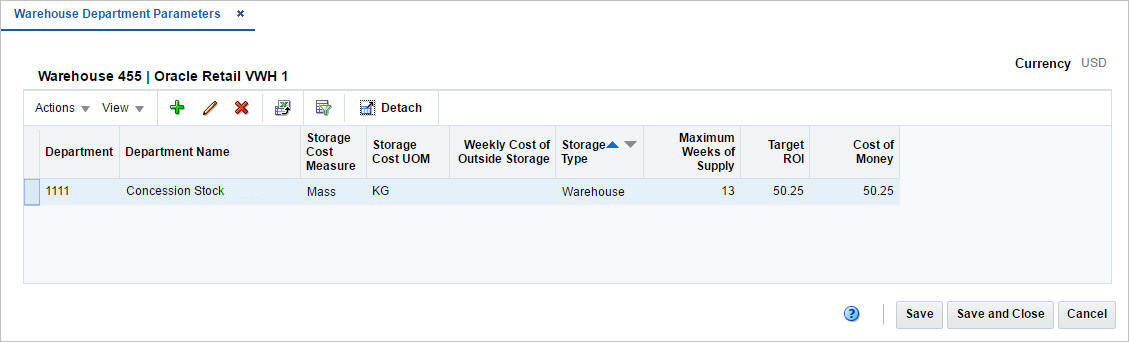
The Warehouse Department page allows you to specify investment buy parameters at the warehouse or warehouse/department level. You can set up costs of storage and other parameters for a specific warehouse. Within the warehouse, you can set up several sets of investment buy parameters which are specific for a set of items, such as frozen goods.
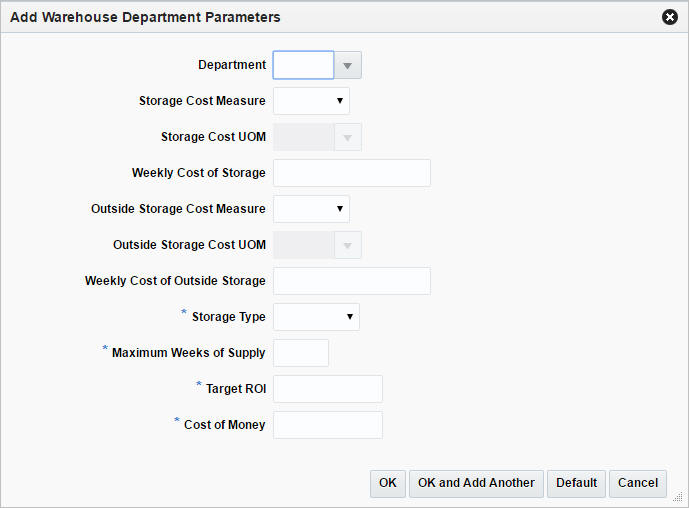
To add warehouse department parameters, follow the steps below.
From the Tasks menu select Foundation Data > Location Foundation > Organizational Hierarchy. The Organizational Hierarchy page appears.
Select the Warehouse button. The available warehouses are displayed in the table.
Select a record in the table.
Select Actions > Edit or use the Edit icon. The Warehouse page appears.
Click the Virtual Warehouse button. The Virtual Warehouses page appears.
Select More Actions > Warehouse Department Parameters. The Warehouse Department Parameters page appears.
Then, select Actions > Add or use the Add icon. The Add Warehouse Department Parameter page appears.
In the Department field, enter, select or search for the department.
In the Storage Cost Measure field, select the cost measure from the list. The Storage Cost UOM field enables.
In the Storage Cost UOM field, enter, select or search for the unit of measure.
|
Note: This field is disabled, if you select Eaches as a storage cost measure. |
In the Weekly Cost of Storage field, enter the weekly cost of storage value.
In the Outside Storage Cost Measure field, select an outside cost measure from the list. The Outside Storage Cost UOM field enables.
In the Outside Storage Cost UOM field, enter, select or search for the unit of measure.
In the Weekly Cost of Outside Storage field, enter the weekly cost of outside storage value.
In the Storage Type field, select the type from the list. This field is a required field.
In the Maximum Weeks of Supply field, enter the number of weeks. This field is a required field.
In the Target ROI field, enter the target ROI (Return of Investment). This field is a required field.
In the Cost of Money field, enter the cost.
Then choose one of the following options.
Click OK to save the current parameter and close the page.
Click OK and Add Another to save the current parameter and add additional entries.
Click Default to save the current parameter and set it as the default value.
Click Cancel to reject all entries and close the page.
To edit warehouse department parameters, follow the steps below.
From the Tasks menu select Foundation Data > Location Foundation > Organizational Hierarchy. The Organizational Hierarchy page appears.
Select the Warehouse button. The available warehouses are displayed in the table.
Select a record in the table.
Select Actions > Edit or use the Edit icon. The Warehouse page appears.
Click the Virtual Warehouses button. The Virtual Warehouses page appears.
Select More Actions > Warehouse Department Parameters. The Warehouse Department Parameters page appears.
Select a record in the table.
Select Actions > Edit or use the Edit icon. The Edit Warehouse Department Parameter page appears. The parameters of the selected record are shown.
Edit the values, if necessary.
Then choose one of the following options.
Click OK to save your changes and close the page.
Click Default to save the current parameter and set it as default value.
Click Cancel to reject all entries and close the page.
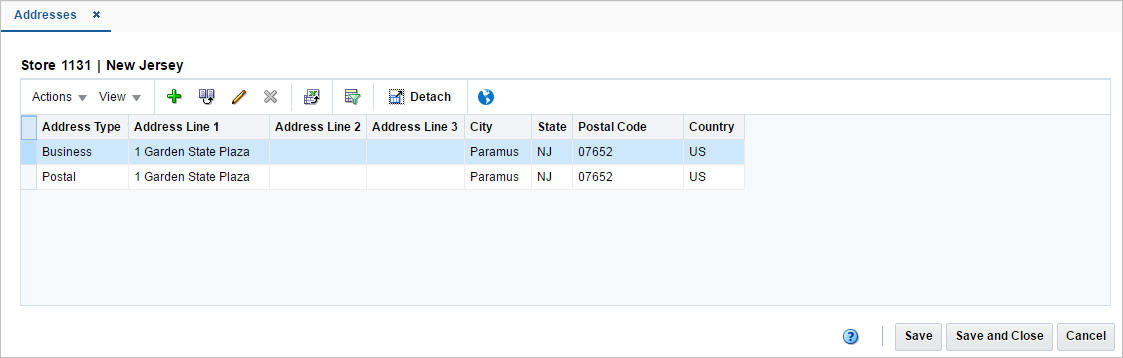
The Addresses page allows you to add, add from existing, edit, delete or view multiple addresses and contact information for either stores, warehouses, suppliers, or partners. You can set up multiple addresses per address type. Each location or vendor that is added requires that a mandatory address is added. Once you have entered a mandatory address, you cannot delete it. However, you can edit the mandatory address to maintain the correct address.
To maintain addresses, follow the steps below.
To maintain an address for a store:
From the Tasks menu, select Foundation Data > Location Foundation > Organizational Hierarchy. The Organizational Hierarchy page appears.
Select the Store button. The available stores are displayed in the table.
In the Store column, click the store ID link, or mark a record and select Actions > Edit, or use the Edit icon. The Store page appears.
Then select More Actions > Address. The Addresses page appears.
To maintain an address for a warehouse:
From the Tasks menu, select Foundation Data > Location Foundation > Organizational Hierarchy. The Organizational Hierarchy page appears.
Select the Warehouse button. The available stores are displayed in the table.
In the Warehouse column, click the store ID link, or mark a record and select Actions > Edit, or use the Edit icon. The Warehouse page appears.
Then select More Actions > Address. The Addresses page appears.
To maintain an address for a supplier:
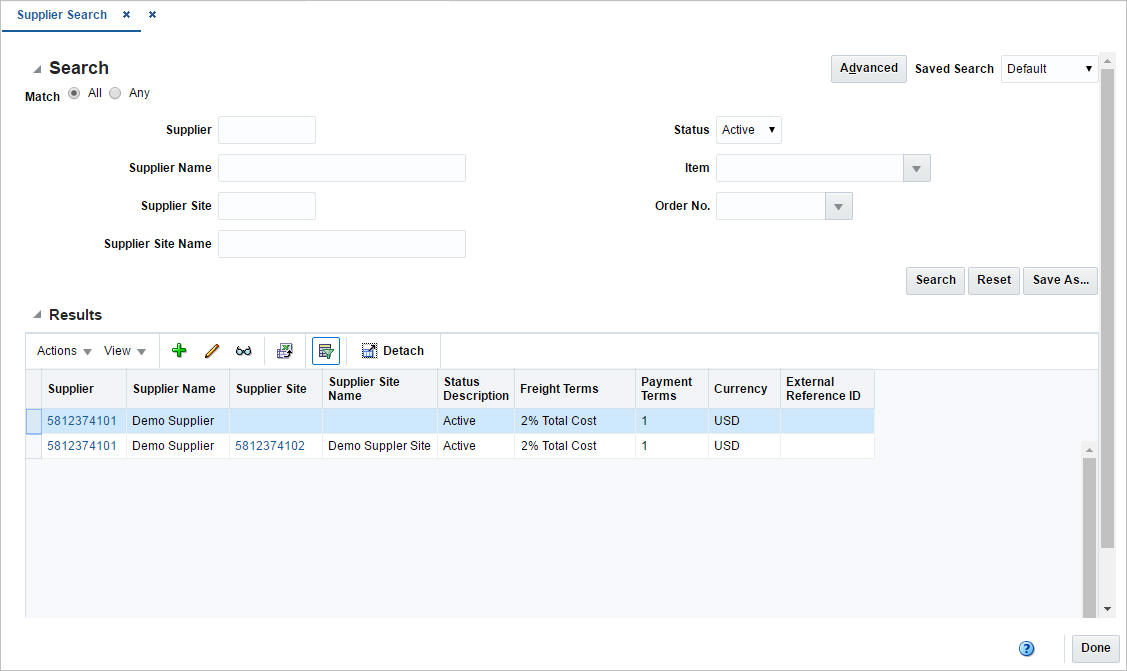
From the Tasks menu, select Foundation Data > Suppliers and Partner Foundation > Manage Suppliers. The Supplier Search page appears.
Enter or select search criteria as desired to make the search more restrictive.
Click Search. The suppliers that match the search criteria are displayed in the Results section.
In the Supplier/Supplier Site column, click the supplier/supplier site ID link, or mark a record and select Actions > Edit, or use the Edit icon. The Supplier/Supplier Site page appears.
Select More Actions > Address. The Addresses page appears.
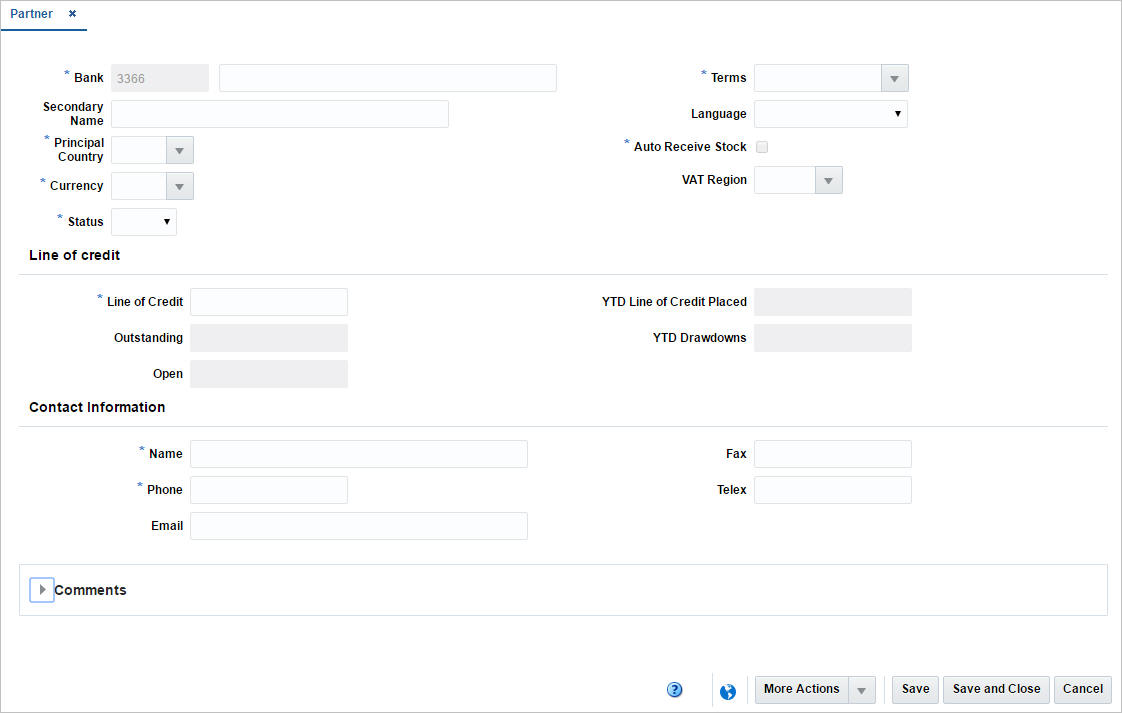
To maintain an address for a partner:
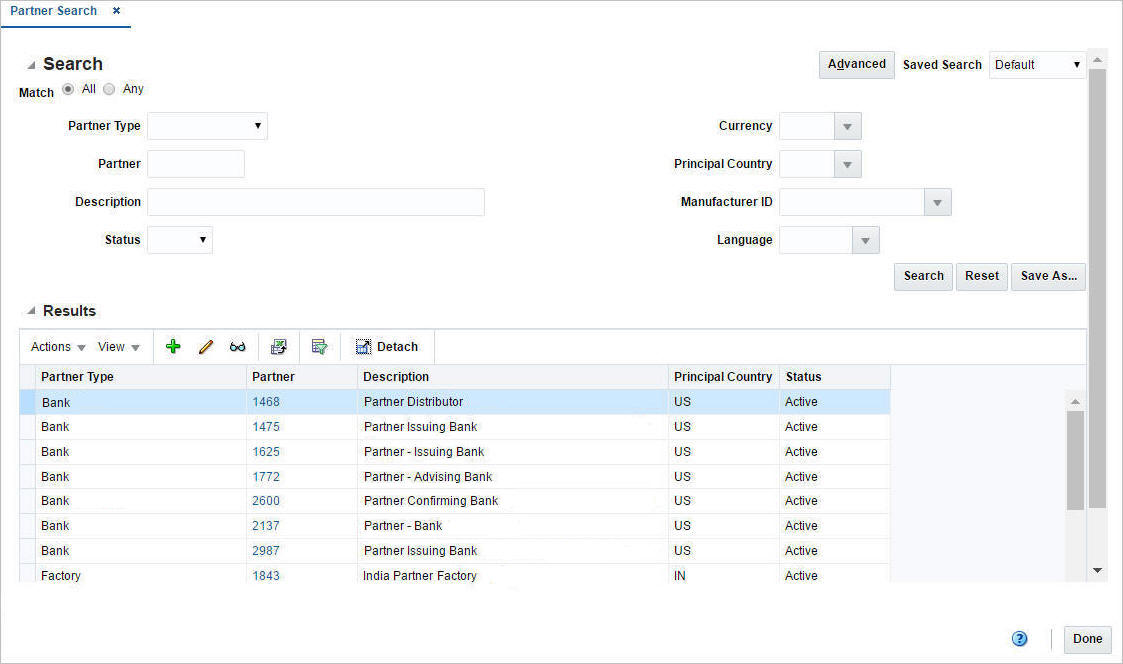
From the Tasks menu, select Foundation Data > Suppliers and Partner Foundation > Manage Partners. The Partner Search page appears.
Enter or select search criteria as desired to make the search more restrictive.
Click Search. The partners that match the search criteria are displayed in the Results section.
In the Partner Site column, click the partner ID link, or mark a record and select Actions > Edit, or use the Edit icon. The Partner page appears.
Select More Actions > Address. The Addresses page appears.
To add an address in the Addresses page:
In the table, select Actions > Add or use the Add icon. The Add Address page appears.
In the Address Type field, select the corresponding type.
The Apply to all Undefined Required Types checkbox, indicates that the current address information is added to each required address type. This checkbox is selected by default.
In the Address information section, enter the following details.
In the Address field, enter the full address. This field is a required field.
In the City field, enter the city in which the store is located. This field is a required field.
In the State field, select a state from the list.
In the Postal Code field, enter the postal code of the store.
In the Country field, enter, select or search for the country. This field is a required field.
Select the Primary Address checkbox to indicate that the current address is a primary address.
In the Contact information section, you can enter the following details.
In the Name field, enter the name of the contact person associated to the store.
In the Phone field, enter the phone number of the contact.
In the Fax field, enter the fax number.
In the Pager field, enter the pager number.
In the Email field, enter the email address.
Then choose one of the following options.
Click OK to save the current address and close the page.
Click OK and Add Another to save the current address and add additional entries.
Click Cancel to reject all entries and close the page.
To add a new address from an existing address, follow the steps below.
In the Address page, select a record in the table.
Select Actions > Add from Existing or use the Add from Existing icon. The Add Address page appears.
In the Address Type field, select the corresponding type.
The address and contact fields enable and display the data of the selected address. Change the entries as necessary.
|
Note: The Primary Address field is disabled. |
Then choose one of the following options.
Click OK to save the current address and close the page.
Click OK and Add Another to save the current address and add additional entries.
Click Cancel to reject all entries and close the page.
To edit an address, follow the steps below.
In the Addresses page, select a record in the table.
Select Actions > Edit or use the Edit icon. The Edit Address page appears.
In the Address Type field shows the type of the selected address. You cannot edit this field.
The address and contact fields display the data of the selected address. Change the entries as necessary.
|
Note: The Primary Address field is disabled. |
Then choose one of the following options.
Click OK to save the your changes and close the page.
Click Cancel to reject all entries and close the page.
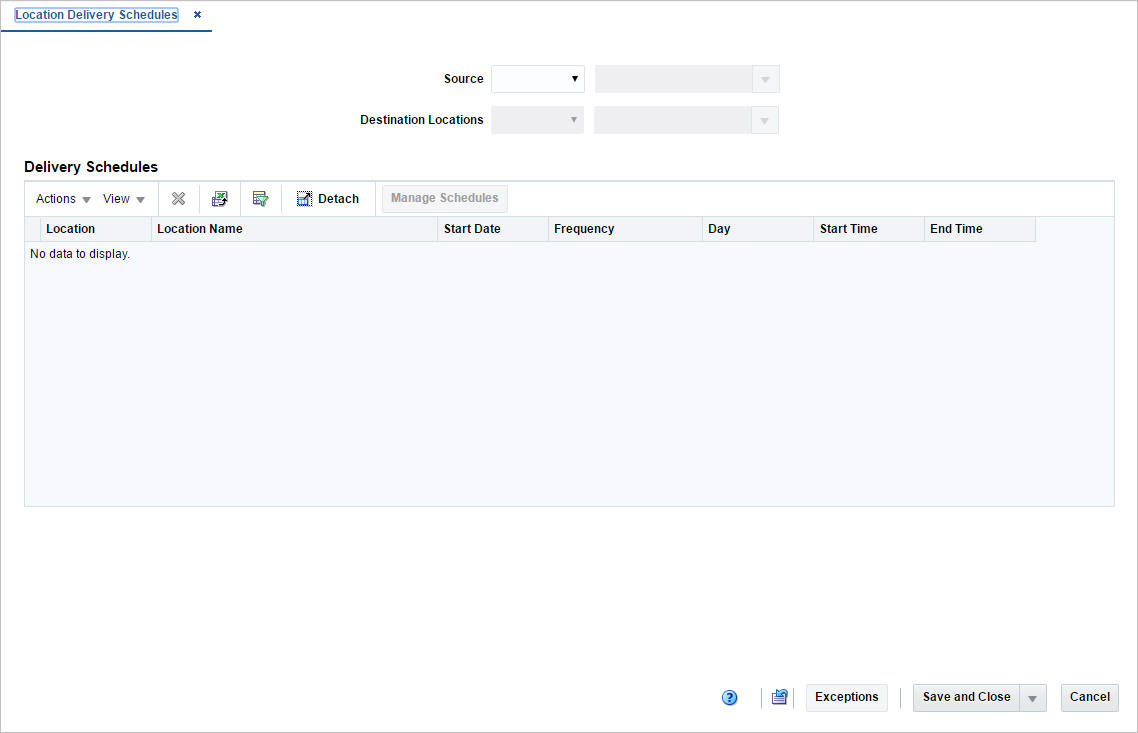
The Location Delivery Schedules window allows you to create, edit, and view delivery schedules for items from a supplier or warehouse to stores and warehouses. After you create a delivery schedule, you can define exceptions to the schedule by specifying which items are not to be delivered to the location on a specific delivery day.
When the Use Location Delivery Schedule system parameter is selected, the replenishment feature uses the delivery schedule to calculate lead times for the items at the location. When there is a delivery schedule for a supplier or warehouse at a location, the specified lead times for the item are the minimum amount of time in which a purchase order can be delivered to that location.
When the delivery date of the purchase order does not fall on a delivery day of the supplier or warehouse, the lead time is calculated by taking the minimum lead time and adding additional days to reach the next valid delivery day. In effect, the lead time is extended until the next delivery day of the supplier or warehouse. Extending the lead time increases the number of units required to replenish the item. The lead time is only extended when the replenishment method is Dynamic, Dynamic - Seasonal, Dynamic - Issues, or Floating Point.
The header displays the Source and Destination Location field.
In the Source field, select the source type, store or warehouse. Then, enter, select or search for the source ID.
In the Destination Location field, select the destination type, store or warehouse. Then, enter, select or search for the destination ID.
When you access the Location Delivery Schedules window from the Warehouse window, the Destination Locations fields are populated with the selected warehouse. The Source fields are blank and enabled. Once you choose a source, the table displays records matching the source and destination locations values.
When you access the Location Delivery Schedules window from the Supplier Site window, the Source fields are populated with the selected supplier site. The Destination Locations fields are blank and enabled. Once you choose a destination, the table displays records for the source and destination values.
The table displays the available delivery schedules for the selected location.
To manage location delivery schedules, follow the steps below. You can enter the Location Delivery Schedules window in different ways.
To add a delivery schedule at the store or warehouse level:
From the Tasks menu, select Foundation Data > Locations > Organizational Hierarchy. The Organizational Hierarchy window appears.
Select the Store/Warehouse button. The available stores/warehouses are displayed in the table.
Select a record in the table.
In the Store/Warehouse column, click the store/warehouse ID link, or mark a record and select Actions > Edit, or use the Edit icon. The Store/Warehouse window appears.
Click More Actions > Delivery Schedules. The Location Delivery Schedules window appears.
Store/Warehouse Level:
In the Source fields, select supplier site or warehouse. Then enter, select or search for the source ID.
The Destination Locations fields display the information of the selected store/warehouse.
To manage delivery schedules, see the Manage Delivery Schedules section.
To add a delivery schedule at the supplier level:
From the Tasks menu, select Foundation Data > Suppliers and Partners > Manage Suppliers. The Supplier Search window appears.
Enter or select search criteria as desired to make the search more restrictive.
Click Search. The suppliers that match the search criteria are displayed in the Results section.
In the Supplier Site column, click the supplier site ID link, or mark a record and select Actions > Edit, or use the Edit icon. The Supplier Site window appears.
Select More Actions > Delivery Schedule. The Location Delivery Schedules window appears.
Supplier Level:
In the Source fields display the information of the selected supplier.
The Destination Locations field, select a destination type from the list. Then select the location ID.
To manage delivery schedules, see the Manage Delivery Schedules section.
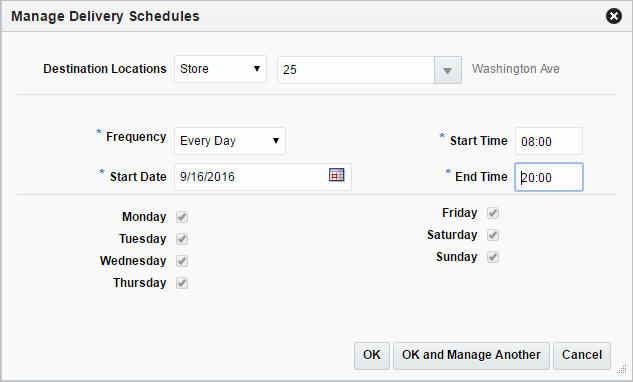
In the Delivery Schedules window, follow the steps below.
In the table, select the Manage Schedules button. The Manage Delivery Schedules window appears.
The Destination Location fields display the store information.
In the Frequency field, select the desired time span from the list.
In the Start Date field, enter the start date or use the Calendar icon to select a date.
In the Start Time field, enter the starting time of the schedule.
In the End Time field, enter the end time of the schedule.
Select the checkboxes of the desired weekdays of the delivery schedule.
Then choose one of the following options.
Click OK to add the current schedule and close the window.
Click OK and Manage Another to add the current schedule and add additional entries.
Click Cancel to reject all entries and close the window.
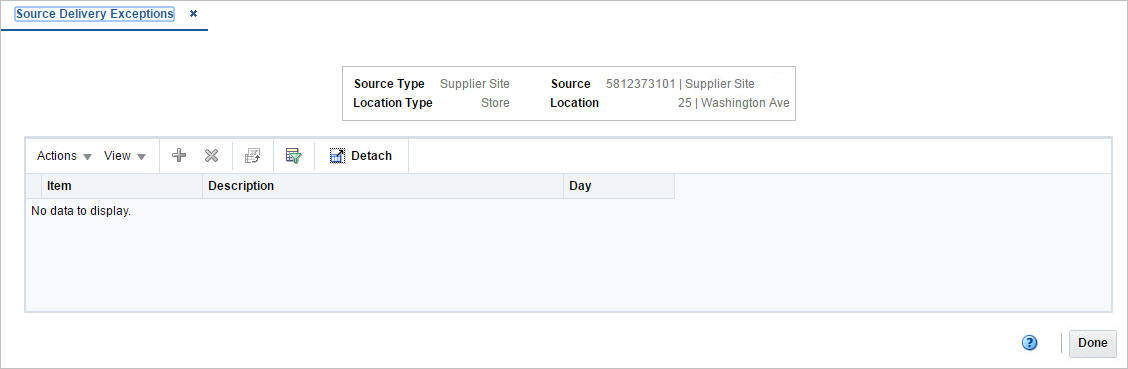
The Source Delivery Exceptions window allows you to define exceptions to the delivery date of a supplier at a store or warehouse. You specify which items are not to be delivered to the location on a specific delivery date.
The table displays the item for which the delivery exception is valid.
To add a delivery exception for a supplier to a warehouse or store, follow the steps below. You can enter the Source Delivery Exceptions window in different ways
Navigate: through Store/Warehouse window
From the Tasks menu, select Foundation Data > Locations > Organizational Hierarchy. The Organizational Hierarchy window appears.
Select the Store/Warehouse button. The available stores/warehouses are displayed in the table.
Select a record in the table.
In the Store/Warehouse column, click the store/warehouse ID link, or mark a record and select Actions > Edit, or use the Edit icon. The Store/Warehouse window appears.
Click More Actions > Delivery Schedules. The Location Delivery Schedules window appears.
Click Exceptions. The Source Delivery Exceptions window appears.
Navigate: through Supplier Site window
From the Tasks menu, select Foundation Data > Suppliers and Partners > Manage Suppliers. The Supplier Search window appears.
Enter or select search criteria as desired to make the search more restrictive.
Click Search. The suppliers that match the search criteria are displayed in the Results section.
In the Supplier Site column, click the supplier site ID link, or mark a record and select Actions > Edit, or use the Edit icon. The Supplier Site window appears.
Select More Actions > Delivery Schedule. The Location Delivery Schedules window appears.
Click Exceptions. The Source Delivery Exceptions window appears.
In the Source Delivery Exceptions window, follow the steps below.
In the table, select Actions > Add, or use the Add icon. The Add Exceptions window appears.
In the Item Type field, select the type, item or item list.
In the Item field, enter select or search for the item.
In the Date field, enter the day on which you do not want the item or item list delivered or use the Calendar icon to select a date.
Then choose one of the following options.
Click OK to add the current exception and close the window.
Click OK and Add Another to add additional exceptions.
Click Cancel to reject all entries and close the window.
Location Closings provides for a way to indicate if specific stores and warehouses will be closed for sales, shipping, and/or receiving on a defined date. For example, if a location close date is defined for Dec. 25, 2019 for sales it would not be expected that any sales are processed on this date. Sales Audit uses the close dates to determine whether or not to create a store/day for a give store and date. Similarly, the replenishment function within Merchandising uses the shipping and receiving location closed dates when determining delivery dates for replenishment orders.
All of these updates are done through a spreadsheet download and upload processes, which are accessed through the main Merchandising task list under Foundation Data > Download Foundation Data and Foundation Data > Upload Foundation Data.
To modify location closing dates, select the template type of Foundation from the Download Data screen and then the template Location Closings. The list of Location Closing records retrieved can be filtered by location or by specifying a range of closing dates values. Click the Download button and when prompted, choose to either open the .ods file that is generated or save the file and open it separately in the spreadsheet application of your choice.
Once opened, there will be 2 sheets that can be modified - Location Closings and Location Closings Translations. The Location Closings will show all the existing closing dates in the system currently, by location and with a reason in the primary language. This tab also allows for the deletion of existing closing dates or the addition of new closing dates. The Location Closings Translations tab will show existing closing dates with their translated reasons in other languages, as applicable for your implementation. This tab allows for the addition of new rows, removal of existing rows, and update to existing.
To add a new close date, start in the Location Closings tab and in a blank line in the template, select the action type of Create and enter the date, in the DD-MON-YYYY format, for the new close date you wish to add, select a location type of Store or Warehouse, enter a location ID, and provide a reason for the close date (e.g. Christmas Day). The reason should be entered in the primary language as configured in the Merchandising system options and can be up to 120 characters. Additionally, select Yes or No in the Sales, Shipping, and Receiving columns to indicate if the location is closed for that particular business activity. A value of Yes indicates it is closed.
To define alternate translated reasons for this date, navigate to the Location Closings Translations tab. Select a language and enter the same location and date used on the Location Closings tab in the Location and Close Date columns respectively of this tab and then enter the reason in the Reason column. It is not required that translated reasons be defined.
If you would like to update any details a similar process will be followed as that described above for creating new location closing dates. First, download the Location Closings spreadsheet, and then navigate to the tab where you would like to make your updates. The following columns can be updated in each tab:
Location Closings - Reason, Sales, Shipping, Receiving
Company Closing Translations - Reason
In the tab where you are going to make your updates, select the action type of Update, and then correct the value in the spreadsheet. Once your updates are complete, save and close the spreadsheet.
If you wish to delete a location close date because it is no longer applicable, update the action column to select Delete in each of the tabs where it occurs. This applies to all tabs and, if deleting a location close date, all of the corresponding translation rows must also be marked for delete.
For all actions defined above, once all the updates have been made to the data in the spreadsheet, save the file and close it. Then, return to the Merchandising screens and select Foundation Data > Upload Foundation Data from the main task list. In this screen, you'll again select the template type Foundation and the template Location Closings. This will generate a process description automatically, but this can be updated if desired. Lastly, you'll select the Browse button and navigate to the directory where you saved the updated spreadsheet.
To review the status of the upload and check whether any errors occurred, select the Foundation Data > Review Status task from the main task list.
Company Closings provides for a way to indicate if a company will be closed for business and to define any exceptions to company-wide closures. Company close dates are used to determine if sales and shipping/receiving activities should be expected for a given date. For example, if a company close date is defined for Dec. 25, 2019 and there are no exceptions defined it would be expected that no sales are processed on this date and that no shipments or receipts occur. Sales Audit uses the close dates to determine whether or not to create a store/day, and the replenishment function within Merchandising uses them when determining delivery dates for replenishment orders.
All of these updates are done through a spreadsheet download and upload processes, which are accessed through the main Merchandising task list under Foundation Data > Download Foundation Data and Foundation Data > Upload Foundation Data.
To modify company closing dates, select the template type of Foundation from the Download Data screen and then the template Company Closings. Click the Download button and when prompted, choose to either open the .ods file that is generated or save the file and open it separately in the spreadsheet application of your choice.
Once opened, there will be 3 sheets that can be modified - Company Closings, Company Closings Translations, and Company Closing Exceptions. The Company Closings will show all the existing closing dates in the system currently with their primary language descriptions. This tab allows for the update or deletion of existing closing dates or the addition of new closing dates. The Closing Dates Translations tab will show existing closing dates with their translated descriptions in other languages, as applicable, for your implementation. This tab allows for the addition of new rows, removal of existing rows, and update to existing. The Closing Dates Exceptions tab allows for the definition of exceptions for stores and warehouses. This tab also supports addition, update, and delete. Exceptions can be defined for all activities, or they can be marked as an open exception for one or more of sales, shipping, and receiving. For example, a store may be open for sales but closed for shipping and receiving.
To add a new close date, start in the Company Closings tab and in a blank line in the template, select the action type of Create and enter the date for the new close date you wish to add, in the DD-MON-YYYY format, and provide a description for the close date (e.g. Christmas Day). The description should be entered in the primary language as configured in the Merchandising system options and can be up to 120 characters.
To define alternate translated descriptions for this date, navigate to the Company Closings Translations tab. Select a language and enter the same date used on the Company Closings tab in the Close Date column of this tab and then enter the business description in the Close Description column. It is not required that translated descriptions be defined.
If exceptions to the company close date need to be defined navigate to the Company Closings Exceptions tab. To define an exception, in a new line in the spreadsheet select Create and then enter the Close Date from the Company Closings tab that you are defining an exception for. Next, select a location type (Store or Warehouse), and enter the store or warehouse ID in the Location column. Then, indicate which activities the store or warehouse will be open for by selecting No in the Sales, Receiving, and Shipping columns. If the location will remain closed for an activity select Yes for the appropriate column(s). In order to be a valid exception at least one of these activities must be marked as No.
If you would like to update any details a similar process will be followed as that described above for creating new company closing dates. First, download the Company Closings spreadsheet, and then navigate to the tab where you would like to make your updates. The following columns can be updated in each tab:
Company Closings - Close Description
Company Closing Translations - Close Description
Company Closing Exceptions - Sales, Receiving, Shipping
In the tab where you are going to make your updates, select the action type of Update, and then correct the value in the spreadsheet. Once your updates are complete, save and close the spreadsheet.
For all actions defined above, once all the updates have been made to the data in the spreadsheet, save the file and close it. Then, return to the Merchandising screens and select Foundation Data > Upload Foundation Data from the main task list. In this screen, you'll again select the template type Foundation and the template Company Closings. This will generate a process description automatically, but this can be updated if desired. Lastly, you'll select the Browse button and navigate to the directory where you saved the updated spreadsheet.
To review the status of the upload and check whether any errors occurred, select the Foundation Data > Review Status task from the main task list.
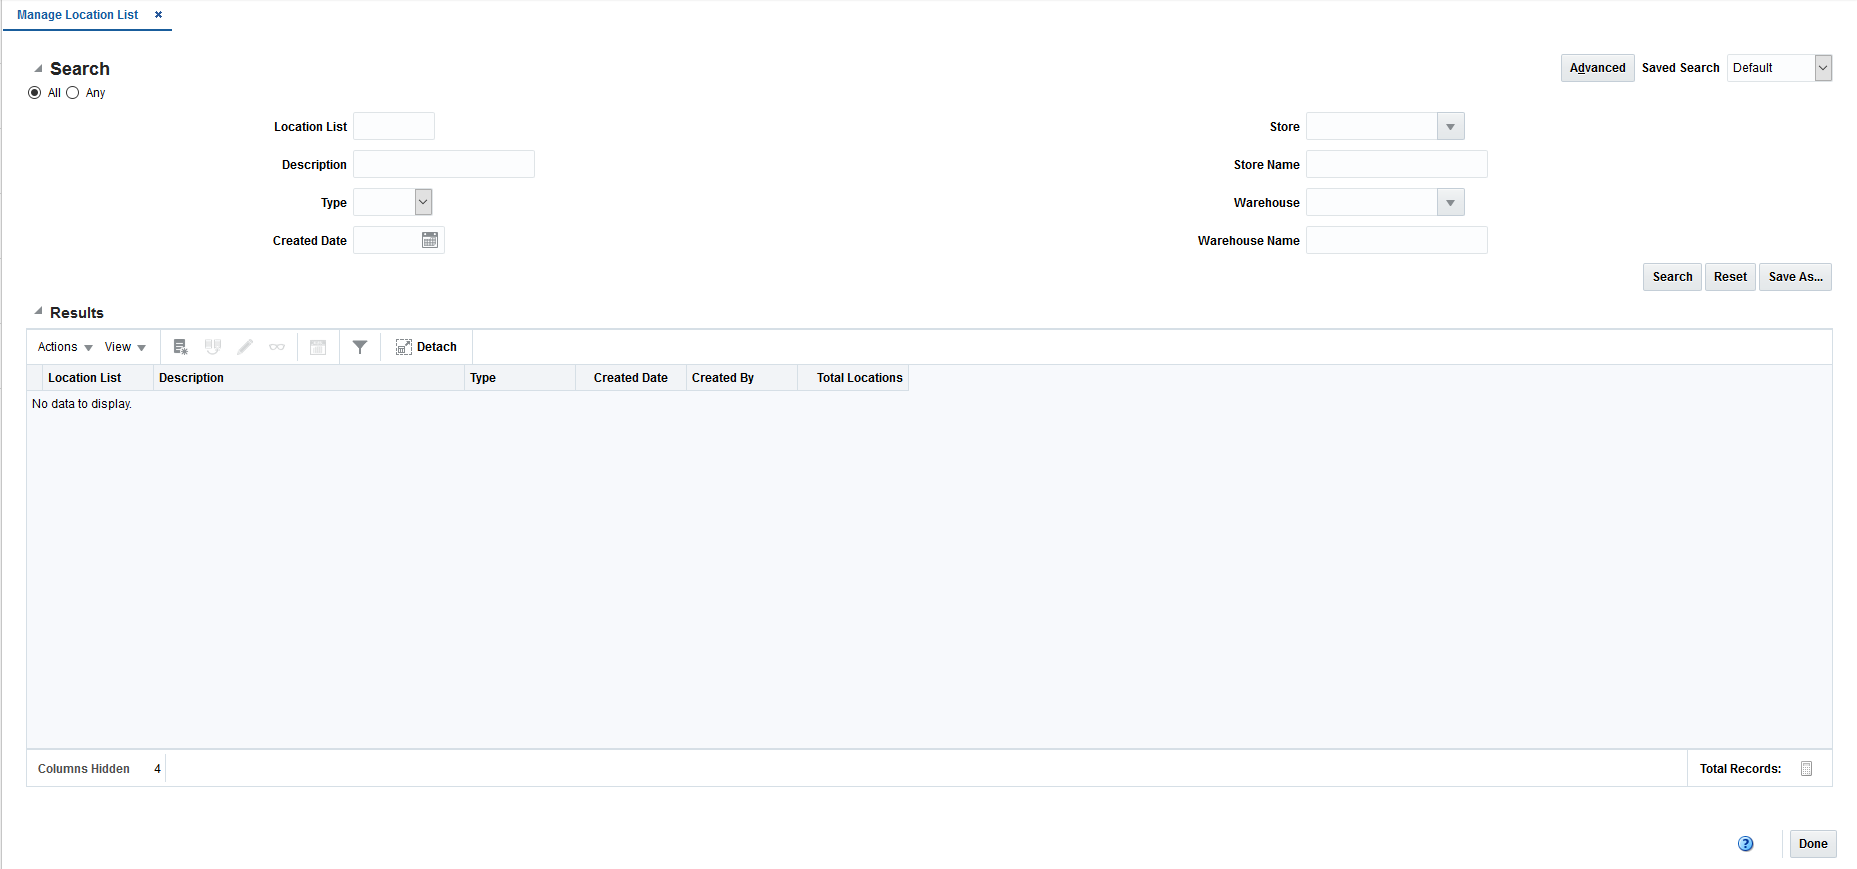
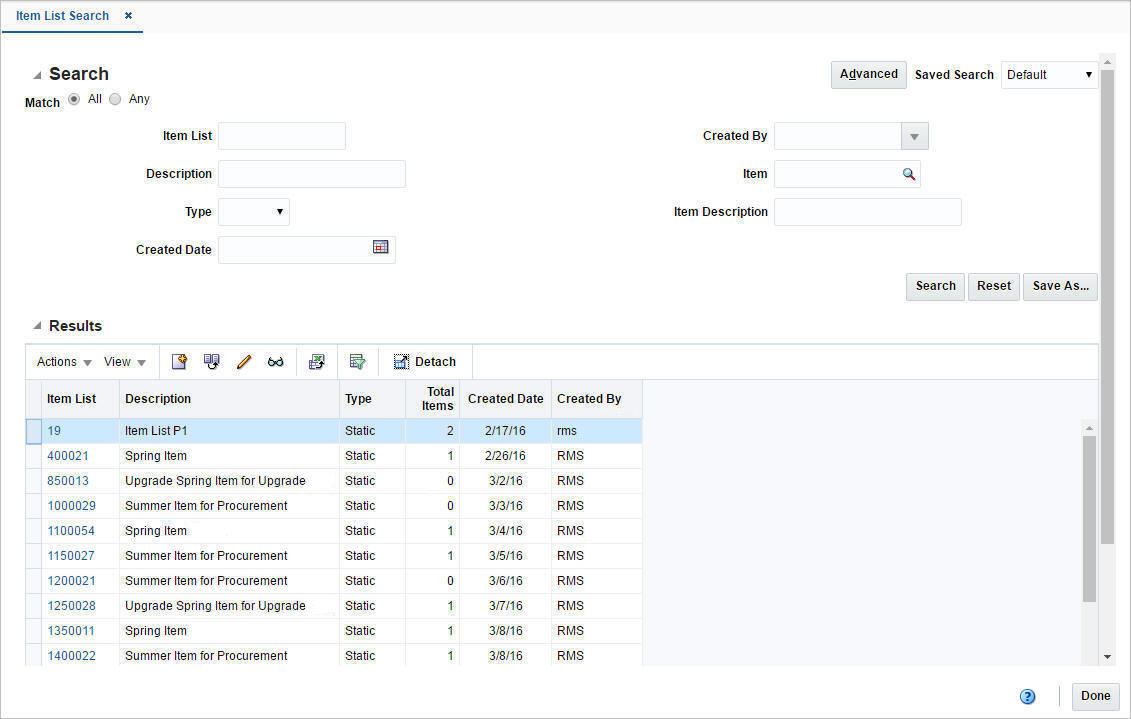
The Manage Location Lists option opens the Location List Search page. In the Location List Search page you can perform the following actions.
Search for a location list by various search criteria
View the entered search results
View a location list
Create a location list
Create a location list from an already existing location list
Edit a location list
You can access the Location List Search page from the Task menu, select Foundation Data > Location Foundation > Manage Location Lists. The Location List Search page appears.
To search for a location list:
From the Task menu, select Foundation Data > Location Foundation > Manage Location Lists. The Location List Search page appears.
You can search for a location list by using basic or advanced search criteria, depending on the requirement. The basic mode is the default search mode.
Click Advanced to access the search section in advanced mode.
Click Basic to return to basic mode.
To search for a location list by using basic search criteria:
Enter, select or search for one or all of the following basic search criteria.
Table 2-4 Location List Search - Basic Search Criteria and Description
| Fields | Description |
|---|---|
|
Match option |
Check radio button All or Any. All - only location lists matching all entered search criteria are shown. Any - location lists matching any of the entered search criteria are shown. |
|
Location List |
Enter the location list ID. |
|
Description |
Enter a location list description. |
|
Type |
Select the location list type, Static or Dynamic, from the list. |
|
Created Date |
Enter the create date of the location list or use the Calendar icon to select a date. |
|
Store |
Enter, select or search for the store ID. |
|
Store Name |
Enter the store name. |
|
Warehouse |
Enter, select or search for the Warehouse ID. |
|
Warehouse Name |
Enter the name of warehouse. |
Click the Saved Search list to select one of the saved search criteria. Selecting a saved search populates the search section with the saved search criteria. If the run automatically function is enabled for the search, the search is executed immediately.
You can also personalize your saved searches by selecting Personalize. The Personalized Saved Searches page appears.
For more information about the Personalized Saved Search, see Personalize Saved Search in the Oracle® Retail Merchandising Do the Basics User Guide.
Click Search. The location lists that match the search criteria are displayed in the Results section.
Click Reset to clear the search section and results.
Click Save As... to save the current search criteria. The Create Saved Search page appears.
For more information about how to save your search criteria, see Create Saved Search in the Oracle® Retail Merchandising Do the Basics User Guide.
Click Done to close the page.
To search for a location list by using advanced search criteria:
To search by using advanced search criteria, enter or select one or all of the advanced search criteria.
To narrow down the search, use the list next to the search fields. For example, determine if the entered value should be equal or not equal to the search result.
Click the Saved Search list to select one of the saved search criteria. Selecting a saved search populates the search section with the saved search criteria. If the run automatically function is enabled for the search, the search is executed immediately.
You can also personalize your saved searches by selecting Personalize. The Personalized Saved Searches page appears.
For more information about the Personalized Saved Search, see Personalize Saved Search in the Oracle® Retail Merchandising Do the Basics User Guide.
Click Search. The location lists that match the search criteria are displayed in the Results section.
Click Reset to clear the search section and results.
Click Save As... to save the current search criteria. The Create Saved Search page appears.
For more information about how to save your search criteria, see Create Saved Search in the Oracle® Retail Merchandising Do the Basics User Guide.
Click Add Fields to add more fields for the advanced search. To remove the field from the search, click the x right next to the field.
Click Reorder to change the order of the available search fields. The Reorder Search Fields page appears.
Select the desired search field and use the up and down arrows to rearrange the order of the fields.
Click OK to confirm the new order of the fields and close the page.
Click Cancel to reject any changes and close the page.
Click Done to close the page.
The Results section lists the retrieved location lists. The Results table shows the following columns by default.
Location List
Description
Type
Created and Last Rebuild Date
Total Locations
To create a location list from an existing location list, follow the steps below.
From the Tasks menu, select Foundation Data > Location Foundation > Manage Location Lists. The Manage Location List page appears.
Enter or select search criteria as desired to make the search more restrictive.
Click Search. The items that match the search criteria are displayed in the Results section.
Select a record in the Results section.
Then select Actions > Create from Existing, or use the Create from Existing icon. The Location List page appears. The data of the existing location list is displayed.
Change the fields, if necessary.
For more information about the available fields in the Location List page, see the Location List Page section.
Then choose one of the following options.
Click Save to save the new location list.
Click Save and Close to save the new location list and close the page.
Click Cancel to reject all entries and close the page.
To edit a location list, follow the steps below.
From the Tasks menu, select Foundation Data > Location Foundation > Manage Location Lists. The Manage Location List page appears.
Enter or select search criteria as desired to make the search more restrictive.
Click Search. The items that match the search criteria are displayed in the Results section.
Select a record in the Results section.
Then select Actions > Edit, or use the Edit icon. The Location List page appears. The data of the selected location list is displayed.
Change the fields, if necessary.
For more information about the available fields in the Location List page, see the Location List Page section.
Then choose one of the following options.
Click Save to save your changes.
Click Save and Close to save your changes and close the page.
Click Cancel to reject all entries and close the page.
To create a location list, follow the steps below.
You can enter the Create Location List page in different ways.
From the Tasks menu, select Foundation Data > Location Foundation > Create Location List. The Create Location List page appears.
From the Tasks menu, select Foundation Data > Location Foundation > Manage Location Lists. Search for location lists. Then select Actions > Create or use the Create icon. The Create Location List page appears.
Enter the data, as necessary.
For more information about the available fields in the Location List page, see the Location List Page section.
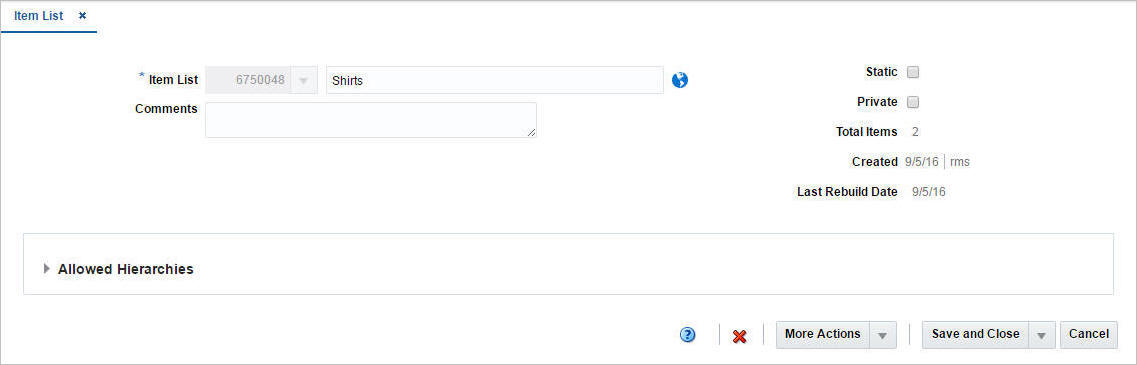
The Location List page allows you to create, edit, or view basic information about a location list. You can indicate whether the location list is static or dynamic. Dynamic lists can be rebuilt on demand. You can indicate whether a dynamic location list can also be rebuilt by a scheduled batch program. The ID of the user who created the location list and the date on which it was created appear. You can also view the number of locations that make up the location list.
The Location List page contains the following fields.
Table 2-5 Location List - Fields and Description
| Fields | Description |
|---|---|
|
Location List |
Displays the location list ID and description of the selected list. |
|
Comments |
Add comments to the selected location list. |
|
Hierarchy Level: |
|
|
The name of this field depends on the hierarchy level the location list is associated to. |
|
|
Chain |
Enter, select or search for the chain. |
|
Area |
Enter, select or search for the area. |
|
Region |
Enter, select or search for the region. |
|
District |
Enter, select or search for the district. |
|
Store |
Enter, select or search for the store. |
|
Warehouse |
Enter, select or search for the warehouse. |
|
Static checkbox |
If selected, the location list is static. You can not add additional locations to the list. If not selected, the location list is dynamic. |
|
Private checkbox |
This checkbox Select the checkbox to indicate that the security for a location list is on. |
|
Batch Rebuild checkbox |
If selected, the dynamic location list is rebuilt automatically by a scheduled batch program based on the original criteria. |
|
Total Locations |
Displays the total number of locations on the selected location list. |
|
Created |
Displays the date, when list has been created, and the user, who created the list. |
|
External Ref. No |
Displays a reference number, if available. |
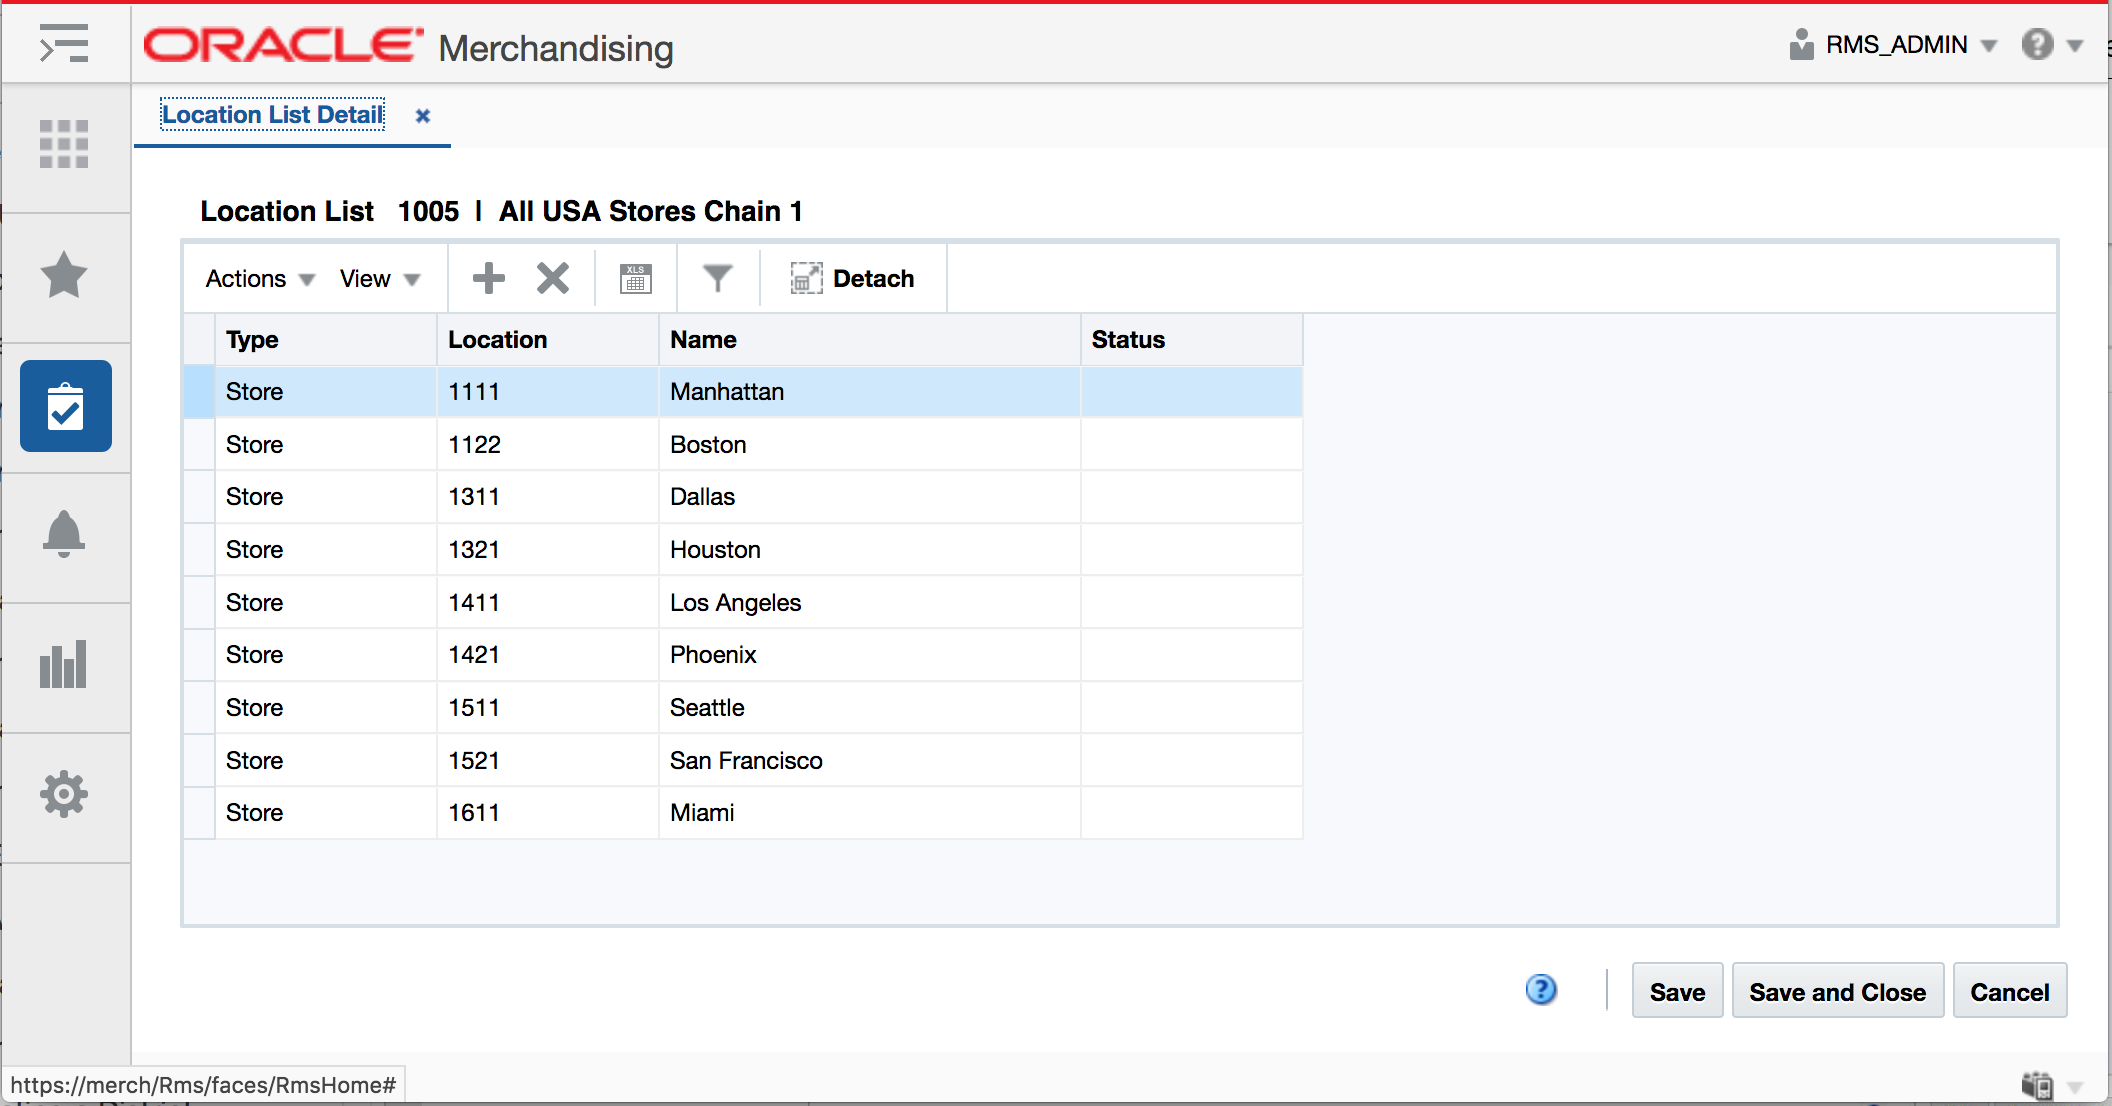
The Location List Detail page allows you to add, delete, and view the locations that make up a location list.
Location List Detail Table
The table displays all the locations making up the location list. The location type, location ID, name and status are displayed by default.
Adding Locations to Location Lists
To add a location to the selected location list, follow the steps below.
From the Tasks menu, select Foundation Data > Location Foundation > Manage Location Lists. The Manage Location List page appears.
Enter or select search criteria as desired to make the search more restrictive.
Click Search. The items that match the search criteria are displayed in the Results section.
Select a record in the Results section.
Then select Actions > Edit, or use the Edit icon. The Location List page appears.
Select More Actions > Locations. The Location List Detail page appears.
Then select Actions > Add or use the Add icon. The Add Location page appears.
In the Type field, enter the location type. For example, select Warehouse.
In the Location field, enter, select or search for the location ID.
Then select one of the following options.
Click OK to add the new location and close the page.
Click OK and Add Another to add additional entries.
Click Cancel to reject all entries and close the page.
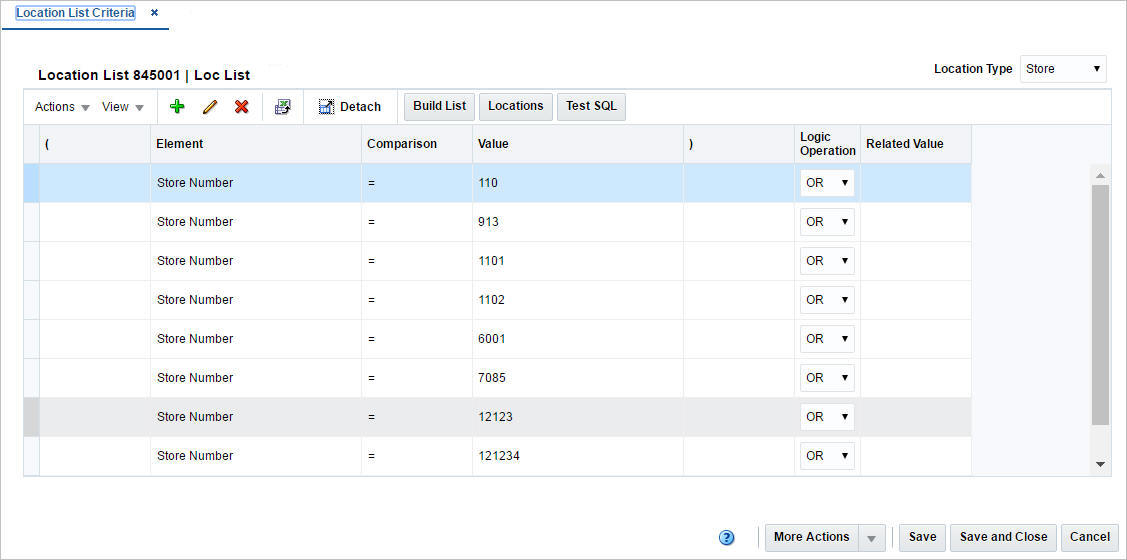
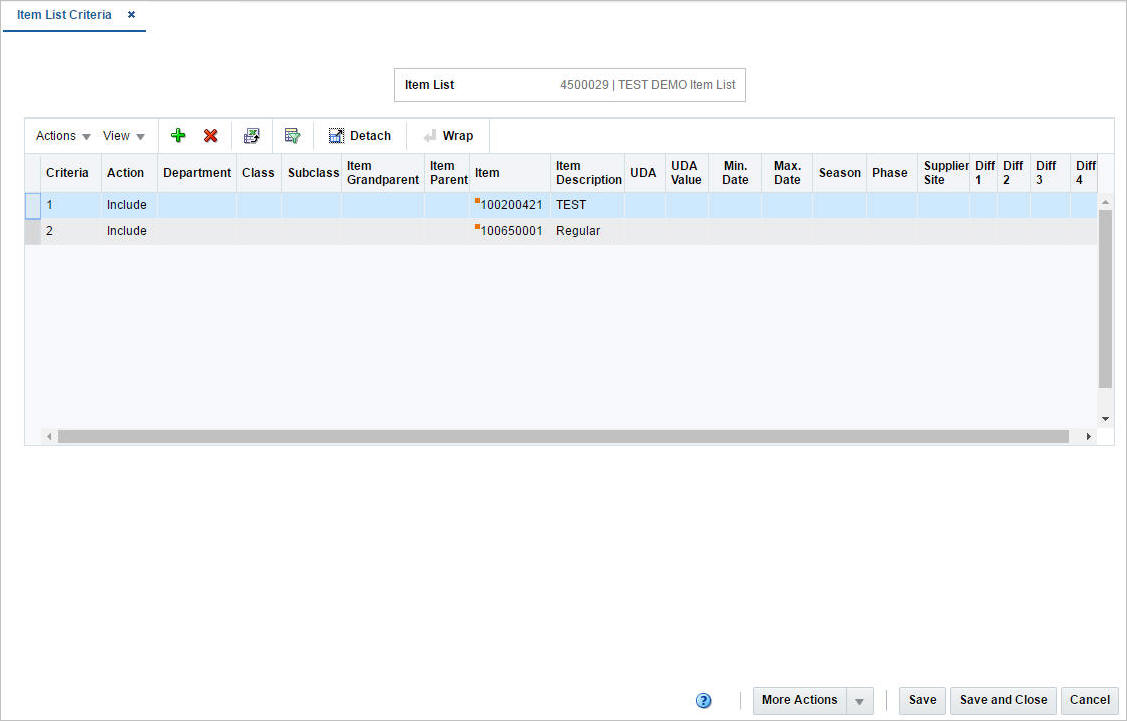
The Location List Criteria page allows you to add, edit, delete and view the criteria by which locations are grouped on a location list. The criteria that you enter become the conditions of a Where clause in a SQL statement. You can test the criteria and view the SQL statement before they are applied to the location list.
Location List Criteria Table
The table lists the elements and values of the criteria.
Maintaining Location List Criteria
To maintain location list criteria, follow the steps below.
From the Tasks menu, select Foundation Data > Location Foundation > Manage Location Lists. The Manage Location List page appears.
Enter or select search criteria as desired to make the search more restrictive.
Click Search. The items that match the search criteria are displayed in the Results section.
Select a record in the Results section.
Then click the location list link, or select Actions > Edit, or the Edit icon. The Location List page appears.
Select More Actions > Criteria. The Location List Criteria page appears.
Update the location list criteria, as necessary.
Adding Location List Criteria
To add location list criteria, follow the steps below.
Go to the Location Type field, in the top right corner of the page. Select a location type.
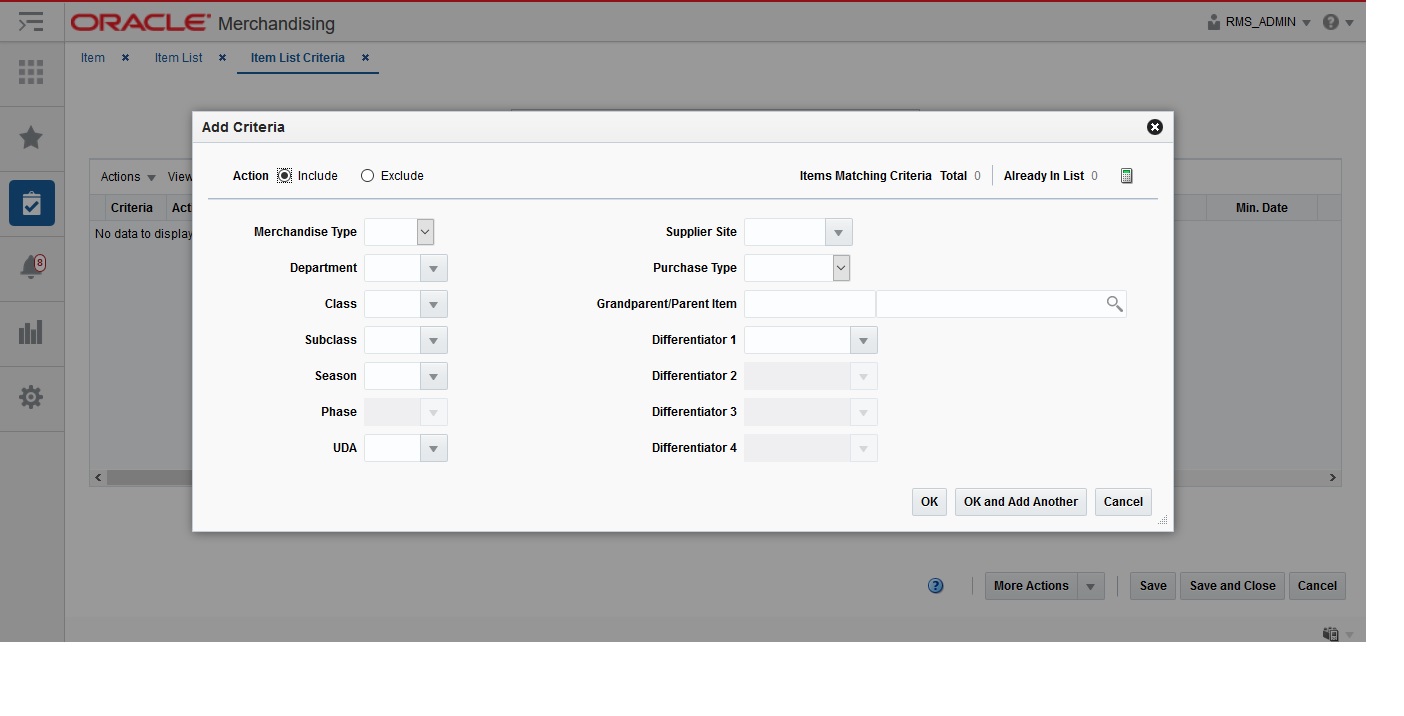
Then select Actions > Add or use the Add icon. The Add Criteria page appears.
In the Element field, select an element from the list.
|
Note: If the Element is Cost Zone or Store Grade, you can specify which group (cost zone group or store grade group) the zone or grade is a member of. |
In the Comparison field, select a sign from the list.
In the Value field, enter a value.
In the Logic Operation field, select an option from the list.
In the Related Value field, enter, select or search for the value.
Then choose one of the following options.
Click OK to add your entries and close the Add Criteria page.
Click OK and Add Another to add additional entries.
Click Cancel to reject all entries and close the Add Criteria page.
Click the Test SQL button to test, if the entered criteria is valid.
|
Note: If the location list criteria is not valid, a message is displayed. |
Click Build List to rebuild the location list.
Then choose one of the following options.
Click Save to save your entries.
Click Save and Close to save your entries and close the page.
Click Cancel to reject all entries and close the page.
Editing Location List Criteria
To edit location list criteria, follow the steps below.
Select a record in the table.
Then select Actions > Edit or use the Edit icon. The Edit Criteria page appears.
Edit the fields, as necessary.
Then choose one of the following options.
Click OK to save your changes and close the Edit Criteria page.
Click Cancel to reject all entries and close the Edit Criteria page.
Click the Test SQL button to test, if the entered criteria is valid.
|
Note: If the location list criteria is not valid, a message is displayed. |
Click Build List to rebuild the location list.
Then choose one of the following options.
Click Save to save your changes.
Click Save and Close to save your changes and close the page.
Click Cancel to reject all entries and close the page.
To rebuild a location list, follow the steps below.
From the Tasks menu, select Foundation Data > Location Foundation > Manage Location Lists. The Manage Location List page appears.
Enter or select search criteria as desired to make the search more restrictive.
Click Search. The items that match the search criteria are displayed in the Results section.
Select a record in the Results section.
Then select Actions > Edit, or use the Edit icon. The Location List page appears.
Select More Actions > Location List Rebuild. The Location List Rebuild page appears. The location list details are displayed.
Select the Rebuild Location List checkbox, to rebuild the current list.
Then choose one of the following options.
Click Execute and Close to rebuild the selected location list and close the page.
Click Cancel to reject all entries and close the page.
The Change Cost Zones page allows you to change the cost zone for all stores and warehouses on a location list.
The Changing Cost Zones page contains the following fields.
Table 2-6 Cost Zones - Fields and Description
| Fields | Description |
|---|---|
|
Location List |
This field displays the location list number and description. |
|
Zone Group |
Enter, select or search for the current zone group. This field is a required field. |
|
New Zone |
Enter, select or search for the new cost zone. This field is a required field. |
Mass Update Cost Zones
To update the cost zone for all stores and warehouses on a location list, follow the steps listed below.
From the Tasks menu, select Foundation Data > Location Foundation > Manage Location Lists. The Location List Search page appears.
Enter or select search criteria as desired to make the search more restrictive.
Click Search. The location lists that match the search criteria are displayed in the Results section.
Select a record in the Results table.
Then select Actions > Mass Update > Create Cost Zone Change. The Change Cost Zones page appears.
In the Zone Group field, enter, select or search for the group.
In the New Zone field, enter, select or search for the new cost zone.
Then choose one of the following options.
Click Save to save the new cost zone.
Click Save and Close to a save the new cost zone and close the page.
Click Cancel to reject all entries and close the page.
In the Change Location Traits page you can update location traits for a specific location list.
Change Location Traits Table
In the table add, edit or delete traits of the selected location list.
Mass Update Location Traits
To update the location traits by location list, follow the steps listed below.
From the Tasks menu, select Foundation Data > Location Foundation > Manage Location Lists. The Location List Search page appears.
Enter or select search criteria as desired to make the search more restrictive.
Click Search. The location lists that match the search criteria are displayed in the Results section.
Select a record in the Results table.
Then select Actions > Mass Update > Change Location Traits. The Change Location Traits page appears.
Update the traits for the selected location list.
Adding Location Traits
To add a location trait, follow the steps below.
In the Change Location Traits page, select Actions > Edit or use the Edit icon. The Edit Location Trait page appears.
In the Action field, select if you want to Add or Delete the location trait. This field is a required field.
|
Note: You can also delete a location trait by selecting the Delete icon in the table. |
In the Location Trait field, enter, select or search for the location trait. This field is a required field.
Then choose one of the following options.
Click OK to add the trait and close the page.
Click OK and Add Another to add the current trait and add additional entries.
Click Cancel to reject all entries and close the page.
Editing Location Traits
To edit a location trait, follow the steps below.
In the Change Location Traits page, select Actions > Edit or use the Edit icon. The Edit Location Trait page appears.
In the Action field, change the action, if necessary.
In the Location Trait field, enter select or search for another location trait, if necessary.
Then choose one of the following options.
Click OK to edit the current trait and close the page.
Click OK and Add Another to add the current trait and add additional entries.
Click Cancel to reject all entries and close the page.
The Cost Zones page allows you to create, maintain, and view the cost zones for a selected cost zone group. You can categorize stores into zones based on a costing strategy. For each cost zone group, one cost zone is set as the base cost zone. The base cost zone indicates that the price for the item is based on the price of the item in the zone. When a new cost zone group is created, all locations must be added to the group. The locations can exist individually within a group or locations can be grouped into cost zones.
The Cost Zone Groups section allows you to add, delete, or view cost zone groups. A cost zone group is a grouping mechanism that allows you to categorize stores into zones based on a costing strategy. This grouping mechanism is available only when you are tracking Estimate Landed Costs (ELC).
The table displays the zone group, cost level and description by default.
Description
You can edit the Description column directly in the table.
The Cost Zones section allows you to add, delete, and view the cost zones for a selected cost zone group.
The table displays the zone ID, description, locations, currency and base cost checkbox by default.
Description
You can edit the Description column directly in the table.
Base Cost
Select the Base Cost checkbox, to indicate that the price for the item is based on the price of the item in the zone.
The Cost Zone Locations section allows you to add, edit, delete, or view locations in the cost zone. In edit mode, you may add locations to a cost zone or move locations to a different cost zone.
Locations cannot be edited for any cost zone group at the location level because the location is a cost zone group.
The table displays the location type, ID and location name as well as the primary discharge port and port description by default.
Primary Discharge Port
You can edit the primary discharge port for a location directly in the table.
To maintain Cost Zones, follow the steps below.
From the Tasks menu, select Foundation Data > Location Foundation > Cost Zones. The Cost Zones page appears.
Update the cost zones, as necessary.
To add cost zone groups, follow the steps listed below.
Open the Cost Zones Group section.
Then select Actions > Add or use the Add icon. The Add Cost Zone Groups page appears.
In the Zone Group field, enter a unique zone group ID. This field is a required field.
In the Description field, enter a unique description for the zone group.
In the Cost Level field, select the cost level from the list.
In the Like Group field, enter, select or search for a group to copy the zones and locations of the selected group to the new group.
Then select one of the following options.
Click OK to add the new cost zone group and close the page.
Click OK and Add Another to add additional cost zone groups.
Click Cancel to reject all entries and close the page.
To add a new cost zone to a cost zone group, follow the steps below.
In the Cost Zones page, select a record in the Cost Zone Groups section.
All the available cost zones for the selected cost zone group are displayed in the Cost Zones section.
In the Cost Zones section, select Actions > Add or use the Add icon. The Add Cost Zone page appears.
In the Zone field, enter a unique Zone ID.
In the Description field, enter a unique zone description.
In the Currency field, enter, select or search for the currency ID.
Then choose one of the following options.
Click OK to add the new cost zone and close the page.
Click OK and Add Another to add additional cost zones.
Click Cancel to reject all entries and close the page.
|
Note: If the cost level of the new cost zone group is Location, a cost zone for each location is created automatically.You have to add all locations for a new cost zone group. If any location is missing from the group, you will receive a message listing all missing locations when you save your changes in the Cost Zones page. |
To add cost zone locations to a cost zone, follow the steps listed below.
In the Cost Zones page, select a record in the Cost Zones section.
The available locations for the selected cost zone are displayed in the Cost Zone Locations table.
In the Cost Zone Locations table, select Actions > Add or use the Add icon. The Add Cost Zone Locations page appears.
In the Location field, select the location type from the list. The field next to the location type enables. Enter, select or search for the location ID.
In the Discharge Port field, select, enter or search for the port.
Then choose one of the following options.
Click OK to add the location and close the page.
Click OK and Add Another to add additional locations.
Click Cancel to reject all entries and close the page.
To edit a cost zone location, follow the steps listed below.
In the Cost Zones page, select the record you want to edit in the Cost Zone Locations table.
Then select Actions > Edit or use the Edit icon. The Edit Cost Zone Location page appears.
The warehouse/store ID and description of the selected record are displayed.
In the New Zone field, enter, select or search for a new zone, if you want to move the current location to another zone.
In the Discharge Port field, enter, select or search for another port.
Then choose one of the following options.
Click OK to save your changes and close the page.
Click Cancel to reject all entries and close the page.
In addition to the organization hierarchy, location lists and cost zone there are few other foundational data components related to locations that can be set up in Merchandising. These are mostly used for classification of locations to into various groups for operation efficiency.
Banners and Channels – Channels in retail are basically different touch points from where the sales happen to customers. Examples include brick and mortar, kiosk, and web store. Banners are groupings of channels that can be used to distinguish one line of business from another.
Cost Components – Cost components are various types of costs that can be used to build total landed cost of an item in international trade. They can also be used to define upcharges that are applied when items are transferred between locations or used for building up franchise costing.
Location Traits – Location traits are user defined classification characteristics that can be associated with a store.
Outside Locations – Used in international trade processing, which requires the definition of locations that are outside retailer's business but required for business process, such as lading and discharge ports, clearing zones, and bill-to locations.
Store Formats – Store formats are another optional way of classifying and grouping stores based on common characteristics.
Store Grades – Store grades are used for store clustering. Each store grade can be associated with a buyer and used to support distributing items on purchase orders, reporting, or mass maintenance.
Transfer Zones – Transfer zones are used to group stores to restrict transfers of merchandise only within a zone to optimize transportation costs.
Channels are a method of grouping like locations based on business they serve. Examples include Brick and Mortar, Kiosk, and Web Store. Channels can be added to a store or virtual warehouse as an attribute. Banners are groupings of channels that can be used to distinguish one line of business from another. Banners and Channels are maintained through the upload/download process. This functionality is accessed from the main Merchandising task list under Foundation Data > Download Foundation Data and Foundation Data > Upload Foundation Data.
To add, update, or remove banners or channels, select the template type of Foundation from the Download Data screen and then the template Banners and Channels. Click the Download button and when prompted, choose to either open the .ods file that is generated or save the file and open it separately in the spreadsheet application of your choice.
Add a Banner or Channel
To add a banner, select the action type of Create on an empty row of the Banners tab. Next, enter a unique number up to 4 digits in length for the Banner ID, and the description of the banner in the primary language (as defined in the Merchandising system options) of up to 120 characters. To add a channel, select the action type of Create on an empty row of the Channels tab. Next, enter a unique number up to 4 digits in length for the channel ID, along with the banner ID, channel type and a description for the channel in the primary language (as defined in the Merchandising system options) of up to 120 characters. The channel type can be selected from a dropdown which is maintained under code 'CHTY' in the Codes table. To modify the valid channel types, you can update the descriptions or add new values by accessing the Codes and Descriptions template (see Download Data and Upload Data). Adding a banner translation or channel translation can be done in a similar manner on the Banner Translations tab or Channel Translations tab, respectively. This facilitates the ability to translate the banner description or channel description in multiple languages.
Updating a Banner or Channel
If you would like to update any details for banners and channels, a similar process will be followed as that described above for creating new. First, download the spreadsheet, and then navigate to the tab where you would like to make your updates.
The following columns can be updated in each tab:
Banner – Description
Banner Translations – Description
Channel – Banner, Channel Type, Description
Channel Translations – Description
In the tab where you are going to make your updates, select the action type of Update, and then correct the value in the spreadsheet.
Removing a Banner or Channel
If you wish to remove a banner, select the Delete action on the row of the banner you which to delete on the Banners tab. Removing a banner translation, a channel, or a channel translation can be done in a similar manner on their respective tabs. Deleting a channel is not allowed if it is still associated with a store or virtual warehouse. In addition, all channels associated with a banner must be deleted before the banner can be deleted.
Uploading Changes
For all actions defined above, once all the updates have been made to the data in the spreadsheet, save the file and close it. Then, return to the Merchandising screens and select Foundation Data > Upload Foundation Data from the main task list. In this screen, you'll again select the template type Foundation and the template Banners and Channels. This will generate a process description automatically, but this can be updated if desired. Lastly, select the Browse button and navigate to the directory where you saved the updated spreadsheet.
To review the status of the upload and check whether any errors occurred, select the Foundation Data > Review Status task from the main task list.
See also Download/Upload Data from Spreadsheets and View Data Loading Status.
Cost components are various types of costs that can be used to build total landed cost of an item in domestic and international trade. They can also be used to define upcharges that are applied when items are transferred between locations or used for building up franchise costing. Cost components are created, maintained or deleted in Merchandising through spreadsheet upload and download processes. Updates can be made to take effect immediately or can be scheduled to go into effect on a specific date. These processes are accessed through the main Merchandising tasks list under Foundation Data > Download Foundation Data and Foundation Data > Upload Foundation Data.
To add or update cost components, you will select the template type of Foundation from the Download Data screen and then the template Cost Components. Click the Download button and when prompted, choose to either open the .ods file that is generated or save the file and open it separately in the spreadsheet application of your choice. Once opened, there will be three sheets that can be modified - Cost Components, Cost Component Translations and Component Rate Updates.
Add a Cost Component
To add a new cost component, start in the Cost Components tab, and, in a blank line in the template, select the action type of Create. Next enter a new Component ID (up to 10 characters) and Component Description in the primary language (as defined in the Merchandising system options) of up to 250 characters. Next, specify the Component Type which can be Assessment, Expense, or Up Charge.
Assessments
For assessments, if the charge is a fee or tax, specify the assessment type. Valid assessment types are fee types or tax types associated with one or more HTS definitions. Fee types and tax types can be found in the HTS Fees and HTS Taxes tabs of the HTS Definition template (which can be downloaded from the Import template type). Next, specify the Import Country for which the charge will be assessed. Next, if the assessment is calculated as a percentage of a calculated value, enter the Computation Value Base (CVB) that will be used as the basis for the calculation. Value based assessment components without a computation value base will be calculated as a percentage of the item's order cost. For more information on CVBs, see Computation Value Bases.
Next, specify the Calculation Basis. Calculation basis indicates whether the assessment is calculated on a per-unit (Specific) or ad valorem (Value) basis. Then, enter the Component Rate, which is the rate to be charged against the calculation base. Enter a percentage value if the calculation basis is Value, else a monetary amount if the calculation basis is Specific. Next, enter the Computation Level, which determines the calculation order, and the Display Order. If one or more assessments have same computation level then they will be calculated in the order they appear in the table. Next, specify the Always Default value and the Component Currency. Every assessment for a given import country must have the same currency. Assessments with Always Default set to Y will default to the item along with the duty related assessments when HTS codes are added. Then, enter the Component Per Count and Component Per Count UOM. Specification of per count and per count unit of measure is mandatory if calculation basis is Specific and must be left blank for calculation basis of Value.
Finally, select +, -, or N/A for the nomination flags. These flags indicate whether or not the value of the component should be added to or subtracted from the associated CVB. For more information on nomination flags, see Computation Value Bases. Any other columns not mentioned above are not relevant for assessments. For more details see the RTM Whitepaper.
Expenses
For expenses, enter a value of Country or Zone in the Expense Type column. Country expenses are those incurred when moving goods from the country of sourcing to the import country. Zone level expenses are those incurred when moving goods from the discharge port to the final destination. Next, if the expense is calculated as a percentage of a calculated value, enter the Computation Value Base (CVB) that will be used as the basis for the calculation. Value based expense components without a computation value base will be calculated as a percentage of the expense's order cost basis. For more information on CVBs, see Computation Value Bases.
Next, specify the Calculation Basis, which indicates whether the component is calculated on a per-unit (Specific) or ad valorem (Value) basis. Then, enter the Order Cost Basis, which indicates the basis the expense will be calculated against if there is no CVB attached; valid values are Supplier or Order. If the cost basis is supplier then when calculating the expense, the item's supplier cost will be used. If the cost basis is order, then the cost of the item on the order will be used to calculate the expense. Next, enter the Expense Category, if applicable. The valid values for expense category can be selected from a dropdown which is maintained under the code type EXPC. To modify the valid categories, you can update the descriptions or add new values by accessing the Codes and Descriptions template.
Then, enter the Component Rate, which is the rate to be charged against the calculation base. Enter a percentage value if the calculation basis is Value, else a monetary amount if the calculation basis is Specific. Next, enter the Computation Level, which determines component calculation order. If one or more components have same computation level then they will be calculated in the order they appear in the table. Then, enter the Display Order of the component and a value for Always Default. Expenses with Always Default set to Y will default to the items along with the expense profile records if the always default component wasn't already added to the item/supplier/discharge port/zone or item/supplier/country/lading port/discharge port combination. Also, when a user manually adds a shipping route (discharge port/zone or lading port/discharge port) to an item/supplier or item/supplier/country, all expenses (of the matching expense type) with Always Default set to Y will default. Next, enter the Component Currency, Component Per Count, and Component Per Count UOM in which the component per count is specified. Specification of per count and per count unit of measure is mandatory if calculation basis is Specific and must be left blank for calculation basis of Value.
Finally, select +, -, or N/A for the nomination flags. These flags indicate whether or not the value of the component should be added to or subtracted from the associated CVB. For more information on nomination flags, see Computation Value Bases. Any other columns not mentioned above are not relevant for expenses. For more details see the RTM Whitepaper.
Up Charges
For up charges, enter the Up Charge Type and Up Charge Group. Valid values for up charge type are Expense or Profit. Expense up charges are charges incurred by the sending location when transferring goods to the receiving location, like Freight or Insurance. Profit up charges are used when the sending location is trying to become a profit center, for examples storage fees and processing fees. Up charge group is used for grouping up charges together. The valid up charge groups can be selected from a dropdown which is maintained under the code type UCHG. To modify the valid up charge groups, you can update the descriptions or add new values by accessing the Codes and Descriptions template (see Download Data and Upload Data).
Next, specify the Calculation Basis, which indicates whether the up charge is calculated on a per-unit (Specific) or ad valorem (Value) basis. Then, enter the Component Rate, which is the rate to be charged against the calculation base. The rate can be added as a positive or negative value. For value based up charges, the calculation base will be the item/from location weighted average cost on transfers or allocations. Enter a percentage value if the calculation basis is Value, else a monetary amount if the calculation basis is Specific. Next, enter the Display Order which determines the order in which the up charge will display in the Department and Item Up Charges screens. Finally, enter the Component Currency, Component Per Count, and Component Per Count UOM. Specification of per count and per count unit of measure is mandatory if calculation basis is Specific; and should be left blank for a calculation basis of Value. Any other columns not mentioned above are not relevant for up charges.
Add Component Translations
If you wish to add translations for the cost component description in languages other than the primary language, this can be done in the Cost Component Translations tab. Navigate to a blank row and select the action type of Create and the language in which the translated description will be entered. Then, enter the component ID for which the translation applies. Finally, enter the translated description. The translated description can also be up to 250 characters long. This is an optional step.
Add a Component Rate Update
To add a component rate update for an existing cost component, start in the Component Rate Updates tab, and, in a blank line in the template, select the action type of Create. Next enter an existing component and type. Next, you may specify the expense type if component type is expense. Next, enter the new values for component rate, per count, per count UOM and component currency, as applicable. Next, enter the effective date from when the new values will be effective in the system. Finally, indicate if you want this rate update to impact existing entities or transactions. For assessments, you can update items and orders. For expenses, you can update items, orders, country profiles, supplier profiles, and partner profiles. For up charges, you can update items, departments, and transfers and allocations.
Update Cost Components or Component Rate Updates
If you would like to update any details for existing cost component or component rate update, a similar process will be followed as that described above for creating new component or component rate updates, respectively. First, download the spreadsheet, and then navigate to the tab where you would like to make your updates.
In the tab where you are going to make your updates, select the action type of Update, and then correct the value in the spreadsheet.
The following fields in each template can be edited:
Cost Components – Component Description, Assessment Type, Import Country, Up Charge Group, Computation Value Base, Calculation Basis, Order Cost Basis, Expense Category, Component Rate, Computation Level, Display Order, Always Default, Component Currency, Component Per Count, Component Per Count UOM, Nom Flag 1, In Duty, Nom Flag 3, In Exp, In ALC
Cost Component Translations – Component Description
Component Rate Updates – Component Rate, Per Count, Per Count UOM, Component Currency, Effective Date, New Effective Date, Item, Order, Country, Supplier, Partner, Dept, Trans and Alloc Ind
Deleting a Cost Component or Component Rate Update
If you wish to delete a cost component or component rate update, update the action column to select Delete in each of the tabs where it occurs.
Uploading Changes
For all actions defined above, once all the updates have been made to the data in the spreadsheet, save the file and close it. Then, return to the Merchandising screens and select Foundation Data > Upload Foundation Data from the main task list. In this screen, select the template type Foundation and the template Cost Components. This will generate a process description automatically, but this can be updated if desired. Lastly, select the Browse button and navigate to the directory where you saved the updated spreadsheet.
To review the status of the upload and check whether any errors occurred, select the Foundation Data > Review Status task from the main task list.
See also Download/Upload Data from Spreadsheets and View Data Loading Status.
Landed cost is the total cost of an item received from a vendor inclusive of the supplier cost and all costs associated with moving the item from the supplier's warehouse or factory to the final destination (warehouse or store). Estimated Landed Cost (ELC) is the bottom-up cost estimate created by the buying organization and is composed of cost components from the supplier, trading partners, item, origin country, and banks which are brought together during purchase order creation to develop an estimate of costs associated with purchasing a particular item. Cost components are combinations of individual expenses, assessments and the calculations associated with that expense or assessment.
Computation Value Bases (CVBs) describe how expenses and assessments are combined to provide a base for the calculation of other expenses or assessments. There are two types of CVBs - those with predefined details and those with dynamically determined components.
CVBs can be created and deleted through spreadsheet download and upload processes. These processes are accessed through the main Merchandising task list under Foundation Data > Download Foundation Data and Foundation Data > Upload Foundation Data.
To add or delete CVBs, you will select the template type of Foundation from the Download Data screen and then the template Computation Value Bases (CVBs). Click the Download button and when prompted, choose to either open the .ods file that is generated or save the file and open it separately in the spreadsheet application of your choice. Once opened, there will be three sheets that can be modified - CVBs, CVB Translations, and CVB Details.
|
Note: CVBs and CVB Details cannot be updated after creation, however additional details can be added to or deleted from an existing CVB definition. If you wish to make a change, you can delete a CVB detail and re-add it with the desired change. You can also delete and entire CVB if it is not already in use, and re-add it with the desired details. |
CVBs with Predefined Details
The value of CVBs with predefined details is determined by summing the values of the cost components that are added as details as part of the CVB definition.
For example, an expense, Agent Commission, is defined as 2% of the sum of the supplier's unit cost, freight, and insurance, less buyer's commission:
(.02 * (unit cost + freight + insurance - buyer's commission)).
Create four simple new expense components:
unit cost (UNCST = 100% with no CVB, when no CVB is used the expense is based on unit cost)
freight (FRGHT = 8% with no CVB)
insurance (INSUR = 2% with no CVB)
buyer's commission (BUYCOM = 1% with no CVB)
Define a CVB called Agent Commission Base (ACBASE). ACBASE will include all of the expenses that the agent's commission is based on.
Computation Value Base ACBASE is defined as:
Create a fifth new expense for Agent Commission called AGCOM with the computation value base ACBASE attached to it, and with a component rate of 2%.
The value of AGCOM for an item with a unit cost of 10.00 will then be calculated as follows:
ACBASE = UNCST + FRGHT + INSUR - BUYCOM
                 = 10.00 + .80 + .20 - .10
                 = 10.90

AGCOM = Component Rate * Computation Value Base (ACBASE)
                = 2% * 10.90
                        = .22
CVBs with Dynamically Determined Components
For CVBs with dynamically determined components, nomination flags are used to determine which cost components to include in the calculation. The value of this type of CVB is calculated by summing the values of all cost components with the nomination flag set in the same way that the flags are set on the CVB definition. There are five nomination flags; three of the flags are reserved for a specific purpose in the system. The other two flags are open for use in calculations as desired. The labels of all of the nomination flags can be changed by updating the code descriptions found under the Label code type (LABL) via the Codes and Descriptions spreadsheet download and upload processes, however it should be noted that changing the label for the system reserved flags will not change how they are used. For additional information, see the Oracle Retail Merchandising Implementation Guide.
Nom Flag 1 – This is an open flag that can be used as desired. Label code NOMF1.
In Duty – This flag is used to include assessment components in the calculation of Total Duty. Label code NOMF2.
Nom Flag 3 – This is an open flag that can be used as desired. Label code NOMF3.
In Exp – This flag is used to include expense components in the calculation of Total Expenses. Label code NOMF4.
In ALC – This flag is used to directly nominate internal fees into actual landed cost. This is to be utilized for expenses a retailer needs to account for, but for which an external vendor will not send an invoice. Label code NOMF5.
An example will help illustrate the use a CVB with dynamically determined components. Using the same Agent Commission example as above, this example will show how to calculate it using the nominations flags instead of CVB details.
Define a CVB called Agent Commission Base (ACBASE). ACBASE will not have any details attached to it; instead, set the first nomination flag, Nom Flag 1, to Yes.
Using the Cost Component download/upload template, create four simple new expense components:
Unit cost (UNCST = 100% with no CVB, when no CVB is used the expense is based on unit cost) – Set Nom Flag 1 to +
Freight (FRGHT = 8% with no CVB) – Set Nom Flag 1 to +
Insurance (INSUR = 2% with no CVB) – Set Nom Flag 1 to +
Buyer's commission (BUYCOM = 1% with no CVB) – Set Nom Flag 1 to -
Agent commission (AGCOM = 2% with the new ACBASE CVB attached) – No nominations flags set
Then, when the five expenses are attached to an item with a unit cost of 10.00 USD, the value of AGCOM will be calculated as follows:
ACBASE = UNCST + FRGHT + INSUR - BUYCOM
                 = 10.00 + .80 + .20 - .10
                 = 10.90
AGCOM = Component Rate * Computation Value Base (ACBASE)
                 = 2% * 10.90
                 = 0.22
If instead the first nomination flag was not set for FRGHT, then value of AGCOM would only be 0.20.
ACBASE = UNCST + INSUR - BUYCOM
                 = 10.00 + .20 - .10
                 = 10.10
AGCOM = Component Rate * Computation Value Base (ACBASE)
                 = 2% * 10.10
                 = 0.20
Add CVBs, CVB Translations and CVB Details
To add a new CVB, start in the CVBs tab, and, in a blank line in the template, select the action type of Create. Next enter a unique computation value base identifier (up to 10 characters), and a description for the CVB in the primary language (as defined in the Merchandising system options) of up to 250 characters. When creating CVBs with dynamically determined components, the desired nomination flag should be set to Yes, with the rest set to No. Only one of the five nomination flags can be set to Yes for each CVB using this approach. When creating CVBs with predefined details, all nomination flags should be set to No.
Next, if you wish to add translations for the CVBs in languages other than the primary language, this can be done in the CVB Translations tab. Navigate to a blank row and select the action type of Create and the language in which the translated description will be entered. Then, enter the computation value base for which the translation applies. Finally, enter the translated description. The translated description can also be up to 250 characters long. This is an optional step.
Lastly, when creating CVBs with predefined details only, the desired details must be added. To do this, move to the CVB Details tab in the spreadsheet. Again, navigate to a blank row in the sheet and select an action type of Create. Enter your new computation value base and then the first cost component to be included. The Combination Operator allows you to define whether the value of the cost component will be added to (+) or subtracted from (-) the total value of the CVB. Continue this process until all the details for the CVB have been added. If you are adding a new detail to an existing CVB, this same process would apply, just using the existing ID instead.
Delete CVBs, CVB Translations or CVB Details
If you would like to delete an existing CVBs or any CVB Details, a similar process will be followed as that described above for creating new CVBs. First, download the spreadsheet, and then navigate to the tab where you would like to mark the desired CVBs or CVB Details for delete. Select the action type of Delete on the desired rows in the spreadsheet.
|
Note: Only CVBs that have not already been associated with a cost component can be deleted. |
Update CVB Translations
If you would like to update any translations for existing CVBs, a similar process will be followed as that described above for deleting CVB Translations. First, download the spreadsheet, and then navigate to the CVB Translations tab.
The following column can be updated:
CVB Translations – Description
Select the action type of Update, and then correct the value in the spreadsheet.
Uploading Changes
For all actions defined above, once all the updates have been made to the data in the spreadsheet, save the file and close it. Then, return to the Merchandising screens and select Foundation Data > Upload Foundation Data from the main task list. In this screen, select the template type Foundation and the template Computation Value Bases (CVBs). This will generate a process description automatically, but this can be updated if desired. Lastly, select the Browse button and navigate to the directory where you saved the updated spreadsheet.
To review the status of the upload and check whether any errors occurred, select the Foundation Data > Review Status task from the main task list.
See also Download/Upload Data from Spreadsheets and View Data Loading Status.
Location traits are user defined text tags that can be associated with stores. The association of a location trait to a store is done in the Store screen. They can be used to identify common characteristics in locations, which can then be used to support various business functions such as reporting, item ranging and location list creation. Location traits are also used in Sales Audit for assigning auditors to stores. Location traits are maintained through the upload/download process. This functionality is accessed from the main Merchandising task list under Foundation Data > Download Foundation Data and Foundation Data > Upload Foundation Data.
To add, update, or remove location traits, select the template type of Foundation from the Download Data screen and then the template Location Traits. Click the Download button and when prompted, choose to either open the .ods file that is generated or save the file and open it separately in the spreadsheet application of your choice.
Add a Location Trait
To add a new location trait, select the action type of Create on an empty row of the Location Traits tab. Next enter a unique number up to 4 digits in length for the location trait, the filter organization id, and a description for the trait in the primary language (as defined in the Merchandising system options) of up to 120 characters. The filter organization ID is optional, but if used will limit the location trait from being accessed to only those that are associated with the selected organizational ID when data filtering is turned on. The organizational ID that should be entered here will be a chain, area, region, or district, depending on the system option setting of the LOV Filtering Organizational Hierarchy attribute for Location Traits. Adding a location trait translation can be done in a similar manner on the Location Trait Translations tab. This facilitates the ability to translate the location trait description in multiple languages.
Updating a Location Trait
If you would like to update any details for location traits, a similar process will be followed as that described above for creating new. First, download the spreadsheet, and then navigate to the tab where you would like to make your updates.
The following columns can be updated in each tab:
Location Traits – Description, Filter Organization ID
Location Trait Translations – Trait Description
In the tab where you are going to make your updates, select the action type of Update, and then correct the value in the spreadsheet.
To update a location trait, select the action type of Update on the row you wish to change on the Location Traits tab. Next, update the column you wish to change. Note that the Location Trait column cannot be changed, but any of the other columns can be updated. The entries on the Location Trait Translations tab can be updated in a similar manner.
Removing a Location Trait
If you wish to remove a location trait, select the Delete action on the row of the location trait you which to delete on the Location Traits tab. Removing a location trait translation can be done in a similar manner on the Location Trait Translations tab. Note that removing a location trait is not allowed if it is still in use.
Uploading Changes
For all actions defined above, once all the updates have been made to the data in the spreadsheet, save the file and close it. Then, return to the Merchandising screens and select Foundation Data > Upload Foundation Data from the main task list. In this screen, you'll again select the template type Foundation and the template Location Trait. This will generate a process description automatically, but this can be updated if desired. Lastly, select the Browse button and navigate to the directory where you saved the updated spreadsheet.
To review the status of the upload and check whether any errors occurred, select the Foundation Data > Review Status task from the main task list.
See also Download/Upload Data from Spreadsheets and View Data Loading Status.
Outside locations are locations used in the import process to define external locations, such as lading and discharge ports, clearing zones, and bill-to locations. Outside Locations are maintained through the upload/download process. This functionality is accessed from the main Merchandising task list under Foundation Data > Download Foundation Data and Foundation Data > Upload Foundation Data.
To add, update, or remove Outside Locations, select the template type of Foundation from the Download Data screen and then the template Outside Locations. Click the Download button and when prompted, choose to either open the .ods file that is generated or save the file and open it separately in the spreadsheet application of your choice.
Add an Outside Location
To add a new outside location, select the action type of Create on an empty row of the Outside Locations tab. Next enter a unique 5 character field for the location field. The description for the outside location must be entered in the primary language (as defined in the Merchandising system options) of up to 150 characters. The secondary name is not required, but is intended to be used to store the Roman lettering for Japanese descriptions of up to 150 characters. The location type is required, and can be selected from a dropdown, which is maintained using the 'LOCT' Code type in the Codes table. To modify the valid outside location types, you can update the descriptions or add new values by accessing the Codes and Descriptions template (see Download Data and Upload Data). The country and VAT region are required for all location types. Currency is required for location types: Bill to Location, Discharge Port, and Routing Location. The rest of the address fields are optional including: Address 1, Address 2, City, State, Postal Code, Contact Name, Contact Phone, Contact Fax, Contact Telex, Contact E-mail, and Jurisdiction.
The Primary column is only used when location type is Clearing Zone, otherwise it should be set to No. When location type is Clearing Zone, one row per country should have primary set to Yes. If only one Clearing Zone is added for a country, the Primary column will automatically be set to Yes. Subsequently, if a new clearing zone is added or updated for the country with the Primary column set to Yes, the existing primary clearing zone for the country should be updated to change Primary to No.
Adding an outside location translation can be done in a similar manner on the Outside Location Translations tab. This facilitates the ability to translate the outside location address information in multiple languages.
Updating an Outside Location
If you would like to update any details for outside locations, a similar process will be followed as that described above for creating new. First, download the spreadsheet, and then navigate to the tab where you would like to make your updates.
The following columns can be updated in each tab:
Outside Locations – Outloc Description, Currency, Address 1, Address 2, City, State, Country, Postal Code, VAT Region, all contact columns, secondary name, jurisdiction, primary flag
|
Note: If the primary flag is changed from Yes to No on a Clearing Zone location type, ensure that another Clearing Zone for the same country is selected as primary or an error may occur. Similarly, if changing from No to Yes, then make sure to also update the currently flagged location for the country to not be the primary. |
Outside Location Translations – Outloc Description, Address 1, Address 2, City, Contact Name, Secondary Name
In the tab where you are going to make your updates, select the action type of Update, and then correct the value in the spreadsheet.
Removing an Outside Location
If you wish to remove an outside location, select the Delete action on the row of the outside location you which to delete on the Outside Locations tab. Removing an outside location translation can be done in a similar manner on the Outside Location Translations tab. Note that the removing an Outside Location is not allowed if it is still in use.
Uploading Changes
For all actions defined above, once all the updates have been made to the data in the spreadsheet, save the file and close it. Then, return to the Merchandising screens and select Foundation Data > Upload Foundation Data from the main task list. In this screen, you'll again select the template type Foundation and the template Outside Locations. This will generate a process description automatically, but this can be updated if desired. Lastly, select the Browse button and navigate to the directory where you saved the updated spreadsheet.
To review the status of the upload and check whether any errors occurred, select the Foundation Data > Review Status task from the main task list.
See also Download/Upload Data from Spreadsheets and View Data Loading Status.
Store Formats are optional attributes of a store. Examples could include Convenience Store or Hypermarket. Store format are used in Merchandising as part of the criteria when building location lists or for reporting. Store Formats are maintained through the upload/download process. This functionality is accessed from the main Merchandising task list under Foundation Data > Download Foundation Data and Foundation Data > Upload Foundation Data.
To add, update, or remove a store format, select the template type of Foundation from the Download Data screen and then the template Store Formats. Click the Download button and when prompted, choose to either open the .ods file that is generated or save the file and open it separately in the spreadsheet application of your choice.
Add a Store Formats
To add a new store format, select the action type of Create on an empty row of the Store Formats tab. Next enter a unique number up to 4 digits in length for the store format along with the description in the appropriate columns. The description should be entered in the primary language (as defined in the Merchandising system options) of up to 60 characters. Adding a store format translation can be done in a similar manner on the Store Format Translations tab. This facilitates the ability to translate the store format description in multiple languages.
Updating a Store Format
If you would like to update any details for store formats, a similar process will be followed as that described above for creating new. First, download the spreadsheet, and then navigate to the tab where you would like to make your updates.
The following columns can be updated in each tab:
Store Formats – Description
Store Format Translations – Description
In the tab where you are going to make your updates, select the action type of Update, and then correct the value in the spreadsheet.
Removing a Store Format
If you wish to remove a store format, select the Delete action on the row of the store format you which to delete on the Store Formats tab. Removing a store format translation can be done in a similar manner from the Store Format Translations tab. Note that the removing a store format is not allowed if the format is still in use for a store.
Uploading Changes
For all actions defined above, once all the updates have been made to the data in the spreadsheet, save the file and close it. Then, return to the Merchandising screens and select Foundation Data > Upload Foundation Data from the main task list. In this screen, you'll again select the template type Foundation and the template Store Formats. This will generate a process description automatically, but this can be updated if desired. Lastly, select the Browse button and navigate to the directory where you saved the updated spreadsheet.
To review the status of the upload and check whether any errors occurred, select the Foundation Data > Review Status task from the main task list.
See also Download/Upload Data from Spreadsheets and View Data Loading Status.
Store Grades are a way of grouping stores together, usually as a result of store clustering. Store grade groups are associated with a buyer, as it usually represents a clustering of locations for a particular group of departments or classes in the merchandise hierarchy. Store Grades are used to support distributing items on a purchase order, for building location lists, and for reporting. Store Grades are maintained through the upload/download process. This functionality is accessed from the main Merchandising task list under Foundation Data > Download Foundation Data and Foundation Data > Upload Foundation Data.
To add, update, or remove store grades or store grade groups, select the template type of Foundation from the Download Data screen and then the template Store Grades. Click the Download button and when prompted, choose to either open the .ods file that is generated or save the file and open it separately in the spreadsheet application of your choice.
Add a Store Grade
To add a store grade group, select the action type of Create on the Store Grade Group tab on an empty row. Next, enter a unique number with up to 8 digits. Then enter a description in the primary language (as defined in the Merchandising system options) and an existing buyer.
|
Note: Valid buyers are also managed via spreadsheet download/upload under the Template Type of Foundation and the Template Buyers and Merchandisers (see Download Data and Upload Data). |
To add a store grade, select the action type of Create on an empty row of the Store Grades tab. Next, enter a newly created or a previously existing store grade group, a store grade description in the primary language of up to 120 characters, and, optionally, a comment up to 2,000 characters. This facilitates the ability to translate the store grade group descriptions in multiple languages. Finally, stores should be added for a store grade group/store grade combination using the Create action on an empty row on the Store Grade Stores tab.
Updating a Store Grade
If you would like to update any details for store grade groups or store grades, a similar process will be followed as that described above for creating new. First, download the spreadsheet, and then navigate to the tab where you would like to make your updates.
The following columns can be updated in each tab:
Store Grade Groups – Description, Buyer
Store Grade Group Translations – Description
Store Grades – Comments
Store Grade Stores – Store Grade
In the tab where you are going to make your updates, select the action type of Update, and then correct the value in the spreadsheet.
Removing a Store Grade
If you wish to remove a store grade, select the Delete action on the row of the store grade you wish to delete on the Store Grades tab. Removing an entry from the Store Grade Groups tab, the Store Grade Group Translations tab, or the Store Grade Stores tab can be done in a similar manner. Note that removing an entry that is still in use is not allowed.
Uploading Changes
For all actions defined above, once all the updates have been made to the data in the spreadsheet, save the file and close it. Then, return to the Merchandising screens and select Foundation Data > Upload Foundation Data from the main task list. In this screen, you'll again select the template type Foundation and the template Store Grades. This will generate a process description automatically, but this can be updated if desired. Lastly, select the Browse button and navigate to the directory where you saved the updated spreadsheet.
To review the status of the upload and check whether any errors occurred, select the Foundation Data > Review Status task from the main task list.
See also Download/Upload Data from Spreadsheets and View Data Loading Status.
Transfer zones are used to restrict transfers from store to store in a specified group of stores (zone), usually to help manage transportation costs. Zones are linked to stores as an attribute. Transfer Zones are maintained through the upload/download process. This functionality is accessed from the main Merchandising task list under Foundation Data > Download Foundation Data and Foundation Data > Upload Foundation Data.
To add, update, or remove a transfer zone, select the template type of Foundation from the Download Data screen and then the template Transfer Zones. Click the Download button and when prompted, choose to either open the .ods file that is generated or save the file and open it separately in the spreadsheet application of your choice.
Add a Transfer Zone
To add a new transfer zone, select the action type of Create on an empty row of the Transfer Zones tab. Next enter a unique number up to 4 digits in length for the transfer zone, and the transfer zone description in the primary language of up to 120 characters. Adding a transfer zone translation can be done in a similar manner on the Transfer Zone Translations tab. This facilitates the ability to translate the transfer zone description in multiple languages.
Updating a Transfer Zone
If you would like to update any details for transfer zones, a similar process will be followed as that described above for creating new. First, download the spreadsheet, and then navigate to the tab where you would like to make your updates.
The following columns can be updated in each tab:
Transfer Zones – Description
Transfer Zone Translations – Description
In the tab where you are going to make your updates, select the action type of Update, and then correct the value in the spreadsheet.
Removing a Transfer Zone
If you wish to remove a transfer zone, select the Delete action on the row of the transfer zone you which to delete on the Transfer Zones tab. Removing a transfer zone translation can be done in a similar manner on the Transfer Zone Translations tab. Note that removing a transfer zone is not allowed if it is still assigned to a store.
Uploading Changes
For all actions defined above, once all the updates have been made to the data in the spreadsheet, save the file and close it. Then, return to the Merchandising screens and select Foundation Data > Upload Foundation Data from the main task list. In this screen, you'll again select the template type Foundation and the template Transfer Zone. This will generate a process description automatically, but this can be updated if desired. Lastly, select the Browse button and navigate to the directory where you saved the updated spreadsheet.
To review the status of the upload and check whether any errors occurred, select the Foundation Data > Review Status task from the main task list.
See also Download/Upload Data from Spreadsheets and View Data Loading Status.
The merchandise hierarchy allows you to create the preferred product management structure for your company. A maximum of six levels of hierarchy relationships can be added from Company down to Subclass. All levels of the hierarchy are required. You can assign a buyer and merchandiser at the division, group, and department levels of the merchandise hierarchy. The levels of the merchandise hierarchy in Merchandising are:
Company: The highest default organizational and merchandise hierarchy level defined in Merchandising. Only one company can be defined.
Division: The second level of the merchandise hierarchy below company is division. The definition of this level can differ based on the needs of your company, but is commonly used for grouping broader categories of product within the organization. For example, a mass merchandiser may have a division for clothing, one for grocery, and so on.
Group: The next level below division is group. This definition can also differ based on the needs of your company, but usually is used to break down the division grouping to the next level of product. So, in the mass merchandiser example, groups within the clothing division may be defined as Women's, Men's, and Children's. A group belongs to only one division.
Department: Below group is department, which where many key attributes for Merchandising are managed in the merchandise hierarchy, such as the accounting method (cost or retail) and whether or not value added tax (VAT) is included in the retail prices for items in the department. A department belongs to only one group.
Class: The second lowest level of the merchandise hierarchy is class, which rolls up to a single department.
Subclass: The lowest level of the merchandise hierarchy, a subclass rolls up to a department/class combination and is the level of the hierarchy that connects to item.
The Merchandise Hierarchy page allows you to create, edit, and view a member of the selected level of the merchandise hierarchy.
The Merchandise Hierarchy structure on the left side of the page contains the following buttons.
Table 2-8 Merchandise Hierarchy Structure - Buttons and Description
| Buttons | Description |
|---|---|
|
Division |
Displays the available divisions in the table. |
|
Group |
Displays the available groups in the table. |
|
Department |
Displays the available departments in the table. |
|
Class |
Displays the available classes in the table. |
|
Subclass |
Displays the available subclasses in the table. |
The Hierarchy table displays the available entries of the selected hierarchy level.
For example, if you select the Division button, all available divisions are displayed in this table.
The table displays the following columns by default.
Hierarchy ID, depending on the selected hierarchy button.
Name of the hierarchy level, for example, the name of the chain.
Next hierarchy level, for example, Group
This column contains either the Create icon or the Details icon.
If the next level has been created, the Detail icon is displayed. Use the icon to maintain or view the details of the next level.
If the next level has not been created, the Create icon is displayed. Use the icon to create the next level.
This column is not available for subclasses.
To create a division, follow the steps below.
Click the Division button. All available divisions are displayed in the table.
In the table, select Actions > Create, or use the Create icon. The Divisions page appears.
Select Actions > Add, or use the Add icon. The Add Division page appears.
In the Division field, enter a unique ID for the division.
In the Name field, enter a name for the division.
In the Total Market Amount field, enter the amount of annual sales that the division is expected to generate in thousands.
In the Buyer Name field, enter, select or search for the buyer ID who is responsible for the division.
In the Merchandiser Name field, enter, select or search for the merchandiser ID who is responsible for the division.
Then choose one of the following options.
Click OK to add the division and close the page.
Click OK and Add Another to add additional divisions.
Click Cancel to reject all entries and close the page.
To edit a division, follow the steps below.
Click the Division button. All available divisions are displayed in the table.
Select Actions > Edit, or use the Edit icon. The Divisions page appears.
Select a record in the table.
Then select Actions > Edit, or use the Edit icon. The Edit Division page appears.
The information of the selected division is displayed. Change the values, as necessary. You cannot change the division ID.
Then choose one of the following options.
Click OK to save your changes and close the page.
Click Cancel to reject all entries and close the page.
The Divisions page allows you to add, edit, delete and view divisions in the merchandise hierarchy. A division is below the company and above the group in the merchandise hierarchy. Typically, the division is used to signify the type of merchandise that your organization offers, such as hardlines or apparel.
To create a group, follow the steps below.
Click the Group button. All available groups are displayed in the table.
In the table, select Actions > Create, or use the Create icon. The Groups page appears.
Select Actions > Add, or use the Add icon. The Add Group page appears.
In the Group field, enter a unique ID for the group. This field is a required field.
In the Name field, enter a name for the group. This field is a required field.
In the Division field, enter, select or search for the division ID of the division associated with the group. This field is a required field.
In the Buyer Name field, enter, select or search for the buyer ID who is responsible for the group.
In the Merchandiser Name field, enter, select or search for the merchandiser ID who is responsible for the group.
Then choose one of the following options.
Click OK to add the group and close the page.
Click OK and Add Another to add additional divisions.
Click Cancel to reject all entries and close the page.
To edit a group, follow the steps below.
Click the Group button. All available groups are displayed in the table.
Select Actions > Edit, or use the Edit icon. The Groups page appears.
Select a record in the table.
Then select Actions > Edit, or use the Edit icon. The Edit Group page appears.
The information of the selected group is displayed. Change the values, as necessary. You cannot change the group ID.
Then choose one of the following options.
Click OK to save your changes and close the page.
Click Cancel to reject all entries and close the page.
To create a department, follow the steps below.
Click the Department button. All available departments are displayed in the table.
In the table, select Actions > Create, or use the Create icon. The Department page appears.
Enter the necessary information. For more information about the available fields of the Department page, see the Department Page section.
Then select one of the following options.
Click Save and Close to save the current department and close the page.
Click Save to save the current department.
Click Save and Create Another to create additional departments.
Click Cancel to reject all entries and close the page.
The Department Up Charge page displays a department's from/to location combinations and associated up charges. Up Charges are incurred when transferring items within the department or within the from and the to locations.
|
Note: This page will only be available if the Merchandising 'Estimated Landed Costs' indicator is set to 'Yes'. |
Each Up Charge has a:
Calculation Basis of either 'Value' or 'Specific.'
Cost Basis of either 'Weighted Average Cost' (when using Average Cost Method) or 'Unit Cost' (when using Standard Cost Method).
Component Rate of:
Monetary if Calculation Basis = 'Specific.'
Percentage if Calculation Basis = 'Value.'
Component Currency.
The Up Charge Group is used to group Up Charge Components together to show a total sum on the Transfer Up Charge page.
The Locations section displays the from and to locations containing expenses for the department.
In the Rate Updates section you can apply rate updates to items and transfers and allocations.
To maintain department up charges, follow the steps listed in the sections below.
From the Tasks menu, select Foundation Data > Items > Merchandise Hierarchy. The Merchandise Hierarchy page appears.
Click the Department button. The available Departments are displayed in the table.
In the Department column, click the department ID link, or mark a record and select Actions > Edit, or use the Edit icon. The Department page appears.
Select More Actions > Up Charges. The Department Up Charges page appears.
Update the department up charges, as necessary.
Adding Locations
To add locations for up charges, follow the steps listed below.
In the Locations section, select Actions > Add, or use the Add icon. The Add Locations page appears.
In the From Group Type field, select a group type from the list. This field is a required field.
In the From Group field, enter, select or search for the group ID, if enabled.
In the To Group Type field, select the group type from the list. This field is a required field.
In the To Group field, enter, select or search for the group ID, if enabled.
In the Component field, enter, select or search for the component. This field is a required field.
In the Up Charge Group field, select an up charge group from the list. This field is a required field.
In the Component Rate field, enter the rate. This field is a required field.
In the Per Count field, enter the number of counts.
In the Per Count Unit of Measure, enter, select or search for the UOM.
In the Component Currency field, enter, select or search for the currency.
Then choose one of the following options.
Click OK to save the location information and close the page.
Click OK and Add Another to add additional location information.
Click Cancel to reject all entries and close page.
Adding Components
To add components, follow the steps listed below.
In the Up Charges section, select Actions > Add, or use the Add icon. The Add Component page appears.
In the Component field, enter, select or search for the component. This field is a required field.
In the Up Charge Group field, select the group from the list.
In the Component Rate field, enter the rate.
In the Per Count field, enter the number of counts.
In the Per Count Unit of Measure, enter, select or search for the UOM.
In the Component Currency field, enter, select or search for the currency.
Then choose one of the following options.
Click OK to save the location information and close the page.
Click OK and Add Another to add additional location information.
Click Cancel to reject all entries and close the page.
Editing Components
To edit existing components, follow the steps listed below.
In the Up Charges section, select Actions > Edit, or use the Edit icon. The Edit Component page appears.
Edit the fields, as necessary.
Then choose one of the following options.
Click OK to save your changes and close the page.
Click Cancel to reject all entries and close the page.
Adding Rate Updates
To add rate updates for items and/or transfers and allocations, follow the steps below.
In the Rate Updates section, select Actions > Add, or use the Add icon. The Add Rates page appears.
In the Effective Date field, enter the effective date or use the Calendar icon to select a date. This field is a required field.
In the Component Rate field, enter the component rate. This field is a required field.
In the Per Count field, enter the number of counts.
In the Per Count UOM, enter, select or search for the unit of measure.
In the Component Currency field, enter, select or search for the component currency code.
Select the Transfers and Allocations checkbox to apply the rate updates to transfers and allocations.
Select the Items checkbox to apply the rate updates to items.
Then choose one of the following options.
Click OK to add the rate updates and close the page.
Click OK and Add Another to add additional rate updates.
Click Cancel to reject all entries and close the page.
Editing Rate Updates
To edit rate updates for items and/or transfers and allocations, follow the steps below.
In the Rate Updates section, select Actions > Edit, or use the Edit icon. The Edit Rates page appears.
Edit the fields, as necessary.
Then choose one of the following options.
Click OK to add the rate updates and close the page.
Click Cancel to reject all entries and close the page.
The Department VAT page allows you to maintain and view value added tax (VAT) regions and VAT codes that are associated with a department. The VAT regions and VAT codes that are entered at the department level become the default VAT regions and VAT codes for items within the department.
To maintain Department VAT regions, follow the steps below.
From the Tasks menu, select Foundation Data > Items > Merchandise Hierarchy. The Merchandise Hierarchy page appears.
Click the Department button. The available Departments are displayed in the table.
In the Department column, click the department ID link, or mark a record and select Actions > Edit, or use the Edit icon. The Department page appears.
Select More Actions > VAT Maintenance. The Department VAT page appears.
Update the department VAT regions, as necessary.
Adding VAT Regions
To add VAT regions to the selected department, follow the steps below.
Select Actions > Add, or use the Add icon. The Add VAT Region page appears.
In the VAT Region field, enter, select or search for the desired region. This field is a required field.
In the VAT Type field, select the type from the list. This field is a required field.
In the VAT Code field, enter, select or search for the VAT code.
The Rate(%) and the VAT Code Description are displayed.
Then choose one of the following options.
Click OK to add the VAT region and close the page.
Click OK and Add Another to add additional VAT regions.
Click Cancel to reject all entries and close the page.
Editing VAT Regions
To edit VAT regions for the selected department, follow the steps below.
Select Actions > Edit, or use the Edit icon. The Edit VAT Region page appears.
In the VAT Code field, change the VAT code, as necessary.
Then choose one of the following options.
Click OK to save your changes and close the page.
Click Cancel to reject all entries and close the page.
To edit a department, follow the steps below.
Click the Department button. All available departments are displayed in the table.
In the table, select the department you want to edit. The Department page appears.
The information of the selected department is displayed. Change the values, as necessary. You cannot change the department ID and purchase type.
Then choose one of the following options.
Click Save and Close to save your changes and close the page.
Click Save to save your changes.
The Department page allows you to create, edit, delete, and view a department in the merchandise hierarchy.
The Department page contains the following fields.
Table 2-9 Department - Fields and Description
| Fields | Description |
|---|---|
|
Department |
Enter a unique ID for the department. Enter a name for the department in the field next to the department ID. These fields are required fields. You cannot edit the department ID in edit mode. |
|
Group |
Enter, select or search for the group ID associated with the department. This field is a required field. |
|
Profit Calculation Type |
Select a profit calculation type from the list. Possible values are:
This field is a required field. |
|
OTB Calculation Type |
Select an OTB calculation type from the list. Possible values are:
This field is a required field. |
|
Purchase Type |
The purchase type indicates the type of merchandise sold in the department. Select a purchase type from the list. Possible values are:
This field is a required field. You cannot change the purchase type in edit mode. |
|
Buyer |
Enter, select or search the buyer ID associated with the department. |
|
Merchandiser |
Enter, select or search for the merchandiser ID associated with the department. |
|
Markup Calculation Type |
Select the markup calculation type. |
|
Markup % of Cost |
Enter the markup percent of the cost. This field is a required field. You cannot change the value in edit mode. |
|
Markup % of Retail |
Enter the markup percent of the retail value. This field is a required field. You cannot change the value in edit mode. |
|
Total Market Amount (in Thousands) |
Enter the amount of annual sales that the department is expected to generate. |
|
Maximum Average Counter |
Enter the maximum average counter. This field is a required field. |
|
Average Tolerance |
Enter the average tolerance value in percent. This field is a required field. |
|
Include VAT in Retail? checkbox |
The Include VAT in Retail checkbox indicates that all prices include VAT in the retail price for all classes in the department. Clear the check box to indicate that VAT is not included in the retail price at the class level, and is applied at the POS. The Include VAT in Retail checkbox is only available, if the default tax type is set to Simple VAT or Global Tax. |
To create a class, follow the steps below.
Click the Class button. The Department field is displayed.
In the Department field, enter, select or search for the department ID.
In the table, select Actions > Create, or use the Create icon. The Classes page appears. The selected department ID and description are displayed in the header.
Select Actions > Add, or use the Add icon. The Add Class page appears.
In the Class field, enter a unique ID for the class. This field is a required field.
In the Name field, enter a name for the class. This field is a required field.
Select the Include VAT in Retail checkbox to indicate that the retail price includes VAT.
|
Note: The Include in VAT Retail checkbox is only displayed, if VAT at the class level is indicated in the Merchandising system settings.If you do not select the checkbox, you indicate that VAT should be applied to the retail price at the point of sale when setting up a store. |
Then choose one of the following options.
Click OK to add the class and close the page.
Click OK and Add Another to add additional classes.
Click Cancel to reject all entries and close the page.
To edit a class, follow the steps below.
Click the Class button. The Department field is displayed.
In the Department field, enter, select or search for the department ID. The classes for the selected department are displayed in the table.
Select Actions > Edit, or use the Edit icon. The Classes page appears.
Select a record in the table.
Then select Actions > Edit, or use the Edit icon. The Edit Class page appears.
The information of the selected class is displayed. Change the values, as necessary. You cannot change the class ID.
Then choose one of the following options.
Click OK to save your changes and close the page.
Click Cancel to reject all entries and close the page.
The Classes page allows you to add, edit, delete, and view a class in the merchandise hierarchy. A class is below the department and above the subclass in the merchandise hierarchy.
A class can belong to only one department. A class further defines the type of merchandise sold in a department. For example, a department for Men's Shirts might have the classes Casual, Business, and Formal.
When VAT is enabled at the class level in Merchandising, you can indicate whether the retail price should include the VAT or not. If you choose not to indicate that VAT is included at the class level, then you should indicate to include it at the POS.
Finally, you can associate user defined attributes with a class.
To create a subclass, follow the steps below.
Click the Subclass button. The Department field is displayed.
In the Department field, enter, select or search for the department ID. The Class field enables.
In the Class field, enter, select or search for the class ID. The available subclasses are displayed in the table.
Select Actions > Create, or use the Create icon. The Subclasses page appears. The selected department/class ID and description are displayed in the header.
Select Actions > Add, or use the Add icon. The Add Subclass page appears.
In the Subclass field, enter a unique ID for the subclass. This field is a required field.
In the Name field, enter a name for the subclass. This field is a required field.
Then choose one of the following options.
Click OK to add the subclass and close the page.
Click OK and Add Another to add additional subclasses.
Click Cancel to reject all entries and close the page.
To edit a subclass, follow the steps below.
Click the Subclass button. The Department field is displayed.
In the Department field, enter, select or search for the department ID. The Class field is enabled.
In the Class field, enter, select or search for the Class ID. The available subclasses are displayed in the table.
In the table, select Actions > Edit, or use the Edit icon. The Subclasses page appears.
Select a record in the table.
Then select Actions > Edit, or use the Edit icon. The Edit Subclass page appears.
The information of the selected subclass is displayed. Change the values, as necessary. You cannot change the subclass ID.
Then choose one of the following options.
Click OK to save your changes and close the page.
Click Cancel to reject all entries and close the page.
The Subclasses page allows you to add, edit, delete, and view a subclass in the merchandise hierarchy. A subclass is below a class in the merchandise hierarchy. A subclass can belong to only one class. A subclass further defines the type of merchandise sold in a department and class.
You can associate user defined attributes with a subclass.
The Pending Merchandise Hierarchy option opens the Pending Merchandise Hierarchy Search page. In the Pending Merchandise Hierarchy Search page you can perform the following actions.
Search for pending hierarchy levels by various search criteria
View the entered search results
View and edit the action type of the hierarchy level
To search for a pending merchandise hierarchy level:
From the Task menu, select Foundation Data > Items > Pending Merchandise Hierarchy. The Pending Merchandise Hierarchy Search page appears.
You can search for a hierarchy by using basic or advanced search criteria, depending on the requirement. The basic mode is the default search mode.
Click Advanced to access the search section in advanced mode.
Click Basic to return to the basic mode.
Searching for a Pending Merchandise Hierarchy Through the Basic Search Criteria
To search for a hierarchy level by using basic search criteria:
Enter, select or search for one or all of the following basic search criteria.
Table 2-10 Pending Merchandise Hierarchy Search - Basic Search Criteria and Description
| Fields | Description |
|---|---|
|
Match option |
Check radio button All or Any. All - only hierarchy levels matching all entered search criteria are shown. Any - hierarchy levels matching any of the entered search criteria are shown. |
|
Action Type |
Select an action type from the list. Possible action types are:
|
|
Effective Date |
Enter an effective date or use the Calendar icon to select a date. |
|
Division |
Enter, select or search for a division. |
|
Group |
Enter, select or search for a group. |
|
Department |
Enter, select or search for a department. |
|
Class |
Enter, select or search for a class. |
|
Subclass |
Enter, select or search for a subclass. |
Click on the Saved Search list to select one of the saved search criteria. Selecting a saved search populates the search section with the saved search criteria. If the run automatically function is enabled for the search, the search is executed immediately.
You can also personalize your saved searches by selecting Personalize. The Personalized Saved Searches page appears.
For more information about the Personalized Saved Search, see Personalize Saved Search in the Oracle® Retail Merchandising Do the Basics User Guide.
Click Search. The pending hierarchy levels that match the search criteria are displayed in the Results section.
Click Reset to clear the search section and results.
Click Save As... to save the current search criteria. The Create Saved Search page appears.
For more information about how to save your search criteria, see Create Saved Search in the Oracle® Retail Merchandising Do the Basics User Guide.
Click Done to close the page.
Searching for a Pending Hierarchy Through Advanced Search Criteria
To search for a hierarchy level by using advanced search criteria:
To search by using advanced search criteria, enter or select one or all of the advanced search criteria.
To narrow down the search, use the list next to the search fields. For example, determine if the entered value should be equal or not equal to the search result.
Click on the Saved Search list to select one of the saved search criteria. Selecting a saved search populates the search section with the saved search criteria. If the run automatically function is enabled for the search, the search is executed immediately.
You can also personalize your saved searches by selecting Personalize. The Personalized Saved Searches page appears.
For more information about the Personalized Saved Search, see Personalize Saved Search in the Oracle® Retail Merchandising Do the Basics User Guide.
Click Search. The pending hierarchy levels that match the search criteria are displayed in the Results section.
Click Reset to clear the search section and results.
Click Save As... to save the current search criteria. The Create Saved Search page appears.
For more information about how to save your search criteria, see Create Saved Search in the Oracle® Retail Merchandising Do the Basics User Guide.
Click Add Fields to add more fields for the advanced search. To remove the field from the search, click the x right next to the field.
Click Reorder to change the order of the available search fields. The Reorder Search Fields page appears.
Select the desired search field and use the up and down arrows to rearrange the order of the fields.
Click OK to confirm the new order of the fields and close the page.
Click Cancel to reject any changes and close the page.
Click Done to close the page.
The Pending Merchandise Hierarchy page allows you to maintain movements within the merchandise hierarchy. Movements within the merchandise hierarchy will lead to the eventual reclassification of the items within the reclassified level. When an item is reclassified, sales history, purchase orders, inventory, and planning information is reclassified as well.
Only Level 1 items can be reclassified. Any prepacks, Level 2, or Level 3 items associated with the Level 1 item are also reclassified.
The Pending Merchandise Hierarchy page contains the following fields.
Table 2-11 Pending Merchandise Hierarchy - Fields and Description
| Fields | Description |
|---|---|
|
Action Type |
Displays, if you add or edit a merchandise hierarchy. |
|
Effective Date |
Enter an effective date or use the Calendar icon to select a date. |
|
Hierarchy Level |
Displays the hierarchy level. |
|
Hierarchy Level ID and Description |
Displays the hierarchy level. Enter a description. You can create a translation by selecting the Translate icon. |
|
Buyer |
Enter, select or search for the buyer. |
|
Total Market Amount (in Thousands) |
Enter the total market amount in thousands. |
|
Merchandiser |
Enter, select or search for the merchandiser. |
|
Domain |
This field contains the unique number representing the domain. The domain number is used when interfacing data to external systems using domains. |
|
Markup Calculation Type: |
|
|
% of Cost |
Indicates that the markup is calculated as a percentage of the cost. |
|
% of Retail |
Indicates that the markup is calculated as a percentage of the Retail value. |
|
Profit Calculation Type: |
|
|
Direct Cost |
Indicates that the profit is calculated by direct cost. |
|
Retail Inventory |
Indicates that the profit is calculated by retail inventory. |
|
Open To Buy (OTB) Calculation Type: |
|
|
Cost |
Determines that the OTB is calculated by costs in this hierarchy level. |
|
Retail |
Determines that the OTB is calculated by retail value in this hierarchy level. |
|
Purchase Order Type: |
|
|
Normal Merchandise |
Indicates that the items in the department are ordered, invoiced, and recorded in the stock ledger. |
|
Consignment Stock |
Indicates that the items in the department are ordered, invoiced, and recorded in the stock ledger. Accounts receivable and accounts payable are not recorded for this item type. The consignment rate is recorded at the item/supplier level. |
|
Concession Stock |
Indicates that the items in the department are ordered, invoiced, and recorded in the stock ledger. Accounts receivable and accounts payable are not recorded for this item type. The concession rate is recorded at the item/supplier level. |
|
For Departments the Markup Calculation Type, OTB Calculation Type and Purchase Order Type are not available. |
|
|
Markup % of Cost |
Displays the budgeted markup as percentage of the costs. |
|
Markup % of Retail |
Displays the markup in %. When the retailer uses Simple VAT or Global Tax, this value excludes VAT. |
|
Maximum Average Counter |
Displays the maximum count of days with acceptable data to include on average for items within the hierarchy type. |
|
Average Tolerance % |
Displays a tolerance percentage value which is used as average for items within this value. This value sets a range for appropriate data and constrain outliers. |
To edit the pending merchandise hierarchy, follow the steps below.
From the Tasks menu, select Foundation Data > Items > Pending Merchandise Hierarchy. The Pending Merchandise Hierarchy Search page appears.
Enter or select search criteria as desired to make the search more restrictive.
Click Search. The actions that match the search criteria are displayed in the Results section.
In the Action Type column, click the action link, or mark a record and select Actions > Edit, or use the Edit icon. The Pending Merchandise Hierarchy page appears.
Edit the fields, as necessary.
Then choose one of the following options.
Click Save to save your changes.
Click Save and Close to save your changes and close the page.
Click Cancel to reject all entries and close the page.
In addition to the hierarchy, there are three other foundational data components that can be set up in Merchandising: buyers, merchandisers, and merchandise hierarchy defaults. Buyers and merchandisers are common retail roles associated with managing the business of a product area. They can be associated with the division, group, or department levels of the merchandise hierarchy to facilitate reporting within Merchandising. Merchandise hierarchy defaults can be defined at the department, class, and/or subclass level and allow for configuration of the item setup process for items in those hierarchies by allowing you to define certain attributes of items as required or displayed. For example, the functionality could be used to make differentiators required for a fashion department, to ensure that all items created in that department get set up with colors and sizes.
Buyer and Merchandiser are business roles that are common across retailers. The role of the buyer is typically to research, select, and procure stock for purposes of resale to an end customer. Similarly, the role of the Merchandiser is broadly to stimulate product sales through a variety of means including product design, packaging, availability, display, pricing, etc. Buyer and Merchandiser details can be captured in the Merchandising system. Once defined, these buyers and merchandisers can be associated with merchandise hierarchy levels thereby giving them a span of control over a product hierarchy.
Buyers and Merchandisers can be defined and managed using the spreadsheet download and upload processes, which are accessed through the main Merchandising task list under Foundation Data > Download Foundation Data and Foundation Data > Upload Foundation Data respectively. Navigate to Foundation Data > Download Foundation Data, choose the Template Type of 'Foundation' and the Template titled 'Buyers and Merchandisers' to download existing data into a spreadsheet.
Adding a Buyer
In order to add a new Buyer, start in the Buyers tab on the spreadsheet. Add a new row by selecting the action type of Create and proceed to add Buyer details which includes the Buyer ID which is a 4 digit numeric code that uniquely identifies the Buyer, the Buyer name and the buyer contact details (phone and fax numbers).
There are no significant validations for uploading a new Buyer definition apart from validating that the Buyer ID is unique.
Adding a Merchandiser
In order to add a new Merchandiser, start in the Merchandisers tab on the spreadsheet. Add a new row by selecting the action type of Create and proceed to add Merchandiser details which includes the Merchandiser ID which is a 4 digit numeric code that uniquely identifiers the Merchandiser, the Merchandiser name and the merchandiser contact details (phone and fax numbers).
There are no significant validations for uploading a new Merchandiser definition apart from validating that the Merchandiser ID is unique.
Updating Buyer and Merchandiser Details
If you would like to update any details, a similar process will need be followed as that described above for creating new Buyers or Merchandisers. First, download the Buyers and Merchandisers spreadsheet, and then navigate to the tab where you would like to make your updates.
The following columns can be updated in each tab:
Buyers – Buyer Name, Buyer Phone, Buyer Fax
Merchandisers – Merchandiser Name, Merchandiser Phone, Merchandiser Fax
In the tab where you are going to make your updates, set the action type to Update on the row being updated, and then correct the value in the spreadsheet. Once your updates are complete, save and close the spreadsheet.
Deleting a Buyer or Merchandiser
If you wish to delete a Buyer or Merchandiser record, then update the action column to Delete against the Buyer or Merchandiser record to be deleted in their respective tabs. Before deleting a Buyer or Merchandiser, care should be taken to ensure it is really not associated with a hierarchy or an error will be raised on upload.
Uploading Changes
For all actions defined above, once all the updates have been made to the data in the spreadsheet, save the file and close it. Then, return to the Merchandising screens and select Foundation Data > Upload Foundation Data from the main task list. In this screen, you will again select the template type Foundation and the template Buyer and Merchandisers. This will generate a process description automatically, but this can be updated if desired. Lastly, you will select the Browse button and navigate to the directory where you saved the updated spreadsheet.
To review the status of the upload and check whether any errors occurred, select the Foundation Data > Review Status task from the main task list.
See also Download Data, Upload Data and View Data Loading Status.
The Merchandise Hierarchy Defaults page allows you to make certain item details available and required. These item defaults are based on the department, class, and subclass in which the item resides. The defaults may include a variety of options, such as Harmonized Tariff Schedule (HTS), item attributes, and tickets. You can set up the defaults when creating a department, class, or subclass. For example, you can indicate that items in a selected department cannot be approved unless they have an HTS code. On the other hand, you can make the HTS option unavailable for items in the selected department.
When creating defaults at the department level, you can add information only for the classes and subclasses within that department. For example, if you enter department 1000 and make the default both available and required, every class and subclass within department 1000 inherits the same default settings. If you enter department 2000 and class 3000, every subclass within department 2000 and class 3000 inherits the same default settings.
To maintain merchandise hierarchy defaults, follow the steps below.
From the Tasks menu, select Foundation Data > Items > Merchandise Hierarchy. The Merchandise Hierarchy page appears.
Click the Department/Class/Subclass button. The available departments/classes/subclasses are displayed in the table.
In the Department/Class/Subclass column, click the department ID link, or mark a record and select Actions > Edit, or use the Edit icon. The Department/Class/Subclass page appears.
Select More Actions > Merchandise Hierarchy Defaults. The Merchandise Hierarchy Defaults page appears.
Update the hierarchy default information, as necessary.
Adding Defaults
To add item defaults for the selected hierarchy level, follow the steps below.
In the table, select Actions > Add, or use the Add icon. The Add Merchandise Hierarchy Defaults page appears.
In the Information field, select the default information you want to add.
In the Class field, enter, select or search for the class ID. This field is only enabled, if you add an item default for a department.
In the Subclass field, enter, select or search for the subclass ID. This field is only enabled, if you add an item default for a department.
Indicate, if the information is unavailable or available for the items in the selected department/class/subclass.
Select the Required checkbox to indicate that the information is required for items in the selected department/class/subclass.
Then choose one of the following options.
Click OK to add the default information and close the page.
Click OK and Add Another to add additional defaults.
Click Cancel to reject all entries and close the page.
Editing Defaults
To edit item defaults for the selected hierarchy level, follow the steps below.
In the table, select Actions > Edit, or use the Edit icon. The Edit Merchandise Hierarchy Defaults page appears.
Change the checkboxes, as necessary. All other fields are disabled.
Then choose one of the following options.
Click OK to save your changes and close the page.
Click Cancel to reject all entries and close the page.
Copy All
To copy all item defaults from one subclass to another, follow the steps below.
In the table, select the Copy All button. The Copy From page appears.
In the Department field, enter, select or search for the department you want to copy from.
In the Class field, enter, select or search for the class ID.
In the Subclass field, enter, select or search for the subclass ID.
Then choose one of the following options.
Click OK to copy the item defaults from the selected hierarchy and close the page.
Click Cancel to reject all entries and close the page.
Reclassification page allows you to move an item or item list from one department/class/subclass to another.
You can determine which item or item list needs to be reclassified, under which department, class, subclass, and the effective date. A batch process reclassifies those items whose effective date is the next day.
The Reclassification page contains the following sections.
The Reclassification table lists the reclassification ID, description, date as well as the pending hierarchy level information. In this table you can to add, delete, or view the reclassification events that have not been processed yet.
The Details section lists the item ID, description and current merchandise hierarchy level information.
To add a reclassification, follow the steps below.
From Task Menu, select Foundation Data > Items > Reclassification. The Reclassification page appears.
In the table, select Actions > Add, or use the Add icon. The Add Reclassification page appears.
In the Description field, enter a description for the new reclassification event.
In the Reclass Date field, enter the date when the item/item list must be reclassified, or use the Calendar icon to select a date.
Then select, if you want to reclassify an item or item list.
Enter, select or search for the desired item or item list.
Then select the new hierarchy for the item or item list. In the Department field, enter select, or search for the new department.
In the Class field, enter, select or search for the new class.
In the Subclass field, enter, select or search for the new subclass.
Then choose one of the following options.
Click OK to save the new reclassification and close the page.
Click OK and Add Another to add additional reclassifications.
Click Cancel to reject all entries and close the page.
When items are moved from one department, class, and subclass combination to another, several other modules can be affected.
Sales history: A reclassification event does not rebuild sales history automatically. A reclassification does not affect previously recorded sales history. Merchandising maintains three levels of rolled up sales history: department, class, and subclass. Optional batch programs are available that can be used to rebuild the rolled up sales history.
Stock ledger: Stock ledger transactions are written to move the inventory amount associated with an item from the old department, class, and subclass to the new. Existing stock ledger transactions are not updated to reflect the hierarchy change.
Open to buy: Open to buy (OTB) records are updated for all orders that are approved, but have not yet been received.
Forecasts: If the reclassified item is forecastable and the new hierarchy values move the item to a new forecast domain, then an indicator is reset for the item at the item/store level. This change indicates to the program responsible for extracting sales history that the next time sales history is extracted from Merchandising for that item and store combination, all sales history should be extracted. Normally, only the sales history that occurred since the last data export is extracted.
The following check are preformed when you reclassify an item.
The following edit checks are performed as you set up a reclassification event. The event cannot be created if:
The item exits in another reclassification event.
One or more items on the reclassification event exist on approved partially received orders.
Other edit checks that can cause a reclassification event to fail also occur during the batch processing of the event. A reclassification cannot occur if:
The item is on a Unit and Value stock count. The items to be counted have already been determined based on the department, class, and subclass specified when the stock count was created. The stock count is scheduled after the effective date of the reclassification event.
The item is forecastable, but the new hierarchy values with which the item is associated do not have an associated forecast domain.
The new department, class, and subclass contain a required user defined attribute that must be entered at the item level.
The new department, class, and subclass contain a user defined attribute that defaults at the item level, but the item does not have this UDA defined.
The Manage Item Lists option opens the Item List Search page. In the Item List Search page you can perform the following actions.
Search for an item list by various search criteria
View the entered search results
View an item list
Create an item list
Create an item list from an already existing item list
Edit an item list
You can access the Item List Search page from the Task menu, select Foundation Data > Items > Manage Item Lists. The Item List Search page appears.
The Item List Search page contains the following sections.
Search
For more information about how to search for an item list, see the Searching for an Item List section.
To search for an item list:
From the Task menu, select Foundation Data > Item > Manage Item Lists. The Item List Search page appears.
You can search for an item list by using basic or advanced search criteria, depending on the requirement. The basic mode is the default search mode.
Click Advanced to access the search section in advanced mode.
Click Basic to return to the basic mode.
To search for an item list by using basic search criteria:
Enter, select or search for one or all of the following basic search criteria.
Table 2-12 Item List Search - Basic Search Criteria and Description
| Fields | Description |
|---|---|
|
Match option |
Check radio button All or Any. All - only item lists matching all entered search criteria are shown. Any - item lists matching any of the entered search criteria are shown. |
|
Item List |
Enter the item list ID. |
|
Description |
Enter the item description. |
|
Type |
Select a type from the list. |
|
Created Date |
Enter a created date or use the Calendar icon to select a date. |
|
Created By |
Select the desired user from the list. |
|
Item |
Enter or search for an item. |
|
Item Description |
Enter the item description. |
Click the Saved Search list to select one of the saved search criteria. Selecting a saved search populates the search section with the saved search criteria. If the run automatically function is enabled for the search, the search is executed immediately.
You can also personalize your saved searches by selecting Personalize. The Personalized Saved Searches page appears.
For more information about the Personalized Saved Search, see Personalize Saved Search in the Oracle® Retail Merchandising Do the Basics User Guide.
Click Search. The item lists that match the search criteria are displayed in the Results section.
Click Reset to clear the search section and results.
Click Save As... to save the current search criteria. The Create Saved Search page appears.
For more information about how to save your search criteria, see Create Saved Search in the Oracle® Retail Merchandising Do the Basics User Guide.
Click Done to close the page.
To search for an item list by using advanced search criteria:
To search by using advanced search criteria, enter or select one or all of the advanced search criteria.
Table 2-13 Item List Search - Advanced Search Criteria and Description
| Fields | Description |
|---|---|
|
Item List |
Enter the item list ID. |
|
Description |
Enter the item description. |
|
Type |
Select a type from the list. |
|
Created Date |
Enter a created date or use the Calendar icon to select a date. |
|
Created By |
Select the desired user from the list. |
|
Item |
Enter or search for an item. |
|
Item Description |
Enter the item description. |
|
Division |
Enter, select or search for the division. |
|
Group |
Enter, select or search for the group. |
|
Department |
Enter, select or search for the department. |
|
Class |
Enter, select or search for the class. |
|
Subclass |
Enter select or search for the subclass. |
To narrow down the search, use the list next to the search fields. For example, determine, if the entered value should be equal or not equal to the search result.
Click the Saved Search list to select one of the saved search criteria. Selecting a saved search populates the search section with the saved search criteria. If the run automatically function is enabled for the search, the search is executed immediately.
You can also personalize your saved searches by selecting Personalize. The Personalized Saved Searches page appears.
For more information about the Personalized Saved Search, see Personalize Saved Search in the Oracle® Retail Merchandising Do the Basics User Guide.
Click Search. The item lists that match the search criteria are displayed in the Results section.
Click Reset to clear the search section and results.
Click Save As... to save the current search criteria. The Create Saved Search page appears.
For more information about how to save your search criteria, see Create Saved Search in the Oracle® Retail Merchandising Do the Basics User Guide.
Click Add Fields to add more fields for the advanced search. To remove the field from the search, click the x right next to the field.
Click Reorder to change the order of the available search fields. The Reorder Search Fields page appears.
Select the desired search field and use the up and down arrows to rearrange the order of the fields.
Click OK to confirm the new order of the fields and close the page.
Click Cancel to reject any changes and close the page.
Click Done to close the page.
The Results section lists the retrieved item lists. The Results table shows the following columns by default.
Item List ID
Description
Type
Total Items
Created Date
Created By
The Create Item List option opens the Item List page. In the Item List page you can create, edit, and view basic information about an item list.
You can indicate whether the item list is static or dynamic. The ID of the user who created the item list and the date on which it was created are displayed in this page. The number of items that make up the item list are also displayed. You can use this page for mass change or mass creation.
The Item List page contains the following sections.
|
Note: This section is only available, if the Data Level Security is enabled. |
The Item List header contains the following fields.
Table 2-14 Item List Header - Fields and Description
| Fields | Description |
|---|---|
|
Item List |
The Item List field displays the generated item list ID. Enter the item list description in the field next to the item list ID. |
|
Comments |
Enter comments for the item list, if necessary. |
|
Static checkbox |
Select the Static checkbox to indicate that the item list cannot be rebuilt. |
|
Private checkbox |
Select the checkbox to indicate that the user level security for an item list is enabled. Only the user who created the item list can select the list for transactions. |
|
Created |
Displays the user who created the list as well as the date the list was created. |
|
Last Rebuild Date |
Displays the date of the last rebuild of the item list. |
The Allowed Hierarchies section displays organizational and merchandising hierarchies from which the items can be part of the item list. This section is only available, if the Data Level Security is enabled.
The table displays the following columns by default.
Department ID and name
Class ID and name
Subclass ID and name
To create an item list, follow the steps below.
From the Task menu, select Foundation Data > Items > Create Item List. The Item List page appears.
The Item List field displays the generated list ID. Enter the description for the item list in the field next to the item list ID.
In the Comments field, enter comments for the list, if necessary.
Select the Static checkbox, as necessary.
|
Note: If you create a static item list, you cannot rebuild the list on demand. |
Select the Private checkbox to indicate whether the user level security for an item list is enabled or disabled.
If the user level security is enabled, only the person who created the item list can select the list for transactions.
The Total Items field, lists the total number of items on the item list.
If the Allowed Hierarchy section is enabled. Add a merchandise hierarchy to the item list, for which the list is available.
|
Note: This section is only available, if the Data Level Security is enabled. |
In the Area field, enter, select or search for the organizational value for which you have access.
Then select Actions > Add, or use the Add icon. The Allowed Merchandise Hierarchy page appears.
In the Group Type field, select a group type from the list.
In the Department field, enter, select or search for a department.
In the Class field, enter, select or search for a class.
In the Subclass field, enter, select or search for a subclass.
Then choose one of the following options.
Click OK to save the hierarchy and close the page.
Click OK and Add Another to add additional merchandise hierarchies.
Click Cancel to reject all entries and close the page.
Then add items to the list. Select More Actions > Items. The Item List Items page appears.
For more information about how to add items to an item list, see the Adding Items to Item Lists, step 6.
Add item criteria to the list, if necessary. Select More Actions > Criteria. The Item List Criteria page appears.
For more information about how to add item list criteria, see the Adding Item List Criteria section, step 6.
Then choose one of the following options.
Click Save and Close to save your entries and close the Item List page.
Click Save and Create Another to create additional item lists.
Click Cancel to reject all entries and close the Item List page.
The Item List Criteria page allows you to add, delete and view the criteria by which items are grouped on an item list.
The Item List Criteria page contains the following sections.
Item List Criteria Header
The Item List Criteria header displays the item list ID and description.
The Item List Criteria table displays the already defined criteria.
To add criteria to an item list, follow the steps below.
From the Tasks menu, select Foundation Data > Items > Manage Item Lists. The Item List Search page appears.
Enter or select search criteria as desired to make the search more restrictive.
Click Search. The item lists that match the search criteria are displayed in the Results section.
In the Item List column, click the item list ID link, or mark a record and select Actions > Edit, or use the Edit icon. The Item List page appears.
Select More Actions > Criteria. The Item List Criteria page appears.
Select Actions > Add, or use the Add icon. The Add Criteria page appears.
Select Include/Exclude to indicate that items meeting the criteria should be included/excluded from the item list.
In the Merchandise Type field, select the merchandise type from the list.
In the Department, Class and Subclass field, enter, select or search for the corresponding IDs.
In the Season field, enter, select or search for the season. The Phase field enables.
In the Phase field, enter, select or search for the phase.
In the UDA (User-defined Attributes) field, enter, select or search for the attribute.
In the Supplier Site field, enter, select or search for the supplier site.
In the Purchase Type field, select purchase type from the list.
In the Diff 1-4 fields, enter, select or search for the desired differentiators.
Use the Calculate Item List Count icon to calculate the total of items matching the selected criteria and how many items are already part of the current item list.
Then choose one of the following options.
Click OK to include/exclude the items with the selected criteria to/from the item list and close the page.
Click OK and Add Another to include/exclude additional criteria.
Click Cancel to reject all entries and close the page.
The Item List Items page allows you to maintain and view the item details for an item list. You can add or remove items individually to/from an item list. Item lists may contain any type of items. However, you cannot add items below transaction level to the item list.
The Item List Items page contains the following sections.
Item List Items Header
The Item List Items header displays the item list ID and description.
The table displays the items of the selected item list.
To add an item to an item list, follow the steps below.
From the Tasks menu, select Foundation Data > Items > Manage Item Lists. The Item Search List page appears.
Enter or select search criteria as desired to make the search more restrictive.
Click Search. The item lists that match the search criteria are displayed in the Results section.
In the Item List column, click the item list ID link, or mark a record and select Actions > Edit, or use the Edit icon. The Item List page appears.
In the table, select More Actions > Items. The Item List Items page appears.
Select Actions > Add, or use the Add icon. The Add Items page appears.
From the Add Items page, you can add items by item, by parent item, or by uploading a data file containing the list of items.
Parent Item – enter, select or search for the desired parent item.
Item – enter, select or search for the desired item.
Upload List – use the browse button to select and upload a previously created data file that contains the items you want to include.
|
Note: The upload list must be created and saved as a .csv file. |
Then choose one of the following options.
Click OK to add the item to the list and close the page.
Click OK and Add Another to add additional items to the list.
Click Cancel to reject all entries and close the page.
To rebuild a location list, follow the steps below.
From the Tasks menu, select Foundation Data > Items > Manage Item Lists. The Item List Search page appears.
Enter or select search criteria as desired to make the search more restrictive.
Click Search. The item lists that match the search criteria are displayed in the Results section.
In the Item List column, click the item list ID link, or mark a record and select Actions > Edit, or use the Edit icon. The Item List page appears.
Select More Actions > Rebuild. The Item List Rebuild page appears. The item list details are displayed.
Then choose one of the following options.
Click Execute and Close to rebuild the selected item list and close the page.
Click Cancel to reject all entries and close the page.
The Change VAT Rates page allows you to edit a VAT code for multiple items by item list.
From the Tasks menu, select Foundation Data > Items > Manage Item Lists. The Item List Search page appears.
Enter or select search criteria as desired to make the search more restrictive.
Click Search. The item lists that match the search criteria are displayed in the Results section.
Select a record in the table.
Then select Actions > Mass Change > VAT Rates. The Change VAT Rates page appears.
Enter the necessary data.
The page contains the following fields.
Table 2-15 Change VAT Rates - Fields and Description
| Fields | Description |
|---|---|
|
VAT Region |
Enter, select or search for a VAT region ID. This field is a required field. |
|
Type |
Select the desired type from the list. This field is a required field. |
|
Code |
Enter, select or search for the desired VAT code. This field is a required field. |
|
Active Date |
Enter an active date on which the VAT code becomes effective or use the Calendar icon to select a date. This field is a required field. |
|
Reverse VAT checkbox |
Select the checkbox, if the reverse charge VAT is applicable for the item. |
|
Rate % |
Displays the VAT in percentage. |
The Change UDAs page allows you to mass update the user defined attributes for all items in an item list.
The Change UDAs page contains the following sections.
Header
The header contains the item list ID and description.
This section displays the user defined values for the item list.
This section contains the user defined dates for the item list.
The Free Form Text section displays the user defined text for the item list.
To add, change, or delete UDAs, follow the steps below
From the Tasks menu, select Foundation Data > Items > Manage Item Lists. The Item List Search page appears.
Enter or select search criteria as desired to make the search more restrictive.
Click Search. The item lists that match the search criteria are displayed in the Results section.
Select a record in the table.
Then select Actions > Mass Change > User Defined Attributes. The Change UDAs page appears.
In the List of Values section select Actions > Add, or use the Add icon. The Add, Change, or Delete UDA page appears.
Select one of the following actions
Add All
Adds the attribute to all items of the selected item list.
Add Where Not Exists
Adds the attribute only to items where the attribute does not yet exist.
Change
Changes the attribute for the items on the item list.
Delete
Deletes the attribute from all items on the item list.
In the UDA field, enter, select or search for the desired attribute.
In the UDA Value field, enter, select or search for the value.
Then choose one of the following options.
Click OK to update the attribute in the item list.
Click OK and Add Another to update the attribute and add additional ones.
Click Cancel to reject all entries and close the page.
To add, change or delete dates for user defined attributes, follow the steps below.
In the Dates section, select Actions > Add, or use the Add icon. The Add, Change, or Delete page appears.
Select one of the following actions
Add All
Adds the date to all attributes.
Add Where Not Exists
Adds the date only to attributes where no date yet exists.
Change
Changes the dates for the selected attribute.
Delete
Deletes the date from the selected attribute.
In the UDA field, enter, select or search for the desired attribute.
In the Date field, enter the desired date or use the Calendar icon to select a date.
Then choose one of the following options.
Click OK to update the date in the item list.
Click OK and Add Another to update the date and add additional ones.
Click Cancel to reject all entries and close the page.
To add, change, or delete text for user defined attributes, follow the steps below.
In the Free Form Text section, select Actions > Add, or use the Add icon. The Add, Change, or Delete page appears.
Select one of the following actions
Add All
Adds the text to all items on the item list.
Add Where Not Exists
Adds the text only to items on the item list where no text yet exists.
Change
Changes the text for the items on the selected item list.
Delete
Deletes the text from all items of the selected item list.
In the UDA field, enter, select or search for the desired attribute.
In the Text field, enter the desired text.
Then choose one of the following options.
Click OK to update the text for the items of the list.
Click OK and Add Another to update the text and add additional ones.
Click Cancel to reject all entries and close the page.
The Change Seasons page allows you to change the seasons and phases for all items in an item list. You can add, change, or delete existing seasons and phases.
The Change Season page contains the following sections.
Header
The header displays the item list ID and description.
The table displays the actions to be performed, the existing seasons and phases to be changed or deleted as well as the new seasons and phases to be added for all items on the item list.
To maintain seasons and phases for an item list, follow the steps below.
From the Tasks menu, select Foundation Data > Items > Manage Item Lists. The Item Search page appears.
Enter or select search criteria as desired to make the search more restrictive.
Click Search. The item lists that match the search criteria are displayed in the Results section.
Select a record in the table.
Then select Actions > Mass Change > Seasons/Phases. The Change Seasons page appears.
To add a season and phase, follow the steps listed below.
Select Actions > Add or use the Add icon. The Add, Change, or Delete Season/Phase page appears.
Select Add.
In the Season field, enter, select or search for the season you want to add.
In the Phase field, enter, select or search for the phase you want to add.
Then choose one of the following options.
Click OK to save the changes and close the page.
Click OK and Add Another to maintain additional entries.
Click Cancel to reject all entries and close the page.
To change a season/phase, follow the steps below.
Select Actions > Add or use the Add icon. The Add, Change, or Delete Season/Phase page appears.
Select Change.
Select a Season/Phase you want to change.
In the Season field, enter, select or search for the season you want to change.
In the Phase field, enter, select or search for the phase.
Then select a new season/phase.
In the Season field, enter, select or search for the season you want to change.
In the Phase field, enter, select or search for the phase.
Then choose one of the following options.
Click OK to save the changes and close the page.
Click OK and Add Another to maintain additional entries.
Click Cancel to reject all entries and close the page.
To delete a season and phase, follow the steps listed below.
Select Actions > Add or use the Add icon. The Add, Change, or Delete Season/Phase page appears.
Select Delete.
In the Season field, enter, select or search for the season you want to delete.
In the Phase field, enter, select or search for the phase you want to delete.
Then choose one of the following options.
Click OK to save the changes and close the page.
Click OK and Add Another to maintain additional entries.
Click Cancel to reject all entries and close the page.
The Scheduled Item Maintenance page is used to view or edit lists of item list/location list links. After linking an item list with a location list, you may specify a date to use the item/location list as part of a scheduled item maintenance update.
Item lists are set up by selecting items either individually or by a group characteristic.At any time you may add items to or delete items from an item list. Item lists may also be linked with Location Lists using the Scheduled Item Maintenance page.
You can add items to a list one by one, or you can enter criteria in order to group the items. It becomes much simpler to apply changes to multiple items when the items are grouped on an item list.
The item list feature allows you to create, copy, edit, view, and use a group of items that are identified by one ID.
The Item/Loc Update page allows you to maintain and view lists of item list/location list links. After linking an item list with a location list, a date to use the item/location list as part of a scheduled item maintenance update should be specified.
To add an item/loc list link:
From the Tasks menu, select Items > Scheduled Item Maintenance > Create Scheduled Item Update. The Item/Loc Update page appears.
In the Item Location Link section, enter the following:
In the Item/Location Link ID field, enter a name for the link you are creating. The ID number will be created by Merchandising.
In the Item List field, enter, select or search for an item list.
In the Location List field, enter, select or search for a location list.
|
Note: You will only be able to add item and location lists that do not have user security, or are created by you. |
To add schedule detail:
From the Tasks menu, select Items > Scheduled Item Maintenance > Create Scheduled Item Update. The Item/Loc Update page appears.
In the Item/Loc Update page, go to Schedule Detail section.
From the Actions menu, select Add or click the Add icon ![]() . The Schedule Detail page appears.
. The Schedule Detail page appears.
In the Effective Date field, enter the date for this link to become effective in Merchandising or use the Calendar icon to select a date.
In the Status field, select the status that will be applied to this link on the effective date.
Then choose one of the following options.
Click OK to add the schedule detail to the table and close the page.
Click OK and Add Another to add additional effective dates.
Click Cancel to reject all entries and close the page.
To maintain an item/loc list link:
From the Tasks menu, select Items > Scheduled Item Maintenance > Manage Scheduled Item Updates. The Item/Loc Update page appears.
In the Item Location Link section, enter the following details:
In the Item/Location Link ID field, enter a name for the link you are creating. The ID number will be created by Merchandising.
If you enter the item/location link, the item list, the location list and scheduled details default to the values of the item/location link.
In the Item List field, enter an item list ID, select or search for an ID.
In the Location List field, enter a location list ID, select or search for an ID.
|
Note: You will only be able to add item and location lists that do not have user security, or created by you. |
In the Schedule Detail section the effective dates and statuses are displayed.
For more information about the Item/Loc Update page, see the Scheduled Item Maintenance section in the Items chapter.
The Differentiator Groups page is used for maintaining differentiator groups. Differentiator groups are used to simplify associating items with multiple differentiators. Differentiator groups can also be assigned to levels of merchandise or organizational hierarchies. You can add, edit, delete or view differentiator groups in this page.
The Differentiator Groups page contains the following sections.
The Groups section displays the available differentiator groups.
Use the Actions Menu and icons to apply actions to the table. You can perform the actions listed below.
Table 2-16 Groups - Actions Menu/Icons and Description
| Actions Menu/Icons | Description |
|---|---|
|
Add and Add icon |
You can add new groups by selecting Actions > Add or by using the Add icon. For more information about how to add groups, see the Adding a New Differentiator Group section. |
|
Delete and Delete icon |
You can delete differentiator groups:
|
|
Edit and Edit icon |
Select Actions > Edit or use the Edit icon to edit the selected groups. For more information about how to edit a group, see the Editing a Differentiator Group section. |
|
Export to Excel and Export to Excel icon |
You can export the records in the table to a Microsoft Excel spreadsheet by selecting Actions > Export to Excel or by using the Export to Excel icon. |
|
Translate and Translate icon |
You can create a translation by selecting Actions > Translate or by using the Translate icon. |
You can customize the view of the table by using the options in the View Menu.
Table 2-17 Groups/Group Details- View Menu/Icons and Description
| View Menu/Icons | Description |
|---|---|
|
Columns |
You can manage which of the columns will be shown in the table by clicking the Show All and Manage Columns options. |
|
Detach and Detach icon |
You can view the tables in the application in a separate page by clicking Detach or by using the Detach icon. |
|
Sort |
You can sort columns by the following options:
|
|
Reorder Columns |
You can reorder columns by clicking the Reorder Columns option. |
|
Query by Example and Query by Example icon |
You can filter the items by one or multiple column values by clicking the Query by Example option or by using the Query by Example icon. |
In the Group Details section you can maintain the differentiators that are members of the group and specify their listing order.
To add a new differentiator group, follow the steps below.
From the Tasks menu, select Foundation Data > Items > Differentiator > Groups. The Differentiator Groups page appears.
In the Groups section, select Actions > Add, or use the Add icon. The Add Group page appears.
In the Group field, enter the group name. This is a required field.
In the Group Description field, enter a more detailed description for the group. This is a required field.
In the Type field, enter, select or search for a type ID. This field is a required field.
In the Area field, enter, select or search for an area.
In the Division field, enter, select or search for a division.
Then choose one of the following options.
Click OK to add the group and close the page.
Click OK and Add Another to add additional groups.
Click Cancel to reject all entries and close the page.
To add details to differentiator groups, follow the steps below.
In the Group Detail section, select Actions > Add, or use the Add icon. The Add Detail page appears.
In the Sequence field, enter the sequence number for the group detail.
|
Note: You can also add the sequence number for the group detail, directly in the table. |
In the Diff Type Description field, enter, select or search for the diff type description. This field is a required field.
Then choose one of the following options.
Click OK to add the detail to the diff group and close the page.
Click OK and Add Another to add additional details to the diff group.
Click Cancel to reject all entries and close the page.
To edit a diff group, follow the steps listed below.
From the Tasks menu, select Foundation Data > Items > Differentiator > Groups. The Differentiator Groups page appears.
In the Groups section, select Actions > Edit, or use the Edit icon. The Edit Group page appears.
In the Group Description field, change the description for the group, as necessary.
In the Area field, enter, select or search for another area, if necessary.
In the Division field, enter, select or search for another division, if necessary.
Then choose one of the following options.
Click OK to edit the group and close the page.
Click Cancel to reject all entries and close the page.
The Manage Diff Ranges option opens the Manage Range page. In this page you can delete a diff range or add, edit, delete or view diff range details.
To manage a diff range, follow the steps below.
For more information about the available fields and functions in this page, see the Creating Differentiator Ranges section.
From the Tasks menu, select Foundation Data > Items > Differentiators > Manage Diff Ranges. The Manage Range page appears.
In the Range Field, enter, select or search for the diff range ID you want to edit. The diff range description and range type as well as the diff types and groups are displayed.
Change the diff range description, if necessary.
In the Details section, add, edit or delete diff range details, as necessary.
|
Note: To include diffs in the diff range, see the Adding Diff Group Details section.To edit diffs of a diff range, see the Editing Diff Group Details section. |
Then select one of the following options.
Click Save and Close to save your changes and close the page.
Click Save to save your changes.
Click Save and Edit Another to save the current change and edit additional diff ranges.
Click Cancel to reject all entries and close the page.
The Create Diff Range option opens the Differentiator Range page. In this page you can create, edit, delete and view ranges of differentiators.
A differentiator range is a list of differentiators that are grouped under one ID. A differentiator range can be used to apply multiple differentiators to an item with less repetition and effort than applying each differentiator ID individually.
The Differentiator Range page contains the following sections.
The Range section contains the following fields.
Table 2-18 Range - Fields and Description
| Fields | Description |
|---|---|
|
Range |
Enter a range. |
|
Translate and Translate icon |
You can create a translation by using the Translate icon. |
|
Range Type |
Select a range type from the list. |
|
Type 1 - 3 |
Enter, select or search for a type. You can add up to 3 diff types. |
|
Group |
Enter, select or search for groups for diff types 1-3. |
In the Detail section you can add, edit, delete and view diffs of the diff range.
|
Note: If you create a new diff range, press Add Details to open this section. |
To create a diff range, follow the steps below.
From the Tasks menu, select Foundation Data > Items > Differentiators > Create Diff Range. The Differentiator Range page appears.
In the Range Field, enter a range ID and description of the diff range.
In the Range Type field, select a type from the list.
|
Note: After you have entered the diff range ID, description and type, the Like Range button enables. Use the button to create a diff range from an existing one. |
In the Type fields, enter, select or search for the desired diff types you want to include in the range.
In the Group fields, enter, select or search for the desired diff groups you want to include in the range.
|
Note: Repeat steps 4 - 5 for up to three diff type/group combinations.To include diffs in the diff range, see the Adding Diff Group Details section. |
Then select one of the following options.
Click Save and Close to save the current diff range and close the page.
Click Save to save the current diff range.
Click Save and Create Another to save the current entry and create additional diff ranges.
Click Cancel to reject all entries and close the page.
To add a diff to a diff range, follow the steps below.
In the Differentiator Range page, click Add Details to enable the Detail section.
Then select Actions > Add, or use the Add icon. The Add Detail page appears.
In the Differentiator Group field, enter, select or search for a new diff you want to add to the diff range.
In the Ratio/Percentage field, enter the rate/percentage for the selected diff.
Then choose one of the following options.
Click OK to add the diff to the table and close the page.
Click OK and Add Another to add the current diff and add additional diffs.
Click Cancel to reject all entries and close the page.
To edit a diff of a diff range, follow the steps below.
In the Differentiator Range page, open the Detail section.
Then select Actions > Edit or use the Edit icon. The Edit Detail page appears.
In the Differentiator Group field(s), enter, select or search for a another diff.
In the Ratio/Percentage field, enter the rate/percentage for the selected diff.
Then choose one of the following options.
Click OK to save the changes and close the page.
Click Cancel to reject all entries and close the page.
In the Differentiator Ratio page you can create, edit, or view a differentiator ratio. The differentiator ratio is based on the sales history for an item in the department, class, and subclass. You can select the type of sales (regular, promotional, or clearance) and the time period to include in the calculation of the differentiator ratio in this page. The ratio is calculated by a batch program.
The Differentiator Ratio page contains the following fields.
Table 2-19 Differentiator Ratio - Fields and Description
| Fields | Description |
|---|---|
|
Ratio |
The ratio ID is generated automatically. Enter a description for the ratio. This field is a required field. |
|
Translate icon |
You can create a translation by using the Translate icon. |
|
Generated By |
Select manual if the diff ratio is calculated manually or system if through a batch program. If you select Manual, the Like Ratio button is enabled and all the other fields are disabled. |
|
Like Ratio button |
Opens the Like Ratio Selection page, to create a diff ratio from an existing ratio. This button is only available, if you create a differentiator ratio. |
|
Department |
Enter, select or search for the department. This field is a required field. |
|
Class |
Enter, select or search for the class. This field is a required field. |
|
Subclass |
Enter, select or search for the subclass. |
|
Group 1 - 3 |
Enter, select or search for the groups. |
|
Sales Type to Use: |
Select the sales type you want to use for the diff ratio. |
|
Regular |
Indicates that you want to use regular sales. |
|
Promotional |
Indicates that you want to use promotional sales. |
|
Clearance |
Indicates that you want to use clearance sales. |
|
Build Time Period: |
Select the time period for the diff ratio. |
|
Period Type |
Displays the type of period to take the sales history for. Select the period type from the list. |
|
From |
Displays the starting date for the sales history to be used. Enter a from date or use the Calendar icon to select a date. |
|
Back To |
Displays the weeks back of sales history to be used. Enter a back to date or use the Calendar icon to select a date. |
|
Review Every |
Enter the number of weeks. |
|
Last Review Date |
Displays the last review date. |
To create a diff ratio, follow the steps below.
From the Tasks menu, select Foundation Data > Items > Differentiators > Create Diff Ratio. The Differentiator Ratio page appears.
In the Ratio field, enter the description of the diff ratio.
In the Generated By area, select System or Manual.
If you select System:
Enter, select or search for the department, class, and subclass.
Enter, select or search for up to three diff groups to be associated with this ratio.
In the Sales Type area, select the types of sales you want to include in the ratio.
In Build Time Period area, select the type of time period. Then enter the dates.
In the Review Every Week(s) field, enter how often the ratio should be reviewed.
If you select Manual:
The Like Ratio button enables, all other fields are disabled.
Select the Like Ratio button. The Select Like Ratio page appears.
In the Ratio field, enter, select or search for the diff ratio you want to copy from.
Then choose:
Click OK. The settings of the selected diff ratio are applied to the current diff ratio.
Click Cancel to reject all entries and close the page.
To edit a diff ratio, follow the steps below.
From the Tasks menu, select Foundation Data > Items > Differentiators > Manage Diff Ratios. The Differentiator Ratio page appears.
Enter or select search criteria as desired to make the search more restrictive.
Click Search. The diff ratios that match the search criteria are displayed in the Results section.
In the Ratio column, click the ratio link, or mark a record and select Actions > Edit, or use the Edit icon. The Differentiator Ratio page appears.
Edit the fields, as necessary.
In the Differentiator Ratio Detail page you can edit and view the results of a differentiator ratio that has been calculated by a batch program. In edit mode, if you select a store that is not yet associated with the current diff ratio, you can base the store's ratios on those for another store. After you select a store or all stores, you can edit the quantity for each diff or diff combination.
The Differentiator Ratio Detail page contains the following sections.
Header
The header displays the ratio, department, class and subclass ID and description.
The table contains the diff IDs and description as well as the quantity.
To edit diff ratio details, follow the steps below.
Edit the description, sales types, and review number as necessary.
Click Detail. The Differentiator Ratio Detail page appears.
In the Level field, select if you want to edit the diffs at all stores, or at a specific store. Then enter, select or search for the store ID.
Click Search.
If you select a store that is not yet associated with the diff ratio, you are prompted to add the store using another store as template.
Select Yes to confirm the prompt. The Create Like Store page appears.
In the Store field, enter, select or search for the store.
Then choose one of the following options.
Click OK to copy the details and close the page.
Click Cancel to reject all entries and close the page.
Edit the quantity of each diff as necessary in the table.
Click the Recalculate icon to update the ratios in the Ratio column.
Then choose one of the following options.
Click Save to save your changes.
Click Save and Close to save your changes and close the page.
Click Save and Edit Another to edit additional diff ratios.
The Manage Diff Ratios option opens the Differentiator Ratio Search page. In this page you can perform the following actions.
Search for diff ratios by various search criteria
View the search results
View a diff ratio
Create a diff ratio
Edit diff ratio
You can access the Differentiator Ratio Search page from the Task menu, select Foundation Data > Items > Differentiators > Manage Diff Ratios. The Differentiator Ratio Search page appears.
The Differentiator Ratio Search page contains the following sections.
Search
For more information about how to search for a diff ratio, see the Searching for a Diff Ratio section.
To search for a diff ratio:
From the Task menu, select Foundation Data > Items > Differentiators > Manage Diff Ratios. The Differentiator Ratio Search page appears.
You can search for a diff ratio by using basic or advanced search criteria, depending on the requirement. The basic mode is the default search mode.
Click Advanced to access the search section in advanced mode.
Click Basic to return to basic mode.
To search for a diff ratio by using basic search criteria:
Enter, select or search for one or all of the following basic search criteria.
Table 2-20 Diff Ratio Search - Basic Search Criteria and Description
| Fields | Description |
|---|---|
|
Match option |
Check radio button All or Any. All - only diff ratios matching all entered search criteria are shown. Any - diff ratios matching any of the entered search criteria are shown. |
|
Ratio |
Enter the ratio ID. |
|
Description |
Enter the ratio description. |
|
Last Review Date |
Enter the last review date or use the Calendar icon to select a date. |
|
Department |
Enter, select or search for the department. |
|
Class |
Enter, select or search for the class. |
|
Subclass |
Enter, select or search for the subclass. |
Click the Saved Search list to select one of the saved search criteria. Selecting a saved search populates the search section with the saved search criteria. If the run automatically function is enabled for the search, the search is executed immediately.
You can also personalize your saved searches by selecting Personalize. The Personalized Saved Searches page appears.
For more information about the Personalized Saved Search, see Personalize Saved Search in the Oracle® Retail Merchandising Do the Basics User Guide.
Click Search. The diff ratios that match the search criteria are displayed in the Results section.
Click Reset to clear the search section and results.
Click Save As... to save the current search criteria. The Create Saved Search page appears.
For more information about how to save your search criteria, see Create Saved Search in the Oracle® Retail Merchandising Do the Basics User Guide.
Click Done to close the page.
To search for a diff ratio by using advanced search criteria:
To search by using advanced search criteria, enter or select one or all of the advanced search criteria.
Table 2-21 Diff Ratio Search - Advanced Search Criteria and Description
| Fields | Description |
|---|---|
|
Match option |
Check radio button All or Any. All - only diff ratios matching all entered search criteria are shown. Any - diff ratios matching any of the entered search criteria are shown. |
|
Ratio |
Enter the ratio ID. |
|
Description |
Enter the ratio description. |
|
Last Review Date |
Enter the last review date or use the Calendar icon to select a date. |
|
Department |
Enter, select or search for the department. |
|
Class |
Enter, select or search for the class. |
|
Subclass |
Enter, select or search for the subclass. |
|
Division |
Enter, select or search for the division. |
|
Group |
Enter, select or search for the group. |
To narrow down the search, use the list next to the search fields. For example, determine if the entered value should be equal or not equal to the search result.
Click the Saved Search list to select one of the saved search criteria. Selecting a saved search populates the search section with the saved search criteria. If the run automatically function is enabled for the search, the search is executed immediately.
You can also personalize your saved searches by selecting Personalize. The Personalized Saved Searches page appears.
For more information about the Personalized Saved Search, see Personalize Saved Search in the Oracle® Retail Merchandising Do the Basics User Guide.
Click Search. The diff ratios that match the search criteria are displayed in the Results section.
Click Reset to clear the search section and results.
Click Save As... to save the current search criteria. The Create Saved Search page appears.
For more information about the Personalized Saved Search, see Personalize Saved Search in the Oracle® Retail Merchandising Do the Basics User Guide.
Click Add Fields to add more fields for the advanced search. To remove the field from the search, click the x right next to the field.
Click Reorder to change the order of the available search fields. The Reorder Search Fields page appears.
Select the desired search field and use the up and down arrows to rearrange the order of the fields.
Click OK to confirm the new order of the fields and close the page.
Click Cancel to reject any changes and close page.
Click Done to close the page.
The Results section lists the retrieved diff ratios. The Results table shows the following columns by default.
Ratio
Description
Department and Department Name
Class and Class Name
Subclass and Subclass Name
Last Review Date
A supplier is a person or entity that provides merchandise to a retailer resulting in an invoice. You can maintain a variety of information about suppliers such as financial arrangements, inventory management parameters, types of EDI transactions, and invoice matching attributes. Suppliers are typically created in a financial system and interfaced into Merchandising. Supplier enrichment can be maintained in Merchandising.
Supplier sites are physical locations of a supplier that also define the business relationship between supplier and the retailer. The supplier site captures business terms and conditions as negotiated by the retailer with the supplier. Supplier sites can be locations from which orders are placed, remittances made, or both; however it is assumed to represent a single location for the supplier, so all address types for a particular site must have the same address information. Most transactions between the supplier and the retailer occur at the supplier site level, with the exception of deals which occur at the supplier level.
The supplier structure can be extended to supplier-parent and supplier-site relationships, to accommodate financial systems that support this configuration. A supplier site is a location from which the supplier ships merchandise.
The supplier management feature allows you to add, edit, and view the following information about suppliers:
Multiple contact persons and addresses: You can enter multiple addresses of different types, such as business, invoice, order, postal, remittance, and returned goods.
Financial arrangements: You can indicate the payment terms, freight terms, currency, settlement code, and payment method.
Inventory management parameters: You can set up a replenishment cycle, order attributes, scaling attributes and constraints, order minimum constraints, and due order processing. You can also indicate whether quality control checking is required and what percentage of the received goods must be checked.
Return to vendor (RTV) requirements: You can indicate whether returns are allowed, whether an authorization number is required, the minimum value of a return, the preferred courier, and the handling charge.
Required documents: You can select which documents, if any, are required by the supplier.
Expense profiles: You can enter the supplier's costs by country or by cost zone.
Types of electronic data interchange (EDI) transactions: You can indicate which EDI transactions the supplier can process.
Generic attributes: You can indicate which attributes apply to the supplier, such as co-op agreement terms, volume rebate terms, whether a PO is required, or whether items are pre-ticketed.
Import attributes: You can enter import-related information such as agent, advising and issuing banks, lading and discharge ports, manufacturer ID, and beneficiary.
Invoice matching attributes: You can indicate when debit memos are sent, whether invoices and debit memos are approved automatically, whether the supplier is allowed to charge freight, and whether invoices are pre-paid. (Oracle Retail Invoice Matching must be installed.)
Supplier traits: You can select the traits by which you want to group the supplier with other suppliers.
Payment types by store: You can select the methods by which the supplier can be paid, such as cash, money order, and by invoice. You can also indicate the payment type by store.
Delivery schedules at stores and warehouses: After you create a delivery schedule, you can specify which items are not to be delivered to the location on a specific delivery day.
Vendor managed inventory (VMI): Use VMI to allow a supplier to manage the inventory levels of designated product at the warehouse. Inventory data is shared with the supplier, who uses the information to create inbound purchase orders, which will achieve and/or maintain budgeted inventory and service levels in the warehouse.
The Supplier/Supplier Site page allows you to create, edit, and view suppliers and supplier sites. Suppliers are vendors that provide your stores and warehouses with merchandise.
Depending on how you enter the page, the label varies.
If you enter the page for a parent supplier, the page is labeled Supplier. For more information about how to create a supplier, see the Creating a Supplier section.
If you enter the page for another supplier site of a supplier, the page is labeled Supplier Site. For more information about how to create a supplier site, see the Creating a Supplier/Supplier Site section.
You can indicate whether the supplier/supplier site is active or inactive. You can also enter the primary contact, financial, shipping, and payment information.
The header contains the following fields.
Table 2-22 Header - Fields and Description
| Fields | Description |
|---|---|
|
Supplier |
The supplier ID is generated automatically. Enter the supplier name. This field is a required field. |
|
Payment Terms |
Enter, select or search for the supplier's payment terms. This field is a required field. |
|
Freight Terms |
Enter, select or search for the supplier's freight terms. This field is a required field. |
|
VAT Region |
Enter, select or search for the supplier's VAT region. This field is a required field. |
|
Status |
Select, if the current supplier is an active or inactive supplier. This field is a required field. |
|
Secondary Name |
Enter the secondary name for the supplier. |
|
Currency |
Enter, select or search for the supplier's currency. This field is a required field. |
|
Language |
Select the supplier's language from the list. |
In the Contact Information section enter the name, phone number, email address, fax, telex and pager for the primary contact person at the supplier's location.
Name and Phone are required fields.
The Ordering section contains the following fields and checkboxes.
Table 2-23 Ordering - Fields/Checkboxes and Description
| Fields/Checkboxes | Description |
|---|---|
|
Inventory Management Level |
Select an inventory management level from the list. This field is a required field. |
|
Ship Method |
Select a shipping method for the supplier from the list. |
|
Lead Time |
Enter the amount of time a supplier needs between receiving an order and having the order ready to ship. This value will be defaulted to item/supplier relationships. |
|
Delivery Policy |
Select a delivery policy from the list. This field is a required field. |
|
Quantity Level |
Select a quantity level from the list to indicate purchase order quantities that are communicated to the supplier in multiples of units (eaches) or cases. This field is a required field. |
|
DSD checkbox |
Select the checkbox to indicate that the supplier can provide direct store deliveries. |
|
Premark checkbox |
Select the checkbox to indicate that the supplier will break orders into separate, marked boxes that can be shipped directly to stores. |
|
Bracket Costing checkbox |
Select the checkbox to indicate that the supplier uses bracket costing in its pricing. |
|
Back Orders checkbox |
Select the checkbox to indicate the supplier accepts back orders. |
|
EDI: |
|
|
Orders checkbox |
Select the checkbox to indicate that the orders are transmitted electronically. |
|
Order Changes checkbox |
Select the checkbox to indicate that order changes are transmitted electronically. |
|
Order Acknowledgments checkbox |
Select the checkbox to indicate that order acknowledgments are transmitted electronically. |
The Contracts and Replenishment section contains the following fields and checkboxes.
Table 2-24 Contracts and Replenishment - Fields/Checkboxes and Description
| Fields/Checkboxes | Description |
|---|---|
|
Scale AIP Orders checkbox |
Select the checkbox to indicate that AIP (Advanced Inventory Planning) is allowed to do order scaling. Order scaling refers to the increase and decrease of the order quantity within constraints to meet purchasing objectives and increase efficiency. |
|
VMI Order Status |
Select the VMI order status from the list. |
|
VMI Channel |
Enter, select or search for the VMI channel. |
|
EDI Availability checkbox |
Select the checkbox to indicate that the supplier processes orders through EDI (Electronic Data Interchange). |
|
EDI Contracts checkbox |
Select the checkbox to indicate that the supplier process contracts through EDI. |
|
Auto Contract Approval checkbox |
Select the checkbox to indicate that contract orders are created in Approved status. |
The Receiving section contains the following fields and checkboxes.
Table 2-25 Receiving - Fields/Checkboxes and Description
| Fields/Checkboxes | Description |
|---|---|
|
QC Required checkbox |
Select the checkbox to indicate that goods received from the supplier must be inspected for quality. |
|
QC % |
Enter what percentage of the goods must be inspected. |
|
QC Frequency |
Enter how often the items will be inspected. |
|
EDI ASN checkbox |
Select the checkbox to indicate that the advanced shipping notice (ASN) is transmitted electronically. |
|
Vendor Control Required checkbox |
Select the checkbox to indicate that orders from this supplier require vendor control by default. |
|
Vendor Control % |
Displays the percentage of items per receipt that are marked for vendor checking. |
|
Vendor Control Frequency |
Displays the frequency in which items per receipt are marked for vendor checking. |
This section contains the following fields and checkboxes.
Table 2-26 Invoicing - Fields/Checkboxes and Description
| Fields/Ceckboxes | Description |
|---|---|
|
Settlement Code |
Select the settlement code from the list. This field is a required field. |
|
Payment Method |
Select the payment method from the list. |
|
Send Debit Memos |
Select how often debit memos should be sent to the supplier. |
|
Receive Invoice |
Select where invoices from this supplier are received, either at the store or centrally through corporate accounting. This field is only enabled, if invoice matching is used. |
|
Pay Invoice |
Indicates where invoices from this supplier are paid, either at the store or centrally through corporate accounting. Valid values are S (paid at the store) and C (paid centrally). This field only displays Store, if Sales Audit is used to accept payment at the store level. Additionally, the field is only enabled, if invoice matching is used. |
|
Invoice at |
Select, if invoice amounts are net or gross values. |
|
Final Match Destination checkbox |
Select this checkbox to indicate that the supplier can ship to the final destination as per allocation. |
|
EDI Invoice checkbox |
Select the checkbox to indicate that the invoices are transmitted electronically. |
|
Auto-approve Invoices checkbox |
Select this checkbox to indicate that the supplier's invoice matches can be automatically approved for payment. This field is only enabled, if invoice matching is used. |
|
Auto-approve Debit Memos checkbox |
Select this checkbox to indicate that debit memos sent to the supplier can be automatically approved on creation. This field is only enabled, if invoice matching is used. |
|
Allow Supplier to Charge-Freight checkbox |
Select this checkbox to indicate that the supplier is allowed to charge freight costs to the client. This field is only enabled, if invoice matching is used. |
|
Invoices Pre-paid for Supplier checkbox |
Select this checkbox to indicate that all invoices for the supplier can be considered pre-paid invoices. This field is only enabled, if invoice matching is used. |
|
Services Performed Confirmation Required checkbox |
Select this checkbox to indicate that all suppliers services, for example shelf stocking, must be confirmed before the invocie can be paid. |
The Returns section contains the following fields and checkboxes.
Table 2-27 Returns - Fields/Checkboxes and Description
| Fields/Checkboxes | Description |
|---|---|
|
Returns Allowed checkbox |
Select the checkbox to indicate that this supplier allows returns. |
|
Authorization Required checkbox |
Select the checkbox to indicate that returns must be accompanied by an authorization number when sent back to the vendor. |
|
Maximum Return Amount |
Enter the maximum amount allowed for returns. |
|
Courier |
Enter the courier for the returns. |
|
Handling % |
Enter the handling percentage. |
The Other Attributes section contains the following fields
Table 2-28 Other Attributes - Fields and Description
| Fields | Description |
|---|---|
|
DUNS Number |
Enter the appropriate Dun and Bradstreet codes to identify the supplier. |
|
DUNS Location Number |
Enter the appropriate Dun and Bradstreet codes to identify the supplier location. |
|
EDI Sales |
Select the EDI Sales from the list. |
|
External Ref. ID |
Displays the external reference ID, if available. |
|
Cost Change Variance: |
|
|
Amount |
This field displays the cost change variance as amount. |
|
Percent |
This field displays the cost change variance in percent. |
To create a supplier, follow the steps below.
From the Tasks menu, select Foundation Data > Suppliers and Partner Foundation > Create Supplier. The Supplier page appears.
The supplier ID is generated automatically. Enter the necessary information in the individual sections.
For more information about the available sections of the Supplier page, see the Create a Supplier section.
Then choose one of the following options.
Click Save to save the supplier.
Click Save and Close to save the supplier and close the page.
Click Save and Create Another to save the current supplier and create additional supplier entries.
Click Cancel to reject all entries and close the page.
|
Note: You can also create a supplier in the Supplier Search screen, for more information about this function, see the Creating a Supplier/Supplier Site section. |
To add importers/exporters to a supplier site, follow the steps below.
In the Importers/Exporters section, select Actions > Add or use the Add icon. The Add Importer/Exporter page appears.
In the Type field, select if you want to add an importer or exporter. This field is a required field.
In the Importer/Exporter field, enter, select or search for the importer/exporter ID and description. This field is a required field.
Select the Default checkbox to indicate that the current importer/exporter is the supplier's default importer/exporter.
Then choose one of the following options.
Click OK to add the importer/exporter and close the page.
Click OK and Add Another to add additional importers/exporters.
Click Cancel to reject all entries and close the page.
To edit importers/exporters for a supplier site, follow the steps below.
In the Importers/Exporters section, select Actions > Edit or use the Edit icon. The Edit Importer/Exporter page appears.
Change the Type and Importer/Exporter field as well as the Default checkbox, as necessary.
Then choose one of the following options.
Click OK to save your changes and close the page.
Click Cancel to reject all entries and close the page.
To add routing locations to a supplier site, follow the steps below.
In the Routing Locations section, select Actions > Add or use the Add icon. The Add Routing Locations page appears.
In the Routing Location field, enter, select or search for the location ID. This field is a required field.
Select the Default checkbox to indicate that the current routing location is the supplier's default routing location.
Then choose one of the following options.
Click OK to add the routing location and close the page.
Click OK and Add Another to add additional routing locations.
Click Cancel to reject all entries and close the page.
To edit routing locations for a supplier site, follow the steps below.
In the Routing Locations section, select Actions > Edit or use the Edit icon. The Edit Routing Locations page appears.
Change the Routing Location field and Default checkbox, as necessary.
Then choose one of the following options.
Click OK to save your changes and close the page.
Click Cancel to reject all entries and close the page.
The Supplier Import Attributes page allows you to enter import information about a particular supplier. You can track information specific to the supplier, such as:
Agent
Factory
Advising bank
Issuing bank
Lading port
Discharge port
Manufacturer ID
Additional partner information
Beneficiary information
The Supplier Import Attributes page contains the following sections.
Header
The header displays the supplier site ID and name.
The Import Attributes section contains the following fields.
Table 2-29 Import Attributes - Fields and Description
| Fields | Description |
|---|---|
|
Agent |
Enter, select or search for the agent ID. |
|
Factory |
Enter, select or search for the factory ID. |
|
Advising Bank |
Enter, select or search for the ID of the advising bank. |
|
Issuing Bank |
Enter, select or search for the ID of the issuing bank. |
|
Lading Port |
Enter, select or search for the ID of the lading port. |
|
Discharge Port |
Enter, select or search for the ID if the discharge port. |
|
Manufacturer |
Enter the manufacturer. |
|
Supplier Related to Manufacturer checkbox |
Select the checkbox to indicate that the supplier is related to the manufacturer. |
|
Partner |
Select a partner type from the list. In the field next to the partner type, enter, select or search for the partner ID. You can add up to three partners in this page. |
The Beneficiary Attributes section contains the following fields.
Table 2-30 Beneficiary Attributes - Fields and Description
| Fields | Description |
|---|---|
|
Beneficiary checkbox |
Select the checkbox to indicate that the supplier can be a beneficiary in a Letter of Credit transaction. |
|
With Recourse checkbox |
Select the checkbox to indicate that the paying bank will be able to claim refunds from the beneficiary in case the letter of credit documents are not paid by the issuing bank. |
|
Revocable checkbox |
Select the checkbox to indicate that the Letter of Credit is revocable. If the LC is revocable, it can be amended or cancelled by the buyer or buyers bank at any time. If the LC is not revocable, the buyer as well as seller must approve any changes. |
|
Place of Expiry |
Enter, select or search for the place of expiry. |
|
Drafts At |
Select the drafts at entry from the list. |
|
Payment Terms |
Select the appropriate payment terms from the list. |
|
Variance Percent |
Enter the variance in percent. |
|
LC Negotiation Days |
Enter the negotiating days for the LC. |
The Supplier Inventory Management page allows you to create, maintain, delete and view inventory management information for a supplier site, or for a department and supplier site.
The Supplier Inventory Management page contains the following sections.
Header
The header contains the supplier site ID, name, department, location type and ID.
The Replenishment section contains the following fields.
Table 2-31 Replenishment - Fields and Description
| Fields | Description |
|---|---|
|
Order Control |
Select how the POs are processed for the supplier from the list. |
|
Review Cycle |
Select how often the items are reviewed for replenishment from the list. |
|
Weekdays checkboxes |
Select the day on which the items are reviewed.
|
|
Single Loc on Order checkbox |
Select the checkbox, if only one location can be on an order. |
The Due Order Processing section contains the following fields.
Table 2-32 Due Order Processing - Fields and Description
| Fields | Description |
|---|---|
|
Due Order Processing checkbox |
Select the checkbox to have due order processing performed for replenishment items from the supplier. |
|
Create Non-Due Orders checkbox |
Select the checkbox to have purchase orders created in Worksheet status for items that are not due to be ordered. |
|
Due Order Level |
Select the level at which the due order processing is based from the list. |
|
Service Basis |
Select the parameter that is used in calculating the stock out level from the list |
The Investment Buy section contains the following fields.
The Scaling section contains the following fields.
Table 2-34 Scaling - Fields and Description
| Fields | Description |
|---|---|
|
Scale Orders to Constraints checkbox |
Select the checkbox to enable the scaling constraints area. |
|
Multiple Vehicles checkbox |
Select the checkbox to indicate that multiple vehicles may be used when delivering the order. |
|
Scaling Objective |
Select whether purchase orders are scaled to the minimum or maximum values of the scaling constraints. |
|
Scaling Level |
Select the level at which the scaling is performed. |
|
Primary: |
In the Scaling Constraints Primary column, complete the following fields. |
|
Type |
Select the primary type of constraint to use when scaling orders. |
|
UOM |
If you select Mass or Volume as the primary type, enter, select or search for the unit of measure. |
|
Currency |
If you select Amount as the primary type, the currency code is displayed in this field. |
|
Maximum Value |
Enter the maximum value of the constraint. |
|
Tolerance |
Enter the percentage tolerance for the maximum value of constraint. |
|
Minimum Value |
Enter the minimum value of the constraint. |
|
Tolerance |
Enter the percentage tolerance for the minimum value of the constraint. |
|
Secondary: |
In the Scaling Constraints Secondary column, complete the following fields. |
|
Type |
Select the secondary type of constraint to use when scaling orders. The secondary type cannot be the same as the primary type. |
|
UOM |
If you select Mass or Volume as the secondary type, enter, select or search for the unit of measure. |
|
Currency |
If you select Amount as the secondary type, the currency code is displayed in this field. |
|
Maximum Value |
Enter the maximum value of the constraint. |
|
Tolerance |
Enter the percentage tolerance for the maximum value of the constraint. |
|
Minimum Value |
Enter the minimum value of the constraint. |
|
Tolerance |
Enter the percentage tolerance for the minimum value of the constraint. |
The Rounding section contains the following fields.
Table 2-35 Rounding - Fields and Description
| Fields | Description |
|---|---|
|
Rounding Level |
Select the level to which quantities should be rounded. |
|
Rounding to Inner Threshold |
Enter the percent of the inner needed to round to an additional inner. |
|
Round to Case Threshold |
Enter the percent of the case needed to round to an additional case. |
|
Round to Layer Threshold |
Enter the percent of the layer needed to round to an additional level. |
|
Round to Pallet Threshold |
Enter the percent of the pallet needed to round to an additional pallet. |
The Supplier Minimums section contains the following fields.
Table 2-36 Supplier Minimums - Fields and Description
| Fields | Description |
|---|---|
|
Purge Orders Failing Minimum checkbox |
Select the checkbox to create POs that meet the supplier minimum. |
|
Minimum Level |
Select the minimum order quantity at which the supplier accepts orders. |
|
Conjunction |
When you define two minimum order requirements, select the relationship between the requirements in the Conjunction field. |
|
Minimum 1: |
In the Minimum 1 column, complete the following fields. |
|
Type |
Select the type for the first minimum order requirement. |
|
UOM |
If you select Mass or Volume as the first minimum order requirement type, enter, select or search for the unit of measure |
|
Currency |
If you select Amount as the first minimum order requirement type, the currency code is displayed in this field. |
|
Value |
Enter the value of the first minimum order requirement for the supplier. |
|
Minimum 2: |
In the Minimum 2 column, complete the following fields. |
|
Type |
Select the second type for the minimum order requirement. |
|
UOM |
If you select Mass or Volume as the first minimum order requirement type, enter, select or search for the unit of measure. |
|
Currency |
If you select Amount as the first minimum order requirement type, the currency code is displayed in this field. |
|
Value |
Enter the value of the first minimum order requirement of the supplier. |
The Truck Splitting section contains the following fields.
Table 2-37 Truck Splitting - Fields and Description
| Fields | Description |
|---|---|
|
Split Orders into Truckloads checkbox |
Select the checkbox to enable the truck splitting constraints. |
|
Auto Approve LTL Orders checkbox |
Select the checkbox to allow Less than a Truckload (LTL) orders. |
|
Truck Split Method |
Select the method of truck splitting used with this supplier. |
|
Constraint 1: |
In the Constraint 1 column, complete the following fields. |
|
Type |
Select the primary type of constraint to use when splitting orders into truckloads. |
|
UOM |
If you select Mass or Volume as the primary type, enter, select or search for the unit of measure. |
|
Value |
Enter the value of the constraint. |
|
Tolerance |
Enter the percentage tolerance for the maximum value of the constraint. |
|
Constraint 2: |
In the Constraint 2 column, complete the following fields. |
|
Type |
Select the secondary type of constraint to use when splitting orders into truckloads. The second constraint type cannot be the same as the first constraint type. |
|
UOM |
If you select Mass or Volume as the secondary type, enter, select or search for the unit of measure. |
|
Value |
Enter the value of the constraint. |
|
Tolerance |
Enter the percentage tolerance for the maximum value of the constraint. |
The Bracket Constraints section contains the following fields.
Table 2-38 Bracket Constraints - Fields and Description
| Fields | Description |
|---|---|
|
Threshold % |
Enter the percentage of the bracket value that the order must meet in order to be rounded up to that bracket. |
|
Primary: |
In the Primary column, complete the following fields. |
|
Type |
Select the type of the primary bracket costing constraint. |
|
UOM |
If you select Mass or Volume as the primary type, enter, select or search for the unit of measure. |
|
Secondary: |
In the Secondary column, complete the following fields. |
|
Type |
Select the type of secondary bracket costing constraints. |
|
UOM |
If you select Mass or Volume as the secondary type, enter, select or search for the unit of measure. |
The Other Attributes section contains the following fields.
Table 2-39 Other Attributes - Fields and Description
| Fields | Description |
|---|---|
|
Pooled Supplier |
Enter, select or search for the supplier ID. |
|
Pooled Supplier Site |
Enter, select or search for the supplier site ID. |
|
Purchase Type |
Select the purchase order type from the list. |
|
Pickup Location |
Only enabled, if you select pick-up as purchase type. Enter the pickup location. |
In the Supplier Brackets page, you can add, edit, delete and view primary and secondary bracket values. You can also specify default brackets, or delete the entire bracket structure.
To add bracket values for a supplier site, follow the steps below.
From the Tasks menu, select Foundation Data > Suppliers and Partner Foundation > Manage Suppliers. The Supplier Search page appears.
Restrict your search to suppliers with enabled Bracket Costing.
Click Search. The suppliers that match the search criteria are displayed in the Results section.
In the Supplier Site column, click the supplier site ID link, or mark a record and select Actions > Edit, or use the Edit icon. The Supplier Site page appears.
Select More Actions > Inventory Management. The Supplier Inventory Management page appears.
Select More Actions > Bracket Costing. The Supplier Brackets page appears.
|
Note: The Bracket Costing checkbox must be selected in the Supplier/Supplier Site page in order to access the Supplier Brackets page. |
Select Actions > Add, or use the Add icon. The Add Bracket page appears.
In the Primary Bracket Value field, enter the lower value of the primary bracket. This field is a required field.
In the Secondary Bracket Value field, enter the lower value of the secondary bracket, if applicable.
Select the Default checkbox to indicate that the bracket value is a default value for this bracket structure.
Select the Pickup checkbox to indicate that the bracket pricing uses pickup prices. The pickup price is the price of the goods without shipping costs, as if the goods were picked up at the supplier's location.
Then select one of the following options.
Click OK to add the bracket value and close the page.
Click OK and Add Another to add additional bracket values.
Click Cancel to reject all entries and close the page.
To edit bracket values for a supplier site, follow the steps below.
From the Tasks menu, select Foundation Data > Suppliers and Partner Foundation > Manage Suppliers. The Supplier Search page appears.
Restrict your search to suppliers with enabled Bracket Costing.
Click Search. The suppliers that match the search criteria are displayed in the Results section.
In the Supplier Site column, click the supplier site ID link, or mark a record and select Actions > Edit, or use the Edit icon. The Supplier Site page appears.
Select More Actions > Inventory Management. The Supplier Inventory Management page appears.
Select More Actions > Bracket Costing. The Supplier Brackets page appears.
|
Note: The Bracket Costing checkbox must be selected in the Supplier/Supplier Site page in order to access the Supplier Brackets page. |
Select a record in the table.
Then select Actions > Edit, or use the Edit icon. The Edit Bracket page appears.
In the Primary Bracket Value and Secondary Bracket Value field, edit the values as necessary.
Select/deselect the Default checkbox to indicate that the bracket value is a default value for this bracket structure.
Select/deselect the Pickup checkbox to indicate that the bracket pricing uses pickup prices.
Then choose one of the following options.
Click OK to save your changes value and close the page.
Click Cancel to reject all entries and close the page.
In the Supplier Org Unit page you can add, edit, delete and view organizational unit information for the selected supplier site.
To add organizational unit information for a supplier, follow the steps below.
From the Tasks menu, select Foundation Data > Suppliers and Partner Foundation > Manage Suppliers. The Supplier Search page appears.
Enter or select search criteria as desired to make the search more restrictive.
Click Search. The suppliers that match the search criteria are displayed in the Results section.
In the Supplier Site column, click the supplier site ID link, or mark a record and select Actions > Edit, or use the Edit icon. The Supplier Site page appears.
Select More Actions > Org Unit. The Supplier Org Unit page appears.
Then select Actions > Add, or use the Add icon. The Add Org Unit ID page appears.
In the Org Unit field, enter select or search for the appropriate unit. This field is a required field.
Select the Primary Pay Site to indicate that the current org unit is the primary pay site.
Then choose one of the following options.
Click OK to add the org unit and close the page.
Click OK and Add Another to add additional org units.
Click Cancel to reject all entries and close the page.
To edit organizational unit information for suppliers, follow the steps below.
From the Tasks menu, select Foundation Data > Suppliers and Partner Foundation > Manage Suppliers. The Supplier Search page appears.
Enter or select search criteria as desired to make the search more restrictive.
Click Search. The suppliers that match the search criteria are displayed in the Results section.
In the Supplier Site column, click the supplier site ID link, or mark a record and select Actions > Edit, or use the Edit icon. The Supplier Site page appears.
Select More Actions > Org Unit. The Supplier Org Unit page appears.
Then select Actions > Edit, or use the Edit icon. The Edit Ord Unit ID page appears.
In the Org Unit field, change the org unit, if necessary.
Select/deselect the Primary Pay Site to indicate that the current org unit is the primary pay site.
Then choose one of the following options.
Click OK to save your changes and close the page.
Click Cancel to reject all entries and close the page.
The Supplier Traits page allows you to add, delete and view supplier traits. After you create supplier traits, you can then associate suppliers with a trait or associate traits with a supplier.
You can also use traits to indicate which of your suppliers have a master supplier. A master supplier is an outside source that provides merchandise to one or more of your suppliers, such as a manufacturer or distributor. You can enter an external ID for the master supplier as well.
To add supplier traits, follow the steps below.
From the Tasks menu, select Foundation Data > Suppliers and Partner Foundation > Manage Suppliers. The Supplier Search page appears.
Enter or select search criteria as desired to make the search more restrictive.
Click Search. The suppliers that match the search criteria are displayed in the Results section.
In the Supplier Site column, click the supplier site ID link, or mark a record and select Actions > Edit, or use the Edit icon. The Supplier Site page appears.
Select More Actions > Supplier Traits. The Supplier Traits page appears.
Then select Actions > Add, or use the Add icon. The Add Supplier Traits page appears.
In the Supplier Trait field, enter, select or search for the supplier trait you want to associate with the supplier.
Select the Master Supplier checkbox to indicate that the current trait is a master supplier trait.
Then choose:
Click OK to add the supplier trait and close the page.
Click OK and Add Another to add additional supplier traits.
Click Cancel to reject all entries and close the page.
Within Merchandising, there is the ability to define information about supplier traits which can later be associated with one or more suppliers. Supplier Traits can be useful for defining specific attributes of suppliers for purposes of reporting, regulatory compliance, and mass maintenance. The specific implementation of supplier traits is to be defined by each retailer however. This functionality is accessed from the main Merchandising task list under Foundation Data > Download Foundation Data and Foundation Data > Upload Foundation Data.
To add, update, or remove supplier trait information, you will need to select the template type of Foundation from the Download Data screen and then the template Supplier Traits. Click the Download button and when prompted, choose to either open the .ods file that is generated or save the file and open it separately in the spreadsheet application of your choice.
Add Supplier Trait
To add a new supplier trait, select the action type of Create on the Supplier Traits tab. Next, enter the trait ID and its description. You can also indicate which of your suppliers have a master supplier, who is an outside source such as a manufacturer or distributor that provides merchandise to one or more of your suppliers. The translations tab will hold the supplier trait details in the specified language.
Update Supplier Trait
If you would like to update a supplier trait, then a similar process will have to be followed to that described above for entering new trait information. First, download the spreadsheet, and then find the supplier trait that you want to update. In that row select the action type of Update, and then update the current details in the spreadsheet.
Delete Supplier Trait
If you wish to delete a supplier trait, update the action column to select Delete in each of the rows you want to delete.
Uploading Changes
For all actions defined above, once all the updates have been made to the data in the spreadsheet, save the file and close it. Then, return to the Merchandising screens and select Foundation Data > Upload Foundation Data from the main task list. In this screen, select the template type Foundation and the template Supplier Traits. This will generate a process description automatically, but this can be updated if desired. Lastly, select the Browse button and navigate to the directory where you saved the updated spreadsheet. To review the status of the upload and check whether any errors occurred, select the Foundation Data > Review Status task from the main task list.
See also Download/Upload Data from Spreadsheets and View Data Loading Status.
The Manage Suppliers option opens the Supplier Search page. In this page you can perform the following actions.
Search for suppliers by various search criteria
View the search results
View supplier information
Create supplier information
Edit supplier information
Edit supplier sites
View supplier sites
You can access the Supplier Search page from the Task menu, select Foundation Data > Suppliers and Partner Foundation > Manage Suppliers. The Supplier Search page appears.
To search for a supplier:
From the Task menu, select Foundation Data > Suppliers and Partner Foundation > Manage Suppliers. The Supplier Search page appears.
You can search for a supplier by using basic or advanced search criteria, depending on the requirement. The basic mode is the default search mode.
Click Advanced to access the search section in advanced mode.
Click Basic to return to basic mode.
To search for a supplier by using basic search criteria:
Enter, select or search for one or all of the following basic search criteria.
Table 2-40 Supplier Search - Basic Search Criteria and Description
| Fields | Description |
|---|---|
|
Match option |
Check radio button All or Any. All - only suppliers matching all entered search criteria are shown. Any - suppliers matching any of the entered search criteria are shown. |
|
Supplier |
Enter the supplier ID. |
|
Supplier Name |
Enter the supplier name. |
|
Supplier Site |
Enter the supplier site ID. |
|
Supplier Site Name |
Enter the supplier site name. |
|
Status |
Select the status of the supplier. |
|
Item |
Enter, select or search for the supplier's items. |
|
Order |
Enter, select or search for the supplier's orders. |
Click the Saved Search list to select one of the saved search criteria. Selecting a saved search populates the search section with the saved search criteria. If the run automatically function is enabled for the search, the search is executed immediately.
You can also personalize your saved searches by selecting Personalize. The Personalized Saved Searches page appears.
For more information about the Personalized Saved Search, see Personalize Saved Search in the Oracle® Retail Merchandising Do the Basics User Guide.
Click Search. The suppliers that match the search criteria are displayed in the Results section.
Click Reset to clear the search section and results.
Click Save As... to save the current search criteria. The Create Saved Search page appears.
For more information about how to save your search criteria, see Create Saved Search in the Oracle® Retail Merchandising Do the Basics User Guide.
Click Done to close the page.
To search for a supplier by using advanced search criteria:
To search by using advanced search criteria, enter or select one or all of the advanced search criteria.
Table 2-41 Supplier Search - Advanced Search Criteria and Description
| Fields | Description |
|---|---|
|
Match option |
Check radio button All or Any. All - only suppliers matching all entered search criteria are shown. Any - suppliers matching any of the entered search criteria are shown. |
|
Supplier |
Enter the supplier ID. |
|
Supplier Name |
Enter the supplier name. |
|
Supplier Site |
Enter the supplier site ID. |
|
Supplier Site Name |
Enter the supplier site name. |
|
Status |
Select the status of the supplier. |
|
Division |
Enter, select or search for the division. |
|
Group |
Enter, select or search for the group. |
|
Department |
Enter, select or search for the department. |
|
Class |
Enter, select or search for the class. |
|
Subclass |
Enter, select or search for the subclass. |
|
Item |
Enter, select or search for the supplier's items. |
|
Order No. |
Enter, select or search for the order number. |
To narrow down the search, use the list next to the search fields. For example, determine if the entered value should be equal or not equal to the search result.
Click the Saved Search list to select one of the saved search criteria. Selecting a saved search populates the search section with the saved search criteria. If the run automatically function is enabled for the search, the search is executed immediately.
You can also personalize your saved searches by selecting Personalize. The Personalized Saved Searches page appears.
For more information about the Personalized Saved Search, see Personalize Saved Search in the Oracle® Retail Merchandising Do the Basics User Guide.
Click Search. The suppliers that match the search criteria are displayed in the Results section.
Click Reset to clear the search section and results.
Click Save As... to save the current search criteria. The Create Saved Search page appears.
For more information about how to save your search criteria, see Create Saved Search in the Oracle® Retail Merchandising Do the Basics User Guide.
Click Add Fields to add more fields for the advanced search. To remove the field from the search, click the x right next to the field.
Click Reorder to change the order of the available search fields. The Reorder Search Fields page appears.
Select the desired search field and use the up and down arrows to rearrange the order of the fields.
Click OK to confirm the new order of the fields and close page.
Click Cancel to reject any changes and close the page.
Click Done to close the page.
To create a supplier or supplier site in the Supplier Search page, follow the steps below.
From the Tasks menu, select Foundation Data > Suppliers and Partner Foundation > Manage Suppliers. The Supplier Search page appears.
Enter or select search criteria as desired to make the search more restrictive.
Click Search. The suppliers/supplier sites that match the search criteria are displayed in the Results section.
Then select Actions > Create Supplier, or use the Create Supplier icon. The Create Supplier page appears.
In the Supplier Level field, select supplier or supplier site from the list. This field is a required field.
In the Supplier field, enter, select or search for the supplier you want to create the site for. If you selected supplier as the supplier level, this field is disabled.
Click OK. The Supplier/Supplier Site page appears.
Enter the necessary information in the individual sections.
For more information about the available sections of the Supplier/Supplier Site page, see the Create a Supplier section.
Then choose one of the following options.
Click Save to save the supplier/supplier site.
Click Save and Close to save the supplier/supplier site and close the page.
Click Save and Create Another to save the current supplier/supplier site and create additional entries.
Click Cancel to reject all entries and close the page.
To edit a supplier, follow the steps below.
From the Tasks menu, select Foundation Data > Suppliers and Partner Foundation > Manage Suppliers. The Supplier Search page appears.
Enter or select search criteria as desired to make the search more restrictive.
Click Search. The suppliers that match the search criteria are displayed in the Results section.
Select a supplier in the Results section.
Then select Actions > Edit Supplier, use the Edit Supplier icon, or click on the supplier link. The Supplier page appears.
Edit the information in the individual sections.
For more information about the available sections of the Supplier/Supplier Site page, see the Create a Supplier section.
Then choose one of the following options.
Click Save to save your changes.
Click Save and Close to save your changes and close the page.
Click Save and Edit Another to your changes and edit additional suppliers.
Click Cancel to reject all entries and close the page.
To edit a supplier site, follow the steps below.
From the Tasks menu, select Foundation Data > Suppliers and Partner Foundation > Manage Suppliers. The Supplier Search page appears.
Enter or select search criteria as desired to make the search more restrictive.
Click Search. The suppliers that match the search criteria are displayed in the Results section.
Select a supplier site in the Results section.
Then select Actions > Edit Supplier Site, or click on the supplier site link. The Supplier Site page appears.
Edit the information in the individual sections.
For more information about the available sections of the Supplier Site page, see the Create a Supplier section.
Then choose one of the following options.
Click Save to save your changes.
Click Save and Close to save your changes and close the page.
Click Save and Edit Another to your changes and edit additional supplier sites
Click Cancel to reject all entries and close the page.
A partner is a person or entity that has an association with the retailer in various areas of the procurement process, especially for import orders. A partner does not provide items to a retailer for resale. Information associated with a partner includes currency, language, status and primary contact details. For example, partners can include those involved in transporting goods (freight forwarders, consolidators), escheatment (for states or countries), providing credit (banks), and facilitating the import of goods (agents, brokers).
External finishers are an exception to the partner types above in that they are used in transfers, not purchasing. You may send goods to an external finisher for finishing work (such as printing, dyeing, or embroidery), or repair (for damaged goods). Then, after the job is done, the finisher will return the goods.
The Partner page allows you to create, edit, and view a partner. Partner status may be active or inactive. You can enter the currency, language, status, and primary contact information. Use this page to track the following information for specific types of partners:
Bank partners: Track a line of credit.
Import authority partners: Indicate whether they are the primary import authority for the principal country.
All partners except banks: Track manufacturer ID, principal country, Tax ID, and terms.
In some countries, inventory maintained with a third party must be controlled by the retailer. A retailer may send goods to the external finisher or supplier for finishing the work (such as printing, dyeing, and embroidery) or repair (in case of damaged goods). After the job is done, the finisher or the supplier returns the goods back to the same or a different location. All such movements must be accompanied by a Nota Fiscal.
Auto Receive Stock Indicator: Available only if the partner type is an external finisher.
This flag is used in the two-legged transfer process to indicate, when the warehouse/store ships the stock for the first leg, the system should automatically update the stock at the external finisher. The system will not wait for confirmation from the external finisher, regardless of whether it has received the merchandise or not. If this indicator is unchecked, when the first leg of the transfer is shipped, the system should not update the stock at the external finisher until the external finisher sends across a message that it has received the merchandise.
At the system level, you can determine if partner IDs are unique to all partners or unique to a partner type. If IDs are unique to a partner type, partners with different partner types may have the same ID.
The header section contains the following fields.
Table 2-42 Header - Fields and Description
| Fields | Description |
|---|---|
|
Partner Type |
The Partner Type field is labeled according to the created partner, for example, Bank. The partner ID is generated automatically. Enter the name of the partner. This field is a required field. |
|
Secondary Name |
Enter a secondary name for the partner, if available. |
|
Principal Country |
Enter, select or search for the principal country code of the partner. This field is a required field. |
|
Currency |
Enter, select or search for the partner's currency code. This field is a required field. |
|
Status |
Select the status of the partner from the list. This field is a required field. |
|
Terms |
Enter, select or search for the payment terms. This field is a required field. |
|
Language |
Select the partner's language from the list. |
|
Auto Receive Stock checkbox |
Select this checkbox to indicate that the system updates the stock for the external finisher when the 1st leg of the transfer is shipped. |
|
Line of Credit: |
|
|
Line of Credit |
Enter the credit limit. This field is a required field. |
|
Outstanding |
Contains the total amount of credit that the company has used or has charged against in the partner's currency. |
|
Open |
Displays the open credit amount. |
|
YTD Line of Credit Placed |
Contains the total amount of credit the company has used this year to this date in the partner's currency. |
|
YTD Drawdowns |
Contains the year to date payments the bank has made on behalf of the company in the partner's currency. |
|
Contact: |
|
|
Name |
Enter the name of the primary contact at the partner's site. This field is a required field. |
|
Phone |
Enter the phone number of the primary contact. This field is a required field. |
|
Email/Fax/Telex |
Enter additional contact information in the appropriate fields. |
To create a partner, follow the steps below.
From the Tasks menu, select Foundation Data > Items > Suppliers and Partners > Create Partner. The Create Partner page appears.
In the Partner Type field, select the type of partner you want to create.
Click OK. The Partner page appears. The partner ID is generated automatically.
Enter the necessary partner information in the available sections.
For more information about the available sections of the Partner page, see the Create a Partner section.
Then choose one of the following options.
Click Save to save the partner information.
Click Save and Close to save the partner and close the page.
Click Save and Create Another to create additional partners.
Click Cancel to reject all entries and close the page.
To edit a partner, follow the steps below.
From the Tasks menu, select Foundation Data > Items > Supplier and Partners > Manage Partners. The Partner Search page appears.
Enter or select search criteria as desired to make the search more restrictive.
Click Search. The partners that match the search criteria are displayed in the Results section.
In the Partner column, click the partner link, or mark a record and select Actions > Edit, or use the Edit icon. The Partner page appears.
Edit the fields as, necessary.
Then choose one of the following options.
Click Save to save the partner information.
Click Save and Close to save the partner and close the page.
Click Save and Edit Another to edit additional partners.
Click Cancel to reject all entries and close the page.
The Invoicing Attribute page allows you to specify how invoices from the partner are handled. You can indicate where an invoice is received and where an invoice is paid. You can also indicate that the stores must confirm that the service was performed before the invoice from the partner is approved. You can select invoicing attributes for a partner if the Oracle Retail Invoice Matching product is installed.
To specify invoicing attributes for a partner, follow the steps below.
From the Tasks menu, select Foundation Data > Supplier and Partners > Manage Partner. The Partner Search page appears.
Enter or select search criteria as desired to make the search more restrictive.
Click Search. The partners that match the search criteria are displayed in the Results section.
In the Partner column, click the partner link, or mark a record and select Actions > Edit, or use the Edit icon. The Partner page appears.
Select More Actions > Invoicing Attributes. The Invoicing Attribute page appears.
In the Receive Invoice, field, select where the invoice is received.
In the Pay Invoice field, select where the invoice is paid.
Select the Confirmation Required for Services Performed checkbox, to indicate that the stores must confirm that the service was performed before the invoice from the partner is approved.
Then choose:
Click OK to save the invoicing attributes and close the page.
Click Cancel to reject all entries and close the page.
The Manage Partners option opens the Partner Search page. In this page you can perform the following actions.
Search for partners by various search criteria
View the search results
View partner information
Create partner information
Edit partner information
You can access the Partner Search page from the Task menu, select Foundation Data > Suppliers and Partners > Manage Partners. The Partner Search page appears.
To search for a partner:
From the Task menu, select Foundation Data > Suppliers and Partners > Manage Partners. The Partner Search page appears.
You can search for a partner by using basic or advanced search criteria, depending on the requirement. The basic mode is the default search mode.
Click Advanced to access the search section in advanced mode.
Click Basic to return to basic mode.
To search for a partner by using basic search criteria:
Enter, select or search for one or all of the following basic search criteria.
Table 2-43 Partner Search - Basic Search Criteria and Description
| Fields | Description |
|---|---|
|
Match option |
Check radio button All or Any. All - only partners matching all entered search criteria are shown. Any - partners matching any of the entered search criteria are shown. |
|
Partner Type |
Select the partner type from the list. |
|
Partner |
Enter, select or search for the partner ID. |
|
Description |
Enter, select or search for the partner description. |
|
Status |
Select the status of the supplier. |
|
Currency |
Enter, select or search for the currency. |
|
Principal Country |
Enter, select or search for the principal country. |
|
Manufacturer ID |
Enter, select or search for the manufacturer ID. |
|
Language |
Enter, select or search for the language. |
Click the Saved Search list to select one of the saved search criteria. Selecting a saved search populates the search section with the saved search criteria. If the run automatically function is enabled for the search, the search is executed immediately.
You can also personalize your saved searches by selecting Personalize. The Personalized Saved Searches page appears.
For more information about the Personalized Saved Search, see Personalize Saved Search in the Oracle® Retail Merchandising Do the Basics User Guide.
Click Search. The partners that match the search criteria are displayed in the Results section.
Click Reset to clear the search section and results.
Click Save As... to save the current search criteria. The Create Saved Search page appears.
For more information about how to save your search criteria, see Create Saved Search in the Oracle® Retail Merchandising Do the Basics User Guide.
Click Done to close the page.
To search for a partner by using advanced search criteria:
To search by using advanced search criteria, enter or select one or all of the advanced search criteria.
To narrow down the search, use the list next to the search fields. For example, determine if the entered value should be equal or not equal to the search result.
Click the Saved Search list to select one of the saved search criteria. Selecting a saved search populates the search section with the saved search criteria. If the run automatically function is enabled for the search, the search is executed immediately.
You can also personalize your saved searches by selecting Personalize. The Personalized Saved Searches page appears.
For more information about the Personalized Saved Search, see Personalize Saved Search in the Oracle® Retail Merchandising Do the Basics User Guide.
Click Search. The partners that match the search criteria are displayed in the Results section.
Click Reset to clear the search section and results.
Click Save As... to save the current search criteria. The Create Saved Search page appears.
For more information about how to save your search criteria, see Create Saved Search in the Oracle® Retail Merchandising Do the Basics User Guide.
Click Add Fields to add more fields for the advanced search. To remove the field from the search, click the x right next to the field.
Click Reorder to change the order of the available search fields. The Reorder Search Fields page appears.
Select the desired search field and use the up and down arrows to rearrange the order of the fields.
Click OK to confirm the new order of the fields and close the page.
Click Cancel to reject any changes and close the page.
Click Done to close the page.
Expense profiles can be defined for suppliers, partners, and/or countries of sourcing. Supplier and country profiles default to items. Partner expense profiles default to PO/items when an item is added to an order.
You can divide supplier and partner expense profiles into Country or Zone level.
Country level profiles are for expenses incurred when moving goods from a country of sourcing to the discharge port in the country of import.
Zone level profiles are for expenses incurred when moving goods from a discharge port in the country of import to a final destination cost zone.
For a given supplier you may utilize one basic route from the supplier's country to the discharge port, but may have many different routes when moving the goods from the discharge port to the destination.
Additionally, you can change the rate on a cost component in expense profiles and automatically update item expenses and/or PO/item expenses on a designated date.
The header section varies depending on, if you create or edit expense profiles for a supplier, partner or a country of sourcing.
Supplier Expense Profiles
The header displays the supplier site ID and name.
In the Profile Type field, select the type.
Select Zone to make changes to the expense profile at the supplier/cost zone level.
Select Country to make changes to the expense profile at the supplier/country of sourcing level.
Partner Expense Profiles
The header displays the partner type, ID and name.
In the Profile Type field, select, the type.
Select Zone to make changes to the expense profile at the partner/cost zone level.
Select Country to make changes to the expense profile at the partner/country of sourcing level.
Country Expense Profiles
The header displays the profile type country by default.
In the Country field, select the country you want to create the expense profiles for.
In the Shipping Routes section you can add, delete and view shipping routes. Additionally, you can define a shipping route as the default expense profile in this section.
To add a new shipping route to an expense profile at the country level, follow the steps below.
In the Profile Type field, select Country from the list.
In the Shipping Routes section, select Actions > Add, or use the Add icon. The Add Shipping Route page appears.
In the Origin Country field, enter, select or search for the appropriate country. This field is a required field.
In the Lading Port field, enter, select or search for the lading port.
In the Discharge Port field, enter, select or search for the discharge port.
Select the Base Profile checkbox to indicate that you want to use this shipping route as the default.
Then choose one of the following options.
Click OK to add the shipping route and close the page.
Click OK and Add Another to add additional shipping routes.
Click Cancel to reject all entries and close the page.
To add new shipping routes to an expense profile at the zone level, follow the steps below.
In the Profile Type field, select Zone from the list.
In the Shipping Routes section, select Actions > Add, or use the Add icon. The Add Shipping Route page appears.
In the Discharge Port field, enter, select or search for the discharge port. This field is a required field.
In the Zone Group field, enter, select or search for the zone group.
In the Cost Zone field, enter, select or search for the cost zone.
Select the Base Profile checkbox to indicate that you want to use this shipping route as the default.
Then choose one of the following options.
Click OK to add the shipping route and close the page.
Click OK and Add Another to add additional shipping routes.
Click Cancel to reject all entries and close the page.
To add a new shipping route to a country expense profile, follow the steps below.
In the Shipping Routes section, select Actions > Add, or use the Add icon. The Add Shipping Route page appears.
In the Lading Port field, enter, select or search for the lading port.
In the Discharge Port field, enter, select or search for the discharge port. This field is a required field.
Select the Base Profile checkbox to indicate that you want to use this shipping route as the default.
Then choose one of the following options.
Click OK to add the shipping route and close the page.
Click OK and Add Another to add additional shipping routes.
Click Cancel to reject all entries and close the page.
In this section you can add, edit, delete and view expenses for the supplier, partner or a country.
To add expenses to the profile follow the steps below.
In the Expense section, select Actions > Add, or use the Add icon. The Add Expense page appears.
In the Component field, enter, select or search for the expense component. This field is a required field.
In the Component Rate field, enter the component rate. This field is a required field.
In the Computation Value Base, enter, select or search for computation value base.
The Calculation Basis field, displays the calculation basis for the expense.
In the Per Count field, enter, select or search for the per count number.
In the Per Count UOM field, enter, select or search for the per count unit of measure. This field is a required field.
In the Component Currency field, enter, select or search for the currency ID. This field is a required field.
In the Component Nomination section, select the status of the expense in relation to the other components.
Select N/A if the expense is not included in the calculation.
Select + (plus sign) to add the expense.
Select - (minus sign) to subtract the expense.
Then choose one of the following options.
Click OK to add the expense and close the page.
Click OK and Add Another to add additional expenses.
Click Cancel to reject all entries and close the page.
To edit expenses to the profile follow the steps below.
In the Expense section, select a record in the table.
Then select Actions > Edit, or use the Edit icon. The Edit Expense page appears. The values of the selected expense are displayed.
Edit the fields, as necessary.
Then choose one of the following options.
Click OK to save your changes and close the page.
Click Cancel to reject all entries and close the page.
In the Rate Updates section you can apply rate updates to items and orders.
To add rate updates for items and/or orders, follow the steps below.
In the Rate Updates section, select Actions > Add, or use the Add icon. The Add Rates page appears.
In the Effective Date field, enter the effective date or use the Calendar icon to select a date. This field is a required field.
In the Comp Rate field, enter the component rate. This field is a required field.
In the Component Currency field, enter, select or search for the component currency code.
Select the Item checkbox to apply the rate updates to items.
Select the Order checkbox to apply the rate updates to orders.
Then choose one of the following options.
Click OK to add the rate updates and close the page.
Click OK and Add Another to add additional rate updates.
Click Cancel to reject all entries and close the page.
To edit rate updates for items and/or orders, follow the steps below.
In the Rate Updates section, select a record in the table.
Then select Actions > Edit, or use the Edit icon. The Edit Rates page appears. The values of the selected rate update are displayed.
Then choose one of the following options.
Click OK to save your changes and close the page.
Click Cancel to reject all entries and close the page.
The Download Data page allows you to download certain data entities into a spreadsheet for viewing or editing.
You can access the Download Data page from the Task menu, select Foundation Data > Download Foundation Data. The Download Data page appears.
In the Template Type field, select the template type from the list.
In the Template field, enter, select or search for the template you want to download.
Then choose one of the following options:
Click Download to download the file. When you click Download, you are prompted to either open or save the file.
Click Revert to clear out the screen inputs.
Click Done to close the Download Data page.
The Upload Data page allows you to upload a spreadsheet of data that you previously downloaded and apply the updates or additions made in the file.
You can access the Upload Data page from the Task menu, select Foundation Data > Upload Foundation Data. The Upload Data page appears.
In the Template Type field, select the template type from the list.
In the Template field, enter, select or search for the template you want to upload.
The Process Description field displays the default process name with the date and timestamp. You can edit the name of the upload process in this field.
In the Source File field, click the Choose File button to select the file.
|
Note: The file uploaded must end in .ods and must be in the same format as that which is downloaded in the Download Data page. It is recommended you always start with downloading the data first and then make changes in that file to ensure you have the correct format. If any columns or tabs in the spreadsheet template are removed, errors will occur on uploading. |
Then choose one of the following options:
Click Upload to upload the file. The upload processing will occur in the background. If an error occurs during the processing, a notification will be displayed with a link to view the details. Alternatively, you can access the Data Loading Status page to check the status of the upload.
Click Revert to clear out the screen inputs.
Click Done to close the Upload Data page.
The Data Loading Status page allows you to view the status of the upload and download processes, so that you can rectify any issues associated with the upload/download process.
The page allows you to drill down to the errors or warnings associated with a selected upload/download request.
You can access the Data Loading Status page from the Task menu, select Foundation Data > Review Status. The Data Loading Status page appears.
The table displays the process, process description, file name, template category and type, destination, action date and time, status and the user, who initiated the process.
Table - Actions Menu and Icons
Use the Actions Menu and icons to apply actions to the table. You can perform the actions listed below.
Table 2-44 Data Loading Status Table - Actions Menu/Icons and Description
| Actions Menu/Icons | Description |
|---|---|
|
Delete and Delete icon |
If no errors occurred with the process and data was fully loaded into Merchandising, or if you wish to re-try the load again after errors have been correct, the process can be deleted in the table. You can delete a process by using the following steps:
|
|
View Issues and View Issues button |
To view the warnings and errors associated with a selected upload/download request:
|
|
Upload to RMS |
With this option you can upload the selected process from Staging to the Merchandising tables. This option is only enabled for items, cost changes, and purchase orders which were loaded with a destination of Staging Tables and do not hold the status ”Processed with Errors”. |
|
Download Staged |
This option allows you to download the staged records of a process to a spreadsheet.
This option is only enabled for Item induction, Cost Change induction and Order induction records. |
The Download Blank Template page allows you to download blank templates for certain entities which support spreadsheet upload, such as items and purchase orders.
You can access the Download Blank Template page from the Task menu, select Foundation Data > Data Loading > Download Blank Template. The Download Blank Template page appears.
In the Type field, select the template type from the list.
In the Template field, enter, select or search for the template you want to download.
Then choose one of the following options:
Click Download to download the file. When you click Download, you are prompted to either open or save the .ods file.
Click Revert to undo any changes.
Click Done to close the Download Blank Template Data page.
In certain entities in Merchandising, there is an option to add a link to documents, images, or other supplemental information. This provides an easy way for users to access this information that is stored elsewhere in the context of an item or transaction. This linking is done in the Attachment tab in the contextual pane by clicking on the paper clip iconic tab ( ![]() ) in the panel, as shown below in the Item screen.
) in the panel, as shown below in the Item screen.
To add an attachment, click on the ![]() iconic button in the attachments panel and fill out all the fields in the pop-up. The URL must be a location that will be accessible to your users.
iconic button in the attachments panel and fill out all the fields in the pop-up. The URL must be a location that will be accessible to your users.
Once added, a small image of the link is displayed, along with a View hyperlink that will allow you to quickly access the image or document at the location where it is stored.
One or more links can be added to each entity. The links can be updated or removed as needed at any time by selecting the ![]() iconic button or the
iconic button or the ![]() iconic button, respectively.
iconic button, respectively.
In certain entities in Merchandising, there is an option to integrate with the Slack collaboration tool. When this feature is turned on, the contextual area of an enabled screen shows the related conversations for the entity (for example, purchase order) being maintained. Click on the conversation tab in the contextual pane ( ![]() ) to access the conversation. From here, you can create a new conversation for an entity, view all existing messages for an entity, and post messages and replies. You can also add or remove members from a conversation and view documents that have been uploaded to Slack. Conversations create channels in Slack.
) to access the conversation. From here, you can create a new conversation for an entity, view all existing messages for an entity, and post messages and replies. You can also add or remove members from a conversation and view documents that have been uploaded to Slack. Conversations create channels in Slack.
To begin using this functionality, you will first need to log into the Slack application that has been configured for Merchandising. To do this, click on the Authenticate link and then enter your Slack username and password. Then, click the Refresh link in Merchandising after authenticating.
To create a new conversation related to an entity, provide a conversation title and then click Create Conversation. Only one conversation can exist per entity.
Once the conversation is created, the collaboration messages panel displays the messages view. This view displays all the messages for the conversation associated with the entity. You can then add messages, add members, share the conversation and so on. Updates to the conversation are shown back in the application tab when you click the Refresh button ( ![]() ).
).
In several areas in Merchandising, in addition to selecting individual items or an item list, you will be provided an option for adding items titled Upload List. This option will allow you to browse for a file of type .csv that contains a column of items. These items will then be applied to the transaction similar to the way an item list is used, but without the need to create an item list in advance. The .csv file does not require a template like other spreadsheet upload processes, but instead uses just the data in the first column (all other data is ignored) of the first tab. The upload also assumes that there is no header for the column.
All items that are valid for the transaction type can be included in the upload. For example, if using to add items to an item list, either parent items or transaction items can be included.
The Documents feature is used to store strings of pre-written text to be attached to a given item to be printed at the Letter of Credit, Logistics, Customs Entry, Purchase Order and Item modules. These texts are crucial in that they provide needed information in all areas of the system.
Documents can be created and managed using the spreadsheet download and upload processes, which are accessed through the main Merchandising task list under Foundation Data > Download Foundation Data and Foundation Data > Upload Foundation Data respectively. Navigate to Foundation Data > Download Foundation Data, choose the Template Type of Foundation and the Template titled Documents to download existing Document data into a spreadsheet.
Adding a Document
To add a new Document, start in the Document Class tab. In a blank line in the template, select the action type of Create and enter a code (having up to 6 numeric digits) to serve as an identifier for the new Document you are adding. Next proceed to enter in the document description that describes the document purpose and select a document type classifier to associate with the new document. The values in the Document type drop down can be configured based on your need via the codes configuration template. Additional details that you can capture as part of the document creation include:
A sequence number that controls the order in which the documents will be listed on an associated item such as a PO, Customs Entry etc.
Document text field that allows captures the actual text of the document (up to 200 characters)
Letter of Credit Document indicator that indicates whether or not the document is a Letter of Credit document. It may be noted Letter of Credit documents are not modifiable in any other dialog besides Letter of Credit screens.
If you wish to store and manage translations for the document description then the same can be managed via the Document Translations worksheet. For each new language in which a translation is to be defined, add a row to the worksheet with an action type of Create carrying the language code and the document code for which the translation is being defined together with the translated document description.
Updating Documents
If you would like to update any Document details, a similar process will be followed as that described above for creating new Documents. First, download the Documents spreadsheet, and then navigate to the tab where you would like to make your updates.
The following columns can be updated in each tab:
Documents – Document Description, Document Type, Sequence No, Document Text
Document Translations – Document Description
In the tab where you are going to make your updates, select the action type of Update for the rows being updated, and then correct the value in the spreadsheet. Once your updates are complete, save and close the spreadsheet.
Deleting Documents
If you wish to delete a document because it is not used by your business, update the action column to select Delete for the rows containing the document in each of the tabs where it occurs. This includes both Documents and Document Translations tabs. Care should be taken ensure that a Document is not used or associated with an item before deleting it or an error could be raised on upload.
Uploading Changes
For all actions defined above, once all the updates have been made to the data in the spreadsheet, save the file and close it. Then, return to the Merchandising screens and select Foundation Data > Upload Foundation Data from the main task list. In this screen, you'll again select the template type Foundation and the template Documents. This will generate a process description automatically, but this can be updated if desired. Lastly, you'll select the Browse button and navigate to the directory where you saved the updated spreadsheet.
To review the status of the upload and check whether any errors occurred, select the Foundation Data > Review Status task from the main task list.
See also Download/Upload Data from Spreadsheets and View Data Loading Status.