| Oracle® Retail Merchandising Foundation Cloud Service Oracle Retail Merchandising System User Guide Release 19.3.000 F83161-01 |
|

 Previous |
 Next |
| Oracle® Retail Merchandising Foundation Cloud Service Oracle Retail Merchandising System User Guide Release 19.3.000 F83161-01 |
|
Previous |
Next |
The franchise business model is typically used by retailers to scale up business operations and market presence, particularly in new markets. In this model, retailers may choose to utilize business partners called franchisees to manage branded or co-branded stores while retaining the retailer's business processes and value proposition. Franchisees may operate one or more stores under the retailer's banner. Franchise models can vary by geography, ease of market entry and line of business. There can also be variances in mode of profiting sharing (license fee vs % of profits vs preferential rates), inventory management (franchisee managed as opposed to franchiser managed), and so on. The Merchandising system supports a franchise model that offers customer management, franchise costing and both retailer-managed as well as franchisee-managed inventory capabilities. A comprehensive description of the Franchise Management features available in Merchandising can be found in the Franchise Management whitepaper.
Franchise Customers are typically business entities who manage branded or co-branded stores with the retailer, while retaining the retailer's business processes and value propositions. Each franchise customer can operate one or more stores for the retailer for which inventory may or may not be managed by the retailer. These franchise locations are set up as stores in Merchandising to ease the process of ordering and fulfilling of franchise orders. Merchandising maintains customer groups and customers pertaining to franchise operations as a hierarchy above the franchise locations, which are created as stores.
Franchise customer groups provide the ability to group customers owned by a larger group. If you do not have a multi-tiered structure for your franchise customers, then customer and customer groups can be created as a one-to-one relationship. Customer groups can also be used as a grouping mechanism while defining cost-build-up templates for uniformity in costing. Definition of franchise customer groups is mandatory to set up franchise customers in Merchandising.
Once a customer group is defined, customers belonging the customer group can be set up in the Merchandising system. Multiple customers can be associated under a single customer group, but a given customer can only belong to a single customer group.
Franchise customers and customer groups can be created and managed using the spreadsheet download and upload processes, which are accessed through the main Merchandising task list under Foundation Data > Download Foundation Data and Foundation Data > Upload Foundation Data respectively. Navigate to Foundation Data > Download Foundation Data, choose the Template Type of Franchise and the Template titled Franchise Customers to download existing customer data.
To add a new franchise customer group, start in the Franchise Customer Group tab. Add a new row by selecting the action type of Create and enter the ID for the new group that you wish to add, using up to 10 numeric digits. Next proceed to enter the Franchise Customer Group Name. Translations of the Customer Group Name can be defined in the Franchise Customer Group translations tab. For each new language in which a translation is to be defined, add a row with an action type of Create, select the language code and enter the customer Group ID for which the translation is being defined together with the translated name. There are no significant validations for uploading a new Franchise Group apart from validating that the Customer Group ID is unique.
To add a new franchise customer, start in the Franchise Customer tab. Add a new row by selecting the action type of Create and enter the ID for the new customer that you wish to add, using up to 10 numeric digits. Next proceed to enter the Franchise Customer Name. Other key details that you will need to enter include:
Credit indicator - Indicate whether the Franchise Customer has good credit. Franchise Ordering will be restricted for Customers with poor credit. Valid values are Yes and No.
Customer Group ID - Enter the ID of a valid Franchise Customer Group to which the customer is associated.
Auto Approve Indicator - Indicates if externally uploaded Franchise Orders should be automatically approved for this customer or not. Valid values are Yes and No.
Translations of the Customer Name can be defined in the Franchise Customer translations tab. For each new language in which a translation is to be defined, add a row with an action type of Create carrying the language code and the customer ID for which the translation is being defined together with the translated name. There are no significant validations for uploading a new Franchise customer apart from validating that the customer is unique and associated with a valid Franchise Customer Group.
If you would like to update any Customer or Customer Group details, a similar process will be followed as described above for creating new Franchise Customer Groups. First, download the Franchise Customer spreadsheet, and then navigate to the tab where you would like to make your updates. The following columns can be updated in each tab:
Franchise Customer Groups – Customer Group Name
Franchise Customer Groups Translation – Customer Group Name
Franchise Customers – Customer Name, Credit Indicator, Customer Group ID, Auto Approve Indicator
Franchise Customer Translations – Customer Name
In the tab where you are going to make your updates, select the action type of Update on rows that you wish to update and then correct the value in the spreadsheet. Once your updates are complete, save and close the spreadsheet.
If you wish to delete a Franchise Customer Group or Franchise Customer or its associated translation record because it is not used by your business, update the action column to select Delete for those rows in each of the tabs where it occurs. This includes Franchise Customer Groups, Franchise Customers and their respective translation tables. Care should be taken before deleting a Franchise Customer or Franchise Customer group to ensure that it is not used and does not have active transactions referencing it in the system. If associated records exist then an error could be raised on upload.
For all actions defined above, once all the updates have been made to the data in the spreadsheet, save the file and close it. Then, return to the Merchandising screens and select Foundation Data > Upload Foundation Data from the main task list. In this screen, you'll again select the template type Franchise and the template Franchise Customers. This will generate a process description automatically, but this can be updated if desired. Lastly, you'll select the Browse button and navigate to the directory where you saved the updated spreadsheet.
To review the status of the upload and check whether any errors occurred, select the Foundation Data > Review Status task from the main task list. For more information, see ”View Data Loading Status” in the Oracle Retail Merchandising Do the Basics User Guide.
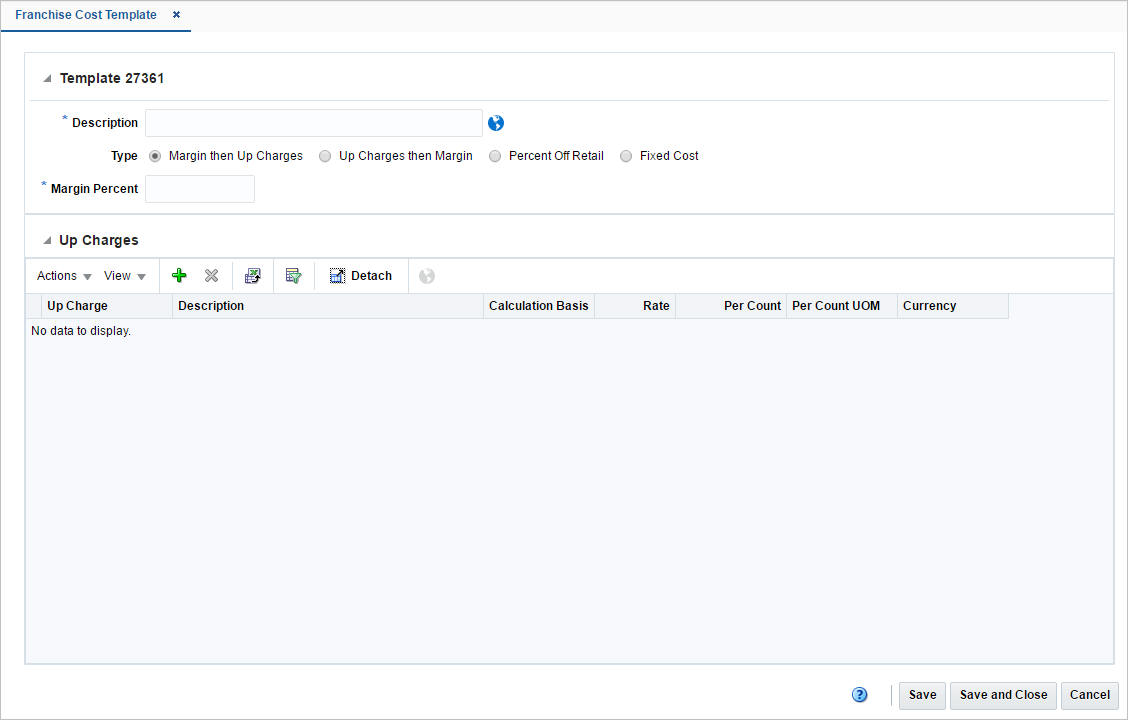
The Franchise Cost Template is used to apply the same pricing concept to multiple item/franchisee location combinations. Each template defines the method by which costing for the Franchisee will be calculated. The Franchise Cost Templates page allows you to view, edit, or create cost templates used to determine customer costs for franchise.
The following template types are available:
Margin then Up Charges
Up Charges then Margin
Percent off Retail
Fixed Cost
The Template section contains the template ID that is that is automatically generated. Depending on the calculation type selected, the section contains the following fields. The system defaults to the Margin then to the Up Charges type.
Table 10-1 Template - Fields and Description
| Fields | Description |
|---|---|
|
Description |
Enter a description. This field is a required field. |
|
Translate icon |
You can create a translation by using the Translate icon |
|
Type |
Select the method by which the costing will be calculated. The following template types are available:
|
|
Margin Percent |
Only available if you select one of the following template types:
Enter the margin in percent. |
|
Percent Off Retail |
Only available if you select the template type Percent Off Retail. Enter the percent off retail used to calculate the customer cost for an item. This field is a required field. |
|
Fixed Cost |
Only available if you select the template type Fixed Cost. Enter the fixed cost. This field is a required field. |
|
Final Cost checkbox |
Only available if you select the template type Fixed Cost. You can define the final customer cost for an item. Select the Final Cost check box. The Final Cost option signifies if this is the final cost for the item/franchise location or deal pass through will have to be applied on the cost to derive the final customer cost for the item/franchise location. |
The Up Charges section contains the list of up charges associated with the template. This section is only available when the template type is either Margin then Up Charges or Up Charges then Margin. You can add new up-charges or delete existing up-charges from the template in this section.
To create a franchise cost template, follow the steps below.
From the Tasks menu, select Inventory > Franchise Orders > Create Cost Template. The Franchise Cost Template page appears.
Enter the required fields.
Then choose one of the following options.
Click Save to save the franchise cost template.
Click Save and Close to save the template and close the page.
Click Cancel to reject all entries and close the page.
To add up charges to a franchise cost template, follow the steps below. This section is only available when the template type is either Margin then Up Charges or Up Charges then Margin.
In the Up Charges section, select Actions > Add, or use the Add icon ![]() . The Add Up Charges pop-up appears.
. The Add Up Charges pop-up appears.
In the Up Charges field, enter, select or search for the up charge you want to add to the template. This field is a required field.
Then choose one of the following options.
Click OK to add the up charge and close the pop-up.
Click OK and Add Another to add additional up charges
Click Cancel to reject all entries and close the pop-up.
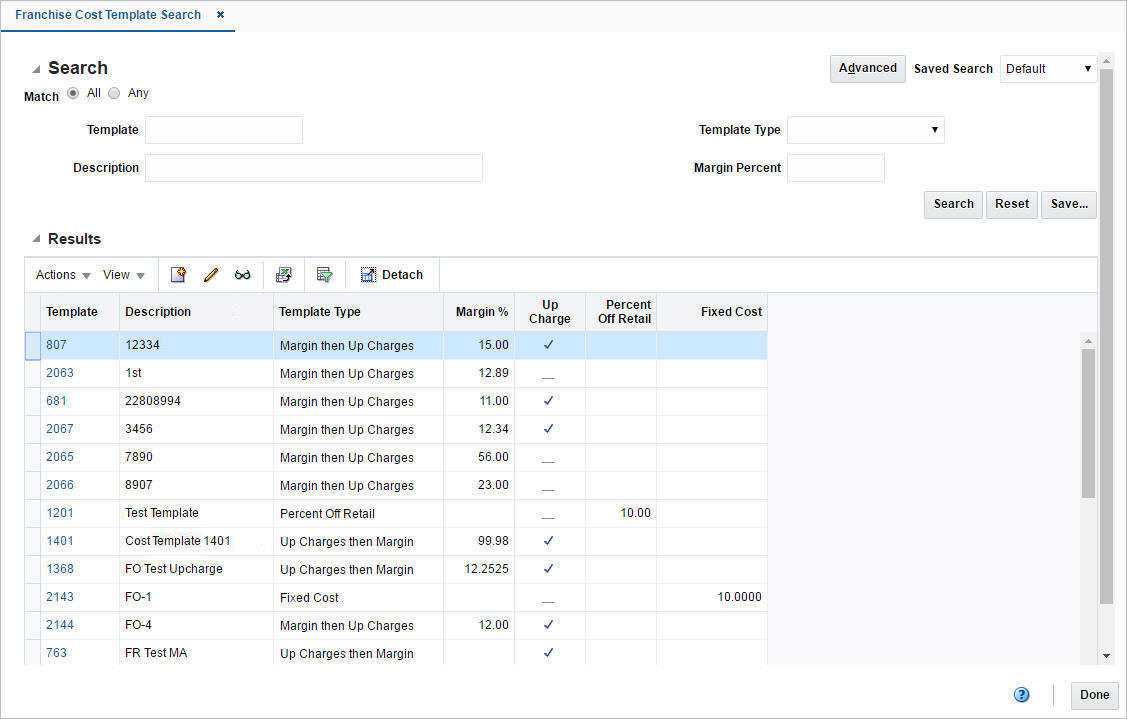
The Manage Cost Template option opens the Franchise Cost Template Search page. In this page you can perform the following actions.
Search for cost templates by various search criteria
View search results
View cost template information
Create cost templates
Edit cost templates
Export Query Results to Excel
You can access the Franchise Cost Template Search page from the Task menu, select Inventory > Franchise Orders > Manage Cost Template. The Franchise Cost Template Search page appears.
To search for a franchise cost template:
From the Task menu, select Inventory > Franchise Orders > Manage Cost Templates. The Franchise Cost Template Search page appears.
You can search for a franchise cost template using basic or advanced search criteria, depending on the requirement. The basic mode is the default search mode.
Click Advanced to access the search section in advanced mode.
Click Basic to return to basic mode.
To search for a franchise cost template using basic search criteria:
Enter, select or search for one or all of the following basic search criteria.
Table 10-2 Franchise Cost Template Search - Basic Search Criteria and Description
| Fields | Description |
|---|---|
|
Match option |
Check radio button All or Any. All - only franchise cost templates matching all entered search criteria are shown. Any - franchise cost templates matching any of the entered search criteria are shown. |
|
Template |
Enter the template ID. |
|
Description |
Enter the template description. |
|
Template Type |
Select the template type from the list. |
|
Margin Percent |
Enter the margin in percent. |
Click Search. The franchise cost templates that match the search criteria are displayed in the Results section.
Click Reset to clear the search section and results.
Click Done to close the page.
To search for a franchise cost template using advanced search criteria:
To search using advanced search criteria, enter or select one or all of the advanced search criteria.
To narrow down the search, use the list next to the search fields. For example, determine if the entered value should equal or not equal the search result.
Click Search. The franchise cost templates that match the search criteria are displayed in the Results section.
Click Reset to clear the search section and results.
Click Add Fields to add more fields for the advanced search. To remove the field from the search, click the x right next to the field.
Click Done to close the page.
To edit a franchise cost template, follow the steps below.
From the Tasks menu, select Inventory > Franchise Orders > Manage Cost Template. The Franchise Cost Template Search page appears.
Enter or select search criteria to make the search more restrictive.
Click Search. The franchise cost templates that match the search criteria are displayed in the Results section.
Select a franchise cost template in the Results section.
Then select Actions > Edit, or use the Edit icon ![]() , or click on the template link. The Franchise Cost Template page appears.
, or click on the template link. The Franchise Cost Template page appears.
Edit the information in the individual sections.
For more information about the available sections of the Franchise Cost Template page, see the Manage Franchise Costs section.
Then choose one of the following options.
Click Save to save your changes.
Click Save and Close to save your changes and close the page.
Click Cancel to reject all entries and close the page.
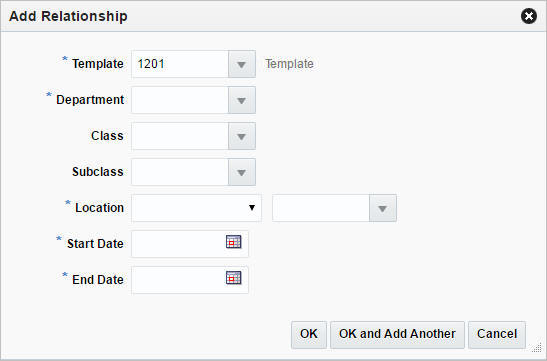
The Franchise Cost Relationships page allows you to maintain the franchise cost relationships between departments/items and locations.
The table contains the cost templates associated with a department/class/subclass or item for one or more franchise stores. You can only associate an item with a template if the selected template uses the fixed cost pricing method. These relationships, which also include start and end dates, are used to calculate the pricing cost for franchise stores.
To add cost relationships, follow the steps below.
From the Tasks menu, select Inventory > Franchise Orders > Cost Relationships. The Franchise Cost Relationships page appears.
In the table, select Actions > Add, or use the Add icon ![]() . The Add Relationships pop-up appears.
. The Add Relationships pop-up appears.
In the Template field, enter, select or search for the template. This field is a required field.
In the Department field, enter, select or search for the department you want to associate the template with. This field is a required field.
In the Class field, enter, select or search for the class.
In the Subclass field, enter, select or search for the subclass.
In the Location field, select the location type from the list. Then enter, select or search for the location. This field is a required field.
In the Start Date field, enter the start date or use the Calendar icon to select a date. This field is a required field.
In the End Date field, enter the end date or use the Calendar icon to select a date. This field is a required field.
Then choose one of the following options.
Click OK to add the cost relationship to the table and close the pop-up.
Click OK and Add Another to add additional cost relationships.
Click Cancel to reject all entries and close the pop-up.
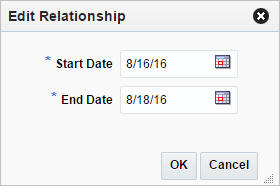
To edit cost relationships, follow the steps below.
From the Tasks menu, select Inventory > Franchise Orders > Cost Relationships. The Franchise Cost Relationships page appears.
Select a record in the table.
Then select Actions > Edit, or use the Edit icon ![]() . The Edit Relationships pop-up appears. The start and end date of the selected template are displayed.
. The Edit Relationships pop-up appears. The start and end date of the selected template are displayed.
In the Start Date field, edit the start date, if necessary.
In the End Date field, edit the end date, if necessary.
Then choose one of the following options.
Click OK to save your changes and close the pop-up.
Click Cancel to reject all entries and close the pop-up.
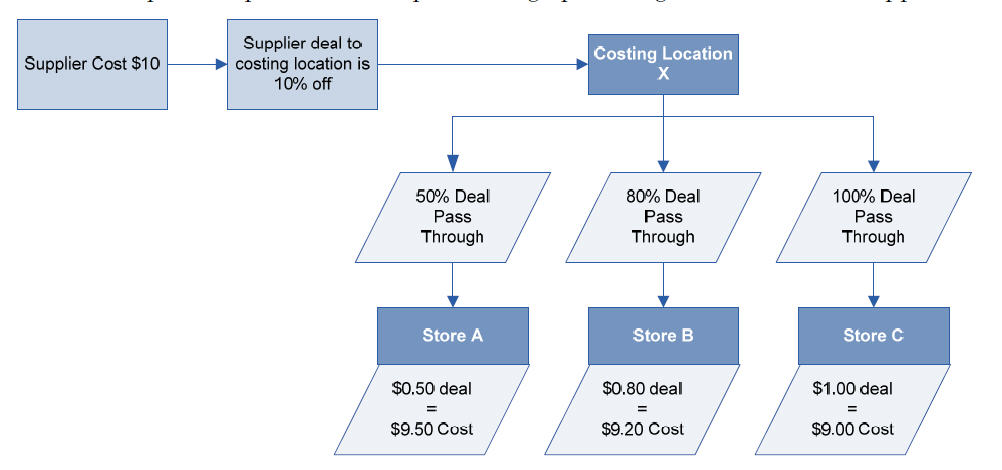
Suppliers often provide off-invoice deals to promote purchases by retailers. These purchase related benefits can be further passed through from the retailer to the franchise customer. The retailer may opt to pass through a full or a partial benefit to the franchise customer. The Merchandising system provides an option to define this deal pass-through percentage by department/supplier/costing location for each franchise store. The diagram below depicts a simple example of how this pass through percentage is calculated and applied.
Deal pass through percentages can be defined and managed using the spreadsheet download and upload processes, which are accessed through the main Merchandising task list under Foundation Data > Download Foundation Data and Foundation Data > Upload Foundation Data respectively. Navigate to Foundation Data > Download Foundation Data, choose the Template Type of Franchise and the Template titled Deal Pass Through to download existing pass through data.
To add a new Deal Pass through definition, start in the Deal Pass Through tab. Add a new row by selecting the action type of Create and enter the department, supplier, costing location and location combination for which the deal pass through is being defined and the pass through percentage applicable for deals involving this combination of entities.There are no significant validations for uploading a new deal pass through definition apart from validating that the department, supplier, costing location and location values supplied in the spreadsheet are valid and that the pass through % does not exceed 100%.
If you would like to update any of the deal pass though related details, a similar process will be followed as that described above for creating new definitions. First, download the Deal Pass Through spreadsheet, and then navigate to single tab in the spreadsheet where you would like to make your updates. Only the deal pass through % can be updated as part of the deal pass through definition. For the rows wherein the pass though % is intended to be updated, select the action type of Update, and then correct the value in the spreadsheet. Once your updates are complete, save and close the spreadsheet.
If you wish to delete a deal pass through definition because it is not used by your business, update the action column to Delete against the rows in the Deal Pass Through tab that are to be deleted. Care should be taken before deleting a deal pass through definition as it can directly impact the pricing cost for a franchise customer.
For all actions defined above, once all the updates have been made to the data in the spreadsheet, save the file and close it. Then, return to the Merchandising screens and select Foundation Data > Upload Foundation Data from the main task list. In this screen, you'll again select the template type Franchise and the template Deal Pass Through. This will generate a process description automatically, but this can be updated if desired. Lastly, you'll select the Browse button and navigate to the directory where you saved the updated spreadsheet.
To review the status of the upload and check whether any errors occurred, select the Foundation Data > Review Status task from the main task list.
For more information, see "Download Data," "Data Upload," and ”View Data Loading Status” in the Oracle Retail Merchandising Do the Basics User Guide.
Franchise orders, which are considered sales orders between the retailer and the franchise customer, need to be raised in order to fulfill demand from a franchise customer. A franchise order contains the item requisition to be sourced from a certain location (supplier, company warehouse or store) and fulfilled at one or more franchise stores by one or more required need dates. A franchise order also contains the price at which the items on the order will be sold to the franchise customer.
The Franchise Orders page allows you to take orders from franchise customers and fulfill those orders from store or warehouse inventory or by orders from suppliers.
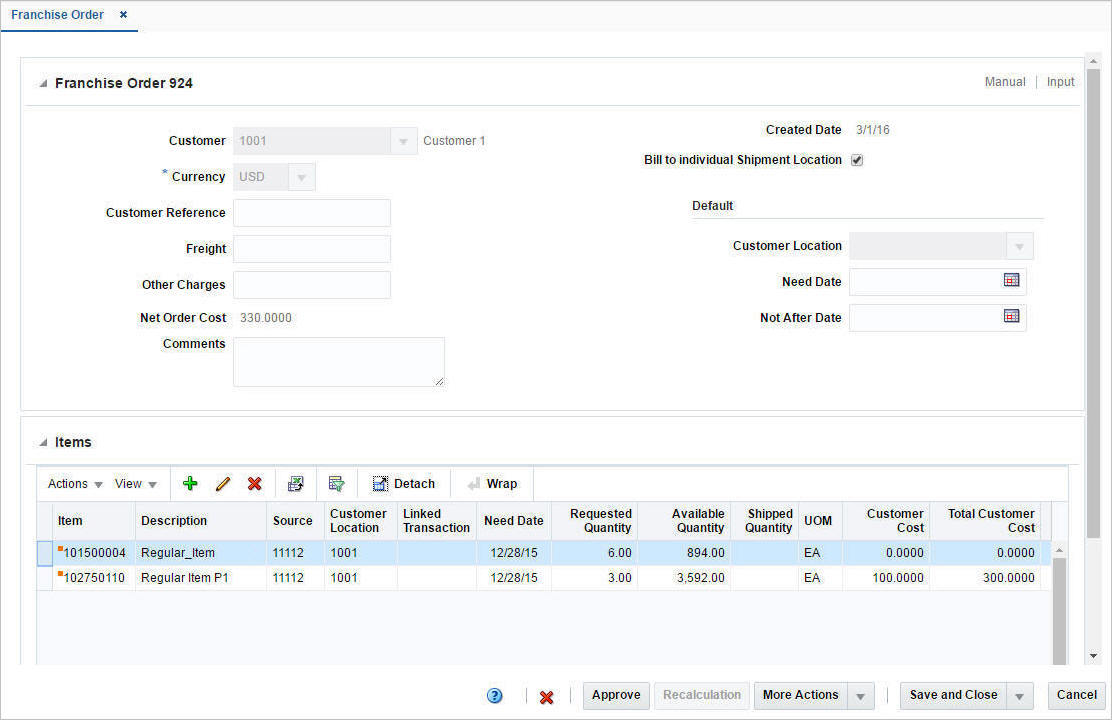
The Franchise Order page contains the following sections.
The title of the Franchise Order section contains the franchise order ID by default. Additionally, the order type and order status are displayed in the right hand corner.
The section contains the following fields.
Table 10-3 Franchise Order - Fields and Description
| Fields | Description |
|---|---|
|
Customer |
Enter, select or search for the customer. |
|
Currency |
Enter, select or search for the currency for the order. This field is a required field. |
|
Customer Reference |
Enter a customer reference. |
|
Freight |
Enter any freight charges associated to the franchise order. |
|
Other Charges |
Enter other miscellaneous charges associated to the franchise order. |
|
Net Order Cost |
Displays the net order costs. |
|
Comments |
Enter comments for the franchise order, if necessary. |
|
Created Date |
Displays the order create date. |
|
Cancel Reason |
Displays the cancel reason. This field is displayed when the Franchise Order has been cancelled at the header level. Only 40 characters of the cancel reason are displayed. |
|
Bill to individual Shipment Location checkbox |
This checkbox is selected by default. If not selected, the Bill to Address section is displayed and expanded, otherwise, the Bill to Address section is cleared, collapsed and hidden. For more information about the Bill to Address section, see the Bill to Address section. |
|
Default: |
|
|
Customer Location |
Enter, select or search for the customer location. |
|
Need Date |
Enter, select or search for the need date. |
|
Not After Date |
Enter, select or search for the date or use the Calendar icon to select a date. |
The Items section contains information on the items on the order such as the item number, item description, customer location, and linked transactions like transfers or orders. The table also contains quantity and cost information.
Additionally, you can add, edit and delete items from the franchise order in this section. You can also view cost details and the stock on hand of the selected item.
Use the Actions Menu and icons to apply actions to the table. You can perform the actions listed below, as well as actions described in ”Action Menu and Icons” in the Oracle Retail Merchandising Do the Basics User Guide.
Table 10-4 Items - Actions Menu/Icons and Description
| Actions Menu/Icons | Description |
|---|---|
|
Cost Details |
Opens the Cost Details pop-up. To view the cost details of an item on the franchise order:
|
|
Stock on Hand |
Opens the Inventory by Location pop-up. For more information about this pop-up, see View Inventory by Location in the Oracle® Retail Merchandising Inventory User Guide. |
The Linked Transaction column displays the order, transfer or allocation associated to the Franchise Order. For associated transfers and orders this column contains an order number or transfer number link. This link takes you to the Order or Transfer page.
For line items with multiple associated transfers, this field displays 'Multiple', instead of showing the transfer number link.
Click 'Multiple', and the Franchise Order Transfers page opens. The page displays all the transfers associated to the line item. The table shows the following columns:
Transfer
Created Date
Delivery Date
Status
Click Done to close the page.
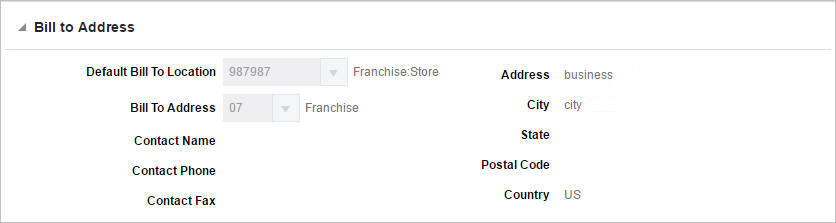
The Bill to Address section is only available if the Bill to individual Shipment Location checkbox is not selected in the Franchise Order section. In this section you can specify a bill to address for the franchise order.
In the Default Bill Location field, enter, select or search for the location.
In the Bill to Address field, enter, select or search for an address.
The toolbar contains the following icons and buttons, as well as icons and buttons described in ”Screen Level Action - Icons and Buttons” in the Oracle Retail Merchandising Do the Basics User Guide.
Table 10-5 Franchise Order Toolbar - Icons/Buttons and Description
| Icons/Buttons | Description |
|---|---|
|
Status |
If you click the Status button, the status of the franchise order changes to the status specified on the button. Possible franchise order statuses are:
|
|
Recalculation |
Opens the Order Recalculation pop-up. This pop-up allows you to scale, or undo scaling of the supplier sourced franchise orders. For more information about how to recalculate franchise orders, see the Recalculate Franchise Orders section. |
|
More Actions |
Click More Actions to see a list of additional actions that can be performed in the Franchise Order page.
|
|
Save and Create Another |
Click Save and Create Another to save the entered records and add additional entries. This option is only available, if you create a new expense profile. |
|
Save and Edit Another |
Click Save and Edit Another to save the entered records and edit additional entries. This option is only available in Edit mode. |
|
Done |
If you open the page in view mode, the Done button is displayed. Click Done to close the page. |
To create a franchise order, follow the steps below.
From the Tasks menu select, Inventory > Franchise Orders > Create Order. The Franchise Order page appears.
Enter the franchise order information, as required.
For more details about the available fields in this section, see the Franchise Order section.
For more information about how to add items to a franchise order, see the Add Items to a Franchise Order section.
Then choose one of the following options.
Click Save to save the current franchise order.
Click Save and Close to save the current franchise order and close the page.
Click Save and Create Another to create additional franchise orders.
Click Cancel to reject all entries and close the page.
You can add the following item types to a franchise order:
Item or Reference Item
To add an item or a reference item, see the Add an Item or Reference Item section.
Item as a Complex Buyer Pack Item with the Order Type of Eaches
To add a complex buyer pack item, see the Add a Complex Buyer Pack Item section.
Item Parent or Item List
To add a parent item, see the Add a Parent Item section.
To add an item list, see the Add an Item List section.
To add an item or a reference item, follow the steps below.
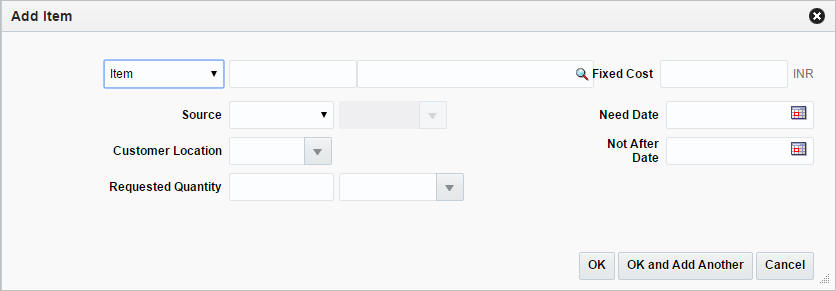
In the Items section, select Action > Add, or use the Add icon ![]() . The Add Item pop-up appears.
. The Add Item pop-up appears.
In the Item field, select the item type from the list. Then enter or search for the item or reference item.
In the Source field, select the source from the list. Then enter, select or search for the source.
In the Customer Location field, enter, select or search for the customer location.
In the Requested Quantity field, enter the quantity. Select the unit of measure.
In the Fixed Cost field, enter the fixed cost for the item.
|
Note: A fixed cost value overrides the customer cost computed through templates. This field is an optional field. |
In the Need Date, enter the need date or use the Calendar icon to select a date.
In the Not After Date, enter the date or use the Calendar icon to select a date.
The Supplier Pack Size field, displays the pack size of the selected supplier. This field is only displayed, if you select supplier as a source type.
Then choose one of the following options.
Click OK to add the current item to the table.
Click OK and Add Another to add additional items.
Click Cancel to reject all entries and close the pop-up.
To add a complex buyer back item to a franchise order, follow the steps below.
In the Items section, select Action > Add, or use the Add icon ![]() . The Add Item pop-up appears.
. The Add Item pop-up appears.
In the Item field, select Item as the item type from the list. Then enter or search for a complex buyer pack item.
In the Source field, select the source from the list. Then enter, select or search for the source.
In the Customer Location field, enter, select or search for the customer location.
In the Requested Quantity field, enter the quantity. Select Eaches as unit of measure.
In the Fixed Cost field, enter the fixed cost for the item.
In the Need Date field, enter the need date or use the Calendar icon to select a date.
In the Not After Date field, enter the date or use the Calendar icon to select a date.
The Supplier Pack Size field, displays the pack size of the selected supplier. This field is only displayed, if you select supplier as a source type.
Click Display Items. In the Distribute Complex Buyer Pack section all the components of the complex buyer pack item are displayed.
|
Note: The table will only be populated when you have entered a requested quantity. |
In the Quantity column enter the distribution quantity as required for the component items.
Then choose one of the following options.
Click OK to add the current item to the table.
Click OK and Add Another to add additional items.
Click Cancel to reject all entries and close the pop-up.
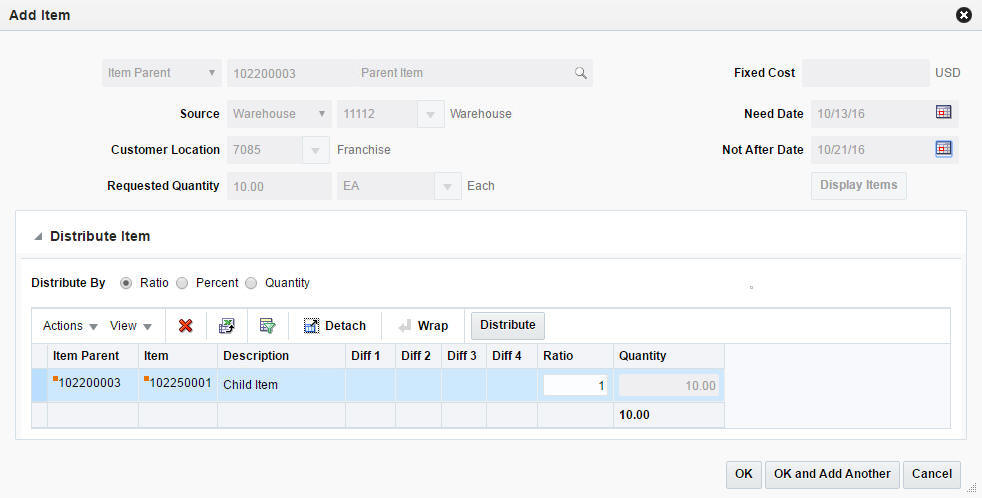
To add a parent item to a franchise order, follow the steps below.
In the Items section, select Action > Add, or use the Add icon ![]() . The Add Item pop-up appears.
. The Add Item pop-up appears.
In the Item field, select the Item Parent as the item type from the list. Then enter or search for the item.
In the Source field, select the source from the list. Then enter, select or search for the source.
In the Customer Location field, enter, select or search for the customer location.
In the Requested Quantity field, enter the quantity. Select Eaches as the unit of measure.
In the Need Date field, enter the need date or use the Calendar icon to select a date.
In the Not After Date field, enter the date or use the Calendar icon to select a date.
The Supplier Pack Size field, displays the pack size of the selected supplier. This field is only displayed, if you select supplier as a source type.
Click Display Items. In the Distribute Item section all the children of the selected parent item are displayed.
In the Distribute Item section, choose one of the following distribution methods.
Choose Ratio. Then enter the ratio for the individual child items in the ratio column.
Choose Percentage. Then enter the percent for the individual child items in the percentage column.
Choose Quantity. Then enter the quantity for the individual child items in the quantity column.
Click Distribute to distribute the items according to the entered ratio or percentage.
|
Note: The Distribute button is not available, if you have selected the distribution method Quantity. |
Then choose one of the following options.
Click OK to add the current item to the table.
Click OK and Add Another to add additional items.
Click Cancel to reject all entries and close the pop-up.
To add an item list to a franchise order, follow the steps below.
In the Items section, select Action > Add, or use the Add icon ![]() . The Add Item pop-up appears.
. The Add Item pop-up appears.
In the Item field, select Item List as the item type. Then enter or search for the item list.
In the Source field, select the source from the list. Then enter, select or search for the source.
In the Customer Location field, enter, select or search for the customer location.
In the Requested Quantity field, enter the quantity. Then select the unit of measure.
In the Need Date field, enter the need date or use the Calendar icon to select a date.
In the Not After Date field, enter the date or use the Calendar icon to select a date.
The Supplier Pack Size field, displays the pack size of the selected supplier. This field is only displayed, if you select supplier as a source type.
Click Display Items. In the Distribute Item section all the items of the selected item list are displayed.
In the Distribute Item section, choose one of the following distribution methods.
Choose Ratio. Then enter the ratio for the individual child items in the ratio column.
Choose Percentage. Then enter the percent for the individual child items in the percentage column.
Choose Quantity. Then enter the quantity for the individual child items in the quantity column.
Click Distribute to distribute the items according to the entered ratio or percentage.
|
Note: The Distribute button is not available, if you have selected the distribution method Quantity. |
If one of the items in the item list is a complex buyer pack item, the Distribute Complex Buyer Pack section is displayed. This section displays all the components of the complex buyer pack item.
|
Note: The table will only be populated when you have entered a requested quantity. |
In the Quantity column enter the distribution quantity as required for the component items.
Then choose one of the following options.
Click OK to add the current item to the table.
Click OK and Add Another to add additional items.
Click Cancel to reject all entries and close the pop-up.
The Manage Franchise Orders option opens the Franchise Order Search page. In this page you can perform the following actions.
Search for franchise orders by using various search criteria
View the search results
View franchise order information
Create a franchise order
Edit franchise order information
You can access the Franchise Order Search page from the Task menu, by selecting Inventory > Franchise Orders > Manage Franchise Orders. The Franchise Order Search page appears.
To search for a franchise order:
From the Task menu, select Inventory > Franchise Orders > Manage Orders. The Franchise Order Search page appears.
You can search for a franchise order using basic or advanced search criteria, depending on the requirement. The basic mode is the default search mode.
Click Advanced to access the search section in advanced mode.
Click Basic to return to basic mode.
To search for a franchise order using basic search criteria:
Enter, select or search for one or all of the following basic search criteria.
Table 10-6 Franchise Order Search - Basic Search Criteria and Description
| Fields | Description |
|---|---|
|
Match option |
Check radio button All or Any. All - only franchise orders matching all entered search criteria are shown. Any - franchise orders matching any of the entered search criteria are shown. |
|
Status |
Select the status of the franchise order from the list. |
|
Customer |
Enter, select or search for the customer. |
|
Supplier Site |
Enter, select or search for the supplier site. |
|
Supplier Site Name |
Enter the supplier site name. |
|
Item |
Enter, select or search for the item of the order. |
|
Item Description |
Enter the item description. |
|
Store |
Enter, select or search for the store. |
|
Warehouse |
Enter, select or search for the warehouse. |
|
Customer Location |
Enter, select or search for the customer location. |
Click Search. The franchise orders that match the search criteria are displayed in the Results section.
Click Reset to clear the search section and results.
Click Done to close the page.
To search for a franchise order using advanced search criteria:
To search using advanced search criteria, enter or select one or all of the advanced search criteria.
To narrow down the search, use the list next to the search fields. For example, determine if the entered value should equal or not equal the search result.
Click Search. The franchise orders that match the search criteria are displayed in the Results section.
Click Reset to clear the search section and results.
Click Add Fields to add more fields for the advanced search. To remove the field from the search, click the x right next to the field.
Click Reorder to change the order of the available search fields. The Reorder Search Fields pop-up appears.
Select the desired search field and use the up and down arrows to rearrange the order of the fields.
Click OK to confirm the new order of the fields and close the pop-up.
Click Cancel to reject any changes and close the pop-up.
Click Done to close the page.
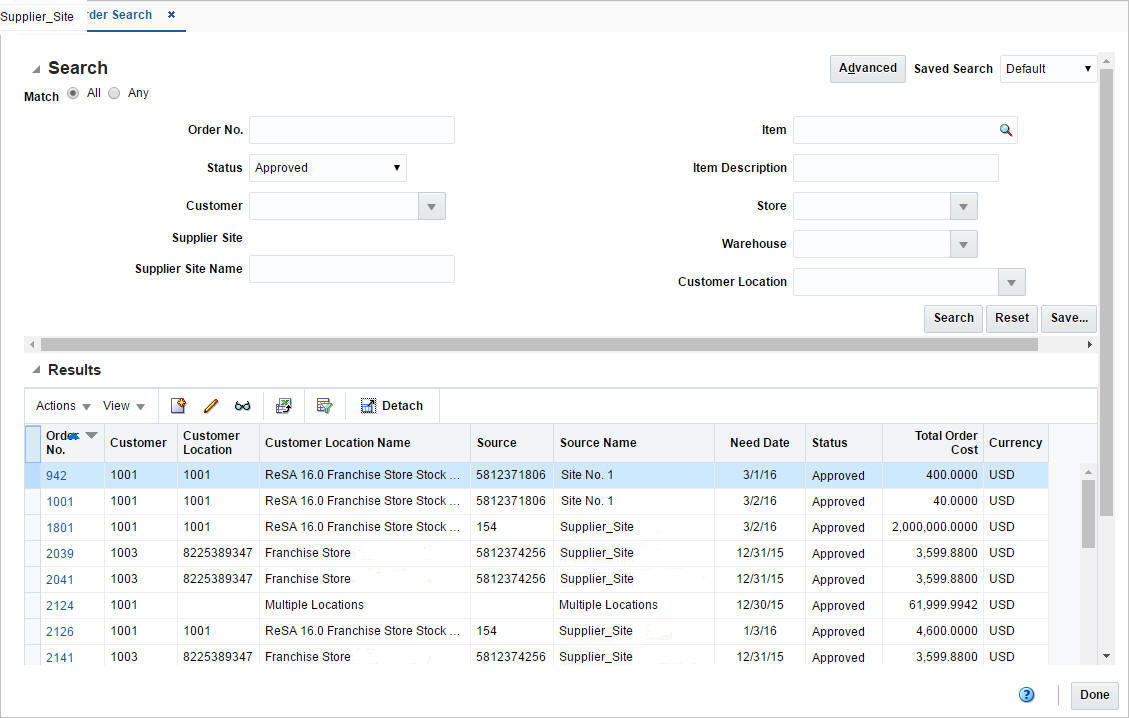
The Results section lists the retrieved franchise orders. The following columns are displayed by default.
Order Number
Customer
Customer Location
Customer Location Name
Source
Source Name
Need Date
Status
Total Order Cost
Currency
The toolbar contains the following button, as well as icons and buttons described in ”Screen Level Action - Icons and Buttons” in the Oracle Retail Merchandising Do the Basics User Guide.
To edit a franchise order, follow the steps below.
From the Tasks menu, select Inventory > Franchise Orders > Manage Orders. The Franchise Order Search page appears.
Enter or select search criteria as desired to make the search more restrictive.
Click Search. The franchise orders that match the search criteria are displayed in the Results section.
In the Order No. column, click the order number link, or mark a record and select Actions > Edit, or use the Edit icon ![]() . The Franchise Order page appears.
. The Franchise Order page appears.
Edit the fields as necessary.
For more details about the available fields in this section, see the Franchise Order section.
|
Note: You can add new items to a franchise order in Input status. For more information about adding items to a franchise order, see the Add Items to a Franchise Order section.For existing items on an order, you can modify the Fixed Cost, Requested Quantity, Need Date, and Not After Date when the order is in Input status. In Approved status, you can modify the Requested Quantity and Fixed Cost. You can modify the Requested Quantity in the In Progress status. For more information about how to edit items on a franchise order, see the Edit Items on a Franchise Order section. |
Then choose one of the following options.
Click Save to save your changes to the franchise order.
Click Save and Close to save your changes to the franchise order and close the page.
Click Save and Edit Another to edit additional franchise orders.
Click Cancel to reject all entries and close the page.
To edit items on a franchise order, follow the steps listed below.
Select a record in the Items section.
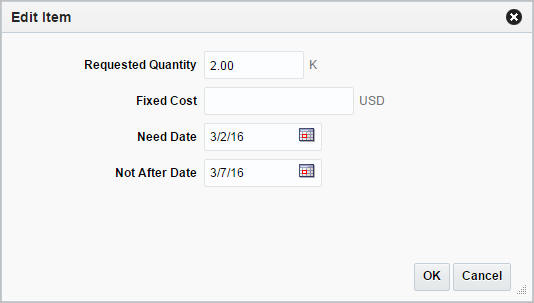
Then select Action > Edit, or use the Edit icon ![]() . The Edit Item pop-up appears.
. The Edit Item pop-up appears.
Edit the following fields, as necessary.
Requested Quantity
Fixed Cost
Need Date
Not After Date
In the Cancel Reason field, select reason for cancelling the item, if necessary.
|
Note: This field is only available when the order status is Approved or In Progress, and the entered requested quantity is less than the original requested quantity, otherwise this field is not available. |
Then choose one of the following options.
Click OK to add your changes to the table.
Click Cancel to reject all entries and close the pop-up.
To change the scaling or to undo the scaling of the franchise order, follow the steps below.
In the Franchise Order page, select a record in the Items section.
|
Note: The Recalculation function is only available if the selected order line item is sourced from a supplier. |
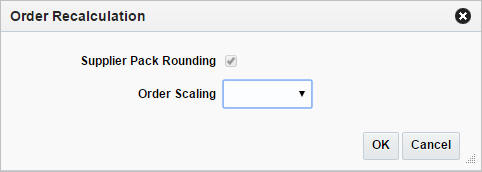
Then select the Recalculation button. The Order Recalculation pop-up appears.
The Supplier Pack Rounding checkbox is selected by default.
In the Order Scaling field, select one of the following options.
Select Scale Order to scale the order.
Select Undo Order Scaling to revert any scaling done for this order.
Then choose one of the following options.
Click OK to save your changes.
Click Cancel to reject all entries and close the pop-up.
To cancel a franchise order, follow the steps below.
From the Tasks menu, select Inventory > Franchise Orders > Manage Orders. The Franchise Order Search page appears.
Restrict your search to franchise orders with the status Approved, In-Progress, or Pending Credit.
Click Search. The franchise orders that match the search criteria are displayed in the Results section.
In the Order No. column, click the order number link, or mark a record and select Actions > Edit, or use the Edit icon ![]() . The Franchise Order page appears.
. The Franchise Order page appears.
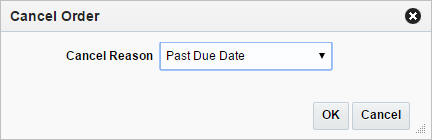
Select Cancel Order. The Cancel Order pop-up appears.
In the Cancel Reason field, select a reason for cancelling the order from the list.
Then choose one of the following options.
Click OK to cancel the franchise order and close the pop-up.
|
Note: For franchise orders in Approved status the entire ordered quantity is canceled. For orders in In Progress status only the outstanding quantity is cancelled. |
Click Cancel to reject your entries and close the pop-up.
Franchise Returns are defined as any return of stock from a franchise store to a company warehouse or store. The return can contain items from multiple orders, but must be from a single franchise store.
Two different types of returns can be created: either a return that brings inventory back to a company store or warehouse, or a return for which the returning store will destroy the goods on site. The latter may be used in the case where the goods are damaged beyond repair or perishable, such that the retailer does not want to take them back into inventory, but has agreed to refund the franchise customer.
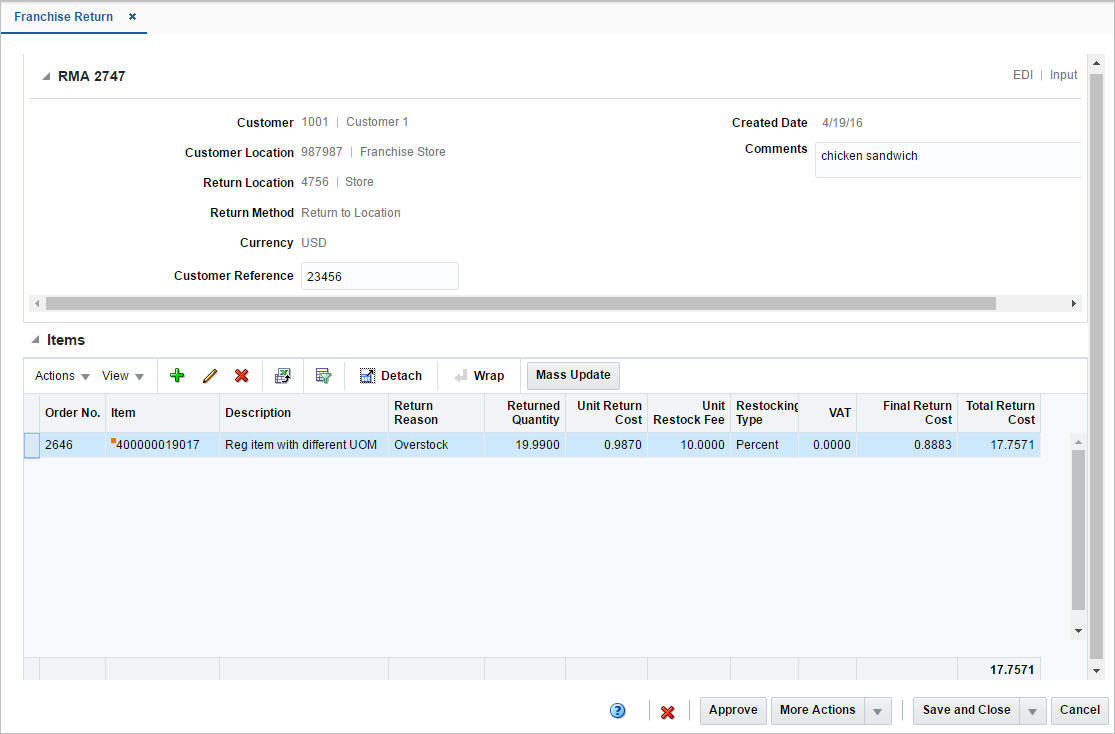
The RMA (Return Merchandise Authorization) section includes the RMA number in the title. The return type and status is displayed in the right hand corner of the section.
The RMA section contains the following fields.
Table 10-8 RMA - Fields and Description
| Fields | Description |
|---|---|
|
Customer |
Displays the customer. |
|
Customer Location |
Displays the customer location. |
|
Return Location |
Displays the return location. |
|
Return Method |
Displays the return method. |
|
Currency |
Displays the currency of the franchise return. |
|
Customer Reference |
Displays the customer reference, if available. This field remains enabled until the franchise return is approved. |
|
Create Date |
Displays the date the franchise return has been created. |
|
Cancel Reason |
Displays the cancel reason. This field is only displayed when the franchise return has been cancelled at the header level. Only 40 characters of the cancel reason are displayed. |
|
Transfer |
Displays the transfer number linked to the return. The transfer number link takes you to the Transfer page in view mode. This field is only available when the franchise return has been approved. |
|
Comments |
Displays comments for the franchise return. |
In the Items section you can add or maintain the items for the franchise return.
Use the Actions Menu and icons to apply actions to the table. You can perform the actions listed below, as well as actions described in ”Action Menu and Icons” in the Oracle Retail Merchandising Do the Basics User Guide.
Table 10-9 Items - Actions Menu/Icons and Description
| Actions Menu/Icons | Description |
|---|---|
|
Mass Update and Mass Update button |
Opens the Mass Update pop-up. This option is only available for franchise returns in Input status. For more information about the mass update option, see the Apply a Mass Update for Items on a Franchise Return section. |
|
Stock on Hand |
Opens the Inventory by Location page. For more information about this page, see View Inventory by Location in the Oracle® Retail Merchandising Inventory User Guide. |
The toolbar contains the following icons and buttons, as well as icons and buttons described in ”Screen Level Action - Icons and Buttons” in the Oracle Retail Merchandising Do the Basics User Guide.
Table 10-10 Franchise Return Toolbar - Icons/Buttons and Description
| Icons/Buttons | Description |
|---|---|
|
Status |
If you click the Status button, the status of the franchise return changes to the status specified on the button. Possible franchise return statuses are:
|
|
More Actions |
Click More Actions to see a list of additional actions that can be performed in the Franchise Return page.
|
|
Done |
If you open the page in view mode, the Done button is displayed. Click Done to close the page. |
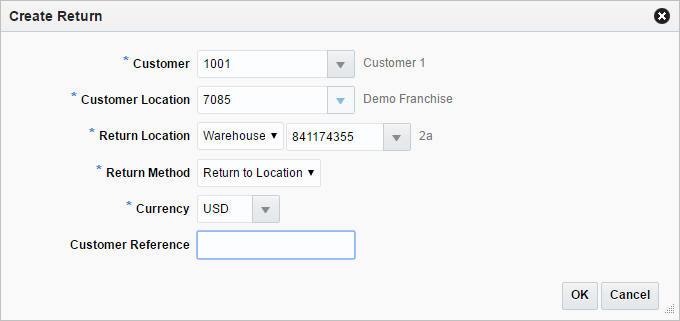
To create a franchise return, follow the steps below.
From the Tasks menu, select Inventory > Franchise Orders > Create Return. The Create Return pop-up appears.
In the Customer field, enter, select or search for the customer. This field is a required field.
In the Customer Location field, enter select or search for the customer location. This field is a required field.
In the Return Location field, select a return location type from the list. Then enter, select or search for the return location. This field is a required field.
In the Return Method field, select if you want to return the item to the location or destroy the item on site. This field is a required field.
In the Currency field, enter, select or search for the currency of the franchise return. This field is a required field.
In the Customer Reference field, enter a customer reference, if available.
Then choose one of the following options.
Select OK to create the franchise return and close the pop-up. The Franchise Return pop-up appears in a new tab. The RMA section of the pop-up contains the information you have entered.
For more information about the Franchise Return pop-up, see the Franchise Return section.
Then add items to the franchise return. For more information about how to add items to the franchise return, see the Add Items to a Franchise Return section.
|
Note: Select Cancel to reject all entries and close the pop-up. |
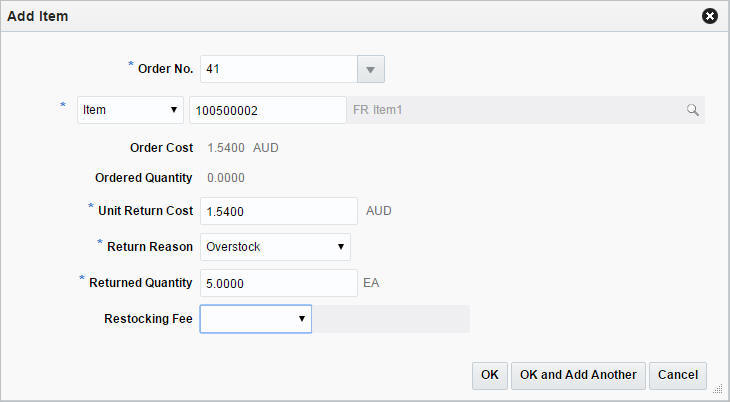
To add an item to a franchise return, follow the steps below.
In the Items section, select Actions > Add, or use the Add icon ![]() . The Add Item pop-up appears.
. The Add Item pop-up appears.
In the Order No. field, enter, select or search for the franchise order number. This field is a required field.
In the Item field, select if you want to return an item or reference item. Then enter, select or search for the item. This field is a required field.
The following fields are populated, depending on the selected item.
Order Cost
If the selected item is a component of a pack item on the order, the cost is calculated based on its percentage of the pack item.
If the selected item is both a component of a pack item on the order and a regular item on the order, the regular item's cost is the cost displayed as the order cost.
Ordered Quantity
If the selected item is a component of a pack item on the order, the ordered quantity is calculated based on the pack item.
If the selected item is both a component of a pack item on the order and a regular item on the order, the ordered quantity displays the sum of the component pack item and the regular item on the order.
In the Unit Return Cost field, enter the unit return cost. This field is a required field.
In the Return Reason field, select a return reason from the list.
In the Returned Quantity field, enter the return quantity.
In the Restocking Fee field, select either the restocking type percent or specific amount from the list. Then enter the desired value.
Then choose one of the following options.
Click OK to add the item and close the pop-up.
Click OK and Add Another to add additional items to the franchise return.
Click Cancel to reject all entries and close the pop-up.
In the Franchise Order Return pop-up, choose a saving option to save your franchise return.
The Manage Franchise Returns option opens the Franchise Return Search page. In this page you can perform the following actions.
Search for franchise returns by various search criteria
View the search results
View franchise return information
Create a franchise return
Edit franchise return information
You can access the Franchise Return Search page form the Task menu, select Inventory > Franchise Orders > Manage Franchise Returns. The Franchise Return Search page appears.
To search for a franchise return:
From the Task menu, select Inventory > Franchise Orders > Manage Returns. The Franchise Return Search page appears.
You can search for a franchise return using basic or advanced search criteria, depending on the requirement. The basic mode is the default search mode.
Click Advanced to access the search section in advanced mode.
Click Basic to return to basic mode.
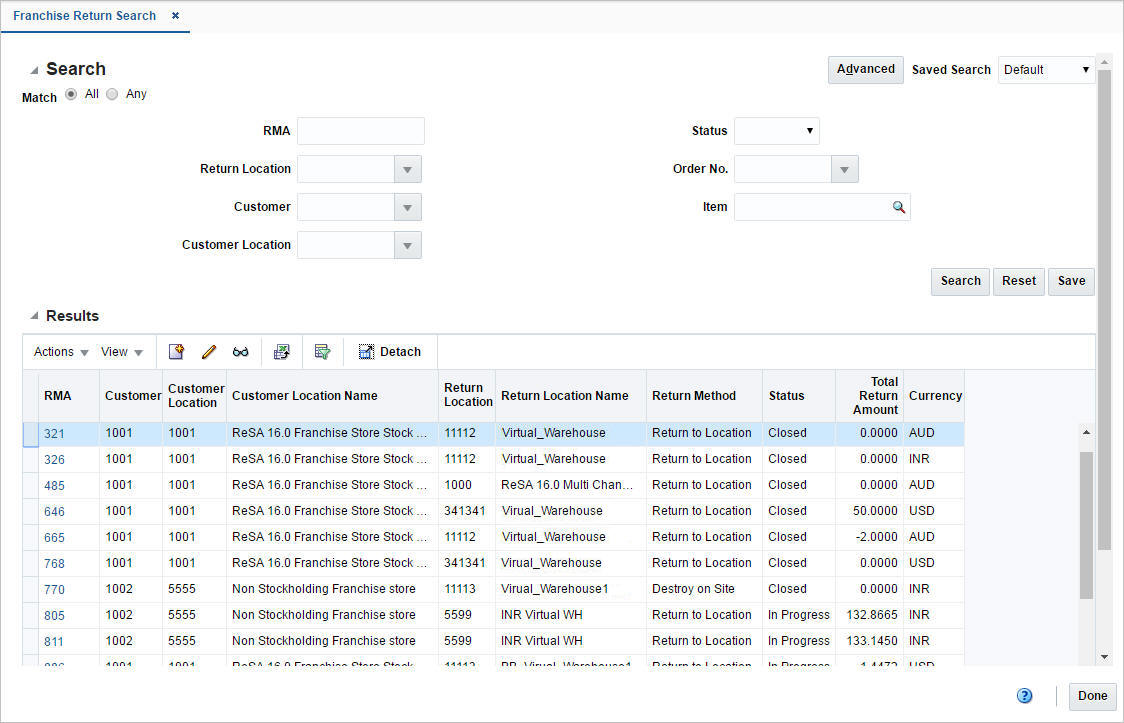
To search for a franchise return using basic search criteria:
Enter, select or search for one or all of the following basic search criteria.
Table 10-11 Franchise Return Search - Basic Search Criteria and Description
| Fields | Description |
|---|---|
|
Match option |
Check radio button All or Any. All - only franchise returns matching all entered search criteria are shown. Any - franchise returns matching any of the entered search criteria are shown. |
|
RMA |
Enter the RMA. |
|
Return Location |
Enter, select or search for the return location. |
|
Customer |
Enter, select or search for the customer. |
|
Customer Location |
Enter, select or search for the customer location. |
|
Supplier Site |
Enter, select or search for the supplier site. |
|
Supplier Site Name |
Enter the supplier site name. |
|
Status |
Select the status of the franchise return from the list. |
|
Order No. |
Enter, select or search for the order number. |
|
Item |
Enter, select or search for the return item. |
Click Search. The franchise returns that match the search criteria are displayed in the Results section.
Click Reset to clear the search section and results.
Click Done to close the page.
To search for a franchise return using advanced search criteria:
To search using advanced search criteria, enter or select one or all of the advanced search criteria.
To narrow down the search, use the list next to the search fields. For example, determine if the entered value should equal or not equal the search result.
Click Search. The franchise returns that match the search criteria are displayed in the Results section.
Click Reset to clear the search section and results.
Click Add Fields to add more fields for the advanced search. To remove the field from the search, click the x right next to the field.
Click Done to close the page.
To edit a franchise return, follow the steps below.
From the Tasks menu, select Inventory > Franchise Orders > Manage Returns. The Franchise Return Search page appears.
Enter or select search criteria as desired to make the search more restrictive.
Click Search. The franchise returns that match the search criteria are displayed in the Results section.
In the RMA column, click the RMA link, or mark a record and select Actions > Edit, or use the Edit icon ![]() . The Franchise Return pop-up appears.
. The Franchise Return pop-up appears.
In the RMA section:
Edit the Customer Reference field, or a comment to the franchise return.
|
Note: You can only edit these fields when the franchise return is still in Input status. |
In the Items section:
Add an Item
For more information about how to add an item to a franchise return, see the Add Items to a Franchise Return section
Edit an Item
For more information about how to edit an item on a franchise return, see the Edit Items on a Franchise Return section.
Delete an Item
Apply a Mass Update for all items on the franchise return
For more information about how to apply a mass update for items on a franchise order, see the Apply a Mass Update for Items on a Franchise Return section.
|
Note: You can only add, delete or apply mass updates for items on a franchise return when the return is still in Input status. |
Then choose one of the following options.
Click Save to save your changes.
Click Save and Close to save your changes and close the pop-up.
Click Cancel to reject all entries and close the pop-up.
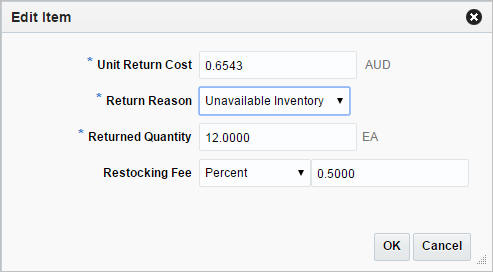
To edit an item on a franchise return, follow the steps below.
In the Items section, select Actions > Edit, or use the Edit icon ![]() . The Edit Item pop-up appears.
. The Edit Item pop-up appears.
Edit the following fields, as necessary.
Unit Return Cost
Return Reason
Returned Quantity
Restocking Fee
Cancel Reason
This field is only available, if the franchise return is in Approved status and the returned quantity is less than the original quantity.
Then choose one of the following options.
Click OK to add your changes to the table.
Click Cancel to reject all entries and close the pop-up.
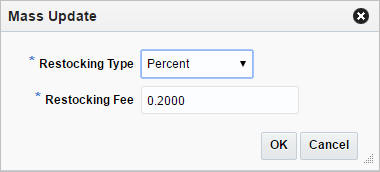
To apply a mass update for all items on the franchise return, follow the steps below.
|
Note: This option is only available for franchise returns in Input status. |
In the Items section, select Actions > Mass Update, or use the Mass Update button. The Mass Update pop-up appears.
In the Restocking Type field, select either the restocking type percent or specific amount from the list. This field is a required field.
In the Restocking Fee field, enter the desired value.
Then choose one of the following options.
Click OK to update the restocking type and fee for all items on the franchise return.
Click Cancel to reject all entries and close the pop-up.
To cancel a franchise order, follow the steps below.
From the Tasks menu, select Inventory > Franchise Orders > Manage Returns. The Franchise Return Search pop-up appears.
Restrict your search to franchise returns with the status Approved and In Progress.
Click Search. The franchise returns that match the search criteria are displayed in the Results section.
In the RMA column, click the RMA number link, or mark a record and select Actions > Edit, or use the Edit icon ![]() . The Franchise Return pop-up appears.
. The Franchise Return pop-up appears.
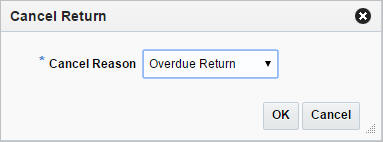
Select Cancel Return. The Cancel Return pop-up appears.
In the Cancel Reason field, select the reason for cancelling the franchise return.
Then choose one of the following options.
Click OK to cancel the franchise return.
Click Cancel to reject your entry and close the pop-up.