| Oracle® Retail Merchandising Foundation Cloud Service Oracle Retail Merchandising System User Guide Release 19.3.000 F83161-01 |
|

 Previous |
 Next |
| Oracle® Retail Merchandising Foundation Cloud Service Oracle Retail Merchandising System User Guide Release 19.3.000 F83161-01 |
|
Previous |
Next |
Inventory Control is one of the foremost functions of Merchandising. Proper inventory control allows the retailer to have optimum and accurate inventory at various entities of business like stores and warehouses. Span of inventory control ranges from receiving merchandise from suppliers and managing it during the time it is on retailer's premises to supplying to franchise partners and returning to vendors.
Merchandising facilitates end to end management of inventory including receiving, transfers, adjustments, reconciliation, mass return transfers, return to vendor, franchise order management, stock counts, item transformation, and work order maintenance.
This book helps you to understand and manage inventory control in Merchandising.
This chapter outlines the ways that inventory levels can be viewed in various pages in the application. This includes a view of inventory by location in different inventory buckets tracked by Merchandising, as well as a view of the number of sellable packs that could be created from component items in a location. This chapter also includes details on the page where you can see sales for an item/store by week and issues for an item/warehouse by week. For other inventory related transactions, see the View Transaction Data page in the Oracle Retail Merchandising Finance User Guide.
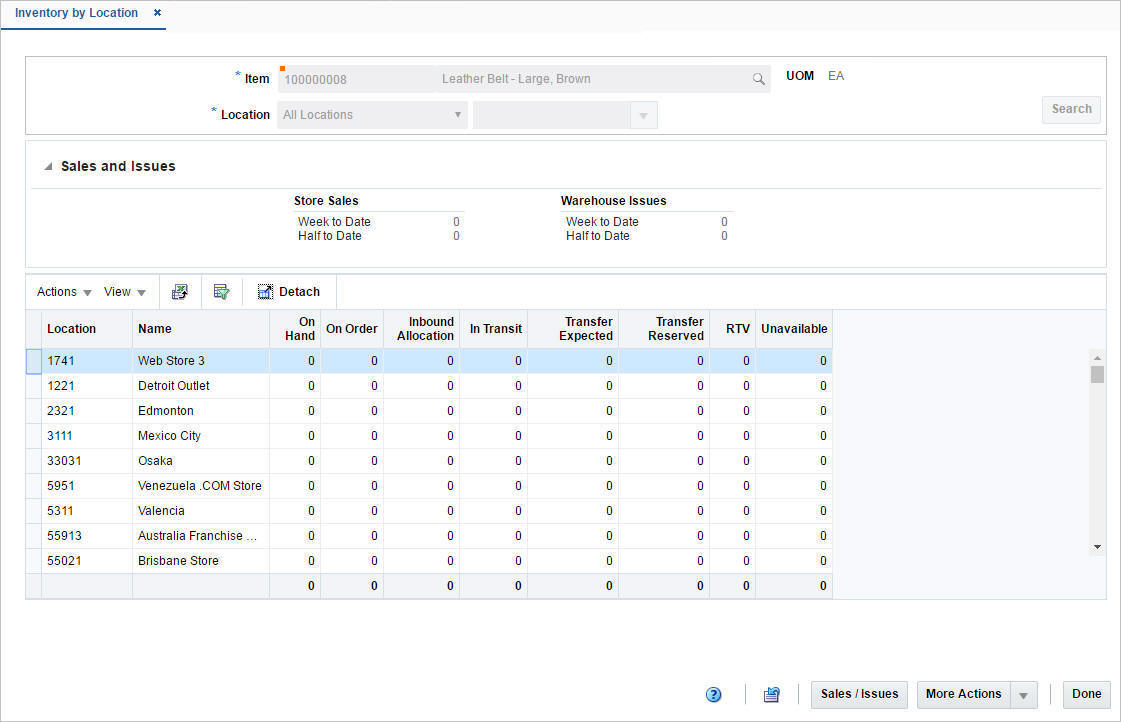
The Inventory by Location page provides a view of inventory for an item by store and warehouse, including the amount on hand, reserved, on inbound transactions, and unavailable. To view inventory by location:
From the Tasks menu, select Inventory > Item Inventory by Location. The Inventory by Location page appears.
In the Item field, enter the item number or search for the item. The UOM is populated by default.
In the Location field, select the location.
Click Search. The store sales and warehouse issue details appear in the Sales and Issues section. The inventory details appear in the table.
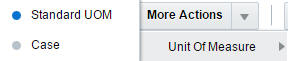
The More Actions menu contains the following options.
Table 9-1 More Actions Menu - Buttons and Description
| Icons/Buttons | Description |
|---|---|
|
More Actions |
Toggle between the Standard and the Case UOM. |
|
Unit of Measure |
You can view the inventory on Standard UOM and Case by choosing the required UOM. |
|
Standard Unit of Measure |
The default option shows all quantities in terms of the item's standard UOM. |
|
Case |
The option will toggle all quantity fields in the Sales/ Issues section and in the table, to the value in terms of cases. The per case value is determined by taking the value in standard UOM and dividing it by the item's primary supplier site/primary sourcing country's pack size. |
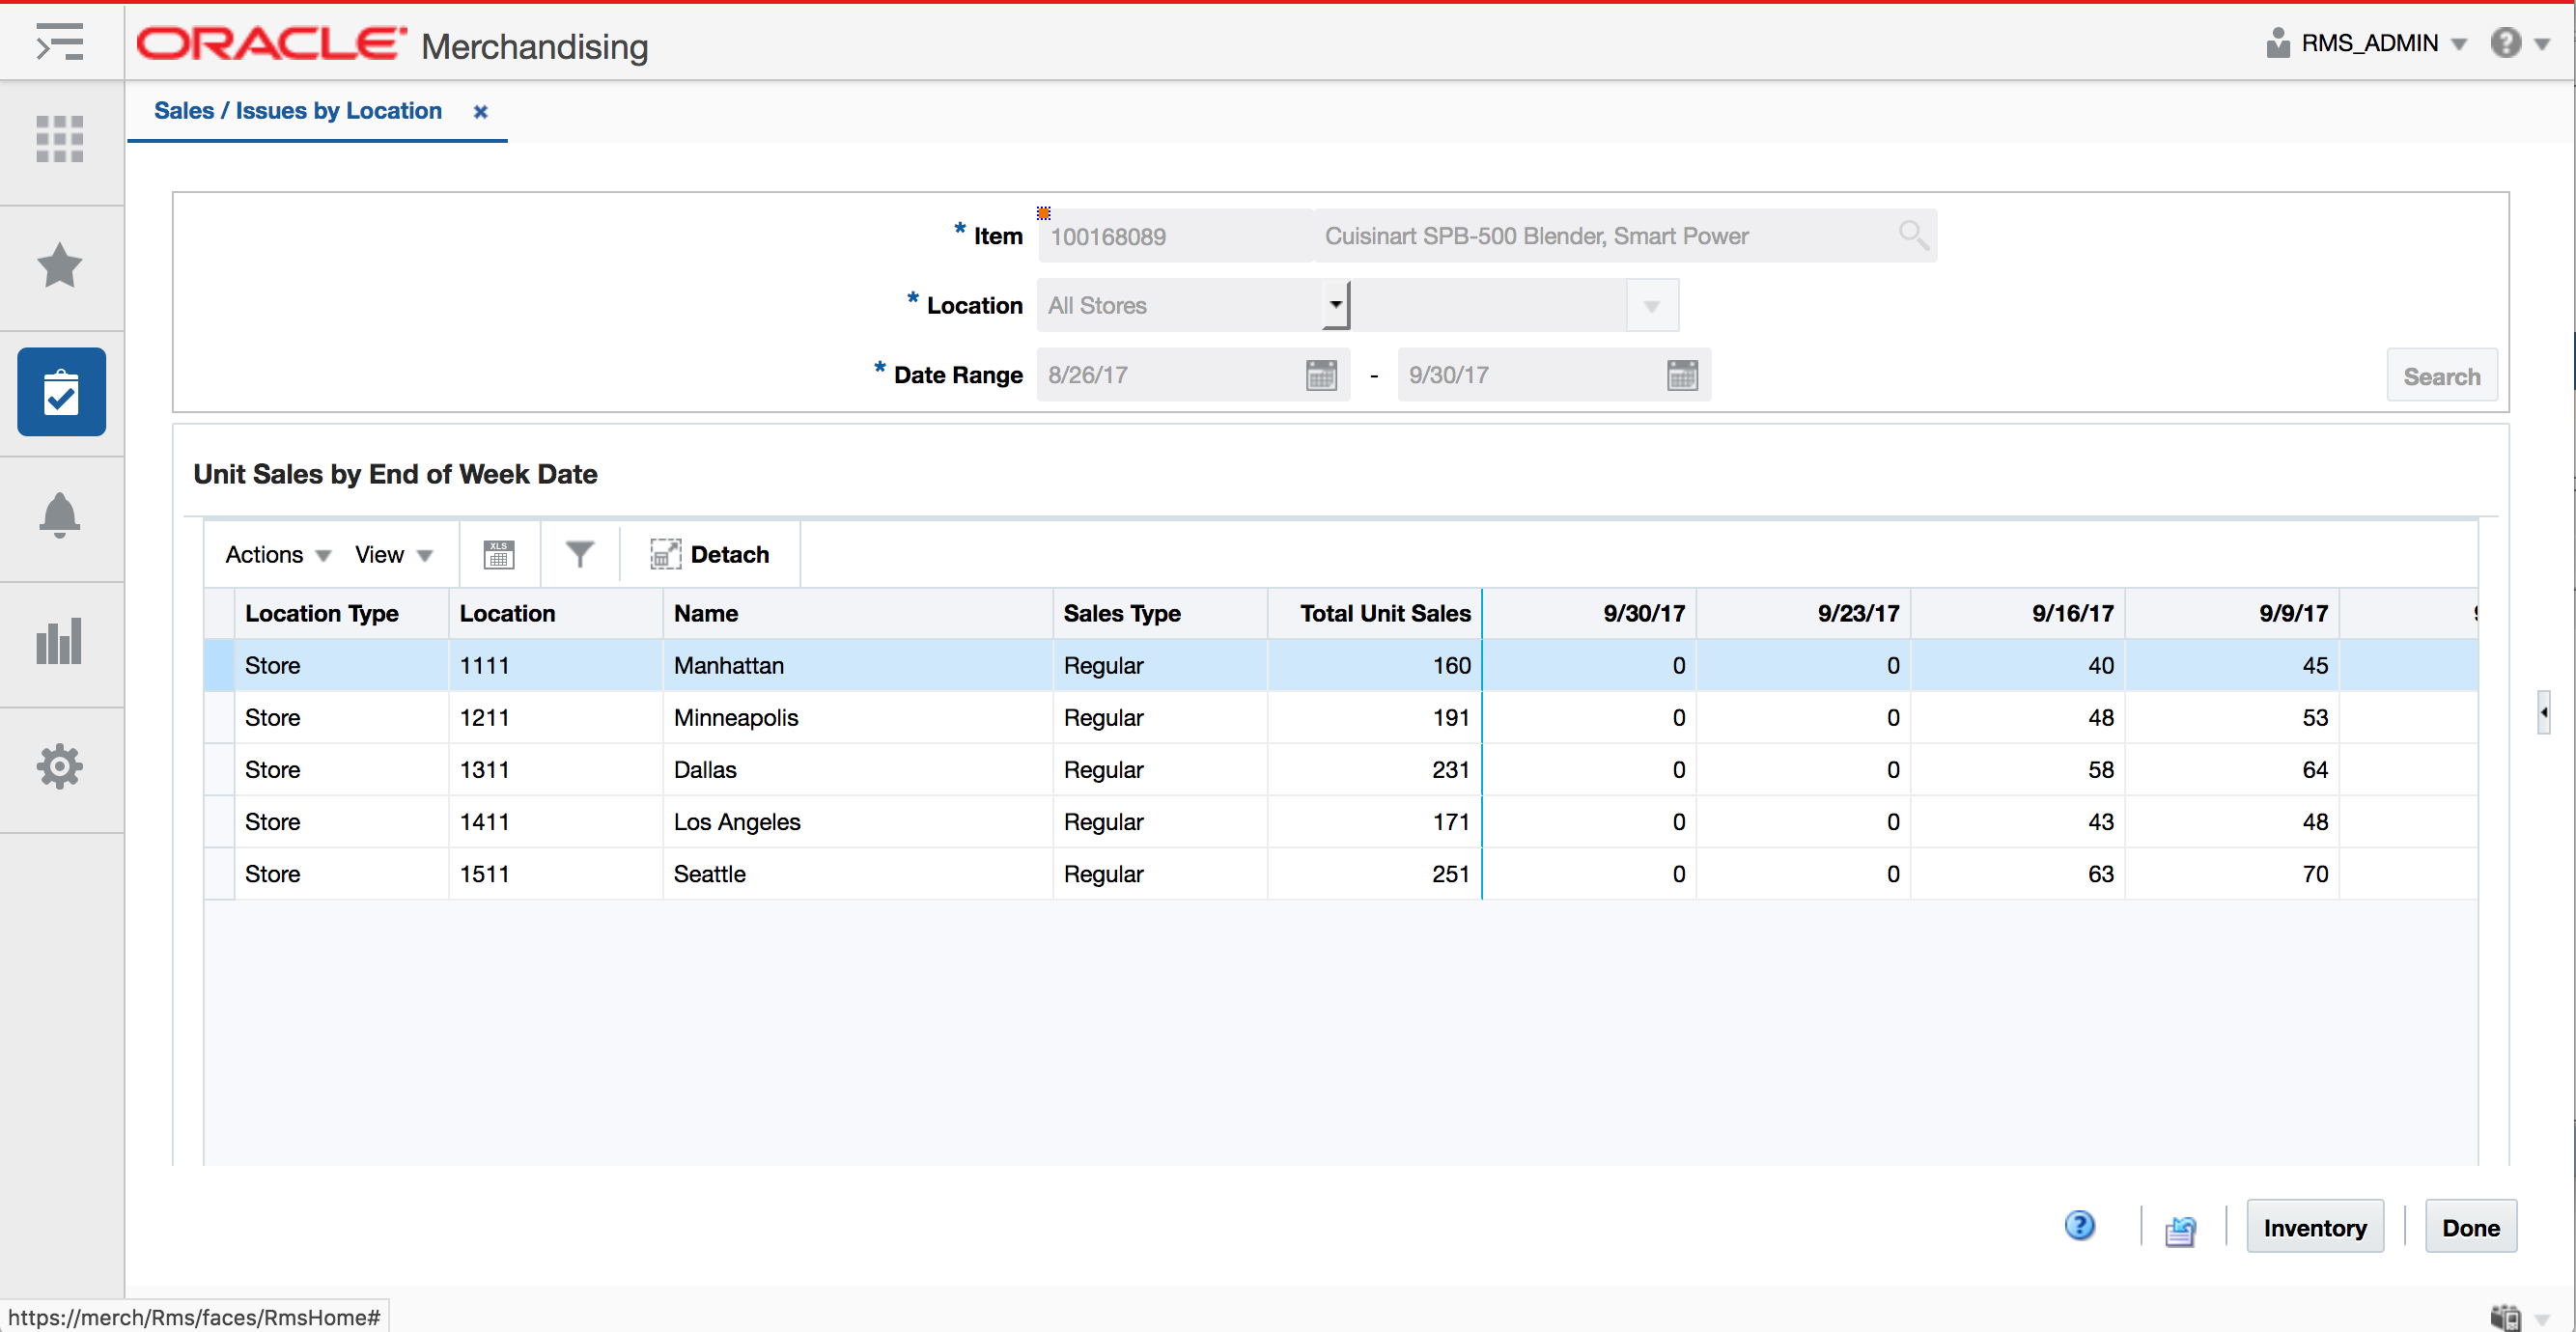
The Sales/Issues by Location page allows you to view weekly sales history or warehouse issues for an item at one or multiple stockholding locations. The monetary amounts appear in the primary currency of the company. The quantities appear in the standard unit of measure. All details appear at the transaction level. If you search for an item that is above the transaction level, the details are summarized at the transaction level.
To view the sales/issues by location page:
From the Tasks menu, select Inventory > Item Inventory by Location. The Inventory by Location page appears.
|
Note: You can also view the Sales/Issues by Location page from the Tasks menu > Inventory > Item Sales/Issues by Location link. |
Click the Sales/Issues button. The Sales/Issues by Location page appears.
The item number and description is displayed by default when accessed from the Inventory by Location page. Otherwise, an item can be selected from the list.
In the Location field, select the location.
In the Date Range area, enter the range of dates to be included in the results, or click the calendar icons and select the dates.
Click Search. The sales history or warehouse issues appear in the table of the Unit Sales by End of Week Date section.
Click Done to close the page.
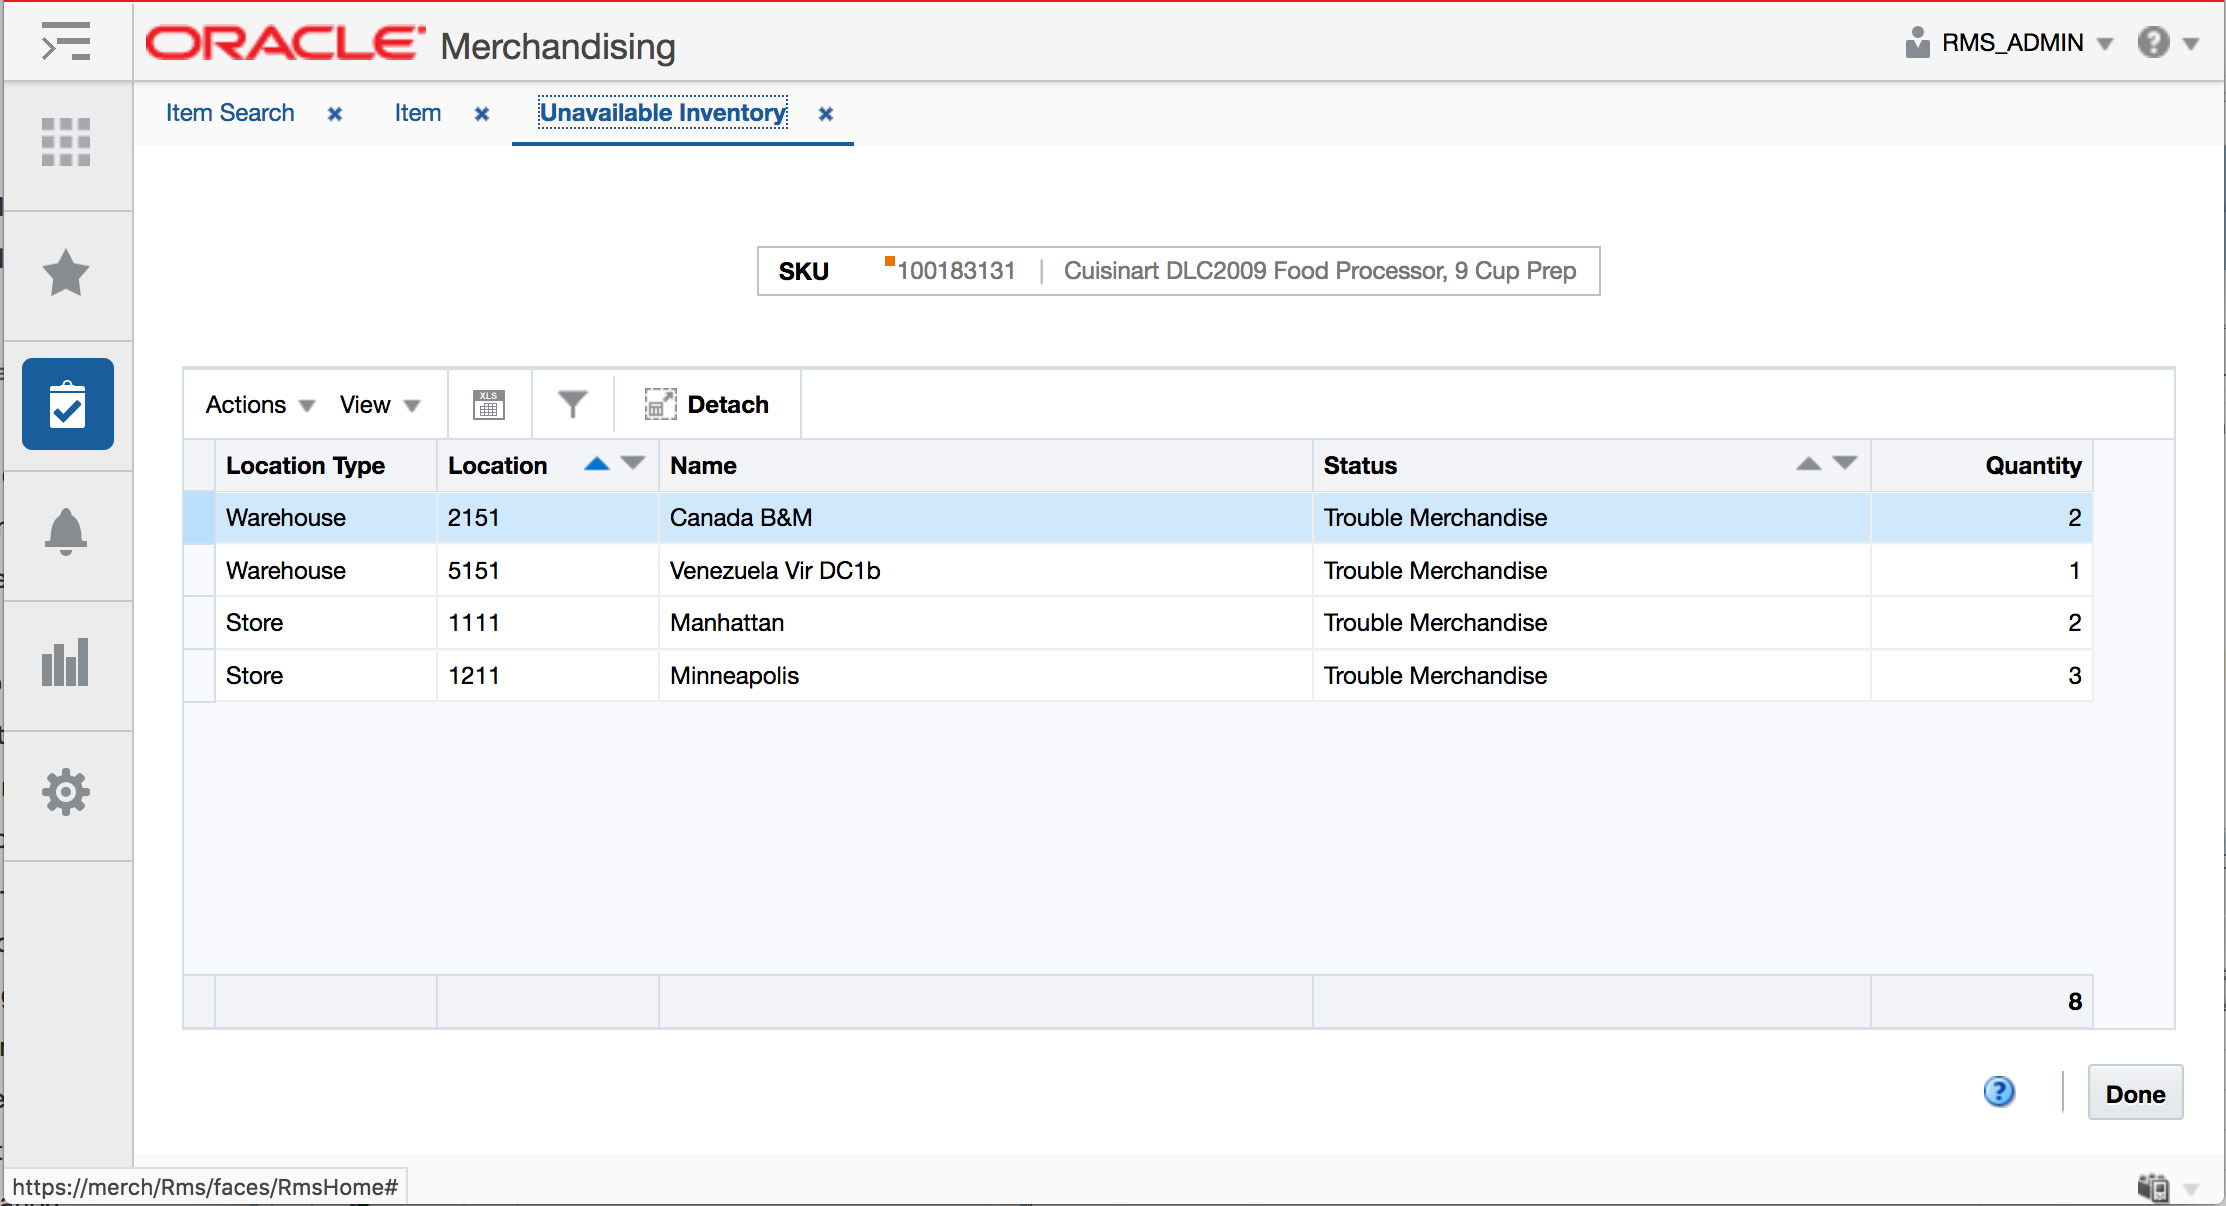
The Unavailable Inventory page allows you to view stock on hand that is not available for sale for an item location or group of locations.
To view unavailable inventory, follow the steps below.
From the Tasks menu, select Items > Manage Items. The Item Search page appears.
Enter or select search criteria as desired to make the search more restrictive.
Click Search. The item lists that match the search criteria are displayed in the Results section.
Then select More Actions > Sales and Inventory > Unavailable Inventory. The Unavailable Inventory page appears.
The Unavailable Inventory page displays the item and item description at the top of the page. In the table, each unavailable status where the item has inventory is displayed, along with the quantity of unavailable for each status.
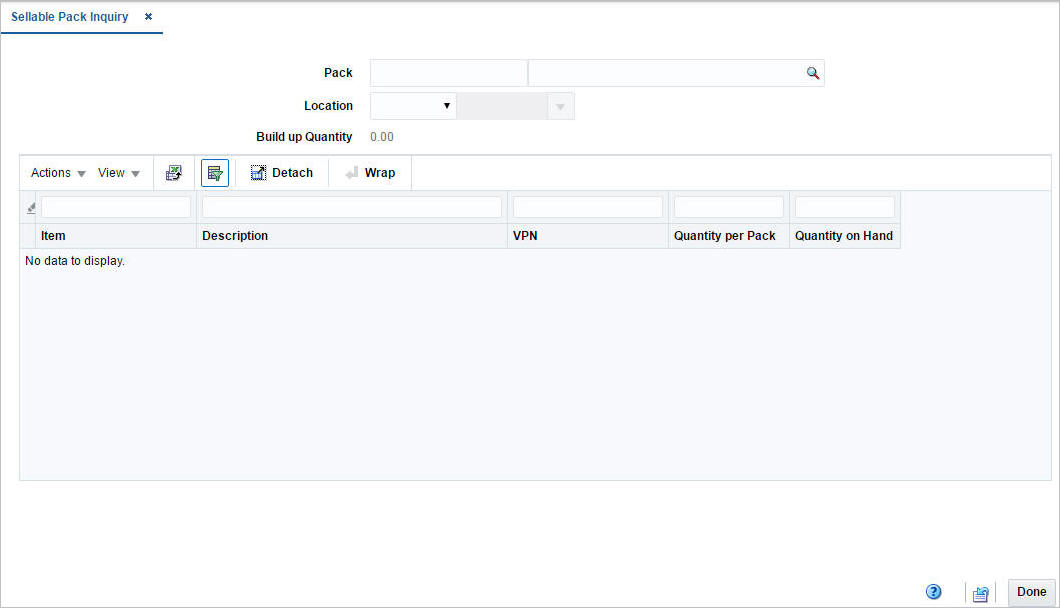
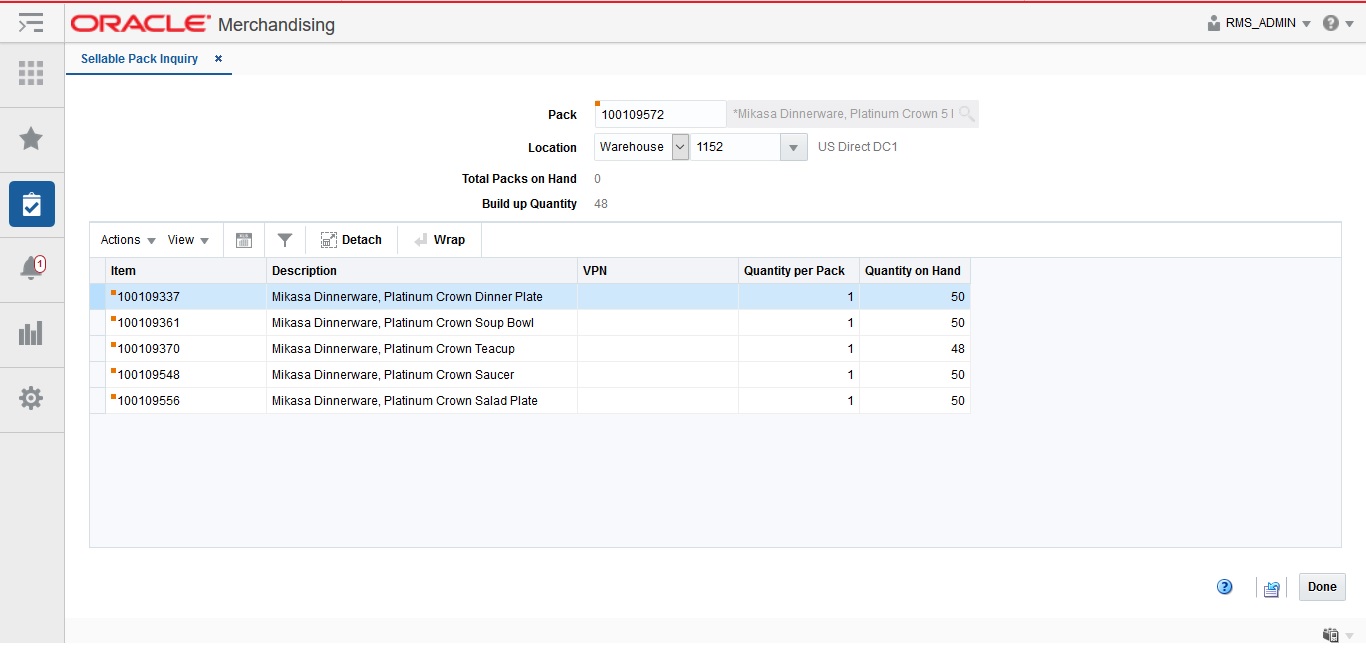
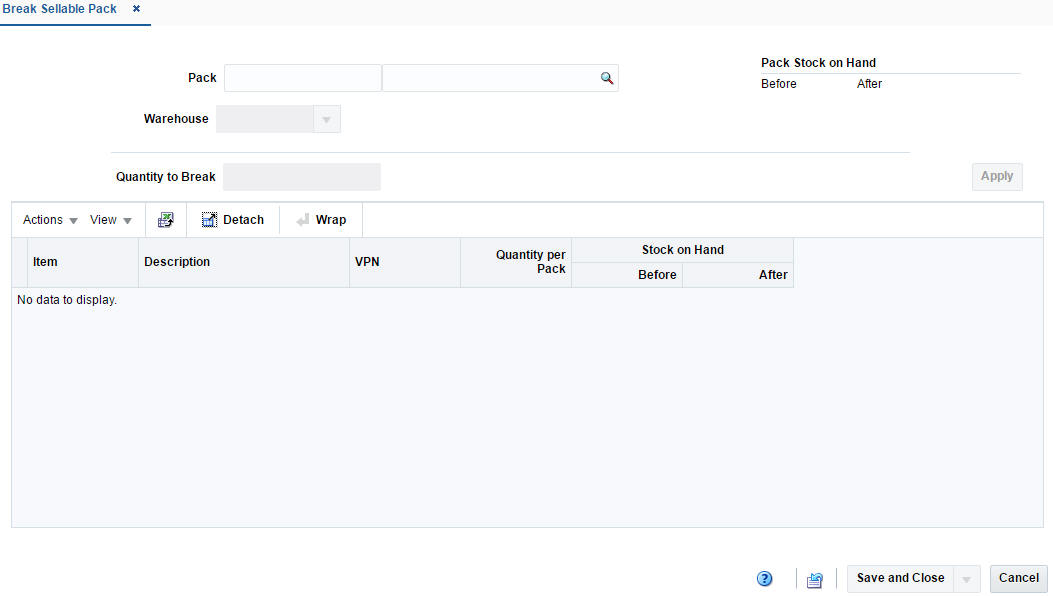
A sellable pack is used to sell multiple items as one item at a specific price. This page will allow you to enter a pack item and a location and determine the number of sellable packs that could be created at the location based on the component items that make up the pack.
To query a sellable pack:
From the Tasks menu, select Inventory > Sellable Pack Inquiry. The Sellable Pack Inquiry page appears.
In the Pack field, enter the item number or search for the item.
In the Location field, select the location type and location. The location type options are: Store and Warehouse. You can also select and search for the location. The details appear in the table.
Click Done to close the page.
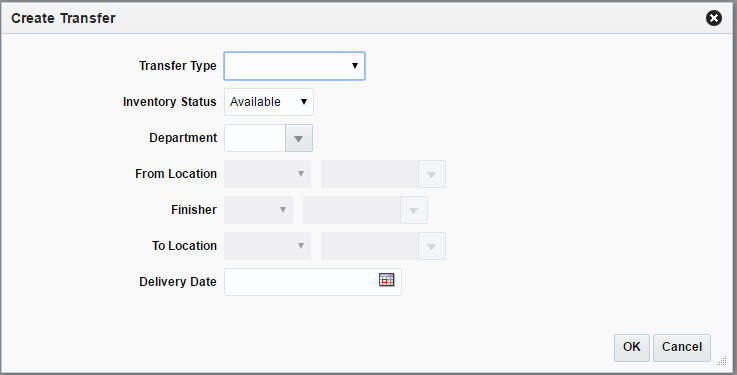
Transfers are an inventory transaction that moves one or more items from one location to another. In some cases, transfers can also be created to pass through a finisher location to have activities performed on the items being transferred, such as ticketing, re-packing, or item transformations.
To create a transfer:
From the Tasks menu, select Inventory > Transfers > Create Transfer. The Create Transfer pop-up appears.
In the Transfer Type field select the type of transfer. The options are: Administrative, Book Transfer, Confirmation, Intercompany, Manual Requisition, Reallocation Transfer, and Return to Vendor.
In the Inventory Status field, select the inventory status. The options are: Available and Unavailable.
In the Department field, enter, select or search for the department from which the items will be transferred. If items from multiple departments are to be transferred, then leave this blank.
In the From Location field, select Store or Warehouse. Then enter, select or search for the location.
In the Finisher field, select either Internal or External option. Enter, select or search for the finisher ID, if the transfer will pass through a finisher.
|
Note: Finishers are required for transfer that will have work orders, transformations, or packaging instructions. |
In the To Location field, select Store or Warehouse. Then enter, select or search for the location.
In the Delivery Date field, enter the earliest date that the transfer can be delivered to the store or warehouse or use the Calendar icon to select a date.
Click OK to save any changes. The Transfer page appears.
Click Cancel to return to the Tasks menu without saving changes.
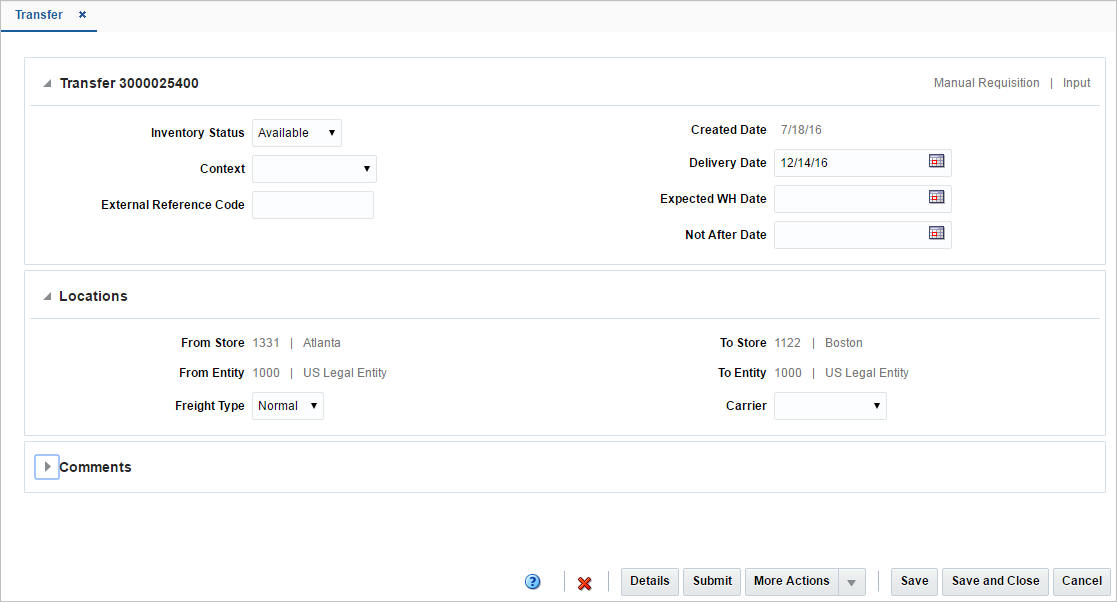
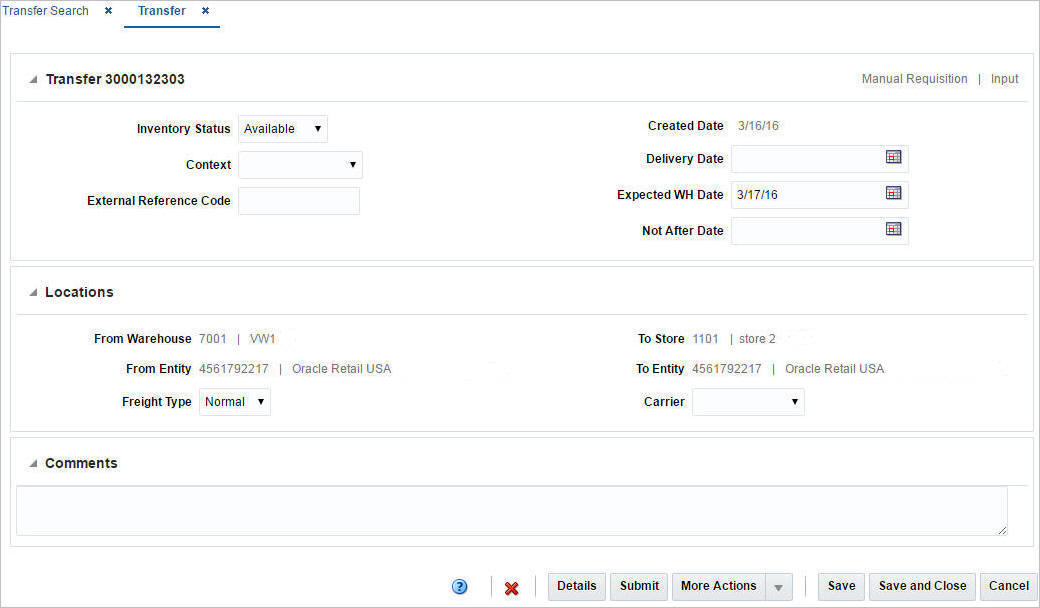
Once a transfer is created, the Transfer page appears. The Transfer page allows you to enter additional information about the transfer.
Table 9-2 Transfer Header - Fields and Description
| Fields | Description |
|---|---|
|
Title |
The title displays the Transfer ID to the top left of the header. The Transfer Type and Status is displayed at the top right of the header. |
|
Department |
This field displays the department ID and the department. |
|
Inventory Status |
This field displays inventory status. The options are Available and Unavailable. |
|
Context |
Select the context from the list. The options are: Promotion, Customer Transfer, Store Requisition, and Repairing. |
|
External Reference Number |
Enter the external reference number. This can be used to specify audit trail reference to external system when an external transaction initiates master record creation in Merchandising. |
|
Created Date |
This field displays the date on which the transfer was created. |
|
Delivery Date |
The date on which the transfer is expected to be delivered at the location. |
|
Expected WH Date |
The date on which the transfer is expected to be delivered at the warehouse. |
|
Not After Date |
The last day upon which a location can ship the requested merchandise. |
|
Note: The Delivery Date, Expected WH Date, and Not After Date fields are editable. However, the remaining fields are displayed based on the information entered in the Create Transfer pop-up. |
The Locations section includes the following fields.
Table 9-3 Locations - Fields and Description
| Field | Description |
|---|---|
|
From Store/Warehouse |
This field displays the ID and description of the source location on the transfer. |
|
From Entity |
This field displays the transfer entity ID and description. |
|
Freight Type |
This field displays the type of freight. The options are: Normal, Expedite, and Hold. |
|
To Store/Warehouse |
This field displays the ID and description of the destination location on the transfer. |
|
To Entity |
This field displays the transfer entity ID and description. |
|
Carrier |
Select the carrier type from the list. |
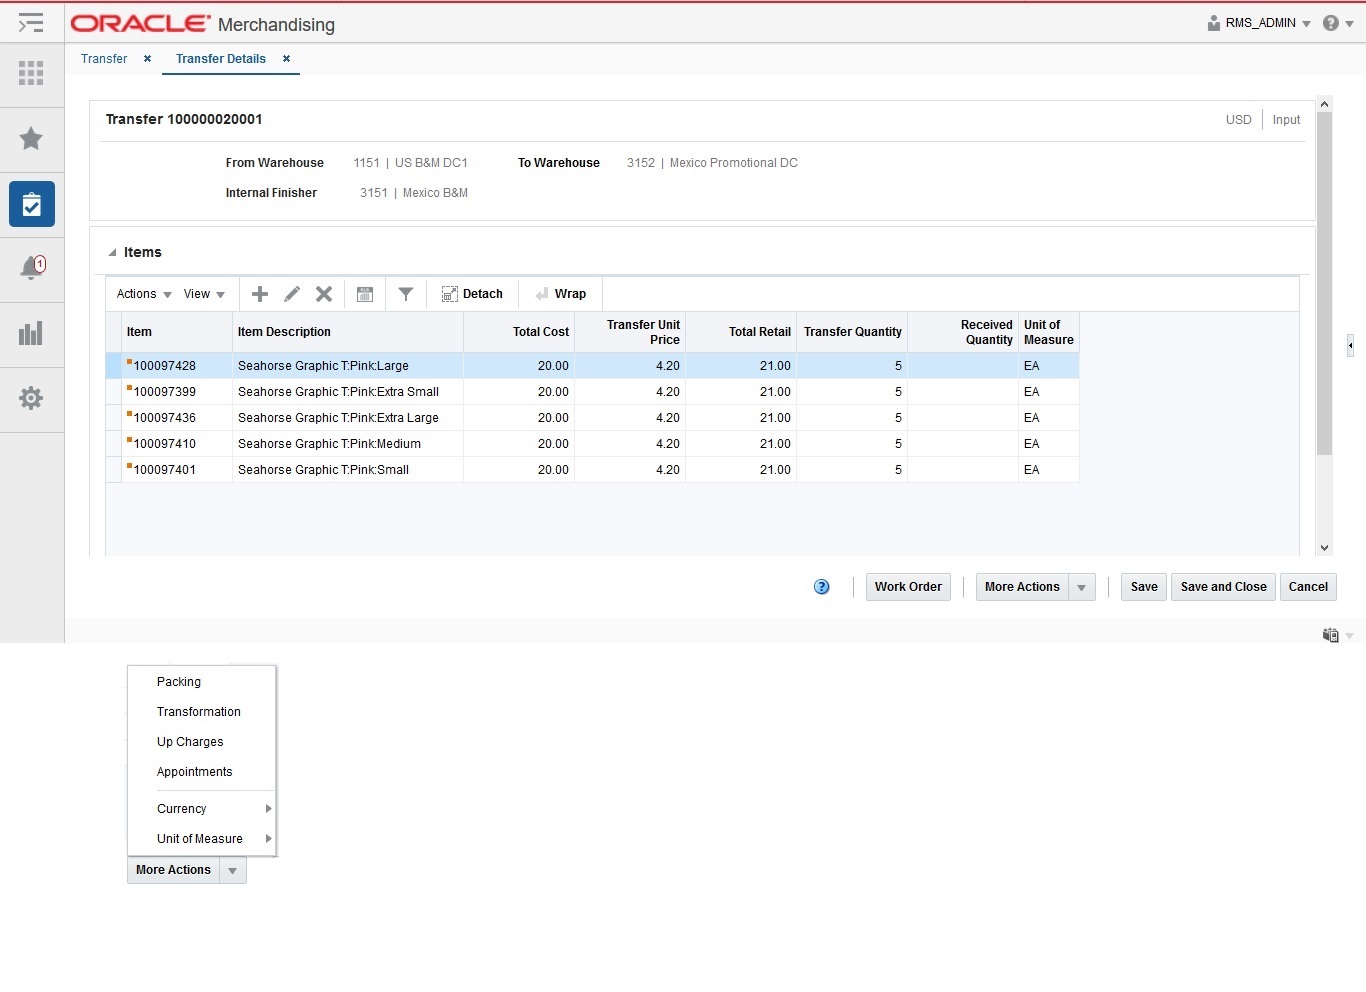
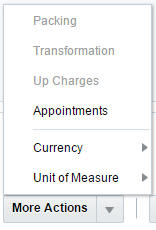
Use the More Actions menu to navigate to the following pages. The More Actions menu contains the following options.
Table 9-4 Transfer - More Actions Menu and Description
| Icon/Buttons | Description |
|---|---|
|
Delete Up Charges |
This option allows you to delete all the up charges associated with this transfer permanently. |
|
More Actions |
You can navigate to open the following pages by clicking the More Actions menu:
|
The Transfer Detail page allows users to add the list of items to be transferred.
You can access the Transfer Details page by clicking Details on the Transfer page.
In the Items section you can maintain the list of items on the transfer.
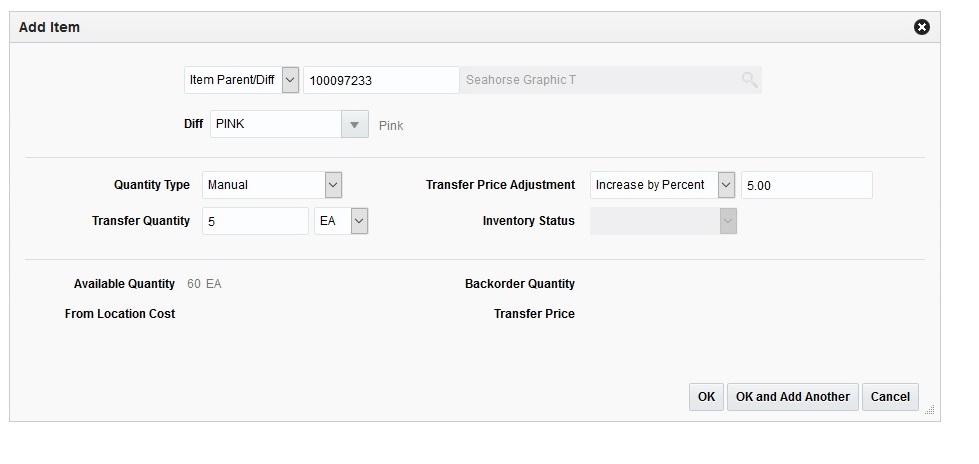
Add Items
To add items to a transfer:
From the Actions menu, click Add or click the Add icon ![]() . The Add Item pop-up appears.
. The Add Item pop-up appears.
In the Type field, select how you would like to add items to the transfer. The options are: Item, Item Parent, Item Parent/Diff, Item List and Upload List.
Depending on you selection, the next fields will change to allow you select items by desired level.
Item – You can enter, select or search transaction level items to add to the transfer.
Item Parent – You can enter, select or search items that are at the parent level to add its transaction level children items to the transfer.
Item Parent / Diff – You can enter, select or search parent level items, further there will be option to select differentiator. Based on the selection, all transaction level items associated with selected diff will be added to the transfer.
Item List – You can enter, select or search item list to add transaction level items contained therein to add to the transfer.
Upload List – This option allows you to upload data file containing items to add to the transfer. The file must be in csv format. There will be validations to ensure that only valid items are added.
In the Quantity Type field, select the quantity from the list. The options are Manual and Total Stock on Hand.
In the Transfer Quantity field, enter the quantity of the item that has to be transferred.
In Transfer Cost Adjustment field, select the type of transfer cost adjustment you want to make. The options are: Decrease by Percent, Decrease by Amount, Increase by Percent, Increase by Amount, Set Price.
|
Note: Transfer Cost Adjustment is only enabled for the Intercompany transfer type. |
In the Inventory Status field, select the inventory status from the list.
In the Available Quantity field, the quantity that is available for transfer is displayed.
The From Location Cost field displays the cost for transferring an item from the location.
The Backorder Quantity field displays the customer back-orders for an item.
The Transfer Cost field displays the transfer cost and the cost varies based on the selected Transfer Cost Adjustment Type and the Adjustment Value.
Then choose one of the following options.
Click OK to add the item to the table and close the pop-up.
Click OK and Add Another to add additional items.
Click Cancel to reject all entries and close the pop-up.
Use the More Actions menu to navigate to other pages or to change the view of the items added to the transfer.
Table 9-5 Transfer Details - More Actions Menu and Description
| Icon/Buttons | Description |
|---|---|
|
More Actions |
|
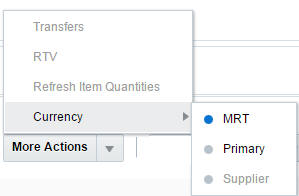
You can toggle between following currencies:
From Location
To Location
Primary
The currency toggle determines that the monetary values on the screen will be shown in From Location's currency or To Location's currency or Primary Currency.
You can toggle between the following units of measure:
Unit of Transfer - indicates the multiple of the standard UOM used for transferring
Standard UOM - is the unit of measure used for inventory for the item, such as eaches, meters, or pounds.
The UOM toggle determines weather the quantities on the screen will be shown in standard UOM or Transfer UOM.
The Transfer Work Order allows you to define activities that are completed by the finisher before the transfer is completed. You must select a finisher when creating the transfer in order to access the page. Work order activities are required for each item when a transfer contains a finisher. To add a work order to a transfer, select the Work Order button on the Transfer Details page to display the Transfer Work Orders page.
At the top of the Transfer Work Orders page, the transfer number and finisher are displayed. Below this, the label of the Item Activity section displays the work order number. In addition the currency is displayed in the top right corner of the section label. Once activities are added, you can add comments for the item activity directly in the table.
To add an activity for one or more items to the current work order, follow the steps below.
In the Item Activity section, select Actions > Add, or use the Add icon ![]() . The Add Item pop-up appears.
. The Add Item pop-up appears.
Select an item type from the list. Then enter or search for the item.
In the Diff field, enter, select or search for the diff.
|
Note: This field is only enabled, if you select the item type Item Parent/Diff. |
Select if you want to add an activity or template (a template is a pre-defined set of work order activities). Then select the corresponding activity or template.
In the Cost Type field, select the cost type from the list.
In the Activity Cost field, enter the costs.
In the Comments field, enter a comment, if necessary.
Then choose one of the following options.
Click OK to add the item activity/template to the table and close the pop-up.
Click OK and Add Another to add additional item activities/templates.
Click Cancel to reject all entries and close the pop-up.
In the Transfer Work Order page, save your changes.
Edit an Item Activity
To edit an item activity previously added, follow the steps below.
In the Item Activities section, select Actions > Edit, or use the Edit icon ![]() . The Edit Item pop-up appears.
. The Edit Item pop-up appears.
Edit the activity cost and/or the comments.
Then choose one of the following options.
Click OK to add your changes to the table and close the pop-up.
Click Cancel to reject all entries and close the pop-up.
In the Transfer Work Order page, save your changes.
Work orders in Merchandising are used to specify the tasks that are to be performed by the internal or external finisher for items on a transfer. These are used to describe the tasks in detail and are used for both basic tasks (e.g. re-ticketing, ironing, etc.) and more complicated tasks that require other mapping in Merchandising such as item transformation and repacking. Any transfer that involves a finisher must have at least one work order task associated with each item on the transfer. Various activities can be pre-defined along with cost in Merchandising and templates can also be created involving multiple activities. Work order templates and activities are created, maintained or deleted in Merchandising through spreadsheet upload and download processes. These processes are accessed through the main Merchandising task list under Foundation Data > Download Foundation Data and Foundation Data > Upload Foundation Data.
To add or update work order templates and activities, you will select the template type of Inventory from the Download Data screen and then the template Work Orders. Click the Download button and when prompted, choose to either open the .ods file that is generated or save the file and open it separately in the spreadsheet application of your choice. Once opened, there will be five sheets that can be modified - Transfer WO Activities, Transfer WO Activities Trans, Work Order Templates, Work Order Template Trans, Work Order Template Details.
Add a Work Order Activity
To add a new activity, start in the Transfer WO Activities tab, and, in a blank line in the template, select the action type of Create. Next enter a unique activity code (up to 10 characters) and the description for the activity in the primary language (as defined in the Merchandising system options) of up to 250 characters. Next, cost for this activity can be specified optionally. A cost is not required for an activity until it is applied to the transfer. Finally, select the accounting method, which determines how the cost for this activity should be handled when a transfer occurs; Post to Financials, which means the work order cost will only impact Stock Ledger and not the weighted average cost of the item, or Update Inventory Cost, which means it will impact both Stock Ledger and the weighted average cost of the item. The valid values for cost type are held in Code and Descriptions under code type ACTP. (e.g., adding the cost to the value of the item, or expensing the cost of the activity). Valid values for this field are 'Post to Financial' and 'Update Inventory Cost' and are stored on the code tables for code type ACTP.
Next, if you wish to add translations for the activity description in languages other than the primary language, this can be done in the Transfer WO Activities Trans tab. Navigate to a blank row and select the action type of Create and the language in which the translated description will be entered. Then, enter the activity code for which the translation applies. Finally, enter the translated description. The translated description can also be up to 250 characters long. This is an optional step.
Add a Work Order Template
To add a new work order template, start in the Work Order Templates tab, and, in a blank line in the template, select the action type of Create. Next enter a unique work order template ID (up to 10 characters) and the description for the template in the primary language (as defined in the Merchandising system options) of up to 120 characters.
Next, if you wish to add translations for the work order template in languages other than the primary language, this can be done in the Work Order Template Trans tab. Navigate to a blank row and select the action type of Create and the language in which the translated description will be entered. Then, enter the work order template ID for which the translation applies. Finally, enter the translated description. The translated description can also be up to 120 characters long. This is an optional step.
Next, the activities that belong to this template must be added. To do this, move to the Work Order Template Details tab in the spreadsheet. Again, navigate to a blank row in the sheet and select an action type of Create. Enter the work order template ID that you added in the Work Order Templates tab. Then add a valid activity code. Next, specify the cost for the activity. This cost can be different than the activity cost defined earlier. Finally comments can be added optionally of up to 2000 characters. If you are adding a new detail to an existing template, this same process would apply, just using the existing template instead.
Update Work Order Activity or Template
If you would like to update any details for existing work order activity or template, a similar process will be followed as that described above for creating new activity or template respectively. First, download the spreadsheet, and then navigate to the tab where you would like to make your updates.
The following columns can be updated in each tab:
Transfer WO Activities - Activity Description, Unit Cost
Transfer WO Activities Trans - Activity Description
Work Order Templates - Work Order Template Description
Work Order Template Trans - Work Order Template Description
Work Order Template Details - Activity Cost, Comments
In the tab where you are going to make your updates, select the action type of Update, and then correct the value in the spreadsheet.
Deleting a Work Order Activity or Template
If you wish to delete a work order activity or template, update the action column to select Delete in each of the tabs where it occurs. A work order activity cannot be deleted if it's a part of work order on a transfer or template. Similarly if a work order template is associated with a transfer then it can't be deleted.
Uploading Changes
For all actions defined above, once all the updates have been made to the data in the spreadsheet, save the file and close it. Then, return to the Merchandising screens and select Foundation Data > Upload Foundation Data from the main task list. In this screen, select the template type Inventory and the template Work Orders. This will generate a process description automatically, but this can be updated if desired. Lastly, select the Browse button and navigate to the directory where you saved the updated spreadsheet.
To review the status of the upload and check whether any errors occurred, select the Foundation Data > Review Status task from the main task list.
See also Download/Upload Data from Spreadsheets and View Data Loading Status.
The Transfer Item Packing page allows you to send instructions to the finisher to tell them how items and packs should be shipped to the final location. For example, you may elect to have the finisher take individual bulk items and have them re-packed into specific pre-pack configurations.
The following packaging combinations may occur:
Pack to Components
| Pack 1 | becomes | Item 1 |
| Item 2 | ||
| Item 3 |
Pack to Pack
Complete Packs:
| Pack 1 made up of: | 2 of Item 1 | becomes | Pack 2 made up of: | 2 of Item 1 |
| 3 of Item 2 | 2 of Item 2 | |||
| 3 of Item 3 | 2 of Item 3 |
Packs with Remainders:
| Pack 1 made up of: | 2 of Item 1 | becomes | Pack 2 made up of: | 2 of Item 1 |
| 3 of Item 2 | 2 of Item 2 | |||
| 3 of Item 3 | 1 of Item 3 | |||
| Remaining items | 1 of item 2 | |||
| 2 of item 3 |
Components to Pack
| Item 1 | becomes | Pack 1 |
| Item 2 | ||
| Item 3 |
At the top of the page, the transfer number, from and to locations, and the finisher are displayed. The page also contains:
Header
The header displays the transfer number, the from/to location and the finisher.
The Item Packing section contains a table listing the "from" items that have been added and will be the starting point of the packing. It also contains the "to" item, which defines how the from items will be packed.
The Packing Results section shows the results of building a pack based on the information that was entered in the Item Packing section.
To pack an item on a transfer, follow the steps below.
Create a transfer.
For more information about how to create a transfer, see the start of the Transfers section.
Add a transfer work order activity.
For more information about how to add a transfer work order activity, see the Add a Work Order section.
In the Transfer Details page, select More Actions > Packing. The Transfer Item Packing page appears.
Add Items and Explode Pack
To add a pack and explode the pack item to its components, follow the steps below.
In the Item Packing section, select Actions > Add, or use the Add icon ![]() . The Add Item pop-up appears.
. The Add Item pop-up appears.
In the From Item field, enter or search for the from pack.
Select the Explode Pack checkbox, to explode the pack.
The pack item will be exploded to its component items and displayed as a new pack set in the Packing Results section.
Then choose one of the following options.
Click OK to add the item and close the pop-up.
Click OK and Add Another to add additional items.
Click Cancel to reject all entries and close the pop-up.
To change the pack, follow the steps below.
In the Item Packing section, select Actions > Add, or use the Add icon ![]() . The Add Item pop-up appears.
. The Add Item pop-up appears.
In the From Item field, enter or search for the from pack.
Select the Explode Pack checkbox, to explode the pack.
The pack item will be exploded to its component items and displayed as a new pack set in the Packing Results section.
Then choose one of the following options.
Click OK to add the item and close the pop-up.
Click OK and Add Another to add additional items.
Click Cancel to reject all entries and close the pop-up.
In the To Item area, enter or search for the to pack item that is on the transfer.
Then click Build Pack. The new pack is created and displayed in the Packing Results section.
To view the pack details, click Pack Details. The Pack Item Details are displayed.
Then save your entries.
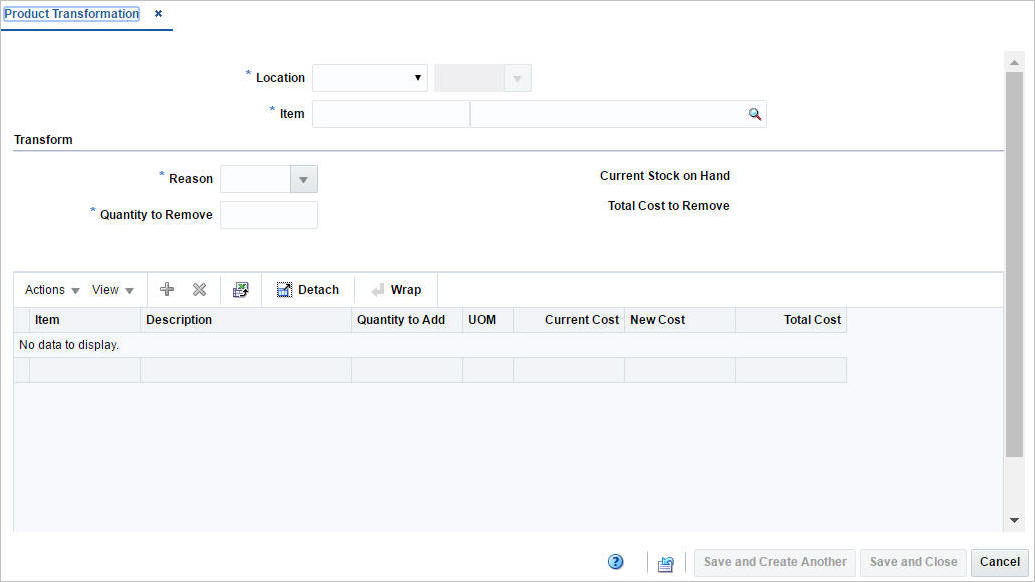
The Transfer Item Transformation page allows you to convert one item to another item at a finisher. You may change one item to a different item or you may consolidate multiple items into one item.
There are certain conditions that must be met before you complete an item transformation. When you transform the first item into a second item, both items must exist in approved status before you can complete the transformation. The entire quantity of item on a transfer must be transformed into the same item.
There are two types of item transformation that can occur:
Table 9-6 Item Transformation
| Item | becomes | item |
|---|---|---|
|
One to One |
||
|
Item 1 |
becomes |
Item 2 |
|
Item A |
becomes |
Item X |
|
Item B |
becomes |
Item Y |
|
Item C |
becomes |
Item Z |
|
Many to One |
||
|
Item 1 |
becomes |
Item 2 |
|
Item A |
becomes |
Item X |
|
Item B |
becomes |
Item X |
|
Item C |
becomes |
Item X |
The Transfer Item Transformation page displays the transfer number, the from and to locations, and the finisher at the top of the page.
The Transform Item section is visible if you are not in View mode and the Status is Input, otherwise the section is hidden.
The Transform Item section contains two sub-sections, the From Item table and the To Item area.
The From Item table displays the following fields by default:
From Item
Description
Diff
Diff Description
Quantity
To Item
The To Item area displays the item, item description, diff and diff description as well as the quantity.
You can edit the to item and diff in this area by clicking the Edit icon ![]() .
.
You can finalize the transformation of the items in this area by clicking the Transform button.
The Transform button is only enabled if From Item and To Item sections are populated. When you click the button the Transform Item section is cleared, the items are transformed and displayed in the Transformation Results section.
The From Item table displays the following fields by default:
From Item
Description
To Item
To Item Description
To Item Retail
To Item Cost
Quantity
To transform an item, follow the steps below.
Create a transfer.
For more information about how to create a transfer, see the start of the Transfers section.
Add a transfer work order activity.
For more information about how to add a transfer work order activity, see the Add a Work Order section.
In the Transfer Details page, select More Actions > Transformation. The Transfer Item Transformation page appears.
Add and Transform an Item
To add a from item, follow the steps below.
In the Transform Item section, select Actions > Add, or use the Add icon ![]() . The Add Item pop-up appears.
. The Add Item pop-up appears.
In the From Item pop-up:
In the Item field, enter or search for an item. This field is a required field.
In the Diff field, enter, select or search for the diff. This field is only available if the parte item has diff.
In the To Item section:
In the Item field, enter or search for an item or parent item that you want the from item to become.
|
Note: The to item you select must be an approved item. |
In the Diff field, enter, select or search for the diff. This field is only available if the to item is a parent item.
Then choose one of the following options.
Click OK to add the from/to item and close the pop-up.
Click OK and Add Another to add additional from/to items.
Click Cancel to reject all entries and close the pop-up.
Then click Transform. The items that have been transformed for the transfer are displayed in the Transformation Results section.
Save your entries.
Edit the To Item
To edit the "to" item before transforming, follow the steps below.
In the To Item area, click the Edit icon ![]() . The Edit Item pop-up appears.
. The Edit Item pop-up appears.
Edit the fields as necessary.
Then choose one of the following options.
Click OK to add your change to the table and close the pop-up.
Click Cancel to reject the entries and close the pop-up.
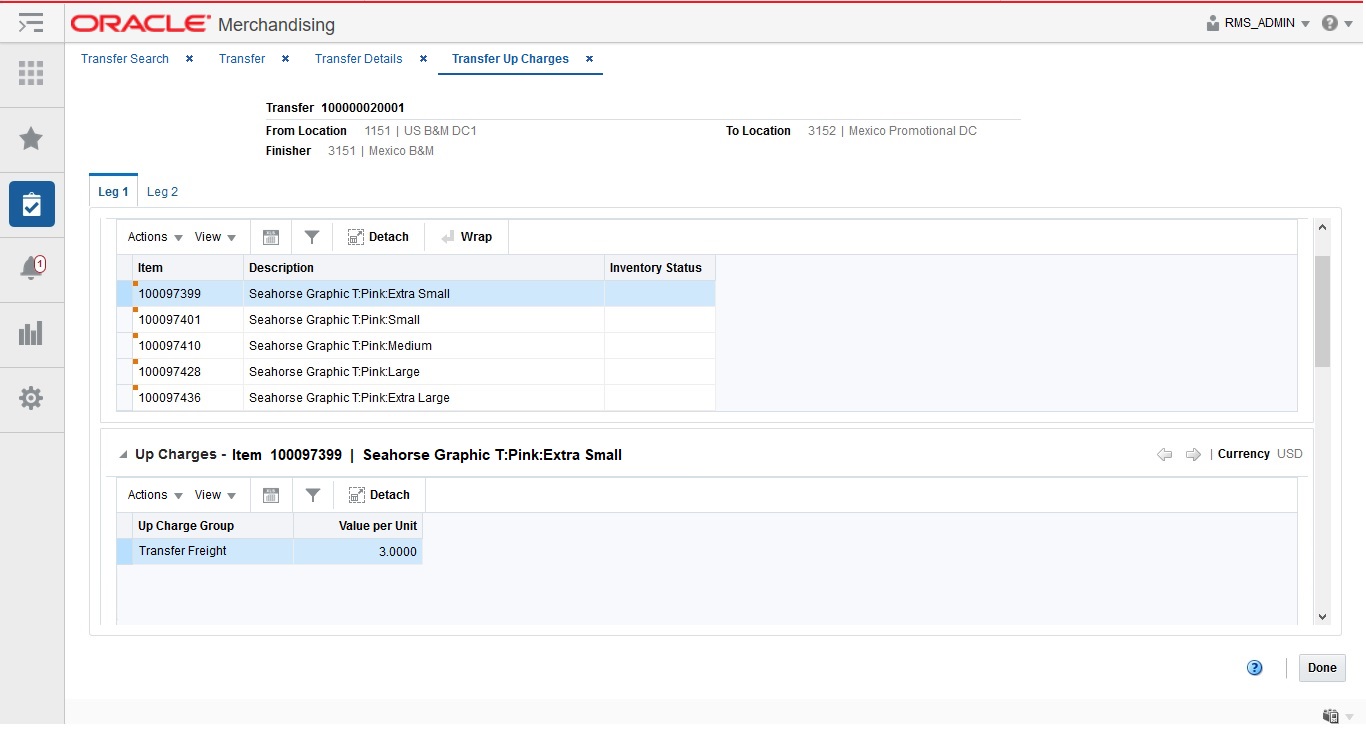
An up charge is a cost associated with moving items between locations in the Merchandising. Up charges may be included to account for work associated with the transfer of goods (for example, cost that the origin location incurs to prepare the items for shipping).
Each up charge has a calculation basis of value or specific, a cost basis of either weighted average cost (when using average cost method) or unit cost (when using standard cost method), component currency, and up charge group, which is used to group up charge components together to show a total sum on the Transfer Up Charge page.
The Transfer Up Charges page allows you to view the up charges that are associated with a specific transfer/item/from location/to location combination. Up charge groups are a combination of up charge components.
The Transfer Up Charges page displays the transfer and the from and to locations at the top of the page. And also includes the following sections:
The Item section displays the items on the transfers that have up charges defined, including information such as item, item description and Inventory Status.
For transfers with finishing, select the tab Leg 2 to view the item information of the second leg.
The Up Charges section displays up charge group and value per unit for the highlighted item.
The Next and Previous icon is displayed in the top right corner of the section, if the selected item is as pack to see the up charges for each item in the pack.
Managing transfers involves performing one or more of the following tasks:
Searching for a transfer
Creating from an existing transfer
Editing a transfer
Viewing a transfer
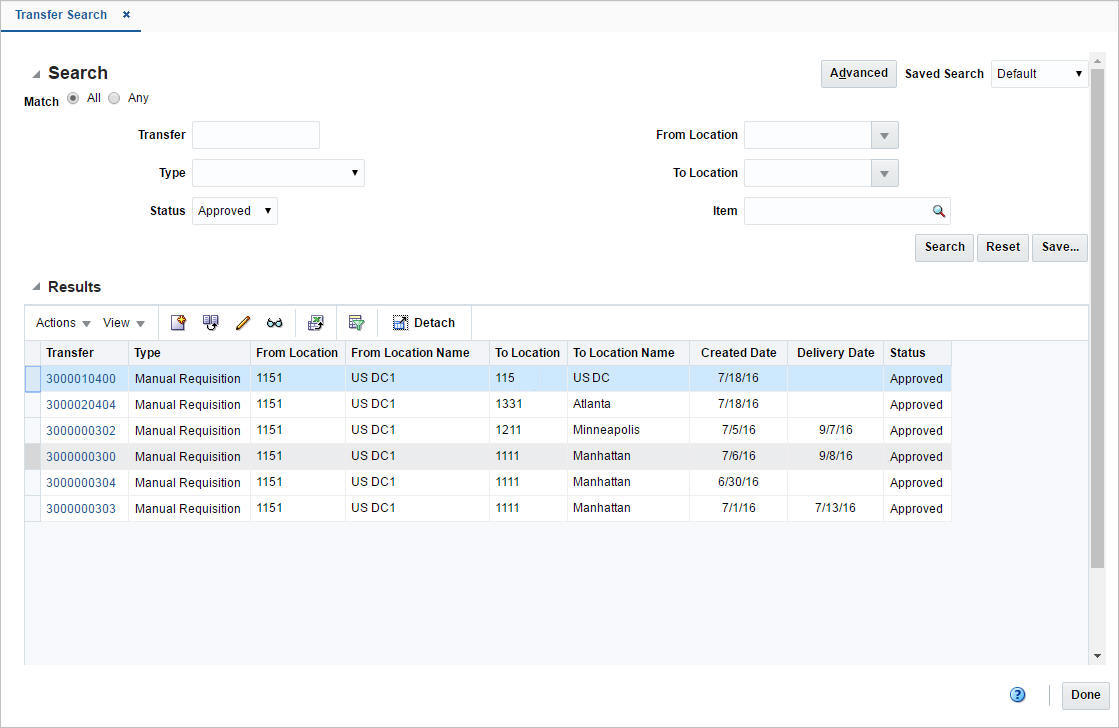
To manage transfers, access the Transfer Search page by selecting Inventory > Transfers > Manage Transfers, the Transfer Search page appears.
To search for a transfer:
Provide search criteria in the search section. The criteria can be provided either in Basic or Advanced mode, depending on the requirement. Basic is the default mode when the search page is entered.
Click Advanced to access the search panel in advanced mode. You can return to Basic mode by clicking Basic.
To search for a transfer through the basic search criteria.
Enter or select one or all of the following basic search criteria.
Table 9-7 Transfer Search - Basic Search Criteria
| Field | Description |
|---|---|
|
Match option |
Check radio button All or Any. All - only transfer matching all entered search criteria are shown. Any - transfer matching any of the entered search criteria are shown. |
|
Transfer |
Enter the transfer ID. |
|
Type |
Select the transfer type from the list. |
|
Status |
Select the status of the transfer. The options are: Input, Submitted, Approved, Closed, Deleted, and In Progress. |
|
From Location |
Enter, select or search for the location ID. |
|
To Location |
Enter, select or search for the location ID. |
|
Item |
Enter the item number or search for the item. |
|
Note: For more information about searches, see Search Screens in the Oracle® Retail Merchandising Do the Basics User Guide. |
Click Search. The transfers that match the search criteria are displayed in the Results section.
Click Reset to execute the saved search.
Click Done to close the page.
To search for a transfer through the advanced search criteria:
Enter or select one or all of the following advanced search criteria. Click Add Fields to add more fields for the advanced search. To remove the field from the search, click the x right next to the field.
Table 9-8 Transfer Search - Advanced Search Criteria and Description
| Fields | Description |
|---|---|
|
Match option |
Check radio button All or Any. All - only transfer matching all entered search criteria are shown. Any - transfer matching any of the entered search criteria are shown. |
|
Transfer |
Enter the transfer ID. |
|
Type |
Select the transfer type from the list. |
|
Status |
Select the status of the transfer. The options are: Input, Submitted, Approved, Closed, Deleted, and In Progress. |
|
From Location |
Enter, select or search for the location ID. |
|
To Location |
Enter, select or search for the location ID. |
|
Department |
Enter, select or search for the department. |
|
Class |
Enter, select or search for the class number. |
|
Subclass |
Enter, select or search for the subclass. |
|
Item |
Enter the item number or search for the item. |
To narrow down the search, use the list next to the search fields. For example, determine if the entered value should equal or not equal the search result.
Click Search. The transfers that match the search criteria are displayed in the Results section.
Click Reset to clear the search section and results.
Click Done to close the page.
To create a deal from an existing transfer:
From the Tasks menu, select Inventory > Transfers > Manage Transfers. The Transfer Search page appears.
Enter or select search criteria as desired to make the search more restrictive.
Click Search. The transfers that match the search criteria are displayed in the Results section.
Select a transfer in the Results section
Then select Actions > Create from Existing or click the Create from Existing icon ![]() . The Transfer page appears. The data of the selected transfer is displayed. Change the data as necessary.
. The Transfer page appears. The data of the selected transfer is displayed. Change the data as necessary.
For more information about transfers, see the Transfer Header section.
Then choose one of the following options.
Click Save to save to create the transfer.
Click Save and Close to create the transfer and close the page.
Click Cancel to reject all entries and return to Transfer Search page.
To edit a transfer:
From the Tasks menu, select Inventory > Transfers > Manage Transfers. The Transfer Search page appears.
Select the transfer you want to edit.
From the Actions menu, select Edit or click the Edit icon. ![]() . The Transfer page appears.
. The Transfer page appears.
Make the necessary changes and click save your changes.
To maintain transfer Details follow the steps below.
From the Tasks menu, select Inventory > Transfers > Manage Transfers. The Transfer Search page appears.
Enter or select search criteria as desired to make the search more restrictive.
Click Search. The transfers that match the search criteria are displayed in the Results section.
In the Transfer column, click the transfer link, or mark a record and select Actions > Edit, or use the Edit icon ![]() . The Transfer page appears.
. The Transfer page appears.
Editing Transfer Details Items
To edit transfer details items:
In the Items section, select the transfer details of the item you want to edit.
From the Actions menu, click Edit or click the Edit icon ![]() .
.
Edit the quantity type and the transfer quantity as necessary.
Then choose one of the following options.
Click OK to save the changes and close the page.
Click Cancel to reject your entries and close the page.
When a transfer is added to the system, it must go through a series of checks before it can be executed. Depending on your user role, you may not be able to move the transfer to the next status. A transfer may be in any of the following statuses.
Table 9-9 Transfer Approval Process - Status and Definition
| Status | Definition |
|---|---|
|
Input |
The transfer has been started, but not completed. |
|
Submitted |
The transfer has been completed and is pending in review. |
|
Approved |
The transfer has been reviewed and has been approved. |
|
In Progress |
The transfer has been shipped to the next receiver in the transfer. |
|
Deleted |
The transfer is marked for deletion. It will be deleted by a regularly scheduled batch program. |
|
Closed |
The transfer has been received at the final location and is complete. |
To submit a transfer for approval, follow the steps below.
From the Tasks menu, select Inventory > Transfers > Manage Transfers. The Transfer Search page appears.
Restrict your search to transfers in Input status.
Click Search. The transfer that match the search criteria are displayed in the Results section.
In the Transfer column, click the Transfer link, or mark a record and select Actions > Edit, or use the Edit icon ![]() . The Transfer page appears.
. The Transfer page appears.
Click the Submit button. The status of the transfer changes to Submitted.
Save your changes.
To approve a transfer, follow the steps below.
From the Tasks menu, select Inventory > Transfers > Manage Transfers. The Transfer Search page appears.
Restrict your search to transfers in Submitted status.
Click Search. The transfer that match the search criteria are displayed in the Results section.
In the Transfer column, click the Transfer link, or mark a record and select Actions > Edit, or use the Edit icon ![]() . The Transfer page appears.
. The Transfer page appears.
Click the Approve button. The status of the transfer changes to Approved.
Save your changes.
To ship a transfer, follow the steps below.
From the Tasks menu, select Inventory > Transfers > Manage Transfers. The Transfer Search page appears.
Enter criteria to find the transfer you wish to ship. Only transfers in Approved status can be shipped. Click Search. The transfers that match the search criteria are displayed in the Results section.
In the Transfer column, click the Transfer link, or select Actions > Edit, or use the Edit icon ( ![]() ). The Transfer page appears.
). The Transfer page appears.
Click the Ship button. The status of the transfer changes to In Progress and the BOL number that has been created for the shipment is displayed.
Click Save and Close to save your changes and close the page.
|
Note: This option is available only when the system options Allow Shipping / Receiving at Stores (for store sourced transfers) and/or Allow Shipping / Receiving at Warehouses (for warehouse sourced transfers) are set to Yes. |
To close a transfer, follow the steps below.
From the Tasks menu, select Inventory > Transfers > Manage Transfers. The Transfer Search page appears.
Restrict your search to transfers in In Progress status.
Click Search. The transfer that match the search criteria are displayed in the Results section.
In the Transfer column, click the Transfer link, or mark a record and select Actions > Edit, or use the Edit icon ![]() . The Transfer page appears.
. The Transfer page appears.
Click the Close button. The status of the transfer changes to Closed.
Save your changes.
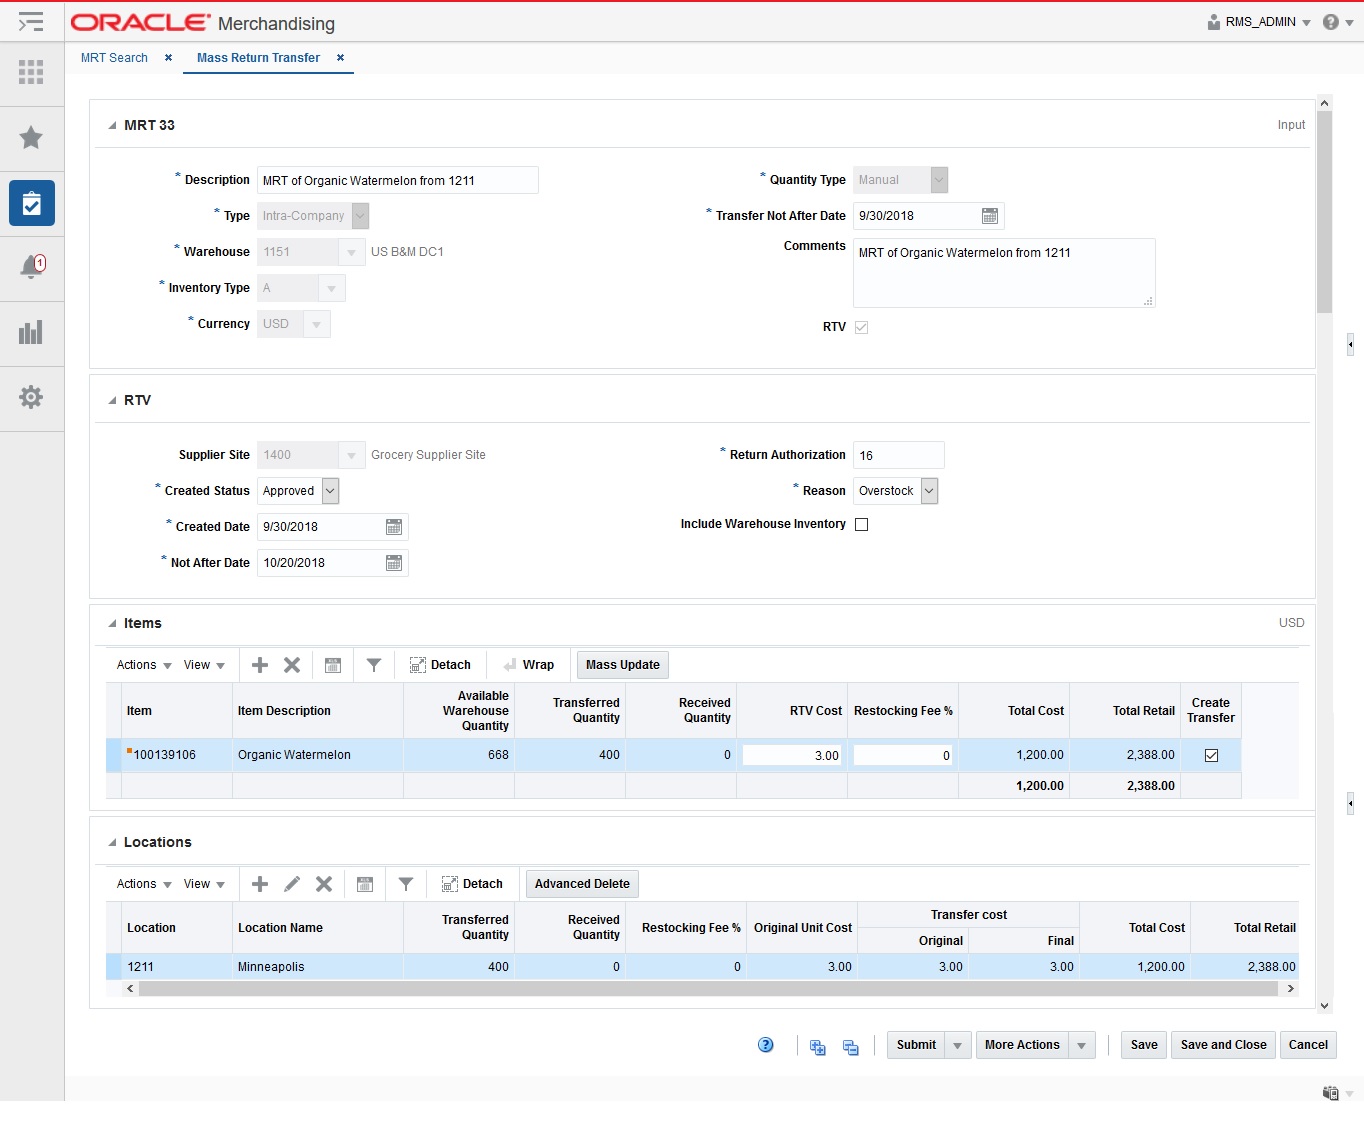
Mass return transfers (or MRTs) allow you to transfer a set of items from multiple locations back to a single location. A return to vendor (RTV) can also be included as part of the MRT. This may be used for end of season when pulling inventory back from stores to a warehouse, or for product recalls.
The Mass Return Transfer (MRT) page allows you to create a transfer of multiple items and locations back to a single location by specifying the following information:
Mass return transfer details
RTV
Items
Locations
From the Tasks menu, select Inventory > Transfers > Create Mass Return Transfer. The Mass Return Transfer page appears.
Table 9-10 Mass Return Transfer Header - Fields and Description
| Fields | Description |
|---|---|
|
Title |
The title displays the Mass Return Transfer ID. The MRT Status is displayed at the top right of the header. This field contains the MRT number by default. |
|
Description |
Enter a description of the mass return transfer. This field is a required field. |
|
Type |
Select the type of the MRT you are creating. The options are:
This field is a required field. |
|
Warehouse |
Enter, select or search for the warehouse. This field is a required field. |
|
Currency |
Enter, select or for search the currency. This field is a required field. |
|
Quantity Type |
Select how you will determine the number of items to transfer. The options are:
This field is a required field. |
|
Transfer Not After Date |
Enter the last date the transfer can occur, or click the Calendar icon to select a date. This field is a required field. |
|
Comments |
Enter any additional comments as necessary. |
|
RTV |
Select the RTV. The RTV section appears. For more information on the RTV, see the Create with an RTV section. |
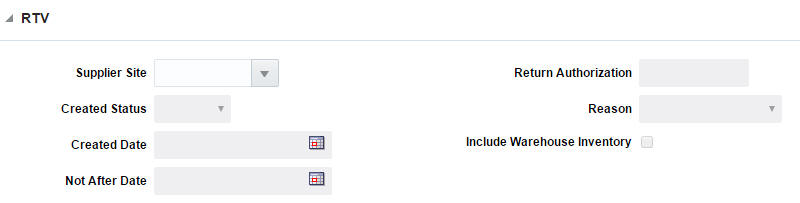
Once you select the RTV checkbox, the RTV section appears in the Mass Return Transfer page.
The RTV section includes the following fields.
Table 9-11 RTV - Fields and Description
| Fields | Description |
|---|---|
|
Supplier Site |
Enter, select or search for the supplier site. |
|
Created Status |
Select the status the RTV will be created in. The options are: Input, Output, and Manual. |
|
Created Date |
Enter the date the RTV is created, or use the Calendar icon to select a date. |
|
Not After Date |
Enter the last date the transfer can occur, or use the Calendar icon and select a date. |
|
Return Authorization |
Enter the return authorization number of the supplier. |
|
Reason |
Select the reason you are creating the RTV. |
|
Include Warehouse Inventory |
Select this option to indicate warehouse inventory is included in the creation of the RTVs. |
The Items section displays item information such as the item number, item description, quantity and cost information.
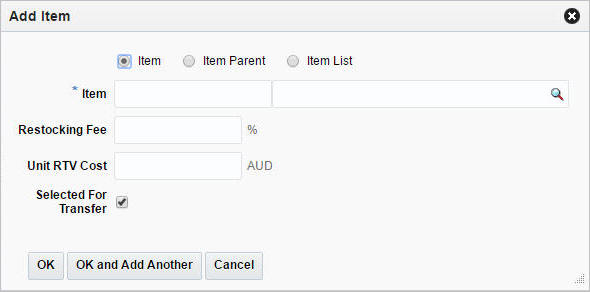
To add items to a mass return transfer, follow the steps below.
In the Mass Return Transfer page, go to the Items section.
From the Actions menu, select Add or click the Add icon ![]() . The Add Item pop-up appears.
. The Add Item pop-up appears.
Select any one of the following options: Item, Item Parent, or Item List.
In the Item field, enter the item or search and select from the list. This is a required field.
If you have selected Item Parent or Item List then you will have to enter, search or select Item Parent and Item List respectively to add items to MRT.
In the Restocking Fee % field, enter the percentage that is applied for restocking fees.
In the Unit RTV Cost field, enter the Unit RTV cost for the item
The Selected For Transfer checkbox is selected by default. This indicates whether the transfer for the item should be created when the MRT is approved or not.
Then choose one of the following option.
Click OK to add the item and close the page.
Click OK and Add Another to add additional items.
Click Cancel to reject all entries and close the page.
The Locations section allows you to indicate at which locations the transfer is effective.
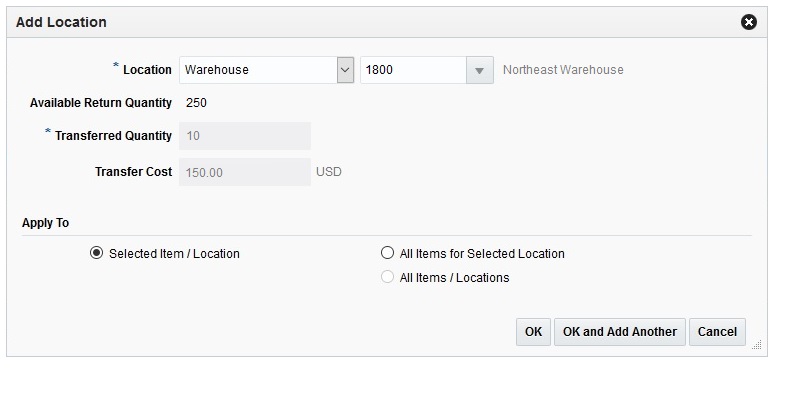
To add the locations to the mass return transfer, follow the steps below.
In the Mass Return Transfer page, go to Locations section.
After entering the header details, select Actions > Add, or click the Add icon ![]() . The Add Locations page appears.
. The Add Locations page appears.
Select the location type from the list. Then enter, select or search for the location.
The available return quantity is displayed.
In the Transfer Quantity field, enter the quantity you want to transfer.
In the Transfer Cost field defaults to the transfer cost associated to the location.
The Transfer Price field defaults to the transfer price associated to the location.
In the Apply to section, select if you want to apply the changes to the selected item/location, all items for selected locations or all item/locations.
Then choose one of the following option.
Click OK to add the location and close the page.
Click OK and Add Another to add additional locations.
Click Cancel to reject all entries and close the page.
Use the More Actions menu to navigate to the following pages. The More Actions menu contains the following options.
Table 9-12 Mass Return Transfer - More Actions Menu and Description
| Icon/Buttons | Description |
|---|---|
|
More Actions |
You can navigate to open the following pages by clicking More Actions menu:
|
Managing mass return transfers involves performing one or more of the following tasks:
Searching for a mass return transfer
Editing a mass return transfer
Viewing a mass return transfer
You can access the MRT Search page from the Task menu, select Inventory > Transfers > Manage Mass Return Transfer. The MRT Search page appears.
In the MRT Search page you can search for mass return transfers by specifying various search criteria. You can choose to access mass return transfers in the search results in edit or view mode depending on security privileges. There are also options for creating a new mass return transfer.
To search for an MRT:
From the Tasks menu, select Inventory > Transfers > Manage Mass Return Transfer. The MRT Search page appears.
You can search for a mass return transfer by providing search criteria in the search section. The criteria can be provided either in Basic or Advanced mode, depending on the requirement. Basic is the default mode when the search page is entered. Click Advanced to access search panel in advanced mode. You can return to Basic mode by clicking Basic.
To search for an MRT through the basic search criteria:
Enter or select one or all of the following basic search criteria.
Table 9-13 MRT Search - Basic Search Criteria and Description
| Fields | Description |
|---|---|
|
Match option |
Check radio button All or Any. All - only MRTs matching all entered search criteria are shown. Any - MRTs matching any of the entered search criteria are shown. |
|
MRT |
Enter the MRT description. |
|
Status |
Select the status of the mass return transfer. The options are: Input, Submitted, Approved, RTV Created, Closed. |
|
Supplier Site |
Enter the supplier site, select or search the supplier site and number from the list. |
|
Warehouse |
Enter the warehouse ID, select or search the warehouse. |
|
Item |
Enter the item number of the item or search the item. |
|
From Location |
Enter the location or select and search the location and the ID. |
|
Note: For more information about searches, see Search Screens in the Oracle® Retail Merchandising Do the Basics User Guide. |
Click Search. The MRTs that match the search criteria are displayed in the Results section.
Click Reset to execute the saved search.
Click Done to close the page.
To search for an MRT through the advanced search criteria:
Enter or select one or all of the following advanced search criteria. Click Add Fields to add more fields for the advanced search. To remove the field from the search, click the x right next to the field.
Table 9-14 MRT Search - Advanced Search Criteria and Description
| Fields | Description |
|---|---|
|
Match option |
Check radio button All or Any. All - only MRTs matching all entered search criteria are shown. Any - MRTs matching any of the entered search criteria are shown. |
|
MRT |
Enter the MRT description. |
|
Status |
Select the status of the mass return transfer. The options are: Input, Submitted, Approved, RTV Created, Closed. |
|
Supplier Site |
Enter the supplier site, select or search the supplier site and number from the list. |
|
Warehouse |
Enter the warehouse ID, select or search the warehouse. |
|
Item |
Enter the item number of the item or search the item. |
|
From Location |
Enter the location or select and search the location and the ID. |
|
Subclass |
Enter a subclass or select and search for a subclass containing items on MRTs. |
|
Class |
Enter a class or select and search for a class containing items on MRTs. |
|
Department |
Enter a department or select and search for a department containing items on MRTs. |
|
Group |
Enter a group or select and search for a division containing items on MRTs. |
|
Division |
Enter a division or select and search for a division containing items on MRTs. |
|
From Location Type |
Select a location type to filter MRTs returned in the results to those containing that location type. Valid options are store or warehouse. |
|
Item Description |
Enter a partial description of an item to return MRTs containing items whose descriptions match the entered partial description. |
|
RTV |
Enter the ID of the RTV linked with an MRT. |
|
RTV Created |
Enter the user ID, or select from the list, the person who created the RTV associated with an MRT. |
|
RTV Created Date |
Enter the date, or select from the calendar, that the RTV associated with an MRT was created. |
|
Return Authorization Number |
Enter the return authorization code for the RTV associated with an MRT. |
|
Supplier Site Name |
Enter a partial supplier site name to return MRTs linked to supplier sites that match the description. |
|
Transfer Note After Date |
Enter the date, or select from the calendar, that was entered as the latest date for the "from" locations to ship their transfer associated with an MRT. |
|
Note: For more information about searches, see Search Screens in the Oracle® Retail Merchandising Do the Basics User Guide. |
To narrow down the search, use the list next to the search fields. For example, determine if the entered value should equal or not equal the search result.
Click Search. The MRTs that match the search criteria are displayed in the Results section.
Click Reset to clear the search section and results.
Click Done to close the page.
To edit an MRT, follow the steps below.
From the Tasks menu, select Inventory > Transfers > Manage Transfers > Manage Mass Return Transfer. The MRT Search page appears.
Select the mass return transfer you want to edit.
From the Actions menu, select Edit or click the Edit icon. ![]() . The Mass Return Transfer page appears.
. The Mass Return Transfer page appears.
Make the necessary changes.
For more information about the Mass Return Transfer page, see the Mass Return Transfers chapter.
Save your changes.
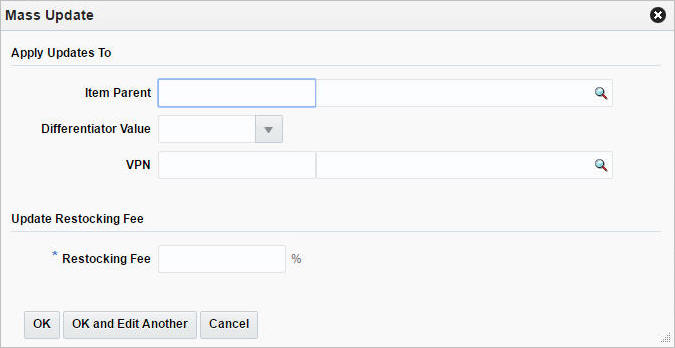
To update the Restocking fee based on either an Item Parent, a Differentiator, or VPN use the Mass Update function in the Mass Return Transfer page.
In the Items section, select Actions > Mass Update, or use the Mass Update button. The Mass Update pop-up appears.
In the Apply Updates to section, you can choose any one of the following fields: Item Parent, Differentiator Value, or VPN. You can narrow down the items for which restocking fee % will be updated. If none of the values are chosen, the update will be applicable to all the items.In the Update Restocking Fee section, enter the intended value of Restocking Fee % . This field is a required field.
Then choose one of the following options.
Click OK to commit the mass update and close the pop-up.
Click OK and Edit Another to commit the changes and edit an additional mass update.
Click Cancel to reject all entries and close the pop-up.
To select delete location options, follow the steps below.
In the Mass Return Transfer page, go to Locations section.
From the Actions menu, click the Advanced Delete button.The Delete Location pop-up appears.
You can delete any one of the following options:
Selected Location for Selected Item
Selected Location for All Items
All Locations for Selected Item
All Item/Locations
Then choose one of the following options.
Click OK to delete the locations.
Click Cancel to reject all entries an close the pop-up.
To edit locations, follow the steps below.
Select the locations you want to edit.
From the Actions menu, click Edit or click the Edit icon ![]() . The Edit Location page appears.
. The Edit Location page appears.
Edit the enabled fields as necessary.
Click OK to return to Mass Return Transfer page.
Appointments define the quantity of goods that are expected to ship from one location to another. The appointments are created in the warehouse management system and sent to Merchandising. When a shipment is received, the warehouse management system sends a message to Merchandising Receiving and completes the following actions:
The appointment status changes to Closed
Quantity Received and Receipt Number fields are updated
Merchandising attempts to close the document associated with the appointment (a purchase order, transfer, or allocation)
A purchase order, transfer, or allocation cannot be closed if an associated appointment does not have a status of Closed. Also, the line item order quantity (canceled quantity) cannot fall below the total expected quantity for all of the shipments and appointments that are attached to the order for that line item.
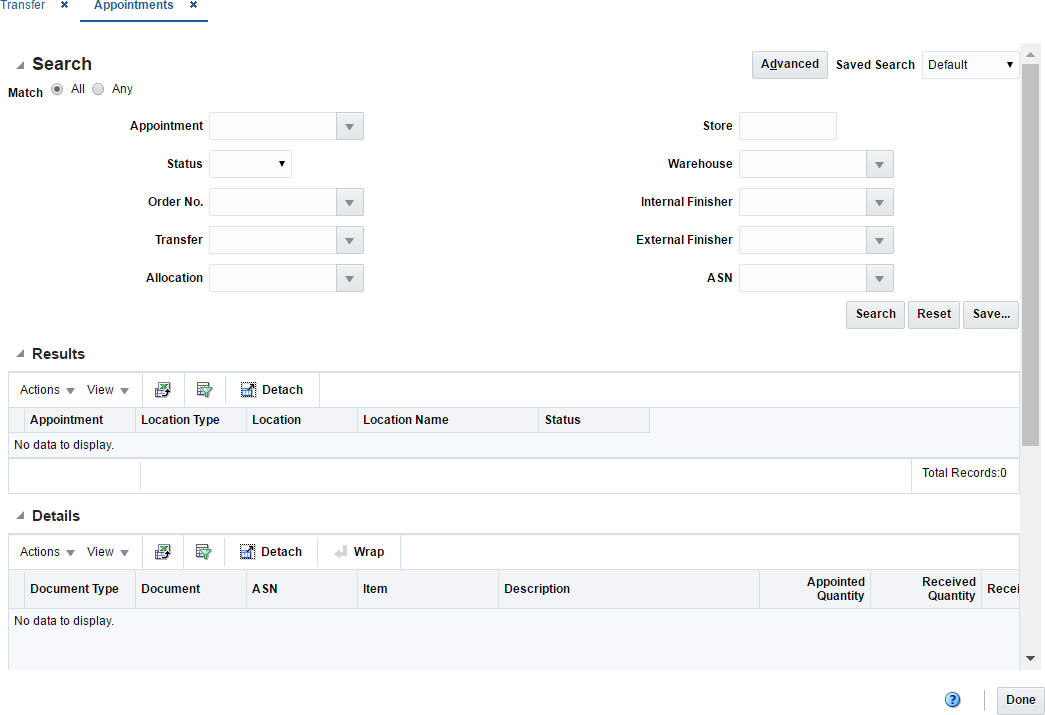
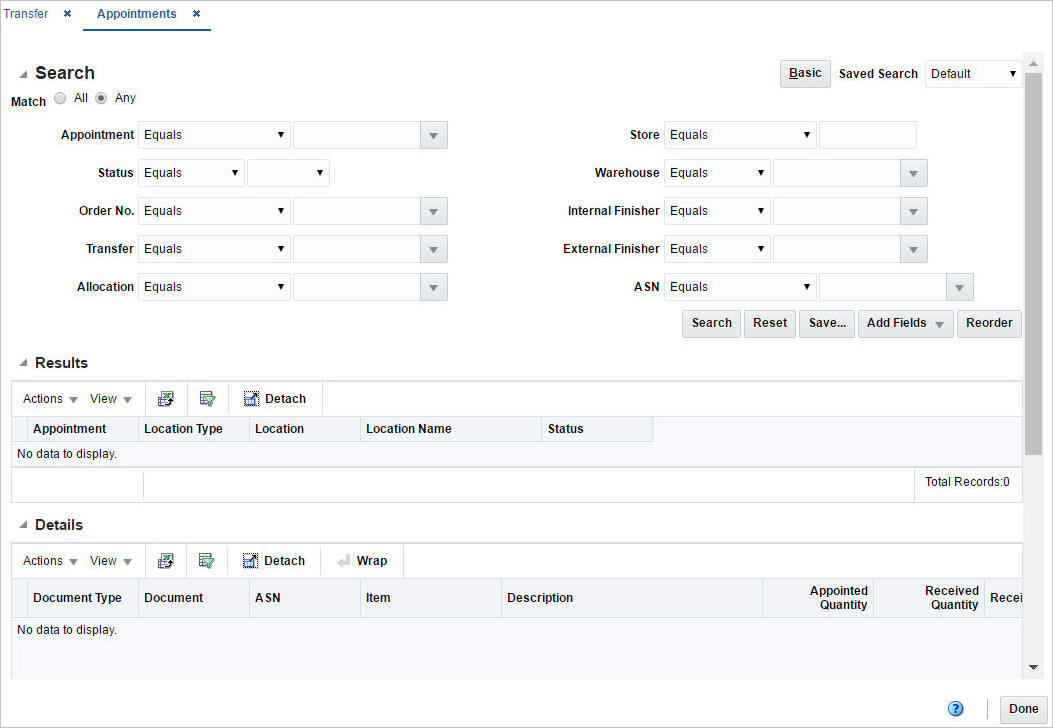
The Appointments window allows you to search for any appointment linked with a specific order or ASN and view its details such as the receiving location and current status.
The Appointments window can be accessed by any of the following ways:
From the Tasks menu, select Inventory > Shipments and Receipts > Appointments. The Appointment window opens.
From the More Actions menu of the following windows:
Order
For more information about orders, see the Orders chapter, section "Define/Enter a Purchase Order".
Transfer
For more information about transfers, see the Transfers section.
Transfer Details
For more information about transfer details, see the Transfer Details section.
In the Order Details window, select Actions > Appointments in the Items section.
For more information about order details, see the Orders chapter, section "Order Details".
In the Shipment window, select the Appointment button in the toolbar.
For more information about shipments, see the Shipment section.
The Appointments window includes the following sections:
Search
For more information about how to search for appointments, see the Search for an Appointment section.
You can search for appointments by providing search criteria in the search section.
You can search for an appointment using basic or advanced search criteria, depending on the requirement. The basic mode is the default search mode.
Click Advanced to access the search section in advanced mode.
Click Basic to return to the basic mode.
To search for an appointment through the basic search criteria:
Enter or select one or all of the following basic search criteria.
Table 9-15 Appointment Search - Basic Search Criteria
| Search Field | Description |
|---|---|
|
Match option |
Check radio button All or Any. All - only appointments matching all entered search criteria are shown. Any - appointments matching each entered search criteria are shown. |
|
Appointment |
Enter, select or search for the appointment ID. |
|
Status |
Select the status of the appointment. The options are: Scheduled, Modified, Arrived, and Closed. |
|
Order No. |
Enter, select or search for the order number. |
|
Transfer |
Enter, select or search for a transfer. |
|
Allocation |
Enter, select or search for an allocation number. |
|
Store |
Enter, select or search for the store. |
|
Warehouse |
Enter, select or search for the warehouse. |
|
Internal Finisher |
Enter, select or search for the internal finisher.. |
|
External Finisher |
Enter, select or search for the external finisher. |
|
ASN |
Enter, select or search for an ASN number. |
You can also click the Saved Search drop down to select one of the saved sets of search criteria. Selecting a saved search will populate the criteria section with saved criteria. If the saved search is selected to run automatically then the search will be executed too.
You can also choose to manage and personalize the saved searches by clicking Personalize in the list. The Personalize Saved Searches window appears.
For more information about the Personalized Saved Search, see the Common User Interface Controls chapter, section "Manage Saved Searches".
Click Search. The appointments that match the search criteria are displayed in the Results section.
Click Reset to execute the saved search.
Click the Save.. button to save the current sets of search criteria as a Saved Search. The Create Saved Search window appears.
For more information on the Create Saved Search, see the Common User Interface Controls chapter, section "Create a Saved Search".
Click Done to close the window.
To search for an appointment through the advanced search criteria:
Enter or select one or all of the advanced search criteria.
To narrow down the search, use the list next to the search fields. For example, determine if the entered value should equal or not equal the search result.
Click on the Saved Search list to select one of the saved search criteria. Selecting a saved search populates the search section with the saved search criteria. If the run automatically function is enabled for the search, the search is executed immediately.
You can also personalize your saved searches by selecting Personalize. The Personalize Saved Searches window appears.
For more information about the Personalized Saved Search, see the Common User Interface Controls chapter, section "Manage Saved Searches".
Click Search. The appointments that match the search criteria are displayed in the Results section.
Click Reset to clear the search section and results.
Click Save As... to save the current search criteria. The Create Saved Search window appears.
For more information about how to save your search criteria, see the Common User Interface Controls chapter, section "Create a Saved Search".
Click Add Fields to add more fields for the advanced search. To remove the field from the search, click the x right next to the field.
Click Reorder to change the order of the available search fields. The Reorder Search Fields window appears.
Select the desired search field and use the up and down arrows to rearrange the order of the fields.
Click OK to confirm the new order of the fields and close the window.
Click Cancel to reject any changes and close the window.
Click Done to close the window.
The Results section lists the appointments that match the entered search criteria. Select an appointment to view the details.
In the Details section you can view the item on this appointment along with the appointed and received quantities based on the related document, purchase order or ASN.
Depending on your supplier agreements, you may be able to return product at that has not sold at the end of a season or based on other issues with the product. This is done using the Return to Vendor transaction in Merchandising.
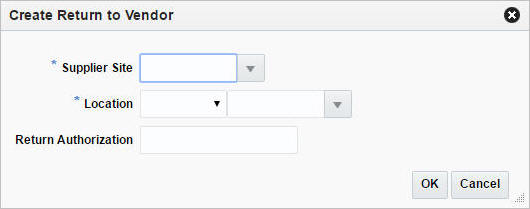
To create a return to vendor (RTV) order:
From the Tasks menu, select Inventory > Create Return to Vendor. The Create Return to Vendor pop-up appears.
In the Supplier Site field, enter, select or search for the supplier site. This field is a required field.
In the Location field, select the location type from the list. Possible options are Store and Warehouse. Then enter, select or search for the location. This field is a required field.
In the Return Authorization field, enter the supplier's return authorization number as necessary. This is a required field.
Then choose one of the following options.
Click OK to create the return to vendor order. The Return to Vendor page appears.
For more information about the RTV page, see the Manage Returns To Vendor section.
Click Cancel reject all entries and close the page.
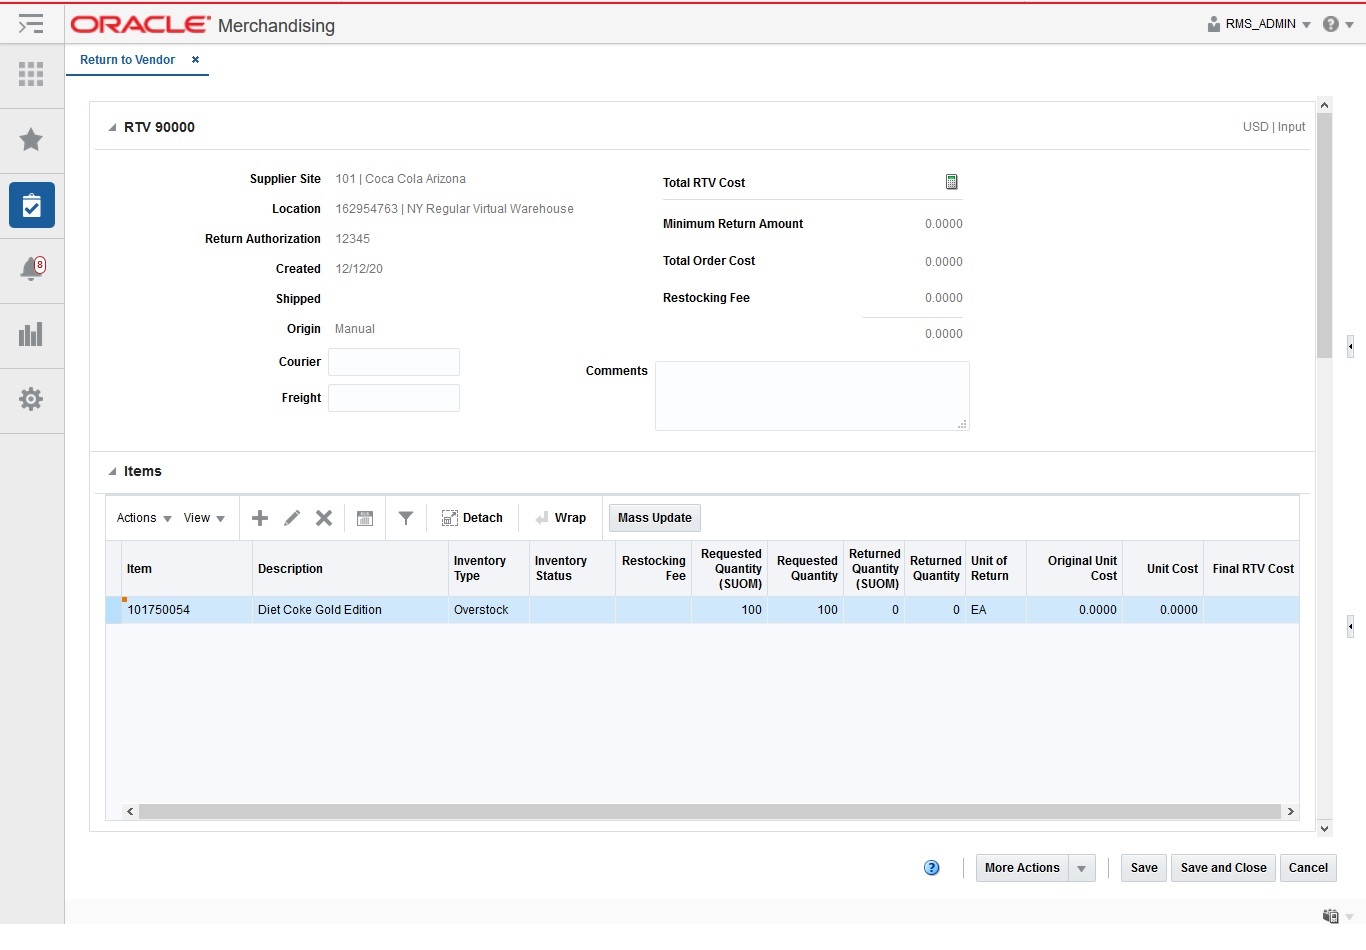
The Return to Vendor (RTV) page allows you to create and maintain RTV orders. When creating an RTV, the details that you entered in the pop-up are defaulted into the page. You can then add the items that will be returned.
Table 9-16 Return to Vendor Header - Fields and Description
| Fields | Description |
|---|---|
|
Title |
The title displays RTV ID to the top left of the head container. The Currency and the RTV status is displayed with a separator between them to the top right of the head container. |
|
Supplier Site |
This field displays the supplier ID and the supplier site. |
|
Location |
This field displays location ID. |
|
Return Authorization |
This field displays the supplier's return authorization number. |
|
Created |
This field displays the date on which the RTV was created. |
|
Shipped |
This field displays the date on which the RTV was shipped. The Shipped field will only be displayed once the RTV has been shipped. |
|
Origin |
This field specifies the source of the RTV is generation. Possible values can be Manual, Externally Generated, Mass Return Transfer, Customer Return, Transfer, Allocation and Ownership Change. |
|
Courier |
Enter the courier name, if applicable. |
|
Freight |
Enter the freight number. |
|
Total RTV Cost |
Click the Calculator icon to kick-off the RTV Cost recalculation. |
|
Minimum Return Amount |
The amount is displayed by default. |
|
Total Order Cost |
The amount is displayed by default. |
|
Restocking Fee |
The amount is displayed by default. |
|
Comments |
Enter any additional comments as necessary. |
|
Note: The Courier, Freight, and Comments fields are editable. The remaining fields are displayed based on the information entered in the Create Return to Vendor page. |
In the Items section you can add, edit or delete inventory information for the items on the RTV order.
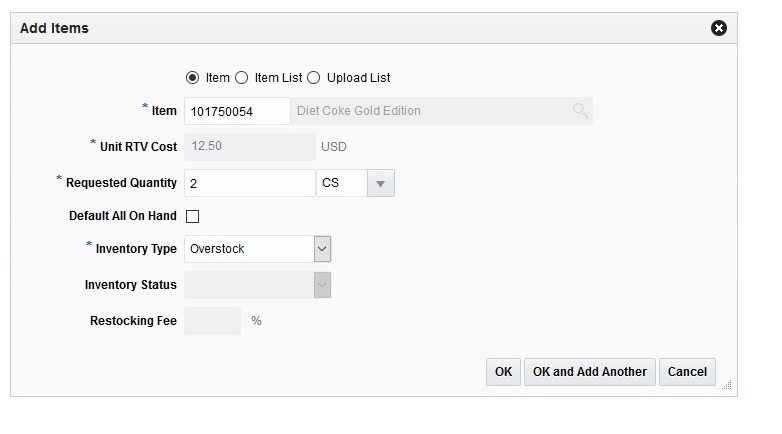
To add items:
In the Return to Vendor page, go to Items section.
Then select Actions > Add, or click the Add icon ![]() . The Add Items pop-up appears.
. The Add Items pop-up appears.
Select any one of the following options: Item, Item List.
Depending on you selection, the next fields will change to allow you select items by desired level.
Item – You can enter, select or search transaction level items to add to the RTV.
Item List – You can enter, select or search item list to add transaction level items contained therein to add to the RTV.
Upload List – This option allows you to upload data file containing items to add to the RTV. The file must be in csv format. There will be validations to ensure that only valid items are added.
In the Item field, enter or search for the item. This field is a required field.
In the Unit RTV Cost field, defaults to the item's unit RTV cost, adjust the cost as necessary.
This field is a required field when you add an item. This field is not available when you add an item list.
If you add a dynamic item list, the Rebuild checkbox is displayed. If you select the checkbox, the item list is rebuild by a background process, once you click OK.
In the Requested Quantity field, enter the return quantity. When you add an item, enter, select or search for the unit of the return quantity. This field is a required field.
You can check the Default All On Hand checkbox to return all the stock on hand value to the supplier.
In the Inventory Type fields, select either of the following inventory type: Overstock, Unavailable Inventory. This field is a required field.
In the Restocking fee % field, enter the percentage that is applied for restocking fees.
Then choose one of the following options.
Click OK to add the items to the table and close the pop-up.
Click OK and Add Another to add additional items.
Click Cancel to all entries and close the pop-up.
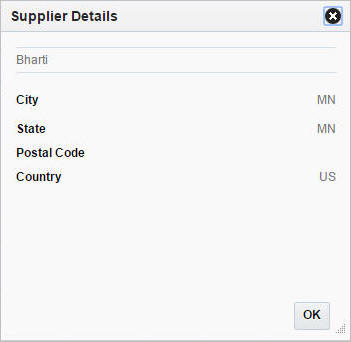
To view the supplier details:
From the Tasks menu, select Inventory > Manage Returns to Vendor. The RTV Search page appears.
Enter or select search criteria as desired to make the search more restrictive.
Click Search. The RTVs that match the search criteria are displayed in the Results section.
In the RTV column, click the RTV link, or mark a record and select Actions > Edi/View or use corresponding icons. The Return to Vendor page appears.
From the More Actions menu, click Supplier Details. The Supplier Details pop-up appears.
The Supplier Site details, City, State, Postal Code, Country are displayed.
Click OK to close the pop-up.
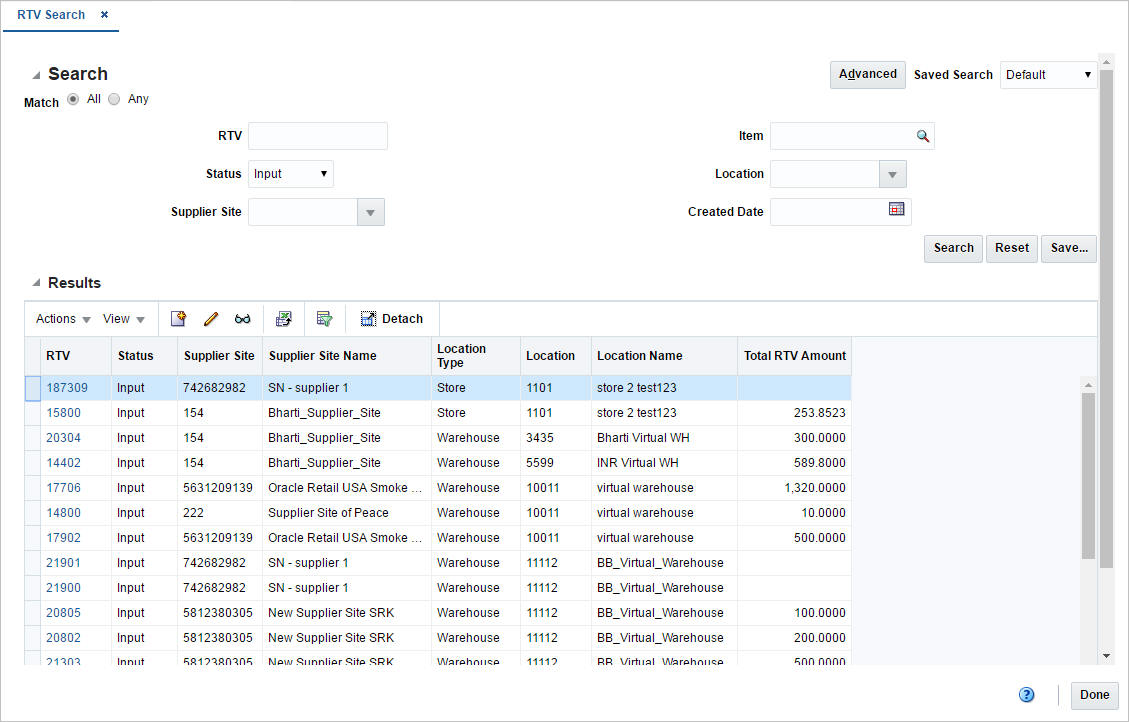
The Manage Returns to Vendor option opens the RTV Search page. Managing returns to vendor involves performing one or more of the following tasks:
Searching for returns to vendor
Editing returns to vendor
Viewing returns to vendor
You can access the RTV Search page from the Task menu, select Inventory > Manage Returns to Vendor. The RTV Search page appears.
In the RTV Search page you can search for returns to vendor by specifying various search criteria. You can choose to access returns to vendor in the search results in edit or view mode depending on security privileges. There are also options for creating a new return to vendor.
To search for an RTV:
From the Tasks menu, select Inventory > Manage Returns to Vendor. The RTV Search page appears.
You can search for a returns to vendor by providing search criteria in the search section. The criteria can be provided either in Basic or Advanced mode, depending on the requirement. Basic is the default mode when the search page is entered. Click Advanced to access the search panel in advanced mode. You can return to Basic mode by clicking Basic.
To search for an RTV order through the basic search criteria:
Enter or select one or all of the following basic search criteria.
Table 9-17 RTV Search - Basic Search Criteria
| Search Field | Description |
|---|---|
|
Match option |
Check radio button All or Any. All - only RTVs matching all entered search criteria are shown. Any - RTVs matching any of the entered search criteria are shown. |
|
RTV |
Enter the RTV number. |
|
Status |
Select the status of the return to vendor from the list. The options are: Input, Approved, In Progress, Shipped, and Cancelled. |
|
Supplier Site |
Enter, select or search for the supplier site. |
|
Item |
Enter or search for the item. |
|
Location |
Enter, select or search for the location. |
|
Created Date |
Enter the date the RTV is created or use the Calendar icon to select a date. |
|
Note: For more information about searches, see Search Screens in the Oracle® Retail Merchandising Do the Basics User Guide. |
Click Search. The RTV orders that match the search criteria are displayed in the Results section.
Click Reset to execute the saved search.
Click Done to close the page.
To search for an RTV through the advanced search criteria:
Enter or select one or all of the following advanced search criteria. Click Add Fields to add more fields for the advanced search. To remove the field from the search, click the x right next to the field.
|
Note: For more information about searches, see Search Screens in the Oracle® Retail Merchandising Do the Basics User Guide. |
To narrow down the search, use the list next to the search fields. For example, determine if the entered value should equal or not equal the search result.
Click Search. The RTV orders that match the search criteria are displayed in the Results section.
Click Reset to clear the search section and results.
Click Done to close the page.
To edit an RTV order, follow the steps listed below.
From the Tasks menu, select Inventory > Manage Returns to Vendor. The RTV Search page appears.
Enter or select search criteria as desired to make the search more restrictive.
In the Results section, select the return to vendor you want to edit.
Then select Actions > Edit, or click the Edit icon. ![]() . The Return to Vendor page appears in Edit mode.
. The Return to Vendor page appears in Edit mode.
Edit the RTV as necessary.
For more information about the Return to Vendor page, see the Manage Returns To Vendor section.
Save your changes.
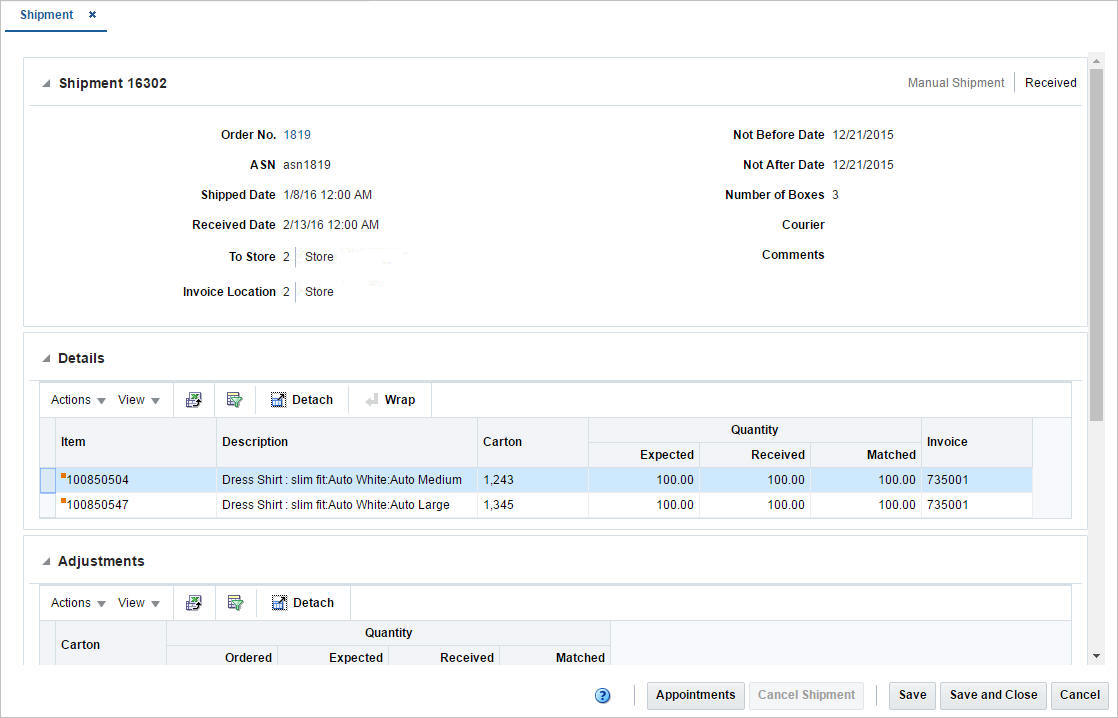
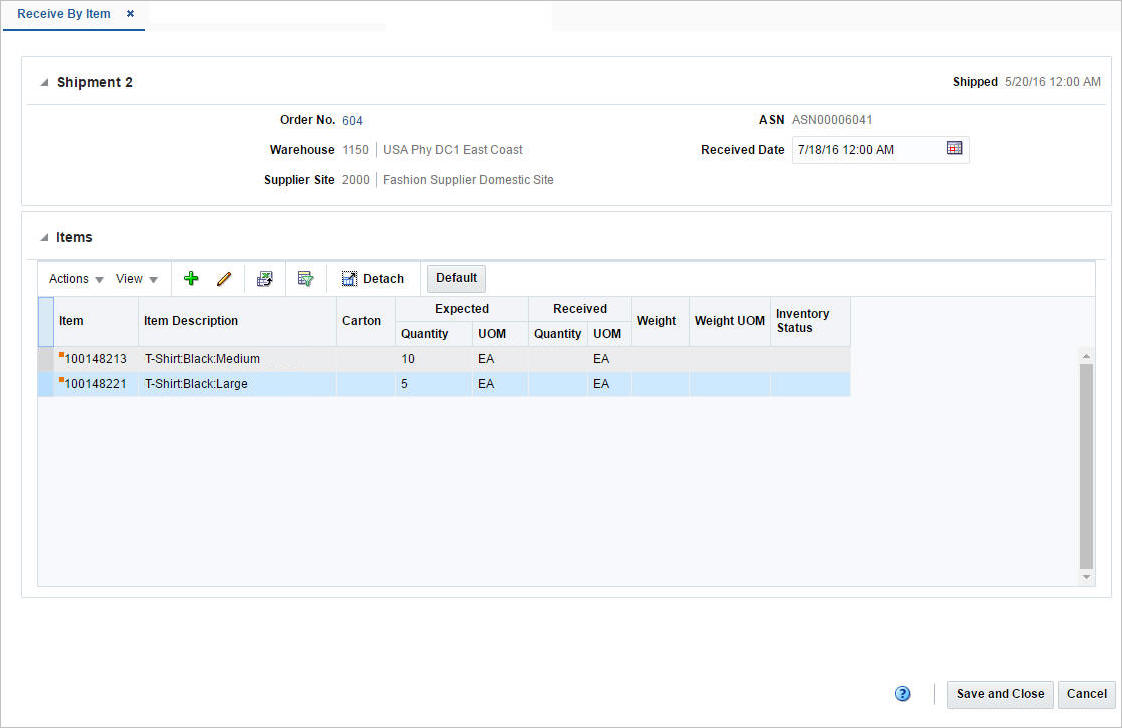
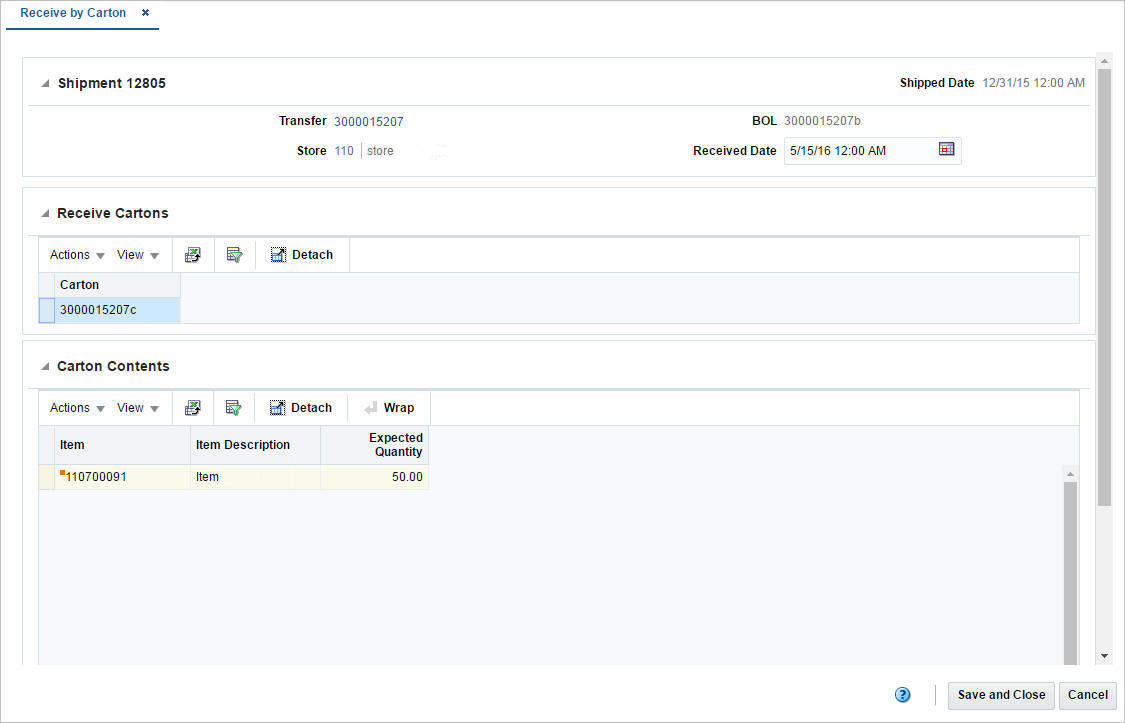
In Merchandising, shipments and receipts are recorded for purchase orders, transfers, and allocations, to manage their progress through the supply chain. In most cases, this activity occurs in another solution, so in Merchandising the shipment and receipt information is provided for visibility and reconciliation, as needed. However, in certain cases there may also be a reason for certain users in Merchandising to be able to ship or receive a purchase order, transfer, or allocation. These functions are available when the system options Allow Shipping / Receiving at Stores (for store sourced transfers) and/or Allow Shipping / Receiving at Warehouses (for warehouse sourced transfers) are set to Yes.
The Order Shipment page allows the manual creation of shipment records for a purchase order at item location level.
To create a shipment for the purchase order:
From the Tasks menu, select Inventory > Shipments and Receipts > Ship Purchase Order. The Order Shipment page appears.
In the Order field, enter the order number or select or search the order number. This field is a required field.
In the Ship Date field, enter a date or use the Calendar icon to select a date.
In the Not Before Date field, the Not Before Date for the Purchase Order will be displayed.
In the Not After Date field, the Not After Date of the Purchase Order will be displayed.
In the Invoice Location field, the invoice location for the purchase order will be displayed.
In the Location field, select the location type from the list. The options are: Store and Warehouse. Then enter, select or search for the location. This field is a required field.
In the ASN field, enter an ASN number. This field is a required field.
In the Number of Boxes field, enter the number of boxes.
In the Courier field, enter the courier name, if applicable.
In the Comments field, enter any additional comments as necessary.
Click Display Items to populate the table below with the items associated to the selected order/location.
In the Ship Quantity columns, enter the quantity you want to ship for each item.
|
Note: If a ship quantity is entered the item will be shipped, upon saving the data. If no ship quantity is entered the item will not be shipped. |
In the Carton columns, enter the cartons for each item.
To process the entered data, save your entries.
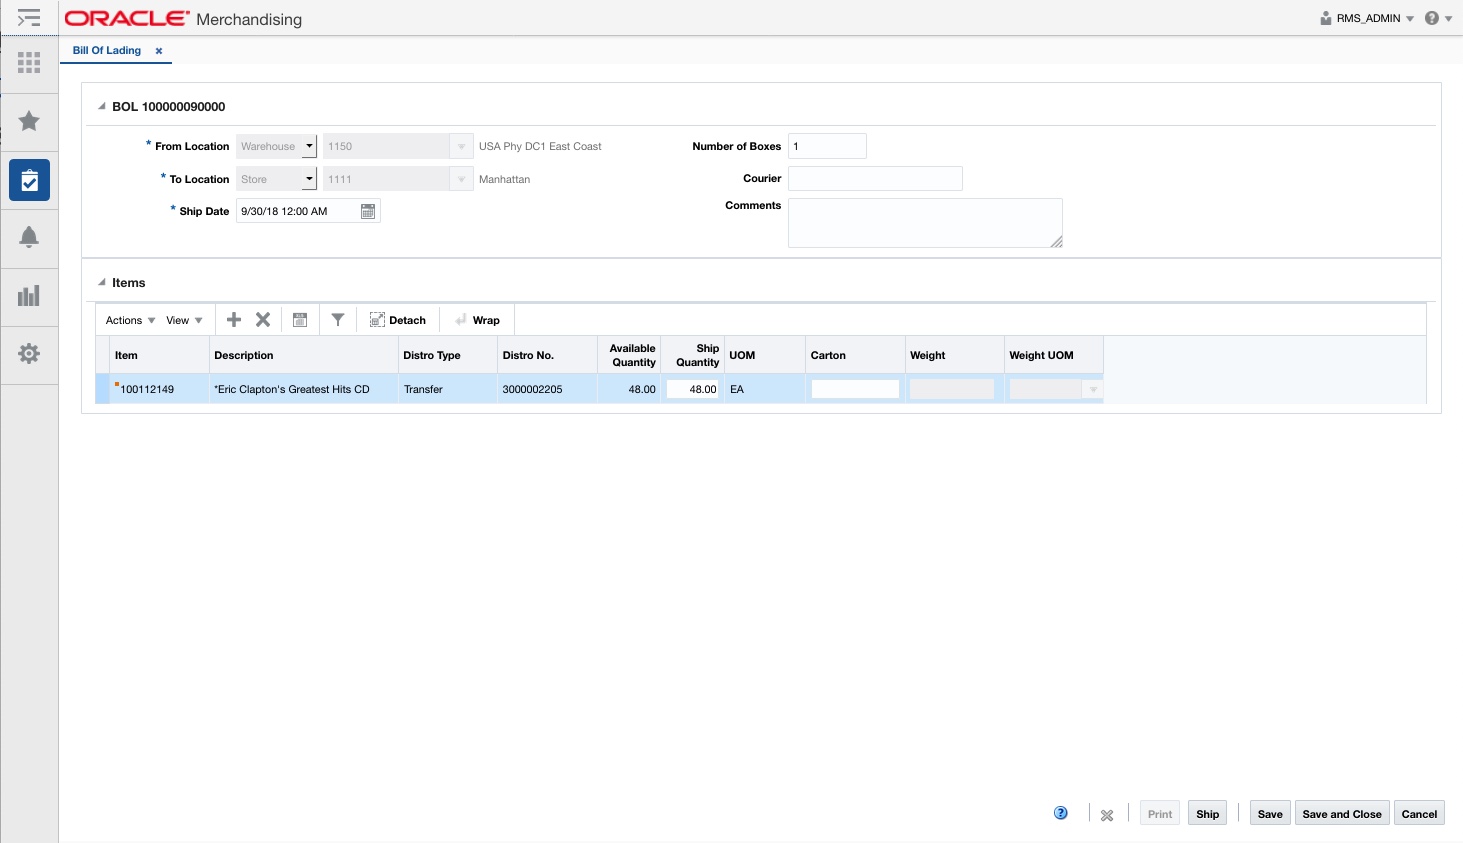
Transfers are normally shipped using a warehouse management system or a store inventory management system, not in Merchandising; however in some cases, there may be a reason to do so. This can be done in two ways:
The Transfers page allows you to ship the transfer as a single shipment with all quantity being shipped at once. See Ship a Transfer for additional information.
By creating a Bill of Lading (BOL), which allows you to create shipment that includes multiple transfers and allocations that are all shipping from the same location, to the same location.
|
Note: The option to ship transfers and allocations is available only when the system options Allow Shipping / Receiving at Stores (for store sourced transfers) and/or Allow Shipping / Receiving at Warehouses (for warehouse sourced transfers) are set to Yes. |
To create a bill of lading (BOL):
From the Tasks menu, select Inventory > Shipments and Receipts > Create Bill of Lading. The Bill of Lading page appears.
The top of the page displays the following fields:
Table 9-18 Bill of Lading Header - Fields and Description
| Fields | Description |
|---|---|
|
Title |
The title displays the Bill of Lading ID to the top left of the header. This field contains the MRT number by default. |
|
From Location |
Select the location type, either Store or Warehouse from the list. Then enter, select or search for the location. |
|
To Location |
Select the location type, either Store or the Warehouse from the list. Enter, select or search for the location. |
|
Ship Date |
Enter the ship date and time, or use the Calendar icon to select a date and a time. If you do not enter a time, the time defaults to midnight (00:00:00). |
|
Courier |
Enter the courier name, if applicable. |
|
Comments |
Enter any additional comments as necessary. |
In items section you can add or delete information for the items on the BOL.
Once you have added items, you can edit Ship Quantity and Carton column directly in the table.
To add items:
In the Bill of Lading page, go to the Items section.
From the Actions menu, select Add Items or click the Add Items icon ![]() . The Add Items pop-up appears.
. The Add Items pop-up appears.
Select any one of the following options: Transfer, Allocation.
In the Transfer/Allocation field, enter, select or search for transfer/allocation. The items of the transfer/allocation are displayed in the table below.
Then choose one of the following options.
Click OK to add the items to the Items section and close the pop-up.
Click OK and Add Another to add additional items.
Click Cancel to reject all entries and close the pop-up.
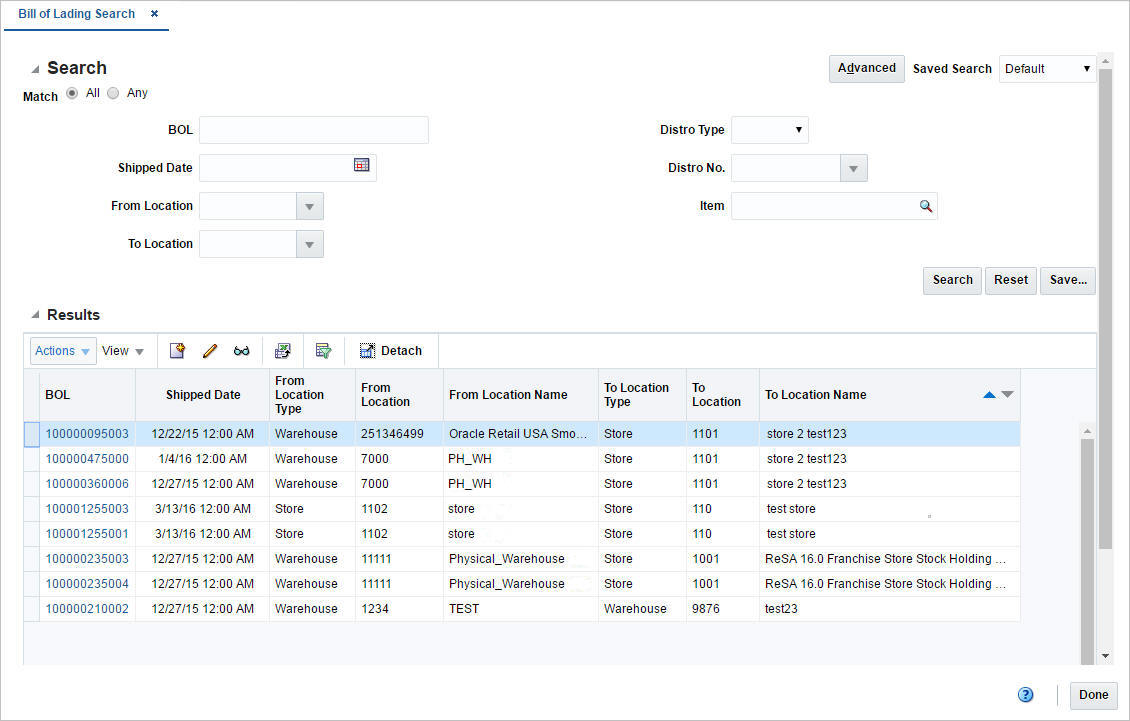
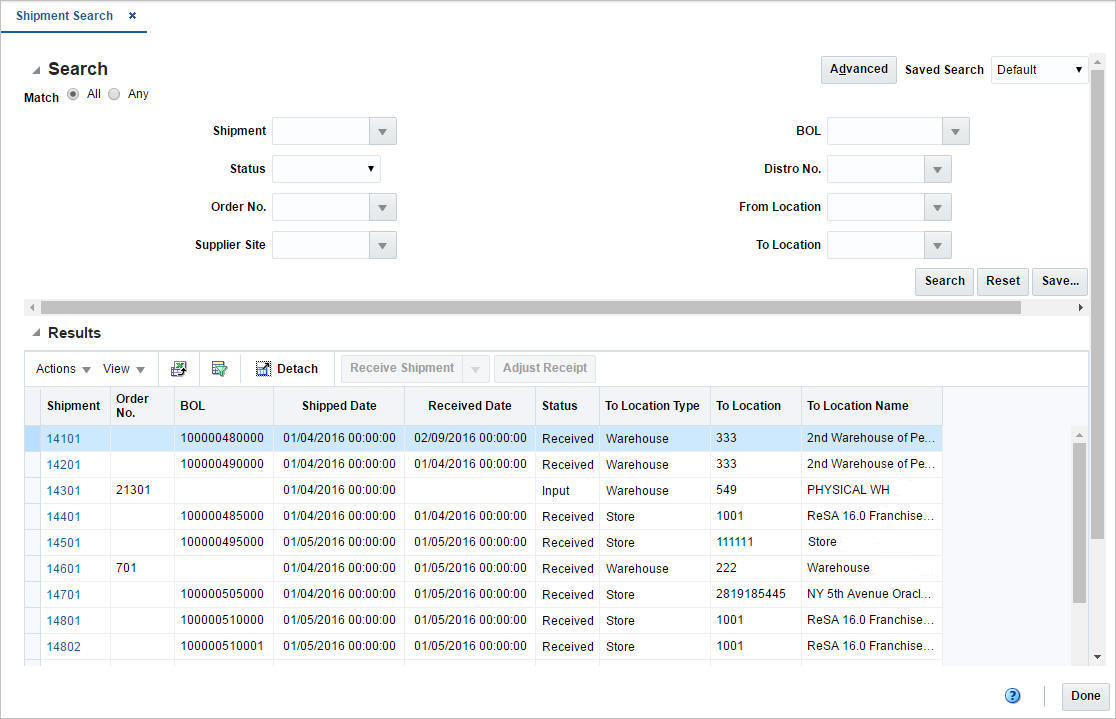
Managing bills of lading involves performing one or more of the following tasks:
Searching for BOL
Editing BOL
Viewing BOL
You can access the Bill of Lading Search page from the Task menu, select Inventory > Shipments and Receipts > Manage Bills of Lading. The Bill of Lading Search page appears.
In the Bill of Lading Search page you can search for bill of lading by specifying various search criteria. You can choose to access BOL in the search results in edit or view mode depending on security privileges. There are also options for creating a new bill of lading.
To search for a Bill of Lading:
From the Tasks menu, select Inventory > Shipments and Receipts > Manage Bills of Lading. The Bill of Lading Search page appears.
You can search for a BOL by providing search criteria in the search section. The criteria can be provided either in Basic or Advanced mode, depending on the requirement. Basic is the default mode when the search page is entered. Click Advanced to access the search panel in advanced mode. You can return to Basic mode by clicking Basic.
To search for a BOL through the basic search criteria:
Enter or select one or all of the following basic search criteria.
Table 9-19 Bill of Lading Search - Basic Search Criteria
| Fields | Description |
|---|---|
|
Match option |
Check radio button All or Any. All - only BOLs matching all entered search criteria are shown. Any - BOLs matching each entered search criteria are shown. |
|
BOL |
Enter the BOL description. |
|
Shipped Date |
Enter the date or click the calendar icon and select the date. |
|
From Location |
Enter the location or select and search the location and the ID. |
|
To Location |
Enter the location or select and search the location and the ID. |
|
Distro Type |
Select the distro type from the list. The options are: Transfer, Location. |
|
Distro No. |
Enter the distro number, select or search the distro number. |
|
Item |
Enter the item number of the item or search the item. |
|
Note: For more information about searches, see Search Screens in the Oracle® Retail Merchandising Do the Basics User Guide. |
Click Search. The bills of lading that match the search criteria are displayed in the Results section.
Click Reset to execute the saved search.
Click Done to close the page.
To search for a BOL through the advanced search criteria:
Enter or select one or all of the following advanced search criteria.
Table 9-20 Bill of Lading Search - Advanced Search Criteria
| Search Field | Description |
|---|---|
|
BOL |
Enter the BOL description. |
|
Shipped Date |
Enter the date or click the calendar icon and select the date. |
|
From Location |
Enter the location or select and search the location and the ID. |
|
To Location |
Enter the location or select and search the location and the ID. |
|
Distro Type |
Select the distro type from the list. The options are: Transfer, Location. |
|
Distro No. |
Enter the distro number, select or search the distro number. |
|
Item |
Enter the item number of the item or search the item. |
|
Item Description |
Enter the item description of the item. |
|
Note: For more information about searches, see Search Screens in the Oracle® Retail Merchandising Do the Basics User Guide. |
To narrow down the search, use the list next to the search fields. For example, determine if the entered value should equal or not equal the search result.
Click Search. The bills of lading that match the search criteria are displayed in the Results section.
Click Reset to clear the search section and results.
Click Add Fields to add more fields for the advanced search. To remove the field from the search, click the x right next to the field.
Click Done to close the page.
To edit a BOL:
From the Tasks menu, select Inventory > Shipments and Receipts > Manage Bills of Lading. The Bill of Lading Search page appears.
Select the BOL you want to edit.
From the Actions menu, select Edit or click the Edit icon. ![]() . The Bill of Lading page appears.
. The Bill of Lading page appears.
You can edit the Ship Quantity and Carton column directly in the table.
For more information on about the Bill of Lading page, see the Create a Bill of Lading section.
Make the necessary changes and save your changes.
Receipts for purchase orders, transfers, and allocations are normally done using a warehouse management system or a store inventory management system, not in Merchandising; however in some cases, there may be a reason to do so. When this is required, Merchandising provides screens where you can.
Receive by Item
Receive by Carton
Adjust Receipts, for purchase orders only
|
Note: The option to receive POs, transfers, and allocations is available only when the system options Allow Shipping / Receiving at Stores (for store sourced transfers) and/or Allow Shipping / Receiving at Warehouses (for warehouse sourced transfers) are set to Yes. |
The Shipment Search page allows you to enter criteria in order to search for shipments and view the results of the search. Additionally you can receive and adjust shipments in this page.
You can access the Shipment Search page from the Task menu, select Inventory > Shipments and Receipts > Shipments. The Shipment Search page appears.
To search for a shipment:
From the Task menu, select Inventory > Shipments and Receipts > Shipments. The Shipment Search page appears.
You can search for a shipment using basic or advanced search criteria, depending on the requirement. The basic mode is the default search mode.
Click Advanced to access the search section in advanced mode.
Click Basic to return to the basic mode.
To search for a shipment using basic search criteria:
Enter, select or search for one or all of the following basic search criteria.
Table 9-21 Shipment Search - Basic Search Criteria and Description
| Fields | Description |
|---|---|
|
Match option |
Check radio button All or Any. All - only shipments matching all entered search criteria are shown. Any - shipments matching any of the entered search criteria are shown. |
|
Shipment |
Enter, select or search for the shipment. |
|
Status |
Select the status from the list. |
|
Order No. |
Enter, select or search for the order number. |
|
Supplier Site |
Enter, select or search for the supplier site. |
|
BLO |
Enter, select or search for the bill of lading. |
|
Distro No. |
Enter, select or search for the distro number. |
|
From Location |
Enter, select or search for the from location. |
|
To Location |
Enter, select or search for the to location. |
|
Note: For more information about searches, see Search Screens in the Oracle® Retail Merchandising Do the Basics User Guide. |
Click Search. The shipments that match the search criteria are displayed in the Results section.
Click Reset to clear the search section and results.
Click Done to close the page.
To search for a shipment using advanced search criteria:
To search using advanced search criteria, enter or select one or all of the advanced search criteria.
|
Note: For more information about searches, see Search Screens in the Oracle® Retail Merchandising Do the Basics User Guide. |
To narrow down the search, use the list next to the search fields. For example, determine if the entered value should equal or not equal the search result.
Click Search. The shipments that match the search criteria are displayed in the Results section.
Click Reset to clear the search section and results.
Click Add Fields to add more fields for the advanced search. To remove the field from the search, click the x right next to the field.
Click Done to close the page.
The Shipment page allows you to view the details of a shipment for a purchase order, a transfer or allocation. You can navigate to additional pages to view details regarding a selected item and details regarding the purchase order, appointments and transfers associated with the shipment. Receipt adjustment details are also be displayed in the Shipment page.
You can cancel shipments in this page, but this option is only available for purchase order (PO) shipments. The option to cancel a shipment is not available for transfer or allocation (BOL) shipments.
You can access the page:
From the Tasks menu, select Inventory > Shipments and Receipts > Shipments. The Shipment Search page appears.
Enter or select search criteria as desired to make the search more restrictive.
Click Search. The shipments that match the search criteria are displayed in the Results section.
In the Shipment column, click the shipment ID link, or mark a record and select Actions > Edit, or use the Edit icon ![]() . The Shipment page appears.
. The Shipment page appears.
The Shipment section displays the shipment ID. In addition the origin and the status of the shipment are displayed in the top right corner of the section. The section varies, depending on whether you view a shipment for a purchase order (PO) or allocation (BOL).
When you view a PO shipment, this section displays the following fields.
Order No.
The Order No. contains a link that opens the Order page in view mode. For more information about the Order page, see Define/Enter a Purchase Order in the Oracle® Retail Merchandising Purchase Orders and Contracts User Guide.
ASN
Shipped Date
Received Date
The Received Date field is only visible if the shipment has already been received.
To Store/To Warehouse
The label for the To Store/To Warehouse field is set, depending on whether the destination location is a store or warehouse.
Invoice Location
Not Before/Not After Date
Number of Boxes
Courier
Comments
When you view an allocation (BOL) shipment, this section displays the following fields.
BOL
Shipped Date
Received Date
The Received Date field is only visible if the shipment has already been received.
To Store/To Warehouse
The label for the To Store/To Warehouse field is set, depending on whether the destination location is a store or warehouse.
From Store/From Warehouse
The label for the From Store/From Warehouse field is set, depending on whether the destination location is a store or warehouse.
Number of Boxes
Courier
Comments
The Details section displays receipt details. The fields displayed in this section vary, depending whether you view a purchase order or allocation shipment.
When you view a PO shipment, the following are displayed by default:
Item
Description
Carton
Invoice
Quantity - Expected, Received, Matched
The Shipment page only allows users to view parent shipments online. It is expected that the shipment quantities displayed for the parent shipment are an aggregate of the parent shipment and child shipment quantities.
When you view an allocation (BOL) shipment, the following fields are displayed by default:
Item
Description
Distro No.
Carton
Tampered
Quantity - Expected, Received
Inventory Status
The Distro No. column can contain either an Allocation or Transfer ID.
If the column contains a Transfer ID you can open the Transfer page in view mode by clicking on the Transfer ID link. For more information about the Transfer page, see the Transfers section.
If the column contains an Allocation ID, the link is disabled.
The Receive by Item page allows you to receive items within a shipment. The receipt of the shipment can be for a purchase order, transfer or allocation.
This section contains the shipment details. The title of section displays the shipment number and the shipped date. The shipped date and time is displayed at the top right corner of the section.
The section varies based on the type of shipment receipt.
When you receive a purchase order shipment, the section displays the following fields.
Order No.
The Order No. field contains a link that opens the Order page in view mode. For more information about the Order page, see Define/Enter a Purchase Order in the Oracle® Retail Merchandising Purchase Orders and Contracts User Guide.
Warehouse/Store
Supplier Site
ASN
Received Date
Enter the date and time of receipt or use the Calendar icon to select a date and time.
When you receive a transfer shipment, the section displays the following fields.
Transfer
The Transfer field contains link that opens the Transfer page in view mode. For more information about the Transfer page, see the Transfer Details section.
Warehouse/Store
BOL
Received Date
Enter the date and time of receipt or use the Calendar icon to select a date and time.
When you receive a allocation (BOL) shipment, the section displays the following fields.
Allocation
Warehouse/Store
BOL
Received Date
Enter the date and time of receipt or use the Calendar icon to select a date and time.
To receive shipments by item, follow the steps below.
From the Tasks menu, select Inventory > Shipments and Receipts > Shipments. The Shipment Search page appears.
Enter or select search criteria as desired to make the search more restrictive.
Click Search. The shipments that match the search criteria are displayed in the Results section.
Select a record in the Results table.
Then select Actions > Receive Shipment > by Item, or click the Receive Shipment button > by Item. The Receive By Item page appears.
In the Shipment section, enter the receive date and time or use the Calendar icon to select a date and time.
Then select an item in the table.
Select Actions > Edit, or use the Edit icon ![]() . The Receive Item page appears. The item, the expected quantity and standard UOM are displayed.
. The Receive Item page appears. The item, the expected quantity and standard UOM are displayed.
In the Receipt Quantity field, enter the quantity. This field is a required field.
Then enter, select or search for the unit of measure in which the receipt quantity has been entered.
For catch weight items, enter the receipt weight.
In the Inventory Status field, select the inventory status from the list.
Then choose one of the following options.
Click OK to receive the current item and close the page.
Click OK and Receive Another to receive additional items.
Click Cancel to reject all entries and close the page.
In the Receive By Item page, save your entries.
|
Note: If you want to default the expected quantity as received for all items in the table, select the Default button. |
You can add items to a shipment you want to receive.
In the Items section, select Actions > Add, or use the Add icon ![]() . The Add Item page appears.
. The Add Item page appears.
In the Item field, enter or search for an item. This field is a required field.
In the Receipt Quantity field, enter the received quantity. Then select the unit of measure for the item.
For catch weight items, enter the received weight.
In the Inventory Status field, select the inventory status from the list.
Then choose one of the following options.
Click OK to add the current item and close the page.
Click OK and Add Another to add additional items.
Click Cancel to reject all entries and close the page.
The Receive By Carton page allows you to receive shipments by carton with in a shipment. The receipt of the shipment can be from a purchase order, transfer or allocation
This section contains the shipment details. The title of section displays the shipment number and the shipped date. The shipped date and time is displayed at the top right corner of the section.
The section varies based on the type of shipment receipt.
When you receive a purchase order shipment, the section displays the following fields.
Order No.
The Order No. field contains a link that opens the Order page in view mode. For more information about the Order page, see Define/Enter a Purchase Order in the Oracle® Retail Merchandising Purchase Orders and Contracts User Guide.
Warehouse/Store
Supplier Site
ASN
Received Date
Enter the date and time of receipt or use the Calendar icon to select a date and time.
When you receive a transfer shipment, the section displays the following fields.
Transfer
The Transfer field contains link that opens the Transfer page in view mode. For more information about the Transfer page, see the Transfer Details section.
Warehouse/Store
BOL
Received Date
Enter the date and time of receipt or use the Calendar icon to select a date and time.
When you receive a allocation (BOL) shipment, the section displays the following fields.
Allocation
Warehouse/Store
BOL
Received Date
Enter the date and time of receipt or use the Calendar icon to select a date and time.
To receive shipments by carton, follow the steps below.
From the Tasks menu, select Inventory > Shipments and Receipts > Shipments. The Shipment Search page appears.
Enter or select search criteria as desired to make the search more restrictive.
Click Search. The shipments that match the search criteria are displayed in the Results section.
Select a record in the Results table.
Then select Actions > Receive Shipment > by Carton, or click the Receive Shipment button > by Carton. The Receive By Carton page appears.
In the Shipment section, enter the receive date and time or use the Calendar icon to select a date and time.
In the Receive Carton section, select the cartons you want to receive.
Then click Save and Close.
The Receiver Unit Adjustment page allows you to adjust the number of units already received by shipment or order.
The unit adjustment is performed at item level that exists in a shipment.
The title of section displays the shipment number. The origin and status of the shipment are displayed at the top right corner of the section. Additionally the Shipment section displays shipment details such as order number, supplier site, location type.
The Adjust Units section displays the item, item description, carton and quantity information.
You can update the quantity for an item directly in the table. Enter the new quantity in the Corrected column.
To adjust the units of a shipment you have already received, follow the steps below.
From the Tasks menu, select Inventory > Shipments and Receipts > Shipments. The Shipment Search page appears.
Enter or select search criteria as desired to make the search more restrictive.
Click Search. The shipments that match the search criteria are displayed in the Results section.
Select a record in the Results table.
Then select Actions > Adjust Receipt, or click the Adjust Receipt button. The Receipt Adjustment by Units page appears. The shipment details and received items are displayed.
In the Corrected column, enter the revised number of units received for each item. The Adjustment column displays the adjusted quantity.
Then save your adjustments.
The Stock Order Reconciliation page allows you to edit and view shipment receipts where the item quantity does not match the actual quantity received. All open stock orders where the shipped quantity could not be reconciled to the received quantity appear in the results. Once you have searched for receipts you can create adjustments to account for the differences.
To search for a shipment to reconcile:
From the Task menu, select Inventory > Transfers > Stock Order Reconciliation. The Stock Order Reconciliation page appears.
Enter, select or search for one or all of the following search criteria.
Table 9-22 Stock Order Reconciliation Search - Basic Search Criteria and Description
| Fields | Description |
|---|---|
|
BOL |
Enter, select or search for the BOL. |
|
Carton |
Enter, select or search for the carton. |
|
Shipped Date |
Enter the shipped date or use the Calendar icon to select a date.. |
|
Received Date |
Enter a received date or use the Calendar icon to select a date. |
|
From Location |
Enter, select or search for the from location. |
|
To Location |
Enter, select or search for the to location. |
|
Distro Type |
Select the distro type from the list. |
|
Distro No. |
Enter, select or search for the Distro No. |
Click Search. The shipment that match the search criteria are displayed in the Stock Order Exceptions and Carton Level Dispositions section.
Click Reset to clear the search section and results.
All open stock orders where the shipped quantity could not be reconciled to the received quantity appear in this section. The over/short quantity and the cost information are displayed.
The Shipment column contains a link which opens the Shipments page, where can view the Shipment Details. For more information about this page, see the Shipment section.
In the Adjustment Type column, select an adjustment type from the list.
If you have several shipments that need reconciliation, these can be mass updated through a spreadsheet upload. To do this, you'll first need to download the template to use for this process. This can be accessed in the task list under Data Loading > Blank Template. Select the template type of Stock Order Reconciliation and the template Stock Order Reconciliation and then click Download. When prompted, choose to either open the file or save it locally and open in the spreadsheet application of your choice.
|
Note: This template cannot be configured. |
Then, in the blank spreadsheet, enter the shipment ID to be reconciled, select a type (Allocation, BOL, or Transfer) and enter an ID that corresponds to the type. The ID will be validated against the type selected. Finally, select an adjustment type. Valid values are Forced Receipt, Freight Claim, Receiving Location, or Shipping Location. Repeat for all the shipments that require reconciliation.
When all the details have been added, save the spreadsheet and then select the Upload Stock Order Reconciliation option under Inventory > Transfers. Select the Stock Order Reconciliation Template and then click the Browse… button to select the file you saved with the shipment details. Finally, click Upload to process the shipment details.
If there are any errors that are encountered during the processing of the updates, you will receive a notification. You can also view the status of the updates in the Review Status page, which can be accessed under the Data Loading in the task list.
Inventory adjustments can be made online or they can be received from an external system, such as a warehouse management system. There are two types of adjustments that can be made to inventory:
Stock on Hand: The quantity of stock on hand, or salable stock, is increased or decreased. Both the quantity and value of the stock on hand are adjusted in the stock ledger.
Unavailable Inventory: The quantity of stock on hand does not change, but the quantity of unavailable stock, or non-salable stock, is increased or decreased. In the stock ledger, the adjustment is recorded as a transfer between stock on hand and unavailable inventory. No adjustment is made to the stock value.
Prior to using the inventory adjustment functionality, status types and reasons for adjustments must be set up in the system. The Total Stock on Hand status type is reserved for adjustments made to salable goods. Any additional status types are user-defined and are reserved for adjustments made to non-salable goods. The user-defined status types indicate why the goods are non-salable. When adjusting total stock on hand, you must select a reason for the adjustment. The reason indicates why the total stock on hand must be adjusted.
Inventory Adjustments covers the following sections:
For effective management of inventory, Merchandising provides the option to classify unavailable inventory by user defined inventory buckets called inventory status types. This facilitates segregation of inventory that is not available to sell into specific purpose buckets such as customer returns or damaged. Inventory status types are mapped to inventory status codes, which are used in the stores and warehouses, in order to manage inventory updates sent from those solutions in Merchandising. The values that you enter for this in Merchandising should be coordinated with your store and warehouse inventory management solutions.
While creating inventory adjustments, users will also need to specify a reason for carrying out such adjustments. These inventory adjustment reason codes are also configurable and each reason code can further be specified to affect cost of goods sold or not. This may be useful if you use budgeted shrink, but wish to post some known shrinkage to the stock ledger separately.
Additionally, there are some situations where Merchandising creates an inventory adjustment automatically. For example, when transfers are reconciled or when the units on a stock count are approved. You can configure which of the reason codes you've created should be used by each of these transaction types.
These statuses, codes, reasons, and reason code configurations are created and maintained in Merchandising through spreadsheet upload and download processes. These processes are accessed through the main Merchandising task list under Foundation Data > Download Foundation Data and Foundation Data > Upload Foundation Data.
To add or update inventory statuses, inventory codes, and reason codes, you will select the template type of Inventory from the Download Data screen and then the template Inventory Status and Adjustment Reasons. Click the Download button and when prompted, choose to either open the .ods file that is generated or save the file and open it separately in the spreadsheet application of your choice. Once opened, there will be seven sheets that can be modified - Inventory Status Types, Inventory Status Type Trans, Inventory Status Codes, Inventory Status Code Trans, Inventory Adjustment Reasons, Inventory Adjustment Reason Tran, and Inventory Adjustment Tran Data.
|
Note: Inventory statuses, codes, and reasons cannot be deleted. If you wish to not have certain values displayed, then the Used flag should be set to No for the status, code, or reason. Additionally, the inventory adjustment reason code configuration cannot be added or deleted, only updated. |
Add an Inventory Status Type
To add a new inventory status type, start in the Inventory Status Types tab, and, in a blank line in the template, select the action type of Create. Next enter a unique numeric status type code (up to 2 characters) and the description for the status type in the primary language (as defined in the Merchandising system options) of up to 120 characters. Next, the Used column indicates whether or not you are using this status actively in the system; valid values are Yes and No. If left blank, Yes is taken as default.
Next, if you wish to add translations for the status type in languages other than the primary language, this can be done in the Inventory Status Type Trans tab. Navigate to a blank row and select the action type of Create and the language in which the translated description will be entered. Then, enter the status code for which the translation applies. Finally, enter the translated description. The translated description can also be up to 120 characters long. This is an optional step.
Add an Inventory Status Code
To add a new inventory status code, start in the Inventory Status Codes tab, and, in a blank line in the template, select the action type of Create. Next enter a unique inventory status code (up to 10 characters). Next, optionally enter the inventory status type associated with this inventory status code in the Inventory Status column. If entered, then when an inventory update is made using this code and received from the store or warehouse, Merchandising will place the inventory in the indicated status. If no status type is assigned, then inventory will not be assigned to a non-sellable status. Then enter the description for the status code in the primary language (as defined in the Merchandising system options) of up to 120 characters. Next, the Used column indicates whether or not you are using this status code actively in the system; valid values are Yes and No. If left blank, Yes is taken as default.
If you wish to add translations for the status code in languages other than the primary language, this can be done in the Inventory Status Code Trans tab. Navigate to a blank row and select the action type of Create and the language in which the translated description will be entered. Then, enter the inventory status and status code combination for which the translation applies. Finally, enter the translated description. The translated description can also be up to 120 characters long. This is an optional step.
Add an Inventory Adjustment Reason
To add a new inventory adjustment reason, start in the Inventory Adjustment Reasons tab, and, in a blank line in the template, select the action type of Create. Next enter a unique numeric inventory adjustment reason code (up to 4 characters) and the description for the adjustment reason code in the primary language (as defined in the Merchandising system options) of up to 120 characters. Next, specify if the inventory adjustments carried out with this reason code will affect cost of goods sold or not. Possible values are Yes and No. Lastly, the Used column indicates whether or not you are using this reason actively in the system; valid values are Yes and No. If left blank, Yes is taken as default.
If you wish to add translations for the adjustment reason code in languages other than the primary language, this can be done in the Inventory Adjustment Reason Trans tab. Navigate to a blank row and select the action type of Create and the language in which the translated description will be entered. Then, enter the reason code combination for which the translation applies. Finally, enter the translated description. The translated description can also be up to 120 characters long. This is an optional step.
Update Inventory Status Type or Code or Inventory Adjustment Reason
If you would like to update any details for existing inventory status type or code or inventory adjustment reason, a similar process will be followed as that described above for creating new status type, code or adjustment reason respectively. First, download the spreadsheet, and then navigate to the tab where you would like to make your updates.
The following columns can be updated in each tab:
Inventory Status Types - Description, Used
Inventory Status Type Trans - Description
Inventory Status Codes - Inventory Status, Description, Used
Inventory Status Code Trans - Description
Inventory Adjustment Reasons - Description, Used
Inventory Adjustment Reason Tran - Description
In the tab where you are going to make your updates, select the action type of Update, and then correct the value in the spreadsheet.
Update Inventory Adjustment Tran Data
If you would like to update the reason codes used for different transaction types, a similar process will be followed as that described above for creating updating status types, codes and adjustment reasons respectively. First, download the spreadsheet, and then navigate to the tab where you would like to make your updates. In the row where you are making your update, select an action type of Update and then make the changes as needed. The transaction types that can have reason codes configured for them are:
Wastage Adjustment
Stock Count Unit Variance
Inventory Adjustment by Item
Inventory Adjustment by Location
Item Transformation at Finisher
Inter Company Transfer
Transfer Overage Sending Location
Transfer Overage Receiving Location
Transfer Short Sending Location
Transfer Short Receiving Location
Transfer Short/Close Sending Location
Transfer Short/Close Receiving Location
Late Posting: Sale
Late Posting: Return
Late Posting: Transfer Out Sending Location
Late Posting: Transfer Receipt
Late Posting: PO Receipt
Late Posting: RTV
Late Posting: Inventory Adjustment
Customer Order Return Without Inventory
Wholesale Franchise Destroy On Site Return
For each of the above transaction types a different reason code can be configured for positive and negative adjustments, as desired. The following can be updated for each transaction type:
Reason - enter the reason code that corresponds to the transaction type and whether the adjustment is a positive or negative adjustment.
Used Ind - this indicates whether or not this configuration row should be used. If not used, then any transactions of this type written will not have a reason code associated to it.
In the tab where you are going to make your updates, select the action type of Update, and then correct the value in the spreadsheet.
Uploading Changes
For all actions defined above, once all the updates have been made to the data in the spreadsheet, save the file and close it. Then, return to the Merchandising screens and select Foundation Data > Upload Foundation Data from the main task list. In this screen, select the template type Inventory and the template Inventory Status and Adjustment Reasons. This will generate a process description automatically, but this can be updated if desired. Lastly, select the Browse button and navigate to the directory where you saved the updated spreadsheet.
To review the status of the upload and check whether any errors occurred, select the Foundation Data > Review Status task from the main task list.
See also Download/Upload Data from Spreadsheets and View Data Loading Status.
In the The Inventory Adjustment by Item page you can manually adjust the inventory of an item at one or more locations.
To adjust inventory by item:
From the Tasks menu, select Inventory > Inventory Adjustments > By Item. The Inventory Adjustment by Item page appears.
In the Item field, enter the item number or search for the item.
Select one of the following options:
Total Stock on Hand
Unavailable Stock
If you select Unavailable Stock, the Inventory Status field enables.
In the Inventory Status field, select an inventory status from the list.
The table lists the locations impacted and the quantity adjusted at each location. You can add, edit or delete inventory adjustments in this table.
You can edit the Adjustment Quantity and the Reason column directly in the table.
In the Location field, select the location type from the list. Then enter, select or search for the location. This field is a required field.
The Stock on Hand and Unavailable quantity are displayed. The Unavailable quantity only displays, if you select Unavailable stock in the header.
In the Adjustment Quantity field, enter the quantity you want to adjust. This field is a required field.
The unit of adjustment defaults to the standard unit of measure for the item. Change the value, if necessary.
|
Note: Adjustments for pack items can only be made at warehouses. |
If you are adjusting the total stock on hand, the reason code is required for the adjustment. The reason indicates why the total stock on hand is being adjusted.
Then choose one of the following options.
Click OK to add the inventory adjustment to the table and close the pop-up.
Click OK and Add Another to add additional inventory adjustments.
Click Cancel to reject all entries and close the pop-up.
To edit an inventory adjustment, follow the steps below.
Select a record in the table.
Then select Actions > Edit, or use the Edit icon. The Edit Inventory Adjustment pop-up appears.
Edit the adjustment quantity, the unit of adjustment and/or the reason code for the adjustment as necessary.
Then choose one of the following options.
Click OK to add your changes to the table and close the pop-up.
Click Cancel to reject all entries and close the pop-up.
In the Inventory Adjustment by Location page you can manually adjust the inventory of one or multiple items at a location.
To adjust inventory by location:
From the Tasks menu, select Inventory > Inventory Adjustments > By Location. The Inventory Adjustment by Location page appears.
In the Location field, select the location type from the list. Then enter, select or search for the location.
Select one of the following options:
Total Stock on Hand
Unavailable Stock
If you select Unavailable Stock, the Inventory Status field enables.
In the Inventory Status field, select an inventory status from the list.
The table lists the inventory adjustments. You can add, edit or delete inventory adjustments in this table.
You can edit the Adjustment Quantity and the Reason column directly in the table.
To add an inventory adjustment, follow the steps below.
In the table select Actions > Add, or use the Add icon. The Add Inventory Adjustment page appears.
In the Item field, enter or search for the item. This field is a required field.
The Stock on Hand and Unavailable quantity are displayed. The Unavailable quantity only displays, if you select Unavailable stock in the header.
In the Adjustment Quantity field, enter the quantity you want to adjust. This field is a required field.
The unit of adjustment defaults to the standard unit of measure for the item. Change the value, if necessary.
|
Note: Adjustments for pack items can only be made at warehouses. |
If you are adjusting the total stock on hand, the reason code is required for the adjustment. The reason indicates why the total stock on hand is being adjusted.
Then choose one of the following options.
Click OK to add the inventory adjustment to the table and close the pop-up.
Click OK and Add Another to add additional inventory adjustments.
Click Cancel to reject all entries and close the pop-up.
To edit an inventory adjustment by location, follow the steps below.
Select a record in the table.
Then select Actions > Edit, or use the Edit icon. The Edit Inventory Adjustment pop-up appears.
Edit the adjustment quantity, the unit of adjustment and/or the reason code for the adjustment as necessary.
Then choose one of the following options.
Click OK to add your changes to the table and close the pop-up.
Click Cancel to reject all entries and close the pop-up.
The Break Sellable Pack page allows you to break orderable packs down to their component items or inner pack levels. The inventory of packs and component items is adjusted accordingly. The number of packs is decremented and the number of inner packs or items is incremented. Pack items are inventoried at the warehouse level.
From the Tasks menu, select Inventory > Inventory Adjustments > Break Sellable Pack. The Break Sellable Pack page appears.
In the Pack field, enter the number of the pack item or select or search the pack.
In the Warehouse field, enter select or search for the warehouse.
The items that make up the pack appear in the table below. In addition the Pack Stock on Hand Before quantity, and Item Stock on Hand Before quantity is populated so you can view the quantities before making any adjustments. The After field in the Pack Stock section displays the value of stock on hand after the pack is broken down
If the selected pack contains an inner pack, the Break To radio buttons display, allowing you to select between breaking the pack into individual items or inner packs.
In the Quantity to Break field, enter the number of packs that you want to break down to the component level. This number must be less than the number displayed in the Stock on Hand: Before field.
Click Apply. The number of packs is decremented. The number of component items is incremented. The system displays the updated Stock on Hand values for the Pack and Item(s) in the After fields.
The Product Transformation page allows you to manually adjust the inventory of a transformed item and the items derived from the transformed item.
For example, a grocer might buy and place into inventory a side of beef. The butcher may prepare steaks and ground beef from the side of beef. In this example, the grocer reduces inventory by one side of beef and increases inventory by the number of steaks and packages of ground beef. In addition to adjusting the quantities, you can adjust the cost of the items derived from the transformed item. The overall cost of the transaction, however, must remain the same.
Both the quantities and values of the stock on hand are adjusted in the stock ledger.
Inventory adjustments may also be initiated by an external system, such as a warehouse management system.
To access the Product Transformation page:
From the Tasks menu, select Inventory > Inventory Adjustments > Product Transformation. The Product Transformation page appears.
In the Location field, select the location type from the list. Then enter, select or search for the location. This field is a required field.
In the Item field, enter the item number to be transformed or search for the item. This field is a required field.
In the Reason field of the Transform section, enter, select or search for the ID of the reason code for the adjustment.
In the Quantity to Remove field of the Transform section, enter the number of units subtracted from stock on hand. This field is a required field.
When the item is selected, the Current Stock on Hand field is populated to view the stock on hand quantity for the selected item before making any adjustments.
The Total Cost to Remove field is auto populated with the value based on the quantity to remove.
In the table you must add the items that you will create from the transformed item.
Once added, the items and their attributes appear in the table. The Total Cost in the Summary Row will be updated. The Total Cost to Remove must equal the Total Cost to Add before an adjustment can be made. Therefore, you can adjust the Quantity to Add and the New Cost columns directly in the table.
To add items you want to create from the transformed item, follow the steps.
From the Actions menu after entering the required details, click Add or click the Add icon. The Add Item page appears.
In the Item field, enter, select or search for the item you want to create. This field is a required field.
In the Quantity to Add field, enter the quantity for the item. This field is a required field.
In the New Cost field displays the current costs of the item. Edit the costs, if necessary. This field is a required field.
Then choose one of the following options.
Click OK to create the item and add it to the table and close the pop-up.
Click OK and Add Another to create additional items.
Click Cancel to reject all entries and close the pop-up.
Inventory accuracy is a critical and highly sensitive area affecting retailers. Inventory record accuracy has a significant impact on increasing levels of customer service, reducing costs, and increasing productivity. Stock counts verify the inventory figures kept within Merchandising, which makes reporting, planning, and ordering more accurate.
In order to reconcile inventory levels in the system with actual inventory on-hand, retailers perform physical inventory stock counts, which also serve to make stock ledger adjustments. These stock counts assist retailers in budgeting and accounting for shrinkage.
Merchandising system plays an active role in freezing inventory in a manner that allows counts to be accurate by considering activities that take place while the count is under way, such as receipts in the back room while stock is being counted in the display areas. Physical stock counts are integrated with the stock ledger to bring book stock into agreement with actual stock. You can request stock counts as needed by creating a stock count request or create a series of count request using the stock count schedule functionality.
There are two types of stock counts supported in Merchandising:
Unit
Unit and Value
Unit
A Unit type stock count is performed when the retailer wants to keep the stock on hand in line with the actual on hand. It can be ad hoc or a scheduled process. The unit type of stock count can be set up in Merchandising using an item list or by selecting one or more departments, classes or subclasses. Unit only counts can also be created for all departments. The ensuing adjustments affect inventory similar to an inventory adjustment - stock on hand quantities are updated and stock adjustments are written to the stock ledger.
Unit and Value
A Unit and Value stock count is often an annual count that can be used to adjust the stock ledger, in addition to updating inventory positions. Unit & Value type stock counts are done either for an entire location or by product hierarchy (such as department, class or subclass level). Unlike Unit counts, Unit & Value counts have a two-step approval process whereby first stock on hand is adjusted based on the count results and then shrinkage is calculated based on the difference between the expected value of inventory in the stock ledger and the value of the count.
For both types of counts, Merchandising assumes that the stock count date is as of the close of business of the location. Therefore the physical count can be done anytime between the last transactions for the stock count date until the next day's transactions start.
One or more locations can be added to both types of stock counts, but a stock count can only contain stores or warehouses, not both. Additionally, for warehouses, counting is done at a physical warehouse level, so all stockholding virtual warehouses within a physical warehouse, including internal finishers, must be added to a count together.
All counts are assumed to occur when a location is closed for all inventory transactions on the end of the business day on which the count is scheduled. That night, a snapshot of inventory positions is captured that will be compared to the actual count results once the count is complete. After the count results are received, you will have several options available to review the count results, adjust as needed, and accept the results.
Unit Variance and Adjustment – this page allows you to view by location the count variances for each item. Only items that are outside the variance tolerance defined in system option will displayed. This is also the screen where you can accept the results sent from the store or warehouse so that the inventory adjustments are applied in Merchandising.
Stock Count Results – this page allows you to adjust the unit results from the count, if errors in the data are identified based on the variances seen in the Unit Variance and Adjustment page.
Virtual Warehouse Distribution – if the count is for a warehouse, then this page allows for adjustments to be made to how the results were distributed to virtual warehouses.
Value Variance and Adjustment – this page allows you to view the calculated value of the count results (cost or retail) by subclass/location and apply adjustments, as needed. The calculated value will be displayed only after the unit variances have been applied, however adjustments can be made and accepted in this page prior to that calculation occurring.
See the Oracle® Retail Merchandising System Stock Counts Overview Release 16.0 white paper in the Oracle Retail Merchandising Functional Library (Doc ID 1585843.1)
The Stock Count Schedule page allows you to maintain schedules for stock counts. You can schedule stock counts for a stockholding store, a warehouse, or all locations on a location list. The stock can be counted in units or in units and monetary value. Depending on system options, the monetary value may be either retail or cost. You can schedule stock counts for every day, every week, or every two or more weeks. You can also designate the dates on which a schedule becomes effective and expires.
To access the Stock Count Schedule page:
From the Tasks menu, select Inventory > Stock Counts > Stock Count Schedule. The Stock Count Schedule page appears.
In the Location field, select the location type from the list. Then enter, select or search for the location.
In the Count Type field, select the type of count. The options are: Unit, Unit & Value.
Once you have selected a location and count type, the table will display all currently scheduled stock counts for that combination. If no stock counts have been scheduled, the table will be blank. You can add, edit or delete stock counts in this table.
To add a stock count schedule, follow the steps below.
Select Actions > Add, or click the Add icon ![]() . The Add Schedule pop-up appears.
. The Add Schedule pop-up appears.
Based on the selected count type you need to enter, select or search for either an Item List or a Department/Class/Subclass. The fields Item List and Department are required fields.
In the Start Date field, enter the date on which the schedule becomes effective, or click the Calendar icon to select a date.
In the End Date field, enter the date on which the schedule expires, or click the Calendar icon and select a date.
In the Cycle field, select the frequency of the stock counts. This is a required field.
In the Count Time field, select the day of the week for the stock count. This is a required field.
Select the days for the stock count below.
|
Note: If the cycle is every day, all of the days are automatically selected. If the frequency is every week, you can select more than one day. |
Then choose one of the following options.
Click OK to add the stock count schedule to the table and close the pop-up.
Click OK and Add Another to add additional stock count schedules.
Click Cancel to reject all entries and close the pop-up.
To edit a stock count schedule, follow the steps below.
Select the stock count schedule you want to edit.
From the Actions menu, click Edit or click the Edit icon ![]() . The Edit Schedule pop-up appears.
. The Edit Schedule pop-up appears.
Edit the enabled fields as necessary.
Then choose one of the following options.
Click OK to add your changes to the table and close the pop-up.
Click Cancel to reject all entries and close the pop-up.
The Create Stock Count Request option opens the Stock Count Request page. In the Stock Count Request page you can request stock counts. You can create unit counts by item list level or product group level (all departments, department, class, or subclass) and unit & value counts by product group level. If a department, class or subclass is selected for either of the count types, one or more departments, classes or subclasses can be added to the count.
|
Note: For unit counts, you can only select the option All Departments for the product group level for warehouse. |
Locations are added to the count individually or by selecting a group of locations, such as a location list or all stores. A count can be for either stores or warehouses, but not both. Any stockholding store can be added to a count, including both company and franchise stores. If multiple locations are added to the count, then the count will only be able to be finalized once the counts for all locations are completed.
To request a stock count:
From the Task menu, select Inventory > Stock Counts > Create Stock Count Request. The Stock Count Request page appears.
In the Description field, enter a description for the stock count. This field is a required field.
In the Date field, enter the scheduled date for the stock count, or use the Calendar icon to select a date.
In the Type field, select the stock count type from the list. Possible options are Unit and Unit & Value.
In the Select Item By section, select either the Item List or Merchandise Hierarchy option.
If you select Unit > Item List:
The Item List field appears. Enter, select or search for the item list for the count.
If you select Unit > Merchandise Hierarchy:
The Hierarchy Level field appears. Select the hierarchy level from the list.
If you select Unit and Value:
The Select Item By section defaults to Merchandise Hierarchy. In the Hierarchy Level field, select the hierarchy level from the list.
|
Note: If you select All Departments in the list, the Merchandise Hierarchy section is not available. If you select Department, Class or Subclass, the Merchandise Hierarchy section is displayed so that you can then add items to the count through the department, the class and the subclass. |
The top of the Stock Count page contains the following fields.
Table 9-23 Stock Count Header - Fields and Description
| Fields | Description |
|---|---|
|
Description |
Enter the description for the stock count request. |
|
Type |
Select a stock count type from the list. The options are: Unit, Unit & Value. |
|
Select Item By |
Select the item by either one of the following options: Item List, Merchandise Hierarchy. |
|
Date |
Enter the beginning date for the stock count, or use the Calendar icon to select a date. |
To add a merchandise hierarchy to the stock count request, follow the steps below.
In the Merchandise Hierarchy section, select Actions > Add, or use the Add icon ![]() . The Add Merchandise Hierarchy pop-up appears.
. The Add Merchandise Hierarchy pop-up appears.
In the Department field, enter, select or search for the department. If you select the hierarchy level Department, Class, or Subclass, this field is a required field.
In the Class field, enter, select or search for the class. If you select the hierarchy level Class, or Subclass, this field is a required field.
In the Subclass field, enter, select or search for the subclass. If you select the hierarchy level Subclass, this field is a required field.
Then choose one of the following sections.
Click OK to add the merchandise hierarchy and close the pop-up.
Click OK and Add Another to add additional merchandise hierarchy levels.
Click Cancel to reject all entries and close the pop-up.
To add locations to the stock count request, follow the steps listed below.
In the Locations section, select Actions > Add, or use the Add icon ![]() . The Add Locations pop-up appears.
. The Add Locations pop-up appears.
In the Location field, select a location type from the list. Then enter, select or search for the location. This field is a required field.
Then choose one of the following sections.
Click OK to add the location to the table and close the pop-up.
Click OK and Add Another to add additional locations to the stock count request.
|
Note: Stores, Warehouses and External Finishers cannot be added to the same Count. |
Click Cancel to reject all entries and close the pop-up.
You can also request to rebuild an item list. The Rebuild Item List button enables when you enter the description, select the stock count type, and enter the item list.
To rebuild an item list, follow the steps listed below.
Click Rebuild Item List. The Item List Rebuild page appears.
Click Execute and Close to rebuild the item list based on the criteria for the item list. This button is not available for static item lists.
Click Cancel to close the pop-up.
The Manage Stock Counts option opens the Stock Count Search page. Managing stock counts involves performing one or more of the following tasks:
Searching for a stock count
Editing a stock count
Viewing a stock count
Results
Unit Variance and Adjustment
Virtual WH Adjustment
Value Variance and Adjustment
You can access the Stock Count Search page from the Task menu, select Inventory > Stock Counts > Manage Stock Count. The Stock Count Search page appears.
In the Stock Count Search page you can search for a stock count by specifying various search criteria. You can choose to access a stock count in the search results in edit or view mode depending on security privileges.
To search for a stock count:
From the Tasks menu, select Inventory > Stock Counts > Manage Stock Counts. The Stock Count Search page appears.
You can search for a stock count by providing search criteria in the search section. The criteria can be provided either in Basic or Advanced mode, depending on the requirement. Basic is the default mode when the search page is entered. Click Advanced to access the search panel in advanced mode. You can return to Basic mode by clicking Basic.
To search for a stock count through the basic search criteria:
Enter or select one or all of the following basic search criteria.
Table 9-24 Stock Count Search - Basic Search Criteria
| Fields | Description |
|---|---|
|
Match option |
Check radio button All or Any. All - only stock counts matching all entered search criteria are shown. Any - stock counts matching each entered search criteria are shown. |
|
Stock Count |
Enter the ID of the unprocessed stock count. |
|
Description |
Enter the description of the unprocessed stock count. |
|
Type |
Select the type of the stock count. The options are: Unit, Unit & Value. |
|
Date |
Enter the date or click the Calendar icon to select a date. |
|
Item |
Enter the item number or search for the item. |
|
Location |
Enter, select or search for the location. |
|
Note: For more information about searches, see Search Screens in the Oracle® Retail Merchandising Do the Basics User Guide. |
Click Search. The stock counts that match the search criteria are displayed in the Results section.
Click Reset to execute the saved search.
Click Done to close the page.
To search for a stock count using advanced search criteria:
To search using advanced search criteria, enter or select one or all of the advanced search criteria.
|
Note: For more information about searches, see Search Screens in the Oracle® Retail Merchandising Do the Basics User Guide. |
To narrow down the search, use the list next to the search fields. For example, determine if the entered value should equal or not equal the search result.
Click Search. The stock counts that match the search criteria are displayed in the Results section.
Click Reset to clear the search section and results.
Click Add Fields to add more fields for the advanced search. To remove the field from the search, click the x right next to the field.
Click Reorder to change the order of the available search fields. The Reorder Search Fields page appears.
Select the desired search field and use the up and down arrows to rearrange the order of the fields.
Click OK to confirm the new order of the fields and close the page.
Click Cancel to reject any changes and close the page.
Click Done to close the page.
The Stock Count Results page allows you to manually enter the results of a stock count. You can also view and edit unprocessed stock counts at a location.
Corrections can be made to the physical count quantities received from the store or warehouse in this page. However, to actually adjust the quantities, you must go to the Unit Variance and Adjustment page.
The Stock Count Result page contains the following sections.
The top of the Stock Count Results page displays the stock count and the stock count name. In addition the type and the date of the stock count are displayed in the top right corner of the section.
Below the location type, the location and the location name are displayed, once you select the location. Other sections on the screen include:
The Items section displays the items in the count and the total count quantity for the item at the location, as well as the basic item information such as item description, unit cost and unit retail.
The Count Locations section displays the location inside the store or warehouse where the item was counted and the quantity counted at this location.
You can edit the Count column directly in the table to update the count quantity for a count location. If the count quantity for a location is updated, the Total Count column in the first table is updated to reflect the new total.
To edit the result of a stock count, follow the steps below.
From the Tasks menu, select Inventory > Stock Counts > Manage Stock Counts. The Stock Count Search page appears.
Enter or select search criteria as desired to make the search more restrictive.
Click Search. The stock counts that match the search criteria are displayed in the Results section.
Select a stock count in the table.
Then select Actions > Results. The Stock Count Results page appears.
|
Note: You can also access the Stock Count Results page through the Unit Variance and Adjustment page.The stock count ID, description, type, date, location type and location of the selected stock count are displayed. In addition all of the items at the location appear in the tables by default. For more information about this page, see the Review Unit Variances and Accepting Unit Counts section. |
The stock count ID, description, type and date are displayed. The location type defaults to either Store or Warehouse. Enter, select or search for the location.
In the items section select an item. The count locations and counts for the selected item are displayed in the Count Locations section.
In the Count column, update the count quantity as necessary.
Save your changes.
To add count locations for an item, follow the steps below.
In the Count Locations section, select Actions > Add, or use the Add icon ![]() . The Add Count Location pop-up appears.
. The Add Count Location pop-up appears.
In the Count Location field, enter the location. This is a required field.
In the Quantity field, enter the quantity. This field is a required field.
Then choose one of the following options.
Click OK to add the count location to the table and close the pop-up.
Click OK and Add Another to add additional count locations.
Click Cancel to reject your entries and close the pop-up.
In the Stock Count Results pop-up, save your entries.
The Stock Count Variance page will allow you to view variances between the stock on hand and the stock count, and allows you to create stock Adjustments.
The label of the Stock Count section displays the stock count and the stock count name. In addition the type and the date of the stock count are displayed in the top right corner of the section.
The table displays the location, the location name and the Adjustment Processed checkbox. The checkbox is selected once the stock adjustment has been submitted for the location by clicking the Create Adjustments button.
The Details sections displays item details, such as the item number, the item description, in transit and on hand quantities as well as the stock count and the variance quantities. Not all items on the count will be displayed here - only those that have a variance that exceeds the variance thresholds defined in the Merchandising system options for quantity, cost, and/or retail. This allows you to focus on reviewing only the largest variances before accepting the count results.
To adjust the stock on hand after a stock count, follow the steps below.
From the Tasks menu, select Inventory > Stock Counts > Manage Stock Counts. The Stock Count Search page appears.
Enter or select search criteria as desired to make the search more restrictive.
Click Search. The stock counts that match the search criteria are displayed in the Results section.
Select a stock count in the table.
Then select Actions > Unit Variance and Adjustment. The Unit Variance and Adjustment page appears.
In the Stock Count section select a location. The item information is displayed in the Details section.
Select Actions > Create Adjustment, or use the Create Adjustment button.
You are prompted, if you want to create a stock adjustment for the selected location. Confirm with Yes.
The adjustment are made during the nightly batch process.
Save your entries.
When a stock count is performed for a warehouse, an adjustment can be made if the distribution of inventory to the virtual warehouse performed during the upload of the count to Merchandising was incorrect. You can carry out this adjustment in the Virtual WH Distribution page.
The Virtual WH Distribution page displays the stock count ID and description at the top of the page, along with the type of count and the count date. It also includes the following sections:
The Physical Warehouse/ Item section displays all the physical warehouse/items pertaining to the selected stock count on entering the page.
The Virtual Warehouses section displays all virtual warehouses associated to the physical warehouse that is selected in the Physical Warehouse/Items section, and displays a snapshot of the inventory when the count occurred.
You can distribute the on-hand inventory at the physical warehouse into the virtual warehouse inventory.
To adjust the distribution, follow the steps below.
From the Tasks menu, select Inventory > Stock Counts > Manage Stock Counts. The Stock Count Search page appears.
Restrict your search to stock counts for warehouse.
Click Search. The stock counts that match the search criteria are displayed in the Results section.
Select a stock count in the table.
Then select Actions > Virtual WH Distribution. The Virtual WH Distribution page appears.
In the Physical Warehouse/Item section, select a physical warehouse. All virtual warehouses associated with the selected physical warehouse are displayed in the Virtual Warehouses section.
In the Virtual Warehouses section select Actions > Edit, or use the Edit icon ![]() . The Edit Distribution pop-up appears.
. The Edit Distribution pop-up appears.
The table displays all of the virtual warehouses for the selected physical warehouse. The snapshot on hand and current distribution quantity are displayed for each virtual warehouse. The new distribution quantity column defaults to the current distribution quantities.
In the New column, update the new distribution quantity, if necessary.
Then choose one of the following options.
Click OK to add your changes to the table and close the pop-up.
Click Cancel to reject all entries and close the pop-up.
In the Virtual WH Distribution pop-up, save your entries.
A Unit & Value stock count is often an annual count that can be used to adjust the financial systems in a corporate merchandising system, in addition to updating inventory positions. Unit & Value stock counts are carried out either for an entire location or by product hierarchy, that is department, class or subclass level.
Once the units have been accepted for Unit & Value counts, the value of the count must also be reviewed and accepted.
The page displays the total cost and total retail as calculated in the stock count and the total adjusted cost and retail, if any adjustments have been made, for each department/class/subclass at a location.
If adjustments need to be made, you can make adjustments to the total cost or retail value of the count, based on the accounting method for the department, for each subclass/location. You can also accept the value of the count.
The label at the top of the page displays the stock count and the stock count name. In addition the type and the date of the stock count are displayed in the top right corner of the section.
The table displays the location and stock count value information. The table contains each location and department/class/ subclass combination of the stock count.
Based on the used accounting method for the Department, you can either edit the Cost or Retail column directly in the table.
To save the adjustments, click the Save/Save and Close button. This will check the Adjustment Processed checkbox for all selected locations and disable the Adjustment Value – Cost or Retail field.
To adjust the cost or retail after a stock count, follow the steps below.
From the Tasks menu, select Inventory > Stock Counts > Manage Stock Counts. The Stock Count Search page appears.
Enter or select search criteria as desired to make the search more restrictive.
Click Search. The stock counts that match the search criteria are displayed in the Results section.
Select a stock count in the table.
Then select Actions > Value Variance and Adjustment. The Value Variance and Adjustment page appears.
In Cost or Retial column update the values of the locations as necessary.
Select one or more records in the table.
Then select Actions > Create Adjustment, or use the Create Adjustment button.
You are prompted, if you want to create adjustments for the selected location(s). Confirm with Yes.
The adjustment are made during the nightly batch process.
Save your entries.