| Oracle® Retail Sales Audit Cloud Service User Guide Release 19.3.000 F83171-01 |
|


 Previous |
 Next |
| Oracle® Retail Sales Audit Cloud Service User Guide Release 19.3.000 F83171-01 |
|
Previous |
Next |
This chapter explains the auditing process in detail and provides procedures to assist you while auditing transactional data. The process flow for auditing is as follows:
At the end of the day or by trickle-poll method, transactions are transmitted from the store to the head office. This data includes order initiation, order complete, and order return transactions from both OMS and POS.
The duplicate records received from OMS and POS are filtered within Sales Audit.
The transmitted transactions are loaded to the database, totaled, audited, and reviewed.
Any errors that are generated as part of the validation process must be corrected or overridden.
Once the audit is complete, the data is exported.
Auditing process followed by the Auditor
As a Sales Audit auditor, your responsibility is to review all exception errors related to your stores and either correct or override these errors.
The following is a standard auditing workflow for a auditor within Sales Audit:
Find and select the store/day containing and navigate to either Balancing Level Summary or Store Day Summary.
Use the Store Day Summary to review and audit the following:
Error List
Miscellaneous totals
Over short totals
Missing transactions
Import and export log
Use the Cashier/Register Level Summary to review and audit the following:
Error list
Miscellaneous total
Over short total
You can also perform data analysis such as, reviewing the audit trails. You can use the following screens for the analysis:
Transaction Search
Item Summary
Tender Summary
Transaction Audit Trail
Total Audit Trail
General Ledger Transactions
Import/Export Log
Bank ACH Maintenance
Store ACH Maintenance
|
Note: Once all errors are corrected or overridden, sales audit sets the store/day audit status to Audited. The store/day audit is then available for export to an external application. |
This chapter covers the following topics:
The Transaction Maintenance module allows you to investigate and correct errors in the external system transactions. You can review the transactions that were flagged by the automated audit process.
Transactions may have many types of errors, which need to be reviewed and corrected manually. In addition, it is also possible to review and edit the data from missing transactions or transactions that have passed the automated audit. Corrected transactions are exported to external systems by a batch program.
You can use the Transaction Maintenance window to view, create, and edit transactions.
From the Tasks menu, select Operations > Manage Transactions. The Transaction Search window appears.
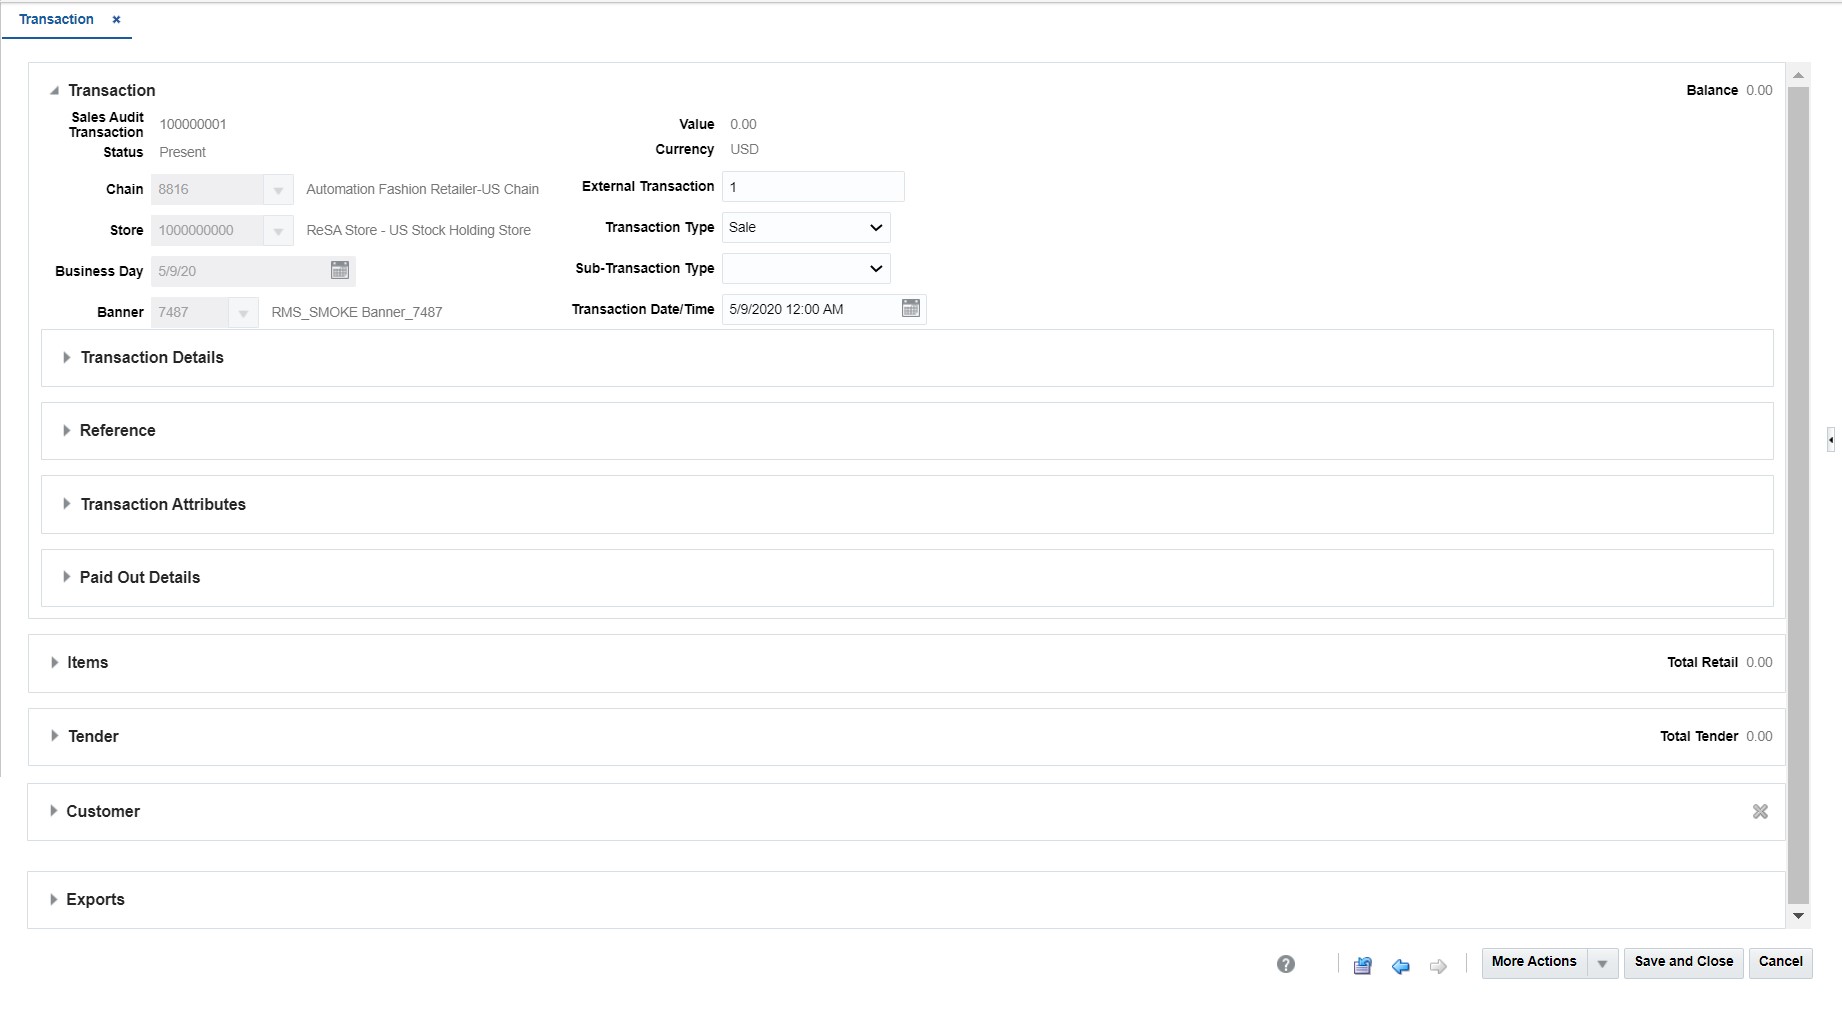
Select Actions > Create. The Transaction Maintenance window appears.
|
Note: You can also navigate to the Transaction Maintenance window by selecting Operations > Create Transaction. |
In the Chain field, enter a chain number.
In the Store field, enter the store ID.
In the Business Day field, enter a date, or click the calendar button and select a date.
Entering a store results in opening a Search and Select pop-up which allows you to select a Business Date. The selection of store and business automatically populates the Chain, Banner and Business Date fields if they were not entered.
In the Transaction Date/Time field, enter the date and time the transaction occurred.
|
Note: The External Transaction field displays the transaction number that was used by the external system. |
In the Transaction Type field, enter the type of transaction you are creating.
|
Note: Depending on the type of transaction you select, additional fields are enabled. Enter the appropriate information in the enabled fields. |
Add any of the following details to the transaction as needed:
Transaction details to a transaction.
Reference field values to a transaction.
Transaction attributes to a transaction.
Paid out details to a transaction.
Items to a transaction.
Item attributes to the items on a transaction.
Tax to the items on a transaction.
Tax attributes to the items on a transaction.
Discount to the item on a transaction.
Discount attributes to the items on a transaction.
Tender records to a transaction.
Tender attributes to a transaction.
Customer information and attributes to a transaction.
Tax details to a transaction, if the store accepts transaction level tax.
Click Save and Close to save your changes and close the window.
|
Note: You cannot create a transaction that contains an error. The respective validations are performed upon clicking Save and Close. |
On the Transaction Maintenance window, click the arrow next to the Transaction Attributes section. The Transaction Details section is expanded.
Enter the information as required.
On the Transaction Maintenance window, click the arrow next to the Reference section. The Reference section is expanded.
In the Reference fields, enter the reference information as needed.
On the Transaction Maintenance window, click the arrow next to the Transaction Attributes section. The Transaction Attributes section is expanded.
Select Actions > Add. The Add Attribute window appears.
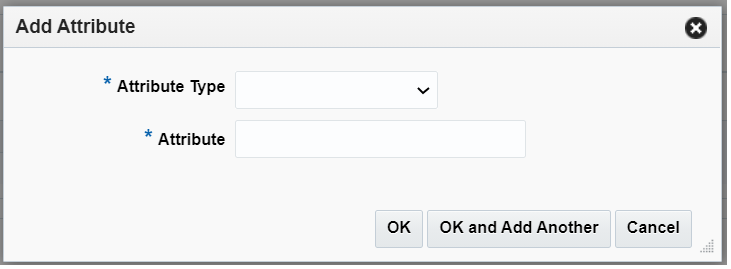
In the Attribute Type field, select the attribute type from the dropdown.
In the Attribute field, enter the attribute value associated to the transaction at the header level.
You can use the following procedures to add item information to a transaction.
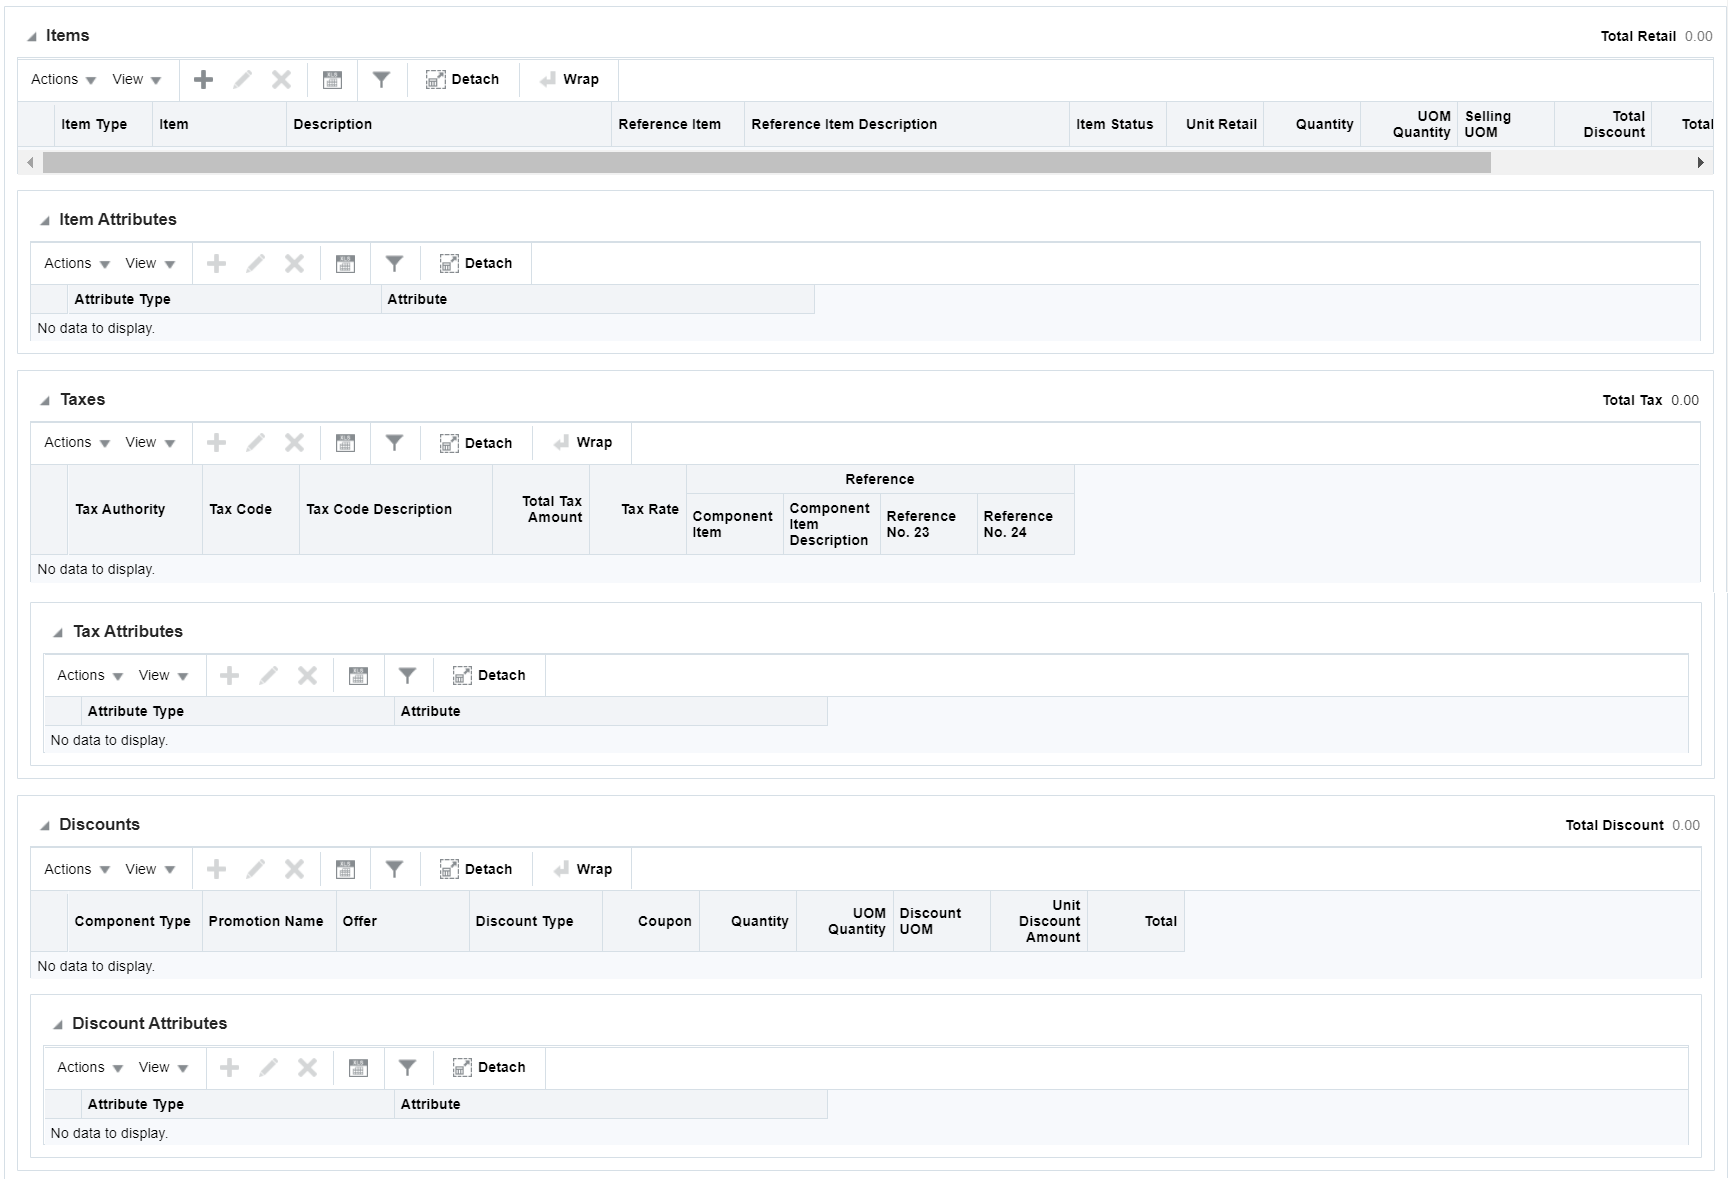
In the Items section, click the arrow next to Item. The Items section is expanded. You can add item, item attributes, taxes (including attributes), and discounts (including attributes) in this section.
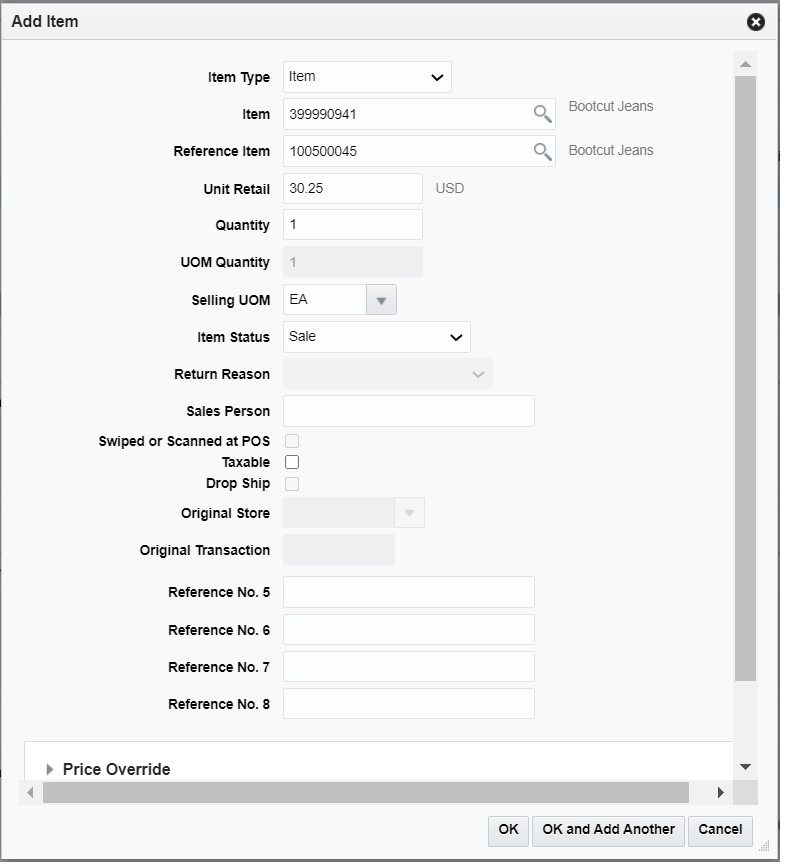
On the Transaction window, in the Items section, select Actions > Add. The Add Item window appears.
Select the Item Type.
Enter the Item ID. Details such as Unit Retail, Selling UOM are defaulted and can be overridden.
If the Item Type is selected as "Item", the Reference Item field appears. Enter or select the required item number in the field.
Enter details such as Quantity and Item Status.
Enter the values in the other fields as required.
Click OK to save your changes and close the window.
On the Transaction Maintenance window, in the Items section, select Actions > Add. The Add Item window appears.
After entering the details mentioned in the earlier section, in the Item Status field, select Return. The Return Reason field is activated.
In the Return Reason field, select the return reason code.
Click OK to save your changes and close the window.
On the Transaction Maintenance window, in the Items section, select Actions > Add. The Add Item window appears.
In the Price Override section, enter the override reason in the Override Reason field.
In the New Unit Retail Price field, enter the new price.
Click OK to save your changes and close the window.
You will be allowed to add the item attributes for a particular item that has been added in the transaction. The option to add these will get enabled only when at least one item has been added.
To add the attributes related to items, in the Item Attributes section, select Actions > Add. The Add Attribute window appears.
In the Attribute Type field, select the attribute type from the dropdown.
In the Attribute field, enter the attribute value for the attribute type, associated to the item in the transaction.
To add Taxes at the Item Level, follow the below steps:
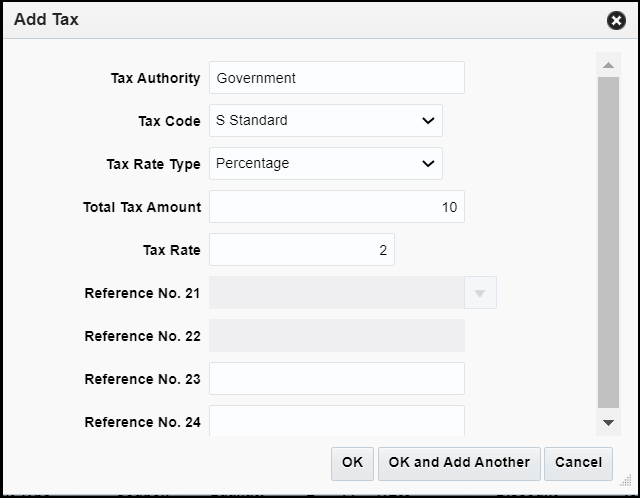
In the Items section, click the arrow next to Taxes to expand the tax section. Click Actions > Add. The Add Tax window appears.
Enter the Tax Authority.
Select the Tax Code from the list.
Enter the Tax Rate Type. This field is only displayed if GTS is on in the system.
Enter the Total Tax Amount and the Tax Rate.
Enter the values in the Reference Fields as required.
Click OK to save your changes and close the window.
You will be allowed to add the item tax attributes for a particular tax that has been added against an item. The option to add these will get enabled only when at least one item level tax has been added.
To add the attributes related to item level taxes, in the Tax Attributes section, select Actions > Add. The Add Attribute window appears.
In the Attribute Type field, select the attribute type from the dropdown.
In the Attribute field, enter the attribute value associated to the attribute type for the item tax in the transaction.
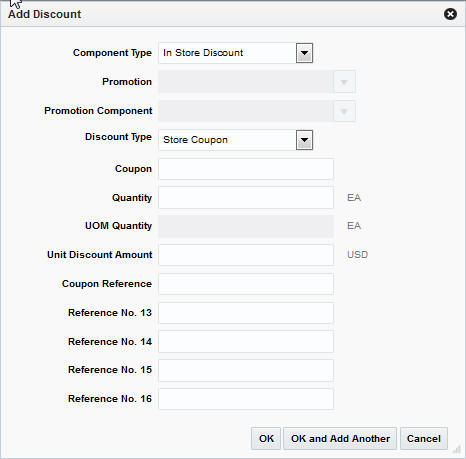
In the Items section, click the arrow next to Discounts to expand the discounts section. Click Actions > Add. The Add Discount window appears.
In the Component Type field, select the type of promotion or discount you are creating.
If you are creating a promotion, in the Promotion field, enter the promotion.
If you are creating a discount, from the Discount Type field, select the type of discount that you want to apply to the item.
In the Promotion Component field, edit the component of the promotion as necessary.
In the Coupon No. field, enter the ID of the promotion or discount.
In the Quantity field, enter the quantity for the discount.
In the Unit Discount Amount field, enter the amount of the discount.
Add the appropriate reference information.
Click OK to save your changes and close the window.
You will be allowed to add the discount attributes for a particular discount that has been added against an item. The option to add these will get enabled only when at least one item level discount has been added.
To add the attributes related to discounts, select Actions > Add. The Add Attribute window appears.
In the Attribute Type field, select the attribute type from the dropdown.
In the Attribute field, enter the attribute value associated to the attribute type added to the discount for the item in the transaction.
To view the revisions of a transaction:
On the Transaction Maintenance window, from the More Actions menu, select Transaction Audit Trail. The Transaction Audit Trail window displays an audit trail of all revisions to the transaction.
Click OK to close the window.
To add comments:
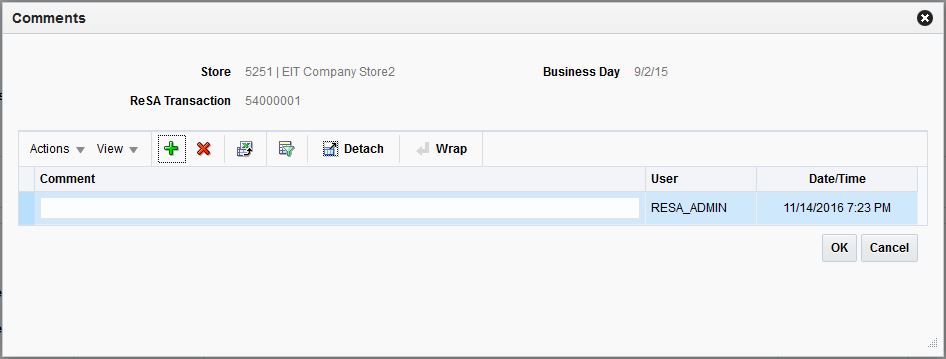
On the Transaction Maintenance window, from the More Actions menu, select Comments. The Comments window appears.
Select Actions > Add. The next line in the table is enabled for commenting.
Enter your comments.
Click OK to save your changes and close the window.
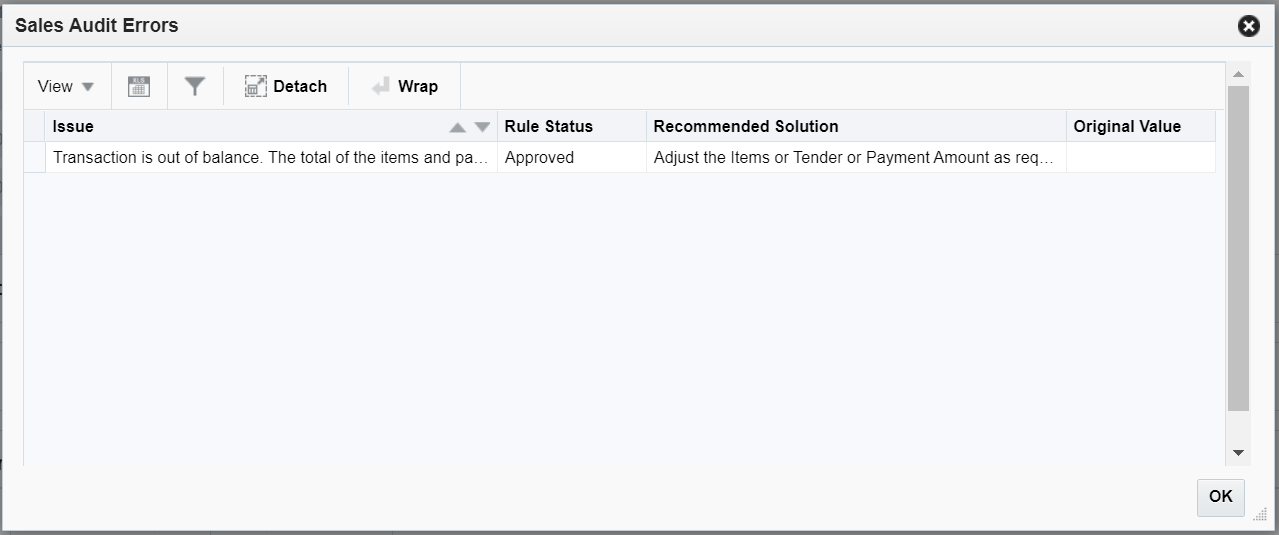
To view errors:
On the Transaction Maintenance window, from the More Actions menu, select Errors. The Sales Audit Errors window appears. You can view all the errors associated with the transaction in this window.
Click OK to close the window.
To refresh the errors:
On the Transaction Maintenance window, from the More Actions menu, select Refresh Errors.
The errors are refreshed taking into account any updates that were made to the transaction.
|
Note: When refreshing errors, Total and Store Day Level rules are not included during the refresh. Only Transaction level rules are executed against the transaction. |
To add tender information to a transaction:
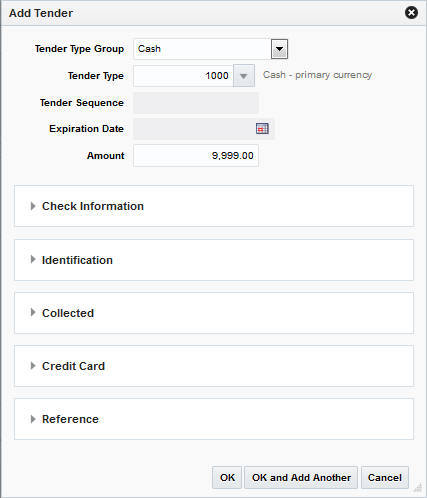
On the Transaction Maintenance window, in the Tender section, select Actions > Add. The Add Tender window appears.
In the Tender Type Group field, select the tender type group.
In the Tender Type field, select the tender type.
In the Amount field, enter the tender amount.
You can enter details in the respective sections based on the tender type you select.
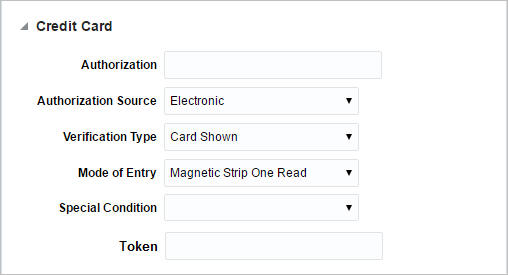
If you select a type of card payment in the Tender Type Group field the Credit Card section is enabled:
In the Authorization No. field, enter the authorization for user ID.
In the Token field, enter the credit card token.
In the remaining fields, select the information needed.
Click OK to save your changes and close the window.
|
Note: The Token field is only available when the selected Tender Type Group is either Credit Card, Debit Card, PayPal, Fonacot or Others. The section label is updated dynamically, based on the selected Tender Type Group. For example, if you select the Tender Type Group Debit Card, the section is labeled Debit Card. |
You can add user-defined reference information to a type of tender in the Reference section.
Click OK to save your changes and close the window.
You will be allowed to add the tender attributes for a particular tender that has been added in the transaction. The option to add these will get enabled only when at least one tender record has been added.
To add the attributes related to the tenders in the transaction, select Actions > Add. The Add Attribute window appears.
In the Attribute Type field, select the attribute type from the dropdown.
In the Attribute field, enter the attribute value associated for the attribute type added to the tender in the transaction.
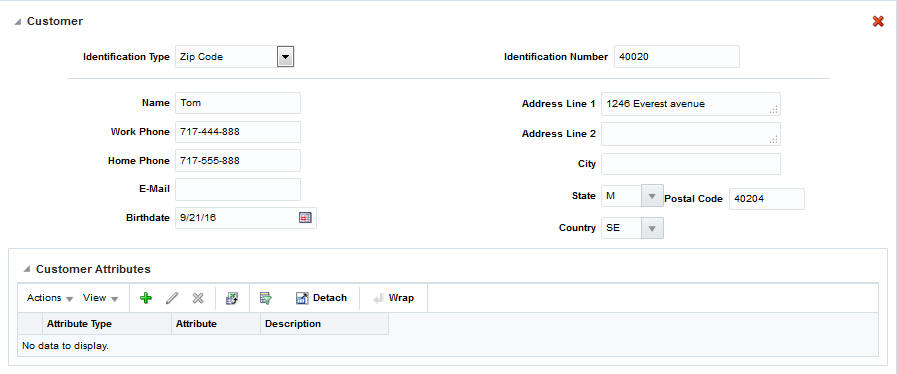
To add customer information to a transaction:
On the Transaction Maintenance window, expand the Customer section.
In the Identification Type field, select the source of the customer information.
In the Identification No. field, enter the ID from the source document selected in the Identification Type field.
In the remaining fields, enter the name and the address information for the customer.
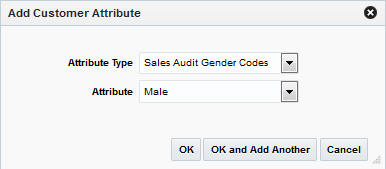
In the Customer Attributes section, select Actions > Add. The Add Customer Attribute window appears.
In the Attribute Type field, select the attribute type.
In the Attribute field, enter an attribute.
Click OK to save your changes and close the window.
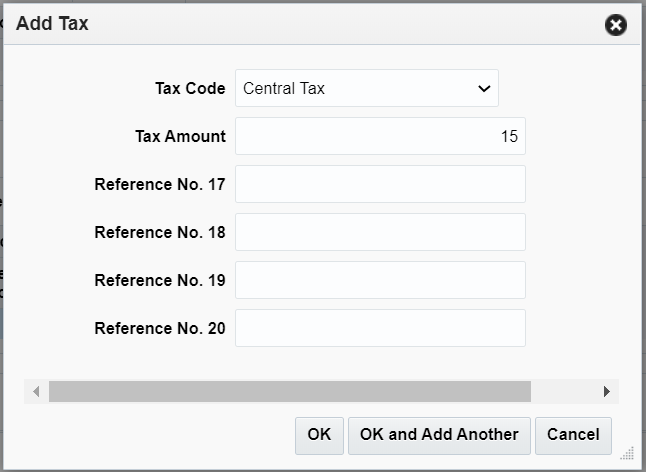
To add Taxes at the Transaction Level, follow the below steps:
Select the Tax Code from the list.
Enter the Tax Amount.
Enter values for the Reference Fields as required.
Click OK to save your changes and close the window.
You will be allowed to add the tax attributes for a particular tax that has been added in the transaction. The option to add these will get enabled only when at least one transaction level tax has been added.
To add the attributes related to the taxes in the transaction, select Actions > Add. The Add Attribute window appears.
In the Attribute Type field, select the attribute type from the dropdown.
In the Attribute field, enter the attribute value associated to the transaction level taxes in the transaction.
To add paid out details to a transaction:
On the Transaction Maintenance window, expand the Paid Out Details section.
In the Vendor field, enter a vendor number.
In the Vendor Invoice No. field, enter a vendor invoice number.
In the Proof of Delivery No. field, enter a proof of delivery number.
In the Payment Reference No. field, enter a payment reference number.
Click OK to save your changes and close the window.
To view a transaction:
From the Tasks menu, select Operations > Manage Transactions. The Manage Transactions window appears.
Enter search criteria to find the transaction that you want to view and click Search.
Select the transaction from the Results table.
Select Actions > View. The Transaction Maintenance window appears in view mode.
You can view all the information related to the transaction on this window.
Click Done to close the window.
To Edit a transaction:
From the Tasks menu, select Operations > Manage Transactions. The Manage Transactions window appears.
Enter search criteria to find the transaction that you want to view and click Search.
Select the transaction from the Results table.
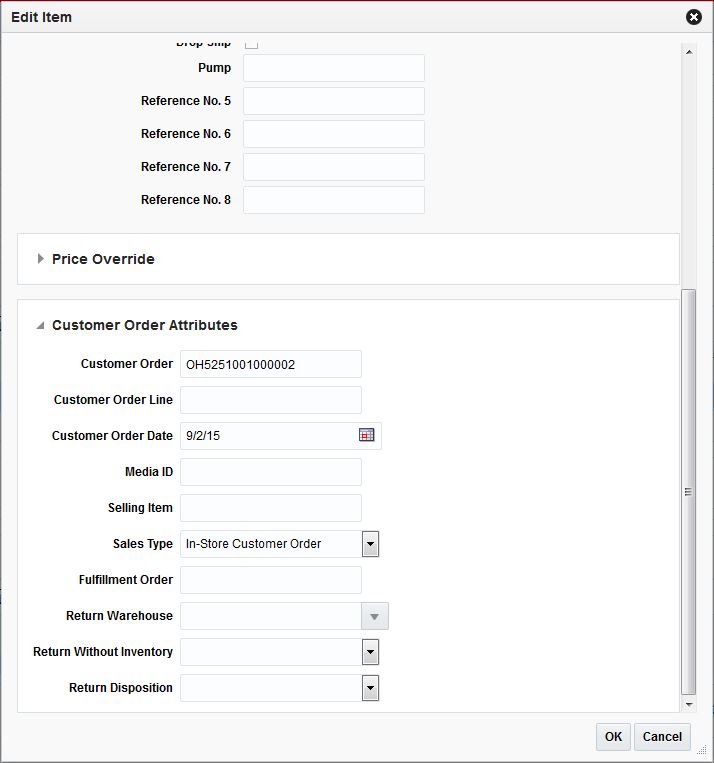
Select Actions > Edit. The Transaction Maintenance window appears in edit mode.
To edit any transaction data, go to the respective container, select an existing record, and select Actions > Edit. The similar screens as mentioned above will be opened in the edit mode.
Add or edit the values of the fields.
Click Save and Close to save your changes and close the window.
|
Note: Saving a transaction with errors, after editing is not restricted as it happens in the create mode. You are able to save an existing transaction that contains an error. The respective validations are performed upon clicking Save and Close. |
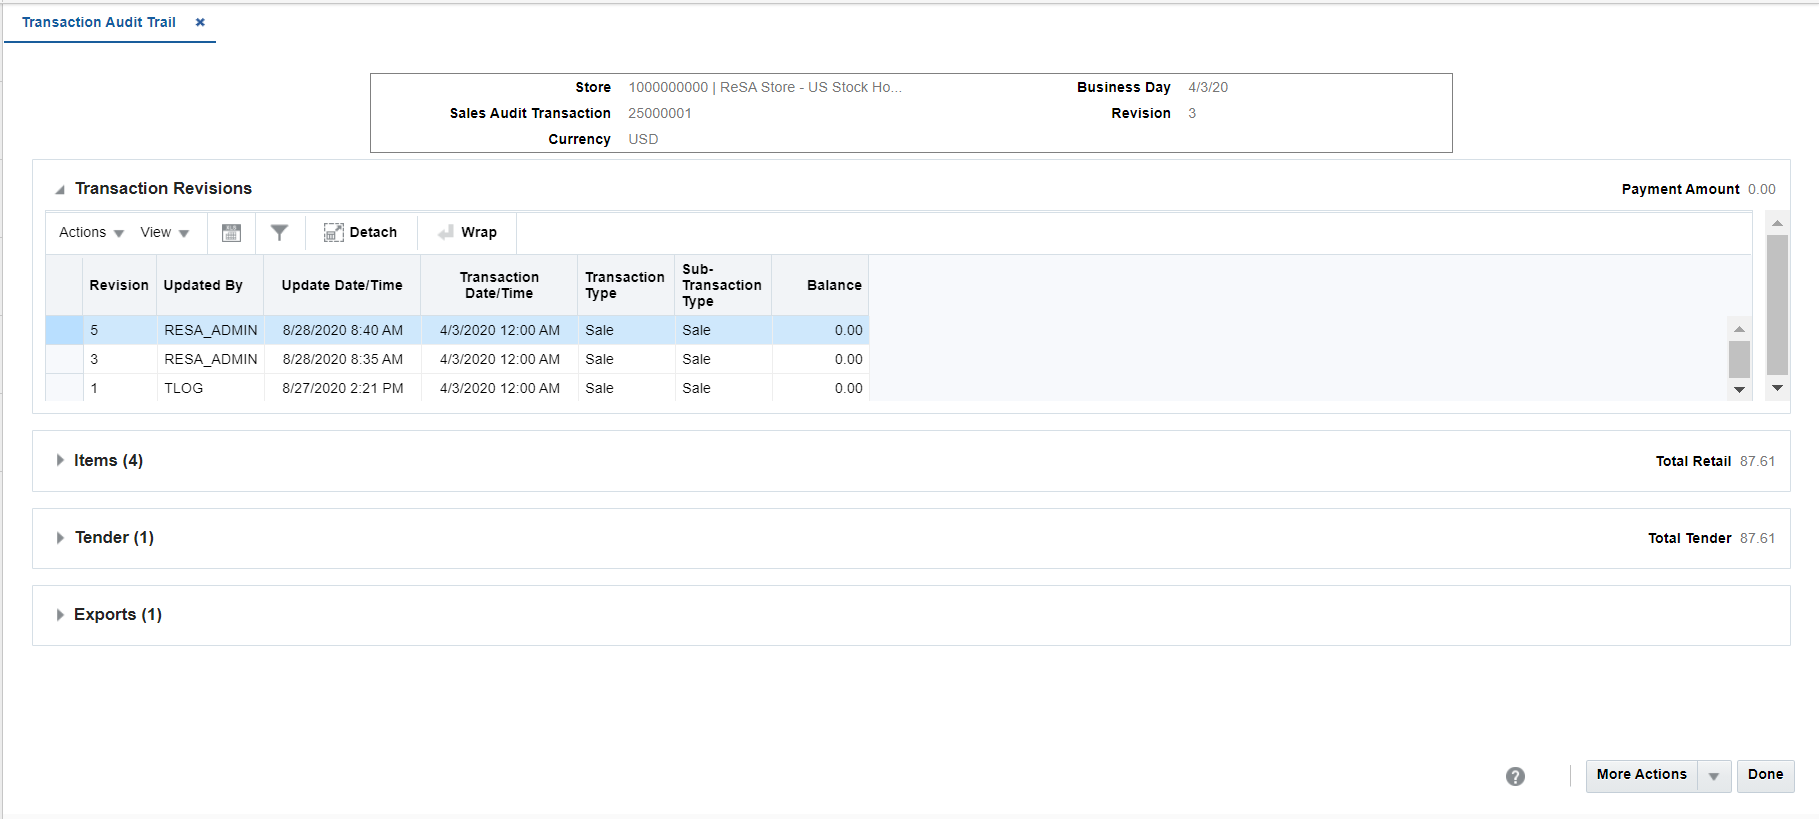
To view the revisions of a transaction:
On the Transaction Maintenance window, from the More Actions menu, select Transaction Audit Trail. The Transaction Audit Trail window displays an audit trail of all revisions to the transaction.
Click OK to close the window.
The Automated Clearing House (ACH) Maintenance module allows you to declare and manage how much money is deposited in local bank accounts. ACH maintenance allows Headquarter (HQ) users to manage how money moves from local bank accounts to centralized bank accounts. You can manage ACH transactions using the following procedures.
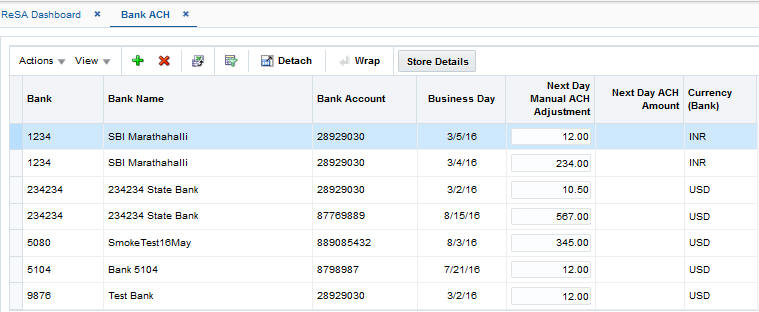
To view bank ACH transactions:
From the Tasks menu, select Operations > Bank ACH. The Bank ACH window appears.
To add a bank ACH transaction amount:
From the Tasks menu, select Operations > Bank ACH. The Bank ACH window appears.
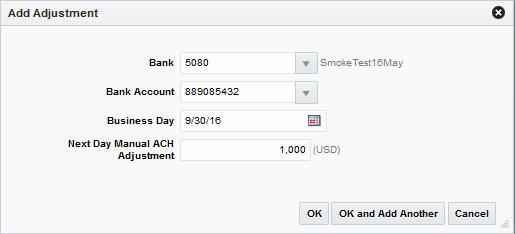
Select Actions > Add. The Bank ACH - Add Adjustment window appears.
In the Bank field, enter the bank ID.
In the Bank Account field, enter a bank account number.
In the Business Day field, enter a business day, or click the calendar button and select the date.
In the Next Day Manual ACH Adjustment field, enter an amount.
Click OK to save your changes and close the window.
To delete a bank ACH transaction amount:
From the Tasks menu, select Operations > Bank ACH. The Bank ACH window appears.
Select the record.
Click Delete.
Click Yes to confirm deletion.
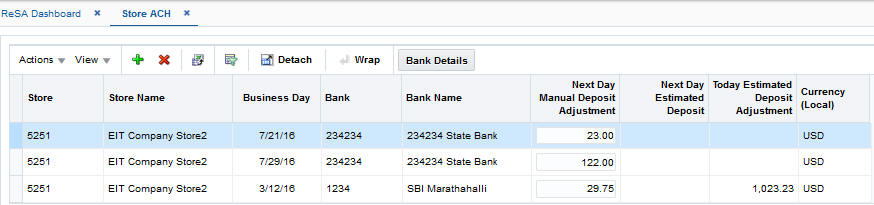
To view a store ACH transaction:
From the Tasks menu, select Operations > Store ACH. The Store ACH window appears.
To view the bank details for a selected store, click Bank Details. The Bank ACH window appears.
Click OK to close the window.
To add a store ACH amount:
From the Tasks menu, select Operations > Store ACH. The Store ACH window appears.
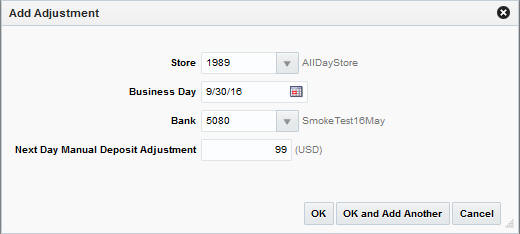
Click Actions > Add. The Add Adjustment window appears.
In the Store field, enter a store ID.
In the Business Day field, enter a business day.
In the Bank field, enter a bank ID.
In the Next Day Manual Deposit Adjustment field, enter an amount.
Click OK to save your changes and close the window.
To delete a store ACH transaction amount:
From the Tasks menu, select Operations > Store ACH. The Store ACH window appears.
Select a record.
Select Actions > Delete.
Click Yes to confirm deletion.
Click Save and Close to save your changes and close the window.
The Bank Stores window is used to enter and maintain the store/bank relationships and bank attributes. The bank attributes are exported to external ACH (Automated Clearing House) and UAR (Universal Account Reconciliation) systems.
To create a bank/store relationship:
From the Tasks menu, select Foundation Data > Bank Store. The Bank Stores window appears.
Select the bank from the Bank field.
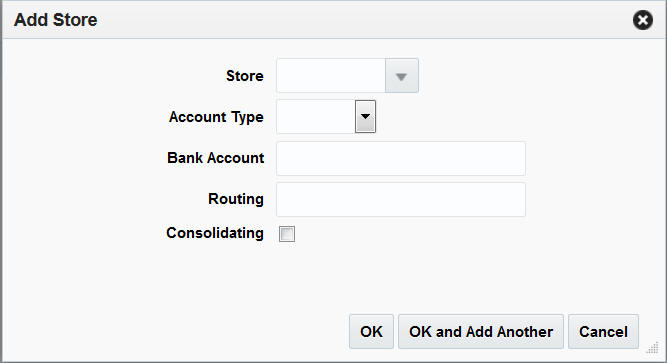
In the Bank Stores table, select Actions > Add. The Add Store window appears.
In the Store field, enter a store ID number, select or search for the store.
In the Account Type field, select the account type the bank has for the store. The options are: Checking, Savings.
In the Bank Account field, enter a bank account number.
In the Routing field, enter the routing number for the bank.
To indicate that the account is a consolidating account, select Consolidating.
Click OK to add a store. You can add more stores by clicking OK and Add Another.
Click Cancel to return to the Bank Stores window.
To delete a bank/store relationship:
From the Tasks menu, select Foundation Data > Bank Store. The Bank Stores window appears.
Select the bank stores you want to delete.
Select Actions > Delete.
Click Yes to confirm deletion.
Click Save and Close to save the changes and close the window.
Audit trails allow you to view the revisions made to a transaction or a total. Summaries allow you to view the transactions that occurred on a Store Day.After modifying the information for a Store Day, you can view the information through audit trails or summaries. After you view the summaries, you can return to the Transaction Maintenance module to update any outstanding issues you find while reviewing the Store Day. For more information on working with the Transaction Maintenance module, see Manage Transactions
To view the revisions of a transaction:
From the Tasks menu, select Operations > Manage Transactions. The Manage Transactions window appears.
Search and select the transaction for which you want to view the audit trail.
Select Actions > View. The Transaction Maintenance window appears.
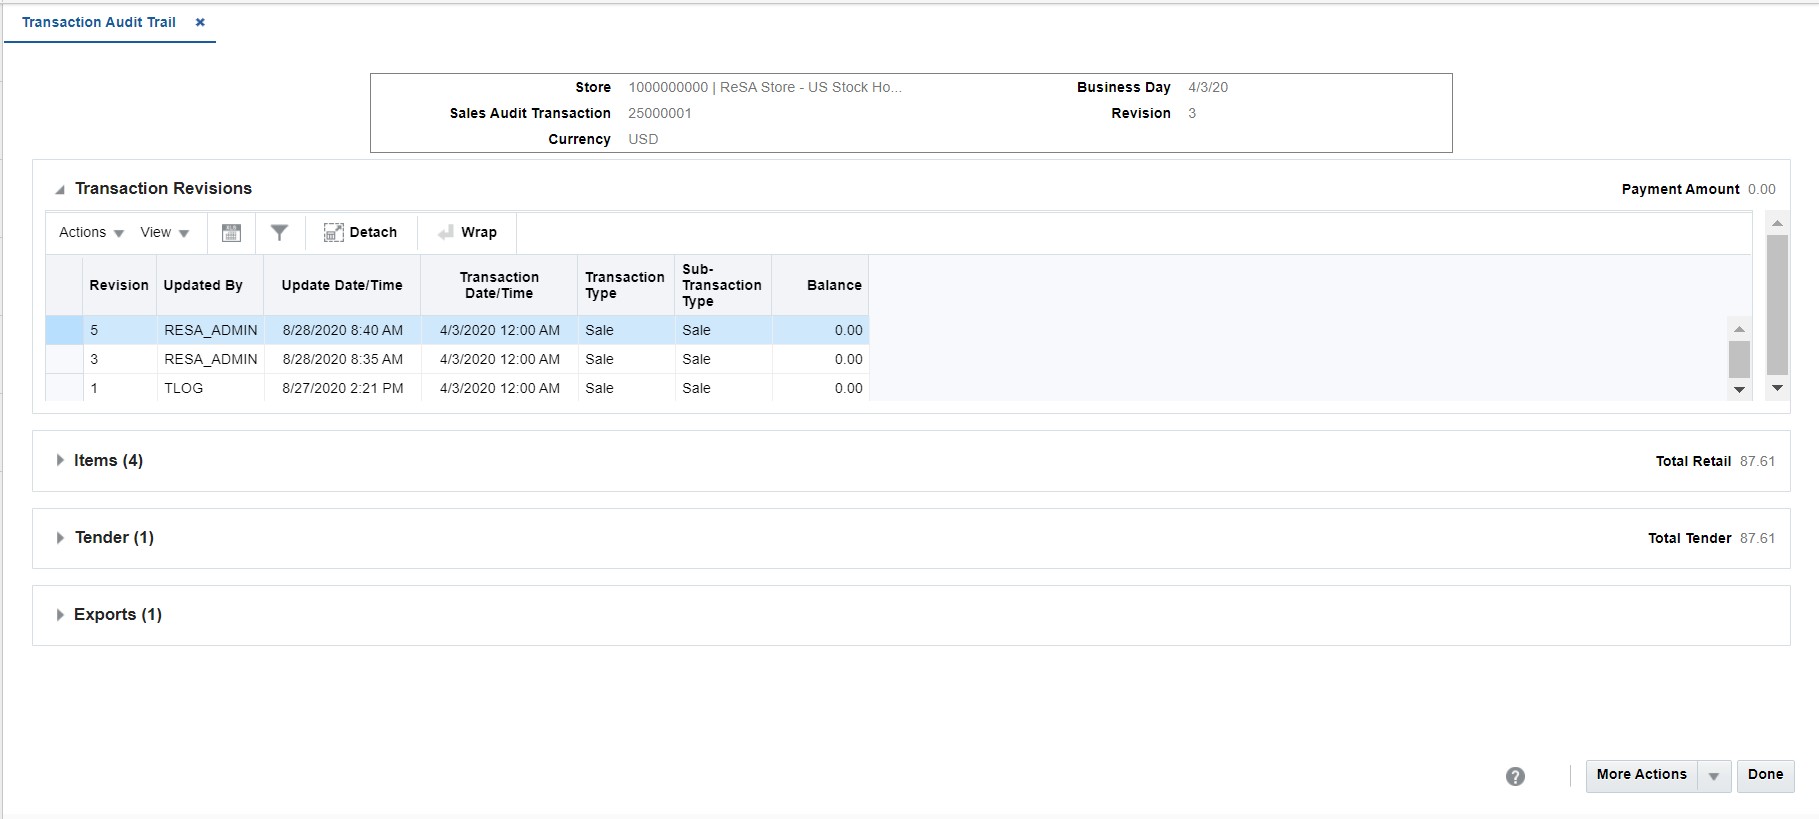
From the More Actions menu, select Transaction Audit Trail.
The Transaction Audit Trail window appears. This window displays an audit trail of all revisions to the transaction.
Select a revision from the table.
To view all revisions in detail:
Item level: Expand the Items section, select an item and expand the Item Revisions section. You can view all the revisions for the selected item.
Tender level: Expand the Tender section, select a tender and expand the Tender Revisions section. You can view all the revisions for the selected tender.
Export level: Expand the Exports section, select an export and expand the Export Revisions section. You can view all the revisions for the selected export.
Click Done to close the window.
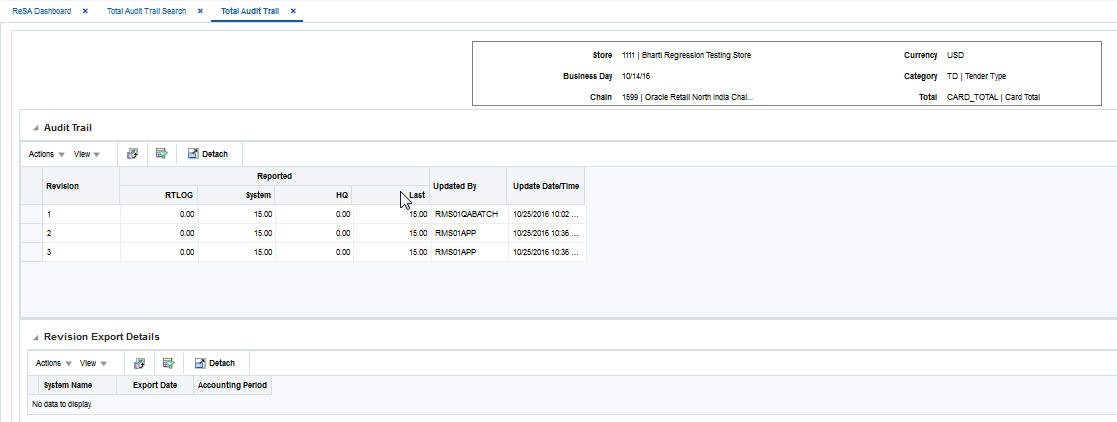
To view a total audit trail:
From the Tasks menu, select Operations > Total Audit Trail. The Total Audit Trail Search window appears.
Enter criteria to make the search restrictive.
Click Search. A list of totals matching the criteria is displayed.
Select a total.
Select Actions > View. The Total Audit Trail window appears.
Click Done to close the window.
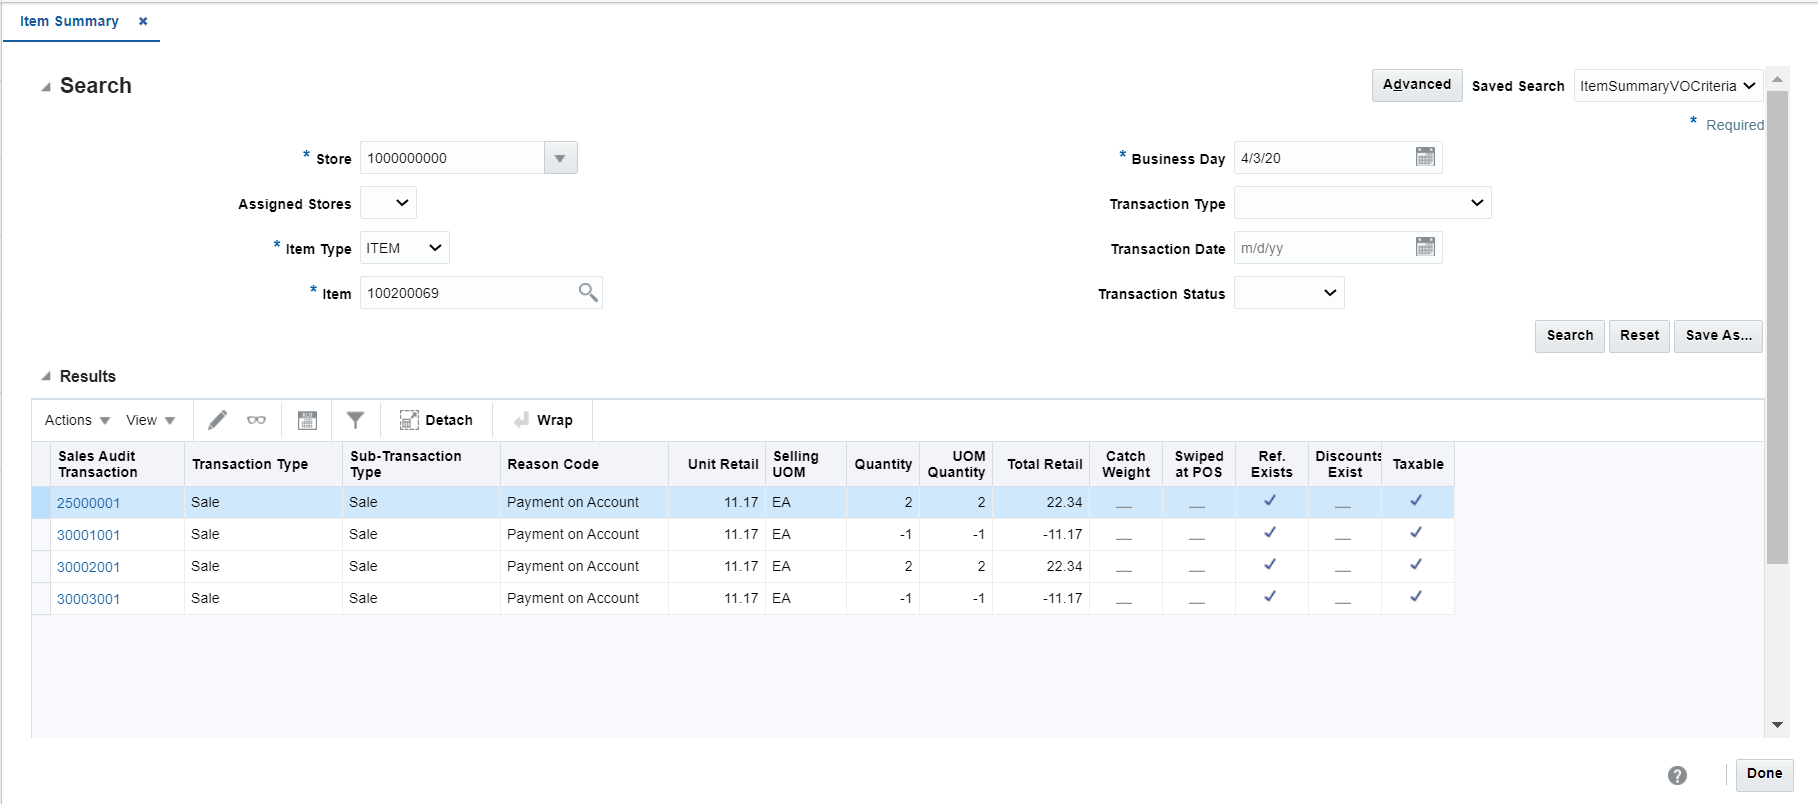
To search for an item summary:
From the Tasks menu, select Operations > Item Summary. The Item Summary window appears.
In the Store field, enter a store number.
In the Item Type field, select an item type.
In the Item field, enter an item number.
In the Business Day field, enter a business day, or click the calendar button and select the date.
Click Search. The table displays the items that match the search criteria.
Click Done to close the window.
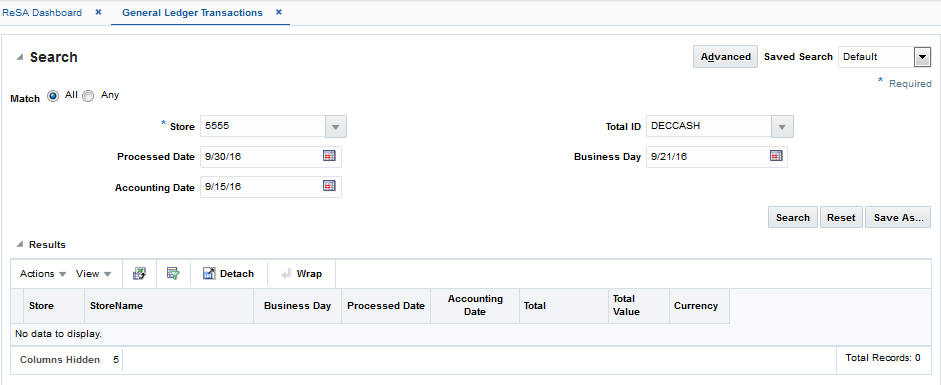
The Sales Audit General Ledger Transactions window facilitates you to search and view transactions related to all the totals in a date range. This window also aids to view finance drill down report and finance drill back report.
To search for general ledger transaction view:
From the Tasks menu, select Operations > General Ledger Transactions. The General Ledger Transactions window appears.
In the Store field, enter a store number.
In the Processed Date field, enter a processed date, or click the calendar button and select the date.
In the Accounting Date field, enter an accounting date, or click the calendar button to select the date.
In the Total ID field, enter or search the total ID.
In the Business Day field, enter a business day, or click the calendar button to select the date.
Click Search. The table displays the items that match the search criteria.
Click Done to close the window.
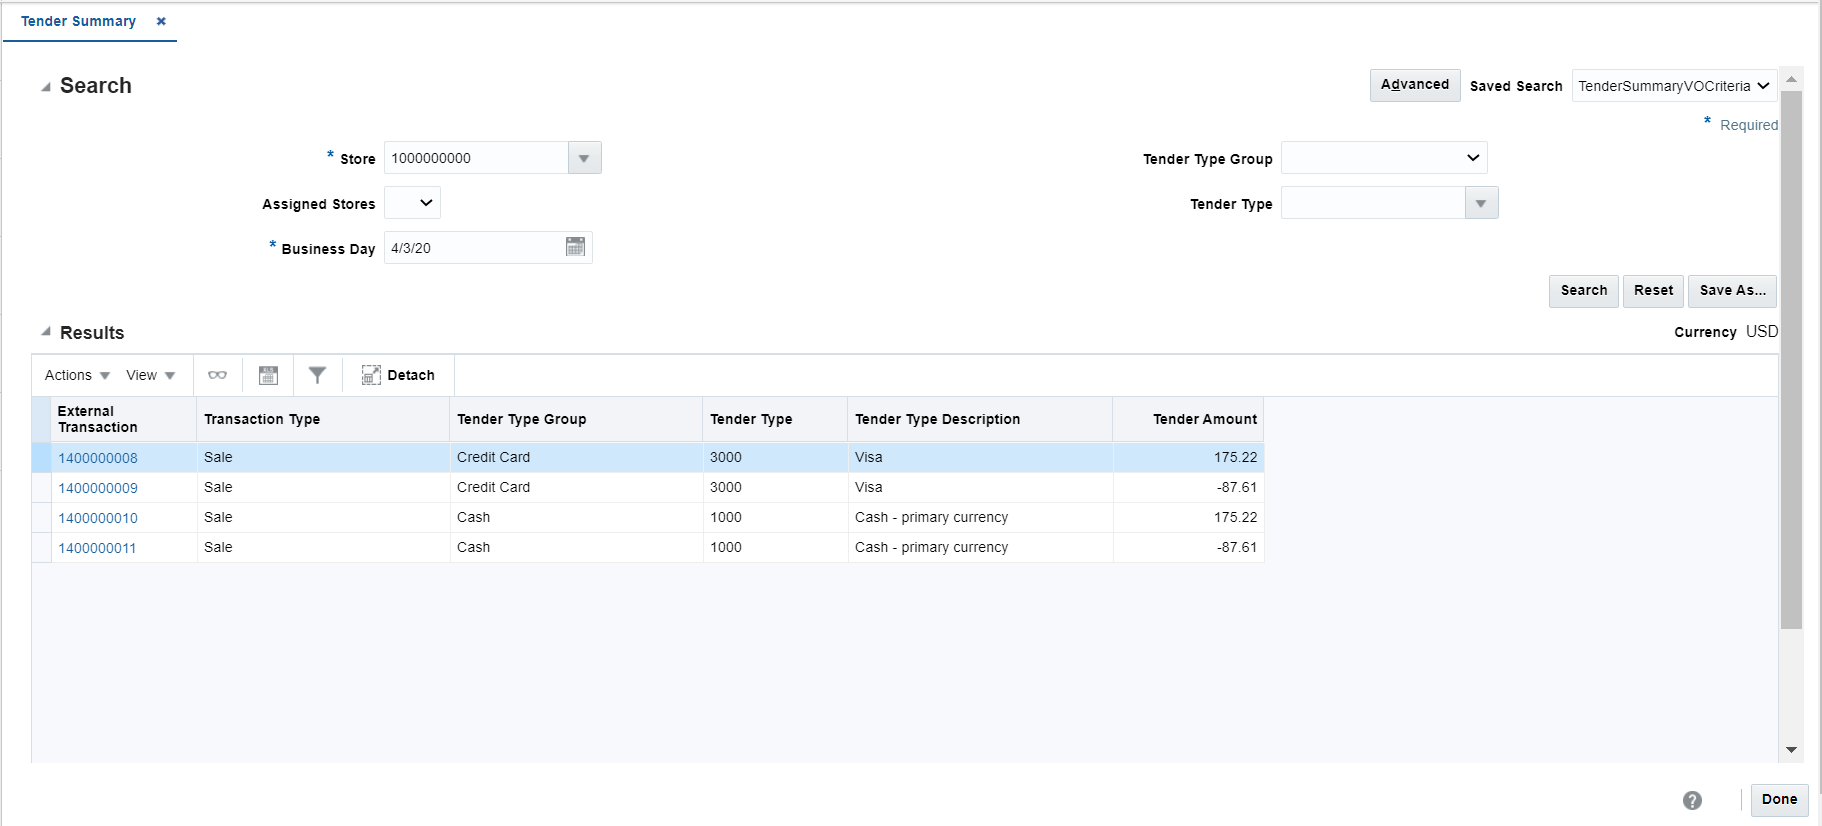
To search for tender summary information:
From the Tasks menu, select Operations > Tender Summary. The Tender Summary window appears.
In the Store field, enter a valid store ID.
In the Business Day field, enter a valid business day, or click the calendar button and select a business day.
To narrow your search, enter or select values in additional search fields.
Click Search. The data matching your search criteria appears.
Click Done to close the window.
As part of normal processing, Sales Audit batch processing will automatically create Store/Days based on configurations for which stores are expected to be open and processing sales for a given day. Creating the store day in Sales Audit creates records that allow Sales Audit to process TLOG files from a store. If a Store Day does not exist in Sales Audit, it will not process unexpected TLOG files for that store/day and cannot be accessed in Sales Audit. In such cases, a user with appropriate security can manually create the store day. If, for some reason, a store was not expected or configured to be open for a specific business day, but that store actually is open for business on that day, a user with appropriate security can manually close the store day.
To create a store day:
From the Tasks menu, select Create Store Day.
The Create Store Day popup opens.
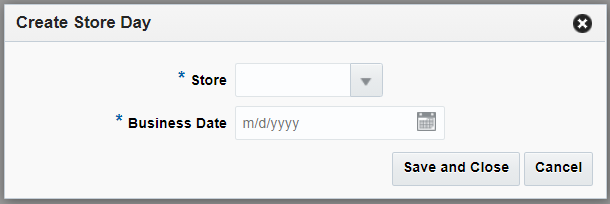
Select a store in the Store field.
Select a date in the Business Day field.
Click Save and Close.
The specified Store Day is created and the Store Day Summary window opens. There will no data for the store day and you can enter transactions through the screens. Sales Audit can now process TLOG files for the Store Day.
You can perform various operations on a store day using the following procedures.
To search for a store day:
From the Tasks menu, select Store Day Audit. The Store Day Search window appears.
In the Store field, select a store.
In the Business Day field, select a date.
In the status fields, select varying status criteria.
Valid Overall Status are:
In Progress
Complete
Valid Data Status are:
Ready for Import
Loading
Partially Loaded
Fully Loaded
Purged
Valid Audit Status are:
Unaudited
Store Errors Pending
HQ Errors Pending
Re-Totaling/Auditing Required
Totaled
Audited
Enter additional criteria as desired to make the search more restrictive.
Click Search. A list of selected stores appears by business date.
Click Done to close the window.
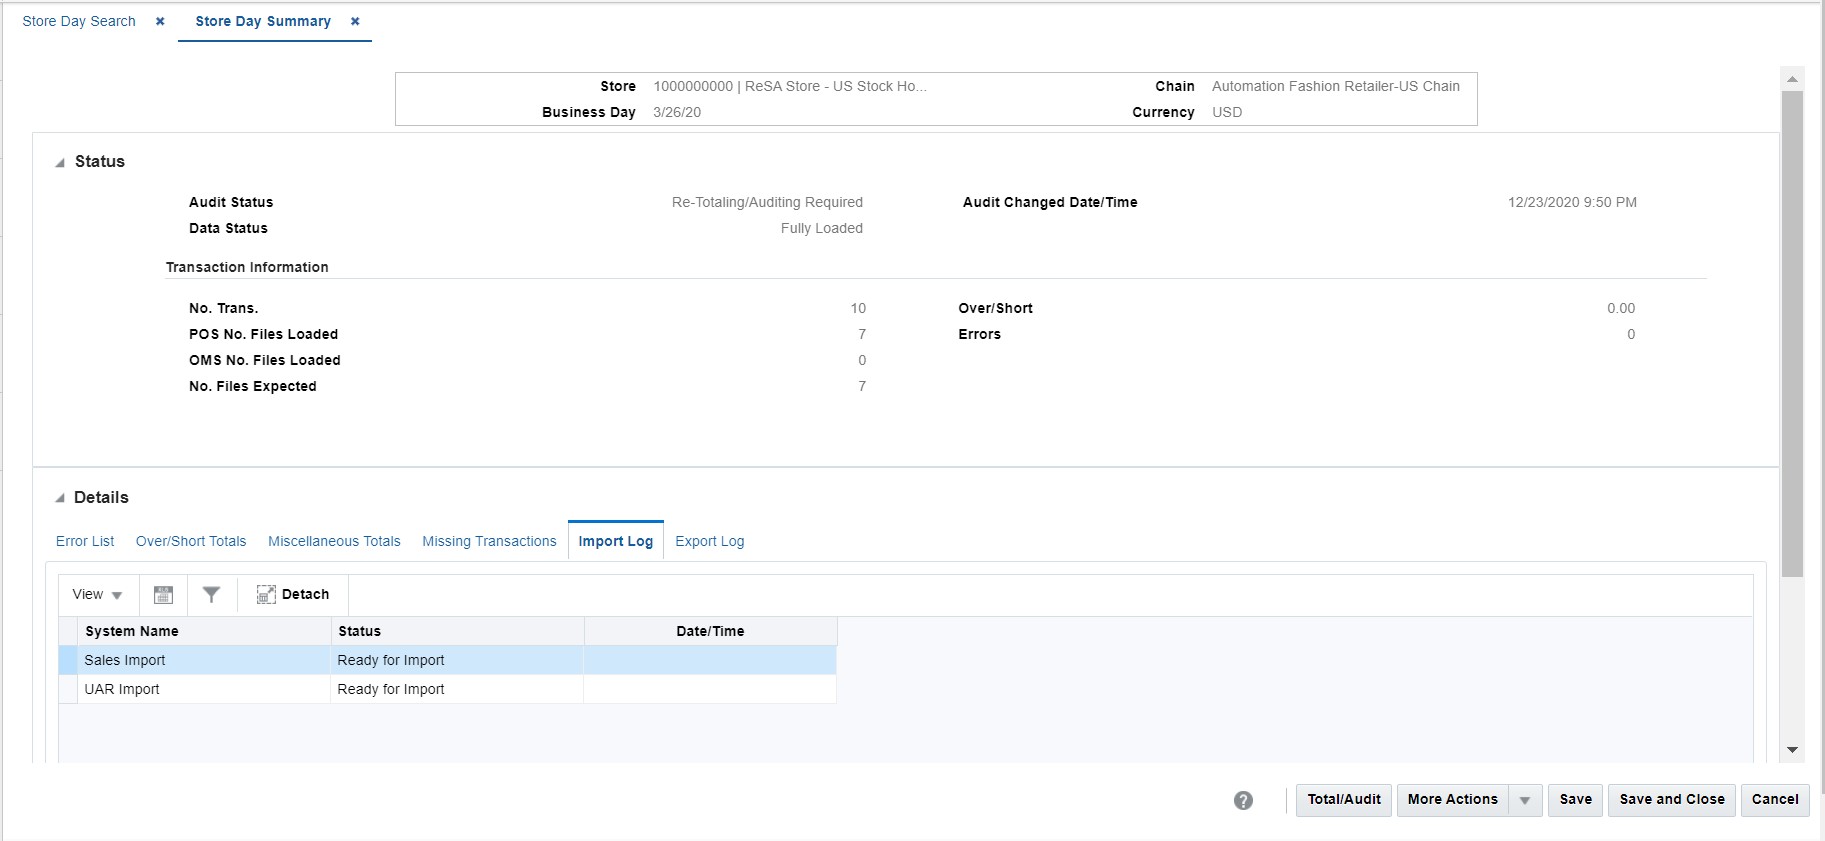
To view the store day summary:
From the Tasks menu, select Store Day Audit. The Store Day Search window appears.
Search for and select a store day.
From the Actions menu, select View. The Store Day Summary window appears.
Click Done to close the window.
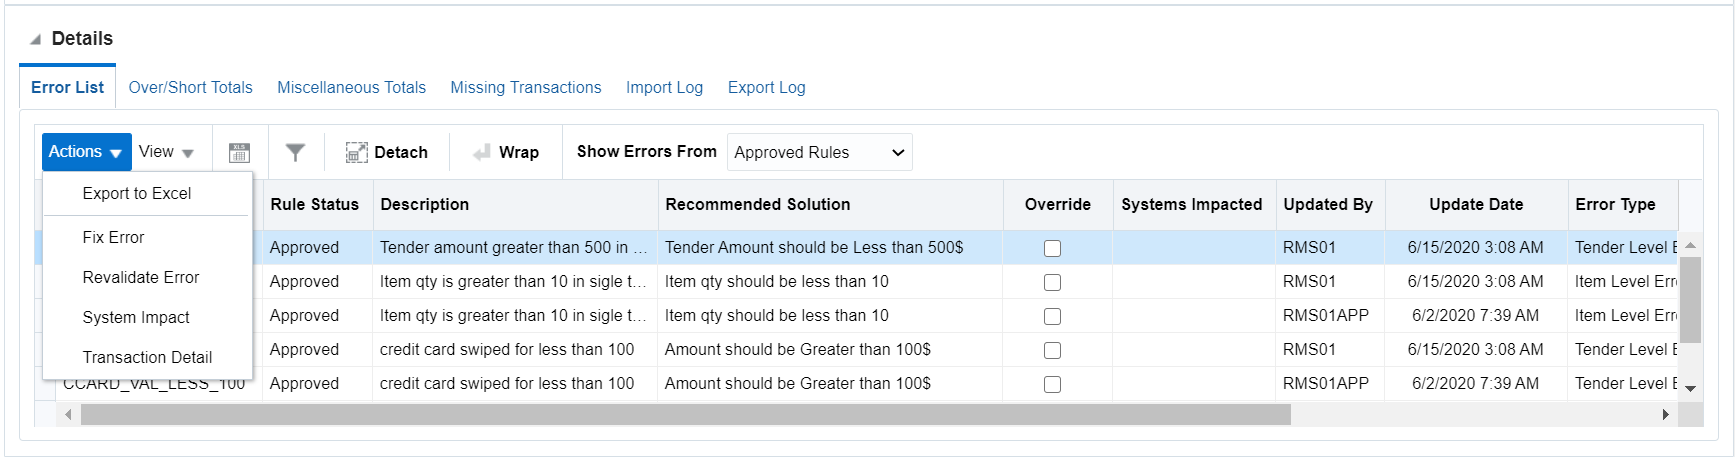
To resolve errors:
From the Tasks menu, select Store Day Audit. The Store Day Search window appears.
Search for and retrieve a store day in Edit mode.
In the Error List tab, select an error from the list.
Select Actions > Fix Error. The Sales Audit window appears.
Resolve the error.
Click OK to save your changes and close the window.
To revalidate errors:
From the Tasks menu, select Store Day Audit. The Store Day Search window appears.
Search for and retrieve a store day in Edit mode.
In the Error List tab, select an error from the list.
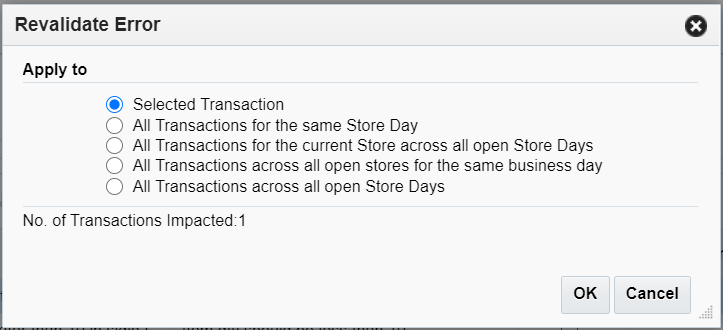
Select Actions > Revalidate Error. A message window appears.
Select the transaction set for revalidation.
Click OK to close the window and run the revalidation process.
To view over/short totals information:
From the Tasks menu, select Store Day Audit. The Store Day Search window appears.
Search for and retrieve a store day in View mode. The Store Day Summary window appears. You can view the Over/Short information in the Over/Short Totals tab.
From the Options menu, select Over/Short Totals. The Over/Short window appears.
According to the information that you want to view, select the appropriate option from the Actions menu.
Select Exports to view the Totals Export window.
Select Audit Trail to view the Audit Trail window.
Click OK to close the window.
To view miscellaneous totals:
From the Tasks menu, select Store Day Audit. The Store Day Search window appears.
Search for and retrieve a store day in View mode. The Store Day Summary window appears. Select the Miscellaneous Totals tab.
From the Actions menu, select Exports, Audit Trail, Combined Total Details, or Errors.
Click Done to close the window.
The Missing Transaction tab allows you to view and update missing transactions. Missing transactions can occur when a transaction number, without any details, is generated at the POS or OMS. Missing transactions may represent transactions that were not properly polled, so you need to add the details. Another possibility is that the transaction numbers were polled erroneously from the POS or OMS, and do not represent actual transactions. You need to delete such transaction numbers.
From the Tasks menu, select Store Day Audit. The Store Day Search window appears.
Search for and retrieve a store day in Edit mode. The Store Day Summary window appears. Select the Missing Transactions tab.
Select an external system transaction to add details.
From the Actions menu, select Edit. The Transaction Maintenance window appears.
Enter the details of the transaction in the appropriate fields.
Click Save to save your changes and close the window.
From the Tasks menu, select Store Day Audit. The Store Day Search window appears.
Search for and retrieve a store day in Edit mode. The Store Day Summary window appears. Select the Missing Transactions tab.
Select the missing transaction.
From the Actions menu, select Delete.
Click Yes to confirm.
Click Done to save your changes and close the window.
To view import/export log:
From the Tasks menu, select Store Day Audit. The Store Day Search window appears.
Search for and retrieve a store day in Edit mode. The Store Day Summary window appears.
Select the Import Log tab to view the import log.
Select the Export Log tab to view the export log.
Click Done to close the window.
To delete a store day:
From the Tasks menu, select Store Day Audit. The Store Day Search window appears.
Search for and retrieve a store day in Edit mode. The Store Day Summary window appears.
From the More Actions menu, select Delete Store Day. A popup window appears.

Click Yes to confirm.
To reopen a store day:
From the Tasks menu, select Store Day Audit. The Store Day Search window appears.
Search for and retrieve a store day in Edit mode. The Store Day Summary window appears.
From the More Actions menu, select Reopen Store Day.
|
Note: The Reopen Store Day function is only available if the Audit Status is Audited, the Data Status is Fully Loaded, the Store Day Status is Closed, and the Business Date is greater than last end of month date. |
The Audit Status is set to Unaudited. The Data Status is set to Ready for Import and the Audit Changes Date/Time is updated. Click Save or Save and Close to save your changes.