| Oracle® Retail Sales Audit Cloud Service User Guide Release 19.3.000 F83171-01 |
|


 Previous |
 Next |
| Oracle® Retail Sales Audit Cloud Service User Guide Release 19.3.000 F83171-01 |
|
Previous |
Next |
Before you proceed with processing the raw transaction data, you need to set up system options to allow importing and exporting data from Sales Audit. This chapter covers the following topics:
Use the system administration module of the Sales Audit application to customize information for your organization.
You can change system options to configure system validations around escheatment, voucher options, and information related to the Automated Clearing House (ACH).
You can customize various parameters, defaults, and constants that are used throughout the system. Normally, these elements are set when Sales Audit is installed by the system or database administrator. They tend to remain fixed unless a business practice is changed which necessitates a change in Sales Audit.
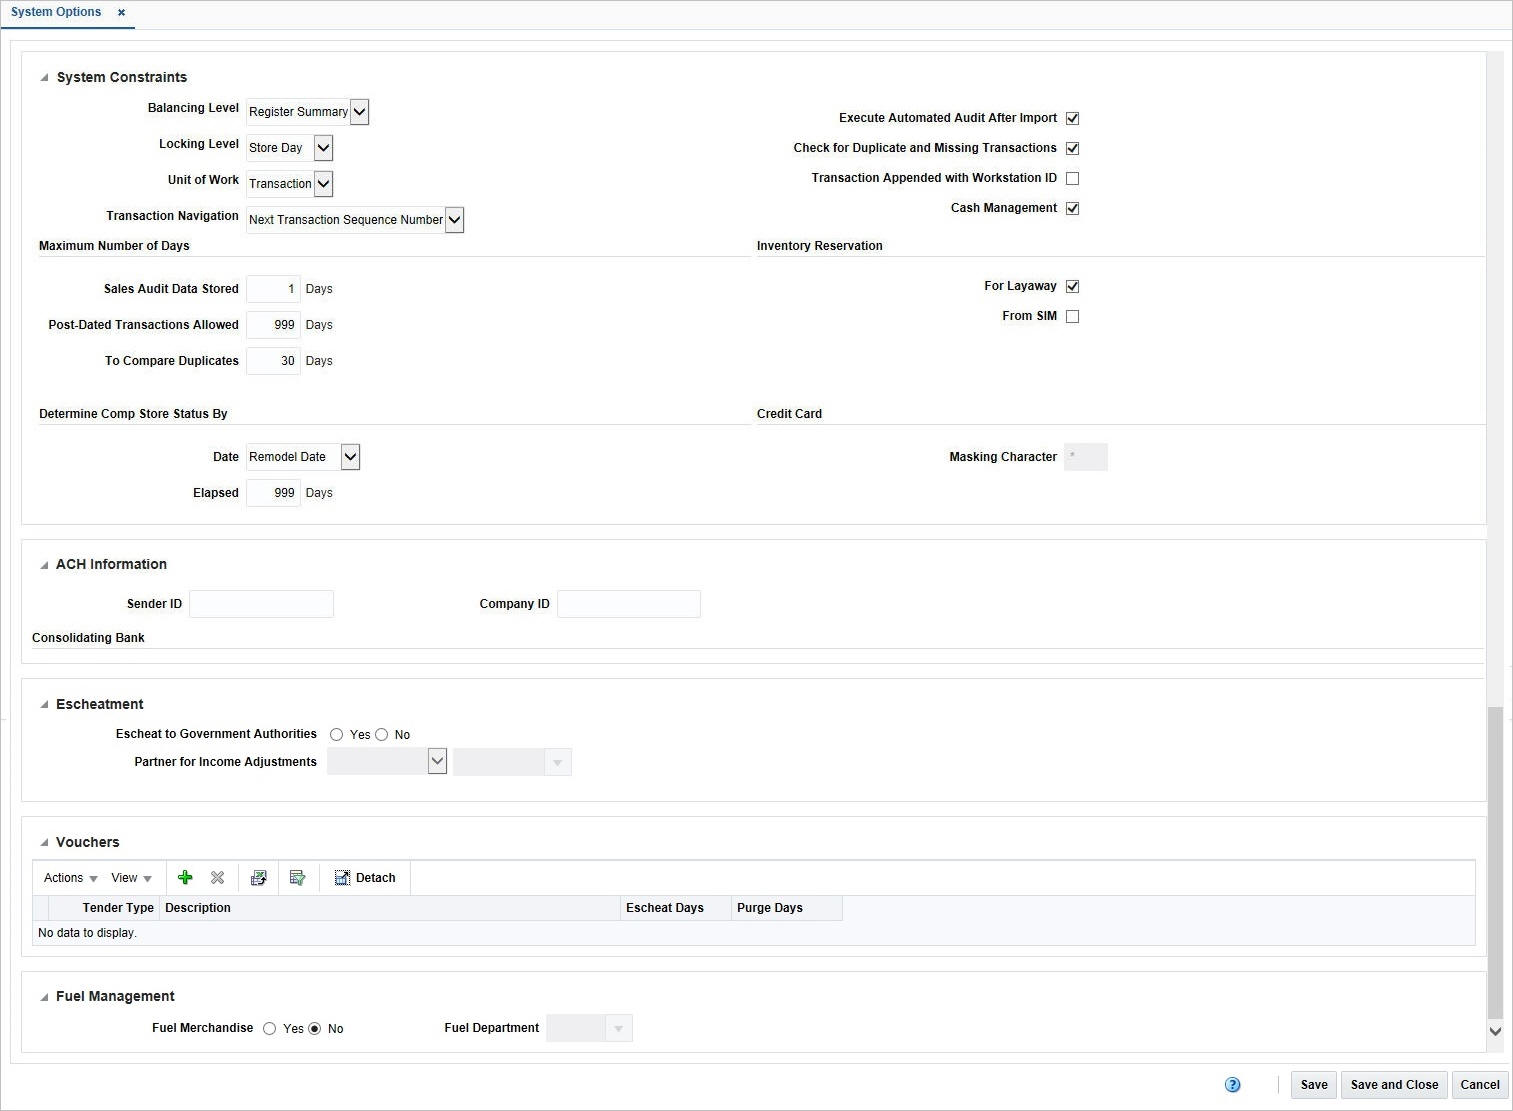
A System Administrator can set the following system options in Sales Audit.
Balancing Level: Define the level (Cashier, Register, and Store) at which the system totals are summarized and reconciled against the reported value.
Locking Level: Defines the level at which locking is done in Sales Audit. It can be done either at the Store Day level or at the Transaction level.
Unit of Work: Defines the level at which transactions are processed within Sales Audit. It is used to determine when to export data to external systems, and it needs to indicate that a transaction or store day must be free of any errors that prevent export.
For Transaction level, an individual transaction is exported from Sales Audit as soon as it is validated.
For Store Day level, the data imported in Sales Audit is exported only once the entire store day is processed.
Maximum Number of Days Sales Audit Data Stored: Defines the number of days for which the audited data is stored in the Sales Audit system.
Maximum Number of Days Post-Dated Transactions Allowed: Define the number of days after a store day has elapsed, within which backdated transactions will be permitted for upload into the system.
Maximum Number of Days to Compare Duplicates: Defines the number of previous days over which the Sales Audit system should look for duplicate transactions.
Inventory Reservation for Layaway: Specifies whether the inventory for Layaway orders is reserved.
Inventory Reservation from SIM: Specifies whether the inventory reserve for customer orders will come from Store Inventory Management or Sales Audit will generate the flat file for Merchandising.
Determine Comp Store Status By
Date: Indicates which of the three following dates (Store Open Date, Acquire Date and Remodel Date) that form a part of the store definition, will be used as the basis for determining whether a store qualifies as a comparison store or not
Elapsed Days: Indicates that the number of days that must have passed since the "Comparison Store Basis Date" for a store to qualify as a comparison store.
ACH Information
Sender ID: Contains the ID used by the originator to identify itself to the Originating Financial Depository Institution (ODFI).
Company ID: Contains the alphanumeric code to identify the company. The first character may be the ANSI one-digit Identification Code Designators (ICD). For example, 1 IRS Employer ID Number or 9 User Assigned Number.
Consolidating Bank
Name: Contains the name of the Originating Financial Depository Institution (ODFI), it is the name of the central bank at which funds from all branches are collected.
Routing: Contains the routing number of the consolidating bank.
Account: Contains the account number of the consolidating bank.
Execute Automated Audit After Import: Indicates whether the automated audit should run after each import or if the Sales Audit system should wait until the transaction data for the entire store day is loaded.
Store Days Must Be Worked in Order: Indicates whether the Sales Audit system can close a current day if the previous day is still open.
Check for Duplicate and Missing Transactions: Indicates whether the Sales Audit application should look for duplicate and missing transactions. Sales Audit can accept duplicate transaction numbers from OMS and POS. If this field is set as 'Y', then Sales Audit filters duplicate transactions when the transaction is originating from the same system. Whereas, if the transaction is originating from a different system, then a different sequence number is inserted in the record.
Transaction Appended with Workstation ID: Indicates whether Sales Audit should append the workstation ID of the employee with their employee ID.
Cash Management: Indicates whether Cash Management will be used within the system. Valid values are 'Y' and 'N'.
Partner ID: Specify whether the partner ID is unique across all partner types.
Partner for Income Adjustments: Specify the type of the partner the deal applies to. Valid values are: S1 for supplier hierarchy level 1, S2 for supplier hierarchy level 2, and S3 for supplier hierarchy level 3.
Credit Card Masking Character: Specify the masking character used for credit/debit card numbers.
Default Chain: Defines the primary chain.
Fuel Merchandise: Specify whether items for audit include fuel items.
Fuel Department: If the items for audit include fuel item, specifies the department the fuel items reside in.
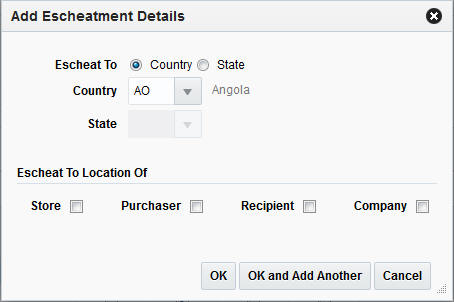
Escheatment Details: Specify whether you would like to escheat vouchers (such as, gift certificates and credit vouchers) back to the state after a defined period of time. The value in the Escheatment field depends on the laws of the state/area where your organization's headquarters is located.
To add Escheatment details:
From the Tasks menu, select Foundation Data > Application Administration > System Options. The System Options window appears.
In the Escheatment section, select Yes in the Escheat to Government Authorities field.
Select the appropriate option in the Partner for Income Adjustment field.
In the Escheatment Details section, select Actions > Add. Add Escheatment Details window appears.
In the Escheat To field, select either Country or State.
If you select country, in the Country field, enter the country code, or select the country.
If you select state, in the Country and State fields, enter the country and state codes, or select them from the list.
In the Escheat To Location Of field, select the location to which the escheatment should be applied.
Click OK to save your changes and close the window.
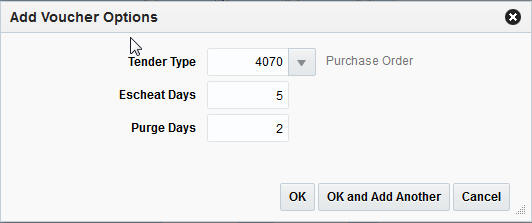
To define Voucher Options:
From the Tasks menu, select Foundation Data > Application Administration > System Options. The System Options window appears.
In the Vouchers section, select Actions > Add. The Add Voucher Options window appears.
In the Tender Type field, select the tender type.
In the Escheat No. Days field, enter the desired number of escheatment days.
In the Purge No. Days field, enter the number of days a voucher will be valid before it is purged from Merchandising.
Click OK to save your changes and close the window.
Sales Audit allows the setup and configuration of a set of standard templates which allow you to upload and update data using spreadsheets. These spreadsheets can be uploaded to the system using the Upload Data window.
The following process is followed to update data for the above Sales Audit modules:
Download the spreadsheet template for the module you want to update using the Download Data window.
Make the updates in the spreadsheet.
Upload the data using the Upload Data window.
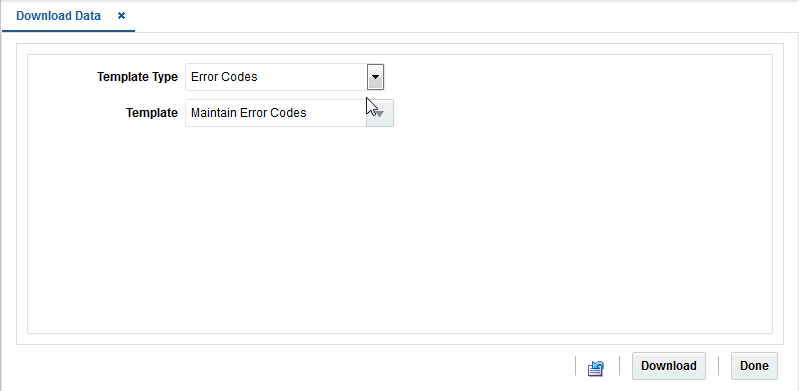
To download data as spreadsheets:
From the Tasks menu, select Foundation Data > Data Loading > Download Data. The Download Data window appears.
In the Template Type field, select the type of template.
The following template types are available:
Error Codes
GL Cross Reference
Reference Fields
Currency Rounding Rules
Store Data
Tender Types
Constants
In the Template field, select the template you want to download.
Click Download.
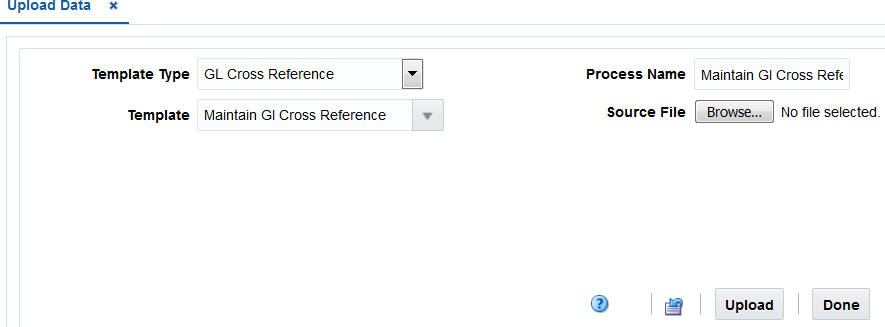
To upload data using spreadsheets:
From the Tasks menu, select Foundation Data > Data Loading > Upload Data. The Upload Data window appears.
In the Template Type field, select the type of template.
The following template types are available:
Error Codes
Reference Field
Currency Rounding Rules
GL Cross Reference
Store Data
Tender Types
Constants
In the Template field, select the template of the spreadsheet.
Enter a process name in the Process Name field. The value specified in this field enables you to find the process created to identify the status of the upload and view any errors that were identified.
Select the spreadsheet to be uploaded in the Source File field.
Click Upload. The relevant data corresponding to the template is uploaded into the spreadsheet file specified.
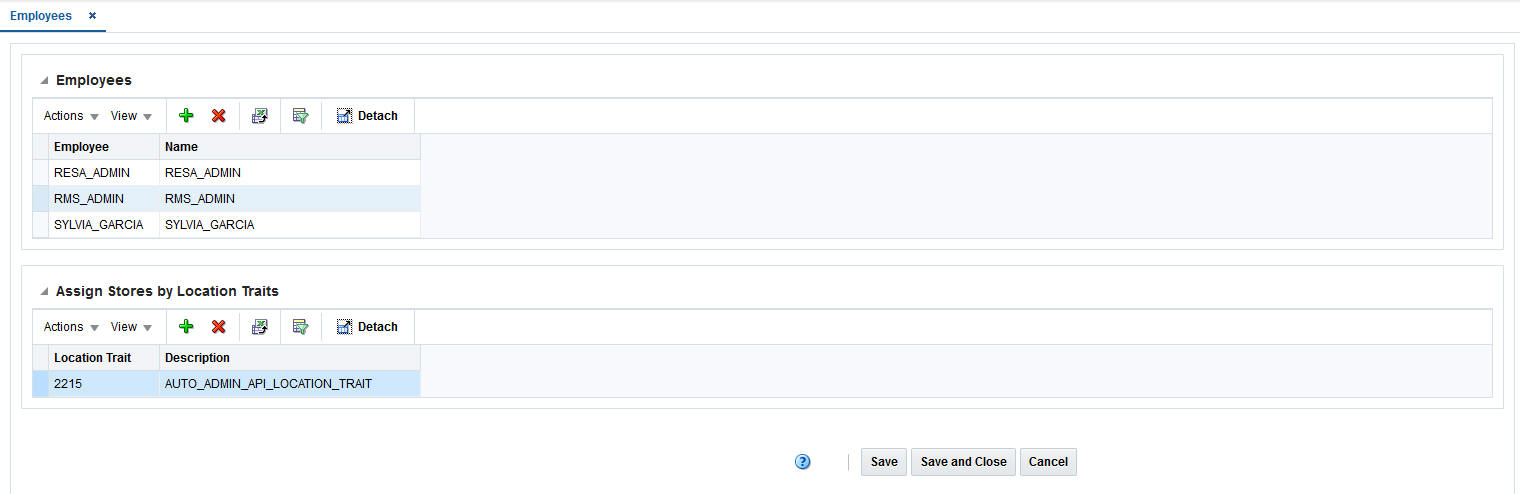
The Employees window is used for associating auditors with the locations based on location traits in the system. This window has two tables, the Employees table and the Assign Stores by Location Traits table. Data displayed in the Assign Stores by Location Traits is based on the records elected in the Employees table. The Employees table displays the Employee ID and the associated display name from the LDAP.
To add an employee:
From the Tasks menu, select Foundation Data > Application Administration > Employees. The Employees window appears.
In the Employees table, select Actions > Add. The Add Employee window appears.
Enter the employee name in the Employee field.
Click OK. If the employee exists in LDAP, the employee name is added.
After an employee is added, you must assign stores using a location trait to the employee.
To assign a location trait:
From the Tasks menu, select Foundation Data > Application Administration > Employees. The Employees window appears.
Select an employee from the Employees table.
In the Assign Stores by Location Traits table, select Actions > Add. The Add Location Trait window appears.
Select the location trait in the Location Trait field.
Click OK. The location trait is assigned to the selected employee.