4 Configuring MAF Application Features
This chapter includes the following sections:
4.1 Introduction to MAF Application Features
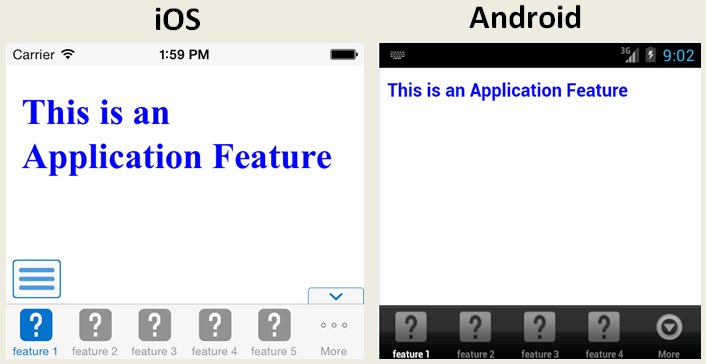
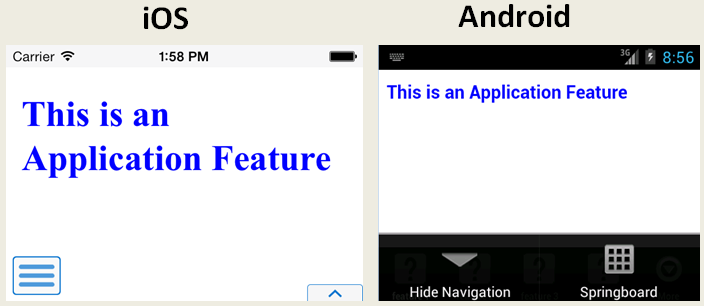
You can configure the MAF application to control the display behavior of the springboard and the navigation bar in the following ways:
-
Hide or show the springboard and navigation bar to enable the optimal usage of the mobile device's interface. These options override the default display behavior for the navigation bar, which is shown by default unless otherwise specified by the application feature.
-
Enable the springboard to slide from the right. By default, the springboard does not occupy the entire display, but instead slides from the left, pushing the active content (which includes the navigation bar's Home button and application features) to the right.
4.2 Configuring Application Navigation
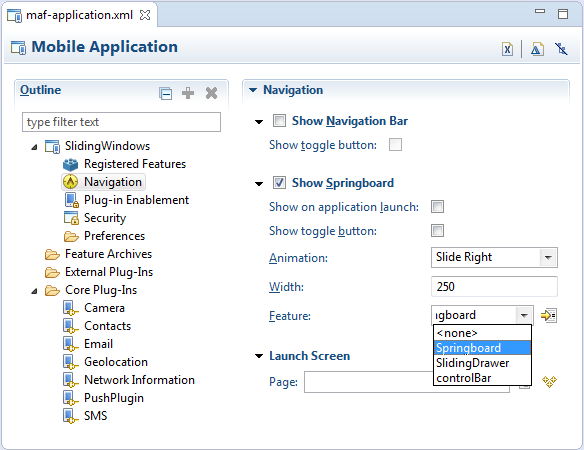
The Navigation options of the Applications page, shown in Figure 4-1, enable you to hide or show the navigation bar, select the type of springboard used by the application, and define how the springboard reacts when users page through applications.
Figure 4-1 The Navigation Options of the Application Page
4.2.1 How to Set the Display Behavior for the Navigation Bar
The default behavior for a MAF application is to show the navigation bar on application launch. You can change this default behavior in the MAF Application editor.
To set the display behavior for the navigation bar:
4.2.2 How to Set the Display Behavior for the Springboard
By default, a MAF application does not show a springboard on application launch. You can change this default behavior in the MAF Application editor.
To set the display behavior for the springboard:
4.2.3 How to Set the Slideout Behavior for the Springboard
If you configure your MAF application to use a springboard, you can set the slideout behavior of the springboard in the MAF Application Editor.
To set the slideout behavior for the springboard:
4.2.4 How to Set the Display Order for Application Features
You set the display order for application features in the Feature References page of the maf-application.xml overview editor.
To set the display order for application features:
The springboard and the navigation bar display by default. If both the navigation bar and springboard options are not selected, then the application feature only displays if it is in the first position.
Note:
Because springboard applications do not display on the navigation bar or within the springboard of a MAF application, Show on navigation bar and Show on springboard must both be deselected for feature references used as custom springboard application features.
4.3 What Happens When You Configure the Navigation Options
Setting the springboard and navigation bar options updates or adds elements to the adfmf:application.xml file's <adfmf:navigation> element. For example, selecting None results in the code updated with <springboard enabled="false"> as illustrated in the following example.
<adfmf:application>
  ...
  <adfmf:navigation>
     <adfmf:navigationBar enabled="true"/>
     <adfmf:springboard enabled="false"/>
  </adfmf:navigation>
</adfmf:application>
Tip:
By default, the navigation bar is enabled, but the springboard is not. If you update the XML manually, you can enable the springboard as follows:
<adfmf:application>
  ...
<adfmf:navigation>
    <adfmf:springboard enabled="true"/>
  </adfmf:navigation>
  ...
</adfmf:application>
The first example below illustrates how the enabled attribute is set to true when you select the options.
Tip:
Because the springboard fills the entire screen of the device, the navigation bar and the springboard do not appear simultaneously.
If you select Custom and then select the application feature used as the springboard, the editor populates the <adfmf:navigation> element as illustrated in the second example. The id attribute refers to an application feature defined in the maf-feature.xml file that is used as a custom springboard.
<adfmf:application>
  ...
  <adfmf:navigation>
     <adfmf:navigationBar enabled="true"/>
     <adfmf:springboard enabled="true"/>
  </adfmf:navigation>
</adfmf:application>
<adfmf:navigation>
    <adfmf:springboard enabled="true">
      <adfmf:springboardFeatureReference id="springboard"/>
    </adfmf:springboard>
  </adfmf:navigation>
4.4 What Happens When You Set the Animation for the Springboard
The example at the end of this section shows the navigation block of the maf-application.xml file, where the springboard is set to slide out and occupy a specified area of the display (213 pixels).
The following line disables the animation:
<adfmf:springboard enabled="true" animation="none"/>
The following line sets the springboard to occupy 100 pixels from the left of the display area and also enables the active application feature to occupy the remaining portion of the display:
<adfmf:springboard enabled="true" animation="slideright" width="100px"/>
In addition to the animation, the example below demonstrates the following:
-
The use of the
showSpringboardAtStartupattribute, which defines whether the springboard displays when the application starts. (By default, the springboard is displayed.) -
The use of the
navigationBar'sdisplayHideShowNavigationBarControlattribute.
To prevent the springboard from displaying, set the enabled attribute to false.
<adfmf:navigation>
   <adfmf:navigationBar enabled="true"
                        displayHideShowNavigationBarControl="true"/>
   <!-- default interpretation of width is pixels -->
   <adfmf:springboard enabled="true"
                      animation="slideright"
                      width="213"
                      showSpringbaordAtStartup="true"/>
</adfmf:navigation>
4.5 What You May Need to Know About Custom Springboard Application Features with HTML Content
The default HTML springboard page provided by MAF uses the following technologies, which you may also want to include in a customized login page:
-
CSS—Defines the colors and layout.
-
JavaScript—The
<script>tag embedded within the springboard page contains references to the methods described in Local HTML and Application Container APIs that call the Apache Cordova APIs. In addition, the HTML page uses JavaScript to respond to the callbacks and to detect page swipes. When swipe events are detected, JavaScript enables the dynamic modification of the style sheets to animate the page motions.A springboard authored in HTML (or any custom HTML page) can leverage the Apache Cordova APIs by including a
<script>tag that references thebase.jslibrary. You can determine the location of this library (or other JavaScript libraries) by first deploying a MAF application and then locating thewww/jsdirectory within platform-specific artifacts in the deploy directory. For an Android application, thewww/jsdirectory is located within the Android application package (.apk) file at:application workspace directory/deploy/deployment profile name/deployment profile name.apk/assets/www/jsFor iOS, this library is located at:
application workspace directory/deploy/deployment profile name/temporary_xcode_project/www/jsFor more information, see Using MAF APIs to Create a Custom HTML Springboard Application Feature.
-
WebKit—Provides smooth animation of the icons during transitions between layouts as well as between different springboard pages. For more information on the WebKit rendering engine, see
http://www.webkit.org/.
Springboards written in HTML are application features declared in the maf-feature.xml file and referenced in the maf-application.xml file.
4.6 What You May Need to Know About Custom Springboard Application Features with MAF AMX Content
Like their HTML counterparts, springboards written using MAF AMX are application features that are referenced by the MAF application. Because a springboard is typically written as a single MAF AMX page rather than as a task flow, it uses the gotoFeature method to launch the embedded application features.
Note:
A custom springboard page (authored in either HTML or MAF AMX) must reside within a view project which also contains the maf-feature.xml file.
The default springboard (springboard.amx, illustrated in the following example) is implemented as a MAF AMX application feature.
<?xml version="1.0" encoding="UTF-8" ?>
<amx:view xmlns:xsi="http://www.w3.org/2001/XMLSchema-instance"
          xmlns:amx="http://xmlns.oracle.com/adf/mf/amx"
          xmlns:dvtm="http://xmlns.oracle.com/adf/mf/amx/dvt">
   <amx:panelPage id="pp1">>
      <amx:facet name="header">
         <amx:outputText value="#{bindings.name.inputValue}" id="ot3"/>
      </amx:facet>
      <amx:listView var="row"
                    value="#{bindings.features.collectionModel}"
                    fetchSize="#{bindings.features.rangeSize}"T
                    id="lv1"
                    styleClass="amx-springboard">
         <amx:listItem showLinkIcon="false"
                       id="li1"
                       actionListener="#{bindings.gotoFeature.execute}">
            <amx:tableLayout id="tl1"
                             width="100%">
               <amx:rowLayout id="rl1">
                  <amx:cellFormat id="cf11"
                                  width="46px"
                                  halign="center">
                      <amx:image source="#{row.image}"
                                 id="i1"
                                 inlineStyle="width:36px;height:36px"/>
                  </amx:cellFormat>
                  <amx:cellFormat id="cf12"
                                  width="100%"
                                  height="43px">
                     <amx:outputText value="#{row.name}"
                                     id="ot2"/>
                  </amx:cellFormat>
               </amx:rowLayout>
            </amx:tableLayout>
               <amx:setPropertyListener from="#{row.id}"
                                        to="#{pageFlowScope.FeatureId}"/>
         </amx:listItem>
      </amx:listView>
   </amx:panelPage>
</amx:view>
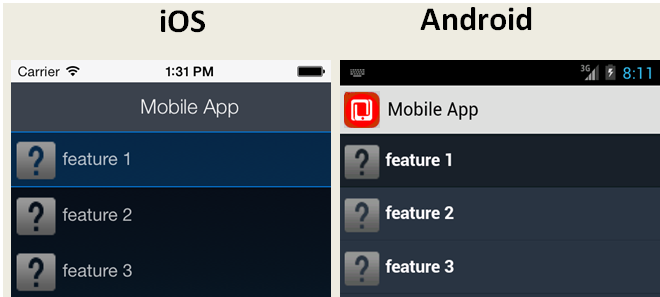
As shown in Figure 4-6, a MAF AMX file defines the springboard using a List View whose List Items are the MAF application's embedded application features. These application features, once deployed, are displayed by their names and associated icons. The gotoFeature method of the AdfmfContainerUtilities API provides the page's navigation functions. For a description of using this method to display a specific application feature, see gotoFeature. See also How to Use List View and List Item Components.
Figure 4-6 The Default Springboard
MAF provides the basic tools to create a custom springboard (or augment the default one) in the ApplicationFeatures data control. This data control, illustrated in Figure 4-7, enables you to declaratively build a springboard page using its data collections of attributes that describe both the MAF application and its application features. For an example of a custom springboard page, see the APIDemo sample application. For more information on this application (and other samples that ship with MAF), see MAF Sample Applications..
Figure 4-7 ApplicationFeatures Data Control
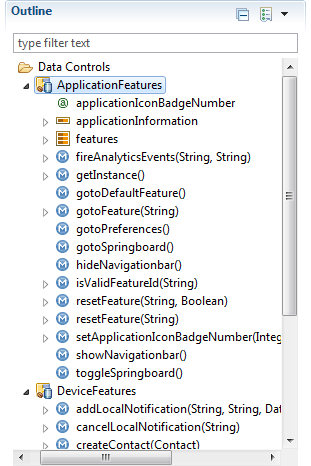
The ApplicationFeatures data control exposes methods that the AdfmfContainerUtilities class from the following package provides to implement navigation in a MAF application:
oracle.adfmf.framework.api
Table 4-1 describes some of the methods that you can drag from the ApplicationFeatures data control and drop on a MAF AMX page to navigate in your MAF application.
For more information about using data controls, see Using Bindings and Creating Data Controls in MAF AMX. For more information about the AdfmfContainerUtilities class, see .
Table 4-1 Application Feature Methods
| Method | Description |
|---|---|
|
|
Navigates to default application feature. |
|
|
Navigates to a specific application as designated by the parameter that is passed to this method. |
|
|
Navigates to the preferences page. |
|
|
Navigates to the springboard. |
|
|
Hides the navigation bar. |
|
|
Displays the navigation bar (if it is hidden). |
|
|
Resets the application feature that is designated by the parameter passed to this method. |
|
|
Hides the springboard. |
|
|
Shows the springboard. |
|
|
Toggles the display of the springboard. |
4.7 What You May Need to Know About the Runtime Springboard Behavior
If you chose the Show on application launch option and defined the slideout width to full size of the screen, then MAF loads the default application feature in the background at startup. When the MAF application hibernates, MAF hides the springboard.
4.8 Navigating a MAF Application Using Android's Back Button
End users can navigate backwards on MAF applications using the Android system's Back button.
Figure 4-8 shows the Android system's Back button that appears on the Android navigation bar or on the Android device itself. Figure 4-8 shows the Android 4.x and Android 5.x versions of the navigation bar where this button appears.
Figure 4-8 Android's Back Button

Figure 4-9 shows a navigation flow on a MAF application where an end user has navigated between three application features (Customer, Sales, and Billing) to the Billing Page 3 page of the Billing application feature.
Figure 4-9 Navigation Flow Between Application Features and Pages in a MAF Application
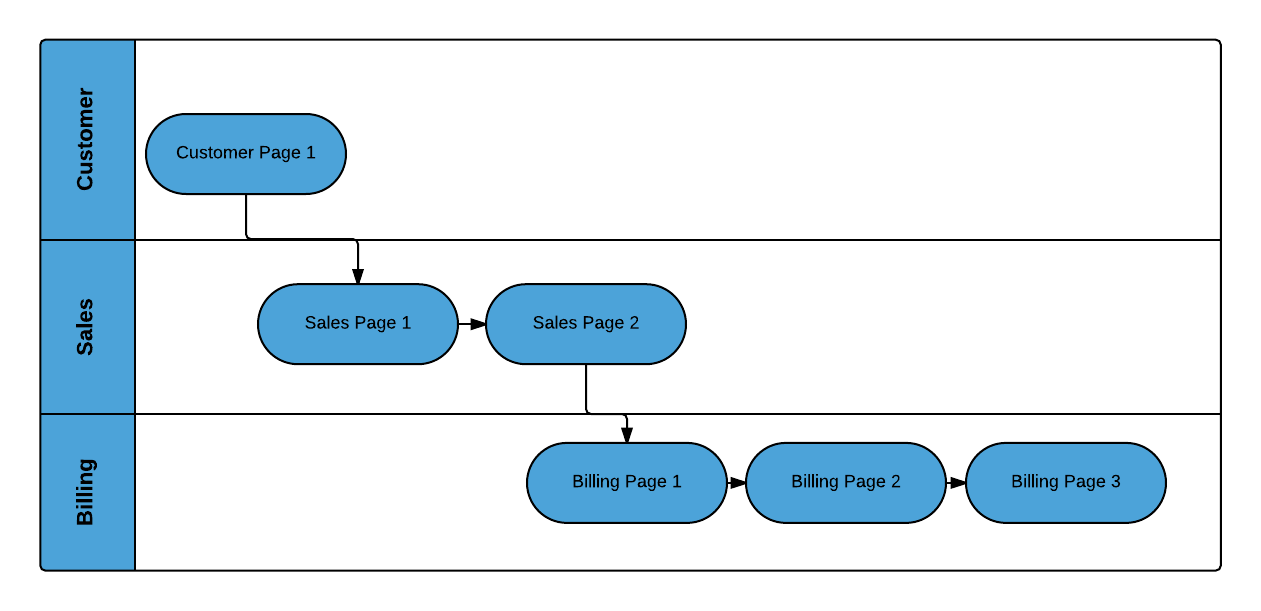
The default MAF application behavior in response to an end user tapping Android's system Back button on:
-
Billing Page 3 is to navigate to Billing Page 2
-
Billing Page 2 is to navigate to Billing Page 1
-
Billing Page 1 is to hibernate the MAF application
An end user may choose to tap Android's system Back button instead of a MAF AMX button that you expose on the UI with a value of __back for the action attribute. The behavior is the same in both scenarios. Assume, for example, that all 3 pages in the Billing application feature expose a button component with an action attribute set to __back. The backward navigation flow in this scenario is from Page 3 to Page 2, Page 2 to Page 1, and for the MAF application to hibernate if the end user taps the command button on Page 1.
You can override the default MAF application behavior in response to an end user tapping the Android system Back button so that the MAF application navigates elsewhere or executes some logic prior to navigating backwards. MAF provides JavaScript APIs and the MAF AMX System Action Behavior (systemActionBehavior) component that you can use to override the default MAF application behavior. The systemActionBehavior component can only be used where your application feature's content is MAF AMX pages. JavaScript can be used to override the default behavior on application features that use MAF AMX pages, local HTML or remote URLs. You can use the registerSystemActionOverride JavaScript method to register a handler to be invoked when an end user taps the Android Back button. Use the unregisterSystemActionOverride JavaScript method to remove a handler from being invoked. Both methods are in the adf.mf.api namespace. For more information, see .
For more information about using the systemActionBehavior component, see HowHow to Configure Behavior of the Android System Back Button.
The default MAF application behavior in response to an end user tapping Android's system Back button in a MAF application created using a release prior to MAF 2.2.0 was to navigate back between application features. This meant that, for example in Figure 4-8, an end user navigates from the Billing application feature to Sales application feature and finally Customer application feature before hibernating the MAF application. You can implement this legacy behavior in MAF applications created using this release of MAF by configuring a parameter in the maf-config.xml file, as described in the Retaining Legacy Behavior When Navigating a MAF Application Using Android's Back Button section of the . Implementing this legacy behavior causes the MAF application to ignore any usage of the systemActionBehavior component and the registerSystemActionOverride JavaScript method discussed here.
4.8.1 How to Configure Behavior of the Android System Back Button
The System Action Behavior (systemActionBehavior) operation allows you to override the default behavior of the Android-powered device Back button to perform processing of custom logic before the navigation proceeds to the previous page of the MAF AMX application feature as defined by the task flow.
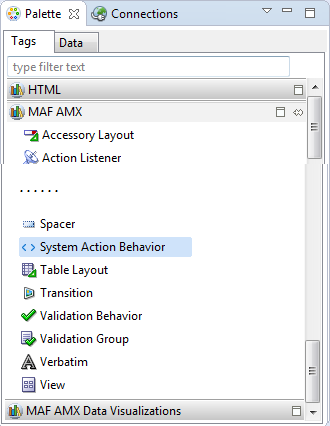
In OEPE, the System Action Behavior is located under MAF AMX in the Palette window, as Figure 4-10 shows.
Figure 4-10 System Action Behavior in the Palette
The following example demonstrates the systemActionBehavior element defined in a MAF AMX file. This element can only be a child of the view element.
<amx:view xmlns:xsi="http://www.w3.org/2001/XMLSchema-instance"
          xmlns:amx="http://xmlns.oracle.com/adf/mf/amx"
          xmlns:dvtm="http://xmlns.oracle.com/adf/mf/amx/dvt">
   <amx:systemActionBehavior id="sab1"
                             type="back"
                             actionListener="#{MyBean.onBackButton}"
                             action="#{MyBean.getNavAction}"/>
   ...
</amx:view>
In the preceding example, the actionListener and action attributes of the systemActionBehavior invoke Java bean methods shown in the following example. The onBackButton method performs processing of custom logic before the back navigation occurs. The getNavAction method disables the back behavior.
In addition to the System Action Behavior MAF AMX component and Java beans, you can use JavaScript to configure behavior of the Android system back button. The following example demonstrates the feature.js file included with the application feature. It defines a handler for the Android system back button that enables some sort of processing to take place before the back navigation occurs.
handleSystemBack = function()
{
   // do some processing, invoke a Java bean
   adf.mf.api.amx.doNavigation("__back");
};
adf.mf.api.registerSystemActionOverride("back", handleSystemBack);
The handler demonstrated in the following example prevents the back navigation from occurring.
handleSystemBack = function()
{
   // do nothing
};
adf.mf.api.registerSystemActionOverride("back", handleSystemBack);
The handler demonstrated in the following example enables the standard back navigation.
handleSystemBack = function()
{
   adf.mf.api.amx.doNavigation("__back");
};
adf.mf.api.registerSystemActionOverride("back", handleSystemBack);
4.9 Creating a Sliding Window in Your MAF Application
You can render an application feature as a sliding window. This makes the application feature display concurrently with the other application features that display within the navigation bar or springboard. You might use a sliding window to display content that is always present within the application, such as a global tool bar, or for temporary (pop-up) content, such as a help window.
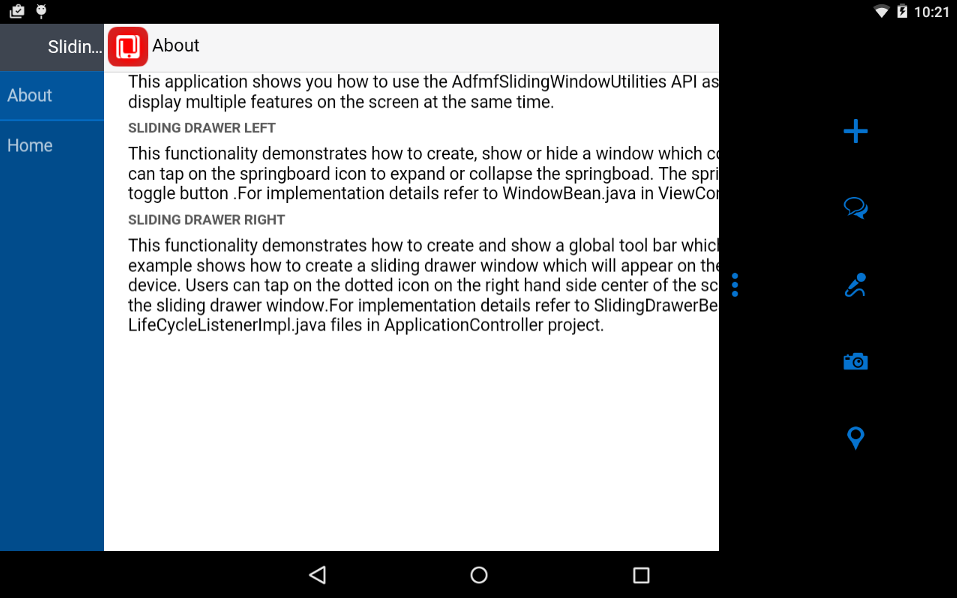
Figure 4-11 shows the SlidingDrawer application feature from the SlidingWindow sample application, described in MAF Sample Applications.." This application feature appears on the right of an application screen while overlaying other application features.
Figure 4-11 Sliding Window Overlaying Other Application Features
If you choose to render an application feature as a sliding window, you must set its Show on Navigation Bar and Show on Springboard properties to false.
You create a sliding window by invoking a combination of the oracle.adfmf.framework.api.AdfmfSlidingWindowOptions and AdfmfSlidingWindowUtilities classes, either from a managed bean or lifecycle listener within your application.
The following example demonstrates how the SlidingWindow sample application creates the sliding window shown in Figure 4-11 from the activate method of LifeCycleListenerImpl.java. After creating the sliding window, the SlidingWindow sample application uses SlidingDrawerBean.java to manage the display of the sliding window.
...
public void activate()  {
    // The argument you pass to the create method is the refId of the
    // feature in the maf-application.xml. For example,
    // <adfmf:featureReference id="fr4" refId="SlidingDrawer" showOnNavigationBar="false"
    // showOnSpringboard="false"/>
      String slidingWindowDrawer = AdfmfSlidingWindowUtilities.create("SlidingDrawer");

    // Note also that both showOn... values must be set to false in the config
    // file for the sliding window to appear

      SlidingDrawerBean.slidingDrawerWindow=slidingWindowDrawer;
      AdfmfSlidingWindowOptions options = new AdfmfSlidingWindowOptions();
      options.setDirection(AdfmfSlidingWindowOptions.DIRECTION_RIGHT);
      options.setStyle(AdfmfSlidingWindowOptions.STYLE_OVERLAID);
      options.setSize("0");

  }
For information about how to access the complete SlidingWindow sample application discussed here, see MAF Sample Applications.
For more information about AdfmfSlidingWindowUtilities and AdfmfSlidingWindowOptions, see the . For more information about using lifecycle listeners, see Using Lifecycle Listeners in MAF Applications.
4.10 Using Custom URL Schemes in MAF Applications
A custom URL scheme can be used to invoke a native application from other applications.
To invoke a MAF mobile application from another application, perform the following steps:
A MAF application can invoke another native application in the following ways:
-
Using an
amx:goLinkon a MAF AMX page whose URL begins with the custom URL scheme registered by the native application. For example:<amx:goLink text="Open App" id="gl1" url="mycustomurlscheme://somedata"/>
-
Using an HTML link element on an HTML page whose
hrefattribute value begins with the custom URL scheme registered by the native application. For example:<a href="mycustomurlscheme://somedata">Open App</a>
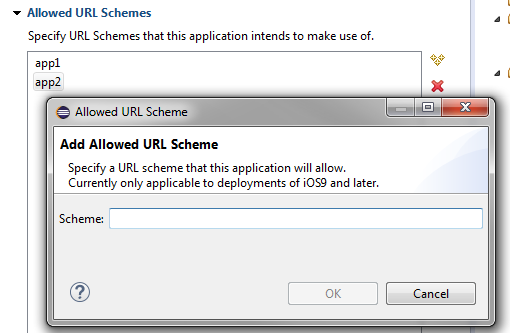
Add any custom URL schemes that your MAF application uses to invoke a native application to the Allowed Scheme list in the Security page of the MAF Application Editor. This change addresses iOS 9's requirement that applications declare any URL schemes they use to invoke other applications. Click the Add icon in the Allow Schemes section of the Security page to add the custom URL scheme, as shown in Figure 4-12.
Figure 4-12 Registering a Custom URL Scheme that a MAF Applications Use to Invoke Another Application
