| Oracle® Argus Safety User's Guide Release 8.1 E70262-01 |
|
|
PDF · Mobi · ePub |
| Oracle® Argus Safety User's Guide Release 8.1 E70262-01 |
|
|
PDF · Mobi · ePub |
This chapter provides information about the Case Form section of the Argus Safety user interface.
The Case Form enables you to do the following:
Enter case-specific information
Log preliminary information about cases
The Case Form has the following tabs:
General Tab
Patient Tab
Products Tab
Events Tab
Analysis Tab
Activities Tab
Additional Info Tab
Regulatory Reports Tab
Each tab enables you to capture specific information about the case and is designed to capture similar information in each of its subsections.
Note:
Some sections in each tab enable you to make multiple entries. For example, you can have more than one reporter in the Reporter Information section of the General tab. Each individual entry is identified by another set of tabs in the section.All tabs of the Case Form also display read-only information about case priority and status.
Search for an existing case.
When the application displays the search results, locate the appropriate case number and click the case number link.
The system opens the Case Form with information about the case.
The case form provides features to help you use it more effectively.
General Case Form Usage Information
When using the Case Form, be aware of the following:
The maximum number of Products and Events is 200 per case.
The drop down values for elements such as Yes/No/Unk is not hard coded. The system retrieves the values from a look-up table. This affects the following:
Reporter Information | HCP
Device Information | Improper usage/Storage Field
The system defaults to the first button on every message box pop up dialog. When the user clicks Enter or the space bar, the system validates the choices.
The user can enter a hyperlink (e.g. http://www.oracle.com and https://www.oracle.com) in the Field Label Help for the Case Form Fields
When the user clicks a hyperlink, the system opens the link in a new Internet Explorer browser window.
The following Case Form fields are type ahead fields:
Contact Logs | Group and Users
Action Items | Groups and Users
The WHO Drug browser displays the WHO Drug Version on the browser dialog. The browser dialog is configured in System Configuration | Case Form Configuration.
Users can enter decimal numbers with up to three (3) decimal places in the UDF Number fields on all tabs. If the user does not enter a decimal, the system does not display trailing zeroes.
The system displays the User Name in read-only mode in following dialog boxes where the user must enter a password to start processing:
Activities Tab: Case Lock/Unlock
Activities Tab: Case Archive/Un-Archive
General Tab: Unblind Case
E2B Acceptance/Rejection for Initial, Follow-up, and Notification
Affiliate Acceptance/Rejection of Events
Case Actions: Delete/Undelete
When using the BookIn dialog box, be aware of the following:
You can enter the attachment classifications and their descriptions on the Initial Case entry dialog.
The field labels are the same as those defined in the Field Labels and the Case Form
The lengths for the Classifications type ahead field and the Description field are the same as those on the Additional Info tab
The system filters classifications by user sites and the attachment classifications permissions.
When you select the URL Reference, the system hides the Classifications and Description fields.
The system transfers the values the user enters in the Classifications and Description fields after the cases have been booked in.
If the system does not find any cases during a duplicate search, it places the following message in the search results section: No cases found.
When you try to book in a clinical trial case and select a study where the country of incidence value does not match the list of countries defined in the study configuration, the system displays the following warning message in the standard Argus Safety warning message dialog box:
The country of incidence does not match the country list specified for the selected study.
If no countries are specified in the study configuration for the selected study, the warning message does not display.
If the user selects the study before entering the COI, the system performs the validation
The user can right click on the row and select the following:
Case Summary -- The system displays the Case Summary (Current functionality).
Print Medical Summary -- The system displays the Medical Summary report PDF only if the user has access to the Medical Review dialog box. If the user does not have access, the system hides the Medical Summary Report option.
Print -- The system launches the Case Form print dialog box. If the user has permission to access the Print Case dialog, the user can print the Case Form. If the user does not have access to the Case Form print dialog box, the system hides the Print Case option.
The Zoom feature enables you to increase or decrease the font size of the text.
Click the Zoom icon across the Case Form tabs.
The Zoom dialog enables you to increase or decrease the Font Size of the text on the Zoom dialog.
Click Adjust Font Size to increase or decrease the font size.
Click + to increase the font size up to five (5) font sizes in one-size increments.
Click - to decrease the font size to the current by increments of 1.
This feature is available on the following dialogs:
Reporter Notes
Patient Notes
Patient Other Relevant History Notes
Patient Lab Data Notes
Patient Relevant Test
Parent Medical History
Parent Other Relevant History Notes
Product Notes
Case Analysis: Narrative. This is also available on the Medical Review Dialog.
Case Analysis: Abbreviated Narrative. This is also available on the Medical Review Dialog.
Case Analysis: Company Comment. This is also available on the Medical Review Dialog.
Case Analysis: Local Evaluator Comment. This is also available on the Medical Review Dialog.
Case Analysis: Administrative Notes. This is also available on the Medical Review Dialog.
Case Analysis: Evaluation in light of similar events in the past. This is also available on the Medical Review Dialog.
AffSAPS: Future Actions.
Activities: Contact Log Description.
Activities: Action Item Description. This is also available on the Medical Review Dialog.
Activities: Routing Comments
Notes and Attachments: Description
The Case form for the following fields includes Type Ahead functionality. This feature automatically suggests possible options as term names as you are entering the text. If you double-click on the field, the system shows the standard drop-down values for the field.
The following is a list of fields with type ahead functionality:
Accidental Exposure
Action Taken
Action Type
Age Groups
Age Units
Anatomical Locations
Attachment Classification
Attachment Keywords
Birth Type
Case Classification
Causality Category
Condition Type
Contact Type
Delivery Types
Device Preliminary Comments
Device Subcomponents
Device Type
Dosage Frequency
Dosage Units
Evaluation Reason
Event Frequency
Event Intensity
Event Outcome
Fetal Outcome
Formulation
Gender
Intermediary
Lab Result Assessment Terms
Lab Test Type
Manufacturers
Occupations
Package Units
Reference Type
Report Media
Report Type
Reporter Type
Routes of Administration
Study Center
Argus Safety remembers your actions as you navigate through the Case Form.
The system can return to the same location on the tab after you tab to a different form. For example, you are on the 8th reporter in the Reporter Section on the General tab and move to another location in the application. When you return to the General tab, the system takes you directly to the 8th Reporter because it was the last Case Form location that you accessed before moving out of the Case Form.
User preferences are only applicable during the same session for a case, irrespective of the Case Status (read-only or editable). If you exit from the case and open a new case, the system resets the preferences.
Each page displays the navigation flow used to access the page. The following table lists shortcut keys to help you navigate more easily and quickly.
| Shortcut Key | Output |
|---|---|
| CTRL+SHIFT+# | Goes to the tab indicated by the # entered. (1=General tab, 2=Patient tab, etc.) |
| ALT+SHIFT+# | Goes to the sub-tab as indicated by the # entered (= Product 1, Product 2, etc.)Note: The maximum # for the sub entities is 10 which pertains to ALT+SHIFT+1 for the first entity within the tab till ALT+SHIFT+0 for the 10th entity within the tab. |
The General tab is designed to capture case information in categorized sections that capture category-specific information. The General tab enables you to enter or view information such as type of report, literature information, and so forth.
The General tab has four sections as described in the following table.
| Section | Purpose |
|---|---|
| General Information | Contains information about the report type, receipt dates, etc. |
| Study Information | Contains information about clinical trial details, if appropriate. |
| Reporter Information | Contains information about Reporter details. |
| Literature Information | Contains information about Literature cases. |
When using the General Tab be aware of the following:
The system saves all filtering criteria the user enters on the Reporter Look Up dialog as user preferences while it populates the reporter information on the General Tab.
If you have reporter information in the case, the system continues to display the reporter information in the Reporter Lookup dialog and automatically performs a search.
After performing the search the system retains the search criteria as user preferences. The next time you perform a search, the system displays these preferences.
When you log out, the system retains the user preferences and makes them available the next time you log in to the system
You can click Clear to clear all the values in the filtering elements.
If the system cannot find any reporters during a search, it displays the following message in the reporter look up dialog:
No reporters found
If a priority has not been assigned to a case, the system hides the Case Priority field label.
If a case owner has been assigned to the case, the system displays the name of the case at the top of the Case form. If a case owner has not been assigned, the system hides the Case Owner label.
The Project ID can be 40 characters long. Users can scroll in the field.
The Study Name field can be 70 characters long.
When the Classifications field is hidden, the system does not display the classification section on the Case Form.
The mandatory fields identified in the E2B Mapping in the factory or custom profiles are identified with an icon on the Case Form fields on the Case From and Medical Review dialog boxes.
All popup message boxes that had only an OK or Cancel button have a Clipboard button that enables you to copy the message content to the clipboard for later use.
Dynamic workflow indicators track the amount of elapsed time it takes to complete a workflow step.
The first number represents the time left or exceeded for a given workflow step
The second number indicates the time left till the reporting deadline.
Time is expressed in days (d), hours (h), and minutes (m) respectively.
The icon changes based on the amount of elapsed time for the workflow step.
| Icon | Denotes |
|---|---|
| Traffic Light | No status can be indicated, for example if no timing is defined in the workflow. |
| Red Traffic Light | The timing has been exceeded. |
| Yellow Traffic Light | The timing is in danger of being exceeded. |
| Green Traffic Light | The timing is in good standing. |
If the time to complete the case process exceeds the allocated time, the system displays the value in red with the time displayed as a negative value. Only archived, locked cases do not display the dynamic workflow indicator.
This part describes the General Information section on the General tab.
The following table lists and describes the fields in the General Information section.
| Field/Control Name | Description |
|---|---|
| Report Type | Select the item that best describes the type of report. Choice of report type determines availability of fields relating to clinical studies and/or literature references.
Note: Clinical study reports prompt the user for information relating to the study, and literature-based reports enable the user to select the journal and reference on which the case is based. |
| Country | Select the country where the adverse event occurred. The E2B icon identifies fields required for E2B. |
| Initial Receipt Date | Enter the date your company became aware of the case. Argus Safety uses this date throughout all reports.
Note: This date can be changed only prior to regulatory report submission. |
| Central Receipt Date | Enter the date on which this information was received by Central Safety. |
| Medically Confirm | Specify whether the case was medically confirmed or not, by a healthcare professional. |
| Initial Justification | Enables you to enter the initial justification reason. The entry in this field is displayed as per the reason entered when the case is being booked in. |
| Amendments/Follow-ups | The number automatically increments when a new record is added to the Amendment/Follow-up section.
Note: On sorting by Follow-up received dates, the serial number still displays the order of entering the follow-ups. The follow-up information can be sorted by Serial Number, Follow-up Received date and Central Received Date Columns. Click on the header to sort in ascending order or to sort in descending order. By default, the sorting is in descending order of the Follow-up Received Date. |
| Follow-up Received Date | Click Add to enter the date on which amendment/follow-up information was received by your company. You can select whether the case has significant follow-up information by confirming the message: 'Is this follow-up significant?'.
Note: If you select Yes, the Significant checkbox is selected and the Amendment checkbox is enabled. When sorting on follow-ups, by default, the dates are sorted in descending order of the Follow-up Received Date. |
| Safety Received | Enter the date on which follow-up information was received by Central Safety. This field is disabled for an amendment and any prior data in this field is cleared. |
| Significant | Click the checkbox if the follow-up is significant. This checkbox is automatically marked and disabled if the Amendment checkbox is checked. |
| Data Clean up | Click the checkbox to mark the Follow up as a Data Clean up version. This version is used in the Data Lock Point for Case Versioning in and System Reports. This field is disabled for an amendment and any prior data in this field is cleared. |
| Amendment | Enables you to specify if the case was updated with a significant change without adding any new information.
The Follow-up Received Date is populated with the previous aware date and is disabled for an amendment. |
| Amendment/Follow-up Justification | Enables you to select a pre-defined justification for Amendment/Follow-up. Click the icon to view the standard justifications dialog. The justification entered in the Amendment field is also populated in this field.
You can select a pre-defined justification from this dialog or enter a new justification. |
| Case Requires Follow-up | Select this checkbox if the case requires follow-up information. |
| Classification | Select up to 50 case classifications used to categorize a case. Click Add to enter additional case classifications. |
The Study Information section enables you to enter information about case studies.
The following table lists and describes the fields in the Study Information section.
| Field/Control Name | Description |
|---|---|
| Project ID | Enter the Project ID, or select one from the list. Selecting a Project ID automatically creates items in the Study ID list. |
| Center ID | Select the appropriate center ID from the list. |
| Study Phase | Enables you to enter the Study Phase for the configured study.
Note: This field is pre-populated if you select a Study with an already-configured Study Phase. |
| Study Name | The study name is entered automatically based on the study that is selected. |
| Study Type | The study type is entered automatically based on the study that is selected. |
| Week # | Enter the week number of the study during which the adverse event occurred. |
| Visit # | Enter the visit number of the study during which the adverse event occurred. |
| Blinding Status | Depending on the type of study, this item is entered automatically by the system. You need special access rights to use any of the Broken By entries.
Note: The Unblind Case dialog appears when you try to unblind a study. For Not Blinded studies, saving the case or generating a report, you can enter the actual drug (vs. placebo) given to the patient. |
| Study Description | The study description is entered automatically based on the study that is selected. |
| Observe Study Type | The value selected from this drop-down list is populated in the Case Form Study Section when the Clinical Study is selected. |
| Unblinding Date | This item is automatically entered by the system when the blinding status is changed to 'Broken by Sponsor' or 'Broken by Investigator'. If you double-click the date in this item, the Unblind Case dialog is displayed. If the date of unblinding is more recent than the date for the most significant follow-up information, an automatic follow-up is generated.
Unblinded date is not editable in the Unblind case dialog when blinded status is changed to 'Broken by Sponsor' whereas it is editable when the blinded status is changed to 'Broken by Investigator'. |
To enter pre-defined Study Information
Click Select to choose from the already available list of study information.
When the Clinical Trial Selection dialog opens, enter Project, Study, and Center information as appropriate.
The Clinical Trial Selection dialog allows you to select a clinical trial from the list configured by the Administrator.
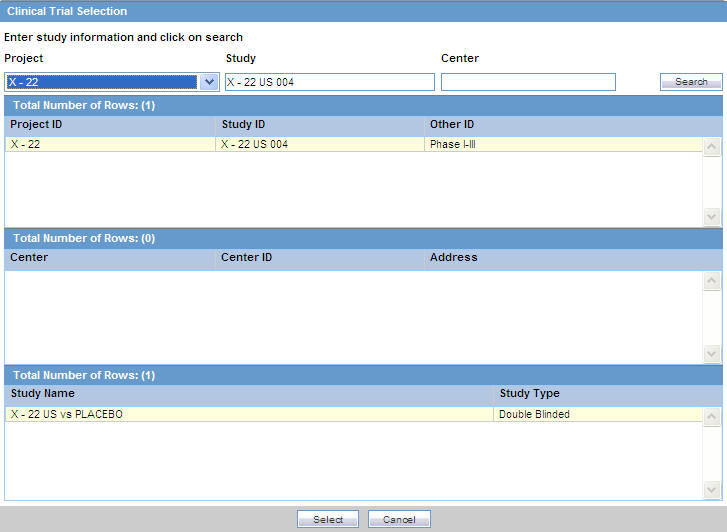
Click Search to generate the search results.
Tip:
To broaden the search results, enter as little information as possible. Select the required clinical study and study center and click Select.Choose the appropriate study information from the list and click Select.
The details of the selected Study Information are added to each field in the Study Information section
The Reporter Information section enables you to enter information about the person providing the case-related information. The following is an illustration of the Reporter Information section.

When using this section, be aware of the following:
The Reporter Rearrangement dialog also shows the number of Reporters present in the case. It displays the First Name and Last Name, followed by the Reporter Type in brackets, as entered in the reporter information dialog.
You can also view all the Reporters by clicking the Quick Launch icon.
Click any Reporter Name to view the details of the selected Reporter tab.
Click the New tab to add a new reporter anytime. You can add a maximum of 100 reporters.
The Primary Reporter is identified by the Reporter icon on the Reporter Information tab.
The following table lists and describes the fields in the Reported Information section.
| Field/Control Name | Description |
|---|---|
| Reporter Notes | Click this button to enter free text notes relating to this reporter.
Note: This field supports multiple language entry. You can click on a flag, select the language tab, and enter information. |
| Sal. | Enter the reporter's salutation. |
| First Name | Enter the reporter's first name. |
| Middle Name | Enter the reporter's middle name. |
| Last Name | Enter the reporter's last name. The Select button displays the Reporter Selection dialog. If you select a reporter from this dialog, the system automatically completes the case form reporter fields. |
| Suffix | Enter the reporter's suffix; for example, HR, or MED. |
| Health Care Professional | Select Yes, No, or Unk (Unknown) to indicate whether the reporter is a health-care professional. |
| Occupation | Select the reporter's occupation from the list. |
| Report sent to Regulatory Authority by Reporter? | Make a selection, as appropriate to the case. |
| Address 1 | Enter line 1 of the reporter's address. |
| Address 2 | Enter line 2 of the reporter's address. |
| Institution | Enter the reporter's institution. |
| Institution ID | Enter the reporter's institution ID.
This field value is populated based on the Institution ID selected for the Reporter from the Reporter Lookup dialog. This field also allows manually entered/updated value directly in the Case Form irrespective of the value specified in the Institution field for the reporter. Manually entered Institution and institution ID field values are allowed in the Reporter Information section even if they are not specified / linked to each other as per Console Institution code list. |
| Department | Enter the reporter's department. |
| City | Enter the reporter's city. |
| Protect Confidentiality | If this check box is selected, the name and address of the reporter do not appear on regulatory reports and the reporter's information displays "NAME AND ADDRESS WITHHELD".
The system also displays 'MSK' null flavor in the eVAERS report when this checkbox is checked. MSK is populated only when the data element contains some data and is not null. |
| Primary Reporter | Identifies the primary reporter. Only one primary reporter is permitted per case. The primary reporter is the reporter whose name appears on the regulatory reports. The tab that identifies the primary reporter is displayed in blue as compared to the other reporter tabs. |
| Correspondence Contact | If this check box is selected for a reporter, the reporter's address information is used in letters. You can select more than one reporter as the correspondence contacts for the case. |
| State | Enter the reporter's state. |
| Postal Code | Enter the reporter's postal code. |
| County | Enter the reporter's county. |
| Country | Select the country name. The Administrator maintains this list. |
| Phone Number | Enter the reporter's telephone number. |
| Alternate Phone | Enter another telephone number for the reporter, if available. |
| FAX Number | Enter the reporter's fax number. |
| Reporter ID | If known, enter the Reporter ID. This automatically completes the Case Form reporter fields. |
| Reporter's Reference # | Enter the Reporter's Reference # for the case. |
| Email Address | Enter the reporter's email address. |
| Reporter Type | Select the Reporter Type. The Administrator maintains this list. |
| Report Media | Select the medium of the report. The Administrator maintains this list. |
| Intermediary | If appropriate, select the type of intermediary. The Administrator maintains this list. |
| (New) Tab | New) Tab Creates details for a new reporter. |
You can add reporter information by clicking the Select button and entering data in the Reporter Lookup dialog box.
Click Select in the Reporter Information section.
When the system opens the Reporter Lookup dialog box, enter the required search criteria in the fields and click Search.
Tip:
You can choose to search either by Search Cases or by Search List Maintenance.
The Search results for the entered search are displayed.
When the system displays the search results, choose the appropriate reporter information from the list and click Select.
The system adds the selected, pre-defined information to the fields in the Reporter Information section.
The following table lists and describes the fields in the Reporter Lookup dialog box.
| Field/Control Name | Description |
|---|---|
| First Name | Enter the first name of the reporter. |
| Last Name | Enter the last name of the reporter. |
| Reporter ID | Enter the ID of the reporter. |
| Institution | Enter the institution of the reporter. |
| Institution ID | Enter the institution ID of the reporter. |
| MR | Select this button if the reporter is a Medical Representative (MR). |
| Physician | Select this button if the reporter is a Healthcare Physician. |
| Department | Enter the department of the reporter. |
| Reporter Type | Enter the reporter type. |
| Address 1 | Enter line 1 of the reporter's address. |
| Address 2 | Enter line 2 of the reporter's address. |
| City | Enter the city of the reporter. |
| State/Province | Enter the state/province of the reporter. |
| Postal Code | Enter the postal code of the reporter. |
| Phone Number | Enter the phone number of the reporter. |
| County | Enter the reporter's county. |
| Country | Enter the country of the reporter. |
| Search Cases | Click this button to search for cases that match the specified search criteria. |
| Search List Maintenance | Click this button to search the list maintenance for the specified criteria. |
This section enables you to enter a literature reference for the case. You can enter the information manually or you can enter pre-defined literature information by clicking the Select button and selecting from the list of pre-defined references.

Click the Quick Launch icon to view all the items present in the case. This information appears in the format: (Journal Name Yea Vol: Pages)
The following table lists and describes the fields in the Literature Information section.
| Field/Control Name | Description |
|---|---|
| Author | Enter the name(s) of the author(s) of the article. |
| Year | Enter the year in which the article was published. |
| Digital Object Identifier | Enter the digital object identifier of the article. |
| Select | Selects a literature reference directly from the list of literature articles entered by the Administrator.
Note: If the required literature article is not present in the list, details of the article can be entered by using the remaining fields in the section. |
| Title | Enter the title of the article. |
| Volume | Enter the volume of the particular journal. |
| Journal | Enter the name of the journal in which the article appeared. This value gets displayed in italics. |
| Pgs | Enter the journal page numbers in which the article appears. |
To enter pre-defined literature information
Click Select to choose from the already available list of literature information.
When the Literature Reference dialog opens, locate and select the appropriate reference in the list and click Select.
The details of the selected literature information are added to each field in Literature Information.
This section of the Case Form helps you to enter patient information such as the patient's past medical history and current conditions, and laboratory tests and test results. The medical information entered here could be very useful to the person analyzing the event. For example, if the adverse event was a rash that developed after applying a topical product, the knowledge that the patient has a history of allergic reactions could be relevant.
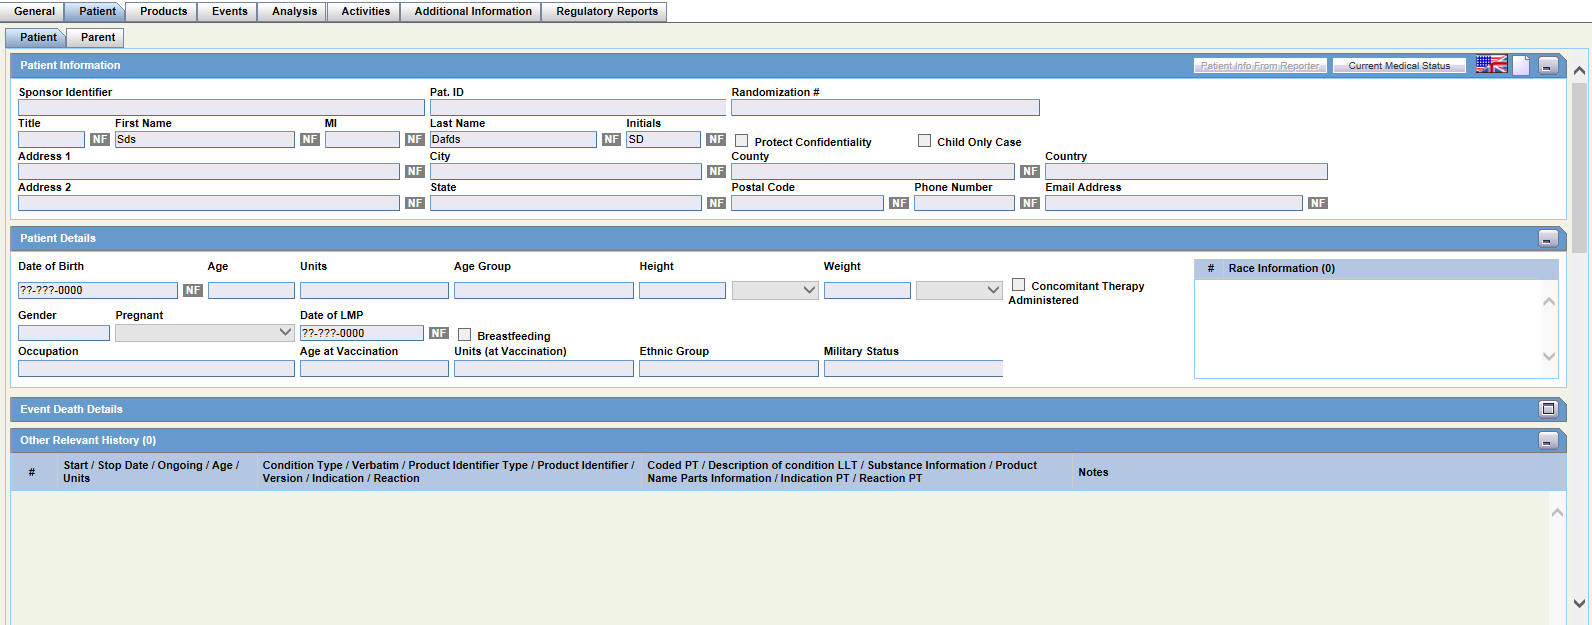
The Patient tab includes the following tabs: Patient and Parent.
Patient Tab
Parent Tab
The Patient tab includes the following sections:
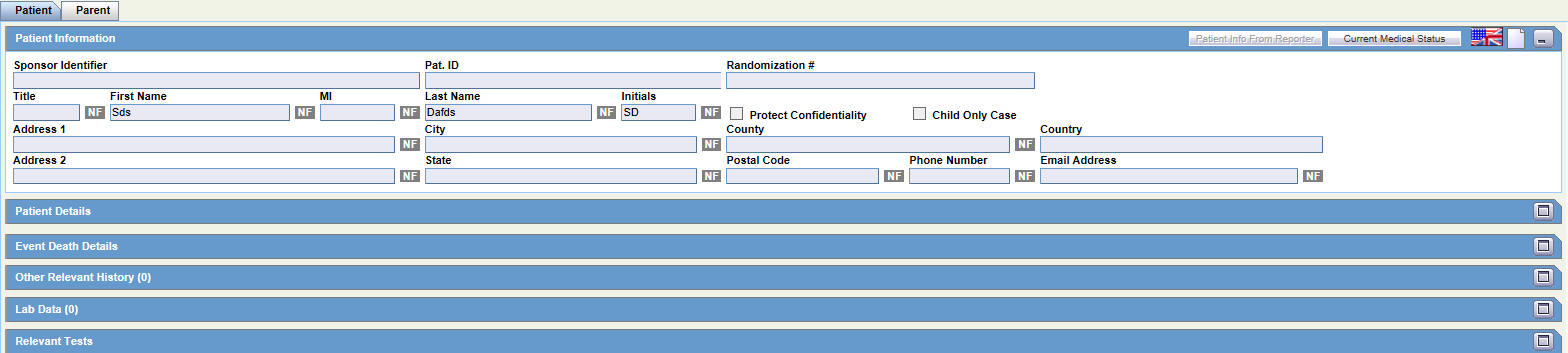
The following table lists and describes the function of each field.
| Field/Control Name | Description |
|---|---|
| Address 1 | Enter the patient's line 1 address. |
| Address 2 | Enter the patient's line 2 address. |
| Child only Case | If this check box is selected, then the pregnancy [Detail] button is accessible from the Parent information tab only and no longer through the Patient tab directly. |
| City | Enter the patient's city. |
| Country | Select the country. The Administrator can adjust this list. |
| County | Enter the patient's county. |
| Current Medical Status | Captures details about the history and the current condition of the patient from the dialog.
Note: The items that appear in the Current Medical Status dialog automatically map to the fields for the German BfArM tab on the Analysis tab. Changing the values on the BfArM tab does not affect these items. |
| Email Address | Enter the patient's email address. |
| First Name | Enter the first name of the patient.
Note: During book-in, the system transfers the appropriate patient name to the relevant name and initials fields. If the Patient Name or Initials are three characters or less, this is transferred to the Initials field. |
| Initials | Enter the patient's initials. Existence of the patient's first, middle, or last name automatically populates this field. |
| Last Name | Enter the last name of the patient. |
| MI | Enter the middle initial of the patient. |
| Number of Patients | Enter the number of patients involved in the adverse event. |
| Pat. ID | Enter the Patient Identifier number.
Note: This field appears for clinical trial cases only. Tip: This field can be used while searching for cases in the Case Selection dialog. |
| Phone Number | Enables you to enter the phone number of the patient. |
| Postal Code | Enter the patient's postal code. |
| Protect Confidentiality | If this check box is selected, the patient's name and address will not appear on any of the regulatory reports and the patient's information will show the word PRIVACY.
The system also displays 'MSK' null flavor in the eVAERS report when this checkbox is checked. MSK is populated only when the data element contains some data and is not null. |
| Randomization # | Determines which drug was administered to the patient during the course of the study.
Note: This field appears for clinical trial cases only. Tip: This field can be used while searching for cases in the Case Selection dialog. |
| Sponsor Identifier | Enter the Sponsor Identifier of the patient.
Note: This field appears for clinical trial cases only. Tip: This field can be used while searching for cases in the Case Selection dialog. |
| State | Enter the patient's state. |
| Title | Enter the title of the patient. |
Click ![]() to enter free text notes relating to the Patient. If there is no text data for Patient Notes, the Null Flavor can selected using the NF drop-down list.
to enter free text notes relating to the Patient. If there is no text data for Patient Notes, the Null Flavor can selected using the NF drop-down list.
Note: This field supports multiple language entry. You can click on a flag icon to enter data in different languages.
![]() Icon is displayed when there is no data in Patient Notes and NF data.
Icon is displayed when there is no data in Patient Notes and NF data.
![]() Icon is displayed when there is data in Patient Notes or NF data.
Icon is displayed when there is data in Patient Notes or NF data.
Use the following procedure to enter information about the patient's current medical status.
Click Current Medical Status in the Patient tab of the Case Form.
The Current Medical Status form opens as a pop-up.

Select the choices that apply to the patient from the items in the form.
If you don't know whether a particular condition applies for the patient, select Unk.
Click OK to save the current medical status.
If the patient and the reporter are the same person, the reporter information entered in the General tab can be copied to the Patient tab.
If the patient and the reporter are the same person, the reporter information entered in the General tab can be copied to the Patient tab.
Click Patient Info From Reporter in the Patient tab to copy the reporter information. The reporter information is copied.
The Patient Details section enables you to enter information, including pregnancy data, about a patient. The following is an illustration of the Patient Details section.

The following table lists and describes the fields in the Patient Details section.
| Field/Control Name | Description |
|---|---|
| Date of Birth | Enter the patient's date of birth. You can enter a partial date if the actual date is unavailable. |
| Age | Calculates the patient's age, from the date of birth and earliest event onset date, if both full dates are available; otherwise, you can enter the age manually. |
| Units | Select the age units. (i.e., days, weeks, months, years)
Note: If both the date of birth and event onset date are available, the Age Units field is automatically calculated. The Administrator can adjust this list. |
| Age Group | Select an age group. If the age group is entered manually, the Age and Age Units fields are disabled. The Administrator can adjust this list.
Note: This field is automatically filled in when the Age and Age Units fields are both entered. |
| Height | Enter the patient's height. |
| Height Units | Select the appropriate height unit. |
| Weight | Enter the patient's weight. |
| Weight Units | Select the appropriate weight unit. |
| Concomitant Therapy Administered | Check this box, if the patient is treated with concomitant therapies such as Physiotherapy, Radiotherapy. |
| Gender | Select the patient's gender.
Note: If the patient is male, the system automatically disables the Pregnancy field. When the Gender is set to Female, the Pregnancy drop down is enabled and set to Unknown. |
| Pregnant | Make the appropriate selection.
Note: If Yes is selected, a Details button will appear. Click Details to enter pregnancy information. |
| Date of LMP | Enter the date of the Last Menstrual Period, if applicable. A partial date can also be entered. |
| Breastfeeding | Select the checkbox, if applicable. |
| Occupation | Select the patient's occupation. The Administrator can adjust this list. |
| Age at Vaccination | Enter the patient's age at the time of vaccination. |
| Units (at vaccination) | Enter the age units (for example: days, weeks, months, and years) at the time of vaccination. |
| Ethnic Group | Enter the patient's ethnic group such as Hispanic or Latino, Not Hispanic or Latino, and so on. |
| Military Status | Enter the details of the Military status of the Patient such as Active Duty, Reserve, National Guard, TRICARE Beneficiary, and so on. |
| Race | Select the patient's race. You can capture up to 5 Race using the Add and Delete buttons.
Note: The system does not let you select the same Race more than once. If you try to select the same Race again, an error message appears. |
Use the following procedure to enter pregnancy information.
Select Yes from the Pregnant drop-down list, if applicable.
This field is shown as active only after the Gender field in this section is selected as Female.
The Pregnancy Information section is displayed.
Enter the available pregnancy information in the form.
Click OK to save the pregnancy information.
The following lists and describes the fields on the Pregnancy Information and Neonate form.
| Field/Control Name Name | Description |
|---|---|
| Due Date | Enter a due date or an approximate due date, if known. |
| Gestation Period | Enter the gestation period when the reaction / event was observed in the foetus. Select a unit for the gestation period from the accompanying drop-down list. |
| Number of Fetus | This tab allows entry of data for a baby who is born to the patient. Click New to make an additional entry. |
| Prospective/Retrospective | Select if the information was Prospective or Retrospective.
Note: A prospective information is one where the company hears of the case before the baby is born to the patient who took the drug. In a retrospective case, a company gets to know after the baby is born. |
| Delivery Date | Enter the date of the delivery. |
| Weight | Enter the birth weight |
| Weight Units | Select the appropriate weight units. |
| APGAR Score | Enter the APGAR scores-up to three per neonate. |
| Delivery Type | Select the delivery type from the list. The Administrator can adjust this list. |
| Birth Type | Select the birth type from the list. |
| Fetal Outcome | Select the fetal outcome from the list. |
| Delivery Notes | Enter notes on the case. |
Note:
When using the Neonate Information section, be aware of the following:You can delete neonate information by right clicking the neonate and selecting the Delete option.
The system tracks changes to the neonate information in the audit log.
The Event Death Details section enables you to enter information about the death of a patient.

The following table lists and describes the fields in the Event Death Details section.
| Field/Control Name | Description |
|---|---|
| Date of Death | Enter the date of death |
| Autopsy Done? | Select whether autopsy was done.
Note: If Autopsy Done is set to No or Unknown, the Autopsy Results Available is shown as No. |
| Autopsy Results Available? | Select if autopsy results are available.
Note: The Autopsy Results Available? field is enabled only if the Autopsy Done? field is marked as Yes. However, if Autopsy Results Available is changed to No and Autopsy Result rows exist, you will be asked to delete the rows first. Click Yes to delete the data. |
| Add | Click this button to add a Cause of Death and Autopsy Results row.
Note: A user can add multiple records, up to 50 entries. |
| Delete | Enables you to delete a highlighted row. |
| Up/Down | Click Up to move the record up and click Down to move the record down.
Note: Ordering reflected on the case form displays the same ordering as displayed in the E2B report repeatable tags. |
| Cause of Death | Describes the cause of death. |
| Description as Reported | Displays the description reported by the reporter. |
| Autopsy Result | Describes the autopsy results. |
| Encode | Encodes the event reported by the reporter. |
The Other Relevant History section enables you to enter information that might be useful. The system lets you copy the Other Relevant History rows by selecting the row and clicking Copy. The following is an illustration of the Other Relevant History section.
The following table lists and describes the fields in the Other Relevant History section.
| Field/Control Name | Description |
|---|---|
| Copy | Enables you to copy a row. After you copy the row, the focus will be on the newly copied row. |
| Add | Enables you to add a row to the relevant history. After you add the row, the focus will be on the new row. |
| Delete | Enables you to delete a row from the relevant history. |
| Up | Enables you to move up a row in the relevant history. |
| Down | Enables you to move down a row in the relevant history. |
| Start Date | Enter the start date of the condition. You can enter a partial date if the actual date is not available. You can also choose not to enter a date.
Note: If you click Add but do not enter a date, the Date column is removed. Once the date is entered and there is a test associated with the date, you cannot clear the date but can only modify it. To remove the date column, individually delete all the cells in that Date column. |
| Stop Date | Enter the stop date of the condition. You can enter a partial date if the actual date is not available. You can also choose not to enter a date.
If you select Ongoing as Yes or Unknown, the system clears and disables the Stop date. |
| Age and Units | Age and Age units are enabled only for condition type with Patient Other Relevant Therapy being set. |
| Family History | Check this checkbox, if this relevant history is reported to be present in another family member. The Family History checkbox is enabled only for Condition types that are mapped to ’Medical History Episode' in the Condition Type codelist. |
| Condition Type/Verbatim/Indication/Reaction | Select a condition type from the list. The Administrator can adjust this list. |
| Substance Information | Displays the substance name, term ID, and strength unit of the Product separated by commas. If there are multiple records, they are displayed in subsequent rows. |
| Substance | Click Substance to enter the Substance Name, Term ID, and Strength Unit details. |
| Substance Name | Displays the Ingredient name. |
| Substance Term ID | Displays the Term ID of the substance selected. |
| Strength Unit | Displays the strength unit of the substance selected. |
| Name Part | Displays the name part and name part type information. If there are multiple records, they are displayed in subsequent rows.
Click Name Part button to enter Product Name Part Type and Product Name Part details. |
| Name Part | Displays the Name of Product Name Part. |
| Name Part Type | Displays the type of Product Name Part such as Container Name, Device Name, Form Name, Invented Name, Scientific Name and so on. |
| Product Name Parts Information | Displays the Product Name Part information. Enabled only for condition type with Patient Other Relevant Therapy being set. |
| Product Identifier Type | Displays the type of Product Identifier such as MPID, PhPID, and so on. Enabled only for condition type with Patient Other Relevant Therapy being set. |
| Product Identifier Version | Displays the Date or Version of the Product Identifier. Enabled only for condition type with Patient Other Relevant Therapy being set. |
| Coded PT/Description of condition LLT/Indication PT/Reaction PT | Enter a term to describe the condition. You can either manually encode or auto-encode, if you have been so configured by the Administrator.
In manual mode, type the description (for example, Fever). In Auto-encode mode, enter a partial description and press ENTER or TAB. The appropriate coding dialog appears. In either mode, you can click Encode and modify the encoding. If the condition type is historical drug, the encoding will be done with WHO drugs. Note: To view the complete MEDDRA hierarchy for the encoded term, click the encoding status icon. |
| Notes | Enter any notes that are relevant to the condition. |
| Encode | Click this button to encode the term. Encode is used in multiple contexts such as coding with MedDRA for reactions and indications, and coding for products using WHO drug browser.
Note: To view the complete MedDRA hierarchy for the encoded term, click the encoding status icon. |
| Indication PT | Enter a term to describe the indication.
Note: This field is visible on the case form only if the condition type selected in the List maintenance is Patient Other Relevant Therapy. |
| Ongoing | Indicates whether the condition is continuing. If it is set to Yes or Unknown, the Stop date is disabled. |
| Reaction PT | Enter a term to describe the reaction.
Note: This field is visible on the case form only if the condition type selected in the List maintenance is Patient Other Relevant Therapy. |
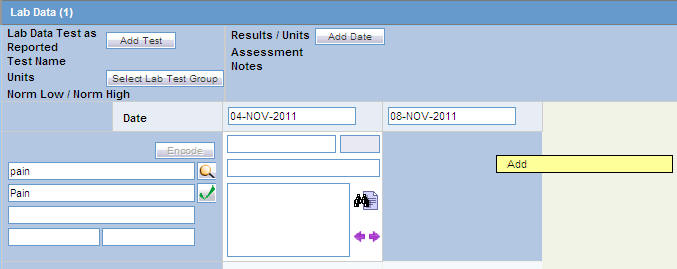
The Lab Data section provides data about lab test and test results. The maximum number of lab test data on the Case Form is 1500. The following is an illustration of the Lab Data section.
The following table lists and describes the fields in the Lab Data section.
| Field/Control Name Name | Description |
|---|---|
| Lab data Test as Reported | |
| Test Name | Enter a lab test name, or select from the list. |
| Units | Select the unit of the lab test result. |
| Select Lab Test Group | Enables you to select one or more lab test groups. |
| Norm Low/Norm High | The Test Name list can retrieve details of the normal range for the test selected (if the Administrator has entered the normal range into the list). Otherwise, enter the values manually. |
| Date | Enter the date the test was carried out. Partial dates are allowed for in this field. |
| Result/Units | Enter the test result, including the appropriate units and select a term to describe the qualitative assessment of the results. The Administrator can modify the list of possible assessments. |
| Assessment | Select a qualitative assessment term to describe the lab test results. |
| More Info Available | Check this checkbox, if there is additional information is available for this Lab test in Additional Info tab. |
| Notes | Enter notes pertinent to this case. |
| Comments | Enter comments made by the reporter about the test result. |
When using the Lab Data section, be aware of the following:
A single, vertical scroll bar has been placed beneath the header and date information in the Lab Data section. This enables the date to be seen at all times.
To keep all the rows together, all rows in the Lab Data Test as Reported " and Results/Units use this scroll bar.
A maximum of three (3) rows is visible at all times.
You can perform several different actions in the Lab Data section as follows:
Click Add Test.
Enter a partial description of the lab test in the Lab Test Name dialog.
Click Search. Select the required lab test from the search results.
The system enables you to select a lab test group from the dialog box.
When selecting a lab test group, be aware of the following:
When you click Select, the system populates the Lab Test Group with a list of lab tests that match the selected lab test group.
If lab test data is already on the Case form, the system appends the lab test group after the last lab test.
Arranging Entries in a Specific Order
Click the Order icons to arrange entries in a specific order.
Adding Additional Rows of Lab Test Data
Right-click on an empty cell as shown below. Click the Add option that gets displayed, to add more rows of lab test data.
Deleting or Copying Rows in Lab Data
Right-click the row to be deleted or copied to an empty cell after a Test Date has been added, as shown below.
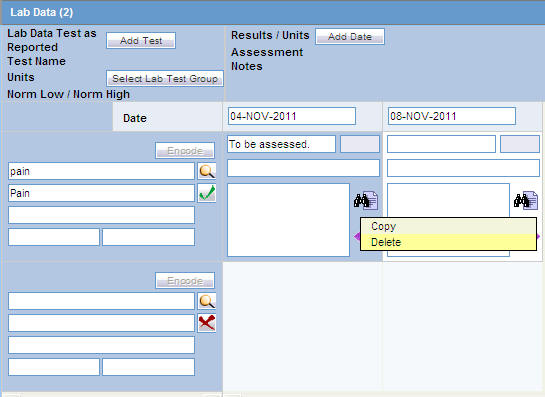
The Copy and Delete options are displayed. Select the applicable option, as required.
The Lab data will be displayed in chronological order by Date of the Test and alphabetically by the Test Name.
If there are partial dates entered, the date is displayed at the beginning of the month, and year for the date entered.
Viewing the Hierarchy of the Event Term
Click the icon to view the entire hierarchy of the Event Term.
Click outside the MedDRA hierarchy dialog to close this hierarchy listing.
Click the icon to view display the Notes in a Zoom dialog.
Click the arrow button to arrange the Lab Test to the right Lab Test. This is available only when the Lab Test has been entered for the same date.
Click the arrow button to arrange the Lab Test to the Left Lab Test. This is available only when the Lab Test has been entered for the same date.
This section enables you to enter additional information about any relevant tests, such as toxicology. The following is an illustration of this section.

The following is an illustration of the Parent tab.
Parent Tab Fields and Field Descriptions
The following table lists and describes the fields on the Parent tab.
| Field/Control Name Name | Description |
|---|---|
| Title | Enter the title of the parent. |
| First Name | Enter the first name of the parent. |
| Middle Name | Enter the middle name of the parent. |
| Last Name | Enter the last name of the parent. |
| Parent Initials | Enter initials about the parent. |
| Date of Birth | Enter the parent's date of birth. You can enter a partial date if the actual date is unavailable. |
| Age | Calculates the parent's age, from the date of birth and earliest event onset date, if both full dates are available; otherwise, you can enter the age manually. |
| Units | Select the age units.
Note: If both the date of birth and event onset date are available, age units field is automatically calculated. The Administrator can adjust this list. |
| Weight | Enter the parent's weight. |
| Weight Units | Select the appropriate weight unit. |
| Height | Enter the parent's height. |
| Height Units | Select the appropriate height unit. |
| Gender | Select the parent's gender.
Note: If the parent is male, the system automatically disables the Pregnancy field. When the Gender is set to Female, the Pregnancy drop down is enabled and set to Unknown. |
| Date of LMP | Enter the date of the Last Menstrual Period, if applicable. A partial date can also be entered. |
| Parent Breastfeeding | Select the check box, if applicable. |
| Age at Vaccination | Parent age at vaccination is auto-calculated using Parent Date of Birth and Block 10 date (similar logic is used for Patient Age at Vaccination) only if both the dates are full dates. |
| Units (at Vaccination) | Displays the data from Age unit codelist for which 'Age unit' flag is marked as checked in Codelist Maintenance. |
| Ethnic Group | Enter the ethnic group of the parent. |
| Race | Select the parent's race. You can capture up to 5 Race using the Add and Delete buttons.
Note: The system does not let you select the same Race more than once. If you try to select the same Race again, an error message appears. |
| Medical History | Captures information about the parent's medical history. |
The Products tab enables you to enter and view details about products and dosage regimens. The Products tab contains the name of the drug that has been entered within that tab. For Blinded Studies, the Blinded Product Name gets displayed in the tab.
When a user has no access to view unblinded information on the Case Form, the following fields are hidden:
Drug Code
Study Drug
Formulation
Concentration
Outside Therapeutic Range
Dose
Dose Description
Daily Dosage
Regimen Dosage
Patient Route of Administration
Parent Route of Administration
Package ID
Pack Units
Batch\Lot
Expiration Date
Total Dosage Units
Total Dose to Primary Event
When using the Products tab, be aware of the following:
If the study has been unblinded and a study drug had been selected, the selected Study Drug Name is displayed. You cannot view unblinded information and the tab continues to show the Blinded Product Name.
You can enter details of more than one product and more than one dosage regimen for a company product for which multiple licenses exist (for example, drug and vaccine, or drug and device).
Depending on the type of license (drug, vaccine, or device), different views are available in the Products tab. If the selected item is not a company product or if a license for a company product does not exist, all three views are always available.
You can enter seconds in the following fields:
Argus > Case Actions > Open > (Select a Case) > Event tab > Event sub tab > {event description} sub tab > Event Information section (middle of screen)
Onset From Last Dose field
Duration field
Onset Latency field
Argus > Case Actions > Open > (Select a Case) > Products tab > Product sub tab > {Product Name} sub-sub tab (drug) > Dosage Regimen section (lower 1/3 of screen)
Duration of Regimen
Argus > Case Actions > Open > (Select a Case) > Products tab > Product sub tab > {Product Name} sub-sub tab (drug) > Product Details section (lower 1/3 of screen
Duration of Administration
Time between First Dose/Primary Event
Time between First Dose/Primary Event
Any number following by the letter "s" defaults to "#sec."
The system interprets the seconds the user enters in the following formats where:
# is a number from 0 to 9
#s -- The system automatically changes the format to # sec.
# s -- The system automatically changes the format to # sec.
# sxx
where:
x is other letters -- The system automatically changes the format to # sec
The Temporal View and the Case Form printout display the seconds.
The E2B import and export case functions support seconds and M2 Validation for the defined fields.
The Products tab displays the Drug section by default as shown in the following illustration.
The Drug tab includes the following sections:
Product Information
Product Indication
Quality Control
Dosage Regimens
Product Details
This section enables you to enter information about the drug being used for the case. The following is an illustration of the Product Information section. 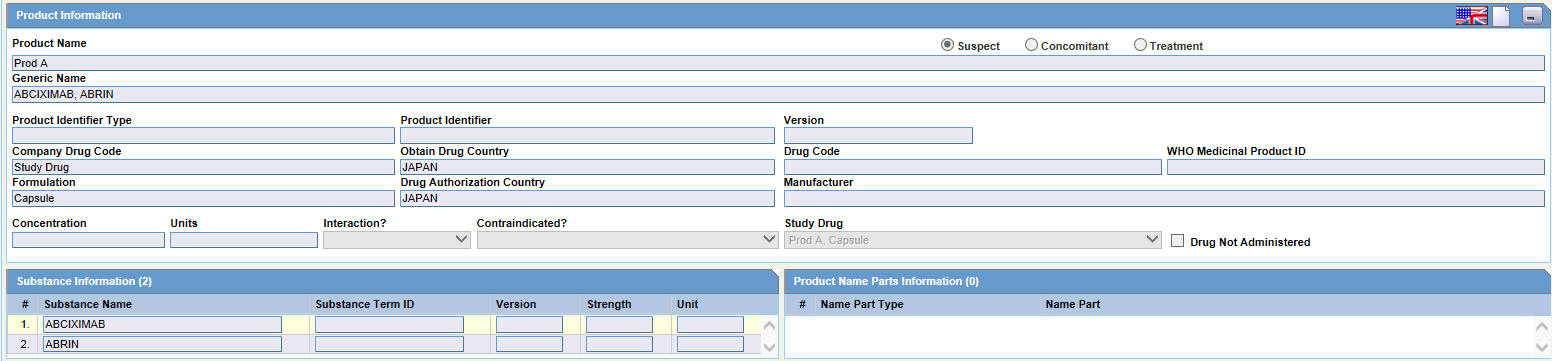
Product Information - Fields and Field Descriptions
The following table lists and describes the fields and controls in the Product Information section.
| Field/Control Name | Description |
|---|---|
|
Product Information |
|
|
Product Name |
The name of the product associated with the adverse event. |
|
Suspect/ Concomitant/Treatment |
Indicates whether the drug is suspect, concomitant or meant for treatment. |
|
Generic Name |
The generic name of the product |
|
Product Identifier Type |
The type of product Identifier selected. |
|
Product Identifier |
Displays the type of Product Identifier such as MPID, PhPID, and so on. |
|
Version |
Displays the Date or Version of the Product Identifier. |
|
Company Drug Code |
The unique value the company uses to identify the drug. |
|
Obtain Drug Country |
The name of the country where the drug was obtained. |
|
Drug Code |
The unique value that identifies the drug. |
|
WHO Medicinal Product ID |
The WHO Drug code used to identify the drug. |
|
Formulation |
The form in which the drug was administered (liquid, tablet, capsule, and so on.) |
|
Drug Authorization Country |
The country where the drug was authorized for use. |
|
Manufacturer |
The company that manufactured the drug. |
|
Concentration |
The amount of the drug that was administered. |
|
Units |
The drug unit (such as mg, tsp, and so on). |
|
Interaction |
Identifies the drug interaction, if any. |
|
Contraindicated? |
Identifies the contraindication, if any. |
|
Drug Not Administered |
Check this box, if the patient was not administered with the drug. |
|
Substance Information |
|
|
Substance Name |
Displays the Ingredient's name. |
|
Substance Term ID |
Displays the Term ID of the substance selected. |
|
Version |
The Substance Term ID Version Date/Number of the substance used in the Product. |
|
Strength |
The Strength of the substance used in the Product. |
|
Units |
The drug unit (such as mg, tsp, and so on). |
|
Product Name Parts Information |
|
|
Name Part Type |
The type of Product Name parts used in the product. |
|
Name Part |
The Product Name parts used in the product. |
The Product Indication section enables you to enter information about the indicator of the adverse event. It includes two fields: Reported Indication and Coded Indication.
Reported indication is the reported reaction and Coded Indication is the code for the reaction. The two values may be the same, but they may also be different.
The Quality Control section enables you to enter quality control information.
Quality Control Fields and Controls
The following table lists and describes the fields in the Quality Control section.
| Field/Control Name | Description |
|---|---|
| Quality Control Safety Date | Enter the Quality Control department reference number for the analysis. |
| Quality Control Sent Date | Enter the sent date. |
| Quality Control Cross Reference | Enter the Quality Control department reference number for the analysis. |
| Date Returned | Enter the date returned. |
| Global ID | Enter the global number. |
| Quantity | Enter the quantity. |
| # CID Number | Enter the Control Identification Number. |
| PCID Number | Enter the Product Control Identification Number. |
| Lot Number | Enter the lot number. If the Lot Number entered is incorrect, a Lot Number Lookup dialog is displayed, that allows you to enter select from the existing lot numbers. |
| Complaint Categories Date | Enter a date for complaint categories. |
| Complaint Categories Text | Enter a text explanation as necessary. Use the zoom icon to open the zoom notes and view or edit the text. |
| Analysis Categories Date | Enter a date for analysis categories. |
| Analysis Categories Text | Enter a text explanation as necessary. Use the zoom icon to open the zoom notes and view or edit the text. |
| Analysis Summary Date | Enter a date for an analysis summary. |
| Analysis Summary Text | Enter a text explanation as necessary. Use the zoom icon to open the zoom notes and view or edit the text. |
| Quality Control Result Date | Enter the date the result of the analysis was received by the Quality Control department. |
| Quality Control Result | Enter a text explanation as necessary. Use the zoom icon to open the zoom notes and view or edit the text. |
| Quality Control Comment | Enter any comment relating to the analysis. |
The Dosage Regimens section enables you to enter information about the size and frequency of drug doses being given to a patient. The following is an illustration of the Dosage Regimens section.

Dosage Regimens Fields and Field Descriptions
The following lists and describes the fields in the Dosage Regimens section of the Drug tab.
| Field/Control Name | Description |
|---|---|
| Start Date/Time | Enter the start date and time of the dosage. Entry of time information is optional, and you can enter partial dates. |
| Stop Date/Time | Enter the stop date and time of the dosage. Entry of time information is optional, and you can enter partial dates.
Note: If no Stop Date is entered, Onset from Last Dose is calculated automatically from the Event Onset Date and the most recent Stop Date or the most recent Start Date. |
| Ongoing | Select this check box if the drug treatment is ongoing. The Stop Date, Duration of Regimen, and Last Dose fields are removed if this check box is selected. |
| Outside Therapeutic Range | Select this check box if the drug has not been used in accordance with the label or has been used for outside the Therapeutic Range. Consult your Administrator for further company-specific information on the use of this field. |
| Duration of Regimen | This value is calculated automatically, based on regimen start and stop dates (if full dates are entered for the start and stop dates). If the value is entered manually, the duration units (for example: minutes, hours, days, months, or years) must also be entered along with the actual duration.
Note: The Administrator can set the duration to be inclusive or exclusive. In Inclusive mode, the starting day counts in the calculation of the duration; in Exclusive mode, it does not. |
| Dose Number | Enter the drug dose number. |
| Dose | Enter the dose received by the patient. |
| Dose Units | Select the dose unit. The Administrator can adjust this list. |
| Frequency | Select the frequency. The Administrator can adjust this list. |
| Dose Description | This value is automatically entered by using the values from Dose, Dose Units, and Frequency. If necessary, you can change this value. However, if Dose, Units, or Frequency information is changed, this value will be recalculated. |
| Daily Dosage | This value is calculated automatically depending on the dose and frequency. It can be manually overwritten. If either the dose or the frequency fields are blank, this field is not calculated automatically. |
| Daily Dosage Units | This value is derived automatically from the dose unit. |
| Regimen Dosage | This value is calculated automatically depending on the daily dose, duration, and frequency. This total can be overridden. If the daily dose is blank or the frequency fields are 0, this field is not calculated automatically. |
| Regimen Dosage Unit | This value is derived depending on the Daily Dose Units. |
| Route of Administration | Select the route of administration. The Administrator can adjust this list. |
| Parent Route of Administration | Select the route of administration for the parent. The Administrator can adjust this list. |
| Accidental Exposure | Select the type of Accidental Exposure from the list. A non-modifiable list of items is provided for this list. |
| Package ID | Enter the package ID. |
| Pack Units | Select the package presentation information of the product. The Administrator can adjust this list. |
| Batch/Lot # | Enter the batch and/or lot number(s). |
| Expiration Date | Enter the expiration date. Enter a partial date if the full date is not known. |
| (New) Tab | Click this tab to create a new dosage regimen entry. |
Product Details Fields and Field Descriptions
The following is an illustration of the fields in the Product Details section of the Drug tab.

The following table lists and describes the fields in the Product Details section.
| Field/Control Name | Description |
|---|---|
| First Dose | The earliest regimen start date, completed automatically. |
| Last Dose | The latest regimen stop date, completed automatically. |
| Duration of Administration | Calculated automatically if full dates are available for the first and last doses. |
| Total Dosage | Calculated automatically based on daily dose and duration. |
| Time Between First Dose/Primary Event | The time from the first dose to primary event onset. |
| Time between Last Dose/Primary Event | The time from the last dose to primary event onset. |
| Total Dose to Primary Event | The cumulative dose to time of the event. |
| Action Taken | Select the appropriate term. If you select Dose Increased or No change, the dechallenge and rechallenge fields are disabled. The Administrator can adjust this list. |
| Dechallenge Results | Indicates the drug stopped for the purpose of determining if it was the drug that caused the adverse event. Click the appropriate button. |
| Date | Enter the date the dechallenge was carried out |
| Gestation Period at Exposure | Gestation Period at Exposure is automatically calculated for all Products in the case by using the formula: Date of First Dose of the respective Product – LMP Date. It is calculated only if full dates available for both fields. |
| Taken Previously / Tolerated | Select the appropriate response from the list. |
| Rechallenge Results | Make the appropriate selection depending on whether the drug was taken again. If Pos or Neg or UNK is selected for the Rechallenge field, the Rechallenge Start Date/Time, Rechallenge Stop Date/Time, and the Rechallenge Outcome fields are enabled. |
| Start Date/Time | Enter the date and/or time when the rechallenge was started. |
| Stop Date/Time | Enter the date and/or time when the rechallenge was stopped. |
| Specialized Product Category | Select specialized FDA product categories such as combination products, compounded and repackaged products used in eVAERS reports. |
| Abuse | Select this checkbox if the patient abused the product (For example: Painkillers taken without pain). |
| Batch and lot tested and found within specifications | Check this checkbox if the batch and lot was found to be within specifications, after being tested. |
| Batch and lot tested and found not within specifications | Check this checkbox if the batch and lot was not found to be within specifications, after being tested. |
| Counterfeit | Check this checkbox if the patient took a counterfeit drug. |
| Drug taken by the father | Check this checkbox if the father of the patient had taken the drug. |
| Drug taken beyond expiry date | Check this checkbox if the drug was taken after its expiry date. |
| Medication Error | Check this checkbox if there was a medication error in administering the drug. |
| Misuse | Check this checkbox in case of possible misuse. |
| Occupational Exposure | Check this checkbox in case of occupational exposure. |
| Off Label Use | Check this checkbox in case of off-label use of the drug. |
| Overdose | Check this checkbox if the patient took an overdose of the product. |
| Tampering | Check this checkbox if the product appeared to have been tampered with before it was used. |
You can enter a Study Drug for a Non-Configured Study entered in a case and mark a current product as a study drug.
To mark a product as a study drug
Right click on any suspect product in the case.
Select Make Study Drug to mark the current product as a study drug.
Be aware of the following:
The system disables the drug type to make the product a Concomitant or Treatment option.
Study Drug is a read-only field that contains the product name selected by the user.
For non-configured studies in the case, the system displays the following for all study drugs in the case:
Drug Not Administered.
The Device tab enables you to enter information about devices being used for a particular case. It has the following subsections:
Product Information
Product Indication
Product Delivered by Device
Device Information
The following is an illustration of the Product Information section of the Device tab.
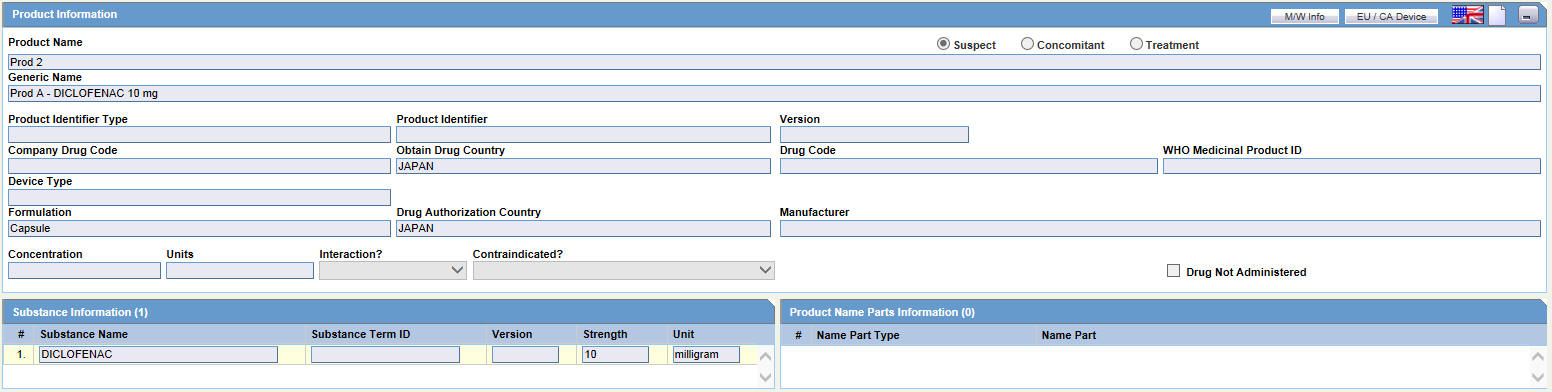
Fields and Field Descriptions
The following table lists and describes the fields in the Product Information section.
| Field/Control Name | Description |
|---|---|
| Product Information | |
| Product Name | Enter the name of the product using the Select button or by entering a partial product name. Type a partial product name and press TAB. This displays the Product Selection dialog. If only one product is found, this information is entered without showing the dialog. If no match is found in the company product list, the WHO Drug Dictionary is searched for a possible match through the WHO Drug Dictionary Dialog. If a match is still not found, the text you initially typed in, is used as is.
Note: If the study is blinded, the Blinded Name of the clinical study is displayed in this field. After unblinding, the selected study's Product Name for Unblinded cases is not shown. |
| Select | Displays the product selection dialog.
Select a product from the list of company products click Select. The relevant fields are added to the Case Form. |
| Encode | Click Encode to retrieve the code. |
| Suspect/ Concomitant/ Treatment | Make the appropriate selection for the product you are entering. The drug types indicate the involvement of the product with the adverse event(s) reported for the case.
Suspect indicates that the product may have caused the adverse event(s). Concomitant indicates drugs that are taken with the suspect drug. Treatment is the drug taken to treat the adverse event. |
| Generic Name | Enter the generic name of the drug in a manner similar to the Product Name. If the study is blinded, the Generic Name is replaced with the Study Name of the product.
Note: This name is entered automatically, depending on the chosen company product. Note: If the study is blinded, the Blinded Name of the clinical study is displayed in this field. After unblinding, the selected study's Product Name for Unblinded cases is not shown. |
| Product Identifier Type | The type of product Identifier selected. |
| Product Identifier | Displays the type of Product Identifier such as MPID, PhPID, and so on. |
| Version | Displays the Date or Version of the Product Identifier. |
| Company Drug Code | Displays the licensed country for the selected company product. |
| Obtain Drug Country | Country the drug is licensed in. |
| Drug Code | Enter the WHO-DRUG code. |
| WHO Medicinal Product ID | Displays the Medicinal ID associated with the selected WHO drug.
Note: This ID is populated only if a WHO-drug is selected. |
| Device Type | Indicates the type of device being used for this case. |
| Formulation | Select the formulation of the product. The Administrator can adjust this list.
Note: This field is entered automatically depending on the product. |
| Drug Authorization Country | Enter the company drug code.
Note: This name is entered automatically depending on the chosen company product. |
| Manufacturer | A different Manufacturer can be selected from the drop-down list and can still be kept as a company product. |
| Concentration | After a drug and formulation have been entered, select the concentration from the list, or enter the concentration. If this information is changed manually, the product is marked as a non-company product.
Note: This field is entered automatically depending on the chosen product. The concentration cannot be modified for a Study drug. |
| Units | Select a concentration unit. The Administrator can adjust this list. |
| Interaction? | Indicates whether the case involves a drug interaction |
| Contraindicated? | Indicates whether the drug was administered contrary to its indication. Make the appropriate selection to indicate whether the drug was contraindicated in this case. |
| Drug Not Administered | Check this checkbox if no drug was administered. |
| Substance Information | |
| Substance Name | Displays the Ingredient's name. |
| Substance Term ID | Displays the Term ID of the substance selected. |
| Version | Displays the Date or Version of the substance selected. |
| Strength | The strength of the substance used in the product. |
| Units | The drug unit (such as mg, tsp, and so on). |
| Product Name Parts Information | |
| Name Part Type | The type of Product Name part used in the Product. |
| Name Part | The Product Name part used in the Product. |
| M/W Info | The MW Info dialog allows you to enter the following device information:
|
|
|
|
|
| EU / CA Device | The EU/CA Device dialog allows you to enter the device information. Fields are marked by either an EU flag or a Canadian flag to indicate which entity is mapped to the field. The following list describes each field in detail:
|
|
|
|
|
|
|
|
|
|
You can perform two types of searches in the section:
Product Browser Search
WHO Drug Coding Search
To search for a product
Click Select in the Products tab.
The Product Browser dialog is displayed.
Click Select to start searching.
When the system opens the Product Browser dialog box, Click the entities displayed in the dialog.
The hierarchy above and below the entity being searched is also displayed. For example, if Product Name is searched, it displays the Product Name as well as the Family Name and Trade Name.
Search for Products based on the following criteria:
Ingredient
Family
Product Name
Trade Name - Searches the License Trade Name
Click the Full Search check box to select all these criteria when searching.
Click Select.
The results based on the search criteria are displayed and the user can select the Product.
Click Clear to remove the entered search criteria.
Be aware of the following when using the WHO Drug Browser search function:
The system enables you to perform a full search from the WHO Drug browser when you select the Full Search option.
By default, the system performs a like search (e.g., CUREALL%)
You can use the percent (%) sign to perform wildcard searches
If you click Full Search, the system performs a full search (e.g., %CUREALL%)
The system also enables you to search for drug formulation and country. However, this is available only if you select the WHO Drug C format. Otherwise, the option is disabled.
When you click Clear, the system clears the search criteria you entered.
After the system performs the search, you can sort the results on all the fields.
To perform a WHO Drug Browser Search
Select the Encode button to open the WHO Drug Coding dialog.
You can use both the WHO Drug B Format as well as the WHO Drug C Format using the same browser.
Select either the WHO Drug B format or the WHO Drug C format from the Case Form Configuration dialog where the Dictionaries are chosen for encoding.
Enter your search criteria in these fields and click Search to display the product attributes that match the given search criteria:
Trade Name - the trade name of the product
Formulation / Strength - the Formulation / Strength (sequence 3 and sequence 4) of the product.
Country - The Sales Country Code of the Product as defined in the WHO Dictionary
Generic - Whether Generic - Yes or No.
The following criteria are not available for display or searching in the WHO Drug B Format:
Formulation
Country
Strength
Generic
Medicinal Product ID
Product Type
Click Select to copy the selected drug to the Product tab.
Click Cancel to close the selection dialog without making any updates to the Product tab.
The WHO Drug Coding Dialog has the following fields:
| Field | Description |
|---|---|
| Product Type | Select the type of product from the drop-down list. Note: All is displayed as the Product Type by default. |
| ATC Code | Enter the ATC Code up to a maximum of 10 characters. |
| Drug Code / Medicinal Prod ID | Searches on either criterion as per the radio button selected for the search. By default, the Drug Code option is selected. |
| Trade Name / Ingredient | Searches on either criterion as per the radio button selected for the search. By default, the Trade Name option is selected. |
| Formulation | Enables you to search based on the drug formulation. |
| Country | Enables you to search for a drug based on the country where the drug was sold. |
You can enter quality control information by clicking the Quality Control button and entering the appropriate information in the Quality Control dialog box.
About the Quality Control Dialog Box
The following is an illustration of the Quality Control dialog box.
The following table lists and describes the fields in the Quality Control dialog box.
| Field | Description |
|---|---|
| Quality Control Safety Date | Enter the Quality Control department reference number for the analysis. |
| Quality Control Sent Date | Enter the sent date. |
| Quality Control Cross Reference | Enter the Quality Control department reference number for the analysis. |
| Date Returned | Enter the date returned. |
| Global ID | Enter the global number. |
| Quantity | Enter the quantity. |
| # CID Number | Enter the Control Identification Number. |
| PCID Number | Enter the Product Control Identification Number. |
| Lot Number | Enter the lot number. If the Lot Number entered is incorrect, a Lot Number Lookup dialog is displayed, that allows you to enter select from the existing lot numbers. |
| Complaint Categories Date | Enter a date for complaint categories. |
| Complaint Categories Text | Enter a text explanation as necessary. Use the zoom icon to open the zoom notes and view or edit the text. |
| Analysis Categories Date | Enter a date for analysis categories. |
| Analysis Categories Text | Enter a text explanation as necessary. Use the zoom icon to open the zoom notes and view or edit the text. |
| Analysis Summary Date | Enter a date for an analysis summary. |
| Analysis Summary Text | Enter a text explanation as necessary. Use the zoom icon to open the zoom notes and view or edit the text. |
| Quality Control Result Date | Enter the date the result of the analysis was received by the Quality Control department. |
| Quality Control Result | Enter a text explanation as necessary. Use the zoom icon to open the zoom notes and view or edit the text. |
| Quality Control Comment | Enter any comment relating to the analysis. |
The following is an illustration of the Product Indication section of the Device tab.

Product Indication Fields and Field Descriptions
The following table lists and describes the fields in the Product Indication section.
| Field/Control Name | Description |
|---|---|
| Reported Indication | By default, the value of this field is populated with the Product Indication from the Product Configuration, if set up by the user. If not, you can enter a term into the Reported Indication field.
Note: Argus Safety automatically encodes this information. You can also click Encode to open the coding dictionary dialog. |
| Coded Indication | This field is populated with the encoded term when the user enters data in the reported indication field and tabs out. |
| Encode (Indication) | Opens the MedDRA Browser with the term already populated from the Coded Indication field.
Note: To view the complete MEDDRA hierarchy for the encoded term, click the Encoding Status icon. |
| Add | Adds a new Indication row.
Note: Only two indications are visible at a time |
| Delete | Click this button to delete the selected Indication row. |
The following is an illustration of the Product Delivered by Device section

The following table lists and describes the fields in the Product Delivered by Device section.
| Field/Control Name | Description |
|---|---|
| Type of Drug | Select the type of drug from the drop-down list. |
| Other Mfg Product | Displays the Other Manufacturing Product. |
| Add | Adds another row. |
| Delete | Deletes the highlighted row. |
This section enables you to enter information about the device component being used. The following is an illustration of the section.

| Field/Control Name | Description |
|---|---|
| Component Name | The device component name used in the product. |
| Component Term ID | The device component term ID of the device component used in the product. |
| Version | The Date or Version of the device component term ID of the device component used in the product. |
| Batch Lot # | The batch lot number of the device component name used in the product. |
| Add | Adds another row. |
| Delete | Deletes the highlighted row. |
This section enables you to enter information about the device being used. The following is an illustration of the section.

When using the Device Information section, be aware of the following:
You can enter up to 10,000 characters in the Additional Manufacturer Narrative field.
The device evaluation codes have been updated to reflect FDA standards. Go to the following link for more information: http://www.fda.gov/cdrh/mdr/373_appdxb.html.
The evaluation method is available is the following site: http://www.fda.gov/cdrh/mdr/373.html.
The evaluation results are available at the following site: http://www.fda.gov/cdrh/mdr/373_appdxd.html.
The following table lists and describes the fields in the Device Information Section
| Field/Control Name | Description |
|---|---|
| Product Information | |
| Lot # | Enter the lot number of the device. |
| Expiration Date | Enter the expiration date. Enter a partial date or no date if the full date is not available. |
| Date of Mfr | Enter the month and year of manufacture of the suspect medical device. |
| Device Age | Enter the age of the device. |
| Units | Enter the unit. |
| Model # | Enter the model number of the device. |
| Serial # | Enter the serial number of the device. |
| Catalog # | Under Catalog#, enter the exact catalog number as it appears in the manufacturer's catalog, device labeling, or accompanying packaging. |
| Unique Identifier (UDI) # | Under Unique Identifier (UDI) #, enter any other applicable identification number (for example: component number, product number, part number, bar-coded product ID). |
| Date Implanted | If the device is implantable, enter the date of the implant. Enter a partial date if the full date is not available. |
| Date Explanted | If the device is implantable, enter the date of the explant, if any. Enter a partial date if the full date is not available. |
| Improper Use/Storage | Indicate if the device was improperly used or stored. |
| Operator of Device | Select the type of person operating or using the suspect medical device on the patient at the time of the event such as Health Care Professional, Patient, Paramedic and so on. |
| If other | If the operator of the device is other, enter the operator of the device. |
| Trained User | Indicate if the operator of the devices was trained to use the device. |
| Duration of implantation | The duration of implantation. |
| Malfunction | Indicate if the devices malfunctioned. |
| Malfunction Type | Make the appropriate selection to indicate the type of reportable event. For an event associated with a malfunction, the FDA refers users to applicable sections in 21 CFR Part 803 reporting guidelines. |
| Manufacturer/Importer Awareness Date | Enter the date when the manufacturer became aware of the event |
| Device Available for Evaluation | Indicate whether the device is available for evaluation. Also, indicate whether the device was returned to the manufacturer and if so, the date of the return. |
| Returned to manufacturer on | Enter the Device Return Date. |
| Preliminary Comments | Enter or select preliminary comments. |
| Malfunction Information | - |
| Reported Malfunction | Enter the malfunction as entered by the reporter. |
| Determined Malfunction | Enter the malfunction as determined by the company. |
| Listedness | Enter the listedness of malfunction in respect of the device. |
| Reportable | Select the reportability of the malfunction. |
EU/CA Device Dialog Fields and Field Descriptions
The EU/CADevice Fields dialog includes the following fields:
NCA Reference Number
Identify to what other NCA's this report was also sent
Number of Patients Involved
Number of Devices Involved
User facility reference number
Remedial Action by HC Facility
Usage of Medical Device
Other
Update to Initial Report (Follow-up Report)
Final Report
The following table provides attribute information for the device fields
| Field/Control Name Name | Field Length | Field Type |
|---|---|---|
| NCA Reference Number | 100 characters | Alphanumeric |
| Identify to what other NCA's this report was also sent | 2000 characters | Alphanumeric |
| Number of Patients Involved | 3 characters | Numeric |
| Number of Devices | 3 characters | Numeric |
| User facility reference number | 20 characters | Alphanumeric |
| Remedial Action by HC Facility | 1000 characters | Alphanumeric |
| Usage of Medical Device | N/A | Check box |
| Other | 15 characters | Alphanumeric |
| Update to Initial Report (Follow-up Report) | N/A | Check box |
| Final Report | N/A | Check box |
When you select the EU/CA Device option, the system prints the fields on the Case form. The system tracks the fields and any updates in the audit log.
The Vaccine section of the Products tab enables you to enter information about a vaccine. The Vaccine tab includes the following sections:
The following table lists and describes the fields in the Product Information section.
| Field/Control Name | Description |
|---|---|
| Product Name | Enter the name of the product using the Select button or by entering a partial product name.
Type a partial product name and press TAB. This displays the Product Selection dialog. If only one product is found, this information is entered without showing the dialog. If no match is found in the company product list, the WHO Drug Dictionary is searched for a possible match through the WHO Drug Dictionary Dialog. If a match is still not found, the text you initially typed in, is used as is. Note: If the study is blinded, the Blinded Name of the clinical study is displayed in this field. After unblinding, the selected study's Product Name for Unblinded cases is not shown. |
| Select | Displays the product selection dialog.
Select a product from the list of company products click Select. The relevant fields are added to the Case Form. |
| Encode | Click Encode to retrieve the code. |
| Include in VAERS Block | Select the VAERS Form block that this vaccine needs to be printed in. |
| Suspect/Concomitant/Treatment | Make the appropriate selection for the product you are entering. The drug types indicate the involvement of the product with the adverse event(s) reported for the case.
Suspect indicates that the product may have caused the adverse event(s). Concomitant indicates drugs that are taken with the suspect drug. Treatment is the drug taken to treat the adverse event. |
| Generic Name | Enter the generic name of the drug in a manner similar to the Product Name. If the study is blinded, the Generic Name is replaced with the Study Name of the product.
Note: This name is entered automatically depending on the chosen company product. |
| Product Identifier Type | The type of product Identifier selected. |
| Product Identifier | Displays the type of Product Identifier such as MPID, PhPID, and so on. |
| Version | Displays the Date or Version of the Product Identifier. |
| Company Drug Code | Enter the company drug code.
Note: This name is entered automatically depending on the chosen company product. |
| Obtain Drug Country | Enter the country where the drug was purchased. |
| Drug Code | Enter the WHO-DRUG code. |
| WHO Medicinal Product ID | Displays the Medicinal ID associated with the selected WHO drug.
Note: This ID is populated only if a WHO-drug is selected. |
| Formulation | Select the formulation of the product. The Administrator can adjust this list.
Note: This field is entered automatically depending on the product. |
| Drug Authorization Country | Displays the licensed country for the selected company product. |
| Manufacturer | A different Manufacturer can be selected from the drop-down list and can still be kept as a company product. |
| Concentration | After a drug and formulation have been entered, select the concentration from the list, or enter the concentration. If this information is changed manually, the product is marked as a non-company product.
Note: This field is entered automatically depending on the chosen product. The concentration cannot be modified for a Study drug. |
| Units | Select a concentration unit. The Administrator can adjust this list. |
| Interaction? | Indicates whether the case involves a drug interaction |
| Contraindicated? | Indicates whether the drug was administered contrary to its indication. Make the appropriate selection to indicate whether the drug was contraindicated in this case. |
| # of Siblings | Enter the number of siblings for patients who are children under the age of five. |
| Birth Weight | For patients who are children under the age of five, enter the birth weight. For example: 3260g, 3.26kg, or 7lb 4oz. If a number without units is entered, the following units are assumed: < 32 - Pounds 32-200 - Ounces >200 - Grams |
| Birth Weight Units | Select the appropriate weight units. |
You can perform two types of searches in the section:
Product Browser Search
WHO Drug Coding Search
Click Select in the Products tab.
The Product Browser dialog is displayed.
Click Select to start searching.
When the system opens the Product Browser dialog box, Click the entities displayed in the dialog.
The hierarchy above and below the entity being searched is also displayed. For example, if Product Name is searched, it displays the Product Name as well as the Family Name and Trade Name.
Search for Products based on the following criteria:
Ingredient
Family
Product Name
Trade Name - Searches the License Trade Name
Click the Full Search check box to select all these criteria when searching.
Click Select.
The results based on the search criteria are displayed and the user can select the Product.
Click Clear to remove the entered search criteria.
Be aware of the following when using the WHO Drug Browser search function:
The system enables you to perform a full search from the WHO Drug browser when you select the Full Search option.
By default, the system performs a like search (e.g., CUREALL%)
You can use the percent (%) sign to perform wildcard searches
If you click Full Search, the system performs a full search (e.g., %CUREALL%)
The system also enables you to search for drug formulation and country. However, this is available only if you select the WHO Drug C format. Otherwise, the option is disabled.
When you click Clear, the system clears the search criteria you entered.
After the system performs the search, you can sort the results on all the fields.
To perform a WHO Drug Browser Search
Select the Encode button to open the WHO Drug Coding dialog.
You can use both the WHO Drug B Format as well as the WHO Drug C Format using the same browser.
Select either the WHO Drug B format or the WHO Drug C format from the Case Form Configuration dialog where the Dictionaries are chosen for encoding.
The WHO Drug Coding Dialog has the following fields:
| Field/Control Name | Description |
|---|---|
| Product Type | Select the type of product from the drop-down list. Note: All is displayed as the Product Type by default. |
| ATC Code | Enter the ATC Code up to a maximum of 10 characters. |
| Drug Code / Medicinal Prod ID | Searches on either criterion as per the radio button selected for the search. By default, the Drug Code option is selected. |
| Trade Name / Ingredient | Searches on either criterion as per the radio button selected for the search. By default, the Trade Name option is selected. |
| Formulation | Enables you to search based on the drug formulation. |
| Country | Enables you to search for a drug based on the country where the drug was sold. |
Enter your search criteria in these fields and click Search to display the product attributes that match the given search criteria:
Trade Name -- the trade name of the product
Formulation / Strength -- the Formulation / Strength (sequence 3 and sequence 4) of the product.
Country -- The Sales Country Code of the Product as defined in the WHO Dictionary
Generic - Whether Generic - Yes or No.
The following criteria are not available for display or searching in the WHO Drug B Format:
Formulation
Country
Strength
Generic
Medicinal Product ID
Product Type
Click Select to copy the selected drug to the Product tab.
Click Cancel to close the selection dialog without making any updates to the Product tab.
The following is an illustration of the fields in the Product Indication section of the Vaccine tab.
Product Indication Fields and Field Descriptions
The following table lists and describes the fields in the Product Indication section.
| Field/Control Name | Description |
|---|---|
| Product Indication Section | |
| Reported Indication | By default, the value of this field is populated with the Product Indication from the Product Configuration, if set up by the user. If not, you can enter a term into the Reported Indication field.
Note: Argus Safety automatically encodes this information. You can also click Encode to open the coding dictionary dialog. |
| Coded Indication | This field is populated with the encoded term when the user enters data in the reported indication field and tabs out. |
| Encode (Indication) | Opens the MedDRA Browser with the term already populated from the Coded Indication field.
Note: To view the complete MEDDRA hierarchy for the encoded term, click the Encoding Status icon |
| Add | Adds a new Indication row.
Note: Only two indications are visible at a time |
| Delete | Click this button to delete the selected Indication row. |
| Up | Allows the user to move an indication up. |
| Down | Allows the user to move an indication down. |
You can enter quality control information and enter the appropriate information in the Quality Control section. The following is an illustration of the section.
The following table lists and describes the fields in the Quality Control window.
| Field/Control Name | Description |
|---|---|
| Quality Control Safety Date | Enter the Quality Control department reference number for the analysis. |
| Quality Control Sent Date | Enter the sent date. |
| Quality Control Cross Reference | Enter the Quality Control department reference number for the analysis. |
| Date Returned | Enter the date returned. |
| Global ID | Enter the global number. |
| Quantity | Enter the quantity. |
| # CID Number | Enter the Control Identification Number. |
| PCID Number | Enter the Product Control Identification Number. |
| Lot Number | Enter the lot number. If the Lot Number entered is incorrect, a Lot Number Lookup dialog is displayed, that allows you to enter select from the existing lot numbers. |
| Complaint Categories Date | Enter a date for complaint categories. |
| Complaint Categories Text | Enter a text explanation as necessary. Use the zoom icon to open the zoom notes and view or edit the text. |
| Analysis Categories Date | Enter a date for analysis categories. |
| Analysis Categories Text | Enter a text explanation as necessary. Use the zoom icon to open the zoom notes and view or edit the text. |
| Analysis Summary Date | Enter a date for an analysis summary. |
| Analysis Summary Text | Enter a text explanation as necessary. Use the zoom icon to open the zoom notes and view or edit the text. |
| Quality Control Result Date | Enter the date the result of the analysis was received by the Quality Control department. |
| Quality Control Result | Enter a text explanation as necessary. Use the zoom icon to open the zoom notes and view or edit the text. |
| Quality Control Comment | Enter any comment relating to the analysis. |
You can enter vaccine information and enter the appropriate information in the Vaccine Information section. The following is an illustration of the section.

Vaccine Information Fields and Field Descriptions
The following table lists and describes the fields in the Vaccine Information section.
| Field/Control Name | Description |
|---|---|
| Start Date/Time | Enter the vaccination date. Enter a partial date if the full date is not available. |
| Dose Number | Enter the vaccine dose number. |
| Dose | Enter the vaccine dose. |
| Units | Select the dose unit. The Administrator can adjust this list. |
| Dose Description | Enter a description of the vaccine dose. |
| Patient Route of Administration | Enter the route of administration or a short code for the route of administration. The system automatically decodes your entry. The Administrator can adjust this list. |
| Parent Route of Administration | Enter the route of administration or a short code for the route of administration. The system automatically decodes your entry. The Administrator can adjust this list. |
| Package ID | Enter the package ID. |
| Batch / Lot # | Enter the batch and/or lot number(s). |
| Expiration Date | Enter the expiration date. Enter a partial date or no date if the full date is not available. |
| Block 10 | If this box is checked, the Start Date in this Dosage record and the time from the leftmost CDD vaccine will be printed in the VAERS Form Block 10 as Date of Vaccination. |
| Block 14 | If this box is checked, this Dosage record will be printed in the VAERS Form Block 14. |
| Anatomical Location | Select the anatomical location of the vaccination. The Administrator can adjust this list. |
This section is the same for the Product Details section under all the tabs - in the Drugs tab, Device tab, and the Vaccine tab.
See the The Product Details Section for details about this section.
The following is an illustration of the Vaccine Administration form.
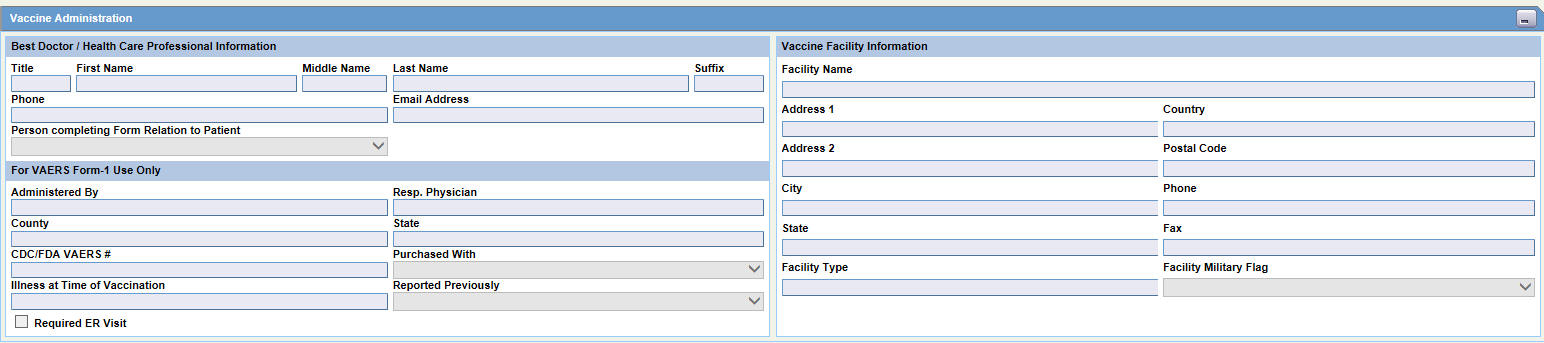
To enter vaccine administration information:
Enter the relevant vaccination information items in the form.
The following table lists and describes the fields in the Vaccine Administration form.
| Field/Control Name | Description |
|---|---|
| Best Doctor / Health Care Professional Information | |
| Title | Enter the health care professional's name title, if applicable. |
| First Name | Enter the first name of the health care professional. |
| Middle Name | Enter the middle name of the health care professional. |
| Last Name | Enter the last name of the health care professional. |
| Suffix | Enter the health care professional's name suffix, if applicable. |
| Phone | Enter the telephone number of the health care professional. |
| Email Address | Enter the email address of the health care professional. |
| Person Completing Form Relationship to Patient | Select an appropriate item from the list. |
| For VAERS Form-1 Use Only | |
| Administered By | Enter the name of the person who administered the vaccine. |
| Resp. Physician | Enter the name of the physician responsible for the patient. |
| County | Enter the county where the patient was vaccinated. |
| State | Enter the state where the patient was vaccinated. |
| CDC/FDA VAERS # | Enter the verification number. |
| Purchased With | Select the most appropriate item from the list to describe how the vaccine was purchased. |
| Illness at time of Vaccination | Enter the illness, if known. |
| Reported Previously | Select an appropriate item from the list. |
| Required ER Visit | Select this check box if the event required a visit to the emergency room or doctor. |
| Vaccine Facility Information | |
| Facility Name | Enter the name of the facility where the vaccine was administered. |
| Address 1 | Enter line 1 of the address of the facility. |
| Address 2 | Enter line 2 of the address of the facility. |
| Country | Enter the country of the facility where the responsible physician works. |
| Postal Code | Enter the postal code of the facility. |
| City | Enter the city of the facility where the responsible physician works. |
| Phone | Enter the telephone number of the facility. |
| State | Enter the state of the facility. |
| Fax | Enter the fax number of the facility. |
| Facility Type | Enter the facility type where the patient was vaccinated. |
| Facility Military Flag | Select Yes or No indicate whether or not the vaccination facility was a Military facility. |
The following is an illustration of the Vaccine Prior Adverse Events form.

To enter prior adverse events information
Enter the relevant vaccination information items in the form.
Click OK to save the entered prior vaccination adverse event information.
The following table lists and describes the fields in the Vaccine Prior Adverse Events form.
| Field/Control Name | Description |
|---|---|
| Patient | Select whether the details refer to the patient or to a sibling. |
| Vaccine | Enter the name of the vaccine. |
| Dose # | Enter the dose number of the vaccine. |
| Age | Enter the patient's age at onset of the event. |
| Age Units | Select the appropriate age unit from the list. |
| Adverse Events | Enter a term that describes the adverse event. Click the Encode button to encode the term. |
The following is an illustration of the Vaccine History section of the screen.

Vaccine History Fields and Field Descriptions
The following table lists and describes the fields in the Vaccine History section.
| Field/Control Name | Description |
|---|---|
| Date | Enter the date of vaccination. Enter a partial date if the full date is not available. |
| Route of Admin | Enter the route of administration or a short code for the route of administration. The system automatically decodes your entry. The Administrator can adjust this list. |
| Vaccine | Enter the name of the vaccine. |
| Generic Name | Enter the generic name of the vaccine. |
| Anatomical Location | Select the anatomical location of the vaccination. The Administrator can adjust this list. |
| Dose # | Enter the vaccine dose number. |
| Manufacturer | Enter the vaccine manufacturer or select a manufacturer. The Administrator can adjust this list. |
| Dose | Enter the vaccine dose. |
| Units | Select the dose unit. The Administrator can adjust this list. |
| Batch & Lot # | Enter the batch and/or lot number(s). |
| Block 14 | If this box is checked, this Vaccine History will be printed in the VAERS Form Block 14. |
| Add | Adds a new Indication row.
Note: Only two indications are visible at a time. |
| Delete | Click this button to delete the selected Indication row. |
The Events tab enables you to enter or view details for adverse events associated with a case. The following is an illustration of the Events tab.
When using the Events tab, be aware of the following:
You can change the listedness for a drug at the individual level.
This limitation also applies to the Medical Review and Local Labeling dialogs.
The field labels for the Event Assessment tab are updated and configured on the Argus Console.
When you modify the Event outcome on the Events Tab, and the event outcome and case outcome do not match, the system displays the following message:
Case Outcome may no longer match events.
If the Death Seriousness criteria on the Event tab are unchecked, the event outcome reverts to empty and is not set to fatal.
On the Death Details screen, the Autopsy Results field defaults to blank instead of No. If the value is incorrectly set, the system sets it to null during the upgrade.
On the Event Assessment tab, the system displays the Notes icon beside the event term if the preferred term has associated notes on the datasheet.
If the datasheet does not have notes for the preferred term, the system does not display the Notes icon.
This is also true for the Medical Summary and the Local Labeling dialog
When you click the Notes icon, the system displays the notes in read-only mode.
If Allow User to Add Non-Current MedDRA Terms for is configured to Case where Country of Incidence (COI) is other than Japan, the existing application behavior is maintained as:
a. For COI other than Japan: The user can choose a MedDRA LLT term for which LLT (J) is non-current, that is, based on English currency.
b. For COI as Japan: Existing application behavior is retained, and if an E or J user tries to add a LLT with Non-current LLT(J), the application displays an error message.
c. The application indicates the Non-current LLT (J) term with icon indicator on the English side of the Case Form similar to the way it indicates Non-current LLT (J) on the Japan side of the Case Form for both English and Japan users.
If the Allow User to Add Non-Current MedDRA Terms for is configured to Case irrespective of Country of Incidence, the existing application behavior is modified as:
a. Irrespective of COI of the case, both E and J users can add a LLT to the case for which LLT (J) is non-current, that is, based on English currency.
b. Also, there is an indicator on both sides (English and J) to indicate the Non-current LLT (J) term similar to the way it indicates a Non-current LLT (J) on the Japan side of the Case form for both English and J users.
The MedDRA LLT term selection behavior across the Case Form (not limited to the list mentioned below) is governed based on the profile switch value configured in the Allow User to Add Non-Current MedDRA Terms for and On change of LLT Term Sync English and Japan LLTs, irrespective of the currency.
Book-in -> Description as Reported
Case Form -> Patient -> Lab Data -> Test Name
Case Form -> Patient -> Other Relevant History -> Verbatim/Indication/Reaction
Case Form -> Patient Tab -> Patient Sub Tab -> Death Details -> Cause of Death To be Coded
Case Form -> Patient Tab -> Patient Sub Tab -> Death Details -> Autopsy Results To be Coded
Case Form -> Parent -> Other Relevant History -> Verbatim/Indication/Reaction
Case Form -> Products -> Product Indication -> Reported Indication
Case Form -> Product-> Vaccine -> Prior Adverse Event -> Adverse Events
Case Form -> Event -> Description to be Coded
Case Form -> Event -> Event Death Details -> Description as Reported
Case Form -> Analysis Tab -> Company Diagnosis Syndrome
Coding Review -> Prior Adverse Event -> Adverse Events
Coding Review -> Event Information -> Description to be Coded
The system populates the To be coded value on the MedDRA popup dialog box when you click the green checkbox for the MedDRA hierarchy. This applies to the following area where the MedDRA dialog box appears.
Patient Tab: Other Relevant History: Description
Patient Tab: Other Relevant History: Reaction
Patient Tab: Other Relevant History: Indication
Patient Tab: lab Tests
Product Tab: Product Indications
Event Tab: Event Coding
Analysis Tab: Company Diagnosis Syndrome
Console: Business Configuration: Products: Datasheets
Console Business Configuration: Products: Product Indications
Console: Codelists: Lab Tests
Console: Codelists: Always Serious Term List
The Event to Exclude from Report Field enables you to identify information not to include in a PMDA expedited report.
The default for this check box is unchecked.
When this check box is checked, you are required to enter a justification for this action in the Reason to Exclude from Report dialog box.
After you enter the justification, the system places a symbol to the right of the field.
You must have at least one event in a report. If you try to exclude all events from the report, the system presents the following message: "All the events are excluded from reports. If you want to report, at least one event is necessary. Proceed?"
The system does not retrieve events that are excluded from a report as part of CSPSR (Clinical Study Periodic Safety Report) unless it has been configured to include them in such a report.
The following is an illustration of the MedDRA dialog box.
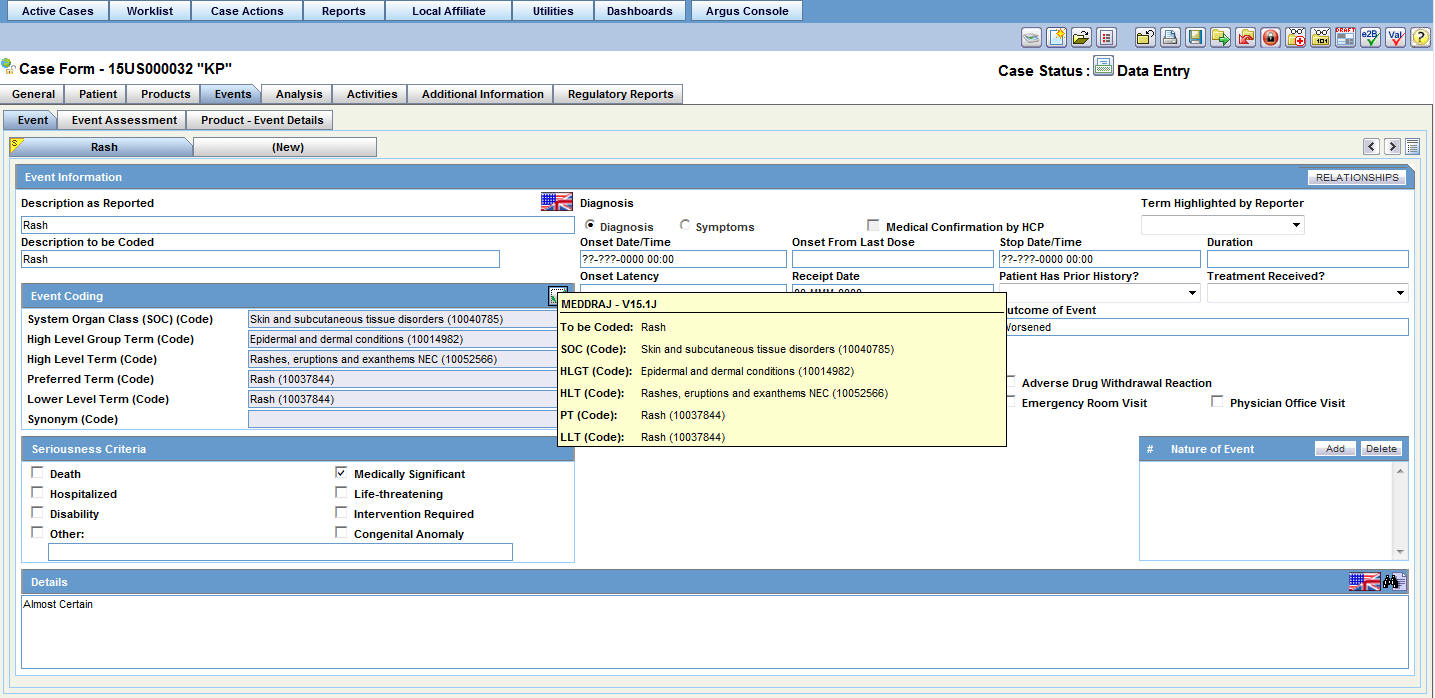
When you click the Recalculate button, the system does not recalculate listedness where the Event Assessment Listedness already has a case justification (generated automatically or manually overwritten).
The following table describes the field properties for the Help Text/Default Labels.
| Default Field Label | Default Help Text |
|---|---|
| Onset from First Dose | This date is defined as the earliest regimen start date to Onset and is completed automatically.
The Date calculation is based on the Case Form Calculation for Inclusive or Exclusive |
| Onset from Last Dose | This date is defined as the latest regimen stop date to Onset and is completed automatically.
The Date calculation is based on the Case Form Calculation for Inclusive or Exclusive. |
| Total Dose to Event | The system calculates this value based on daily dose and duration. |
| Units | The system provides this value based on the dosage units entered. |
| Action Taken | Select the appropriate term from the drop-down list (e.g., Dose Increased, Withdrawn, etc.). The Administrator may adjust the values in this list. |
| Other | The value can only be entered when the Action Taken is "Other." |
| Dechallenge Results | Select the appropriate option. |
| Rechallenge Results | Select the appropriate option. |
| Event occurred as consequence of | Select the appropriate option. |
| Term | Select the appropriate option. |
| Most Important Diagnosis? | Select the appropriate option. |
| Event more specific/severe than PT? | Select the appropriate option. |
The following table describes the calculations the system uses for each field.
| Field | Calculation |
| Total Dosage | The sum of all Total Regimen Dosages. |
| First Dose to Onset | The system calculates this value based on the first dose stop date and the event onset date, if present.
If any regimen start date is null, the system sets the First Dose to Onset is to null. The system does not automatically use partial date entries for the Regimen Start and Stop Date/Time fields to calculate First Dose to Onset. The user can overwrite this field. |
| Last Dose to Onset | The system calculates this value based on the last dose stop date and the even onset date, if present.
If the regimen start date is null, the system sets the Last Dose to Onset is to null. The system does not automatically use partial date entries for regimen Start and Stop Date/Time fields to calculate the Last Dose to Onset. The user can overwrite this field. |
The Event information tab enables you to encode adverse events, record the criteria for the seriousness of each event, and display the results of automated assessments to determine whether events are listed in data sheets. It also lists the licenses for the data sheets. The Event information tab includes the following sections:
Event Information
Event Coding
Seriousness Criteria
Nature of Event
Details
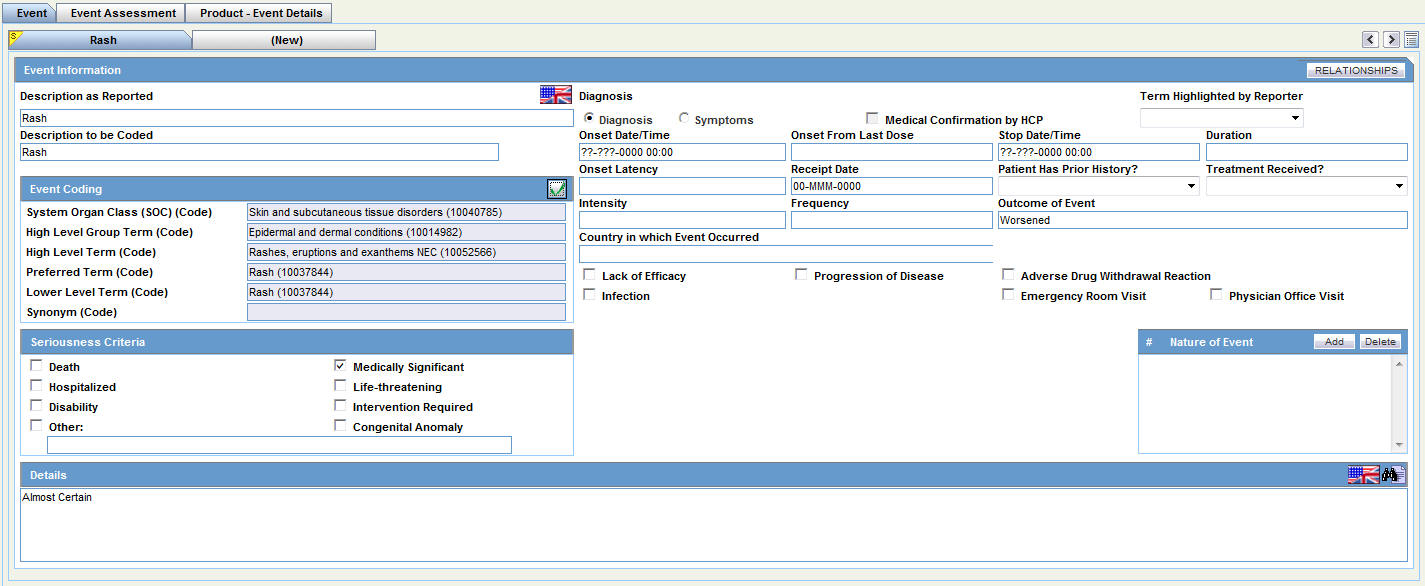
The Event Information section enables you to enter information about the event information including diagnosis, patient history, intensity, and so forth.
Event Information Fields and Field Descriptions
The following table lists and describes the fields in the Event Information section.
| Field/Control Name | Description |
|---|---|
| Relationships | Click the Relationships button to view the Diagnosis-Event Relationships dialog. This allows you to group symptoms and signs with diagnoses. This requires at least two events and a diagnosis. |
| Original Language | Make the appropriate selection to indicate the original language the event was reported in. |
| Description as Reported | Enter the verbatim term used by the reporter, or patient, to describe the adverse event. As you type, the term is automatically copied under Description to be Coded. Verbatim English translations of foreign languages may also be entered here. |
| Diagnosis/ Symptoms | Make the appropriate selection to indicate whether the event is a diagnosis or symptoms. |
| Medical Confirmation by HCP | Make the appropriate selection to indicate whether the event is medically confirmed by a HCP. This drop-down has the values: Yes, No, and Blank. |
| Term Highlighted by Reporter | Make the appropriate selection to indicate whether the primary source reporting the event considered it a major concern or reason for reporting the case. If the information was not explicitly provided by the initial reporter the term should not be considered a highlighted term. The seriousness of the reaction/event should be based on the ICH E2A criteria.
Note: Selecting Yes does not mark this case as Serious automatically. |
| Description to be Coded | If necessary, the verbatim term can be modified in this field. For example, the original term may need to be split, or enhanced with an anatomical location. The Administrator can prevent manual encoding of the description. If automatic encoding is enabled, the term can be auto-encoded to the included term level. |
| Onset Date/Time | Enter the date/time when the event started. Enter a partial date if the full date is not available. |
| Onset from Last Dose | This field is calculated automatically from the event onset date and most recent stop date listed in the dosage regimen details of the suspect drug(s). You can also enter or modify the field manually. This field is removed if the dosage regimen is ongoing. |
| Stop Date/Time | Enter the date/time when the event stopped. |
| Duration | This field is calculated automatically from the event start and stop dates. You can also enter or modify the duration manually. |
| Onset Latency | This field is calculated automatically from the earliest first dose date of the suspect drug(s) to onset date. You can also enter or modify the duration manually.
Note: Onset Latency = Onset Date - First Dose. |
| Receipt Date | Enter the date on which information about this event was received by your company. |
| Patient Has Prior History? | Make the appropriate selection to indicate whether the patient has had a prior history or has suffered from the same event in the past. |
| Treatment Received? | Select Yes, No, or Unknown. |
| Intensity | Select the category of severity of the event. The Administrator can adjust this list. |
| Frequency | Select the frequency of the event from the list. The Administrator can adjust this list. |
| Outcome of Event | Select the outcome of the event. The Administrator can adjust this list. If Fatal is selected, Death is selected in the list of seriousness criteria.
Note: If the Death check box is subsequently cleared, the outcome still remains fatal. |
| Country in which event occurred | Select the country in which event occurred. |
| Lack of Efficacy | Check this check box, if applicable. |
| Progression of Disease | Select this check box, if appropriate. |
| Adverse Drug Withdrawal Reaction | Check this check box, if applicable. |
| Infection | Check this check box, if an infection has occurred. |
| Emergency Room Visit | Check this check box, if applicable. |
| Physician Office Visit | Check this check box, if applicable. |
Argus Safety allows you to group events in a case, and/or to associate them with particular diagnoses. These determinations can be made by your company or simply as reported to your company. This feature aids significantly in the interpretation and review of individual case reports. It is also useful in summary reports as it enables the reporting of diagnoses only, while retaining database records of individual event terms.
Click the Relationships button in the Event Information section of the Eventstab to open the Diagnosis-Event relationship dialog.
Note:
To use this feature, the case must contain at least two events and, at a minimum, one diagnosis. The events related to a diagnosis are listed on top in this dialog and the symptoms are indented with respect to the diagnoses. You can group events together and associate them with individual diagnoses.Click the up or down arrows to associate a selected symptom with a diagnosis. In Argus Safety Web, select the symptom and click Move Up or Move Down.
Example:
Such Adverse Events (AE) might be entered into the database as follows:
This example demonstrates how defining a diagnosis-event relationship can clarify an adverse event report. Suppose an initial case report describes a patient suffering from "Somnolence," "Sore Throat," and "Fever."
AE # Diagnosis AE Term (Associated AEs)
1 Somnolence
2 Sore Throat
3 Fever
For reports on all events, they would appear on a CIOMS-I form as:
Somnolence [SEDATION]
Sore Throat [SORE THROAT NOS]
Fever [PYREXIA]
Suppose a follow-up report then supplies information that the patient also had neutropenia, and had been diagnosed as suffering from agranulocytosis (the cause of the sore throat and fever). The somnolence was considered to be co-incidental, and unrelated to any other adverse events.
Neutropenia and agranulocytosis would be entered onto the system, and a diagnosis-event relationship established as follows:
| AE # | Diagnosis AE Term (Associated AEs) |
|---|---|
| 1 | Yes agranulocytosis |
| 2 | (sore throat) |
| 3 | (fever) |
| 4 | (neutropenia) |
| 5 | Somnolence |
These events would appear on a CIOMS I form as:
AGRANULOCYTOSIS
[AGRANULOCYTOSIS] ([SORE THROAT],
[PYREXIA NOS], [NEUTROPENIA])
Somnolence [SEDATION]
This immediately gives a clear clinical picture of the case.
The MedDRA application searches the term dictionary for a match at the Lower level term or at the Synonym level. If a match is found, the following fields are automatically populated: Term code, Preferred Term, Included Term, High Level Term, Group Term and Body System/SOC.
Click the icon to view the MedDRA Browser.
The regulatory reporting rules can be configured to look at any type of criteria but are mainly configured to look at Seriousness, Listedness, Causality, and Outcome. Out of these, Listedness and Causality can be captured and controlled (using the event assessment section) down to an individual license basis.
This granularity allows individual license holders to override the normal listedness and causality assessment to control the need for submissions to their local regulatory authority. Each affiliate could either suppress the need for a report by demoting the criteria, or add the requirement for a report by promoting the listedness or causality.
This serves to promote the global reporting automation while maintaining the level of individual local affiliate control that is often needed.
Note:
To obtain an assessment of the adverse event, the product must be in the company's suspect product and the event must be encoded.The Event Coding section enables you to enter information about the event. The following is an illustration of the Event Coding section.
The following table lists and describes the fields in the Event Coding section.
| Field/Control Name | Description |
|---|---|
| Body System/SOC | Displays the body system or System Organ Class. This item is automatically entered from the event dictionary that is used and it cannot be edited. |
| Lower Level Term | Displays the ART code. If you have appropriate access rights, click Encode to view the associated coding dialog. |
| Preferred Term | Displays the preferred term. This item is automatically entered from the event dictionary that is used and it cannot be edited. |
| Preferred Term Code | Displays the preferred term code. This item is automatically entered from the event dictionary that is used and it cannot be edited. |
| High Level Term | Displays the High Level Term when the MedDRA coding dictionary is used. This item is not displayed when event encoding is done using the WHO-ART dictionary. This field cannot be edited. |
| High Level Group Term | Displays the high-level group term when using the MedDRA coding dictionary. This field is not shown when coding with WHO-ART. This field cannot be edited. |
The Seriousness Criteria section enables you to identify how serious the event was. For example, did the result in death or was it life threatening. The following is an illustration of the Seriousness Criteria section.

Seriousness Criteria Fields and Field Descriptions
The following table lists and describes the options in the Seriousness Criteria section.
| Field/Control Name | Description |
|---|---|
| Death | Displays the Death Details dialog
Note: If you un-check the Death option in the Seriousness Criteria, you are required to confirm the deletion of the death details. |
| Hospitalized | Displays the Event Hospitalization dialog. |
| Medically Significant | Select this check box to display the seriousness as medically significant. |
| Life-threatening | Select this check box to display the seriousness as life-threatening. |
| Disability | Select this check box to display the seriousness as a disability. |
| Intervention Required | Select this check box to display the seriousness as requiring intervention. |
| Congenital Anomaly | Select this check box to display the seriousness as a congenital anomaly. |
| Other | Select this check box to enter explanatory text. It is mandatory to enter text, specifying the Other Seriousness Criteria. |
Use the following procedure to enter details about a death.
Select the Death check box under Seriousness Criteria.
The form for Event Death Details appears.
Enter information for the items in the form.
Click OK to save the entered Death Details.
The following table lists and describes the fields in the Event Death Details section.
| Field/Control Name | Description |
| Death Date | Enter the date of death. You can enter a partial date if the exact date is unavailable. |
| Autopsy Done? | Make the appropriate selection. |
| Cause of Death | Enter a term to describe the cause of death. Click Encode to display the associated encoding dialog. |
| Autopsy Results Available? | Make the appropriate selection. |
| Autopsy Results | Enter Information about the autopsy results. |
Note:
When Seriousness criteria Death is unchecked, the system displays a message Do you wish to delete the Death Details?.On confirming, the Death date (NF or date) and Autopsy details are cleared .Use the following procedure to fill out the Hospitalization Details form.
To complete the Hospitalization Details form
Select the Hospitalized check box under Seriousness Criteria.
The form for Hospitalization Details appears.
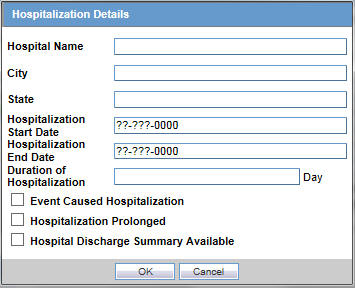
Enter information for the items in the form.
Click OK to save the entered Hospitalization Details.
The following tables lists and describes the fields in the Hospitalization Details form.
| Field/Control Name | Description |
|---|---|
| Hospital Name | Enter the hospital name associated where the adverse event occurred. |
| City | Enter the city in which the hospital is located. |
| State | Enter the state in which the hospital is located. |
| Hospitalization Start Date | Enter the first date of the patient's hospitalization associated with this adverse event. If the exact date is not available, you can enter a partial date in this field. |
| Hospitalization End Date | Enter the last date of the patient's hospitalization associated with this adverse event. If the exact date is not available, you can enter a partial date in this field. |
| Duration of Hospitalization | This field is automatically calculated by the system, based on the start and end dates entered. This field is calculated using 24-hour increments. You can also manually enter the number of days the patient was hospitalized. |
| Event caused initial hospitalization | Select this check box if the event is associated with the initial hospitalization of the patient. |
| Event prolonged hospitalization | Select this check box if the event prolonged hospitalization. |
| Discharge summary available | Select this check box if a discharge summary is available. |
The Event Assessment tab enables you to capture causality and listedness information for a case. All encoded events in the case are compared with the listed events for company products (agents) associated with the case. The following is an illustration of the Event Assessment tab.

Event Assessment Tab Fields and Field Descriptions
The following table lists and describes the fields on the Event Assessment tab.
| Field/Control Name | Description |
|---|---|
| Recalculate | Refreshes the Event Assessment section with the newly entered data if new suspect products or events are entered, or the Event Relationship is modified. |
| Product | This field is populated when events are entered in the Products tab and is displayed in the following format:
|
| Causality as Reported/Source | This field provides the source of causality as reported such as Investigator, MAH, Healthcare Professional, and so on |
| Method | This field provides the method used for causality determination. |
| Result | This field indicates the result of the causality as reported. |
| Causality as Determined/Source | This field provides the source of causality as determined. |
| Method | This field provides the method used for As Determined Causality. |
| Result | This field indicates the result of As Determined Causality. |
| Other Causality / Source | This field specifies the source of other causality. |
| Method | This field provides the method used for other causality. |
| Result | This field indicates the result of other causality. |
| Event | This field is populated when events are encoded and are displayed in the following format:
|
| D/S | Displays the Diagnosis/Symptom details by D or S in line with the Events. |
| Seriousness Severity Duration | Displays the Seriousness, Severity and the Duration of the Event. |
| Datasheet | Displays the datasheet(s) for the agent. |
| License | Displays the license(s) for the agent. |
| As Determined Listedness | Indicates whether the system found the event on the datasheet for this product. |
The following table lists and describes how the system filters each field on the Event Assessment tab.
| Field/Control Name | Description |
|---|---|
| Product | The product filter drop down list contains all products listed in the event assessment. The user can filter on all the products which are present in the Event Assessment dialog. |
| Event | Contains a drop down of values of distinct Event PT. The user can filter on all the products which are present in the Event Assessment dialog. |
| D/S | Contains a drop down values of D for Diagnosis or S for Symptoms. |
| Datasheet | Contains a drop down of values of distinct Datasheets. |
| Licenses | Contains a drop down of values of distinct Countries of the Licenses. |
Note:
Only the assessment rows that match the selected criteria display in the filtering results.The following table list user actions and the results of those actions.
| User Action | Result |
|---|---|
| Click Datasheet column's icon | The system does the following:
|
| Click Product Name link | Displays the name for the selected product |
| Click Event Description link | Displays the Event Information for the selected event |
| Click License Description link | Displays the license description as defined in the License Configuration |
| Click Datasheet Description link | Displays the first 1000 terms in the datasheet. Click Print to view all the terms and click Export to export all the labeled terms to an Excel file in a single column with column header as Labeled Terms. |
The Product-Event Details tab enables you to capture causality information for a case. The following is an illustration of the Product-Event Details tab.

Product-Event Details Tab Fields and Field Descriptions
The following table lists and describes the fields on the Product-Event Details tab.
| Field/Control Name | Description |
|---|---|
| Product | This field is populated when events are entered in the Products tab and is displayed in the following format:
|
| Causality as Reported/Source | This field provides the source of causality as reported such as Investigator, MAH, Healthcare Professional, and so on |
| Method | This field provides the method used for causality determination. |
| Result | This field indicates the result of the causality as reported. |
| Causality as Determined | This field is populated automatically, along with the information entered in the Reported Causality field. |
| Other Causality Source | This field defines the source of causality calculation. |
| Event | This field is populated when events are encoded and are displayed in the following format:
|
| Most Important Diagnosis? | Select Yes or No. |
| Event more specific/severe than PT? | Select Yes or No. |
| Onset from First Dose | This date is defined as the earliest regimen start date to Onset, and is completed automatically.The Date calculation based on the Case Form Calculation for Inclusive or Exclusive. |
| Onset from Last Dose | This date is defined as the latest regimen stop date to Onset, and is completed automatically.The Date calculation based on the Case Form Calculation for Inclusive or Exclusive. |
| Total Dose to Event | This value is calculated automatically, based on daily dose and duration. |
| Units | Units are provided automatically based on the dosage units entered. |
| Action Taken | Select the appropriate term from the drop-down list. |
| Other | This value can be entered only when the Action Taken is Other. |
| Dechallenge Results | Select the appropriate option. |
| Rechallenge Results | Select the appropriate option. |
| Event Occurred as a Consequence of | Select the appropriate option. |
| Term | Select the appropriate option. |
The Analysis tab enables you to generate or view a narrative description of the case, together with other notes. In addition, it also enables you to enter information required for generating the MedWatch 3500A, BfArM, and AFSSaPS reports.
The typical users of this tab are responsible for:
Making a medical assessment of the case
Approving the case for completeness and accuracy.
The following is an illustration of the Analysis tab.
The Case Analysis section of the Case Analysis tab enables you to enter narrative information about the adverse event. The following is an illustration of the Case Analysis section.
Case Analysis Fields and Field Descriptions
The following table lists and describes the fields in the Case Analysis section of the Case Analysis tab.
| Field/Control Name | Description |
|---|---|
| Narrative | Click Generate to generate an auto narrative.
This feature is configured by the Administrator. If you are not utilizing the auto narrative feature, enter the narrative here. The narrative is printed on expedited reports. |
| Case Comment | You can enter comments in this area. If you are not permitted to edit the auto narrative, you can use this field to provide additional details important to the interpretation of the case. Comments appear on certain expedited reports. |
| Abbreviated Narrative | Enter brief comments in this field. This item maps only to the PSUR report. |
| Local Evaluator Comment | Enter the comments provided by the local evaluator. |
| Company Comment | Enter comments in this area. This information does not appear on expedited reports. |
| Evaluation in light of similar events in the past | Enter an evaluation comment that takes in to consideration similar events that have occurred in the past. |
You can select an Auto Narrative template for the Narrative, Case Comment, Abbreviated Narrative, Company Comment, and Evaluation in light of similar events in the past.
To generate or add narrative templates
Click the button to view the Custom Auto Narrative Templates dialog.
Select the required Autonarrative from the list.
Click Append to append this Autonarrative to the existing narrative.
Click Append if this is the first narrative being added to the text area.
Click Replace to replace the existing narrative with the selected narrative.
Note:
You cannot modify the Autonarrative text if the Administrator has configured the system to prevent modification of the Autonarrative.If an Autonarrative template has been configured in multiple languages, icons representing the languages display above the text area.
The system enables you to view the differences in case comments from previously locked versions of the case. To view these differences, click the Show Difference button in the Case Comments section of the Analysis Tab.
When you choose to view the differences in the two narratives, the system does the following:
Displays the differences in red with a strike out and a yellow highlight.
Displays additions to the narrative in black with green highlights.
The Narrative is read-only and you cannot modify it.
Use the zoom dialog to adjust the font size.
The system displays the last revision number of the case and date and time stamp in the following format:
(Last revision # X as of YYYY MMMM)
where:
| X | Is the revision number of the last case |
| YYYY | Is the date the case was locked |
| MMMM | Is the time the case was locked in 24-hour format. |
The system disables the button if there is no previously locked version of the case.
This function is also available on the Medical Review dialog.
The Case Summary section of the Case Analysis tab enables you to enter summary information about the adverse event. The following is an illustration of the Case Summary section.

Case Summary Section Fields and Field Descriptions
The following table lists and describes the fields in the Case Summary section of the Case Analysis tab.
| Field/Control Name | Description |
|---|---|
| Case Serious | This list indicates whether the overall adverse event case is serious or non-serious. This assessment is automatically performed by the system from the Seriousness Criteria of the Events tab. If any of the Seriousness Criteria was selected for any event in the Event tab, Yes is selected automatically in the list. No is selected if the Seriousness Criteria is cleared for all events in the Events tab. You can modify the selection after entering a justification, if you have the access rights to do so. |
| Serious Notes | A justification for overriding the system determination will be displayed in the Notes area. A green dot will appear adjacent to the Notes area. Click the green dot to revert to the automatic calculation for seriousness or to view the overriding notes. |
| Company Agent Causal | The system automatically determines this value from the As Determined causality in the Event Assessment section. This field is displayed as Yes if the As Determined causality is Yes and vice versa. If the As Determined causality is Unknown, this field will be Yes. |
| Case Causal Notes | A justification for overriding the system determination is displayed in the Notes area. A green dot is displayed next to the Notes area. Click the green dot to revert to the automatic calculation for seriousness or to view the overriding notes. |
| Listedness Determination | The value for this field is calculated from the Event Assessment section in the Events tab. If any row there shows Unlisted under the Listed column, this value is set to unlisted. |
| Listedness Determination Notes | A justification for overriding the system determination is displayed in the Notes area. A green dot appears adjacent to the Notes area. Click the green dot to revert to the automatic calculation for seriousness or to view the overriding notes. |
| Case Outcome | The value for this field is also calculated from the Events tab. If the outcome for any event is Fatal, the case outcome is set to Fatal. If the case outcome is changed here, that change is not made to the event outcome in the Events tab. |
| Company Diagnosis/Syndrome | The company diagnosis or syndrome is entered in this field. |
| Notes | A justification for overriding the system determination is displayed in the Notes area. A green dot is displayed adjacent to the Notes area. Click the green dot to revert to the automatic calculation for seriousness or to view the overriding notes. |
The MedWatch Info tab enables you to enter additional details required for the MedWatch 3500A Drug Report. The following is an illustration of the MedWatch Info tab.

MedWatch Info Tab Fields and Field Descriptions
The following table lists and describes the fields on the MedWatch Info tab. Be aware that the values in the Form section column refer to specific sections of the MedWatch 3500A Drug Report form.
| Form Section | Field Description |
|---|---|
| B1. Adverse Event / Product Problem | Select the applicable check boxes.
Select Adverse Event when a product is suspected to have caused an adverse outcome in a patient. Select Product Problem when the defect or malfunction in the product could lead to a death or serious injury. Select both check boxes if a malfunction or product problem caused a death or serious injury. |
| C9. Suspect Medications (NDC#) | Enter the National Drug Code if you have selected the Product Problem check box. |
| F1. User Facility or Importer | Indicate whether this report is from a user facility or an importer. You can suppress printing of Block F of the MedWatch 3500A report by selecting Suppress Block F Printing. |
| F2. UF/Dist report number
Consider UF / Importer data from |
Enter the complete number of the report exactly as entered in the upper right corner of the front screen.
Select User Facility or Importer information from Case Form of from Reporting Destination. |
| F3. User facility or Importer Name
Address1/Address 2/City / State/ Country/Postal code |
Enter the full name and address of the user facility or distributor reporting site. |
| F4. Contact person
Sal/First Name/MI/Last Name |
Enter the full name of the medical device reporting (MDR) contact person. This is the person who is designated as the device user facility/distributor contact for this requirement. The FDA will conduct its MDR correspondence with this individual. The contact person may or may not be an employee of the facility. However, the facility and its responsible officials will remain the parties ultimately responsible for compliance with MDR reporting requirements. |
| F5. Phone number | Enter the phone number of the medical device reporting (MDR) contact person. |
| F6. Date aware of event | Enter the date that the user facility's medical personnel or the distributor became aware that the device may have caused or contributed to the reported event. |
| F10. FDA codes Patient
FDA Device Codes |
Click the first row and column of the FDA Patient and Device Codes section and then click Select. You can enter up to six FDA Patient Codes. If the entered code is not present in the FDA Codes list, it is erased. |
| F11. Report sent to FDA | Select this check box if a report has been sent to the FDA. If you select it, enter the date when the report was sent to FDA. |
| F12. Location where event occurred | Select the location of the actual occurrence of the event. |
| F13. Report sent to mfr? | Select this check box if a report has been sent to the manufacturer. If you select it, enter the date when the report is sent to manufacturer. |
| G3. Report Source | Select the Report Source check boxes as applicable, to match all report sources specified with the Reporter Type.
See the following guidelines for selecting the check boxes. |
| G5. PLA# Pre-1938 / OTC Product | Enter the PLA number.
If the product pre-dates 1938, select Pre-1938. If the product is an over-the-counter product, select OTC product. |
The following table provides information about the conditions that govern when a specific check box should be selected.
| If this condition is true | Select the following check box |
|---|---|
| Country of Incidence is not USA. | Foreign |
| Report Case type is configured to contain cases from Literature. | Literature |
| Report Case Type is configured to contain cases from Clinical Trials. | Study |
| Any reporter with Health Professional set to Yes | Health Professional |
| Any Reporter Type is selected as Company Representative. | Company Representative |
| Any Reporter (Primary or Other) exists in a case with a Reporter Type of Other, If the selected Report Type is a Regulatory Authority (text value) within the Argus Case, the Other check box should be checked and the text Regulatory Authority should be entered in the text box. | Other |
| Any Reporter Type is selected as Consumer AND none of the reporters is identified as Health Care Professional. | Consumer |
Note:
The User Facility and Distributor check boxes must be checked manually.Enter the appropriate text if you have selected Other as a report source.
Use the BfArM Info tab to enter information required for the BfArm Report. The following is an illustration of the BfArM Info tab.

To enter data for the BfArM report
Open the BfArM Info tab.
Select the choices that apply to the patient from the items in the form.
If you do not know if a particular condition applies for the patient, select Unk.
Note:
If any of the relevant items are entered in the Current Medical Status form in the Patient tab, the system automatically enters them here. If you change any of those items in the BfArM Info tab, the system will not enter the data in the Patient tab.Use the AFSSaPS Info tab to enter the imputability assessment information for the suspect product along with the Adverse Events. The following is an illustration of the AFSSaPS Info tab.
AFSSaPS Info Tab Fields and Field Descriptions
The following table lists and describes the fields on the AFSSaPS Info tab.
| Field/Control Name | Description |
|---|---|
| Event | Displays included terms for all events. |
| Product | Enter the suspect product. You cannot enter a concomitant product. |
| Chronology | Select a Chronology code. The fixed set of values is C0, C1, C2, and C3. Click the icon to select the Time to onset, Readministration and Drug Stopped Values.
The user's selection auto-calculates the Chronology for the Product - Event combination. |
| Semiology | Select a Semiology code. The fixed set of values is S1, S2, and S3.
Click the icon to select the Semiology Outcome, Complementary Test, and Other Explanation. The user's selection auto-calculates the Semiology for the Product - Event combination. |
| Bibliography | Select a Bibliography code. The fixed set of values is B0, B1, B2, and B3. |
| Imputability | Imputability Calculation: |
| ~ | Select from one or more of the following checkboxes:
The text box after Autres supports fifty characters. If the Autres checkbox is not checked, the field is disabled. You can click Copy to Local Evaluator Comment to copy imputability values to the Local Evaluator Comment field and place the imputability text-equivalent at the beginning of the text that currently exists in the field. Copy to Local Evaluator Comment is visible only if the language for the "Local Evaluator Comment" field is French. |
| Future Actions | Enter a text description for future actions. |
The Activities tab presents detailed information about the contact log, routing comments, action items, and Case Lock/Closure.
The following is an illustration of the Activities tab.

The Contact Log section of the Activities tab enables you to:
Track correspondence related to individual cases
Display scheduled letters
The following is an illustration of the Contact Log section of the Activities tab.

The following table lists the different icons that appear for letters:
| Icon | Description |
|---|---|
| Letter envelope icon with a Blue Arrow to the right | Clicking on the email button opens a message editor. |
| Double Overlapping Letter Envelope Icon | Indicates Letter scheduled awaiting to be sent. |
| Letter Envelope icon with a Red Exclamation Mark | Indicates that the letter is overdue (Date Open > System Date) |
| Letter Envelope icon with a Green Exclamation Mark | Indicates mail success status. |
Contact Log Fields and Field Descriptions
When using the Contact Log section, be aware of the following:
The number displayed in parenthesis in the header of each section - Contact Log, Action Item, Routing Comments, Case Lock/Archive - displays the total number of entities within the section.
You can choose to view All Action Items or only Open Action Items, which display all the Open Action items within the case. By default, All Action Items are displayed.
You can sort Action Items by clicking on the column headers.
The system remembers the sort order on for the duration of the case.
The following table lists and describes the fields in the Contact Log section of the Activities tab.
| Field/Control Name | Description |
|---|---|
| Date | The date is automatically inserted by the system when a letter is scheduled or generated through the Letters menu. You can enter the date on which the letter is manually scheduled or generated.
Click the letter icon to open the Letter Preview dialog. This allows you to view a letter or to modify it if it has not been sent already. |
| Code | Select from a list of values to set the contact code for this entry. The Administrator can adjust the information in this list. |
| e-mail button | Click to send an e-mail message. |
| Description | Enter a brief explanation for the letter, for example, "Initial Letter," or the details of a phone conversation. |
| New Letter button | Click this button to generate a new letter. |
| Group/User | Select a group responsible for the Contact item. From the list below, select a user from the selected group who will be responsible for the action. The Contact Item will appear in the Worklist for selected user. If "Any" is chosen as the group, the Action Item appears in all the users' Worklist. The Administrator can adjust the information in these lists. |
| Date Sent | The date is automatically inserted when a letter is sent through the letter menu. You can also manually enter the date the letter was sent. If this field is completed, the letter will become read-only. |
You can generate letters from the Contact Log section. When generating letters, be aware of the following:
The placeholders for the original letter template can be replaced by information that is specific to the current case.
A letter is only added to a search if the Correspondent check box is checked.
The Administrator can configure the system to generate letters automatically and to schedule them for a specific number of days after receiving details of an adverse event. For example, the system might schedule an Initial Response Letter to be sent the day after an adverse event is received. Auto letter scheduling is triggered when a case is initially saved.
Letters cannot be auto-generated unless the "Date" [contact log date] is reached, to ensure that the latest information for the case has been updated to the letter.
If the Primary Reporter is marked as a correspondence contact, the system sends Auto-scheduled letters are sent to the Primary Reporter. Otherwise, the letter is sent to the first correspondence contact.
Auto-scheduled letters appear in the Contact Log section of the Case Form. You can view or print them by double clicking the letter icon. You can also edit letters that have not been sent. The system does not automatically send letters. You must send or remove letters manually.
In addition to auto-scheduling letter, you can also configure auto action items, which prompt you to follow-up with a correspondent after a letter has been scheduled and sent. Auto action item scheduling is triggered once the sent date has been entered for a letter. Auto action items appear in the Action Items section on the Case Form and in the Action Items tab of the Worklist.
The system uses the following naming convention to when saving letters in the Uploaded letters folder:
XXXX_YYYY.RTF
where:
| XXXX | Is the current case number |
| YYYY | Is the current letter numbering format (i.e., date and time the letter was generated) |
The system replaces all special characters in the case number with an underscore ( _ ) character.
The CFG_PLACEHOLDER SQL limit is 4000 characters rather than 1000.
To create an RTF document with placeholders, you need to configure it through Argus Console > Code List > Letter Configuration. The details of this configuration are available in the Argus Console Guide under the Configuring letter (RTF) templates section.
The following image displays the meaning/status of various letter icons:
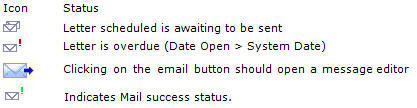
Use the following procedure to generate a letter:
Go to Contact Log in the Activities tab and click New Letter.
The Custom Letter Templates dialog opens.
Select the required letter template from the list and click OK to open the letter in a separate window.
Make the necessary changes to the letter text.
Select File-->Save to save the changes.
If you modified the letter, select Yes.
This attaches the letter to the Case Form by browsing to the location where you saved the changes.
After saving the letter, the system displays it in the Contact Log section of the Activities tab.
The system creates an action item for following-up on this letter in the Action Items section of the Activities tab.
When specifying or changing the Date Sent field in a letter, you can schedule an action item if you wish to do so.
If an action item is not specified, the field is blank.
Any Action Item can be updated on the screen immediately after a case has been saved.
Unless the Action Item has already been marked as completed, each time the Date Sent field is changed for a letter, the corresponding action item (if one exists) is also updated with a new Due Date of Date Sent of the Letter and the number of days specified for the Action in the Letter configuration
Click the letter icon to open the message editor.
The system opens the message editor.
The following table lists and describes the fields in the dialog box
| Field/Control Name | Description |
|---|---|
| To | Displays the e-mail address specified for the Primary Reporter in the Case Form.
You can edit this field. |
| From | Displays the email address specified in the Return Email Address in Argus Console>Code Lists>Letter Configuration. You can edit this field also. |
| Subject | Displays the Case Number and the Description of the Contact log.
You can edit this field. |
| Send | Enables you to send the e-mail to the intended recipient. |
The Action Items section enables you to view or enter details of action items for the case and to assign responsibilities for actions. The following is an illustration of the Action Items section.

The following lists and describes the fields in the Action Items section.
| Field/Control Name | Description |
|---|---|
| Date Open | Enter the date the action item was created. Open action items appear in the Worklist of the user who is responsible for the action item. They also appear in the Open Action Items Report. |
| Code | Select an Action Item code from the drop-down list. This will display the description of the selected Action Item Code. The Administrator can adjust this list. |
| Description | Selecting an Action Item code automatically enters information into this field. The text can be modified as required. The Administrator can adjust this list. |
| Group/User | Select a group responsible for the Action Item from the given drop-down list. From the drop-down list below this, select a user from the selected group who will be responsible for the action. The Action Item will appear in the Worklist for the selected user. If "Any" is chosen as the group, the Action Item appears in all the users' Worklist. The Administrator can adjust these lists. |
| Due | Enter the date on which the action item is to be completed. |
| Completed | Enter the date on which the action item was completed. A red border indicates a completed action item while a green border indicates an incomplete action item. |
| Sent in Letter | Identifies that the Query Type Action item has been sent as a part of the Letters. Displays only for those Action Items that are configured as "Query Action" in Console ' Action Type code list. |
The Routing Comments section displays workflow routing information and comments for the case. It also contains a read-only sub-section on Case Locking/Closure. The following is an illustration of the Routing Comments section.

Routing Comments Fields and Field Descriptions
The following table lists and describes the fields in the Routing Comments section.
| Field/Control Name | Description |
|---|---|
| Date | Displays the date the case was routed to a new workflow state. This field is automatically generated when a case is routed. |
| User | Displays the name of the user who routed the case. This field is automatically generated when case is routed. |
| Comment | Displays the routing comment. |
| Route button | Routes the cases. |
| Return button | Returns the case to the previous state. |
If the case meets the routing rules specified by the Administrator, you can use the Case Routing dialog box to route a case to the next workflow state. When using the Routing Forward Cases function, be aware of the following:
Non-Enterprise Workflow managers cannot view all the Workflow States below the line if the Workflow States are assigned to Sites in the Workflow Configuration.
Only Enterprise Workflow managers have access to all sites for routing cases ahead in the Workflow.
If the Workflow state does not have defined site, all workflow managers can see it.
Click Route in the Activities tab of the Case Form to open the Case Routing dialog box.
From the Route to Next State drop-down list, select the state to which you would like to route the case.
If only one workflow state can be selected for the Next Route state, that state can be selected by default in the Route to Next State field.
From the Route to User drop-down list, select the user or user group to route the case to.
Enter the routing comments in the Comments field.
OR
Click Select to select a comment from a list of pre-defined routing justifications.
Routing Comments Log and Case Print
Local Lock/Unlock details are displayed as part of the Routing Comments log in Case Form > Activities tab.
It displays the Date of local lock/unlock, User who performed the local lock/unlock similar to the existing global lock functionality. The text "Case Locally Locked for JP" or "Case Locally Unlocked for JP" is populated before the user added comments in the Local Lock screen, corresponding to the Local lock or unlock action. Note "JP" is the standard A2 country code for the country Japan defined in the Argus Console > Countries code list.
When a case is globally/locally locked or globally/locally unlocked at the same time, only one entry is added to the Routing Comments log.
The text "Case Globally and Locally Locked for JP" is added for single lock operation.
The text "Case Globally and Locally Locked for JP" is added for sngle unlock operation.
The system records the corresponding routing comments described above even in scenarios where the system user (e.g., AGservice) performed the local lock/unlock action.
To select text from the pre-define list of routing justifications
Click on the Select button in the Case Routing dialog to open the Routing Justification dialog box.
Select the required justification from the justification list displayed under Select a standard justification for this field. The system highlights the selected row.
Click OK.
The system closes the Routing Justification dialog box and displays the selected justification text in the Comments field in the Case Routing dialog box.
Click OK to route the case.
Note:
The system displays disabled users in the user drop-down list in alphabetical order with an asterisk (*) at the end. You can view the total number of times the case has been routed in the header section, excluding the blank rows.If necessary, you can return a case to its previous workflow state.
To return a case to its previous workflow state
Open the case.
Click the Return button in the Activities tab of the Case Form.
When the system opens the Case Routing dialog box, enter your password in the Password field.
From the Route to User drop-down list, select the user or group the case needs to be returned to.
Enter any routing comments in the Comments field.
Click OK to return the case to its previous workflow state.
The Case Lock/Close section enables you to lock a case, unlock a locked case, and formally close a case. You must lock the case before you can generate a report. The following is an illustration of the Case Lock/Close section on the Activities tab.

When closing a case, be aware of the following:
If the Auto-schedule Later checkbox for expedited reports is checked and you try to archive a case, the system displays the following message:
Case xxxx cannot be closed while Auto Schedule Later is checked. Please uncheck the option for the Auto Schedule Later option on the Regulatory Reports tab or wait for the Report Scheduling to complete before attempting to archive the case.
The system displays this same message when you close single or multiple cases from the New/Open dialog on the Worklist.
Case Lock/Close Fields and Field Descriptions
The following table lists and describes the fields in the Case Lock/Close section of the Activities tab.
| Field/Control Name | Description |
|---|---|
| Case Status | Enables you to unlock, lock, or close a case after entering the appropriate user information.
|
| Closure Date | Date on which the case was locked or closed. If a locked case is being viewed by a user, any other user who tries to access the same case will have read-only access to the case.
|
| Lock or Closed By | Displays the name of the user who locked or closed the case. |
| Notes | Displays relevant information about the case lock or closure. |
When a user clicks on the Local Lock icon on a case that has been Global Locked but is pending Local Lock for Japan, the system displays a pop-up dialog to validate the user who attempts to perform the local lock on the case.
Enter the password and notes to perform the local lock on the case.
When a user clicks the Local Lock icon on a case that has already been Local Locked for Japan, the system checks that the common profile switch "Enable Local Unlocking" for the current enterprise is set to "Yes". If this option is set to "No", it displays a message that the "Local Unlocking feature is not enabled".
If the option is set to Yes, first check if the case has any Local Japan report, that are pending generation, and displays a warning message.
If there are no Local Japan report that are pending generation, the system prompts the users with Case Local Unlock dialog on whether they want to proceed with Local Unlock.
On clicking Yes for Local Unlock, the system validates the user again.
After the user has been validated, the system stops any local Japan report that is pending generation from being generated and enables all the Local Fields for editing.
The following table lists the different lock statuses in the application and their meanings/descriptions :
| Lock Status with Icon | Description |
|---|---|
| Global Locked |
Denotes a locked case that does not have local reporting needs. |
Global Unlocked  |
Denotes an unlocked case that does not have local reporting needs or where the Local PRPT case is both globally and locally unlocked. |
| Global Locked and Local Locked |
Denotes a Local PRPT case that is locked at both global and local levels for all local countries for the case. |
| Global Locked and Pending Local Lock |
Denotes a Local PRPT case that is locked global but pending local lock for any local country for the case. |
To lock a case:
In the Case Lock/Close section of the Activities tab, click Lock.
The system opens the Case Locking dialog box.
Enter your Argus Safety password in the Password field.
Enter any notes in the Notes field.
Click OK.
The system displays the locking notes in the Notes field of the Case Lock/Close.
Note:
To unlock a case from the Locked/Archived state, select the Unlocked value from the Case Status drop-down list. This will display the Archived Case or Case Lock dialog. The dialog box requires you to specify your password and the reason for unlocking the case. The case is unlocked/archived after you enter this information.After a case has been globally locked and when a local user (an Argus J user) opens that case, the application allows the local user to enter local data, as follows:
All the local fields remain editable for the Argus J user.
All the existing case form fields and tabs that remain editable after global lock retain the same behavior (irrespective of English or local users).
Any operation that update the global value such as Re-arrange, Add, Delete, Up / Down buttons, Relationships, Copy Japanese to English button, Lab data import is not allowed, retaining the existing behavior on lock. One exception to this is Case Classification field - the Add and Delete buttons shall remain available.
The Copy English to Japanese buttons allow the user to copy information from English to Japanese data entry. Note that no global values shall be updated with copy action.
On global lock, all the qualifying reporting rules will be executed as follows:
All the qualifying Global (i.e., non-Japan) and Japan Local reports will be scheduled.
The Global (i.e., non-Japan) reports shall be generated/transmitted as per the existing functionality.
However, the Japan Local reports cannot be generated before local lock is performed.
One Step Global and Local Lock
In some scenarios, when a Japanese user enters a domestic case, both the local data entry as well as English translation may happen before the global lock, which would necessitate the Global and Local Lock be done in a single step by the Japanese user.
In order to support this scenario and allow the Argus J user to perform the Global Lock and Local Lock at the same time, the system has been enhanced as follows:
When a local user (Argus J user in this release) performs a global lock, the system shall display the existing Case Locking dialog but enhanced with an option to perform Local lock additionally for a Local PRPT case. Note that this functionality shall be applicable for global case locking done from any place via the application's UI including Case Form, E2B, Incoming Review, etc. Note this is not applicable to LAM as this feature is applicable only to the Argus J user type.
This checkbox appears only for a Local PRPT case, when the user has Allow Local Locking configuration enabled under Argus Console > Access Management > Users.
When the user clicks OK on this screen to perform Global Lock and if the Local Lock option is checked, the system shall be enhanced to perform both the global and the local lock for the case.
The following table lists the different lock statuses in the application and their meanings/descriptions :
| Lock Status | Description |
|---|---|
| Global Locked | Denotes a locked case that does not have local reporting needs. |
| Global Unlocked | Denotes an unlocked case that does not have local reporting needs or where the Local PRPT case is both globally and locally unlocked. |
| Global Locked and Local Locked | Denotes a Local PRPT case that is locked at both global and local levels for all local countries for the case. |
| Global Locked and Pending Local Lock | Denotes a Local PRPT case that is locked global but pending local lock for any local country for the case. |
Use the following procedure to unlock a case.
In the Case Lock/Close section, select Unlocked from the Case Status drop-down list.
When the system opens the Locked Case dialog box:
Type your password in the Password field.
Type any relevant information in the Notes field.
Click OK.
When the system opens the Case Unlock dialog box, click one of the following:
Significant F/U
Non-significant F/U
Other
When a user performs global unlock for a case, the system shall check if the case has local or global reports in pending generation state (i.e. "scheduled" and "new data available" states as identified by the configured SQL explained below) or pending lock (for Local PRPT case), as explained below:
The checks for reports pending generation are applicable only when DLP_EXPEDITED_E2B_REPORTS is set to 0 (i.e., DLP is not enabled for Expedited Reporting).
The system checks the value returned by running the SQL (if any) configured in the existing common profile switch "SQL to prevent case unlock when reports are pending generation" under Case Processing (introduced in release 7031). If the value returned is 0 or no SQL has been configured, the system shall allow users to global unlock the case without any of the other checks.
If the value returned is greater than 0, the system behaves as follows:
If the Value of Allow forced unlock (Global and Local) is No and the Report status (Global or Local) is Pending (i.e. the configured SQL returned a value > 0), the case is not unlocked and an error message is shown.
If the Value of Allow forced unlock (Global and Local) is Yes and the Report status (Global or Local) is Pending (i.e. the configured SQL returned a value > 0), a warning message is displayed. The case is unlocked using the existing "Locked Case" dialog if the user selects "Yes" on the warning message.
If the Value of Allow forced unlock (Global and Local) is N/A and the Report status (Global or Local) is Generated /Submitted (i.e., the value from SQL check returned 0 or no SQL has been configured), the case is unlocked, as per its existing functionality.
This switch functions independent of the "Allow Local Lock" privilege and "Enable Local unlocking" privileges. So, for example a local user that does not have "Allow Local Lock" privilege but has "Allow forced unlock (Global and Local)" privilege would still be able to globally and locally unlock the case on Global unlock.
When a user performs a global unlock for a case that has pending local lock (for a Local PRPT case), a warning message is displayed.
When a user performs global unlock for a case that has pending local lock (for a Local PRPT case):
If the value of Allow Global Unlock on Pending Local Lock is set to Yes, a warning message is displayed. If the user selects No, the case shall NOT be unlocked. If the user selected Yes, further checks on reports explained above are implemented.
If the value of Allow Global Unlock on Pending Local Lock is set to No, the case shall NOT be unlocked and an error message is displayed.
If the case has both local lock pending and reports scheduled, the pending local lock check shall take precedence over the pending report generation check.
This functionality is applicable for case unlocking done from any place via the application's UI including Case Form, LAM, E2B, Incoming Review, etc.
This feature is NOT applicable to End of Study Unblinding (EOSU).
Local Report icon in Screens
After unlocking a case, the system sets the focus for significant/non-significant follow-up events as follows:
When you click the Significant F/U button on the Case Unlock dialog, the system automatically displays the case General tab, checks the Significant check box for both drugs and devices (if enabled by the profile switch), and sets the focus on the Follow-up Received Date.
Screen: Argus > Case Actions > Open > (Select a Case) > General Tab > General Information Section > Follow-ups sub-section (middle of screen).
The system checks to determine whether the Significant check box is checked.
The system sets the focus on the Follow-up Received Date.
When a case is unlocked and you select the Non-Significant F/U button from the case unlock pop-up dialog, the system automatically displays the case General tab and sets focus on the Follow-up Received Date.
Argus > Case Actions > Open > (Select a Case) > General Tab > General Information Section > Follow-ups sub-section (middle of screen)
The Significant check box is not checked.
Focus is on the Follow-up-Received Date.
You can add multiple follow-ups.
Argus > Case Actions > Open > (Select a Case) > General Tab > General Information Section > Follow-ups sub-section (middle of screen)
If you add a single follow-up, the Add button remains available for the user to add additional follow-ups.
Currently, the Add button disappears after the user adds a single follow-up. The user must save, close and reopen the case before he/she can add an additional follow-up.
A hyperlink in the follow-ups section enables you to open the link in a different dialog box.
The Additional Information tab enables you to attach notes and other items to the case. For example, you could attach a fax message that came in as part of the case and needs to be scanned and attached or an electronic file received by e-mail. It also enables you to set up cross-references to other cases such as links between cases referring to mothers and children. The total number of attachments and references attached to a case display in the header.
The following is an illustration of the Additional Information tab.
When using the Additional Information tab, be aware of the following:
The system shrinks the main widow up to 60% and opens the attachments from the Notes and Attachments dialog in a new browser window.
The system opens any hyperlinks that appear on the Additional Info tab in a new Internet Explorer window if the selected reference is HTTP/URL Reference.
When you click the hyperlink and a reference case is present, the system opens a case number irrespective of the selected reference type when you clicked the hyperlink.
If no sites are defined for the attachments classification, the system permits all users to view the attachments on the Additional Info tab.
The system only permits users who belong to the site defined on the attachment classifications to view the attachments.
The system filters the attachment classifications based on the sites a user has permission to access.
The Case Form/Case Listing reports printout hides the row.
The system permits Workflow Enterprise to view all attachments across all sites
The following table lists and describes the fields on the Additional Info tab.
| Field/Control Name | Description |
|---|---|
| Notes and Attachments | |
| Notes and Attachments | This section of Additional Info tab provides an option to sort on the column headers (similar to Activities tab's Action Items sorting feature) to sort the records based on the fields in Notes and Attachment section. |
| Classification | Select a classification that describes the attachment. The Administrator can adjust this list.
Refer to the Oracle Argus Interchange User's Guide for details about Attachment Classification usage in sending attachments in electronic reports. |
| Date | The current date is automatically entered in this field. You can also enter a date manually. |
| Incl. Reg. Sub | Select this checkbox to merge PDF attachments within the case form. The Incl. Reg. checkbox identifies the attachments to be included as an appendix to the Expedited Reports. On selecting this checkbox, the Expedited Reports - CIOMS I, CIOMS I (Local), US FDA MedWatch 3500 Drug and 3500 A Device print an appendix page before each attachment. This is added to the case, and marked as Inc. Reg. Sub checked.
Note: The checkbox is available only if a PDF is selected as an attachment. |
| Literature Reference | Select the Literature that is related to the attachment. Attachments that have Literature reference are transmitted as in-line attachments for the data element C.4.r.2 in E2B(R3) report. |
| Keywords | Enter keywords related to the case or click Select. |
| Description | Enter a description of the attachment. |
| Attach File | Inserts a file attachment into the case. Maximum file size is 4 GB. |
| Add | Inserts a row for an additional attachment. |
| Delete | Deletes the selected row. |
| Attach Documentum Link | This option is visible only if Documentum is available.
Click Searching for Documentum to search for and attach Documentum. |
| References Type | Select a reference type from the list, for example, a parent-child link. The Administrator can adjust this list. |
| ID # | Enter the case number of the case that is to be referenced.
Note: Click Select to search for the case that is to be referenced. You can also use this field to record the reference number for external cases. |
| Notes | Notes can be entered here for reference. |
| Select | Opens the Case Selection dialog for the selected ID. |
| Add | Inserts a row for an additional attachment. |
| Field | Description |
|---|---|
| Classification | Select a classification that describes the attachment. The Administrator can adjust this list.
Refer to the Oracle Argus Interchange User's Guide for details about Attachment Classification usage in sending attachments in electronic reports. |
| Keywords | On clicking this column header for the first time, records are sorted in the ascending order (alphabetically) of the "Keywords". |
| Date | On clicking this column header for the first time, records are sorted in the ascending order (chronologically) of the "Date". |
| Description | On clicking this column header for the first time, records are sorted in the ascending order (alphabetically) of the "Description". |
It is possible to send different Case Form attachments to different agencies, based on the 'Attachment classification' specified to the Receiving Agency in Reporting Destination Codelist in Argus Console. Refer to the Argus Console Guide for details.
After the records in Notes and Attachments are sorted, if the following options are invoked without closing the case, sort order is respected in these modules (similar to Activities 'Action Items sorting feature):
Case Form Print
Medical Review
Copied Case
To search for Documentum links
Click the Attach Documentum Link button to open the Documentum Lookup screen.
Enter the desired search criteria as per Type Name, Attribute Name and Search String, and click Search.
Select the desired link from the row displaying the search results.
Click Select to select the link from the list.
You can associate keywords with a case in the Notes and Attachments section.
Go to the Notes and Attachments section and click Select.
When the system opens the Attachment Keywords dialog box:
Select a keyword from the Select a keyword to add to the list drop-down list.
The system displays the selected keywords in the Keywords field.
Click OK
Locate the References section and click Select.
When the system opens the Case Search Criteria dialog box, enter the appropriate search parameters and click Search.
When the system displays the search results in the Total Number of Rows section, select the desired search criteria from the list and click Select to view details about the selected case.
The Regulatory Reports tab enables you to:
View all scheduled reports
Schedule new reports
When a new case is created, there are no reports associated with it. As data is entered and the case is saved, the regulatory report scheduling algorithm determines which reports, if any, will be required for that case.
The reports determined to be necessary appear in the Regulatory Reports tab. You can manually schedule reports via the Reports menu or by clicking the Regulatory Reports Tab. You can also add comments to the existing reports. The comment section can also be updated to enter the notes for the report even after the report has been submitted.
The following is an illustration of the Regulatory Reports tab.
When using the Regulatory Reports tab, be aware of the following:
The case submission date must be on or after the initial receipt date for the case. If the submission date is before the initial receipt date, the system displays the following message:
Please enter the Submitted Date greater than the Initial Receipt Date of the Case
The system displays the time component for the date generated on the Case Form|Regulatory Reports tab using the IE offset of the client machine for the display.
The system displays the time component for the date generated on the Report Details using the IE offset of the client machine for the display.
When you manually schedule an expedited report, the system places the word, Manual, in the Notes field along with the current notes information.
When you manually schedule a report, the system enables you to check "Blind Product Study" on the Schedule New Expedited Report dialog box to blind the study products if they are in the case.
The following table lists and describes the fields on the Regulatory Reports tab.
| Field/Control Name | Description |
|---|---|
| Status | The notification log provides a list of reports which have been scheduled, generated, or submitted. The following report status are available indicated by the icons in the regulatory reports tab:
|
| Seq | Displays the sequence (Initial, Follow-up, etc.) |
| Destination | Displays regulatory authority to which the report is to be submitted. |
| Report Type | Displays the type of regulatory report like US IND Summary, BfARM Form 643, etc. |
| License Type | Displays license information. |
| License # | Displays the license number. |
| Generated | Displays the date when the regulatory report was generated (if applicable). The system date on which it is generated is used as the default value. |
| Local Comment | Displays a local comment, if it exists. |
| Submitted | Displays the date the regulatory report was submitted (if applicable). The system date on which it is generated is used as the default value. This date does not initially appear on the Case Form when submitted. It is displayed when the case is re-opened. |
| Notes | Displays notes entered when the report was created. |
| Due | Displays the date the regulatory report is due for submission to the regulatory authority (if applicable). This field is auto-calculated based on the initial receipt date or on the basis of the most recent significant follow-up date. It can also be specified manually by entering the date in the Due Date section. |
| Responsible | Displays the name of the user responsible for the report. |
| Auto Schedule button | Initiates Auto-Scheduling of expedited reports according to the configuration for this feature, for example, Always, Significant, Manual, or None. |
| Schedule Local Reports Only | Allows you to schedule only local reports. |
| Auto Schedule Device button | Schedules regulatory reports, using the Device rules. |
| Schedule New Report button | Schedules a new expedited report. |
| Auto Schedule Later | This item appears if the system is configured for auto-schedule of expedited reports using Argus Safety Service. Select this check box when the system is about to run the auto-scheduling against this case after the case is locked. |
| Auto Schedule Device Later | Select this check box to run the auto-scheduling for only devices. |
You can group reports by selecting the appropriate grouping structure from the Organized by drop-down list. You can group reports as follows:
Report Type/Submit Category/Reporting Destination
Report Type/Reporting Destination
Report Type/Reporting Group
The numbers in parentheses next to each folder indicate the number of reports in the folder.
The following are definitions of the terms used in the reporting structure.
Report Type -- Can be either Expedited or Periodic reports. The system generates a folder for each type.
Reporting Destination contains all defined code list items for Reporting Destinations that have at least one report scheduled within the case.
If no reports are scheduled for a defined reporting destination, no folder will be created for this destination. All the folders which are the reporting destinations under each folder are sorted alphabetically.
Pending Reports -- Reports that have not been submitted or are marked as non-submitted.
Submitted Reports --All submitted reports.
Marked as Non-Submit --Reports that have not been submitted.
Reporting Group -- Contains all user groups assigned to the scheduled expedited or scheduled in the case
The Expedited folder contains the following:
Pending Reports by Destination
Submitted Reports by Destination
Non-Submitted Reports by Destination
The Periodic folder contains single case report forms (MedWatch, VAERS or CIOMS) that were generated as part of a Periodic Report.
Pending Reports by Destination
Submitted Reports by Destination
Non-Submitted Reports by Destination
The Expedited folder contains a sub-folder for reporting destinations that have at least one scheduled report.
The Periodic folder contains the single case report form (MedWatch, VAERS or CIOMS) generated as part of a Periodic Report are listed in the Periodic section. If no report was generated, the system does not create sub-folders.
|
Copyright © 2016, Oracle and/or its affiliates. All rights reserved. Legal Notices |
|