| Oracle® Argus Insight Installation Guide Release 8.1 E68412-01 |
|

 Previous |
 Next |
Once you have installed the BI Publisher (BIP), you need to configure certain settings to be able to view the available reports in BIP. This chapter introduces you with the steps to make those configuration changes using BIP.
This chapter includes the following topics:
Managing Users and Roles: BI Publisher Standalone Installation with BI Publisher Security
Managing Users and Roles: BI Publisher Standalone Installation with OFM Security
Configuring BIP Users and Roles: Oracle Fusion Middleware Security Model
If you are installing BIP on a Windows machine, the TNS entry of Argus Insight must be added in TNSNAMES.ora file of the BIP Web Server.
If BIP is installed on a Linux machine, no modifications to the TNSNAMES.ora file are required.
When you have uploaded the Argus Insight.xdrz file to BIP, you also need to create a connection between the BIP and the database.
To connect the BIP and the database, execute the following steps:
Log on to BIP using the administrator credentials.
The BIP home page appears.
From top-menu, click Administration.

In the Data Sources section, click JDBC Connection.
The Data Sources screen appears.
Click Add Data Source.
In the Add Data Source section:
In the Data Source Name field, enter PRMART.
From the Driver Type drop-down list, select the database.
The Database Driver Class field is auto-populated based on the selected Driver Type.
In the Connection String field, enter the connection string.
You must enter all the details in lower case in this field.
In the Username field, enter the username (Argus Insight application DB user, for example, apr_app) to connect to the database.
In the Password field, enter the password for the user.
Click Test Connection.
If successful, a confirmation message appears.
Click Apply.
The PRMART Data Source in the list of already existing data source names appears.
A connection between BIP and the database is successfully created.
When you have uploaded the Argus Insight.xdrz file to BIP and created the JDBC connection, you can start creating the users for the BI Publisher Security Model.
This section introduces you to the steps that you need to execute to create users, assign the roles and permissions to those users, and configure server settings for the BI Publisher Security Model.
This section comprises the following sub-sections:
To create users and assign the required roles to the users in the BIP Security Model, execute the following steps:
Log on to BIP using the administrator credentials.
The BIP home page appears.
From top-menu, click Administration.
Refer to Section 6.2 > Step 2.
In the Security Center section, click Users.
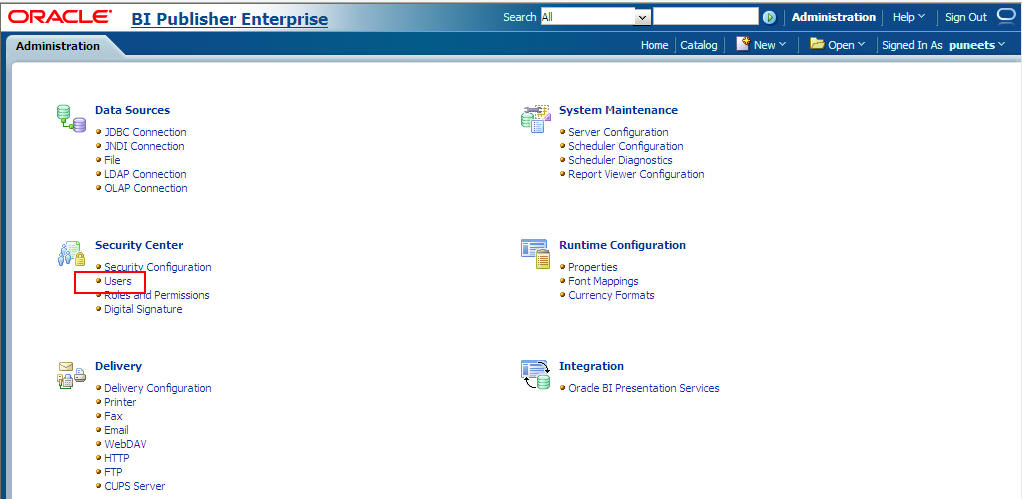
The Users screen appears.
Click Create User.
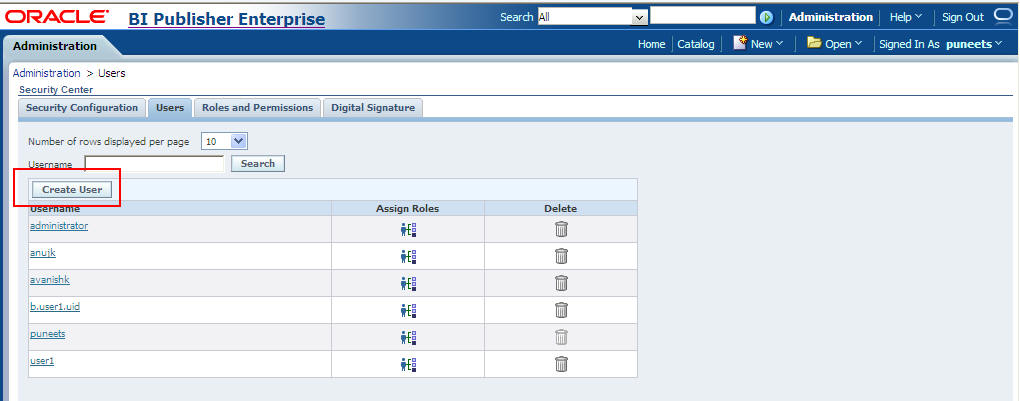
The Create User screen appears.
In the Username field, enter the name of the user.
In the Password field, enter the password.
Click Apply.
The name of the user appears in the list of existing users.
When you have created the user, you need to assign the required roles to the user.
Click the Assign Roles icon corresponding to the user that you have created.
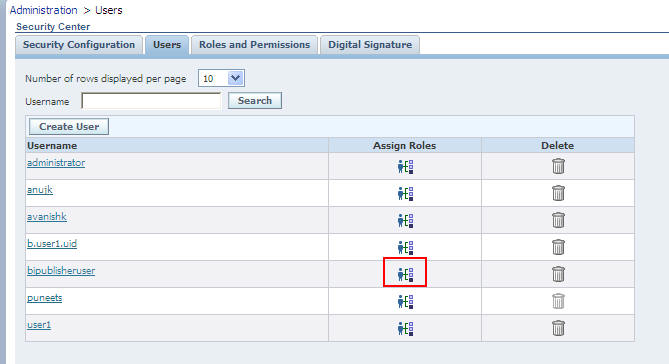
The Assign Roles screen appears.
The BIP system roles such as BI Publisher Administrator, BI Publisher Excel Analyzer, BI Publisher Online Analyzer, BI Publisher Developer, BI Publisher Scheduler, and BI Publisher Template Designer are available by default along with the custom roles (if any) that have been created by you.
See Section 6.2.2, "Creating Roles, Adding Data Sources, and Assigning Roles" for the steps to create custom roles.
For more information on system roles, refer to Understanding BI Publisher's Users, Roles, and Permissions in Administrator's Guide for Oracle Business Intelligence Publisher.
From the Available Roles section, select the role that you want to assign to the user, and click Move(>) to move the selected role to the Assigned Roles section.
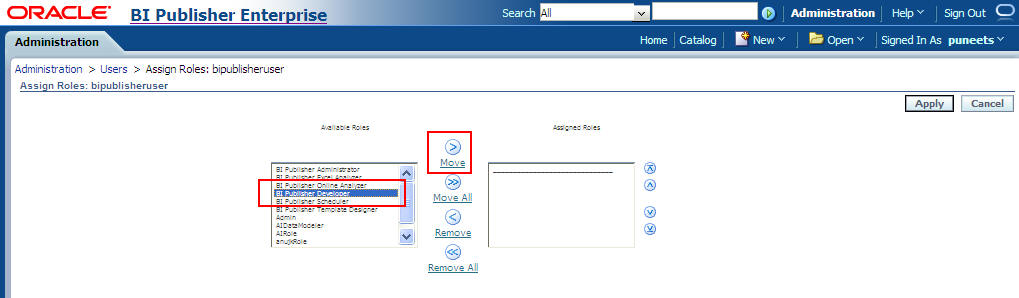
Click Apply.
The selected roles are assigned to the user.
For the list of users that you need to configure using BIP, refer to Section 6.4, "Configuring BIP Users and Roles: Oracle Fusion Middleware Security Model".
In addition to creating users and assigning them the required roles, you also need to create certain roles, add data sources, and assign them the required roles.
To create roles, add data sources, and assign them the required roles, execute the following steps:
Log on to BIP using the administrator credentials.
The BIP home page appears.
From the top-menu, click Administration.
Refer to Section 6.2 > Step 2.
In the Security Center section, click Roles and Permissions.

The Roles and Permissions screen appears.
Click Create Role.
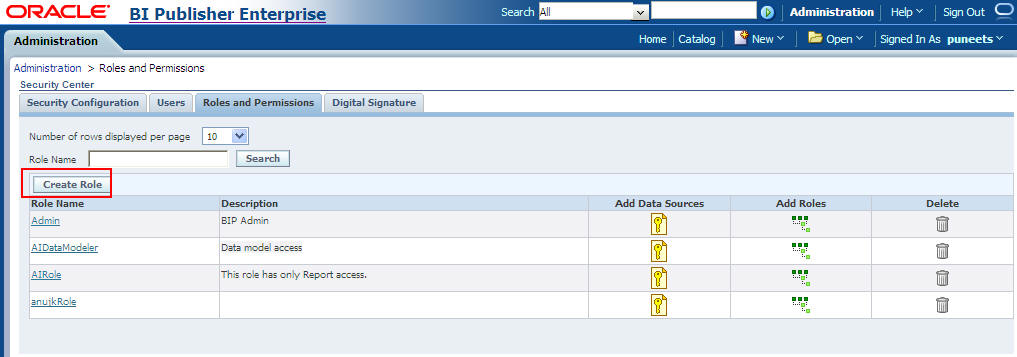
The Create Role screen appears.
Enter the Name and Description of the role, and click Apply.
The new role is created and appears in the list of existing roles in the Roles and Permissions screen.
Click Add Data Sources icon, corresponding to the role which you have just created.
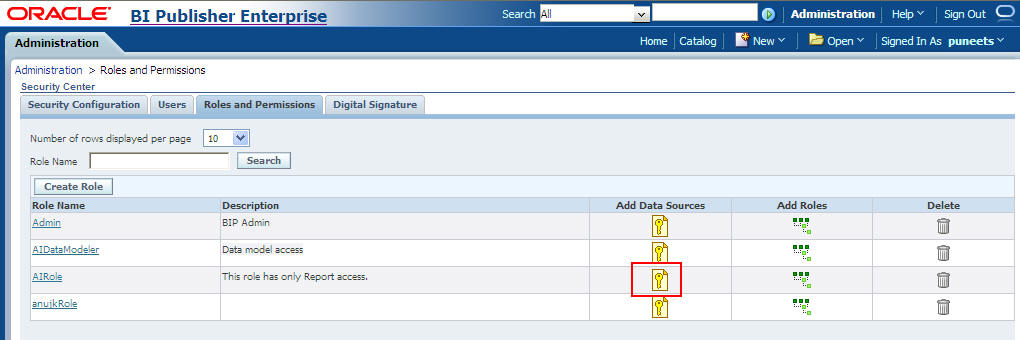
The Add Data Sources screen appears.
Form Available Data Sources section, select PRMART, and click Move(>) to move it to the Allowed Data Sources section.
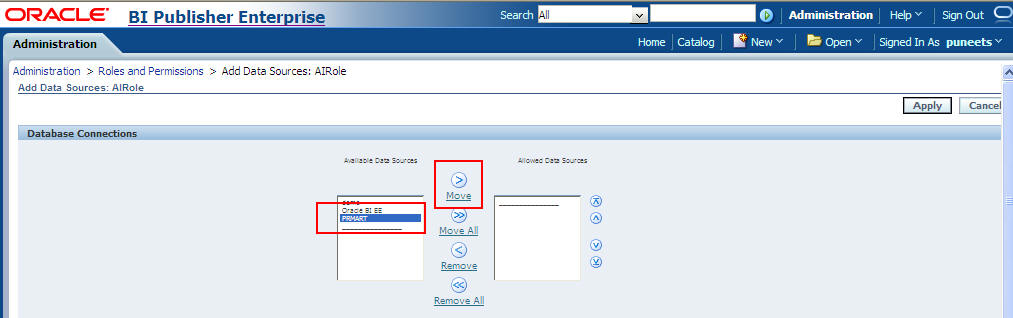
Click Apply to save the changes.
The Roles and Permissions screen appears.
See Section 6.1, "Creating PRMART JDBC Connection" for the steps to create the JDBC connection.
Click the Add Roles icon, corresponding to the role which you have just created to add the required roles.
The Add Roles screen appears.
From the Available Roles section, select the roles that you want to include, and click Move(>) to move the selected roles to the Included Roles section.
Click Apply to save the changes.
For more information, refer to the Configuring Users, Roles, and Data Access section in the Oracle BIP Administrator's Guide.
For the list of roles that you need to configure using BIP, refer to Section 6.4, "Configuring BIP Users and Roles: Oracle Fusion Middleware Security Model".
This section introduces you with the steps that you need to execute to create users, assign the roles and permissions to those users, and configure server settings for the Oracle Fusion Middleware (OFM) Security Model.
This section comprises the following sub-sections:
Creating users for LDAP or SSO users is done using the LDAP servers which is beyond the scope of this manual.
For the list of users that need to be configured, refer to the Section 6.4, "Configuring BIP Users and Roles: Oracle Fusion Middleware Security Model".
This section provides the steps to create roles, policies, users, and groups in OFM (Oracle Fusion Middleware) Security for BIP Standalone Installation.
To create users and assigning groups:
Open the WebLogic Administration Console.
Navigate to Security Realms > myrealm > Users and Groups > Groups tab.
From the Groups section, and click New.
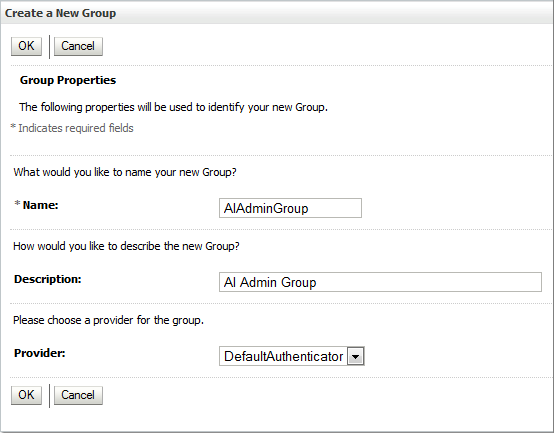
The Create a New Group dialog box appears.
Create the following groups by entering the Name and Description, and click OK.
AIAdminGroup
AIAuthorGroup
AIConsumerGroup
To create users in the Fusion Middleware Control:
Open the WebLogic Administration Console.
Navigate to Security Realms > myrealm > Users and Groups > Users.
From the Users section, and click New.
The Create a New User dialog box appears.
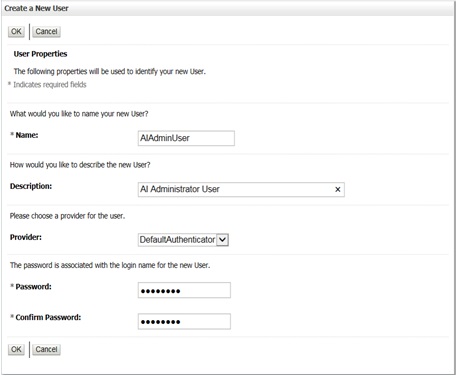
Enter the following fields, and click OK.
Name
Description
Provider
Password
Confirm Password
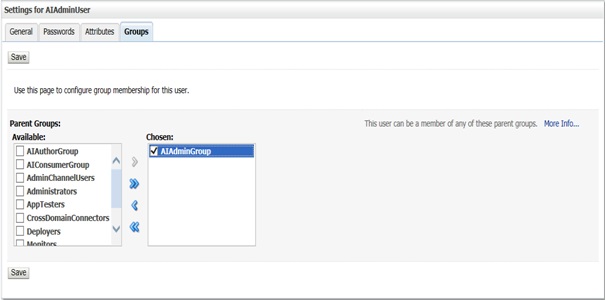
To assign a group to the user, from the Groups tab, select a Group, and click Save.
|
Note: For more details, refer to Section 2.5.2 Managing Users and Groups Using the Default Authentication Provider in https://docs.oracle.com/middleware/1221/bip/BIPAD.pdf. |
To create new application roles:
Login to Fusion Middleware Control Enterprise Manager.
Go to WebLogic Domain > Security > Application Roles.
The Application Roles dialog box appears.
From the Application Stripe drop-down list, select OBI, and click Search  .
.
The default role available in clean slate installation appears.
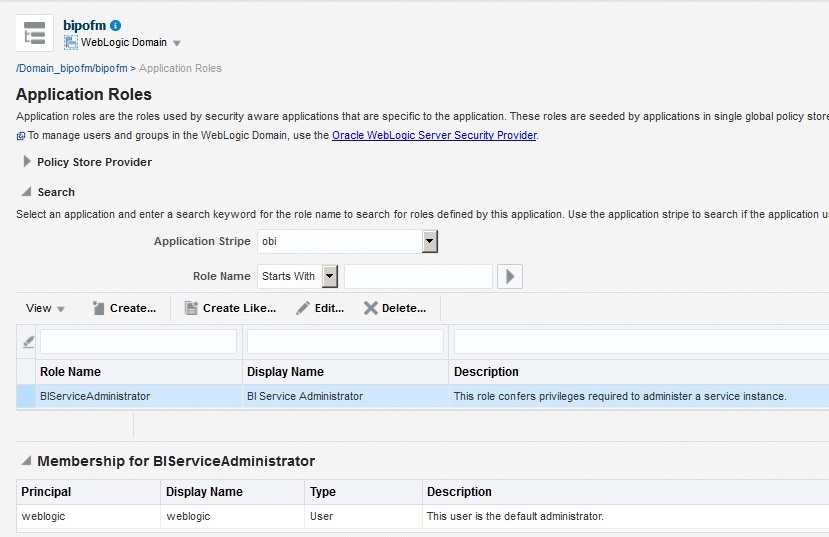
Click Create.
The Create Application Role dialog box appears.
In the Role Name field, enter AIAdminRole.
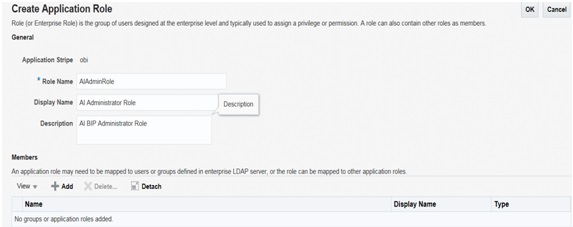
From the Members section, click +Add.
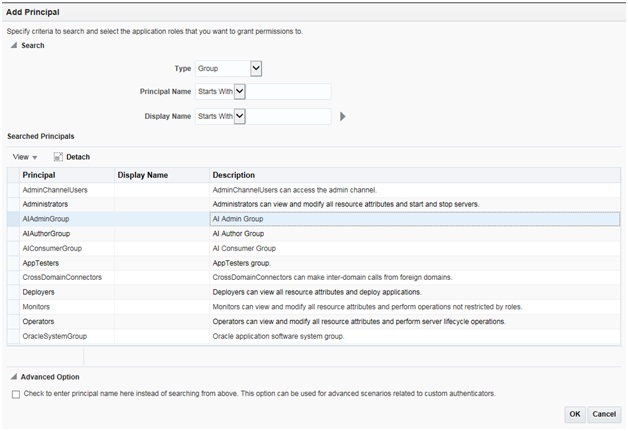
The Add Principal dialog box appears.
From the Type drop-down list, select Group, and click Search.
A list of principals appears.
From the list of Searched Principals, select AIAdminGroup, and click OK.
From the Members section, click +Add.
The Add Principal dialog box appears.
From the Type drop-down list, select Application Role, and click Search.
A list of principals appears.
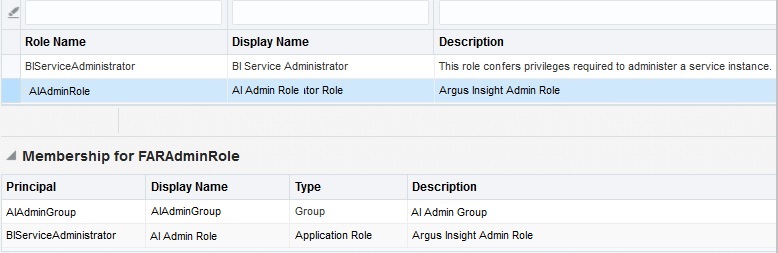
From the list of Searched Principals, select BIServiceAdministrator , and click OK.
The Membership for AIAdminRole appears as below:
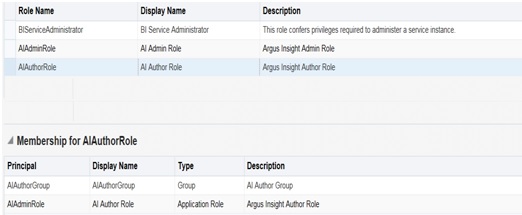
To add AIAuthorRole, repeat from Step 4 to Step 11.
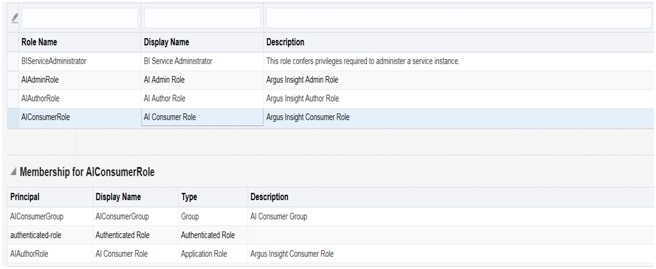
To add AIConsumerRole, repeat from Step 4 to Step 11, and add authenticated-role as a Member for this role.
|
Note: For more details, refer Section 2.8.3.1 Creating Application Roles Using Fusion Middleware Control in https://docs.oracle.com/middleware/1221/bip/BIPAD.pdf |
To create new application policy:
Login to Fusion Middleware Control Enterprise Manager.
Go to WebLogic Domain > Security > Application Policies.
The Application Policies screen appears.
To create a new application policy, click Create.
The Create Application Grant dialog box appears.
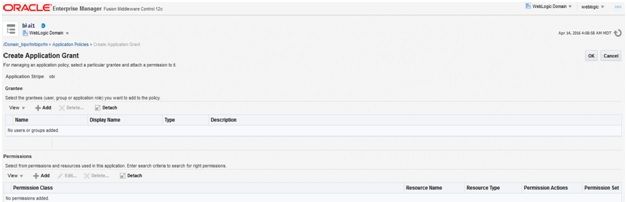
From the Grantee section, click +Add.
The Add Principal dialog box appears.
From the Type drop-down list, select Application Role, and click Search .
From the list of Searched Principals, select AIAdminRole, and click OK.
From the Permissions section, click +Add.
The Add Permission dialog box appears.
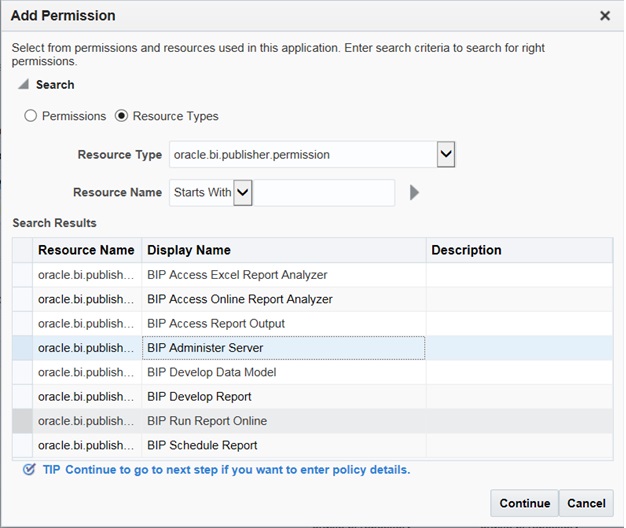
Select the Resource Types radio button.
From the Resource Type drop-down list, select oracle.bi.publisher.permission, and click Search.
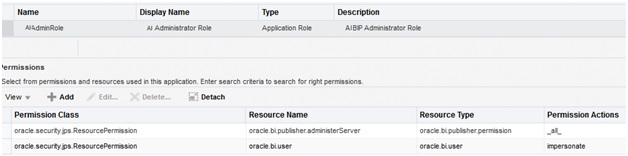
From the Search Results, select oracle.bi.publisher.permission (BIP Administer Server), and click Continue.
The Add Permission dialog box appears.
For Permission Actions, select All (_all_), and click Select.
Add Resource Name as oracle.bi.user with Impersonate permission.
The new AI Admin policy has all the permissions.
|
Note: Make sure all the fields are either selected or entered manually. |
Repeat from Step 4 to Step 12, to add the following:
| Name | Grantee | Resource Permissions |
|---|---|---|
| AI Author | AIAuthorRole | BIP Develop Report
BIP Develop Data Model |
| AI Consumer | AIConsumerRole | BIP Access Excel Report Analyzer
BIP Access Online Report Analyzer BIP Access Report Output BIP Schedule Report |
|
Note: For more details, refer to Section 2.8.3.2 Creating Application Policies Using Fusion Middleware Control from https://docs.oracle.com/middleware/1221/bip/BIPAD.pdf. |
To create roles, add data sources, and assign roles in WebLogic Enterprise Manager, execute the following procedure:
Log on to the Enterprise Manager.
The Enterprise Manager home page appears with a list of folders in the left pane.
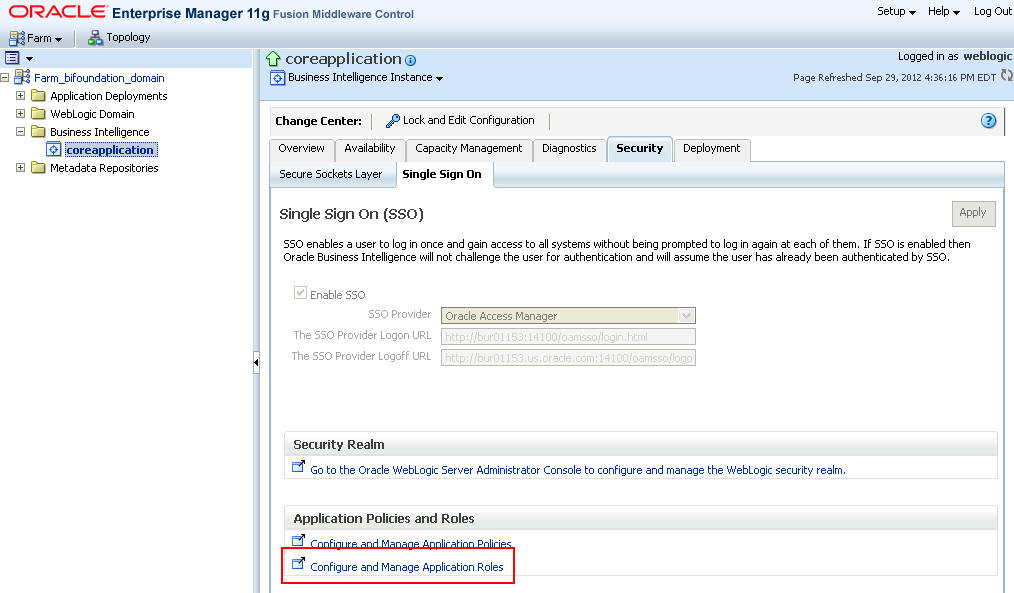
In the left pane, expand the Business Intelligence folder, and click coreapplication.
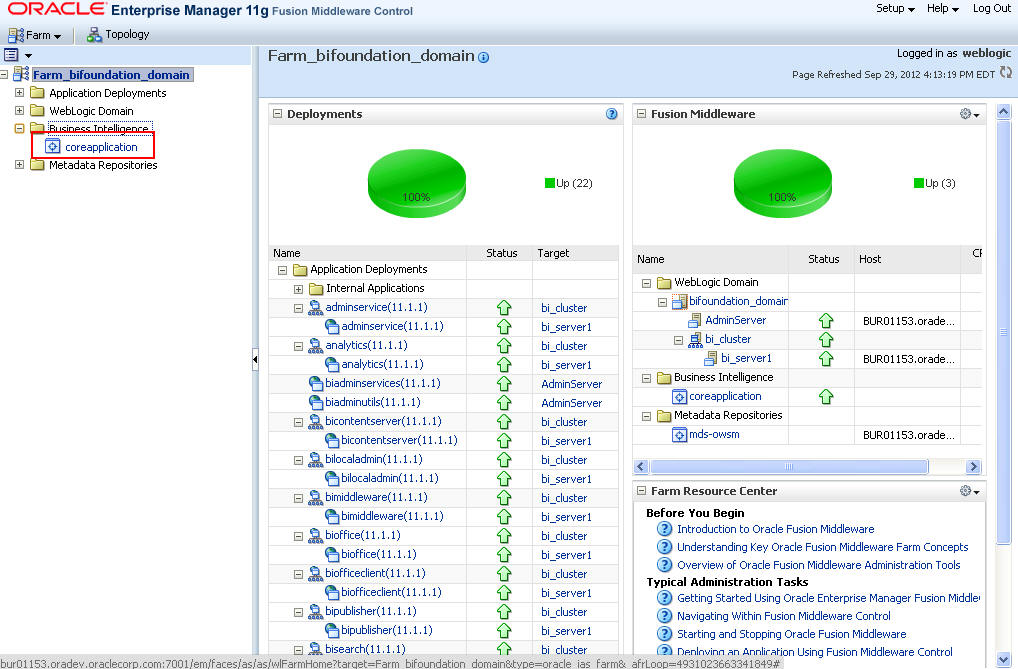
The Coreapplication screen appears in the right pane.
In the Application Policies and Roles section, click Configure and Manage Application Roles.
The Application Roles screen appears.
From the Application Stripe drop-down list, select the required application stripe.
Select any existing role (for example, BIConsumer), and click Create Like.
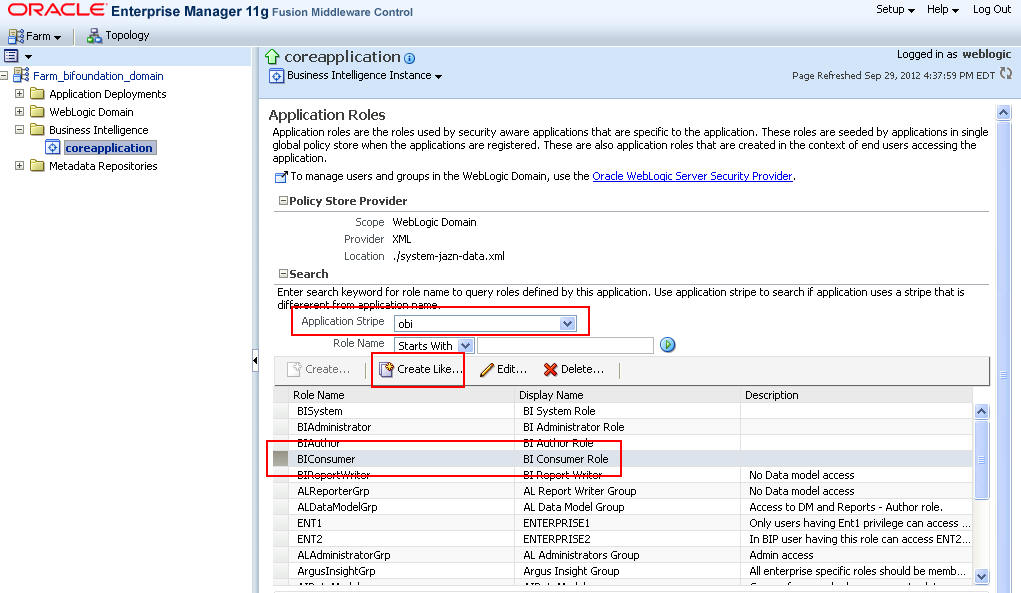
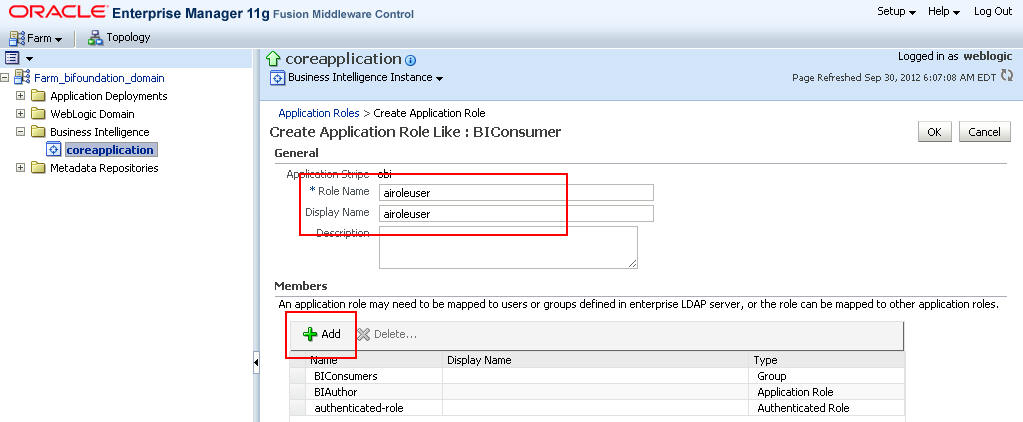
The Create Application Role screen appears.
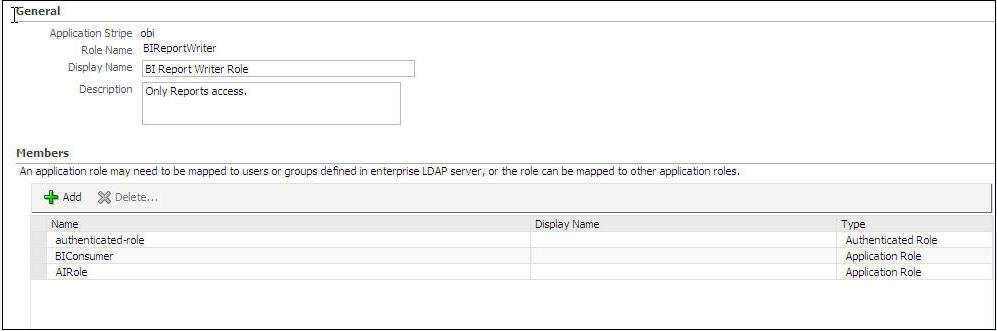
In Role Name field, enter the name of the role.
Optionally, enter the Display Name and Description for the role.
To add any existing application role/group/user to the new role, click Add.
The Add Principal screen appears.
To display the list of all the roles, groups, and users that are created in LDAP server, click the > icon next to the Display Name field.
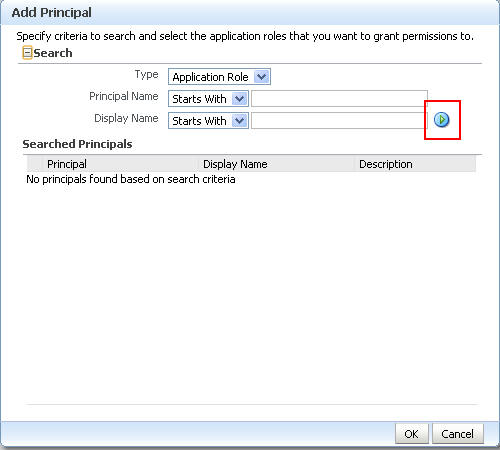
Select the name of the role, group, or user that you want to add to the new role, and click OK.
For example, for the BIReportWriter role, BIConsumer and authenticated-role are mandatory members. Besides that, the AIRole must also be a part of the BIReportWriter Role. These roles are displayed in the Members section of the Create Application screen.
|
Note: The BIReportWriter role must be added to the BIReportWriter application policy. Refer to Section 6.3.4, "Creating Application Policy" for the steps to create the application policy for the BIReportWriter role. |
Repeat steps 8 to 10 to add more roles, users, and groups to the new role.
On Create Application Role screen, click OK to save the changes.
When you have created the role and added the required list of users, roles, and groups to the new role, you must add the PRMART data source to the new role.
Log on to BIP using the administrator credentials.
The BIP home page appears.
From top-menu, click Administration.
Refer to Section 6.2 > Step 2.
In Security Center section, click Roles and Permissions.
The Roles and Permission screen appears.
You can view the name of the new role which you have just created in the list of role names.
Click the Add Data Sources icon corresponding to the name of the new role.
The Add Data Sources screen appears.
From the Available Data Sources section, select PRMART, and click the Move (>) icon to move the PRMART data source to the Allowed Data Sources section.
Click Apply to save the changes.
For more information, refer to the Oracle BIP Administrator's Guide > Creating Application Roles Using Fusion Middleware Control section.
For the list of roles that need to be configured, refer to the Section 6.4, "Configuring BIP Users and Roles: Oracle Fusion Middleware Security Model".
Once you have created the new role and assigned the required roles, users, and data sources to the role, you also need to create the application policy for the new role.
Before creating a BI Publisher policy, you must have created an empty role in the Enterprise Manager.
|
Note: The steps mentioned in this section are valid for creating BIReportWriter application policy. |
To create the application policy for the new role, execute the following steps:
Log on to the Enterprise Manager.
The Enterprise Manager home page appears with a list of folders in the left pane.
In the left pane, expand the Business Intelligence folder, and click coreapplication.
The Coreapplication screen appears in the right pane.
In the Application Policies and Roles section, click Configure and Manage Application Policies.
The Application Policies screen appears.
From the Application Stripe drop-down list, select obi.
Select the BIAuthor policy, and click Create Like.
The Create Application Grant Like screen appears with the Grantee and Permissions sections.
In the Grantee section, click Add.
This displays the Add Principal Screen.
To retrieve the list of all the available application roles, click the > icon next to the Principal Name field.
From the Searched Principals section, select the name of the role (for example, BIReportWriter), and click OK.
The Create Application Grant Like screen appears.
From the list of Permission Classes, select the developDataModel resource name, and click Delete.
Click OK to apply the changes.
|
Note: You must be logged in to BIP with the BI Admin User credentials to be able to upload the Argus Insight.xdrz file. |
To upload the Argus Insight.xdrz file to BIP, execute the following steps:
Copy the Argus Insight.xdrz file from the following location on the Argus Insight Web Server to the local file system:
Drive:\<Argus Insight Installation Folder>\ArgusInsight\BIP\Repository
Log on to BIP using the BI Admin User credentials.
The BIP home page appears.
From the menu bar, click Catalog.
The Catalog screen with the Folders and Tasks sections appears.
From Folders section in the left pane, click Shared Folders.
From Tasks section in the left pane, click Upload.
The Upload dialog box appears.
Click Browse and navigate to the location where you have saved the Argus Insight.xdrz file on the local file system.
Click Upload.
After successful upload, an Argus Insight folder is created in Shared Folders.
Expand the Argus Insight folder to verify that the Generic Line Listing Data Model exists in the Data Models sub-folder and the Generic Line Listing Report in LE and RTF formats exists in the Reports sub-folder.
This section lists the names of the <Admin Users> and roles that you need to configure using the steps given in Section 6.2, "Managing Users and Roles: BI Publisher Standalone Installation with BI Publisher Security" and Section 6.3, "Managing Users and Roles: BI Publisher Standalone Installation with OFM Security".
Table 6-1 Configuring BIP Users: Oracle Fusion Middleware Security Model
| User | Description |
|---|---|
|
BI Admin User |
An Admin user refers to the user who has BI Publisher administrative rights. This user should belong to the BIAdministration functional role. |
|
Data Modeler Users |
An Argus Insight Data Model user refers to the user who should have access to both Data Models and Reports in the Argus Insight folder. This user should belong to AIDataModeler custom role. There are Enterprise specific Modeler users, who have access to Data Models and Reports in Enterprise specific folders and Argus Insight folder. These users should have Enterprise specific Modeler roles assigned to them. This user should belong to Enterprise specific Modeler roles. |
|
Users |
An Argus Insight Role (AIRole) user refers to the user who should have access to Reports only, and should have Read-only access to the Data Model which is required to create the reports. This user should belong to AIRole. There can be users who have access to reports of specific Enterprises. These users can Read/Write reports in Enterprise specific Report folder and Argus Insight Report folder. However, these users have Read-only access to the Data Models in the Enterprise specific Data Model and Argus Insight Data Model folder. This user should belong to Enterprise specific Report roles. |
|
Global Admin Users |
An AI Admin Role user should have full access to the Argus Insight folder (Read/Write/Delete). An Enterprise specific Admin user should have full access to the Enterprise specific folders (Read/Write/Delete) and Argus Insight folder (Read/Write/Delete). |
The following table illustrates the roles that you need to configure using BIP:
Table 6-2 Configuring BIP Roles
| Role | Users/Roles to be added |
|---|---|
|
BIAdministration (Functional Role) |
Super user who has full access to any folder and BIP Administration access |
|
AIRole |
All Argus Insight role users, AIDataModelerRole, and All Enterprise Report Roles (for specific enterprises) |
|
AIDataModelerRole |
All AI Data Modeler Users, All Enterprise Modeler Roles, and AIAdminRole |
|
Enterprise Report Role |
Users that belong to a specific Enterprise with Reports access and Enterprise Modeler Role |
|
Enterprise Modeler Role |
Users that belong to a particular Enterprise with both Data Models and Reports access |
|
Enterprise Admin Role |
Enterprise specific Admin users. These users should have full access to the Enterprise specific folders. |
|
AIAdminRole |
Any User with this role should have full access to the Argus Insight Folder. The Enterprise Admin Role should be added to this role. |
|
BIAdministrator (Functional Role) |
BI Admin User |
|
BIAuthor (Functional Role) |
AIDataModelerRole |
|
BIReportWriter (create this role using the steps given in section 8.4.3 and create an Application Policy for this role using the steps given in section 8.4.4) |
AIRole |
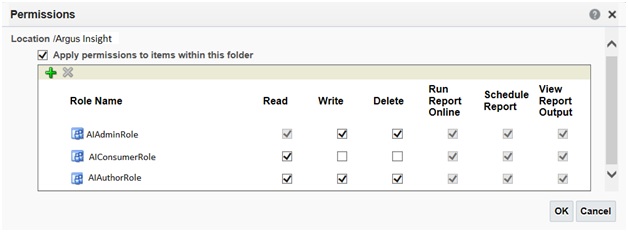
Viewing folder level permissions for BI Publisher Standalone Installation:
You cannot see the permissions of shared folder for BIP Stand-Alone installation. Besides, the Argus Insight folder permissions appears as below:
To assign folder level permissions for BIP Integrated Installation (OBIEE+BIP):
Go to Catalog > Shared Folders > Tasks > Permissions.
The Permissions dialog box appears.
Set the Permissions as follows, and click OK.
| Accounts | Permissions |
|---|---|
| AI Admin Role | Open (Read, and Traverse) |
| AI Author Role | Open (Read, and Traverse) |
| AI Consumer Role | Open (Read, and Traverse) |
| BI Service Administrator (Owner) | Full Control |
Go to Shared Folders > Argus Insight > Permissions.
The Permissions dialog box appears.
Set the Permissions as follows, and click OK.
| Accounts | Permissions |
|---|---|
| AI Admin Role (Owner) | Full Control |
| AI Author Role | Full Control |
| AI Consumer Role | Custom (Read, Traverse, Run Publisher Report, Schedule Publisher Report, and View Publisher Output) |
| BI Service Administrator | Full Control |
