| Oracle® Argus Insight Installation Guide Release 8.1 E68412-01 |
|

 Previous |
 Next |
This chapter describes the steps required to run and work with the initial extract, transform, and load (ETL) process.
This chapter includes the following topics:
Before running the Initial ETL, ensure:
The Auto extend is set to ON for all the data files in the database that are related to staging and Insight Mart.
The POPULATE CASE/CONFIGURATION DATA profile switch is configured to the desired value.
In addition, note that:
Since the initial ETL requires a huge amount of temporary space, set the temporary space to 100 GB to prevent data errors. After completing the Initial ETL, reduce the temporary space to 30 GB.
After the Initial ETL completes, the balancing log may show differences between the Argus (Stage) and Insight Mart table counts. This is because of the derivation rules applied to the Insight data mart.
The system may display the following message:
Warning !!! - Could not locate MedDRA-J User in the Argus Database.
Ignore this warning for all MedDRA tables.
Do not run incremental ETL for more than 50,000 cases. Run the Initial ETL again if the number of cases exceeds 50,000.
The Argus Insight ETL will not populate the Argus Mart database.
Refer to the Oracle Argus Mart Installation and Administration Guide for more information on the Argus Mart ETL.
To run the initial ETL:
Log in to the Argus Insight Web Server as a user with administrator privileges.
Click Start.
Navigate to Programs > Oracle > Argus Insight, and then select Schema Creation Tool.
Click Initial ETL.
The Oracle Database Connect dialog box appears.
To connect to the Oracle Database:
In the Password field, enter the password for the APR_MART user.
In the Database field, enter the name of your Argus Insight database.
Click OK.
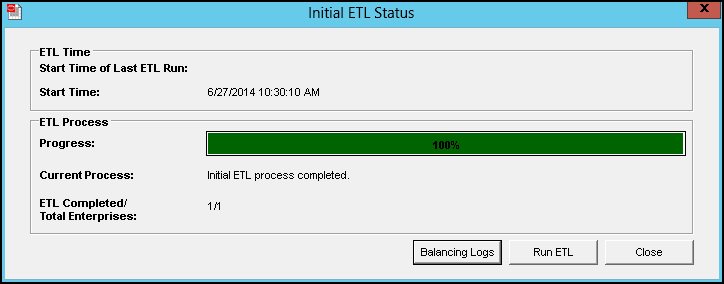
The Initial ETL Status dialog box opens.
Click Start ETL.
The initial process of extracting, transforming, and loading data begins. A message confirming that you have completed the required configuration steps appears.
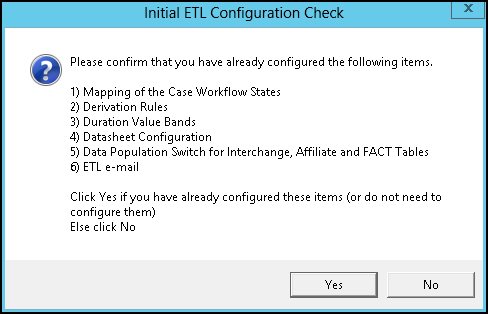
Click Yes if these items have already been configured.
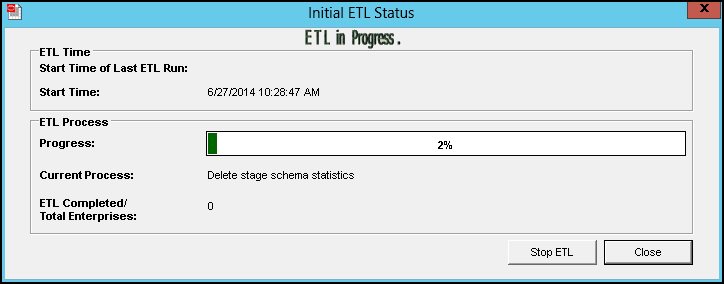
The Initial ETL Status dialog box appears stating the ETL start time, the progress bar, and the current process in execution.
While the ETL is in progress, you can:
To close the dialog box, and exit from the Schema Creation Tool, click Close.
Closing the dialog box does not affect the execution of the ETL process.
To halt the ETL process, click Stop ETL.
For more information about this option, see Section 5.2.3, "Stopping the Execution of ETL."
A status message appears when the initial ETL process is completed.
When the system successfully completes the Initial ETL process, you should generate and check the logs.
To generate the balance logs:
Wait until the dialog box that reports the initial ETL completed successfully appears.
Click Balancing Logs.
A dialog box appears to confirm that you want to generate balancing logs for the completed Initial ETL appears.
Click OK.
The command prompt screen appears.
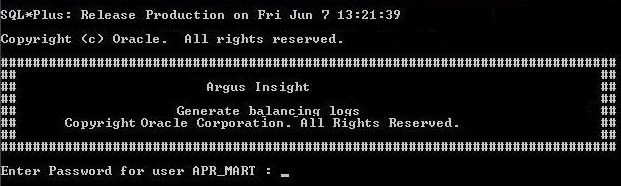
Enter the password for the APR_MART user, and press Enter.
This following command prompt screen appears:
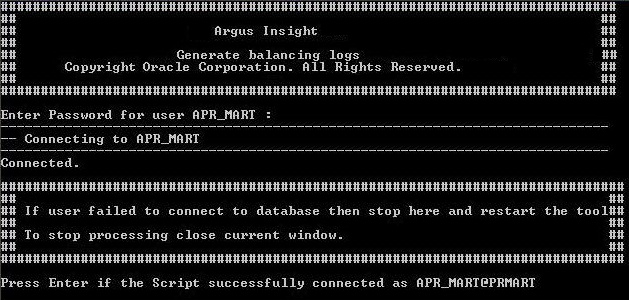
Verify that the script is successfully connected as <APR_MART User Name>@<Argus Insight Database Name>, and press Enter.
The command prompt screen appears and the balancing logs are generated.
When the logs are generated, a dialog box with the location and name of the log files appears.
Click OK to close the dialog box.
Open and verify the contents of each Balancing Report.
The Balancing Reports are located at:
drive:\VSS SOURCE\Argus Insight\Main Source\Database Source\DBInstaller
The log files are named as:
etl_ini_atos_bal_lm_cfg_rep.log
etl_ini_atos_bal_rep.log
etl_ini_stom_bal_lm_cfg_rep.log
etl_ini_stom_bal_rep.log
To close the Initial ETL Status dialog box and exit from the Schema Creation Tool:
Click Close.
A message to confirm that you want to close the Schema Creation Tool application appears.
Click OK.
You can choose to stop an ETL in progress.
To halt the execution of the initial ETL process:
Click Stop ETL.
A message to confirm that you want to stop the ETL currently in progress appears.
Click OK.
The ETL process is stopped and returns to the Initial ETL Status dialog box.
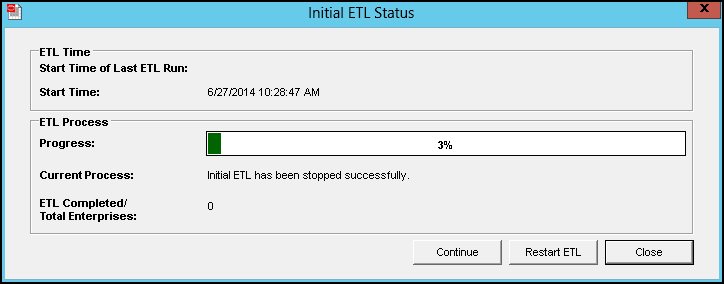
At this point, you can select one of the following options:
To continue extracting, transforming, and loading the data that was in progress, click Continue.
To start the initial ETL from the beginning, click Restart ETL.
To exit from the Schema Creation Tool application, click Close.
To start the ETL process from the beginning:
Click Run ETL.
A message to confirm whether you want to start the initial ETL from the beginning appears.
Click OK.
The Oracle Database Connect dialog box appears.
Enter the password for the APR_MART user, and then click OK.
The initial ETL process starts from the beginning.
The initial ETL may fail due to an error. If an error occurs, the system stops processing the ETL and displays the following screen:
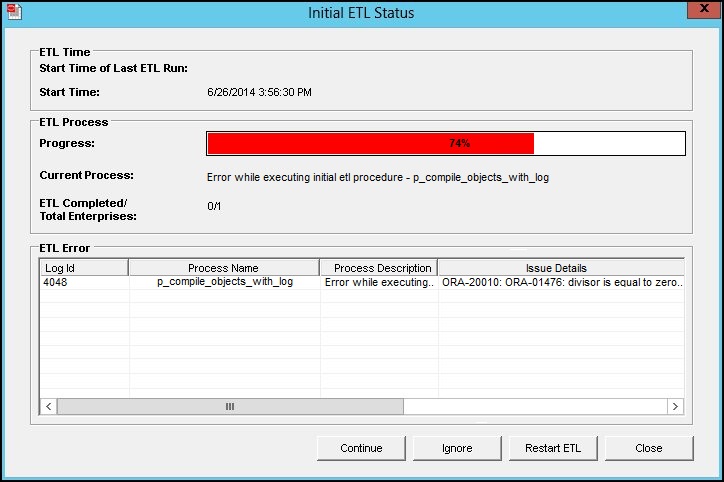
You may choose any of the following options for the failed Initial ETL process:
To continue the failed Initial ETL process, click Continue.
To ignore the failed Initial ETL process, click Ignore.
For ETL Data Exclusion, click Modify Attributes, if PRE_REQ_CHECK_FLAG switch is set to ABORT.
|
Note: These modifications must be done before running the Initial ETL process. |
To continue the Initial ETL process from the failed ETL procedure:
Double-click on the ETL error.
The Error Data dialog box appears with details of the error.
Review the error information, and then click OK.
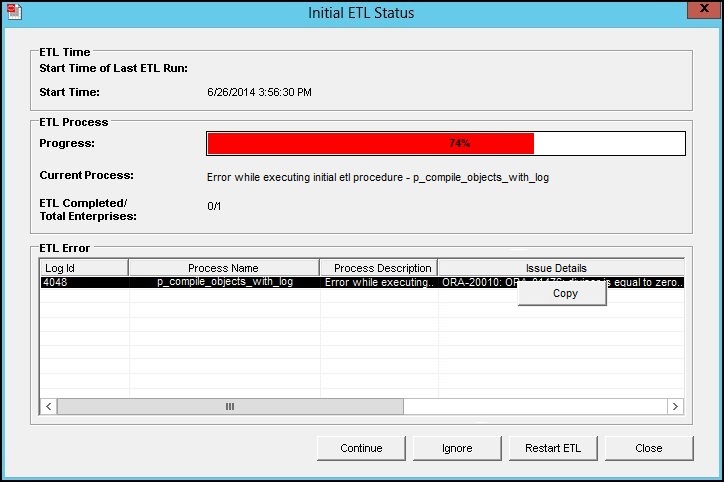
Right-click on the ETL Error, and click Copy to copy the error data.
Click Continue to continue the failed ETL process.
A message to confirm that you want to start the initial ETL from the stopped process appears.
Click OK.
The ETL process continues (if no errors are found).
To ignore a failed ETL process and continue with the next process in the ETL:
Click Ignore.
A message to confirm that you want to skip the failed process and continue executing the Initial ETL with the next process appears.
Click OK.
The Initial ETL begins from the next process and continues with the ETL process (if no errors are found).
You must modify these attributes before ETL execution.
To modify ETL Data Exclusion attributes:
Log in to the Argus Insight application as a user with administrator privileges.
On Argus Insight home page, from the upper-right corner, click the Tools tab.
The Administration Tools screen appears.
Click the List Maintenance tab.
Select Profile Switches from the List Maintenance Items group.
The Attributes group is updated with the profile switches that you can modify.
Select ETL Data Exclusion, and click Modify.
The Modify Attribute dialog box appears.
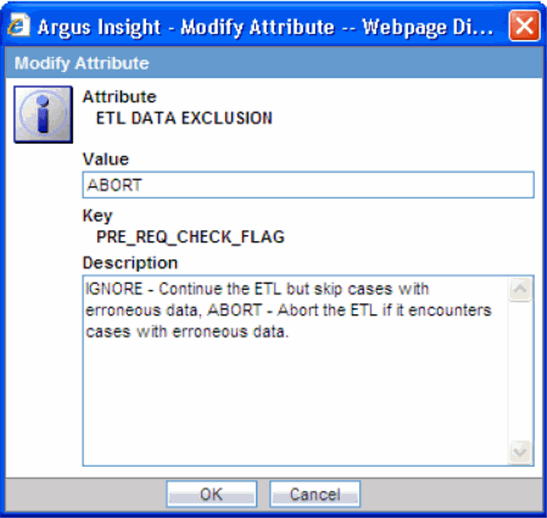
Click the Value field, and enter one of the following values:
If you want the ETL process to skip cases with erroneous data and continue processing all other cases, enter IGNORE.
If you want the ETL process to abort when it encounters cases with erroneous data, enter ABORT.
Click OK to save the changes and return to the List Maintenance tab.
To restart the Initial ETL process starting from after the confirmation message and APR_MART password input:
Click Restart ETL.
A message to confirm that you want to start the initial ETL from the beginning appears.
Click OK.
The Oracle Database Connect dialog box appears.
Connect to the Oracle Database:
In the Password field, enter the password for the APR_MART user.
In the Database field, enter the name of your Argus Insight database.
Click OK.
Click Start ETL to start the initial process of extracting, transforming, and loading data.
A message to confirm that you have completed the required configuration steps appears. See Section 5.2 > Step 6.
Click Yes if these items have already been configured.
The Initial ETL Status dialog appears with the ETL start time, the progress bar, and the current process in execution.
When the system finishes the ETL process, click Close.
