Working with the Work Plan Page
The Work Plan page provides a planning board for sequencing your task work. Create tasks, and then drag and drop them onto the planning board to build your work plan. The first time you open the Work Plan page, you can choose to watch a video that provides an overview of the page and its features. The video can be viewed at any time by opening the Help menu and accessing the Training Center.
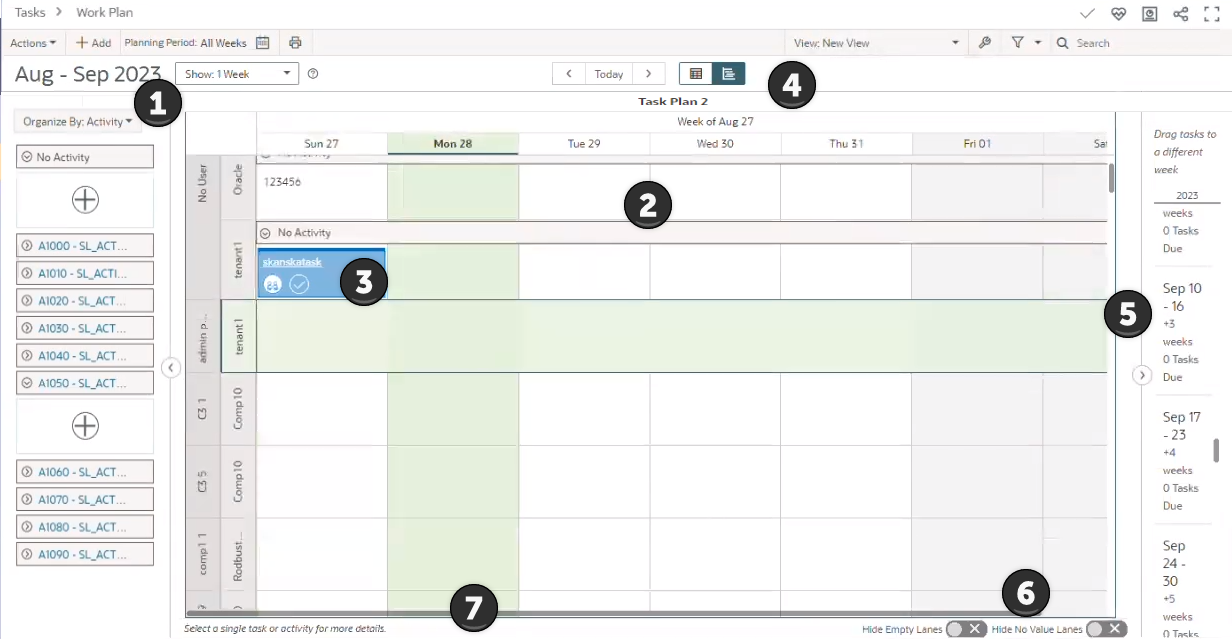
Table of Screen Highlights
Item | Description |
|---|---|
1 | Hopper: The hopper contains all tasks that do not have a due date, also known as unplanned tasks. Add new tasks, and group the list of tasks by assigned activity, WBS, activity or task code, company, or none. You can also drag tasks into the planning board or planning buckets. Each hopper band indicates the number of unplanned tasks assigned to the activity. Bands without numbers have zero assigned tasks. Right-click a hopper band to select all tasks assigned to that activity in the hopper, highlight the activity on the planning board, or set the activity as a quick filter. |
2 | Planning Board: The planning board displays tasks that have due dates, in weekly or daily intervals. Drag a task to a new date on the planning board, into past or future planning buckets, or into the hopper to remove its due date. Each activity band indicates the number of assigned tasks. Bands without numbers have zero assigned tasks. Right-click an activity band to select all tasks assigned to that activity on the planning board, highlight the activity in the hopper, or set the activity as a quick filter. If a task plan is open on the planning board, the name of the task plan displays above the planning board, and the planning board adjusts to display swimlanes. See Use Swimlanes on the Planning Board for more information about using swimlanes. |
3 | Tasks Cards: Basic task cards are shown in the hopper and planning board. Each task card is colored according to its assigned company. The width of each card in the planning board denotes its duration. Icons on task cards indicate statuses of Complete, Committed, Overdue, Pending, and if a task has hand-offs or a proposed due date. Cards with diamonds indicate milestone tasks. See Task Icon Reference for icon descriptions. Enable configurable task cards to show a customized set of task details when a basic task card is double-clicked. If the size of the planning board columns are decreased beyond a certain point, smaller, more generic cards may be shown. |
4 | Planning Board Options: Change the hand-off mode that is selected. Display up to six weeks at a time in the calendar. When working in a task plan, you can enable full display of task data with activities shown in swimlanes by selecting |
5 | Planning Buckets: Planning buckets display past and future weekly periods according to the currently applied filter. Move a task from the hopper or planning board into a bucket to place it in that time period. |
6 | Hide Empty Lanes: Use the Hide Empty Lanes toggle to organize swimlanes based on if the swimlane contains a task or task milestone. When the toggled off, empty swimlanes will display on the Work Plan page and allow you to add tasks to the empty swimlanes. By default, this option is toggled on, and empty swimlanes are hidden. Hide No Value Lanes: Use the Hide No Value Lanes toggle to hide swimlane levels that contain no data. For example, you may want to hide swimlane levels for newly created tasks on the board that have no assigned user. By default, this toggle is on to hide swimlanes with no value. |
7 | Info Bar: Use the info bar at the bottom of the planning board to view details for the selected task or activity. You can use the icons in the info bar to commit, complete, or view hand-offs on the selected task. The bar can be enabled in the view settings. The info bar will display the value for the attribute that is coloring the Task. If activity code is coloring the task, the info bar legend will show the code value assigned to the selected task. If no code value is assigned, or if no activity is associated with a task and color by is set to activity code, then the label will display "No Value Assigned". |
Last Published Monday, June 22, 2026