Configuring the Wireless KW270 and the USB Wireless Card

All network configuration and security settings are dependent upon the site’s infrastructure and configuration of the wireless network. If you encounter problems with the wireless network, see your site administrator.

To connect the Wireless KW270 to a wireless network:

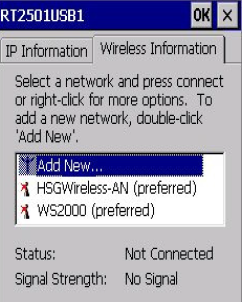
  1. Power on the KW270. If the card has never been configured, the Wireless Configuration dialog box opens.

    Figure 14-1 Adding a New Wireless Network for the KW270


    This figure shows the Wireless Configuration dialog box that appears when adding a new wireless network for the KW270.
  2. If your Wireless network appears in the list, double-click it; otherwise, double-click Add New.

    The Wireless Network Properties dialog box opens.

    Note:

    The size of the dialog boxes vary and may exceed the dimensions of the screen. When this occurs, items at the bottom of the dialog box, such as buttons, are hidden or cut off. To see these items, move the dialog box up as far as possible.
  3. On the Wireless Network Properties dialog box, enter the following:
    1. In the Network Name (SSID) field, enter the SSID for your Access Point. Note that this is case sensitive.
    2. In the Encryption drop-down list, select AES.
    3. In the Authentication drop-down list, select WPA2.
    4. In the EAP Type drop-down list, select PEAP.

      This is your IEEE 802.1X authentication. PEAP is a security method that requires a user name and password before being able to join the network.

    5. Click the Properties button. The Authentication Settings dialog box opens.
      • If you are using a certificate to validate the RADIUS server, select Validate Server, click Select, select the certificate, and then click OK to close and save.

      • If you are not using a certificate, deselect Validate Server, and then click OK to close and save.

  4. Click OK in the top right of the Wireless Network Properties dialog box to save.
  5. Select your network, and then click Connect.

    Once you have a wireless network association, you can keep the Wireless network card on the default DHCP setting.

  6. To set a static IP address:
    1. Click Start, click Settings, and then click Network and Dial-Up Connections.
    2. Double-click the RT2501USB1 icon, and then enter a static IP address, subnet mask, and gateway if using a router.
    3. Run the MICROS CAL normally.